DXG Technology DW001001 Fitness Track User Manual DSW001 EN M1 0415
DXG Technology Corp. Fitness Track DSW001 EN M1 0415
UserManual.wiki
>
DXG Technology
>
DW001001 User Manual
User Manual.pdf
Navigation menu
Upload a User Manual
Namespaces
Wiki Guide
HTML
PDF
Info
Views
User Manual
Discussion / Help
Navigation


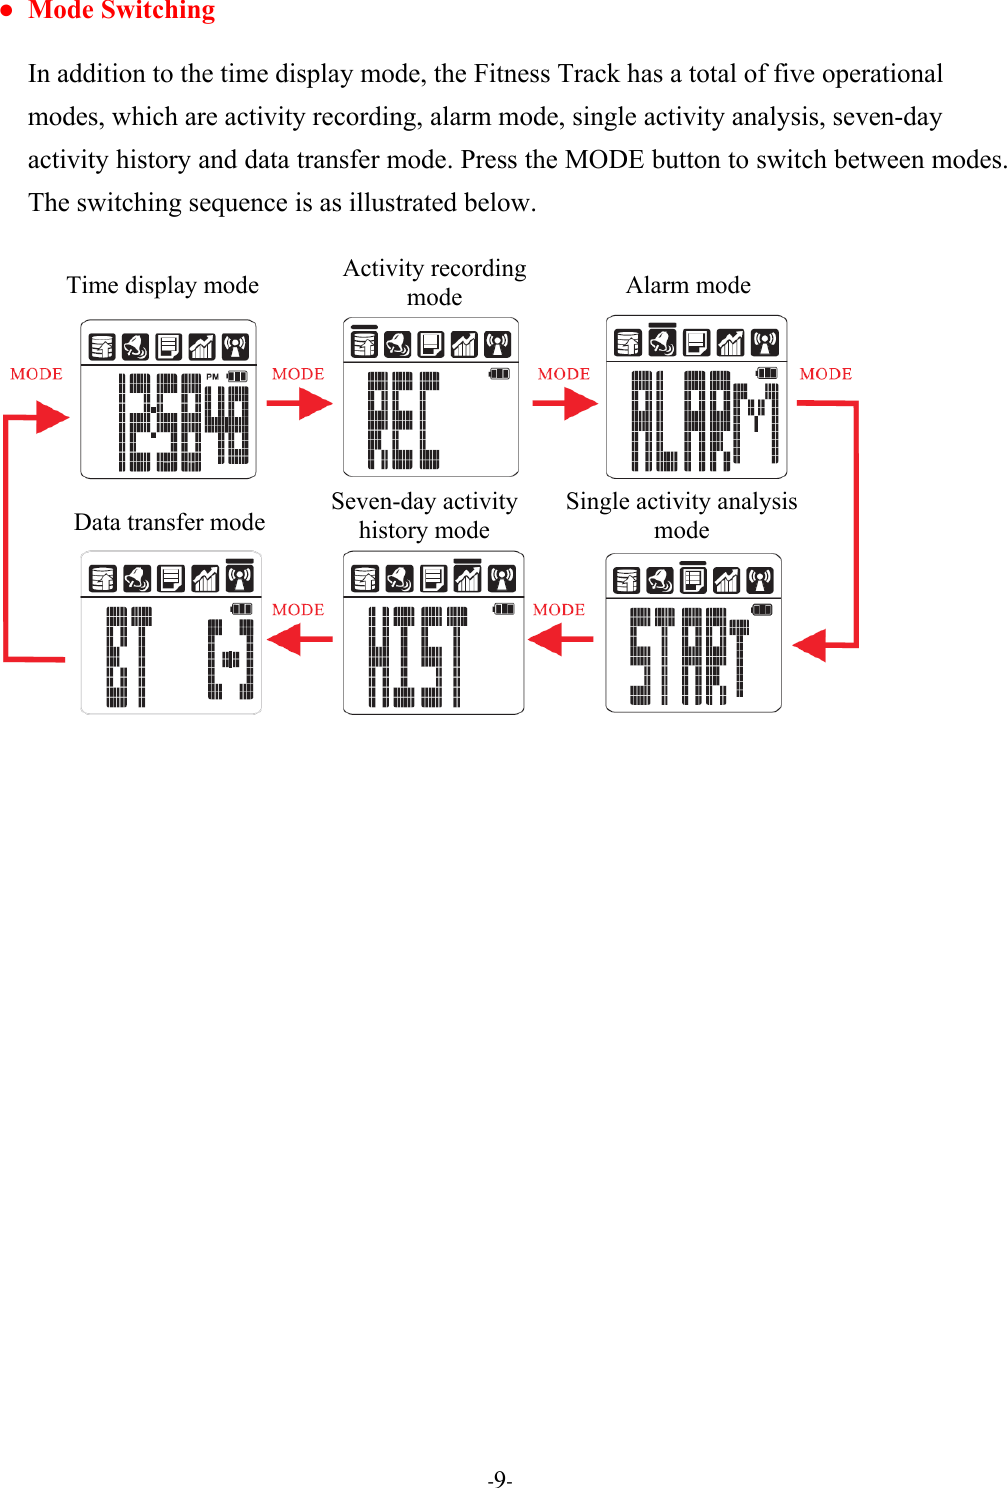
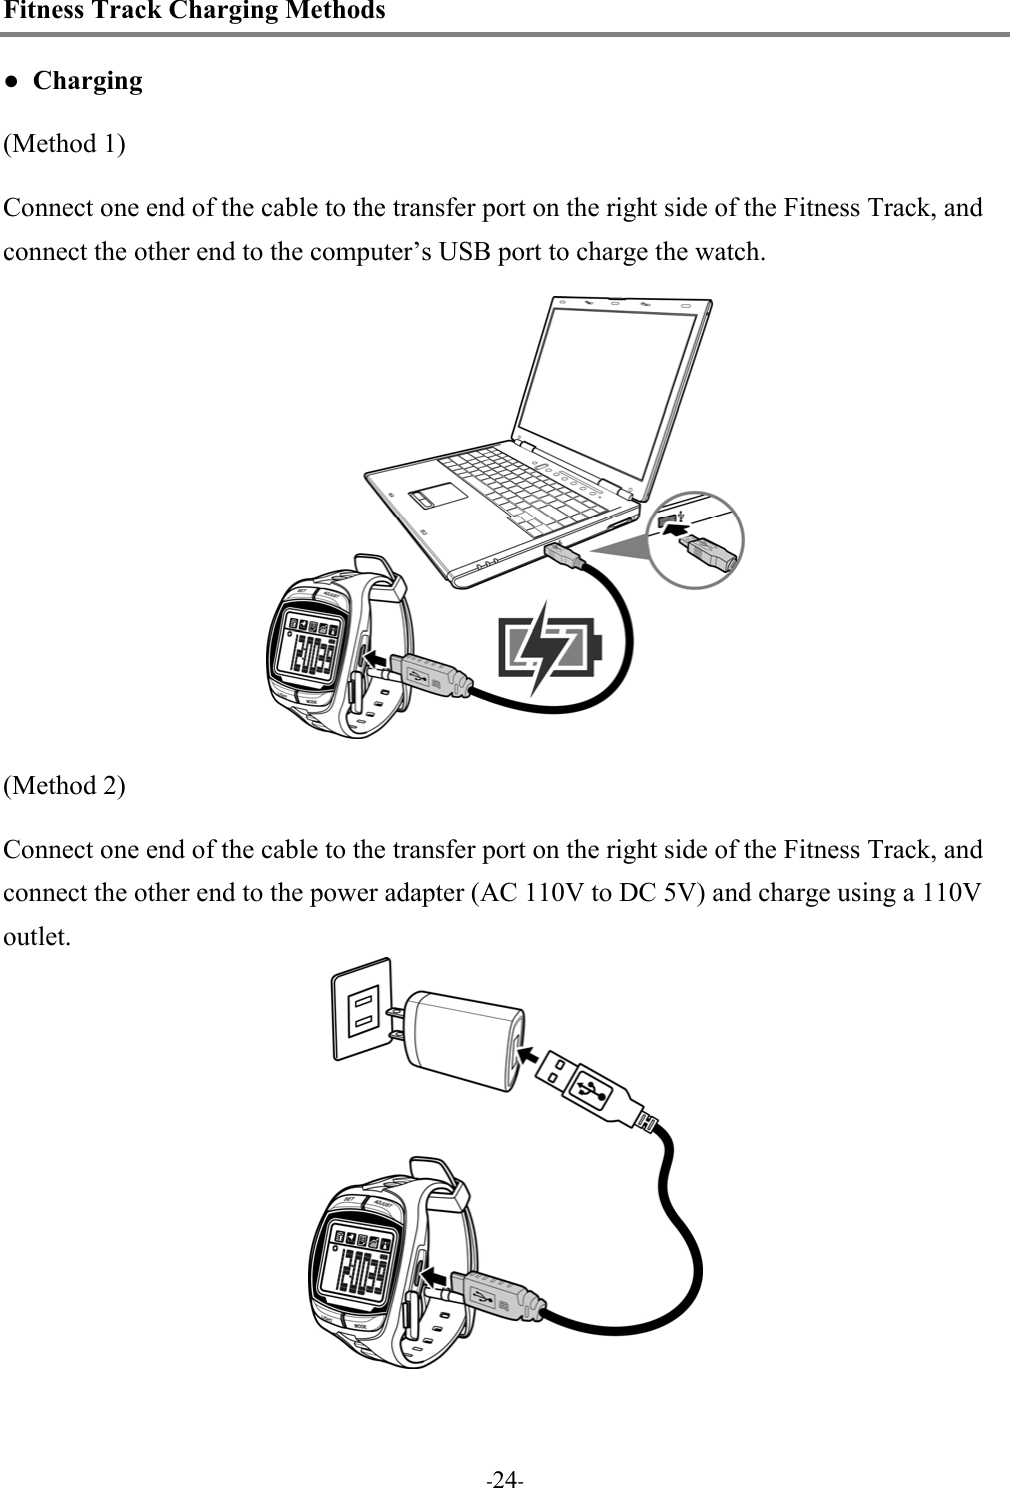
![‐10‐● [Time display mode] button operations The function of the time display mode is to display and adjust the time and date. To display time: Press the MODE button to switch to time display mode and show the time (as shown in the bottom left figure) To display date: Press and hold the ADJUST button to display the date, then release it to return to time display (as shown in the bottom right figure) Hour:Minutes:SecondsMonth/Day/Day of the week (i.e., Friday, February 18th)](https://usermanual.wiki/DXG-Technology/DW001001/User-Guide-2246674-Page-14.png)
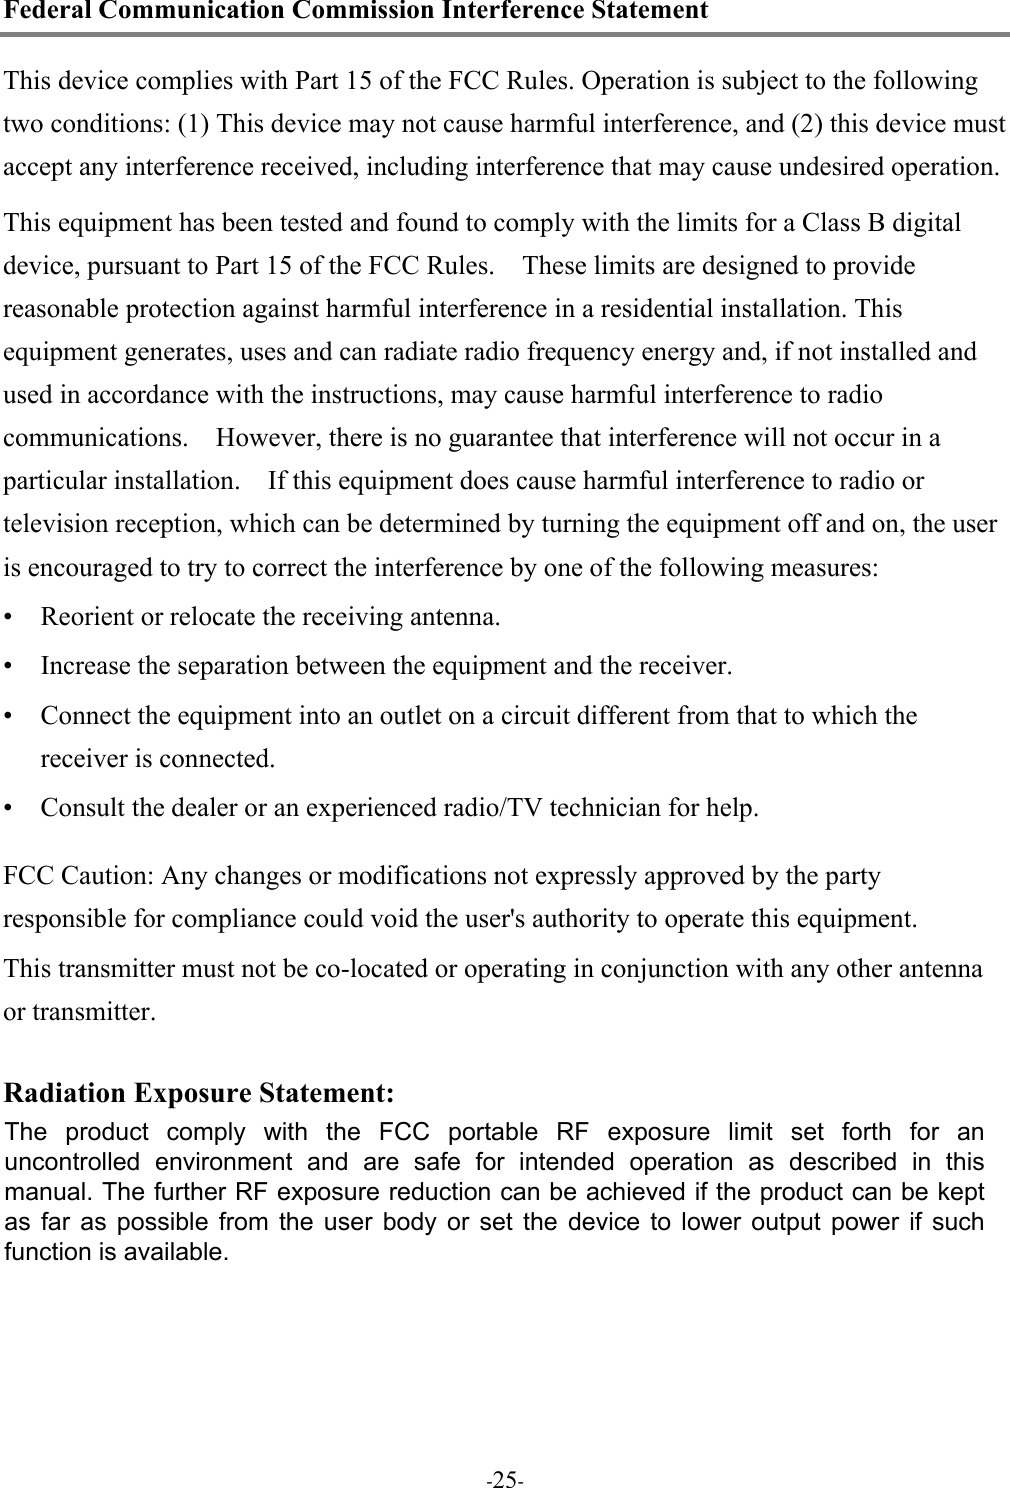
![‐11‐● [Time display mode] button operations To set the time and date: ▲ Press and hold the SET button. The “Year” will begin to flash. Press the ADJUST button to change the year until it is correct. ▲ Press the MODE button. The “Month” will begin to flash. Press the ADJUST button to change the month until it is correct. ▲ Press the MODE button. The “Day” will begin to flash. Press the ADJUST button to change the day until it is correct. ▲ Press the MODE button. The “Hour” digits of the “Hour:Minutes:Seconds” display will begin to flash. Press the ADJUST button to set the correct time. ▲ Press the MODE button. The “Minutes” digits of the “Hour:Minutes:Seconds” display will begin to flash. Press the ADJUST button to set the correct time. ▲ Press the MODE button. The “Seconds” digits of the “Hour:Minutes:Seconds” display will begin to flash. Press the ADJUST button to set the correct time. ▲ Press the SET button to return to the time display. ▲ This Fitness Track displays time using a 12 hour clock format; PM will be displayed during the afternoon. When PM is not displayed, the time shown will be AM.](https://usermanual.wiki/DXG-Technology/DW001001/User-Guide-2246674-Page-15.png)
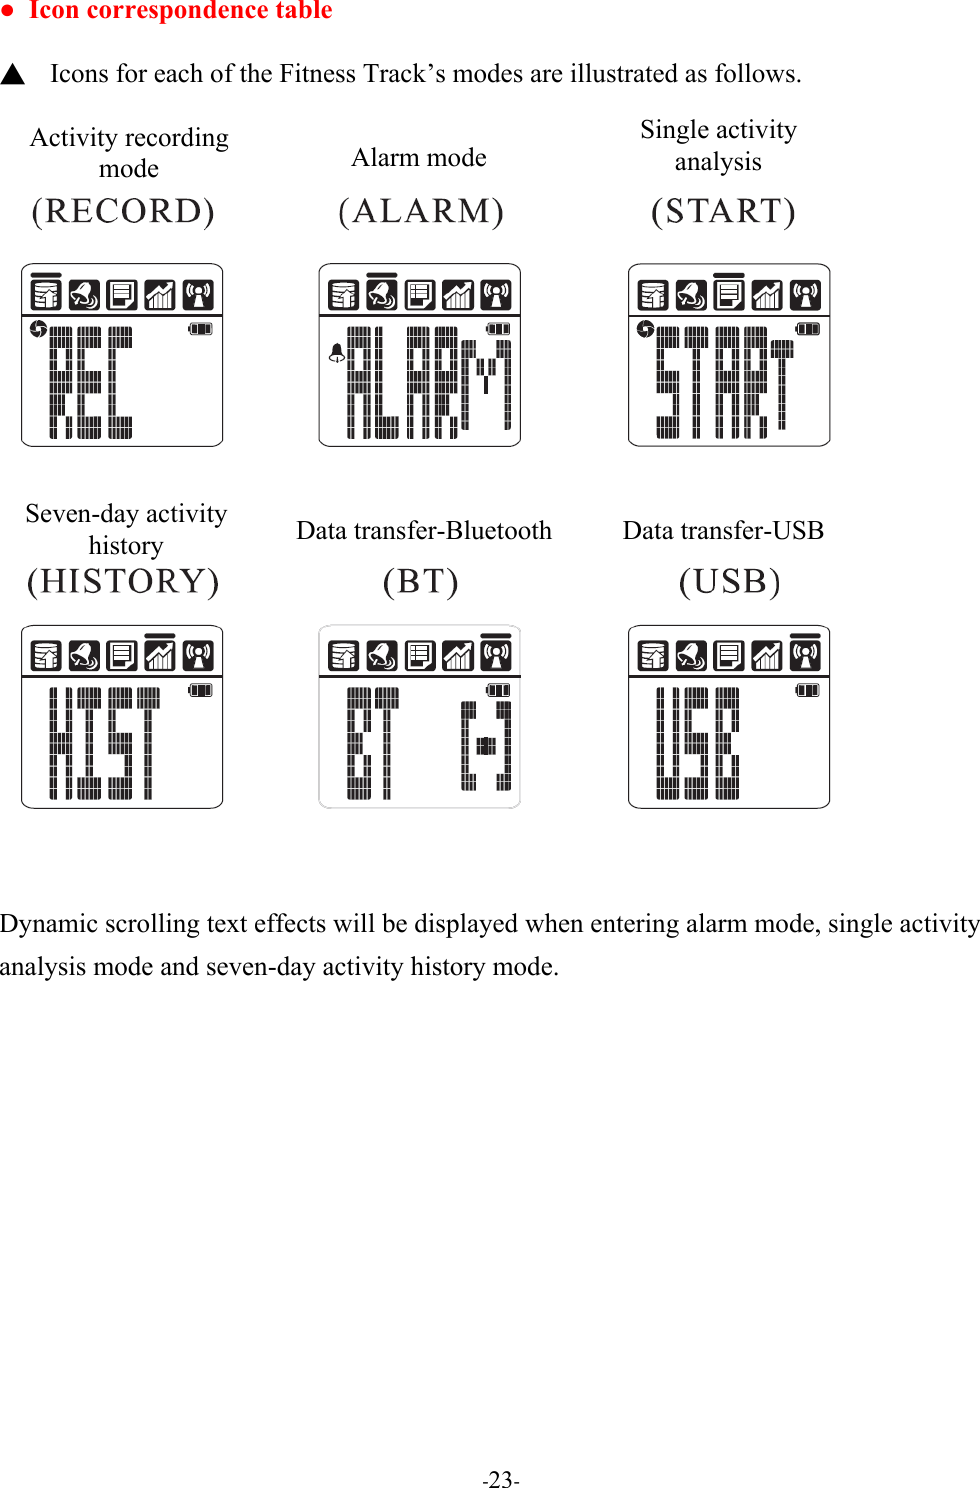
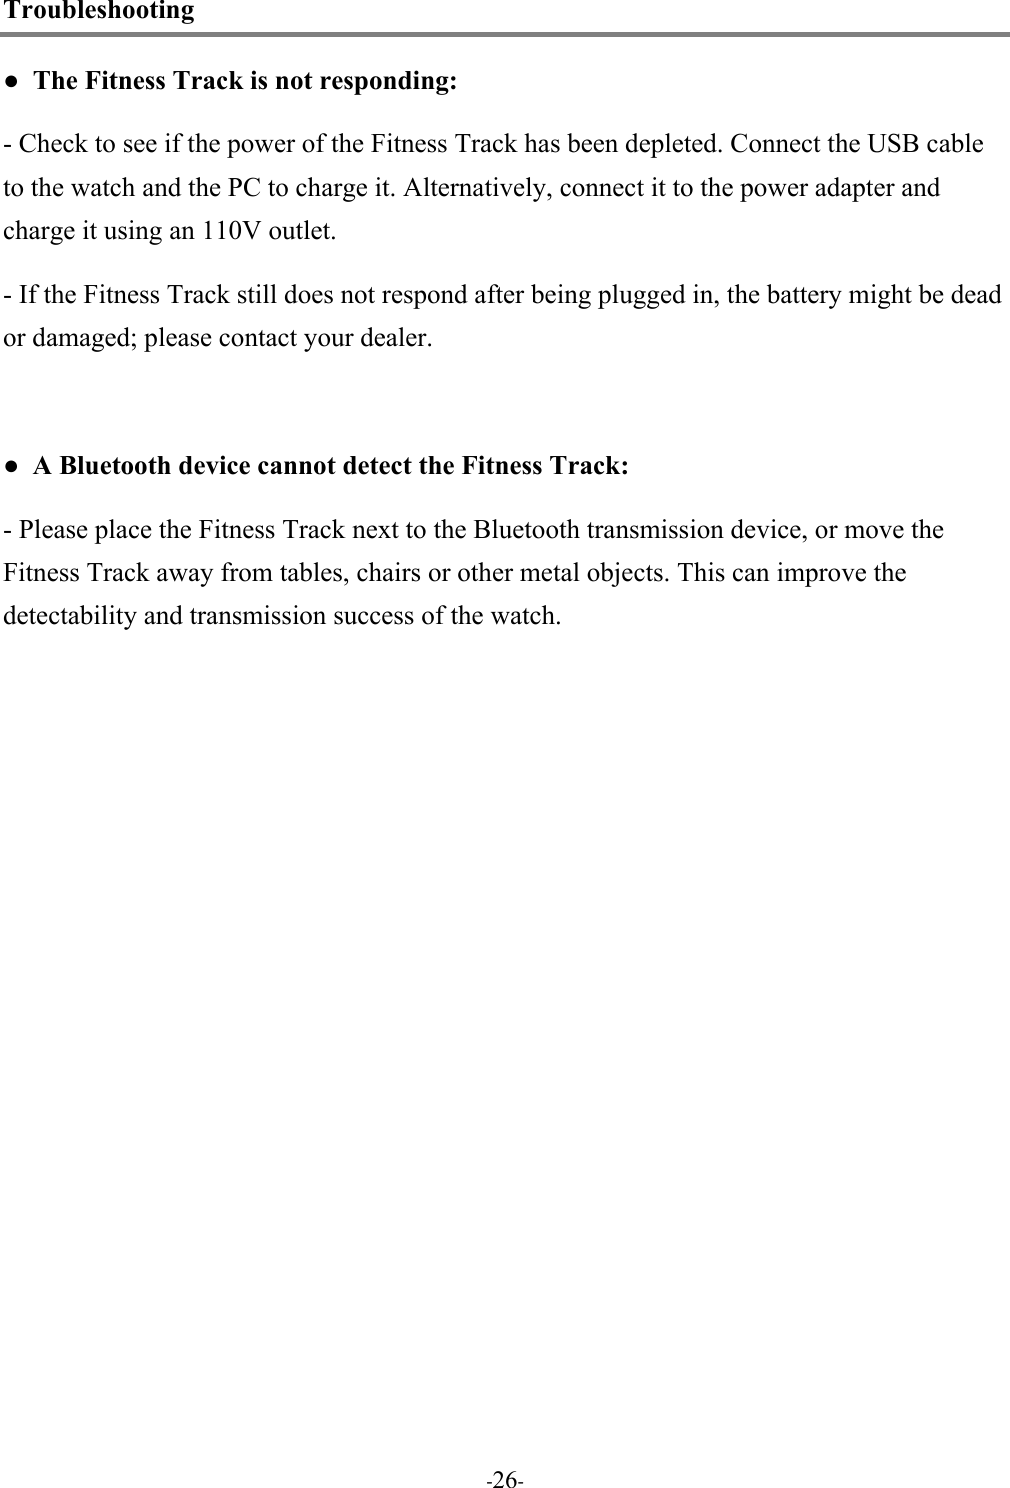
![‐12‐● [Activity recording mode] button operations This enables or disables the activity and sleep monitoring function. To enter activity recording mode: Press the MODE button to select the activity recording mode. To enable or disable activity recording: Press the SET button to enable or disable the activity recording function. ON: the activity recording function is enabled; the following animation will appear: The image will change frame by frame, repeating in one-second intervals. This indicates that activity recording is taking place. OFF: the activity recording function is disabled; no animation will be displayed. Image disappears](https://usermanual.wiki/DXG-Technology/DW001001/User-Guide-2246674-Page-16.png)
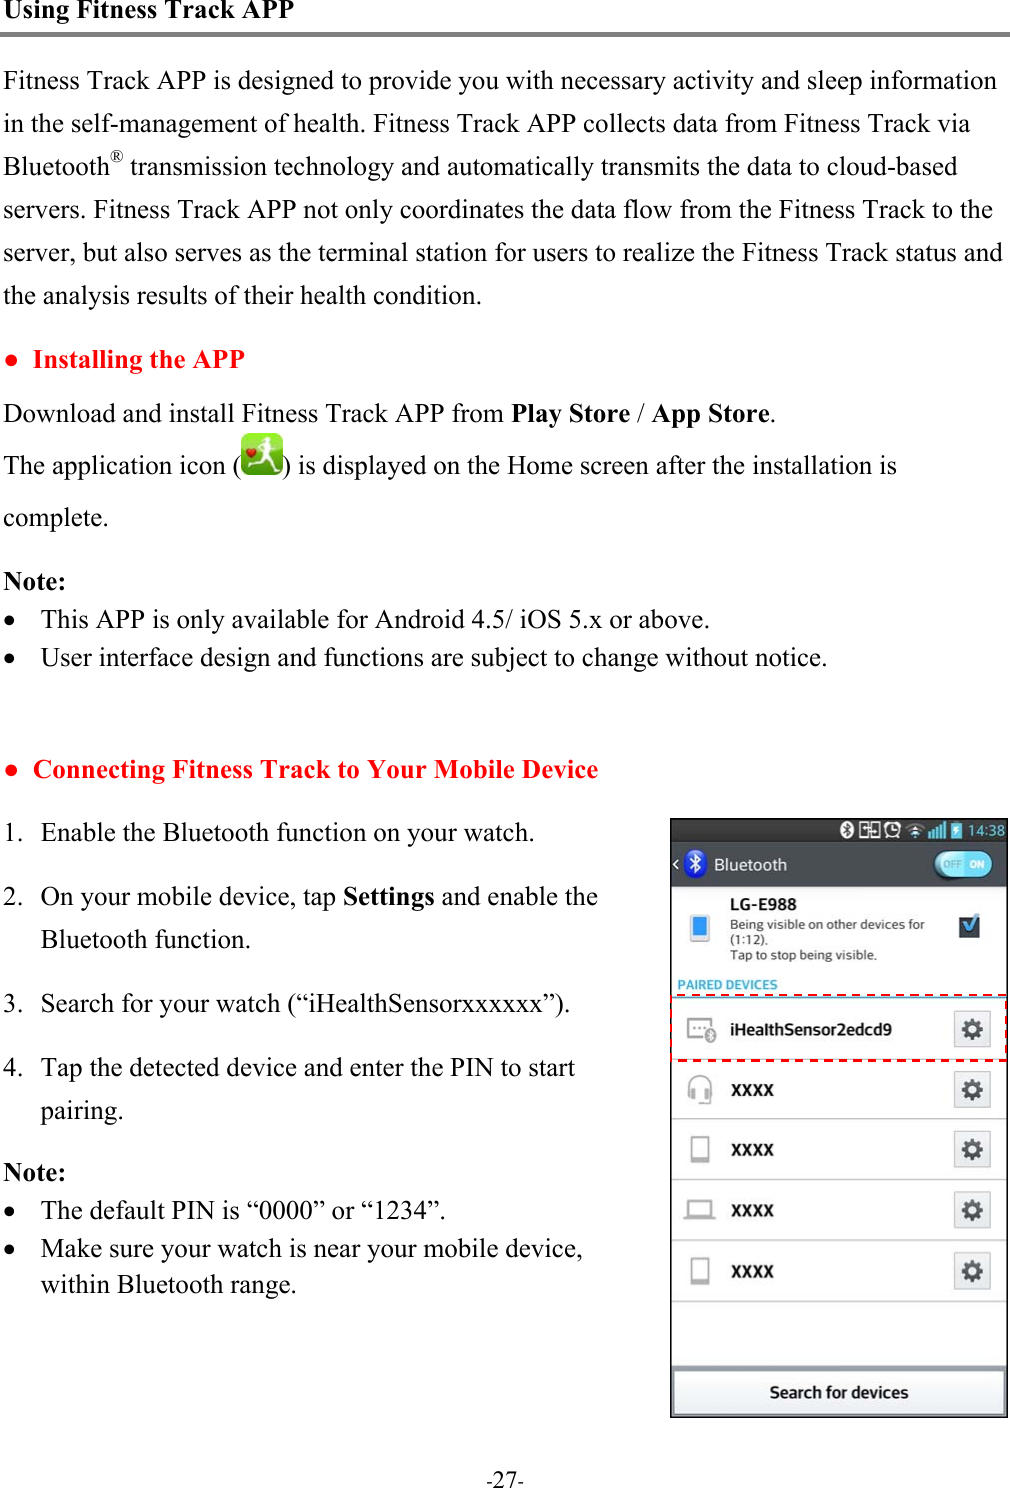
![‐13‐● [Alarm mode] button operations The alarm mode enables or disables the alarm and adjusts the alarm settings. To enter alarm mode: Use the MODE button to select alarm mode. A scrolling text will appear showing “ALARM” (see the left figure below); after two seconds the current alarm setting will be displayed (see the right figure below). To enable or disable the alarm: Press the ADJUST button to switch turn the alarm on or off. The bell icon will appear when the alarm is turned on and disappear when the alarm is turned off, as the following figures illustrate. DisplaysDisappears](https://usermanual.wiki/DXG-Technology/DW001001/User-Guide-2246674-Page-17.png)
![‐14‐● [Alarm mode] button operations To adjust the alarm time: ▲ First set the “Hour” of the alarm. After pressing the SET button, the “Hour” digit in the “Hour:Minutes” display will begin to flash. Press the ADJUST button to set the alarm time until the hour is correct. ▲ Next adjust the “Minutes” of the alarm. After pressing the SET button, the “Minute” digit in the “Hour:Minutes” display will begin to flash. Press the ADJUST button to adjust the alarm time until the minutes are correct. ▲ Then set the days for which the alarm is enabled (i.e., days of the week from Monday-Sunday). First press the MODE button to select a day of the week and use the ADJUST button to either enable or disable the alarm for that day. For each day, the alarm will be set to ON (enabled; as shown in the bottom left figure) or OFF (disabled; as shown in the bottom right figure). ▲ The icons for the days of the week are shown on the following page. ▲ Press the MODE button again. The “Hour” digit in the “Hour:Minutes” display will begin to flash. ▲ Press the SET button to complete the alarm setting process. The alarm is enabled for MondayThe alarm is disabled for Monday](https://usermanual.wiki/DXG-Technology/DW001001/User-Guide-2246674-Page-18.png)
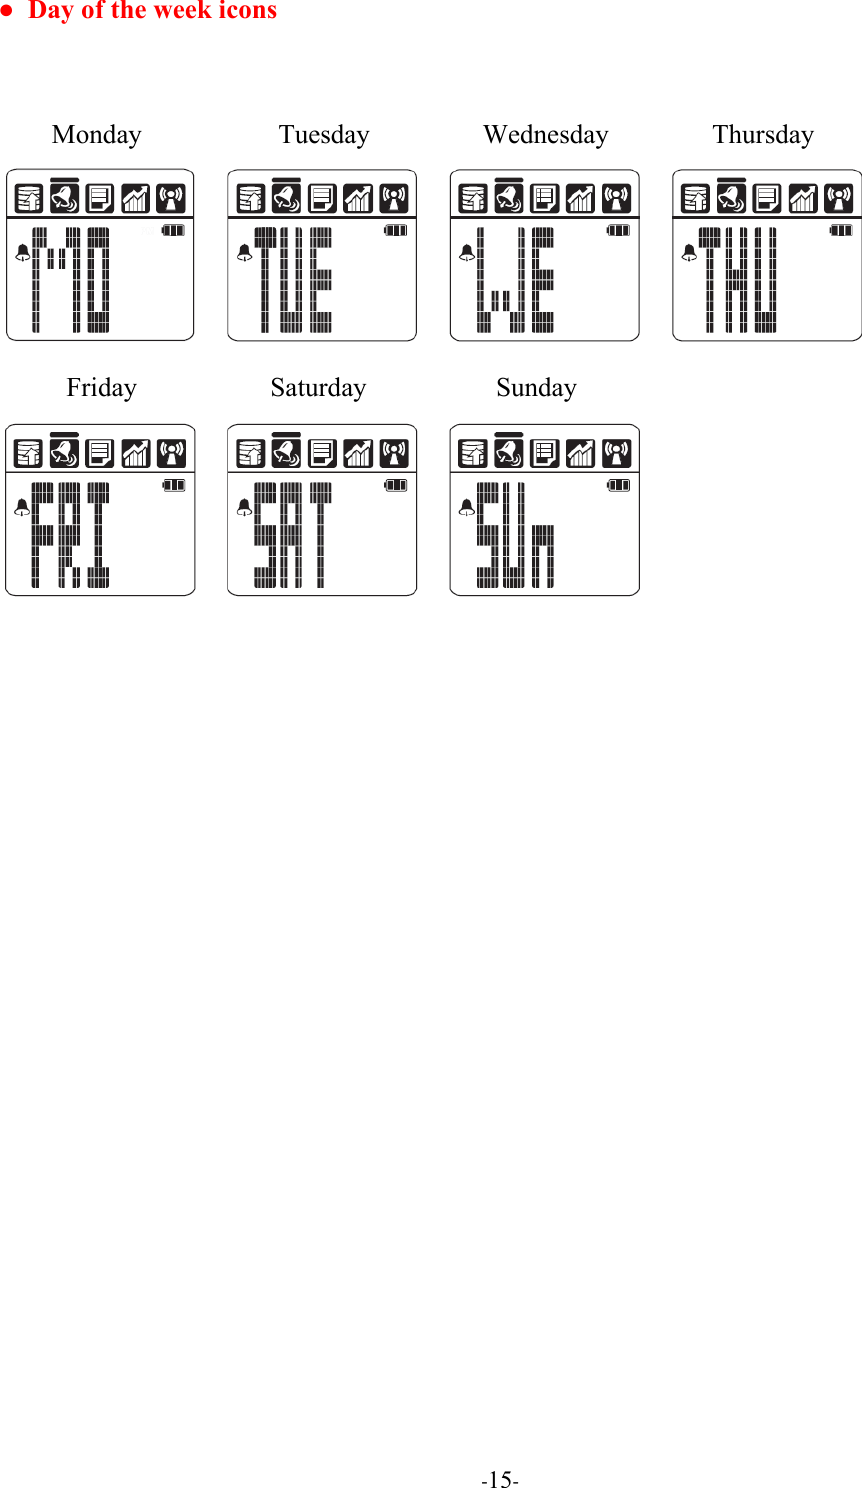
![‐16‐● [Single activity analysis mode] button operations The single activity analysis mode allows the user to calculate calorie consumption, number of steps taken and duration of inactivity within a user-selected time period. Note: The activity recording mode must first be enabled before single activity analysis can be activated. To enter single activity analysis mode: Use the MODE button to select single activity analysis. A scrolling text displaying START will be displayed, indicating that single activity analysis can begin. To begin single activity analysis: Press the SET button. The bar above the single activity analysis icon will begin to flash (marked by the red arrow in the figure below). This indicates that single activity analysis has begun and that calorie consumption, number of steps taken and duration of inactivity are being recorded and analyzed. Press the SET button again to reset it to zero and end the single activity analysis session.](https://usermanual.wiki/DXG-Technology/DW001001/User-Guide-2246674-Page-20.png)
![‐17‐● [Single activity analysis mode] button operations To view calorie consumption, number of steps taken and duration of inactivity for the single activity analysis session: Press the ADJUST button to switch between displays for viewing calorie consumption, number of steps taken and duration of inactivity for the single activity analysis session. Calories consumed (Kcal)Duration of inactivity (minutes and seconds)Steps taken](https://usermanual.wiki/DXG-Technology/DW001001/User-Guide-2246674-Page-21.png)
![‐18‐● [Seven-day activity history mode] button operations The function of the seven-day activity history mode is to allow users to observe calorie consumption, number of steps taken and duration of inactivity over a period of seven days. To enable the seven-day activity history mode: Use the MODE button to select the seven-day activity history mode. A scrolling text displaying HISTORY will be displayed. After two seconds, the current date will be displayed on the screen. To view the seven-day activity history: Press the ADJUST button to display calorie consumption, number of steps taken and duration of inactivity for a specific day.](https://usermanual.wiki/DXG-Technology/DW001001/User-Guide-2246674-Page-22.png)
![‐19‐● [Seven-day activity history mode] button operations To scroll through activity history data from the past seven days: Press the ADJUST button to sequentially switch from displays for calorie consumption, number of steps taken and duration of inactivity. Continue pressing ADJUST to scroll to activity analysis results for previous days, up to seven days. To switch to a specific date: Press the SET button to switch dates. After the date is selected, press the ADJUST button to view calorie consumption, number of steps taken and duration of inactivity for that day. Current datePrevious dayTwo days agoCurrent day (Calories consumed)Previous day (Date)Current day (Duration of Inactivity)Current day (Steps taken)Previous day (Calories consumed)Can display a maximum of seven days of data](https://usermanual.wiki/DXG-Technology/DW001001/User-Guide-2246674-Page-23.png)
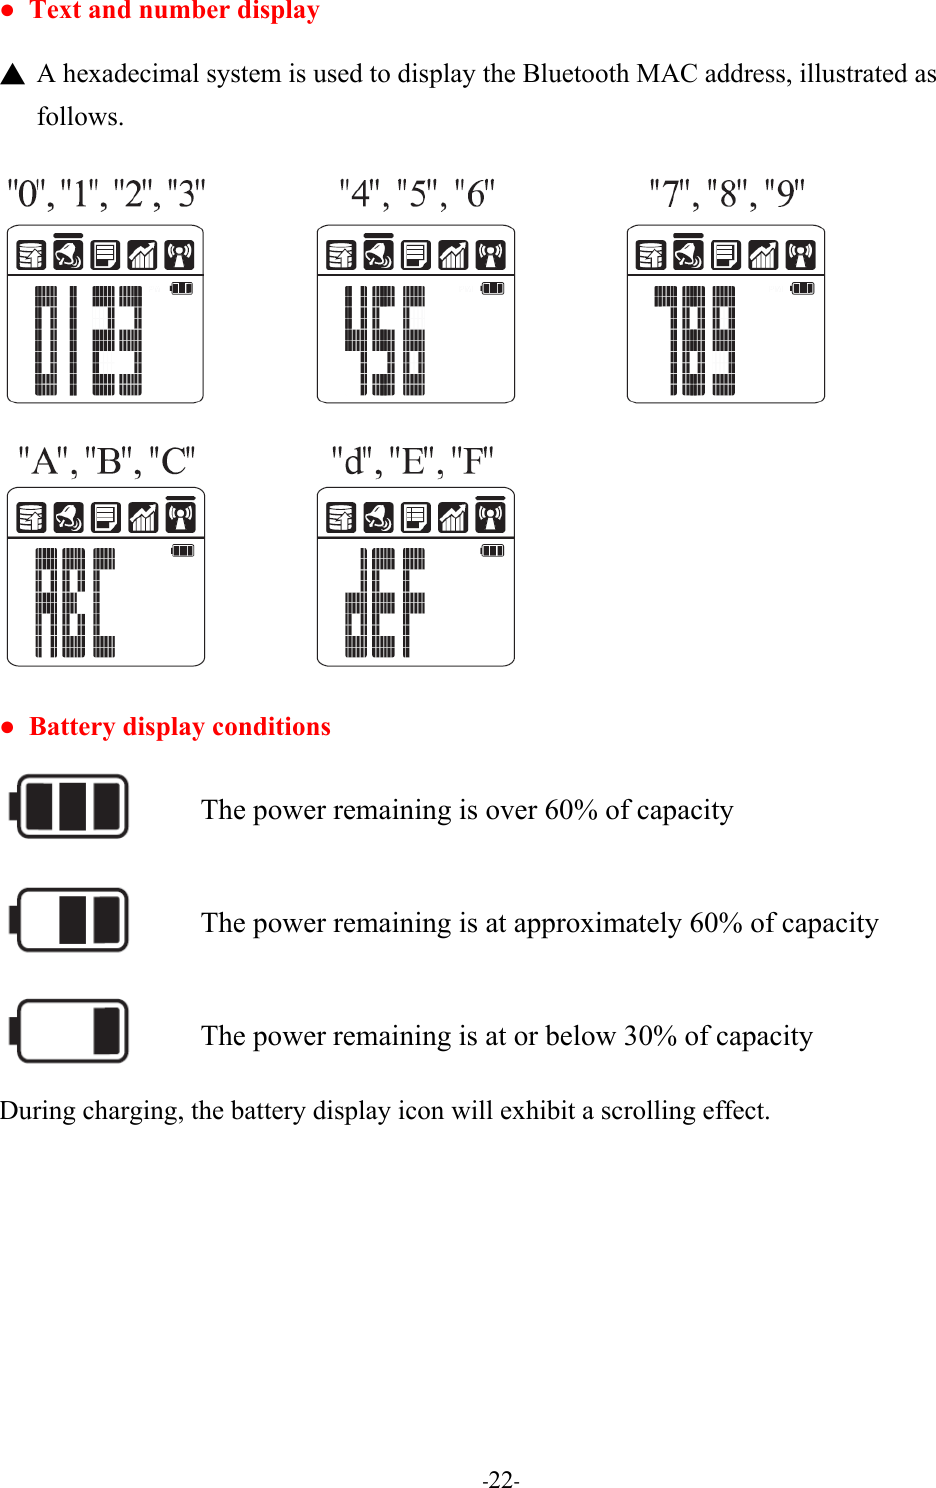
![‐20‐● [Data transfer mode] button operations Users can transfer data from the Fitness Track to a PC or mobile device through either a Bluetooth connection or using a USB connector. BLUETOOTH DATA TRANSFER To enter the Bluetooth data transfer mode: Use the MODE button to select the data transfer mode. The screen will display the text “BT”. Users can activate Bluetooth connectivity by pressing the SET button to select ON (enabled; as shown in the bottom left figure) or OFF (disabled; as shown in the bottom right figure). When Bluetooth is enabled, users can use a Bluetooth connection to connect the Fitness Track to a PC or mobile device. Note: Bluetooth connections cannot be made with the Fitness Track unless Bluetooth is enabled on both devices. To display the Bluetooth MAC address: In the data transfer mode, press the ADJUST button to display the MAC address (as shown in the figure below). Bluetooth is enabled Bluetooth is disabled](https://usermanual.wiki/DXG-Technology/DW001001/User-Guide-2246674-Page-24.png)
![‐21‐● [Data transfer mode] button operations USB DATA TRANSFER To enter the Bluetooth data transfer mode: Connect the Fitness Track to a PC or other device using the USB cable. The text “USB” will be displayed on the watch. USB data transfer will then begin. To clear data from the Fitness Track: Users can clear data from the Fitness Track using the deletion function of the app installed on your mobile device. This function involves deleting all data from the memory card. The text ERASE will be displayed while the Fitness Track is being cleared. The animation will display the letters “E”, “R”, “A”, “S”, “E” in sequence, as shown in the figure below.](https://usermanual.wiki/DXG-Technology/DW001001/User-Guide-2246674-Page-25.png)

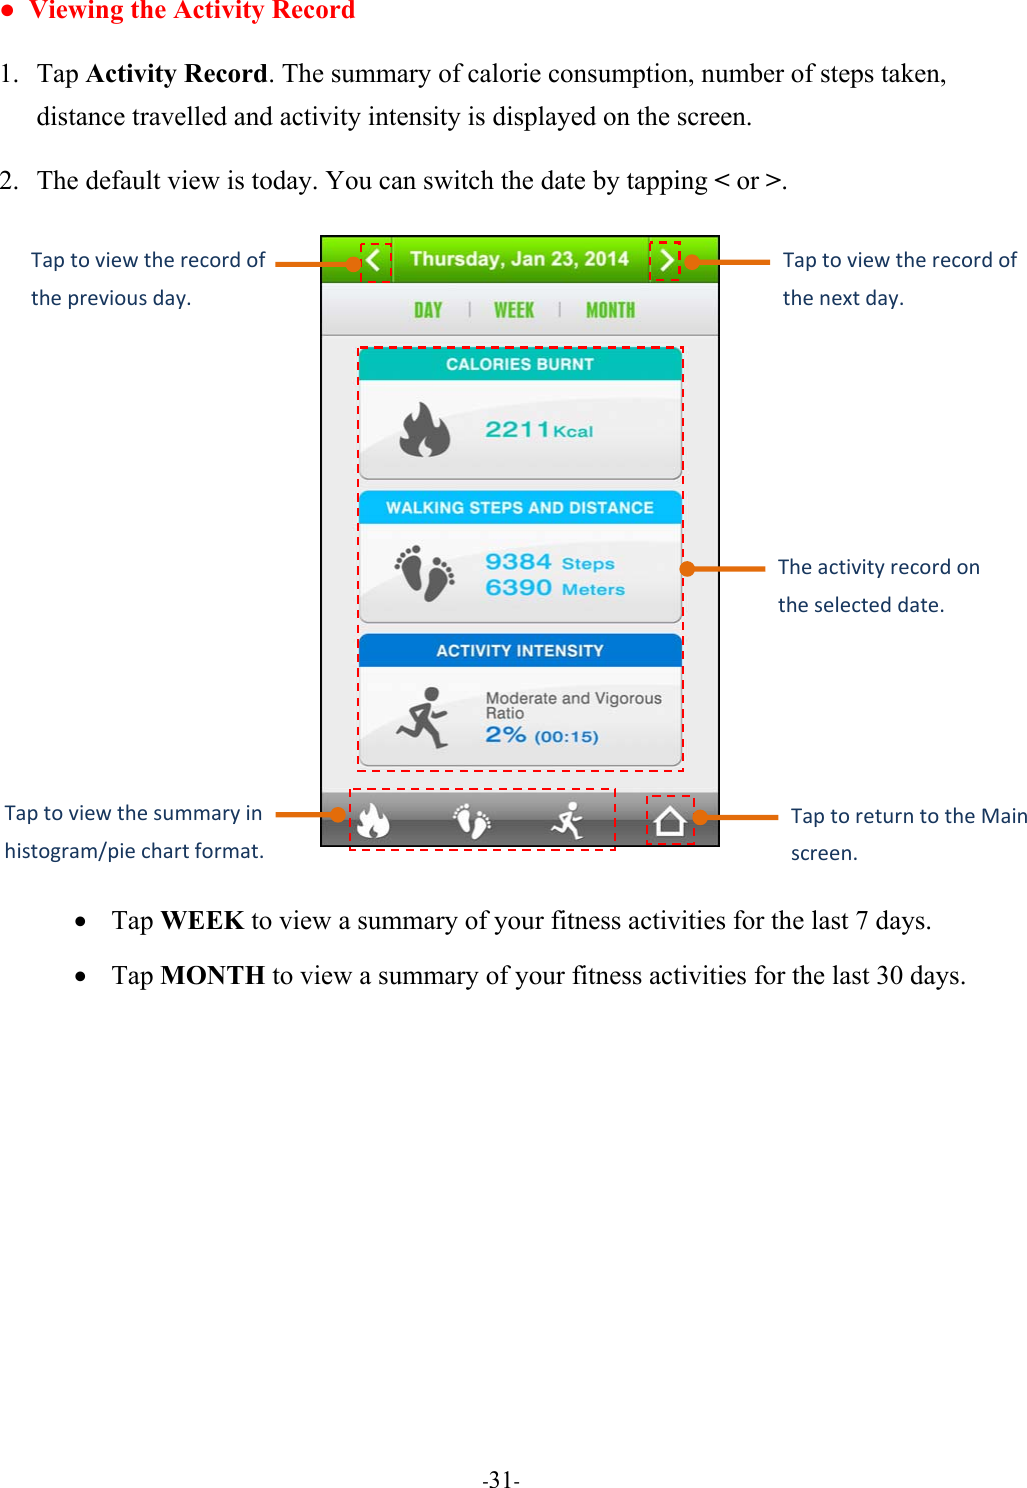
![‐32‐Viewing the Advanced Activity Analysis Tap the respective tab to view the analysis results of the selected category in details. • Calories Burned and Walking Steps and Distance: the data collection of the selected date is shown in a histogram. • Activity Intensity: the analyzed data of the selected date is shown in a pie chart. [Calories Burned] [Walking Steps and Distance] [Activity Intensity]](https://usermanual.wiki/DXG-Technology/DW001001/User-Guide-2246674-Page-36.png)
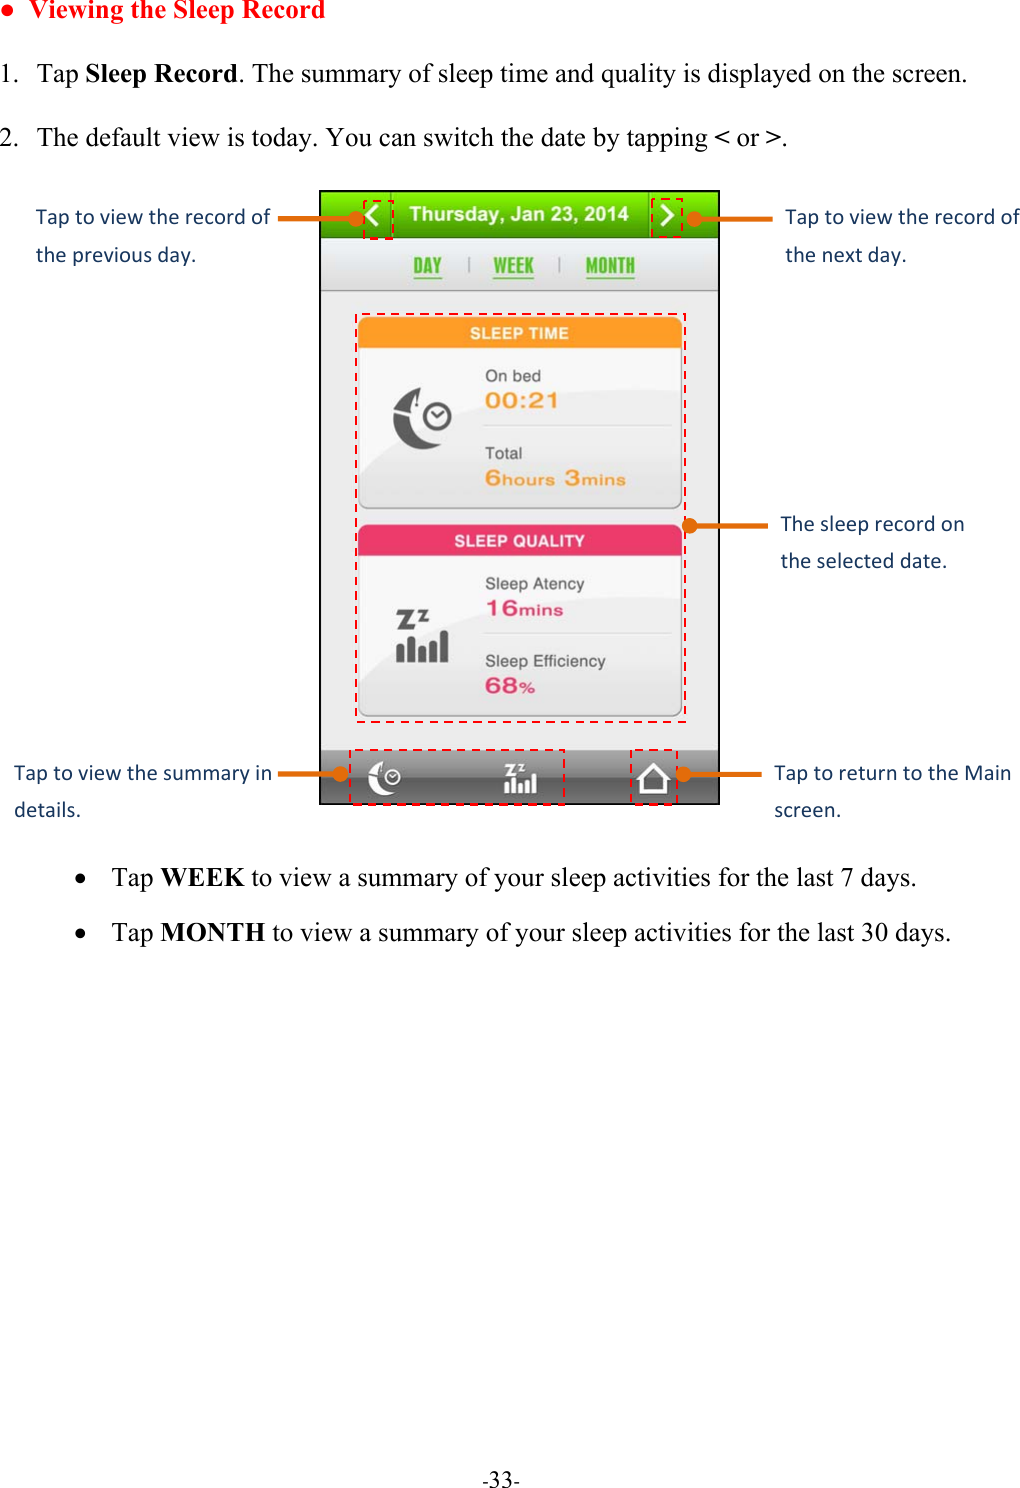
![‐34‐Viewing the Advanced Sleep Analysis Tap the respective tab to view the analysis results of selected sleep category in details. • Sleep Time: display the analyzed data of the selected date, including On bed time, Fall asleep time, Wake up time, Off bed time, and Total sleep time. • Sleep Quality: display the analyzed data of the selected date, including Sleep latency, Wake up latency, The degree of light sleep, and Sleep efficiency. [Sleep Time] [Sleep Quality]](https://usermanual.wiki/DXG-Technology/DW001001/User-Guide-2246674-Page-38.png)