Daesung Eltec DA180 VEHICLE'S DVD PLAYER User Manual
Daesung Eltec Co., Ltd. VEHICLE'S DVD PLAYER Users Manual
USERS MANUAL
Owner's Manual

FCC
This device complies with section 15 of FCC Regulations.
Operation is subject to the following two conditions: (1)
This device may not cause harmful interference (2) this
device is subject to interference, including interference that
may cause undesired operation.
Note : Any changes or modifications in construction of this
device which are not expressly approved by the party
responsible for compliance could void the authority to
operate the equipment.
Note : This equipment has been tested and found to
comply with the limits for a Class B digital device, pursuant
to section 15 of FCC Regulations. These limits are
designed to provide reasonable protection against harmful
interference in a residential area. This equipment generates,
uses and can radiate radio frequency energy and, if not
installed and used in accordance with the instructions, may
cause harmful interference to radio communications. However,
there is no guarantee that interference will not occur in a
particular installation. If this equipment does cause harmful
interference with radio or television reception, which can be
determined by turning the equipment off and on, the user
is encouraged to try to correct the interference by one or
more of the following measures:
-Reorient or relocate the receiving antenna.
-Increase the separation between the equipment and receiver.
-Connect the equipment into an outlet on a circuit,
different from that to which the receiver is connected.
-Consultthedealeroranexperiencedtechnicianforhelp.
CLASS 1 LASER PRODUCT
KLASSE 1 LASER PRODUCT
LUOKAN 1 LASER LAITE
KLASS 1 LASER APPARA

FCC
WARNING
To reduce the risk of fire or shock hazard, do not expose
this DVD player to rain or moisture.
NOTE
This product utilizes a laser. Use of controls or
adjustments, or performance of procedures other than
those specified herein may result in hazardous radiation
exposure. Do not open cover and do not personally
attempt repair. Refer servicing to qualified personnel.

Contents
Precautions■
Before Operating the Unit■
Disc■
Remote Control Installation■
Remote Control■
Identification of Controls■
Main Unit■
Remote Control and Buttons■
Basic Operation■
Playing DVD Disc■
Playing MP3 Disc■
Kodak Picture CD View/Play■
FF/RW Search■
FF/RW Skip■
Slow Motion■
Frame Advance■
Advanced Operation■
Display Information / Setup Display■
Languages■
Subtitles■
Repeat Play (Title, Chapter, Track)■
Section Repeat Play (A-B)■
Play in desired order■
Zoom In/Out■
Camera Angle■
Chapter Selection (GO TO)■
Initialization■
Basic Operation■
Common Setup■
Audio Setup■
Video Setup■
Disc Setup■
Password Setup■
Product Standards■
■Warranty

Precautions
■Do not remove the cover
To reduce the risk of electric shock and maintain
qualityofproduct,pleasedonotremovethecover.
Please follow the instructions on the wiring diagram of
the Installation Guide.
■Keep small articles out of the reach of children
Store small articles (screws etc.) in places not
accessible to children. If swallowed, consult physician
immediately.
■Stop using immediately if a problem occurs
When problems occur, stop using the system
immediately and contact the dealer from whom you
purchased the equipment. Some problems which may
warrant immediate attention include a lack of sound,
noxious smoke being emitted from the unit, or foreign
objects dropped inside the unit.
1
■Do not operate the equipment while driving
Do not change settings while driving. If operation
requiring a prolonged view of the display is required,
stop the vehicle in a safe location before attempting
operation.
■Do not use this equipment outside vehicle.
Do not use this equipment for purposes other than
those listed for a vehicle. Failure to do so may result
in an electric shock or an injury.
■Keep foreign objects out of the monitor compartment
Keep foreign objects out of the monitor compartment.
Also, avoid placing your hands in the area where it
might interfere with the monitor's operation.

Precautions
■Stop the vehicle before carrying out any
operation that could interfere with your driving
If the operation of the unit (such as opening or closing
of the monitor, etc.) interferes with your driving, stop
the vehicle in a safe location before attempting
operation.
■Maintenance
If you have problems, do not attempt to repair the unit
yourself. Return it to your purchasing dealer.
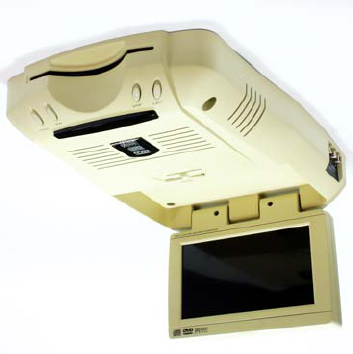
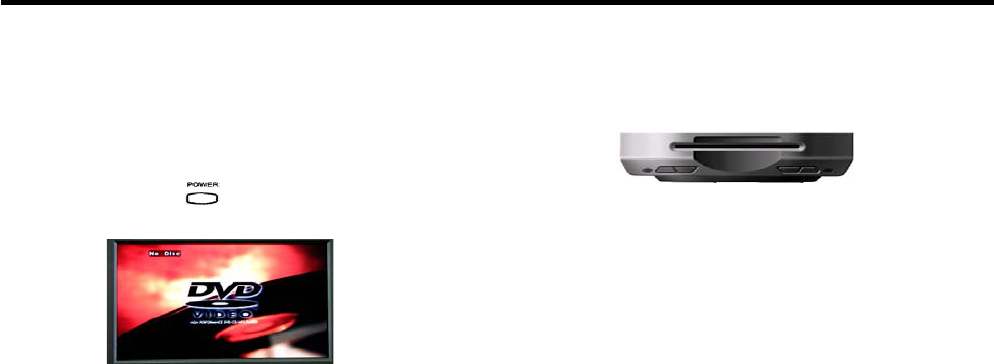
■Turning On or Off
1. Pushing the OPEN switch forward will release the
TFT-LCD monitor and it will drop down slightly.
Pull the monitor downward until a comfortable
viewing angle is reached.
The internal friction will hold the screen in position
while the system is in use.
2
2. Pressing the POWER button on the unit or the remote
controlwillturnthesystemonoroffalternately.
When in use the internal backlighting will illuminate
the controls.
3. After the unit has been turned on and is displaying a
picture, adjust the viewing angle by pivoting the
screen to optimize the picture quality.
4. Remember to turn the unit off and pivot the LCD to
the locked position when not in use.
■Connect Additional AV Input
1. AUX Video Input
The unit will accept an audio/video input through the
RCA jacks located on the side of the unit.
The audio/video device could be a video game system,
Video Cassette Recorder(VCR), or other input device.

Precautions
■Region Code
1. Both the DVD player and disc are coded by region.
2. These Region Code number must match in order for
the disc to play.
3. This unit's code number is region number 1. Other
Region Codes cannot be played in this unit.
If the disc is not Region 1, the unit will display "Invalid Region."
4. Types of Discs your DVD will play :
DVD disc - DVD disc which contain video.
Audio disc - Audio CD contain musical or sound
content only.
MP3 disc - A disc that contain audio files (for example,
a CD-R with MP3 files).
VCD disc - VCD disc which contain video.
■FM Transmitter Mode
1. If this unit has FM Transmitter function, please adjust
the FM frequency to hear.
3
Before Operating the Unit
Disc
Usediscswithoneofthefollowinglabels.
Check disc label or the mark on the jacket.
DVD Video■
- Single - or double - sided disc
- Single - or double - layer disc
- Dolby Digital, MPEG or Linear PCM
Digital Audio
- MPEG-2 Digital Audio
■DVD-R, DVD-RW, DVD+R, DVD+RW
- Can play DVD-R/RW, +R/RW discs that contain DVD
video format. However, discs created on a certain
brand or type of DVD recorder may not be
recognized.
4
Audio CD, CD-R, CD-RW■
- 12cm or 8cm disc
- Linear PCM Digital Audio
- Can play CD-Audio and MP3 audio files recorded on
CD-R and CD-RW. However, discs created on a
certain brand or type of CD recorder may not be
recognized.
■PictureCD
-12cmdiscKodakPictureCD

Before Operating the Unit
MP3 disc■
- Can only play CD-R/RW discs that contain MP3 files
with ISO9660 or JOLIET format.
- Can only play files compatible with MPEG-1 Layer 3
Audio of 32, 44.1 or 48 sampling frequency, mono㎑
or stereo.
- Can play Variable Bit Rate (VBR) files. (e.g., 32 to
320Kbps)
- Can play multi-session discs.
- Can play audio files encoded at 48Kbps to 320Kbps.
For CD quality sound, use files encoded at minimum
128Kbps.
Region Code■
- Every DVD disc bears on its case a Region Code, which
indicates where in the world the disc can be played. All DVD
systems also carry the Region Code on the back. DVD discs
5
canonlybeplayedonasystemwithamatchingRegionCode.
Discs with the "ALL" mark can be played on any DVD player.
Disc Handling■
- Keep disc free of fingerprints, grease or dust.
- Protect disc from scratches.
- Do not touch the surface of the disc when inserting or removing
it.
- Do not bend or deform disc.
- Keep away from heat.
- Do not deform the inner ring (doughnut hole).
- Do not write on surface of disc with pen or pencil.
-Donotstorediscinahumidordustyplace.
- When cleaning disc, use non-abrasive soft cloth. Start from
the center moving outward.
- Do not use paint thinner, benzene, industrial strength
detergent, or chemical spray.

Before Operating the Unit
Note during play■
- Do not insert another disc. This may cause damage to the
disc or the player.
- While the disc is playing, it spins at high speed. Do not use
the disc if it is cracked, bent or otherwise damaged. It could
cause the player to malfunction.
- Do not use a disc with a sticker or label glued on it. They may
comeoffinsidetheplayerandcausedamagetothediscor
cause the player to malfunction.
■ Remote Control Battery Installation
Install battery before operating the player.
- Open the battery lid.
- Insert batteries. (AAA type)
Make sure the (+) and (-) signs on the batteries match
thoseoftheremotecontrol.
- Close the battery lid.
6
Using the Remote Control■
For proper operation, make sure the remote control is within
5m from the remote control IR (Infrared) sensor and within
30 to the left and right of the sensor.˚
- Make sure there are no obstructions between the remote
control and the player.
- Do not apply excessive force to the remote control.
- Do not keep the remote control in extreme heat or in damp
places.
- Do not drop water on the remote control or leave wet
objects on it.
- Do not disassemble the remote control.
- When not in use, leave it still.
Note
-Onlyusetheremotecontrolasspecifiedinthismanual.
- Do not install batteries the wrong way.
- Do not keep dead batteries in the remote control.
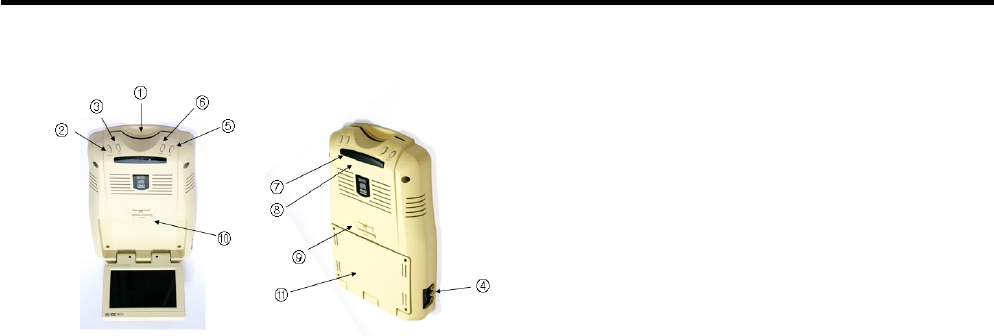
Identification of Controls
Main Unit
DISC INSERT SLOT①
POWER Button②
PLAY Button③
7
Auxiliary A Input④
EJECT Button⑤
STOP Button⑥
IR (Infrared) Remote Sensor Eye⑦
- Allows the remote control to operate and control other
accessories in the system
IR (Infrared) Transmitter⑧
-Usedtotransmitaudiotowirelessheadphones
Three position FM Modulator Switch⑨
- On: Turn on the FM Modulator. Make sure the FM radio
is set to the desired frequency.
- Off: Turns the FM Modulator off. FM radio will operate
normally.
Open Switch⑩
- Moves in the direction of the arrow to release the
flip-down screen.
Flip-down LCD Panel⑪
Identification of Controls
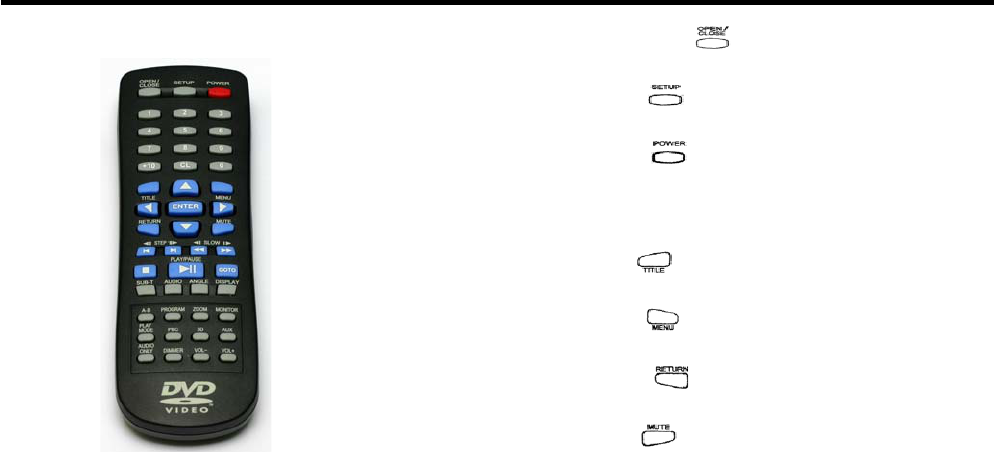
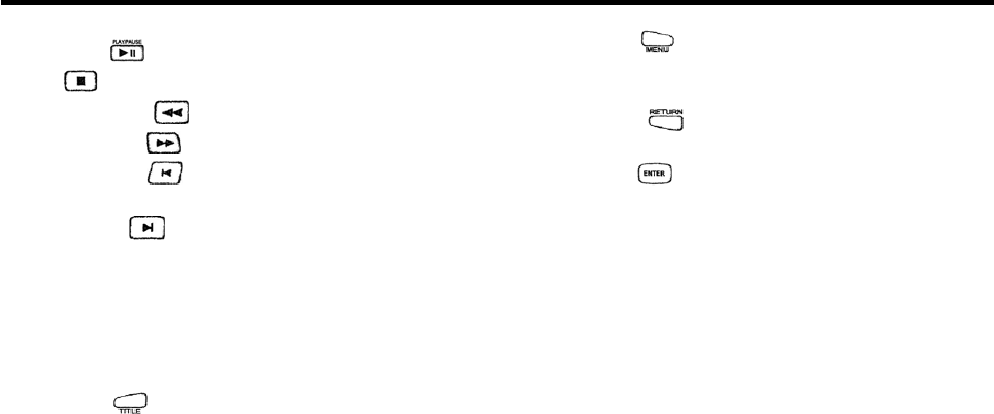
Remote Control and Buttons
8
Open/Close button ()
Loads and unloads the disc.
Setup button ()
Sets up all functions of the system.
Power button ()
Turns the player on or puts it in stand-by mode.
Numeric keypad
Moves to desired track or chapter.
Title button ()
Displays the top level menu of the disc.
Menu button ()
Displays the disc menu.
Return button ()
Returns to the previous menu.
Mute button ()
Mutes sound.
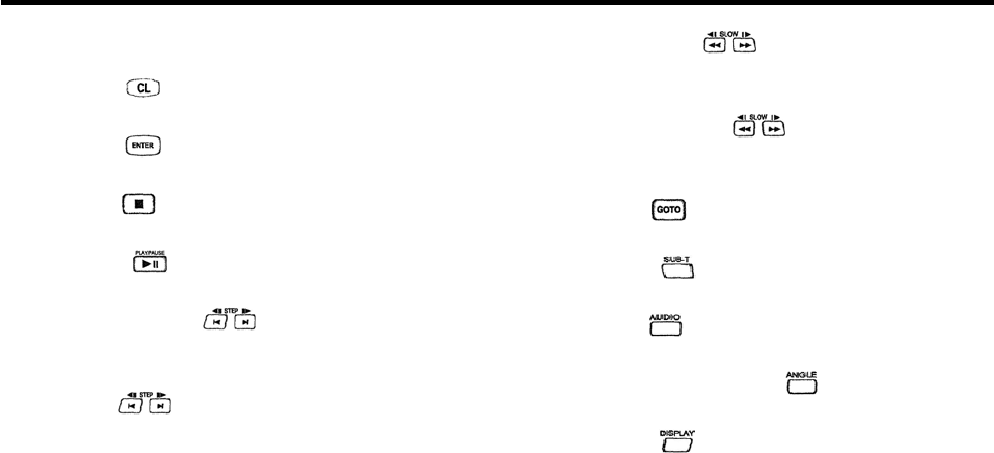
Identification of Controls
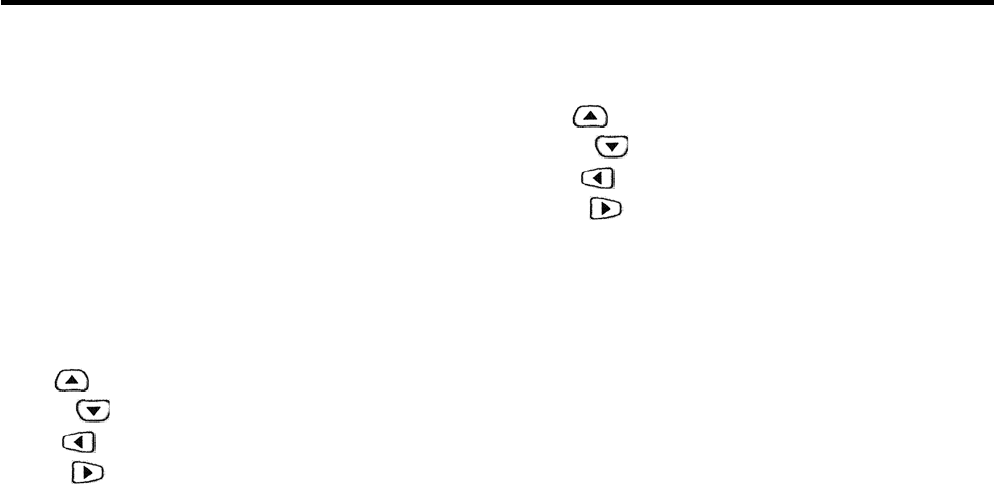
Navigation buttons
Used to navigate through menu options.
Clear button ()
Cancels selected function.
Enter button ()
Sets up or select functions.
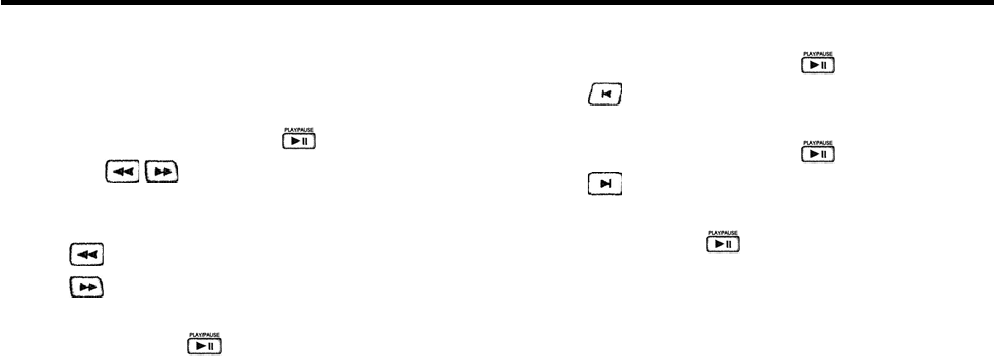
Stop button ()
Stops play.
Pause button ()
Pauses and resumes play.
Frame Advance button ()
While in Pause mode, advances a frame forwards or
backwards.
Skip button ()
Skips one page or to next song.
9
Fast Forward button ()
Fast search forwards and backwards. Each time pressed,
speed increases.
Slow Motion Play button ()
While in PAUSE mode, plays in slow motion forwards and
backwards.
GOTO button ()
Looks up desired content directly.
Subtitle button ()
Selects the subtitle language during play.
Audio button ()
Selects the language of the audio during play.
Camera Angle Selection button ()
Selects the camera angle on screen.
Display button ()
Displays play information on screen.
Identification of Controls
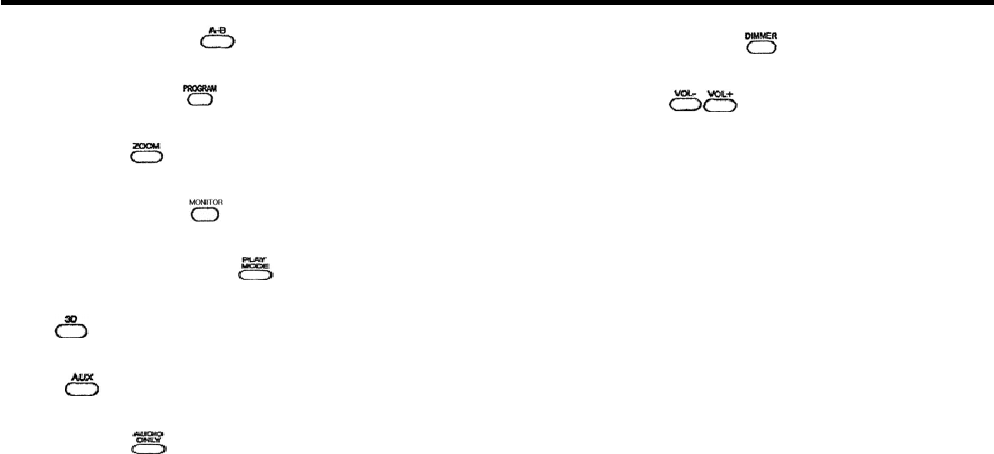
Section Repeat button ()
Sets specified sections of the disc to repeat.
Memory Play button ()
Plays specified sections repeatedly.
Zoom button ()
Enlarges the screen.
Monitor Menu button ()
Displays monitor menu.
PlayModeSelectionbutton()
Repeats disc (chapter, title, track, or entire disc).
3D ()
Simulates 3D audio on a pair of speakers.
AUX ()
Selects external A/V input mode.
AUDIO ONLY ()
Sound only.
10
Brightness Control button ()
Controls the brightness of the display.
Volume buttons ()
Increases or decreases volume.
Basic Operation
Playing DVD Disc
■BeforeplayingDVD
Make sure the DVD Region Codes on the disc and on the
player match. The disc will not play unless they match.
■Playingdisc
- Press POWER button ( )
11
- Gently insert disc with recorded side facing down.
⇪
- When disc is inserted, it will begin to play automatically.
When the disc menu appears, use the Navigation arrows
and Select button, or the Numeric Keypad to select the
menu options. The selected menu option will play.
Basic Operation
■BasicPlayControls
Play/Pause ( ) : Starts playing or to pauses a playing disc.
Stop ( ):Stopsplayingdisc.
Backward Search ( ) : Searches backwards at high speed.
Forward Search ( ) : Searches forwards at high speed.
Jump Backward ( )
: Skips to the beginning of the current track or chapter.
Jump Forwad ( ):Skipstothenexttrackorchapter.
Basic Disc Menu Control■
DVD discs include a menu. When playing a disc, menu
options appear automatically. For some discs you may need
to press Menu or Title button to get the menu options.
Title button ( )
: Displays the disc's top-level menu. Menu content depends
on the disc.
12
Menu button ( )
: Displays the DVD disc's main menu. Depending on the
disc, this may be the same as the top-level menu.
Return button ( ):Returnstothepreviousmenu.
Navigation Arrows : Move the cursor to different menu options.
Enter button ( ) : Selects the current menu option.
Numeric Keypad
: Choose menu options by the number (only for certain discs).
Note
- If you press a button and see "⊘"onthescreen,itmeans
that the function is not available on the disc playing.
- Depending on DVD disc type, certain functions may work
differently, or may not work.
★ When using DVD R/RW, the DVD player may or may not
work depending on the disc condition or the recording
program used.

Basic Operation
Playing MP3 Disc
Playing MP3 files■
- Gently insert disc with recorded side facing down.
- When the disc plays, the screen will automatically display
the disc's MP3 files organized in folders.
- Using "up" and "down" arrows, select the desired folder.
- Press Enter button and the MP3 files will appear on the
screen.
13
- Using "up" and "down" arrows, select the desired MP3 file.
- Press Enter button and the MP3 file of choice will start to play.
Note
- Filenames can only be displayed in English.
- Only supports MPEG-1 Audio Layer 3 (MP3) standards.
Does not support MPEG-2 Audio Layer 3, MPEG-2.5 Audio
Layer, MP1, or MP2 standards.
- If a CD-R/RW disc contains CD audio files, MP3 files or
picture files, the CD may not play.
- MP3 disc does not support programmed play.
-WhensavingMP3filesonaCD-R/RWdisc,youmustuse
ISO9660 Level I format before recording.
★ When using CDR/RW, the DVD player may or may not work
depending on the disc condition or the recording program
used.
Basic Operation
PlayingKodakPictureCDandOtherPhotoFiles
When you insert a Kodak CD into the player, the slideshow will
start automatically. When you load picture files, the table of
contents will appear on the screen. It offers 16 different slideshow
modes. Use program button to change from slideshow mode to
manual operation.
Choosing a Photo■
- Using "up" and "down" arrows, choose the photo you want
to see. The thumbnail picture of the selected photo will display
on the file menu on the right-hand side.
Rotating a Photo■
There are 4 ways to rotate a photograph.
-Up( ) arrow : Flips the image upside down.
-Down( ) arrow : Flips the image upside down.
-Left( ) arrow : Rotates to the left
-Right( ) arrow : Rotates to the right.
14
Zoom In / Zoom Out■
Each time a zoom button is pressed, the image will zoom to
125% 150% 200% 50% 75% original size.⇒⇒⇒⇒⇒
-Up( ) arrow : Zoomed image will move up.
-Down( ) arrow : Zoomed image will move down.
-Left( ) arrow : Zoomed image will move to the left.
-Right( ) arrow : Zoomed image will move to the right.
Note
- Depending on the file size, the zoom function may not work.
★ When using CD R/RW, the DVD player may or may not work
depending on the disc condition or the recording program
used.
Basic Operation
Viewing Slow Motion Video
This function views the disc content in slow motion. While in
slow motion, the audio does not play.
- During play, press Resume/Pause ( ) button.
-PressSlow( ) button. Each time you press the button,
the speed will change as follows :
1/2 1/4 1/8 1/16⇒⇒⇒
1/2 1/4 1/8 1/16⇒⇒⇒
- Press Resume/Pause ( ) button, and the disc will play at
normal speed.
15
Frame Advance
- During play, press Resume/Pause ( ) button.
-Press( ) button repeatedly. Each time you press the
button, the previous frame will display.
- During play, press Resume/Pause ( ) button.
-Press( ) button repeatedly. Each time you press the
button, the next frame will display.
- Press Resume/Pause ( ) button, and the disc will play at
normal speed.
Advanced Operation
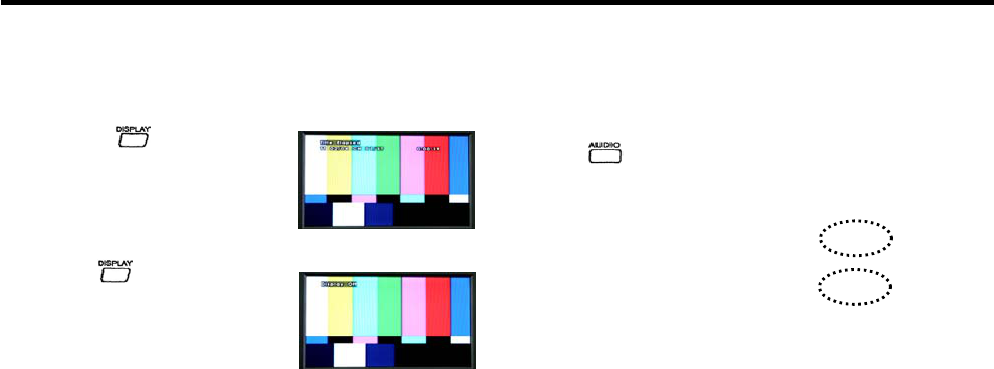
On-Screen Information Display
During play, it displays disc type, title, chapter number,
elapsed time.
-Ifyoupress( ) button during
play, chapter, title, song or time
information will appear on screen
depending on the disc type.
-Pressthe( ) button again,
and the on-screen information
display will disappear.
16
Changing Audio Languages
While playing DVD disc with two or more languages, you can
change the audio language at any time.
-Press( ) button during play. Each time you press the
button, the audio language will change.
Audio 1/2:Dolby Digital 5.1CH English
Audio 2/2:Dolby Digital 5.1CH Korean
Advanced Operation
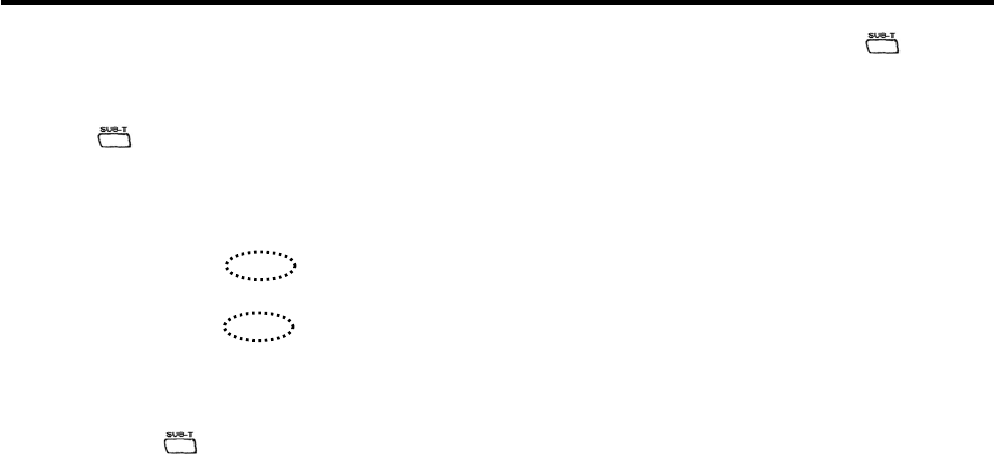
Changing Subtitle Languages
Most DVD discs have subtitles in one or more languages.
During play, you can change the language.
-Pressthe( ) button during play. Information about the
subtitles will appear on the bottom of the screen. Initially, it
will be set to "Subtitle Off." If the disc does not contain any
subtitles, then ( ) will appear.⊘
Subtitle 1/2 : English
Subtitle 2/2 : Korean
Subtitle Off
- Continue pressing ( ) button until the subtitle in desired
language appears.
17
- To turn the subtitles off, continue pressing ( )until
"Subtitle Off" appears on the screen.
Note
- Your subtitle choices are limited to the languages contained
on the disc. Depending on the disc, the subtitle selection
function may not work.
Advanced Operation
Repeat Play - Title, Chapter (DVD), Track (CD-DA)
Allows you to play the title, chapter or track repeatedly.
-Press( ) button during play. Each time ( )is
pressed,therepeatmodewillchangeasfollows:
DVD : Chapter Title All Repeat Off→→→
CD-DA : Track All Random Repeat Off→→ →
MP3 : Single All Random Repeat off→→ →
- To cancel repeat play, press ( ) until "Repeat Off"
appears on the screen.
Note
- Depending on the disc, the repeat play function may not
work.
18
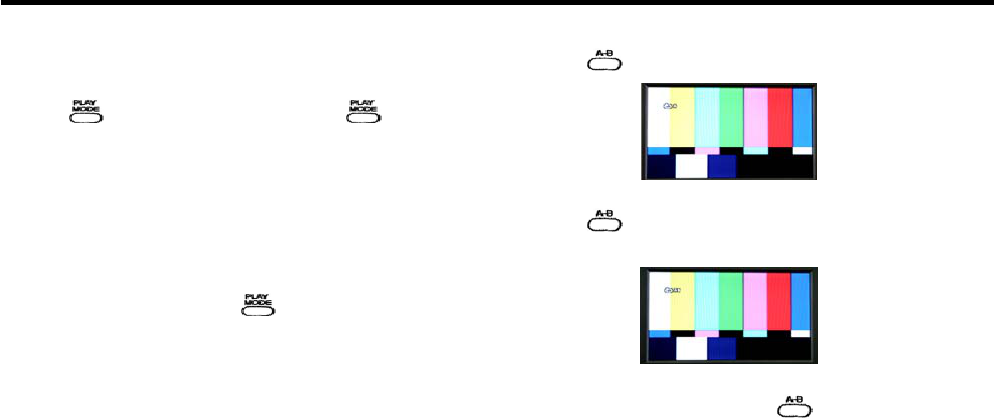
Section Repeat Play
-Press( ) at the beginning of the desired section.
-Press( ) at the end of the desired section. The specified
section will play repeatedly.
-Toreturntonormalplay,press( ) until "AB" disappears
from the screen
Advanced Operation
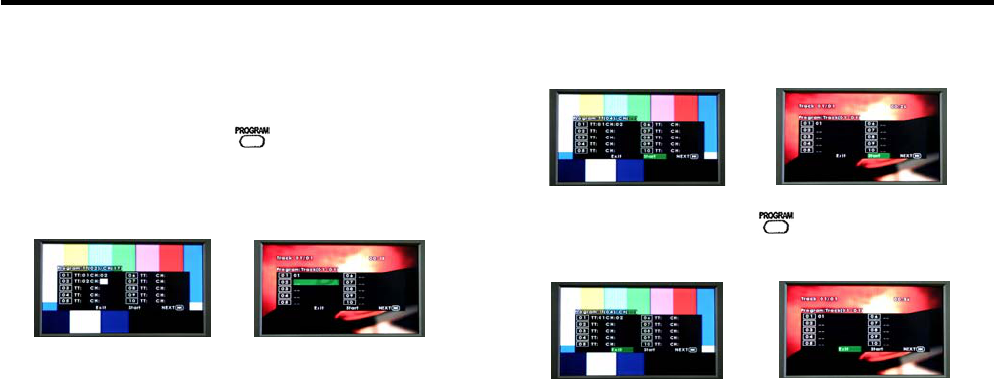
Play in Desired Order
This function allows the user to arrange and play a disc's title,
chapterortrackindesiredorder.
- During play or pause, press ( )andtheprogrammenu
will appear on the screen.
- Select the desired title, chapter (DVD), track (CD-DA) using
the numeric keypad.
- To add another title, chapter, or track, repeat the previous
step.
19
- When finished, use the navigation arrows to select "Start" on
the screen. The disc will play in the programmed order.
-Tostopprogramplay,press( ) button one more time.
Use navigation arrows to select "Exit" on the screen.
Advanced Operation
Zoom Screen
-Duringplay,press( ) button.
-Eachtimeyoupress( ), the screen will zoom as follows
and display current zoom level.
2341/21/31/4NORMAL→→→→→→
- Using the navigation arrows, you can move to the area you
desire to zoom in.
-Tocancelzoom,press( ) until "Zoom" disappears from
the screen.
20
Changing Camera Angle
If the disc contains different camera angles, you can view
from the different camera angles.
-Duringplay,press( ) button. Available camera angles
will appear on the screen. If there are no alternate camera
angles, then (⊘) will appear on the screen.
- If there is more than one angle, the camera icon with the
angle number will appear on the screen.
-Press( ) button again, and it will move to the next
camera angle available.
Note
- The number of available camera angles depends on the
disc.
Advanced Operation
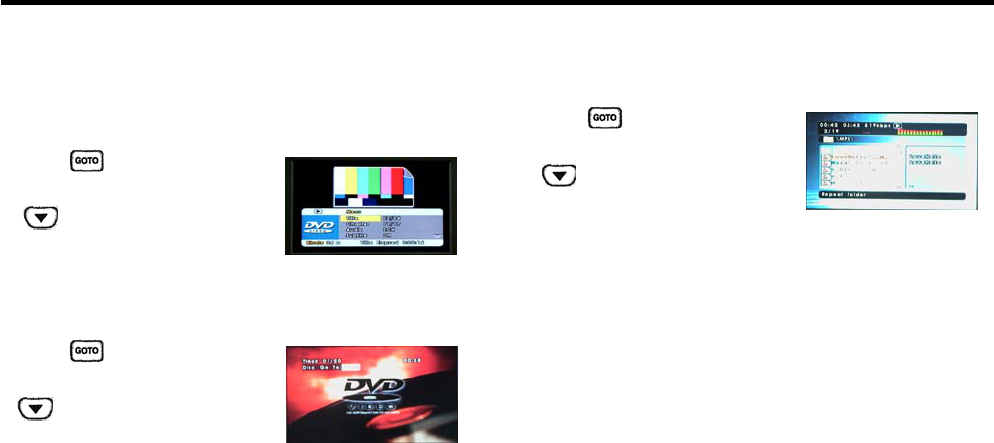
Go To the Desired Scene
This function allows the user to go to a specific track, chapter
or song.
DVD■
-Press( ) button during play.
- Select "Chapter" and press DOWN
() button.
- Using the numeric keypad, enter
the desired title number.
CD-DA■
-Press( ) button during play.
- Select "Track" and press DOWN
() button.
- Using the numeric keypad, enter
the desired title number.
21
MP3■
-Press( ) button during play.
- Select "Song" and press DOWN
() button.
- Using the numeric keypad, enter
the desired title number.
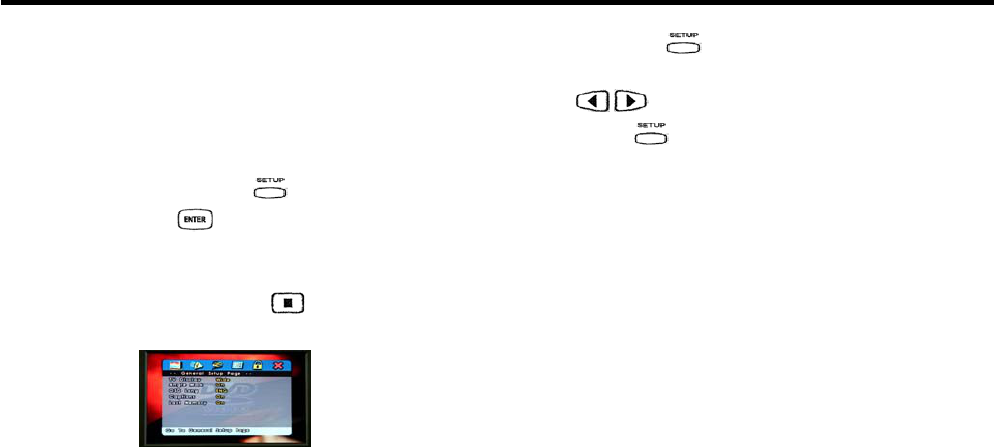
Initialization
While the disc is stopped, pressing the Setup button will bring
up the basic setup, audio setup, video setup, disc setup, and
password setup menu. Initial setting will be preserved even
when the player is powered off.
Basic Operation
While the disc is stopped, press ( ) button. Using the
navigation arrows and ( ) button, find and select the menu
of your choice. The current setup menu will be highlighted in
blue.
- If the disc is playing, press Stop ( ) button.
22
- When you press ( ) button, Setup Menu will appear on
the screen.
-Use( ) buttons to select the menu of your choice.
-Ifyoupress( ) button again, Setup Menu will disappear.
Note
- Depending on the disc, certain setup menu options may not
be active.
Initialization
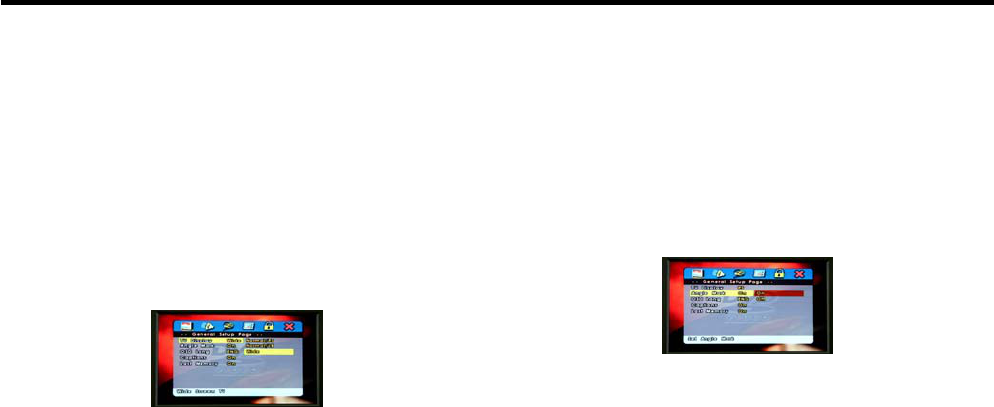
Common Setup
TV Display■
- Pan Scan: Applies to media formatted for pan-scan. (You
can only see the middle section of a screen formatted in
16:9 aspect ratio.)
- Letter box: If not formatted in pan-scan, screen will appear
in letter box with black bands on the top and bottom of the
screen.
- Widescreen: To view in widescreen mode, black bands will
appear on the top and bottom of the screen.
23
Angle Mark■
While the disc is playing the user can set up the multi-angle
mark displayed on the screen. Multi-angle screen only works
if the disc supports the multi-angle format.
On: During play, multi-angle mark is displayed on the screen.
Off: During play, multi-angle mark is not displayed on the screen.
Initialization
OSD Language■
You can choose the language displayed on the screen.
When you select a language, the screen will display in the
language of your choice.
Captions■
During play, this option enables or disables captions.
On: Caption is on.
Off: Caption is off.
24
Last Played Memory■
Enables or disables disc's last played memory function.
If you eject the disc or power off the player, it will automatically
resume play from the previous spot when you play the same disc
again. The player will only remember the most recent disc played.
Initialization
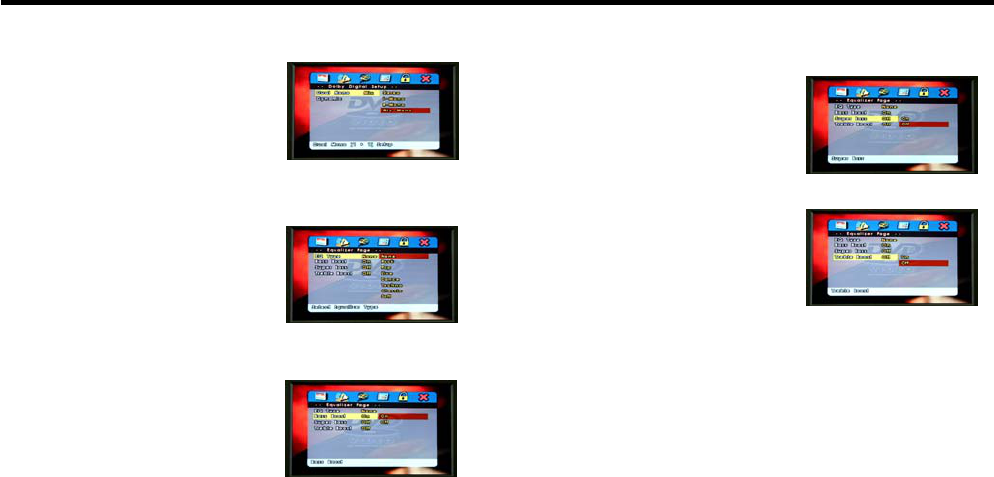
Audio Setup
Dolby Digital Setup■
Sets up digital audio effects.
(Stereo, L-Mono, R-Mono,
Mix-Mono, Dynamic)
Equalizer■
-EQTYPE
You can choose desired equalizer
mode.(Rock,Pop,Live,Dance,
Techno, Classic, Soft)
-BassBoost
Without affecting other frequencies,
you can boost the low frequency
section only.
25
-SuperBass
This amplifies the low frequencies
even further.
- Treble Boost
Without affecting other frequencies,
you can boost the high frequency
section only.
Initialization
■ 3D Processing
- Reverb Mode
Simulates realistic sound effects in various settings. (Concert,
Living Room, Hall, Bathroom, Cave, Arena, Church)
26
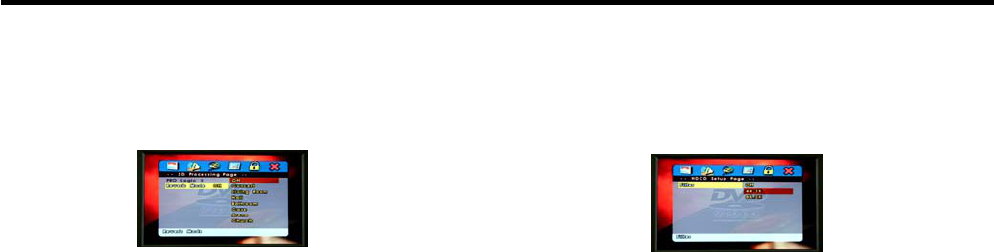
■HDCD
- Recreates the sound most closely to the original when
playing discs recorded in HDCD (High Definition Compatible
Digital) format.
Note
- This should only be used with HDCD discs. If you try to use
normal discs, it may produce unacceptable sound quality.
Initialization
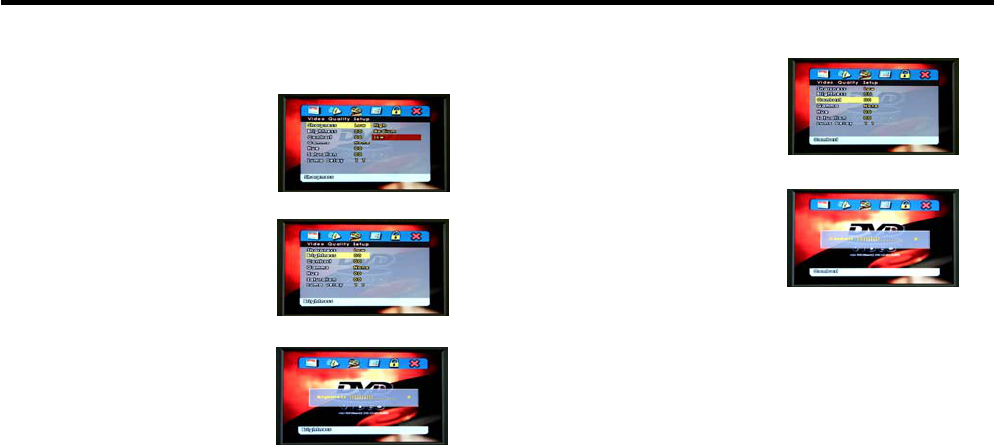
Video Setup
Quality■
-Sharpness
Controls the screen sharpness.
-Brightness
Controls the screen brightness.
Use navigation arrows to adjust
screen brightness.
27
-Contrast
Adjusts the screen contrast.
Use navigation arrows to adjust
screen contrast.
Initialization
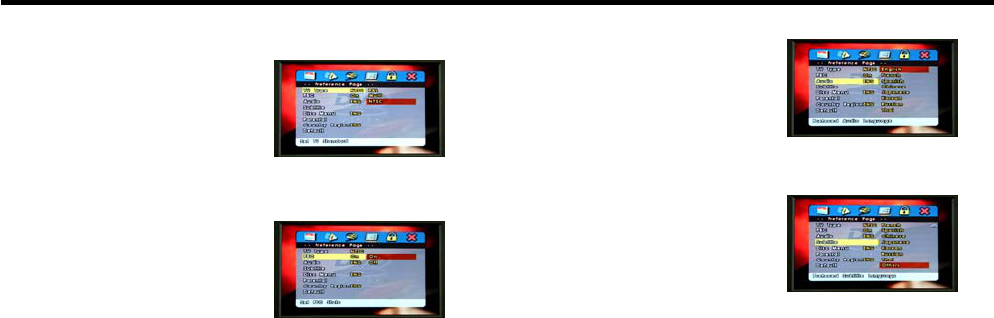
Preference Page
TV Type■
- ThissetstheTVsignaltype
(PAL, Multi, NTSC) of the DVD,
monitor, and external A/V.
PBC (Play Back Control)■
-WhenplayingavideoCDwith
playback control (version 2.0),
you can view a special scene or
menu. If the video CD has a
PBC function, depending on
the condition of the play control,
a menu or additional information
will appear.
28
Audio■
- You can select the audio
language that comes out of
the speakers.
Subtitle■
- You can select the subtitle
language that appears on the
screen.
Initialization
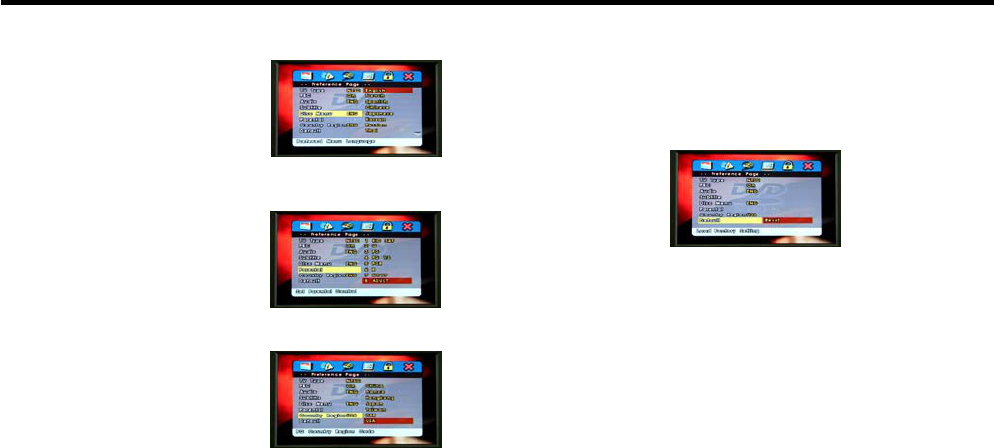
DISC Menu■
- Selectsthelanguageofyour
disc's DVD menu.
Parental■
- Limits children's access to
certain discs. Choose from 8
different levels.
Country Region■
- Selects the applicable region
when setting the parental control
level.
29
Default■
- Resets all menu options to the factory setting. (However,
parental control level, region code, and password will not
be reset.)

Initialization
Password Setup Page
Password Mode■
- Sets password mode on/off.
Password Change■
- Changes password.
- Enter previous password and
enter the new 4-digit password.
30
- Under Confirm PWD, enter new password and select OK
buttononthescreen.
Note
- Do not forget your password.
- You cannot set new password without your old password.
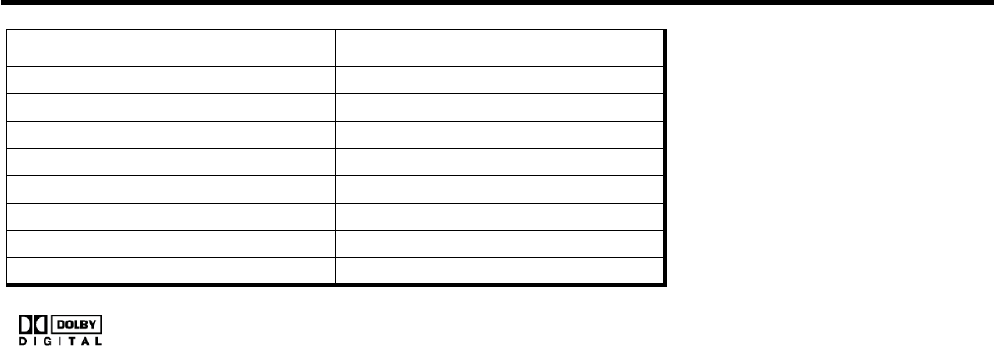
Product Standards
Item Features
Power Consumption MAX 30Watts
LCD Dimension(mm) 154.08(W)×86.58(H)
Resolution(dot) 1,440(W)×234(H)
Screen Size(inch) 7.0(Diagonal)
Dot Pitch(mm) 0.107(W)×0.370(H)
Viewing Angle 90°(H),60°(V)
Signal Mode NTSC
Power Source DC 9~16V
Manufactured under license from Dolby Laboratories.
"Dolby" and the double-D symbol are trademarks of
Dolby Laboratories.

Warranty
This warranty covers repairs needed to correct defects
in materials or workmanship of the unit. The warranty
coverage is for 36 months or 36,000 miles, whichever
comes first. To obtain warranty service, contact the
Mopar dealer that installed the unit.
This warranty does not cover damages or failures
resulting directly or indirectly from the following:
Fire, accidents or theft•
Abuse or negligence•
Misuse•
Improper Repairs•
Alteration or Tampering, including installation of•
non-Genuine Mopar Accessories
Airborne chemicals, floods, lightning and other•
environmental conditions