Daesung Eltec DA200TFDS CAR DVD - PLAYER User Manual Manual102 40214
Daesung Eltec Co., Ltd. CAR DVD - PLAYER Manual102 40214
USERS MANUAL

2004-02-17
Operation Manual
Model : DA-200
1 Manual102-40214
2004-02-17
Precaution
1. Do not remove the cover.
To reduce the risk of electric shock and keep the quality of product, please do not remove the cover.
Please follow up by the instruction of the wiring Diagram of the Installation Guide.
2. Keep small articles out of the reach of children.
Store small articles (screws etc.) in places not accessible to children.
If swallowed, consult physician immediately.
3. Stop using immediately if a problem appears.
When problems appear, stop using the system immediately and contact the dealer from whom you purchased the equipment.
Some problems which may warrant immediate attention include a lack of sound, noxious smoke being emitted from the unit,
or foreign objects dropped inside the unit.
4. Do not operate the equipment while driving.
Do not change setting while driving. If operation requiring a prolonged view of the display is required, stop the vehicle in a
safe
5. Do not insert 3.5 Inch Disc
3.5 Inch Disc will may not be used.
6. Do not use this equipment outside vehicle.
Do not use this equipment for purposes other than those listed for a vehicle Failure to do so may result in an electric shock
or an injury.
2 Manual102-40214
2004-02-17
7. Keep foreign objects out of the Monitor compartment.
Keep foreign objects out of the monitor compartment. Also, avoid placing your hands in the area where it might interfere
with the monitor's operation.
8. Stop the vehicle before carrying out any operation that could interferes with your driving.
If the operation of the unit (such as opening or closing of the monitor, etc.) interferes with your driving, stop the vehicle
in a safe location before attempting operation.
9. Temperature
Be sure the temperature inside the vehicle is beween +60℃ (+140℉) and -10℃ (+14℉) before turining your unit on.
10. Maintenance
If you have problems, do not attempt to repair the unit yourself. Return it to your purchasing dealer.
3 Manual102-40214
2004-02-17
Check point before operating.
1.Turning On or Off
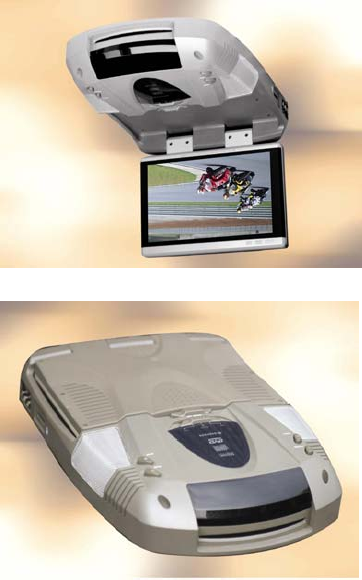
1. Pushing the OPEN switch forward will release the TFT-LCD monitor and it will drop down slightly.
Pull the monitor downward until a comfortable viewing angle is reached.
The internal friction will hold the screen in position while the system is in use.
2. Pressing the POWER button on the unit or the remote control will turn the system ON or OFF alternately.
When in use, the internal backlighting will illuminate the controls.
3. After the unit has been turned on and is displayed in a picture, adjust the viewing angle
by pivoting the screen to optimize the picture quality.
4. Remember to turn the unit off and pivot the LCD to the locked position when not in use.
2.Dome Lights Operation
1.The lights are controlled by a three position slide switch.
2. Sliding the switch to the ON position will turn the lights on.
3. The OFF position will prevent the lights from turning on at all times,
4. The AUTO position will allow the lights to turn on and off with the vehicle's interior lighting.
Note : Refer to the Installation Manual for the wire connections.
Do not leave the vehicle unattended with the dome light switch in the ON position,
as this could result in a discharged battery.
3.Connect Additional AV Input
1. The audio/video inputs may be connected to Audio/Video device directly or through a Junction Box
which can connect to a Video cassette Recorder(VCR), video game system, or other audio/video devices.
2. AUX Video Input ( Additional)
The unit will accept an audio/video input through the RCA jacks located on the side of the unit.
The audio/video device could be a video game system, Video Cassete Recorder (VCR), or other input device.
4 Manual102-40214
2004-02-17
4.Regionl Code
1.Both the DVD player and disc are coded by region.
2.These regional code number must match in order for the disc to play.
3.This unit's code number is region number 1. Other regional codes cannot be played in this unit.
If not, the unit will display "Invalid Region"
4.Types of Discs your DVD will play
DVD discs - DVDs discs which contain video.
Audio discs - Audio CDs contains musical or sound content only.
MP3 discs - A disc that contains audio files(for example, a CD-R with downloaded MP3 files).
VCD discs - VCD discs which contain video.
5.FM Transmitter Mode (Optional)
1.If this unit has FM Transmitter function, please adjust the FM frequency to hear.
2.For details, please refer to page XXXX.
5 Manual102-40214
2004-02-17
General Features
1.Slot Mechanism type DVD Deck
2.Flip Down type 10.2 Inch TFT LCD Monitor (Wide Screen)
3.Full Function Remote Contol
4.FM Transmitter with remote control and OSD (Optional)
5.Infrared Transmitter for IR Wireless Headphones
6.Two (2) Audio/Video Inputs / One (1) Audio/Video Output
7.Remote Sensor
8.Dome Lights with Switch ( ON/OFF/AUTO)
9.FM Modulater Jack for connection
10.OSD for Control of DVD and Monitor Functions
11.TV Tuner (Optional)
12.FM Modulator (Optional)
6 Manual102-40214
2004-02-17
Identifications of controls
Main Unit
Picture
1. DVD disc insert slot.
2. Play Button.(In emergeny mode, Direction Left)
3. Stop Button.(In emergency mode, Direction Right and Emergency Start)
4. Infrared Transmitter and Sensor
- Used to transmit audio to wireless headphones.
5.Eject Button. (In emergency mode, Enter Button)
6. Power Button
7.F.SKIP Button (In emergency mode, Direction UP)
8.R.SKIPButton (In emergency mode, Direction DOWN)
9. Dome Lights - provide additional Interior illumination.
10. Three position Dome Light Switch.
Auto-The dome lights will turn on automatically in this position.
Off-The dome lights will not turn on in this position.
On-Turns on the dome lights.
11. OPEN Switch -Moves in direction of the arrow to release the drop down screen.
12. Flip Down LCD Panel.
13. Auxiliary A Input.
14. Auxiliary B Input.
15. Memory Card Slot
16. Side Remote Sensor Eye
- Allows the remote control to operate and control other accessories
in the system.
1 Manual102-40214
2004-02-17
Remote Controller
Picture
1. POWER ON/OFF BUTTON
2. Insert/ Eject Button
Monitor Part
3.Dimmer Button
4.Function Button
5.Set Up Button
6.Picture Button
7.Monitor Mode Button
8.Monitor Menu Button
DVD part
9. NUMBER Buttons
10.FM Transmitter Button
11.Go To Button /Memory Card
12.Repeat Button
13.Repeat A-B Button
14.Return Button
15.Clear Button
16.Sub Title Button
17.Audio Button
18.Angle Button
19.Program Button
20. CHANNEL Up/Down Buttons
21.Input Select Button
22.channel Search Button
23.Volume Control Button
24. MENU Buttojn / PBC
25. Top MENU Buttojn
26. Direction Key Button 2 Manual102-40214
2004-02-17
(UP/DOWN or LEFT/RIGHT Buttons)
27. ENTER Key Button
28. SETUP Button
29. DISPLAY Button
30.Mute Button
31. STOP Button
32. PAUSE Button
33. PLAY Button
34. SEARCH Buttons ( FF, FR)
35. SKIP Buttons (R.SKIP/ F.SKIP)
36. SLOW Button
37. STEP Button
38. ZOOM Button
Remote Controller
BATTERY INSTALLATION
Before attempting to operate your Remote Controller. Install the batteries as described below.
1)Turn the Remote Controller face down. and remove battery cover by lifting tab.
2) Install two "AAA" batteries. Make sure that proper polarity (+ or -) is observed.
3) Align the cover tabs with the remote controller and press down until the cover clicks.
If the remote controller doesn't operate properly:
1.Check the polarity + /- of the batteries(Dry-Cell)
2.Check if the batteries are drained.
3.Check if remote sensor is blocked by obstacles.
4.Check if there is any fluorescent lighting nearby.
3 Manual102-40214
2004-02-17
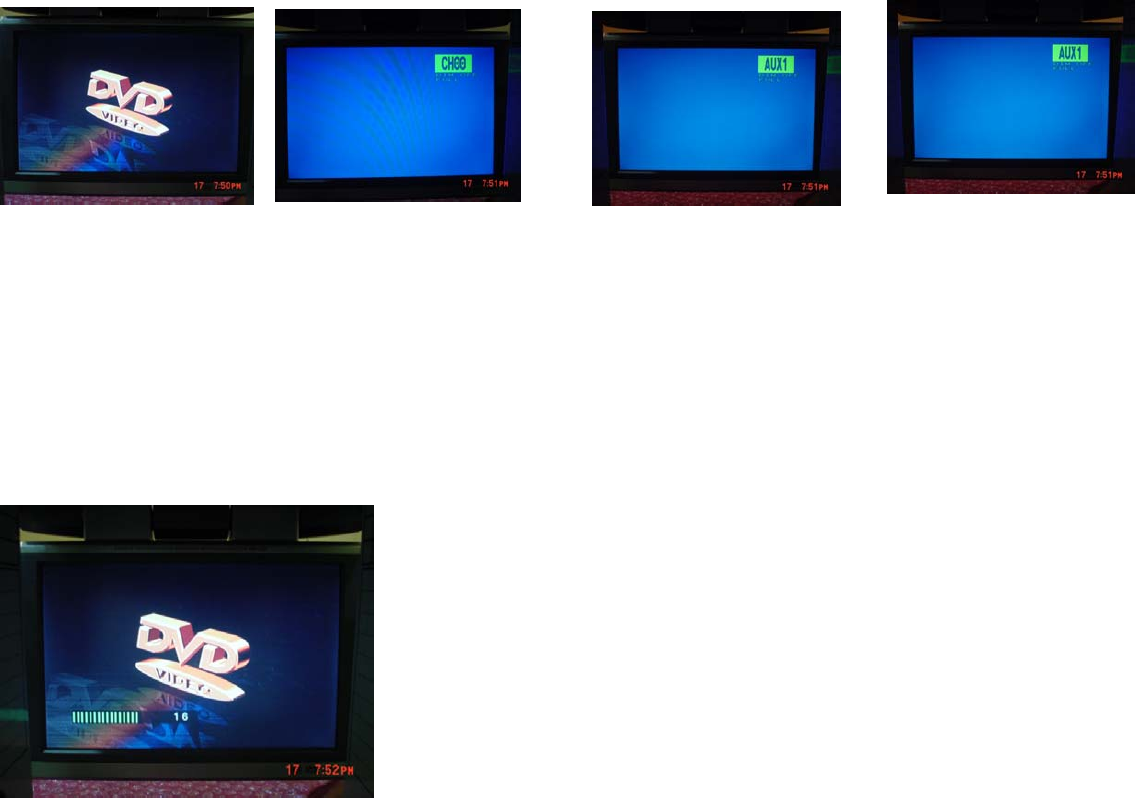
Changing A/V Source Signal
1.Press INPUT SEL button
2.The desired A/V source signal will be changed as follows ;
DVD -> TV ( Optional) -> AUX 1 -> AUX 2 -> DVD
DVD TV AUX1 AUX2
Watching TV ( Optional )
1.Press INPUT SEL button
2.Select the desired item (TV) pressing INPUT SEL button. TV screen appears.
3.Select TV Channel using CH UP(+) / DOWN (-) button.
Adjusting Volume Control
1.Press VOL UP (+) / DOWN (-) button.
2.Adjust Volume using UP (+) / DOWN (-) button.
Note : DVD Only mode
4 Manual102-40214

2004-02-17
Playing Disc
Before Load and Play
- Before you load a disc, make sure that in it compatible with the player.
NOTE : the following Discs CANNOT be used with this player :
3.5 Inchs Disc, CD-ROM, CD-I, DVD-ROM
Before using Remote Controller
- If ⓛ icon appears, it indicates an invalid command . Please wait.
Loading and Play
1.Press the POWER button. the unit will turn on and display the source selected when the disc was loaded.
2.Insert the disc(Label Up) into the disc compartment.
When the disc is half way in, it will be automatically pulled in and play will begin.
Stopping Play
- During Play, press the STOP button
Removing Disc
- Press INS/EJECT button
Step Motion Play (Except CD / MP3)
- During play, press the STEP button
· Each time the button pressed, the new frame will appear.
· Press the STEP button continously, the step motion play will be done.
· To resume normal play, Press the PLAY button.
Slow Motion Play (Except CD / MP3/ VCD)
· During play, press the F.SLOW button, the play will be done forward slowly1/8X, 1/4X, and 1/2X of normal.
· During play, press the R.SLOW button, the play will be done reverse slowly1/8X, 1/4X, and 1/2X of normal.
Note
· After playing the last of track, the unit will be in STOP mode.
1 Manual102-40214

2004-02-17
Skipping Tracks
1.DVD Mode
· When playing a DVD, if you press the F.SKIP (▶▶I) button, it moves to next chapter.
- In Last chapter, it does not move.
· If you press the R.SKIP ( I◀◀) button, it moves to the previous chapter.
2. VCD, CD Mode
· When playing VCD 2.0 in Menu Off mode, VCD 1.1 or CD,
- If you press the F. SKIP (▶▶I) button, it moves to next track.
- Dose not move when on the LAST TRACK.
· If you press the R. SKIP ( I◀◀) button, it moves to the beginning of the track.
- It does not move when on the first track.
3.MP3 Mode
· When playing a MP3 disc, if you press the F.SKIP (▶▶I) button, it moves to next song.
· If you press the R.SKIP ( I◀◀) button, it moves to the previous song.
- Moves to the Beginning when on the first track.
Note
· This unit can recognize Max. 8 characters of English.
· MP3 titles in other languages are not recognized.
· When making MP3 disc, please reduce label names within Max. 8 characters of English.
2 Manual102-40214

2004-02-17
Searching through a chapter or Track
During play, you can search quickly through a chapter or track using the skip function to jump
to the next selection.
1.DVD Mode
· Press the FF (▶▶) or FR (◀◀) button on the remote and press again to search
at s faster speed (2X/4X/8X/32X of normal speed.)
· To resume normal play, Press the PLAY button.
2. CD / VCD Mode
· Press the FF (▶▶) or FR (◀◀) button on the remote and press again to search
at s faster speed.
* VCD(2X/4X/8X/16Xof normal speed. * CD(2X/4X/8X of normal speed.
· To resume normal play, Press the PLAY button.
3.MP3 Mode
· Not available
Program Play
* CD-DA
1. In Stop Mode, when press PROGRAM Button, Program Menu appears.
2.Press the appropriate track number using Number Buttons and press ENTER button.
Continuously press the appropriate numbers using Number Button, press ENTER button.
3. press PLAY Button. Then Program Play will be started.
* MP3
1. In Stop Mode, when press PROGRAM Button, Program Menu appears upside MP3 Menu.
2.Select the a
pp
ro
p
riate track numbers, usin
g
the LEFT (◀) / RIGHT (▶) or UP (▲) / DOWN (▼) butt
o
Press the ENTER button.
Continuously press the appropriate numbers using Number Button, press ENTER button.
3.Press STOP button and press PLAY Button. Then Program Play will be started.
* Clear Program Play
1. In Stop Mode, when press PROGRAM Button, Program Menu appears.
2.Press Program Button once again. Then Program Play will be cleared.
3 Manual102-40214
2004-02-17
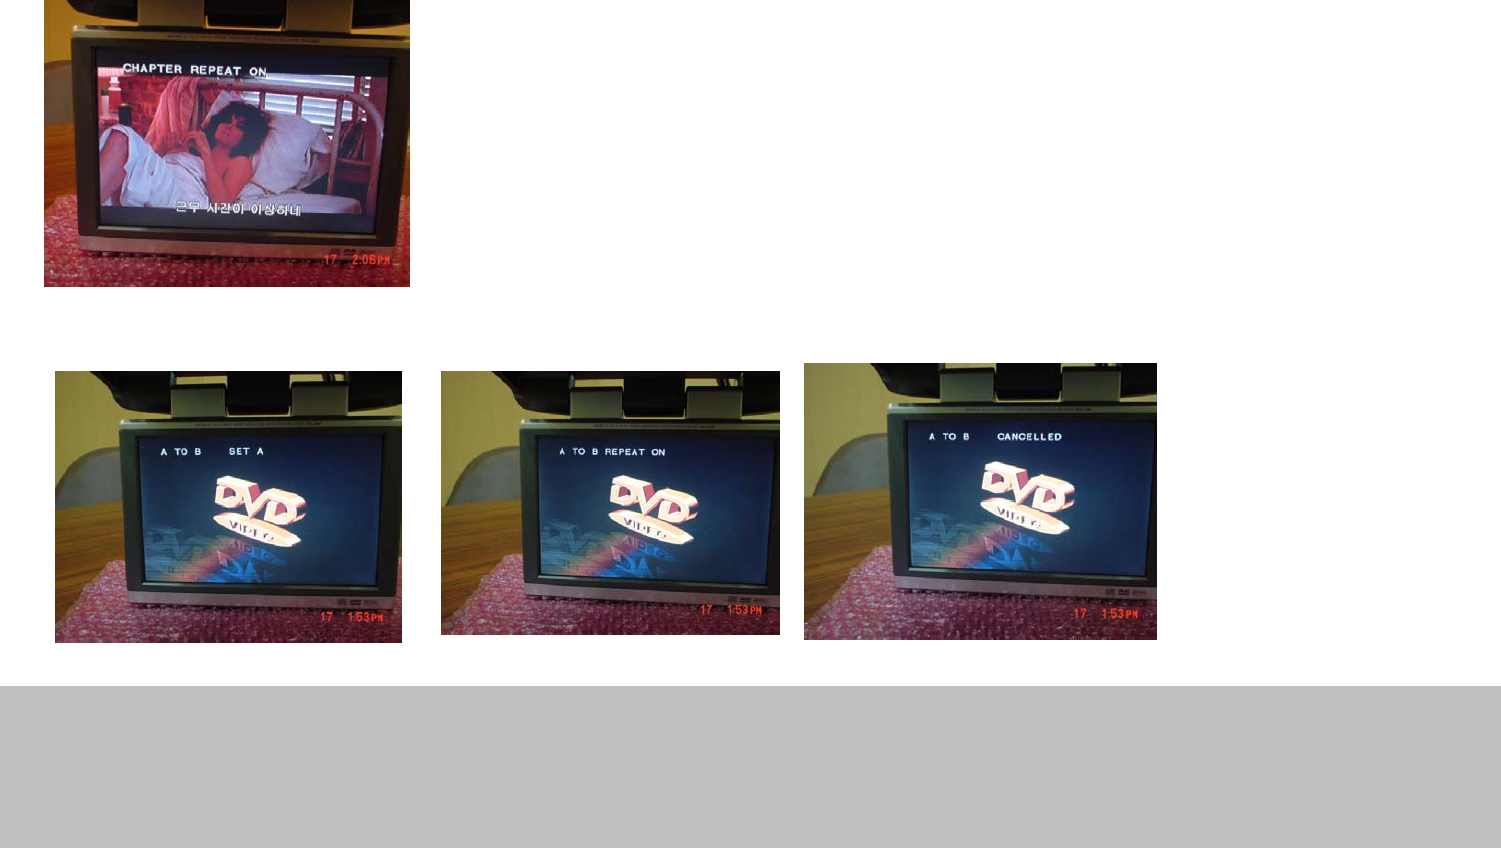
Repeat Play
Repeat the current track, chapter, title, or a chosen section (A-B).
When playing a DVD
1. Press the REPEAT button on the remote. Repeat screen appears.
2. Select Chapter Repeat On, Title Repeat On, Repeat Off
pressing REPEAT button.
3. To return to normal play, select Repeat Off pressing REPEAT button again.
· A-B Repeat
- Press REPEAT A-B button at the point where you want the repeat play to start(A).
- Press REPEAT A-B button at the point where you want the repeat play to stop(B).
Chapter Repeat On - A chosen section ( A-B) will be repeated.
- To return to normal play, press REPEAT A-B button again, to select off
Repeat A-B (A) Repeat A-B (B) Repeat A-B Cancel
NOTE
· DVD repeats play by chapter or title, CD and VCD repeat play by disc or track.
· Depending on the disc, the Repeat function may not work.
· If the title or track is completed before marking the end(B), the end of title or track becoms B
automatically.
· When in VCD 2.0 model(MENU ON mode), this function does not work.
4 Manual102-40214
2004-02-17
Direct Play
DVD Mode
- Press the GOTO button, the Direct Play screen appears.
- Select Title /Chapter/Time pressing GOTO Button ,
enter the numbers of Title/Chapter/Time which you want.
- Press ENTER button. PLAY begins at selected Time/Title/Chapter.
VCD Mode
- When press the GOTO button, GoTo screen appears.
- Enter the numbers of Time which you want. Press ENTER button
- Then PLAY begins at selected Track.
MP3 Mode
· During play, MP3 screen appears.
· Select the numbers of Track which you want using the LEFT (◀) / RIGHT (▶) or
UP (▲) / DOWN (▼) buttons.
· Press ENTER button.
. Continuously press the appropriate numbers using Number Button, press ENTER button.
Zoom Play (Using the Zoom Functions)
DVD/VCD Mode
1.During play or pause mode, press the ZOOM button on the remote.
2.When press the ZOOM button first time, ZOOM 1.5x appears on the left top of Monitor.
3.Press the ZOOM button on the remote again, ZOOM 2x and ZOOM 3x appears on the left top of Monitor.
4 To resume normal play, Press the ZOOM button. ZOOM Off appears on the left top of Monitor.
5 Manual102-40214

2004-02-17
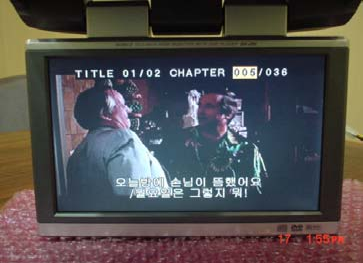
Using the Display Function
When Playing a DVD
1.During play, press the Display button on the remote.
- Current title, chapter number and elapsed time will be displayed.
Title, Chapter & Running Time -> Title Remain -> Chapter Elapsed -> Chapter Remain
- To make the screen disappear, press the DISPLAY button till the screen will show None.
When Playing a VCD
1.During play, press the DISPLAY button on the remote.
- Current elapsed, remain time will be displayed.
Elapsed -> Remain -> Off
- To make the screen disappear, press the DISPLAY button till the screen will show OFF.
When Playing a CD
1.During play, press the DISPLAY button on the remote.
- Current elapsed, remain, total elapsed and total remain time will be displayed pressing DISPLAY button.
elapsed -> remain -> total elapsed -> total remain -> off
Note
What is a chapter?
Each title on a DVD is usually divided into chapters
(similar to tracks on an audio CD).
What is a Title?
A DVD may contain several different titles. For example,
if a disc contains four different movies, each might be considered a title.
Using the Subtitle Function
When Playing a DVD
1.During play, press the SUBTITLE button on the remote, the Sub Title screen appears.
2 Select the desired language using the SUBTITLE button again.
6 Manual102-40214

2004-02-17
Using the Audio Function
When Playing a DVD
1.During play, press the AUDIO button on the remote, the AUDIO screen appears.
2.Select the desired Audio type using the AUDIO button again.
Note
If the selected audio function does not work with this unit, please select the other
audio function.
Using the Menu Function
When Playing DVD / VCD
1.During play, press the TOP MENU or MENU button on the remote.
- Accoting to disc, TOP MENU or MENU button will work.
2.Select the desired item in Menu using the LEFT (◀) / RIGHT (▶) or UP (▲) / DOWN (▼) buttons.
3. Press enter button Then PLAY begins
7 Manual102-40214
2004-02-17
Set up
Using the Setup Display Function
Using the setup function, you can do the initial setup, adjust the picture and sound quality,
and set the various outputs.
You can also set a language for the subtitles and limit play back by children.
Note
● You can display the setup display only when the player is in stop mode.
● Depending on the disc.
To cancel Using the Setup Display
1.Press the SET UP button on the remote.
2.Press the ENTER button after moving the cursor to EXIT menu in Screen.
To Move to the other Menu
Using the Direction Button, move to the desired items or list in Main menu or sub-menu.
Using the Setup Display
1.With the unit Stop mode, press the SETUP
button on the remote,
the SETUP menu appears.
2.Using the Direction buttons, select
AUDIO
VIDEO
LANG (Language)
LOCK (Locking)
EXIT in Main Menu
3.To return to the previous menu ,
using LEFT (◀) / RIGHT (▶) or UP (▲) / DOWN (▼) buttons.
Set up screen
8 Manual102-40214
2004-02-17
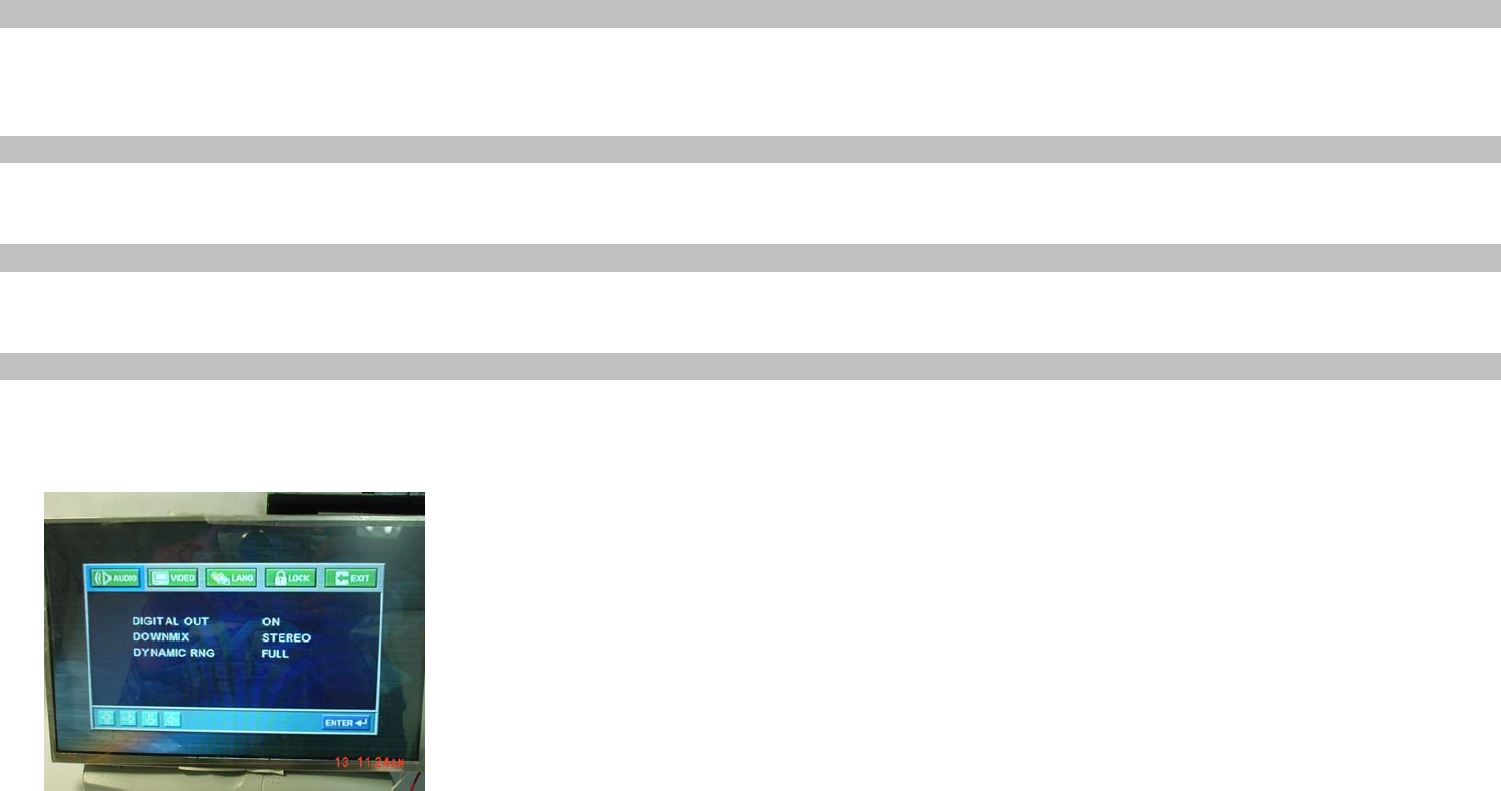
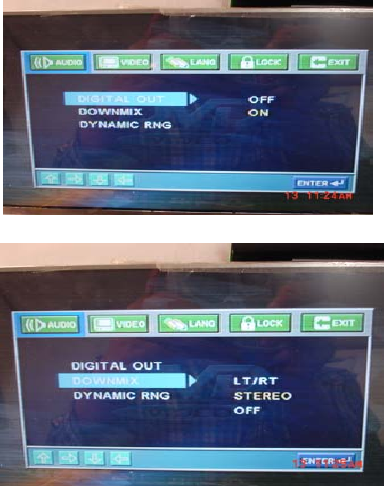
Setting Up the Audio Options
1.Press the SETUP button on the remote.
2.Select the AUDIO in Main Menu using the LEFT (◀) / RIGHT (▶) buttons.
3.Select the desired item in sub-menu using the UP(▲) / DOWN (▼) buttons.
Then the desired item's color will be changed.
1)Digital Output
1.OFF
2.ON : Converts to Dolby Digital Bitstream(5.1CH).
Audio Menu / Digital out Select ON when using the Digital, Audio Output.
Note: Be sure to select the correct Digital Output or audio will be not heard.
2)DOWN MIX
1.LT/RT : Left / Right Speaker only.
2.STEREO :
3.OFF :
3)DYNAMIC RNG
1.FULL:
2.7/8 ~ 1/8 :
3.OFF :
Audio Menu / Down Mix
4.Move to lists in sub-menu using the RIGHT (▶) button. Select the desired item in list using ENTER
button.
9 Manual102-40214

2004-02-17
Setting Up the Video Options
Depending on the type of television you have, you may want to adjust the screen setting
1.Press the SETUP button on the remote.
2.Select the VIDEO in Main Menu using the LEFT (◀) / RIGHT (▶) buttons.
1)OSD LANG : Select the desired Language in Screen
2) DISPLAY MODE :
16:9 WIDE :
You can view the full 16:9 picture on your wide screen TV
4:3 PAN & SCAN :
Select this for converting size TVs when you want to see the central portion of 16:9 screen
(Extreme left and right side of movie picture will be cut off.)
4:3 LETTER BOX :
Select when you want to see the total 16:9 ratio screen DVD supplies,
even though you have a TV with 4:3 ratio screen.
3)NTSC / PAL
NTSC
PAL
AUTO : Depending on the actual DVD Video discs, select AUTO (NTSC or PAL)
4)SCREEN SAVER
ON
OFF
3.Move to the list in sub-menu using the RIGHT (▶) button.
Select the desired item in list using ENTER button. Then the color of
the item will be changed.
● Depending on the DVD, 4:3 LETTER BOX may be selected automatically
instead of 4:3 PAN & SCAN and vice versa.
Video Menu / TV Type
10 Manual102-40214
2004-02-17
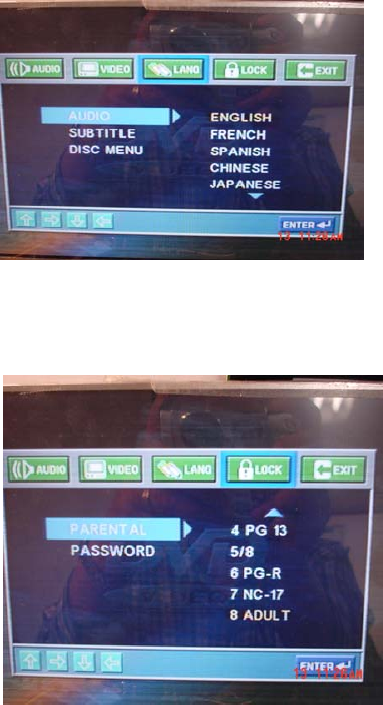
Setting Up the Language Options
1.Press the SETUP button on the remote.
2.Select the LANG in Main menu using the LEFT (◀) / RIGHT (▶) buttons.
3.Select the desired item in sub-menu using the UP(▲) / DOWN (▼) buttons.
1) Audio: Setup of the Audio Language
Use the Audio preference menu to select the soundtrack language.
2)Subtitle: Setup of the Subtitle Language
Use the Subtitle preference menu to select the language the disc's subtitles are to be displayed in.
3)Disc : Setup of the Menu Language
Use the Menu preference menu to select the language you want a DVD's disc menu to be displayed
NOTE
lf the selected language is not recorded on the disc, the original pre-recorded language is selected.
Setting Up the Locking Options
1.Pushing the SETUP button on the remote.
2.Select the LOCK in Main menu using
the LEFT (◀) / RIGHT (▶) buttons.
3.Select the desired item in sub-menu using the UP(▲) / DOWN (▼)
buttons.
1) Parental: Setup of the Parental Level
Allows users to set the level necessary to prevent children from
viewing unsuitable movies
2) Password
4.Move to the list in sub-menu using the RIGHT (▶) button.
Select the desired item in list using ENTER button. Then the color of
the item will be changed.
11 Manual102-40214
2004-02-17
Controlling Monitor Function
Menu Mode
1.Press the M.MENU button on the remote, the PICTURE screen appears.
2.Select the desired items in Main Menu using the LEFT (◀) / RIGHT (▶) buttons.
Picture -> Function -> Set up -> FM -> Exit
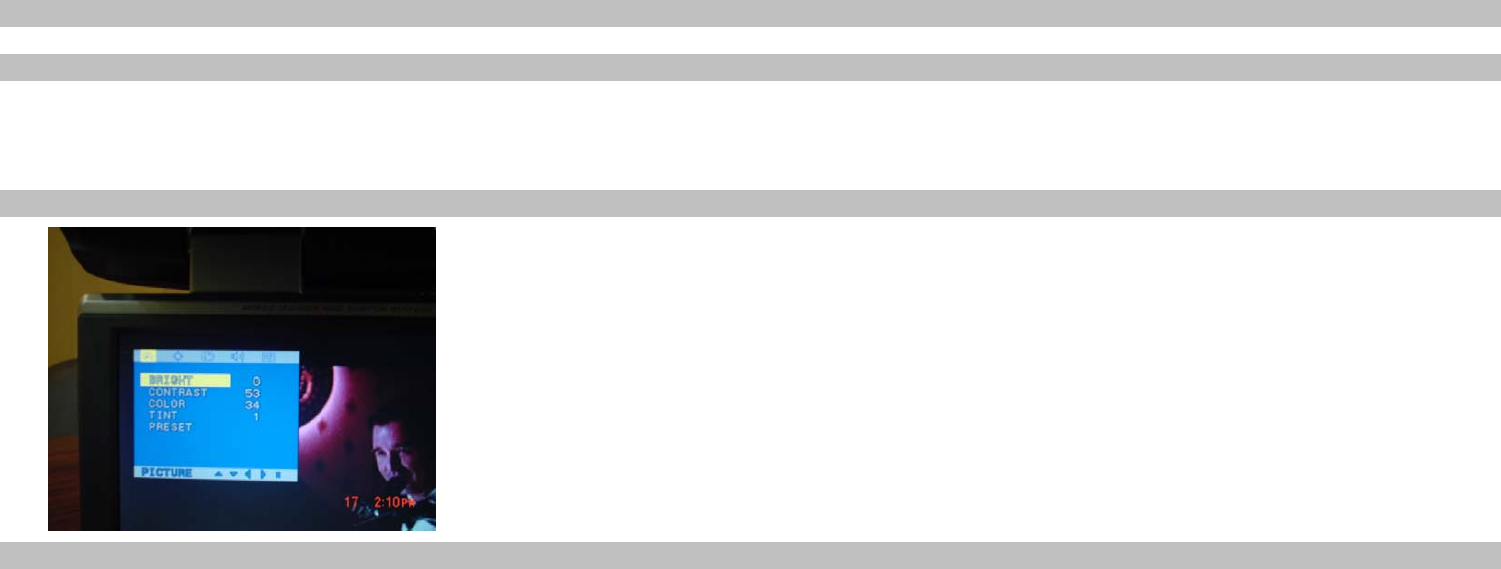
Picture Mode
1.Press the PIC button on the remote, the PICTURE screen appears.
2.Select the desired items in sub-menu using the the UP(▲) / DOWN (▼) buttons.
Bright -> Contrast -> Color -> Tint -> Preset
3. Adjust the level of picture using the the UP(▲) / DOWN (▼) buttons.
after moving right side of sub-menu using the LEFT (◀) / RIGHT (▶) or ENTER button.
4.To resume normal play , moving to EXIT menu using the UP(▲) or
the LEFT (◀) / RIGHT (▶)buttons, press ENTER button.
Function Mode (Screen size / Dimmer)
1.Press the FUNC button on the remote, the Function screen appears.
2.Select the desired items in sub-menu using the the UP(▲) / DOWN (▼) buttons.
Wide Mode -> Dimmer
3. Adjust the level of picture using the the UP(▲) / DOWN (▼) buttons.
after moving right side of sub-menu using the LEFT (◀) / RIGHT (▶) or ENTER button.
4.To resume normal play , moving to EXIT menu using the UP(▲) or
the LEFT (◀) / RIGHT (▶)buttons, press ENTER button.
Note:
Wide Mode :
Full : View with full (16:9) size screen mode inspite of Video signal's type.
Normal : View with 4:3 size screen mode inspite of Video signal's type.
Dimmer Mode
On : 50% from the present Brightness level
Off : Present Brightness
12 Manual102-40214
2004-02-17
Set-up Mode
1.Press the SET UP button on the remote, the Set up screen appears.
2.Select the desired items in sub-menu using the the UP(▲) / DOWN (▼) buttons.
Video Mode
3. Adjust the level of picture using the the UP(▲) / DOWN (▼) buttons.
after moving right side of sub-menu using the LEFT (◀) / RIGHT (▶) or ENTER button.
4.To resume normal play , moving to EXIT menu using the UP(▲) or
the LEFT (◀) / RIGHT (▶)buttons, press ENTER button.
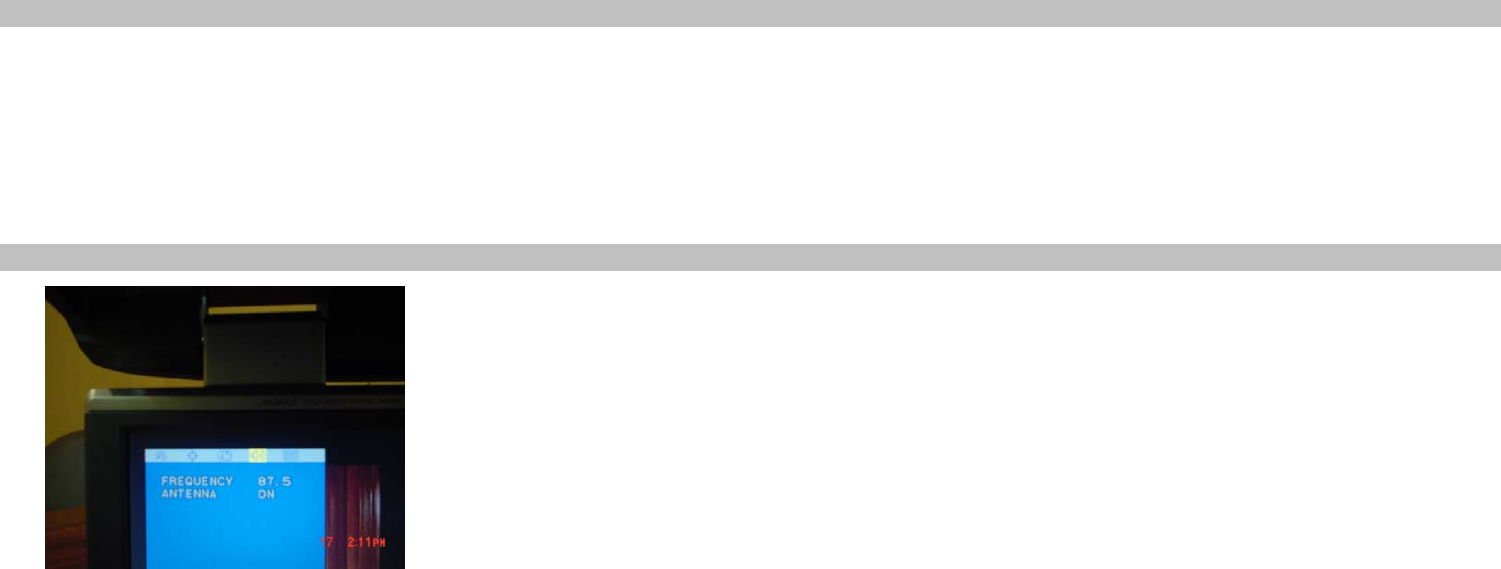
FM Mode ( FM Transmitter / FM Modulator)
1.Press the FM button on the remote, the FM screen appears.
2.Select the desired item in sub-menu using the the UP(▲) / DOWN (▼) buttons.
3. Adjust the level of picture using the the UP(▲) / DOWN (▼) buttons.
after moving right side of sub-menu using the LEFT (◀) / RIGHT (▶) or ENTER button.
4.To resume normal play , moving to EXIT menu using the UP(▲) or
the LEFT (◀) / RIGHT (▶)buttons, press ENTER button.
Note :
Note : Frequency ( of FM Transmitter ) : 88.1 Mhz to 89.5 Mhz ( 8 Channels)
Antenna ( of Modualtor) :
On : The wire transmission ( FM Modualtor : Optional)
Off : The wireless transmission ( FM Transmitter )
13 Manual102-40214
2004-02-17
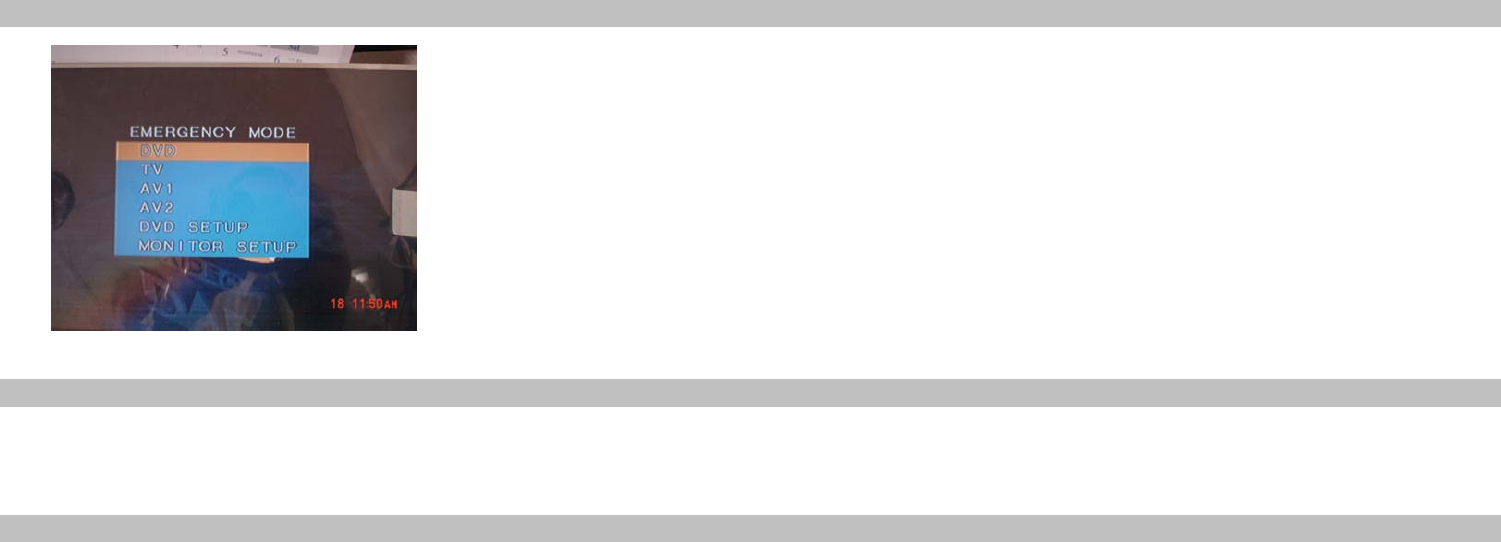
Emergency Mode
1.Press STOP button 3~4 seconds. The Emergency Mode screen appears.
2.Select the desired mode using the direction buttons on Main Unit
Note - Direction Buttons
CH-PREV : Down
CH+NEXT : Up
EJECT : Enter
PLAY : Left
STOP : Right
Note :
1.This mode is useful in case the customer lost the Remote Controller.
2.Essential function will be done by Emergency Mode.
DVD Mode ( CD/MP3 Mode)
Note :
CH-PREV : Searching Chapter ( R.SKIP)
CH+NEXT : Searching Chapter ( F.SKIP)
TV Mode
Note :
CH-PREV : Down
CH+NEXT : Up
14 Manual102-40214
2004-02-17
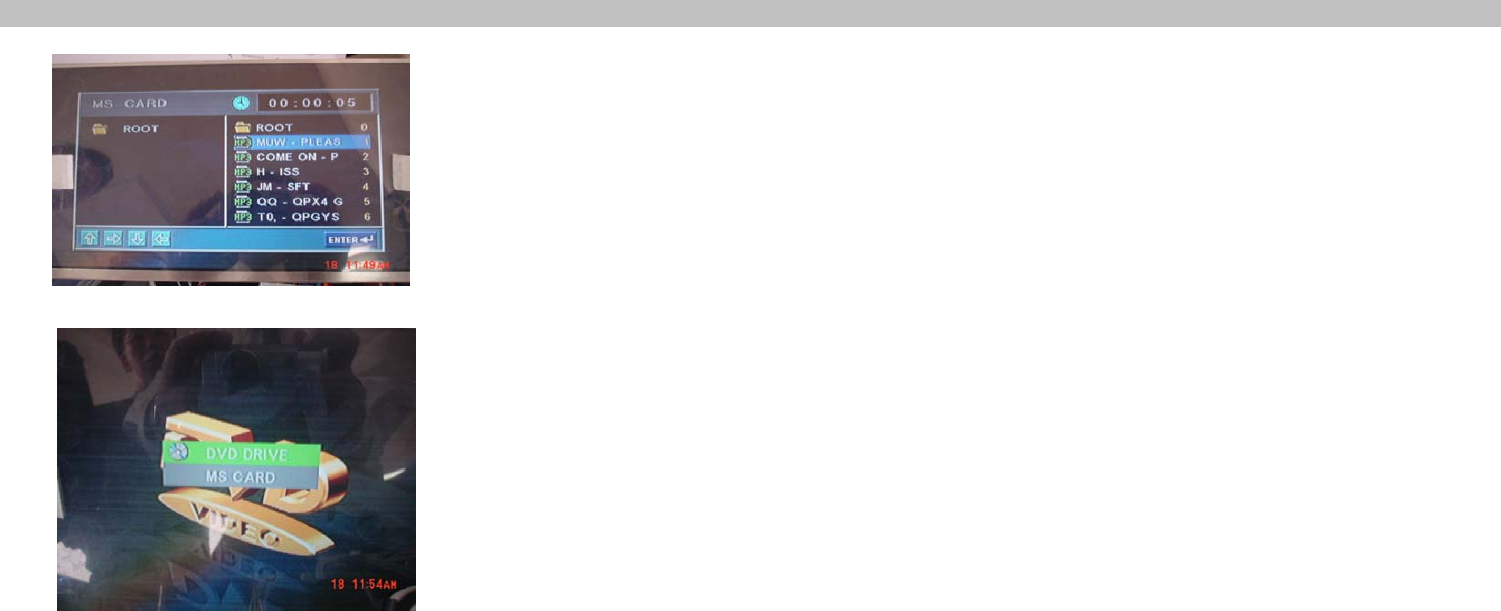
Viewing Memory Card
1.Insert Memory Card to Memory Card Slot.then CARD screen appears.
2.Select the desired picture or movie using UP(▲) / DOWN (▼) or the LEFT (◀) / RIGHT (▶) buttons.
and press ENTER button.
3.To return to previous mode (DVD), press GOTO button. Then SELECT screen appears.
Select the desired mode using UP(▲) / DOWN (▼) or the LEFT (◀) / RIGHT (▶) button
and press ENTER button.
15 Manual102-40214
Acknowledging Special Precautions and the FCC Industry Canada Notice
Cautions
Modifications not expressly approved by the party responsible for compliance could void the user’s authority to operate the equipment.
FCC compliance Information
This device complies with part 15 of FCC Rules.
Operation is subject to the following two conditions:
1. This device may not cause harmful interference, and
2. This device must accept any interference received.
Including interference that may cause undesired operation.
Information to User
This equipment has been tested and found to comply with the limits for a Class B digital device, Pursuant to part 15 of the FCC Rules.
These limits are designed to provide reasonable protection against harmful interference in a residential installation.
This equipment generates, uses and can radiate radio Frequency energy and, if not installed and used in accordance with the instructions,
may cause harmful interference to radio communications.
However, there is no guarantee that interference will not occur in a particular installation. If this equipment does cause harmful
interference to radio or television reception, which can be determined by turning the equipment off and on, the user is encouraged to try
to correct the interference by one or more of the following measures:
▪ Reorient or relocate the receiving antenna.
▪ Increase the separation between the equipment and receiver
▪ Connect the equipment into an outlet on a circuit different from that to which the receiver is connected.
Consult the dealer or an experienced radio/TV technician for help.