Danby DWC282BL User Manual WINE COOLER Manuals And Guides L0712183
DANBY Wine Cooler Manual L0712183 DANBY Wine Cooler Owner's Manual, DANBY Wine Cooler installation guides
User Manual: Danby DWC282BL DWC282BL DANBY WINE COOLER - Manuals and Guides View the owners manual for your DANBY WINE COOLER #DWC282BL. Home:Kitchen Appliance Parts:Danby Parts:Danby WINE COOLER Manual
Open the PDF directly: View PDF ![]() .
.
Page Count: 7
Model.Modele.Modelo
DWC282BL
For service,contact
yournearestservicedepotor call:
1-800-26D-anby
to recommenda depotin
yourarea.
Pour0btenirieservice,c0nsultez
votresuccursaleregi0nalede
serviceoutei6phonez:
1-800-26D-anby
quivousrec0mmanderaun
centreregional.
Parasevicio,c0mmuniquesecon
su departament0deservici0smas
cercan0o llameal:
1-800-26D-anby
paraqueie recomiendenun
departament0deservicios
ensu z0na.
DELUXE 2 TEIVlPZONEWINE COOLER
The model number of your wine cooler is found on the serial
plate located on the back, top left-hand corner of the refrigerator.
All repair parts available for purchase or special order when you
visit your nearest service depot. To request service and!or the
location of the service depot nearest you, call the toll free number
listed to the left in Canada and the U.S.
When requesting service or ordering parts, always provide the
following information:
• Product Type
• Model Number
• Part Number
• Part Description
CABINET A VIN DE LUXE ADEUX TEMPleRATURES
Le numero de modele de votre refroidisseur de vin se trouve sur
la plaque d'identification qui se trouve sur le coin du haut gauche
de I'arriere du refrig6rateur.
Toutes les pieces de rechange sont disponibles immediatement
ou peuvent 6tre commandees de votre Centre de Service
regional. Pour obtenir le service et/ou le Centre de Service le
plus proche, tel6phonez le numero sans-frais indique a gauche
pour le Canada et les Etats-Unis.
Ayez les informations suivantes a la portee de la main Iors de la
commande de pieces ou service:
• Genre de produit
• Numero de modele
• Numero de piece
• Description de la piece
REFRIGERADOR PARA VINOS DELUXE CON 2
COMPARTIMIENTOS DE REFRIGERACION
INDEPENDIENTES
El nOmero del modelo de su refrigerador para vinos se encuentra
en la placa de serie ubicada en el angulo posterior superior
izquierdo del refrigerador.
Todas las piezas de repuesto se encuentran disponibles para la
compra o por pedido especial cuando Ud. visite su departamento
de servicio mas cercano. Para solicitar servicio y/o la ubicacion
del departamento de servicio mas cercano, Ilame al nQmero de
marcando gratis que aparece a la izquierda en el Canada y en
los E.U.
Cuando solicite servicio o encargue repuestos, siempre
proporcione la siguiente informacion:
• Tipo de producto
• NQmero de modelo
• NQmero del repuesto
• Descripcion del repuesto
Danby Products Limited, PO Box 1778, Ontario,Canada N1H6Z9
Danby ProductsInc., PO Box 669, Findlay,Ohio, USA 45839-0669
Printed in China (PRC)
OWNER'SMANUAL
MANUELD'UTILISATION
MANUALDELPROPIETARIO
Model.Modele.Modelo
DWC282BL
CAUTION:
Readandfollowallsafetyrulesand
operatinginstructionsbeforefirst
useofthisproduct.
PRECAUTION:
Veuillez lire attentivementles
consignes de securite et les
instructionsd'utilisationavant
I'utilisationinitialedeceproduit.
PRECAUCION:
Leay observetodaslasreglasde
seguridady las instruccionesde
operacionantes de usar este
productoporprimeravez.
DELUXE 2 TEMP ZONE WINE COOLER
Owner's Manual ....................... 1-5
•Safety Instructions
• Installation
• Operation
• Care and Maintenance
CABINET AVIN DE LUXE ADEUX TEMPI_RATURES
Manuel d'utilisation .................... 6-10
• Consignes de securit6
• Installation
• Fonctionnement
• Soins et entretien
REFRIGERADOR PARAVINOS DELUXE CON 2
COMPARTIMIENTOS DE REFRIGERACION
INDEPENDIENTES
Manual del propietario ................ 11-15
• Instrucciones de seguridad
• Instalaci6n
• Operaci6n
• Cuidado y Mantenimiento
Danby Products Limited, PO Box 1778, Ontario,Canada N1H6Z9
Danby ProductsInc., PO Box 669, Findlay,Ohio, USA 45839-0669
2821182
LIMITED PRODUCT WARRANTY
Thisqualityproductis ,warrantedto befreefrommanufacturer'sdefectsinmaterialandworkmanship,providedthattheunitis usedunderthenormaloperating
conditionsintendedbythemanufacturer.
Thiswarrantyisavailableonlyto thepersonto whomthe unitwasoriginallysoldbyDanbyorbyan authorizeddistributorof Danby,andisnon-transferable.
TERMSOFWARRANTY
Plasticparts(ie.evaporatordoor,doorrails,coversandtraysarewarrantedforthirty(30)daysonlyfrompurchasedate,withno extensionsprovided.
2 Years Duringthefirst twoyears (2),anyelectricalpartsofthis productfoundto bedefective,includinganysealedsystemunits,will be repaired
orreplaced,atwarrantor'soption,at no chargeto the ORIGINALpurchaser.Consumableparts(ie. lightbulbs)arenotwarrantedor
guaranteedforanylengthoftime.
ThirdThrough Duringthe nextthreeyears(3)any partof the sealedsystemfoundto be defective(consistingof compressor,condenser,evaporator,
Fifth Year dryerandallrelatedtubing)will bereplacedwithoutcharge. Thepurchasershallpayforall labourandreturnfreightduringthisthree
year(3)periodforrepairorreplacementof anysealedsystemcomponents.Anyunit beingdiagnosedasnon-functionaldueto sealed
systemfailureandwarrantingan exchangeduringtheexistingthree(3) yearswill be subjecttoan appropriatedepreciationoruserfee,
includinganyandallfreightchargesbeingleviedagainsttheconsumer.
ToobtainService Danbyreservesthe rightto limitboundariesof"ln HomeService"dueto the proximityof an AuthorizedServiceDepot.Any appliance
requiringserviceoutsidethetimitedboundariesof "in HomeService",it willbe thecustomer'sresponsibilityto transportthe applianceto
theclosestAuthorizedServiceDepotattheirownexpense.Contactyourdealerfromwhomyourunitwaspurchased,or contactyour
nearestauthorizedDanbyservicedepot,whereservicemust beperformedby a qualifiedservicetechnician.If serviceisperformedon
theunitsbyanyoneotherthanan authorizedservicedepot,orthe unitis usedforcommercialapplication,all obligationsof Danbyunder
thiswarrantyshallbeat an end.
The followingclauserefersto singleanddoubledoor refrigerators,suppliedwithorwithouta separatefreezersection.Nothingwithinthiswarrantyshallimplythat
Danbywill beresponsibleor liableforanyspoiIageor damageto foodorothercontentsof this appliance,whetherdueto anydefectof theappliance,or its use,
whetherproperorimproper.
EXCLUSIONS
Saveas hereinprovided,DanbyProductsLimited(Canada)or DanbyProductsInc.(U.S.A.),therearenootherwarranties,conditions,representationsor
guarantees,expressor implied,madeor intendedby DanbyProductsLimitedoritsauthorizeddistributorsanda}lotherwarranties,conditions,representationsor
guarantees,includinganywarranties,conditions,representationsor guaranteesunderanySaleof GoodsActorlikelegislationor statueis herebyexpressly
excluded.Saveashereinprovided,DanbyProductsLimited(Canada)orDanbyProductsInc.(U.S.A),shallnot beresponsiblefor anydamagesto personsor
property,includingthe unititself,howsoevercausedoranyconsequentialdamagesarisingfromthe malfunctionof the unitandbythepurchaseofthe unit,the
purchaserdoesherebyagreeto indemnifyandsaveharmlessDanbyProductsLimitedfromanyclaimfor damagesto personsor propertycausedbythe unit.
GENERALPROVISIONS
Nowarrantyorinsurancehereincontainedor setoutshallapplywhendamageorrepairiscausedbyanyof thefollowing:
1) PowerFailure.
2) Damageintransitorwhenmovingthe appliance.
3) Improperpowersupplysuchas towvoltage,defectivehousewiringor inadequatefuses.
4) Accident,alteration,abuseor misuseof theappliancesuchasinadequateair circulationinthe roomorabnormaloperatingconditions,
(extremelyhighor lowroomtemperature).
5) Useforcommercialorindustrialpurposes.
6) Fire,waterdamage,theft,war,riot, hostility,actsof Godsuchas hurricanes,floodsetc.
7) Servicecallsresultingin customereducation.
Proofof purchasedatewill berequiredforwarrantyclaims;so,pleaseretainbillsof sale. inthe eventwarrantyserviceis required,presentthisdocumentto our
AUTHORIZEDSERVICEDEPOT.
WarrantyService
With-InCanada With-inUnitedState
tnHome InHome
DanbyProductsLimited
POBox1778,5070WhitelawRoad,
Guelph,Ontario,CanadaN1H6Z9
Telephone:(519)837-0920FAX: (519)837-0449 9/O2
DanbyProductsInc.
POBox669,101BentleyCourt,
Findlay,Ohio,U.S.A.45839-0669
Telephone:(419)425-8627FAX: (419)425-8629
SAFETY INSTRUCTIONS
GROUNDING INSTRUCTIONS
This wine cooler must be grounded in the event of an electrical short circuit. Grounding reduces the risk of
electrical shock. This wine cooler is equipped with a power cord having a grounding wire with a grounding
plug. The wine cooler plug must be plugged into a properly installed and grounded electrical outlet.
WARNING IMPROPER USE OF THE GROUNDING PLUG CAN RESULT IN THE RISK OF ELECTRIC
SHOCK. Consult a qualified electrician or service person if the grounding instructions are not completely
understood.
CAUTION: Read and follow all safety rules and operating instructions before using this product.
INSTALLATION INSTRUCTIONS
Remove the exterior and interior packaging. Use a soft dry cloth to thoroughly wipe the outside of the wine
cooler. Use a wet, lukewarm cloth to wipe the inside of the wine cooler.
Air must circulate freely in front of the wine cooler. Avoid placing the wine cooler near any heat source, direct
sunlight or moisture. Direct sunlight may affect the finish of the wine cooler. Nearby heat sources will cause
higher electricity consumption.
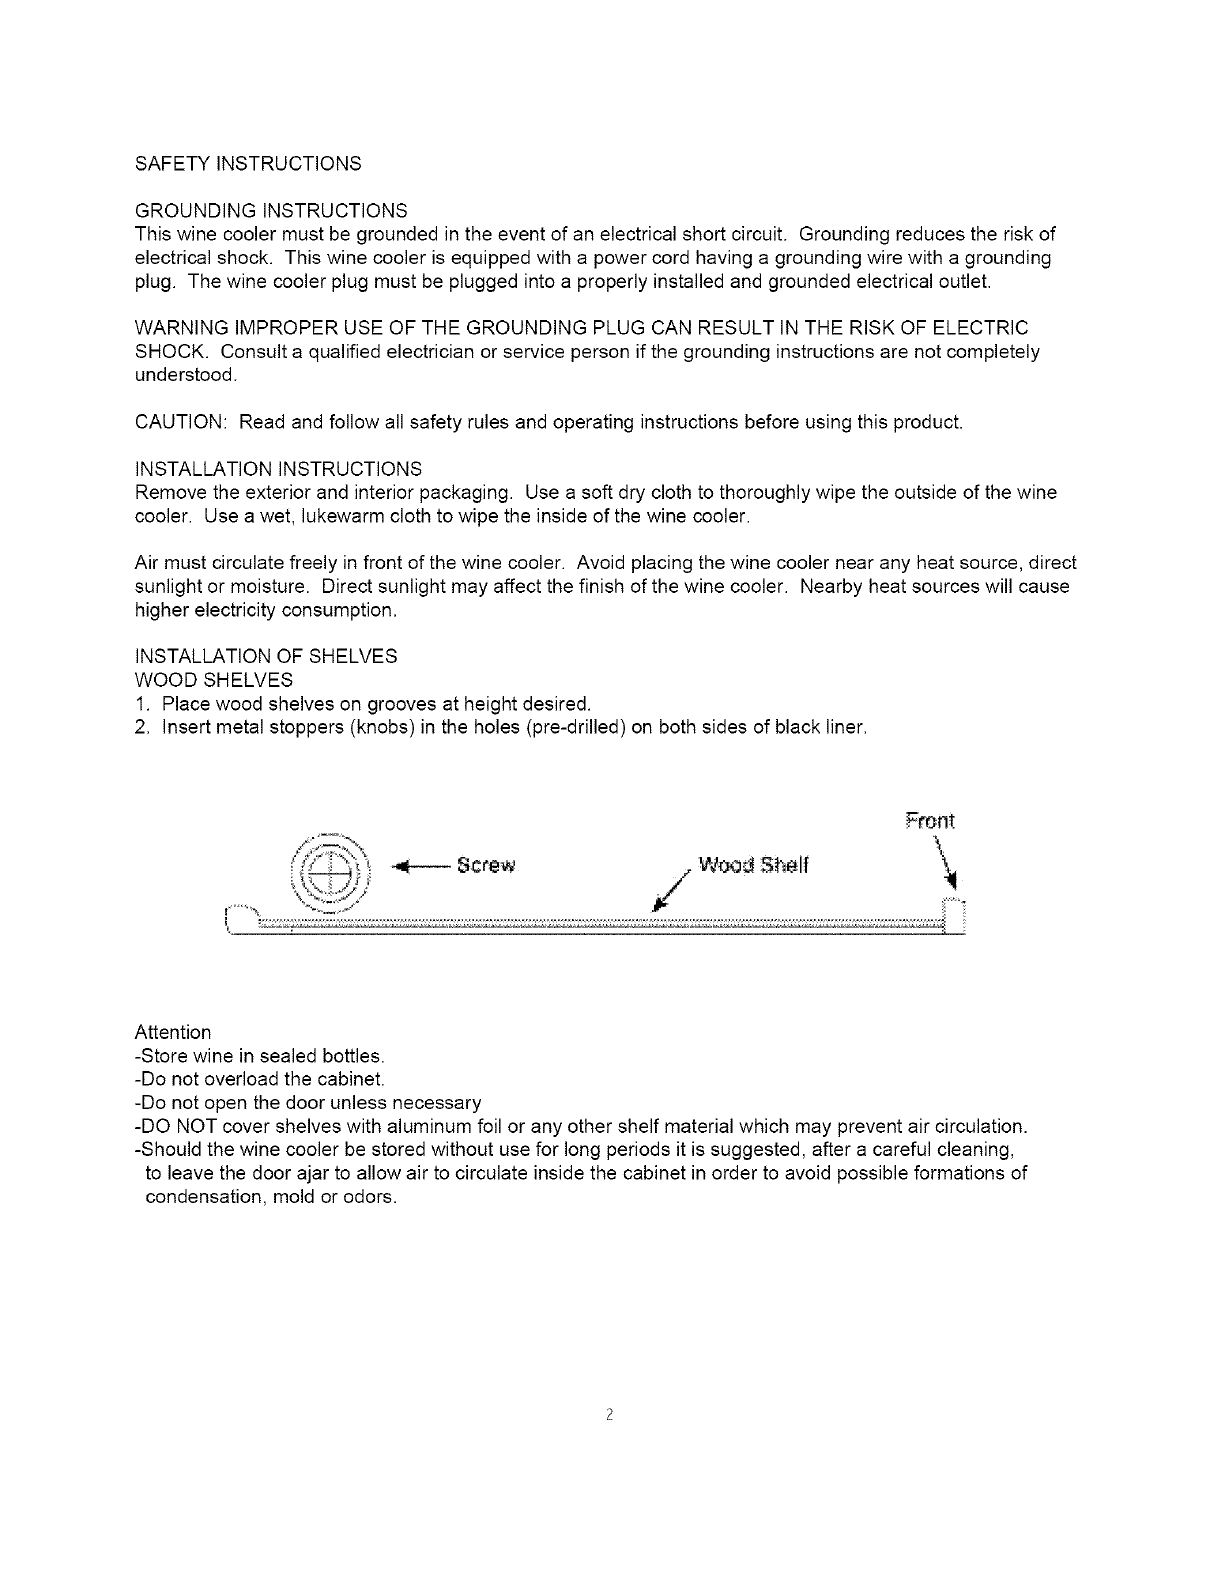
INSTALLATION OF SHELVES
WOOD SHELVES
1. Place wood shelves on grooves at height desired.
2. Insert metal stoppers (knobs) in the holes (pre-drilled) on both sides of black liner.
Attention
-Store wine in sealed bottles.
-Do not overload the cabinet.
-Do not open the door unless necessary
-DO NOT cover shelves with aluminum foil or any other shelf material which may prevent air circulation.
-Should the wine cooler be stored without use for long periods it is suggested, after a careful cleaning,
to leave the door ajar to allow air to circulate inside the cabinet in order to avoid possible formations of
condensation, mold or odors.
DOORREVERSAL
TOFACILITATEDOORREVERSAL,WERECOMMENDSOMEONEASSISTYOUDURINGTHISPROCESS.
TOOLSREQUIRED:PHILLIPSSCREWDRIVER
1. Laytheunitinit'sback.
2. Removethethree(3)screwsfromthebottomhinge.Removethebottomhinge.
NOTE:Keepthishingeinasafeplaceintheeventyoueverneedtorevertbacktoarighthanddoorswing.
3. Removethedoorfromthecabinetandcarefullysetaside.
4. Removethetwo(2)plasticscrewcoverslocatedontopofthehingecover.
5. Removethescrewsholdingthehingecovertothetophinge.
6. Removethethree(3)screwsfromthetophinge.
7. Removethetophinge.
8. Removethethree(3)plasticscrewcoversfromthetopleftsideofthecabinet.
9. Installthetophingeontheleftsideoftheunitandsecurewiththree(3)screws.
10.Installthehingecoverbackonthetophinge.
11.Installthetwo(2)plasticscrewcoversonthehingecover.
12.Installthethree(3)plasticscrewcoverstothetoprighthandsideofthecabinet.
13.Carefullyinstallthedooronthecabinet.(Insertupperdoorintotophingepin)
14.Usingthelefthandbottomhingesuppliedwithyourunit,insertthehingepinintothebottomofthedoor.
(Alignthehingeholeswiththeholesinthecabinet,andsecuretocabinetwiththree(3)screws.
15.Checkalignmentofdooranddoorsealbeforetighteningscrews.
16.Tightenallhingescrews.
17.Placeunitintheuprightposition.
NOTE: Allow the unit to stand upright for Ihour before putting the unit into operation.
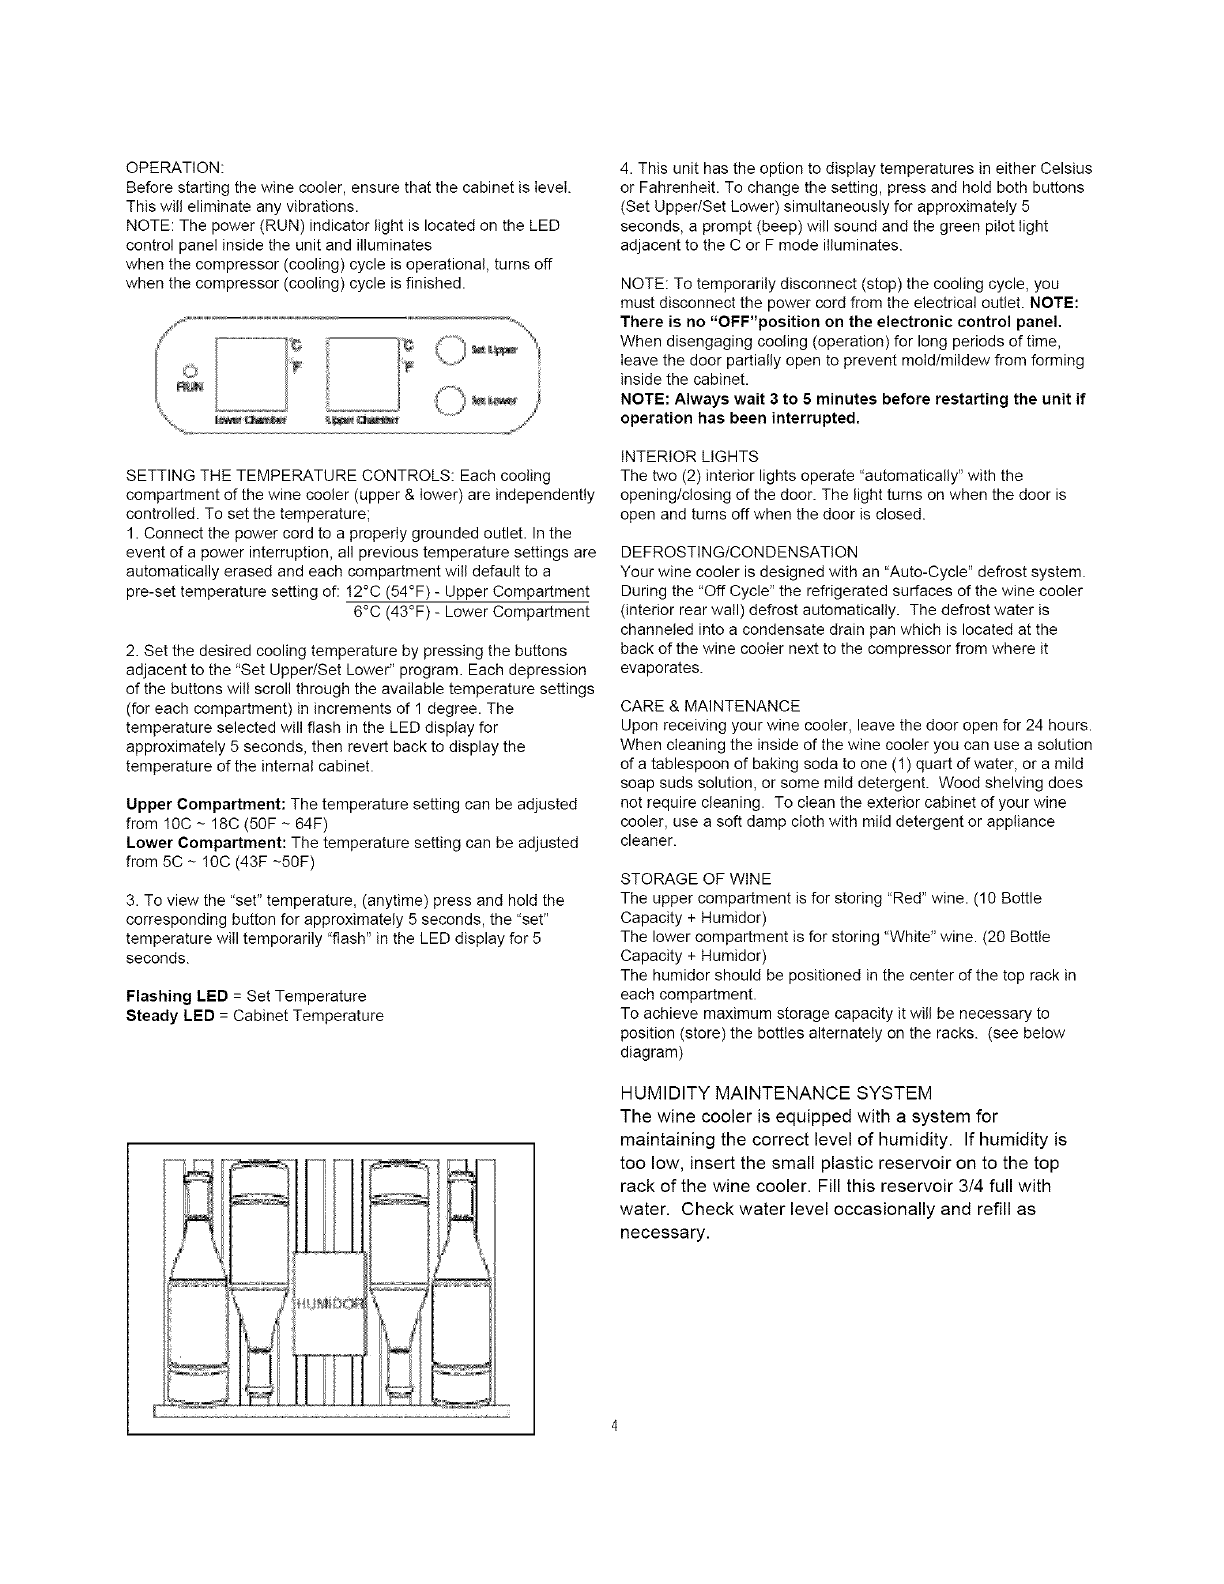
OPERATION:
Before starting the wine cooler, ensure that the cabinet is level.
This will eliminate any vibrations.
NOTE: The power (RUN) indicator light is located on the LED
control panel inside the unit and illuminates
when the compressor (cooling) cycle is operational, turns off
when the compressor (cooling) cycle is finished.
/++ °...............1:;
++++ "++
z
SETTING THE TEMPERATURE CONTROLS: Each cooling
compartment of the wine cooler (upper & lower) are independently
controlled. To set the temperature;
1. Connect the power cord to a properly grounded outlet. In the
event of a power interruption, all previous temperature settings are
automatically erased and each compartment will default to a
pre-set temperature setting of: !2°C (54°F) - Upper Compartment
6°C (43°F)- Lower Compartment
2. Set the desired cooling temperature by pressing the buttons
adjacent to the "Set Upper/Set Lower" program. Each depression
of the buttons will scroll through the available temperature settings
(for each compartment) in increments of 1 degree. The
temperature selected will flash in the LED display for
approximately 5 seconds, then revert back to display the
temperature of the internal cabinet.
Upper Compartment: The temperature setting can be adjusted
from 10C - 18C (50F - 64F)
Lower Compartment: The temperature setting can be adjusted
from 5C + 10C (43F -50F)
3. To view the "set" temperature, (anytime) press and hold the
corresponding button for approximately 5 seconds, the "set"
temperature will temporarily "flash" in the LED display for 5
seconds.
Flashing LED = Set Temperature
Steady LED = Cabinet Temperature
4. This unit has the option to display temperatures in either Celsius
or Fahrenheit. To change the setting, press and hold both buttons
(Set Upper/Set Lower) simultaneously for approximately 5
seconds, a prompt (beep) will sound and the green pilot light
adjacent to the C or F mode illuminates.
NOTE: To temporarily disconnect (stop) the cooling cycle, you
must disconnect the power cord from the electrical outlet. NOTE:
There is no "OFF'position on the electronic control panel.
When disengaging cooling (operation) for long periods of time,
Ieave the door partially open to prevent meId/mildew from forming
inside the cabinet.
NOTE: Always wait 3 to 5 minutes before restarting the unit if
operation has been interrupted.
INTERIOR LIGHTS
The two (2) interior lights operate "automatically" with the
openinglclosing of the door. The light turns on when the door is
open and turns off when the door is closed.
DEFROSTING/CONDENSATION
Your wine cooler is designed with an "Auto-Cycle" defrost system.
During the "Off Cycle" the refrigerated surfaces of the wine cooler
(interior rear wall) defrost automatically. The defrost water is
channeled into a condensate drain pan which is located at the
back of the wine cooler next to the compressor from where it
evaporates.
CARE & MAINTENANCE
Upon receiving your wine cooler, leave the door open for 24 hours.
When cleaning the inside of the wine cooler you can use a solution
of a tablespoon of baking soda to one (1) quart of water, or a mild
soap suds solution, or some mild detergent. Wood shelving does
not require cleaning. To clean the exterior cabinet of your wine
cooler, use a soft damp cloth with mild detergent or appliance
cleaner.
STORAGE OF WINE
The upper compartment is for storing "Red" wine. (10 Bottle
Capacity + Humidor)
The lower compartment is for storing "White" wine. (20 Bottle
Capacity + Humidor)
The humidor should be positioned in the center of the top rack in
each compartment.
To achieve maximum storage capacity it will be necessary to
position (store) the bottles alternately on the racks. (see below
diagram)
HUMIDITY MAINTENANCE SYSTEM
The wine cooler is equipped with a system for
maintaining the correct level of humidity. If humidity is
too low, insert the small plastic reservoir on to the top
rack of the wine cooler. Fill this reservoir 3/4 full with
water. Check water level occasionally and refill as
necessary.
STORING YOUR WINE COOLER
If you intend not to use the wine cooler for short periods of time, leave the control panel at its usual settings.
During longer periods of absences:
1. Remove bottles from wine cooler.
2. Unplug wine cooler from the electrical outlet.
3. Thoroughly clean the inside and outside of the wine cooler.
4. Leave the door open to avoid possible formations of condensation, mold or odors.
WHATTO DO REGARDING POWER FAILURE
Most power failures are corrected within a short period of time. An hour or two loss of power will not affect
your wine cooler temperatures. To protect your wines while the power is off, you should minimize the number
of door openings. For power failures of longer durations, take steps to protect your wine.
IF YOU HAVE TO MOVE YOUR WINE COOLER
Remove ALL bottles from the wine cooler and securely fasten down all loose items inside the wine cooler.
To avoid damaging the levelling legs, turn them all the way into the base of the unit.
HUMIDITY MAINTENANCE SYSTEM
The wine cooler is equipped with a system for maintaining the correct level of humidity. If humidity is too low,
snap the small plastic reservoir on to the top rack of the wine cooler. Fill this reservoir 3/4 full with water.
Check water level occasionally to refill.
REPLACING INTERIOR LIGHT BULBS
To replace an interior light bulb:
1. Remove the screw holding the light bulb cover. Remove the cover.
2. Unscrew light bulb. Replace the light bulb. NOTE: The light bulb should not exceed 25 watts.
3. Replace light bulb cover. Re-install screw to secure cover.
FEATURES AND BENEFITS
Powder coated, heavy duty steel cabinet with high density thermal insulation.
1. DIGITAL ELECTRONIC THERMOSTAT: Controls the temperature inside the wine cooler.
The compressor will cycle on/off as soon as the temperature rises/falls above the desired cooling level.
2. WOODEN SHELVES: Slide-out for easy access to your wine.
3. MAGNETIC DOOR GASKET: Tight fitting magnetic door seal keeps all the
cooling power and humidity sealed inside.
4. TEMPERED GLASS DOOR: Tinted for UV protection and allows for easy interior viewing.
5 DUAL INTERIOR LIGHTS: Illuminate when door opened.
