Danger ONISH GSM 900/1800/1900 Phone with PDA User Manual RefGuide 27 2002 indd
Danger, Inc. GSM 900/1800/1900 Phone with PDA RefGuide 27 2002 indd
Danger >
User Manual

Sidekick II
Reference Guide
27-2002-01 Rev. A - Release 2.0 - June 7, 2004
Copyright © 2004 Danger, Inc. All rights reserved.

2 Contents
Contents
Welcome! 6
I. Device Controls 8
Opening and Closing the Display 8
Phone Controls 9
Control Buttons 10
II. Registration 12
III. Device Basics 16
Battery Charger 16
USB Port 17
Wrist Strap Holder 17
The Jump Screen 18
Title Bar and Indicators 19
Menus 20
Device Settings 21
Sound and Display Controls 21
Backlighting 22
Key Guard Mode 22
Device Privacy Code 23

Customization 24
Default Locale Setting 25
Typing and Editing Text 25
Navigating in Text Boxes 25
Deleting Text 26
Entering Special Unicode Characters 26
Cut, Copy, Paste 27
AutoText 27
IV. The Desktop Interface 28
V. Using the Applications 30
Phone
Make a Phone Call 30
Answer a Phone Call 31
Add a Number to Your Speed Dial List 31
Change Your Phone Ringtone 32
Check Your Voice Mail 32
Import Contacts from Your SIM Card 33
Phone Messages
Send a Text Message 33
Contents 3

Web Browser
Browse the Web 34
Bookmark a Web Page 34
Email
Send an Email Message 35
Fetch Email from External Accounts 35
Fetch Email Using Your Device’s Web Browser 39
Attach a Photo to an Email Message 39
Address Book
Add a Contact to the Address Book 40
Import Address Book Contacts 41
Calendar
Add an Event to Calendar 42
Notes
Create a Note 43
To Do
Add a Task 43
Camera
Take a Photo 44
Send a Photo by Email 44
4 Contents

Download Fun™ Catalog
Purchase Items 45
Manage Your Purchases 46
Instant Messaging
Sign On 47
Send an Instant Message 47
Switch Between IM Conversations 48
VI. Keyboard Shortcuts 49
VII. Troubleshooting 50
VIII. Handling and Safety Precautions 54
Battery Handling 54
Device Handling and Use 55
Battery Charger Handling 56
Radio Frequency Exposure 57
Regulatory Compliance Information 58
IX. Legal Information 60
Contents 5
Welcome!
Thank you for buying a Sidekick II. Your Sidekick II will change
the way you communicate, get organized, and stay connected.
Your Sidekick II connects seamlessly to wireless networks,
which gives you the ability to browse the Internet, exchange
instant messages, and send and receive email with image
attachments. Other features include a full-featured phone,
personal information management (PIM) applications, access to
a personal Web portal, a catalog for downloading ringtones and
applications to your device, and a built-in camera.
For the latest instructions on all the Sidekick II applications,
open the online Owner’s Manual from the Help link on the
Desktop Interface.
6 Welcome!

Welcome! 7
Here’s what you’ll find in the box:
Sidekick II Device
SIM Card
Battery Charger
Hands-Free Headset
Carrying Case
Start Guide
Reference Guide
T-Mobile Welcome Guide
If any of these items are missing, please contact T-Mobile’s Customer Care
department.
Now, let’s get started!
Warning
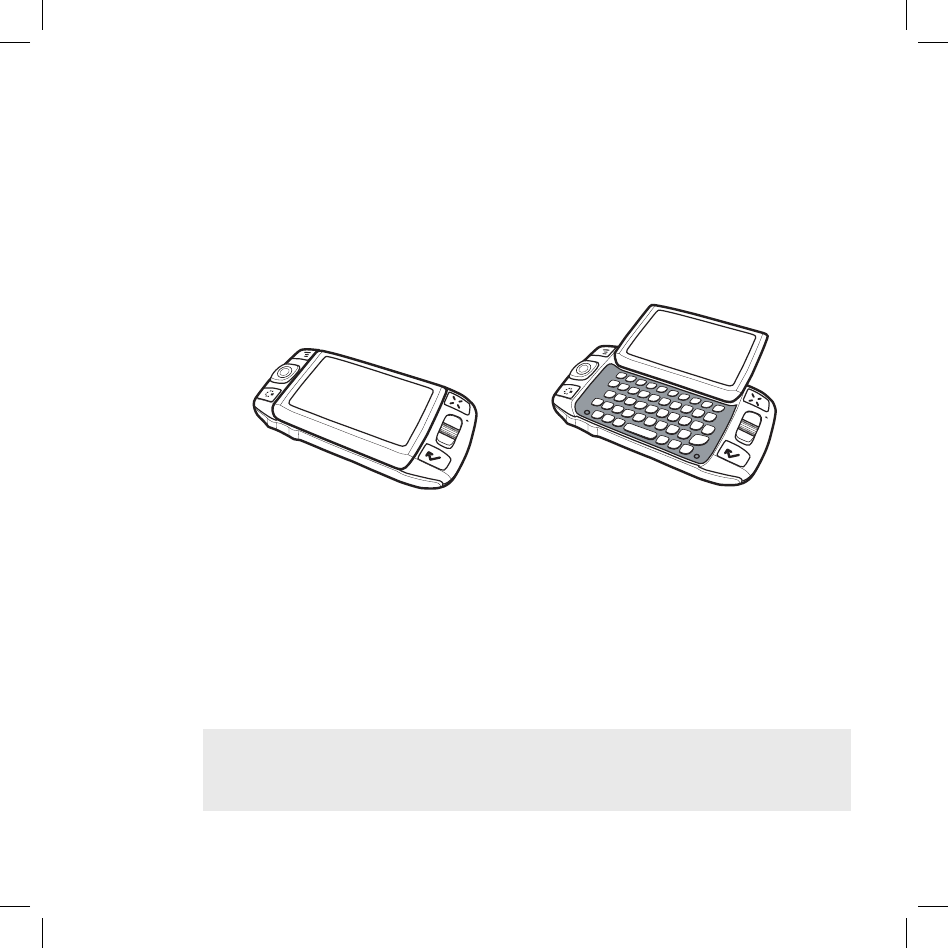
Device Controls
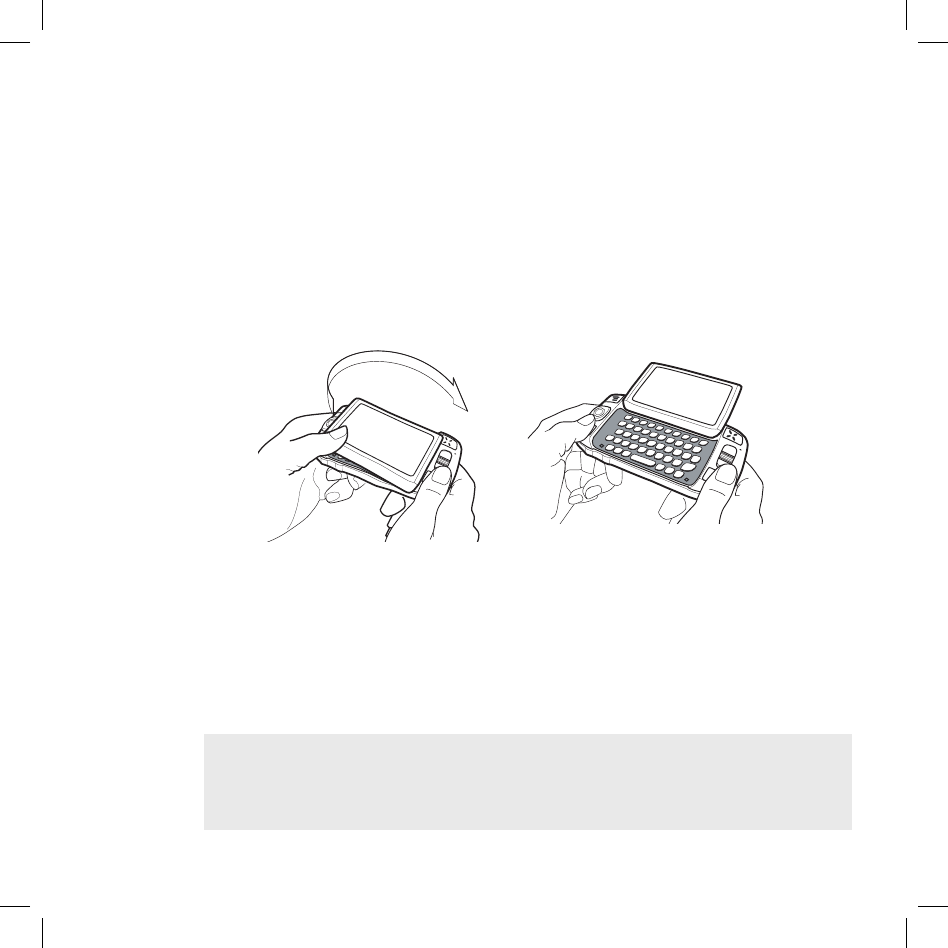
Opening and Closing the Display
To open the display, press your left thumb on the lower-left corner of the
display and gently push in a clockwise direction. The display will spring
smoothly into the open position.
Alternatively, use your right index finger to push down gently on the upper-
right corner of the display. The screen will spring into the open position.
The normal operating position of the device is horizontal, with the wheel on
the right side, as shown above.
To close the display, reverse the motion to pivot the display counter-clockwise
and snap it into the closed position.
Do not open or close the display in the wrong direction or you risk damaging
your device. Stop if you feel any resistance; the display should spring smoothly
into position. Protect the display from scratches by always using the carrying
case to transport your device.
I.
8 Device Controls

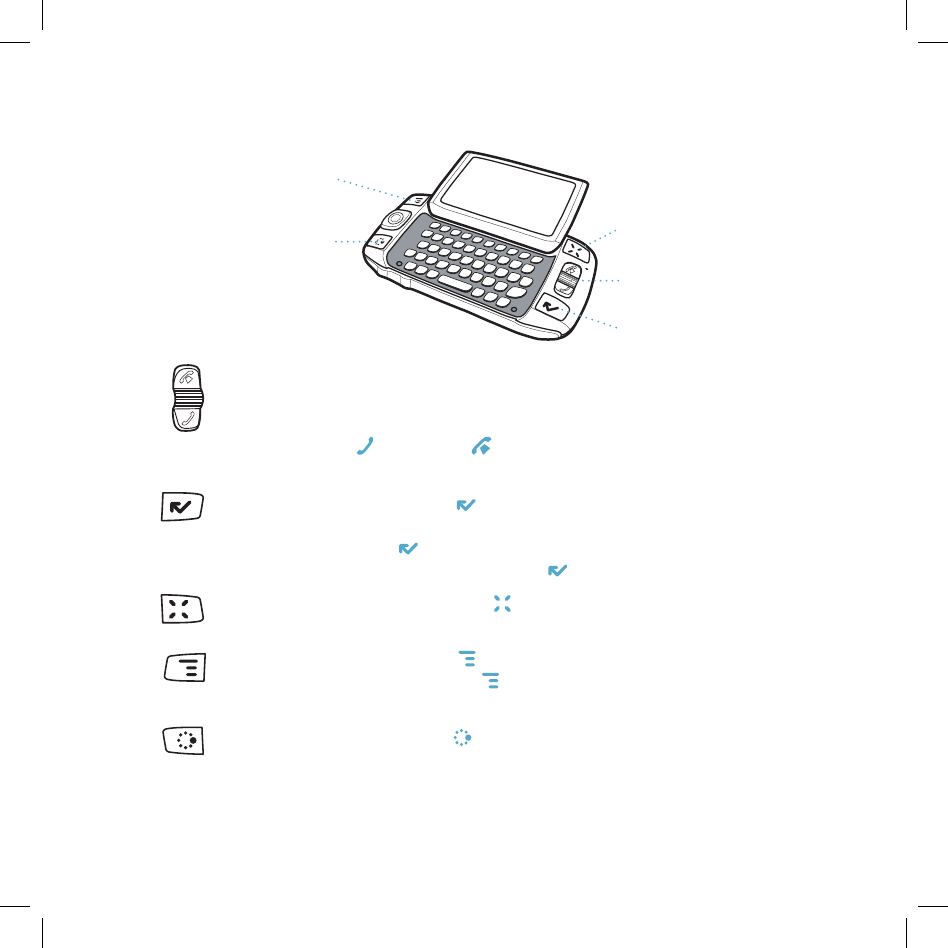
Phone Controls
VOLUME BUTTONS +-
DIAL PAD
SEND CALL
END CALL
SPEAKERPHONE ON / OFF
MUTE ON / OFF
DIAL PAD Use the dial pad within the keyboard to dial a number using just
your right hand.
END CALL and SEND CALL buttons While on a phone call, press to
end a phone call or clear the screen of a number you’ve typed. Press to
place a call to the phone number you’ve typed or highlighted in a list.
Pressing with no number typed launches a list of recently-dialed numbers.
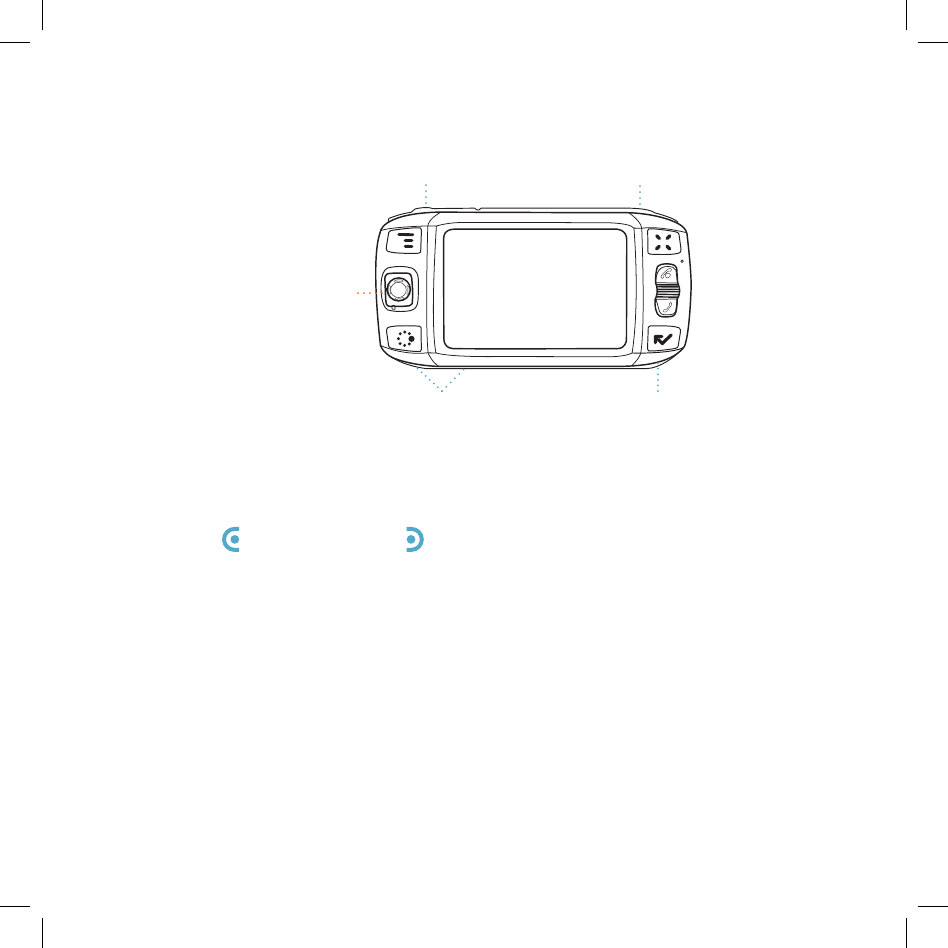
SPEAKER When using the phone as a
handset, position the speaker to your ear.
MICROPHONE While on the Phone
speak into the microphone.
VOLUME buttons The volume buttons are
under the JUMP button. While on a phone
call, press + to increase and - to decrease
volume. Use the shoulder buttons to turn
Mute or Speakerphone on and off.
Device Controls 9
SPEAKER
MICROPHONE
VOLUME
BUTTONS
Control Buttons
MENU
JUMP
WHEEL
CANCEL
DONE
WHEEL Pressing the wheel selects a highlighted item or opens a pop-up
menu. Rotate the wheel up/down to reverse/advance the current selection
through the “selectable” items on a screen, or to scroll up/down a Web page.
Use the SEND CALL and END CALL buttons while using the phone. When not on
the phone, these buttons will page up and page down.
DONE button Pressing DONE takes you back to the screen you were
previously viewing, until you reach the Jump screen. On a screen or in a
dialog box, press DONE to save your changes and dismiss the screen or
dialog box. If a menu is open, press DONE to close it.
CANCEL button Pressing CANCEL dismisses any changes you have made to
a screen or dialog box.
MENU button Pressing MENU opens a menu of actions you can take on the
current screen. If you press MENU and nothing opens, this means there are
no menu actions available for the current screen.
JUMP button Pressing JUMP takes you back to the Jump screen, your
starting point for launching all the device applications.
10 Device Controls
RIGHT SHOULDER
BUTTON
LEFT SHOULDER
BUTTON
POWER BUTTON
VOLUME BUTTONS
DIRECTIONAL PAD
+-
DIRECTIONAL PAD (D-Pad) Press up/down/left/right to scroll or move
within text fields, and navigate in games. The D-Pad “rocks” into four different
directions or positions.
LEFT AND RIGHT SHOULDER buttons The function of these
buttons depends on which application you’re using. For example, while in
the Camera, the right shoulder button captures a photo. While in the Phone,
the left shoulder button toggles Mute, and the right shoulder button toggles
Speakerphone.
POWER button Press the power button for 3 seconds to turn the device on
or off. You can also press the power button twice (“double-tap”) to power down.
VOLUME buttons While not using the Phone, press and hold + or - to step
through your Sound Profiles.
Device Controls 11
II. Registration
Before you can start using your Sidekick II, you must complete the registration
steps, as explained in step 3 in the Start Guide. This section of the Reference
Guide takes you through the registration process in more detail. Note that
these instructions are for new users (not returning users). Returning users
can simply sign in using their existing username and password.
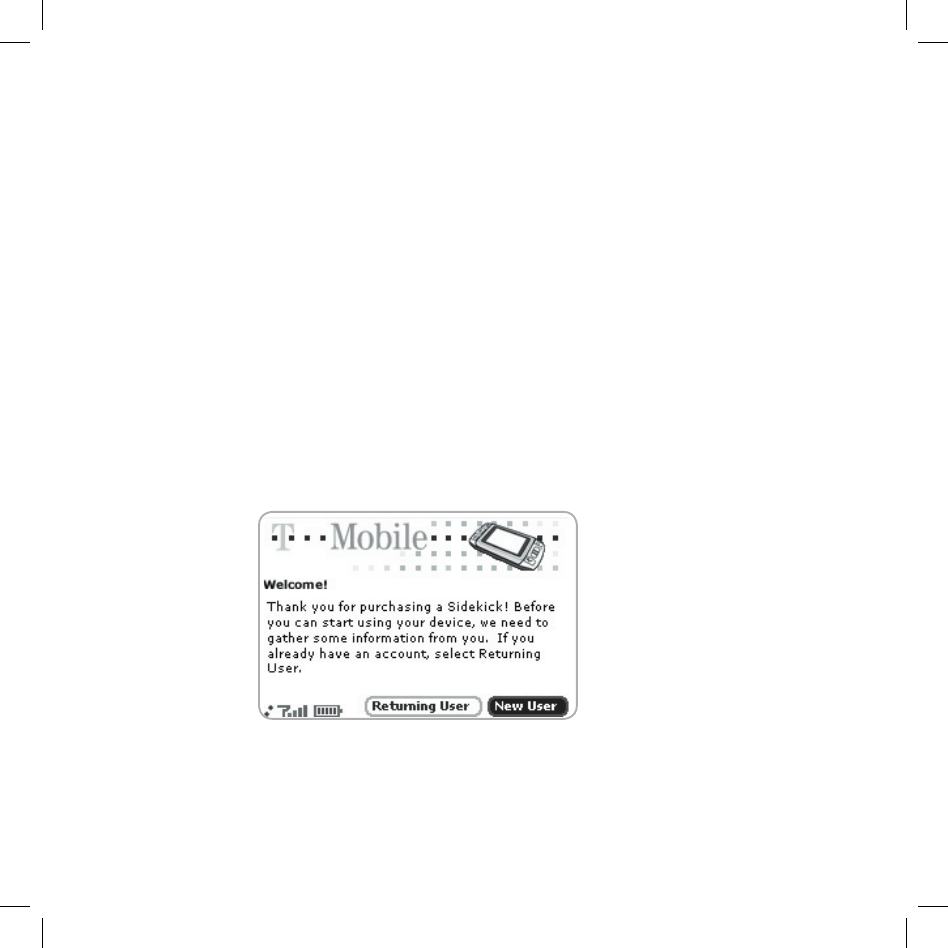
1 Wait for account activation.
Before you can use your account, your account must be activated. This
can take up to 48 hours, but usually takes only 1-3 hours. While you
wait, step through the screens that appear. If applicable, you’ll be given
the opportunity to select your language just before the Welcome screen
appears. When you see the Welcome screen, you’ll know your device has
been activated:
Press the wheel to select the New User button and advance to the next
screen. For subsequent screens, select the Next button to advance.
12 Registration

Registration 13
2 Type your first and last names.
Use the keyboard to type your First name, then rotate the wheel to
highlight the Last name field. Type your last name, scroll to highlight the
Next button, then press the wheel to advance to the next screen.
3 Select a username.
The username you select will be the first part of your email address (for
example, username@tmail.com). Before you select a username, read the
following guidelines:
Usernames must start with an alphabetic character (A-Z) and can
include numbers and underscores ( _ ), but no other punctuation.
Usernames must be at least 2 but no more than 32 characters long.
Usernames are not case-sensitive. For example, if your username is
“bridget”, you will be authenticated if you sign in by typing “Bridget”,
“BRIDGET”, or any combination of upper or lower case.
Once you decide on a username, type it in the text box on the screen.
4 Select a password.
Select a password that follows the rules below then type it in the text box:
Passwords must contain 4-15 characters, can include both
letters and numbers, but no spaces, single quotes ('), semicolons (;),
backslashes (/), or percent signs (%).
Passwords are case-sensitive. For example, if you set your password
to be “Hard2Guess”, then you will not be authenticated if you sign in
by typing “hard2guess”.
After you type your password, type it again to confirm.
5 Select your time zone.
Open the pop-up menu to see a list of time zones. Select yours from the
list, then select Next.
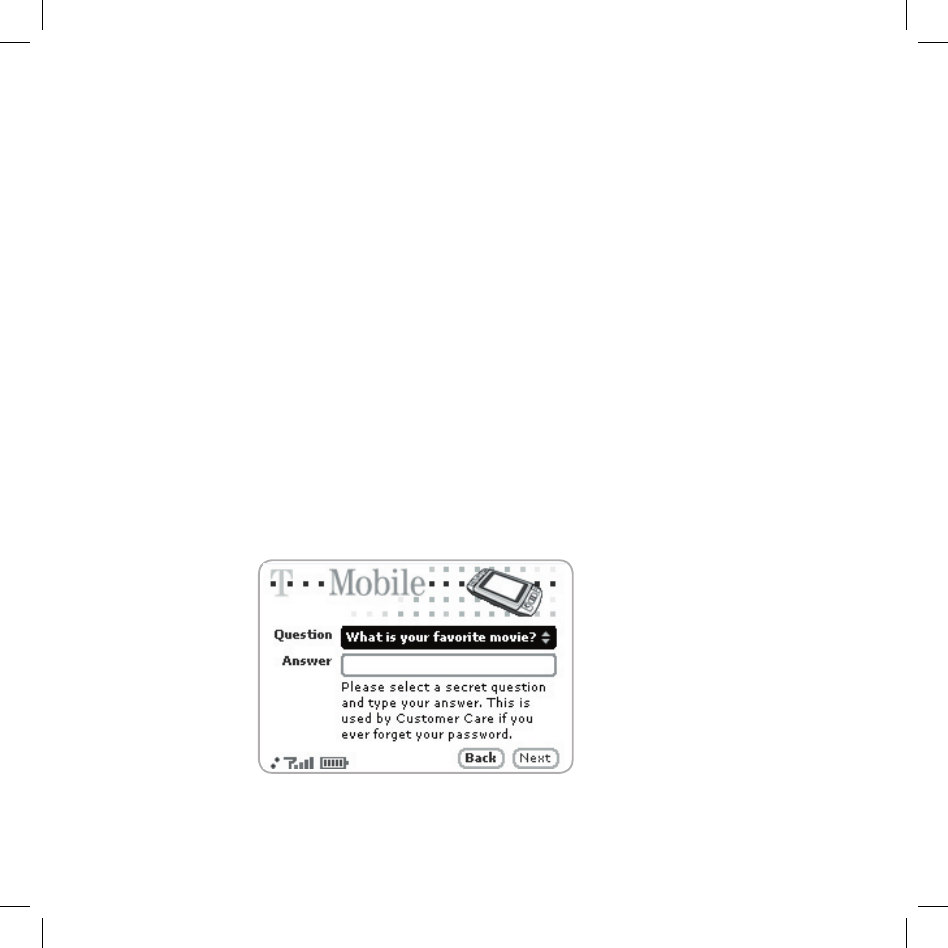
6 Select a “secret question” and type your answer.
If you ever forget your password, you’ll need to contact T-Mobile’s
Customer Care representative. For security purposes, they will ask you
to provide an answer to the “secret question” you select on this screen.
Press the wheel to open the Question pop-up menu, scroll to highlight a
question, then press the wheel to select it.
Rotate the wheel to highlight the Answer field, then type your answer.
14 Registration

Registration 15
7 Read and agree to the end-user agreement.
Before you can finish registration, you must read and agree to the end-
user agreement. You can read it in a number of places: by selecting the
on-screen View Agreement link, in “Legal Information” on page 60 of
this Guide, or from the Desktop Interface. Once you read the end-user
agreement, select the Next button to indicate your acceptance and
transmit your registration data.
8 Wait while data transmits.
Wait while the data you entered in Registration is transmitted to T-Mobile.
The service will check to see if your username has already been taken. If
it has, you will be offered alternative suggestions. You can either pick one
of these alternatives or type another username. Note that If you are out of
network coverage, you’ll be asked to “try again” to resume registration.
9 Congratulations!
Once your account has been set up,
you’ll see the
Congratulations screen:
Select the Start button to proceed.
10 Read the hints.
Before going to the Jump screen, take a minute to step through the hints
that appear. After reading each hint, select Next to advance. Select Done
at any time to dismiss the Hints screen and reveal the Jump screen. You
can always open these hints later from the Jump screen menu.

Warning
Device Basics
Battery Charger
Your device comes with a built-in rechargeable lithium ion (Li-Ion) battery. The
battery should be fully charged when you receive your device, but if it isn’t,
follow the instructions below to charge the battery.
Only use the battery charger provided with your device to charge your battery,
or you risk damaging your device.
1 Attach the battery charger to your device.
Locate the battery charger that came with your device in the box. Insert
the charger lead (the small round end of the adapter) into your device’s
power jack (the small round hole located on the lower right side of your
device) and plug the power cord into a standard electrical wall outlet.
A lightning bolt icon will appear over the battery icon (in the title bar),
indicating the charger is connected and the battery is charging.
III.
16 Device Basics

Device Basics 17
Tip
2 Let the device charge for at least four (4) hours.
Rest the device in a safe place and let the battery charge for at least
four hours, or overnight, to ensure maximum battery life. As the device is
charging, you will see the bars in the battery icon fill repeatedly from left
to right in an animated fashion. When your device is fully-charged, the
lightning bolt icon will disappear and the bars will stop moving and remain
in the filled position.
For efficient operation, charge your device nightly. If you plan to leave your
device unattended for an extended period of time, be aware that the battery
will discharge after 10 days if it is not attached to the charger. If your device
does fully discharge, simply attach it to the charger; all your data will be
restored from the service.
USB Port
The USB port is located under a cover between the power jack and headset
jack on the right side of your device. Although the current hardware version of
the device has a USB port, it is primarily used by developers as they create
new device applications, ringtones, and services. There are no immediate
plans to expand the functionality of the USB port.
Wrist Strap Holder
To carry your device securely, use a wrist strap with a flexible loop on one end.
(Straps are optional accessories.) Thread the loop under the strap holder and
through the “tunnel” on the back of your device, near the power button.

The Jump Screen
The Jump screen is your entry point to all the device applications.
1 Go to the Jump screen from any screen by pressing JUMP . The Phone
splash screen is selected by default.
2 Press MENU from the Jump screen to open the Jump screen menu:
From this menu you can open device-wide Settings and Controls screens.
You can also Sign In, view Network Status, open Hints, put the device into
Key Guard mode, and Power Off your device from this menu.
3 To select a particular application, use the wheel to scroll through the “ring”
of application icons. When the application you want is highlighted, simply
press the wheel once to open that application.
18 Device Basics

Device Basics 19
Title Bar and Indicators
The device display indicators appear at the top of your screen at all times.
Screen Title
Battery Strength
Wireless Signal Strength
Date and Time
Service Connectivity Status
New Message Notification (Email)
Sound Profile Setting
Wireless signal strength indicator. The more signal bands showing to the
right of the radio tower icon, the stronger the signal strength at your current
location. If you see an X flashing over the radio tower icon, you’ve temporarily
lost network connection.
Service connectivity indicators. One dot = device is connecting to the
GPRS network, two dots = getting IP address; three dots = connecting to the
data service; “G” = fully connected to the data service.
GSM (Phone) Service Only. A phone icon in the place of the “G” means you
are using (or only have access to) GSM phone service. If you have a call in
progress you’ll also see a timer.
Battery indicators. The more bars shown in the battery icon, the more
charge in the battery. When connected to the charger, a lightning bolt appears,
and when your battery is almost out of charge, an exclamation point appears.
Phone Call Indicators.
You have a call in progress; in the example, time elapsed is 3 mins, 40 secs.
Note that the phone icon blinks. If you have two calls active, the time displayed
will be for the foreground call.
Call forwarding is turned on. Your phone will not ring.
Sound Profile Setting. When you have sound turned off (“Silent” sound
profile), the title bar will indicate whether you have flashing lights or vibration
set for alerts or notifications. From left to right, the icons indicate: totally silent
(no sound, flashing lights, or vibration), flashing lights only, and vibration only.
Communication Services Notifications. When you receive a new email,
text, IM, or voice mail message, or when a Web page has finished loading,
you’ll see a visual “balloon” notification move across the title bar, while you’re in
any application except games.
Until you check your new message or go to your Web page you’ll see the
appropriate icon in the title bar, as a reminder. The examples shown to the left
illustrate a pending email message, text message, and loaded Web page.
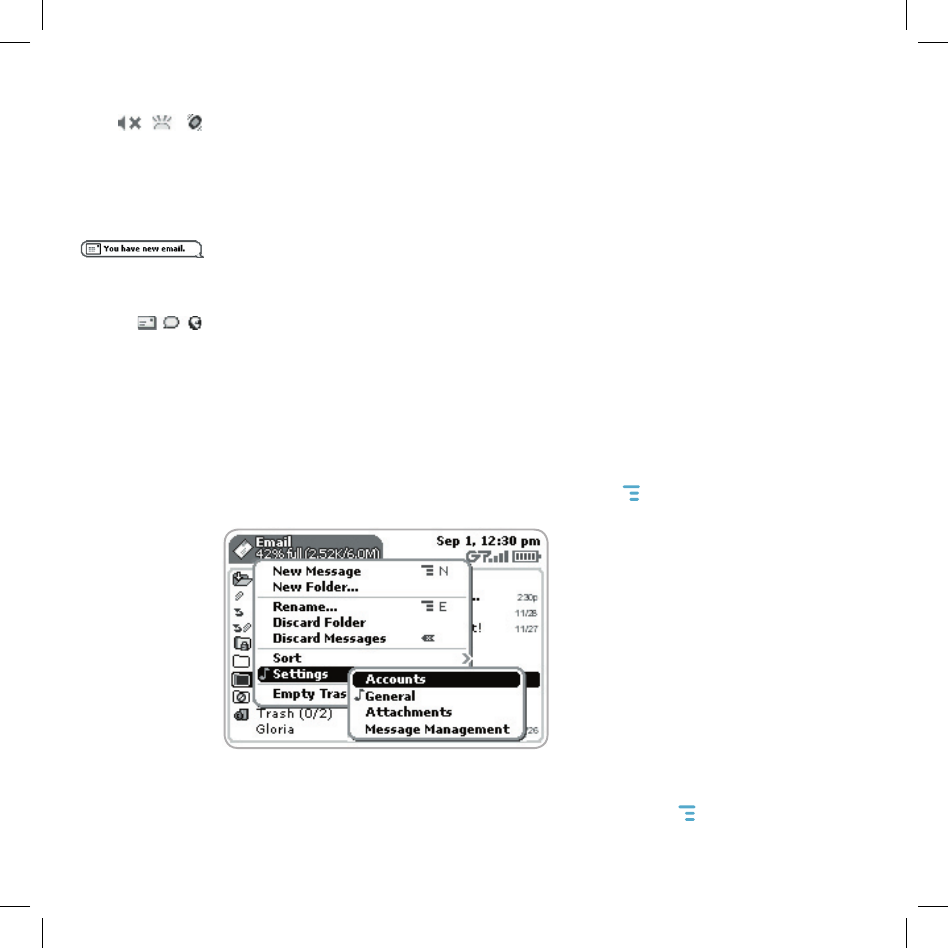
Menus
Almost every screen on your device has a set of actions you can take while
on that screen. These actions are listed in a floating window, called a menu,
which you open by pressing the Menu button MENU . Notice that some menu
items expand into submenus, as shown with Settings below.
Frequently-used menu items also have keyboard shortcuts that use the Menu
button plus a shortcut key. For example, take a look at the menu shown above.
To compose a new email message, you could press MENU + N rather than
opening the menu and selecting New Message with the wheel.
20 Device Basics
Device Basics 21
Device Settings
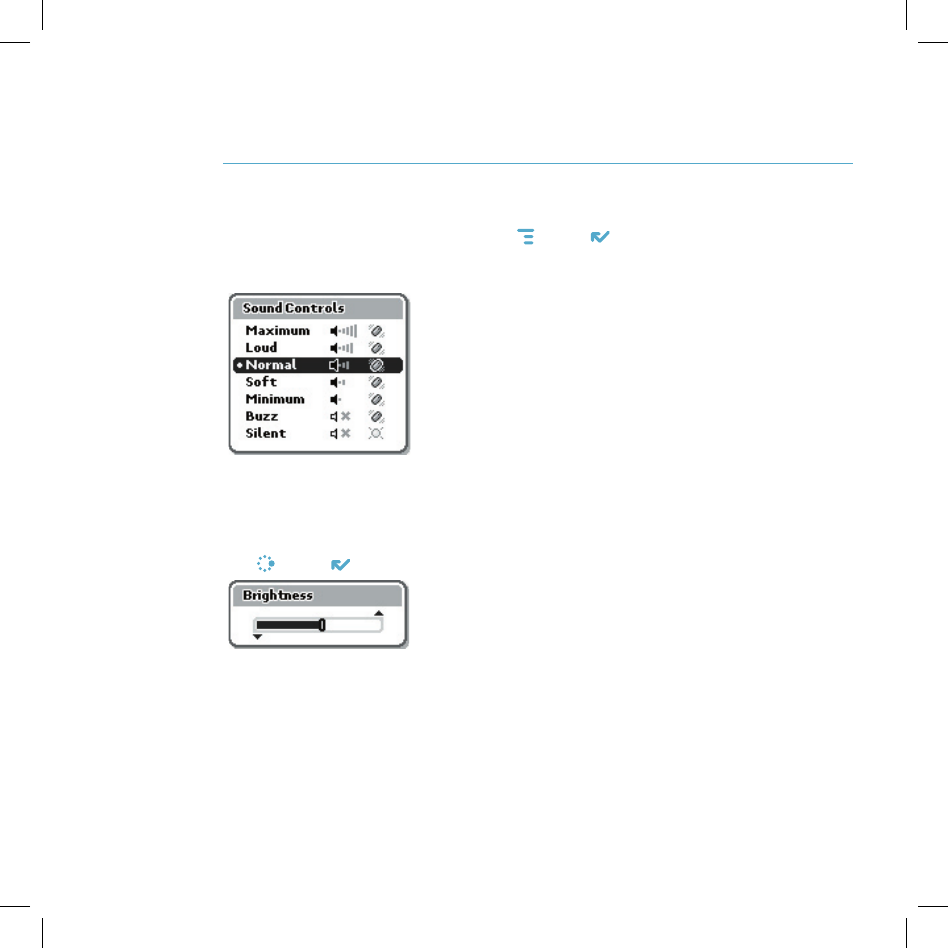
Sound and Display Controls
To silence your device and adjust the system and phone sound volume, open
the Sound Controls by pressing MENU + DONE . Select a sound “profile” from
the list. Customize profiles from the Jump menu Settings > Sound Profiles
screen.
You can step through your sound profiles quickly by pressing the volume
+ or - buttons.
To adjust the display brightness, open the Display Control by pressing
JUMP + DONE . Press the wheel to open the slider for adjustment.

Backlighting
For better screen visibility in poor light, enable backlighting:
1 Press JUMP to open the Jump screen. Press MENU to open the menu,
then select Settings > Battery & Display.
2 Select the Automatically turn on when using device check box to
enable backlighting. Select the length of time you want backlighting to
stay on from the Turn off after pop-up menu.
3 To use the device’s light meter to detect when the backlight is not needed,
scroll down and select the Use backlight only when needed check box.
4 Press DONE to save your settings.
Key Guard Mode
You can effectively lock the controls by entering key guard mode. By default,
your device is set to go into key guard mode after one minute of idle time.
To enter key guard mode, do the following:
1 Press JUMP to open the Jump screen. Press MENU to open the menu,
scroll to highlight Key Guard, then press the wheel. You can also quickly
enter key guard mode by pressing and holding DONE for two seconds.
2 Your device control buttons lock and the key guard screen appears.
3 To unlock and wake the device, press MENU + DONE . If you have set a
privacy code (see next section), type it at the prompt. You can also wake
the device by opening the screen.
To prevent display damage, after your device has been in key guard mode for
two hours, a screen saver will appear. To dismiss the screen saver, press any
key or open the device.
22 Device Basics

Note
Note
Device Basics 23
To change the default key guard idle time setting:
1 Press JUMP to open the Jump screen. Press MENU then select
Settings > Key Guard & Security.
2 In the first section of the Key Guard & Security screen, “Key Guard”, the
key guard idle time pop-up is selected by default. Press the wheel to open
the pop-up. Highlight a “guard” time, then press the wheel to select it.
3 Press DONE to save your settings and return to the Jump screen.
Your device will still receive calls and messages while in key guard mode.
Device Privacy Code
If you want to secure your device from unauthorized access once your device
has gone into key guard mode, you will first need to set up a privacy code:
1 Press JUMP to open the Jump screen. Press MENU then select
Settings > Key Guard & Security.
2 On the Key Guard & Security screen, scroll down to highlight
, then press the wheel to select it.
3 Enter a three-digit code using the keyboard or the dial:
At the prompt, re-enter your code to verify.
4 A “New Combination Enabled” message appears. Select OK.
5 Press DONE to save your settings and return to the Jump screen.
You can still make emergency calls from the key guard screen even if privacy
code is enabled.
Tip
Customization
Your device is designed so you can set up many of its features to suit your
preferences. You specify device-wide preferences using the Settings screens
accessed from the Jump screen menu.
You can also customize many of the applications, including the following:
Setting your favorite Web home page (Web Browser)
Selecting individual Caller ID icons or photos (Phone/Address Book)
Creating your own categories and labels for identifying contact
information (Address Book)
Setting different ringtones for individual callers (Phone/Address Book)
You specify most application-specific preferences using the application
Settings screens: From the Jump screen, open any application (Web Browser,
Instant Messaging, Email, and so on). Then, from within the application, open
the menu and select Settings to open these screens.
If you see a musical note next to a menu item, you’ll know that’s where you
customize that application’s ringtone setting.
24 Device Basics

Device Basics 25
Note
Default Locale Setting
If, at any time, you must change the default locale used on your device, you
can do so from the Locale Settings screen:
1 Press JUMP to open the Jump screen. Press MENU to open the menu,
then select Settings > Locale. The Locale screen appears.
2 All available languages (locales) are listed in the Language pop-up menu.
Select the language you wish to set as your default. If your pop-up menu
is dimmed, then you have no other languages available.
Your device must restart before a language change will take effect!
3 In the Keyboard Mapping pop-up, select a language (locale) to which
you want your keyboard mapped. If you change the mapping, what
appears on the screen when you type may no longer correspond to the
characters printed on your keyboard. If this pop-up menu is dimmed, then
you have no other mappings available.
4 Press DONE to save your setting and dismiss the Locale screen. Your
device will restart if you have changed your default language.
Typing and Editing Text
It’s easy to type and edit text in any text box using the keyboard and the
advanced text editing features described below.
Navigating in Text Boxes
Use the Directional Pad to navigate within a text box:
Press the up/down and left/right arrows to move in those directions
among characters in a text box.
Press the ALT button while using the D-pad up and down arrows to jump
to the top or bottom of a text box.
Press the ALT button while using the D-pad left and right arrows to jump
to the beginning and end of a line of text.

Deleting Text
To delete a character to the left of the cursor, press the DEL key .
To delete a character to the right of the cursor, press SHIFT + .
To delete all the characters on one line, press ALT + .
Entering Special Unicode Characters
To enter special Unicode characters in any text box, press the SYM key. The
Special Character selector opens, displaying special characters alphabetically.
Use the D-pad to navigate through the list: left-right to flip through the
Favorites, Recent, alphabet, and symbol sets; up-down to select specific
characters. Press the wheel to insert a highlighted character. Here are some
useful tips in using the Special Character selector:
With the selector open, you can show the same characters capitalized
by pressing Shift + the character (like “a”). Toggle back to lowercase by
pressing the letter again.
To see all special characters, select All (at the bottom of the selector) or
use the menu shortcut MENU + A, and the grid expands.
To open a character set for a specific letter, press SYM + the letter.
To type a character using its Unicode value (hover over a selection in the
selector for two seconds to see code), press SYM + Spacebar (press the
keys simultaneously), then type the 4-character Unicode value.
26 Device Basics

Device Basics 27
Cut, Copy, Paste
To cut, copy, or paste text you have typed, follow these instructions:
1 Position your text cursor next to the text you want to cut or copy. (Use the
D-pad’s arrows to position the text cursor.)
2 Hold down the Shift key while pressing a D-pad arrow. As you select text,
it is shown highlighted. (To de-select, release the Shift key and press a
D-pad arrow.)
3 Press MENU and select Edit Text to open the Edit Text submenu, or
simply press and hold the wheel to open the Edit Text context menu.
Select the operation you want to perform on the selected text. Note the
standard shortcuts:
Cut MENU + X
Copy MENU + C
Select All MENU + A
4 You can paste text that you have copied to the device clipboard to any
other text box in any application. Simply position your cursor where you
want to paste the text, then use the Paste shortcut MENU + V. (You can
also open the menu and select Edit Text > Paste.) Note that the device
clipboard only stores one set of copied or cut text at a time.
AutoText
The AutoText feature will help you enter text quickly and accurately. To open
the AutoText screen, do the following:
1 Press JUMP to open the Jump screen. Press MENU to open the menu,
then select Settings > AutoText. The AutoText screen appears.
2 The screen offers automatic formatting and word replacement options you
can select. Open the menu to create new rules or discard rules you don’t
like.

The Desktop Interface
The data you store in your device’s Email, To Do, Calendar, Address Book,
Notes, and Camera applications are also available for viewing or editing on the
Web from any computer connected to the Internet. Information in your account
is stored on secure servers in a data center protected by extensive physical
security and firewalls.
To reach the Desktop Interface, use the Web navigation and sign-in
instructions provided in the Start Guide, included in the box.
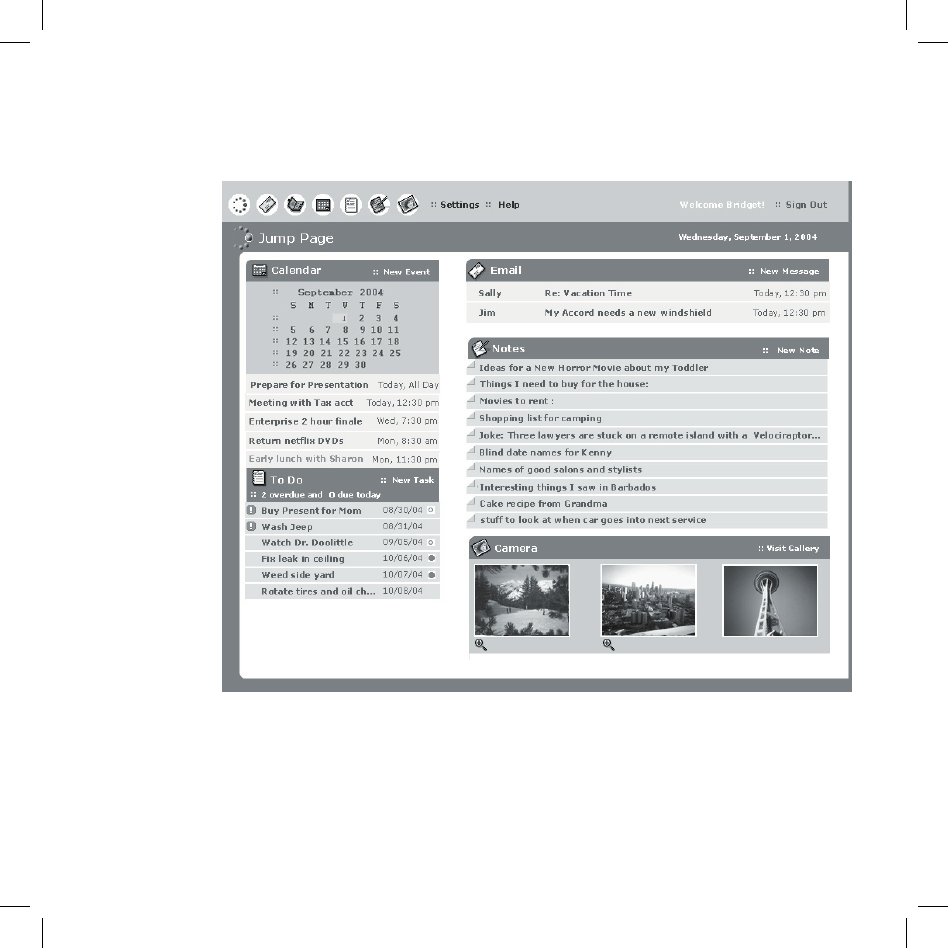
Once you’ve signed in, your Jump page will open. Use the Jump page
navigation buttons to open the various applications:
Open the online Help page by clicking the Help link.
Import existing contacts from the Address Book > Import page. Import
existing Calendar events from the Calendar > Import page.
To change your default language or time zone, click Settings (next to the Help
link on the top bar).
Remember! When you’ve finished using the Web applications, always click
the Sign Out link to exit the Web site securely.
IV.
28 The Desktop Interface
The Desktop Interface 29
Desktop Interface Jump Page
Tip
Using the Applications
Phone
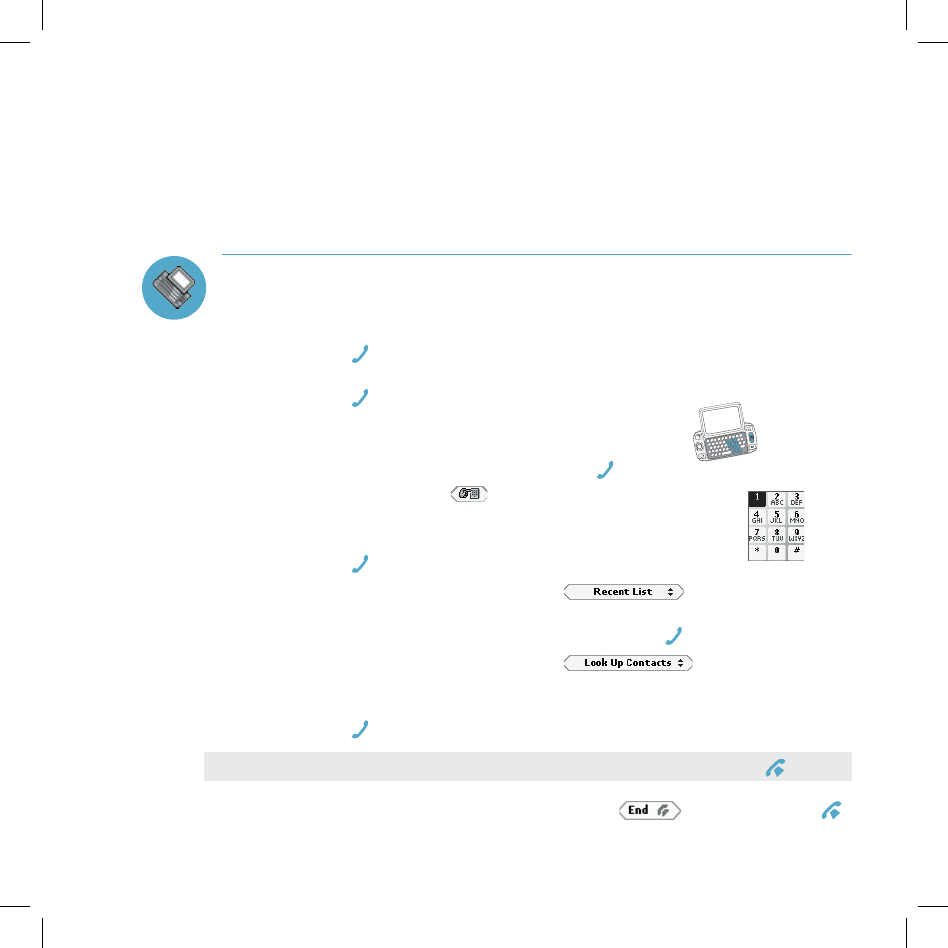
Make a Phone Call
1 Enter the number you want to call by using any of these dialing methods:
From the Jump screen, press and hold the wheel or press
SEND CALL to open your list of speed dials and recently-dialed
numbers. Highlight the number, then place the call by pressing
SEND CALL .
From the Jump screen or Phone, open the display
and type your number using the keyboard dial pad , or use the
numbers on the top row. Press SEND CALL to place the call.
In the Phone, select to open the on-screen dial pad:
Rotate the wheel to highlight a number, then press to
select it. When you’ve completed the number, press
SEND CALL to place the call.
In the Phone, highlight then select to open a list of
recently-dialed numbers. If the number you want to call is on the list,
highlight it using the wheel, then press SEND CALL . The call is placed.
In the Phone, highlight then select to open a list of
Contacts and Phone Numbers from your Address Book. Start typing a
name to narrow your search. Highlight a number, then press
SEND CALL to place the call.
To clear a phone number before sending the call, press END CALL .
2 To end your call, select the on-screen button , or press END CALL .
V.
30 Using the Applications
Using the Applications 31
Note
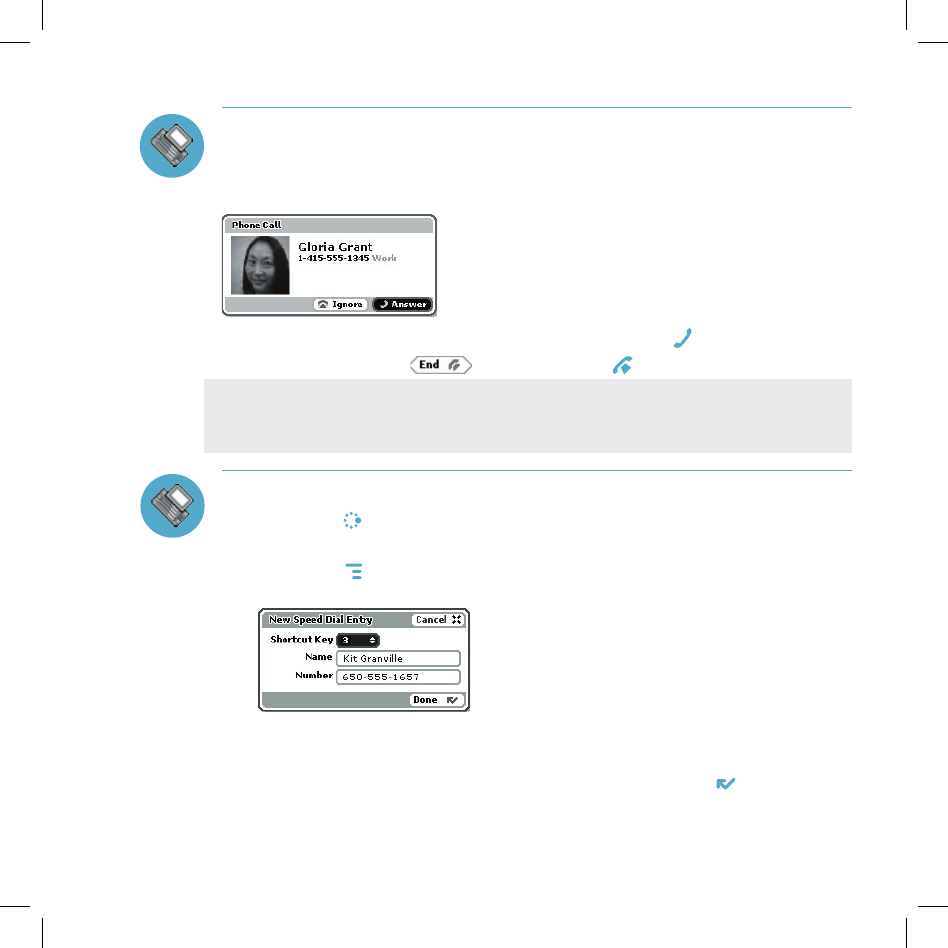
Answer a Phone Call
When your device signals there is an incoming phone call, the display will
show the name of the caller and the icon or photo associated with that caller
in your Address Book (see “Add a Contact to the Address Book” on page 40).
1 Press the wheel to select Answer or press SEND CALL . Your call connects.
2 To hang up, select , or press END CALL .
If another call comes in while you’re on the phone (call waiting), a dialog
box will appear, giving you the call details and a choice of how to handle the
incoming call: select either Switch Calls or Ignore.
Add a Number to Your Speed Dial List
1 Press JUMP to go to the Jump screen, then press the wheel to open the
Phone application.
2 Press MENU to open the menu. Select New Speed Dial… to open the
New Speed Dial Entry dialog box. You can create 8 speed dial shortcuts.
3 Select a Shortcut Key from the pop-up menu. Only the numbers available
will appear in the pop-up menu.
4 Type the speed dial Name and Number, then select DONE .
5 To dial using the shortcut, from either the Phone application or the Jump
screen, simply press and hold the number on the keyboard.
Note
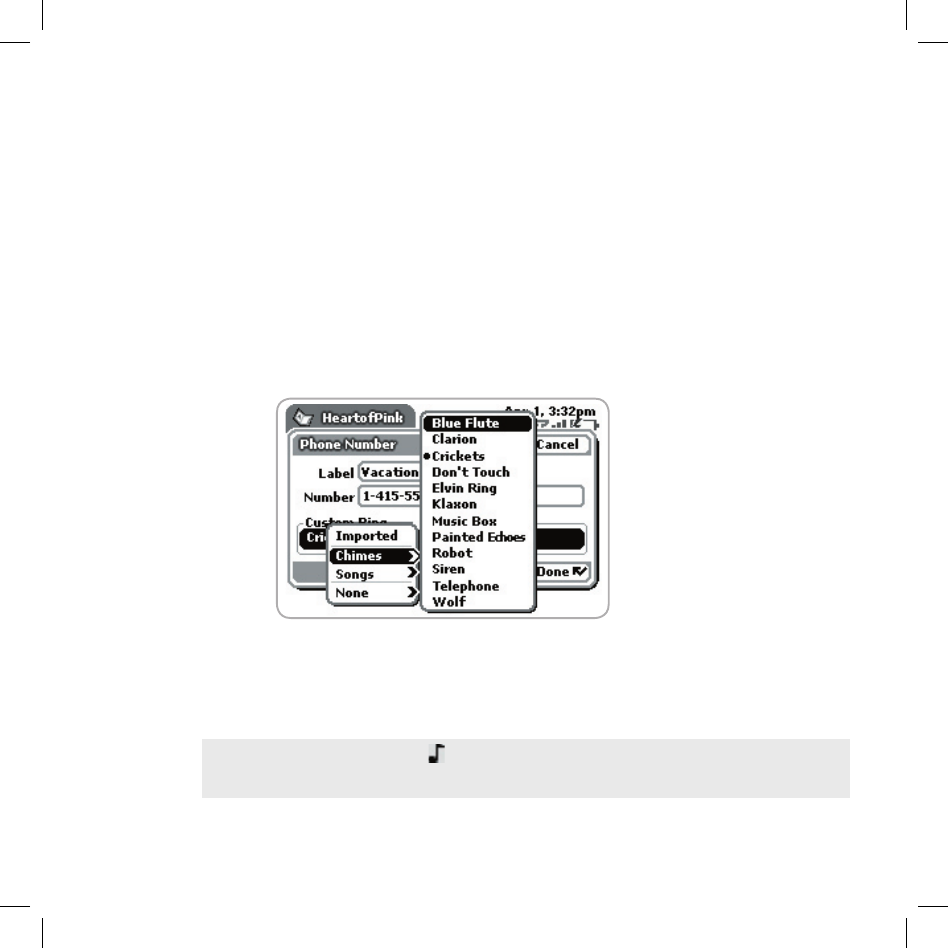
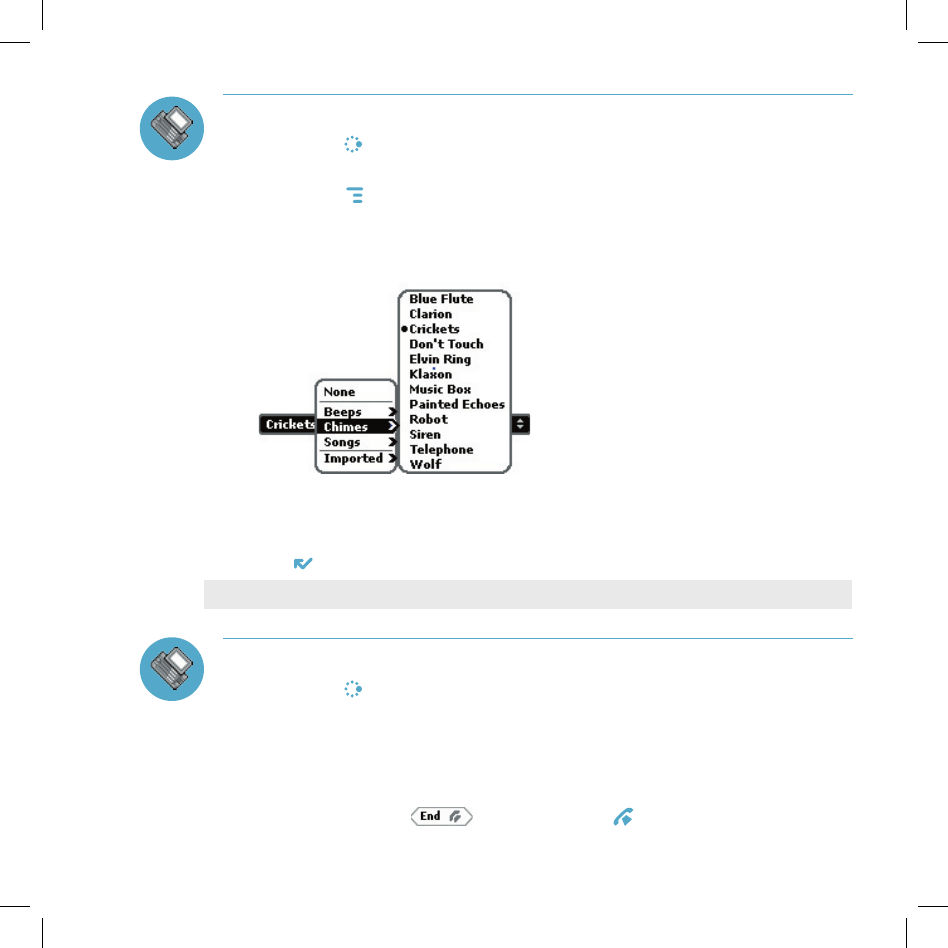
Change Your Phone Ringtone
1 Press JUMP to go to the Jump screen, then press the wheel to open the
Phone application.
2 Press MENU to open the Phone menu. Select Settings > General.
3 Highlight the Incoming phone call ring pop-up menu, then press
the wheel. The menu reveals the ringtone categories. First highlight a
category, then press the wheel to open the submenu of ringtones.
As you scroll through the songs, you can preview each song by hovering
over it for a few seconds.
4 When you have decided on a ringtone, press the wheel to select it. Press
DONE to assign your new ringtone.
Assign caller-specific ringtones from the Address Book.
Check Your Voice Mail
1 Press JUMP to go to the Jump screen, then press the wheel to open the
Phone application.
2 Press and hold the 1 key (the speed dial shortcut assigned to voice mail)
to call your voice mailbox.
3 Follow the prompts to retrieve your messages.
4 To hang up, select , or press END CALL .
32 Using the Applications
Using the Applications 33
Import Contacts from Your SIM Card
If you already have a SIM card from T-Mobile, you can import the phone
numbers you have stored on the SIM card into your device’s Address Book.
First, insert the SIM card with the contacts into your device, then:
1 Press JUMP to go to the Jump screen. Scroll to highlight Address Book,
then press the wheel to open the application.
2 Press MENU to open the menu. Select Settings > Import SIM Contacts.
3 The SIM Import dialog will alert you when the import is complete.
Phone Messages
Send a Text Message
1 Press JUMP to go to the Jump screen. Scroll to highlight Phone
Messages, then press the wheel to open the application.
2 Press MENU to open the menu. New Message is selected by default;
press the wheel to go to the Compose screen.
3 Address your message using the recipient’s phone number, or start typing
their name to bring up Address Book matches. Add more recipients by
typing a comma (,) or semicolon (;) in the To field.
4 Use the wheel to scroll to the message body; type your message. If your
message is more than the limit for a single text message (approximately
160 characters), the message will be sent in parts. (When received, it will
appear as one message.)
5 When ready to send, either select the Send button at the bottom of the
Compose screen, or press MENU + M.
Hint
Note
Web Browser
Browse the Web
1 Press JUMP to go to the Jump screen. Scroll to highlight Web Browser,
then press the wheel to open the application.
2 Start typing the address of the Web page you wish to visit. The Go To
dialog box opens automatically, showing the address you are typing.
3 What you type appears in the top field of the Go To dialog box. Possible
URL matches, and the option to search for the text you type, appear in
the drop-down menu.
4 To go to a Web page, you can either finish typing the complete URL in
the Go To dialog box then press Return; or, rotate the wheel to highlight a
suggested URL in the drop-down menu, then press the wheel.
To open Web pages faster, press MENU and select Settings. Scroll down the
Settings screen and clear the “Show pictures in Web pages” check box.
Bookmark a Web Page
1 Open the Web page you want to bookmark.
2 Press MENU + N to open the Add Bookmark dialog box.
3 Edit the bookmark name if you wish, verify the URL, and select a folder in
which to store the bookmark from the Folder pop-up menu. (If you select
New Folder…, you’ll be prompted to give the folder a name.)
4 Press DONE to save the bookmark.
If you find a Web address (URL) that cannot be displayed on your device,
send a message to WebURL@hiptop.com. In the message, include the Web
address and the problem you experienced when trying to go to the URL,
including any error messages you received. The problem will be investigated.
34 Using the Applications
Tip
Using the Applications 35
Email
Send an Email Message
1 Press JUMP to go to the Jump screen. Scroll to highlight Email, then
press the wheel to open the application.
2 Press MENU to open the menu. New Message is selected by default;
press the wheel to go to the Compose screen.
3 The text cursor is in the To field; type the name or email address of
the person to whom you wish to send an email. If you type a name, the
Address Book will try to pull the correct email address from your contact
data. Add more To fields by typing a comma (,) or semicolon (;).
4 Scroll to the Subject field and type the subject of your email.
5 Scroll to the message body and type your message.
To delete text in the forward direction, press the SHIFT+DEL keys together.
To delete the current line of text, press the ALT+DEL keys together.
6 When ready to send, either select the Send button at the bottom of the
Compose screen, or press MENU + M.
Fetch Email from External Accounts
When you register your device account, you automatically receive an email
account that you can use immediately on either your device or the Email
application on the Desktop Interface. In addition, you can fetch email from up
to three external POP3 or IMAP email accounts.
At this time, email from MSN Hotmail® and email servers that are protected
by a firewall do not allow email to be fetched by other servers. You can,
however, check some Internet email accounts by using the Web Browser, as
described in “Fetch Email Using Your Device’s Web Browser” on page 39.
The instructions below explain how to fetch email from external accounts by
using your device. Note that you can also set up accounts from the Email
application on the Desktop Interface.
1 Press JUMP to go to the Jump screen. Scroll to highlight Email, then
press the wheel to open the application.
2 If you want your external email messages to be fetched to a new email
folder, press MENU then select New Folder to create the new folder.
3 Press MENU then select Settings > Accounts to open the Accounts
screen.
4 On the Accounts screen, press MENU then select New Account to open
the New Account screen.
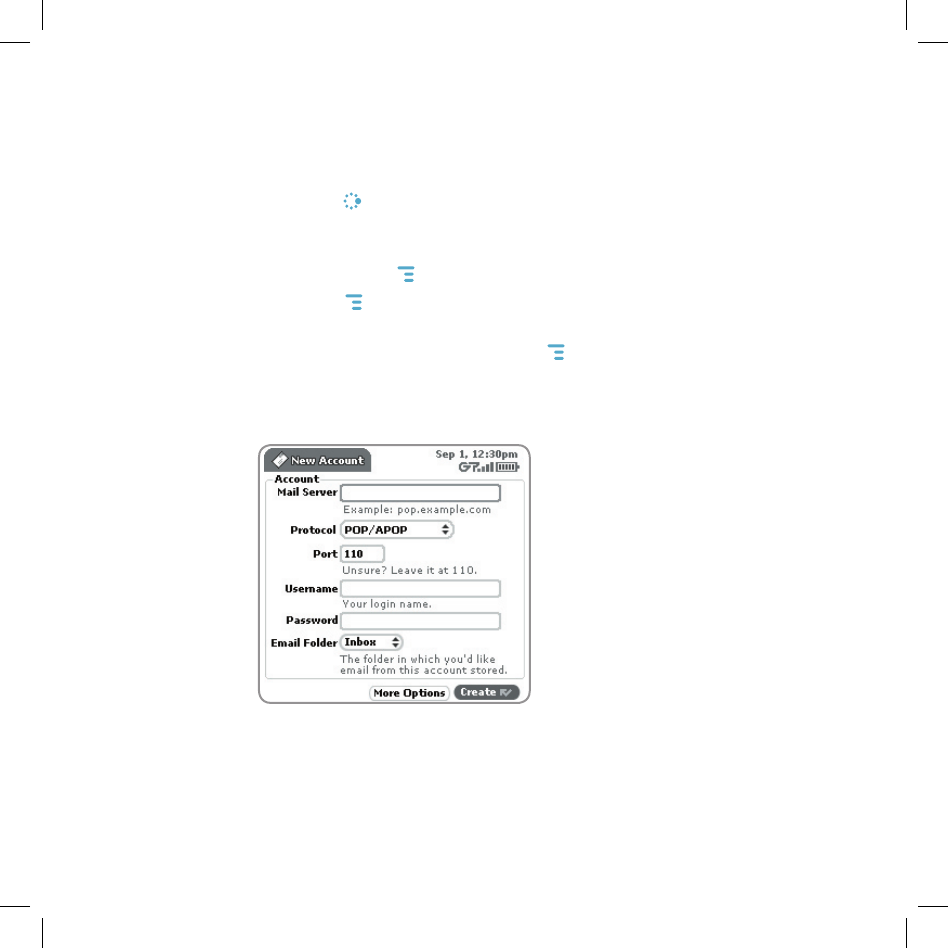
5 Type your email account information in the fields on this New Account
screen. Read the sections below for more details on each field.
Mail Server field - The first thing you must provide on the New Account
screen is the name of the mail server. Many people don’t know the name
of their mail server. If you don’t, your email provider will be able to tell you,
or you can reference the following table for samples.
36 Using the Applications

Tip
Using the Applications 37
Some popular Web-based email providers and their Mail Server names are
provided below for your convenience. If you have an email account through
your ISP, contact them for more assistance. Some ISPs require additional
configuration or charge a fee to download email.
Web Email Provider Mail Server Name
Yahoo!® Mail pop.mail.yahoo.com
Mail.com pop1.mail.com
Softhome.net mail.SoftHome.net
Protocol field - Select the protocol your mail server uses from this pop-
up menu. Select Auto-detect if you don’t know which one to pick.
Port field - Unless your email provider has specified otherwise, leave this
field at 110.
Username and Password fields - Type your email account username
and password.
Email Folder pop-up menu - Select the folder to which you want your
account email delivered.
6 When you’ve filled in all the fields on the screen, select the More Options
button at the bottom of the screen.
7 In the General group box, the Collect email from this account check
box is selected by default. If at any time you want to stop fetching
messages from this account, simply clear this check box.
If you want to Remove retrieved email from server after it is fetched to
your device, select this check box.
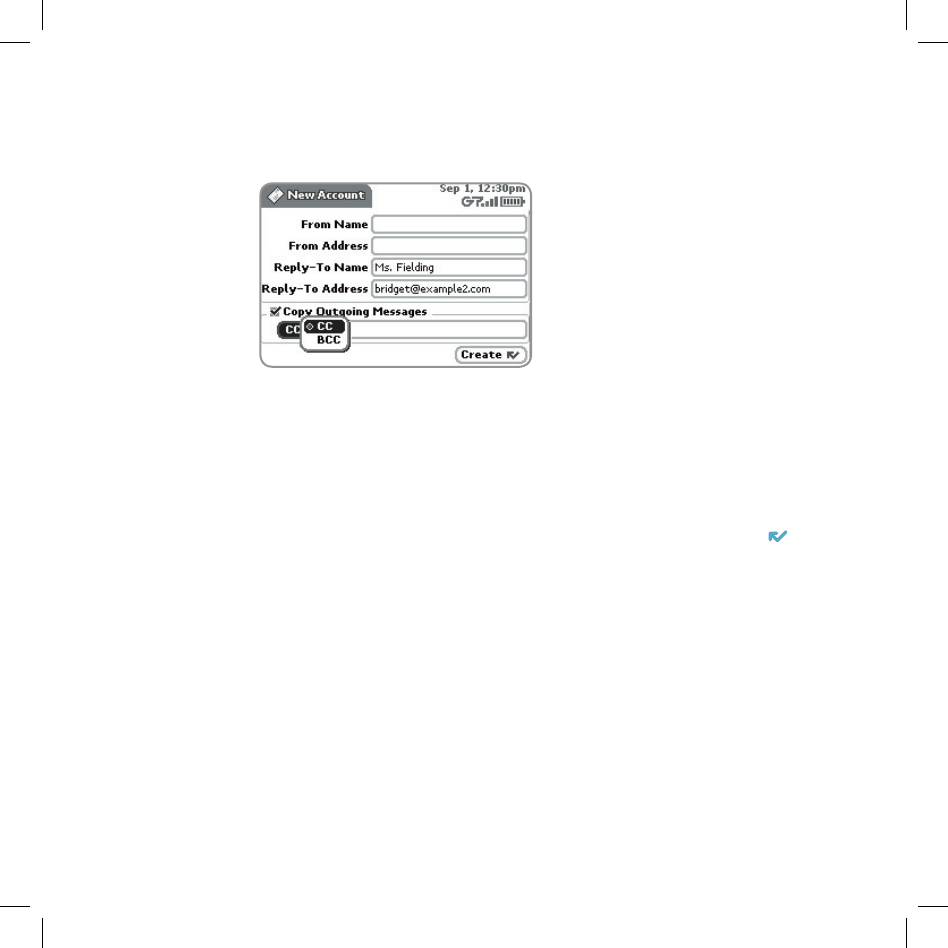
8 Scroll to the bottom of the screen, past the account information you have
already provided, to the From Name field:
If you leave these fields blank, your default POP or IMAP account name
and address will be used. Specify alternative names or addresses in
these fields as you wish.
9 Select the Copy Outgoing Messages check box to have every message
sent from this account copied to another email address. Specify either CC
or BCC (from the pop-up menu), then type the email address in the field.
10 Save your information by selecting Create; or simply press DONE .
11 Wait to send messages from this email account until you receive a
confirmation message on the Email Accounts screen.
38 Using the Applications

Using the Applications 39
Fetch Email Using Your Device’s Web Browser
If there is a Web interface to your email account, you can use your device’s
Web Browser application to sign in to those accounts and check your email.
Some popular email Web sites are listed below:
Yahoo!® Mail – http://mobile.yahoo.com/home
AOL MailSM – http://dmail.aol.com
MSN Hotmail – http://mobile.msn.com/hm/folder.aspx
Press MENU + K to open the Bookmarks screen; some sites may have been
bookmarked for you. To go directly to an email Web site, do the following:
1 Press JUMP to go to the Jump screen. Scroll to highlight Web Browser,
then press the wheel to open the application.
2 Start typing the URL to your Internet email account. What you type is
automatically inserted into the Go To dialog box.
3 Press the wheel to go to the Web site’s sign in page.
Attach a Photo to an Email Message
1 Press JUMP to go to the Jump screen. Scroll to highlight Email, then
press the wheel to open the application.
2 Press MENU + N to open the Compose screen. Complete the To,
Subject, and Message fields.
3 Press MENU + P to open your Photo Gallery. Rotate the wheel to
highlight, then press to select a photo to send. You can select multiple
photos. All selected photos will have check marks.
4 When you’ve finished selecting photos, open the menu and select Use
Checked or press DONE .
5 Your email message returns to the screen, including attached photos.
Select the Send button or press MENU + M when you’re ready.
Address Book
Add a Contact to the Address Book
You can store up to 2000 contacts in your Address Book.
1 Press JUMP to go to the Jump screen. Scroll to highlight Address Book,
then press the wheel to open the application.
2 Press MENU to open the menu. New Contact is selected by default;
press the wheel to go to the New Contact Identity screen.
3 To create a contact, you only need to type basic “identity” information: a
First or Last name. On this screen you can also provide a Middle name
and a Nickname, as well as select an icon.
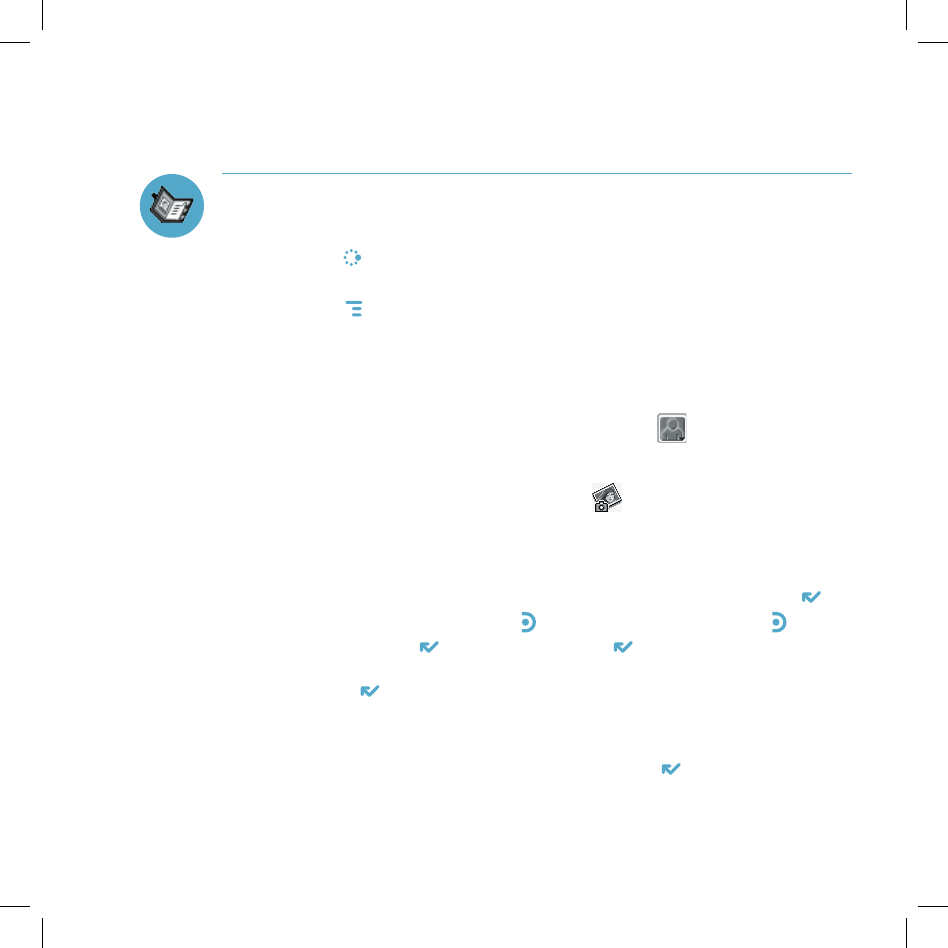
4 To select an icon, rotate the wheel up to highlight , then press the
wheel to open the icon selector. Rotate the wheel to highlight the icon you
want, then press the wheel to select it.
To assign a Photo Caller ID icon, select from the icon selector,
which will open your Photo Gallery. Then, from the Gallery:
• To select a photo already in your Gallery, rotate the wheel to highlight
the photo you want to associate with the contact, then press the wheel
to select it (a check mark will appear under the photo). Press DONE .
• To capture a new photo, press . Compose your photo, press to
capture, then DONE to save it. Press DONE again to view the Gallery.
Select the photo (a check mark will appear under the photo).
Press DONE .
A smaller version of the photo now appears on the Identity screen and will
be used to identify that contact on incoming call notifications.
5 When finished with the Identity screen, select DONE . You advance to
the next New Contact screen, in which you can type or select additional
contact information.
40 Using the Applications
Tip
Using the Applications 41
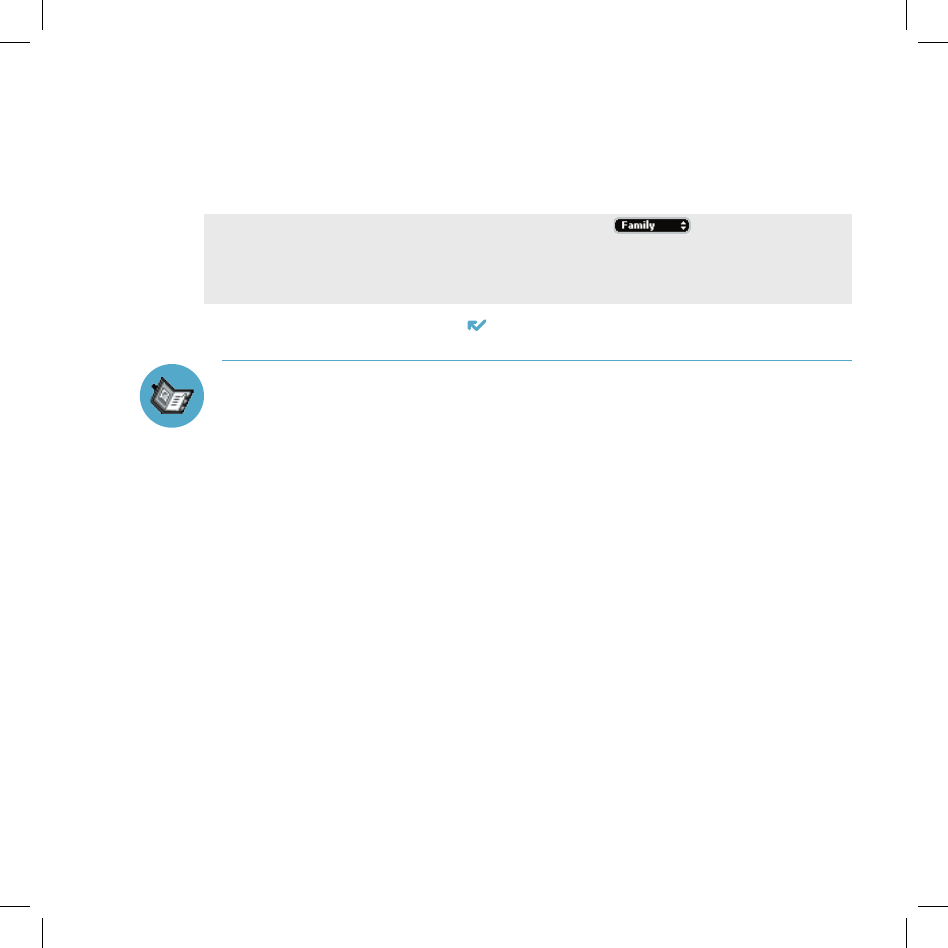
6 Scroll through the New Contact fields (Personal Info, Phone, Email, and
so on), selecting Add or Edit to open screens in which you can add
contact information. You can set a custom ringtone for your contact in the
Phone number screen!
To select a choice from a pop-up menu, such as , highlight the menu
using the wheel, then press once. The menu opens. Scroll through the list of
options, highlighting the option you want. Then press the wheel to select the
option.
7 When finished, press DONE to save your new contact information.
Import Address Book Contacts
If you have a SIM card from T-Mobile with contact information stored on it,
you can import that information to your device by following the instructions in
“Import Contacts from Your SIM Card” on page 33 of this guide.
If you have existing contact information stored in a Personal Information
Management (PIM) application, you can import that data to your Address Book
on the device and Web. You do this by first going to your Address Book on the
Web:
1 Go to your desktop or laptop computer and sign in to the Desktop
Interface by following the instructions on the back of your Start Guide.
2 Your Jump page opens.
3 From your Jump page, click Address Book. The Address Book
application displays.
4 Click Import in the sidebar. The Import page opens.

5 The Import page includes step-by-step instructions for completing
the import process. The following file types (exported formats) can be
imported:
Microsoft Outlook for PC (.txt file)
Microsoft Outlook Express for Mac (.txt file)
Microsoft Entourage for Mac (.txt file)
Palm Desktop for PC (.txt/.tab file)
Palm Desktop for Mac (.txt/.tab file)
6 After you click the Import button, your contacts are imported to your
Web Address Book, then sent to your device via the network. Make sure
your device has a wireless connection; then, after 2-3 minutes, check
your device to see if your new contacts have arrived (assuming you are
connected to the service).
Calendar
Add an Event to Calendar
You can create and store up to 1000 events in Calendar.
1 Press JUMP to go to the Jump screen. Scroll to highlight Calendar, then
press the wheel to open the application.
2 Press MENU to open the menu. New Event is selected by default.
3 Press the wheel to go to the Event Details screen.
4 Name your event, enter a location, assign a duration, add repetitions,
reminders, and notes as applicable.
5 Press DONE to save the event. It will now appear on your Upcoming (if
it’s scheduled within the next five days), Daily, Week, or Month views.
6 To view your schedule, select one of the “Views” from the menu:
Upcoming (next five days), Day, Week, Month, Year, or Trash.
42 Using the Applications

Using the Applications 43
Notes
Create a Note
You can create and store up to 50 notes. Each note can be up to 8000
characters, which is about four pages in a paperback.
1 Press JUMP to go to the Jump screen. Scroll to highlight Notes, then
press the wheel to open the application.
2 Press MENU to open the menu. New Note is selected by default.
3 Press the wheel to open a blank note. Type your note; it is saved as soon
as you type it.
4 Press the wheel to fold your note; press again to unfold. Notes must be
unfolded before you can edit them.
To Do
Add a Task
You can create and store up to 50 To Do tasks.
1 Press JUMP to go to the Jump screen. Scroll to highlight To Do, then
press the wheel to open the application.
2 Press MENU to open the menu. New Task is selected by default.
3 Press the wheel to open a blank task screen.
4 Fill in your task information.
5 Press DONE to save the task.
Tip
Camera
Take a Photo
You can create and store up to 36 photos in your Gallery.
1 Press JUMP to go to the Jump screen. Scroll to highlight Camera, then
press the wheel to open the application.
2 Press MENU and select Capture New, or simply press the right shoulder
button . The screen now acts as the “viewfinder”.
3 To set the flash, open the pop-up menu and select a flash setting. Use
“Normal” for no flash (the default setting), “Flash” for regular flash, “Night”
for a slower shutter speed with no flash, and “Lowlight Flash” for slower
shutter speed plus flash.
To take a photo of yourself, center your image in the small mirror on the back
of the device and press the right shoulder button to capture. Remember the
“right shoulder button” will be on your left as you’re looking at the back of the
device.
4 Press the right shoulder button or select to take your photo.
5 Check the photo preview on the display: select CANCEL to discard it;
select to send the photo to an email and save it to your Gallery; or
select DONE to save it to your Gallery without sending it.
6 To look at your Photo Gallery, open the menu and select View Gallery.
Send a Photo by Email
In addition to being able to send a photo immediately after capture (read “Take
a Photo”, step 5 above), you can attach one or more photos in your Gallery to
an email message while composing. For instructions, read “Attach a Photo to
an Email Message” on page 39.
44 Using the Applications
Using the Applications 45
Download Fun™ Catalog
Purchase Items
Download ringtones, applications, games, and more! You’ll find that browsing
and purchasing items is easy:
1 Press JUMP to go to the Jump screen. Scroll to highlight the Download
Fun catalog, then press the wheel to open the application.
2 Wait while the latest catalog contents load... then use the wheel to scroll
through the categories. The categories are organized like the Jump
screen in a “ring” on the left, with each category’s splash screen on the
right. Highlight, then press the wheel to open a category’s Browse Items
screen.
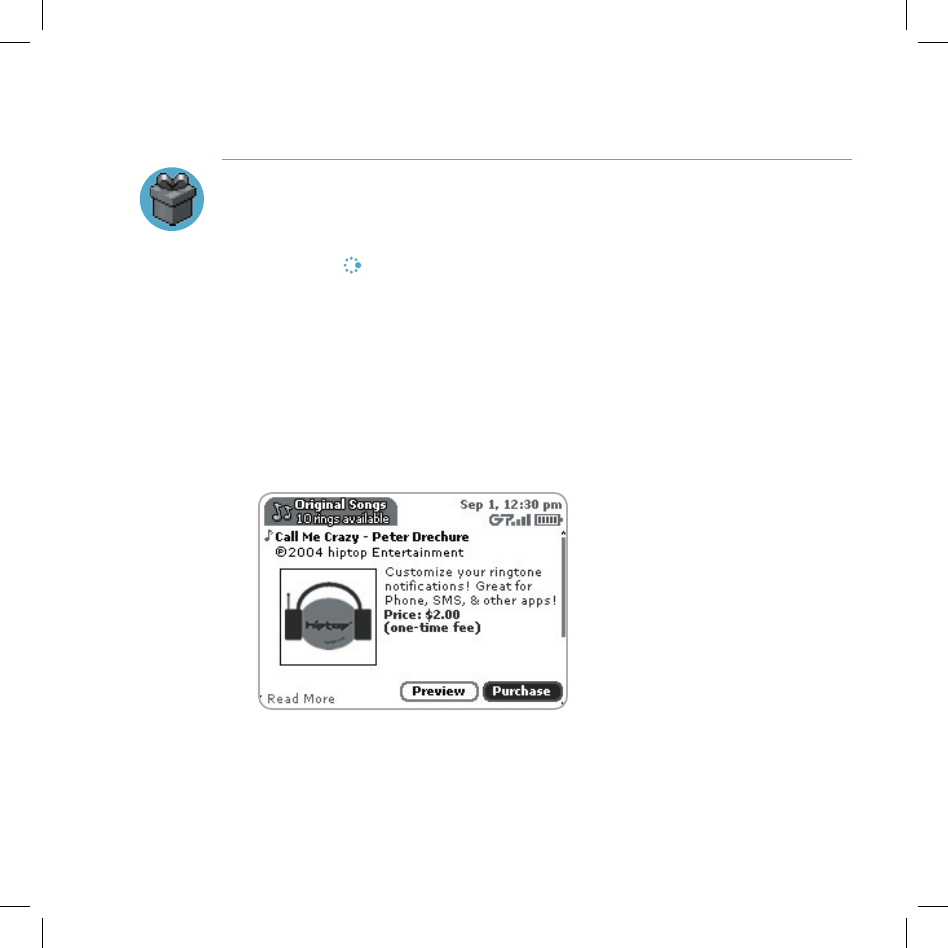
3 Individual items are grouped into folders. Highlight then press the wheel to
open a folder’s items. Once you find an item you’re interested in, highlight
the item, then press the wheel to open the Item Details screen:
4 To listen to a brief sample of a ringtone or view sample screen shots of
an application before you purchase it, select the Preview button. Select
Purchase to step through the simple on-screen purchase process.
5 Once purchased, your item will be downloaded to your device, network
connectivity permitting. You’ll be notified once the download is complete.
Note that applications require “installation”, an automatic process that
does involve a restart of your device.
6 If your item is not delivered immediately, you can check the download
process from the Purchases screen, described below.
Manage Your Purchases
To remove a purchased item, check the download status of a purchased item,
or view a list of all the purchases you have made fun (including details such as
price, subscription term, upgrade information) go to the Purchases screen:
1 Press JUMP to go to the Jump screen. Scroll to highlight the Download
Fun catalog, then press the wheel to open the application.
2 Scroll down to Purchases, then press the wheel to open the Browse
Purchases screen.
3 All your purchases are listed on this screen, organized into folders by
categories. Highlight a folder then press the wheel to reveal the items
within.
4 Items currently being downloaded are shown in italic:
To view item details, highlight the item then press the wheel. To discard
any highlighted item permanently, press MENU then select Discard.
46 Using the Applications
Using the Applications 47
Instant Messaging
Sign On
1 Press JUMP to go to the Jump screen. Scroll to highlight your Instant
Messaging application, then press the wheel to open the application. The
Sign On screen appears.
2 Type your username and password (passwords are case-sensitive), then
select the Sign On button.
3 Your list of users appears and you are ready to send an instant message.
Send an Instant Message
1 Press JUMP to go to the Jump screen. Scroll to highlight the Instant
Messaging application, then press the wheel to open the application.
2 Sign on with your username and password; the screen listing all your IM
friends’ username displays.
3 To start a conversation with a friend on your list, scroll to highlight the
friend’s username, then press the wheel to start a conversation.
4 Type your message. When ready, press the Return key to send.
Switch Between IM Conversations
You can have up to 10 IM conversations open at the same time. If you do
have more than one IM conversation open, you can quickly switch between
conversations by doing one of the following:
Menu - Press MENU + D to open the IM Conversations submenu, which
lists all your open conversations. Scroll to highlight the conversation you
want to open, then press the wheel.
Conversation Number - Each open IM conversation has a number (0-9),
which is displayed in the IM Conversations submenu, as well as on the
screen displaying your list of friends: ,
From any screen in IM, including the IM Jump screen, you can quickly
switch between conversations by entering MENU + the IM conversation
number.
Friends List Screen - On the screen listing all your friends’ usernames,
scroll to highlight the conversation to which you want to switch, then press
the wheel.
48 Using the Applications

Keyboard Shortcuts
Call a speed dial number Press and hold the speed dial number on the
keyboard while in the Phone or Jump screen.
Redial last number Press JUMP + + .
Answer an incoming call Press the wheel or .
Ignore an incoming call
Press .
(call will forward)
Hang up active call Press .
Mute your device when ringing Press any key, except .
Create a new note, message, Press MENU + N.
event, task, to do, or contact
Insert special Unicode character Press the SYM key.
Discard item Highlight the item then press the DEL key.
Send a composed email or Press MENU + M.
text message
Delete all text in a single line Press ALT + DEL.
Put device in key guard mode Press and hold DONE for two seconds.
plus lock controls
Unlock device Press MENU + DONE .
Power on/off your device Press and hold for three seconds.
Press twice to power off.
Open Sound Controls Press MENU + DONE .
Open Display Control Press JUMP + DONE .
Scroll page-by-page Hold MENU and rotate wheel. Or, press
to page up; press to page down.
Keyboard Shortcuts 49
VI.

Troubleshooting
How do I know when my account has been activated?
Once your account has been activated by T-Mobile, you will see a “Welcome”
message on your screen. If the Welcome message doesn’t appear on your
device within 48 hours after registering, contact T-Mobile’s Customer Care
department.
In order to comply with airline regulations, how can I temporarily disable
wireless connectivity when traveling?
Remember to power off your device during aircraft takeoffs and landings. To
turn off wireless connectivity (to comply with FAA regulations) follow these
instructions:
1 From the Jump screen, press MENU , and select Controls > Wireless....
2 In the Wireless Options dialog box that appears, select the Wireless Off
option, then select DONE .
3 Your device is now offline. You should confirm offline status by looking
next to the radio tower icon in the title bar; it should read OFF.
Even without wireless connectivity, you can still access the device applications
and you can read email messages that have been already downloaded.
However, you will not be able to send or receive messages until you enable
wireless connectivity.
50 Troubleshooting
VII.

Troubleshooting 51
How can I improve radio reception when I’m in a “fringe” coverage area?
Try the following to improve radio reception:
• Use the hands-free headset and position the phone away from your body.
• Walk to a window if you are indoors.
• Step outside of buildings that have high metal, concrete, or earthen content
as they may absorb radio signals.
• Step away from metallic windows as they absorb RF energy.
• Go to the highest spot possible to make the call.
• Step away from computers or electronic equipment.
• If you are in a car, first park, then try the call from outside the car.
• If you are near or directly under a cellular/PCS radio tower, walk at least one
block away.
How can I protect my device from damage?
The best way to protect your device is to carry it with the display closed, in the
carrying case supplied in the box. You may risk damaging your device if you
do not protect the display.
My device has not connected to the service for quite a while. Is there
anything I can do myself before calling Customer Care?
Yes, try powering your device off and on. After your device boots, you’ll know
you’ve connected to the service when you see the in the title bar again.
What Web browsers do you support on the Desktop Interface?
Web browsers IE 5+ are supported on both the Windows and Macintosh
operating systems.

Why do the Web pages I open using the device’s Web Browser
application appear different from the pages I open on my desktop
computer?
The Web pages displayed on your device have been reformatted so they are
easier to read on a small display. The same information displays; it’s just laid
out on the screen so that it’s easier to view from your device.
What are the requirements for getting my other email accounts to appear
on my device?
To fetch messages from another email account, you must gather the following
information:
Name of the remote email server (e.g., mail.example.com).
Protocol used by the remote email server (e.g., POP, IMAP).
Your username on the remote email server. (For example, if your
email address is joe@example.com, then your username is “joe”.)
Your password on the remote email server. This is the same password
you use to open the remote email directly.
Most Internet Service Providers and University email systems work with
the POP3 protocol. If you are not sure of the protocol, use the Auto-detect
setting, or you can call or email your remote service and ask what protocol
they support. The remote service operators should also be able to tell you the
name of the remote email server.
Once you have all this information, set up your external account by following
the instructions in “Fetch Email from External Accounts” on page 35 of this
guide. Once set up, your remote email account will be checked periodically
and a copy of all new, unread messages will be placed in your
device Email mailbox.
52 Troubleshooting

Troubleshooting 53
What should I do if I need a replacement part for my device or if I need to
have my device repaired?
Contact T-Mobile’s Customer Care department for troubleshooting support.
How secure is my account data on the Desktop Interface? There may be
sensitive information stored in contact information (credit card numbers
for example) that must be secure!
Information in your account is stored on secure servers in a data center
protected by extensive physical security and firewalls. Please refer to
T-Mobile’s Privacy Policy for more information.
I noticed there isn’t a battery door on the device. Why is that?
The device does not contain a user-replacable battery. The battery is
rechargable and it is recommended that you charge it nightly.
How can I clean my device screen?
The screen on your device is coated with a protective layer of polycarbonate.
You can safely use warm soapy water, denatured alcohol, or isopropyl alcohol
to remove dirt and smudges from your screen. Be sure to use a very soft
cotton cloth, such as an old t-shirt, to prevent scratching when wiping the
screen.
How do I report a lost device?
Call T-Mobile’s Customer Care department to report the lost device. Don’t
worry! T-Mobile will disable your lost device and your data is always safely
stored on the service. When you receive your new device, your account data
will be downloaded to it automatically after you sign in with your existing
username and password.

Handling and Safety
Precautions
The Sidekick II is a mobile computing device that is susceptible to breaking if
dropped or subjected to severe shock. Please handle the device carefully.
Before using your device, please read the precautions listed below carefully as
they provide essential information for the safe handling of the product, and for
the protection of the users and others from possible harm.
Battery Handling
• Your device uses an internal lithium ion battery. Please contact customer care for
assistance should you need a replacement battery.
• Lithium ion batteries are recyclable. Never dispose of the battery or the unit by
incineration.
• Never attempt to disassemble or modify the battery.
• Never touch any fluid that may leak from the internal battery, as doing so may result in
injury to the skin or eyes.
• Never drop your device or subject it to severe shock. This may cause the internal
battery to leak, ignite, and/or rupture. Always immediately remove your device from
the vicinity of any open flame in the event the built-in battery leaks or emits an
unusual odor.
54 Handling and Safety Precautions
VIII.

Handling and Safety Precautions 55
Device Handling and Use
• Never attempt to disassemble, repair, or modify your device. Such action may result in
bodily injury, or damage to the unit or other property.
• Never touch liquid that might leak from a broken liquid crystal display (LCD), as doing
so may cause a skin rash.
• Never dispose of your device with ordinary waste.
• Never allow infants or small children within reach of your device.
• Switch off your device when in an aircraft. The use of the device in an aircraft may
be dangerous to the operation of the aircraft, disrupt the cellular network, and is
illegal. Failure to observe this instruction may lead to suspension or denial of cellular
telephone services to the offender, or legal action, or both.
• Certain locations (e.g., hospitals) may restrict the use of any device that emits low-
level RF energy. Always comply with posted prohibitions of the use of RF-emitting
devices.
• Do not use the device when at a refuelling station.
• Observe restrictions on the use of radio equipment in fuel depots, chemical plants, or
where blasting operations are in progress.
• It is advised that the device not be used by a driver while the vehicle is moving, except
in an emergency. Speak only into a fixed, neck-slung or clipped-on microphone when
it would not distract your attention from the road.
• Never allow any metallic objects (e.g., staples, paper clips) to become inserted into
your device, as this could result in the generation of excess heat or fire.
• Never use or store your device in the following locations:
- Anywhere it may be exposed to water (e.g, bathroom or sauna)
- Conditions of high humidity (e.g., rain or fog)
- Conditions of extreme high temperatures (e.g., near fire or in a sealed automobile)
- In direct sunlight
- Locations or site subject to strong vibration
• Use your device in locations with the following ambient environmental conditions:
- Normal operation: 0ºC to 40ºC (32ºF to 104ºF), with humidity of 30% to 80%

Battery Charger Handling
• The device is intended for use when supplied with power from the battery charger
included in the box with your device. Other usage will invalidate any approval given to
this device and may be dangerous.
• Charge the device within the temperature range of 0 to 40 degrees Celsius, or 32 to
104 degrees Fahrenheit, for the fastest charging time.
• Never place the battery charger on any surface that can be marred by exposure to
heat; always place the battery charger on a heat-insulating surface.
• Never place the battery charger adjacent to any heat source.
• Never leave the battery charger close to any open container of liquids.
• Never use a worn or damaged battery charger cable or plug, or a worn or damaged
extension cord or plug.
• When traveling abroad, never plug the battery charger into a power source that does
not correspond to both the voltage and frequency specified on the charger.
• Always confirm that the battery charger plug has been fully inserted into the
receptacle to ensure a secure electrical connection.
• Always immediately power-off the device and disconnect the battery charger from the
power outlet in the event of any unusual odor or smoke.
• It is normal for the battery charger to become warm when charging. Disconnect the
battery charger from the outlet when not in use.
• Never attempt to disassemble or repair an battery charger, power supply cables, or
plugs, as doing so exposes you to electric shock.
56 Handling and Safety Precautions

Radio Frequency Exposure
THIS MODEL DEVICE MEETS THE GOVERNMENT’S REQUIREMENTS
FOR EXPOSURE TO RADIO WAVES.
Your wireless device is a radio transmitter and receiver. It is designed and manufactured
not to exceed the emission limits for exposure to radiofrequency (RF) energy set by the
Federal Communications Commission of the U.S. Government and also the limits set by
the Council of the European Union. These limits are part of comprehensive guidelines
and establish permitted levels of RF energy for the general population. The guidelines
are based on standards that were developed by independent scientific organizations
through periodic and thorough evaluation of scientific studies. The standards include a
substantial safety margin designed to assure the safety of all persons, regardless of age
and health.
The exposure standard for wireless mobile devices employs a unit of measurement
known as the Specific Absorption Rate, or SAR. The SAR limit set by the FCC is
1.6W/kg.1 Tests for SAR are conducted using standard operating positions specified
by the FCC with the device transmitting at its highest certified power level in all tested
frequency bands. Although the SAR is determined at the highest certified power level,
the actual SAR level of the device while operating can be well below the maximum
value. This is because the device is designed to operate at multiple power levels so as
to use only the power required to reach the network. In general, the closer you are to a
wireless base station antenna, the lower the power output.
Before a device model is available for sale to the public, it must be tested and certified
to the FCC that it does not exceed the limit established by the government-adopted
requirement for safe exposure. The tests are performed in positions and locations (e.g.,
at the ear and worn on the body) as required by the FCC for each model.
Handling and Safety Precautions 57
1 In the United States and Canada, the SAR limit for mobile devices used by the
public is 1.6 watts/kg (W/kg) averaged over one gram of tissue. The EU SAR limit for
the general public is currently 2 W/kg averaged over 10 grams of body tissue. These
standards incorporate a substantial margin of safety to give additional protection for the
public and to account for any variations in measurements.

The highest SAR value for this model device when tested for use at the ear is 0.54
W/kg and when worn on the body, as described in this Guide, is 0.75 W/kg. (Body-worn
measurements differ among device models, depending upon available accessories and
FCC requirements.) While there may be differences between the SAR levels of various
devices and at various positions, they all meet the government requirement for safe
exposure.
The FCC has granted an Equipment Authorization for this wireless device with all
reported SAR levels evaluated as in compliance with the FCC RF emission guidelines.
SAR information on this model device is on file with the FCC and can be found under
the Display Grant section of http://www.fcc.gov/oet/fccid after searching on FCC ID P5J-
ONISH.
For body-worn operation, to maintain compliance with FCC RF exposure guidelines,
use the supplied carrying case. Use of non-approved accessories may violate FCC RF
exposure guidelines and should be avoided. When carrying the device on you, turning
the display in towards the body will minimize RF exposure and maximize antenna
efficiency.
Regulatory Compliance Information
EU Declaration of Conformity
Danger, Inc. hereby declares that this wireless device, model number PV-100,
manufactured by Sharp Corporation, is in compliance with the essential requirements
and other relevant provisions of Directive 1999/5/EC.
A copy of the original declaration of conformity can be found at the following Internet
address: http://www.danger.com/consumers.php
58 Handling and Safety Precautions

Note
FCC Declaration of Conformity
This wireless device, model number PV-100, manufactured by Sharp Corporation,
complies with part 15 of the FCC Rules.
Operation is subject to the following two conditions: (1) This device may not cause
harmful interference, and (2) this device must accept any interference received,
including interference that may cause undesired operation.
Responsible Party:
Danger, Inc.
3101 Park Blvd., Palo Alto, CA 94306, USA
650-289-5000
www.danger.com
This equipment has been tested and found to comply with the limits for a Class B digital
device, pursuant to Part 15 of the FCC Rules. These limits are designed to provide
reasonable protection against harmful interference in a residential installation. This
equipment generates, uses and can radiate radio frequency energy and, if not installed
and used in accordance with the instructions, may cause harmful interference to radio
communications. However, there is no guarantee that interference will not occur in a
particular installation. If this equipment does cause harmful interference to radio or
television reception, which can be determined by turning the equipment off and on, the
user is encouraged to try to correct the interference by one or more of the following
measures:
• Reorient or relocate the receiving antenna.
• Increase the separation between the equipment and receiver.
• Connect the equipment into an outlet on a circuit different from that to which the
receiver is connected.
• Consult the dealer or an experienced radio/TV technician for help.
Modifications not expressly approved by the manufacturer could void the user’s authority
to operate the equipment.
Handling and Safety Precautions 59

Legal Information
Danger® Service and End-User License Agreement
IMPORTANT: PLEASE CAREFULLY READ THIS SERVICE AND END-USER LICENSE AGREEMENT (THE
“AGREEMENT”) BETWEEN YOU AND DANGER, INC. (“DANGER”) BEFORE YOU USE YOUR SIDEKICK DEVICE
(THE “DEVICE”). YOUR USE OF THE DEVICE OR THE SERVICE FOR THE DEVICE SHALL CONSTITUTE YOUR
BINDING ACCEPTANCE OF ALL OF THE TERMS AND CONDITIONS OF THIS AGREEMENT. IF YOU DO NOT
AGREE TO ALL OF THE TERMS AND CONDITIONS OF THIS AGREEMENT, THEN YOU MAY NOT USE THE
DEVICE OR THE SERVICE AND SHOULD PROMPTLY RETURN THE DEVICE TO THE PLACE WHERE YOU
PURCHASED IT.
Danger owns and operates a service that enables certain features on your Device, including email, Internet access,
instant messaging, address book, and calendar functions, and that also allows you to access such features from a Web
site operated by Danger (the “Service”). Your use of the Service and the Software (as defined below) in the course of
operating your Device is subject to the terms and conditions of this Agreement. Danger reserves the right to change
or modify any of the terms and conditions contained in this Agreement or any policy referenced herein at any time and
in its sole discretion. You may access this agreement at www.danger.com/agreements. If the Agreement is changed,
we will post the new terms to such Web page. Any changes or modifications will be effective upon posting, and your
continued use of the Service or Software after the posting of such changes will constitute your binding acceptance of
the Agreement as revised.
1. Software
1.1 Definition. “Software” means any computer software, in executable code form, owned by Danger (or
software owned by third parties, which Danger has the right to distribute or sublicense) and either pre-loaded on
the Device at the time of manufacture or otherwise furnished to you by Danger in its sole discretion. “Software”
includes the hiptop® operating system and applications.
1.2 License Grant. Subject to the terms and conditions of this Agreement, Danger hereby grants to you a
nonexclusive, nontransferable, nonsublicenseable license to use, perform, and display the Software using the
Device upon which the Software was originally installed, and solely as necessary to operate the Software in
accordance with the applicable documentation.
1.3 Restrictions. You may not (a) reproduce, distribute, sublicense, use for service-bureau purposes, sell,
lease, or otherwise transfer the Software to any third parties; (b) modify, alter, improve, “hack,” or create
derivative works of the Software; or (c) reverse-engineer, decompile, disassemble, reverse-assemble, or
otherwise attempt to derive the source code of the Software.
1.4 Third-Party Software. You understand and agree that in addition to the Software, the Device may contain
certain third-party software (“Third-Party Software”) the use of which is subject to separate license agreements
containing additional terms and conditions. Any such license agreements are provided to you separately. You
hereby agree to comply with all such additional terms and conditions in your use of the Third-Party Software.
IX.
60 Legal Information

2. Ownership. The Software is licensed to you, not sold. Danger and its licensors retain exclusive ownership of
all proprietary rights, including all patent, copyright, trade secret, trademark and other intellectual property rights
worldwide, in and to the Service and the Software (including any corrections, bug fixes, enhancements, updates
or other modifications thereto). There are no implied licenses under this Agreement, and all rights not expressly
granted are hereby reserved.
3. Use of the Service
3.1 Wireless Service Provider. In addition to Danger’s terms and conditions set forth in this Agreement, you
agree and acknowledge that your use of the Service is subject to your wireless carrier’s terms and conditions of
service.
3.2 Privacy Policy. Danger believes strongly in protecting user privacy and providing you notice of Danger’s
collection and use of data, including personally identifying information. To learn about Danger’s information
collection and use practices and policies, please refer to the Danger Service Privacy Notice
(http://www.danger.com/service_privacy.php).
3.3 Your Account. All information that you provide in connection with your registration for the Service must be
accurate. You will receive a password and username upon completing your registration. You are responsible
for maintaining the confidentiality of the password and account information, and are fully responsible for all
activities that occur under your password or account. You agree to immediately notify your wireless network
operator of any unauthorized use of your password or account or any other breach of security.
3.4 Prohibited Activities. You agree not to use the Service to: (a) directly or indirectly violate any applicable
laws, rules, or regulations issued or promulgated by any competent government authority, including without
limitation any intellectual property laws, privacy laws, computer fraud or abuse statutes, or export control laws;
(b) upload, post, email or transmit any content that you do not have the right to post or transmit under any law,
contractual duty or fiduciary relationship; (c) upload, post, email or transmit any content that infringes a third
party’s trademark, patent, trade secret, copyright, publicity, privacy, or other proprietary right; (d) upload, post,
email or transmit any materials that are unlawful, untrue (including incomplete, false or inaccurate biographical
information), harassing, libelous, defamatory, abusive, tortuous, threatening, obscene, pornographic, indecent,
hateful, abusive, or harmful (including but not limited to viruses, corrupted files, or any other similar software or
programs); (e) violate, attack, or attempt to violate or attack the security, integrity, or availability of any network,
service, or other computer system; (f) send mass unsolicited or unauthorized electronic messages or “spam”,
including without limitation, promotions or advertisements for products or services; (g) send altered, deceptive
or false source-identifying information (including forged TCP/IP headers); or (h) use the Service in a manner
that otherwise violates Danger’s then-current Acceptable Use Policy, the latest version of which is available
at www.danger.com/agreements. Violations of any of the above will be investigated by Danger and, where
appropriate, Danger may either institute legal action, or cooperate with law enforcement authorities in bringing
legal proceedings, against users who violate this Agreement.
3.5 Third-Party Content and Services. In the course of using the Service, you may access services and Web
sites provided by third parties, including third-party Web sites accessible through links from the Service. Danger
is not responsible for the content, products, materials, or practices (including privacy practices) of any such
Web sites or third-party services. You understand that by using the Service you may be exposed to third-party
Web sites or content that you find offensive, indecent or otherwise objectionable. Danger makes no warranty,
representation, endorsement, or guarantee regarding, and accepts no responsibility for, the quality, content,
nature or reliability of third-party Web sites (including Web sites accessible by hyperlink from the Service)
or products or services accessible from the Service. Danger provides links to third-party Web sites for your
convenience only and Danger does not control such Web sites. Danger’s inclusion of links to such Web sites
Legal Information 61

does not imply any endorsement of the materials on such third party Web sites or any association with their
operators. It is your responsibility to review the privacy policies and terms of use of any other Web site you visit.
In no event will Danger be liable to you in connection with any Web sites, content, products, services, materials,
or practices of a third party.
3.6 Uploading and Downloading of Information. You hereby agree and acknowledge: (a) that Software, data,
and other information may be downloaded from Danger to your Device and requests for information may be
uploaded from your Device to Danger on a regular basis; (b) that Danger makes no guarantee of, and is not
responsible for, the accuracy or completeness of any downloaded information; and (c) that the Service may be
inoperable from time-to-time and Danger shall incur no liability for such inoperability.
4. Intellectual Property Rights.
4.1 Copyright. All content included on the Device, including graphics, text, images, logos, button icons,
images, audio and video clips and software, as well as the compilation of the content, is the property of
Danger and/or its licensors (“Danger Material”) and is protected by U.S. and international copyright laws. Any
unauthorized use of Danger Material may violate copyright, trademark or other laws. Additionally, certain other
content, including, websites, photographs, images, text, graphics, video clips, audio recordings, or other content
accessed or transmitted through the Service may be copyrighted by third parties and protected by U.S. and
international copyright law. Materials that are copyrighted may be viewed as presented and are for personal use
only. Unless otherwise authorized by law, you agree not to alter, falsify, misrepresent, modify, copy, reproduce,
republish, upload, post, transmit, distribute or otherwise utilize such materials without the express, written
permission of the copyright holder. Unauthorized copying or distribution of copyrighted works is an infringement
of the copyright holders’ rights. Pursuant to the Digital Millennium Copyright Act, Danger reserves the right to
terminate the accounts of users of the Service who are infringers of the copyrights of others.
4.2 Trademarks. Danger, hiptop, Get Away With It!, hiplogs, Flip for It, the Danger logo, and the hiptop logo
are trademarks, service marks, and/or registered trademarks of Danger, Inc. in the United States and other
countries. You agree not to use Danger’s trademarks (i) to identify products or services that are not Danger’s, (ii)
in any manner likely to cause confusion, (iii) in or as a part of your own trademarks, (iv) in a manner that implies
that Danger sponsors or endorses your products or services or (v) in any manner that disparages or discredits
Danger. You must have Danger’s prior written consent before you use Danger’s trademarks in any way.
5. No Monitoring; Necessary Disclosures. You acknowledge that Danger does not pre-screen or monitor
content posted to or transmitted through the Service, but that Danger shall have the right (but not the obligation)
to remove any content in its sole discretion, including, without limitation, any content that violates this
Agreement. In addition, Danger reserves the right to disclose all content that you upload, post, email, transmit
or otherwise make available via the Service (whether or not directed to Danger) if required to do so by law or in
the good faith belief that such disclosure is necessary or appropriate to conform to the law or comply with legal
process served on Danger, to protect and defend the rights or property of Danger, the Service or our customers,
whether or not required to do so by law, or to protect the personal safety of our customers or the public.
6. Termination. You agree that Danger, in its sole discretion, may immediately terminate your access to the
Service (whether directly or through your wireless carrier) if Danger believes that you have violated the terms
and conditions of this Agreement. You agree that any termination of your access to the Service may be effected
without prior notice, and acknowledge and agree that, upon termination, Danger may immediately deactivate
or delete your account and all related information, emails, files and other data in your account and/or bar any
further access to such files or the Service. Further, you agree that Danger shall not be liable to you for any
termination of your access to the Service hereunder.
62 Legal Information

7. NO WARRANTIES. THE SERVICE AND SOFTWARE ARE PROVIDED BY DANGER ON AN “AS IS” BASIS.
DANGER HEREBY DISCLAIMS ALL REPRESENTATIONS OR WARRANTIES OF ANY KIND, WHETHER
EXPRESS, IMPLIED, OR STATUTORY, RELATING TO THE SERVICE OR THE SOFTWARE (INCLUDING
ANY INFORMATION, CONTENT, MATERIALS OR PRODUCTS THAT YOU MAY ACCESS THROUGH
THE SERVICE), INCLUDING WITHOUT LIMITATION ANY IMPLIED WARRANTY OF MERCHANTABILITY,
FITNESS FOR A PARTICULAR PURPOSE, QUIET ENJOYMENT, NON-INFRINGEMENT OF THIRD
PARTY RIGHTS, ACCURACY OF INFORMATIONAL CONTENT, AND ANY WARRANTIES ARISING
FROM A COURSE OF DEALING OR USAGE OF TRADE. WITHOUT LIMITING THE FOREGOING, YOU
ACKNOWLEDGE THAT DANGER DOES NOT WARRANT OR REPRESENT THAT THE SERVICE OR THE
SOFTWARE WILL MEET YOUR REQUIREMENTS, THAT THE SERVICE OR THE SOFTWARE WILL BE
TIMELY, SECURE, UNINTERRUPTED, OR ERROR-FREE, THAT DEFECTS IN THE SERVICE OR THE
SOFTWARE WILL BE CORRECTED, THAT ANY CONTENT OR INFORMATION CONTAINED IN THE
SERVICE OR ACCESSED THROUGH YOUR USE OF THE DEVICE WILL BE ACCURATE, COMPLETE,
RELIABLE, OR ERROR-FREE, THAT THE SOFTWARE OR ANY MATERIALS AVAILABLE FOR DOWNLOAD
FROM THE SERVICE WILL BE FREE OF VIRUSES OR OTHER HARMFUL COMPONENTS, OR THAT
THE SERVICE WILL BE FREE FROM UNAUTHORIZED ACCESS (INCLUDING THIRD PARTY HACKERS
OR DENIAL OF SERVICE ATTACKS). FURTHER, AS THE WIRELESS CARRIER IS NOT CONTROLLED
BY DANGER, NO WARRANTY IS MADE AS TO COVERAGE, AVAILABILITY, OR GRADE OF SERVICE
PROVIDED BY THE WIRELESS CARRIER. PLEASE NOTE THAT SOME JURISDICTIONS MAY NOT ALLOW
THE EXCLUSION OF IMPLIED WARRANTIES, SO SOME OF THE ABOVE EXCLUSIONS MAY NOT APPLY
TO YOU.
8. LIMITATION OF LIABILITY. IN NO EVENT SHALL DANGER BE LIABLE TO YOU FOR ANY DIRECT,
INDIRECT, INCIDENTAL, SPECIAL, CONSEQUENTIAL, EXEMPLARY, PUNITIVE, OR OTHER DAMAGES
(INCLUDING, WITHOUT LIMITATION, DAMAGES FOR LOSS OF PROFITS, BUSINESS INTERRUPTION,
LOSS OF INFORMATION OR DATA, OR OTHER PECUNIARY LOSS) RESULTING FROM YOUR ACCESS TO,
OR USE OR INABILITY TO USE THE SERVICE OR SOFTWARE (INCLUDING AS A RESULT OF AN OUTAGE
OF THE SERVICE PROVIDED BY YOUR WIRELESS CARRIER OR ANY OTHER THIRD-PARTY SERVICE
PROVIDER), OR WITH RESPECT TO THE INFORMATION, SERVICES, CONTENT OR ADVERTISEMENTS
CONTAINED ON OR OTHERWISE ACCESSED THROUGH THE SERVICE. IN NO EVENT WILL DANGER
BE LIABLE TO YOU IN CONNECTION WITH THE SERVICE OR THE SOFTWARE FOR ANY DAMAGES IN
EXCESS OF TWO HUNDRED U.S. DOLLARS (U.S. $200).
9. Indemnity. You agree to defend, indemnify, and hold harmless Danger, its officers, directors, employees and
agents, from and against any claims, actions or demands, including without limitation reasonable attorneys’
fees, made by any third party due to or resulting from your violation of this Agreement.
10. Export Controls. You agree and acknowledge that the Software may contain cryptographic functionality
the export of which is restricted under U.S. export control law. You will comply with all applicable laws and
regulations in your activities under this Agreement, including without limitation all export laws and regulations
of the U.S. Department of Commerce and all other U.S. agencies and authorities, including the Export
Administration Regulations promulgated by the Bureau of Industry and Security (as codified in 15 C.F.R.
Parts §§ 730-774). You expressly agree not to export or re-export the Software in violation of such laws or
regulations, or without all required licenses and authorizations.
11. Government End Users. The Software is a “commercial item” as that term is defined at 48 C.F.R. 2.101,
consisting of “commercial computer software” and “commercial computer software documentation” as such
terms are used in 48 C.F.R. 12.212. Consistent with 48 C.F.R. 12.212 and 48 C.F.R. 227.7202-1 through
227.7202-4, all U.S. Government end users acquire the Software with only those rights set forth therein.
Legal Information 63

12. Applicable Law and Jurisdiction. You agree that this Agreement and all matters relating to the Service and
the Software will be governed by the laws of the State of California, without giving effect to any principles
of conflicts of laws that would require the application of the laws of a different state. You also consent to the
exclusive jurisdiction and venue of the Superior Court of Santa Clara County for state claims and the Northern
District of California for federal claims in all disputes arising out of or relating to the Software or the Service. The
parties agree that the Uniform Computer Information Transaction Act (or any statutory implementation of it) and
the United Nations Convention on the International Sale of Goods will not apply with respect to this Agreement
or the parties’ relationship.
13. General Provisions. You are responsible for compliance with applicable local laws. This Agreement is
personal to you, and you may not transfer, assign or delegate this Agreement to anyone without the express
written permission of Danger. Any attempt by you to assign, transfer or delegate this Agreement without the
express written permission of Danger shall be null and void. The paragraph headings in this Agreement,
shown in boldface type, are included to help make the agreement easier to read and have no binding effect.
The waiver of any breach or default, or any delay in exercising any rights shall not constitute a waiver of any
subsequent breach or default. This Agreement constitutes the complete and exclusive agreement between you
and Danger with respect to the subject matter hereof, and supersedes all prior oral or written understandings,
communications or agreements. If for any reason a court of competent jurisdiction finds any provision of this
Agreement, or portion thereof, to be unenforceable, that provision of the Agreement will be enforced to the
maximum extent permissible so as to effect the intent of the parties, and the remainder of this Agreement will
continue in full force and effect.
Danger® Service Privacy Notice
Danger, Inc. (“Danger”) owns and operates a service that enables certain features on your wireless device, including
email, Internet access, instant messaging, address book, and calendar functions (the “Danger Service”). The Danger
Service also includes a Web site operated by Danger (the “Danger Service Web Site”) that subscribers may use to
access these features, as described more fully in this Reference Guide. This Privacy Notice applies to information
collected by Danger in connection with its operation of the Danger Service. This Notice does not apply to information
collected on Web sites operated by Danger, such as www.danger.com or www.hiptop.com. To find out how Danger
handles information collected on those Web sites, please read the privacy policies located at those sites. Finally, this
Notice does not apply to information collected by your wireless carrier. Please refer to your wireless carrier’s privacy
policy to learn what information it collects about you and how such information is used.
YOUR PRIVACY IS IMPORTANT TO US
At Danger we are committed to maintaining the privacy and accuracy of your personal information and to protecting
such information from loss, misuse and unauthorized access and disclosure. This Privacy Notice describes how
Danger treats information received about you when you become a subscriber to the Danger Service, when you provide
information to us, and when you use the Danger Service.
64 Legal Information

WHAT INFORMATION DOES DANGER COLLECT?
It is important to know that we collect different types of information. We use each type of information in different ways,
as explained in more detail below. The terms defined below are used throughout our Privacy Notice.
1. “Personal Information” is any information that personally identifies you as an individual. Examples of this type of
information would be your name, address, telephone number, email address, and other information that personally
identifies you. Personal Information also includes data you transmit and/or store on the Danger Service, such as your
addresses book, notes, tasks, pictures and the contents of messages and emails you send and receive.
2. “Anonymous Information” does not personally identify you as an individual. It is information collected without
connecting it to any name, address, or other Personal Information. Although this data does not personally identify you,
it does provide us with anonymous information about how people are using our Service. For example, Anonymous
Information collected by us may describe how many people viewed a particular Web site or used a particular feature of
our Service, but this data does not disclose Personal Information of those people.
Personal Information
Danger collects certain information that personally identifies you. When you register to become a user of the Danger
Service, Danger requests your name. Danger also collects the mobile phone number for the device you are registering
and the email address assigned to you as a subscriber to the Danger Service. In addition, if you use your wireless
device to access the AOL Instant Messenger™ Service, Danger will collect your screen name and password for this
service.
By using the Danger Service, you will transmit and store on Danger’s servers other personal information, such as your
addresses book, notes, tasks, pictures and the contents of emails you send and receive. You may also retrieve email
from your existing email accounts with third party services by using protocols such as “POP”. When you set up mail
accounts through the Danger Service, Danger collects the email addresses and other information associated with
these accounts and stores the content of the email messages sent to these accounts on its servers.
Personal Information may also be collected at other times by specifically requesting it from you, such as when you
order premium services, when you request other promotional material, when we ask you to complete customer
surveys, and in other circumstances when you interact with the Danger Service or our employees, agents and
contractors working to provide the Danger Service to you.
Anonymous Information
Danger collects and stores Anonymous Information relating to the use of the Danger Service. For example, Danger’s
servers automatically gather information regarding which Web pages are visited by users of the Danger Service. In
addition, Danger collects data regarding subscribers’ usage of various features of the Service, such as how many
email messages or IM messages are sent by a particular user or by users in the aggregate, the most popular Web
sites visited by users of the Service, the number of Web pages viewed at the Danger Service Web Site, and other
similar information. Similarly, for network monitoring purposes, the Danger Service records how many devices in
the aggregate are connected to the Service in particular geographic locations, but the Service does not identify the
location of individual devices or subscribers. All of this Anonymous Information gathered from your use of the Danger
Service is stored by Danger under an automatically generated identification number that will not be linked to your name
or your other Personal Information without your consent, except as specifically provided in the Use of Anonymous
Information section below.
Legal Information 65

Private Data and Online Communications
Danger stores certain information on its servers at your request. As described above, you may request that Danger
retrieve email messages from email accounts maintained by third parties. The content of Instant Messaging
conversations may also be temporarily stored on Danger’s servers pending delivery to your wireless device. In addition,
you may store addresses, calendar information, to do lists, notes, and photographs on the Danger Service, either
through your wireless device or by uploading such information at the Danger Service Web Site. If you input such
information directly on your wireless device, it is automatically synchronized with and stored on Danger’s servers and is
available to you through both the device and the Danger Service Web Site.
HOW DOES DANGER USE THE INFORMATION IT COLLECTS?
Personal Information
Danger collects and uses Personal Information to (a) operate and deliver the Danger Service, (b) process or collect
payments and for other billing purposes, (c) to assist with questions about use of the Danger Service, (d) to anticipate
and resolve problems with your Service, and (e) to alert you to new products, product upgrades, software upgrades,
changes to the service, technical and administrative issues, special offers and other information related to the Danger
Service.
Anonymous Information
Danger uses Anonymous Information to effectively operate the Danger Service and enhance your experience using
the Service. For example, Danger stores cached versions of the Web sites that are most frequently visited by users
of the Service, so that you can access them more quickly. Danger also uses Anonymous Information to understand
how certain features of our Service are being used and to measure the costs of providing certain features. We may
also use Anonymous Information to diagnose and correct problems with the Danger Service. In some cases, it may be
necessary to link Anonymous Information relating to your use of the Service with you individually in order to correct
problems that you may be experiencing with the Danger Service. In general, the collection and use of Anonymous
Information allows Danger to analyze the use of the Danger Service to continue to develop and provide improved
features and services to our subscribers.
Private Data and Online Communications
Danger honors the confidentiality of your private communications and other private data, whether it is through Instant
Messaging conversations, email messages, or other data stored at your request, such as addresses and calendar
information. Danger will not read or disclose to third parties private communications that are transmitted using the
Danger Service or private data stored at your request, except as required to operate the Danger Service or as
otherwise provided in the Special Circumstances section below.
WITH WHOM DOES DANGER SHARE THE INFORMATION THAT IS COLLECTED?
Personal Information
Danger will not share your Personal Information with third parties without your consent, except in the very limited
circumstances outlined in the Special Circumstances section below. Your Personal Information is not otherwise sold,
marketed or shared with third parties without your permission.
66 Legal Information

Anonymous Information
Anonymous Information may be shared with third parties for research, analysis, or other similar purposes. Danger will
only share Anonymous Information with third parties if the information is disclosed in a manner that does not identify
individual subscribers to the third parties concerned.
ARE THERE ANY SPECIAL CIRCUMSTANCES THAT MAY REQUIRE MY INFORMATION TO BE SHARED WITH
THIRD PARTIES?
Danger may disclose Personal Information and/or Anonymous Information if required to do so by law or in the good-
faith belief that such action is necessary or appropriate to (a) conform to the edicts of the law or comply with legal
process served on Danger, (b) protect and defend the rights or property of Danger, the Danger Service, or the users of
the Danger Service, whether or not required to do so by law, or (c) protect the personal safety of users of the Danger
Service or the public. Danger reserves the right to contact appropriate authorities and disclose Personal or Anonymous
Information to them at its discretion when it appears that individuals using our products or services are engaged in
activities that are illegal or violate the Danger Service and End-User License Agreement.
Should Danger merge with or be acquired by another company, or if the business unit providing your service were
sold to another company, then customer information maintained by Danger, including Personal and Anonymous
Information, may be transferred to and used by the resulting combined company. If Danger were to cease operations,
this customer data might be transferred to and used by another company, which offers similar or related products or
services. While we cannot predict a great deal about such an unlikely event, we would hope this would provide you with
continuity of service.
From time to time, Danger may also share Personal Information with third parties for their use to provide services to
Danger in the operation and delivery of the Danger Service, such as to process or collect payments, service accounts,
or provide the products and services associated with the Danger Service. All such third parties are prohibited from use
of such Personal Information except to provide such services to Danger, and they are also required to maintain the
confidentiality of such Personal Information.
HOW CAN YOU UPDATE OR CORRECT YOUR INFORMATION?
Danger believes in and supports your right to access and edit the Personal Information you have provided us. You may
make such changes at the Danger Service Web Site.
DOES DANGER COLLECT INFORMATION FROM CHILDREN UNDER 13?
Danger currently does not knowingly collect or use Personal Information from children under 13, and Danger will not
do so in the future without first obtaining verifiable consent from their parents. Should a child whom Danger knows to
be under 13 send Personal Information to Danger, Danger will only use that information to respond directly to that child
or seek parental consent.
Legal Information 67

WHAT TYPES OF SECURITY MEASURES ARE IN PLACE TO PROTECT YOUR INFORMATION?
Danger maintains a variety of physical, electronic, and procedural safeguards to guard your information. For example,
information transmitted from your wireless device to the Danger Service is automatically encrypted for your protection.
Once your information reaches us, it resides on a server that is heavily guarded both physically and electronically. In
order to prevent unauthorized access into our systems, our servers sit behind an electronic firewall and are not directly
connected to the Internet. These technologies and methods increase the security and privacy of information traveling
to, from and within the Danger Service. While we cannot guarantee that loss, misuse or alteration of your data will not
occur, we work hard to prevent such occurrences.
Danger also safeguards Personal Information from unauthorized access. Only authorized Danger employees or
agents carrying out permitted business functions are permitted to access Personal Information. Employees who violate
Danger’s privacy access policies are subject to disciplinary actions, including termination when appropriate. In addition,
Danger encourages all users of the Danger Service to review the privacy policies posted by the Web sites visited over
the Internet, including those linked to from the Danger Service, to ensure that these Web sites also protect Personal
Information. Danger is not responsible for Personal Information you provide to such sites or the privacy practices and
other polices of such sites.
DOES DANGER USE COOKIES?
Cookies are small text files that are placed on the hard drive of your computer by a Web site you visit. These files
identify your computer and record your preferences and other data about your visit so that when you return to the site,
the site knows who you are and can personalize your visit. In operating the Danger Service Web Site, Danger uses
cookies to personalize the site, improve your experience at the site, and to determine which areas and features of the
site are most popular. You may set your browser to reject cookies, but this may affect your ability to use some parts of
the Danger Service Web Site.
When you access the Internet using your wireless device, the Web sites you visit may use cookies. These cookies will
not be physically placed on your wireless device, but they may be transferred to Danger’s servers or placed on servers
operated by third-party Web site operators. This cookie-like functionality is in place for the same reasons and designed
for the same purposes as cookies installed on your computer, but information collected from cookies by third parties is
subject to their privacy practices rather than Danger’s.
As technology advances and cookies provide more functionality, we may utilize them in different ways in the future. As
we do so, this Notice will be updated to provide you with more information.
HOW CAN I FIND OUT ABOUT CHANGES TO THIS PRIVACY NOTICE?
Danger may make changes to this Notice from time to time. We will post changes to our Privacy Notice here, so be
sure to check back periodically. We may also notify you of significant changes by email or in other ways.
WHAT IF I HAVE OTHER QUESTIONS, COMMENTS, OR CONCERNS ABOUT PRIVACY?
If you have any questions or comments about our use of Personal Information or about this Privacy Notice, please
contact us at privacy@danger.com. Danger will use reasonable efforts to promptly investigate any complaint you may
have regarding our use of Personal Information and to comply fully with the legal and regulatory supervisory authorities
responsible for enforcing our adherence to the privacy principles stated above.
68 Legal Information

One-Year Limited Warranty
Audiovox Communications Corp. (“Audiovox”) warrants to the original retail purchaser (“Purchaser”) that this Audiovox®
product will be free from defects in materials and workmanship under normal use for one year from the date of original
purchase from Audiovox or an Audiovox authorized reseller. Your dated sales receipt showing the date of purchase is
your proof of the purchase date.
WARRANTY LIMITATIONS
Within the first twelve (12) months from date of purchase, Audiovox’s sole obligation under this express warranty shall
be to repair or replace the defective product or parts (with new or rebuilt parts). If neither repair nor replacement is
reasonably available, Audiovox may in its sole discretion, refund to Purchaser the purchase price paid for the product.
To obtain repairs or replacement within the terms of this warranty, the product should be delivered with proof of
Warranty coverage (e.g. dated bill of sale), the consumer’s return address, daytime phone number and/or fax number
and complete description of the problem, transportation prepaid, to the Company at the address shown below or to the
place of purchase for repair or replacement processing.
THE EXTENT OF AUDIOVOX’S LIABILITY UNDER THIS WARRANTY IS LIMITED TO THE REPAIR OR
REPLACEMENT AS PROVIDED ABOVE AND, IN NO EVENT, SHALL AUDIOVOX’S LIABILITY EXCEED THE
PURCHASE PRICE PAID BY PURCHASER FOR THE PRODUCT.
Accessory products, including those listed in the applicable Audiovox catalogue, are not covered under this Limited
Warranty.
Audiovox shall not be responsible for Purchaser’s software, firmware, information or memory data contained in, stored
on, or integrated with any products returned to Audiovox for repair, whether under warranty or not. Audiovox is not
liable for any damages caused by the product or the failure of the product to perform, including lost profits, lost savings,
incidental damages or consequential damages. Audiovox is not liable for any claim made by a third party or made by
you for a third party.
This limited warranty does not apply to physical damage to the surface of the product, including breakage, cracks or
scratches on the LCD touchscreen or outside casing. This limited warranty also does not extend to any product from
which the serial number has been removed or to any product that has been: (a) damaged or rendered defective by
misuse, abuse, accident or other external causes; (b) subjected to unauthorized modification, alteration or repair; or,
(c) operated in an unsuitable environment or in a manner for which it is not intended. Purchasers will be charged for all
product repairs for damage or failure not covered by this limited warranty.
ANY IMPLIED WARRANTIES, INCLUDING ANY IMPLIED WARRANTY OF MERCHANTABILITY SHALL BE
LIMITED TO THE DURATION OF THIS WRITTEN WARRANTY. ANY ACTION FOR BREACH OF ANY WARRANTY
HEREUNDER INCLUDING ANY IMPLIED WARRANTY OF MERCHANTABILITY MUST BE BROUGHT WITHIN
A PERIOD OF 24 MONTHS FROM DATE OF ORIGINAL PURCHASE. IN NO CASE SHALL THE COMPANY BE
LIABLE FOR ANY CONSEQUENTIAL OR INCIDENTAL DAMAGES FOR BREACH OF THIS OR ANY OTHER
WARRANTY, EXPRESS OR IMPLIED, WHATSOEVER.
Some states or jurisdictions do not allow limitations on how long an implied warranty lasts or the exclusion or limitation
of incidental or consequential damages for consumer products so the above exclusions or limitations may not apply to
you. This Limited Warranty gives you specific legal rights, and you may also have other rights that may vary from state
to state or jurisdiction to jurisdiction. You are advised to consult applicable laws for a full determination of your rights.
Legal Information 69

SOFTWARE
THIS AUDIOVOX® PRODUCT MAY INCLUDE THIRD PARTY SOFTWARE, THE USE OF WHICH IS GOVERNED
BY THE APPLICABLE SOFTWARE LICENSE, END-USER LICENSE OR PROGRAM LICENSE AGREEMENT.
THIS LIMITED WARRANTY DOES NOT APPLY TO SUCH THIRD PARTY SOFTWARE AND SUCH SOFTWARE
IS PROVIDED “AS IS”. FOR THE APPLICABLE WARRANTY, PLEASE REFER TO THE SOFTWARE LICENSE,
END-USER LICENSE OR PROGRAM LICENSE GOVERNING THE USE OF SUCH SOFTWARE OR THE
DOCUMENTATION ACCOMPANYING SUCH SOFTWARE.
Audiovox does not warrant that any contained software products will meet Purchaser’s requirements or will work
together with any hardware or software products supplied by third parties, that the software products will be error free
or that software defects will be corrected.
WARRANTY SERVICE
Purchaser must contact Audiovox within the applicable warranty period to obtain warranty service authorization.
Audiovox is not responsible for products or parts received without a warranty service authorization. BE SURE TO
BACK UP DATA AND REMOVE ANY CONFIDENTIAL PROPRIETARY, OR PERSONAL INFORMATION BEFORE
RETURNING PRODUCT FOR SERVICE. AUDIOVOX IS NOT RESPONSIBLE FOR DAMAGE TO OR LOSS OF
ANY PROGRAMS, DATA OR REMOVABLE STORAGE MEDIA. Repaired or replacement products will be shipped to
Purchaser at Audiovox’s expense.
THE EXTENT OF THE COMPANY’S LIABILITY UNDER THIS WARRANTY IS LIMITED TO THE REPAIR OR
REPLACEMENT PROVIDED ABOVE AND, IN NO EVENT, SHALL THE COMPANY’S LIABILITY EXCEED THE
PURCHASE PRICE PAID BY PURCHASER FOR THE PRODUCT.
ANY IMPLIED WARRANTIES, INCLUDING ANY IMPLIED WARRANTY OF MERCHANTABILITY OR FITNESS FOR
A PARTICULAR PURPOSE SHALL BE LIMITED TO THE DURATION OF THIS WRITTEN WARRANTY. ANY ACTION
FOR BREACH OF ANY WARRANTY MUST BE BROUGHT WITHIN A PERIOD OF 18 MONTHS FROM DATE OF
ORIGINAL PURCHASE. IN NO CASE SHALL THE COMPANY BE LIABLE FOR ANY SPECIAL CONSEQUENTIAL
OR INCIDENTAL DAMAGES FOR BREACH OF THIS OR ANY OTHER WARRANTY, EXPRESS OR IMPLIED,
WHATSOEVER. THE COMPANY SHALL NOT BE LIABLE FOR THE DELAY IN RENDERING SERVICE UNDER THIS
WARRANTY OR LOSS OF USE DURING THE TIME THE PRODUCT IS BEING REPAIRED OR REPLACED.
No person or representative is authorized to assume for the Company any liability other than expressed herein in
connection with the sale of this product.
Some states or provinces do not allow limitations on how long an implied warranty lasts or the exclusion or limitation
of incidental or consequential damage so the above limitation or exclusions may not apply to you. This Warranty gives
you specific legal rights, and you may also have other rights which vary from state to state or province to province.
Audiovox Communications Corporation
555 Wireless Boulevard
Hauppauge, New York 11788
800-229-1235
70 Legal Information