Darfon Electronics G9 Wireless Keyboar User Manual Connection Steps of BT HID Keyboard
Darfon Electronics Corp Wireless Keyboar Connection Steps of BT HID Keyboard
users manual
A. Introduction
Congratulations on your purchase of the Innovative Bluetooth Keyboard. Now, if
you replace your Bluetooth handheld, you won’t have to replace your keyboard.
Using Bluetooth HID Profile technology to communicate with your handheld,
this innovation lets you input data to your device without physically attaching it
to the Keyboard. Connection distance is up to 7M. It works with most popular
Bluetooth handhelds. Hope it can bring you convenience of typing.
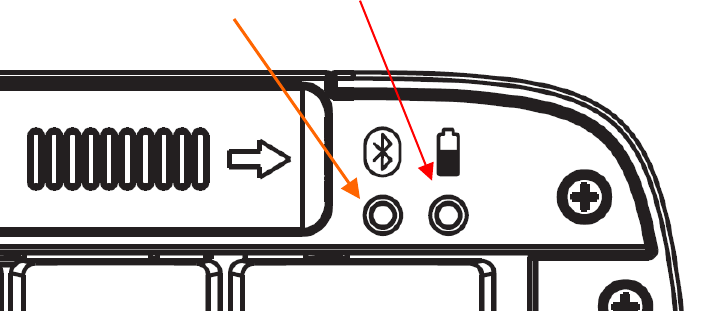
B. Introduction of LED and Button
LED position: Upper right corner on the keyboard.
LED light color: Orange and Red
LED function:
OrangeÆ To indicate the Bluetooth connection status, detail
please refer to following,
RedÆ To indicate the low battery
Orange LED has two status: Slow flashing and OFF
(a) Slow flashing: Keyboard is in discoverable mode which means the user can
inquiry and connects to the keyboard from device side.
(b) OFF: It means the keyboard is in either connected or sleep mode. In
discoverable mode, keyboard will go into sleep mode after 60 seconds.
When in connected state, the LED is also off.
Red LED has only one status: Slow flashing
When the battery capacity is low, the red LED flashes, two times per one
second.
Connect button has 2 functions.
(a) Wake up the keyboard.
(b) Disconnect the link. When in connected state, user can press connect
button to cancel the link. However we recommend the user disconnect the link
from the device side.
C. Connection Steps of Iron Horse Keyboard driver
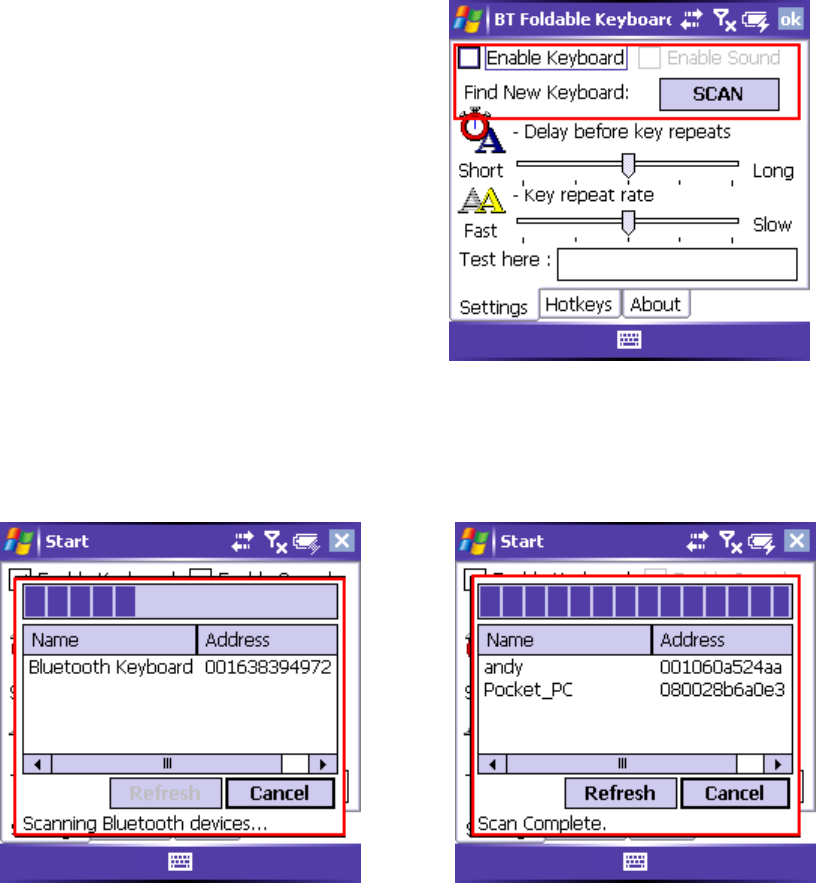
BT connection (WinMobile)
Step 1:
When the user checks the “
Enable
Keyboard
” item first time, the scanning
dialog will be pop up.
Step 2:
The “
Refresh
” button will be enabled until the scanning process is completed.
When the “
Refresh
” button is clicked, it will be disabled again. All the items of
the device list will be cleared before the searching process starts. After the
searching process is completed, the “
Refresh
” button will be enabled again.
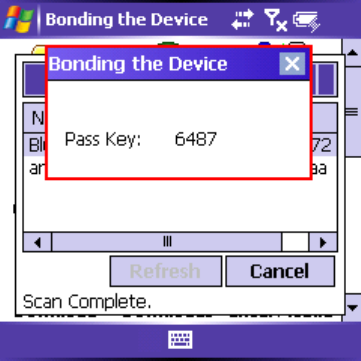
Step 3:
When a user clicks a searched
Bluetooth keyboard in the list, it will
pop up a bonding dialog for typing PIN
code.
If the user types the PIN correctly, it
will start to connect to the keyboard.
No matter if it succeeds to bond or
connect the selected keyboard or not, it
will close the searching / connecting
dialog, and go back to the “
Settings
”
page.
If it succeeds, the “
Enable Keyboard
” item will be checked. If it fails to
connect for the first time after the driver is installed, the “
Enable Keyboard
”
will not be checked.
Step 4:
If the driver connected the keyboard, the scanning dialog and bonding dialog
will not pop up, when you enable the keyboard the next time. If the users need
to scan and connect the other keyboards devices, pressing
“SCAN”
button
will launch scanning process.
BT connection (PalmOS)
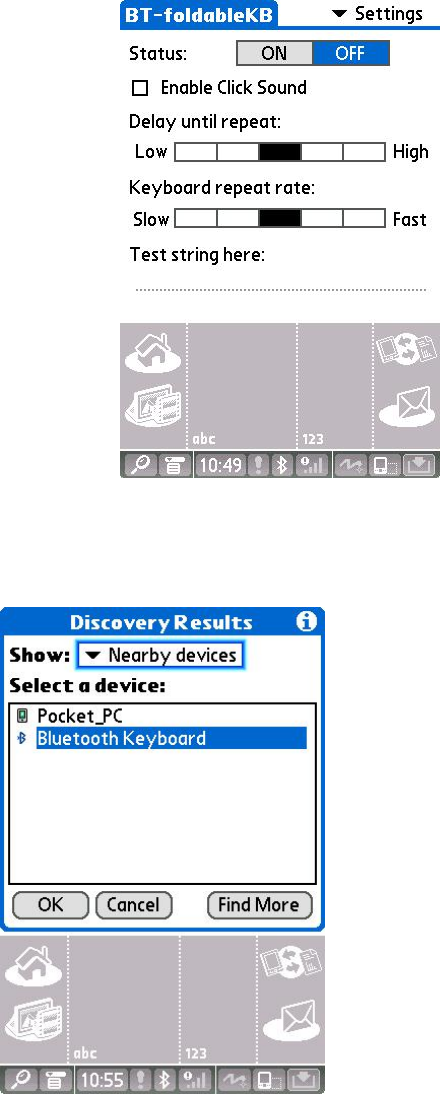
Step 1:
The radio buttons are disabled when the user executes “
BT-foldableKB
” for
the first time after installing the driver. The default selected radio is “
OFF
”.
Step 2:
When the user taps the “
ON
” button, then searching dialog will be pop up.
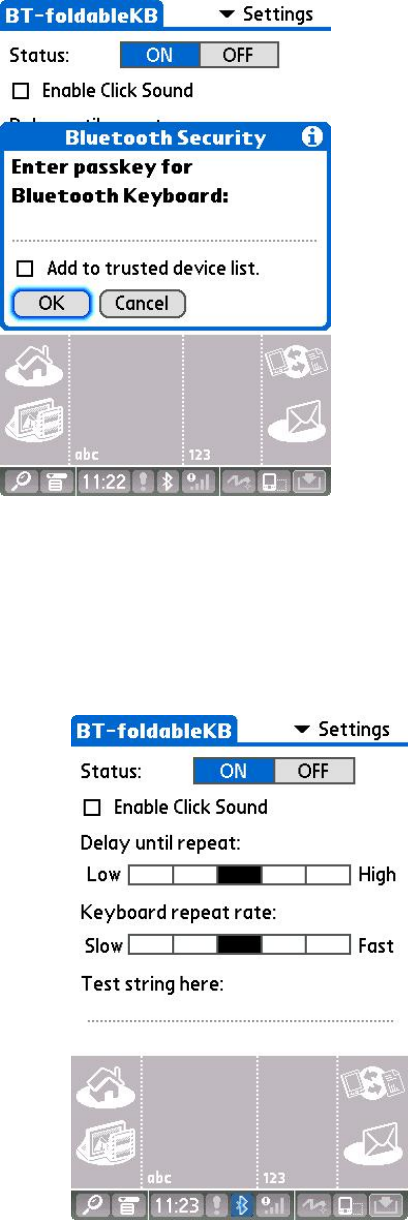
Step 3:
When a user clicks a searched Bluetooth keyboard in the list, it will pop up a
bonding dialog for typing PIN code
Step 3:
After the connection is success, then user can type the words on the “Test
string here”.
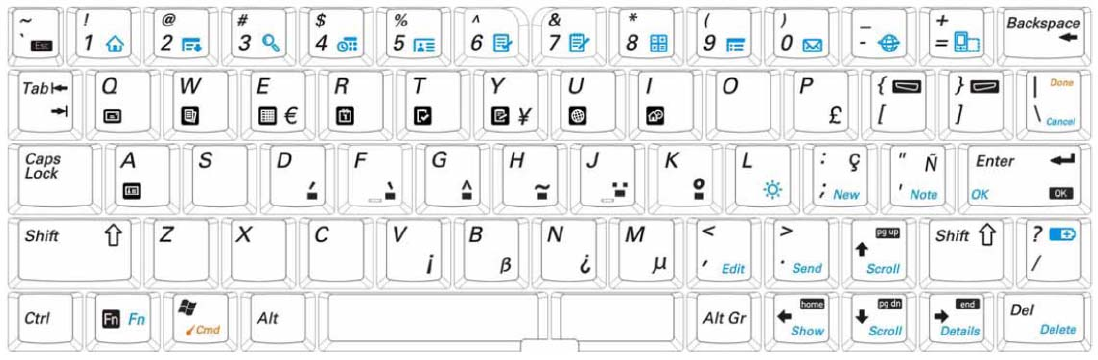
D. Keyboard Shortcuts and Special Characters
This section lists the various keyboard shortcuts you can use for navigating,
moving the cursor, activating menu commands, and typing special characters,
symbols, and punctuation. The keyboard has four keys, Ctrl, Fn, Cmd, and Alt
Gr, that you use in combination with other keys to execute keyboard shortcuts
and type special characters. To help you remember the shortcut keys for your
device, the keyboard has color-coded keycap icons and text—blue or orange for
Palm OS®, black for Pocket PC.

Cursor movements
Palm OS Shortcut WinMobile Shortcut Action
Fn+up arrow Fn+up arrow Scrolls up (Palm OS)
Page up (Pocket PC)
Fn+down arrow Fn+down arrow Scrolls down (Palm OS)
Page down (Pocket PC)
None Fn+left arrow Home
None Fn+right arrow End
Ctrl+left arrow None Moves cursor left (back) one word
Ctrl+right arrow None Moves cursor right (forward) one word
Ctrl+Shift+left arrow None Selects the word to the left of the cursor
Ctrll+Shift+right arrow None Selects the word to the right of the cursor
None Tab
T
abs forward to the next field (may not work in
some applications)
None Shift+Tab
Tabs backward to the previous field (may not
work in some applications)
Shift+right arrow Shift+right arrow Selects text to the right of the cursor
Shift+left arrow Shift+left arrow Selects text to the left of the cursor
Shift+up arrow Shift+up arrow Selects text one line above the cursor
Shift+down arrow Shift+down arrow Selects text one line below the cursor

Menu commands
Palm OS Shortcut WinMobile Shortcut Action
cmd None
Command stroke
None Ctrl+c Copy
None Ctrl+v Paste
None Ctrl+x Cut
None Ctrl+a Select All
None Ctrl+z Undo
Fn+; None New
Fn+’ None Note
Fn+Enter Fn+Enter OK
Fn+, None Edit
Fn+. None Send
Fn+right arrow None Details
Fn+left arrow None Show
Fn+Del None Delete
Cmd+Done None Done
Fn+Done None Cancel
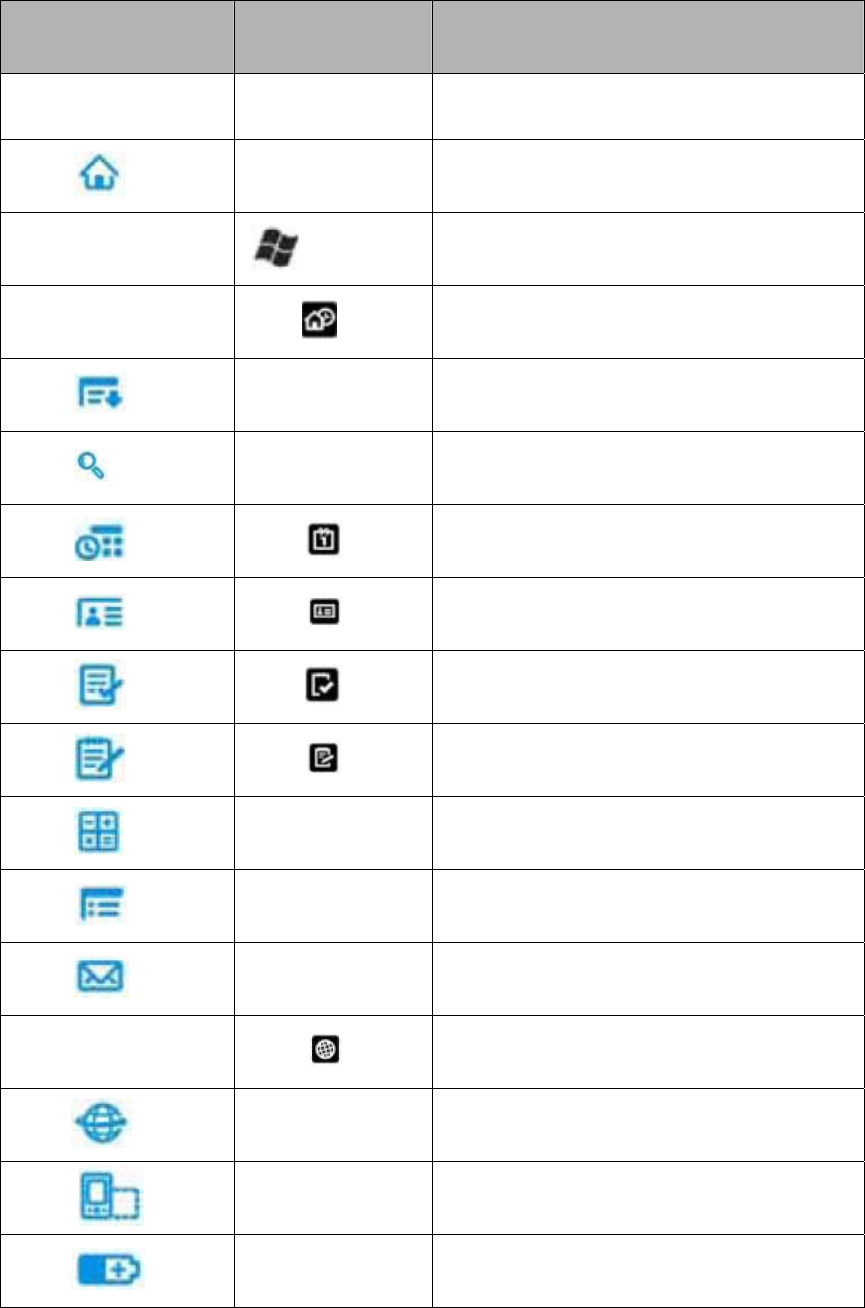
Keyboard function keys
Palm OS Function Key WinMobile Function
Key Action
None Fn+` esc
Fn+1 None Opens Applications view (Palm OS)
None Opens Start menu (Pocket PC)
None Fn+i Opens Today
Fn+2 None Opens pull-down menu for screen currently
displayed
Fn+3 None Opens Find
Fn+4 Fn+r Opens Calendar
Fn+5 Fn+a Opens Contacts
Fn+6 Fn+t Opens Tasks
Fn+7 Fn+y
Opens Memos (Palm)
Notes (Pocket PC)
Fn+8 None Opens Calculator
Fn+9 None Opens Preferences
Fn+0 Fn+q Opens the mail application (Palm OS)
Inbox (Pocket PC)
None Fn+u Opens Windows Explorer
Fn+- None Opens the web browser
Fn+= None Rotates screen orientation (except Treo 650)
Fn+/ Fn+/ Displays keyboard battery status
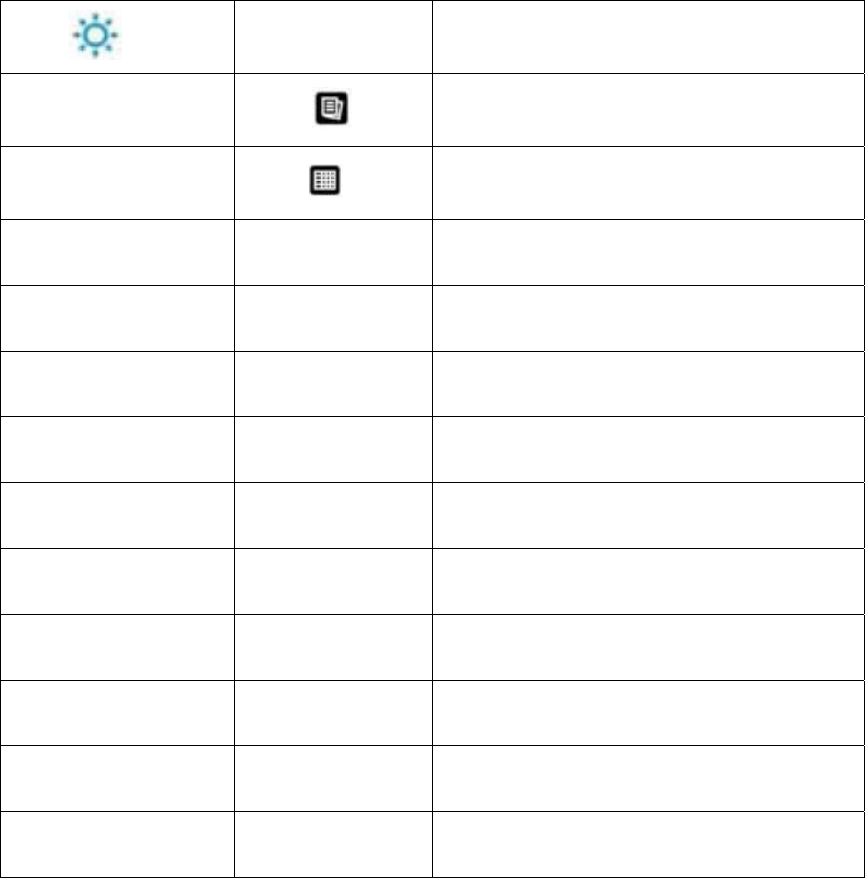
Fn+l None Turns the backlight (frontlight) on or off
None Fn+w Opens Pocket Word
None Fn+e Opens Pocket Excel
None Fn+0 through 9 Opens the assigned hotkey application
Fn+Enter Fn+Enter OK
Fn+; None New
Fn+’ None Note
Fn+, None Edit
Fn+. None Send
Fn+right arrow None Details
Fn+left arrow None Show
Fn+Del None Delete
Fn+Done None Cancel

Characters, symbols, and punctuation marks
Palm OS Shortcut WinMobile Shortcut Character Description
Alt Gr+b Alt Gr+b β Beta
Alt Gr+e Alt Gr+e € Euro
Alt Gr+n Alt Gr+n ¿ Upside-down “?”
Alt Gr+’ Alt Gr+’ Ñ Capital N-tilde
Alt Gr+p Alt Gr+p £ Pound sterling
Alt Gr+; Alt Gr+; ç Cedilla
Alt Gr+y Alt Gr+y ¥ Yen
Alt Gr+m Alt Gr+m µ Micro
Ctrl+Fn+O Ctrl+Fn+O Ø Capital O with slash
Ctrl+Fn+o Ctrl+Fn+o ø Lowercase o with slash
Alt Gr+v Alt Gr+v ¡ Upside-down “!”
Ctrl+Fn+e Ctrl+Fn+e Æ Uppercase AE ligature
Ctrl+Fn+a Ctrl+Fn+a æ Lowercase ae ligature
Ctrl+Fn+w Ctrl+Fn+w • Bullet
Ctrl+Fn+p Ctrl+Fn+p © Copyright
Ctrl+Fn+. Ctrl+Fn+. ° Degrees
Ctrl+Fn+i Ctrl+Fn+i ÷ Divide
Ctrl+Fn+q Ctrl+Fn+q ¶ Paragraph
Ctrl+Fn+r Ctrl+Fn+r ® Registered trademark

Ctrl+Fn+s Ctrl+Fn+s § Section
Ctrl+Fn+t Ctrl+Fn+t ™ Trademark
Ctrl+Fn+- Ctrl+Fn+- ± Plus or minus
Ctrl+Fn+2
Ctrl+Fn+2 ½ Half
Ctrl+Fn+3 Ctrl+Fn+3 ¾ Three-quarters
Ctrl+Fn+4 Ctrl+Fn+4 ¼ One-quarter
Ctrl+Fn+d Ctrl+Fn+d ¢ Cents
Ctrl+Fn+f None ƒ Script f
Accent marks
Shortcut
(Palm OS and Pocket PC)
Character
Example Description
Alt Gr+d á Acute accent
Alt Gr+f à Grave accent
Alt Gr+g â Circumflex
Alt Gr+h ñ Tilde
Alt Gr+j ä Umlaut
Alt Gr+k å Nordic a-ring (for letter “a” only)

strokes for the 5-way navigator on a Palm OS
device
Keystroke Description
Cmd+up arrow Navigates up
Cmd+down arrow Navigates down
Cmd+left arrow Navigates left
Cmd+right arrow Navigates right
Cmd+Enter Navigates select
Product Regulatory Information
Safety Statement
Warning: Prolonged or improper use of the keyboard may result in discomfort
or injury.
The keyboard is not intended for extended or intensive use. If discomfort
develops, consider changing your method of input or the manner in which you
use the keyboard or stylus. If discomfort or pain persists, either decrease usage
or consult a medical or ergonomics professional.
FCC Statement
This device complies with part 15 of the FCC rules. Operation is subject to the
following two conditions: (1)This device may not cause harmful interference,
and (2) this device must accept any interference received, including
interference that may cause undesired operation. This equipment has been
tested and found to comply with the limits for a Class B digital device, pursuant
to Part 15 of the FCC rules. These limits are designed to provide reasonable
protection against harmful interference in a residential installation. This
equipment generates, uses, and can radiate radio frequency energy and, if not
installed and used in accordance with the instructions, may cause harmful
interference to radio communications. However, there is no guarantee that
interference will not occur in a particular installation. If this equipment does
cause harmful interference to radio or television reception, which can be
determined by turning the equipment off and on, the user is encouraged to try
to correct the interference by one or more of the following measures:
‧ Reorient or relocate the receiving antenna.
‧ Increase the separation between the equipment and receiver.
‧ Consult the dealer or an experienced radio/TV technician for help.
The use of shielded I/O cables is required when connecting this equipment to
any and all optional peripheral or host devices. Failure to do so may violate FCC
rules. Changes or modifications not covered in this manual must be approved in
writing by the manufacturer’s Regulatory Engineering Department. Changes or
modifications made without written approval may void the user’s authority to
operate this equipment.