Darfon Electronics N551 Bluetooth Mouse User Manual
Darfon Electronics Corp Bluetooth Mouse Users Manual
User Manual
N551 使用手冊
注意事項及警語
專家證實,長期使用滑鼠會產生某些容易復發的肌肉型傷害,包括手、腕關節、
手臂、頸部及背部的疼痛、麻痺、無力等。若您有受傷的症狀時,請向專業醫師
諮詢。每個人受這些傷害的影響程度涉及許多因素,包括:身體姿勢、重覆性的
肢體行為以及平常的身體狀況等。
包裝內容
1. 滑鼠
2. 接收器
3. 三號電池 2顆
4. 使用手冊
系統需求
‧IBM® 相容系統
‧Microsoft Windows® 98SE、 2000、 Me、 XP
‧麥金塔系統 10.4 版本
‧可供使用的 USB 連接埠
第1節 安裝電池
步驟 1:翻轉滑鼠,使其底部朝上。
步驟 2:小心地打開電池蓋子。
步驟 3:請依照電池盒內正極(+)與負極(-)的標記指示放入新的電池。
步驟 4:將電池蓋放回原來的位置。
注意:更換電池後,請進行第 2節-建立無線連結,重新建立無線連結。
第2節 建立無線連結
步驟 1:在電腦開啟的情況下,將無線接收器的 USB 接頭插入電腦的 USB 連接
埠,電腦會自動偵測到新硬體並安裝該裝置。為確保滑鼠可正常運作,請確認接
收器至少遠離電子儀器(例如監視器或擴音器)20 公分(8 英吋)以上,且與滑鼠的
距離不要超過 100 公分(3.3 英呎)。
步驟 2:請將滑鼠的開關推至 開(ON) 的位置。
步驟 3:請準備迴紋針、筆、牙籤或其他較為尖銳的物體。
步驟 4:按下無線電接收器上方的連結按鈕,並於 10 秒內以該尖銳物體按下滑
鼠背面的連結按鈕,即完成無線連結。
注意:
‧請注意接收器若放置在金屬物體的表面可能會無法正常地運作。
‧如果沒有連結成功,請重複以上步驟。
‧當您更換新電池後,請重新建立連結。
第3節 滑鼠的多重省電模式
‧將滑鼠靜置 6至10 分鐘後,滑鼠將自動進入睡眠狀態。
‧將滑鼠的電源開關移至 關(OFF) 的位置。
第4節 疑難排除
當我的滑鼠無法順利操作時:
1. 請確認滑鼠的電池安裝方向是否正確,請參照使用手冊第 1節-安裝電池。
2. 如果您覺得電池可能已經耗盡,建議更換新的電池,並請確認電池蓋子已正
確地蓋回。更換電池後,必須重新建立無線連結,請參照本使用手冊第 2節-建
立無線連結。
3. 請檢查無線電接收器是否正確地連接到你的電腦,請參照使用手冊第 2節-建
立無線連結。
4. 為達最佳的功能效果,請將接收器放置在遠離電子儀器(例如電腦或監視器)
至少 20 公分(8 英吋)以上的位置,並確認無線接收器沒有放置在金屬物體的表面
上,以免受到干擾。
5. 滑鼠僅能離無線電接收器 100 公分(3.3 英呎)的距離運作。此有效運作距離取
決於無線電接收器與無線裝置的位置,和電子儀器等無線裝置的干擾或其他因
素。
6. 當您察覺滑鼠受到其他無線儀器的干擾,您可以藉由重複進行本使用手冊第 2
節-建立無線連結轉換無線頻道。
第5節 保固資訊
‧從購買日起保固一年。
‧ 請參考購買地區之保固條款,以得知更多保固細節。
FCC Statement
This equipment has been tested and found to comply with the limits for a Class B digital device,
pursuant to Part 15 of the FCC Rules. These limits are designed to provide reasonable protection
against harmful interference in a residential installation. This equipment generates, uses and can
radiate radio frequency energy and, if not installed and used in accordance with the instructions,
may cause harmful interference to radio communications. However, there is no guarantee that
interference will not occur in a particular installation. If this equipment does cause harmful
interference to radio or television reception, which can be determined by turning the equipment
off and on, the user is encouraged to try to correct the interference by one or more of the following
measures:
--Reorient or relocate the receiving antenna.
--Increase the separation between the equipment and receiver.
--Connect the equipment into an outlet on a circuit different from that to which the receiver is
connected.
--Consult the dealer or an experienced radio/TV technician for help.
CAUTION:
Any changes or modifications not expressly approved by the party responsible for compliance
could void the user’s authority to operate the equipment..
This device complies with part 15 of the FCC Rules. Operation is subject to the
following two conditions:
1.This device may not cause harmful interference, and
2.This device must accept any interference received, including interference that may cause
undesired operation.
FCC RF Radiation Exposure Statement
This equipment complies with FCC RF radiation exposure limits set forth for an uncontrolled
environment .
This equipment must not be co-located or operating in conjunction with any other antenna or
transmitter.
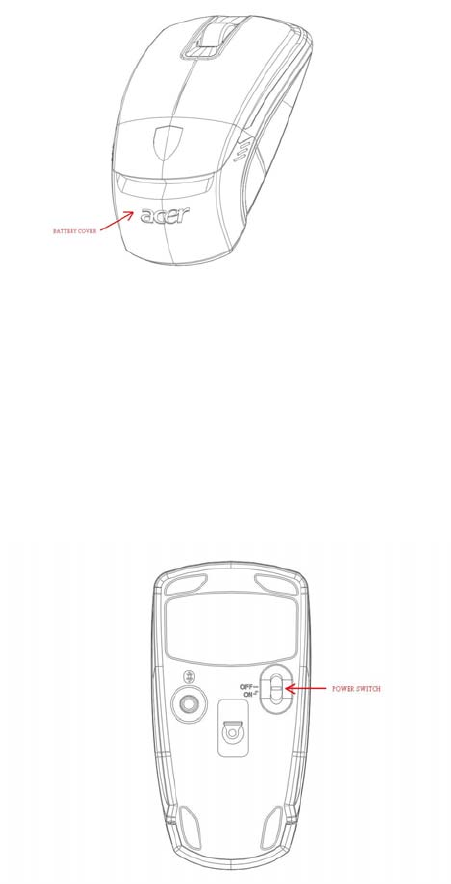
1. Battery Installation
Step1. Detach the battery cover.
Step 2. Follow the direction of installation to load batteries.
Step 3. Put on the battery cover.
2. Connecting the Mouse
Step 1. Turn the Mouse upside down; make sure the power switch is ON.
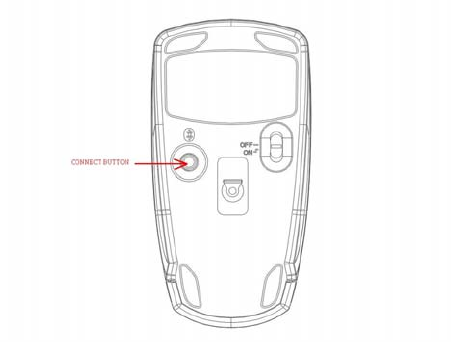
Step 2. Press and hold the “Connect” button for three seconds. The Mouse is now in
pairing mode and is ready to connect to your computer.
Step 3. On your computer, open “My Bluetooth Places” by double-clicking on the
Bluetooth icon.
Step 4. From the menu bar, select “Bluetooth”, and then “Bluetooth Setup Wizard”.
Step 5. Select“ I want to find a specific Bluetooth device and configure how this
computer will use its devices”. Then click” Next”.
Step 6. From the drop-down menu, select “Show mice, keyboards and joysticks”, and
then click on the “Search Again” button.
Step 7. The Acer mouse will be discovered. Click on the Acer mouse icon, and then
click “Next”.
Step 8. The services that are available from the device will be listed. Select”
Bluetooth Mouse” and click” Finish”.
Step 9. Wait while the Mouse is installed. This may take several seconds.
Step 10. Your mouse is now connected. Move your Mouse to verify the connection.

Cautions
Long periods of repetitive motion using a mouse may be associated with physical
discomfort and injury in your hands, wrists, arms, shoulders, neck, or back. To reduce
the risk of injury, we suggest you take frequent short breaks and keep your shoulders
relaxed with your elbows at times.
This product has been tested to comply with international standard IEC 60825-1:2001.