Datalogic S r l DLNFCUR1 Personal Device Assistant User Manual 822001882
Datalogic S.r.l. Personal Device Assistant 822001882
Contents
- 1. Users Manual_852000970
- 2. Users Manual_Quick Guide 822001882
- 3. Users Manual
- 4. Quick Guide
Users Manual_Quick Guide 822001882
Datalogic S.r.l.
Via S. Vitalino, 13
40012 Calderara di Reno
Bologna - Italy
Telephone: (+39) 051-3147011
Fax: (+39) 051-3147205
©2016-2017 Datalogic S.p.A. and/or its affiliates
An Unpublished Work - All rights reserved. No part of the contents of this
documentation or the procedures described therein may be reproduced or
transmitted in any form or by any means without prior written permission
of Datalogic S.r.l. or its subsidiaries or affiliates. Owners of Datalogic prod-
ucts are hereby granted a non-exclusive, revocable license to reproduce
and transmit this documentation for the purchaser's own internal business
purposes. Purchaser shall not remove or alter any proprietary notices,
including copyright notices, contained in this documentation and shall
ensure that all notices appear on any reproductions of the documentation.
Should future revisions of this manual be published, you can acquire
printed versions by contacting your Datalogic representative. Electronic
versions may either be downloadable from the Datalogic website
(www.datalogic.com) or provided on appropriate media. If you visit our
website and would like to make comments or suggestions about this or
other Datalogic publications, please let us know via the "Contact Datalogic"
page.
Disclaimer
Datalogic has taken reasonable measures to provide information in this
manual that is complete and accurate, however, Datalogic reserves the
right to change any specification at any time without prior notice.
Datalogic and the Datalogic logo are registered trademarks of Datalogic
S.p.A. in many countries, including the U.S.A. and the E.U.
DL-Axist is a trademark of Datalogic S.p.A. and/or its affiliates. All other
brand and product names may be trademarks of their respective owners.
Patents
See www.patents.datalogic.com for patent list.
Reference Documentation
For further information regarding DL-Axist refer to the SDK Help on-
line, to the DL-Axist Quick Reference Guide and to the DL-Axist User’s
Manual, downloadable from our website www.datalogic.com.
Service and Support
Datalogic provides several services as well as technical support
through its website. Please check our website at www.datalogic.com.
under “Support & Services”, then “Automatic Data Capture”, and click
on the links indicated for further information including:
•Downloads
•Manuals for the latest versions of user manuals and product
guides.
•Software & Utilities for the latest firmware release for your
product. You can also click on the following link for direct
access to this section: www.datalogic.com/products_up-
dates.
•Service Program for warranty extensions and maintenance
agreements.
•Repair Centers for a list of authorized repair centers.
•Technical Support Automatic Data Capture email form to contact
our technical support.
Warranty Terms and Conditions
The warranty period is 1 year for the device and 90 days for consum-
ables (e.g. battery, power supply, cable etc.) from date of purchase at
our company.
Personal Digital Assistant (PDA)
For WiFi and WWAN Versions
Quick Start Guide
822001882 (Rev. A) Jan. 2017
Out of the Box
The DL-Axist package contains:
• DL-Axist (device)
• Rechargeable battery
• USB charge/communication cable
• Battery Box (for spare battery)
•Quick Start Guide
•Safety & Regulatory Addendum
• EULA sheet
Remove all the components from their packaging; check their integrity
and compare them with all the packing documents.
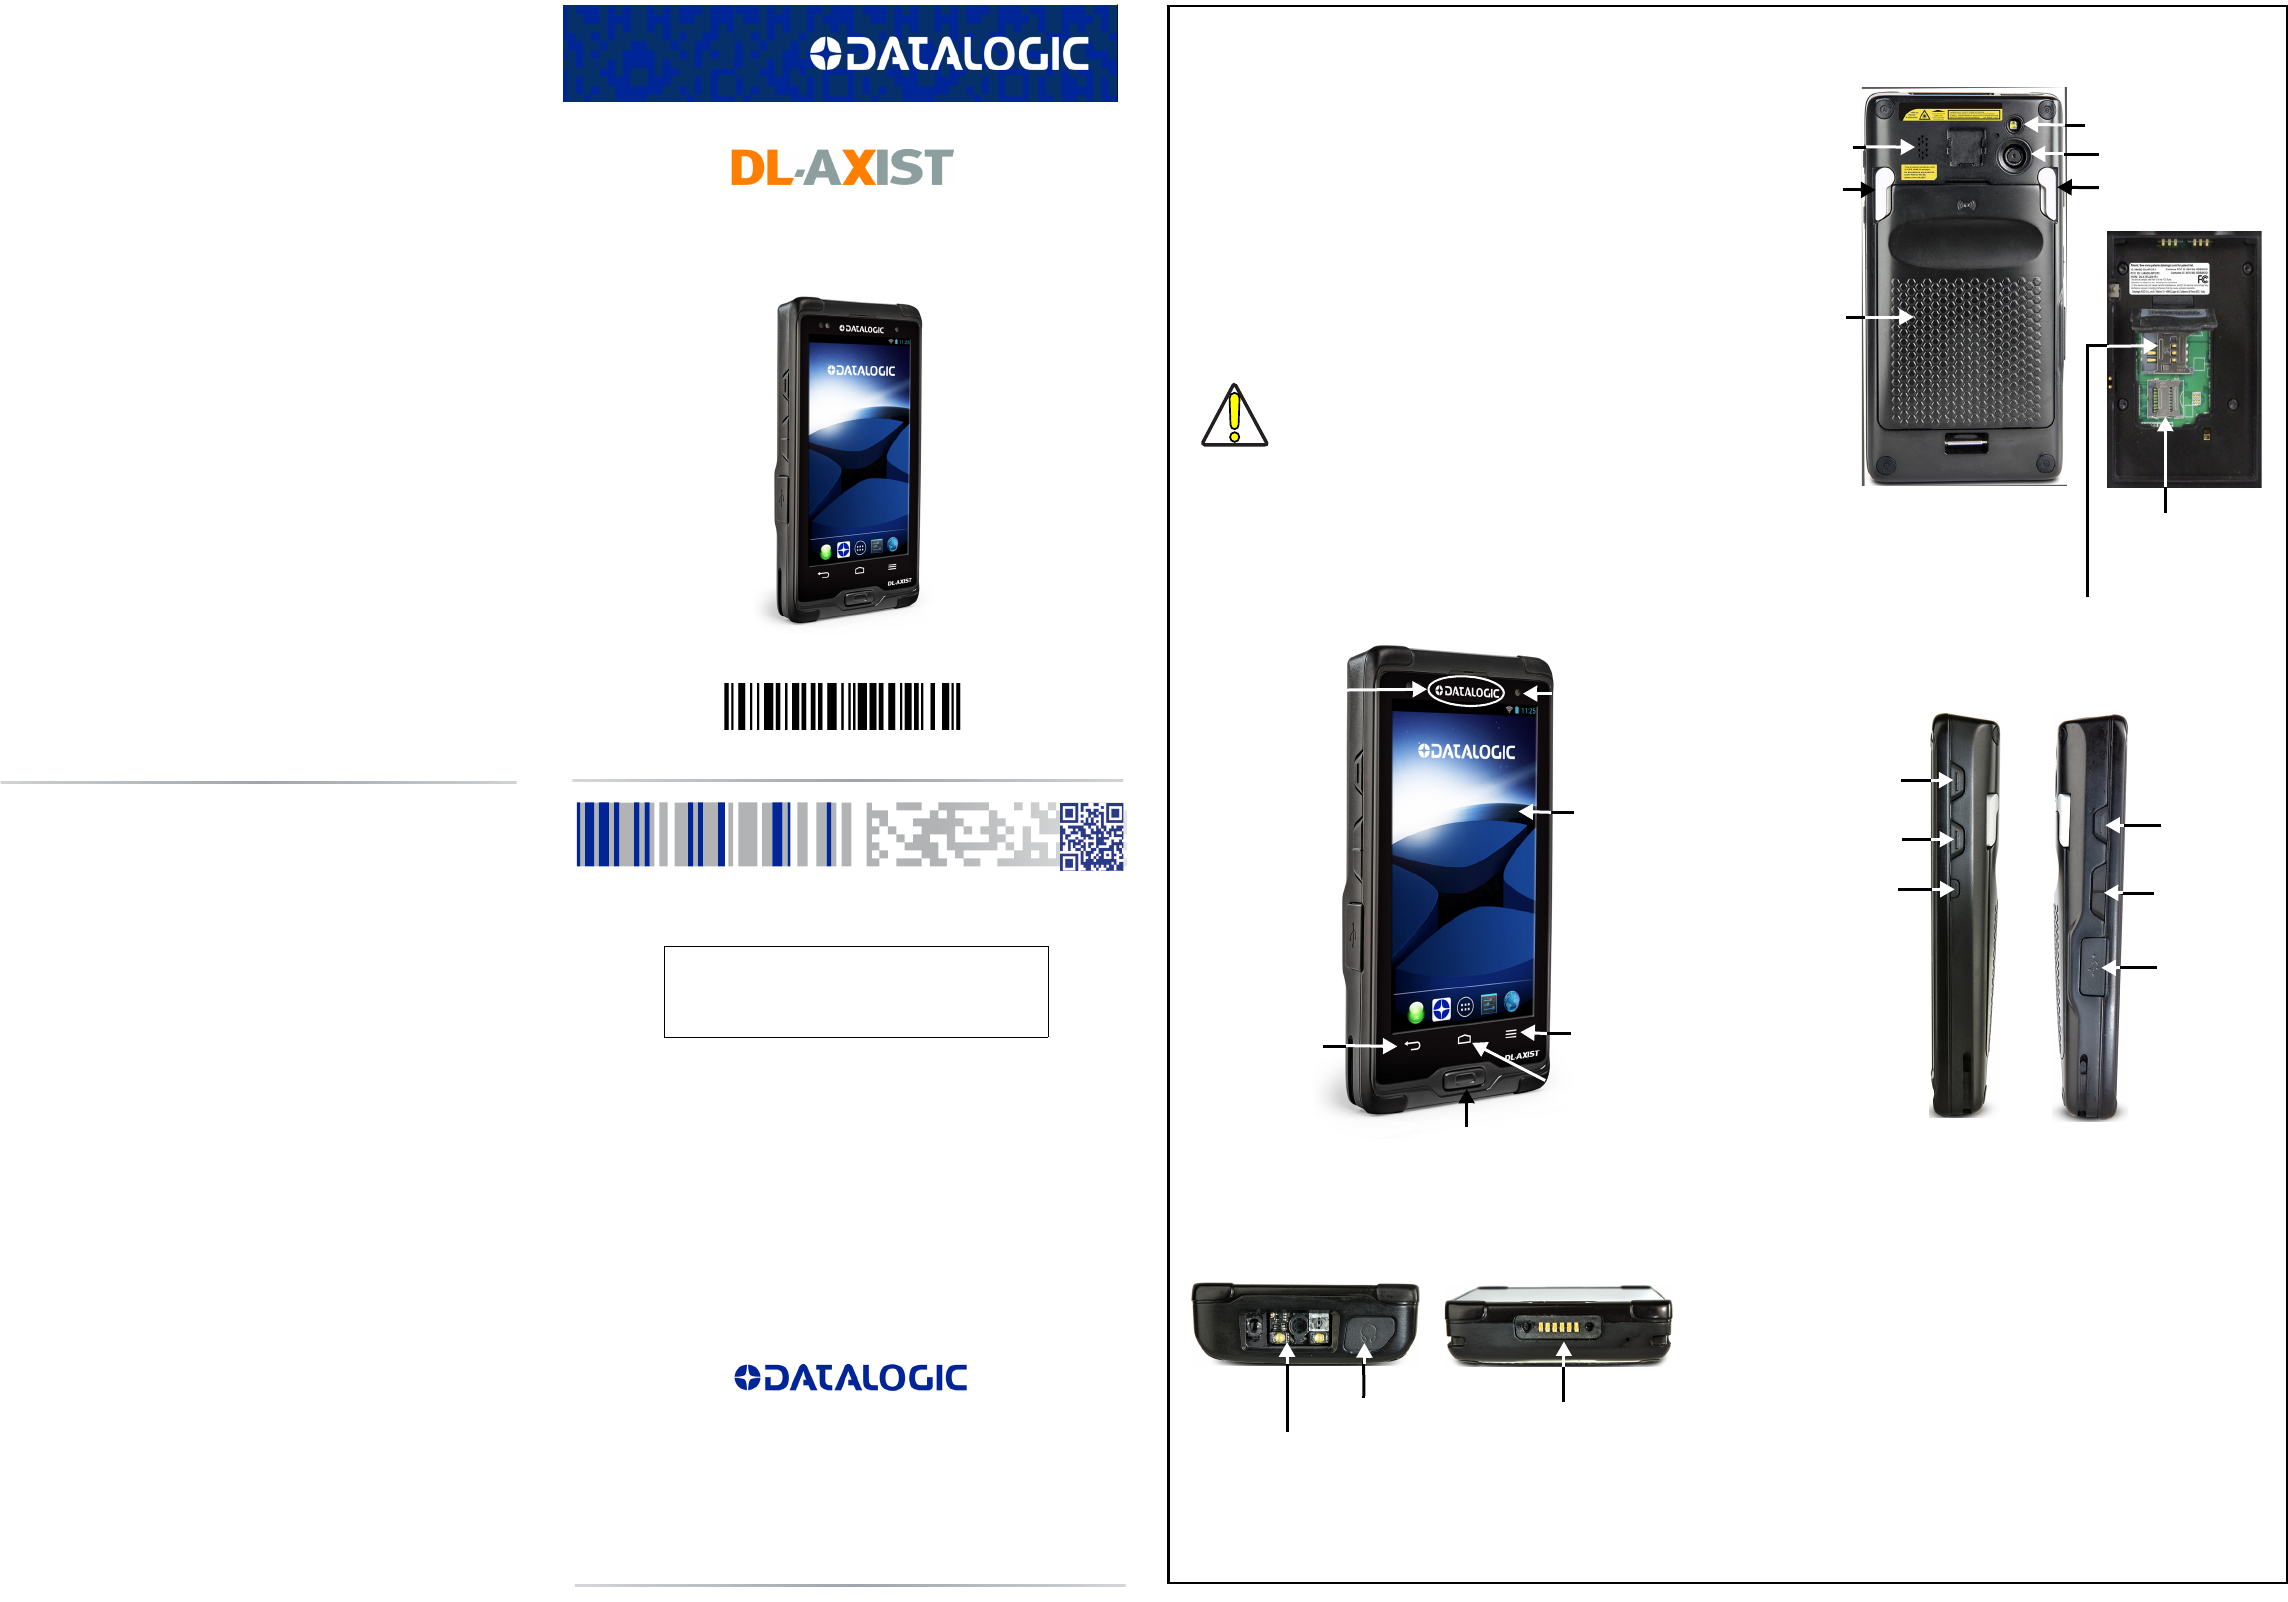
General View
Front View
CAUTION
Keep the original packaging for use when sending products to
the technical assistance center. Damage caused by improper
packaging is not covered under the warranty.
Top View Bottom View
Back Button
Home Button
Scan Key
Menu
Button
Charging LED
Touch Panel
Display
Logo
(Notifications/
Good Read
Indicator)
Data Capture Window
Audio Jack Dock Contacts
Back View
Side View
Speaker
LED Flash
Color Camera
Battery
Door
SIM Card Socket
Memory Card Socket
Battery
Latch
Battery Latch
Power Button
Left Trigger
Volume Control
Buttons
Micro USB Port
Right Trigger
Function Key
See the Safety & Regulatory Addendum
included with your product for additional
regulatory, safety and legal information.
©2016-2017 Datalogic S.p.A. and/or its affiliates. All
rights reserved.
Datalogic and the Datalogic logo are registered trade-
marks of Datalogic S.p.A. in many countries, including
the U.S.A. and the E.U.
www.datalogic.com
DRAFT VERSION
DRAFT VERSION
DRAFT VERSION
DRAFT VERSION
Battery Installation
To install the battery pack, follow the steps below:
1. Rotate the latches to the open position. Grab the battery cover by
the sides and lift it out of the way:
2. Remove the battery pack from the battery box1. Insert the
battery pack into the slot, top (contacts) side first, and press it
into place:
3. Insert the battery cover, bottom first, and press it into place.
Rotate the latches to the lock position to lock the cover:
4. Press and release the power button to turn the DL-Axist on.
1. Always use the battery box to carry the battery pack. Do not
put the battery pack in your pocket.
Charging Instructions
The battery pack is not initially fully charged. After installing the bat-
tery, charge it with the USB cable or with the single dock.
Charge with USB
You can use the provided USB charge/communication cable in
conjunction with the power supply adapter (p/n 94ACC0135) to charge
the terminal from a power outlet.
Charge with the Dock
NOTE
Charge the battery for a minumum of 4 hours for the standard
battery and 8 hours for the extended battery.
NOTE
Use only a Datalogic approved power supply.
Scanning and Imaging
Imager Data Capture
To scan a barcode symbol:
1. Point the scan window at the barcode.
2. Tap Scan on the screen or press one of the scan buttons on the
DL-Axist. The imager projects a laser aiming pattern similar to
those used on cameras. The aiming pattern is used to position
the barcode or object within the field of view.
3. Center the symbol in any orientation within the aiming pattern.
Ensure the entire symbol is within the rectangular area formed by
the brackets in the aiming pattern, then either wait for the
timeout or release the scan key to capture the image. A red beam
illuminates the symbol, which is captured and decoded.
Aiming System Pattern
If the scan has been successful:
• If enabled, the good read LED glows steadily green for a
configurable time.
• If enabled, the good read beep plays.
• The barcode type and content data display on the screen.
Linear Bar Code
2D Matrix Symbol
SD Card / SIM Card Installation
1. Turn off the DL-Axist or put it in swap battery mode (refer to the
User's Manual for more details).
2. Remove the battery cover (see Battery Installation, step 1)
3. Remove the battery pack by pulling the tab on the bottom of the
battery. Lift the retaining door:
4. Slide the microSD card/SIM card holder to the left to unlock it.
5. Lift the holder:
6. Insert the microSD card/SIM card into the holder. Make sure the
contacts side is face down.
7. Close the holder and shift it to the right to lock it:
8. Close the retaining door.
9. Insert the battery pack into the slot.
10. Insert the battery cover (see Battery Installation, step 3).
SIM Card
MicroSd Card
SIM Card
MicroSD Card
MicroSD Card SIM Card
MicroSD Card SIM Card
DRAFT VERSION
DRAFT VERSION
DRAFT VERSION