Datel Design and Development XB10251 Power Racer 270 User Manual
Datel Design & Development, Inc. Power Racer 270 Users Manual
Users Manual
Power Racer 270™
User Guide
V1.0
Thank you for Choosing Power Racer 270™ Wireless Racing Wheel
Power Racer 270™ is a truly wireless customizable racing wheel for Xbox 360® gamers who
want the ultimate, realistic racing experience. Including an accelerator and brake pedal set for
added realism as well as a built-in rechargeable Lithium-ion Polymer battery.
Featuring a fully rubberized wheel grip, 270 degree lock to lock control, dual vibration, wheel
mounted twin paddle shift and a sequential type stick shift. Add to this three preset profiles
which are fully customizable using the Power Racer 270™ Customizer software.
Before First Time Usage:
Please ensure that you carefully read each of the sections in this user guide. Failure to do so
may result in damage or the incorrect usage of the Power Racer 270.
If you experience problems in operating the Power Race 270, Please refer to the
‘Troubleshooting’ section.
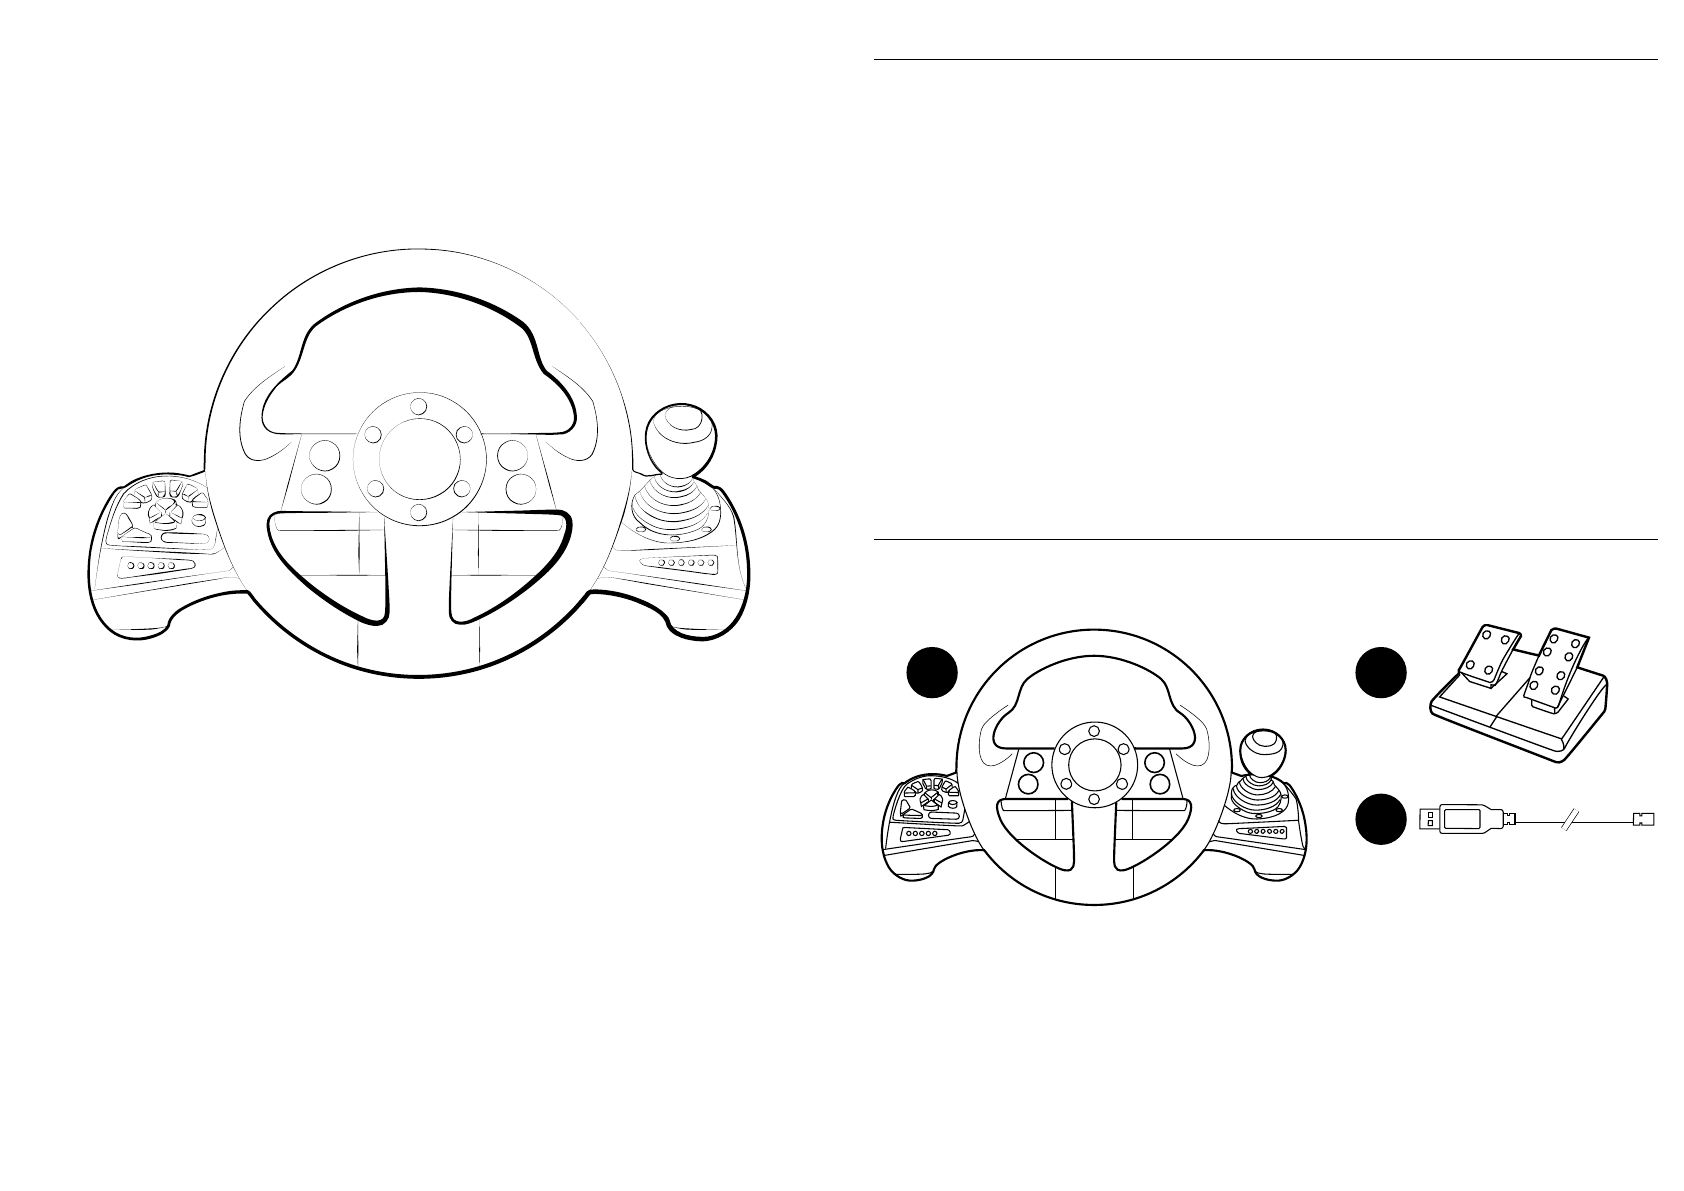
Carton Contents
Please verify that your package contains the following:
A. Power Racer 270
B. Pedal Base
C. USB Data/Charge Cable
A B
C

Important Information
Please ensure that you read the following information before continuing:
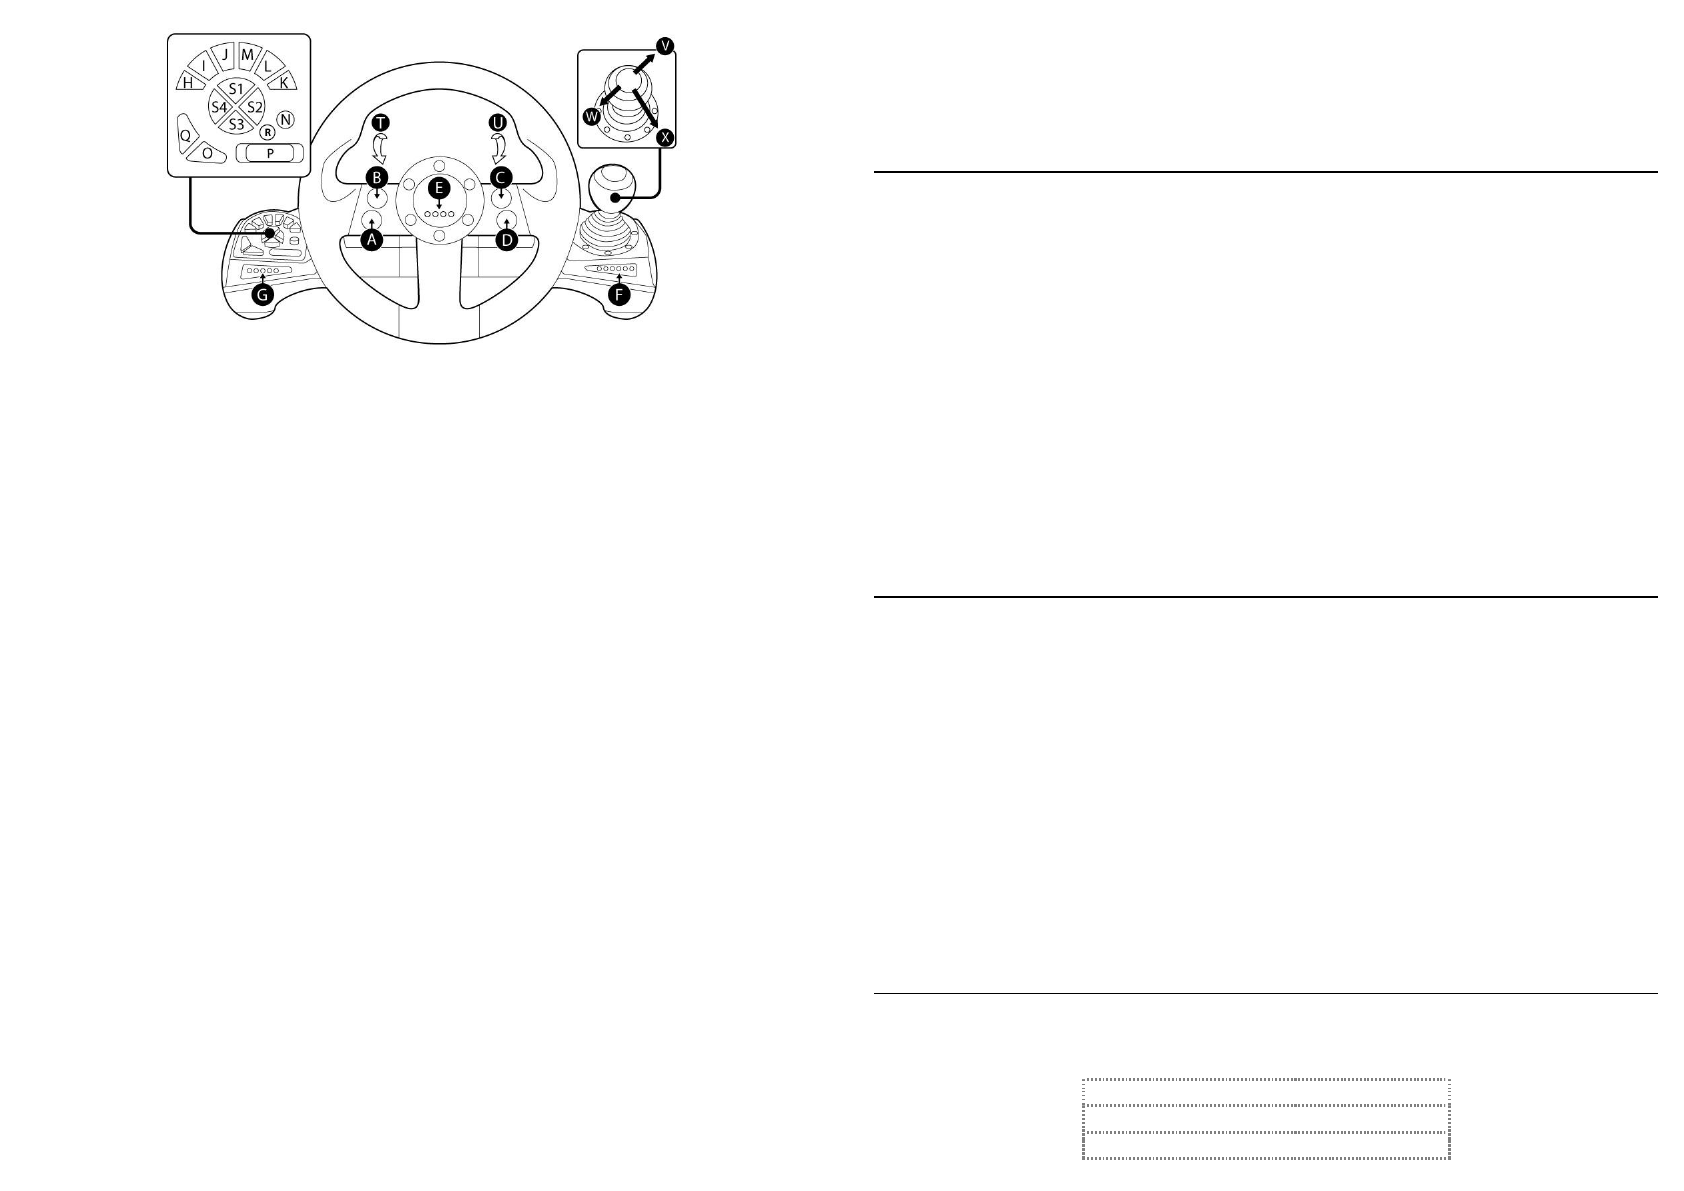
Power Racer 270 Front Overview
The following section shows a front overview of the Power Racer 270 with the location of the
buttons and indicator lights.
A. X Button
B. Y Button
C. B Button
D. A Button
E. Player Number Indicator Lights
F. Accelerator Pedal Pressure Indicator
G. Brake Pedal Pressure Indicator
H. L1 Button
I. L2 Button
J. L3 Button
K. R1 Button
L. R2 Button
M. R3 Button
N. Guide Button
O. Start Button
P. Profile Switch
Q. Back Button
R. Battery Indicator Light
S1. Directional 1
S2. Directional 2
S3. Directional 3
S4. Directional 4
T. Paddle 1
U. Paddle 2
V. Stick Shift Up
W. Stick Shift Down
X. Stick Shift Right
Pre-Set Profiles
The actual controls which are assigned to each button are dependent on the selected pre-set
profile, for advice on the configuration of the pre-set profiles please refer to the section ‘Pre-
Set Profiles’.
Customizer PC Software
For advice on creating your own customized profiles, please refer to the section ‘Power Racer
270 Customizer’.
Caution When Turning The Wheel:
Do not apply excessive force to turn the wheel beyond the limits of its rotation as this may
result in damage to the Power Racer 270.
Battery Precautions:
• ”Caution” – The battery used in this wheel may present a risk of fire or chemical burn if
mistreated.
• Do not attempt to open the product or replace the battery. It is built-in and not
changeable. Use of other batteries may present a risk of fire or explosion and the warranty
will be terminated.
• Only recharge your battery with the provided cable designated for this product.
• Dispose of batteries according to local regulations. Please recycle when possible. Do not
dispose as household waste or in a fire as they may explode.
• Batteries may explode if damaged.
Built-In Battery Care:
• The wheel is powered by a rechargeable battery.
• The full performance of a new battery is achieved only after two or three complete charge
and discharge cycles.
• The battery can be charged and discharged hundreds of times, but will eventually wear
out.
• If left unused, a fully charged battery will lose its charge over time.
• Leaving the product in hot or cold places will reduce the capacity and lifetime of the
battery.
• Always try to keep the battery between 15°C and 25°C (59°F and 77°F). A product with a
hot or cold battery may not work temporarily, even when the battery is fully charged.
Battery performance is particularly limited in temperatures well below freezing.
Safety Information:
• Never try to dismantle the product yourself, or push objects of any kind into the products,
as this may cause short circuits which could result in a fire or electric shock.
• None of the components can be replaced or repaired by users.
• Avoid exposing your product to rain, moisture or other liquids to protect against damage
to the product or injury to you.
• Keep all products, cords, and cables away from operating machinery.
• Dispose of the product according to local standards and regulations.
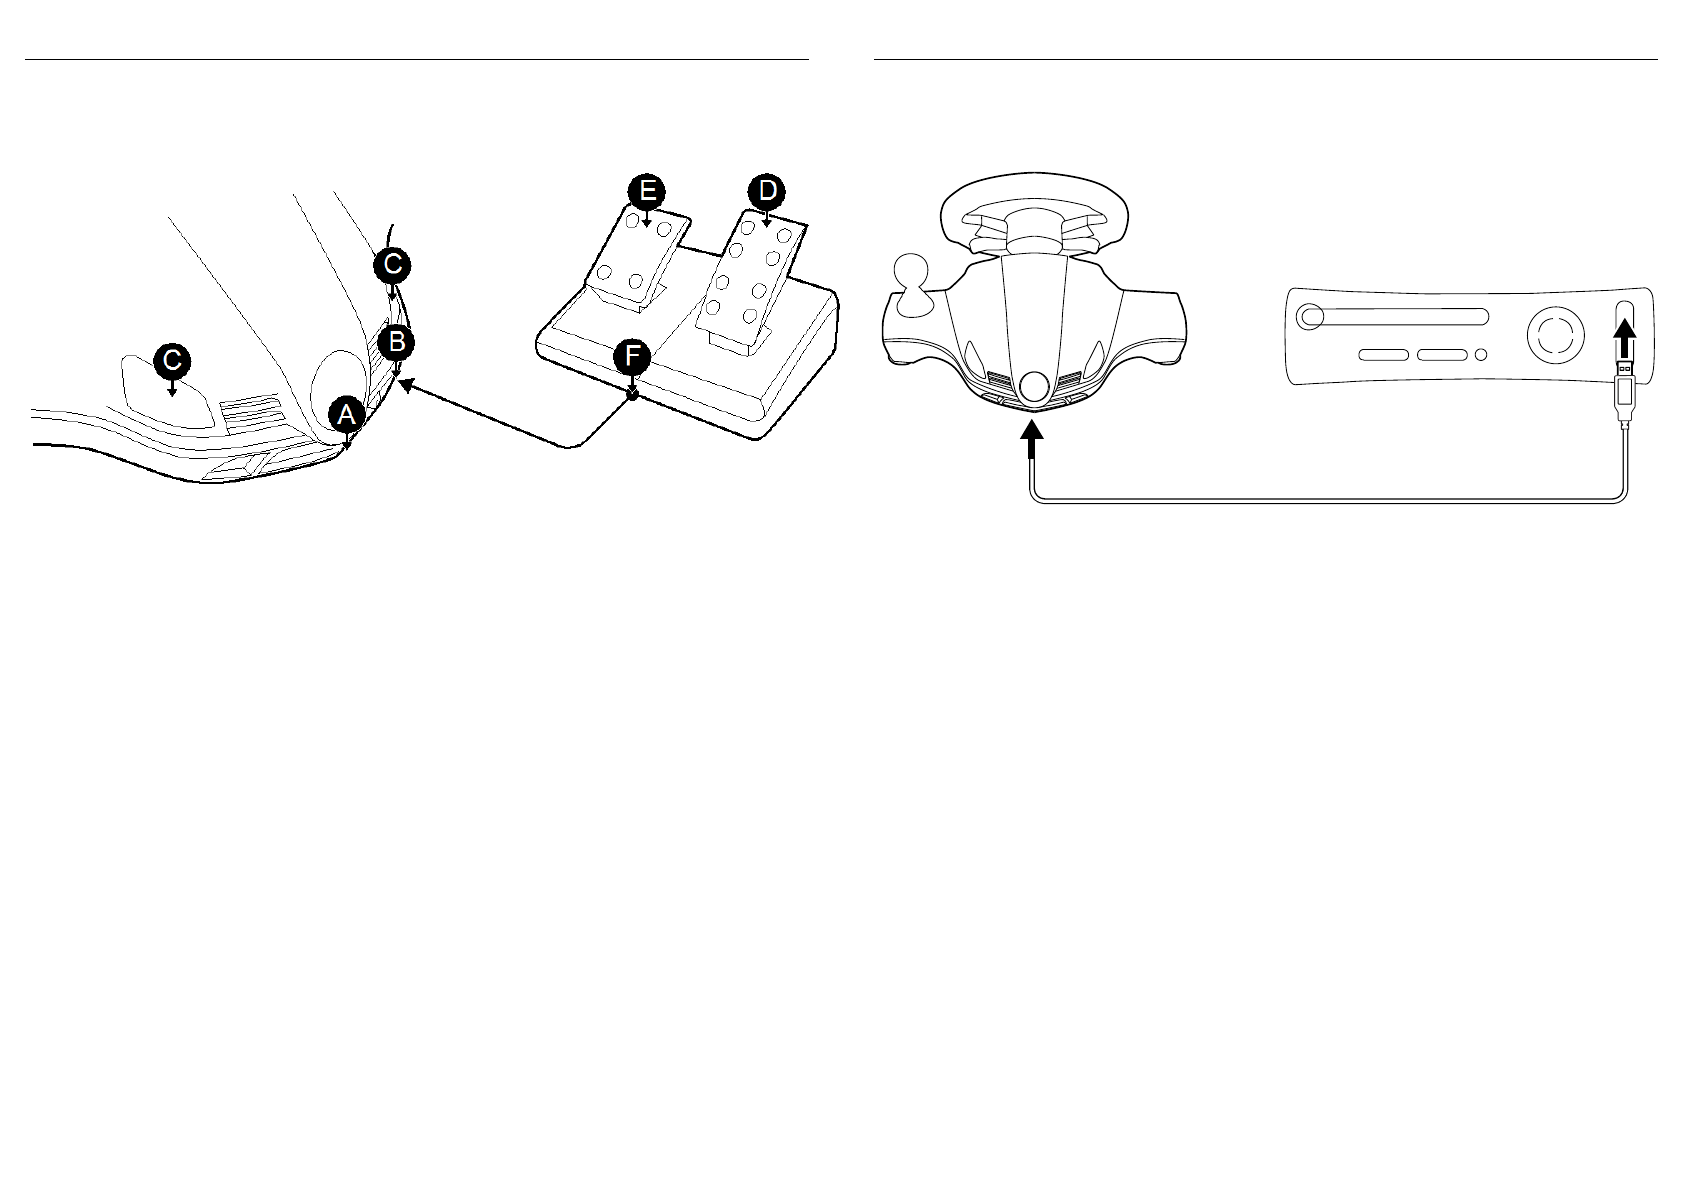
Power Racer 270 Rear Overview and Pedal Base Overview
The following section shows a rear overview of the Power Racer 270 wheel and the Power
Racer 270 Pedal Base.
A. USB Data/Charge Connection
B. Pedal Base Connection
C. Paddle Indicator Lights
D. Accelerator Pedal
E. Brake Pedal
F. Pedal Base Connection Cable
Charging the Power Racer 270
The Power Racer 270 comes with a built-in Lithium Polymer battery that needs to be charged
before first time use. To do this, please follow these steps:
Step 1:
Connect the larger end of the USB Data/Charge Cable (supplied) into any free USB port on your
Xbox 360.
Step 2:
Connect the mini USB end of the USB Data/Charge Cable to the USB Data/Charge Connection
located on the rear of the Power Racer 270. Whilst charging, the Player Number Indicator
Lights will repeatedly fill up in sequence and the Battery Indicator Light will flash red.
Step 3:
When charging is complete the four Player Number Indicator Lights will remain static and a
static green Battery Indicator light will be shown. Disconnect the USB Data/Charge Cable from
your Xbox 360 and the USB Data/Charge Connection on the Power Racer 270.
Charging Time
Fully charging the built-in battery can take up to eight hours. While charging, the wheel will not
function and it’s perfectly normal for parts of the wheel to become slightly warm.
When to Recharge
When the battery begins to run low the wheel will show a static red Battery Indicator Light. The
wheel will continue to show a static red Battery Indicator Light until the battery is recharged or
until the battery is completely exhausted.

Syncing the Power Racer 270 with the Xbox 360
Before you can use the Power Racer 270 for the first time you need to sync it with the Xbox
360. To do this, please follow these steps:
Step 1:
Ensuring the Xbox 360 is turned on. Press and hold the ‘Start’ and ‘Guide’ button on the Power
Racer 270, until the Player Number Indicator Lights begin to flash.
Step 2:
To complete the syncing process, press the ‘Sync’ button on the front of the Xbox 360.
Step 3:
After a few seconds the Power Racer 270 and the Xbox 360 will automatically be synchronized.
A player number will be assigned to the Power Racer 270 and displayed by one of the Player
Number Indicator Lights remaining static.
Selecting a Suitable Location
Power Racer 270 can either be mounted on a table or on your lap. Select a suitable location
ensuring that the Pedal Base Connection Cable can be arranged in a way to avoid people or
pets from tripping over it or damaging the equipment.
If you would like to mount the Power Racer 270 on a table, use the suction pads located on the
underside of the Power Racer 270 to securely fix it in position. When relocating the wheel use
the quick release tab located on the suction pad at the rear of the wheel to easily release the
wheel.
Connecting the Pedal Base
Position the pedal base in your preferred position and connect the Pedal Base Connection
Cable to the Pedal Base Connection located on the rear of the Power Racer 270.
When connecting the Pedal Base Connection Cable ensure that you orientate the cable
correctly and when pushed inwards ensure that it clips in position. To remove the Pedal Base
Connection Cable, pull the arm located on the connector inwards and pull the connector
outwards.
Pre-set Profiles
Profile Switch
The Power Racer 270 can be set to one of three pre-set profiles allowing you to change the
configuration of the wheel without the need to connect the wheel to a computer. Each of the
profiles are selected using the Profile Switch, which can be set to the position ‘P1’, ‘P2’ and ‘P3’
representing each of the profiles as shown. The position of the Profile Switch can be changed at
anytime with the wheel connected or disconnected from the console.
Profile 1 is the default configuration with the button layout and wheel sensitivity designed as
an ideal setup for a majority of racing games.
Profile 2 is designed as an ideal setup for the game ‘Dirt 3™’, with the button layout and wheel
sensitivity specifically configured for ‘Dirt 3™’.
Profile 3 is designed as an ideal setup for the game ‘Forza 3™’, with the button layout and
wheel sensitivity specifically configured for ‘Forza 3™’.
All three pre-set profiles use the control ‘RT’ for the accelerator pedal and the control ‘LT’ for
the Brake Pedal. The layout of the wheel for each of the pre-set profiles is as follows:
P1 P2 P3
Profile 1 (P1) Default Layout:
A. X Button
B. Y Button
C. B Button
D. A Button
E. Player Number Indicator Lights
F. Accelerator Pedal Pressure Indicator
G. Brake Pedal Pressure Indicator
H. LB Button
I. LT Button
J. Left Click
K. RB Button
L. RT Button
M. Right Click
N. Guide Button
O. Start Button
P. Profile Switch
Q. Back Button
R. Battery Indicator Light
S1. D-Pad Up
S2. D-Pad Right
S3. D-Pad Down
S4. D-Pad Left
T. LT Button
U. RT Button
V. X Button
W. B Button
X. A Button
Profile 2 (P2) Dirt 3™ Layout:
A. X Button
B. Y Button
C. B Button
D. A Button
E. Player Number Indicator Lights
F. Accelerator Pedal Pressure Indicator
G. Brake Pedal Pressure Indicator
H. Right Analogue Stick Left
I. RB Button
J. Y Button
K. Right Analogue Stick Right
L. R3 Button
M. Y Button
N. Guide Button
O. Start Button
P. Profile Switch
Q. Back Button
R. Battery Indicator Light
S1. D-Pad Up
S2. D-Pad Right
S3. D-Pad Down
S4. D-Pad Left
T. A Button
U. X Button
V. A Button
W. X Button
X. B Button
Profile 3 (P3) Forza 3™ Layout:
A. LB Button
B. Y Button
C. B Button
D. A Button
E. Player Number Indicator Lights
F. Accelerator Pedal Pressure Indicator
G. Brake Pedal Pressure Indicator
H. Right Analogue Stick Left
I. LB Button
J. Left Click
K. Right Analogue Stick Right
L. RB Button
M. Right Click
N. Guide Button
O. Start Button
P. Profile Switch
Q. Back Button
R. Battery Indicator Light
S1. D-Pad Up
S2. D-Pad Right
S3. D-Pad Down
S4. D-Pad Left
T. X Button
U. B Button
V. X Button
W. B Button
X. A Button
Profile Customization
Each of the preset profiles are customizable using the Power Racer 270 Customizer PC
software, please refer to the section ‘Power Racer 270 Customizer’.
Setting the Power Racer 270 to On or Off
In order to set the Power Racer 270 to on. Press and hold the ‘Start’ or ‘Guide’ button for a
number of seconds, until the Player Number Indicator Lights begin to flash.
If the Power Racer 270 is synchronised with your console, one Player Number Indicator Light
will remain static after a brief period indicating the assigned player number. If the Player
Number Indicator Lights continue to flash after a brief period, please refer to the section
‘Syncing the Power Racer 270 with the Xbox 360’.
When powering the Xbox 360 console off the wheel will automatically power off after a
number of seconds. In order to manually set the Power Racer 270 to off. Press and hold the
‘Guide’ button inwards for a number of seconds and select the onscreen option to turn the
controller off.
Accelerator Pedal Pressure Light, Brake Pedal Pressure Light and Paddle Indicator Light
The accelerator pedal pressure and brake pedal pressure indicator are designed at default to
display the amount of pressure which you are applying to either pedal. The Accelerator
Pressure Indicator fills up from left to right as pressure is applied to the Accelerator Pedal and
decreases as the pressure is reduced. The Brake Pedal Pressure Indicator fills up from right to
left as pressure is applied to the Brake Pedal and decreases as the pressure is reduced.
The Paddle Indicator Lights are designed at default to illuminate when each of the paddles are
pulled inwards.
Each of these Indicator lights are customizable using the Power Racer 270 Customizer PC
software, please refer to the section ‘Power Racer 270 Customizer’.
Battery Indicator Light
The battery Indicator Light indicates the status of the battery by showing different lights as
detailed below:
Green Static Light =
Charged Battery
Red Static Light =
Low Battery
Red Flashing Light =
Charging

Power Racer 270 Customizer
The Power Racer 270 Customizer is a free downloadable PC application which allows the
customization of the three pre-set Power Racer 270 profiles. The Power Racer Customizer is
downloadable complete with instructions from Datel’s website, www.codejunkies.com.
Using the Power Racer 270 Customizer and the USB Data/Charge Cable (supplied), for each of
Power Racer 270 profiles you can change the button layout, wheel sensitivity, pedal sensitivity
and even how you want to use the different indicator lights.
This is particularly useful for users who may wish to have different layouts and sensitivity
settings for the same game stored under different profiles.
This fantastic feature gives you the ultimate freedom to customize the Power Racer 270 for
how you want to play and best of all it is completely free.
FCC Rules, Part 15
This equipment has been tested and found to comply with the limits for a class B digital device,
pursuant to Part 15 of the FCC rules. These limits are designed to provide reasonable protection
against harmful interference in a residential installation. This equipment generates, uses and
can radiate radio frequency energy and, if not installed and used in accordance with the
instructions, may cause harmful interference to radio communications. However, there is no
guarantee that interference will not occur in a particular installation. If this equipment does
cause harmful interference to radio or television reception, which can be determined by
turning the equipment off and on, the user is encouraged to try to correct the interference by
one or more of the following measures:
• Reorient or relocate the receiving antenna
• Increase the separation between the equipment and receiver
• Connect the equipment to an outlet on a circuit different from that to which the
receiver is connected
• Consult the dealer or an experienced radio/TV technician for help
This device complies with Part 15 of the FCC rules.
Operation is subject to the following two conditions:
This device may not cause harmful interference.
This device must accept any interference received, including interference that may
cause undesired operation
Changes or modifications not expressly approved by the party responsible for compliance could
void the user’s authority to operate the equipment.
Responsible Party:
Datel Design & Inc,
33 North Garden Avenue,
Suite 900,
Clearwater,
FL 33755
United States of America
Tel. 727-431-0650
Customers in Canada
IC warning statement:
This Class B digital apparatus complies with Canadian ICES-003.
This device complies with RSS 210 of Industry Canada (IC).
Operation of this device is subject to the following two conditions: (1) this device may not
cause interference, and (2) this device must accept any interference, including interference
that may cause undesired operation of the device.
RF warning statement:
The device has been evaluated to meet general RF exposure requirement. The device can be
used in portable exposure conditions without restriction.
Technical Support and Customer Services
Before contacting Datel’s customer service department, please ensure that you have read
through and understood the information in this user guide. Please ensure that you have
information on when and where you purchased this product to hand.
Datel Customer Services Europe
Customers Services, Datel Ltd
Stafford Road, Stone, STAFFS, ST15 0DG
UNITED KINGDOM
Email: support@datel.co.uk
Web: http://uk.codejunkies.com

Datel Customer Services USA
ATTN: Customer Services, Datel Design & Development Inc
33 North Garden Avenue, Suite 900, Clearwater, FL 33755
UNITED STATES
Email: support@dateldesign.com
Knowledgebase: http://www.datelcustomerservice.com
Web: http://us.codejunkies.com
© 2011 Datel Ltd. Power Racer 270 is a trademark of Datel Ltd.
Power Racer 270 for Xbox 360 is a 100% unofficial product and is NOT sponsored, endorsed or approved by MICROSOFT, nor any games
developer or publisher. Forza 3, Xbox 360 and Xbox Live are registered trademarks or trademarks of MICROSOFT in the United States
and/or other countries. Dirt 3 is a registered trademark or trademark of Codemasters in the United Kingdom and/or other countries.