Datron World Communications HH7700 FM TRANSCEIVER User Manual HH770 MSOPb
Datron World Communications Inc FM TRANSCEIVER HH770 MSOPb
Contents
- 1. Users Manual
- 2. Notice to Users
Users Manual

HH7700-MSOP
HH7700
5W VHF Handheld Transceiver
Operator Manual
Datron World Communications, Inc.
Part No. HH7700-MSOP
Release Date: February 2008
Revision: B
3030 Enterprise Court
Vista, CA 92081, USA
Phone: (760) 597-1500
FAX: (760) 597-1510
E-mail: sales@dtwc.com
www.dtwc.com
HH7700-MSOP i
Change Description
Date of
Revision
Revision
Letter
Description of Changes Pages
Affected
01/08 A New manual. All
02/08 B Updates. All

HH7700-MSOP iii
© 2003 Datron World Communications, Inc. (Datron)
All rights reserved.
Datron World Communications, Inc.
This manual, as well as the software described in it, is furnished under license and may only be used
or copied in accordance with the terms of such license. The information in this manual is furnished
for informational use only, is subject to change without notice, and should not be construed as a
commitment by Datron. Datron assumes no responsibility or liability for any errors or inaccuracies
that may appear in this book.
Except as permitted by such license, no part of this publication may be reproduced, stored in a
retrieval system, or transmitted, in any form or by any means, electronic, mechanical, recording, or
otherwise without the prior written permission of Datron.
Software License Agreement and Warranty
This software is licensed to the user (licensee) under the express terms and conditions of Datron’s
software licensing policies and agreement as outlined below. By receiving and installing this software
package the user (licensee) has indicated acceptance of the terms and conditions of this agreement
presented herewith.
As used in this document, the term “Software” shall mean the application or control software in
machine readable format and the hardware protection key, along with any or all supporting
documentation, as well as all updated or enhanced versions of the program supplied to the user at later
date(s). This software license does not include source code, and therefore, no license is granted with
respect to source code of any kind utilized directly or indirectly in any Datron or Datron supplied
third party product. Note, in some cases, covered software may be included in Datron products in
RAM or ROM, and/or forms of machine readable code, not readily accessible to the user or licensee.
In consideration of the terms and conditions of this agreement, Datron grants the user a non-
exclusive, nontransferable license to install and operate one copy of the program. Licensee agrees not
to attempt, aid, authorize, or direct any effort, either directly or indirectly to reverse engineer or
reverse compile the Software. Licensee further agrees they or their agents are not authorized to make
derivative versions or changes to the Software.
Title to and ownership of the Software shall at all times remain with Datron and/or its licensors.
Further, no license is granted to copy or reproduce in any form whatsoever the Software supplied
without the express written permission of Datron, prior to any such contemplated action.
Datron may terminate this agreement and discontinue further warranty coverage at any time due to
failure to comply with the terms and conditions of this agreement.
In such an event, Datron will provide the user with written notice of such a “failure-to-comply” and
the user will have 10 days to demonstrate that a remedy has been implemented. If the user fails to
perform, the agreement will be terminated by further written notice from Datron. Upon termination,
the user shall immediately return all original Software, documentation, and any copies of each to
Datron.
This Software is licensed “AS IS” and Datron provides a warranty that covers the media upon which
the Software is embedded for a period of 30 days from receipt of the product. Under this warranty
policy Datron’s sole obligation shall be to replace or repair, at Datron’s discretion, any such media
that in Datron’s opinion proves defective.
The user is obligated to provide Datron with a detailed description of possible defects along with
sample material such that Datron can reproduce the identified defects.
By receipt and use, user (licensee) acknowledges that certain software developed or distributed by
Datron is controlled by one or more governmental agencies. The user (licensee) herewith
acknowledges they will take all necessary actions to comply with applicable regulations concerning
the use of licensed software. Further, Datron is under no obligation to supply source code or
documentation of its software for any reason.

iv HH7700-MSOP
Datron makes no representation, express or implied, with respect to any Software licensed under this
document as to its fitness for any particular purpose or intended use. Furthermore, Datron shall have
no liability under this agreement for any incidental, special, or consequential damages arising out of
the use of any supplied software programs. Datron reserves the right to make periodic changes in it’s
software for any purpose without any obligation to notify users.
One Year Limited Warranty and Remedies
Datron warrants that its equipment is free from defects in design, materials, and workmanship for a
period of 12 months from the date of installation of the equipment,
but in no event later than 15 months from the date of shipment. If the equipment does not provide
satisfactory service due to defects covered by this warranty, Datron will, at its option, replace or
repair the equipment free of charge.
Should it be impractical to return the equipment for repair, Datron will provide replacements for
defective parts contained in the equipment for a period of 12 months from the date of installation of
the equipment, but in no event later than 15 months from the date of shipment.
This warranty is limited to the original purchaser and is not transferable. Repair service performed by
Datron is warranted for the balance of the original warranty or 90 days, whichever is longer.
Exclusive Warranty: There are no other warranties beyond the warranty as contained herein. No
agent, employee, or representative of Datron has any authority to bind Datron to any affirmation,
representation, or warranty concerning the equipment or its parts that is not in conformity with the
warranties contained herein.
EXCEPT AS EXPRESSLY SET FORTH ABOVE, NO OTHER WARRANTIES, EITHER
EXPRESS OR IMPLIED, ARE MADE WITH RESPECT TO THE EQUIPMENT OR THE PARTS
CONTAINED THEREIN, INCLUDING BUT NOT LIMITED TO THE IMPLIED WARRANTIES
OF MERCHANTABILITY AND FITNESS FOR A PARTICULAR PURPOSE, AND DATRON
EXPRESSLY DISCLAIMS ALL WARRANTIES NOT STATED HEREIN.
Limitations of Warranty: This warranty does not cover:
Physical damage to the equipment or its parts that does not involve defects in design, material, or
workmanship, including damage by impact, liquids, temperature, or gases.
Damage to the equipment or its parts caused by lightning, static discharge, voltage transients, or
application of incorrect supply voltages.
Defects or failures caused by unauthorized attempts to repair or modify the equipment. Defects or
failures caused by Buyer abuse or misuse.
Return of Equipment - Domestic: To obtain performance of any obligation under this warranty, the
equipment must be returned freight prepaid to the Technical Support Services. Datron World
Communications Inc., 3030 Enterprise Court, Vista, California 92081. The equipment must be
packed securely. Datron shall not be responsible for any damage incurred in transit. A letter
containing the following information must be included with the equipment.
a. Model, serial number, and date of installation.
b. Name of dealer or supplier of the equipment.
c. Detailed explanation of problem.
d. Return shipping instructions.
e. Telephone or fax number where Buyer may be contacted.
Datron will return the equipment prepaid by United Parcel Service, Parcel Post, or truck. If alternate
shipping is specified by Buyer, freight charges will be made collect. Return of Equipment -
International: Contact Datron or your local Representative for specific instructions. Do not return
equipment without authorization. It is usually not possible to clear equipment through U.S. Customs
without the correct documentation. If equipment is returned without authorization, Buyer is
responsible for all taxes, customs duties, clearance charges, and other associated costs.

HH7700-MSOP v
Parts Replacement: The following instructions for the supply of replacement parts must be
followed:
a. Return the parts prepaid to “Parts Replacement” Datron World Communications Inc., 3030
Enterprise Court, Vista, California 92081; and
b. Include a letter with the following information:
1. Part number
2. Serial number and model of equipment
3. Date of installation
Parts returned without this information will not be replaced. In the event of a dispute over the age of
the replacement part, components date-coded over 24 months previously will be considered out of
warranty.
Remedies: Buyer’s sole remedies and the entire liability of Datron are set forth above. In no event
will Datron be liable to Buyer or any other person for any damages, including any incidental or
consequential damages, expenses, lost profits, lost savings, or other damages arising out of use of or
inability to use the equipment.
Safety Considerations
This product and manual must be thoroughly understood before attempting installation and operation.
To do so without proper knowledge can result in equipment failure and bodily injury.
Caution: Before applying ac power, be sure that the equipment has be properly configured for the
available line voltage. Attempted operation at the wrong voltage can result in damage and voids the
warranty. See the manuals section on installation. DO NOT operate equipment with cover removed.
Earth Ground: All Datron products are supplied with a standard, 3-wire, grounded ac plug. DO
NOT attempt to disable the ground terminal by using 2-wire adapters of any type. Any disconnection
of the equipment ground causes a potential shock hazard that could result in personal injury. DO NOT
operate any equipment until a suitable ground has been established. Consult the manual section on
grounding.
Servicing: Only trained personnel should carry out servicing. To avoid electric shock, DO NOT open
the case unless qualified to do so. Various measurements and adjustments described in this manual are
performed in ac power applied and the protective covers removed. Capacitors (particularly the large
power supply electrolytics) can remain charged for a considerable time after the unit has been shut
off. Use particular care when working around them, as a short circuit can release sufficient energy to
cause damage to the equipment and possible injury.
To protect against fire hazard, always replace line fuses with ones of the same current rating and type
(normal delay, slow-blow, etc.). DO NOT use higher value replacements in an attempt to prevent fuse
failure. If fuses are failing repeatedly this indicates a probable defect in the equipment that needs
attention.
Use only genuine Datron factory parts for full performance and safety of this product.

CONTENTS
HH7700-MSOP vii
1: Introduction
The HH7700 VHF Radio. . . . . . . . . . . . . . . . . . . . . . . . . . . . . . . . . 1-1
Technical Specifications . . . . . . . . . . . . . . . . . . . . . . . . . . . . . . . . . 1-2
Referenced Manuals. . . . . . . . . . . . . . . . . . . . . . . . . . . . . . . . . . . . . 1-3
2: Radio Basics
Radio Controls . . . . . . . . . . . . . . . . . . . . . . . . . . . . . . . . . . . . . . . . . 2-1
Programmable Buttons. . . . . . . . . . . . . . . . . . . . . . . . . . . . . . . . . . . 2-2
Scroll Buttons. . . . . . . . . . . . . . . . . . . . . . . . . . . . . . . . . . . . . . . . . . 2-3
Shift Button . . . . . . . . . . . . . . . . . . . . . . . . . . . . . . . . . . . . . . . . . . . 2-3
Monitor Button. . . . . . . . . . . . . . . . . . . . . . . . . . . . . . . . . . . . . . . . . 2-3
LCD Display and Icons . . . . . . . . . . . . . . . . . . . . . . . . . . . . . . . . . . 2-4
Audio Signal Tones . . . . . . . . . . . . . . . . . . . . . . . . . . . . . . . . . . . . . 2-5
Battery Information . . . . . . . . . . . . . . . . . . . . . . . . . . . . . . . . . . . . . 2-6
Accessory Information. . . . . . . . . . . . . . . . . . . . . . . . . . . . . . . . . . . 2-6
3: Radio Operation
Quick Start . . . . . . . . . . . . . . . . . . . . . . . . . . . . . . . . . . . . . . . . . . . . 3-1
Selecting Channels. . . . . . . . . . . . . . . . . . . . . . . . . . . . . . . . . . . . . . 3-1
Setting Output Power. . . . . . . . . . . . . . . . . . . . . . . . . . . . . . . . . . . . 3-2
Receiving a Call. . . . . . . . . . . . . . . . . . . . . . . . . . . . . . . . . . . . . . . . 3-3
Sending a Call . . . . . . . . . . . . . . . . . . . . . . . . . . . . . . . . . . . . . . . . . 3-3
Monitoring the Radio. . . . . . . . . . . . . . . . . . . . . . . . . . . . . . . . . . . . 3-3
Setting Squelch Level . . . . . . . . . . . . . . . . . . . . . . . . . . . . . . . . . . . 3-4
Scanning. . . . . . . . . . . . . . . . . . . . . . . . . . . . . . . . . . . . . . . . . . . . . . 3-4
Key Lock Feature. . . . . . . . . . . . . . . . . . . . . . . . . . . . . . . . . . . . . . . 3-9
Power Save Feature . . . . . . . . . . . . . . . . . . . . . . . . . . . . . . . . . . . . . 3-9
Back Light Feature. . . . . . . . . . . . . . . . . . . . . . . . . . . . . . . . . . . . . 3-10
Scramble Feature . . . . . . . . . . . . . . . . . . . . . . . . . . . . . . . . . . . . . . 3-10
VOX Feature . . . . . . . . . . . . . . . . . . . . . . . . . . . . . . . . . . . . . . . . . 3-10
Whisper Feature . . . . . . . . . . . . . . . . . . . . . . . . . . . . . . . . . . . . . . . 3-11
Cloning a Radio . . . . . . . . . . . . . . . . . . . . . . . . . . . . . . . . . . . . . . . 3-11
Programmed Settings. . . . . . . . . . . . . . . . . . . . . . . . . . . . . . . . . . . 3-12
HH7700-MSOP 1-1
1: INTRODUCTION
The HH7700 VHF Radio
Datron’s HH7700 is a compact and lightweight VHF
handheld transceiver that provides communications
capability in the 30 to 88 MHz band. RF power output
levels of 500 mW, 2W and 5W can be selected. It offers
up to 2320 channels at 25 kHz spacing or 4640 channels
at 12.5 kHz spacing. The HH7700 has a programmable
100 channel memory selectable via keypad, and up to
fifteen programmable preset channels selectable via
rotary knob.
The HH7700 is interoperable in FM clear-voice mode
with Datron’s squad radio family (PRC1060/70/80), the
SpectreV series (PRC2100/2150), the new PRC7700V
and most other single-channel 30 to 88 MHz VHF/FM
radios using a 150 Hz tone-squelch or CTCSS squelch
system.
Most of the radio’s settings and buttons are already
programmed into the radio using the HH7700
Programmer software. Request a list of the functions
that are assigned to the buttons and knobs on the radio. For details about
programming the radio, refer to the HH7700-PROG-MSOP
Programmer Guide.
Features include:
• Ease of operation
• Selectable power levels
• Computer programmable
• Cloning
• 100 Channel memory
•LCD display
• Vox (standard)
• Whisper (standard)
• Full range of accessories

1-2 HH7700-MSOP
1: Introduction
Technical Specifications
Note: Specifications are subject to change without notice or obligation.
Characteristic Description
General
Frequency Range 30 MHz to 87.9875 MHz
CCIR Emission 16K0F3E (wide), 11K0F3E (narrow)
Mode Simplex
Channel Spacing 25 kHz (wide), or 12.5 kHz (narrow)
Preset Channels 15
Modulation FM (300 Hz to 3000 Hz)
Display Alphanumeric, 14 segments, 5 digits, icons
Programming Computer programmable
Current
Consumption
Transmit mode: Less than 2.0A
Receive mode: Less than 0.6A
Battery Life 4000 mAH Li-Ion: ~18 hours
(5-5-90, high power)
2200 mAH Ni-MH: ~10 hours
(5-5-90, high power)
Environmental
Temperature -30°C to +60°C
Humidity 90%
Water Resistance Splash proof
Receiver
Receiver Type Dual conversion, super heterodyne
Sensitivity Better than 0.35µV for 12 dB SINAD
Squelch 150 Hz tone, CTCSS (39 tones)
Audio Distortion ≤3%
Audio Output 400mW (≤5% distortion), 500mW max.
Output Impedance 8Ω

HH7700-MSOP 1-3
1: Introduction
Referenced Manuals
• HH7700-PROG-MSOP Programmer guide
• TVS-2-DT1 Hopping Code Scrambler manual
Transmitter
Output Power Hi: 5W, Mid: 2W, Low: 500mW (nominal)
Antenna Impedance 50Ω
Frequency Stability ±2.5 ppm (-30°C to +60°C)
FM Hum and Noise ≥45dB (wide), ≥40dB (narrow)
Spurious Response ≤50dB
Modulation Direct frequency modulation
Characteristic Description

HH7700-MSOP 2-1
2: RADIO BASICS
Radio Controls
Channel Knob
For access to frequently used channels. Turning it to F allows a display
off all 100 channels programmed into the radio.
Power/Volume Knob
Turns the radio on and off and adjusts the volume of the radio.
LED Indicator
Indicates radio status. Red light indicates transmission; green light
indicates the receive monitor is on.
Push-to-talk (PTT)
Press and hold down to talk; release to listen.
Shift
Used with the MONITOR button to set squelch levels. Used with the scroll
buttons to select power settings and tones. Performs programmable
functions when used with the P1 and P2 buttons.
Monitor
Used to control squelch/muting (keeps the speaker quiet and free from
static). Enables/disables the keylock function and is used with the SHIFT
button to set squelch levels.
Accessory Connectors
Connections for programming cable and microphone. Keep the dust cap
on when not in use.
LCD Display
Five-character single line display with up to 13 icons.
Programmable Buttons
Buttons P1 and P2 can be programmed to perform scan, dual watch,
scramble, VOX and whisper functions. Can be used in combination with
the SHIFT button to perform secondary functions.
Scroll Buttons
Used for scrolling through channels and squelch settings. Down scroll is
used to access the programming mode and up scroll the cloning mode.

2-2 HH7700-MSOP
2: Radio Basics
Programmable Buttons
Buttons P1 and P2 are programmed using the Programmer. P1 and P2 can
have secondary functions when the SHIFT button is pressed with one of
them. These combinations of buttons can be programmed for None,
Scan, Dual Watch, VOX or Whisper.
In the example below, pressing P1 would activate Scan. Pressing SHIFT
and P1 would activate Dual Watch. Pressing P2 would activate Scramble.
Pressing SHIFT and P2 would activate VOX.
Check with your administrator for a list of the functions your radio
supports.
Function Description
None When the button assigned to None is pressed, there is no
action.
Scan When the button assigned to Scan is pressed, the radio
proceeds to scan the memory list.
Dual Watch When the button assigned to Dual Watch is pressed, the
radio proceeds to scan a preset channel with a priority
channel.
Scramble When the button assigned to Scramble is pressed, voice
is scrambled.
VOX When the button assigned to VOX is pressed, the radio
goes into VOX mode.
Whisper When the button assigned to Whisper is pressed, the
radio goes into whisper mode.
=== Button === ===== Primary ===== ===== Secondary =====
P1 Scan Dual Watch
P2 Scramble VOX

HH7700-MSOP 2-3
2: Radio Basics
Scroll Buttons
Scroll ▼
• To scroll down programmed channels when the channel knob is in
the F position.
• To scroll down through the squelch levels.
• To access the programming mode when MONITOR is also pressed.
Scroll ▲
• To scroll up programmed channels when the channel knob is in
the F position.
• To scroll up through the squelch levels.
• To access the cloning mode when MONITOR is also pressed.
Shift Button
• To select high, medium and low power settings for channels when
the ▼ button is also pressed.
• To select CTCSS (CT) or 150 MHz (A) tones when the ▲ button
is also pressed.
• To use in combination with P1 and P2 (for Scan, Dual Watch,
VOX, Whisper, or None) when programmed to do so.
• To set squelch levels when pressed simultaneously with the
MONITOR button.
Monitor Button
• To disable the mute/squelch function.
• To enable or disable keylock (except PTT and MONITOR). To release
the lock, press MONITOR again for 2 seconds.
• To set squelch levels when pressed with SHIFT.
• To access the programming mode when ▼ is also pressed.
• To access the cloning mode when ▲ is also pressed.
Note: If MONITOR is pressed longer than 2 seconds, the radio
locks. To unlock, press MONITOR again for 2 seconds.
2-4 HH7700-MSOP
2: Radio Basics
LCD Display and Icons
Icon Description
Monitor indicator. If displayed, monitoring is activated.
Its activation disables audio mute.
If displayed, the key lock is activated. Its activation
prevents the buttons from functioning (with the
exception of PTT and MONITOR). Unlock by pressing
MONITOR at least 2 seconds.
Unused at this writing.
If displayed, the 150 Hz tone has been programmed
into the radio for the displayed channel.
If displayed, the CTCSS tone has been programmed
into the radio for the displayed channel.
If displayed, channels are being scanned.
If displayed, the scrambler is installed in the radio and
activated.
The last two digits of a frequency when the frequency
exceeds the 5 digits.
Transmit power L (low), M (medium) or high (default
with no icon displayed).
HH7700-MSOP 2-5
2: Radio Basics
Audio Signal Tones
Refer to this table to ascertain the high or low pitched (tone) frequency
beeps. Knowledge of these tones allows monitoring of the radio without
looking at the display.
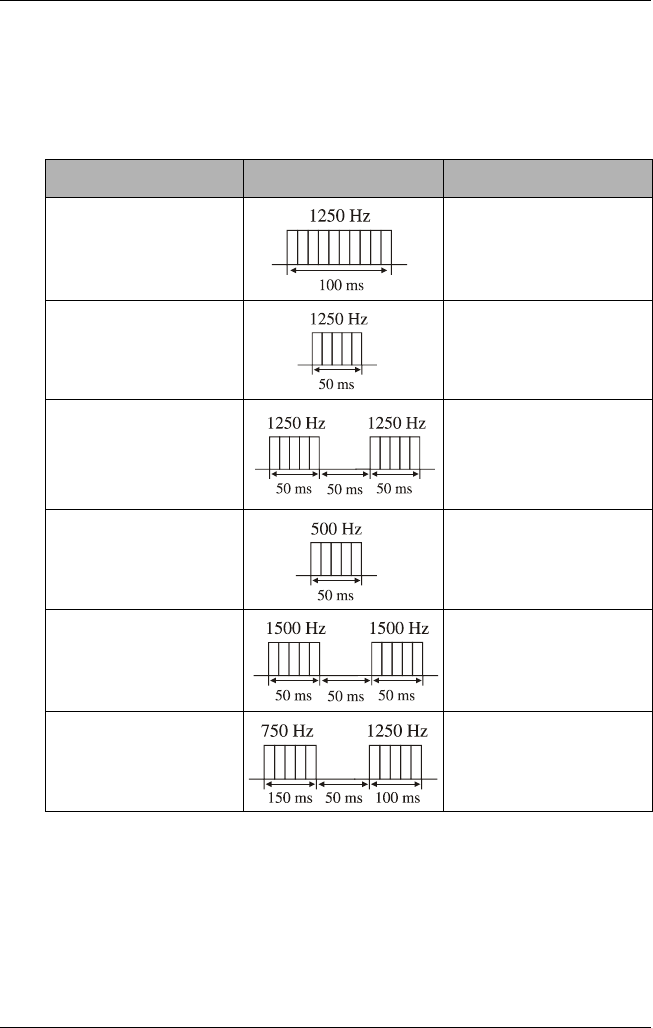
Reason for Beep Output (1 cycle) Remark
Power on Enable/disable using
Programmer
SHIFT or MONITOR
button enabled or
channel knob turned
Enable/disable using
Programmer
SHIFT or MONITOR
button released
Enable/disable using
Programmer. Two
beeps.
P1 or P2 disabled,
Tx inhabit, or no
channel assigned
No TX frequency
programmed or busy
channel lockout
Timeout timer Beeps 10 seconds
prior to timeout
Low battery Enable/disable using
Programmer.
One beep at low
battery
2-6 HH7700-MSOP
2: Radio Basics
Battery Information
If the battery is new (it is shipped empty) or its charge level is low, it
needs to be charged before use. The radio beeps if the voltage goes
below 6.5V. Detection and beep is only indicated once.
To charge the battery:
1. Turn the radio off and plug the charger into the power source.
2. Place the battery (with or without the radio attached) into the
charging pocket.
3. Remove the battery when the indicator is a steady green.
Accessory Information
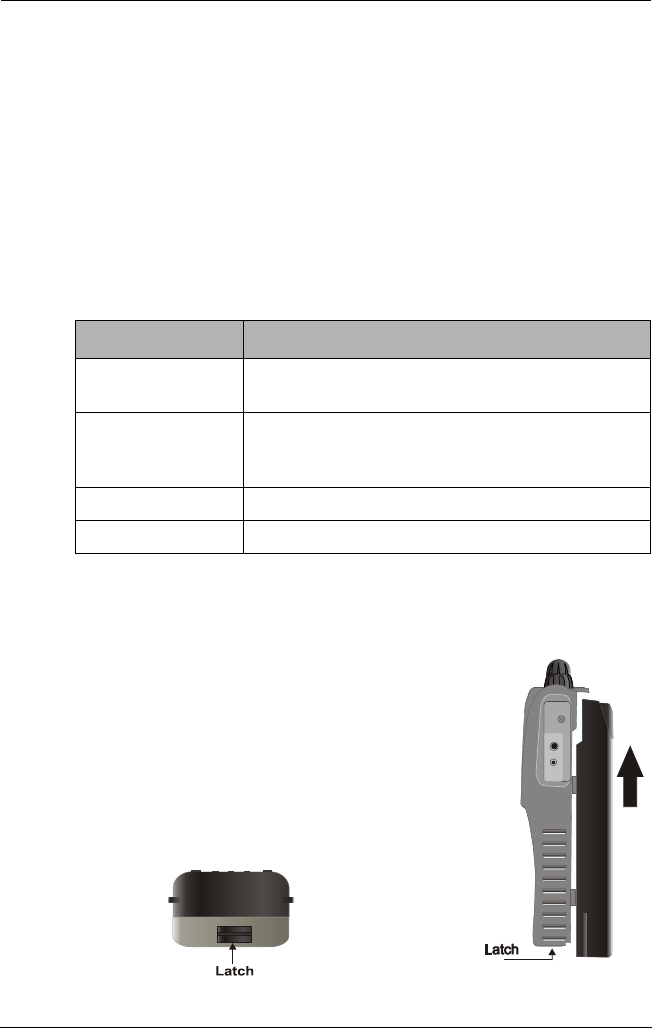
Attaching and Removing the Battery
To attach the battery:
1. Align the battery to the battery rails on the
back of the radio (about 1 cm from the top
of the radio).
2. Press the battery firmly onto the radio and
slide the battery upward until the battery
latch snaps into place.
LED Indicator Status
No indication Charger not plugged into outlet or charger is
damaged.
Flashing red Battery not inserted or not detected. Remove
and replace the battery in the charger. If it
continues to flash red, replace the charger.
Steady red Battery is charging.
Steady green Battery is fully charged.
HH7700-MSOP 2-7
2: Radio Basics
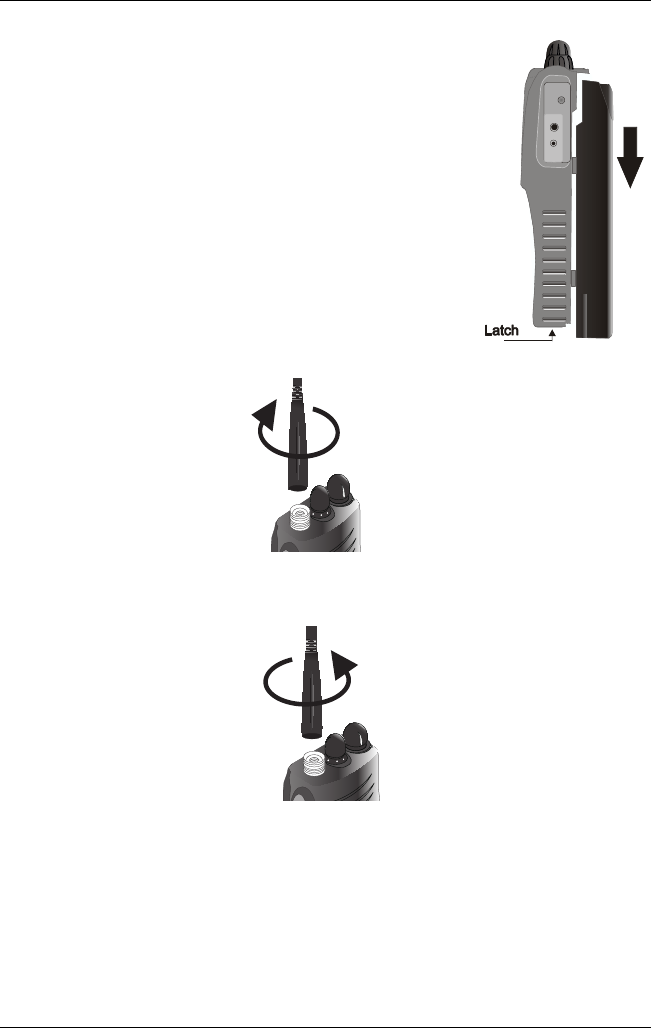
To remove the battery:
1. Turn off the radio.
2. Slide the battery latch toward the
front of the radio into the unlock
position.
3. With the battery latch engaged,
slide the battery away from the top
of the radio.
Attaching the Antenna
Removing the Antenna
3
1
5
3
1
5

2-8 HH7700-MSOP
2: Radio Basics
Attaching the Belt Clip
1. Using your thumb, press
the clip’s spring latch
towards the top of the
clip. Slide the latch down
into the groves of the
radio and release your
thumb.
2. Place the screw on top of
the phillips screwdriver
and keep it in place while
passing the screwdriver
through the opening of
the clip.
3. Tighten the screw to the
battery.
Removing the Belt Clip
1. Using a phillips screwdriver,
loosen the screw positioned
through the opening in the
clip and remove it.
2. Using your forefinger, press
the clip toward the battery
and slide the clip up and off.

HH7700-MSOP 3-1
3: RADIO OPERATION
The HH7700 operates with most of its features already programmed
into the radio. Request a list of the functions that are assigned to the
buttons and switches on your radio.
Quick Start
Before proceeding, the radio must be set up using the HH7700 software
Programmer.
Selecting Channels
The radio can be programmed to hold up to 100 channels. Fifteen of the
most frequently used channels can be programmed to coincide with the
15 positions on the channel knob. These are Preset channels.
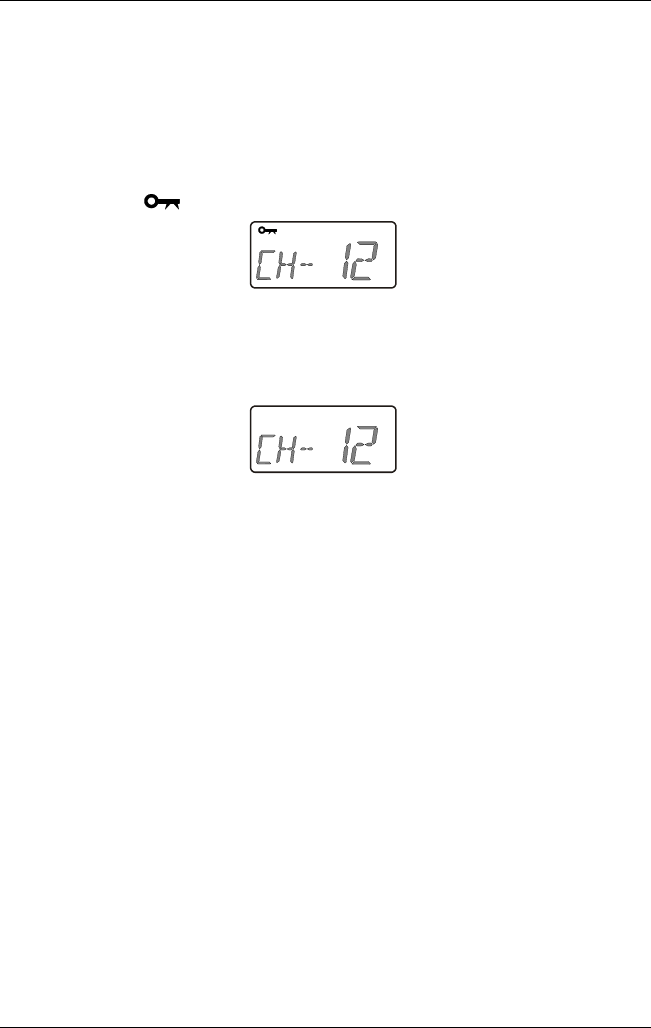
To access Preset channels, turn the channel
knob to display the channel assigned to each
of the 15 positions. Use the LED indicator as a
reference when positioning the 1 to 15 and F.
In the illustration to the right, the knob is in
the channel 2 position.
1. Battery Install a charged battery.
2. Antenna Install the antenna. Do not operate the radio
without an antenna.
3. Power-up Turn the power/volume knob clockwise about
halfway around. The radio beeps if
programmed to do so. Set the volume to a
comfortable level. If necessary, press MONITOR
to mute the speaker.
4. Select channel Turn the channel knob until the desired channel
is shown on the display.
5. Receive Listen using the built-in speaker.
6. Transmit Press PTT and speak about 4 inches from
microphone. Release PTT when finished
speaking. Do not press PTT longer than
necessary after talking.
3-2 HH7700-MSOP
3: Radio Operation
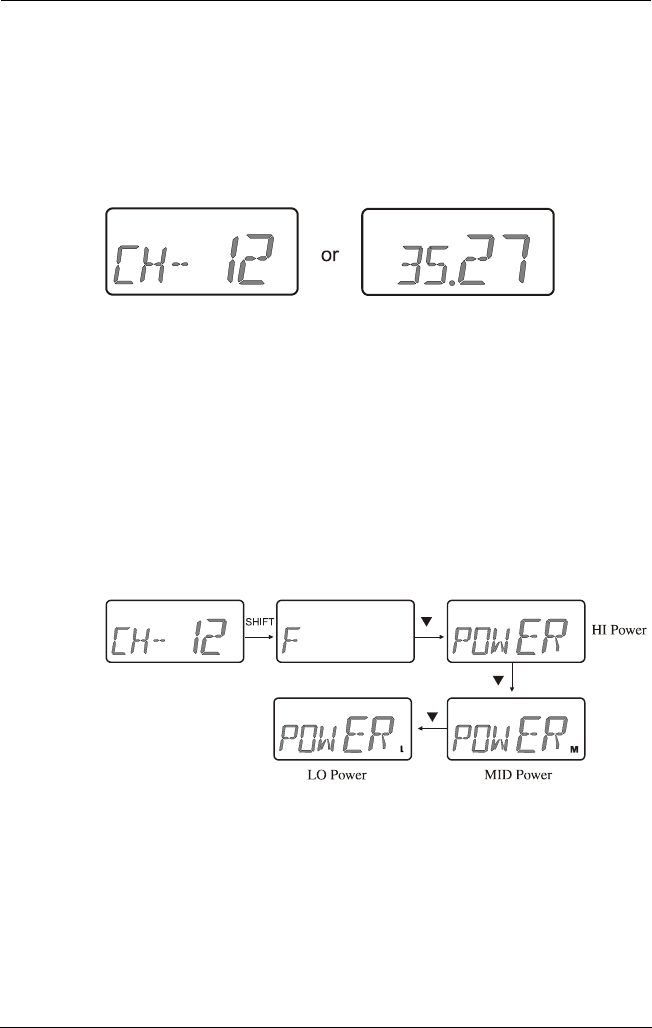
If a channel has not been assigned to a position, NO-CH is displayed.
To access the channels that are not preset:
1. Turn the channel knob to F.
2. Press ▲ or ▼ to scroll through the channels.
3. Press SHIFT to display the channel’s frequency.
Note: The radio is programmed to display either channel
numbers or channel frequencies. It is not possible to display both.
Setting Output Power
The power level can be set for each channel (high, medium or low).
To set the power level:
1. Navigate to the channel to set and press SHIFT.
2. Press ▼ to scroll through the power levels of high (no icon is
displayed) medium (M) or low (L).
3. Press SHIFT to release.
Note: If a button is not pressed during the power change, this mode
terminates automatically after 5 seconds.

HH7700-MSOP 3-3
3: Radio Operation
Receiving a Call
1. Turn the radio on.
2. Adjust the volume.
3. Select the desired channel.
4. Listen for voice activity. The LED indicator flashes green while
the radio is receiving.
5. To respond, hold the radio 1 to 2 inches from your mouth. Press
PTT to talk. The LED turns red.
Note: The radio can be programmed to enable a timeout from 0.5
seconds to 4 minutes. The call may terminate if the call time is exceeded.
Sending a Call
1. Turn on the radio.
2. Select the desired channel.
3. Press PTT to talk. Pause a second before speaking to avoid voice
cutoff.
Note: The MONITOR button can be pressed for tracking frequency usage.
However, if LOCKOUT TYPE is programmed to monitor busy channels or
tones, pressing MONITOR is not necessary.
Monitoring the Radio
Press MONITOR to listen for activity on the channel/frequency. The
monitor function works in standby or receiving mode. When the feature
is on, the LED is green and the monitor icon is displayed.
Press MONITOR again to disable the function.
3-4 HH7700-MSOP
3: Radio Operation
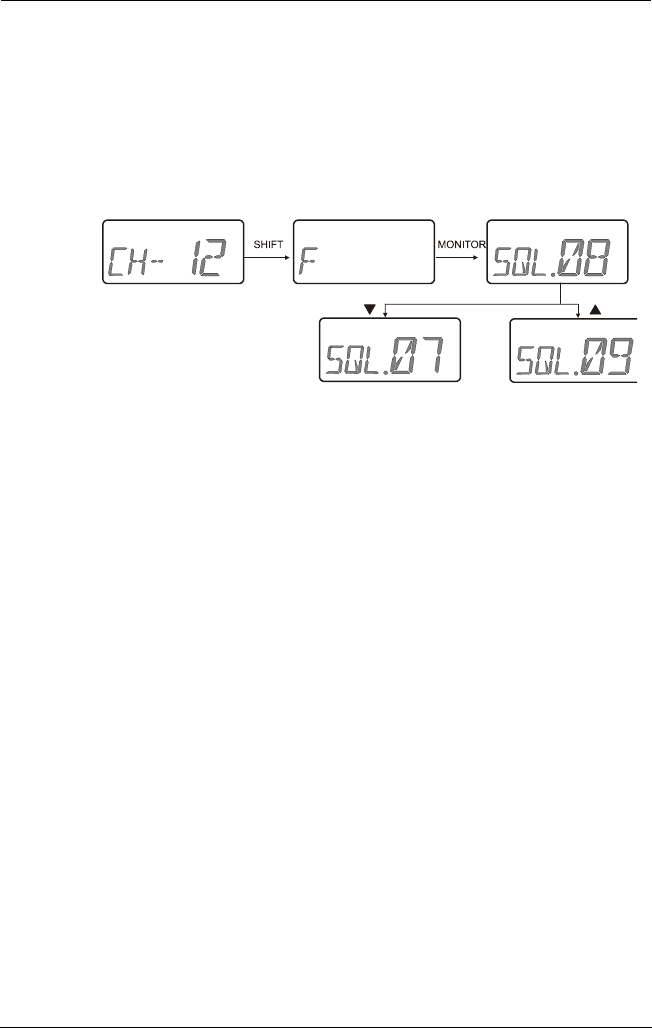
Setting Squelch Level
To set the squelch level:
1. Navigate to the channel to set.
2. Press SHIFT and MONITOR.
3. Press ▲ to scroll up through the 16 squelch levels and press ▼ to
scroll down through the 16 squelch levels.
4. Press SHIFT to release the squelch level function.
Note: If a button is not pressed during squelch level changes, this mode
terminates automatically after 5 seconds.
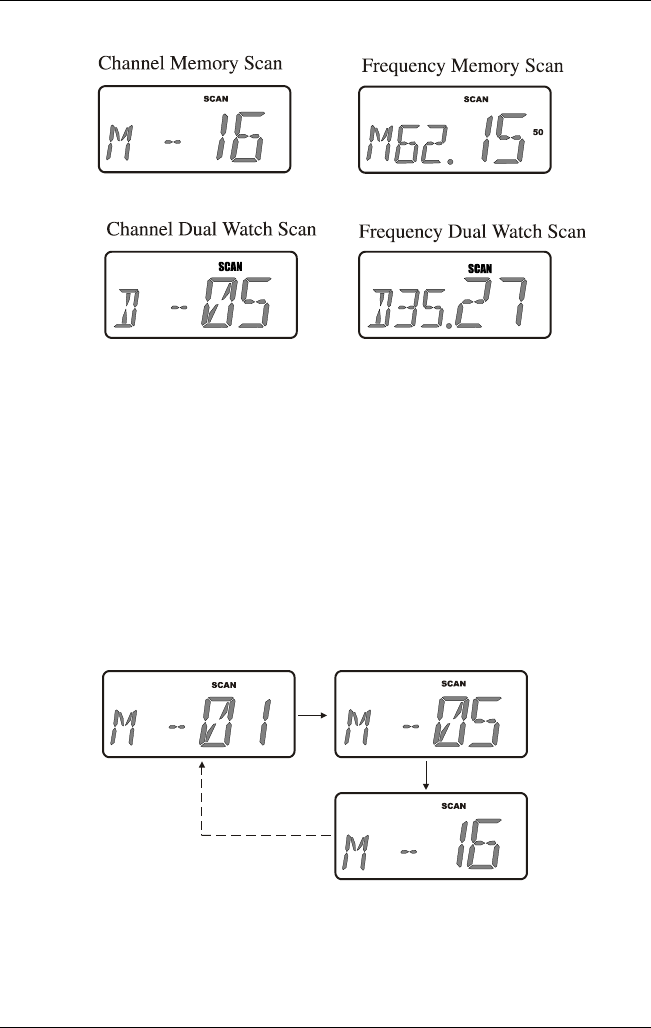
Scanning
There are two types of scanning: Memory and Dual Watch.
Conditions
The following conditions apply to scanning:
• Scan lists, range and speed are defined using the Programmer.
• There has to be more than one channel on the memory scan list
for scanning to proceed.
•A
SCAN button and DUAL WATCH button must designated using the
Programmer.
•Memory (
M) and Dual Watch (D) scanning takes place in channel
mode or frequency mode as illustrated on the next page.
HH7700-MSOP 3-5
3: Radio Operation
Memory Scan
More than 1 channel must be assigned to the memory scan list for
scanning to take place. Scanning can be viewed in channel mode or
frequency mode.
1. Turn the Channel knob to the F position.
2. Press SCAN.
The radio scans the memory list in a continuous loop at a speed
set in the Programmer (from 50 ms to 120 ms). The example
below shows an uninterrupted Memory scan (no activity
detected).
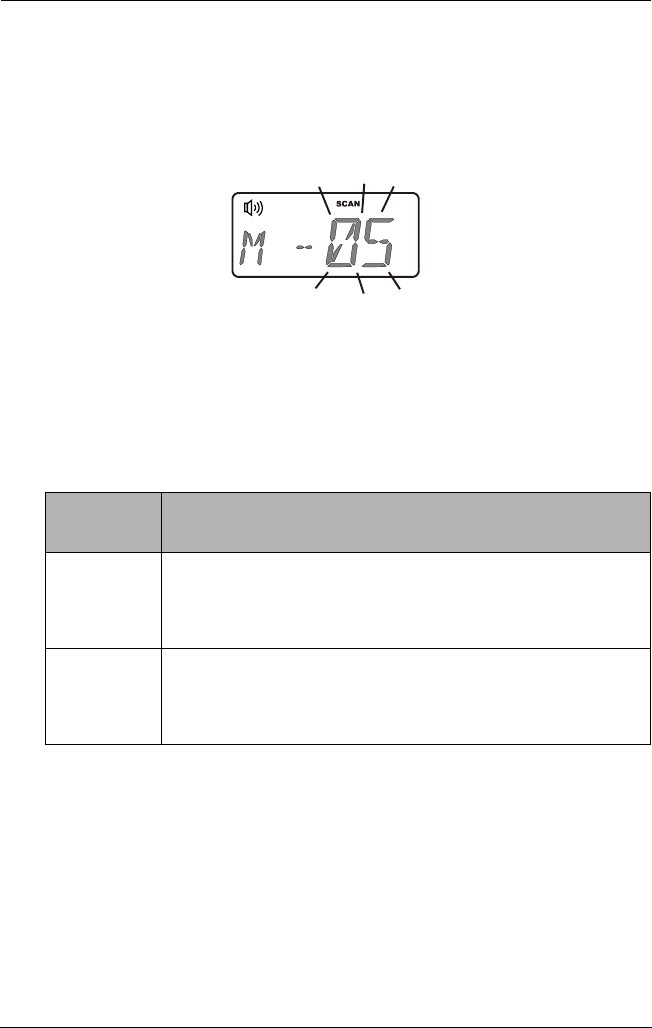
3-6 HH7700-MSOP
3: Radio Operation
When a signal is detected on a channel, the monitor icon is
displayed, the channel or frequency flashes and activity on the
channel is heard. Scanning pauses for 5 seconds unless tone
decoding is enabled on some or all channels causing the scan rate
to slow down as the radio decides whether or not there is
something worth listening to.
When the signal ends or 5.0 seconds is up, scanning resumes.
3. Press SCAN again to stop scanning.
Dual Watch Scan
Dual watch has two functions and is dependent on how the channel knob
is positioned. It is setup as follows:
To scan all assigned channel frequencies with a priority channel:
1. Turn the channel knob to the F position.
2. Press DUAL WATCH.
The radio begins to scan all of the channels that have assigned
frequencies at a speed set in the Programmer (from 50 ms to
120 ms). In the example below, channels 1, 5 and 6 are the only
Channel
Position
Description
FScanning alternates between all channels that are
assigned to a frequency and a programmed priority
channel. This function does not work if the assigned
Priority channel is also a Preset channel.
1 to 15 Scanning alternates between the chosen Preset channel
and the programmed Priority channel. This function
does not work if the chosen Preset channel is also a
Priority channel.
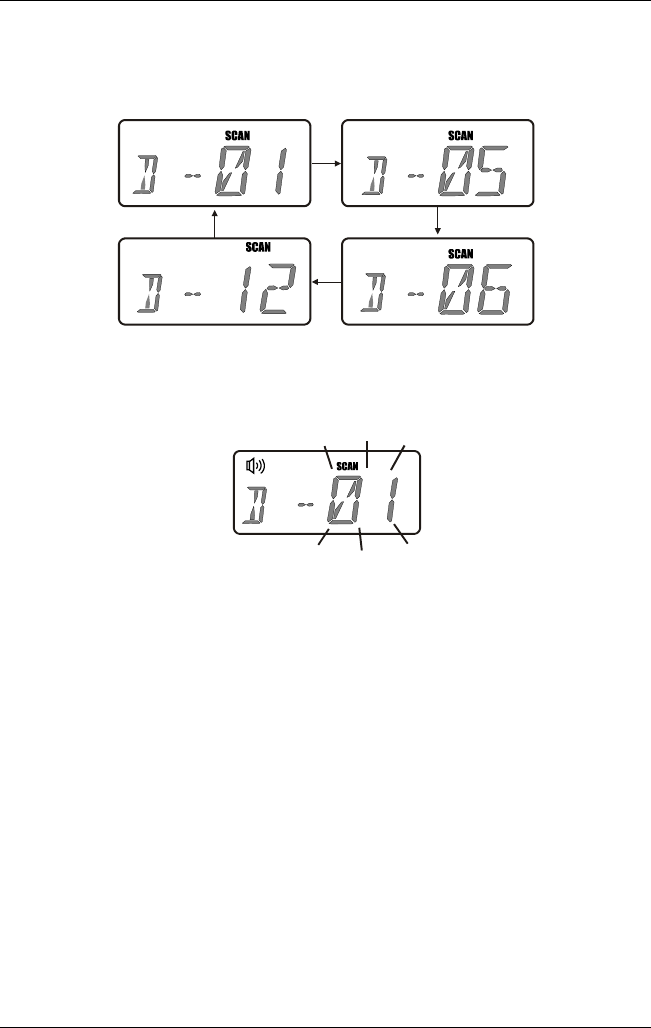
HH7700-MSOP 3-7
3: Radio Operation
programmed frequencies and channel 12 is the priority channel.
After scanning the priority channel, the scan cycle continues with
channel 1.
When a signal is detected on a channel, the monitor icon is
displayed, the channel or frequency flashes and activity on the
channel is heard.
Scanning pauses for 5 seconds unless tone decoding is enabled on
some or all channels in which case the scan rate slows down as
the radio decides whether or not there is something worth
listening to.
When the signal ends or 5.0 seconds is up, scanning resumes.
3. Press DUAL WATCH again to stop scanning.
Note: If the radio finds something of interest on a non-priority
channel, it continues to monitor the priority channel. If the radio
finds something of interest on a priority channel, it stays there. If
something of interest is found on both a non-priority and priority
channel, the radio stays on the priority channel.

3-8 HH7700-MSOP
3: Radio Operation
To scan a Preset channel with a Priority channel:
1. Turn the channel knob to one of the Preset channels (1 to 15).
2. Press DUAL WATCH.
The radio begins to scan the radio looking for the Preset channel
and the Priority channel (setup using the Programmer) to monitor.
In the example below, the Preset channel is 5 and the priority
channel is 1.
When a signal is detected on a channel, the monitor icon is
displayed, the channel or frequency flashes and activity on the
channel is heard.
Scanning pauses for 5 seconds unless tone decoding is enabled on
some or all channels in which case the scan rate slows as the radio
decides whether or not there is something worth listening to.
When the signal ends, or 5.0 seconds is up, scanning resumes.
3. Press DUAL WATCH again to stop the scanning process.
HH7700-MSOP 3-9
3: Radio Operation
Key Lock Feature
The key lock feature prevents the accidental pressing of radio buttons
with the exception of PTT and MONITOR.
To activate this feature:
1. Press MONITOR for more than 2 seconds. Doing so displays the key
icon .
The key lock status is retained when the radio is turned off.
2. Release the key lock by pressing MONITOR again for more than 2
seconds. The key icon is no longer displayed.
Power Save Feature
If no transmission or reception has occurred for 5 seconds, the receiver
switches from continuously on to periodically turning on and off based
on whether and how the radio is programmed. By reducing the amount
of time the receiver is on, battery life is extended.
The power save feature is set by the Programmer as follows.
•Battery Save On Timer:
Set to Disable or 200 ms to 1000 ms, at 50 ms increments
• Battery Save Off Timer:
Set to 100 ms to 500 ms, at 50 ms increments.
With this feature enabled, up to 500 ms of an incoming message can be
missed so in some cases the sender may have to repeat the call. However,
the resulting increase in battery life is usually worth this inconvenience.
3-10 HH7700-MSOP
3: Radio Operation
Back Light Feature
The back light is enabled using the Programmer and can affect the
display area and buttons on the radio in various ways:
• On After Key. The light goes on after any key is pressed (default).
It lights up for 1 second when the radio is turned on and for 5
seconds when the channel knob is turned or any other button is
pressed (pressing any key within this 5 seconds extends the light
5 seconds longer).
• Always on. The light is always on.
• Disable. No light (useful in combat situations).
Scramble Feature
The scrambler is a hopping type of rolling code encryption that must be
installed in your radio. A SCRAMBLE button must also be assigned by the
Programmer for this feature to work. For details about using this feature,
refer to the TVS-2-DT1 manual.
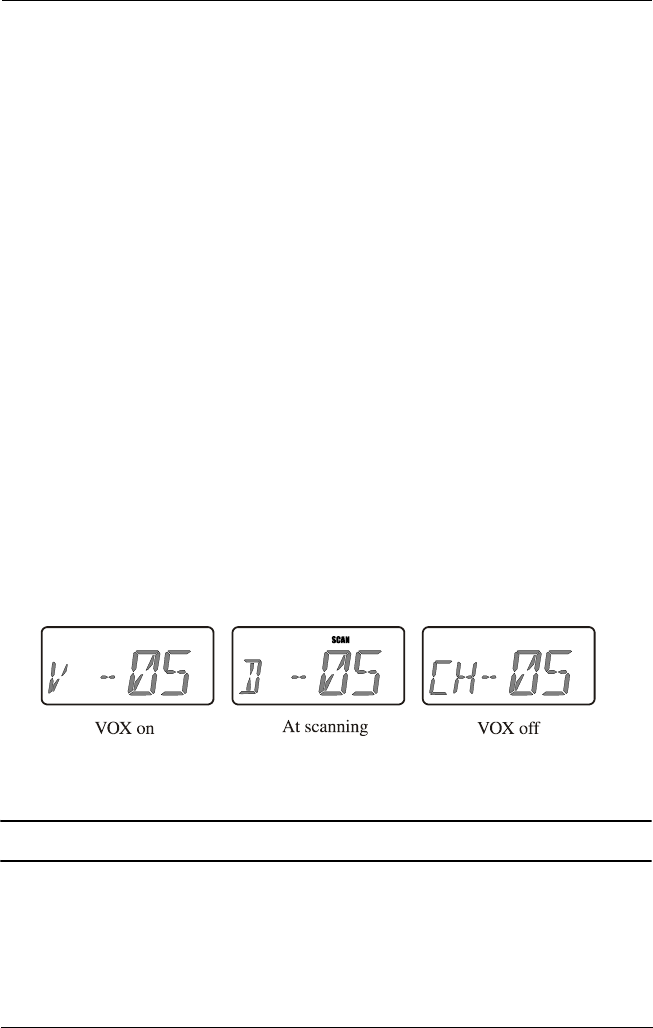
VOX Feature
VOX allows hands-free operation for voice detection and transmission.
A VOX button must be assigned by the Programmer for this feature to
work. When VOX is enabled, V is displayed. When scan is activated,
VOX is overridden.
The VOX status is retained when the radio is turned off.
CAUTION: Not to be used with the Whisper feature.
HH7700-MSOP 3-11
3: Radio Operation
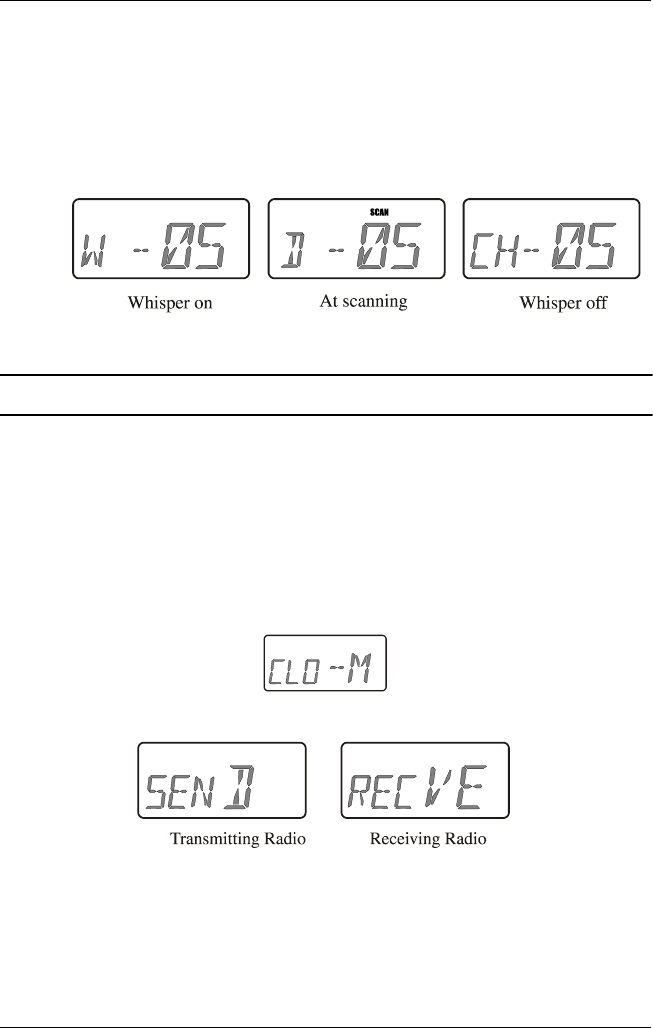
Whisper Feature
Whisper increases the sensitivity of voice transmission. The validity of
its use must be taken into consideration before being programmed into
the radio. A WHISPER button must be assigned by the Programmer for this
feature to work. When Whisper is enabled, W is displayed. When scan is
activated, Whisper is overridden.
The Whisper status is retained when the radio is turned off.
CAUTION: Not to be used with the VOX feature.
Cloning a Radio
Programmed data can be copied between 2 radios.
1. Connect the cloning cable to the radios.
2. Place both radios into cloning mode by pressing MONITOR and ▲
simultaneously while turning the radio on. The following screen
is displayed on both radios.
3. Press P1 on the transmitting (master) radio.
A beep sounds when the transfer of data is finished. END is
displayed on the sending radio for 2 seconds followed by CLO-M.
After the receiving radio gets the data, CLO-M is displayed.
Note: If cloning fails, the radio beeps and ERR is displayed for 2
seconds followed by CLO-M.

3-12 HH7700-MSOP
3: Radio Operation
Programmed Settings
The following settings are programmed using the Programmer. For
details, refer to the HH7700-PROG-MSOP Programmer guide.
Common Parameters
.
Feature Available Settings Default
Power on beep Enable: Radio beeps when turned on.
Disable: Radio does not beep when
turned on.
Enable
Key button beep Enable: Radio beeps when a key is
pressed.
Disable: Radio does not beep when a
key is pressed.
Enable
Rotary beep Enable: Radio beeps when the channel
select knob is turned.
Disable: Radio does not beep when
turning channel select knob.
Enable
Low battery
beep
Enable: Radio beeps when battery is
low.
Disable: Radio does not beep when
batter is low.
Enable
Battery save on
timer
Disable: No powersave feature.
To enable, set from 200 ms to 1000 ms
in increments of 50 ms.
Disable
Battery save off
timer
100 ms to 500 ms in increments of
50 ms.
250 ms
Timeout timer 0.5 minutes to 4 minutes in increments
of 0.5 minutes.
3 min
TX/Busy lamp Enable: On transmission, radio lamp is
lit.
Disable: Lamp does not light up during
transmission.
Enable
LCD/keypad
lamp
Disable: LCD/buttons don’t light up.
On after key: Light turns on after any
button is pressed.
Always on: Light is always on.
On after
key
Frequency
display
Enable: Frequency is displayed instead
of channel number.
Disable: Channel number is displayed.
Disable
HH7700-MSOP 3-13
3: Radio Operation
Programmable Buttons
Channel Parameters
Scan speed From 50 ms to 120 ms in increments of
10 ms.
80 ms
CTCSS timer From 100 ms to 300 ms increments of
10 ms.
200 ms
P1, P2, P1+Shift, P2+ Shift Description
None No function.
Scan On or off: If on, SCAN icon and
M(emory) or D(ual Watch) are displayed.
Dual watch On or off: If on, SCAN icon and
D(ual Watch) are displayed.
Scramble Security system if installed in radio.
VOX Hands-free operation.
Whisper Increased sensitivity of voice
transmission.
Function Available Settings Default
Channel number 1 to 100
Scan None, Scan, Priority None
Channel spacing Wide, Narrow Wide
Receive frequency 30.0000 MHz to 87.9875 MHz None
Transmit frequency 30.0000 MHz to 87.9875 MHz None
RX Sub-Audio CTCSS, 150Hz, None None
TX Sub-Audio CTCSS, 150Hz, None None
Feature Available Settings Default
3-14 HH7700-MSOP
3: Radio Operation
Decode CTCSS tone. If RX Sub-Audio is
set to CTCSS, choose from
Decode/Encode CTCSS
Frequencies table below.
If RX Sub-Audio is set to none or
150 Hz, CTCSS frequencies cannot
be set.
Off
Encode CTCSS tone. Set TX Sub-Audio
tone with CTCSS frequencies.
Cannot be programmed if set to
150 Hz.
Off
Lockout type Busy channel: If set to on while
receiving, cannot transmit.
Busy tone: Can transmit if receive
with CTCSS tone frequency is
matched.
None: Can transmit regardless, and
receiving condition is set to none.
None
Timeout timer Enable, Disable Enable
Preset Channel Parameter
Function Available Settings
Preset 15 channels to
channel knob positions
Channels 1 to 100 can be set to work with
the channel knob.
Function Available Settings Default

HH7700-MSOP 3-15
3: Radio Operation
Decode/Encode (CTCSS) Frequencies
No. Freq.
(Hz)
No. Freq.
(Hz)
No. Freq.
(Hz)
No. Freq.
(Hz)
1 67.0 11 94.8 21 131.8 31 186.2
2 69.3 12 97.4 22 136.5 32 192.8
3 71.9 13 100.0 23 141.3 33 203.5
4 74.4 14 103.5 24 146.2 34 210.7
5 77.0 15 107.2 25 151.4 35 218.1
6 79.7 16 110.9 26 156.7 36 225.7
7 82.5 17 114.8 27 162.2 37 233.6
8 85.4 18 118.8 28 167.9 38 241.8
9 88.5 19 123.0 29 173.8 39 250.3
10 91.5 20 127.3 30 179.9