User Manual
A C
B
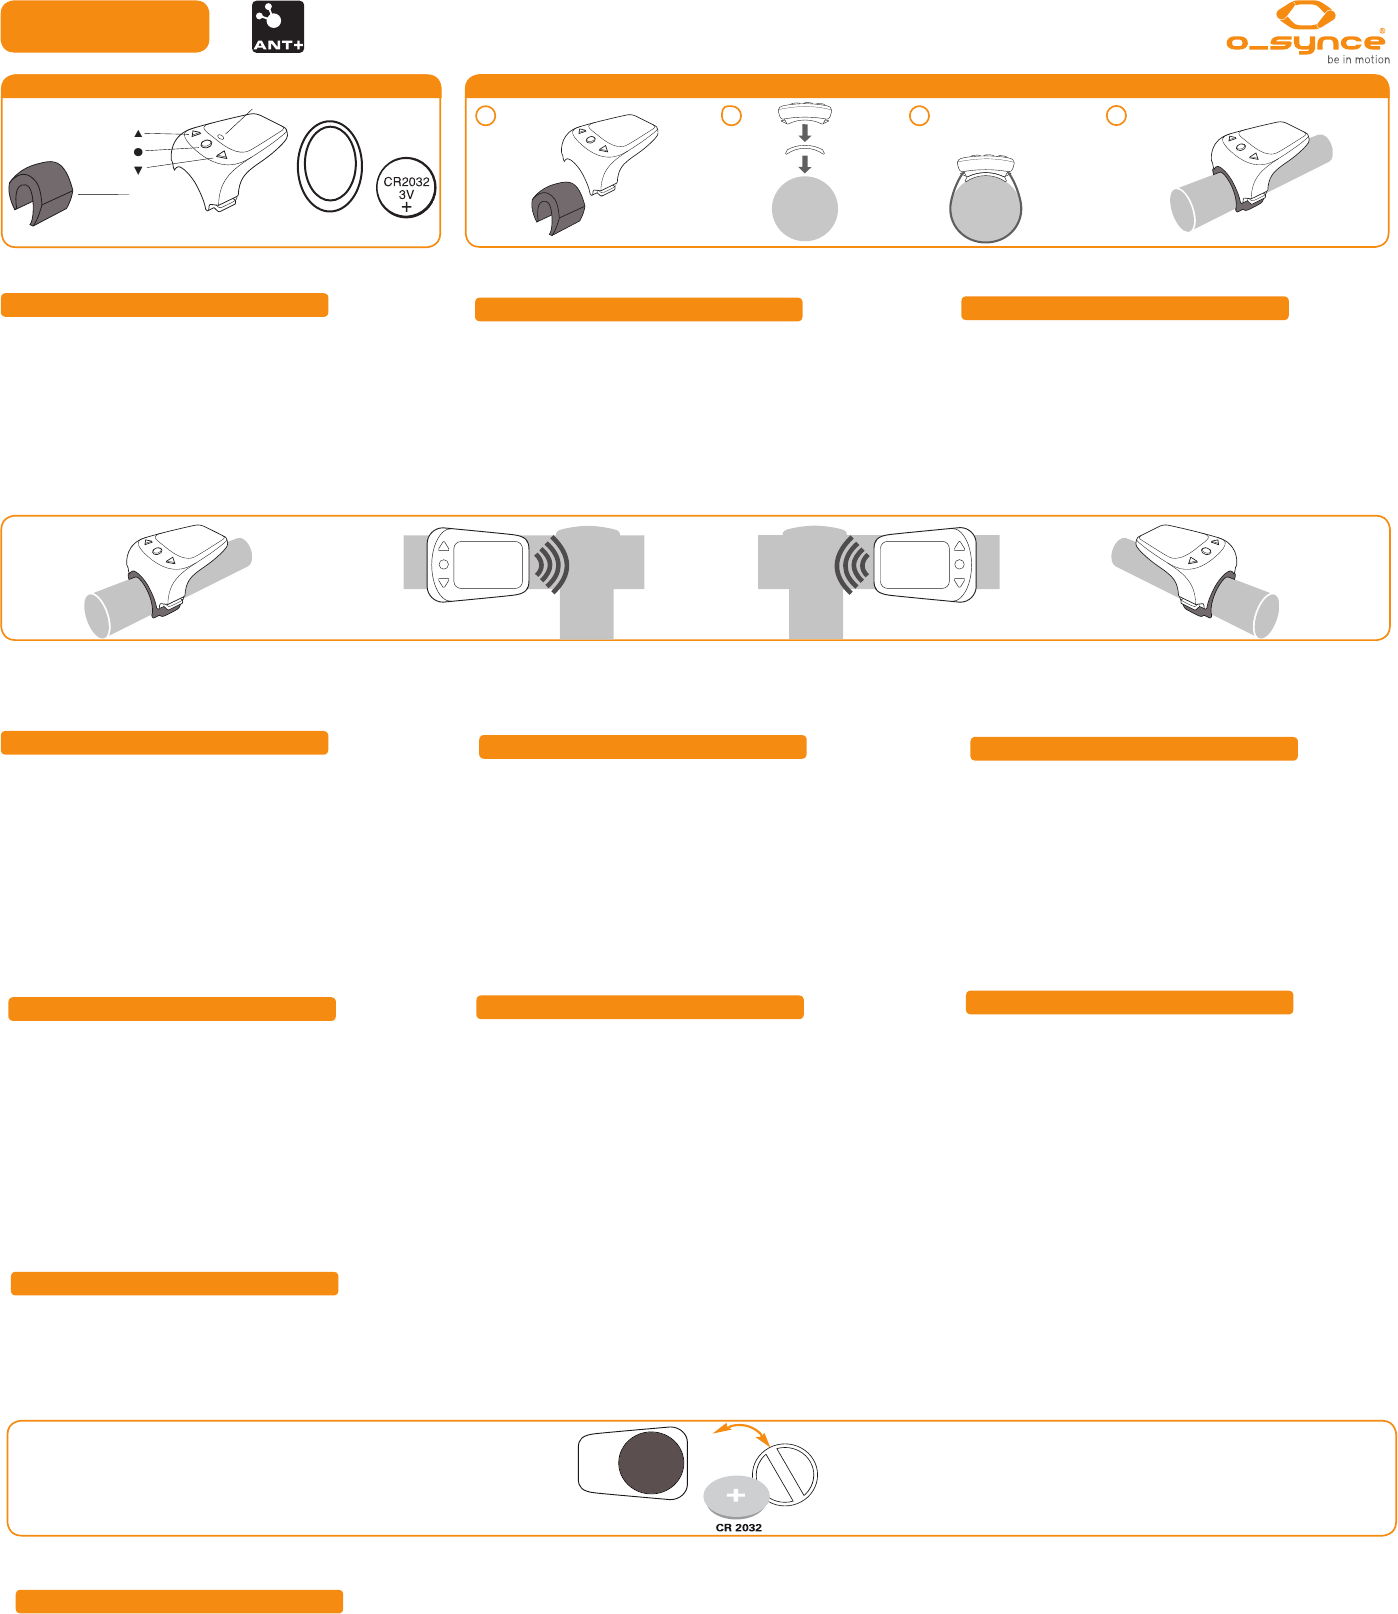
Bar adapter
Status LED D
1x
multiremote
1x 2x 1x
Content / Inhalt / Contenu / Inhoud / Contenido Installation / Montage / Fitting / Bevestiging / Instalación
The multiremote has three buttons, which are marked with the
symbols (▲, ● and ▼ ). Additionally there is a red/green LED
located at the center.
To mount the remote control a handlebar adapter and various
rubber rings are provided.
1 multiremote parts
To activate the remote control press the center button. Once the
remote is activated, the status LED is flashing periodically.
Assembly on the left side of the handlebar
After you have installed the multiremote on the left side, please
press and hold the upper and middle buttons (▲ and ●) for about
2 seconds.
Once the Status LED turns green for 2 seconds, the remote
control is set to the left side of the handlebar.
Assembly on the right side of the handlebar
After you have installed the multiremote on the right side, please
press and hold the upper and middle buttons (▲ and ●) for about
2 seconds.
Once the Status LED turns red for 2 seconds, the
remote control is set to the right side of the handlebar.
The multiremote will switch automatically to standby mode after
up to 150 seconds, when the head unit is no longer activated.
If the Status LED flashs during operation periodically red, the batte-
ry is almost completely drained and should be replaced.
The battery of the multiremote can be changed without special
knowledge and by using a 50 Euro cent coin. For this purpose, a
standard CR2032 battery is required, which is inserted into the
new remote control.
LED flashing green:
multiremote is ready to use and connected to the head unit.
Flashing green and red together:
multiremote is ready to use but searches for the „paired“ head
unit.
a) Please bring the head unit within the transmission range (1m).
b) Devices are not paired. Please see chapter „pairing“.
LED flashing red:
Battery weak
Please replace the battery.
No flashing even though botton press:
Battery completely discharged
Please replace the battery.
Electromagnetic Interferences:
Disturbance may occure near electrical devices such as LED lights,
motors or electrical brakes. Also WLAN access points may cause
interference when using multiremote. To avoid problems move
away from possible sources of disturbance.
Please refer also to the User’s Guide of your head unit (App or
ANT+™ device) to ensure that the pairing mode is activated if
needed. To find compatible apps please refer to our homepage.
1. Bring the multiremote in the near (1m) of the head unit.
2. Please press and hold the upper and lower button (▲ and ▼)
for about 2 seconds until the Status LED lights flashs green and
red together for 2 seconds.
3. Now the multiremote is looking for a head unit (Status LED
flashes green and red together).
4. If required, follow the specific instructions for „pairing“ in the
User‘s Guide of your head unit.
5. Once the Status LED is flashing green, the
multiremote is connected to the head unit successfully.
3 Turning the multiremote on
4 Adjusting the assembly side of the bar 5 Pairing 6 Turn your multiremote off
7 Replacing the battery 8 Overview of Status LEDs
We are only liable for damages in accordance to the statutory regulations
in respect to our contractual partners. Batteries are excluded from
warranties. In case of a warranty please contact the retailer where you
purchased your device. Batteries may not be disposed of with the regular
household.
10 Warranty
The multiremote can be mounted on the left or on the right side
of a handlebar.
To achieve correct key assignment, please refer to „Adjusting the
assembly side“ of this manual once the multiremote has been
mounted.
2 Mounting of multiremote
Dimensions: 48 x 38 x 21 mm (L x W x H)
Weight: ca. 15g (incl. CR2032 battery)
Water resistance: 1m
Compatibility: ANT+, Bluetooth® 4.0
Radio frequency: 2,4 GHz ANT™, Bluetooth® 4.0
Transmission range: 3m
Operating temperature: -10°C – 60°C
Battery: CR2032 Lithium Battery.
Battery lifetime: up to 100 hours operating
9 Technical specifications
11 FCC STATMENT
This device complies with Part 15 of the FCC Rules.
Operation is subject to the following two conditions: (1) This device may not cause harmful interference, and (2) This device must
accept any interference received, including interference that may cause undesired operation.
NOTE
The grantee is not responsible for any changes or modifications not expressly approved by the party responsible for compliance.
Such modifications could void the user’s authority to operate the equipment.
This equipment has been tested and found to comply with the limits for a Class B digital device, pursuant to part 15 of the FCC Rules.
These limits are designed to provide reasonable protection against harmful interference in a residential installation. This equipment
generates, uses and can radiate radio frequency energy and, if not installed and used in accordance with the instructions, may
cause harmful interference to radio communications. However, there is no guarantee that interference will not occur in a particular installation.
If this equipment does cause harmful interference to radio or television reception, which can be determined by turning the equipment
off and on, the user is encouraged to try to correct the interference by one or more of the following measures:
—Reorient or relocate the receiving antenna.
—Increase the separation between the equipment and receiver.
—Connect the equipment into an outlet on a circuit different from that to which the receiver is connected.
—Consult the dealer or an experienced radio/TV technician for help.