User Manual
mPulseTM Series
User Manual
Thisistheinsertingmanualfor“ControlPanel”.Thecontrolpanelis
partofthewholefinalproduct“mPulse”.
Thekeyfunctionsofthe“ControlPanel”asfollows:
1. Memorizetheuserpersonalparticularsandheatersettings.
2. Userpre‐setschedulefortheSaunasoperation.
3. SendcommandstotheheatercontrollerthroughtheRS232
connector.
4. GeterrormessagefromtheRS232connectoranddisplayitonthe
LCD.
5. Itconsista2.4GTransceivermodulethatcapableofreceiving
user’sheartratedataifhe/sheiswearingaheart‐ratebelt.The
heartratedatawillbebroadcasttohis/herwatch.Thesedatawill
besavedinthewatch.
15
LCD Control Panel
1. Turn on Control Panel
Simply touch the screen to start. Follow the on-screen instructions to
complete the initial set-up. You will not have to go through the same
process each time you use the control panel - additional information is
needed for the first use only.
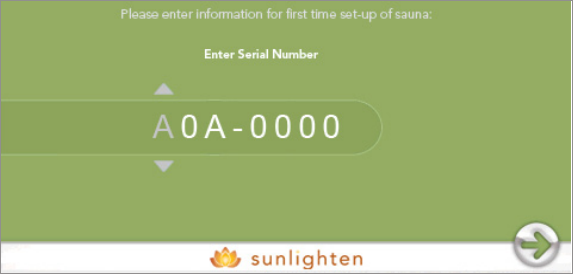
2. Set-Up
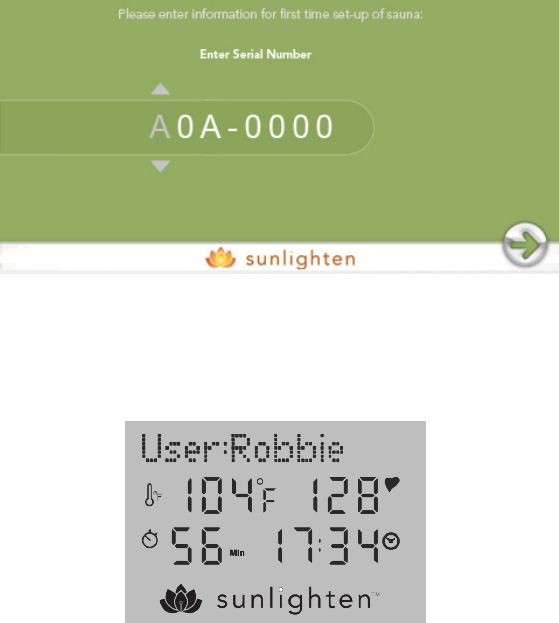
On the first set up of your sauna, or if your sauna has been unplugged,
you will go through the Set-Up screens. Make sure to enter in your serial
number correctly - the heater programs and customization depend on the
model of sauna you are using.
If you enter information incorrectly, or need to change your Set-Up
information, you can do so through the Options tab. Write down your serial
number in case it is needed for future use. The serial number is located on
the sauna boxes and on the back panel.

16
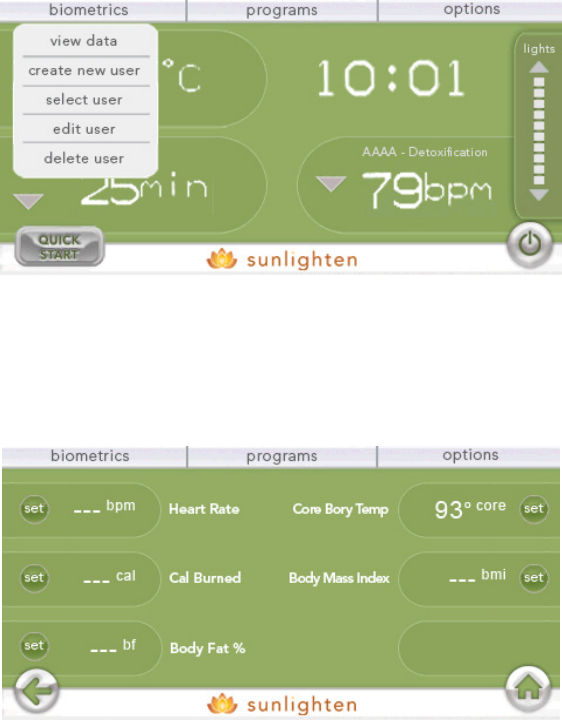
3. Home Screen
When set-up is complete, you will see the home screen. This will give the
critical information you need when inside your sauna: the temperature, set
time, clock, program selected, and a single piece of biometric information.
You can also control the interior lights, or utilize “QUICK START,” which
runs a session at whatever settings the previous session ended.
1
2
3
4 5 6
7
8
9
10
11
1. Quick Start Button
Press this button to repeat the last sauna session run.
2. Sauna Timer
Counts down the amount of time remaining in the
current sauna session.
3. Temperature Setting/Reading
Shows the current temperature within the cabin. When
temp is being adjusted, it displays the set temperature for
a moment, then goes back to current temperature.
4. Biometrics Tab
Press for access to biometric information and user
settings.
5. Programs Tab
Press to access the six pre-programmed sauna sessions -
each targeting specific health needs.
6. Options Tab
Press to access the Schedule, Heater Customization,
Audio/Video, and more.
7. Clock
Displays the current time.
8. Lighting Control
Use the up and down arrows to control the interior lights.
9. User Name & Program
Displays the current user and program running.
10. Biometric Display
Displays a selected piece of biometric information.
11. Power Button
Press to turn off the LCD display and your sauna.
17
4. Biometrics Menu
Pressing the Biometrics Tab give you access to the Biometrics drop-down
menu. From this menu, you have several options:
View Data: The “view data” screen allows you to view any pieces of
biometric information that your accessories support (note: without
Sunlighten biofeedback-accessories, you will not be able to see any data.
Some data will be unlocked on later software/hardware upgrades).
Create New User: The set-up process gave you the opportunity to create
a user. You can also create additional users. Having multiple users will allow
you to utilize multiple biofeedback accessories simultaneously, and keep
custom settings for each user.
18
Select User: The “select user” screen allows you to select from any user you
have stored, or select “Guest” if you would prefer to be without a user.
Edit User: If you have already created a user and wish to make changes,
you can user the “edit user” option. This lets you go back through the
information you entered when you created the user and edit it.
Delete User: If you have already selected a user, you can use the “Delete
User” option to remove it from your system.
19
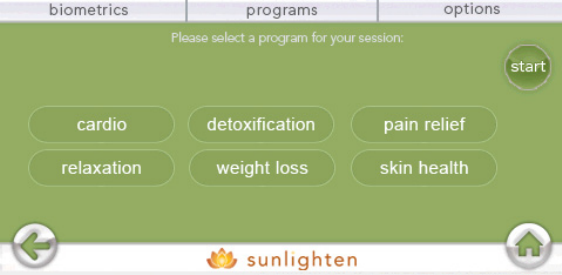
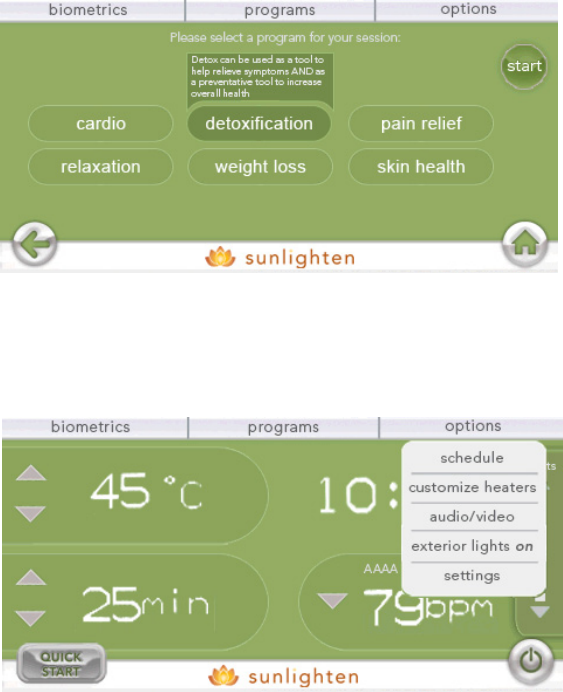
5. Programs Screen
Pressing the Programs Tab give you access to the program selection screen.
There are six programs to choose from - each targeting a specific health
benefit.
Cardio: As the body tries to cool itself, you should notice an increase in
heart rate, cardiac output and metabolic rate.
Detoxification: Detox can be used as a tool to help relieve symptoms AND
as a preventive tool to increase overall health.
Pain Relief: Heat activates neurological, vascular and metabolic mechanisms
to mediate the transmission of pain.
Relaxation: Relax in comfort with an invigorating deep tissue sweat.
Weight Loss: It has been estimated that a 30 minute infrared sauna session
can burn over 200 calories.
Skin Health: Infrared heat easily penetrates human tissue to help with acne,
eczema, psoriasis, burns, cuts and more.
20
To run a program, first press the program you would like. A brief description
is shown and the button is highlighted. Then press the “start” button to
begin the program. The active program will display on your Home screen
and the temperature and timer will adjust.
6. Options Menu
Pressing the Options Tab gives you access to the Options drop-down
menu. From this menu, you have several choices:
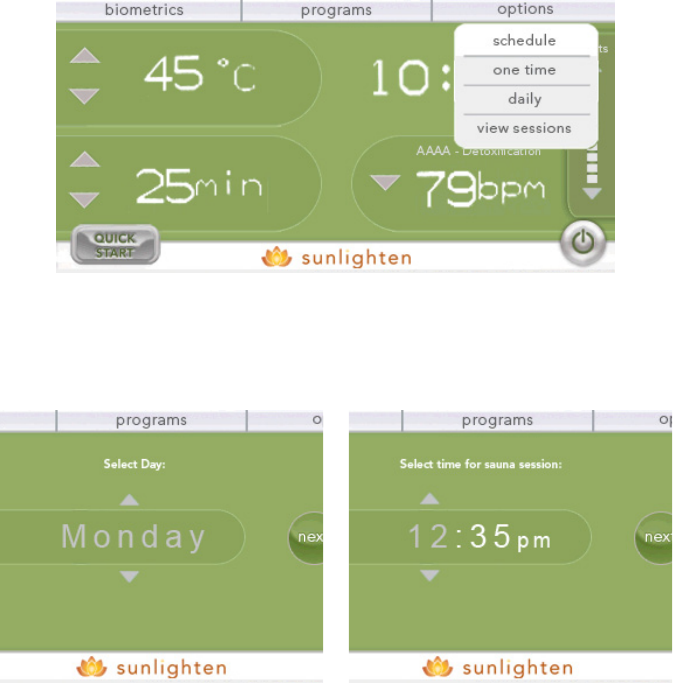
Schedule: The “schedule” button will open a second drop down, allowing
you to choose between either a “daily” session, or “one time” session - or
you can “view sessions”.
A “one time” session will simply schedule a single sauna session for anytime
within the next 7 days.
21
You begin by selecting the day you want your session scheduled for. You
then select the time, followed by the program, and then your program is
set. It can be confirmed with the “view session” button.
The “daily” session will involve the same steps - but instead of selecting a
specific day of the week, it automatically schedules the session for every day
of the week. Just like the “one time” session, you select the time, select the
program, and see a confirmation screen. You can schedule a maximum of
three sessions per-day, per-user.
The “view sessions” option lets you see all programs that you have
scheduled. Pressing the up and down arrows allows you to scroll through
the days of the week, and pressing the “x” to the right of any session will
give you the option to delete it.

22
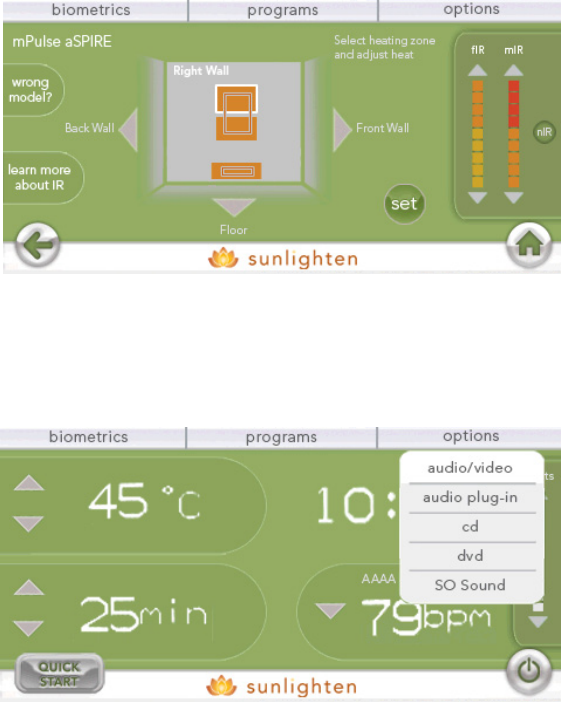
Quick Infrared Guide for Customization:
Customize Heaters: Along with the provided heater programs, we also
allow for you to customize the heaters to your specific needs. This section
allows you to access each “zone”, and to decide on the levels of infrared
you are getting for infinite possibilities for each sauna session.
1
2
5
7
8
9
1. Back Button
Press this button to return to the previous screen.
2. Learn More About IR
Press this button to access a screen that gives a brief
description of near, mid, and far infrared.
3. Wall Selection Arrows
The arrows allow you to view the different walls of the
sauna that you can customize.
4. Heating Zone
Most walls have two heating zones: an upper and lower.
Simply press the zone you want to access, and a white
outline will tell you that it is selected.
5. Far Infrared Adjustment
Press the up and down arrows to increase or decrease
the intensity of far infrared from the selected zone.
6. Mid Infrared Adjustment
Press the up and down arrows to increase or decrease
the intensity of mid infrared from the wall (note: mid
infrared is not dependent on the heating zone - it is
controlled one wall at a time).
7. Near Infrared Adjustment
Press the button to turn on and off the near infrared for
the selected wall (note: near infrared arrays are only on
specific walls - the rectangle with two horizontal lines
indicates an NIR array).
8. Set Button
When you have completed your adjustments press the
“set” button to confirm the settings.
9. Home Button
The “home” button returns you to the home screen.
3
6
4
23
To customize, use the arrows to view the desired wall. Then press the
heating zone you want to adjust and use the panel on the right side of the
screen to adjust the near, mid, and far infrared.
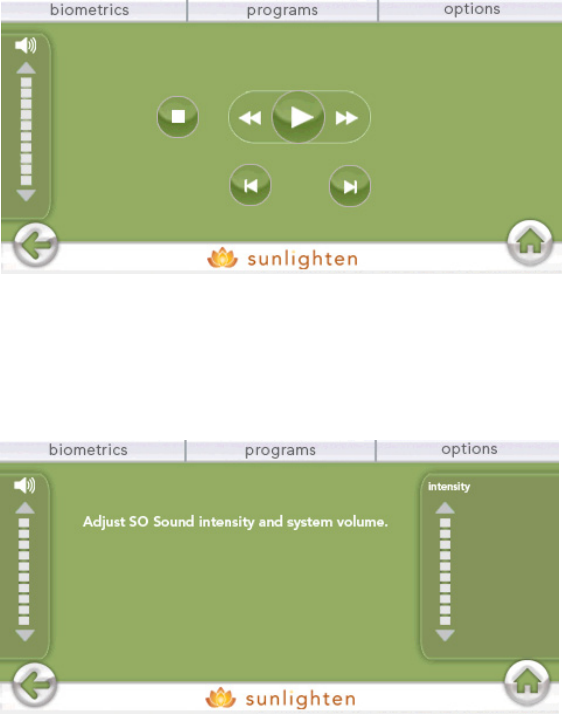
Audio/Video: The “audio/video” button will open a second drop down,
allowing you to choose between either an “audio plug-in,” “cd,” “dvd” or
“SO Sound” (vibrational therapy).
The “audio plug-in” allows you to play your mp3 player, or other portable
device through the sound system of your sauna. Simply plug-in to the
audio input on the front of your stereo, and the volume can be adjusted on
the LCD.
24
The “cd” and “dvd” are controlled using the same interface. If a cd or dvd
is in your stereo, you can control it using these screens. When playing a
dvd, touching the screen will bring up the control screen. Pressing “play”
will then take you back to the video.
SO Sound can only be used by those who have purchased SO Sound
therapy and have it installed in their sauna. If it is, the SO Sound control
screen lets you control the volume of the system as well as the intensity of
the SO Sound vibrations.
Exterior Lights: The “exterior lights on/off” button allows you to control
the exterior LED lights. Pressing this button will turn the lights on when they
are off, and off when they are on.
25
Settings: The “settings” button accesses a drop down which lets you turn
on or off “quick heat”, or go back through the options that were selected
on the first start up of the sauna.
Quick Heat: The “quick heat” button allows you to turn on and off quick
heat - which turns your sauna heaters to max power while the sauna is
heating up. Some users prefer a slower warm up, so they may want quick
heat turned off.
Set Up: The “Set Up” button allows you to go back through those settings
you went through at the first start up of the sauna. Among the options that
can be changed here: the serial number, measurement, country and time.
7. Exterior Control Panel
The exterior control panel can also be used for simple functions of the
sauna. The display is oriented in the same way as your “home screen” on
the interior LCD control panel, and will give you the same information.
26
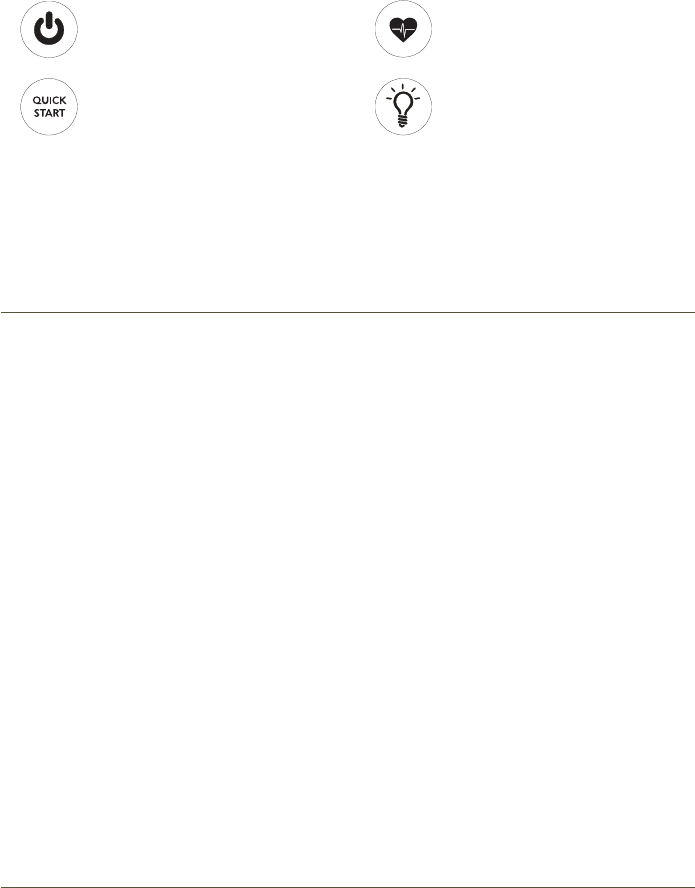
Power Button
Press this button to turn on both the
interior and exterior control panels.
Quick Start Button
Press this button to repeat the last
sauna session run.
Biometric Button
Use to scroll through different biometric
data (requires Sunlighten biofeedback
accessories.
Exterior Lights Button
Press to turn on or off the lights on the
exterior of the sauna.
The exterior control panel can be used for simple functions - but we
recommend using the interior panel for the majority of operations.
WARNING:
1. If the temperature becomes unbearable, decrease it or shut off the
sauna immediately.
2. Do not use if pregnant or if you have serious inflammation, a fever, a
communicable disease or acute bleeding. See contraindications on
sunlighten.com for additional information.
3. Consult physician prior to use if you have a medical condition.
4. Do not consume alcohol or drugs when using the sauna.
5. Do not splash water on the heaters or any component inside the sauna.
6. Do not bring wet towels into your sauna or any substances that could harm
the interior of your sauna.
7. Do not install a lock on your sauna.
8. Do not install your sauna outdoors without an authorized water resistant
cover from Sunlighten.
9. All repairs need to be authorized by a Sunlighten representative or you
may void your warranty.
10. Do NOT touch the heater surface while the heaters are ON.

sunlighten.com
phone 913.754.0831 fax 775.514.4314 toll-free 877.292.0020
7373 W. 107th St., Overland Park, KS 66212 USA
INTERNATIONAL: cs@sunlighten.com or contact your local Sunlighten representative
US/CAN
sunlighten
empowering wellness
version 091410

FCCstatement
NOTE:
THEMANUFACTURERISNOTRESPONSIBLEFORANYRADIOORTVINTERFERENCE
CASUSEDBYUNAUTHORIZEDMODIFICATIONSTOTHISEQUIPMENT.SUCH
MODIFICATIONSCOULDVOIDTHEUSERAUTHORITYTOOPERATETHEEQUIPMENT.
NOTE:Thisequipmenthasbeentestedandfoundtocomplywiththelimitsfora
ClassBdigitaldevice,pursuanttoPart15oftheFCCRules.Theselimitsare
designedtoprovidereasonableprotectionagainstharmfulinterferenceina
residentialinstallation.Thisequipmentgeneratesusesandcanradiateradio
frequencyenergyand,ifnotinstalledandusedinaccordancewiththeinstructions,
maycauseharmfulinterferencetoradiocommunications.However,thereisno
guaranteethatinterferencewillnotoccurinaparticularinstallation.
Ifthisequipmentdoescauseharmfulinterferencetoradioortelevisionreception,
whichcanbedeterminedbyturningtheequipmentoffandon,theuseris
encouragedtotrytocorrecttheinterferencebyoneormorethefollowing
measures:
Reorientorrelocatethereceivingantenna
Increasetheseparationbetweentheequipmentandreceiver
Connecttheequipmentintoanoutletonacircuitdifferentfromthattowhich
thereceiveriscorrected
Consultthedealerorexperienceradio/TVtechnicianforhelp
PRECAUTION:
Topreventthefirehazard,pleasemakesurethattheproductmustbe
suppliedbyUSB2.0computerthroughUSBcablecord
FCCID:O4GSNINTP
MADEINCHINA
Thisdevicecomplieswithpart15ofFCCRules.Operationissubjectedto
thefollowingtwoconditions:
(1) Thisdevicemaynotcauseharmfulinterference,and
(2) Thisdevicemustacceptanyinterferencereceived,including
interferencethatmaycauseundesiredoperation.