Dayton SPORTDWL BIKE COMPUTER User Manual 15 Spdzn SprtDblWrlss Manual
Dayton Industrial Co., Ltd. BIKE COMPUTER 15 Spdzn SprtDblWrlss Manual
Dayton >
User Manual

1
User Manual
Model : Sport
2 3
Components of the Sport Double Wireless 3
Installing Computer Mounts 4
Installing speed & cadence transmitter 5
Sport Double Wireless user interface 6
Easy set-up and resetting 7
8VLQJ\RXU6SRUW'RXEOH:LUHOHVVNH\ÁRZ
Linking 16
Re-entering pairing sequence 18
Clearing data 20
Re-setting the clock 22
Re-setting the odometer and mi/km 24
5HVHWWLQJZKHHOWLUHVL]H
0DQXDOO\VHWWLQJZKHHOWLUHVL]H
Replacing the battery 30
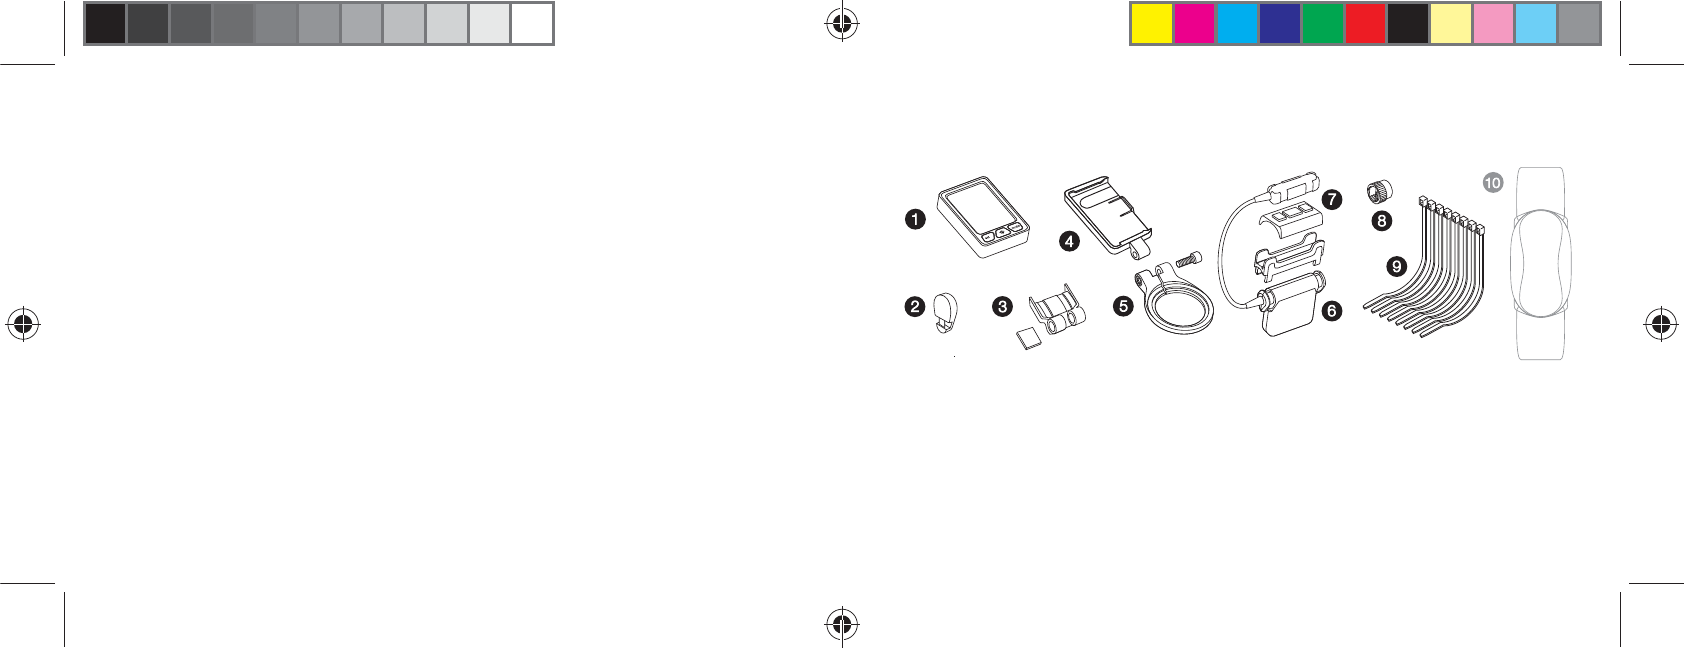
Components of the Sport Double Wireless
1. 6SHHG]RQHF\FOR
computer head unit
2. Cadence magnet
3. Handlebar bracket
4. Base mount
5. Steerer tube bracket
6. Speed transmitter
7. Cadence sensor
8. Spoke magnet
9. Zip ties
10. Digital heart rate strap
(sold seperately)
6SHFLÀFDWLRQVDQGUDQJHV
Troubleshooting 32
Warranty information 33
Table of contents
4 5
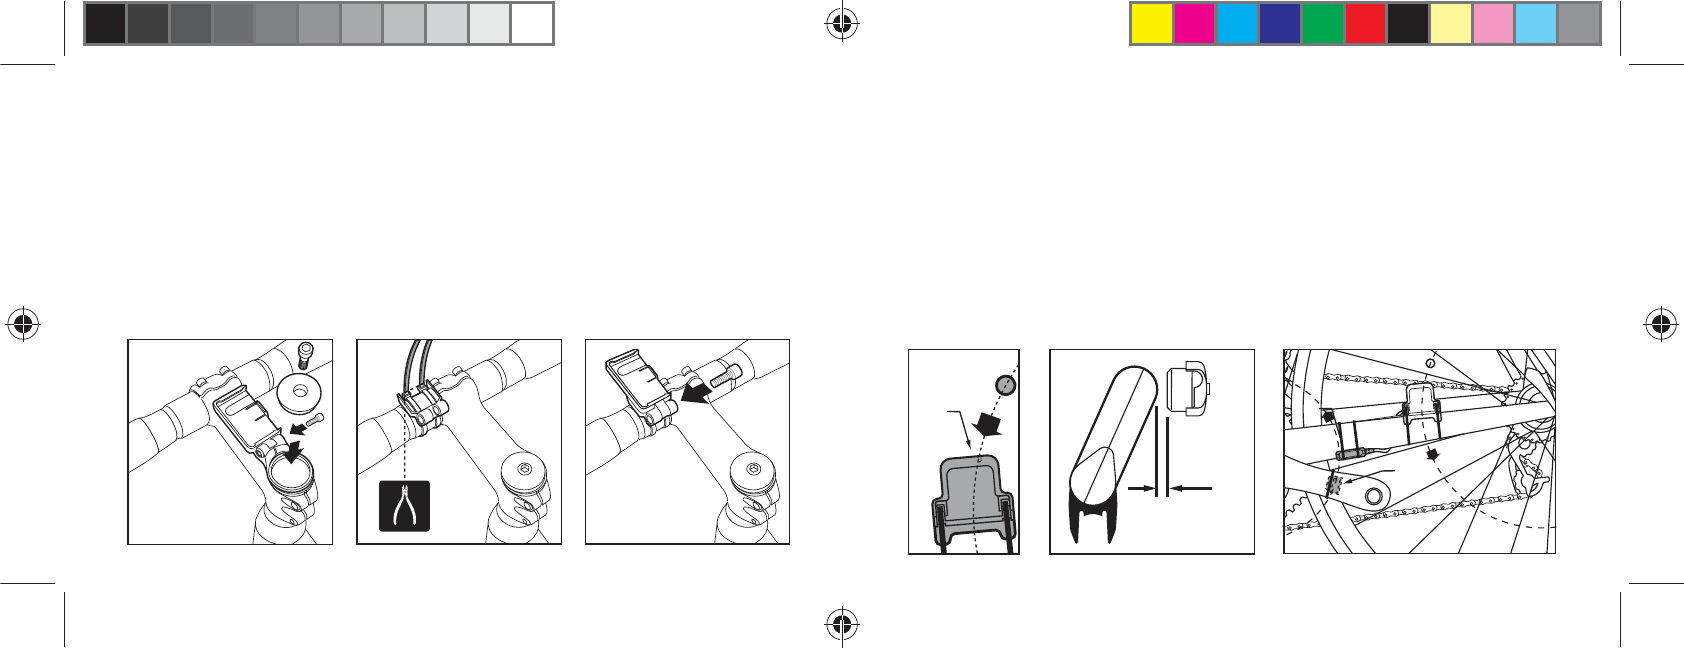
• Install the steerer tube bracket base assembly on the steerer tube.
Re-install the steerer tube top cap.
• Place handlebar bracket on handlebar, attach the base mount to the handlebar
EUDFNHWZLWKWKHLQFOXGHGEROW
• $GMXVWEDVHWRGHVLUHGDQJOHZLWKEROWDGMXVWPHQW
Installing Computer Mounts
steerer tube bracket handlebar bracket
Adjust spoke magnet so path of rotation passes along the groove area inside
the sensor. IMPORTANT: Placing magnet outside the groove path may cause
improper reading.
• $WWDFKWKHFDGHQFHPDJQHWZLWKVHOIDGKHVLYHSDGWRWKHFUDQNDUPDQG
SRVLWLRQWKHVHQVRUҋVUDLVHGOLQHZLWKLQWKHPDJQHWҋV
rotation path.
Installing speed & cadence transmitter
!
1-5mm
1/16 - 1/4 in.
!
6SETUP 7
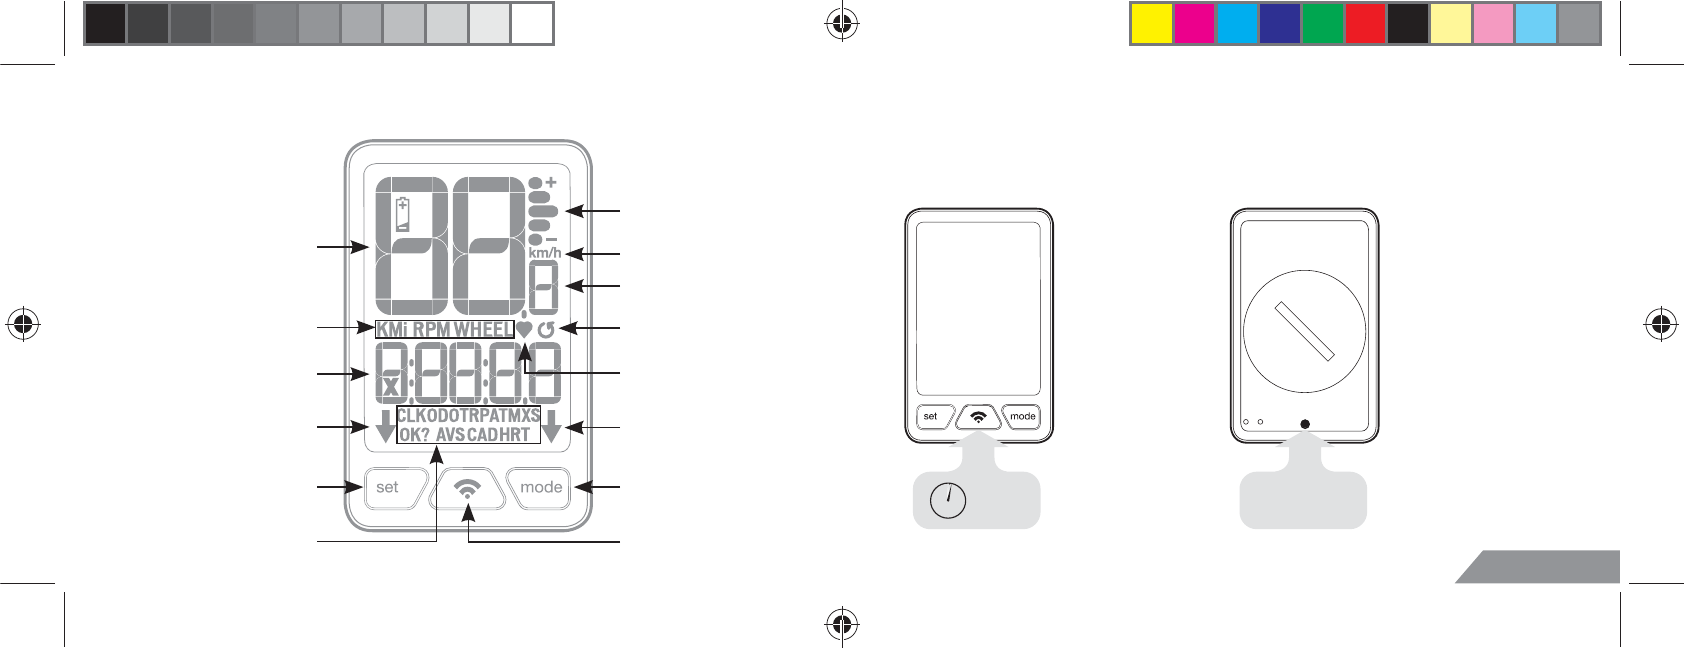
Speedzone Sport Double Wireless interface
Hold PAIR BUTTON
for 2 seconds to initi-
ate easy setup;
this is only required
WRZDNHXQLWIURP
VKLSSLQJPRGHÀUVW
purchased).
Wake from shipping mode Reset and all clear
Press RESET BUTTON
to enter easy set up.
Blank screen
indicates
shipping mode
Easy set-up and resetting
Average speed comperator
Digital speed display
Secondary function display
Secondary function indicators
Secondary function indicators
6HWXSFRQÀUPDWLRQDUURZ
Set button
*Illuminated when signal is paired
Miles (English)/KM (metric)
Speed (10ths)
Cadence signal
Heartrate signal
6HWXSVHOHFWLRQDUURZ
Mode button
Pair button
2 sec OR PRESS
8SETUP SETUP 9
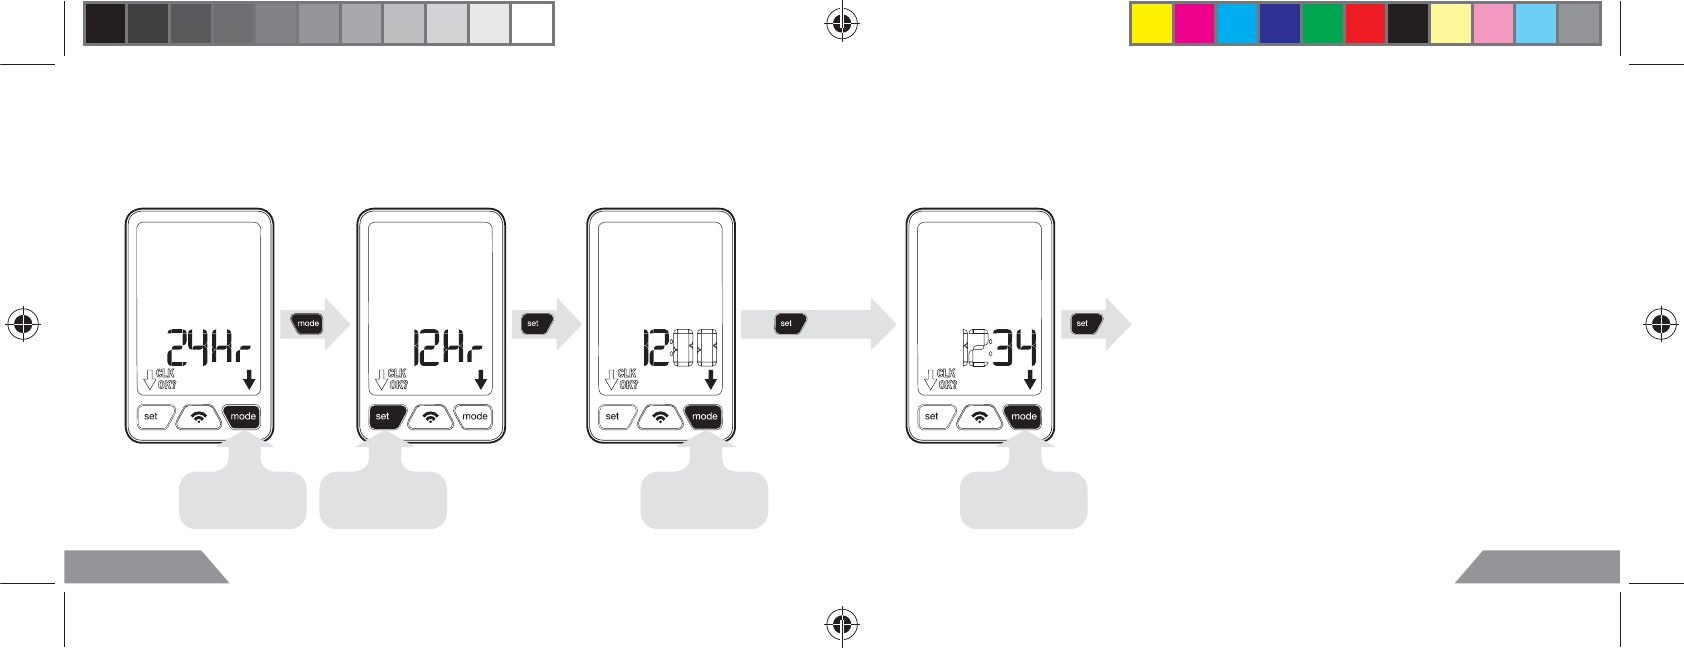
From initial start-up:
Clock setting
select 12/24 hr “set” preference select hour
...continued
select minute
10 SETUP SETUP 11
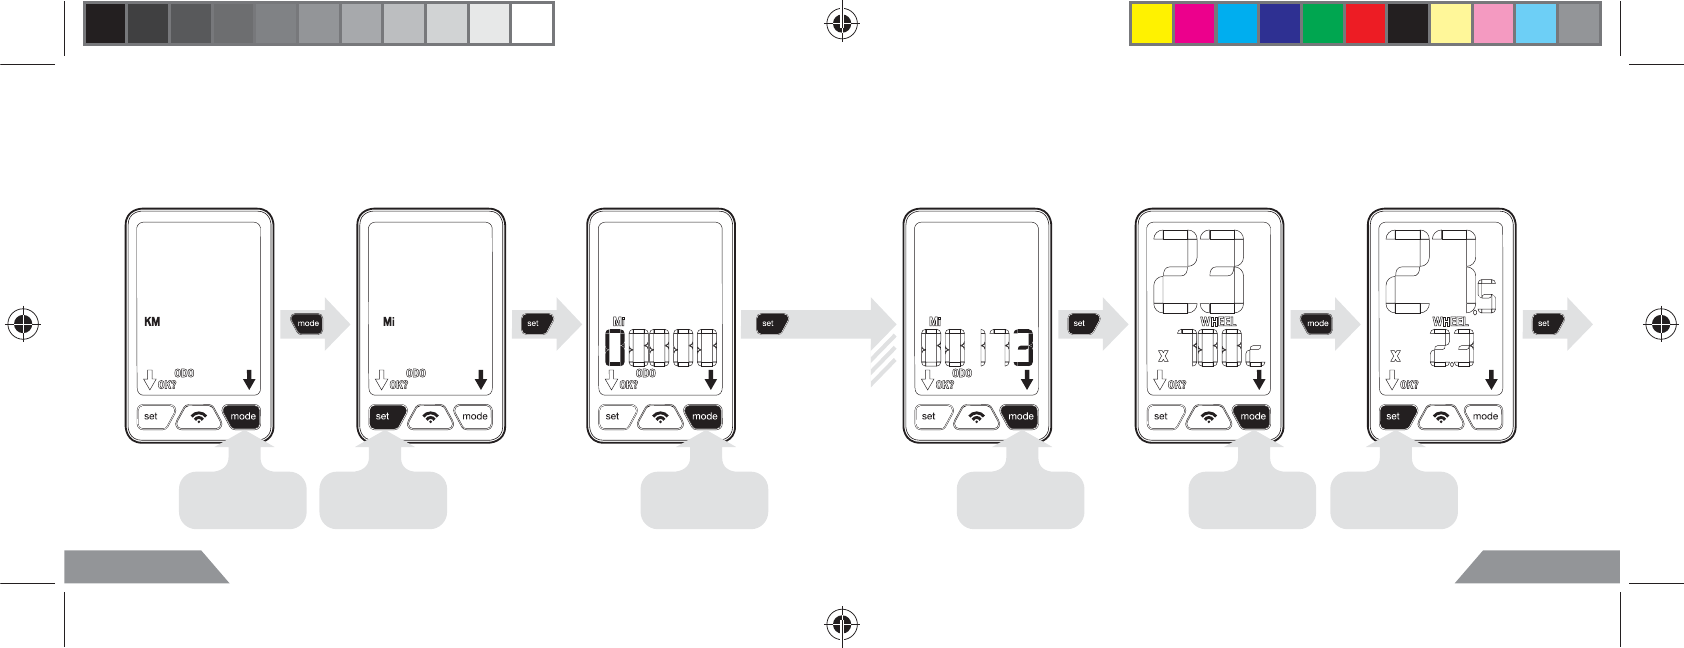
Metric (km) or English (mi) & odometer Wheel and tire size selection
7RPDQXDOO\VHWZKHHOVL]HVHHSDJH
select KM/miles “set” preference VHOHFWÀUVWGLJLW select last digit ´VHWµZKHHOVL]H
VHOHFWZKHHO
VL]HIURP
VL]HSUHVHWV
x4

12 SETUP SETUP 13
Head unit is searching for speed, cadence, and heart rate transmission signal from
ANT+ digital transmitters. (To re-enter pairing sequence see page 18)
Pairing digital ANT+™ wireless device ...continued
begin pairing
speed paired cadence paired *HR paired
30s timeout or
all sensors found
clock mode
*Heart rate monitor sold seperately
14 15
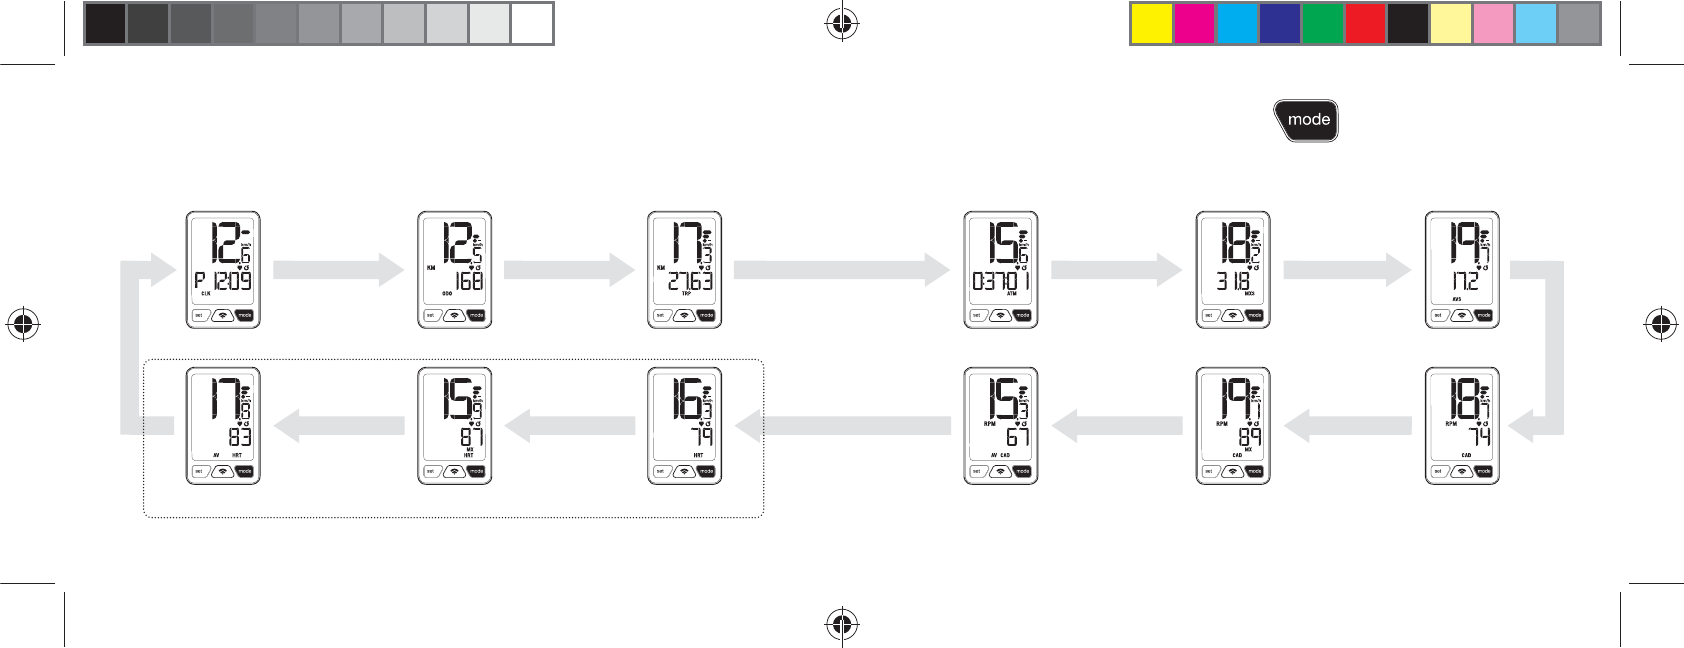
Using your Speedzone Sport Double Wireless
NH\ÁRZ
PRESS WRVKXIÁHWKURXJKPRGHV
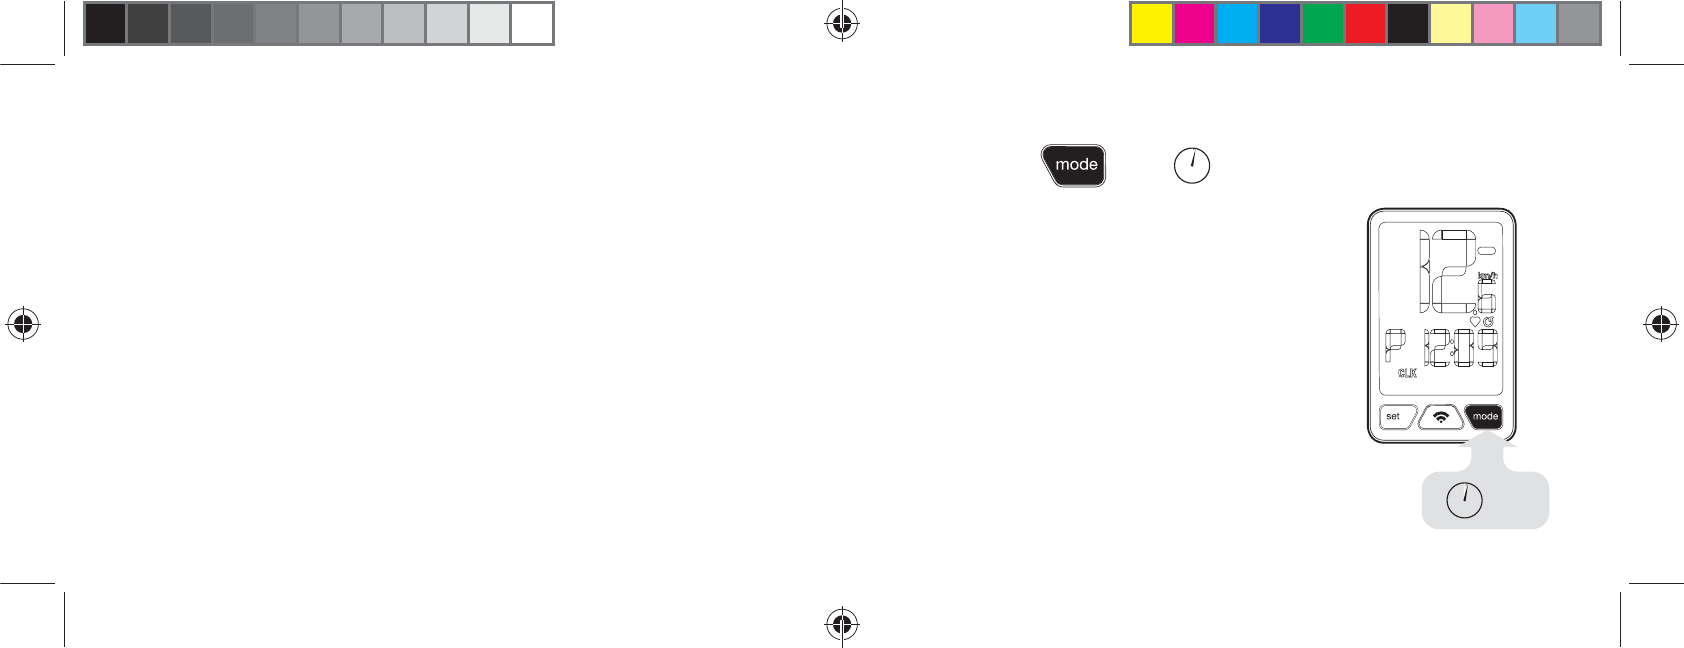
CLOCK MODE
*AVE. HRT MODE
ODO MODE
*MAX. HRT MODE
TRIP DISTANCE MODE
*CURRENT HR MODE
ACTUAL TIME MOVING MODE
AVE. CADENCE MODE
MAX. SPEED MODE
MAX. CADENCE MODE
AVE. SPEED MODE
CURRENT CADENCE MODE
...continued
*If paired with heart rate monitor (Heart rate monitor sold seperately)

16 17
Linking
:KHQZDNLQJIURPSLEEP MODEWKHFRPSXWHUZLOODXWRPWLFDOO\VHDUFKIRU
previously paired sensors.
From ANY MODE press PAIR BUTTON to search for previously
paired sensors.
...continued
press PAIR
searching speed found cadence found IRXQGVHQVRUVZLOO
VWRSÁDVKLQJ
and remain solid
*HR found
*Heart rate monitor sold seperately

18 19
Re-entering the pairing sequence
In ANY MODE, press and hold PAIR BUTTON for 2 SECONDS(YHU\ZLUHOHVV
device must be ANT+ compatible device to transmit data.
2 sec begin pairing
speed paired cadence paired
to stop pairing 30s timeout/
all sensors found
PRESS OR
...continued
FRPSXWHUZLOO
return to previous
mode
*HR paired
*Heart rate monitor sold seperately
20 21
Clearing Data
In MAX SPEED MODE press and hold MODE BUTTON for 2 SECONDS to clear
maximum speed.
In MAX CADENCE MODE press and hold MODE BUTTON for 2 SECONDS to
clear maximum cadence.
In MAX HEART RATE MODE press and hold MODE BUTTON for 2 SECONDS
to clear maximum heart rate.
In ALL OTHER MODES press and hold MODE BUTTON for 2 SECONDS to
clear all data except odometer.
...continued
PRESS FOR 2 seconds to clear data
2 sec
22 23
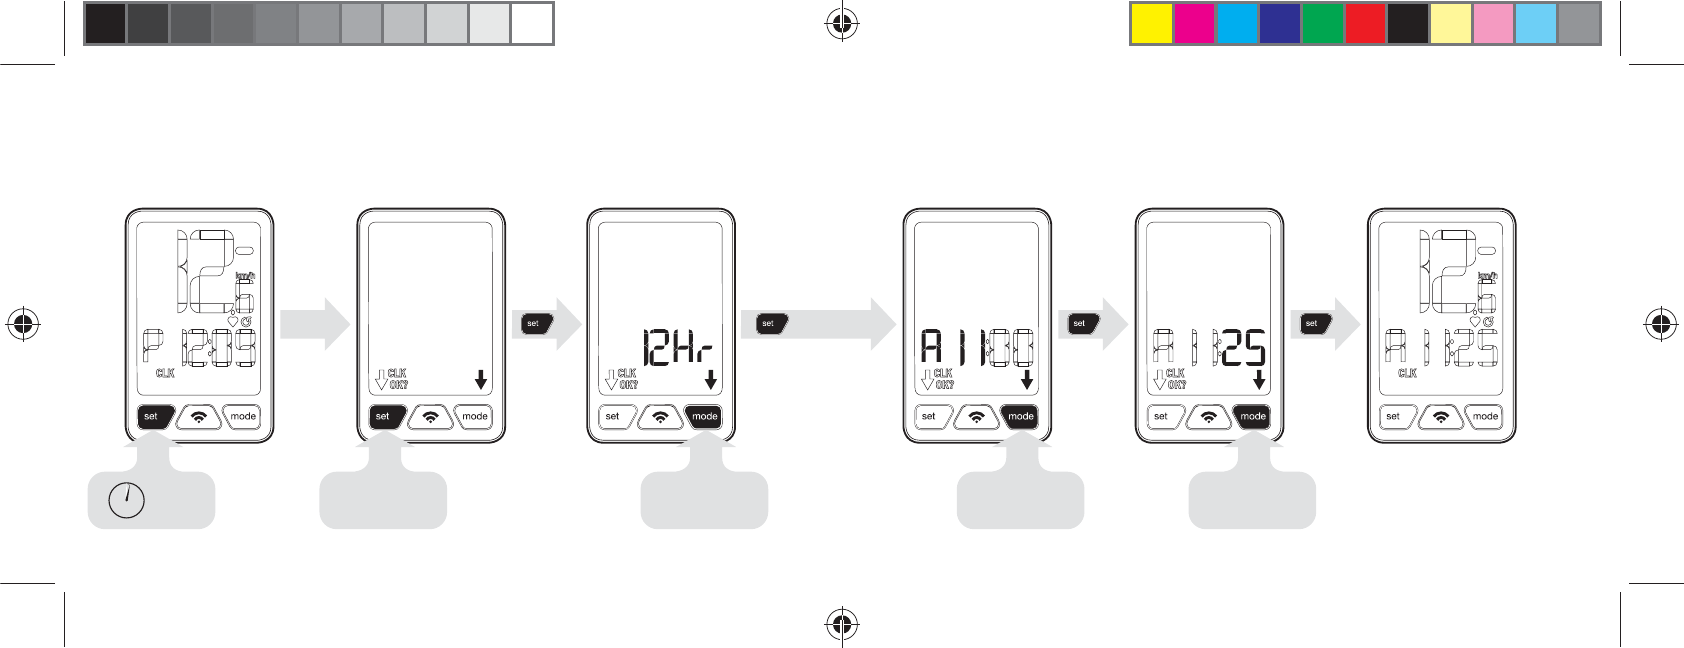
Re-setting the clock
In ANY MODE press and hold SET BUTTON for 2 SECONDS to enter setting
mode. Press SET BUTTON to set clock.
“set” to continue select 12/24 hr select hour select minute2 sec
FRPSXWHUZLOO
return to previous
mode
24 25
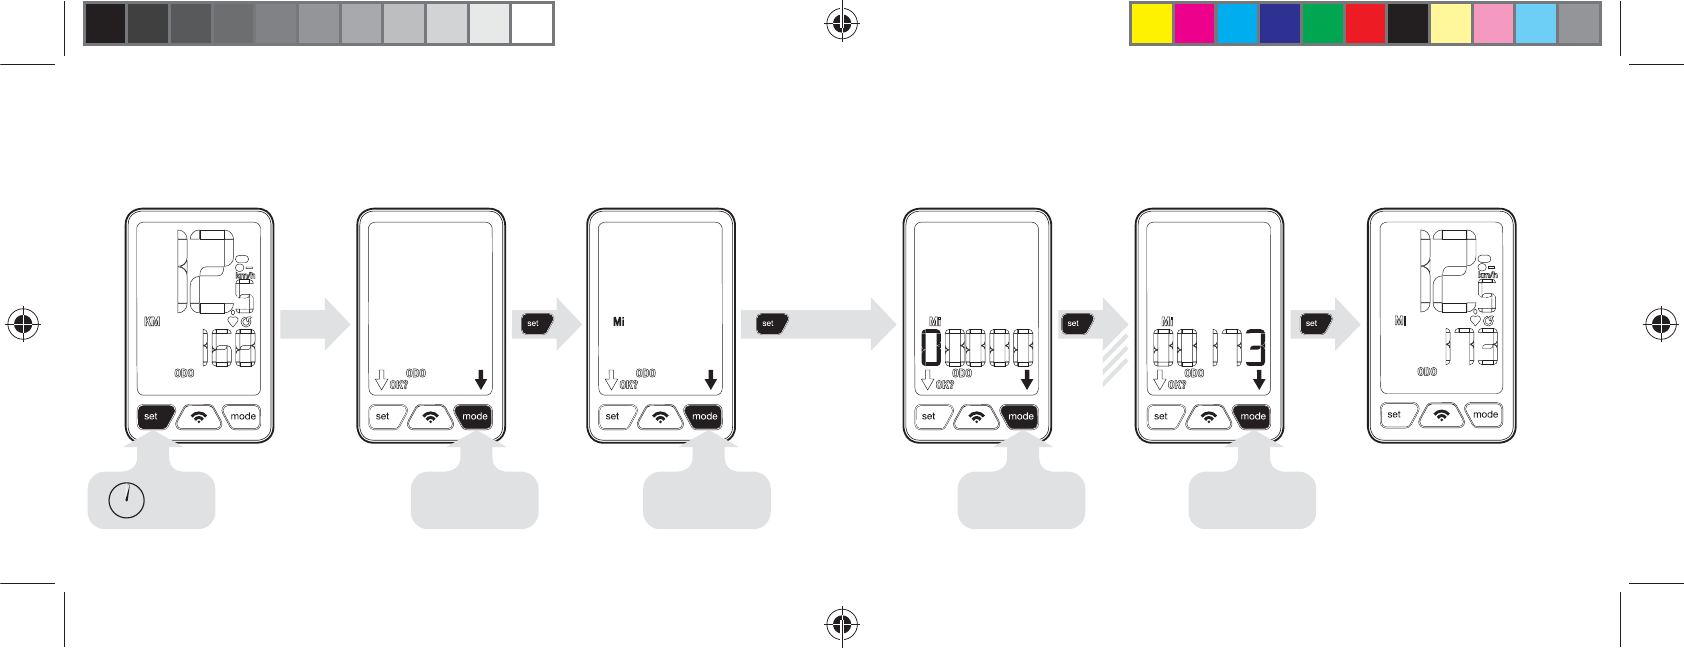
Re-setting the odometer and miles/kilometers
In ANY MODE press and hold SET BUTTON for 2 SECONDS to enter setting
mode. Press MODE BUTTON, then SET BUTTON to set odometer.
select KM/miles select last digit
x4
2 sec select odometer VHOHFWÀUVWGLJLW
FRPSXWHUZLOO
return to previous
mode
26 27
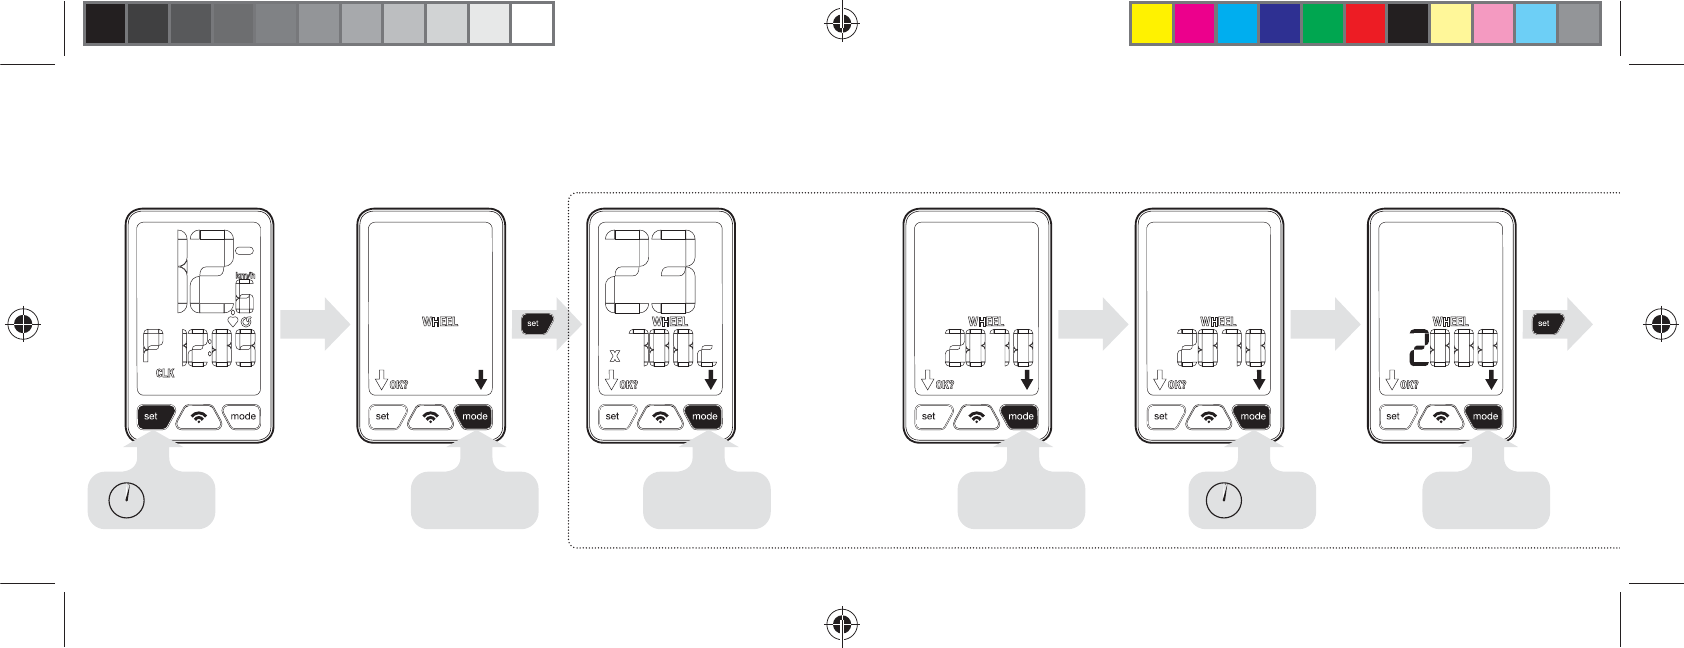
Re-setting wheel/tire size
OR
In ANY MODE press and hold SET BUTTON for 2 SECONDS to enter setting
mode. Press MODE BUTTON TWICE, then SET BUTTONWRVHWZKHHOWLUHVL]H
Using MODE BUTTON ÀQGFXVWRPFLUFXPIHUHQFH+ROGMODE BUTTON for 2
SECONDS to enter custom circumference.
2 sec VHOHFWZKHHO
VHOHFWZKHHO
VL]HIURP
VL]HSUHVHWV
Manually entering wheel circumference
*Calculating wheel circumference p.29
manually enter
ZKHHO
circumference*
2 sec
VFUROOWRÀQG
FXVWRPZKHHO
circumference
28 29
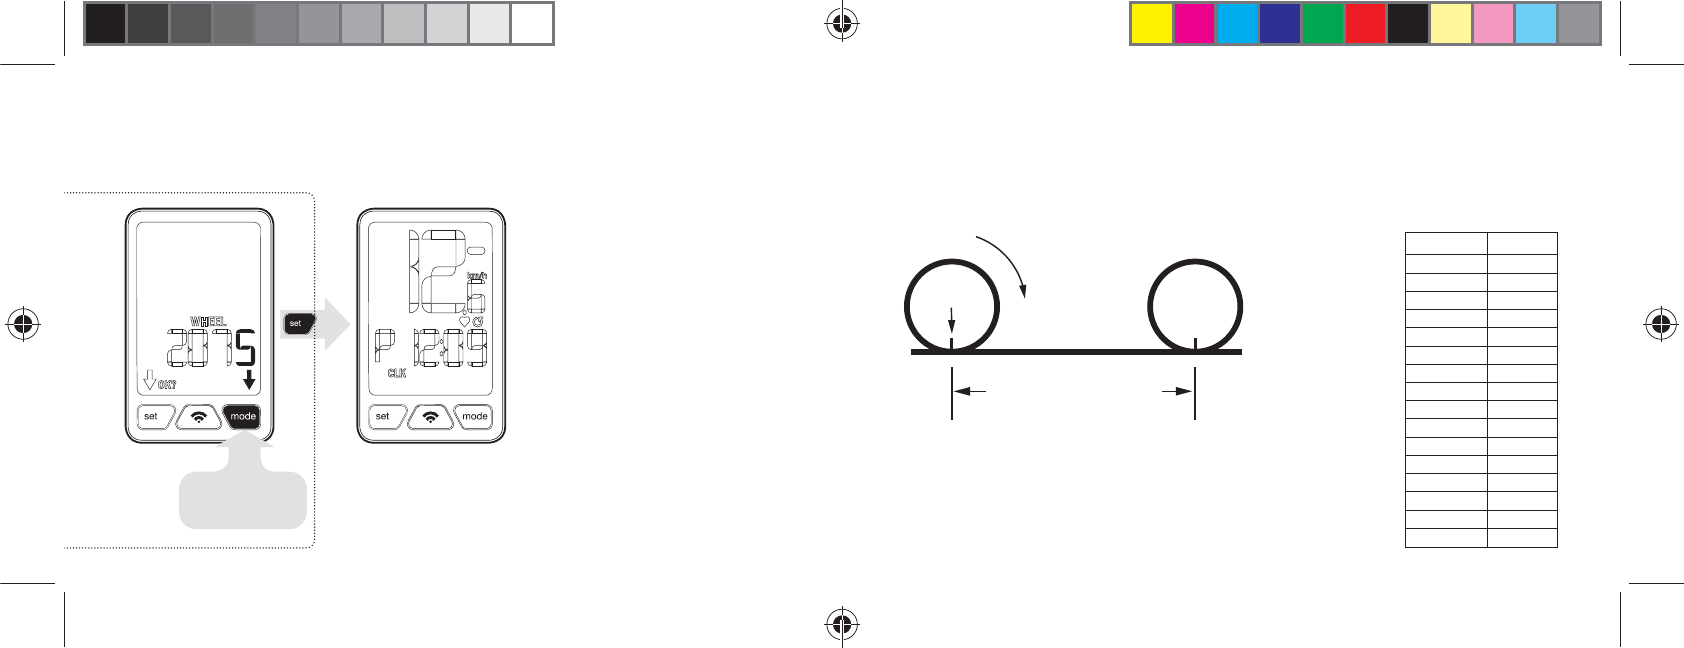
continued... entering wheel circumference Calculating wheel circumference
enter last digit
FRPSXWHUZLOO
return to previous
mode
TIRE SIZE
26x1.25
26x2.0
26x2.2
27.5x2.1
27.5x2.3
29x2.1
29x2.3
650x23c
700x21c
700x23c
700x25c
700x28c
700x32c
700x35c
700x38c
Custom
SIZE/MM
1949
2066
2075
2135
2160
2224
2245
1930
2092
2102
2113
2138
2161
2175
2187
0-2999
stem
Wheel circumference
size in MM
Roll forward
one revolution
0DUN\RXUWLUHDQGWKHJURXQGZKHUHWKH\PHHW5ROOELNHIRUZDUGIXOOUHYROXWLRQ
DQGPDUNWKHSRLQWRQWKHÁRRU
Measure the distance in millimeters and enter digits.
x2
30 31
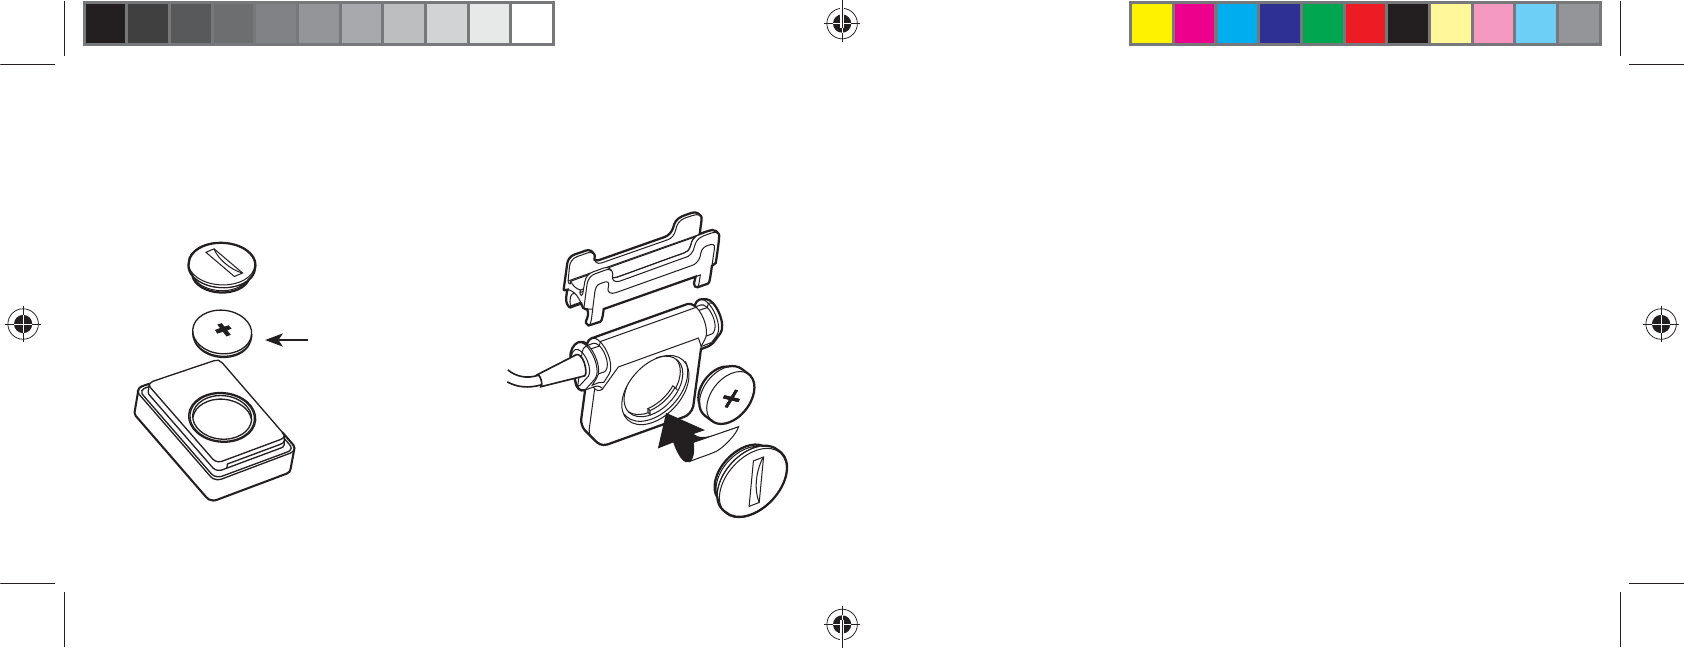
Rotate battery cover quarter turn to remove battery.
Replacing the battery
*9IH[[LY`
HEADUNIT SPEED/CADENCE SENSOR
6SHFLÀFDWLRQVDQGUDQJHV
ODOMETER
• 99999 miles or kilometers
• 1 mile or 1 kilometer resolution
TIME OF DAY
• KRXUVZLWKRQHPLQXWHUHVROXWLRQ
• Function in either 12 or 24 hour formats
WHEEL SIZE
• SUHSURJUDPPHGZKHHOVL]HV
• Wheel circumference measured in millimeters
SPEED
• 0-99.9 MPH KPH
• 0.1 MPH or KPH resolution
CADENCE
• 530ZLWK530UHVROXWLRQ
HEART RATE
• 30 -240 beats per minute (bpm)
BATTERY LIFE
• 200 - 300 hours
• Speed/Cadence sensor 400 hours
• Heart rate sensor 400 hours
• Ride duration & frequency may affect total life

32 33
6SHFLDOL]HG%LF\FOH&RPSRQHQWV,QF´6SHFLDOL]HGµZDUUDQWVWRWKHRULJLQDOSXUFKDVHUWKDWWKLV
SURGXFWLVIUHHRIGHIHFWVLQPDWHULDODQGZRUNPDQVKLSXQGHUQRUPDOXVHIRUSHULRGRIWZR
\HDUVIURPWKHGDWHRIRULJLQDOSXUFKDVHIURPDQDXWKRUL]HG6SHFLDOL]HGUHWDLOHU,IWKLVSURGXFW
LVIRXQGWREHGHIHFWLYHLQPDWHULDORUZRUNPDQVKLSZLWKLQWZR\HDUVIURPWKHGDWHRIRULJLQDO
SXUFKDVH6SHFLDOL]HGZLOOLQLWVVROHGLVFUHWLRQUHSDLURUUHSODFHWKLVSURGXFWZLWKRXWFKDUJH
provided the original purchaser returns the product securely packaged, postage prepaid to:
6SHFLDOL]HG%LF\FOH&RPSRQHQWV,QF
1475 S 5070 W, Suite A
Salt Lake City, UT, 84104, USA
Attn: Warranty
7KHRULJLQDOSXUFKDVHUPXVWDOVRLQFOXGHDOHWWHULQGLFDWLQJWKHVSHFLÀFUHDVRQVIRUUHWXUQLQJWKLV
product and proof of purchase.
7KLVZDUUDQW\GRHVQRWDSSO\WRDQGLVYRLGDVWRSK\VLFDOGDPDJHUHVXOWLQJIURPQHJOHFW
DEXVHDOWHUDWLRQVPRGLÀFDWLRQVRUXVHFRQWUDU\WRWKDWLQWHQGHGE\WKHPDQXIDFWXUHU
6SHFLDOL]HGGLVFODLPVDOOLPSOLHGZDUUDQWLHVLQFOXGLQJWKRVHRIPHUFKDQWDELOLW\DQGÀWQHVV
IRUSDUWLFXODUSXUSRVH6SHFLDOL]HGFDQQRWEHKHOGOLDEOHIRUFRQVHTXHQWLDOGDPDJHV
)XOO6HUYLFHDQGWURXEOHVKRRWLQJJXLGHDQGPDQXDOVFDQEHIRXQGDWZZZVSHFLDOL]HGFRP
Warranty information
• 'LVSOD\LVEODQNRUVKRZVSDUWLDOGLJLWV&KDQJHWKHEDWWHU\RUUHVHWWKHFRPSXWHUSDJH
• 6SHHG'LVWDQFHLVQRWUHFRUGLQJ$WWHPSWWROLQNVHQVRUSDJH,IOLQNLQJGRHVQRWZRUNDWWHPSW
WRSDLUVHQVRUSDJH,IOLQNLQJDQGSDLULQJGRQRWZRUNFKHFNVSHHGVHQVRUPDJQHW
DOLJQPHQWSDJH,IQRQHRIWKHDIRUHPHQWLRQHGZRUNFKDQJHEDWWHU\RQVSHHGVHQVRUDQG
computer (page 30).
• &RPSXWHUPRYHVRQKDQGOHEDUWLJKWHQKLQJHEROWRUWLHVWUDSV&KHFNUXEEHUVSDFHUEHWZHHQ
handlebar and mount.
•
Important:
• 3D\DWWHQWLRQWRWUDIÀFDQGURDGFRQGLWLRQDWDOOWLPHVDQGDOZD\VREH\WUDIÀFODZV<RXUÀUVW
obligation is to be attentive and ride safely.
• Never let the operation of the computer distract from riding safely and avoid resetting,
WURXEOHVKRRWLQJRUSURJUDPPLQJWKHFRPSXWHUZKLOHULGLQJ
• Keep the computer and all of its components tightly attached and check them regularly. If any
of the components come loose, it could become tangled in the spokes or mechanism of the
bicycle and cause an accident.
• 6SHHG]RQHFRPSXWHULVLQWHQGHGIRUXVHRQELF\FOHRQO\DQGVKRXOGQRWEHXVHGRQPRWRUL]HG
vehicles.
• 6HH\RXUDXWKRUL]HG6SHFLDOL]HGGHDOHULI\RXKDYHWURXEOHLQVWDOOLQJRURSHUDWLQJWKHFRPSXWHU
Troubleshooting

34
FCC ID: O4GSPORTDWL
MADE IN CHINA
7KLVGHYLFHFRPSOLHVZLWKSDUWRIWKH)&&5XOHV
NOTES:
CAUTION:
5,6.2)(;3/26,21,)%$77(5<,65(3/$&('%<$1,1&255(&77<3(
CAUTION:
DISPOSE OF USED BATTERIES ACCORDING TO THE INSTRUCTIONS.
Operation is subject to the following two conditions: (1) This device may not
cause harmful interference, and (2) This device must accept any interference
received, including interference that may cause undesired operation.
The grantee is not responsible for any changes or modifications not expressly
approved by the party responsible for compliance. Such modifications could
void the user’s authority to operate the equipment.