Dayton TEIIM Bluetooth (BLE SMART WATCH) User Manual
Dayton Industrial Co., Ltd. Bluetooth (BLE SMART WATCH)
Dayton >
User Manual
GETTING STARTED
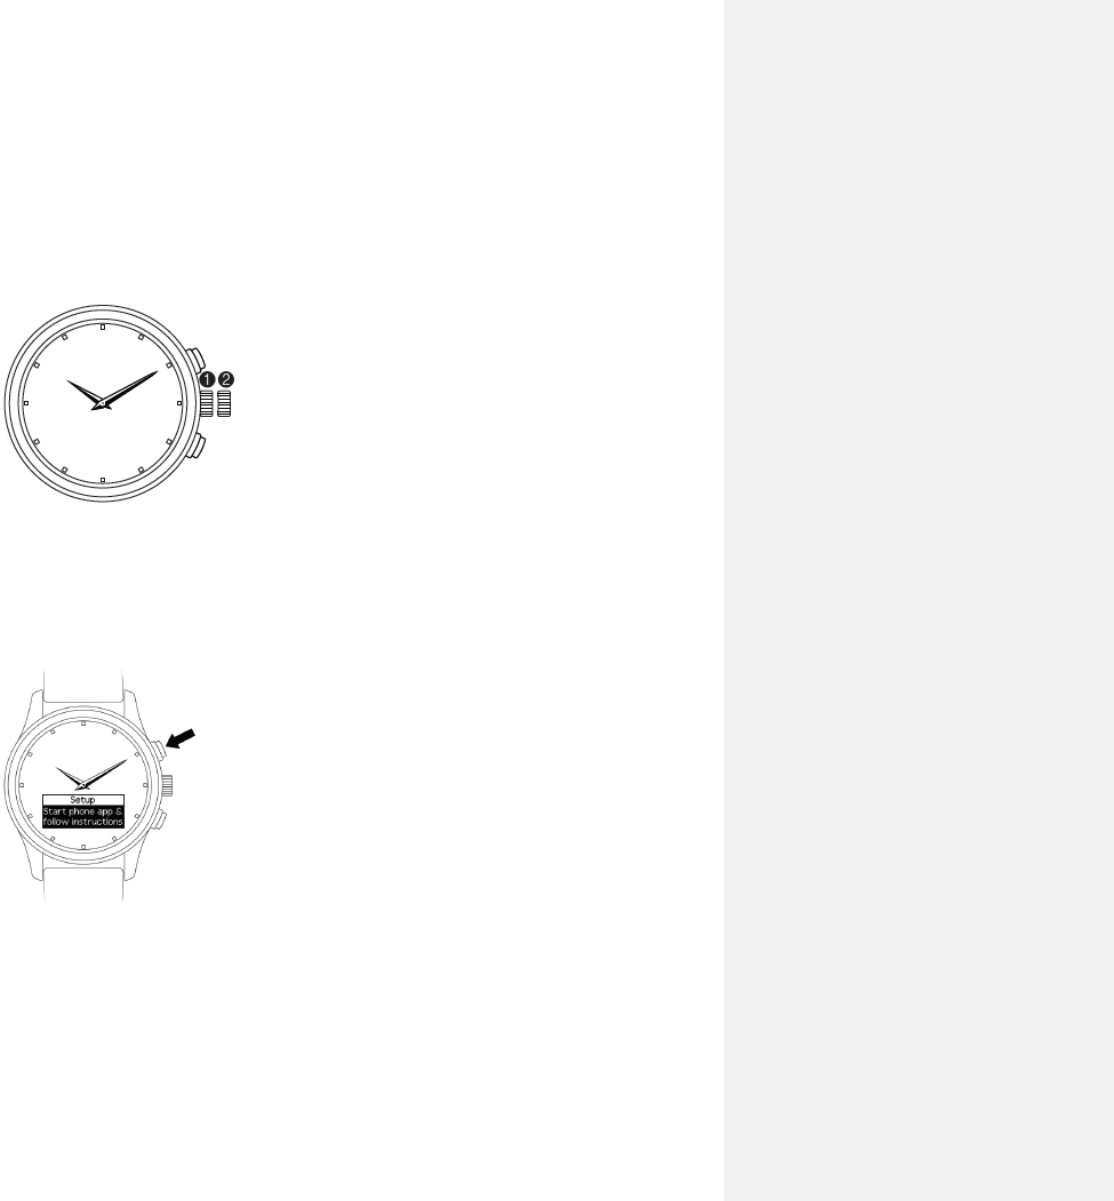
1 SET THE TIME.
1. Gently pull the crown out to position 2; the seconds hand stops moving.
2. Rotate the crown in either direction to move the hour and minute hands to the desired time.
3. Push the crown back in to position 1; the seconds hand restarts.
2 ACTIVATE YOUR WATCH.
To turn on your watch, press and hold the top watch button until the Set Up screen is displayed on your
watch.
NOTE: If the digital watch battery is completely depleted during shipping, your watch will not illuminate
or vibrate until after it has charged for a few minutes.
3 CHARGE YOUR WATCH.
Charge your watch for at least four hours.
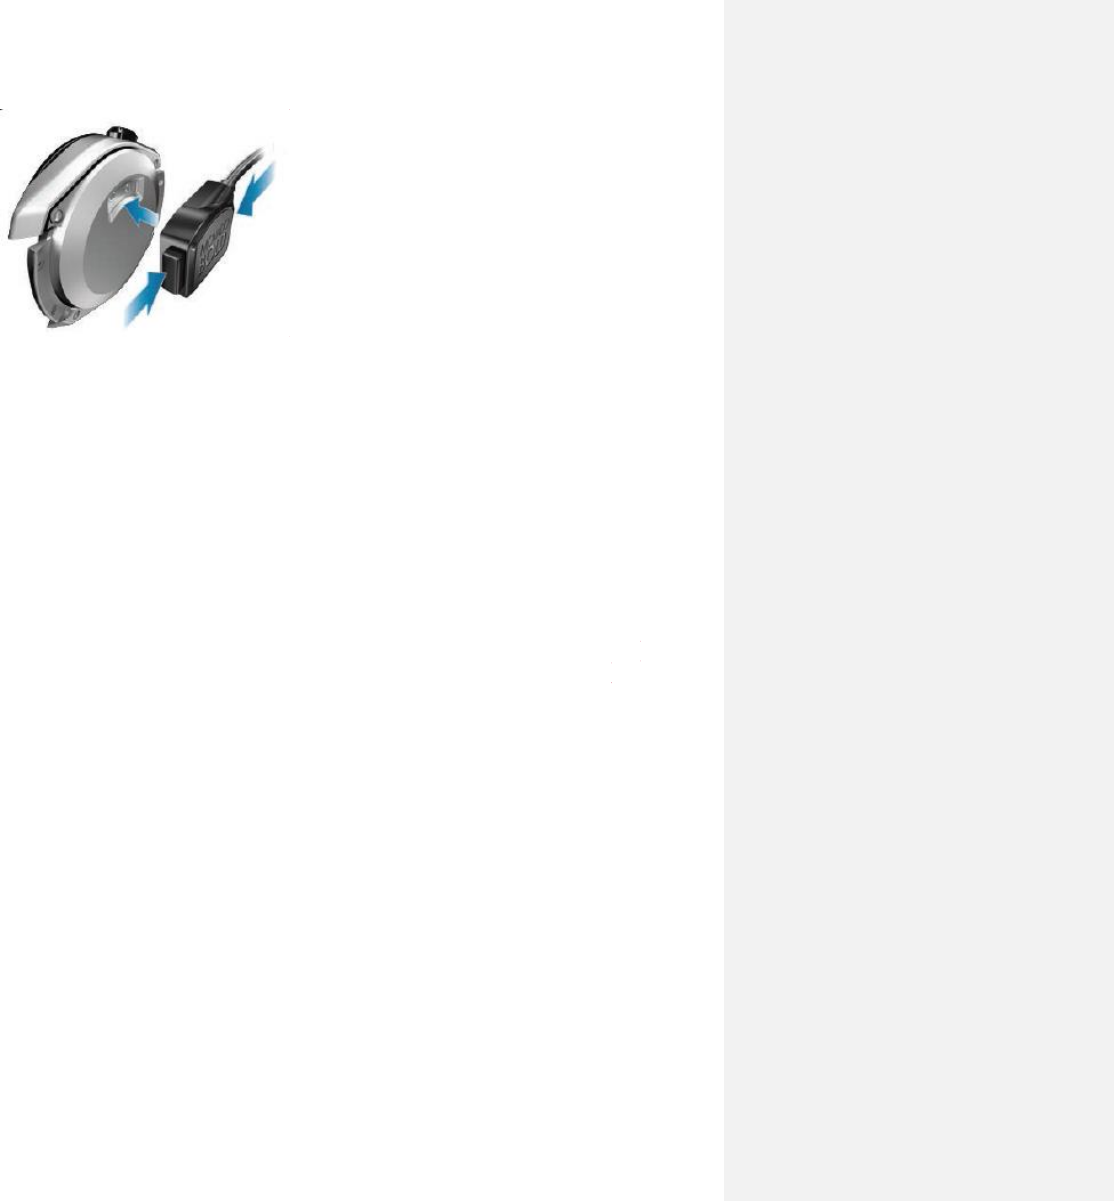
IMPORTANT: You must make sure that your watch is connected securely to the charger. When your
watch is successfully connected to the charger, it vibrates twice.
NOTE: If your watch battery has depleted completely during shipping, your watch will not vibrate and a
faint charging icon displays on your watch screen after 5-10 minutes.
Before you charge your watch, disconnect the charger from power and thoroughly wipe the charger and
watch contact pins with a soft, lint-free cloth. Never use soap or any chemicals to clean the contact pins
for your watch or charger.
Your watch contains two batteries. One battery controls the digital functions of your watch and can be
recharged. The other battery controls the analog functions of your watch and is not rechargeable.
Replacement of either battery—for the analog or the digital functions—requires service from an
authorized watch repair location. For locations, visit smartsupport.repairs.com. Never open your watch
or attempt to replace the batteries yourself; opening your watch case will void your warranty. Movado
Group assumes responsibility only for service performed at its Authorized Service Centers.
4 INSTALL THE PHONE APP.
The phone app connects your watch to your phone. Use the app to control the information and
notifications that are displayed on your watch. If your watch is not connected to the phone app, it will
continue to tell the time, but you cannot use the digital functions.
NOTE: Your phone must have either iOS 8 or later or Android 4.4 operating system or later. It does not
support tablets.
A. On your phone, search for the product name of your watch in your app store.
B. Download and install the app on your phone.
5 CONNECT YOUR WATCH TO YOUR PHONE.
A. Make sure that your phone’s Bluetooth® is turned on. See your phone documentation for
instructions.
NOTE: If you connect your watch to the phone using only your phone’s Bluetooth settings, you cannot
use the functions of your watch. You must connect your watch using the phone app to enable the phone
to push notifications and other information to your watch.
B. Open the phone app, and then follow the on-screen instructions to set up your account.
C. The phone app automatically searches for nearby watches.
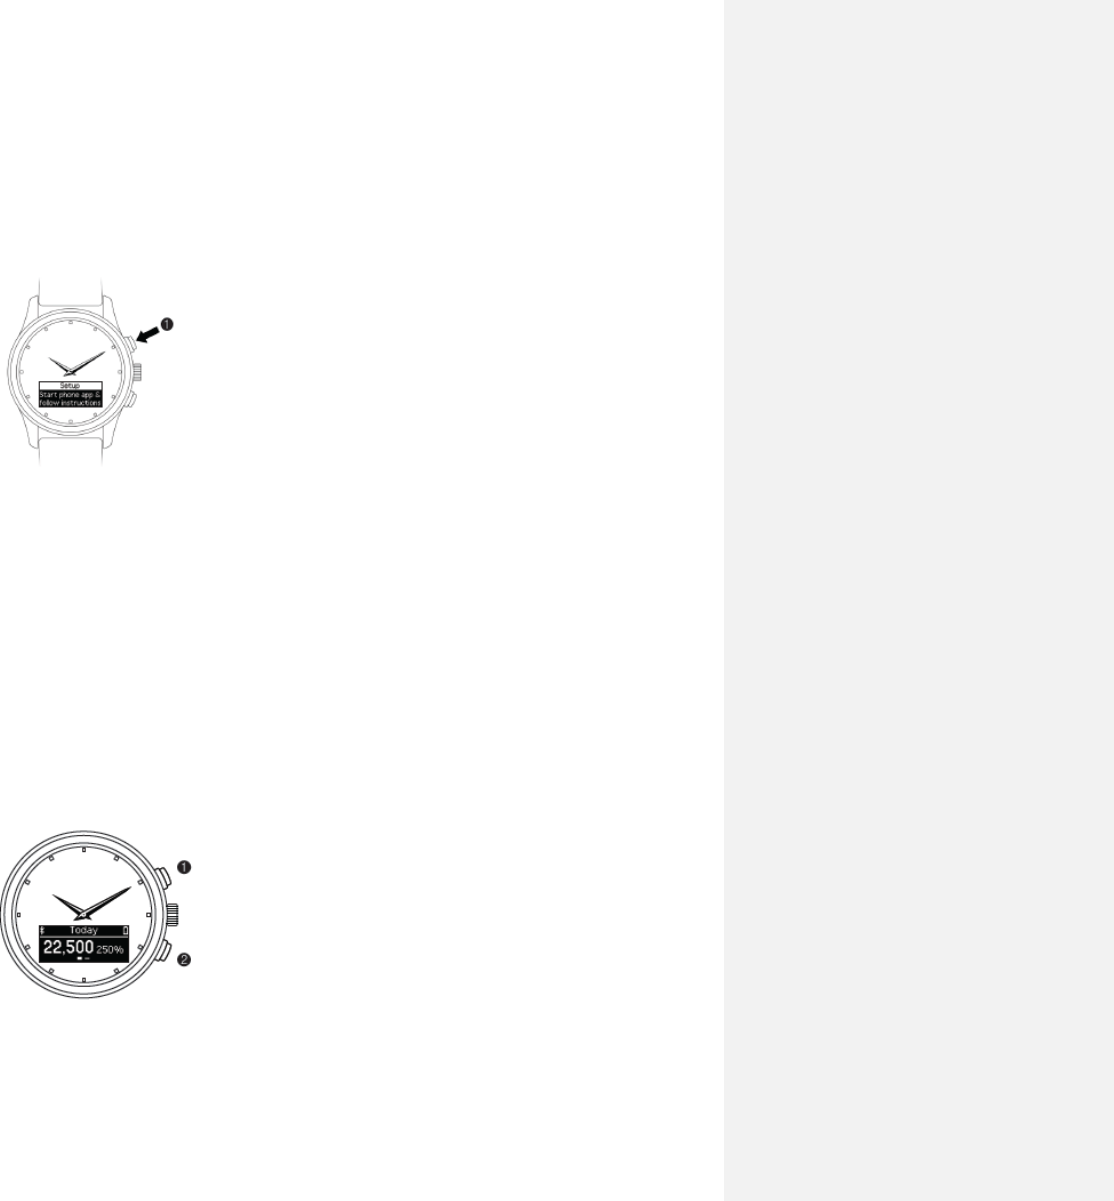
Press the top watch button 1 so that the setup screen is displayed and the app can find your watch.
D. When the phone app finds your watch, select Use This Watch. When prompted by the app, press the
top watch button 1 again and enter the PIN displayed on your watch.
6 SET UP YOUR WATCH USING THE PHONE APP.
A. Select Set Up Watch.
B. In the phone app, enable Allow Notifications, Allow Contacts Access, and Allow Calendar Access. You
must enable access for all three for your watch to work properly. Then, select Next.
C. Enable the notifications (Calls, Calendar, Messaging, Email, Social, Other) you want to be displayed on
your watch.
D. Select Next and swipe through the app tutorial.
You have now completed your watch setup. The rest of this guide provides more information about
using your watch and customizing it using the phone app.
NAVIGATING YOUR WATCH
DISPLAYING YOUR WATCH STATUS
To display your watch status, press and hold button 2 for three seconds. The status icons disappear
automatically after five seconds.
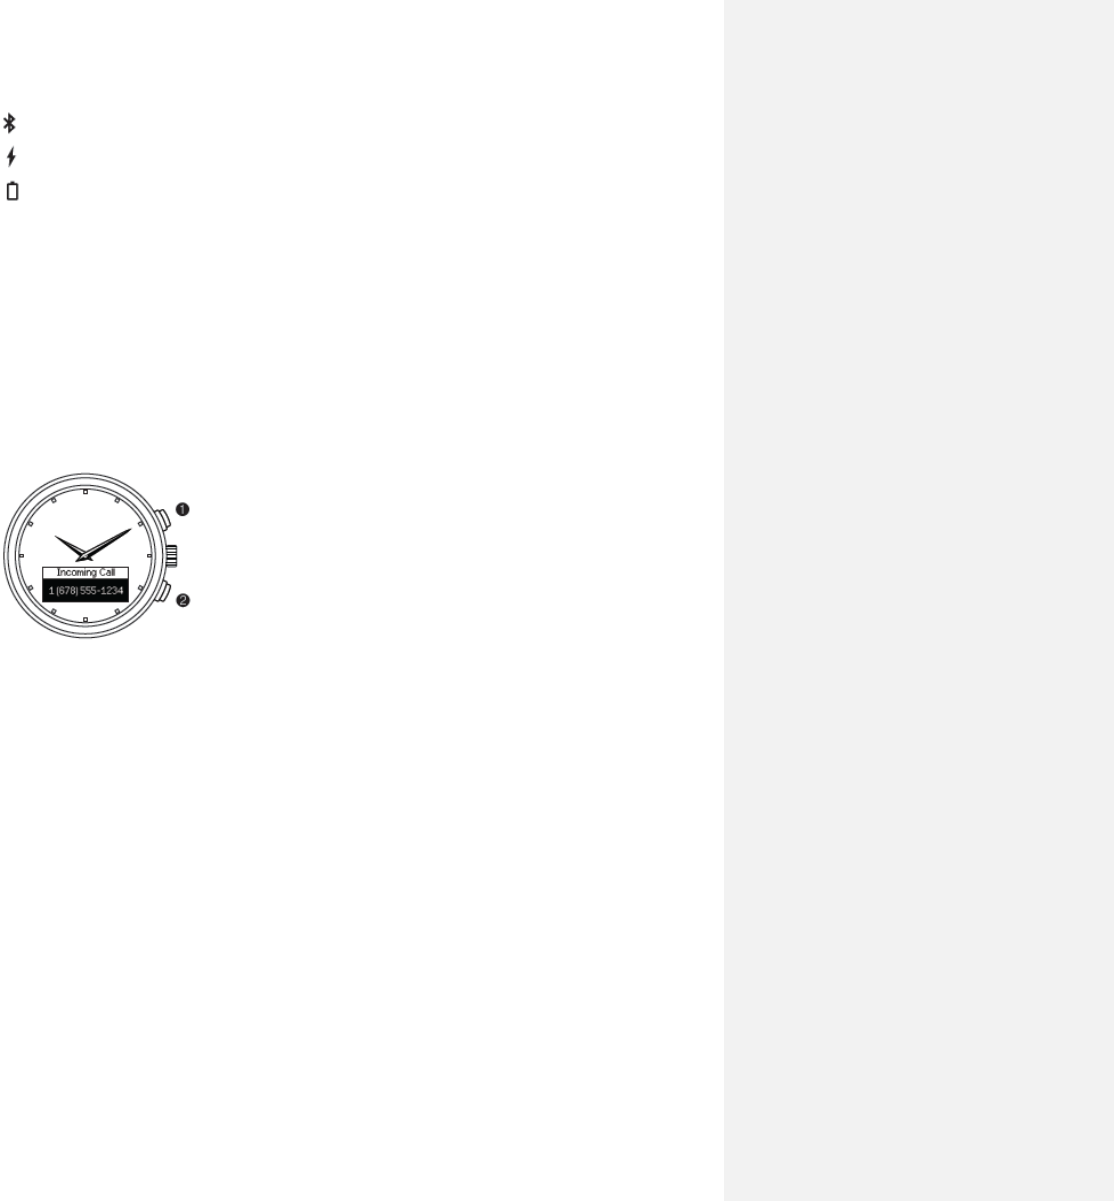
Bluetooth status icon Appears when Bluetooth is disconnected.
Charging status icon Appears when your watch is connected to power.
Battery status icon Displays remaining battery charge for the battery that powers the digital
functions of your watch.
NAVIGATING BETWEEN WATCH VIEWS
To navigate between World Clock and Activity Tracker, press button 1. In World Clock view, press button
2 to display the time in your next selected city. In Activity Tracker view, press button 2 to view
yesterday’s steps.
DISMISSING NOTIFICATIONS
To dismiss a notification or to decline a call, press button 1.
To dismiss all notifications, press and hold button 1.
WATCH FUNCTIONS
INCOMING CALL
When you have an incoming call, the caller’s name is displayed if the caller is in your contacts. If the
caller is not in your contacts, their phone number is displayed instead. Press button 1 to decline the call.
TEXT MESSAGE
When you receive a text message, the sender’s name and message are displayed if the sender is in your
contacts. If the sender is not in your contacts, the sender’s phone number is displayed with the
message. Press button 2 to scroll through the text, and press button 1 to dismiss the text.
ACTIVITY TRACKER
Activity Tracker keeps track of your daily steps and your progress to your daily goal. To check today’s
steps, press button 1. Review yesterday’s steps by pressing button 2.
A notification is displayed when you reach your daily goal. Use the app to view your steps for the day, as
well as a bar chart detailing your steps per week and a line graph detailing monthly trends.

WORLD CLOCK
World Clock syncs automatically with your phone. In the app, you can select other time zones to be
displayed and change the order in which the cities are displayed on your watch. Press button 2 to scroll
through your selected cities.
CALENDAR REMINDERS
Your watch syncs with the calendar on your phone to notify you of upcoming appointments.
Press button 2 to scroll for more information, such as meeting time and location.
Press button 1 to dismiss the notification.
OTHER NOTIFICATIONS
Your watch can receive notifications from any third-party app on your phone that has optional
notifications.
To dismiss a third-party notification, press button 1.
DIGITAL BATTERY STATUS
When the battery that powers the digital functions of your watch has less than a 20% charge, a
notification displays. When the digital watch battery has less than a 10% charge, another notification
displays. To display the battery status any time, press and hold button 2 for 3 seconds.
You can also use the phone app to view digital battery status for your watch at the bottom of the home
screen, next to your watch graphic.
NOTIFICATION VIBRATIONS
In addition to on-screen messages, your watch vibrates to notify you of events. Notification vibrations
are either high or low priority. You can change the priority of most notifications. High-priority
notifications use a longer vibration than low-priority notifications.
To enable, disable, or change the priority of notification vibrations:
1. In the app, select Notifications.
2. Tap the button next to the notification to turn that notification on or off. Tap Edit to change the
default vibration priority to high or low.
NOTE: You can enable a notification vibration for any third-party app. All notification vibrations not
enabled by default are set automatically to low priority.
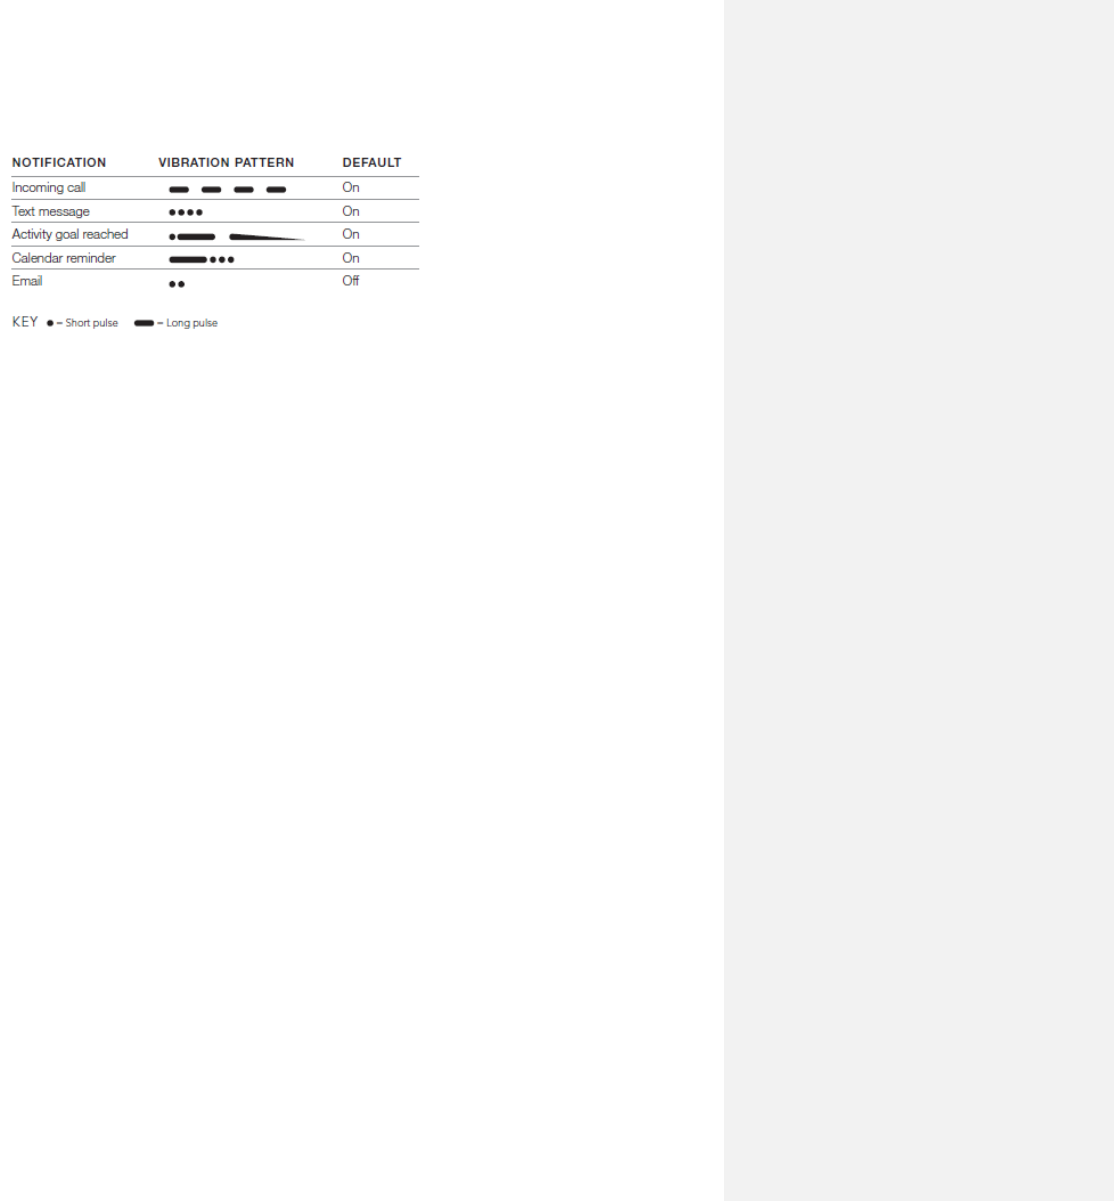
The following table describes the default vibration patterns for notifications.
MANAGING INCOMING CALL NOTIFICATIONS
Declining an incoming call using your watch
When you receive an incoming call notification, press your watch button once to decline the call.
Enabling or disabling incoming call notifications
1. In the phone app, select NOTIFICATIONS.
2. Tap the button next to CALLS to turn notifications on or off.
CUSTOMIZING MESSAGE NOTIFICATIONS
Enabling or disabling all message notifications
1. In the phone app, select NOTIFICATIONS.
2. Tap the button next to MESSAGING to turn notifications on or off.
Enabling or disabling notifications from a specific messaging app
1. In the phone app, select NOTIFICATIONS.
2. Next to MESSAGING, tap EDIT.
3. To enable notifications from a messaging app, select it. To disable notifications from a messaging app,
clear it.
NOTE: On a phone running iOS, the text message app preloaded on your phone is listed as SMS. All other
messaging apps are listed by their name.
Changing the priority of all message notifications
1. In the phone app, select NOTIFICATIONS.
2. Next to MESSAGING, tap EDIT.
3. Tap the slider next to PRIORITY to select either low or high priority.

MANAGING FAVORITE CONTACTS
Setting your favorite contacts
You can set up to 12 people as your favorite contacts.
You can use the favorite contacts list to filter calls and text messages.
1. In the phone app, select NOTIFICATIONS.
2. Next to FAVORITE CONTACTS, select EDIT.
3. To remove a favorite contact, select the X next to their name.
4. To add a favorite contact, select ADD CONTACTS.
5. Scroll or use the search field to locate the name of a contact saved in your phone. Select the name to
add the contact to your favorites.
6. Select DONE.
Receiving notifications from favorite contacts only
To receive call and text message notifications from only your favorite contacts:
1. In the phone app, select NOTIFICATIONS.
2. Next to FAVORITE CONTACTS, tap the slider next to EDIT to turn notifications from only favorite
contacts on or off.
CUSTOMIZING EMAIL NOTIFICATIONS
Enabling or disabling all email notifications
1. In the phone app, select NOTIFICATIONS.
2. Tap the button next to EMAIL to turn notifications on or off.
Enabling or disabling notifications from a specific email app
1. In the phone app, select NOTIFICATIONS.
2. Next to EMAIL, tap EDIT.
3. To enable notifications from an email app, select it.
To disable notifications from an email app, clear it.
Changing the priority of all email notifications
1. In the phone app, select NOTIFICATIONS.
2. Next to EMAIL, tap EDIT.
3. Tap the slider next to PRIORITY to select either low or high priority.

CUSTOMIZING CALENDAR EVENT NOTIFICATIONS
Enabling or disabling all calendar event notifications
1. In the phone app, select NOTIFICATIONS.
2. Tap the button next to CALENDAR to turn notifications on or off.
Enabling or disabling notifications from a specific calendar
1. In the phone app, select NOTIFICATIONS.
2. Next to CALENDAR, tap EDIT.
3. Scroll to the name of the app.
4. To enable notifications from a calendar for that app, select it. To disable notifications from a calendar
for an app, clear it. For example, you might select both the OFFICE and BIRTHDAYS calendars for an app.
CUSTOMIZING SOCIAL MEDIA NOTIFICATIONS
Enabling or disabling all social media notifications
NOTE: To turn on notifications for private messages from a social media app, see CUSTOMIZING
MESSAGE NOTIFICATIONS.
1. In the phone app, select NOTIFICATIONS.
2. Tap the button next to SOCIAL to turn notifications on or off.
Enabling or disabling notifications from a specific social app
1. In the phone app, select NOTIFICATIONS.
2. Next to SOCIAL, tap EDIT.
3. To enable notifications from a social media app, select it. To disable notifications from a social media
app, clear it.
Changing the priority of all social media notifications
1. In the phone app, select NOTIFICATIONS.
2. Next to SOCIAL, tap EDIT.
3. Tap the slider next to PRIORITY to select either low or high priority.
CUSTOMIZING OTHER THIRD-PARTY APP NOTIFICATIONS
Your watch can display notifications from any third-party app with optional notifications enabled on
your phone. See your phone documentation for instructions for enabling notifications.
Enabling or disabling all other third-party app notifications
1. In the phone app, select NOTIFICATIONS.
2. Tap the button next to OTHER to turn notifications on or off.
Enabling or disabling notifications from a specific uncategorized third-party app
1. In the phone app, select NOTIFICATIONS.
2. Next to OTHER, tap EDIT.
3. To enable notifications from a third-party app, select it. To disable notifications from a third-party
app, clear it.
Changing the priority of all other third-party app notifications
1. In the phone app, select NOTIFICATIONS.
2. Next to OTHER, tap EDIT.
3. Tap the slider next to PRIORITY to select either low or high priority.
MANAGING ACTIVITY TRACKER
Use the activity tracker to monitor your progress toward your daily step goal and to view graphs of your
weekly and monthly step goal achievements.
Enabling and disabling activity tracker
To enable or disable the activity tracker:
1. In the phone app, select the settings icon .
2. Next to ACTIVITY TRACKING, tap the button.
When the button is white, tracking is disabled.
Viewing your progress toward your daily step goal
On your watch, press button 1 once.
In the app, select ACTIVITY.
Viewing your daily steps for the day, week, or month
1. In the phone app, select ACTIVITY. Your daily step count and goal are displayed.
2. Tap WEEK or MONTH to view your daily steps for the current week or month.
If your watch becomes disconnected from the phone, it continues to collect activity tracker data but
cannot send the data to the phone app. The phone app displays when the activity tracker data last
updated.
When you connect your watch to the phone again, the data is sent to the phone app. If your watch
remains disconnected from the phone for more than two days, some data might be lost.
Changing your daily step goal
1. In the phone app, select the settings icon.
2. Next to DAILY GOAL, tap the current number of steps.
3. Tap the Daily Goal box and enter your target number of steps per day.
4. Tap SAVE.
CHANGING THE TIME FORMAT
1. In the app, select the settings icon.
2. Select the current setting of Time Format to switch between 12 Hour and 24 Hour.
CHECKING YOUR WATCH DIGITAL BATTERY STATUS
On your watch, press button 2 for 3 seconds.
In the phone app, view digital battery status for your watch at the bottom of the home screen.
MANAGING QUIET MODE
Quiet mode allows you to turn off notifications during a specified time period. By default, quiet mode is
enabled, and you will not receive any event notifications from 10 o’clock PM to 8 o’clock AM.
You can manage this setting in the phone app to adjust the time period when notifications are disabled
or to turn quiet mode off.
To configure quiet mode:
1. In the phone app, select the settings icon .
2. Select the slider next to Silence watch notifications between XX and XX to turn quiet mode on or off.
This starts and ends quiet mode at a specific time and can be set to reoccur, like an alarm. Only device
alerts and specifically configured notifications are displayed on your watch in this mode.
3. Click the time next to START TIME or END TIME to set the start and end times.
MANAGING THE CONNECTION BETWEEN YOUR WATCH AND THE
PHONE
Verifying the Bluetooth connection status
On your watch, press and hold button 2 for 3 seconds.
In the app, the status of the Bluetooth connection between your watch and your phone is displayed at
the bottom of the home screen.
Turning Bluetooth on or off
To turn Bluetooth on or off, press and release the top and bottom buttons at the same time.
Reconnecting your watch to your phone
If your phone and your watch are disconnected, try these methods to reconnect them in the following
order:
1. Ensure that your watch is fully charged and the phone and watch are within range of each other.
Press watch button 1.
2. Check ensure that Bluetooth is enabled on both the phone and your watch.
3. Open the app on your phone.
4. Close and restart your phone app. (See the manufacturer’s instructions for your phone.)
If none of these procedures work, try the following:
Make sure airplane mode is disabled on phone
Make sure airplane mode is disabled on watch
Make sure watch app is running
Toggle Bluetooth on and off
Call customer support
SETTING YOUR WATCH TO AIRPLANE MODE
When airplane mode is on, your watch still receives activity tracker and device notifications. General
notifications, such as calendar meetings, are disabled.
To turn airplane mode on or off, press and release both watch buttons at the same time.
PAIRING YOUR WATCH TO A DIFFERENT PHONE
You might want to use your watch with a different phone or transfer ownership of your watch.
1. In the phone app, select the settings icon , and then tap SIGN OUT.
NOTE: Your locally stored user data might be deleted.
2. Select OK to confirm that you want to sign out. When finished, the phone app returns to the login
screen.
3. A prompt to Remove Watch appears. If you select OK, your watch automatically resets to factory
settings.
If you select Skip, you must press and hold button 2 while pressing button 1 three times. Press button 2
to confirm.
4. If prompted, select OK.
5. If you are using Android, you can now pair your watch to a different phone. If you are using iOS, open
your phone Settings, and then select Bluetooth. Tap the I icon next to your watch, and then tap FORGET
THIS DEVICE. You can now pair your watch to a different phone.
PAIRING THE PHONE TO A DIFFERENT WATCH
You can only pair one watch to the phone at a time.
1. In the phone app, select the settings icon .
2. Tap Remove Watch.
3. Select OK to confirm that you want to remove your watch.
4. If you are using Android, you can now pair the phone to a different watch. If you are using iOS, open
your phone Settings, and then select Bluetooth. Tap the I icon next to your watch, and then tap FORGET
THIS DEVICE. You can now pair the phone to a different watch.
REINSTALLING THE PHONE APP
You might need to uninstall and reinstall the phone app. You must reconnect your watch to your phone
after reinstalling the phone app.
If you are using Android, you should be able to reconnect your watch to the phone. If you are using iOS,
open your phone Settings, and then select Bluetooth. Tap the I icon next to your watch, and then tap
FORGET THIS DEVICE.
You can now pair your watch to the phone again.
UPDATING YOUR WATCH
When a software update is available, a notification is displayed at the bottom of the phone app home
screen.
1. Connect your watch to the charger and ensure your watch battery is charged to at least 80%.
2. In the phone app, select INSTALL NOW and then START INSTALLATION to install the update.
NOTE: Do not press your watch button or close the phone app until the update is complete.
3. When the update is complete, select DONE.
If you receive an error message, tap RETRY.
RESETTING YOUR WATCH TO FACTORY SETTINGS
NOTE: Resetting your watch to factory settings removes all user data from your watch. Reset your watch
only if you are experiencing a serious problem that has not been solved after trying all other
troubleshooting methods, or if you want to pair your watch with a different phone. Use one of the
following methods:
If your watch is connected to your phone, use the phone app to reset your watch.
1. In the phone app, select the settings icon .
2. Tap Remove Watch.

3. Select OK to confirm that you want to remove your watch.
If your watch is not connected to your phone, to reset to factory settings, press and hold button 2 while
pressing button 1 three times. Press button 2 to confirm.
CARE AND MAINTENANCE
Charging and replacing your watch batteries
Your watch contains two batteries. One battery controls the digital functions of your watch and can be
recharged. The other battery controls the analog functions of your watch and is not rechargeable. Under
normal use, the battery that controls the analog functions of your watch should last approximately two
years.
Never open your watch yourself. If your watch needs repair or adjustment, take or mail it directly to an
authorized watch repair location. Do not attempt to change the batteries yourself. If one or both of your
batteries needs to be changed, take or send your watch to an authorized watch repair location to have
battery(ies) changed. To locate an authorized watch repair location in your region, visit
smartsupport.repairs.com and click FIND AN AUTHORIZED WATCH REPAIR LOCATION.
NOTE: The Movado Watch Company assumes responsibility only for service performed at its Authorized
Service Centers.
Cleaning the connection pins of your watch and charger
Each time you need to charge your watch, disconnect the charger from power and thoroughly wipe the
charger and watch contact pins with a soft, lint-free cloth before connecting the charger to power and
then to your watch.
If necessary, you may dampen the cloth with a small amount of isopropyl rubbing alcohol. Never use
soap or any chemicals other than isopropyl rubbing alcohol to clean the contact pins for your watch or
charger.
Caring for your watch strap
While the life span of a watch strap depends on your care and wearing habits, as well as the climate in
which you live, proper care will extend its life.
To help preserve the natural elasticity and quality of your watch strap, wipe the strap with a soft cloth
soaked in fresh water or a dilute detergent if the strap has been exposed to salt water, chemicals,
isopropyl alcohol, or abrasive substances. Contact with acetone, ethyl alcohol, organic solvents, and
perfume should be avoided.
NOTE: Movado watch straps are not covered by the Movado watch warranty.
Water resistance
All Movado watches are tested to meet international standards for water resistance. This style is
resistant to 50 meters (5 ATM), as marked on the case back; however, because of its connectivity
feature, Movado recommends not wearing your watch when showering or swimming. You should avoid
submerging your watch in water or allowing the contact pins to get wet. Moisture and electrolyte
residues (salts and chlorides) can cause corrosion and possibly short circuit the contact pins.

If the contact pins get wet, wipe them with isopropyl alcohol, and then dry them with a soft cloth. The
contact pins must be moisture-free before you attach the charging cable.
CAUTION: Do not subject your watch to a pressure/depth greater than 50 meters (5 ATM), or your
watch could be damaged and your warranty voided.
IMPORTANT: Do not operate your watch button or pull the crown out while your watch is wet or
underwater.
NOTE: The Movado Group will not be responsible for any damage caused by or related to leakage
originating from improper handling or damage to the case, crown, gaskets, or crystal.
To maintain water resistance, yearly maintenance is required. The gaskets and crown that seal the case
are subject to wear and deterioration under normal use. These parts should be inspected and replaced
as needed each time your watch is opened for service, including battery changes. An authorized watch
repair location will automatically retest your watch for water resistance as a routine step in all service
orders. To locate an authorized watch repair location in your region, visit smartsupport.repairs.com and
click FIND AN AUTHORIZED WATCH REPAIR LOCATION.
Water resistance applies only to your watch case; some watch straps should not be worn under water or
subjected to wet conditions.
Avoid exposing your watch to sudden and excessive temperature variations.
Do not drop your watch or bang it against a hard surface. Water resistance must be rechecked after
every violent shock. Clean your watch regularly by wiping it with a soft cloth dampened with fresh
water, especially after exposure to seawater.
MORE INFORMATION
In the phone app, select the settings icon , then tap Help & Support to access the user manual,
FAQs, terms of use, privacy policy, customer service phone number, or other information about your
watch, including the app software version and watch serial number.
WARRANTY AND SUPPORT
Your watch comes backed by a 2-year limited warranty. For full terms and conditions, visit
smartsupport.mgiservice.com.
For customer service support, visit smartsupport.mgiservice.com.
Copyright ©2016 Movado Group, Inc. ANDROID is a trademark of Google Inc. BLUETOOTH is a trademark owned by the Bluetooth SIG and is
used by Movado under license. MOVADO is a trademark of Movado Group, Inc. and/or its affiliates.
First Edition: June 2016
903247-001

FCC STATEMENT
This device complies with Part 15 of the FCC Rules.
Operation is subject to the following two conditions: (1) This device may not cause harmful
interference, and (2) This device must accept any interference received, including
interference that may cause undesired operation.
The grantee is not responsible for any changes or modifications not expressly approved
by the party responsible for compliance. Such modifications could void the user’s
authority to operate the equipment.
NOTE: This equipment has been tested and found to comply with the limits for a Class B
digital device, pursuant to part 15 of the FCC Rules. These limits are designed to
provide reasonable protection against harmful interference in a residential installation.
This equipment generates, uses and can radiate radio frequency energy and, if not
installed and used in accordance with the instructions, may cause harmful
interference to radio communications. However, there is no guarantee that
interference will not occur in a particular installation. If this equipment does cause
harmful interference to radio or television reception, which can be determined by
turning the equipment off and on, the user is encouraged to try to correct the
interference by one or more of the following measures:
—Reorient or relocate the receiving antenna.
—Increase the separation between the equipment and receiver.
—Connect the equipment into an outlet on a circuit different from that to which the
receiver is connected.
—Consult the dealer or an experienced radio/TV technician for help.
FCC ID: O4GTEIIM
Model: HSTNW-D08W

Le présent appareil est conforme aux CNR d'Industrie Canada applicables aux
appareils radio exempts de licence. L'exploitation est autorisée aux deux conditions
suivantes:
(1) il ne doit pas produire de brouillage et
(2) l’ utilisateur du dispositif doit étre prêt à accepter tout brouillage
radioélectrique reçu, même si ce brouillage est susceptible de compromettre le
fomctionnement du dispositif.
CAN ICES-3(B)/NMB-3(B)
The device meets the exemption from the routine evaluation limits in section 2.5 of
RSS-102 and compliance with RSS-102 RF exposure, users can obtain Canadian
information on RF exposure and compliance.
Le dispositif rencontre l'exemption des limites courantes d'évaluation dans la
section 2.5 de RSS 102 et la conformité à l'exposition de RSS-102 rf,
utilisateurs peut obtenir l'information canadienne sur l'exposition et la
conformité de rf.
ISED Statement
This device complies with Industry Canada licence-exempt RSS standard(s).
Operation is subject to the following two conditions: (1) this device may not
cause interference, and (2) this device must accept any interference, including
interference that may cause undesired operation of the device.
CAN ICES-3(B)/NMB-3(B)
ISED Cerification Number: 7666A-COACH
Model: HSTNW-D08W
This transmitter must not be co-located or operating in conjunction with any other
antenna or transmitter. This equipment should be installed and operated with a
distance of less than 5 millimeters between the radiator and your body.
Cet émetteur ne doit pas être Co-placé ou ne fonctionnant en même temps
qu'aucune autre antenne ou émetteur. Cet équipement devrait être installé et
actionné avec une distance moins de 5 milliimètres entre le radiateur et votre
corps.