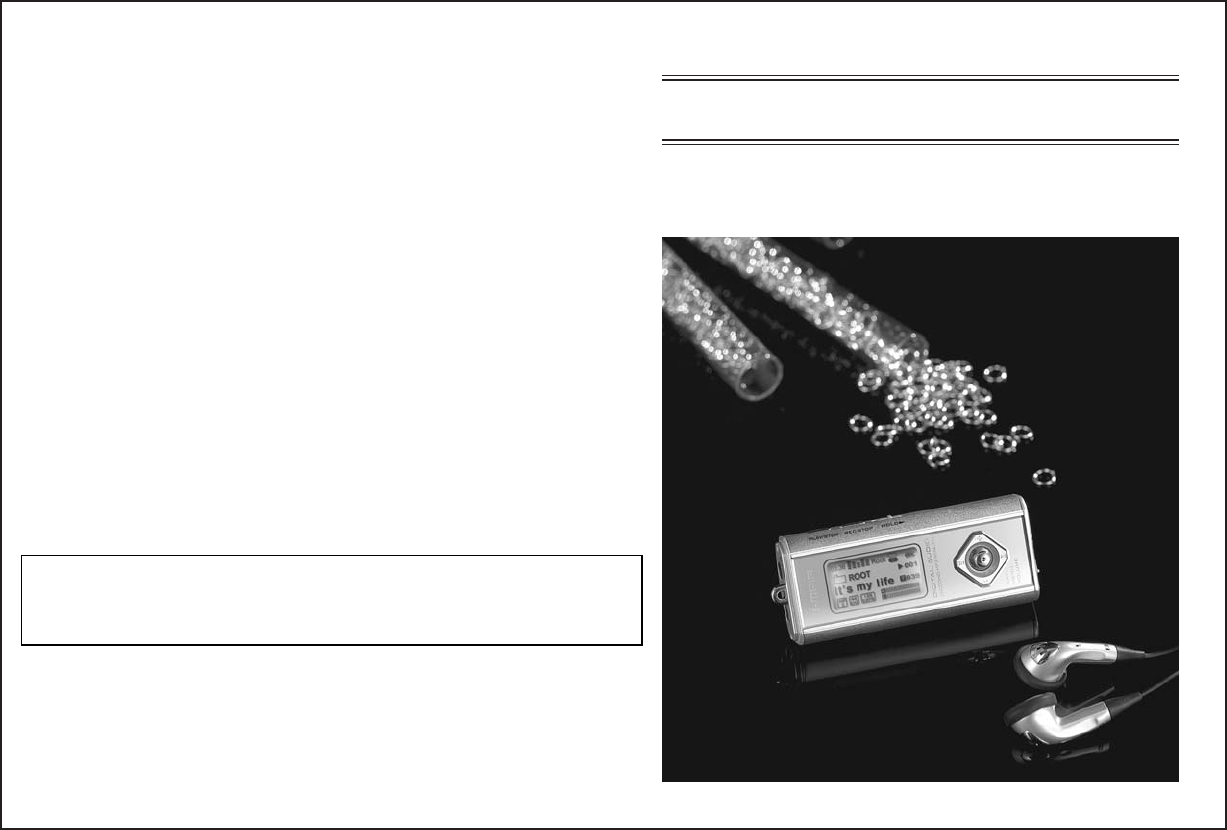
Decktron IMP7512 Digital Audio Player User Manual
Decktron Co., Ltd. Digital Audio Player
Decktron >
User Manual
English Ver 1.0
User's Manual
DIGITAL AUDIO PLAYER
INFORMATION TO THE USER
This equipment has been tested and found to comply with the limits for a Class B
digital device, pursuant to part 15 of the FCC Rules. These limits are designed to
provide reasonable protection against harmful interference in a residential installation.
This equipment generates, uses and can radiate radio frequency energy and, if not
installed and used in accordance with the instructions, may cause harmful
interference to radio communications. However, there is no guarantee that
interference will not occur in a particular installation. If this equipment does cause
harmful interference to radio or television reception, which can be determined by
turning the equipment off and on, the user is encouraged to try to correct the
interference by one more of the following measures:
-. Reorient or relocate the receiving antenna.
-. Increase the separation between the equipment and receiver.
-. Connect the equipment into an outlet on a circuit different from that to which
the receiver is connected.
-. Consult the dealer or an experienced radio/TV technician for help.
WARNING
Any changes or modifications not expressly approved by the manufacturer
could void the user’s authority to operate the equipment.
This device complies with Part 15 of the FCC Rules. Operation is subject to the
following two conditions: (1) this device may not cause harmful interference, and
(2) this device must accept any interference received, including interference that
may cause undesired operations.
Features
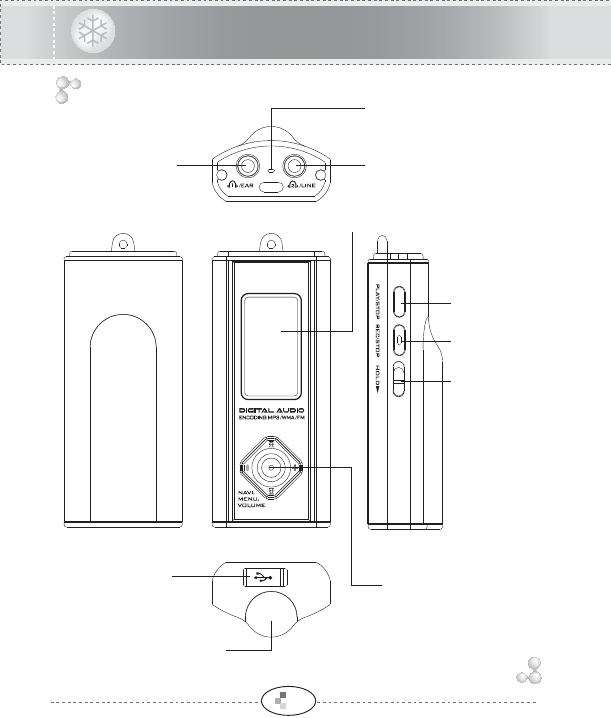
Name of each part
Preparation for operating
Inserting a Battery
Power ON
Power OFF
HOLD Function
Setting up MODE
MP3 PLAYER
PLAYBACK
Select Equalizer
Change the Playback Speed
Setting up Loop Repeating
INTRO Playback
Lyric Display (Media Sync)
FILE NAVIGATION
Select Folder or File
Move to Upper/Lower Folder
Playback Audio file
Deleting a file
FONT UPGRADE
Function & Structure of MENU
DISPLAY MENU
BACKTLIGHT COLOR
LCD CONTRAST
LYRICS
VISUALIZATION
CONTENTS
SOUND MENU
EQUALIZER
USER EQ
REPEAT
INTRO PLAY
TIME & SPEED MENU
BACKLIGHT TIME
POWER OFF TIME
TITLE SCROLL
PLAY SPEED
MEMORY FORMAT
FM RADIO
Listening FM
Listening saved channel
Save channels
Save channels Automatically
Delete saved channel
To record FM
RECORDER
Setting the Recording Mode
VOICE RECORDING
MP3 ENCODING
DOWNLOAD & UPLOAD
FIRMWARE UPGRADE
PC software installation from
the CD
Cautions
Specifications
1
2
4
4
4
4
4
5
6
6
6
7
7
7
8
9
9
9
10
10
11
12
13
13
13
13
13
14
14
14
15
15
16
16
16
16
16
17
18
18
18
19
19
20
20
21
21
23
23
24
24
25
30
31
1
Features
MP3, WMA & ASF Playback
Support 5 step speed playback speed control
Support MP3, WMA and ASF format.
MP3 encoding function
Encode directly into an MP3 format from audio device such as
CDP, MD or Walkman through the cable.
High-Quality voice recording with MP3 format
Save a digital voice recording file as a high quality MP3 file.
Auto search and station memory function make it easy to listen
to the FM radio. And you can also convert an FM radio program
into an MP3 file in real time.
Listening to/Recording of FM RADIO
Easy File Navigation
The file navigation function makes it easy to find and delete any song.
Lyric display (Media Sync)
The words of a playback song or foreign language files will be
displayed in LCD screen.
USB Storage Device
You can easily copy and paste PC files to the player using built-in
USB connector and windows. It is immediately recognized as a
removable storage device without Manager program (Windows ME
or Higher).
Convenient firmware upgrade
Transfer the upgraded firmware file to the player and power off.
The upgrade will be automatically done.
Support 7 color LED Backlight
You can select among 7 backlight colors.
Control the playback speed fast or slowly.
Support Dual Earphone
You can listen to music through the Line-In jack as well as the
Earphone jack when encoding function is not in use.
2
Name of each part
EARPHONE1 LINE IN / EARPHONE2
LCD display
HOLD Switch
REC/STOP
PLAY/STOP
Battery Cover
USB
Connector
Built-in microphone
MENU / NAVI /
REW / FF /
VOLUME + / -
3
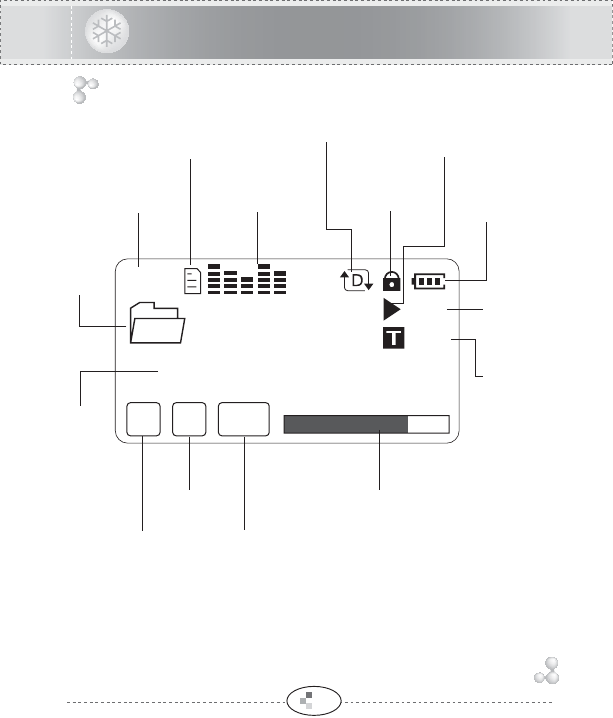
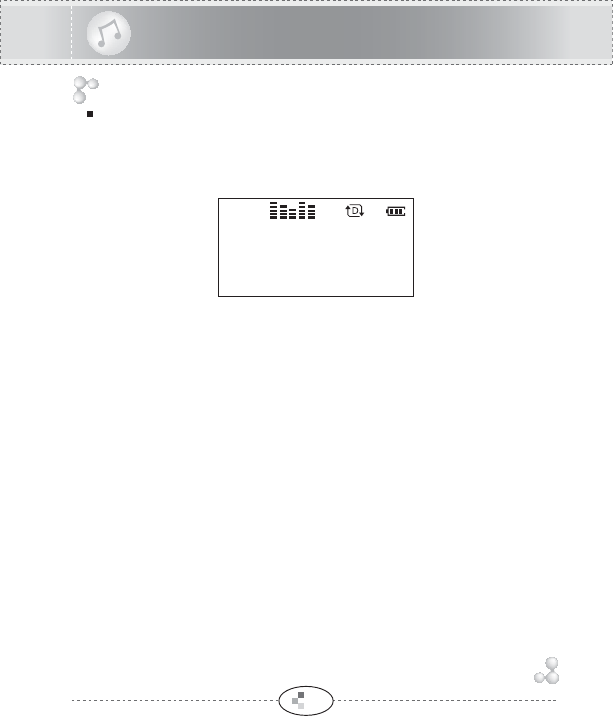
Name of each part
*Playback Time
*Number of
Current File
*Number of
Total Files
*Remaining Battery
Capacity Display
*HOLD
*Playback/Pause/
INTRO Playback Display
*File
Name
*Folder
Name
*Equalizer
*Bitrate
*Remain Memory Size /
Volume / Level Meter / Progressive
*File Type
*Sampling
Frequency
*Repeat Mode
*MEDIA
SYNC
03:36
001
019
34MB FREE
Rock
MP
3128
KBPS
44
KHZ
Sample1.mp3
ROOT

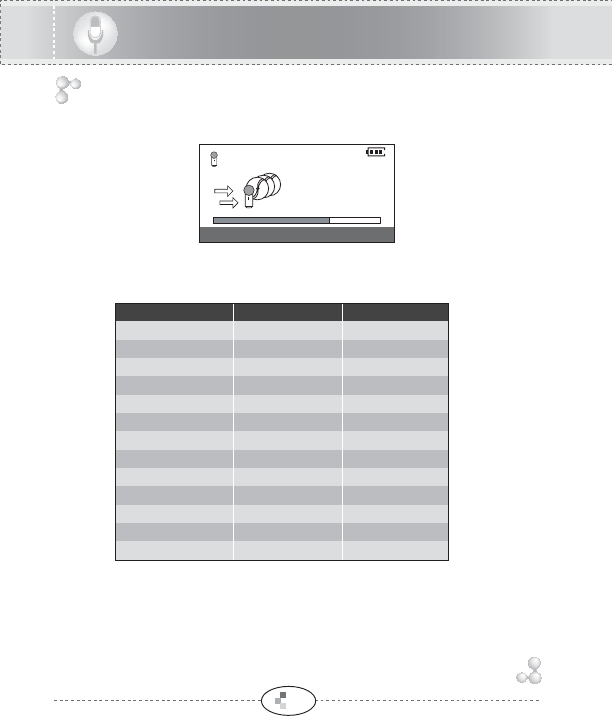
Preparation for operating
Inserting a Battery
Power ON
Power OFF
HOLD Function
Slide the cover to open. Insert a battery in the correct direction, then
slide cover back on.
Set HOLD switch to the OFF position and press PLAY/STOP button for
2 seconds.
The player will then power on.
Press PLAY/STOP button for 2 seconds, the player will power off. For
managing your battery life time efficiently, the player will automatically
power off if no buttons are pressed in STOP state.
Under HOLD mode, buttons will not work.
Move HOLD switch to the direction of the arrow.
The icon appears on the LCD screen and HOLD mode starts.
Battery Life Time
(Battery : AAA, LR03 or UM-4 or equivalent)
Battery at recording at earphone playback
"AAA" Alkaline over 18 hrs over 14 hrs
4
Fully charged
A little
decreased
A large amount
decreased
Replace
the Battery
OPEN
5
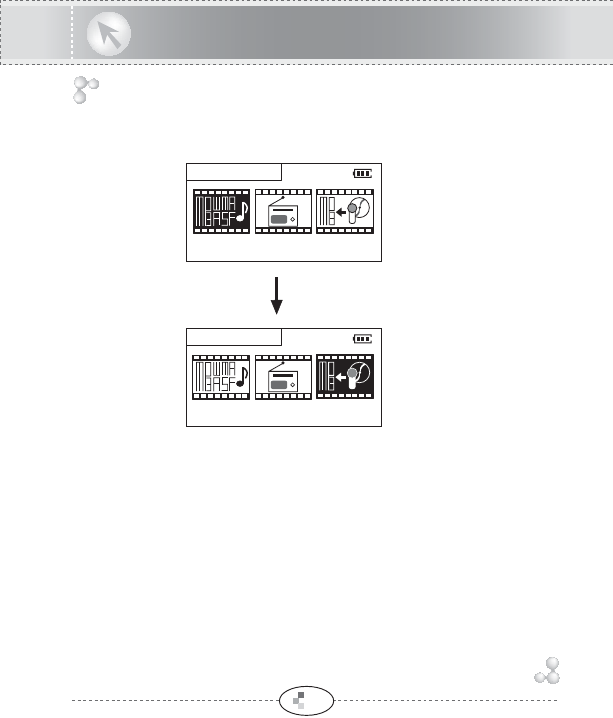
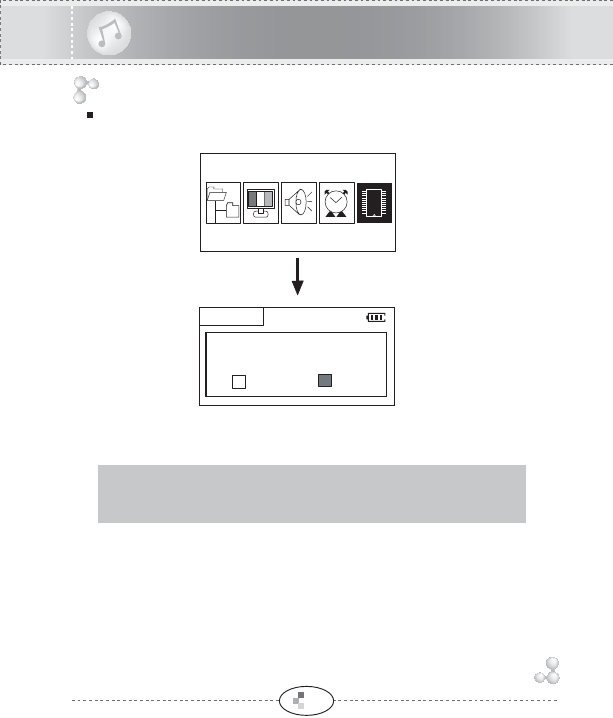
Setting up MODE
If you press MENU button for over 2 seconds at any time except for the
MENU and NAVIGATION mode, you can enter the MODE SELECT mode.
Press the MENU button.
Select MODE by using FF/REW button.
MUSIC PLAYER
MODE SELECT
RECORDER
MODE SELECT
MP3 PLAYER
PLAYBACK
You can verify the remain memory size in STOP state.
Change the FM or RECORD MODE by pressing MENU button for over 2 seconds.
Press PLAY/STOP button to play the audio file.
Select Equalizer
Every time you press REC/STOP button for over 2 seconds, the equalizer
mode changes as follows :
NORMAL ROCK JAZZ CLASSIC POP USER EQ
You can also select the desired Equalizer mode in SOUND MENU.
To stop playback, press PLAY/STOP button one more time.
6
00:00
001
019
34MB FREE
Rock
MP
3128
KBPS
44
KHZ
Sample1.mp3
ROOT
00:36
001
019
Rock
MP
3128
KBPS
44
KHZ
Sample1.mp3
ROOT
03:36
001
019
34MB FREE
Rock
MP
3128
KBPS
44
KHZ
Sample1.mp3
ROOT
7
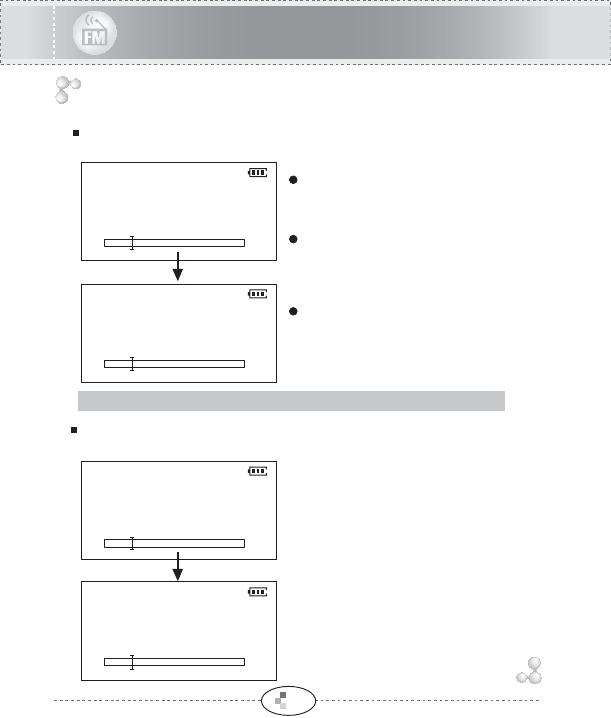
MP3 PLAYER
Setting up Loop Repeating
1. While the audio file is playing, press REC/STOP button once to select
the beginning point. AIcon will be blinking.
2. Press REC/STOP button again to select the ending point.
AB
Icon appears in the display. The selected loop is played repeatedly.
3. Press REC/STOP button briefly to cancel the loop.
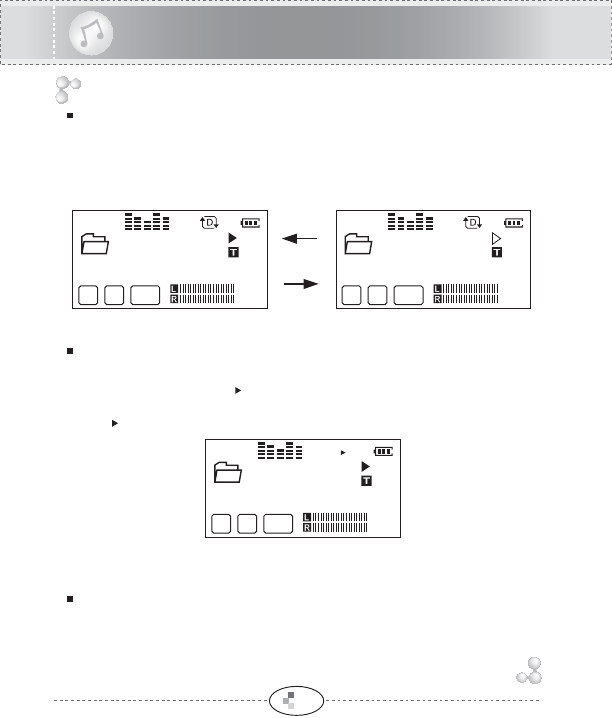
INTRO Playback
Change the Playback Speed
Press MENU button during playing audio file, the playback speed is
changed the selected speed.
And press MENU button one more time, playing at normal speed.
The playback speed can be selected in TIME & SPEED MENU.
You can set the INTRO playback in SOUND MENU.
All files is played for 10 seconds.
While INTRO playing, press PLAY/STOP button to cancel INTRO
Playback during INTRO playback.
AB
01:53
001
019
Rock
MP
3128
KBPS
44
KHZ
Sample1.mp3
ROOT
01:53
001
019
Rock
MP
3128
KBPS
44
KHZ
Sample1.mp3
ROOT
01:53
001
019
Rock
MP
3128
KBPS
44
KHZ
Sample1.mp3
ROOT
Press
MENU button.
8
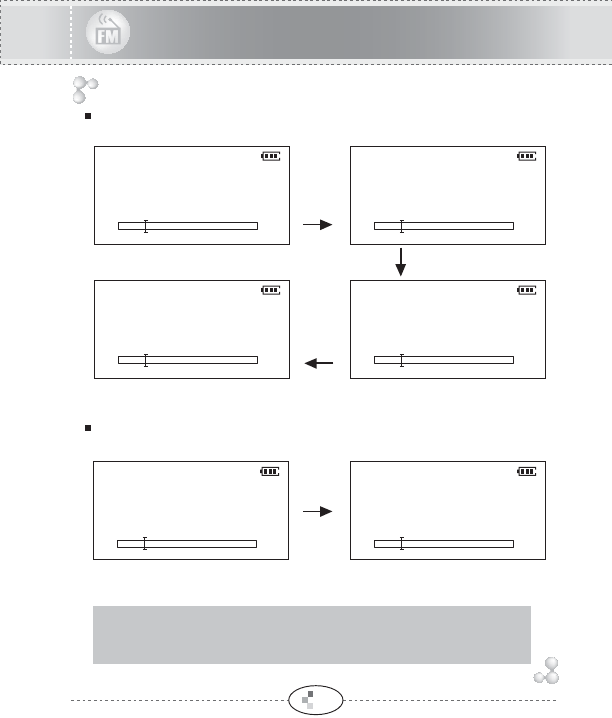
MP3 PLAYER
Lyric Display (Media Sync)
To enable Lyric display function, press REC/STOP button in STOP state.
To disable, press REC/STOP button one more time in STOP state.
You can also apply the Lyric display function in DISPLAY MENU.
01:53
Rock
You can listen to the music,
and see the lyrics of the
music.
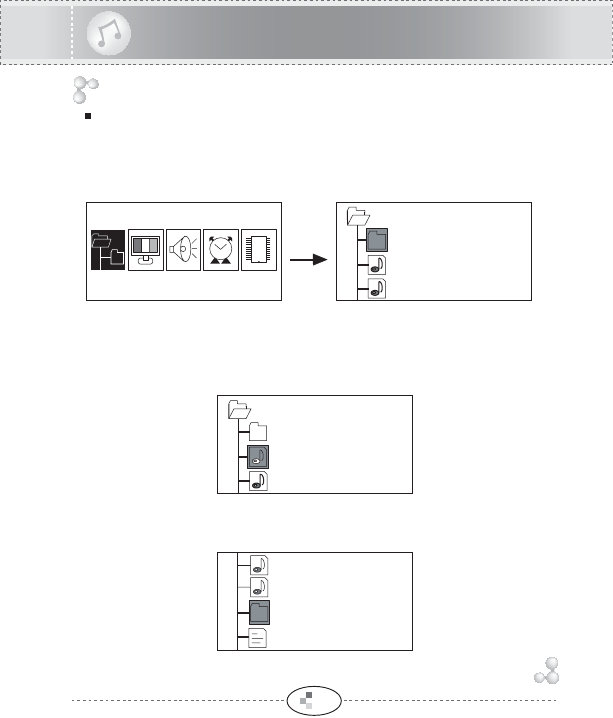
You can delete the file and upgrade font file in FILE NAVIGATION mode.
FILE NAVIGATION mode belongs to MENU mode.
Press MENU button in STOP state, you can enter the MENU mode.
You can enter the NAVIGATION mode by pressing MENU button one more time.
Select NAVIGATION mode, and press the MENU button.
ROOT
RECORD
SAMPLE.MP3
MUSIC.MP3
MUSIC.MP3
MUSIC.MP3
Move to Upper/Lower Folder
1. Select desired folder by using VOL+/VOL- button.
IFONT_.TCC
IMPA
SAMPLE.MP3
Select Folder or File
Select using VOL+/VOL- button. The icon of the selected file is
displayed as the inversed icon.
ROOT
RECORD
SAMPLE.MP3
FILE NAVIGATION (FILE DELETE & FONT UPGRADE)
MP3 PLAYER
9
NAVIGATION
VER 1.01
Press
REC/STOP
button for
over 2
seconds
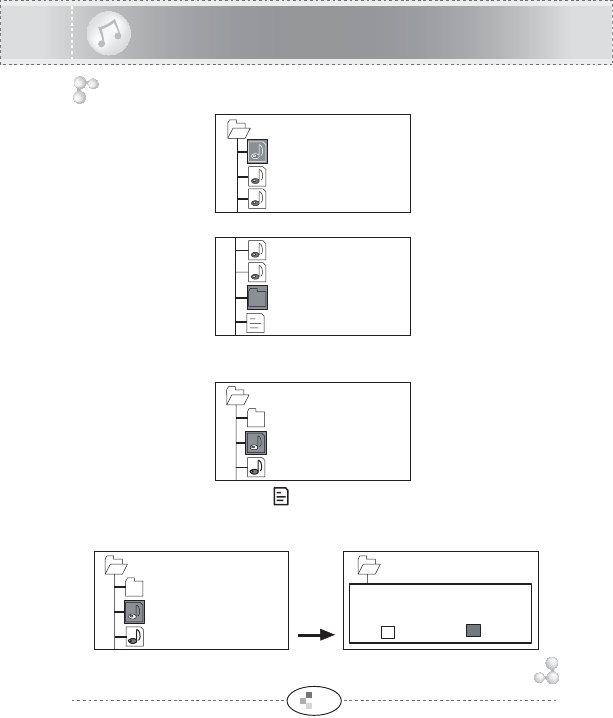
3. Press REW button, move to Upper Folder.
2. Press FF button, move to desired Lower Folder.
IMPA
SAMPLE01.MP3
SAMPLE02.MP3
SAMPLE03.MP3
MP3 PLAYER
10
MUSIC.MP3
IFONT_.TCC
IMPA
SAMPLE.MP3
Select file and press REC/STOP button for over 2 seconds.
Playback Audio file
If you select audio file and press FF button, the selected audio file
is played.
Display as icon, except for audio files.
Deleting a file
Select YES and press MENU
button, the selected file is deleted.
MUSIC.MP3
ROOT
RECORD
SAMPLE.MP3
MUSIC.MP3
ROOT ROOT
RECORD
SAMPLE.MP3
[NOTICE] Delete
SAMPLE.MP3 ?
YES NO
11
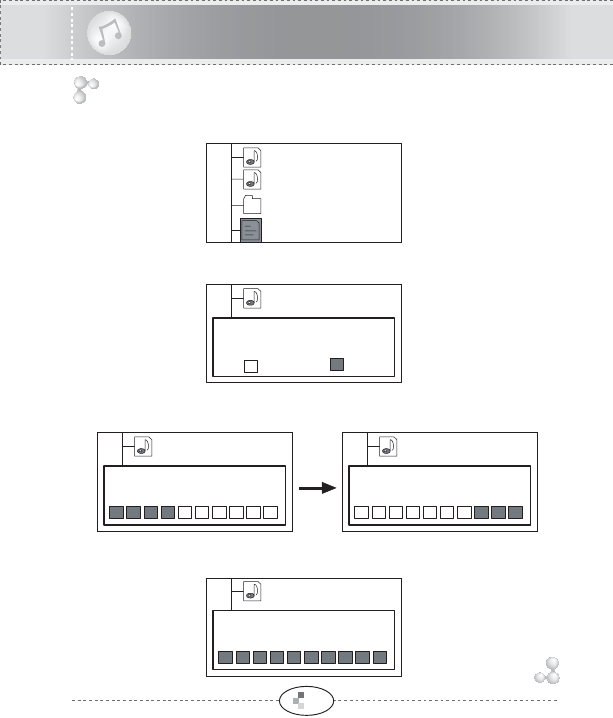
FONT UPGRADE
1. Select the "IFONT_.TCC" file in NAVIGATION mode.
2. Press the FF button.
3. Select YES and press the MENU button.
4. Font setting is completed. And the player is powered off.
MP3 PLAYER
MUSIC.MP3
IFONT_.TCC
IMPA
SAMPLE.MP3
SAMPLE.MP3
YES NO
SAVR [FONT] FILE
ARE YOU SURE?
SAMPLE.MP3
FONT SETTING
WRITING...
SAMPLE.MP3
FONT SETTING
VERIFYING...
SAMPLE.MP3
FONT SETTING
COMPLETED.

12
Press
FF/REW
button
Press MENU button
DISPLAY MENU SOUND MENU
TIME & SPEED MENU
You can enter the MENU mode by pressing MENU button in STOP state.
If you press MEMU button in each MENU mode, you can select SUB MENU
section.
To Confirm the MENU setting, press MENU button one more time.
MP3 PLAYER
Function & Structure of MENU
MAIN MENU
SUB MENU
DISPLAY
VER 1.01
SOUND
VER 1.01
BACKLIGHT COLOR
BACKLIGHT TIME
EQUALIZE
DISPLAY
TIME&SPEED
SOUND
13
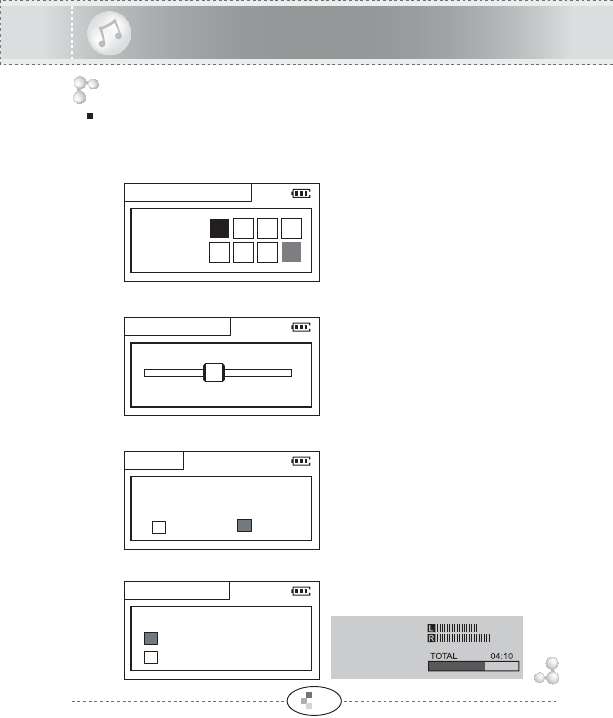
BACKTLIGHT COLOR : Setting up LED Backlight COLOR
BACKLIGHT COLOR
LCD CONTRAST : Setting up LCD CONTRAST
LYRICS : Setting up LYRICS function (MEDIA SYNC)
VISUALIZATION : Setting up VISUALIZATION function
You can change the Backlight
Color among the RED, GREEN,
BLUE, CYAN, MAGENTA,
YELLOW, WHITE.
Select the LCD Contrast by using
FF/REW button.
The setting range of the LCD
Contrast adjusts from 1 to 10.
You can see the Lyric or Foreign
Language TEXT on the LCD display.
Select the Visualization function
on the LCD display.
DISPLAY MENU:
You can select BACKLIGHT COLOR, LCD CONTRAST,
LYRICS and VISUALIZATION.
MP3 PLAYER
B
BLUE GCR
M Y W
LCD CONTRAST
5110
LYRICS
YES NO
ENABLE MEDIA SYNC
ARE YOU SURE?
VISUALIZATION
VISUALIZATION MODE
LEVEL METER
PROGRESSIVE
LEVEL METER :
PROGRESSIVE :
14
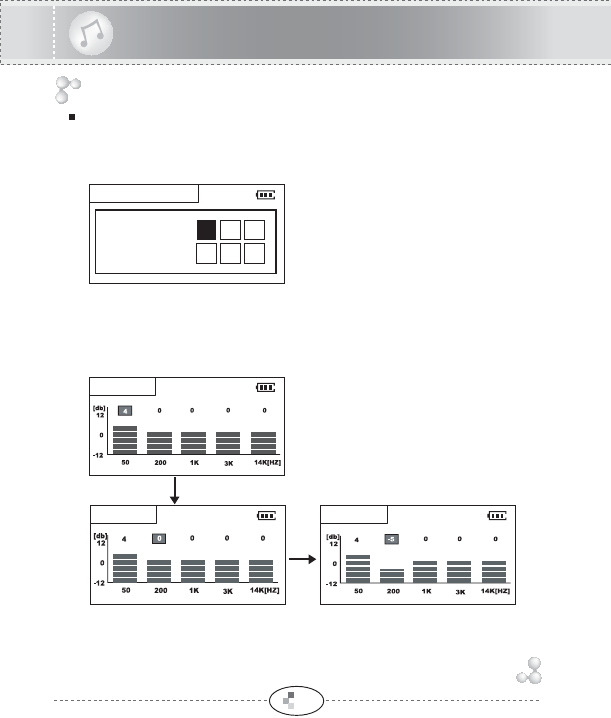
SOUND MENU:
You can select Equalizer, USER EQ setting,
REPEAT and INTRO PLAY function.
EQUALIZER : Setting up EQUALIZER Mode
You can select the Equalizer Mode.
USER EQ: Setting up USER EQUALIZE
You can set the User Equalize.
Select the band you want to adjust using FF/REW button.
In the selected Band, the level can be adjusted using VOL+/VOL- button.
MP3 PLAYER
EQUALIZE MODE
N
NORMAL RJ
C P U
USER EQ
USER EQ USER EQ
Select the band by using FF /REW button
Adjust the value by using VOL+/VOL- button
15
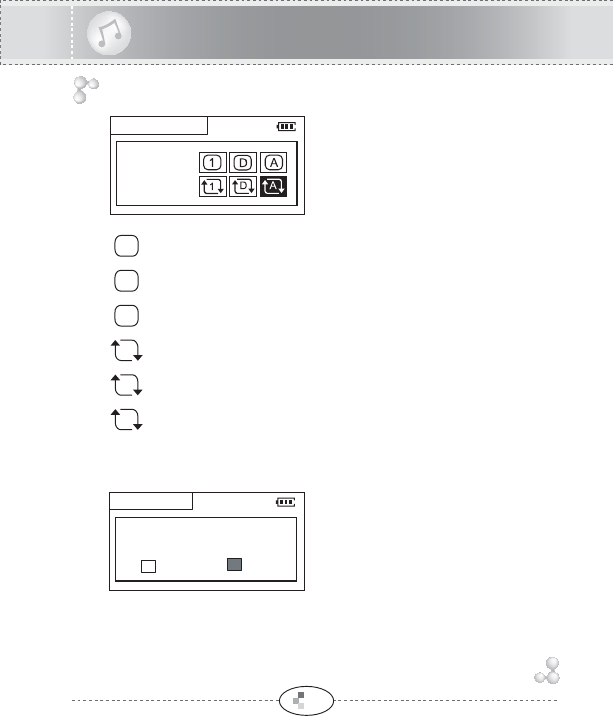
INTRO PLAY : Setting up INTRO PLAY
Select "Yes" and press MENU button.
All files are played for first 10 seconds
one by one.
REPEAT : Setting up Repeat Mode
You can select the Repeat mode
you want.
MP3 PLAYER
EPEAT
ALL
REPEAT MODE
D
A
A
D
1
1
:Play a single track and stop.
:Play all tracks in the folder and stop.
:Play all tracks in the unit and stop.
:Play a single track repeatedly.
:Play all tracks in the folder repeatedly.
:Play all tracks in the unit repeatedly.
INTRO PLAY
DO YOU WANT TO
INTRO PLAY?
YES NO
16
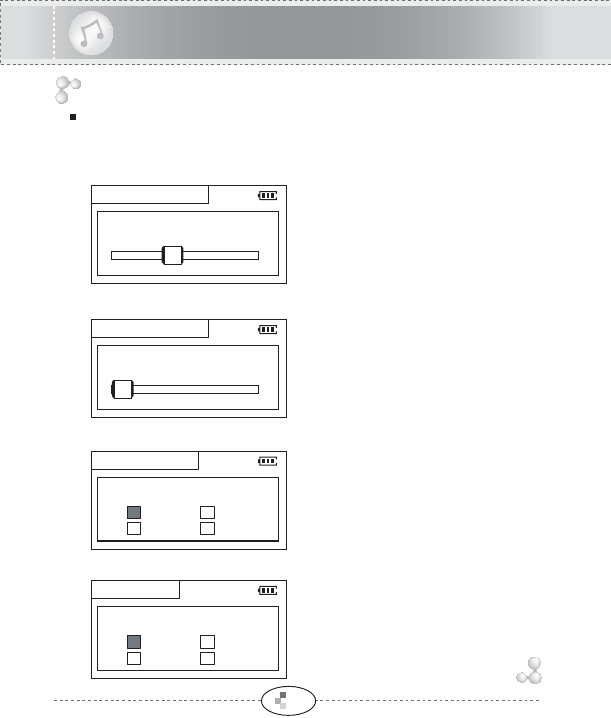
BACKLIGHT TIME: Setting up LED BACKLIGHT TIME
Select the Backlight Time by using
FF/REW button.
TITLE SCROLL : Setting up TITLE SCROLL SPEED
Select the scroll speed of the file name.
TIME & SPEED MENU:
You can select BACKLIGHT TIME, POWER OFF
TIME, TITLE SCROLL and PLAY SPEED MENU.
POWER OFF TIME : Setting up Automatic Power Off Time
You can select the automatic power off
time.
Automatically turns itself off if no buttons
are pressed for the selected power off
time in STOP state.
PLAY SPEED : Setting up Playback Speed
You can select the playback speed.
'+' means the fast playback and
'-' means the slow playback.
MP3 PLAYER
BACKLIGHT TIME
4
010
OFF TIME[SEC]
POWER OFF TIME
1
110
OFF TIME [ MIN ]
SCROLL SPEED
SELECT SCROLL SPEED
x1
x3 x2
NO
PLAY SPEED
SELECT PLAYBACK SPEED
- 50%
+25% -25 %
+50%
17
MEMORY FORMAT : Initialize the built-in Memory
Press MENU button, and select MEMORY FORMAT.
Select "YES", the built-in memory is formatting.
MP3 PLAYER
FORMAT
MEMORY FORMAT
ARE YOU SURE?
YES NO
VER 1.01
MEMORY FORMAT
Press MENU button once more.
[NOTE] It takes a few minutes to format the memory.
All files will be deleted when the memory is formatting.
After format, you should to download the font.
18
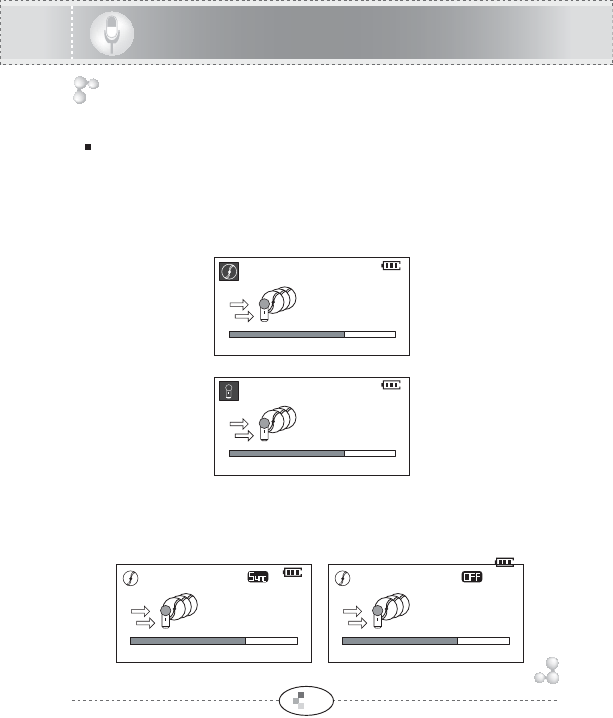
Select the FM MODE by pressing MENU button long.
AUTO SCAN Function: Press FF/REW
button for over 2 seconds, and
channel is selected automatically.
Press PLAY/STOP button to select
Stereo/Mono.
[NOTE] AUTO SCAN may not work within weak transmission area.
PRESET function (Listening saved channel)
Press MENU button to enter the PRESET mode.
MONO
89.1
MHZ
89.1
MHZ
89.2
MHZ
108
87
PRESET
CH 02
FM RADIO
Press briefly FF/REW button, the
frequency changes by 0.1MHz.
Listening FM (87.0MHz~108.0MHz)
STEREO
108
87
89.7MHZ 108
87
PRESET
CH 03
STEREO
MONO
108
87
Press FF/REW button, and the channel number is changed.
Change the MUSIC or RECORD MODE by pressing MENU button for over 2 seconds.
MEMORY Function (Save channels)
Select channel to be saved using FF/REW button in PRESET mode.
Press
REC/STOP
button for
over 2 seconds
Select channel using
FF/REW button.
Press
REC/STOP
button
for
over 2 seconds
,
channel is saved
FM RADIO
AUTO MEMORY Function (Save channel Automatically)
Press FF/REW button for over 2 seconds in PRESET mode.
Automatically select channels and save them in sequential order by
using FF/REW button.
[NOTE] If you use AUTO MEMORY function, the saved channels
before are deleted.
[NOTE]
AUTO MEMORY may not work within weak transmission area.
19
89.1
MHZ
108
87
STEREO
89.1
MHZ
108
87
MEMORY
CH 01
STEREO
89.1MHZ 108
87
STEREO
89.1MHZ 108
87
MEMORY
CH 02
STEREO
89.1MHZ
PRESET
EMPTY
STEREO
108
87 91.9MHZ
PRESET
CH 04
STEREO
108
87

20
MEMORY Delete Function (Delete saved channel)
Select channel to be deleted using FF/REW button in PRESET mode.
FM RADIO
To record FM RADIO
Press the REC/STOP button, while you listen to the FM radio, the
recording is started.
To stop recording, press the REC/STOP button again.
The recorded file is saved as FMR001.MP3.
[NOTE] The recorded file is saved in the RECORD folder.
RECORDING...
FMR001.MP3 00:00:01
Press REC/STOP button
for over 2 seconds.
89.7
MHZ
108
87
PRESET
CH 03
STEREO
89.1MHZ 108
87
PRESET
CH 02
STEREO
89.1MHZ
PRESET
CH 02
21
Change the MUSIC or FM MODE by pressing MENU button for over 2 seconds.
Setting the Recording Mode
By pressing MENU button, you can enter the Record setting mode.
By pressing VOL+/VOL- button can move each setting mode.
Press MENU button again, Record setting is completed.
You can setting at ONLY MP3 ENCODING
mode.
Select CD SYNC ON/OFF by using FF/REW button.
Selecting the MP3 ENCODING/VOICE RECORDING MODE
Select MP3 ENCODING or VOICE RECORDING by using FF/REW button.
MP3 ENCODING MODE
Setting the CD SYNC :
RECORDER
VOICE RECORDING MODE
CD SYNC OFF
CD SYNC ON
READY...
Remain time
00:55:03
STEREO 44KHz 128KBPS
READY...
Remain time
00:55:03
STEREO 44KHz 128KBPS
READY...
Remain time
00:55:03
STEREO 44KHz 128KBPS
READY...
Remain time
00:55:03
STEREO 44KHz 128KBPS
22
Select the Sound Quality.
Select the Sampling Frequency and Bit Rate by using FF/REW button.
Support sampling frequency and Bit rate is shown as below.
RECORDER
READY...
Remain time
00:55:03
STEREO 44KHz 128KBPS
STEREO/MONO
MONO 16 KHz 16 Kbps
24 Kbps
32 Kbps
40 Kbps
48 Kbps
56 Kbps
64 Kbps
80 Kbps
96 Kbps
112 Kbps
128 Kbps
160 Kbps
192 Kbps
16 KHz
16 KHz
16 KHz
22 KHz
22 KHz
22 KHz
22 KHz
22 KHz
32 KHz
44.1 KHz
44.1 KHz
44.1 KHz
MONO
MONO
STEREO
STEREO
STEREO
STEREO
STEREO
STEREO
STEREO
STEREO
STEREO
STEREO
Sampling freq. Bit Rate

23
RECORDER
VOICE RECORDING
1. Press REC/STOP button and
voice recording starts.
If recording is started, the
recording time is displayed in
upper line and remain time are
displayed in lower line.
2. To pause recording, press
PLAY/STOP button.
And press REC/STOP button
to resume recording.
When the recording is paused,
recording time is blinking.
3. Press REC/STOP button, and
recording is completed.
MP3 ENCODING
1. Connect the Headphone jack of
the external equipment to the
LINE-IN jack of the player with
Line-In cable .
2. Set the Bit Rate and CD SYNC
in the MENU.
*Refer to "Setting the Recording
Mode"
3. Press REC/STOP button.
4. Press PLAY/STOP button to Pause Encoding.
5. And press REC/STOP button to resume Encoding.
6. Press REC/STOP button, Encoding is completed.
*Test the quality of recording, CD SYNC and external audio volume
before the Encoding.
*Encoding can be failed if the sound is weak on the external audio volume.
*When MP3 Encoding, be sure to connect the cable in the LINE-IN Jack.
RECORDING...
ENCODING...
REMAIN TIME
VOR001.MP3
01:55:01
00:05:03
READY...
01:40:03
Remain time
STEREO 44KHz
Remain time
01:40:03
STEREO 44KHz 128KBPS
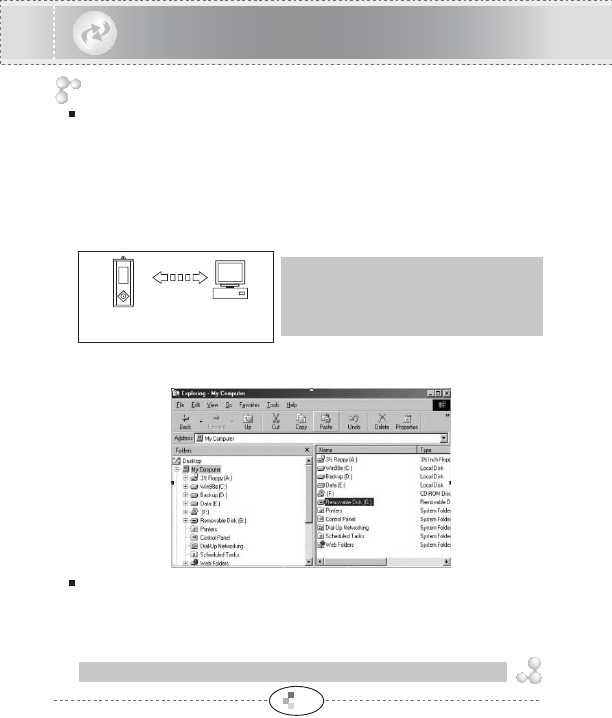
DOWNLOAD & UPLOAD
Downloading and Uploading file is not necessary to use the special
management program.
The recorded file will be saved in the RECORD folder.
1. Connect the player to the PC with an USB cable or PC USB port, and "USB
CONNECTED" is displayed in the LCD screen. When connected to the USB, the
player is detected Removable Disk at the Windows Explorer.
2. Select files to download from
Windows Explorer and copy the desired files.
3. Paste on to the Removable Disk.
DOWNLOAD & UPLOAD
FIRMWARE UPGRADE
You can download the firmware file(Player7.rom) from our Homepage.
Copy it to the player.
Turn off player and turn on player again, the Firmware is automatically
upgraded.
24
USB CONNECTED
[NOTE] If the firmware file name is not "Player7.rom", Firmware is not upgraded.
[NOTE] "DON'T REMOVE USB" is displayed in
the LCD during files is download to the player.
Do not disconnect the USB cable when
"DON'T REMOVE USB" is displayed in the LCD.
25
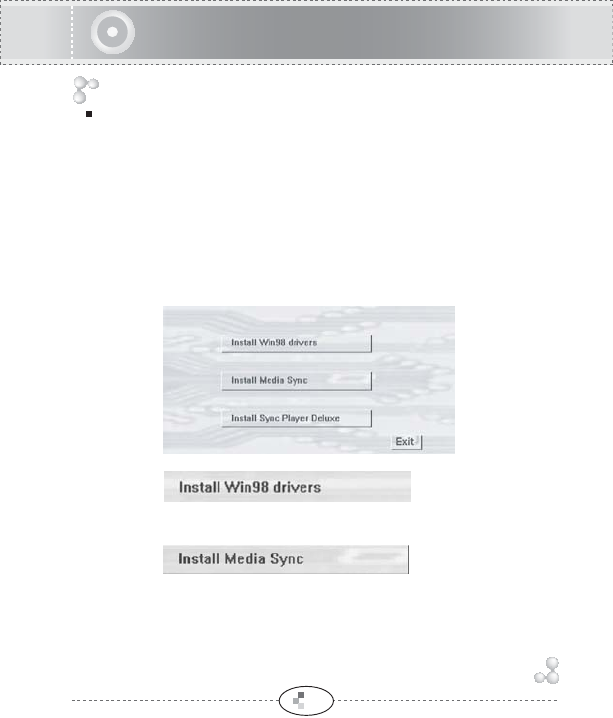
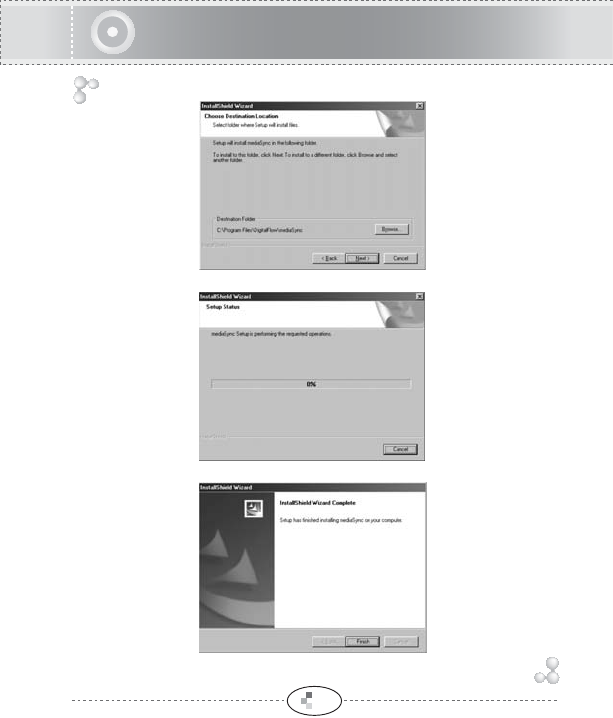
PC software installation from the CD
System Requirement
* COMPUTER : Pentium 200MHz or faster, supported USB
* MEMORY : Above 64MB
* OS : Windows 98SE/ME/2000/XP
* HDD : More than 20MB free
Insert Installation CD into the CD-ROM drive.
The following screen appears after insert the CD.
If the installation doesn't automatically begin, execute the "Install.exe" file
in the installation CD.
The installation program will begin.
Installing driver for Windows 98SE.
Windows ME/2000/XP OS do not need this driver.
Installing Media Sync that is the lyric edit program.
26
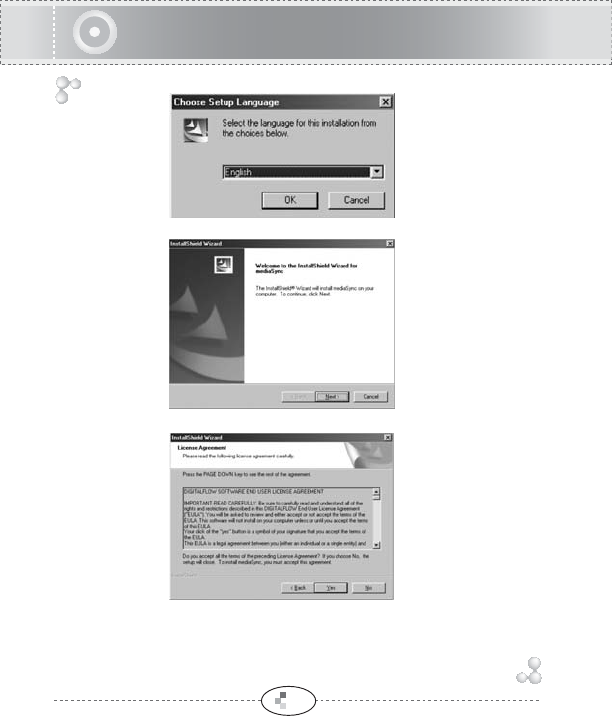
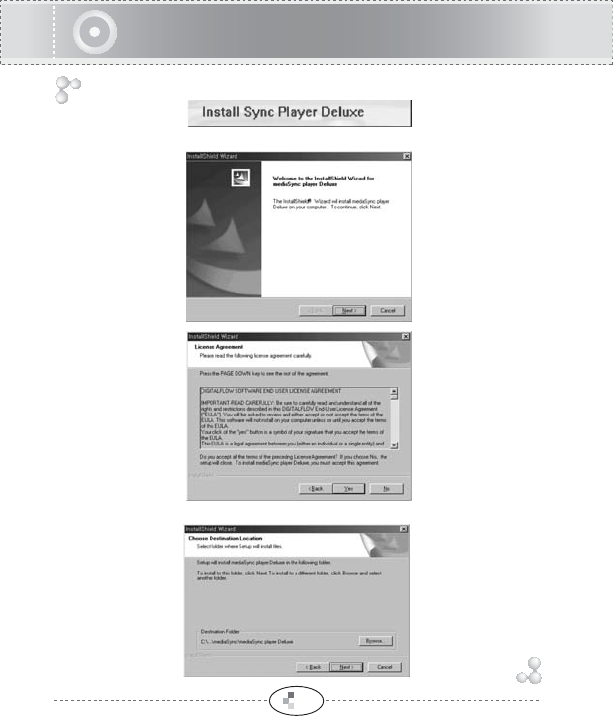
Choose the language.
Click NEXT.
If you accept all the terms of the License Agreement,
click Yes.
PC software installation from the CD
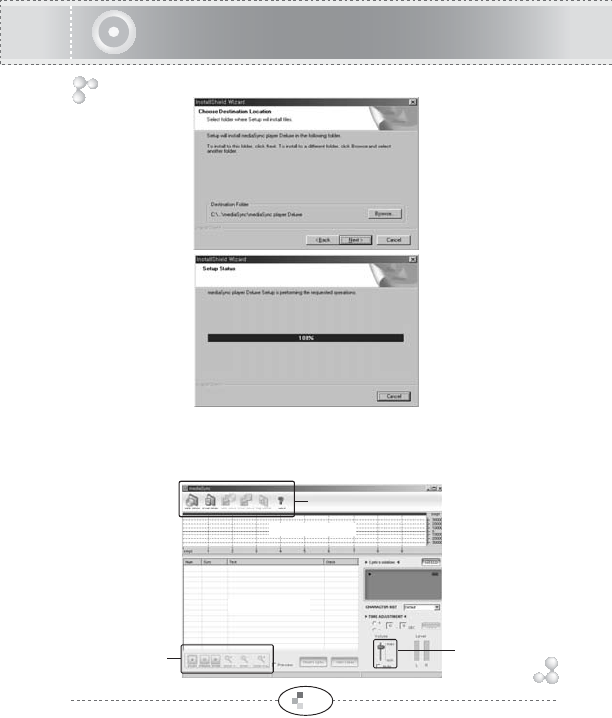
Click NEXT.
Wait for the installation complete.
Click Finish to complete the installation.
27
PC software installation from the CD
28
Installing Sync Player Deluxe that is Lyric display application program.
Click NEXT.
If you accept all the terms of the License Agreement, click Yes.
Click NEXT.
PC software installation from the CD
29
Click NEXT.
Wait for the installation complete.
Installation is completed, program icon appears on the PC.
<Media Sync>
Further detailed information, please refer to "HELP" menu in the program.
Main Buttons
Buttons for
MP3 Playback
Volume
Indicator
Lyrics Edit Window
Lyrics Window
MP3 Windows
PC software installation from the CD

30
Cautions
Cautions in Operating
1.Do not place the product in the following condition and/or places:
--Where temperatures reach above 120 F.
--Dusty place.
--Near heaters or any type of heat sources.
--In a car with windows closed, especially in the summer.
--Damp places,like a sauna or bathroom.
2.Any excessive force on the LCD display could cause damages
to it and to the over all LCD functions.
3.A magnetic card such as a credit card or subway communication
ticket may not work once it is placed on or close to the speaker.
4.The seller holds no lability for any damages caused by misuse
of the product and any claims from the third party.
5.The seller holds no liability for any lost messages which are
caused by repair or any other troubles.
Cautions in Using Battery
1.Do not short circuit,disassemble,heat or put batteries in
the fire. Battery acid could cause bodily harm if exposed
to the skin or eyes.
2.Do not use different kind of battery.
3.Remove the battery, if the player will not be in use for over a
month time.
Cautions for Safety
1.Remove the battery when there are malfunction caused
by smoke and heat.
2.Do not use the device where electronic product operation is
prohibited like inside an airplane.
3.Do not operate when driving or walk, to prevent accidents or
distractions.

31
Specifications
For improvement of product, specifications & design can be changed
without notice.
FM Frequency
range
Headphone Output
MPEG1/2/2.5
Layer3
WMA ASF(Audio
only)
Play
Record
FM Radio
Specification
FM RADIO
FILE
SUPPORT
Category
Dimensions
Weight
Memory Medium
LCD
MAX. Output Power
Input
Output
Power Source
Operational Temperature
87 ~ 108 MHz
(L)7mW+(R)7mW(16Ohm) max:Volume
Bit Rate: 16 ~320 Kbps
Bit Rate: 16 ~192 Kbps
Full Graphic 4 lines with 7 Color LED Backlight
USB
(L)7mW+(R)7mW(16Ohm) max:Volume
Built in MIC / Line in Jack
Stereo Jack
USB 1.1
77*33*21mm (H*W*D)
35g (Without battery)
Built in Flash Memory
1.5V, "AAA" Alkaline
0 ~40 C
MAX. Playtime 18 Hours (16 KHz,16 Kpbs)
14 Hours
14 Hours (44.1 KHz,128 Kbps)
Antenna Headphone/earphone-code Antenna
85dB
S/N ratio
Tag Info ID3 V1, ID3 V2 2.0, ID3 V2 3.0, ID3 V2 4.0
18 hours 36 hoursMAX. Recording Time 72 hours
128MB 256MBMEMORY 512MB