Dell Bridgehead HDM Setting Up The DR Series System On Healthcare Data Management (HDM) 1508079258dell Dr4000 White Papers100 En Us
User Manual: Dell DELL DR4000 RESTORE MANAGER pdf | FreeUserManuals.com
Open the PDF directly: View PDF ![]() .
.
Page Count: 37
- 1 Install and Configure the DR Series Deduplication Appliance
- 2 Set Up BridgeHead Healthcare Data Management
- 3 Create a New Backup Job with DR Series Deduplication Appliance as the Target
- 4 Set up DR Native Replication & Restore from Replication Target Container
- 5 Set Up the DR Series Deduplication Appliance Cleaner
- 6 Monitoring Deduplication, Compression and Performance
- A Appendix

A Dell Technical White Paper
Setting Up Dell™ DR Series Deduplication
Appliance on BridgeHead® Healthcare Data
Management
Dell Engineering
January 2014

2 Setting Up Dell™ DR Series Deduplication Appliance on BridgeHead® Healthcare Data Management | January 2014
Revisions
Date
Description
January 2014
Initial release
THIS WHITE PAPER IS FOR INFORMATIONAL PURPOSES ONLY, AND MAY CONTAIN TYPOGRAPHICAL ERRORS AND
TECHNICAL INACCURACIES. THE CONTENT IS PROVIDED AS IS, WITHOUT EXPRESS OR IMPLIED WARRANTIES OF
ANY KIND.
© 2013 Dell Inc. All rights reserved. Reproduction of this material in any manner whatsoever without the express
written permission of Dell Inc. is strictly forbidden. For more information, contact Dell.
PRODUCT WARRANTIES APPLICABLE TO THE DELL PRODUCTS DESCRIBED IN THIS DOCUMENT MAY BE FOUND
AT: http://www.dell.com/learn/us/en/19/terms-of-sale-commercial-and-public-sector Performance of network
reference architectures discussed in this document may vary with differing deployment conditions, network loads, and
the like. Third party products may be included in reference architectures for the convenience of the reader. Inclusion
of such third party products does not necessarily constitute Dell’s recommendation of those products. Please consult
your Dell representative for additional information.
Trademarks used in this text:
Dell™, the Dell logo, Dell Boomi™, Dell Precision™ ,OptiPlex™, Latitude™, PowerEdge™, PowerVault™,
PowerConnect™, OpenManage™, EqualLogic™, Compellent™, KACE™, FlexAddress™, Force10™ and Vostro™ are
trademarks of Dell Inc. Other Dell trademarks may be used in this document. Cisco Nexus®, Cisco MDS®, Cisco NX-
0S®, and other Cisco Catalyst® are registered trademarks of Cisco System Inc. EMC VNX®, and EMC Unisphere® are
registered trademarks of EMC Corporation. Intel®, Pentium®, Xeon®, Core® and Celeron® are registered trademarks of
Intel Corporation in the U.S. and other countries. AMD® is a registered trademark and AMD Opteron™, AMD
Phenom™ and AMD Sempron™ are trademarks of Advanced Micro Devices, Inc. Microsoft®, Windows®, Windows
Server®, Internet Explorer®, MS- DOS®, Windows Vista® and Active Directory® are either trademarks or registered
trademarks of Microsoft Corporation in the United States and/or other countries. Red Hat® and Red Hat® Enterprise
Linux® are registered trademarks of Red Hat, Inc. in the United States and/or other countries. Novell® and SUSE® are
registered trademarks of Novell Inc. in the United States and other countries. Oracle® is a registered trademark of
Oracle Corporation and/or its affiliates. Citrix®, Xen®, XenServer® and XenMotion® are either registered trademarks or
trademarks of Citrix Systems, Inc. in the United States and/or other countries. VMware®, Virtual SMP®, vMotion®,
vCenter® and vSphere® are registered trademarks or trademarks of VMware, Inc. in the United States or other
countries. IBM® is a registered trademark of International Business Machines Corporation. Broadcom® and
NetXtreme® are registered trademarks of Broadcom Corporation. Qlogic is a registered trademark of QLogic
Corporation. Other trademarks and trade names may be used in this document to refer to either the entities claiming
the marks and/or names or their products and are the property of their respective owners. Dell disclaims proprietary
interest in the marks and names of others.

3 Setting Up Dell™ DR Series Deduplication Appliance on BridgeHead® Healthcare Data Management | January 2014
Table of contents
Revisions ............................................................................................................................................................................................. 2
Executive summary .......................................................................................................................................................................... 4
1 Install and Configure the DR Series Deduplication Appliance........................................................................................... 5
2 Set Up BridgeHead Healthcare Data Management ........................................................................................................... 12
2.1 Procedure for the Windows Environment ................................................................................................................ 12
2.2 Procedure for Unix/Linux Environment .................................................................................................................... 14
3 Create a New Backup Job with DR Series Deduplication Appliance as the Target ..................................................... 15
4 Set up DR Native Replication & Restore from Replication Target Container ............................................................... 27
4.1 Build Replication Relationship between DRs ........................................................................................................... 27
4.2 Backup to Source DR (Optional: only when there is no backed up data on source container) .................... 29
4.3 Restore from Replication Target ................................................................................................................................ 32
5 Set Up the DR Series Deduplication Appliance Cleaner ................................................................................................... 34
6 Monitoring Deduplication, Compression and Performance ........................................................................................... 35
A Appendix .................................................................................................................................................................................... 36
A.1 Create a Storage Device for CIFS ............................................................................................................................... 36
A.2 Create a Storage Device for NFS ................................................................................................................................ 37

4 Setting Up Dell™ DR Series Deduplication Appliance on BridgeHead® Healthcare Data Management | January 2014
Executive summary
This paper provides information about how to set up the Dell DR Series Deduplication Appliance as a
backup to disk target for BridgeHead Healthcare Data Management 12B. This paper is a quick reference
guide and does not include all DR Series Deduplication Appliance deployment best practices.
See the DR Series Deduplication Appliance documentation for other data management application best
practices whitepapers at http://www.dell.com/support/troubleshooting/us/en/04/Product/powervault-
dr4100, under “Manuals & Documentation”.
Note: The DR Series Deduplication Appliance/BridgeHead Healthcare Data Management build version
and screenshots used for this paper may vary slightly, depending on the version of the DR Series
Deduplication Appliance/ BridgeHead Healthcare Data Management software version used.
5 Setting Up Dell™ DR Series Deduplication Appliance on BridgeHead® Healthcare Data Management | January 2014
1 Install and Configure the DR Series Deduplication
Appliance
1. Rack and cable the DR Series Deduplication Appliance, and power it on.
2. Please refer to
Dell DR Series System Administrator Guide
, under sections of “iDRAC Connection”,
“Logging in and Initializing the DR Series System”, and “Accessing IDRAC6/Idrac7 Using RACADM”
for using iDRAC connection and initializing the appliance.
3. Log in to iDRAC using the default address 192.168.0.120, or the IP that is assigned to the iDRAC
interface. Use user name and password of “root/calvin”.
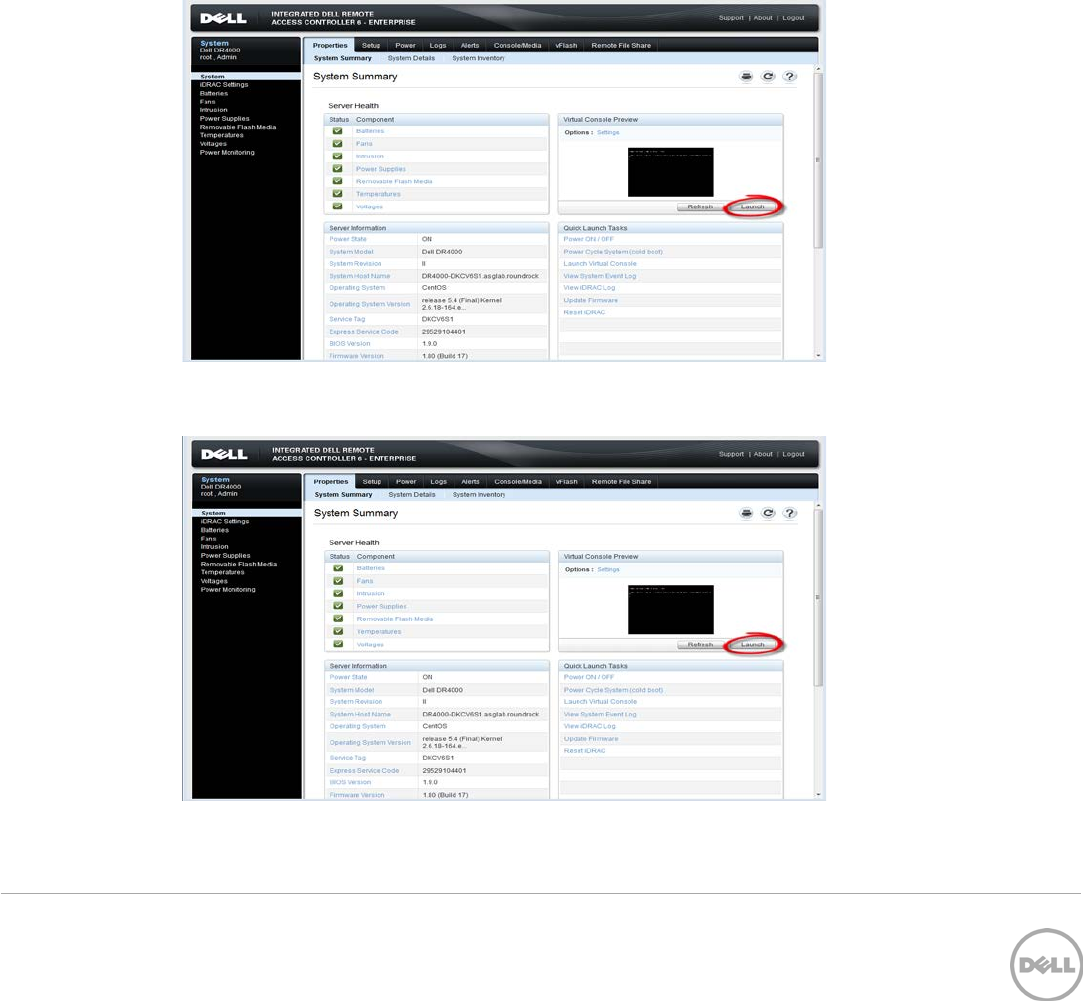
4. Launch the virtual console.

6 Setting Up Dell™ DR Series Deduplication Appliance on BridgeHead® Healthcare Data Management | January 2014
5. After the virtual console is open, log in to the system as user administrator and the password
St0r@ge! (The “0” in the password is the numeral zero).
6. Set the user-defined networking preferences.
7. View the summary of preferences and confirm that it is correct.
7 Setting Up Dell™ DR Series Deduplication Appliance on BridgeHead® Healthcare Data Management | January 2014
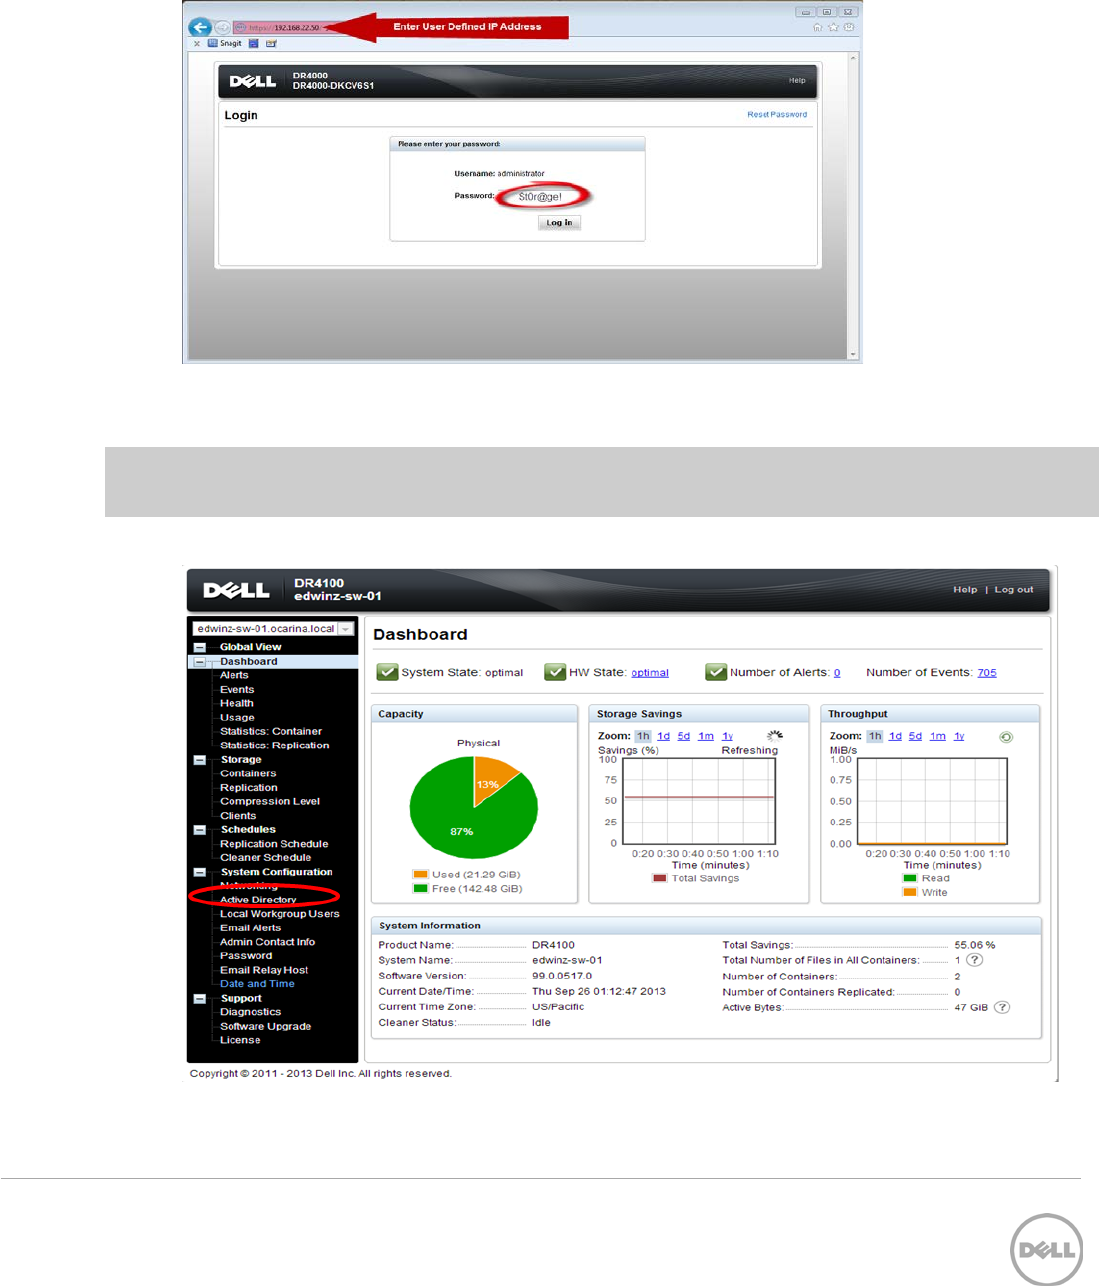
8. Log on to DR Series Deduplication Appliance administrator console, using the IP address you just
provided for the DR Series Deduplication Appliance, with username administrator and password
St0r@ge! (The “0” in the password is the numeral zero.).
9. Join the DR Series Deduplication Appliance to Active Directory.
Note: if you do not want to add DR Series Deduplication Appliance to Active Directory, please see the
DR
Series Deduplication Appliance
Owner’s Manual
for guest login instructions.
• Select Active Directory from the menu panel on the left side of the management interface.

8 Setting Up Dell™ DR Series Deduplication Appliance on BridgeHead® Healthcare Data Management | January 2014
• Enter your Active Directory credentials.
10. Create and mount the container. Select Containers in the tree on the left side of the dashboard,
and then click the Create at the top of the page.

9 Setting Up Dell™ DR Series Deduplication Appliance on BridgeHead® Healthcare Data Management | January 2014
11. Enter a Container Name and select Connection Type, select the Enable CIFS or Enable NFS check
box. BridgeHead HDM supports both CIFS and NFS protocols.
12. Select the preferred client access credentials.
Note: For improved security, Dell recommends adding IP addresses for the following (Not all
environments will have all components):
Backup console (BridgeHead Healthcare Data Management Server, BridgeHead Healthcare Data
Management Clients)
Name the container
Select CIFS or NFS
Enter Backup Server Info
Name the container
Select CIFS or NFS
Select client access credentials
10 Setting Up Dell™ DR Series Deduplication Appliance on BridgeHead® Healthcare Data Management | January 2014
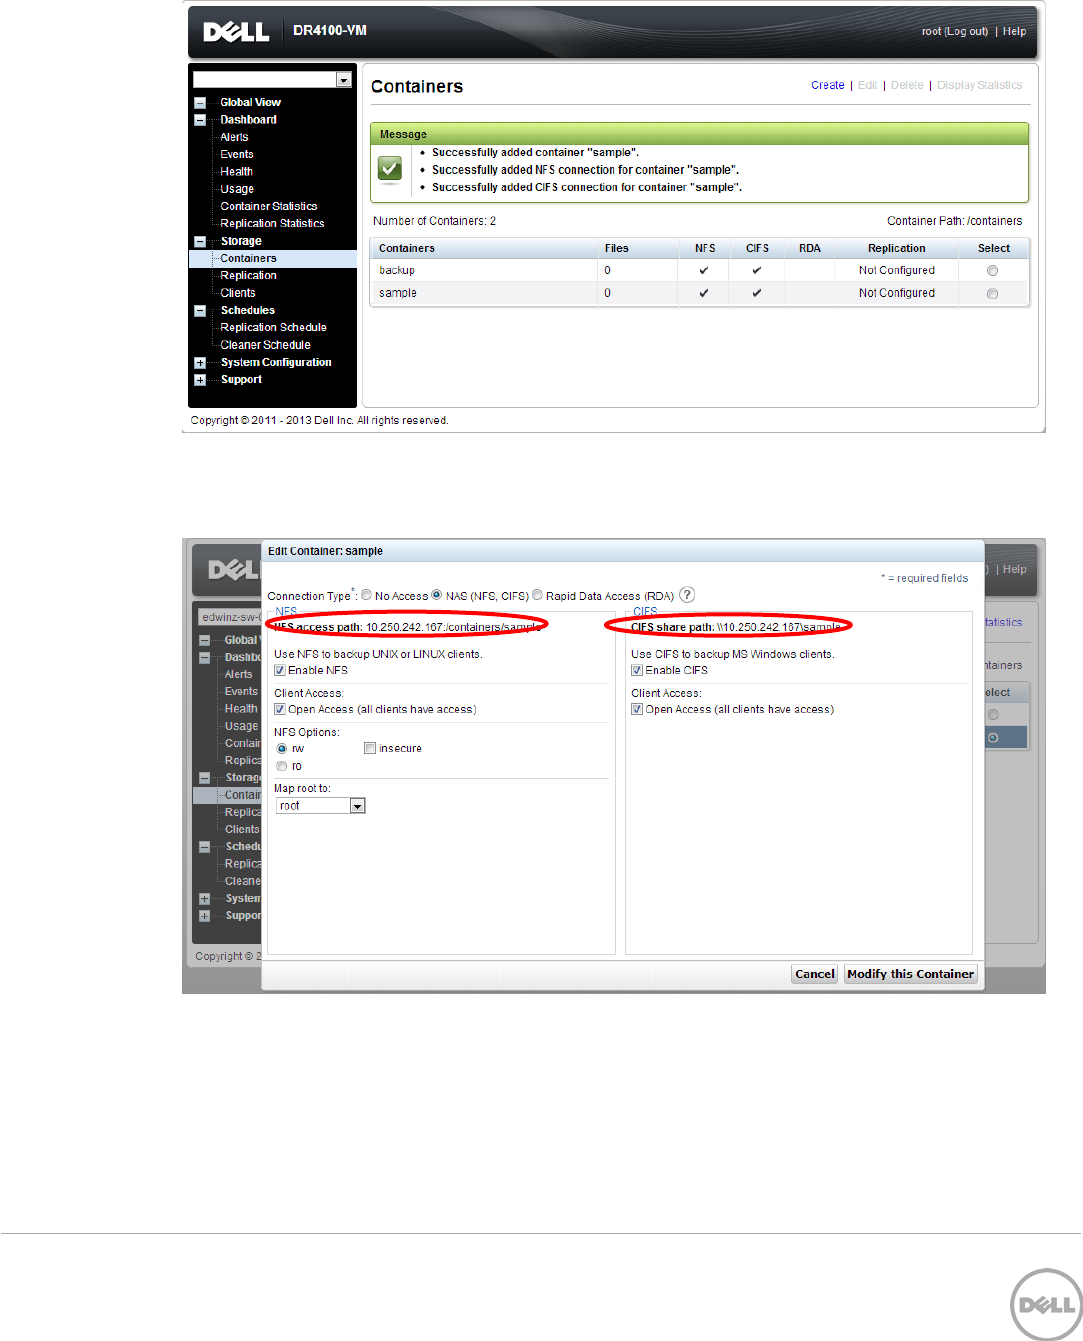
13. Click Create a New Container. Confirm that the container is added.
14. Click Edit. Note down the container share/export path, which you will use later to target the DR
Series Deduplication Appliance.
11 Setting Up Dell™ DR Series Deduplication Appliance on BridgeHead® Healthcare Data Management | January 2014
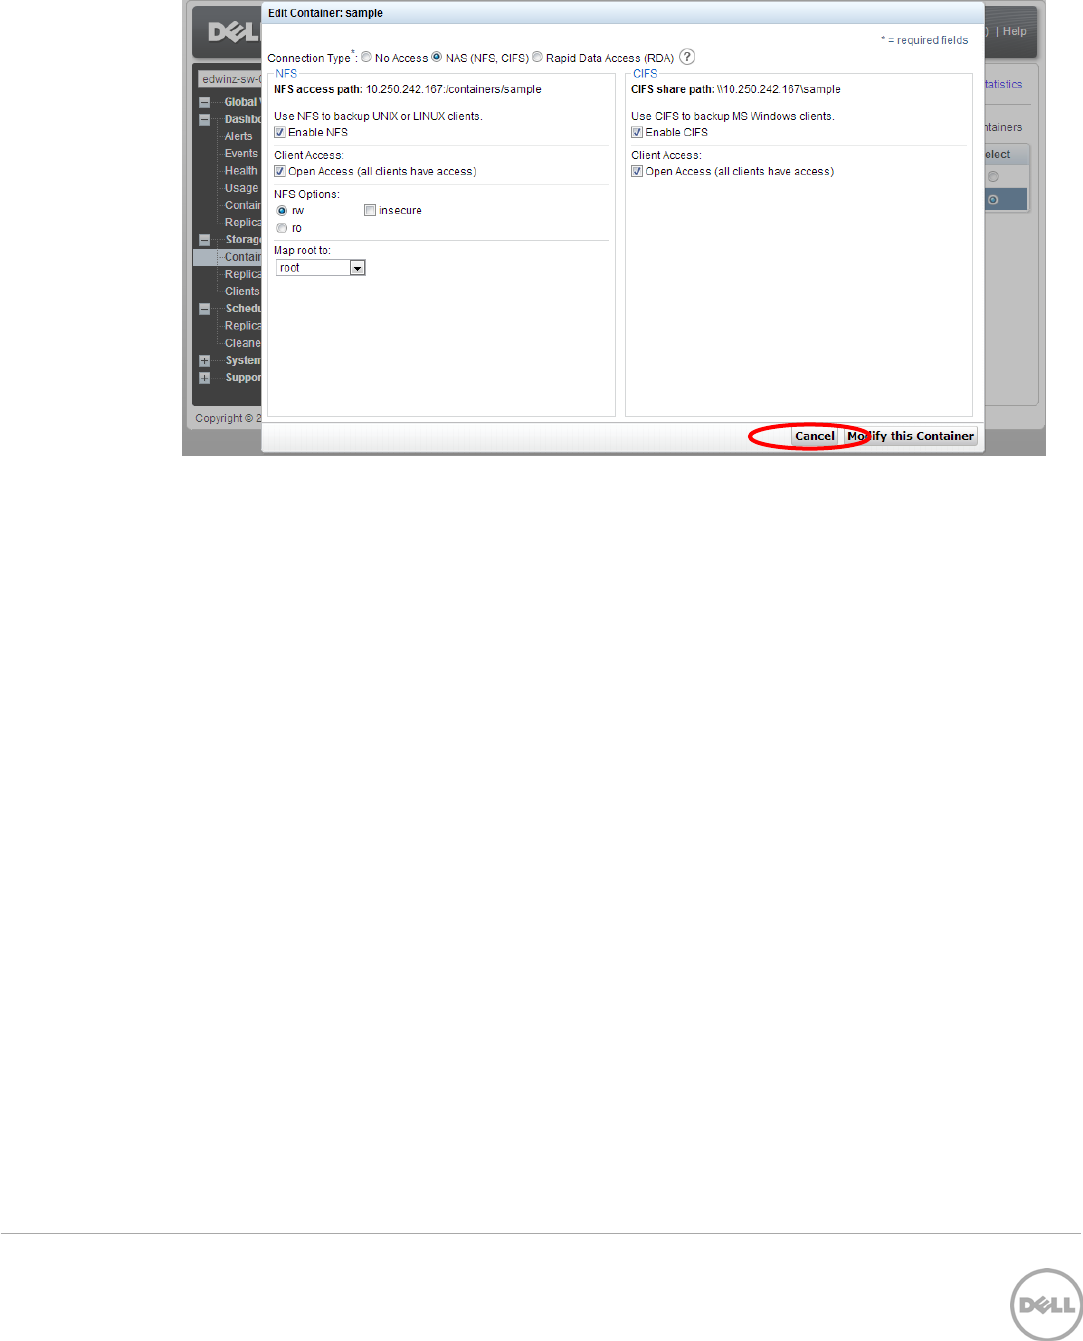
15. Click Cancel to exit.

12 Setting Up Dell™ DR Series Deduplication Appliance on BridgeHead® Healthcare Data Management | January 2014
2 Set Up BridgeHead Healthcare Data Management
2.1 Procedure for the Windows Environment
1. Open Bridge HDM Management Console. Under Backup Node, click Configuration. Double click
to open the Configuration File.

13 Setting Up Dell™ DR Series Deduplication Appliance on BridgeHead® Healthcare Data Management | January 2014
2. Search Staging_Area in text editor. Use DR container share UNC path for the Staging Area Path,
define a Staging Area Name. Save the Configuration file.
Note: The Backup Node for BridgeHead Healthcare Data Management requires appropriate permissions
to the DR Series Deduplication Appliance CIFS Share for the step below to complete successfully. See
Appendix A for setting up the BridgeHead Healthcare Data Management Backup Node account correctly.
This should be done before the next step.

14 Setting Up Dell™ DR Series Deduplication Appliance on BridgeHead® Healthcare Data Management | January 2014
2.2 Procedure for Unix/Linux Environment
Notes:
Make sure that you can mount/verify the NFS share from the UNIX/Linux backup node. Please see
Appendix B for how to mount/verify the NFS share.
The procedure for the Unix/Linux Environment is very similar to the procedure for the Windows
Environment. One difference is that the configuration file of Backup Node is ht_media.def, the default
location for the file is “/etc/ht_media.def ”.
For other details, please refer to the Procedure for the Windows Environment.
15 Setting Up Dell™ DR Series Deduplication Appliance on BridgeHead® Healthcare Data Management | January 2014
3 Create a New Backup Job with DR Series Deduplication
Appliance as the Target
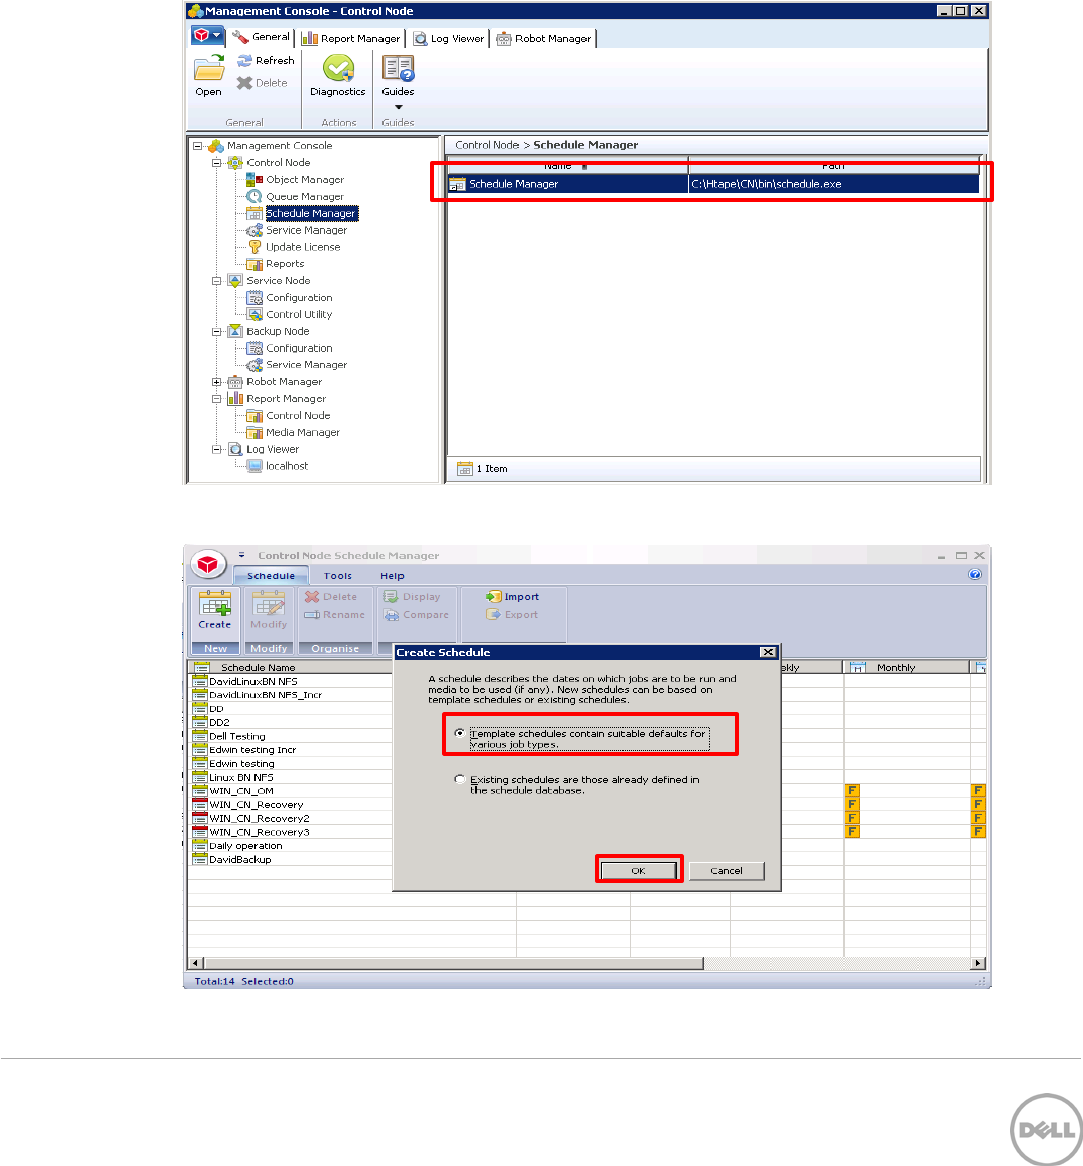
1. Open Bridge HDM Management Console. Click Schedule Manage under Control Node. Double
click to open the Schedule Manager.
2. Choose Template schedules contain suitable defaults for various job types. Click OK.

16 Setting Up Dell™ DR Series Deduplication Appliance on BridgeHead® Healthcare Data Management | January 2014
3. Choose None the click OK
4. Populate all the required fields and choose Media Manager under Media Management, click New.

17 Setting Up Dell™ DR Series Deduplication Appliance on BridgeHead® Healthcare Data Management | January 2014
5. Choose Disk in Media Management option then click Advanced.
6. Choose all the required fields then click Next

18 Setting Up Dell™ DR Series Deduplication Appliance on BridgeHead® Healthcare Data Management | January 2014
7. Enter Stage Area Name, Application as BACKUP, click Finish.
8. Click OK.
19 Setting Up Dell™ DR Series Deduplication Appliance on BridgeHead® Healthcare Data Management | January 2014
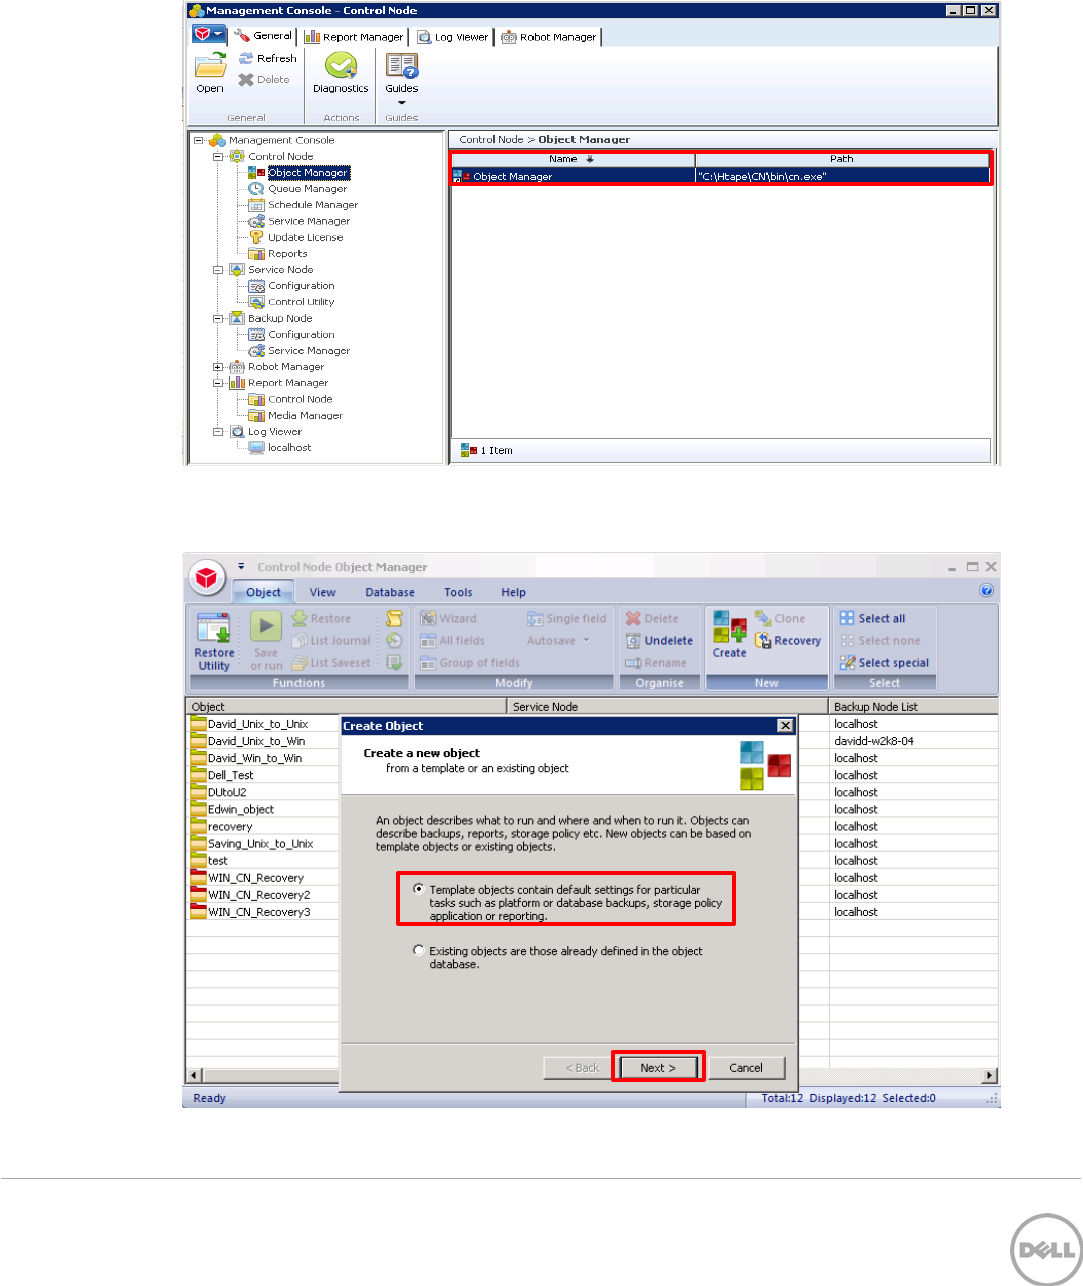
9. On Bridge HDM Management Console, click Object Manager under Control Node, which
displays the Object Manager in the list. Double click to open the Object Manager on right-hand
side pane.
10. Choose Template objects contain default settings for particular tasks such as platform or
database backups, storage policy application or reporting, click Next.
20 Setting Up Dell™ DR Series Deduplication Appliance on BridgeHead® Healthcare Data Management | January 2014
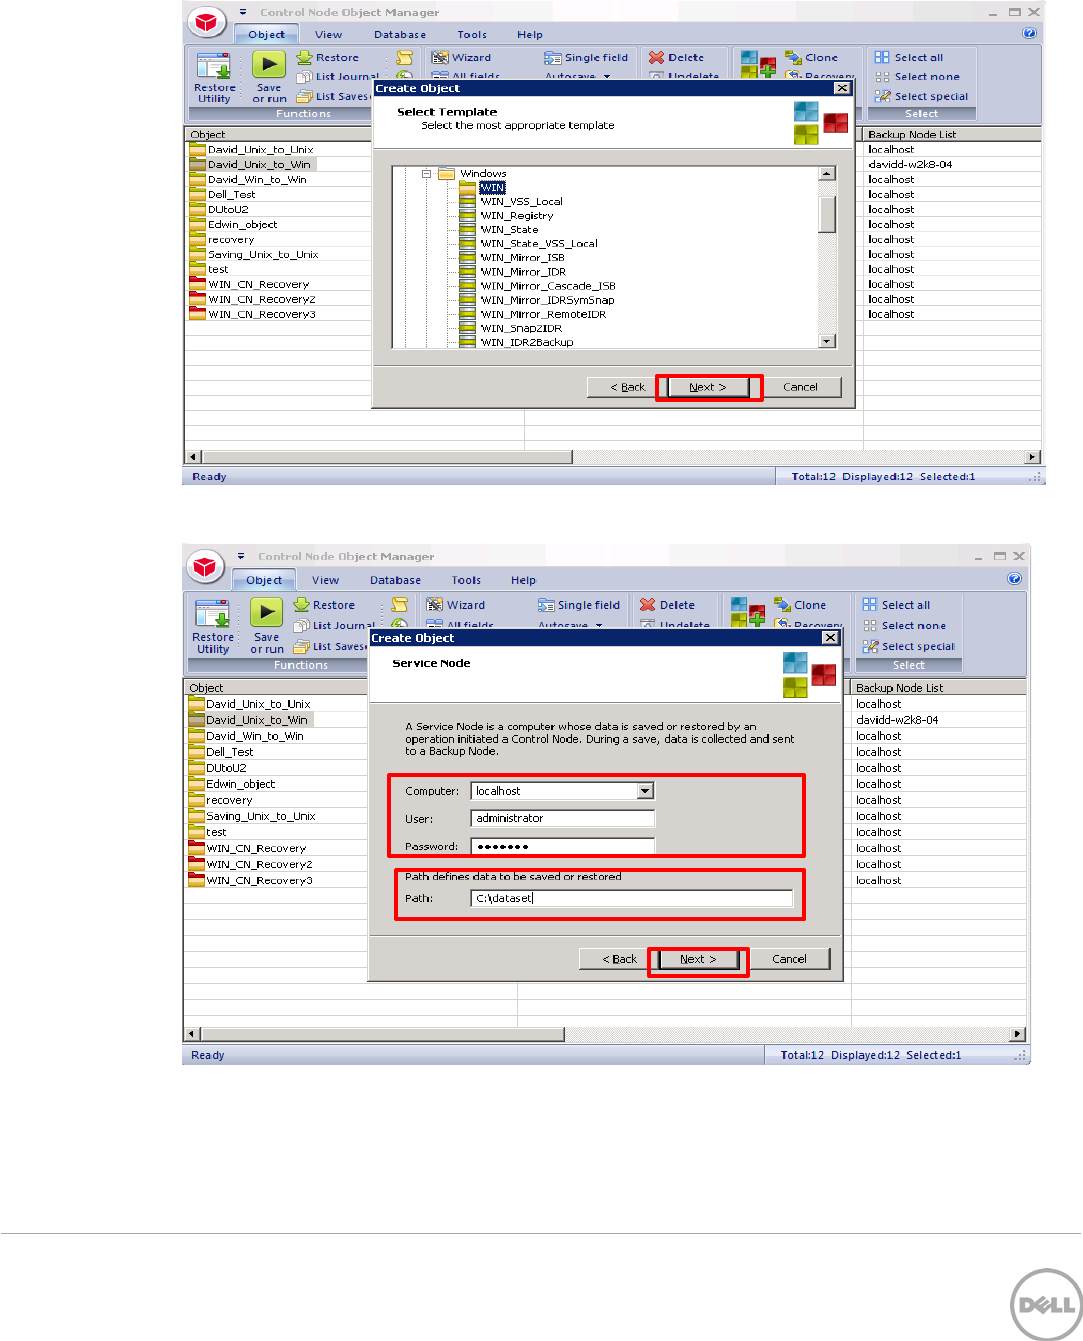
11. Choose WIN in the template list then click Next.
12. Enter the Service Node related info with the valid file path for backup data source, click Next.
21 Setting Up Dell™ DR Series Deduplication Appliance on BridgeHead® Healthcare Data Management | January 2014
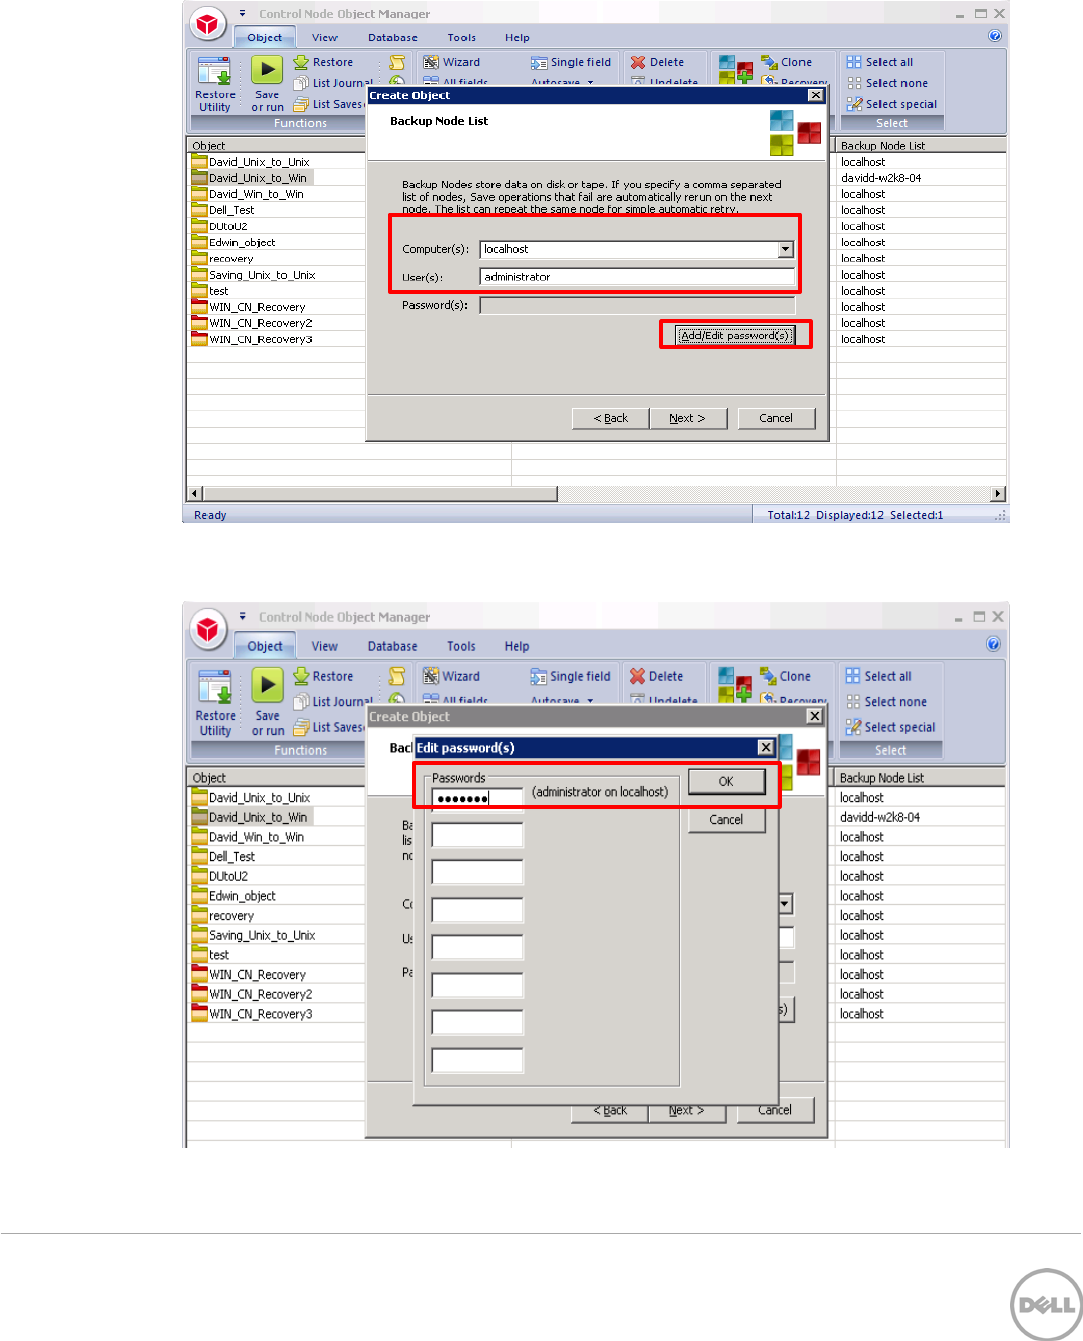
13. Enter Backup Node related info, click Add/Edit password(s)
14. Enter the Passwords for Backup Node then click OK

22 Setting Up Dell™ DR Series Deduplication Appliance on BridgeHead® Healthcare Data Management | January 2014
15. Click Next. Please refer to Appendix A for User and Password.
16. Accept the defaults and click Next.

23 Setting Up Dell™ DR Series Deduplication Appliance on BridgeHead® Healthcare Data Management | January 2014
17. Select Mail Recipients, click Next.
18. Choose the Schedule, click Next.
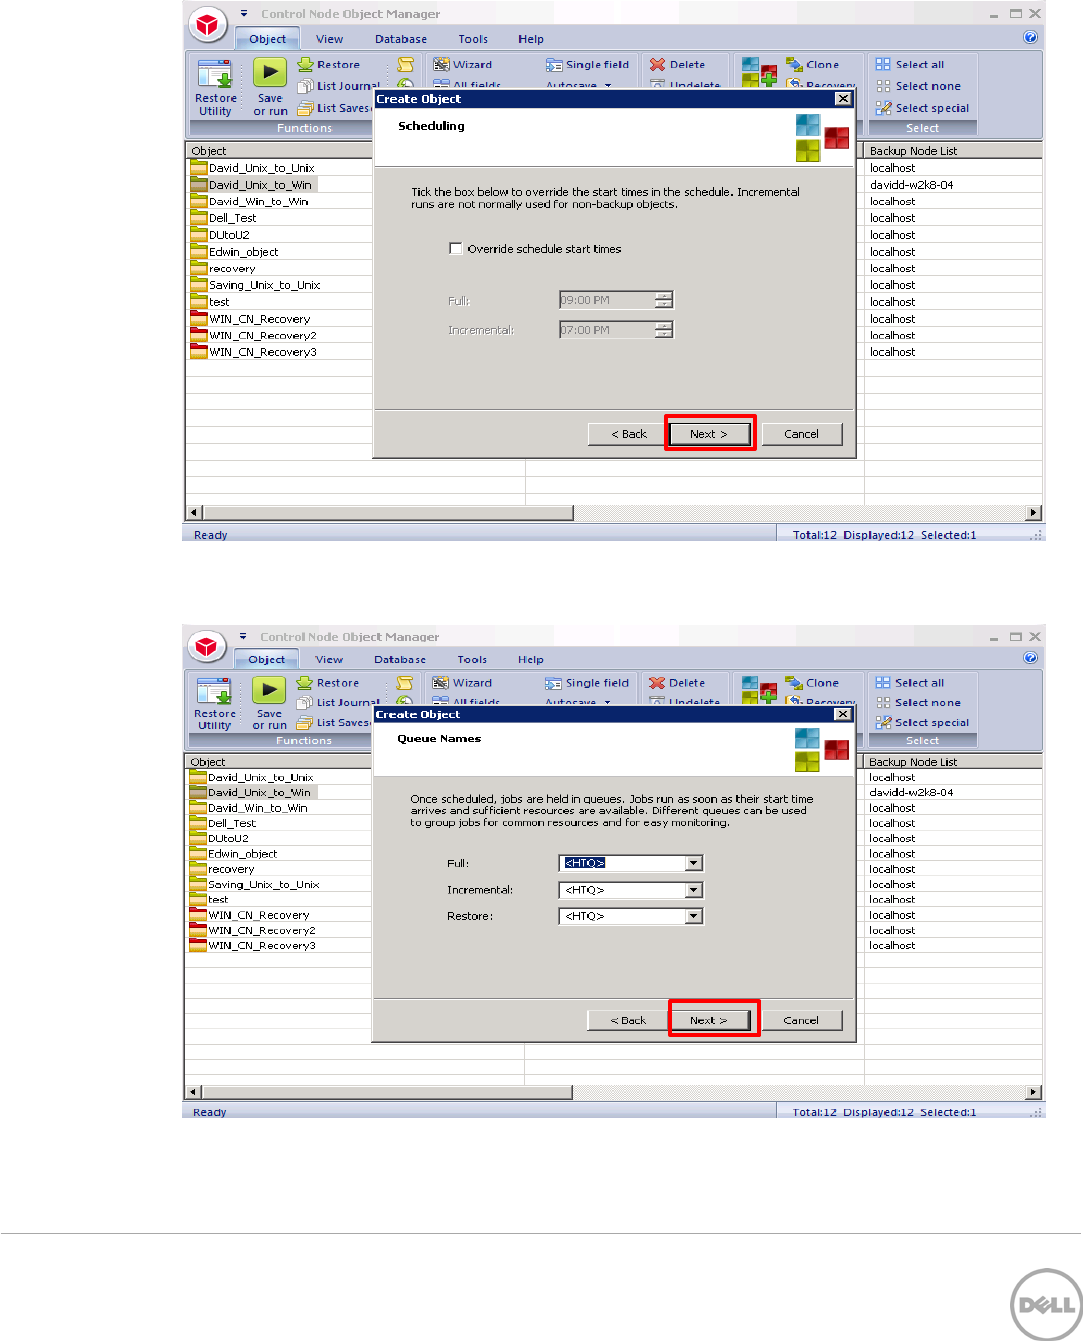
24 Setting Up Dell™ DR Series Deduplication Appliance on BridgeHead® Healthcare Data Management | January 2014
19. Accept the defaults and click Next
.
20. Accept the defaults and click Next.

25 Setting Up Dell™ DR Series Deduplication Appliance on BridgeHead® Healthcare Data Management | January 2014
21. Enter the Name of Object then click Finish to save it.
22. The backup object summary is displayed on the Object list. Right- click the object to run the
backup.

26 Setting Up Dell™ DR Series Deduplication Appliance on BridgeHead® Healthcare Data Management | January 2014
23. When Save or Run Operation window opens, click Start On-Line to start the backup.
24. The Object Manager Operation Log window displays the progress of the backup session.
Operation status has details of the backup job.

27 Setting Up Dell™ DR Series Deduplication Appliance on BridgeHead® Healthcare Data Management | January 2014
4 Set up DR Native Replication & Restore from Replication
Target Container
4.1 Build Replication Relationship between DRs
1. On source DR, select Replication from the menu panel on the left side of the management
interface, click Create.
2. Select a local container as source container, select Map to container on remote system,
enter Target DR related info, click Retrieve Containers, select populated target container from the
list, click Create Replication.
28 Setting Up Dell™ DR Series Deduplication Appliance on BridgeHead® Healthcare Data Management | January 2014
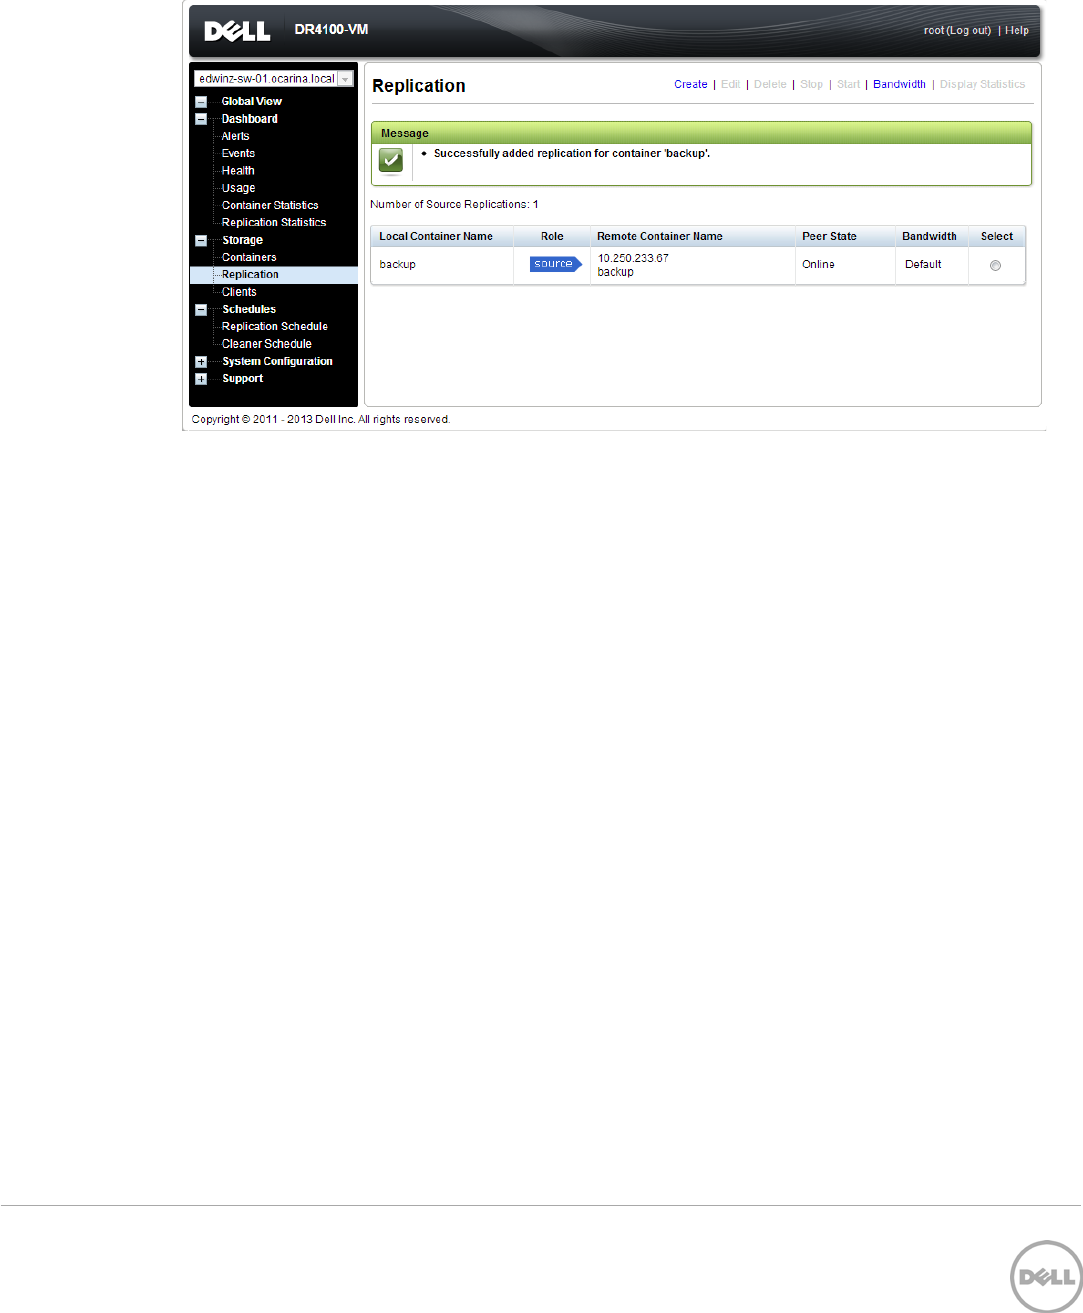
3. Verify that the replication is created successfully. Make sure Peer Status is Online for the
replication session.

29 Setting Up Dell™ DR Series Deduplication Appliance on BridgeHead® Healthcare Data Management | January 2014
4.2 Backup to Source DR (Optional: only when there is no backed up
data on source container)
1. Add both source DR and target DR as Stage Area on Bridge HDM, create a New Backup Job with
source DR as the Target. Make sure the backup is successful.
30 Setting Up Dell™ DR Series Deduplication Appliance on BridgeHead® Healthcare Data Management | January 2014
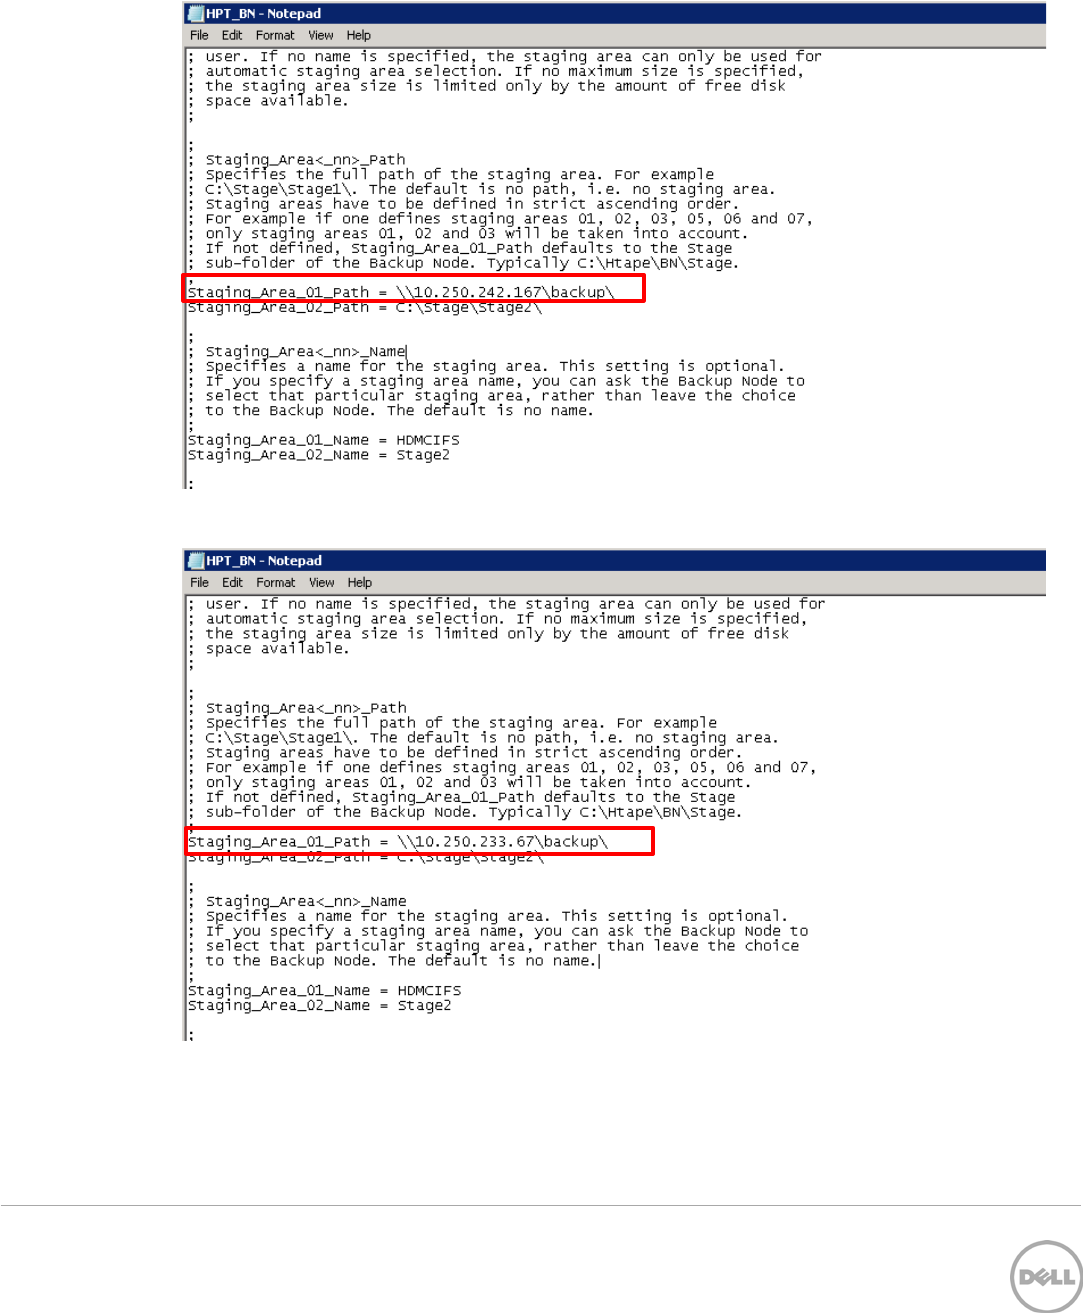
2. Click Configuration of Backup Node, which displays Configuration File, Double click to open the
Configuration File.
3. Modify the Stage Path to point to target DR container path, then save the changes

31 Setting Up Dell™ DR Series Deduplication Appliance on BridgeHead® Healthcare Data Management | January 2014
4. Go to Backup Node -> Service Manager, restart the Service of Backup Node
32 Setting Up Dell™ DR Series Deduplication Appliance on BridgeHead® Healthcare Data Management | January 2014
4.3 Restore from Replication Target
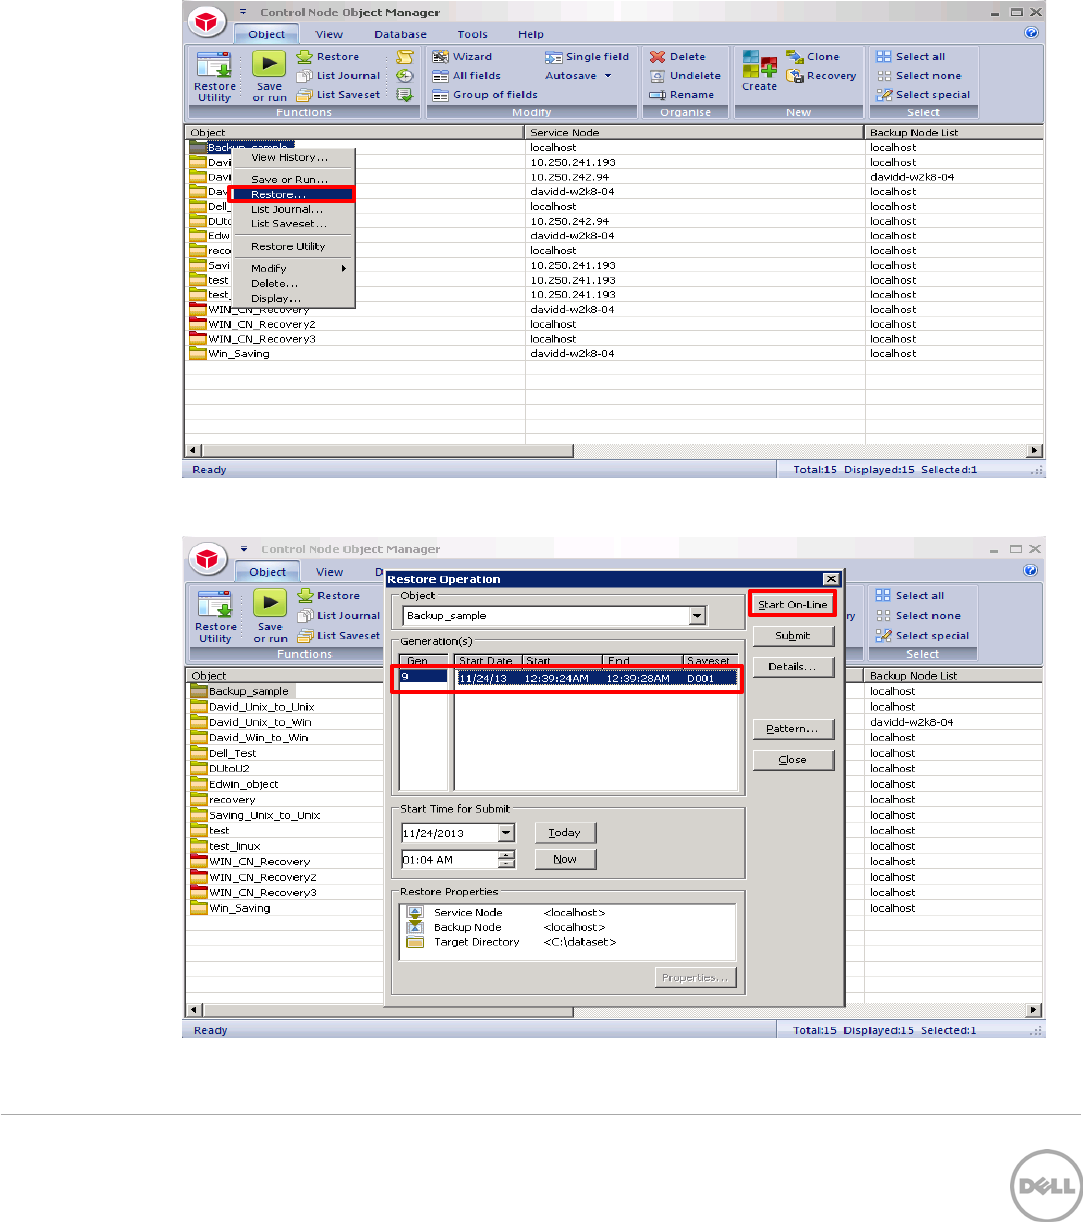
1. On Bridge HDM Management Console, open Object Manager, the backup object summary is
displayed under Object list. Right- click the object and choose Restore
2. Select the Saveset, then click Start On-Line.

33 Setting Up Dell™ DR Series Deduplication Appliance on BridgeHead® Healthcare Data Management | January 2014
3. Verify that the restore job completes successfully.
34 Setting Up Dell™ DR Series Deduplication Appliance on BridgeHead® Healthcare Data Management | January 2014
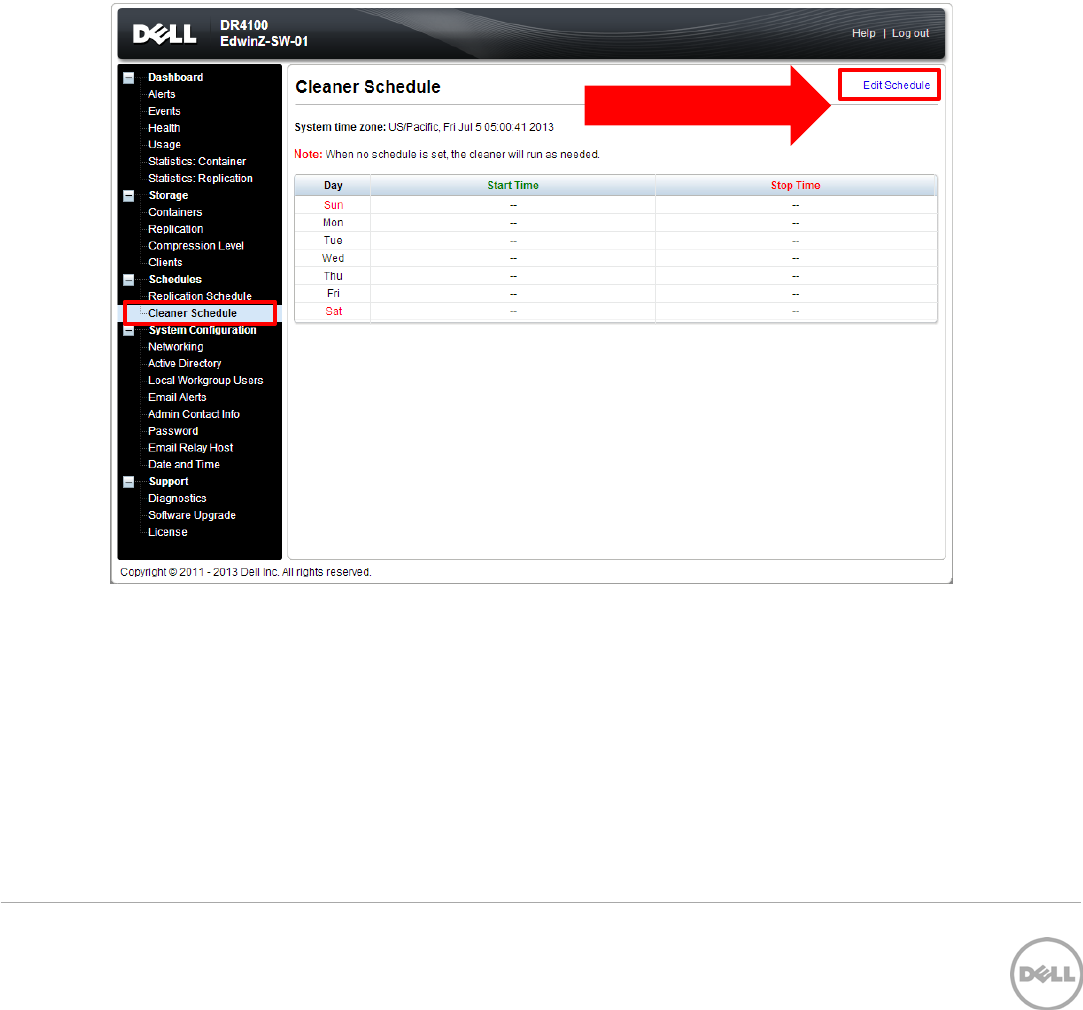
5 Set Up the DR Series Deduplication Appliance Cleaner
The cleaner will run during idle time. If you workflow does not have a sufficient amount of idle time on a
daily basis then you should consider scheduling the cleaner which will force it to run during that
scheduled time.
If necessary you can do the following procedure as described in the screenshot to force the cleaner to
run. Once all the backup jobs are setup the DR Series Deduplication Appliance cleaner can be scheduled.
The DR Series Deduplication Appliance cleaner should run at least 6 hours per week when backups are not
taking place, generally after a backup job has completed.
Performing scheduled disk space reclamation operations are recommended as a method for recovering
disk space from system containers in which files were deleted as a result of deduplication.
Schedule Cleaner

35 Setting Up Dell™ DR Series Deduplication Appliance on BridgeHead® Healthcare Data Management | January 2014
6 Monitoring Deduplication, Compression and Performance
After backup jobs have completed, the DR Series Deduplication Appliance tracks capacity, storage savings
and throughput on the DR Series Deduplication Appliance dashboard. This information is valuable in
understanding the benefits the DR Series Deduplication Appliance.
Note: Deduplication ratios increase over time; it is not uncommon to see a 2-4x reduction (25-50% total
savings) on the initial backup. As additional full backup jobs complete, the ratios will increase. Backup
jobs with a 12-week retention will average a 15x ratio in most cases.

36 Setting Up Dell™ DR Series Deduplication Appliance on BridgeHead® Healthcare Data Management | January 2014
A Appendix
A.1 Create a Storage Device for CIFS
There are two options for BridgeHead HDM to authenticate to DR Series Deduplication Appliance through
CIFS.
1. DR is joined into an Active Directory Domain: Integrate BridgeHead HDM and DR Series
Deduplication Appliance with Active Directory
a. Ensure the AD user has appropriate ACLs to the DR Series Deduplication Appliance Container
share
b. When creating an object, set the Backup Node of BridgeHead HDM to run with this AD user
<Domain\User>
2. DR is standalone CIFS server: Make sure this CIFS user has appropriate access permission to the
DR Series Deduplication Appliance container share. BridgeHead HDM Backup Node will use this
user to authenticate to DR Series Deduplication Appliance share in Workgroup mode.
a. To set the password for local CIFS administrator on the DR Series Deduplication Appliance, log on
to the DR using SSH.
i. Log on with username Administrator and password St0r@ge!
ii. Run the following command:
Authenticate --set --user administrator
Note: The CIFS administrator account is a separate account from the administrator account used to
administer the appliance. After an authentication method is chosen, set the BridgeHead Healthcare Data
Management service account to use the CIFS administrator account.

37 Setting Up Dell™ DR Series Deduplication Appliance on BridgeHead® Healthcare Data Management | January 2014
A.2 Create a Storage Device for NFS
For NFS backup using the BridgeHead Healthcare Data Management, a target folder needs to be created
as NFS share directory. This is the location to which backup objects will be written. This is not required
while adding CIFS share.
1. Mount the DR Series Deduplication Appliance NFS share onto the NFS share directory which
backup objects will be written in the BridgeHead Healthcare Data Management environment.
2. Verify the NFS share. One way is to try using the Linux command “cat /proc/mounts”. The rsize
and wsize of the connects in the command output should be 512K.
