Dell UPS Upgrade Software Utility Installation And Configuration User's Guide 1508079808dell Line Interactive Rack 1920r Guide12 En Us
User Manual: Dell DELL 1920W pdf | FreeUserManuals.com
Open the PDF directly: View PDF ![]() .
.
Page Count: 28
Dellt UPS Upgrade Software Utility
Installation and Configuration
User's Guide
w w w . d e l l . c o m | s u p p o r t . d e l l . c o m

Notes and Warnings
NOTE: A NOTE indicates important information that helps you make better use of your product.
Information in this document is subject to change without notice.
E 2009 Dell Inc. All rights reserved.
Reproduction in any manner whatsoever without the written permission of Dell Inc. is strictly forbidden.
Trademarks used in this text: Dell and the DELL logo are trademarks of Dell Inc.; Microsoft, Vista, Windows, Windows Server, and Windows
XP are registered trademarks of Microsoft Corporation.
Other trademarks and trade names may be used in this document to refer to either the entities claiming the marks and names or their
products. Dell Inc. disclaims any proprietary interest in trademarks and trade names other than its own.
November 2009 S 164201891 1
3
Table of Contents |
Table of Contents
1 Introduction
Supported Platforms 4. . . . . . . . . . . . . . . . . . . . . . . . . . . . . . . . . . . . . . . . . . . . . .
Supported UPS Models 5. . . . . . . . . . . . . . . . . . . . . . . . . . . . . . . . . . . . . . . . . . . .
Supported Languages 5. . . . . . . . . . . . . . . . . . . . . . . . . . . . . . . . . . . . . . . . . . . . .
2 Installing the Utility
Installing the Utility 6. . . . . . . . . . . . . . . . . . . . . . . . . . . . . . . . . . . . . . . . . . . . . .
Uninstalling the Utility 14. . . . . . . . . . . . . . . . . . . . . . . . . . . . . . . . . . . . . . . . . . . .
3 Using the Utility
Exploring the Dell UPS Upgrade Software Window 17. . . . . . . . . . . . . . . . . . . . .
Before You Begin 20. . . . . . . . . . . . . . . . . . . . . . . . . . . . . . . . . . . . . . . . . . . . . . . .
4 Upgrading UPS Firmware

4
|Introduction
Introduction
The Dellt UPS Upgrade Software utility is a user interface (UI) program for updating uninterruptible
power system (UPS) firmware. The Dell UPS Upgrade Software utility can upgrade the UPS firmware
locally using an RS-232 or USB port, or over a network using an Ethernet connection through the Dellt
Network Management Card. The utility resides on your PC.
NOTE: Upgrades over a network require a Dell Network Management Card with a firmware version of
v01.04.0000 or greater.
The Dell UPS Upgrade Software utility allows you to perform each upgrade through an easy-to-use
upgrade management screen. You connect to the UPS you intend to upgrade, select the firmware
version, and set the utility to upgrade locally or over a network. Then, before the upgrade begins, the
Dell UPS Upgrade Software utility checks the viability of the upgrade in the following ways:
SValidates all required settings
SVerifies the new firmware version is compatible with the UPS model you intend to upgrade
SConfirms the new firmware version is more recent than the version currently on the UPS
SDetermines that communication is established with the UPS
After all upgrade conditions are evaluated, the utility displays the result. If setup errors are detected,
error messages help you determine the problem. If there are no errors, you can begin the upgrade.
Supported Platforms
The Dell UPS Upgrade Software utility supports the following operating system platforms:
SMicrosoft® Windows Server® 2008, Standard Edition
SMicrosoft Windows Server 2008, Standard x64 Edition
SMicrosoft Windows Server 2003 R2, Standard Edition with SP2
SMicrosoft Windows Server 2003 R2, Standard x64 Edition with SP2
SMicrosoft Small Business Server 2003 R2 with SP2
SMicrosoft Windows XP® Professional with SP3
SMicrosoft Windows XP Home with SP3
SMicrosoft Windows Vista® Home Premium with SP1
SMicrosoft Windows Vista Business with SP1
SMicrosoft Windows Vista Ultimate with SP1
SMicrosoft Windows 7®
1

5
Introduction |
Supported UPS Models
The Dell UPS Upgrade Software utility supports the Dell UPS System models listed in Table 1.
Table 1. Supported UPS Models
Product Models
500W to 2700W Line Interactive (LI)
UPS Systems
Dell 500T LV, Dell 500T HV, Dell 1000T LV, Dell 1000T HV,
Dell 1920T LV, Dell 1920T HV, Dell 1000R LV, Dell 1000R HV,
Dell 1920R LV, Dell 1920R HV, Dell 2700R/T LV, Dell 2700R/T
HV-US, Dell 2700R/T HV
2700W Online (OL) UPS Systems Dell 2700R Telco LV, Dell 2700R Telco HV-US, Dell 2700R Telco
HV
3750W and 4200W Online (OL)
UPS Systems
Dell 3750R HV-US, Dell 3750R HV, Dell 4200R HV-US, Dell
4200R HV
5600W Line Interactive (LI) and Online
(OL) UPS Systems
Dell 5600R LI HV-US, Dell 5600R LI HV, Dell 5600R OL HV-US,
Dell 5600R, OL HV
Supported Languages
The Dell UPS Upgrade Software utility supports the following languages:
SEnglish
SFrench
SSpanish
SGerman
SSimplified Chinese
SJapanese
SRussian
SKorean
STraditional Chinese
6
|Installing the Utility
Installing the Utility
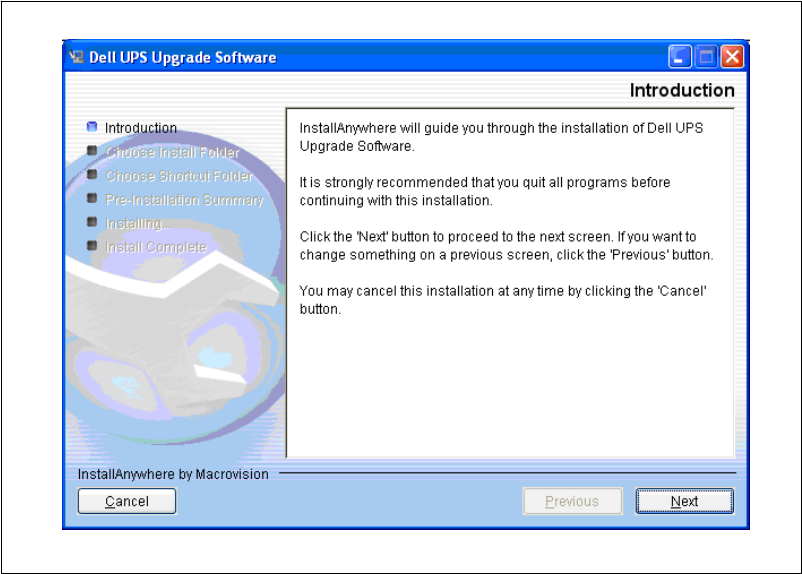
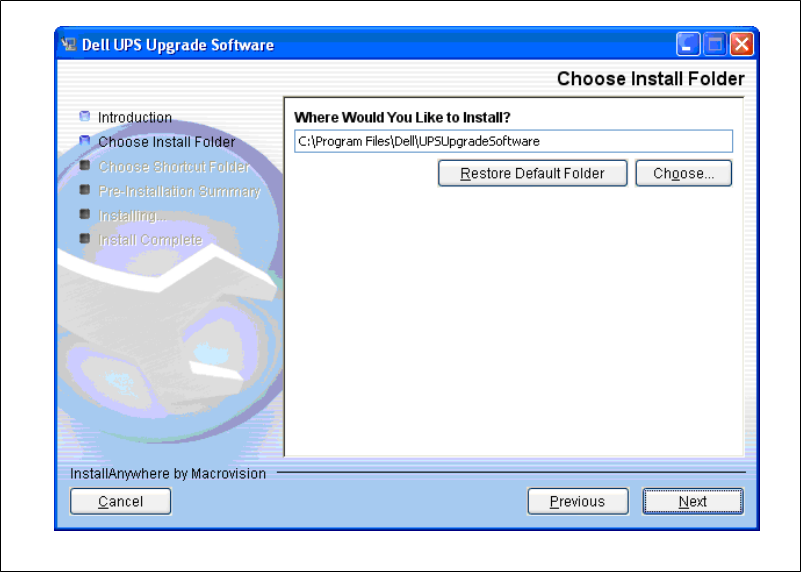
This chapter describes how to install and uninstall the Dell UPS Upgrade Software utility.
Installing the Utility
This section includes instructions for installing the Dell UPS Upgrade Software utility.
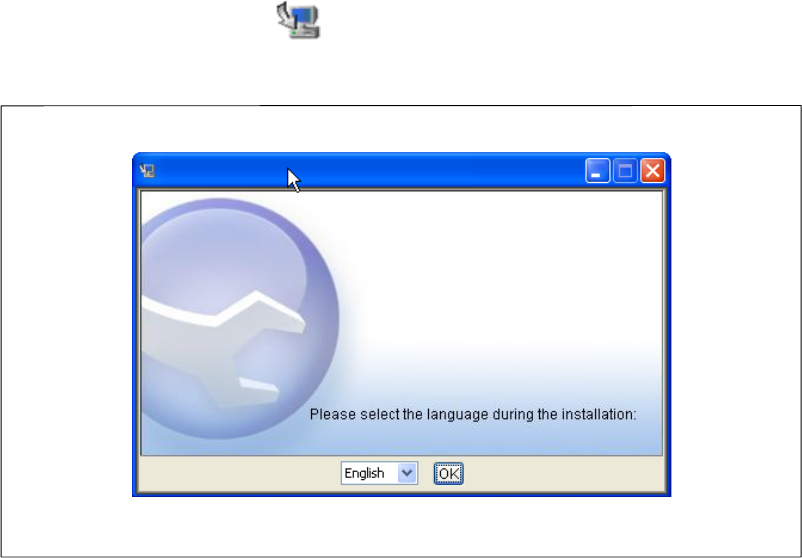
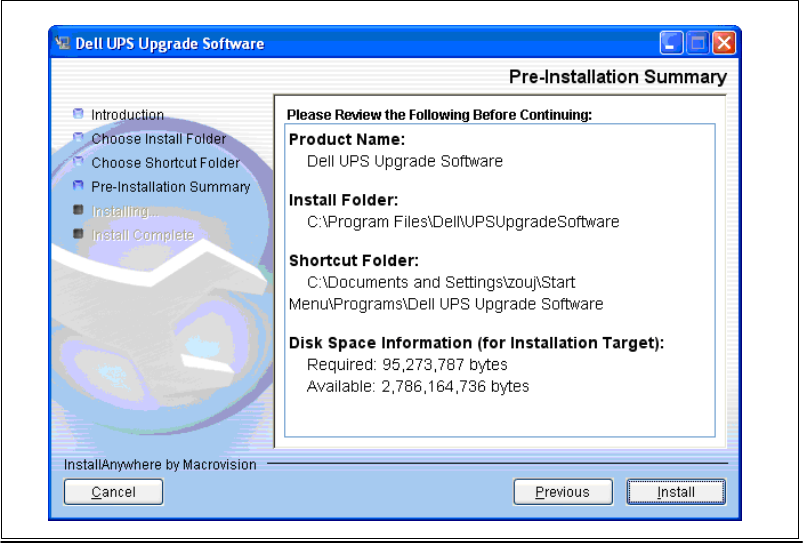
1Double-click the setup icon to run the setup.exe program and begin installation.
2Select the language to display during installation and click OK (see Figure 1).
Figure 1. Selecting the Language
2

10
|Installing the Utility
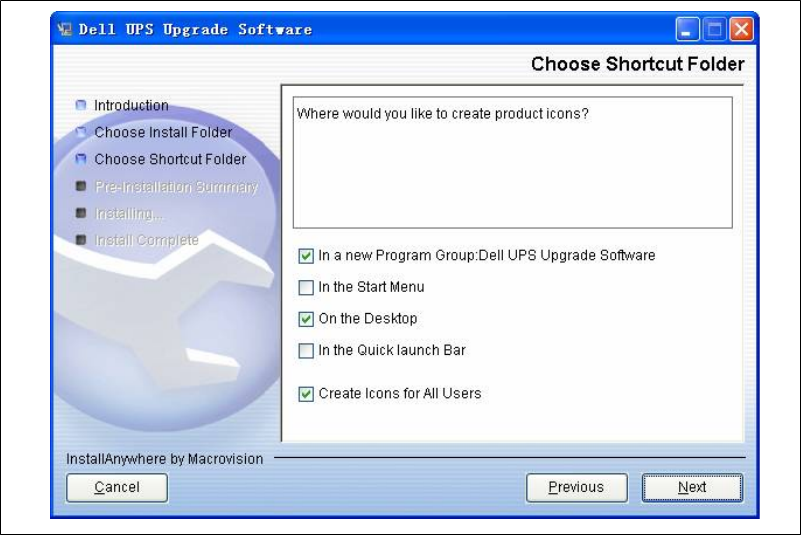
Table 2. Choose Shortcut Folder Settings
Startup Option Activation Action
In a new Program
Group
(Default)
STo disable the Create Icons for All
Users feature, deselect the checkbox.
SClick Next to accept the default.
Start the utility from the Start menu > All
Programs > Dell UPS Upgrade Software
path.
In the Start Menu SSelect the option.
STo disable the Create Icons for All
Users feature, deselect the checkbox.
SClick Next.
Start the utility from the Start menu > All
Programs path. The selection is not under a
program group.
On the Desktop
(Default)
SSelect the option.
STo disable the Create Icons for All
Users feature, deselect the checkbox.
SClick Next.
Start the utility by clicking the upgrade icon
on the desktop.
In the Quick
Launch Bar
SSelect the option.
STo enable the Create Icons for All
Users feature, select the checkbox.
SClick Next.
Start the utility by clicking the upgrade icon
on the Quick Launch Bar.
Create Icons for All
Users
(Default)
SSelect an option.
SSelect or deselect the Create Icons for
All Users checkbox.
SClick Next.
The selected shortcut option is available to
other privileged users who log on to this
computer.
13
Installing the Utility |
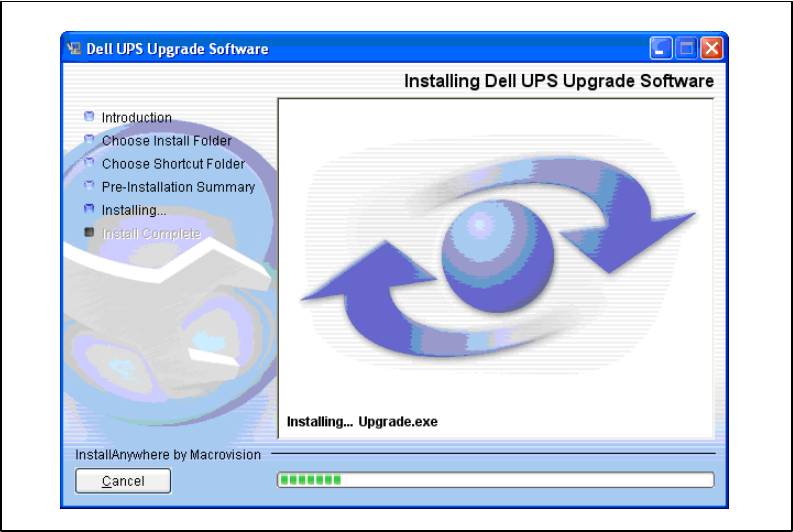
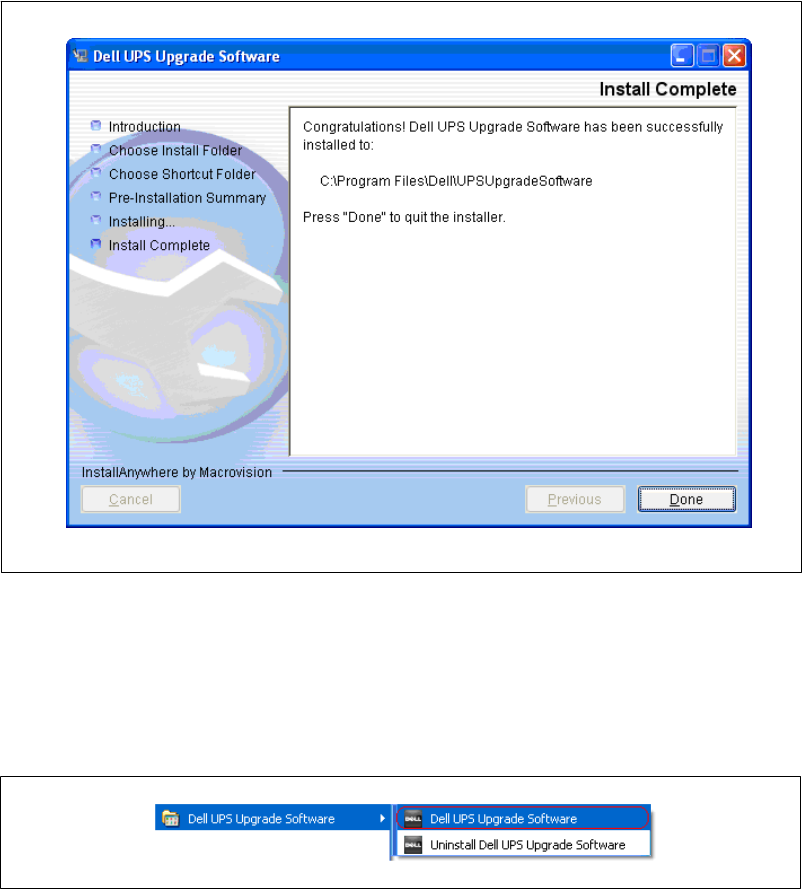
8Click Done to exit (see Figure 7).
Figure 7. Completing the Utility Installation
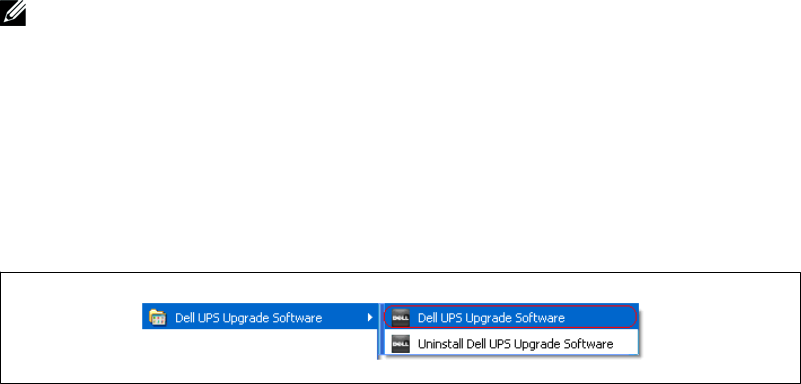
9Once installed, you can start the Dell UPS Upgrade Software utility using the start-up option you
specified on the Choose Shortcut Folder window (see Figure 4 on page 9).
For example, if you accepted the default start-up method (In a new Program Group), you will
start the utility using the Start menu > All Programs > Dell UPS Upgrade Software path (see
Figure 8).
Figure 8. Selecting the Utility from the Start Menu
14
|Installing the Utility
Uninstalling the Utility
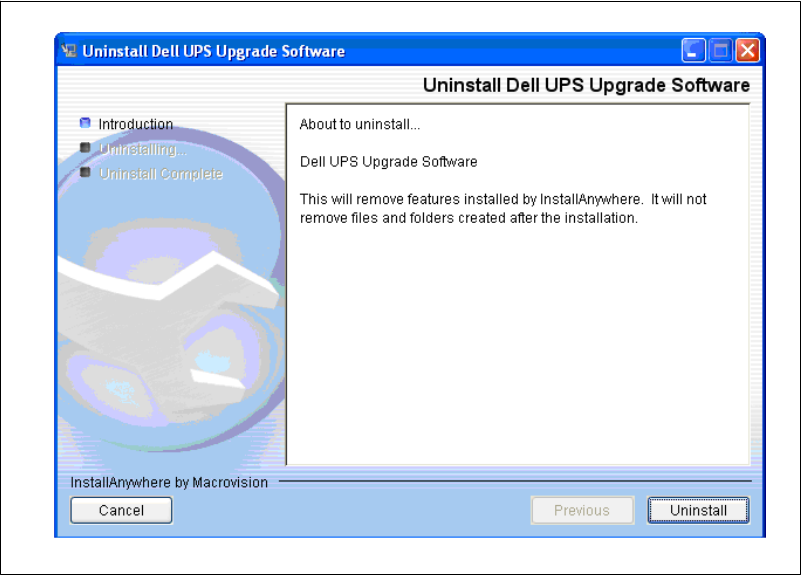
This section includes instructions for uninstalling the Dell UPS Upgrade Software utility.
1Exit the Dell UPS Upgrade Software utility.
2Begin uninstalling the software in one of the following ways:
SIf you chose to start the utility using a Start menu selection, follow the appropriate
Start menu > All Programs path and select Uninstall Dell UPS Upgrade Software.
SIf you chose to start the utility from an icon or by using the Upgrade.exe file, select
Start menu> Control Panel > Add/Remove Program. Select Dell UPS Upgrade Software
and click Change/Remove.
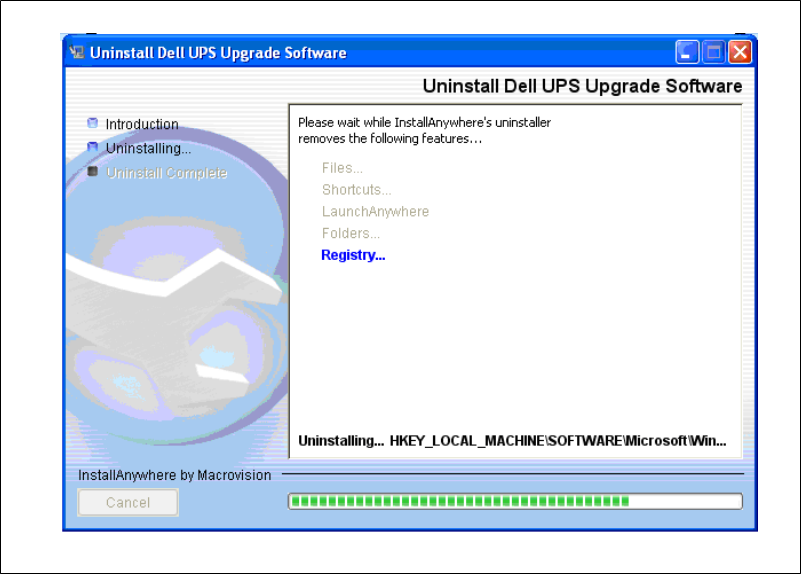
3The Uninstall Dell UPS Upgrade Software window opens. Click Uninstall to continue (see
Figure 9).
Figure 9. Introducing Utility Removal

17
Using the Utility |
Using the Utility
This chapter describes the Dell UPS Upgrade Software window and provides prerequisites for upgrading
the UPS using the Dell UPS Upgrade Software utility.
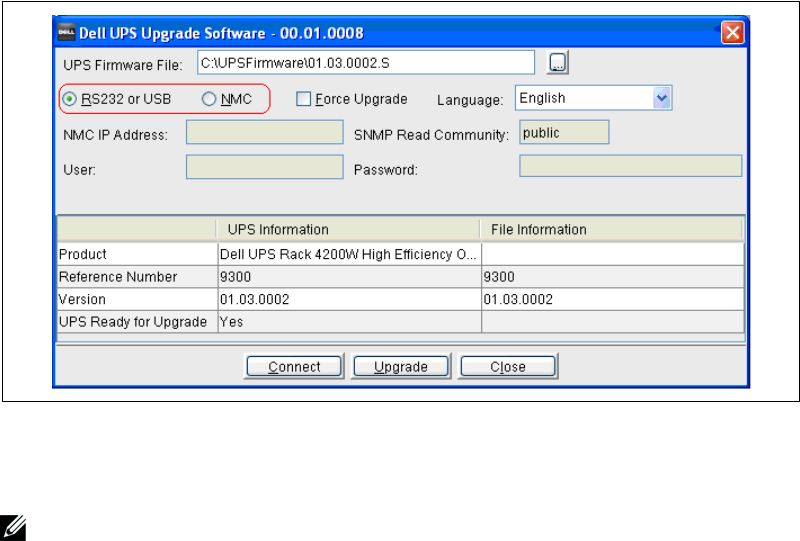
Exploring the Dell UPS Upgrade Software Window
Use the Dell UPS Upgrade Software window to perform the following:
SSelect upgrade settings and set upgrade preferences
SVerify unique UPS and firmware file version identification data before you upgrade the UPS
SInitiate the UPS firmware upgrade
NOTE: You must reconfigure upgrade settings each time you upgrade the UPS firmware.
The Dell UPS Upgrade Software window allows you to select upgrade settings. For example, use this
window to select the firmware version for the UPS upgrade. You can also direct the upgrade through
either the RS-232 or USB port, or use the Dell Network Management Card Ethernet interface to
upgrade the firmware (see Figure 12).
3

19
Using the Utility |
Table 3. Upgrade Software Window Selections
Field Purpose Description
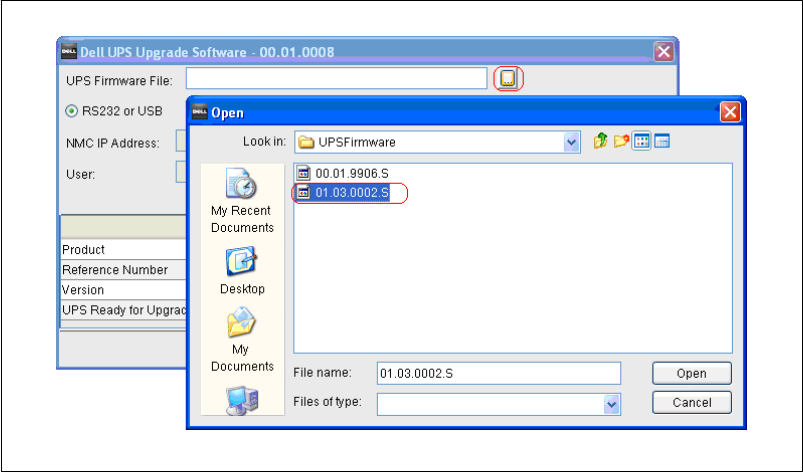
UPS Firmware File Upgrade Setting Produces a list of UPS firmware versions. The program
reference number and firmware version display in the
UPS Information column for the file you select.
RS232 or USB Upgrade Setting Updates the UPS firmware through the RS-232 or USB
port.
NMC Upgrade Setting Enables the NMC IP Address and SNMP Read
Community fields for updating the UPS firmware
through the Ethernet.
Force Upgrade Upgrade Setting Forces a subsequent upgrade after a processing
problem prevents the upgrade from completing. Force
Upgrade mode validates only the program reference
number before upgrading the UPS firmware.
Language Upgrade Setting Changes the language. The default language depends
on the operating system language selected on your
computer.
NMC IP Address Upgrade Setting Provides the Dell Network Management Card IP
address to direct the utility to upgrade the UPS over an
Ethernet network.
SNMP Read Community Upgrade Setting Provides the community string for communicating over
an Ethernet network.
User Upgrade Setting Provides the user name for communicating over an
Ethernet network.
Password Upgrade Setting Provides the password for communicating over an
Ethernet network.
Display Only Purpose Description
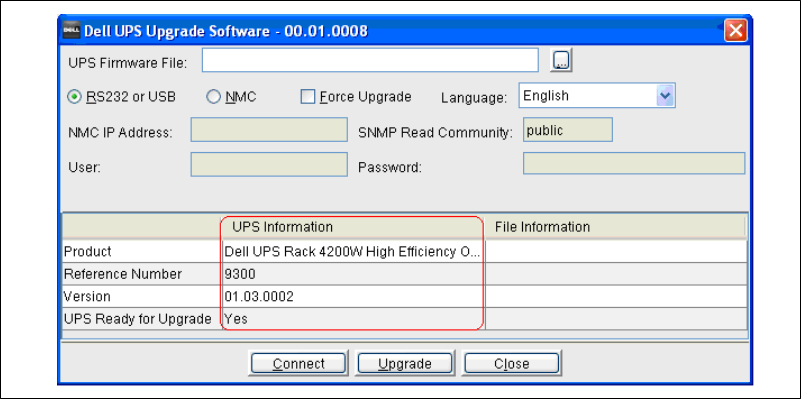
UPS Information Information Provides unique identification data for the currently
connected UPS before the upgrade starts.
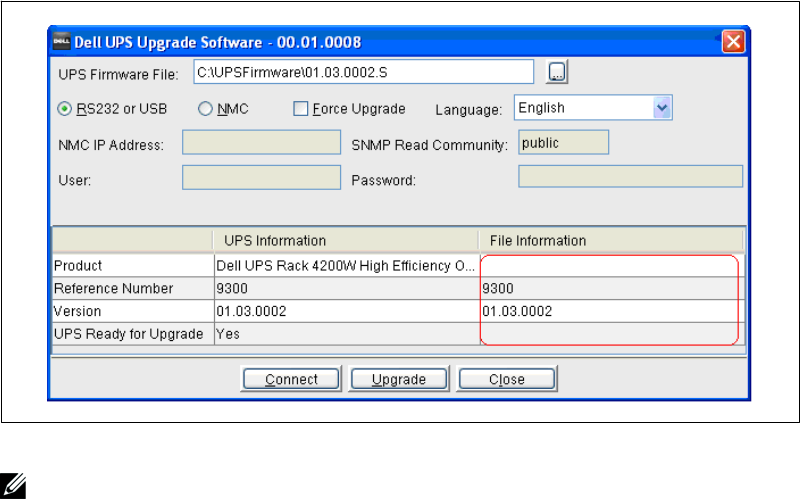
File Information Information Provides unique identification data for the currently
selected firmware file before the upgrade starts.
Button Purpose Description
Connect Action Generates data in the UPS Information column when
selected.
Upgrade Action Starts the UPS firmware upgrade.
Close Action Closes the utility window without saving your changes.

20
|Using the Utility
Before You Begin
Before you begin the upgrade, verify that you can provide a proper connection to the UPS as follows:
SIf you are upgrading the UPS firmware through an RS-232 or USB port, connect only to the
UPS you intend to upgrade—even if you are using a multi-port PC. A single connection
ensures that the upgrade utility communicates only with the UPS that you intend to upgrade.
SIf you are using an Ethernet interface to upgrade the UPS firmware, verify the NMC IP
Address and SNMP Read Community values for the UPS you intend to upgrade. Correctly
entering these values ensures that the upgrade utility will know which UPS to upgrade, even
if there are several UPSs online at the same time.
NOTE: Because the Dell UPS Upgrade Software utility receives UPS information through Simple Network
Management Protocol (SNMP), SNMP must be enabled to use the Dell Network Management Card as an
Ethernet interface to upgrade the UPS. Refer to the Dell Network Management Card (NMC) User's Guide for
more information.
NOTE: You can use the Connect button on the Dell UPS Upgrade Software window to display UPS details and
verify that you are connected to the correct UPS before you begin upgrading the UPS firmware.
AC input must be available and within the UPS operating range to begin the upgrade.
21
Upgrading UPS Firmware |
Upgrading UPS Firmware
This chapter describes how to use the Dell UPS Upgrade Software utility to upgrade Dell UPS firmware.
The instructions describe the upgrade procedure in the following sequence:
SSelecting upgrade settings
SValidating the operating state of the UPS and the upgrade settings you selected
SCompleting the upgrade process
NOTE: You can upgrade only one UPS at a time.
To select upgrade settings, perform the following:
1Review the important information in “Before you Begin” on page 20.
2Start the Dell UPS Upgrade Software utility using the option you selected on the Choose Shortcut
Folder window during installation.
For example, if you accepted the default start-up method (In a new Program Group), select the
utility using the Start menu > All Programs > Dell UPS Upgrade Software path (see Figure 13).
The Dell UPS Upgrade Software window opens.
Figure 13. Starting the Utility from the Start Menu
4
22
|Upgrading UPS Firmware
3Choose one of the following communication methods through which to upgrade the UPS
firmware (see Figure 14):
SSelect RS232 or USB to use the PC COM port or USB port to upgrade locally.
SSelect NMC to use the Dell Network Management Card Ethernet interface to upgrade over
the network.
Figure 14. Selecting the Communication Method
4NMC option only. Enter the IP address of the Dell Network Management Card, and either enter
the SNMP Read Community value or accept the default value (public).
NOTE: Unless SNMP is enabled, you cannot use the Dell Network Management Card as an Ethernet interface
to upgrade the UPS.
5Complete the User and Password fields.
25
Upgrading UPS Firmware |
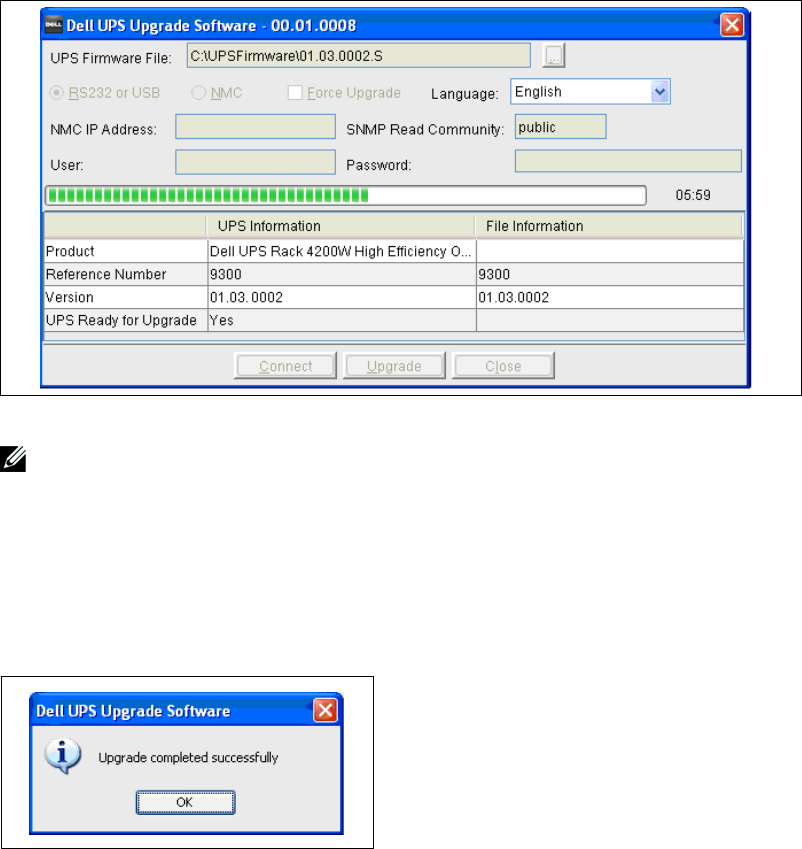
9Ensure that the firmware version was correctly selected by verifying the program reference number
and firmware version number in the File Information column (see Figure 17).
Figure 17. Identifying the Firmware Version
NOTE: Before the upgrade begins, the Dell UPS Upgrade Software utility validates the operating state, the
upgrade settings you selected, firmware version compatibility with the selected UPS model, and the UPS
connection.
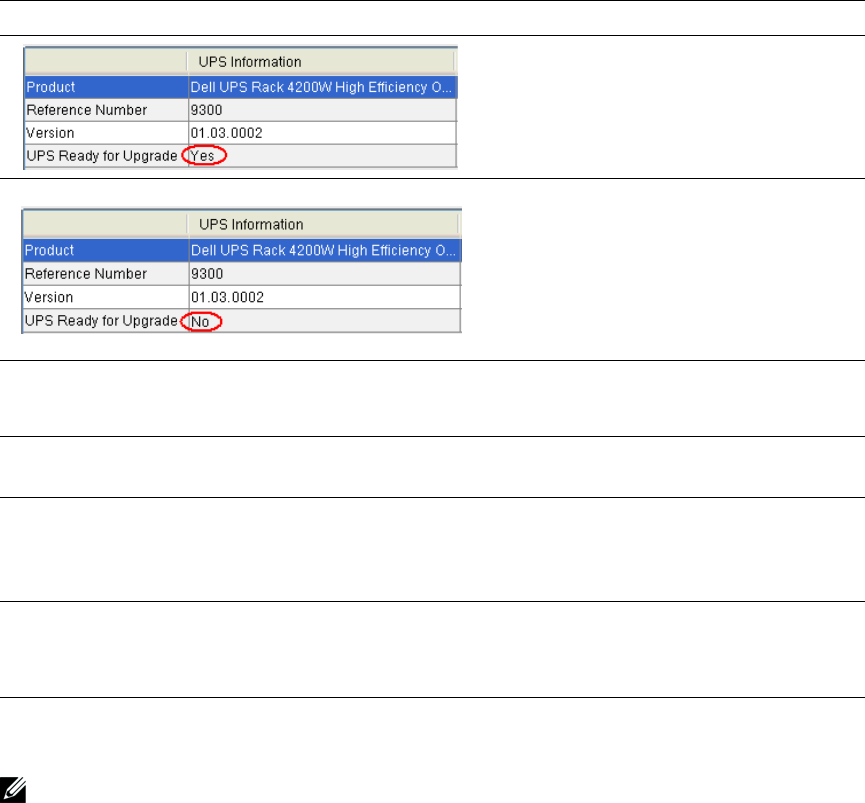
10 Review the validation notification of the results to determine if the UPS is ready to be upgraded
with the firmware you selected. (See Table 4 for descriptions of validation notifications.)
SIf the validation results are successful, Yes displays in the UPS Ready for Upgrade field. Go to
Step 12.
SIf the validation results are unsuccessful, No displays in the UPS Ready for Upgrade field.
Resolve all errors (see Table 4). Go to Step 12.
26
|Upgrading UPS Firmware
Table 4. Validation Notification
Notification Description
The UPS Ready for Upgrade field in the UPS
Information column displays Yes. The UPS is
ready for upgrade. The Dell UPS Upgrade
Software utility begins upgrading the UPS
firmware.
The UPS Ready for Upgrade field in the UPS
Information column displays No. The UPS is
not ready for upgrade. The UPS is not in the
correct operating mode, communication is not
established with the UPS, there is a firmware
version error, or the UPS cannot accept the
command from serial port currently. To
continue the upgrade, resolve the error.
Error Message Text:
File Format Error
An incompatible UPS firmware version is
selected. Click OK. Reselect the firmware
version.
Error Message Text:
No UPS connected or unable to open connection
Communication with the UPS is lost. Click
OK. Check the UPS connection.
Error Message Text:
The UPS firmware version you selected is the same or older
than the firmware presently in the UPS. Are you sure that you
want to proceed?
The firmware version is not more recent than
the firmware version on the UPS. Click Yes to
continue the upgrade. Click No to cancel the
upgrade. Reselect a newer firmware version.
Error Message Text:
The user or password you typed is not correct
The user or password communicating over the
Dell Network Management Card is not
correct. Click OK. Check the user name and
password.
11 Click Upgrade on the Dell UPS Upgrade Software window (see Figure 17).
NOTE: After you click Upgrade, the UPS requires several seconds to prepare for the upgrade. As a result, the
progress bar on the Dell UPS Upgrade Software window will not be synchronized with the UPS progress bar.
This is normal.
12 Monitor the progress of the upgrade using the progress bar in the Dell UPS Upgrade Software
window (see Figure 18).
27
Upgrading UPS Firmware |
Figure 18. Monitoring Progress as the UPS Firmware Upgrades
NOTE: While upgrading, the UPS LCD displays the message Flash Update in Process. A progress bar with the
upgrade percentage completed also displays.
13 Determine the upgrade completion status as follows:
SIf the UPS firmware upgrade is successful, a notification message displays and this procedure
is completed (see Figure 19).
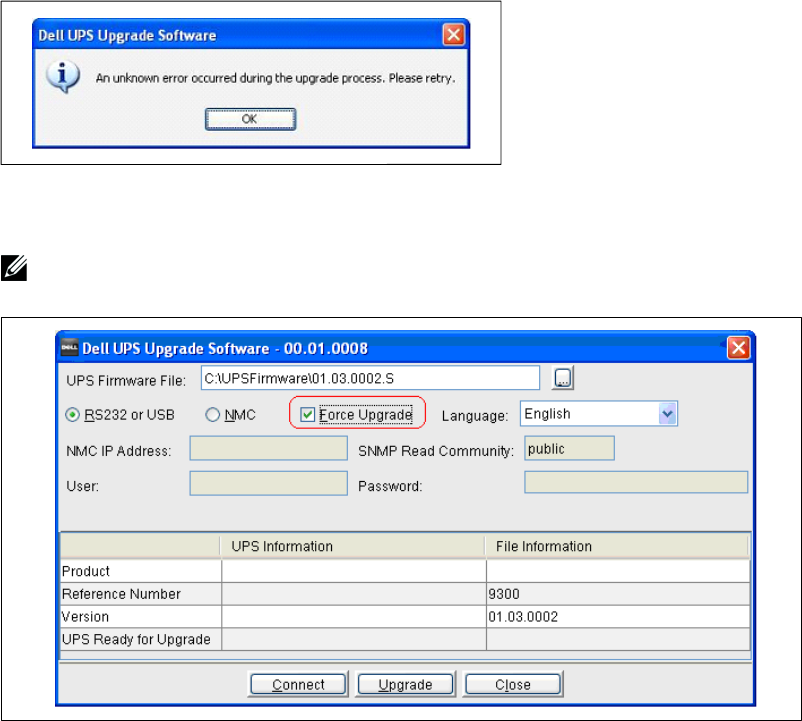
SIf errors occur during the upgrade, an error message displays (see Figure 20). Continue to
Step 14.
Figure 19. Successful Upgrade Message
28
|Upgrading UPS Firmware
Figure 20. Upgrade Processing Error Message
14 Select Force Upgrade on the Dell UPS Upgrade Software window (see Figure 21).
NOTE: When you select Force Upgrade, only the program reference number is validated before the upgrade
begins.
Figure 21. Forcing the Upgrade
15 Click Upgrade to retry the UPS firmware upgrade.
16 Determine the upgrade completion status as follows:
SIf the UPS firmware upgrade is successful, a notification message displays (see Figure 19 on
page 27).
SIf retrying the UPS upgrade fails, contact Dell User Support at www.support.dell.com.
