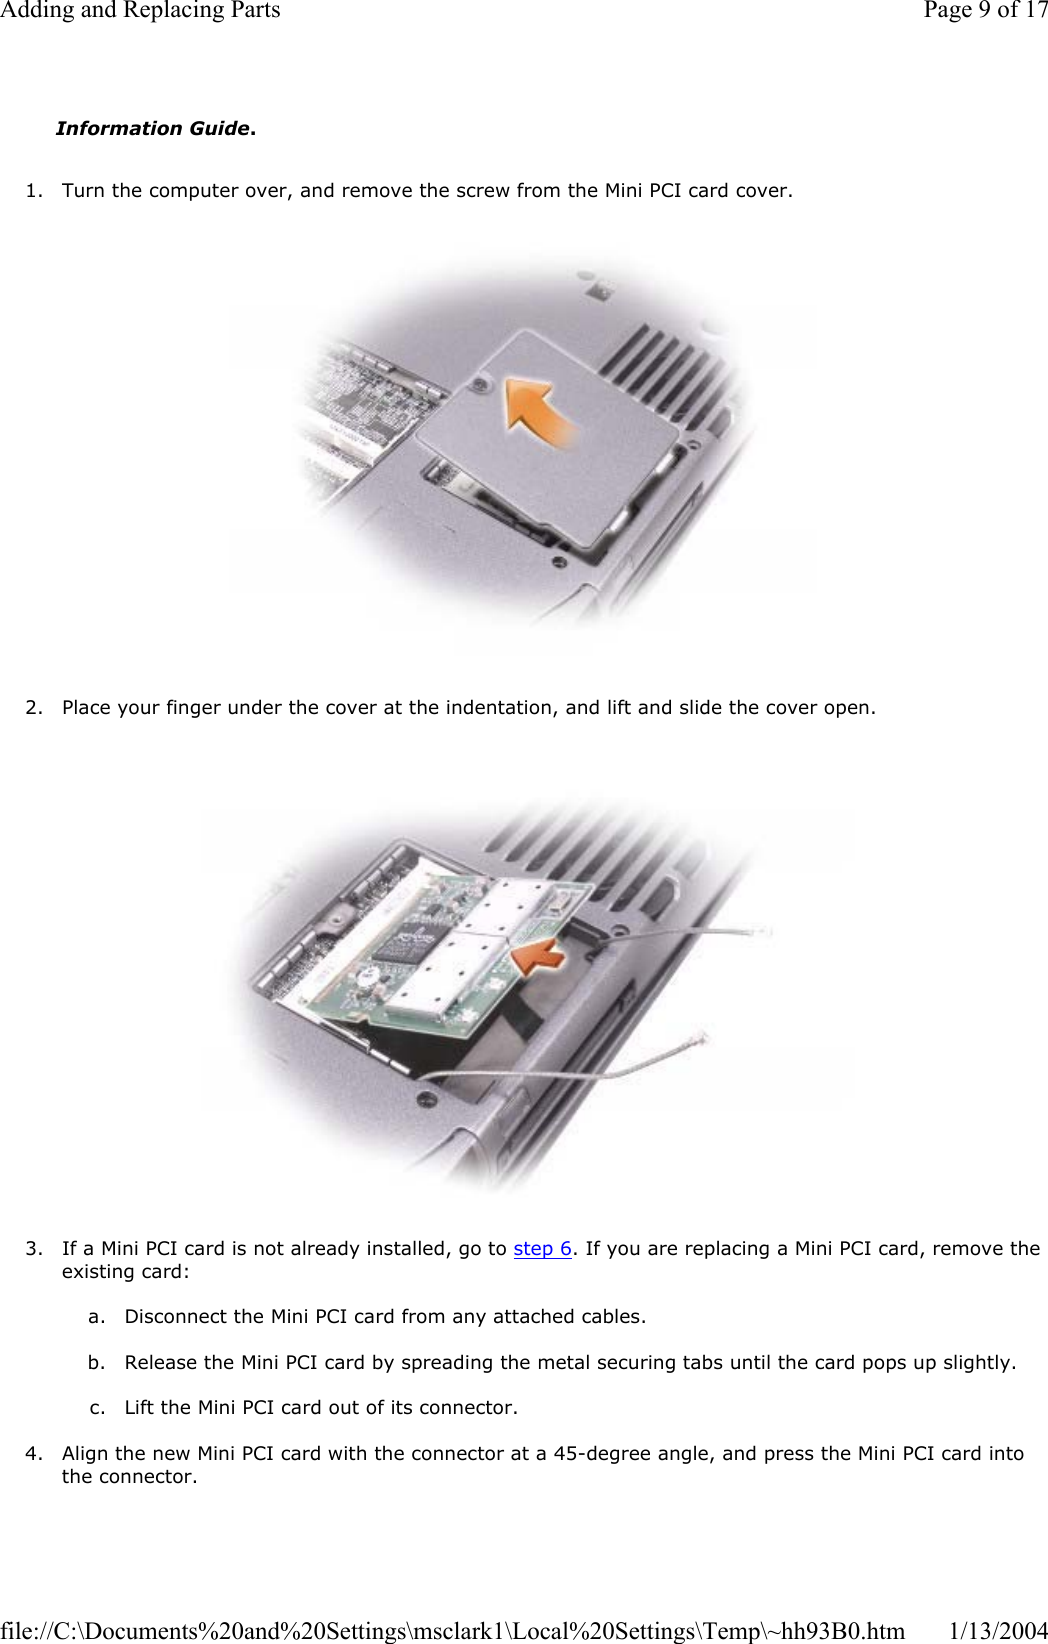
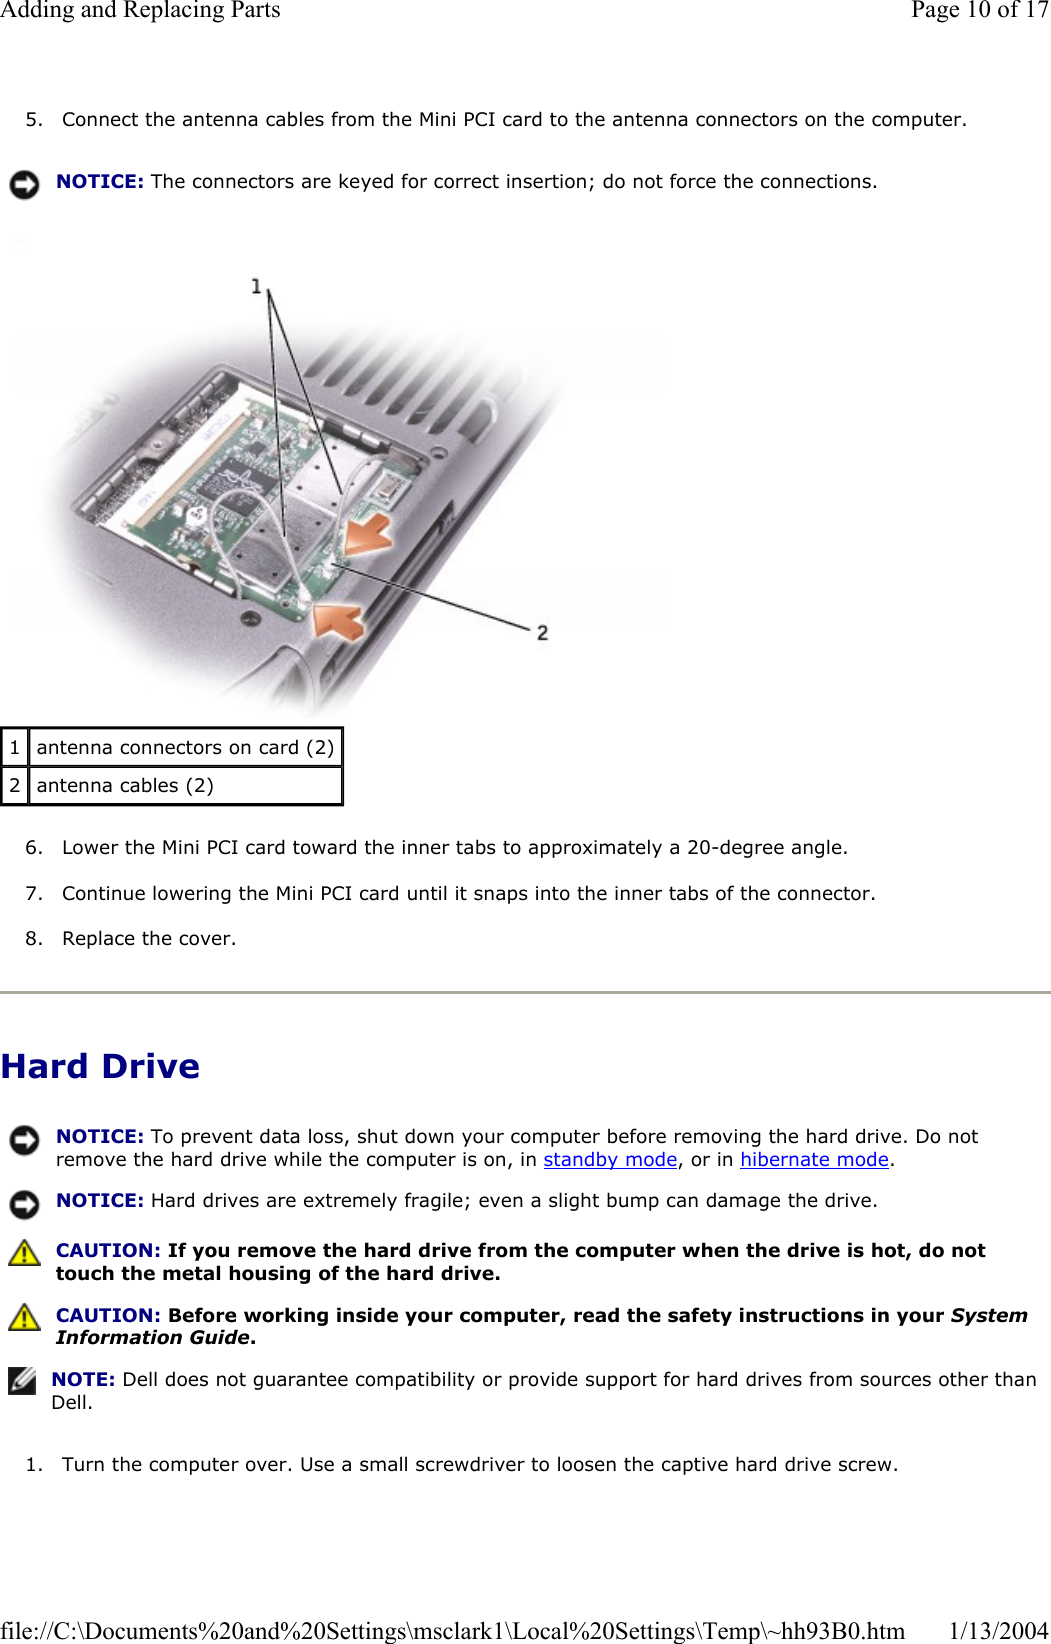
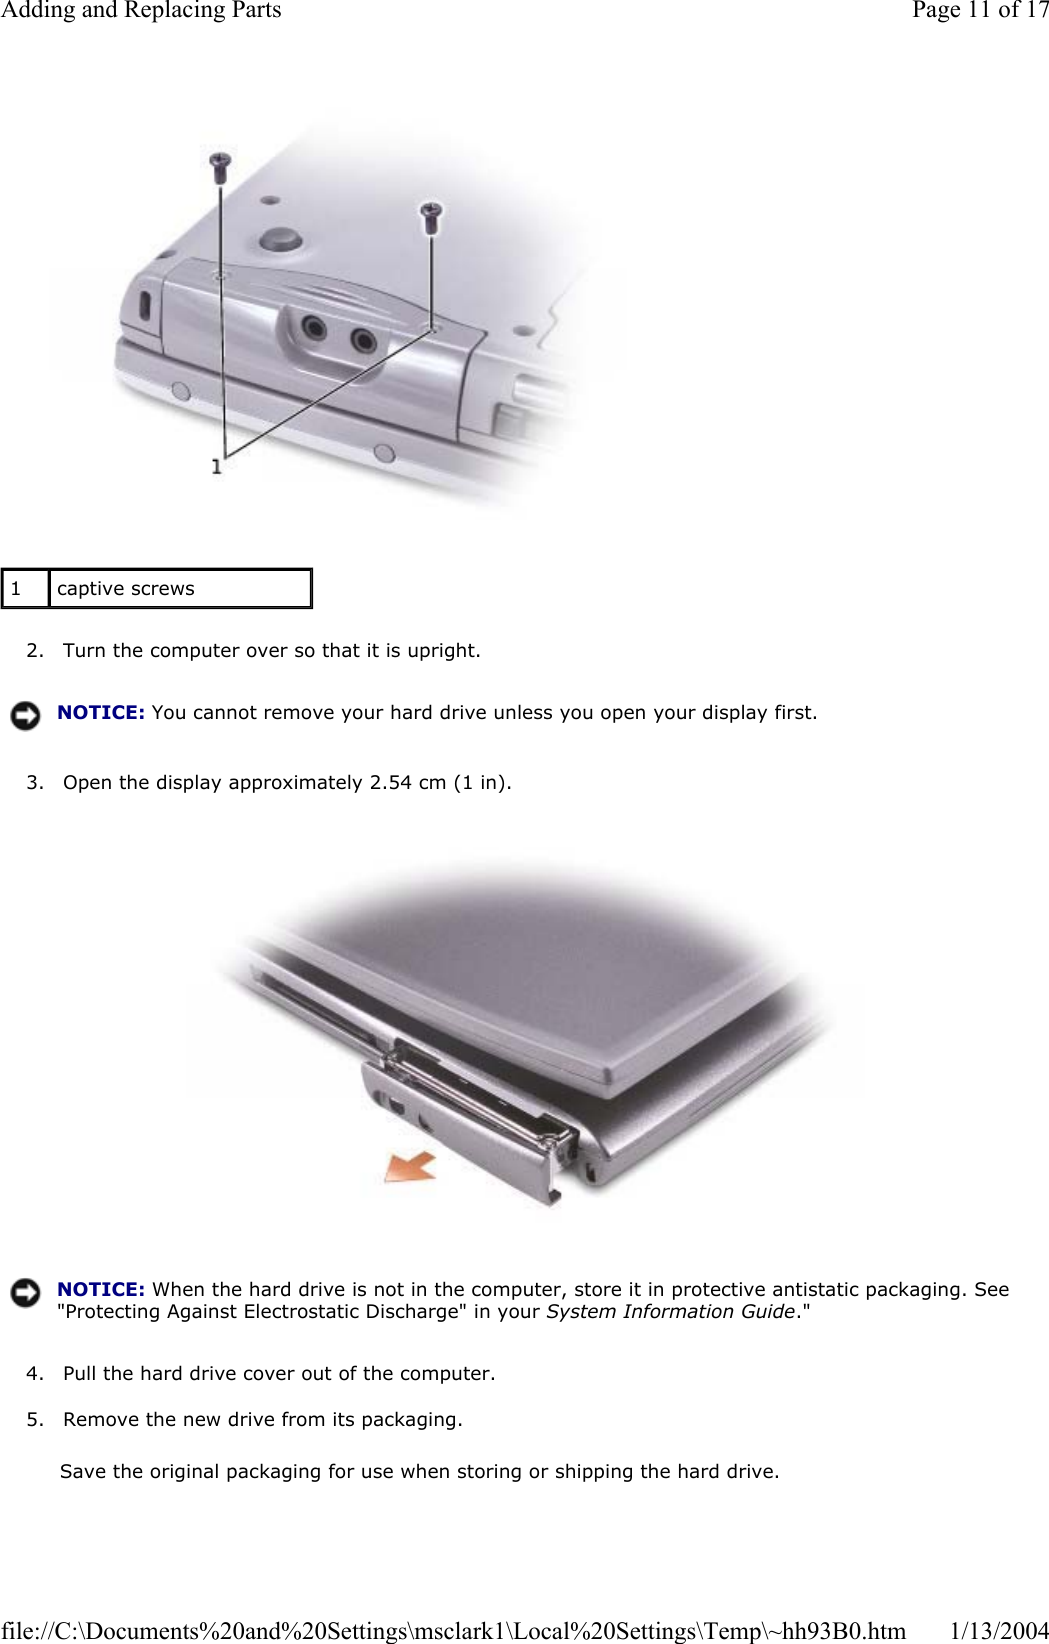
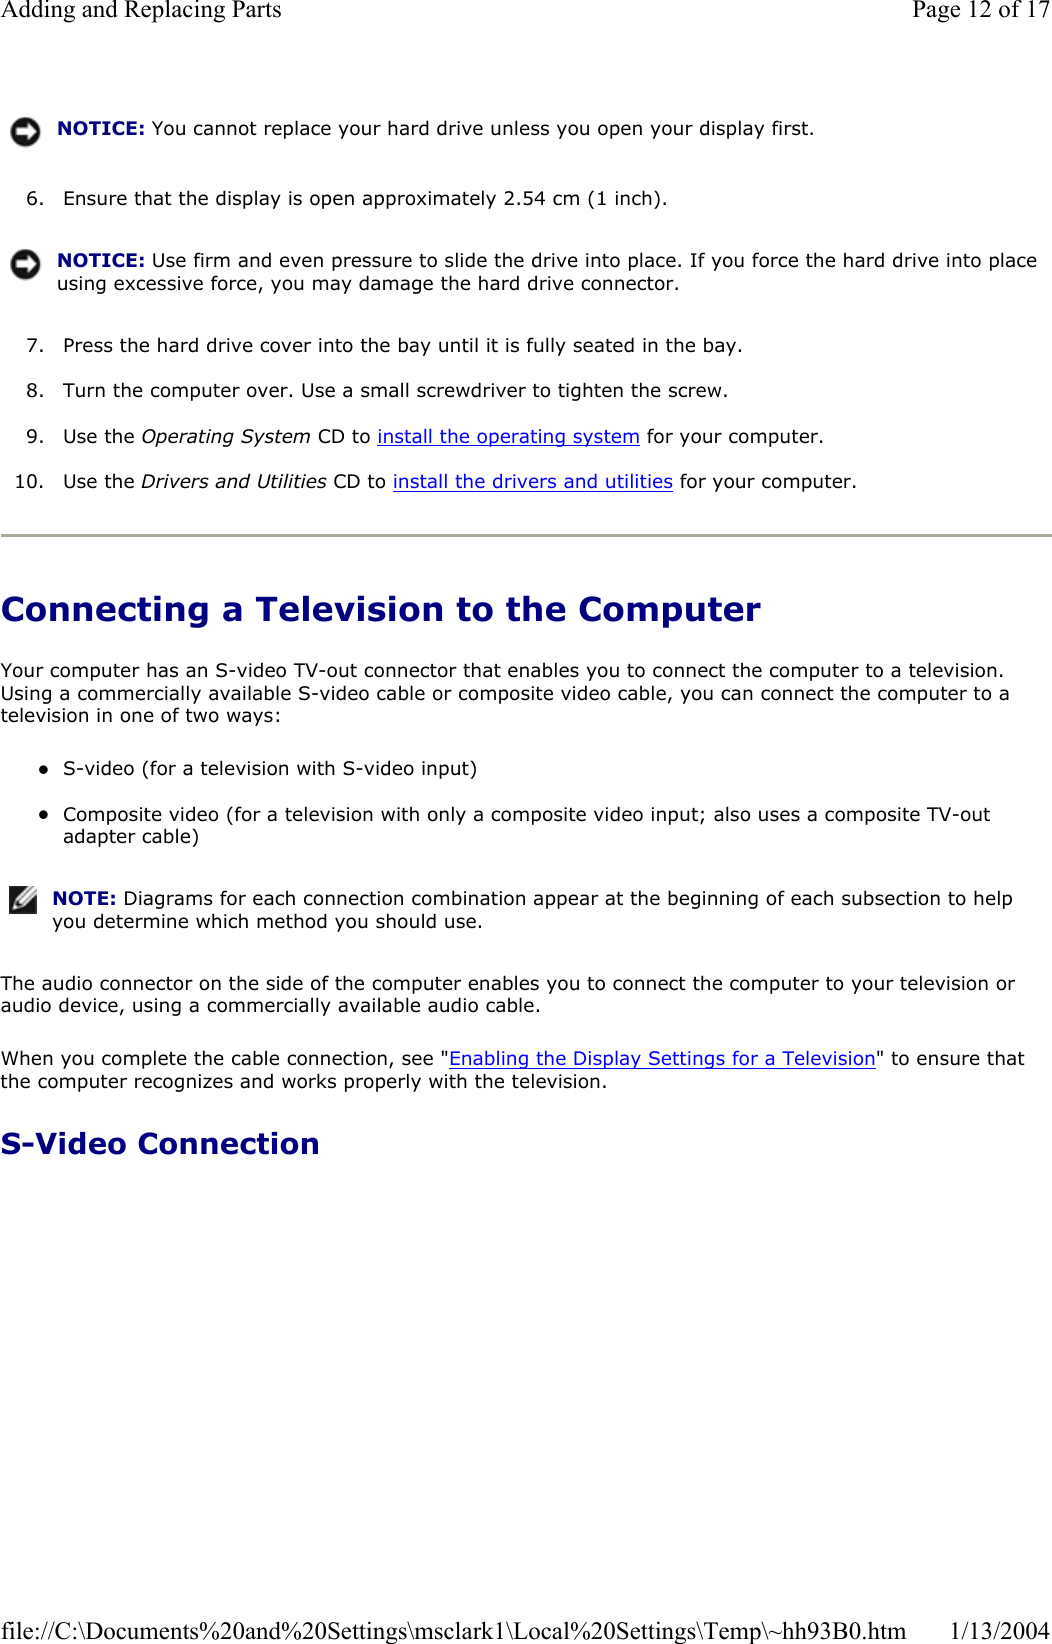
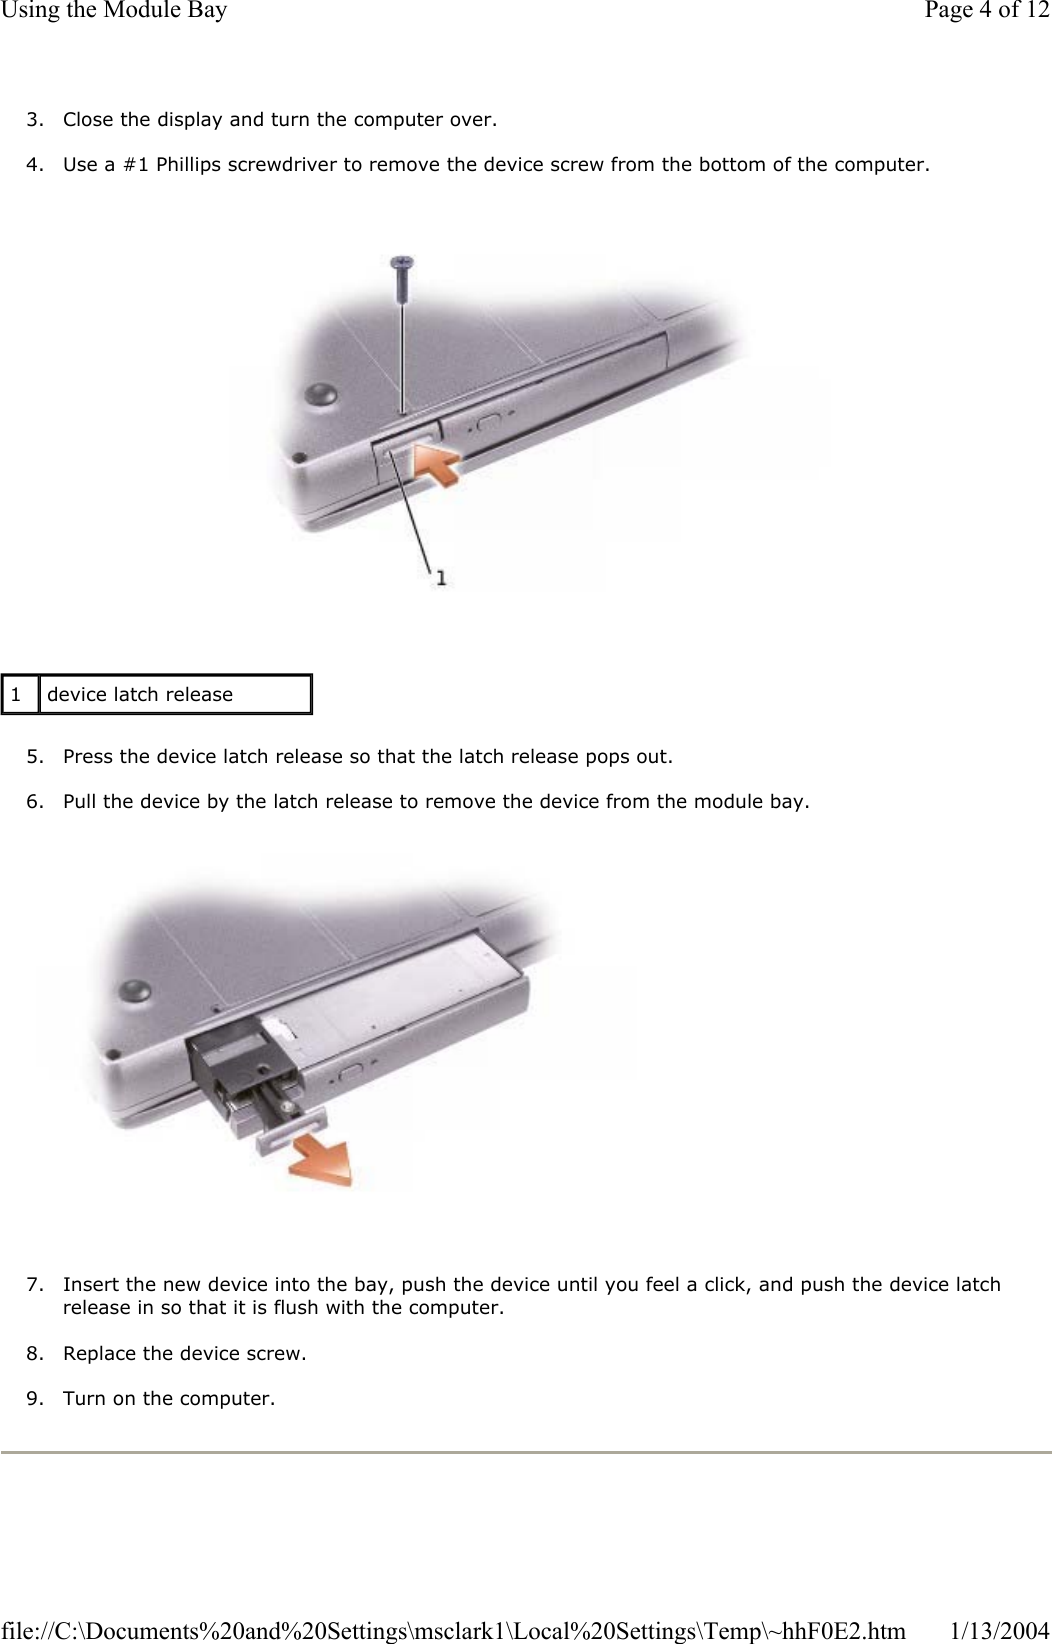
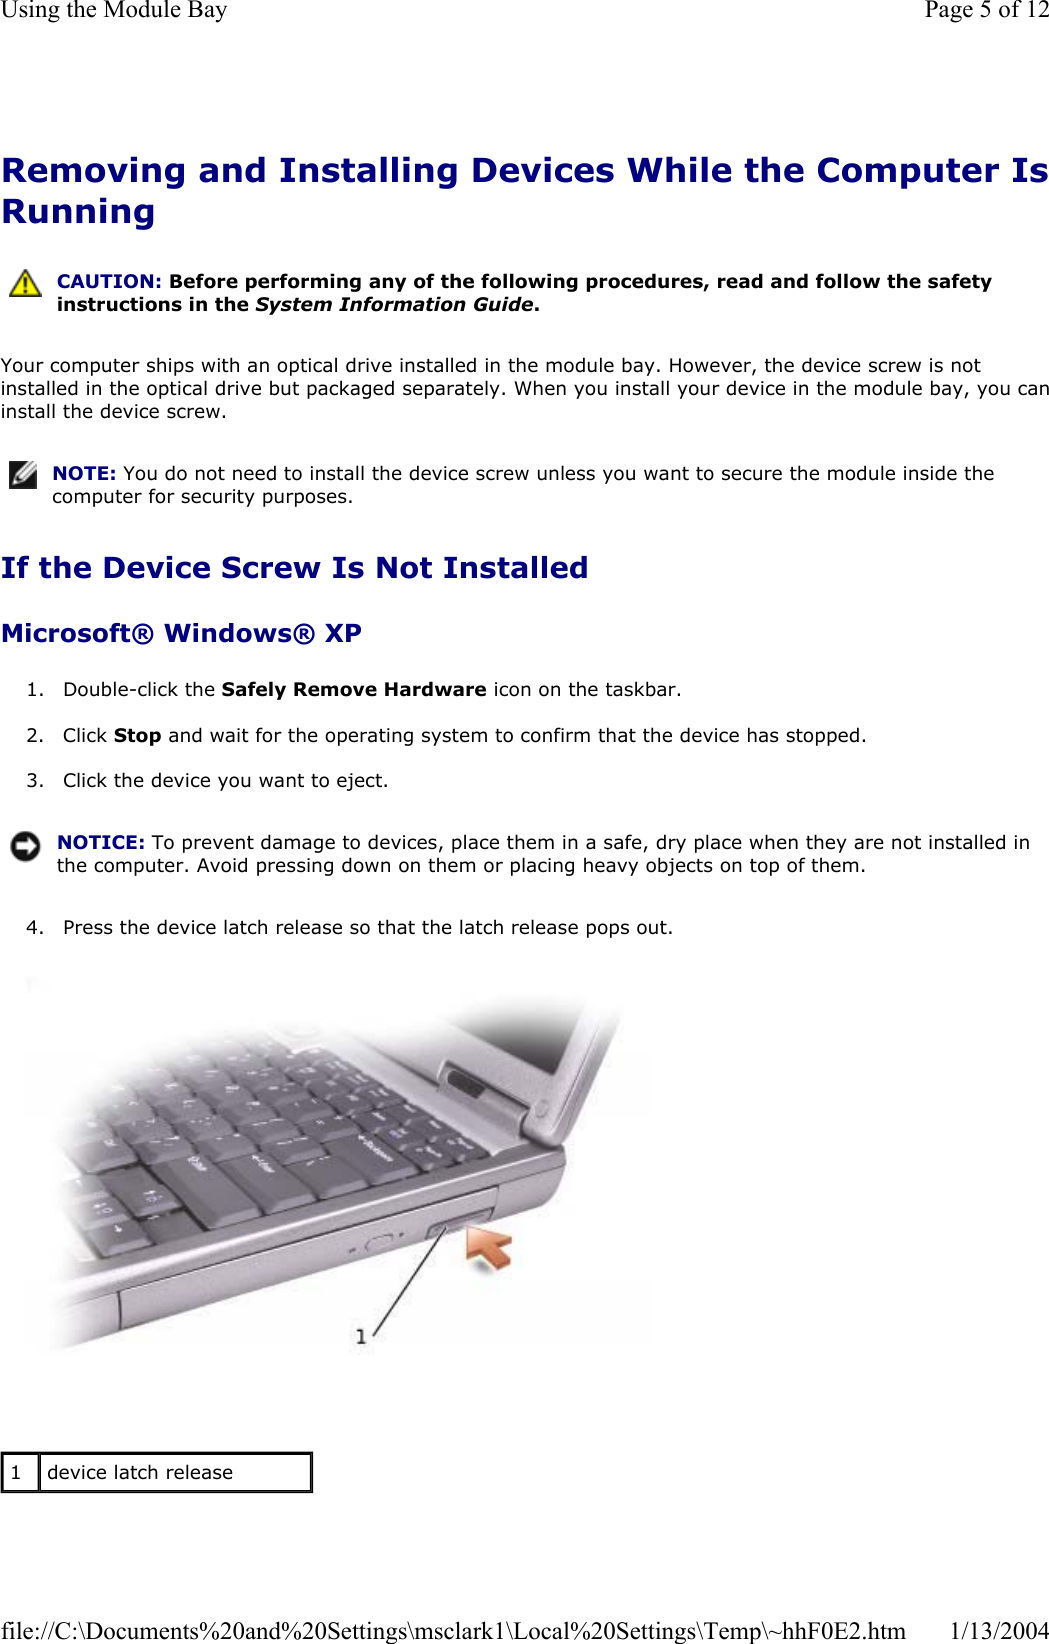
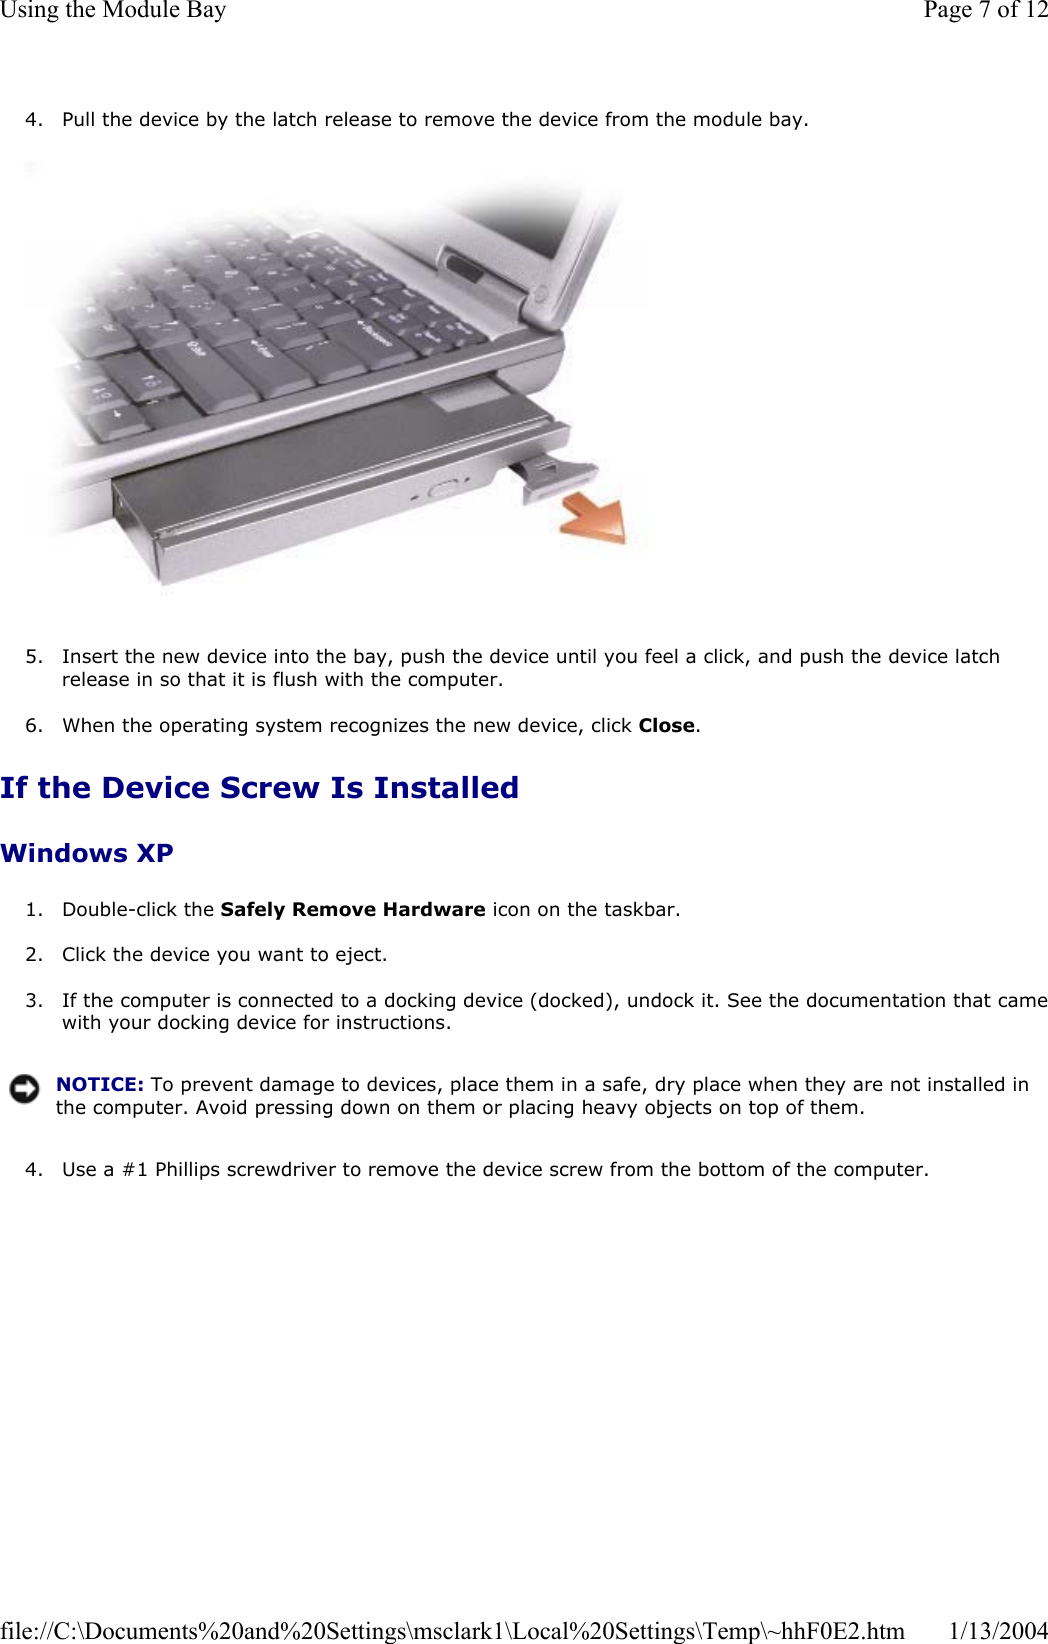
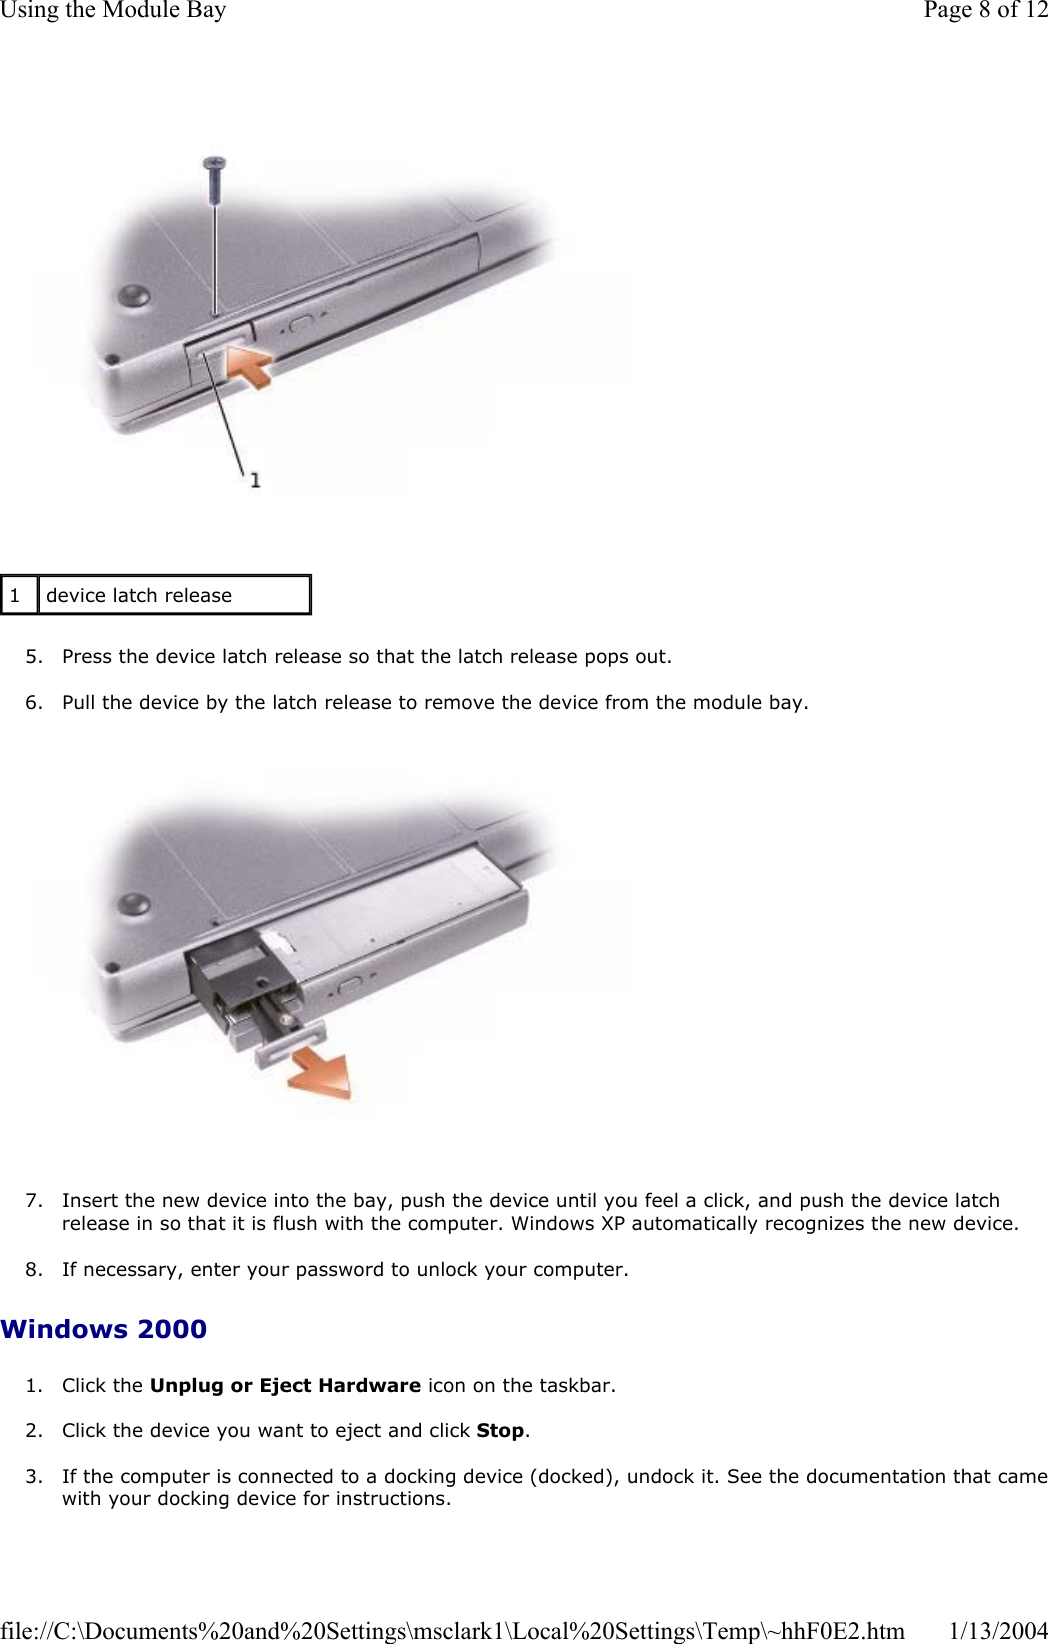
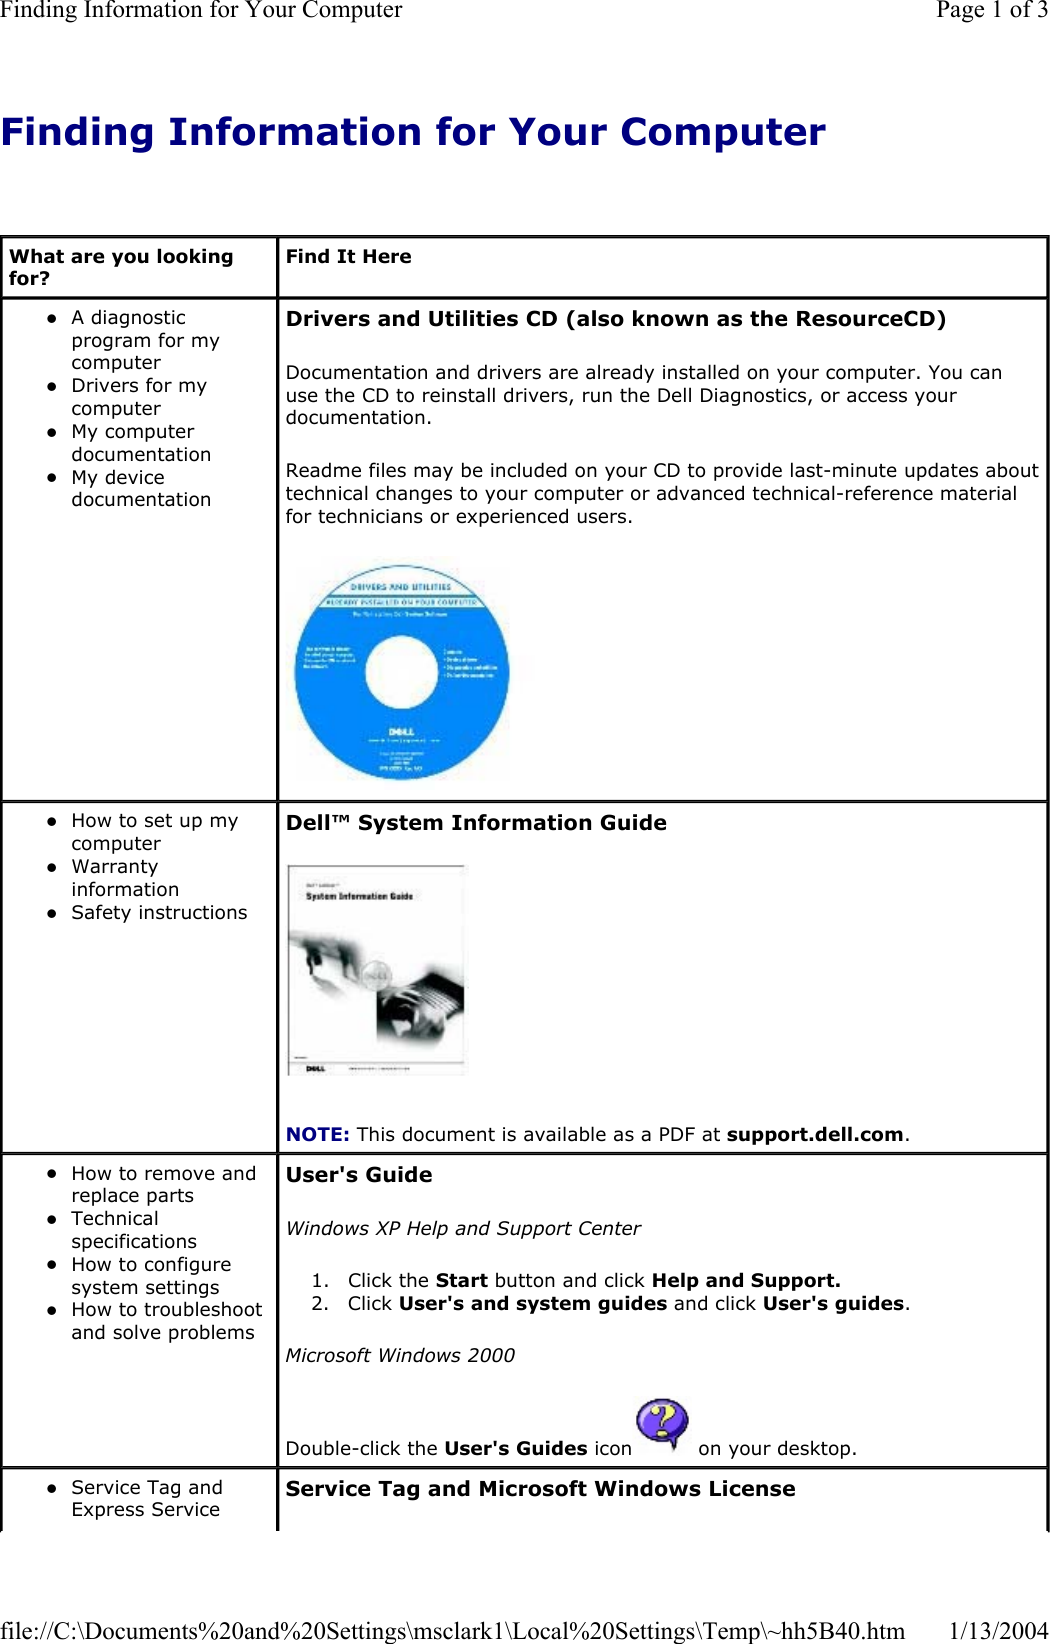
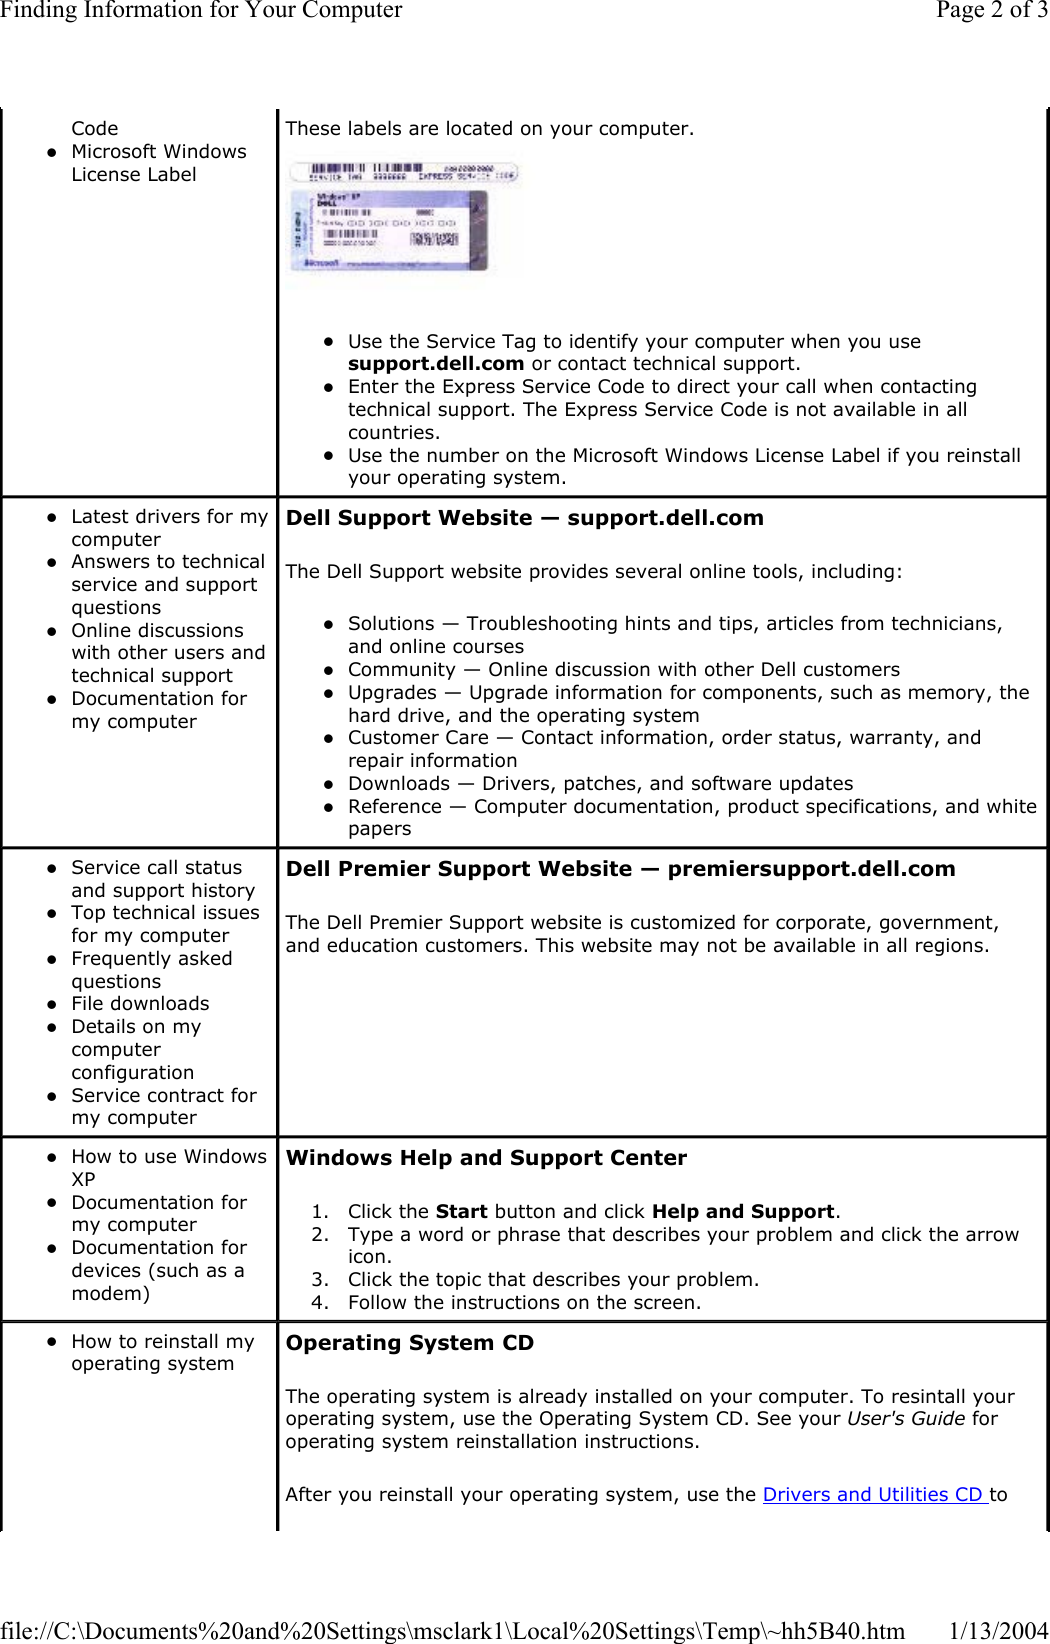
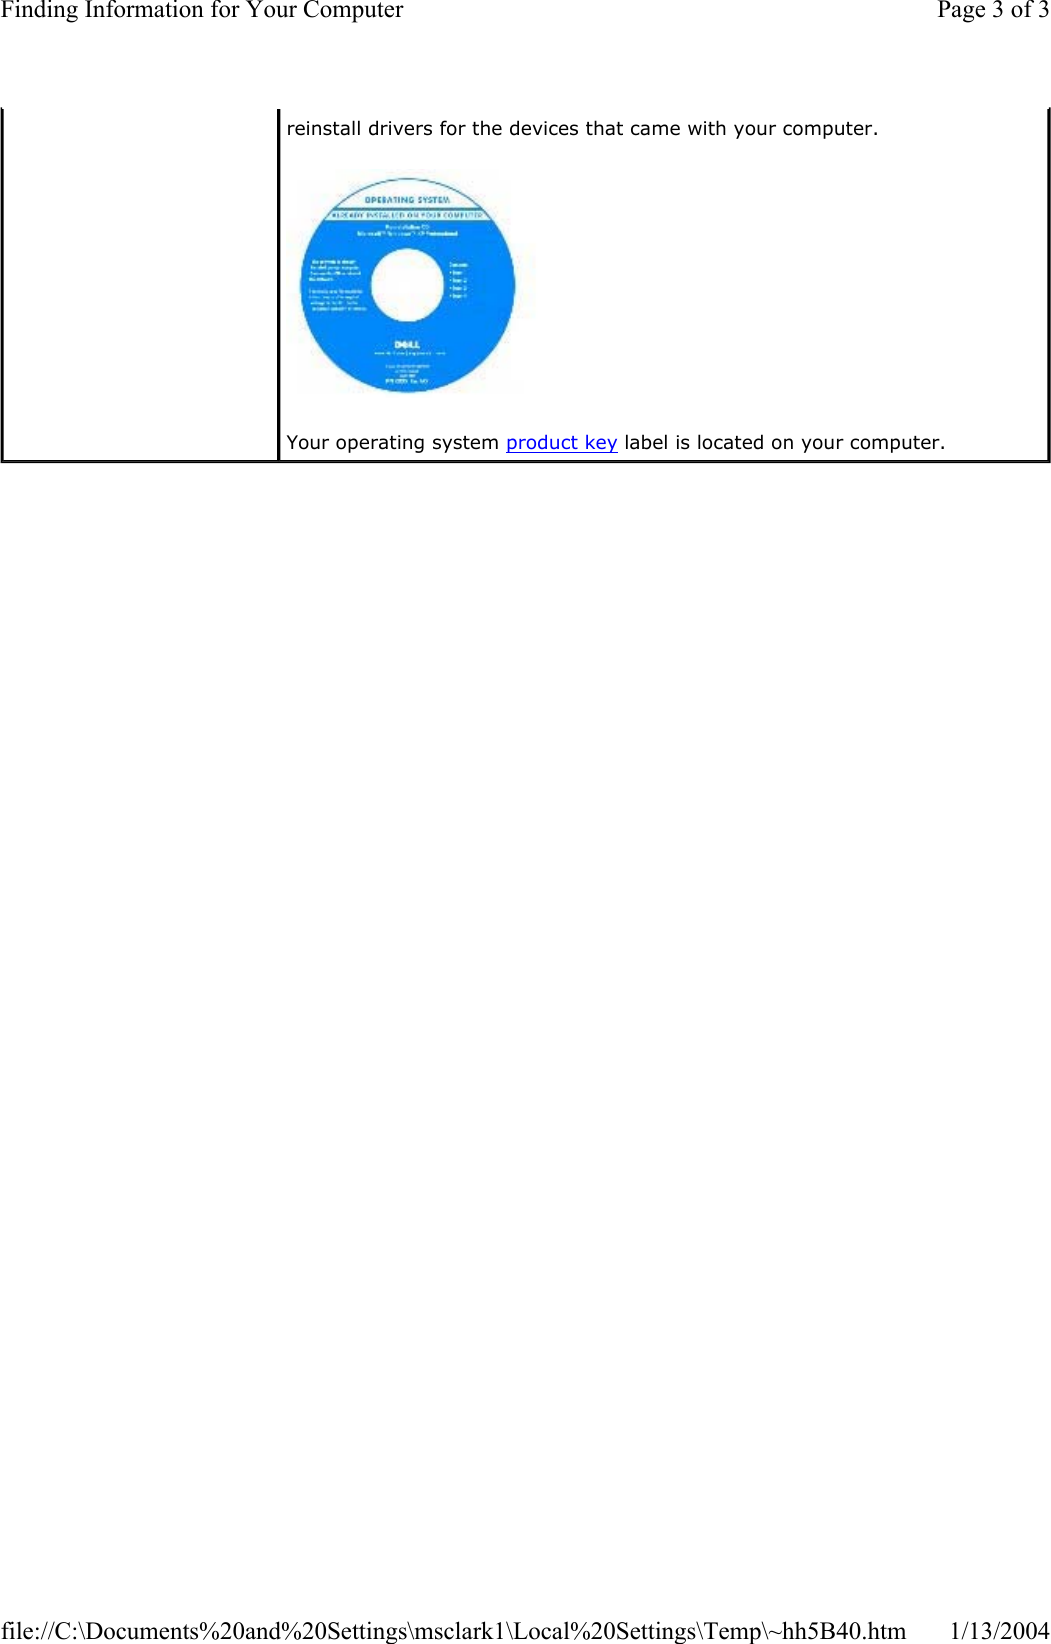
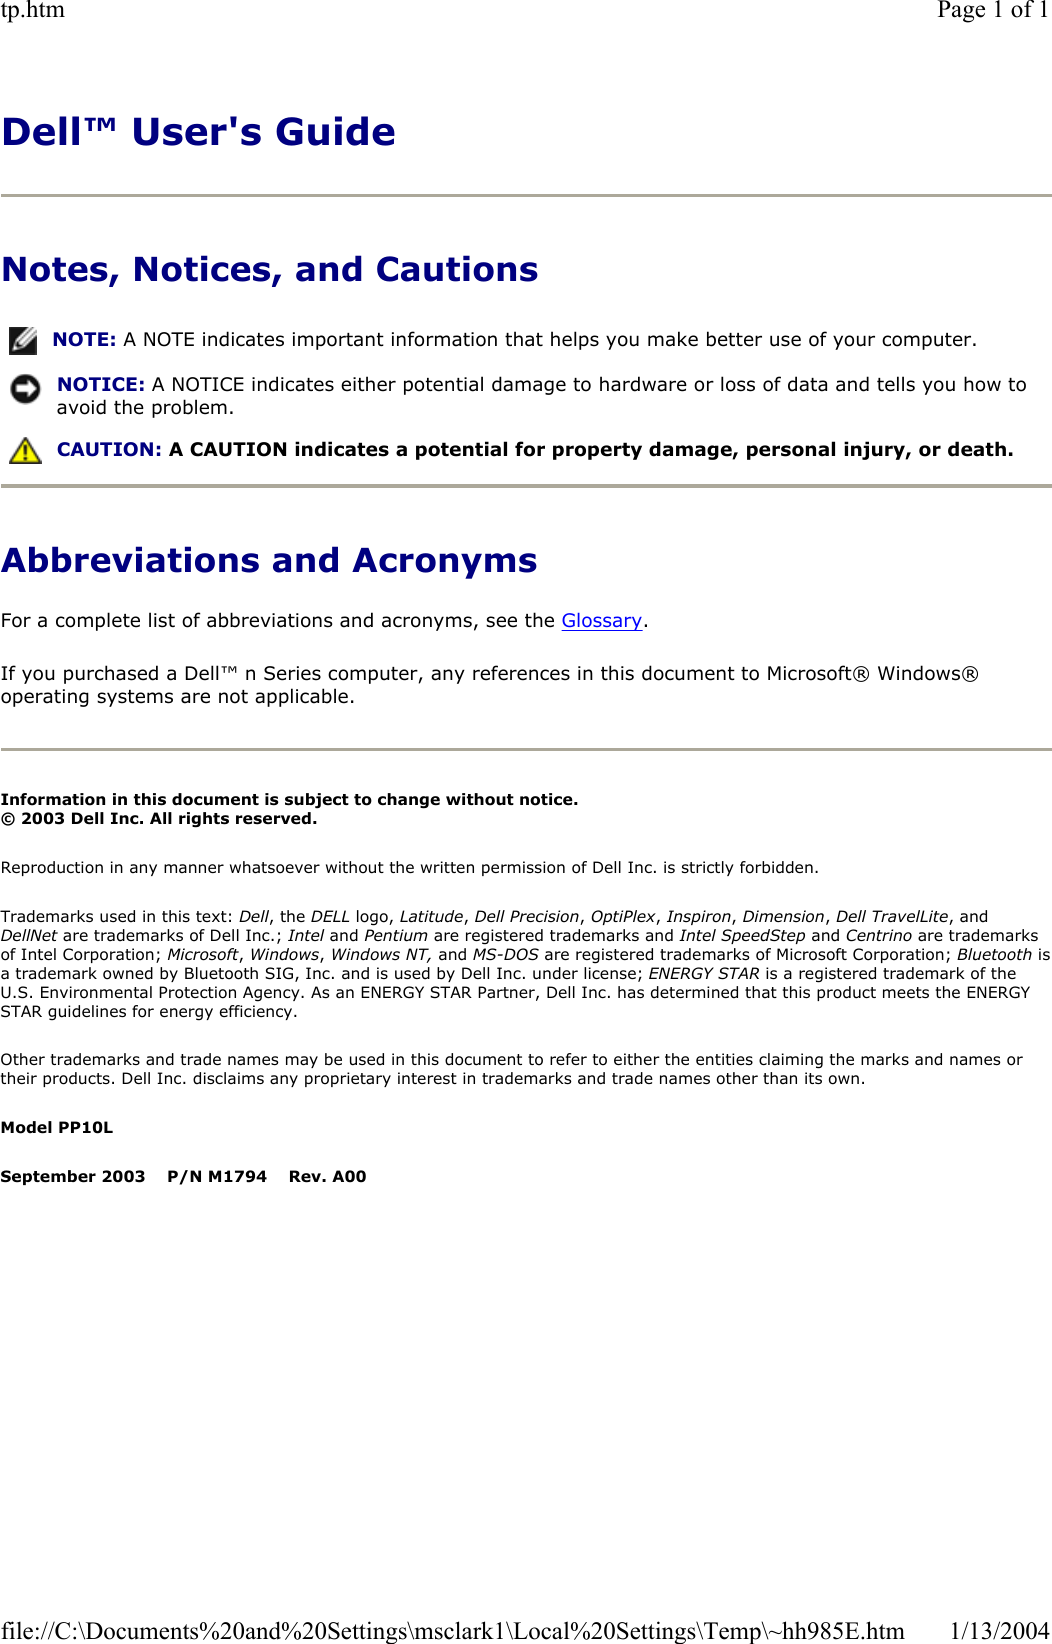
Dell 24GBRL Notebook PC with Intel PRO/Wireless 2200BG WLAN User Manual Users Guide Notebook
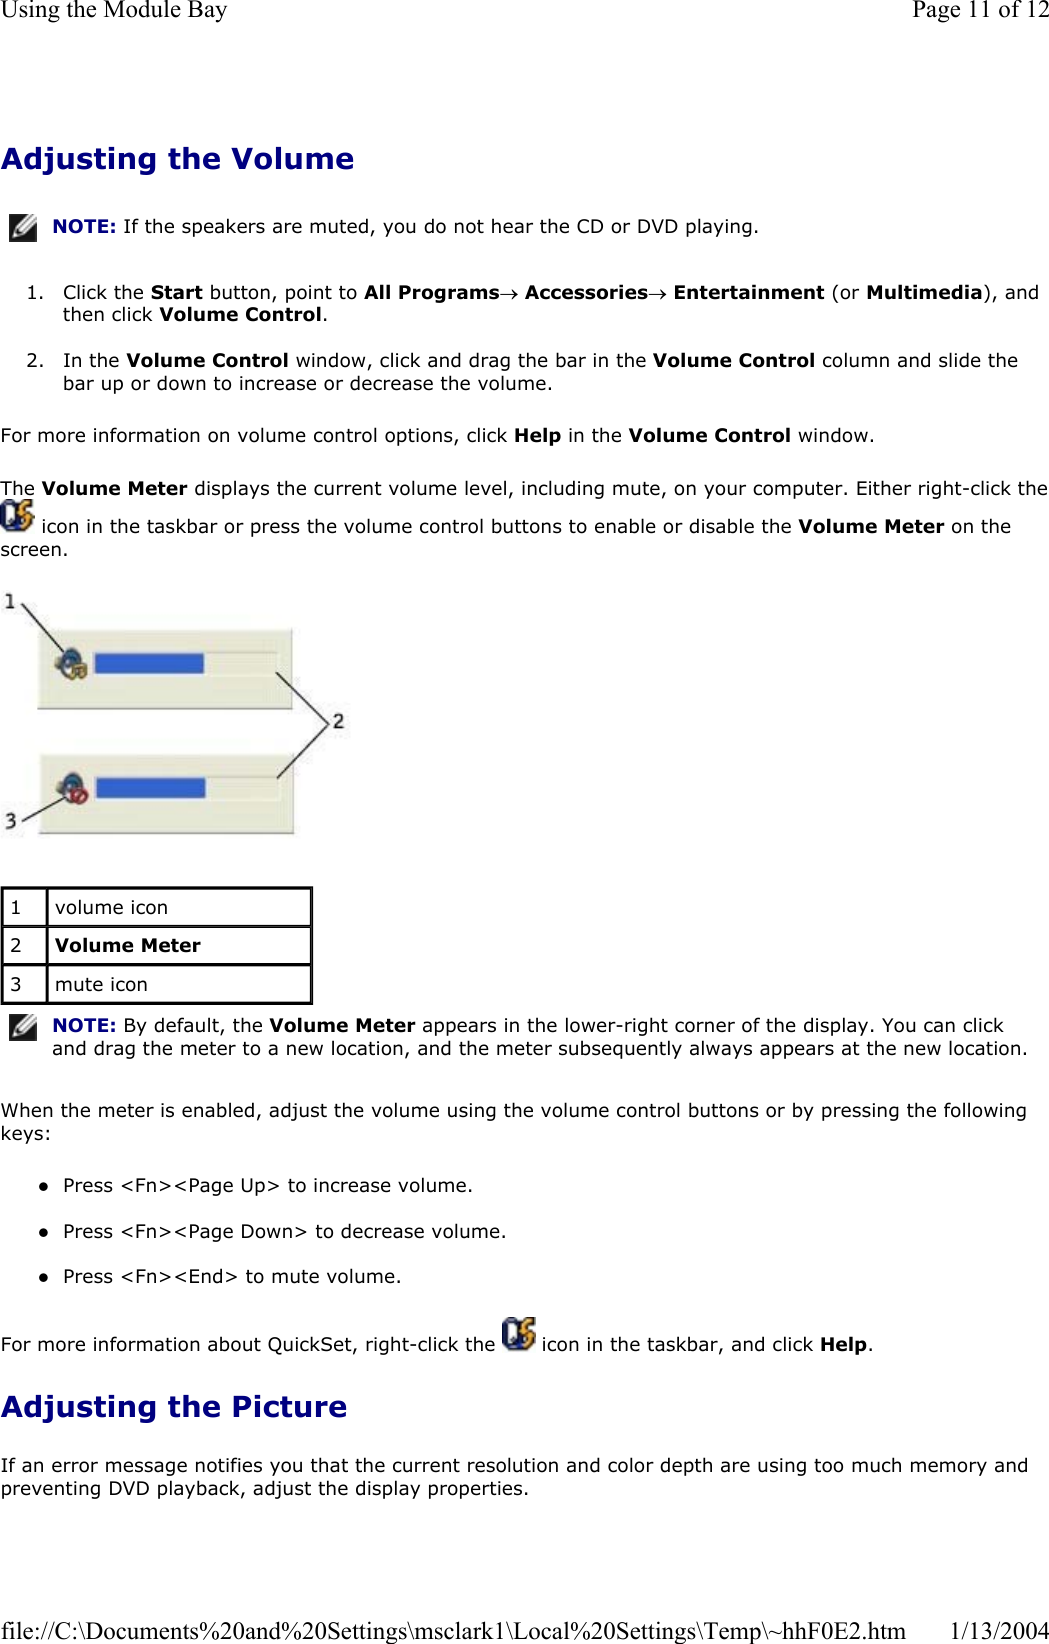
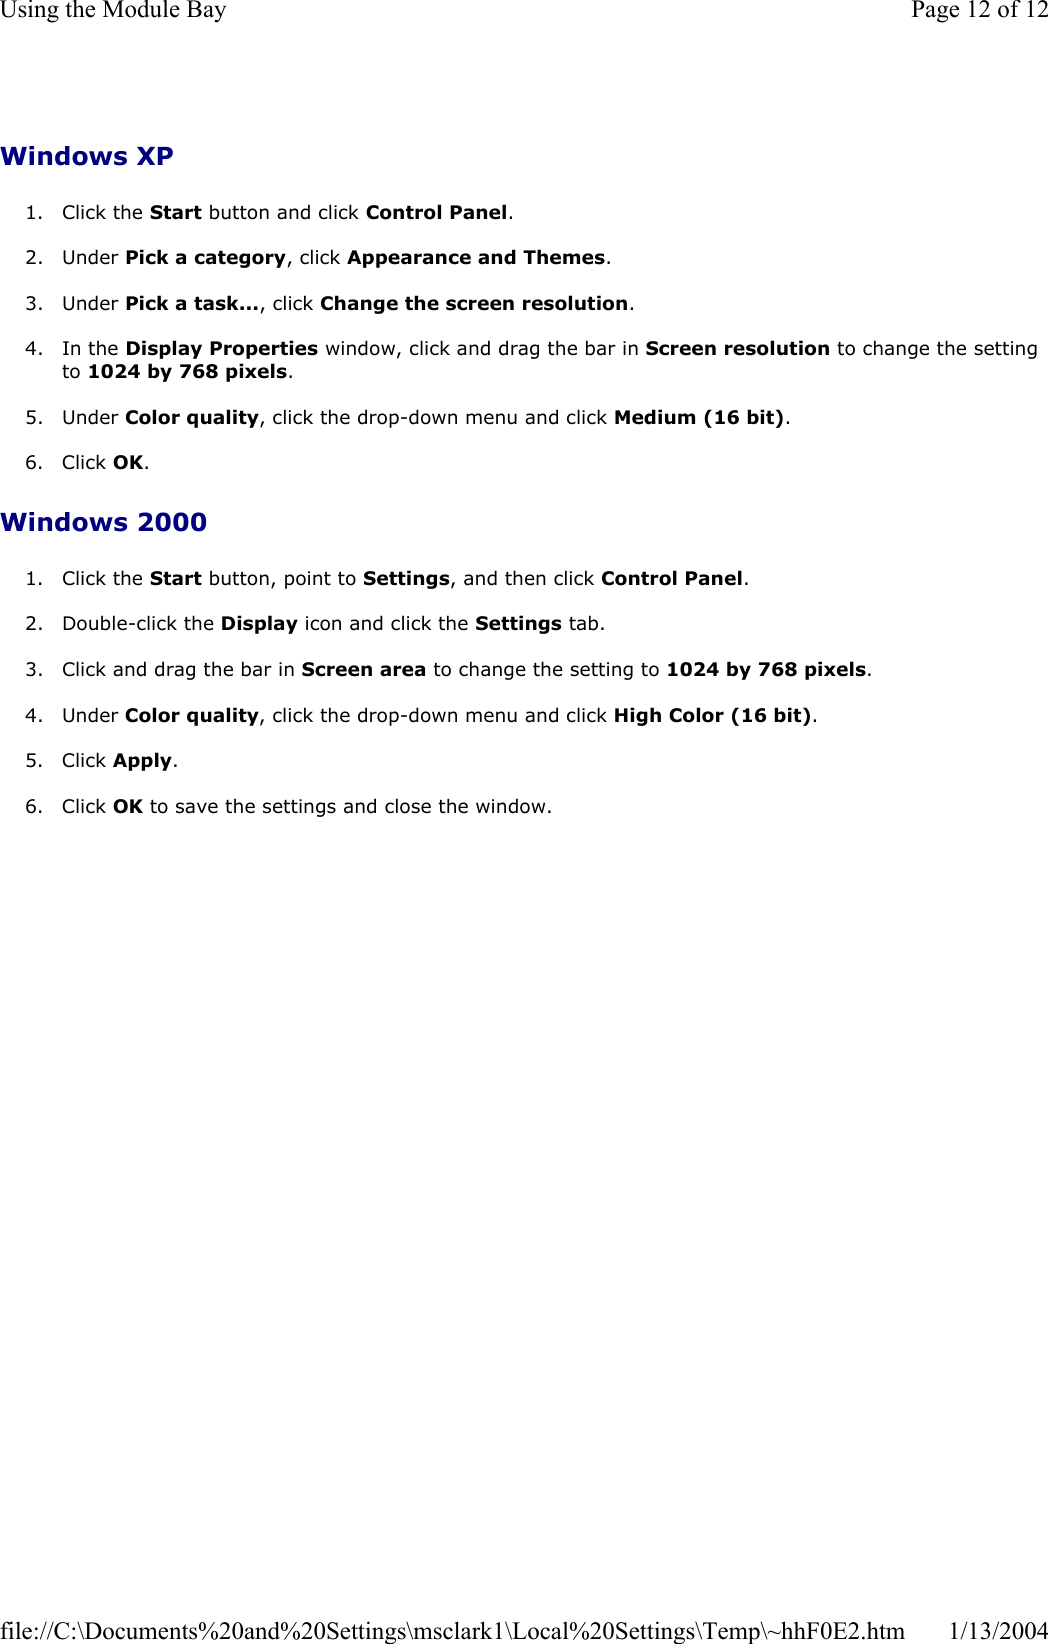
Dell Inc. Notebook PC with Intel PRO/Wireless 2200BG WLAN Users Guide Notebook
UserManual.wiki
>
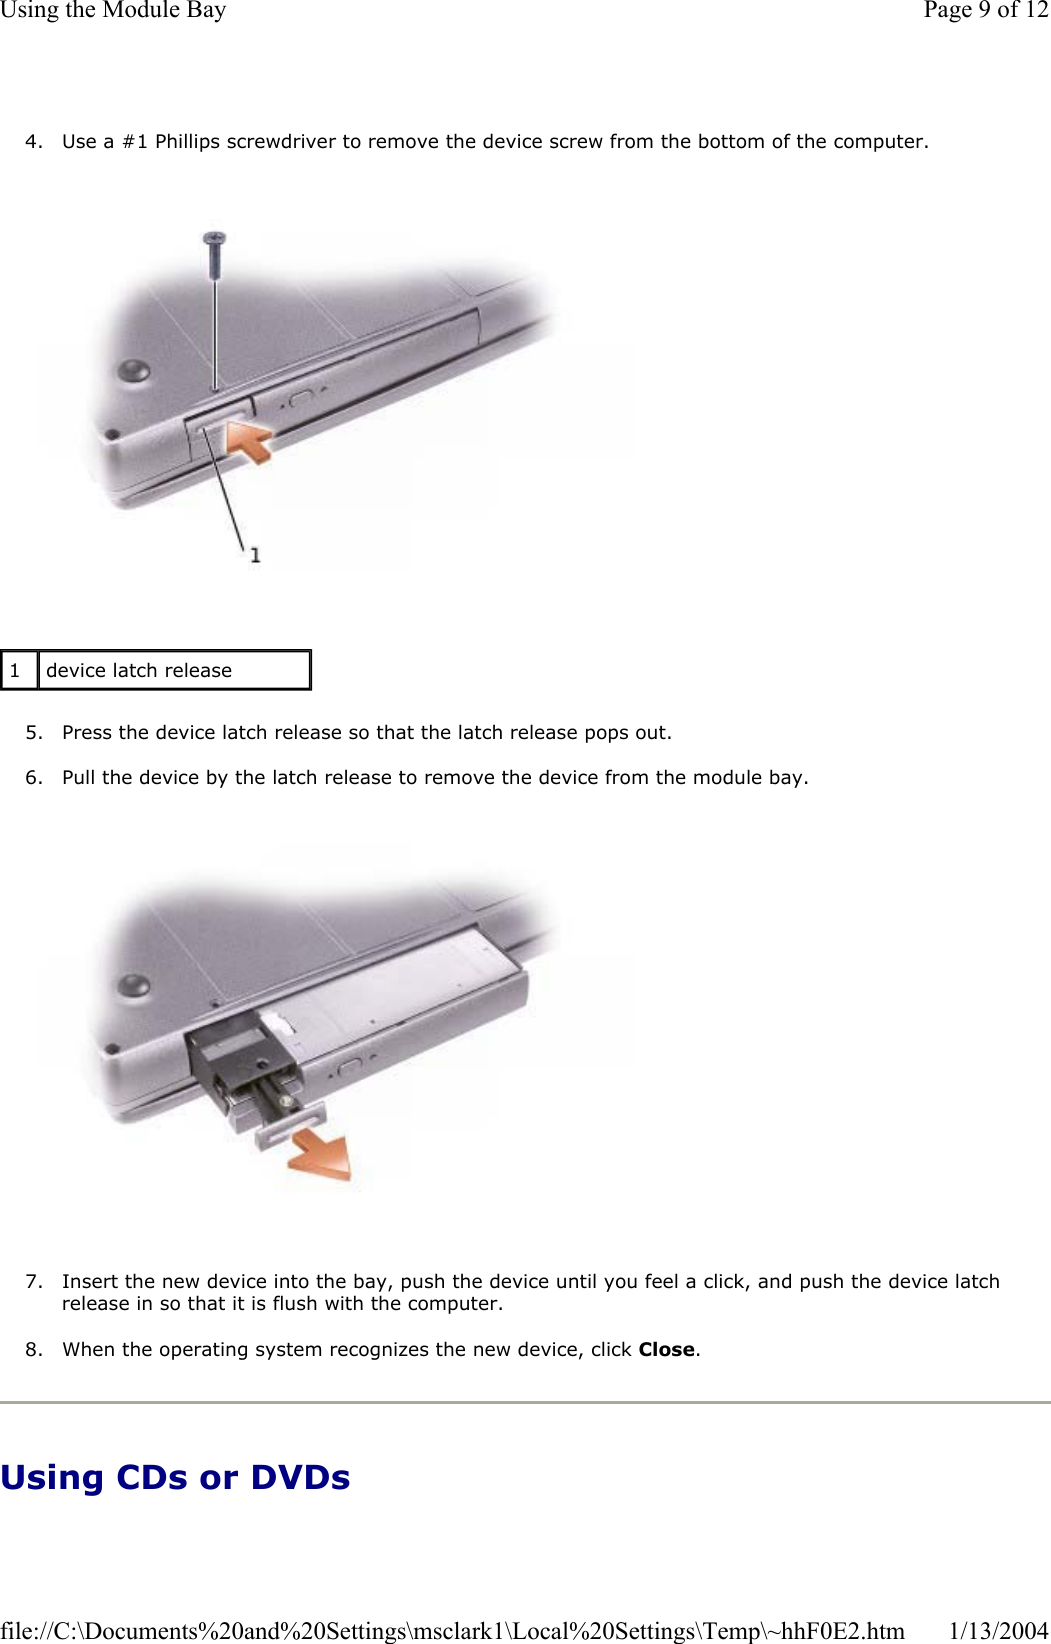
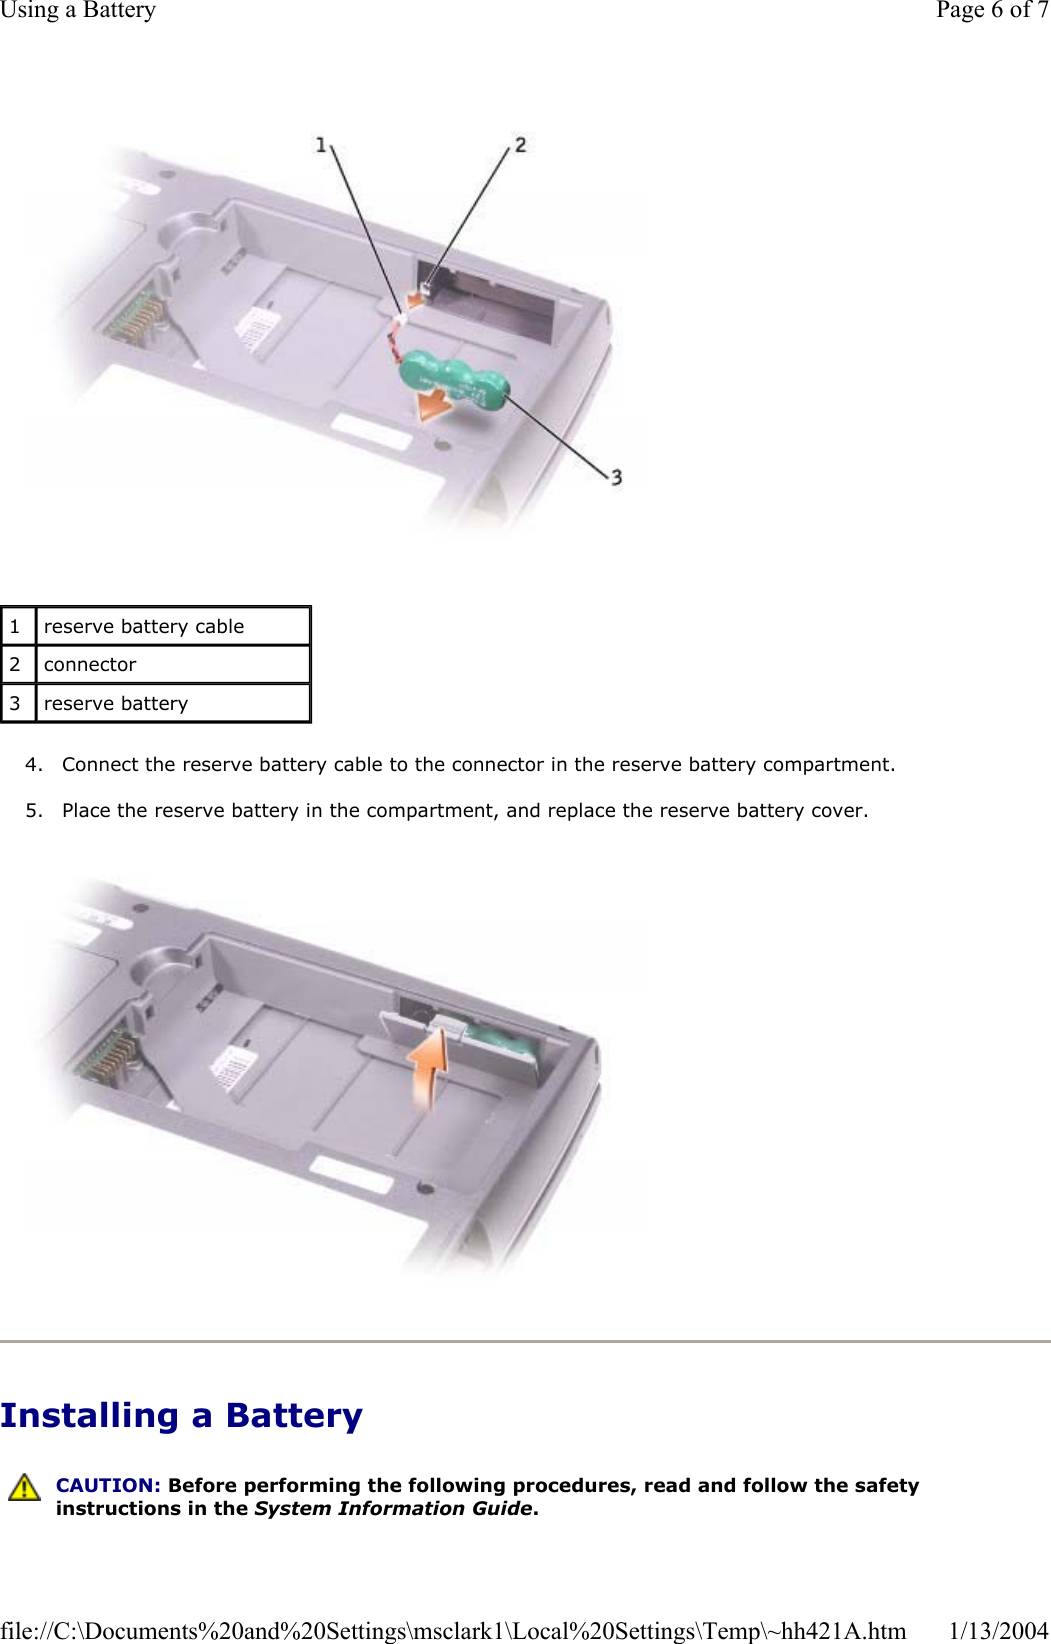
Dell
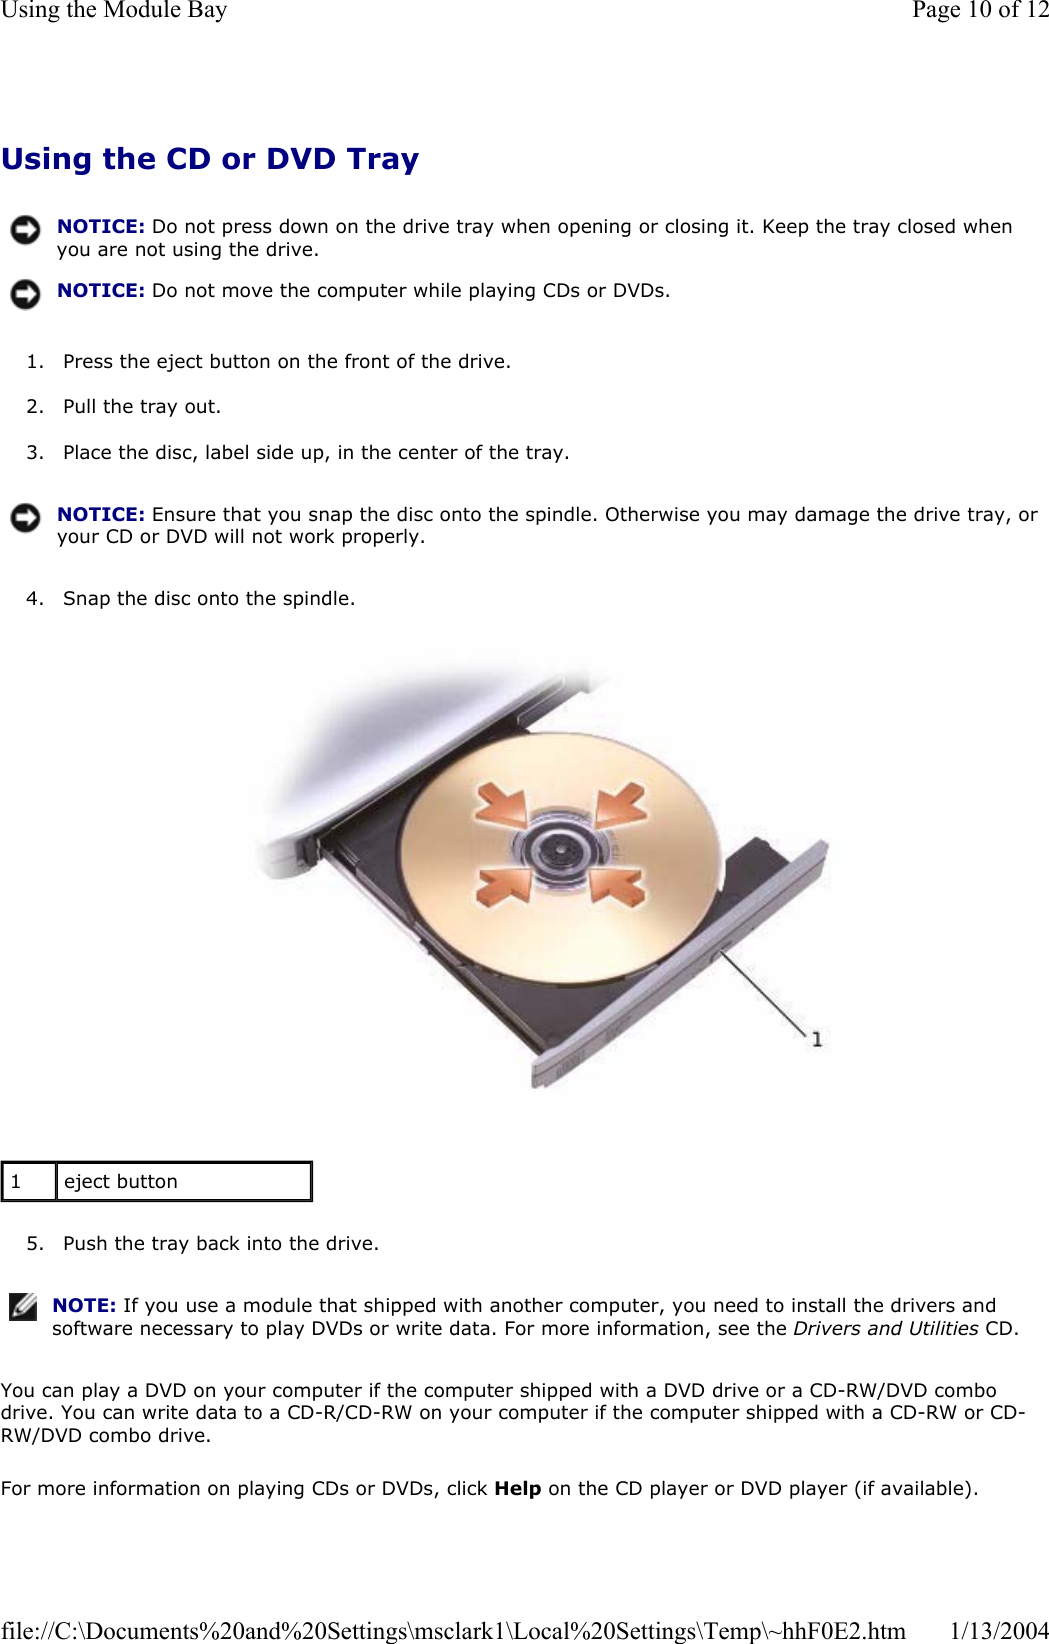
>
24GBRL User Manual
>
Notebook Manual
Contents
1.
Notebook Manual
2.
Regulatory Info
3.
Regulatory Information
4.
Users Manual Notebook
5.
Users Manual WLAN
6.
Manual 1
7.
Manual 2
8.
Manual 3
9.
Manual 4
Notebook Manual
Navigation menu
Upload a User Manual
Namespaces
Wiki Guide
HTML
PDF
Info
Views
User Manual
Discussion / Help
Navigation
![Bluetooth™ — A wireless technology standard for short-range (9 m [29 feet]) networking devices that allows for enabled devices to automatically recognize each other. boot sequence — Specifies the order of the devices from which the computer attempts to boot. bootable CD — A CD that you can use to start your computer. In case your hard drive is damaged or your computer has a virus, ensure that you always have a bootable CD or floppy disk available. Your Drivers and Utilities or Resource CD is a bootable CD. bootable disk — A disk that you can use to start your computer. In case your hard drive is damaged or your computer has a virus, ensure that you always have a bootable CD or floppy disk available. bps — bits per second — The standard unit for measuring data transmission speed. BTU — British thermal unit — A measurement of heat output. bus — A communication pathway between the components in your computer. bus speed — The speed, given in MHz, that indicates how fast a bus can transfer information. byte — The basic data unit used by your computer. A byte is usually equal to 8 bits. CC — Celsius — A temperature measurement system where 0° is the freezing point and 100° is the boiling point of water. cache — A special high-speed storage mechanism which can be either a reserved section of main memory or an independent high-speed storage device. The cache enhances the efficiency of many microprocessor operations. L1 cache — Primary cache stored inside the microprocessor. L2 cache — Secondary cache which can either be external to the microprocessor or incorporated into the microprocessor architecture. carnet — An international customs document that facilitates temporary imports into foreign countries. Also known as a merchandise passport.CD — compact disc — An optical form of storage media, typically used for audio and software programs. CD drive — A drive that uses optical technology to read data from CDs. CD player — The software used to play music CDs. The CD player displays a window with buttons that you use to play a CD. CD-R — CD recordable — A recordable version of a CD. Data can be recorded only once onto a CD-R. Once recorded, the data cannot be erased or written over. CD-RW — CD rewritable — A rewritable version of a CD. Data can be written to a CD-RW disc, and then erased and written over (rewritten). Page 2 of 14Glossary1/13/2004file://C:\Documents%20and%20Settings\msclark1\Local%20Settings\Temp\~hhBAF1.htm](https://usermanual.wiki/Dell/24GBRL.Notebook-Manual/User-Guide-393906-Page-3.png)

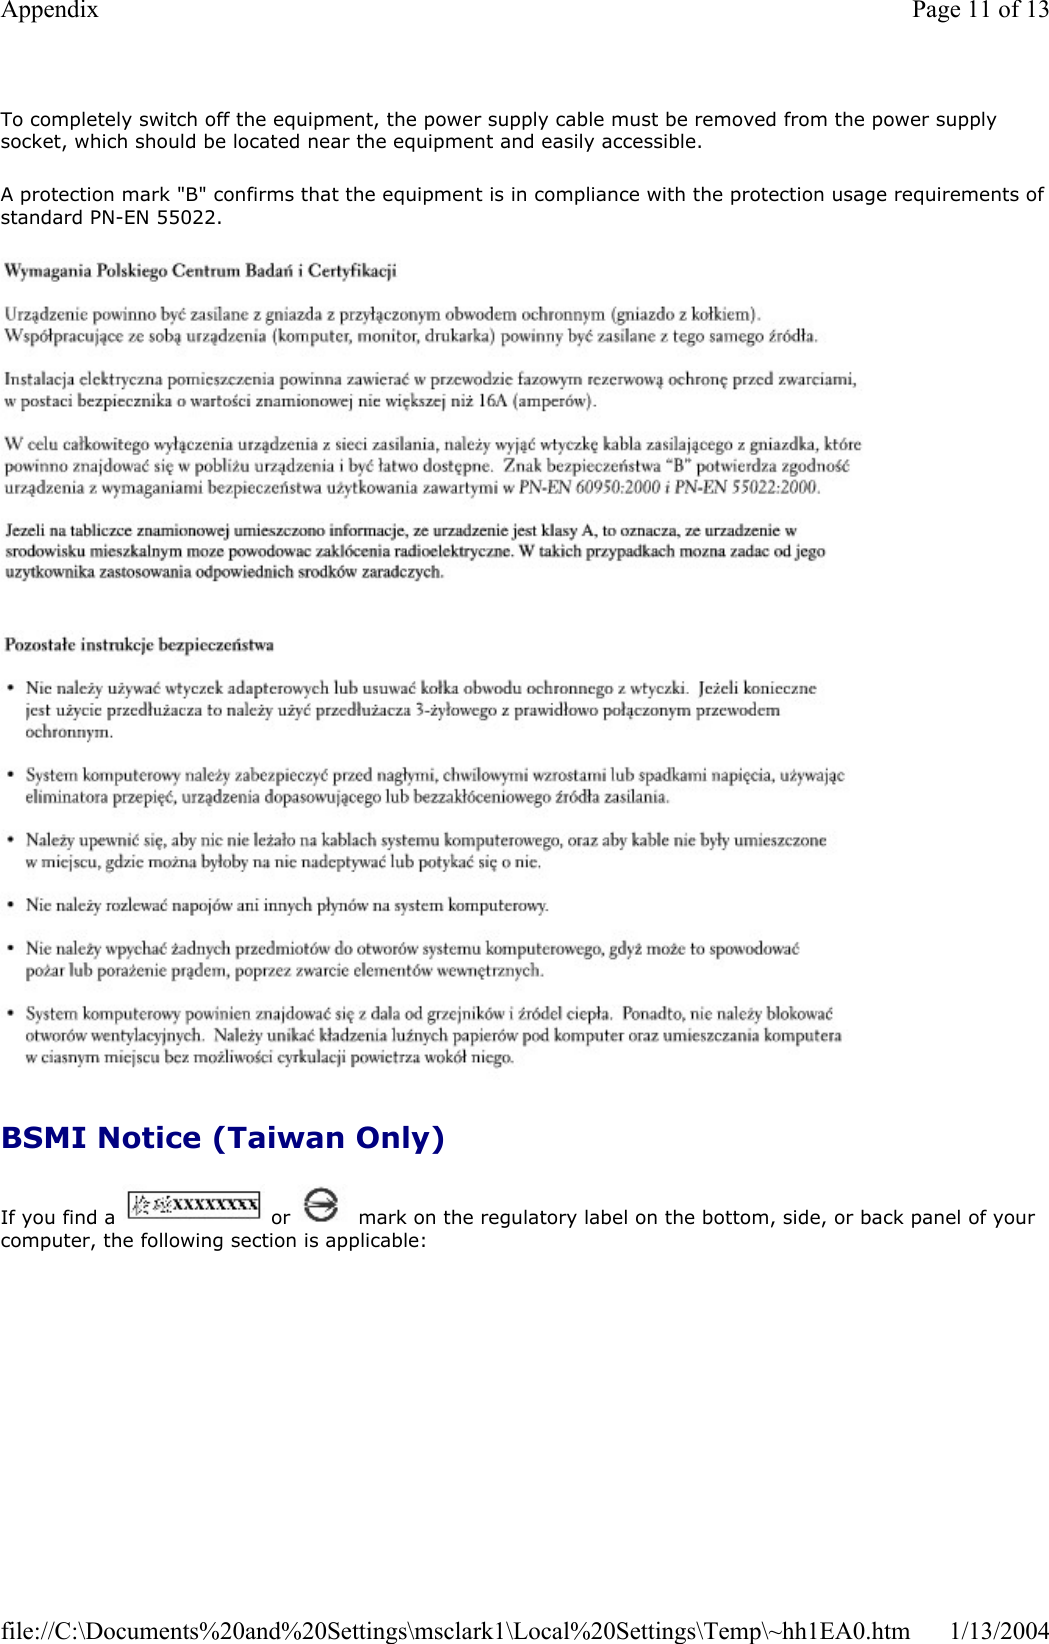
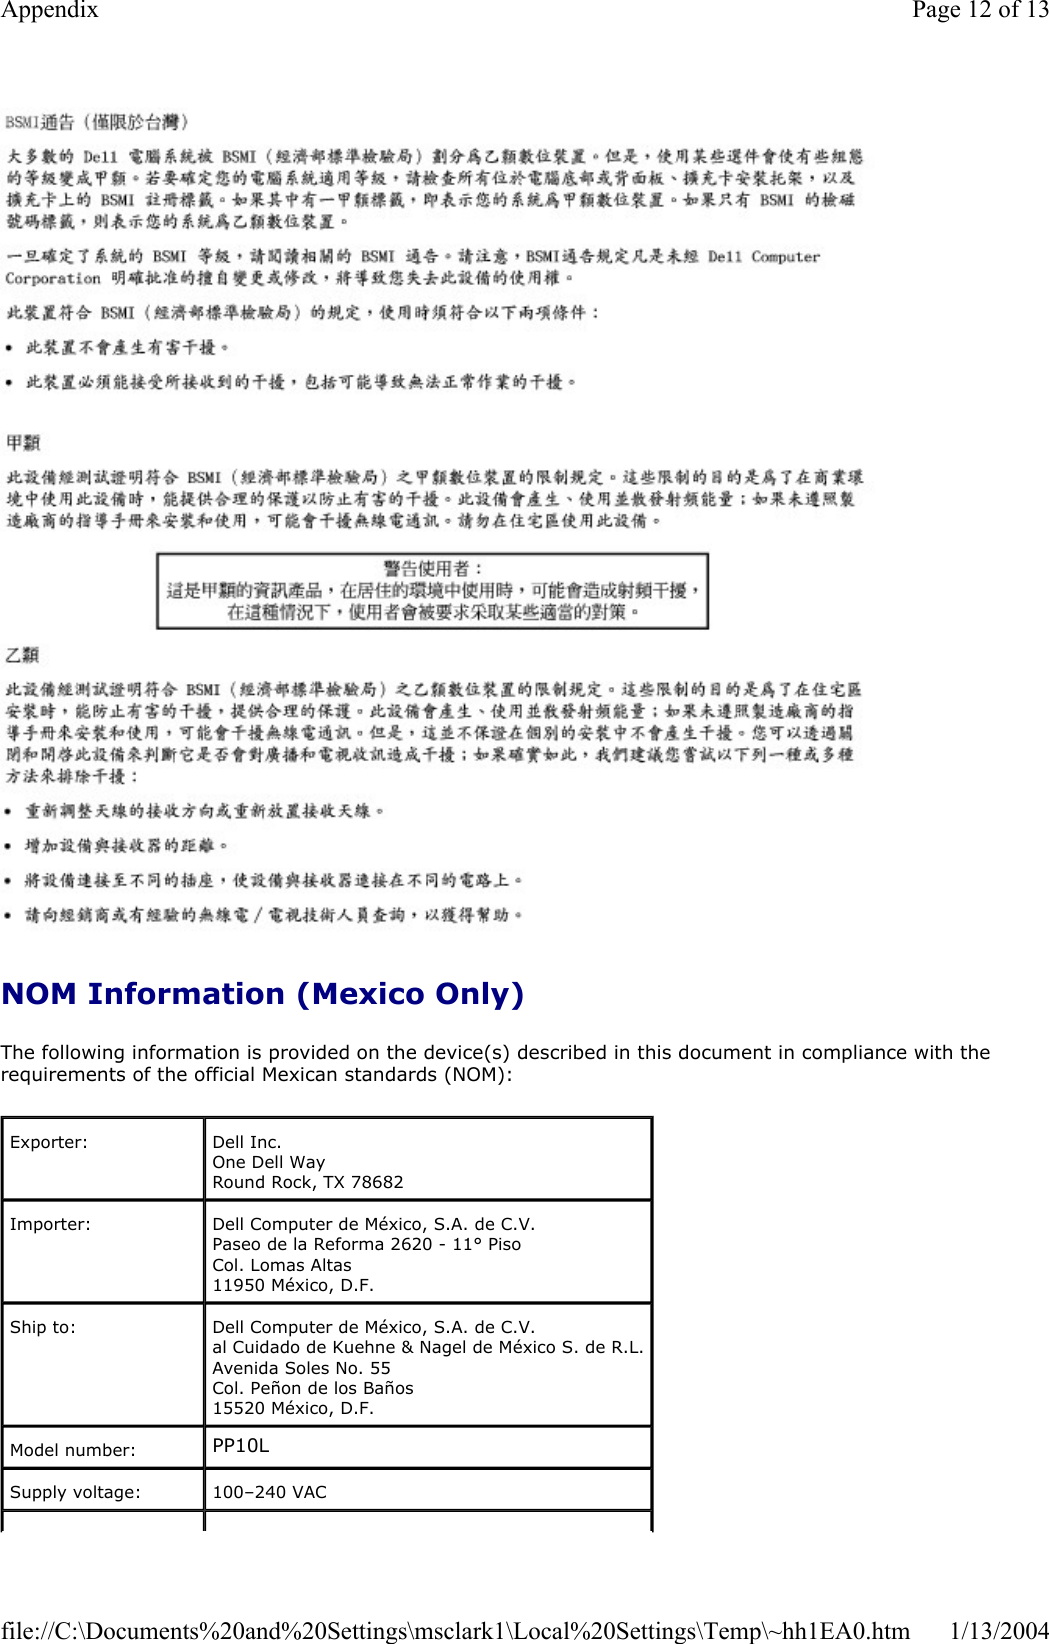
![AppendixMacrovision Product NoticeErgonomic Computing HabitsRegulatory NoticesWarranty and Return PolicyMacrovision Product Notice This product incorporates copyright protection technology that is protected by method claims of certain U.S. patents and other intellectual property rights owned by Macrovision Corporation and other rights owners. Use of this copyright protection technology must be authorized by Macrovision Corporation, and is intended for home and other limited viewing uses only unless otherwise authorized by Macrovision Corporation. Reverse engineering or disassembly is prohibited. Ergonomic Computing Habits For comfort and efficiency, observe the following ergonomic guidelines when setting up and using your computer workstation: zPosition your computer directly in front of you as you work. zAdjust the tilt of the computer's display, its contrast and/or brightness settings, and the lighting around you (such as overhead lights, desk lamps, and the curtains or blinds on nearby windows) to minimize reflections and glare on the display. zWhen using an external monitor with your computer, set the monitor at a comfortable viewing distance (usually 450 to 610 millimeters [18 to 24 inches] from your eyes). Make sure the monitor screen is at eye level or slightly lower when you are sitting in front of the monitor. zUse a chair that provides good lower-back support. zKeep your forearms horizontal with your wrists in a neutral, comfortable position while using the keyboard, touch pad, track stick, or external mouse. zAlways use the palm rest with the keyboard, touch pad, or track stick. Leave space to rest your hands when using an external mouse. zLet your upper arms hang naturally at your sides. CAUTION: Improper or prolonged keyboard use may result in injury. CAUTION: Viewing the display or external monitor screen for extended periods of time may result in eye strain. Page 1 of 13Appendix1/13/2004file://C:\Documents%20and%20Settings\msclark1\Local%20Settings\Temp\~hh1EA0.htm](https://usermanual.wiki/Dell/24GBRL.Notebook-Manual/User-Guide-393906-Page-16.png)


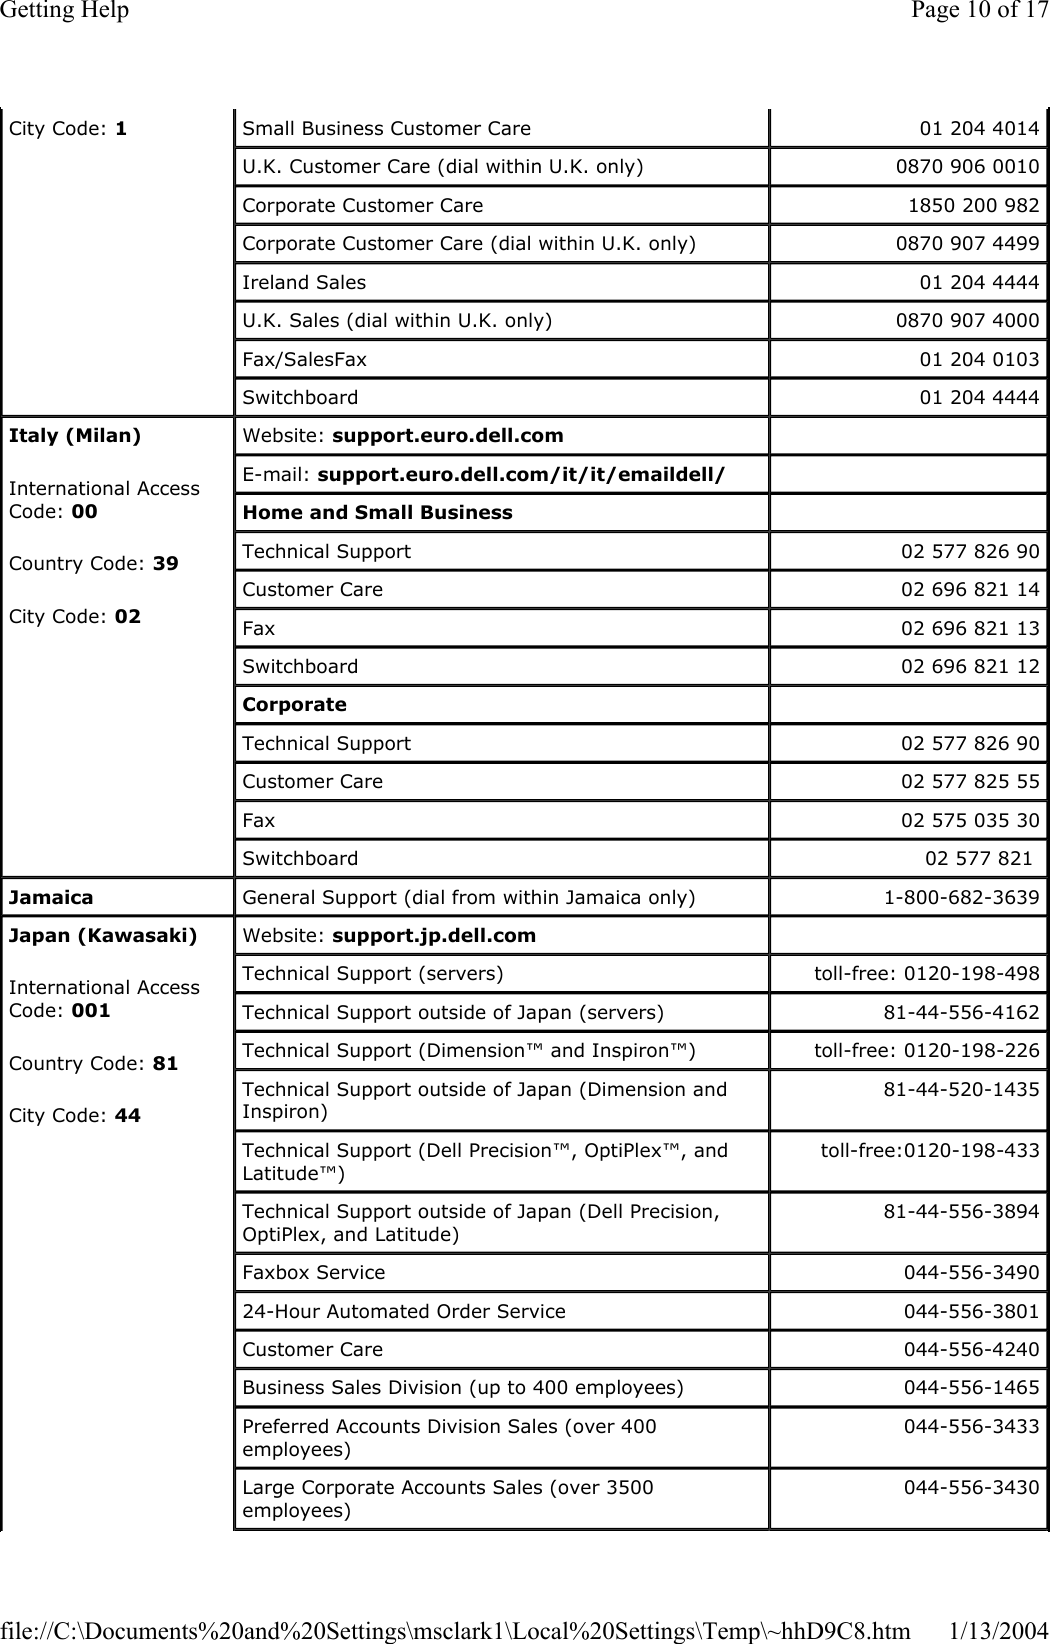
![Fax Technical Support 08 590 05 594 Sales 08 590 05 185 Switzerland (Geneva)International Access Code: 00Country Code: 41City Code: 22Website: support.euro.dell.com E-mail: swisstech@dell.com E-mail for French-speaking HSB and Corporate Customers: support.euro.dell.com/ch/fr/emaildell/ Technical Support (Home and Small Business) 0844 811 411 Technical Support (Corporate) 0844 822 844 Customer Care (Home and Small Business) 0848 802 202 Customer Care (Corporate) 0848 821 721 Fax 022 799 01 90 Switchboard 022 799 01 01 TaiwanInternational Access Code: 002Country Code: 886Technical Support (portable and desktop computers) toll-free: 00801 86 1011 Technical Support (servers) toll-free: 0080 60 1256 Transaction Sales toll-free: 0080 651 228 or 0800 33 556 Corporate Sales toll-free: 0080 651 227 or 0800 33 555 ThailandInternational Access Code: 001Country Code: 66Technical Support toll-free: 0880 060 07 Customer Service (Penang, Malaysia) 604 633 4949 Sales toll-free: 0880 060 09 Trinidad/Tobago General Support 1-800-805-8035 Turks and Caicos IslandsGeneral Support toll-free: 1-866-540-3355 U.K. (Bracknell)International Access Code: 00Country Code: 44City Code: 1344Website: support.euro.dell.comCustomer Care website: support.euro.dell.com/uk/en/ECare/Form/Home.aspE-mail: dell_direct_support@dell.com Technical Support (Corporate/Preferred Accounts/PAD [1000+ employees]) 0870 908 0500 Technical Support (direct/PAD and general) 0870 908 0800 Global Accounts Customer Care 01344 373 186 Home and Small Business Customer Care 0870 906 0010 Corporate Customer Care 01344 373 185 Page 15 of 17Getting Help1/13/2004file://C:\Documents%20and%20Settings\msclark1\Local%20Settings\Temp\~hhD9C8.htm](https://usermanual.wiki/Dell/24GBRL.Notebook-Manual/User-Guide-393906-Page-55.png)
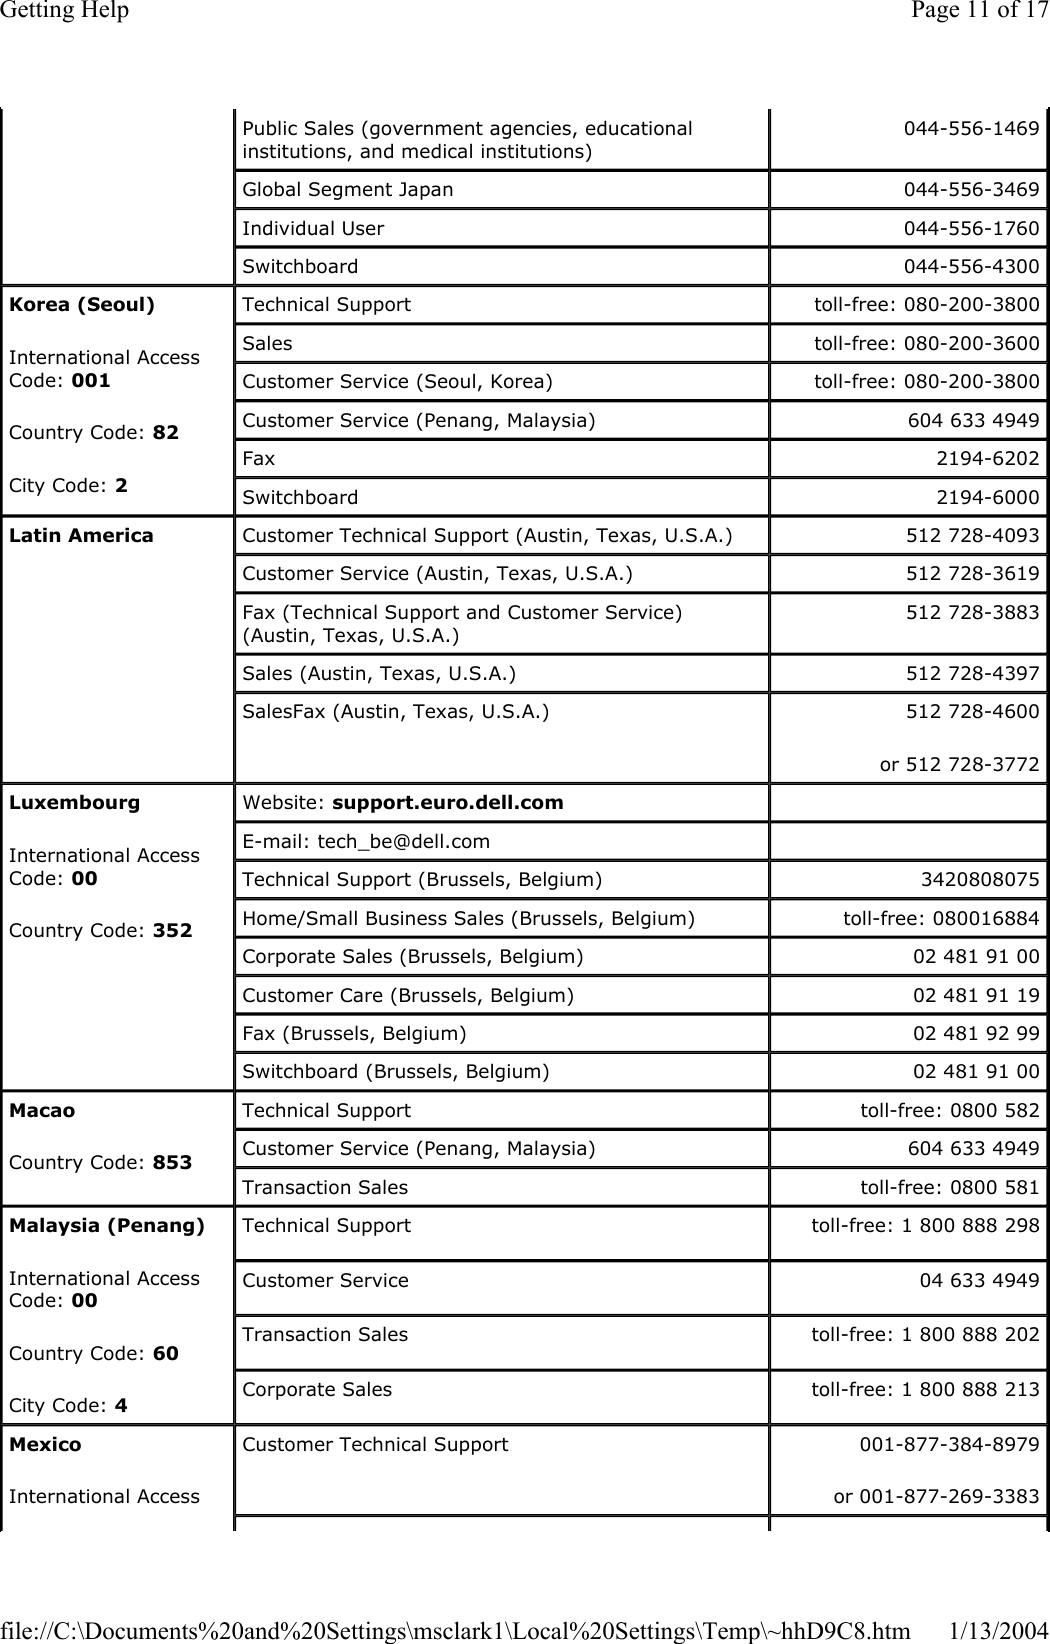
![Preferred Accounts (500–5000 employees) Customer Care 0870 906 0010 Central Government Customer Care 01344 373 193 Local Government & Education Customer Care 01344 373 199 Health Customer Care 01344 373 194 Home and Small Business Sales 0870 907 4000 Corporate/Public Sector Sales 01344 860 456 Uruguay General Support toll-free: 000-413-598-2521 U.S.A. (Austin, Texas)International Access Code: 011Country Code: 1Automated Order-Status Service toll-free: 1-800-433-9014 AutoTech (portable and desktop computers) toll-free: 1-800-247-9362 Consumer (Home and Home Office) Technical Support toll-free: 1-800-624-9896 Customer Service toll-free: 1-800-624-9897 DellNet™ Service and Support toll-free: 1-877-Dellnet (1-877-335-5638) Employee Purchase Program (EPP) Customers toll-free: 1-800-695-8133 Financial Services website: www.dellfinancialservices.comFinancial Services (lease/loans) toll-free: 1-877-577-3355 Financial Services (Dell Preferred Accounts [DPA]) toll-free: 1-800-283-2210 BusinessCustomer Service and Technical Support toll-free: 1-800-822-8965 Employee Purchase Program (EPP) Customers toll-free: 1-800-695-8133 Projectors Technical Support toll-free: 1-877-459-7298 Public (government, education, and healthcare) Customer Service and Technical Support toll-free: 1-800-456-3355 Employee Purchase Program (EPP) Customers toll-free: 1-800-234-1490 Dell Sales toll-free: 1-800-289-3355 or toll-free: 1-800-879-3355 Dell Outlet Store (Dell refurbished computers) toll-free: 1-888-798-7561 Software and Peripherals Sales toll-free: 1-800-671-3355 Spare Parts Sales toll-free: 1-800-357-3355 Extended Service and Warranty Sales toll-free: 1-800-247-4618 Fax toll-free: 1-800-727-8320 Dell Services for the Deaf, Hard-of-Hearing, or Speech-Impaired toll-free: 1-877-DELLTTY (1-877-335-5889) Page 16 of 17Getting Help1/13/2004file://C:\Documents%20and%20Settings\msclark1\Local%20Settings\Temp\~hhD9C8.htm](https://usermanual.wiki/Dell/24GBRL.Notebook-Manual/User-Guide-393906-Page-56.png)