Dell 5880-13 Notebook PC User Manual book
Dell Inc. Notebook PC book
UserManual.wiki
>
Dell
>
5880-13 User Manual
>
User manual 1 of 2
Contents
1.
User manual 1 of 2
2.
User manual 2 of 2
User manual 1 of 2
Navigation menu
Upload a User Manual
Namespaces
Wiki Guide
HTML
PDF
Info
Views
User Manual
Discussion / Help
Navigation


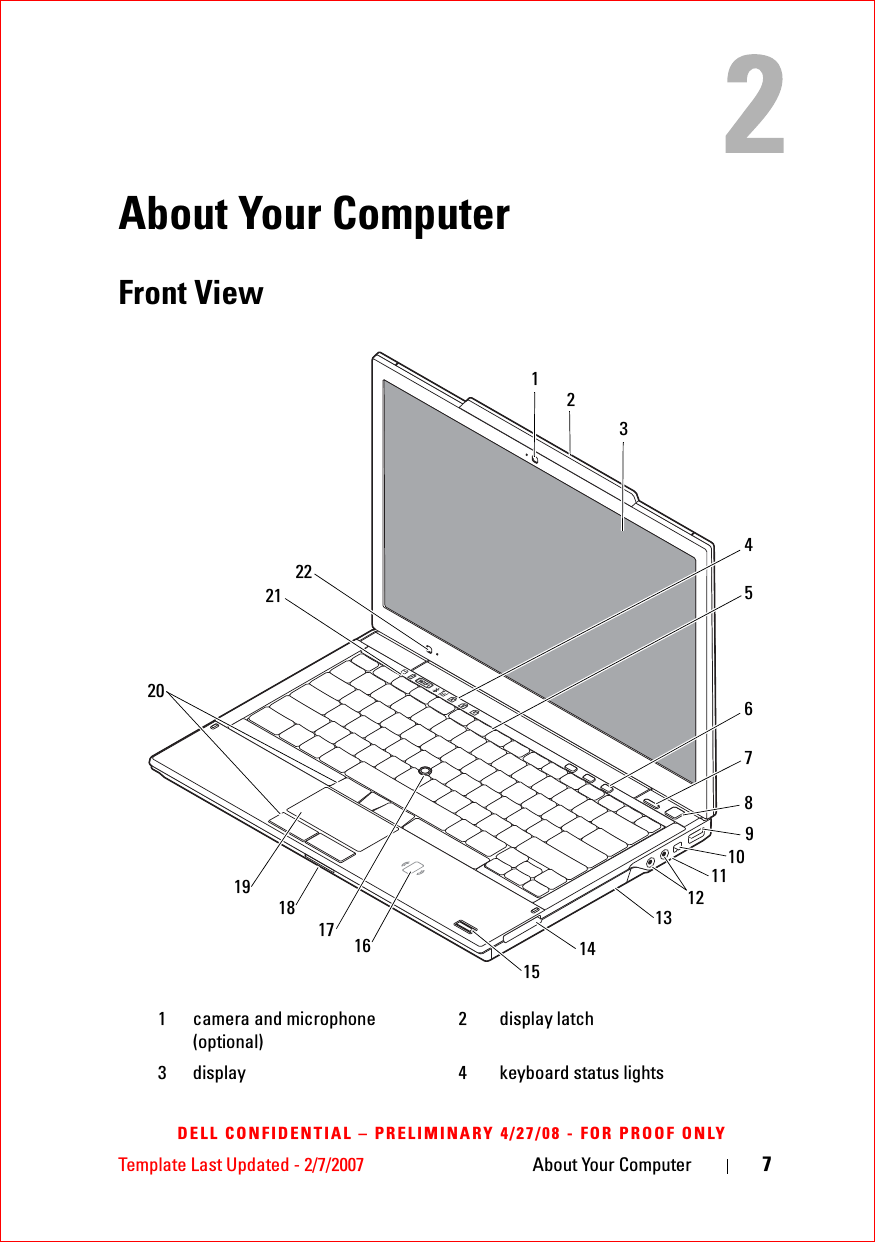
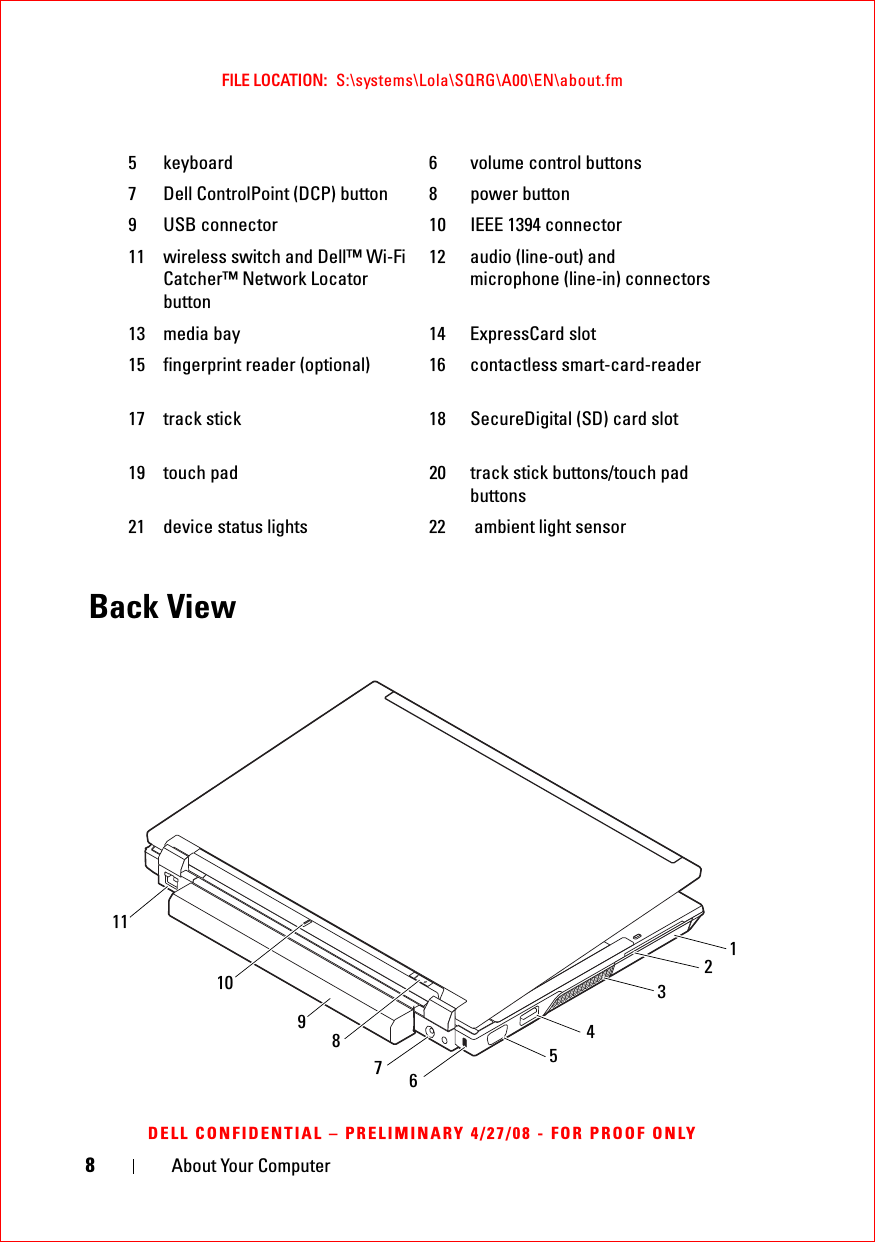

![Specifications 21FILE LOCATION: S:\systems\Lola\SQRG\A00\EN\specs.fmDELL CONFIDENTIAL – PRELIMINARY 4/27/08 - FOR PROOF ONLYMini-Card support (internal expansion slots) one dedicated half Mini-Card slot for WLANone dedicated full Mini-Card slot for WWAN (Mobile Broadband)one dedicated full Mini-Card slot for WPAN (Bluetooth® wireless technology or ultra wideband [UWB])Network adapter RJ-45 network connectorSmart card reader integrated smart-card readerUSB, eSATA two USB-2.0 compliant connectors (one with eSATA)Video VGA video connectorDisplayPortCommunicationsNetwork adapter 10/100/1000 Ethernet LAN on system boardWireless WLAN half Mini-Card, WWAN, WPAN full Mini-CardsBluetooth® wireless technologyUWB technologyMobile Broadband full Mini-CardGPS supported by Mobile Broadband full Mini-CardVideoVideo type integrated on system board, hardware acceleratedData bus integrated videoVideo controller Intel ExtremePorts and Connectors (continued)](https://usermanual.wiki/Dell/5880-13.User-manual-1-of-2/User-Guide-987455-Page-21.png)


![36 TroubleshootingFILE LOCATION: S:\systems\Lola\SQRG\A00\EN\trouble.fmDELL CONFIDENTIAL – PRELIMINARY 4/27/08 - FOR PROOF ONLYsetup program, then immediately exit the program (see your Service Manual at support.dell.com). If the message reappears, contact Dell (see "Contacting Dell" on page 63).TIME-OF-DAY CLOCK STOPPED —The reserve battery that supports the system configuration settings may require recharging. Connect your computer to an electrical outlet to charge the battery. If the problem persists, contact Dell (see "Contacting Dell" on page 63).TIME-OF-DAY NOT SET-PLEASE RUN THE SYS TEM SETUP PROGRAM —The time or date stored in the system setup program does not match the system clock. Correct the settings for the Date and Time options. See your Service Manual at support.dell.com for more information. TIMER CHIP COUNTER 2 FAILED —A chip on the system board may be malfunctioning. Run the System Set tests in the Dell Diagnostics (see "Dell Diagnostics" on page 38).UNEXPECTED INTERRUPT IN PROTECTED MODE —The keyboard controller may be malfunctioning, or a memory module may be loose. Run the System Memory tests and the Keyboard Controller test in the Dell Diagnostics (see "Dell Diagnostics" on page 38).X:\ IS NOT ACCESSIBLE. THE DEVICE IS NOT READY —Insert a disk into the drive and try again.WARNING: BATTERY IS CRITICALLY LOW —The battery is running out of charge. Replace the battery, or connect the computer to an electrical outlet; otherwise, activate hibernate mode or shut down the computer.System Messages NOTE: If the message you received is not listed in the table, see the documentation for either the operating system or the program that was running when the message appeared.ALERT! PREVIOUS ATTEMPTS AT BOOTING THIS SYSTEM HAVE FAILED AT CHECKPOINT [NNNN]. FOR HELP IN RESOLVING THIS PROBLEM, PLEASE NOTE THIS CHECKPOINT AND CONTACT DELL TECHNICAL SUPPORT —The computer failed to complete the start routine three consecutive times for the same error (see "Contacting Dell" on page 63 for assistance).CMOS CHECKSUM ERROR —Possible system board failure or RTC battery low. Replace the battery. See your Service Manual at support.dell.com or see "Contacting Dell" on page 63 for assistance.](https://usermanual.wiki/Dell/5880-13.User-manual-1-of-2/User-Guide-987455-Page-36.png)


![Reinstalling Software 47FILE LOCATION: S:\systems\Lola\SQRG\A00\EN\software.fmDELL CONFIDENTIAL – PRELIMINARY 4/27/08 - FOR PROOF ONLYReinstalling SoftwareDriversIdentifying DriversIf you experience a problem with any device, identify whether the driver is the source of your problem and, if necessary, update the driver.Microsoft® Windows Vista®:1Click the Windows Vista Start button™ , and right-click Computer.2Click Properties→ Device Manager. NOTE: The User Account Control window may appear. If you are an administrator on the computer, click Continue; otherwise, contact your administrator to continue.Microsoft Windows® XP:1Click Start→ Control Panel.2Under Pick a Category, click Performance and Maintenance, and click System.3In the System Properties window, click the Hardware tab, and click Device Manager. Scroll down the list to see if any device has an exclamation point (a yellow circle with a [!]) on the device icon.If an exclamation point is next to the device name, you may need to reinstall the driver or install a new driver (see "Reinstalling Drivers and Utilities" on page 48).](https://usermanual.wiki/Dell/5880-13.User-manual-1-of-2/User-Guide-987455-Page-47.png)