Dell APL260AE Access Point User Manual SonicPoint ACe GSG
Dell Inc. Access Point SonicPoint ACe GSG
Dell >
Contents
- 1. User Manual
- 2. 15. User Manual-1 rev.1
- 3. 15. User Manual-2 rev.1
15. User Manual-1 rev.1

Dell™ SonicPoint ACe
Getting Started Guide
Regulatory Model Number: APL26-0AE

© 2014 Dell Inc.
ALL RIGHTS RESERVED.
This guide contains proprietary information protected by copyright. The software described in this guide is furnished under a software license or
nondisclosure agreement. This software may be used or copied only in accordance with the terms of the applicable agreement. No part of this
guide may be reproduced or transmitted in any form or by any means, electronic or mechanical, including photocopying and recording for any
purpose other than the purchaser’s personal use without the written permission of Dell Inc.
The information in this document is provided in connection with Dell products. No license, express or implied, by estoppel or otherwise, to any
intellectual property right is granted by this document or in connection with the sale of Dell products. EXCEPT AS SET FORTH IN THE TERMS AND
CONDITIONS AS SPECIFIED IN THE LICENSE AGREEMENT FOR THIS PRODUCT, DELL ASSUMES NO LIABILITY WHATSOEVER AND DISCLAIMS ANY EXPRESS,
IMPLIED OR STATUTORY WARRANTY RELATING TO ITS PRODUCTS INCLUDING, BUT NOT LIMITED TO, THE IMPLIED WARRANTY OF MERCHANTABILITY,
FITNESS FOR A PARTICULAR PURPOSE, OR NON-INFRINGEMENT. IN NO EVENT SHALL DELL BE LIABLE FOR ANY DIRECT, INDIRECT, CONSEQUENTIAL,
PUNITIVE, SPECIAL OR INCIDENTAL DAMAGES (INCLUDING, WITHOUT LIMITATION, DAMAGES FOR LOSS OF PROFITS, BUSINESS INTERRUPTION OR LOSS
OF INFORMATION) ARISING OUT OF THE USE OR INABILITY TO USE THIS DOCUMENT, EVEN IF DELL HAS BEEN ADVISED OF THE POSSIBILITY OF SUCH
DAMAGES. Dell makes no representations or warranties with respect to the accuracy or completeness of the contents of this document and reserves
the right to make changes to specifications and product descriptions at any time without notice. Dell does not make any commitment to update
the information contained in this document.
If you have any questions regarding your potential use of this material, contact:
Dell Inc.
Attn: LEGAL Dept
5 Polaris Way
Aliso Viejo, CA 92656
Refer to our web site (software.dell.com) for regional and international office information.
SonicPoint ACe Getting Started Guide
Updated - 11/26/14
232-002617-50 Rev A

Patents
This product is protected by multiple U.S. Patents. For more information, go to http://software.dell.com/legal/patents.aspx.
Trademarks
Dell, the Dell logo, SonicWALL, and all other SonicWALL product and service names and slogans are trademarks of Dell Inc. Other trademarks and
trade names may be used in this document to refer to either the entities claiming the marks and names or their products. Dell disclaims any
proprietary interest in the marks and names of others.
Legend
CAUTION: A CAUTION icon indicates potential damage to hardware or loss of data if instructions are not followed.
WARNING: A WARNING icon indicates a potential for property damage, personal injury, or death.
IMPORTANT NOTE, NOTE, TIP, MOBILE, or VIDEO: An information icon indicates supporting information.

1
Dell SonicPoint ACe Getting Started Guide 5
Introduction
In this guide
This Getting Started Guide provides instructions for basic installation and configuration of the Dell™ SonicPoint ACe wireless
access point in single-unit or multi-unit wireless deployments.
Chapter 1 Topics
Introduction on page 5•Wireless overview on page 7
Chapter 2 Topics
Initial Setup on page 11 •Check package contents on page 12
•Deployment requirements on page 12
•SonicPoint ACe available ports/status LEDs on page 13
•Installing antennas on page 15
•Connecting Ethernet cables on page 16
•Wireless access point placement considerations on page 17
•Mounting the SonicPoint ACe on page 19

Dell SonicPoint ACe Getting Started Guide
6
Chapter 3 Topics
Configuring SonicOS for wireless access on page 23 •Configuring SonicOS for SonicPoint ACe on page 23
•Verifying SonicPoint operation on page 28
•Troubleshooting tips on page 28
Chapter 4 Topics
Support and product registration on page 29 •Registration and support on page 29
•Online support and training on page 30
Chapter 5 Topics
Product safety and regulatory information on page 31 •Mounting the appliance on page 32
•Verwarnung Weitere hinweise zur montage on page 33
•EU and EFTA on page 35
•Declaration of conformity on page 35

Dell SonicPoint ACe Getting Started Guide 7
Wireless overview
The Dell™ SonicPoint ACe is part of the next evolutionary generation in wireless access points after the Dell SonicWALL SonicPoint
N and NDR.
The SonicPoint ACe provides physical layer enhancements for higher throughput with a maximum data rate of 1.3 Gbps. To
achieve this, the SonicPoint ACe uses:
•More antennas—three antennas for the 5 GHz radio, and three more for the 2.4 GHz radio
•Wider channels—80 MHz-wide channels for the 802.11ac radio module, while continuing to support 20/40 MHz channels.
This allows for dynamic per packet negotiation of channel widths so that when there is interference, the SonicPoint can
temporarily fall back to 40 or 20MHz channels.
•More spatial streams—3X3 multiple-input and multiple-output, (MIMO) for the 802.11ac radio module, where the capacity
of a radio link is multiplied using multipath propagation.
Dell SonicPoint ACe Getting Started Guide
8
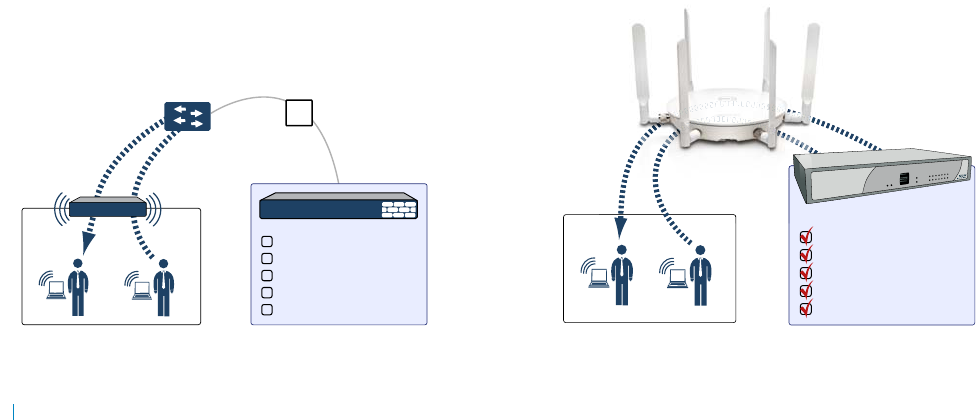
Dell SonicWALL wireless firewalling
When a wireless device uses a Dell SonicPoint ACe wireless
access point to communicate with a wireless device on
another subnet or on a completely different network, traffic
between the devices is forced to traverse the Dell SonicWALL
network security appliance. This traversal enables security
services to be enforced by SonicOS.
Standard practice for wireless firewalling (where one wireless
client is communicating with another) bypasses many of the
critical security services. The following illustration shows the
standard practice for wireless firewalling.
Figure 1. Standard wireless firewalling
Many security products on the market share this potential
vulnerability when two users connected by a common hub or
wireless access point wish to exchange data.
Dell SonicWALL addresses this security shortcoming by
managing the SonicPoint access points from the network
security appliance. This allows complete control of the
wireless space, including zone enforcement of security
services and complete firewalling capabilities.
Figure 2. Secure wireless firewalling
WLAN Zone
Security Services
?
Content Filtering Service
Client Anti-Virus Enforcement
Gateway Anti-Virus
Gateway Anti-Spyware
Intrusion Prevention Service
Other Security Appliance
WLAN Zone Security Services
SonicWALL
appliance
SonicWALL
SonicPoint
Content Filtering Service
Client Anti-Virus Enforcement
Gateway Anti-Virus
Gateway Anti-Spyware
Intrusion Prevention Service
W
AL
L
P
oi
nt
Dell SonicPoint ACe Getting Started Guide 9
Frequency bands and channels
There are currently five widely adopted standards for 802.11 wireless network types: a, b, g, n, and ac. 802.11n and 802.11ac are
the newest and highest capacity standards, but older client devices may not be able to utilize the newer standards.
Different frequency bands provide varying signal strength and quality over different distance ranges. Signals in the 2.4 GHz range
tend to pass through physical barriers better and carry farther than those in the 5 GHz range, but they do not provide as high a
data rate. Signals in the 5 GHz range provide faster data rates for better throughput, but the signal attenuates faster and is best
suited for open spaces.
Refer to Radio frequency barriers and RF interference on page 18 for detailed information about RF barriers and interference.
Table 1. Wireless standards
802.11 (x) Frequency standard Maximum data rate
802.11a 5 GHz 54 Mbps
802.11b 2.4 GHz 11 Mbps
802.11g 2.4 GHz 54 Mbps
802.11n 2.4 GHz and 5 GHz 450 Mbps
802.11ac 5 GHz + multichannel + multipath 1.3 Gbps
Table 2. Strengths and weaknesses of 5 GHz and 2.4 GHz signals
5 GHz 2.4 GHz
Strength Higher speed, more channels Longer Range, stronger signal penetration
Weakness Limited penetration of walls, client compatibility More sources of interference
Dell SonicPoint ACe Getting Started Guide
10
To allow multiple separate wireless networks in a shared and confined space, the RF medium is divided into channels. For devices
in the 5 GHz range (802.11a/n/ac), this means the possibility of up to 23 discrete channels.
For devices using the 2.4 GHz range (802.11b/g/n), the wireless space is limited to a maximum of 14 overlapping channels. As a
result of these overlapping channels, 2.4 GHz technology provides only a total of three discrete channels.
802.11 comparison chart
Table 3. 802.11 signal characteristics
802.11a 802.11b 802.11g 802.11n 802.11ac
# of Channels in USA2311111121
# of Channels in EU 23 13 13 13 16
# of Channels in Japan 15 14 14 14 19
Frequency Band 5 GHz 2.4 GHz 2.4 GHz 2.4/5 GHz 5 GHz
Max. Data Rate 54 Mbps 11 Mbps 54 Mbps 450 Mbps (For 3X3
MIMO) 1.3 Gbps (For
QAM-64, MIMO
3X3, and 80 MHz
channels)
Radius (Range) 90ft/25m 120ft/35m 120ft/35m 300ft/90m 120ft/35m
NOTE: Although 802.11b/g/n standards provide between 11 and 14 channels, only three of those channels are fully discrete
(non-overlapping) channels.

2
Dell SonicPoint ACe Getting Started Guide 11
Initial Setup
This section provides a basic checklist of materials, hardware information, and describes how to connect and configure physical
aspects of the Dell SonicPoint ACe including antennas, cabling, and mounting.
•Check package contents on page 12
•Deployment requirements on page 12
•SonicPoint ACe available ports/status LEDs on page 13
•Installing antennas on page 15
•Connecting Ethernet cables on page 16
•Wireless access point placement considerations on page 17
•Mounting the SonicPoint ACe on page 19

Dell SonicPoint ACe Getting Started Guide
12
Check package contents
Before continuing, ensure that your Dell™ SonicPoint ACe
package contains the following materials:
*The included power cord is approved for use only in specific
countries or regions. Before using a power cord, verify that it
is rated and approved for use in your location.
Any items missing?
If any of the items corresponding to your product are missing
from the package, contact Technical Support at:
https://support.software.dell.com/manage-service-request
A listing of the most current support documents are available
online at:
https://support.software.dell.com/
Deployment requirements
SonicOS firmware
•Dell SonicPoint ACe access points are centrally
managed by Dell SonicWALL network security
appliances running the following versions of SonicOS:
•SonicOS 5.9.1 or a higher 5.9 release
•SonicOS 6.2.2 or higher
Power source
•A 120V power source or an 802.3at compliant PoE
injector or PoE-capable switch capable of providing 25
watts of power to each SonicPoint ACe is required.
Internet connectivity
•An active Internet connection is required for your
firewall to download the latest SonicPoint firmware.
Gigabit Ethernet connectivity
•802.11ac wireless hardware requires more bandwidth
than a single (or even dual) 10/100 Ethernet
connection can handle. Gigabit Ethernet connectivity
between the WLAN and the LAN is required to take full
advantage of 802.11ac speed.
See Product safety and regulatory information on page 31.
SonicPoint ACe Appliance Checklist
Dell SonicPoint ACe Appliance
Antennas (6)
Mounting Kit (Ceiling Brackets, Anchor and Screw Kit)
Getting Started Guide
Power Adaptor*
Dell SonicPoint ACe Getting Started Guide 13
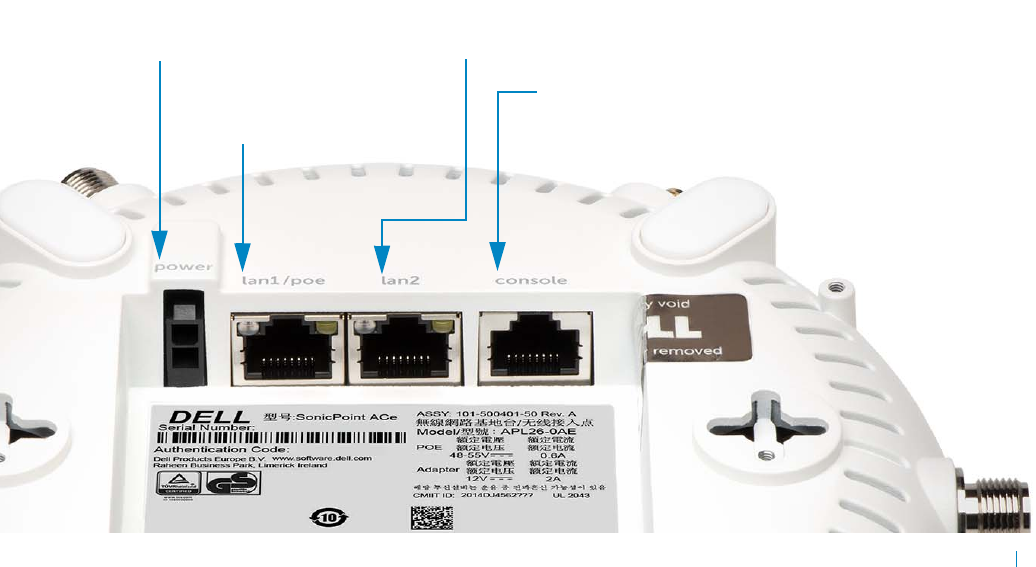
SonicPoint ACe available ports/status LEDs
Figure 3. Available ports
LAN1/PoE port.
Provides Ethernet and
Power over Ethernet (PoE)
connections.
LAN2 port.
Provides an additional Ethernet connection. Refer to
the SonicOS Administrator’s Guide for use cases.
Console port.
Provides a management connection
using CLI > DB9 cable (for command
line management only).
Power port.
Provides 120V DC power
connection.
Dell SonicPoint ACe Getting Started Guide
14
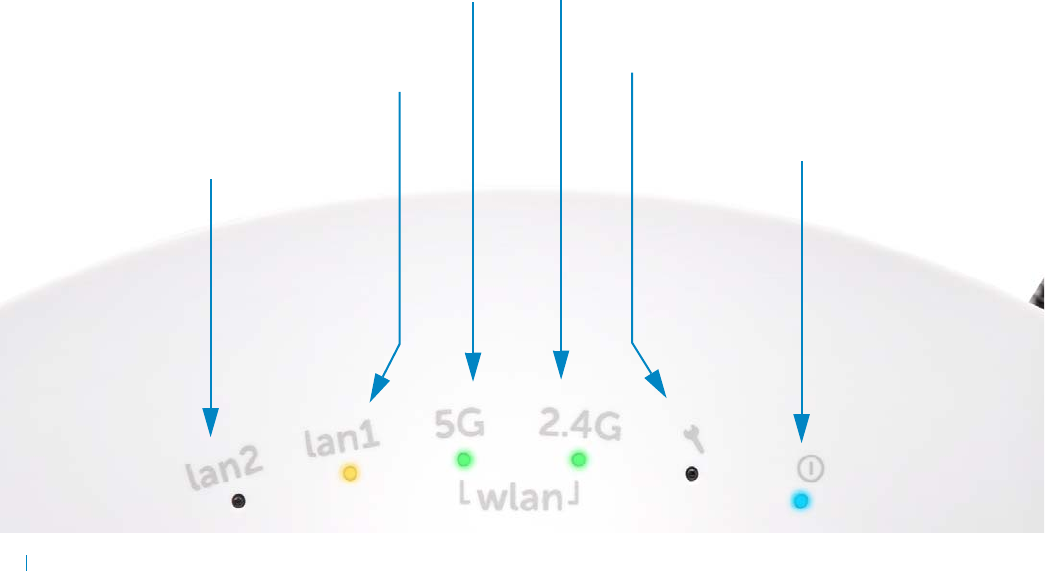
Figure 4. Status LEDs
LED (lan2)
- On (solid green, Ethernet link)
- Blinking green (1G Ethernet activity)
- Blinking yellow (10/100M Ethernet activity)
LED (lan1)
- On (solid green, Ethernet link)
- Blinking green (1G Ethernet activity)
- Blinking yellow (10/100M Ethernet activity)
LED (5G)
- On (solid green, 5 GHz radio link)
- Blinking green (5 GHz radio activity)
LED (2.4G)
- On (solid green, 2.4 GHz radio link)
- Blinking (2.4 GHz radio activity)
LED (Tool)
- On (solid yellow, error)
- Blinking (safe mode)
LED (Power)
- On (solid blue, power)
- Blinking (booting/FW upgrade)
Dell SonicPoint ACe Getting Started Guide 15
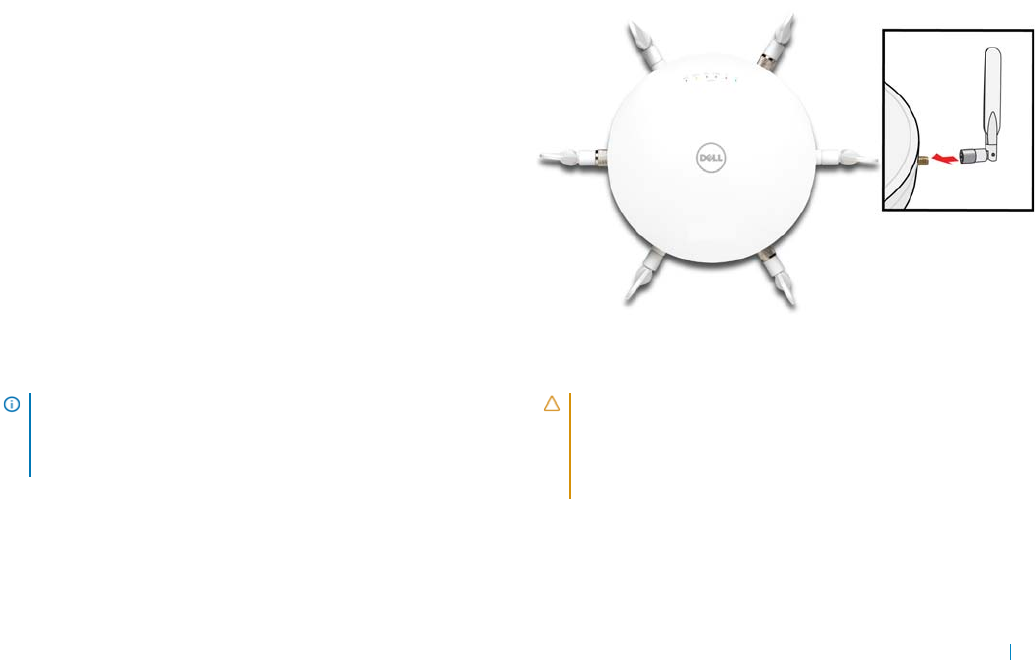
Installing antennas
To install the antennas on your SonicPoint ACe
1 Remove all six antennas from their bags and place one
on each connector. Match the fittings with the antenna
style. There are three of each type.
2 Carefully finger-tighten the fittings.
3 Adjust the antennas for optimal reception.
For optimal wireless coverage in most cases, the SonicPoint
ACe antennas should be oriented vertically. The circular
design of the SonicPoint aides in creating a strong multi-
directional wireless signal pattern. In most cases, leaving the
antennas straight up (as shown in the illustration) provides the
best overall coverage.
TIP: There may be a “dead” zone directly underneath
the SonicPoint ACe when it is mounted on the ceiling
with the antennas oriented vertically. You can mitigate
this by slightly angling the antennas.
CAUTION: The SonicPoint ACe uses dipole antennas
with 5.5dBi at 5 GHz and 3.5dBi at 2.4 GHz. Only
antennas provided by Dell are authorized for use with
the SonicPoint ACe. Be aware of the regulations in
your region before using other antennas.
Dell SonicPoint ACe Getting Started Guide
16
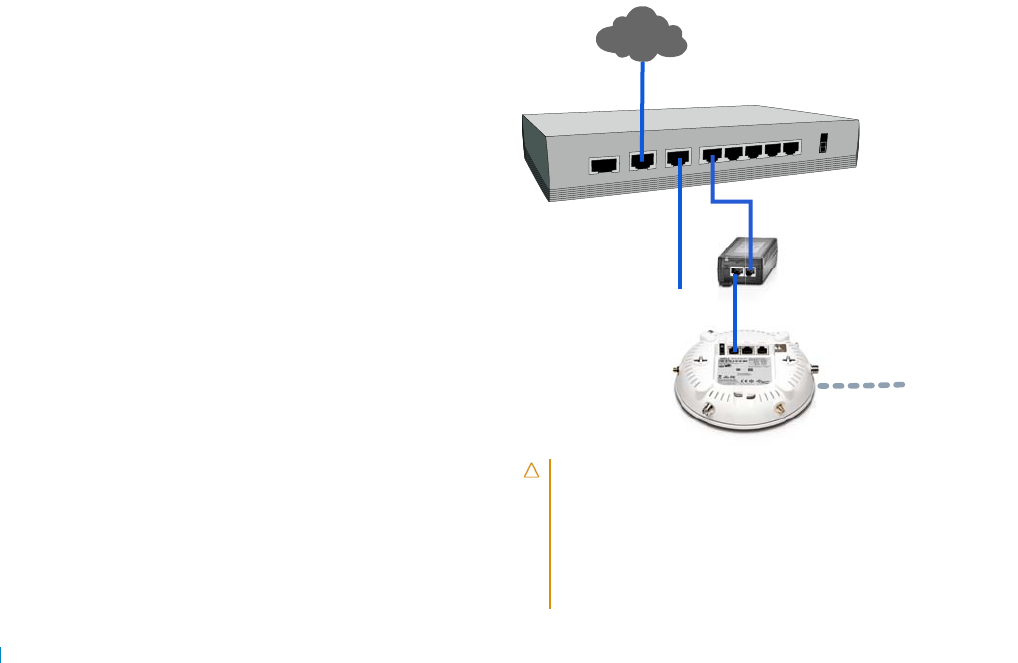
Connecting Ethernet cables
The SonicPoint ACe may be powered with either the included
external power adaptor or through Power over Ethernet (PoE),
and can be cabled with CAT5, CAT5e, or CAT6 Ethernet
cabling.
When using Power over Ethernet (PoE), use a Dell SonicWALL
802.3at compliant PoE line injector (sold separately), or an
802.3at compliant switch is required to power each SonicPoint
ACe.
To connect PoE to your SonicPoint ACe
1 Using an Ethernet cable, connect the Data in port on
the Dell SonicWALL PoE Injector to an existing WLAN
zone interface or to an unused interface to be
configured later in SonicOS.
2 Using a second Ethernet cable, connect the Data and
Power out port on the Dell SonicWALL PoE injector to
the LAN1/PoE port on your SonicPoint ACe.
3 Plug the power cord of the Dell SonicWALL PoE injector
into an appropriate power outlet.
4 Wait for the LAN1 LED on the SonicPoint ACe to
illuminate green. This indicates an active connection.
See Product safety and regulatory information on page 31.
CAUTION: An 802.3at compliant PoE injector or PoE-
capable switch capable of providing 25 watts of power
to each SonicPoint ACe is required.
To maintain 25 watts of power to the SonicPoint ACe,
the maximum length of CAT5e cable from the 802.3at
PoE injector to the SonicPoint ACe is 100 meters.
Local Network (LAN)
X1 WAN
X0 LAN
Internet
X2 WLAN
PoE Injector
or PoE Switch
Wireless Clients

Dell SonicPoint ACe Getting Started Guide 17
Wireless access point
placement considerations
Physical placement of the SonicPoint ACe wireless access point
has a measurable effect on who can and cannot access your
wireless signal.
Access points should be kept clear of Radio Frequency (RF)
interference sources. RF barriers can be circumvented by
deploying multiple access points.
A site survey will help find the optimum wireless access point
placement, but you can find usable locations without it.
Considerations include:
• Number of access points versus user density – If too
many users are serviced by a single access point,
maximum transfer rates are reached and that access
point may become a bottleneck for the whole system.
•Bandwidth – How much data is moving upstream and
downstream for a given type of user?
• Ethernet cabling – Where are you running the powered
Ethernet (PoE) cable to and how are you securing that
cable? Is your PoE switch 802.3at compliant and able to
power all access points with 25 watts each?
To maintain 25 watts of power to the SonicPoint ACe,
the maximum length of CAT5e cable from the 802.3at
PoE injector to the SonicPoint ACe is 100 meters.
•Hubs / Switches – Your wireless deployment has to tie
back into your network security appliance and LAN
resources. Consider where your key networking devices
are deployed and how they will connect efficiently
with your wireless appliances. What speed is needed
for your Ethernet connection to accommodate the
number of access points you are installing? A Gigabit
Ethernet interface is recommended when connecting a
SonicPoint ACe to your Dell SonicWALL network
security appliance.
•Legacy clients - Older laptops and mobile devices may
not support 802.11ac. Although clients with
802.11a/g/b hardware are supported by the Dell
SonicPoint ACe, the presence of these legacy clients
within range of your wireless network could affect the
connection speed of your 802.11ac clients.
For example, an 802.11b device authenticated to the
SonicPoint ACe could limit all clients connected to that
radio to 802.11b data rates.
Dell SonicPoint ACe Getting Started Guide
18
Radio frequency barriers
Determining how to circumvent RF barriers can be a
challenging part of the placement process, but RF barriers can
also be used beneficially in an attempt to block signals where
you do not want coverage. The 5 GHz frequency is more
sensitive to RF barriers. A wall that allows a 2.4 GHz wireless
network to operate can block a 5 GHz one.
RF interference
RF interference from home, office, and medical equipment is
a common challenge in wireless deployments.
When considering RF interference sources, remember that
most cell/wireless phones and Bluetooth devices only utilize
the 2.4 GHz frequency. As such, they should not cause
significant interference with wireless networks operating in
the 5 GHz frequency.
Table 4. Common RF barrier types
Barrier Type RF Signal Blocking
Open air Very Low
Glass, wood, drywall, cube partitions Low
Floors and outer walls, aquariums
(brick/marble/granite/water) Medium
Concrete, security glass, wire mesh,
stacked books/paper High
Metal partitions, desks, reinforced
concrete Very High
Table 5. Common sources of RF interference
Interference
Source Possible Range Bands Affected
2.4 GHz phones 100 feet 2.4 GHz
(802.11 b/g/n)
Bluetooth devices 30 feet 2.4 GHz
(802.11 b/g/n)
Microwave oven 10-20 feet 2.4 and 5 GHz,
depending on
shielding
Scientific and
medical
equipment
Short distance,
varies 2.4 and 5 GHz,
depending on
shielding
Dell SonicPoint ACe Getting Started Guide 19
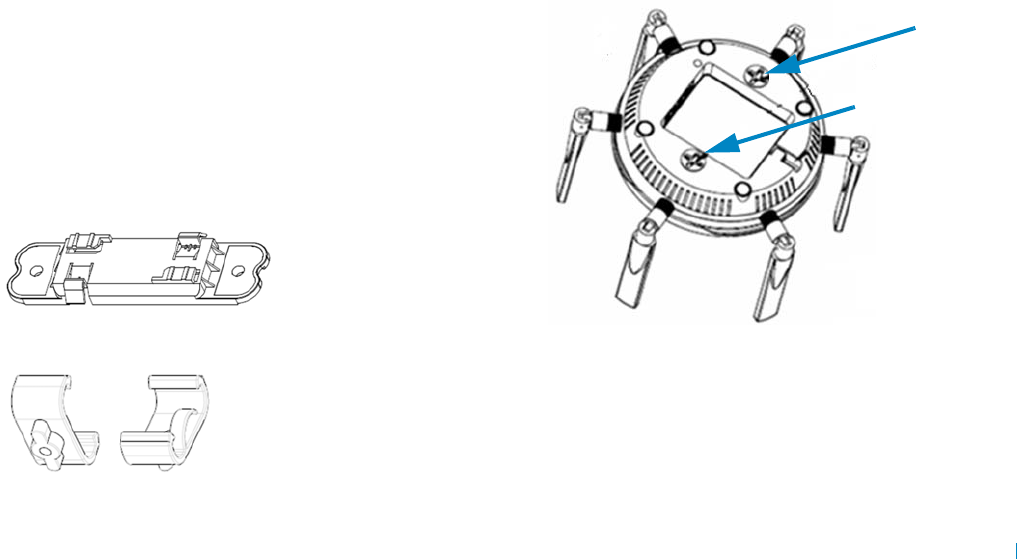
Mounting the SonicPoint ACe
You can mount your Dell SonicPoint ACe to a wall or ceiling, or
you can simply set it on a flat surface.
For safety tips when mounting the SonicPoint ACe, see Product
safety and regulatory information on page 31.
Mounting using ceiling brackets
The mounting kit includes a large bracket, two small brackets,
anchor screws, and screws.
Figure 5. Large ceiling bracket
Figure 6. Small ceiling brackets
The underside of the SonicPoint ACe has two insertion points
for the screws. You can use these insertion points to attach
either the large bracket or the two small brackets to the
SonicPoint ACe.
Holes for screws
Dell SonicPoint ACe Getting Started Guide
20
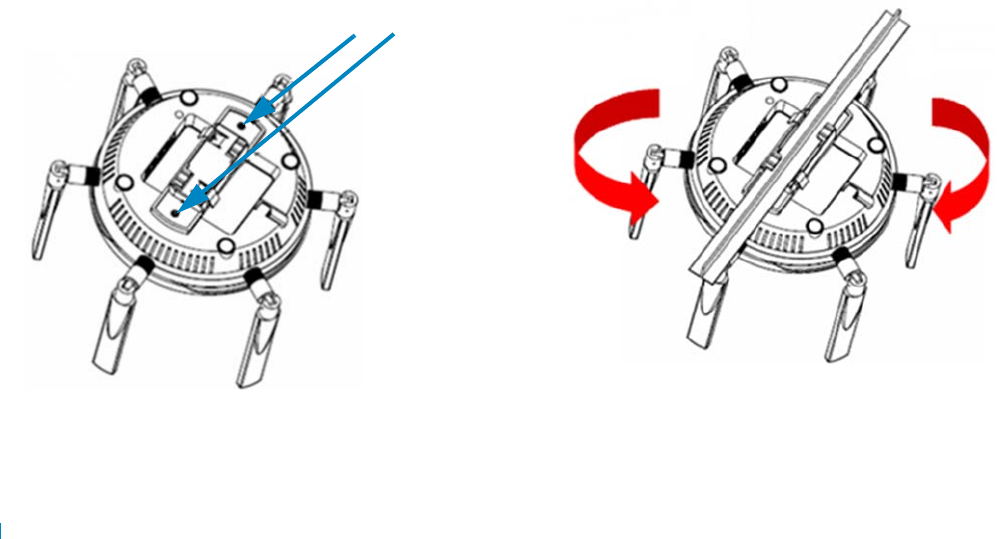
To mount the SonicPoint ACe to a crossbar between
ceiling panels using the large bracket
1 Use the included screws to attach the large bracket to
the underside of the SonicPoint.
2 Supporting the SonicPoint in one hand, position the
edge clips of the bracket over the edge of the ceiling
crossbar and rotate the SonicPoint counterclockwise
(to the left when looking up at it) until the bracket is
securely attached to the crossbar.
To remove the SonicPoint ACe from the ceiling crossbar,
rotate it clockwise (to the right when looking up at it)
until the bracket detaches from the crossbar.
Fasten the large ceiling
bracket with screws.
Dell SonicPoint ACe Getting Started Guide 21
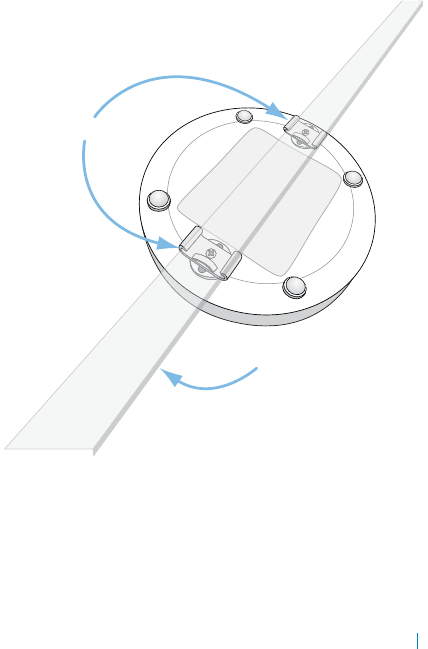
To mount the SonicPoint ACe to a crossbar between
ceiling panels using the small ceiling brackets:
1 Use the included screws to attach the small brackets to
the underside of the SonicPoint, making sure both
brackets are parallel.
2 Supporting the SonicPoint in one hand, clip the edge of
each bracket over the edge of the ceiling crossbar as
shown in the following image. Make sure the SonicPoint
is securely attached to the crossbar before releasing
the device.
Ceiling crossbar
Mounting brackets
SonicPoint unit
Dell SonicPoint ACe Getting Started Guide
22
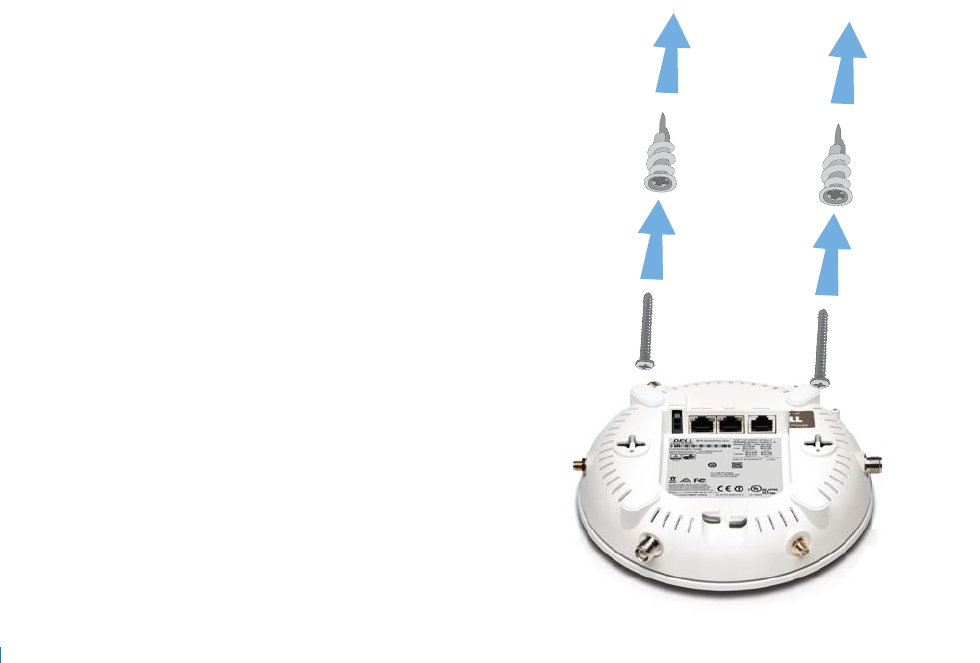
Mounting using anchor screws
To mount the SonicPoint ACe using the anchor screws
1 On the mounting surface, mark the location to make
two screw holes. The marks should be horizontally
parallel to each other.
2 Screw the anchor screws into the ceiling tile or drywall
to their full depth.
3 Insert the screws into the anchors, and screw them in
deep enough to leave minimal space between the
screw heads and the wall surface.
4 Supporting the SonicPoint in your hands, securely fit
the underside slots of the SonicPoint onto the screw
heads.

3
Dell SonicPoint ACe Getting Started Guide 23
Configuring SonicOS for wireless access
This section provides instructions for configuring SonicOS on your Dell SonicWALL network security appliance to connect your
SonicPoint ACe to the WLAN zone and manage it as a Layer 2 device. For more advanced configurations, including Layer 3
management of your SonicPoint ACe on a LAN zone, refer to the SonicOS Administrator’s Guide.
•Configuring SonicOS for SonicPoint ACe on page 23
•Verifying SonicPoint operation on page 28
•Troubleshooting tips on page 28
Configuring SonicOS for SonicPoint ACe
You only need to complete three simple configuration tasks in SonicOS to prepare your SonicPoint ACe to provide secure wireless
access.
1 Configure the network interface to which the SonicPoint ACe is connected.
2 Configure the WLAN zone for trust and security services.
3 Configure the SonicPoint ACe entry for the desired radio frequency, mode, and authentication type.
Dell SonicPoint ACe Getting Started Guide
24
Configuring the network interface
Each SonicPoint or group of SonicPoints must be connected to
a physical network interface that is configured in a wireless
zone. SonicOS provides a standard wireless zone (WLAN) which
can be applied to any available interface.
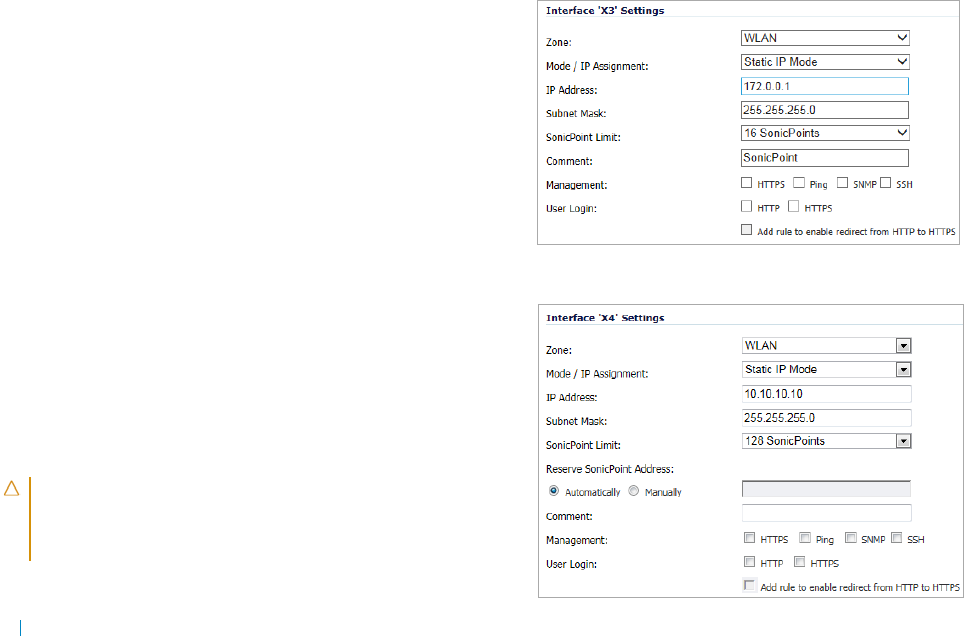
To configure the network interface in SonicOS
1 Navigate to the Network > Interfaces page and click
Configure for the interface to which your SonicPoint is
connected.
2 Select WLAN zone for the Zone type.
3 Select Static IP Mode for the Mode/IP Assignment.
4In the IP Address field, type in any private IP address
that does not interfere with the IP address range of any
other interfaces on the appliance.
5 Enter a Subnet Mask. The default is 255.255.255.0.
6 Use the default settings or select appropriate settings
for the other fields and then click OK.
Figure 7. SonicOS 5.9 interface settings
Figure 8. SonicOS 6.2 interface settings
CAUTION: Allowing Management and User Login to the
appliance from a wireless zone can pose a security
threat, especially if you or your users have not set
strong passwords.
Dell SonicPoint ACe Getting Started Guide 25
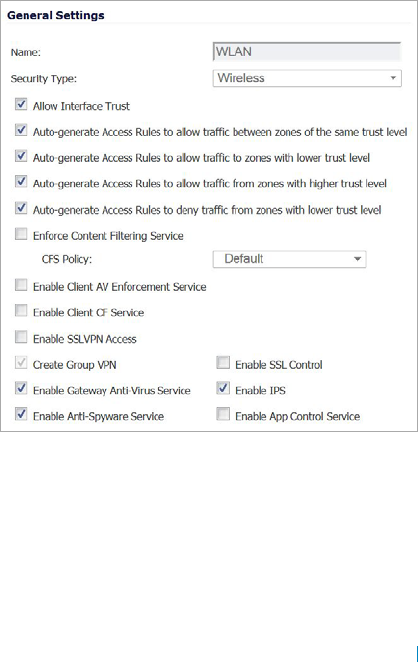
Configuring the WLAN zone
To configure the WLAN zone in SonicOS
1On the Network > Zones page in the WLAN row, click
the icon in the Configure column.
2On the General tab, select the Allow Interface Trust
setting to automate the creation of Access Rules to
allow traffic to flow between the interfaces within the
zone, regardless of the interfaces to which the zone is
applied.
For example, if the WLAN zone has both the X2 and X3
interfaces assigned to it, selecting Allow Interface
Trust creates the necessary access rules to allow hosts
on these interfaces to communicate with each other.
3 Select the checkboxes to enable security services on
this zone. Minimally, you would enable Gateway Anti-
Virus, IPS, and Anti-Spyware. If your wireless clients
are all running Dell SonicWALL Client Anti-Virus, select
Enable Client AV Enforcement Service.
4On the Guest Services tab, optionally configure guest
Internet access. For information about Guest Services,
see the SonicOS Administrator’s Guide.
5On the Wireless tab, select Only allow traffic
generated by a SonicPoint/SonicPointN to allow only
traffic from SonicPoints to enter the WLAN zone
interfaces, providing maximum security.
6 When finished, click OK.

Dell SonicPoint ACe Getting Started Guide
26
Configuring the SonicPoint ACe
settings
When a SonicPoint ACe is initially connected to an interface,
the firewall uses a default provisioning profile to create a
SonicPoint ACe entry. It can take up to 5 minutes for the entry
to be created.
You can modify the SonicPoint ACe entry to configure the
access point name, radio frequency mode, authentication
type, and other settings specific to your SonicPoint ACe.
To modify the SonicPoint ACe entry in SonicOS
1 Navigate to the SonicPoint > SonicPoints page.
2 In the SonicPointNs table, click the configure button in
the row for the SonicPoint ACe entry you wish to
modify.
General tab settings
3 On the General tab, select Enable SonicPoint.
4In the Name field, optionally type in a new name for
this SonicPoint ACe. The existing name is assigned by
the provisioning profile based on the name prefix in
the profile with a unique number appended.
This is the access point name that appears in clients’
lists of available wireless connections.
5 Verify the Country Code for the area of operation.
6 Configure the remaining options as needed. For more
information, see the SonicOS Administrator’s Guide.
Radio 0 / Radio1 Basic tab settings
7Click the Radio 0 Basic tab, or the Radio 1 Basic tab.
The configuration is very similar for the Radio 0 and
Radio 1 Basic tabs. The main differences are the radio
frequencies:
TIP: For deployments of multiple SonicPoints that need
the same provisioning settings, you can create a custom
provisioning profile in the upper section of the
SonicPoint > SonicPoints page. In the Network > Zones
page, you can edit the WLAN zone and specify this
profile on the Wireless tab. Any SonicPoints connecting
to an interface in the WLAN zone will then be
provisioned with the assigned profile. See the SonicOS
Administrator’s Guide for more information.
Radio Frequency Default Mode
Radio 0 5 GHz 5 GHz 802.11ac/a Mixed
Radio 1 2.4 GHz 2.4 GHz 802.11ac/g/b
Mixed

Dell SonicPoint ACe Getting Started Guide 27
8 Select Enable Radio.
9 Select a Mode or use the default.
10 Under Wireless Security, select the Authentication
Type for your wireless network. Dell SonicWALL
recommends using WPA2 as the authentication type if
all client devices support it.
11 Select the Cipher Type. When using WPA and WPA2,
Dell SonicWALL recommends AES for maximum
security.
12 Fill in the fields specific to the authentication type
that you selected. The remaining fields change
depending on the selected authentication type.
13 Optionally, under ACL Enforcement, select Enable
MAC Filter List to enforce Access Control by allowing
or denying traffic from specific devices. Select a MAC
address object group from the Allow List or Deny List
to automatically allow or deny traffic to and from all
devices with MAC addresses in the group. The Deny List
is enforced before the Allow List.
Radio 0 / Radio1 Advanced tab settings
14 Click the Radio 0 Advanced tab, or the Radio 1
Advanced tab.
The configuration is very similar for the Radio 0
Advanced and Radio 1 Advanced tabs. For most
advanced options, the default settings give optimum
performance. For a full description of the fields on this
tab, see the SonicOS Administrator’s Guide.
15 Optionally select the Hide SSID in Beacon checkbox.
The SSID refers to the access point name that appears
in clients’ lists of available wireless connections.
Hiding the SSID provides additional security because it
requires the user to know the access point name before
connecting.
16 When you are finished with configuring all tabs, click
OK.
TIP: PSK uses a personal passphrase for authentication,
EAP uses an Enterprise RADIUS server.
NOTE: Older client devices might not support AES.

Dell SonicPoint ACe Getting Started Guide
28
Verifying SonicPoint operation
To verify that the SonicPoint is provisioned and operational,
navigate to the SonicPoint > SonicPoints page in SonicOS. In
the SonicPointNs table, the Status column displays the
SonicPoint ACe status. It should say Operational.
To verify Internet connectivity through the
SonicPoint ACe
1 Connect a client device to the SonicPoint ACe by
selecting the appropriate access point name (SSID).
2 Ensure that the client device is not connected to any
other network connections (wired LAN, 3G/4G WWAN).
3 In a browser, enter “http://software.dell.com” in the
address bar and press Enter. The Dell website should
display. If you are unable to browse to a website, refer
to Troubleshooting tips.
Troubleshooting tips
When the SonicPoint ACe is correctly connected to a
Dell SonicWALL network security appliance, the two units
perform an encrypted exchange, and an entry for the
SonicPoint ACe is automatically created in the SonicPointNs
table on the SonicPoint > SonicPoints page in SonicOS.
If the entry does not appear in the table within 5 minutes of
connecting the SonicPoint ACe:
•Make sure the SonicPoint ACe is connected to an
interface that is configured as part of a wireless zone.
Either the default WLAN zone or a custom zone with
type set to “wireless” is required.
•Ensure that the SonicPoint ACe is properly connected
by Ethernet cable to an 802.3at compliant PoE device
or to a 120V power source.
•If an 802.3at compliant PoE injector is being used,
verify that the SonicPoint ACe is connected to the PoE
port labeled Data and Power Out.
If the SonicPoint ACe has an entry in the table, but reboots
frequently or seems non-functional:
•Verify that your PoE switch/injector is 802.3at
compliant and rated to deliver 25 watts of power to
each PoE port. 802.3af compliant PoE devices do not
provide sufficient power to properly run current
generation 802.11 devices. An 802.3at compliant
switch or PoE injector is required to power the Dell
SonicPoint ACe over Ethernet.
•Click Synchronize SonicPoints on the SonicPoint >
SonicPoints page to force SonicOS to download a new
SonicPoint firmware image from the Dell SonicWALL
back-end server.

4
Dell SonicPoint ACe Getting Started Guide 29
Support and product registration
This section provides information about registering your Dell™ SonicPoint ACe, requirements for receiving technical support, and
other online support and training options.
•Registration and support on page 29
•Online support and training on page 30
Registration and support
All Dell™ SonicPoint ACe wireless access points include an initial subscription to Dell SonicWALL 24x7 Support.
SonicOS will automatically register your SonicPoint ACe on MySonicWALL, if connected to the Internet. It may take up to 24 hours
for your SonicPoint ACe to be automatically registered.
Optionally, you can manually register the SonicPoint ACe on MySonicWALL by logging into your account at:
http://www mysonicwall.com.
The SonicPoint ACe will also be associated in MySonicWALL with the registered Dell SonicWALL network security appliance to
which it is connected. See the Associated Products section at the bottom of the appliance Service Management page in
MySonicWALL. In order to receive technical support, your SonicPoint ACe must have an active Support subscription.

Dell SonicPoint ACe Getting Started Guide
30
Online support and training
Dell SonicWALL offers a variety of online support and training
options for your convenience.
• Customer support
Dell SonicWALL offers telephone, email and Web-based
support to customers who have a valid Warranty or who
purchased a Support Contract. Review our Warranty
Support Policy for product coverage. Dell SonicWALL
also offers a full range of consulting services to meet
your needs, from our innovative implementation
services to traditional statement of work-based
services.
For further information, visit:
https://support.software.dell.com/
• Knowledge base
The Knowledge Base allows users to search for
Dell SonicWALL documents by browsing the knowledge
base, searching for keywords, or using full-text search.
For further information, visit:
https://support.software.dell.com/sonicwall-
sonicpoint-series/
• User forums
The Dell SonicWALL User Forums are a resource that
provide users the ability to communicate and discuss a
variety of security and appliance subject matters. The
forums are organized by categories.
For further information, visit:
https://forum.sonicwall.com/
• Training
Dell SonicWALL offers an extensive sales and technical
training curriculum. Dell SonicWALL Training provides
the E-Training, instructor-led training, custom training,
technical certification, and uses authorized training
partners.
For further information, visit:
https://support.software.dell.com/essentials/
sonicwall-certification-programs
• Related documentation
•SonicOS Administrator’s Guide
•SonicOS Release Notes
•SonicOS Configuration or Deployment Guides
For further information, visit:
https://support.software.dell.com/

5
Dell SonicPoint ACe Getting Started Guide 31
Product safety and regulatory information
This section provides product safety and regulatory information.
•Mounting the appliance on page 32
•Verwarnung Weitere hinweise zur montage on page 33
•EU and EFTA on page 35
•Declaration of conformity on page 35
Products with “UL 2043” printed on their product labels are within the limit specified in the “UL 2043 Standard for Fire Test for
Heat and Visible Smoke Release for Discrete Products Installed in Air-Handling Spaces” (Plenum). Applies only when powered
through PoE. The PoE power supply is not covered the by the UL 2043 evaluation of this Access Point.
NOTE: Additional regulatory notifications and information for this product can be found online at:
https://support.software.dell.com/.
Regulatory Model/Type Product Name
APL26-0AE SonicPoint ACe

Dell SonicPoint ACe Getting Started Guide
32
Mounting the appliance
WARNING:
•Mount in a location away from direct sunlight and
sources of heat. A maximum ambient temperature of
104º F (40º C) is recommended.
•Route cables away from power lines, fluorescent
lighting fixtures, and sources of noise such as radios,
transmitters, and broadband amplifiers
•The included power cord(s) are approved for use only
in specific countries or regions. Before using a power
cord, verify that it is rated and approved for use in
your location.
•Ensure that no water or excessive moisture can enter
the unit.
•Allow unrestricted airflow around the unit and through
the vents on the side of the unit. A minimum of 1 inch
(25.44mm) clearance is recommended.
•Consideration must be given to the connection of the
equipment to the supply circuit and that the effect of
overloading the circuits has minimal impact on
overcurrent protection and supply wiring. Appropriate
consideration of equipment nameplate ratings must be
used when addressing this concern.
•This device is not intended for use in the direct field of
view at visual display workplaces. To avoid
incommoding reflections at visual display workplaces,
this device must not be placed in the direct field of
view.
Cable connections
WARNING:
All Ethernet and RS232 (Console) cables are designed for intra-
building connection to other equipment. Do not connect these
ports directly to communication wiring or other wiring that
exits the building where the appliance is located.
Lithium Battery
WARNING:
The Lithium Battery used in the Dell appliance cannot be
replaced by the user. The appliance must be returned to a Dell
authorized service center for replacement with the same or
equivalent type recommended by the manufacturer. If, for any
reason, the battery or Dell appliance must be disposed of, do
so following the battery manufacturer's instructions.

Dell SonicPoint ACe Getting Started Guide 33
Power supply information for
APL26-0AE
If the power supply is missing from your Dell SonicWALL
product package, contact Dell Technical Support at https://
support.software.dell.com/manage-service-request for a
replacement.
This product should only be used with a UL listed power supply
marked “Class 2” or “LPS,” with an output rated 12VDC,
minimum 2.0 A, Tma: minimum 40 degrees C.
If power is provided by the Ethernet cable plugged in to the
“LAN” port, this is called “Power Over Ethernet” or “POE.”
The POE source should only be UL listed marked “Class 2" or
“LPS,” with an output rated 48 VDC, minimum 0.6 A, Tma:
minimum 40 degrees C.
Verwarnung Weitere hinweise
zur montage
•Wählen Sie für die Montage einen Ort, der keinem
direkten Sonnenlicht ausgesetzt ist und sich nicht in
der Nähe von Wärmequellen befindet. Die
Umgebungstemperatur darf nicht mehr als 40 °C
betragen.
•Führen Sie die Kabel nicht entlang von Stromleitungen,
Leuchtstoffröhren und Störquellen wie Funksendern
oder Breitbandverstärkern.
•Das im Lieferumfang enthaltene bzw. die im
Lieferumfang enthaltenen Netzkabel sind nur für die
Verwendung in bestimmten Ländern und Regionen
zugelassen. Überprüfen Sie bitte vor der Verwendung
eins Netzkabels, ob es für die Verwendung in Ihrem
Land oder Ihrer Region zugelassen ist und den
geforderten Normen entspricht.
•Stellen Sie sicher, dass das Gerät vor Wasser und hoher
Luftfeuchtigkeit geschützt ist.
•Stellen Sie sicher, dass die Luft um das Gerät herum
zirkulieren kann und die Lüftungsschlitze an der Seite
des Gehäuses frei sind. Hier ist ein Belüftungsabstand
von mindestens 26 mm einzuhalten.
•Vergewissern Sie sich, dass das Gerät sicher im Rack
befestigt ist.
•Das Gerät ist nicht für die Benutzung im unmittelbaren
Gesichtsheld am Bildschirmarbeitsplatz vorgesehen.
Um störende Reflexionen am Bildshirmarbeitsplatz zu
vermeiden, darf dieses Produkt nicht im unmittelbaren
Gesichtsfeld platziert verden.

Dell SonicPoint ACe Getting Started Guide
34
Verwarnung Kabelverbindungen
Alle Ethernet- und RS232-C-Kabel eignen sich für die
Verbindung von Geräten in Innenräumen. Schließen Sie an die
Anschlüsse der Dell keine Kabel an, die aus dem Gebäude
herausgeführt werden, in dem sich das Gerät befindet.
Verwarnung Hinweis zur
Lithiumbatterie
Die in der Internet Security Appliance von Dell verwendete
Lithiumbatterie darf nicht vom Benutzer ausgetauscht
werden. Zum Austauschen der Batterie muss die Dell in ein
von Dell autorisiertes Service-Center gebracht werden. Dort
wird die Batterie durch denselben oder entsprechenden, vom
Hersteller empfohlenen Batterietyp ersetzt. Beachten Sie bei
einer Entsorgung der Batterie oder der Dell Internet Security
Appliance die diesbezüglichen Anweisungen des Herstellers.
Informationen zur stromversorgung
APL26-0AE
Wenn die Stromversorgung von der Dell-Produktpaket fehlt,
wenden Dell den Technischen Support unter
https://support.software.dell.com/manage-service-request.
Dieses Produkt sollte nur mit einem für den Europäischen
Markt genehmigten Netzteil mit dem Logo "I.T.E. LPS" und
einer Ausgangsleistung von12 VDC, mind. 2.0 A, Tma: mind. 40
Grad C, betrieben werden.
Wenn die Stromversorgung durch das Ethernet-Kabel in die
"LAN"-Anschluss angeschlossen vorgesehen ist, wird dies als
"Power over Ethernet" oder "POE." Der POE-Quelle sollte nur
UL-gelistet werden der "Klasse 2" oder "LPS," mit einer
Leistung bewertet 48 VDC, 0,6 A Mindest TMA: mindestens 40
Grad C.

Dell SonicPoint ACe Getting Started Guide 35
EU and EFTA
5.150-5.350 GHz is limited to indoor use.
This device is approved for use in all EU member states and
EFTA countries.
Declaration of conformity
A “Declaration of Conformity” in accordance with the
directives and standards has been made and is on file at Dell
Inc. Products Europe BV, Limerick, Ireland.
CE declarations can be found online at www.dell.com.
NOTE: Additional regulatory notifications and
information for this product can be found online at:
https://support.software.dell.com/

Dell SonicPoint ACe Getting Started Guide
36

Dell SonicPoint ACe Getting Started Guide 37
About Dell
Dell listens to customers and delivers worldwide innovative technology, business solutions and services they trust and value. For
more information, visit www.software.dell.com.
Contacting Dell
Technical support:
Online support
Product questions and sales:
(800) 306-9329
Email:
info@software.dell.com
Technical support resources
Technical support is available to customers who have purchased Dell software with a valid maintenance contract and to
customers who have trial versions. To access the Support Portal, go to https://support.software.dell.com/.
The Support Portal provides self-help tools you can use to solve problems quickly and independently, 24 hours a day, 365 days a
year. In addition, the portal provides direct access to product support engineers through an online Service Request system.

Dell SonicPoint ACe Getting Started Guide
38