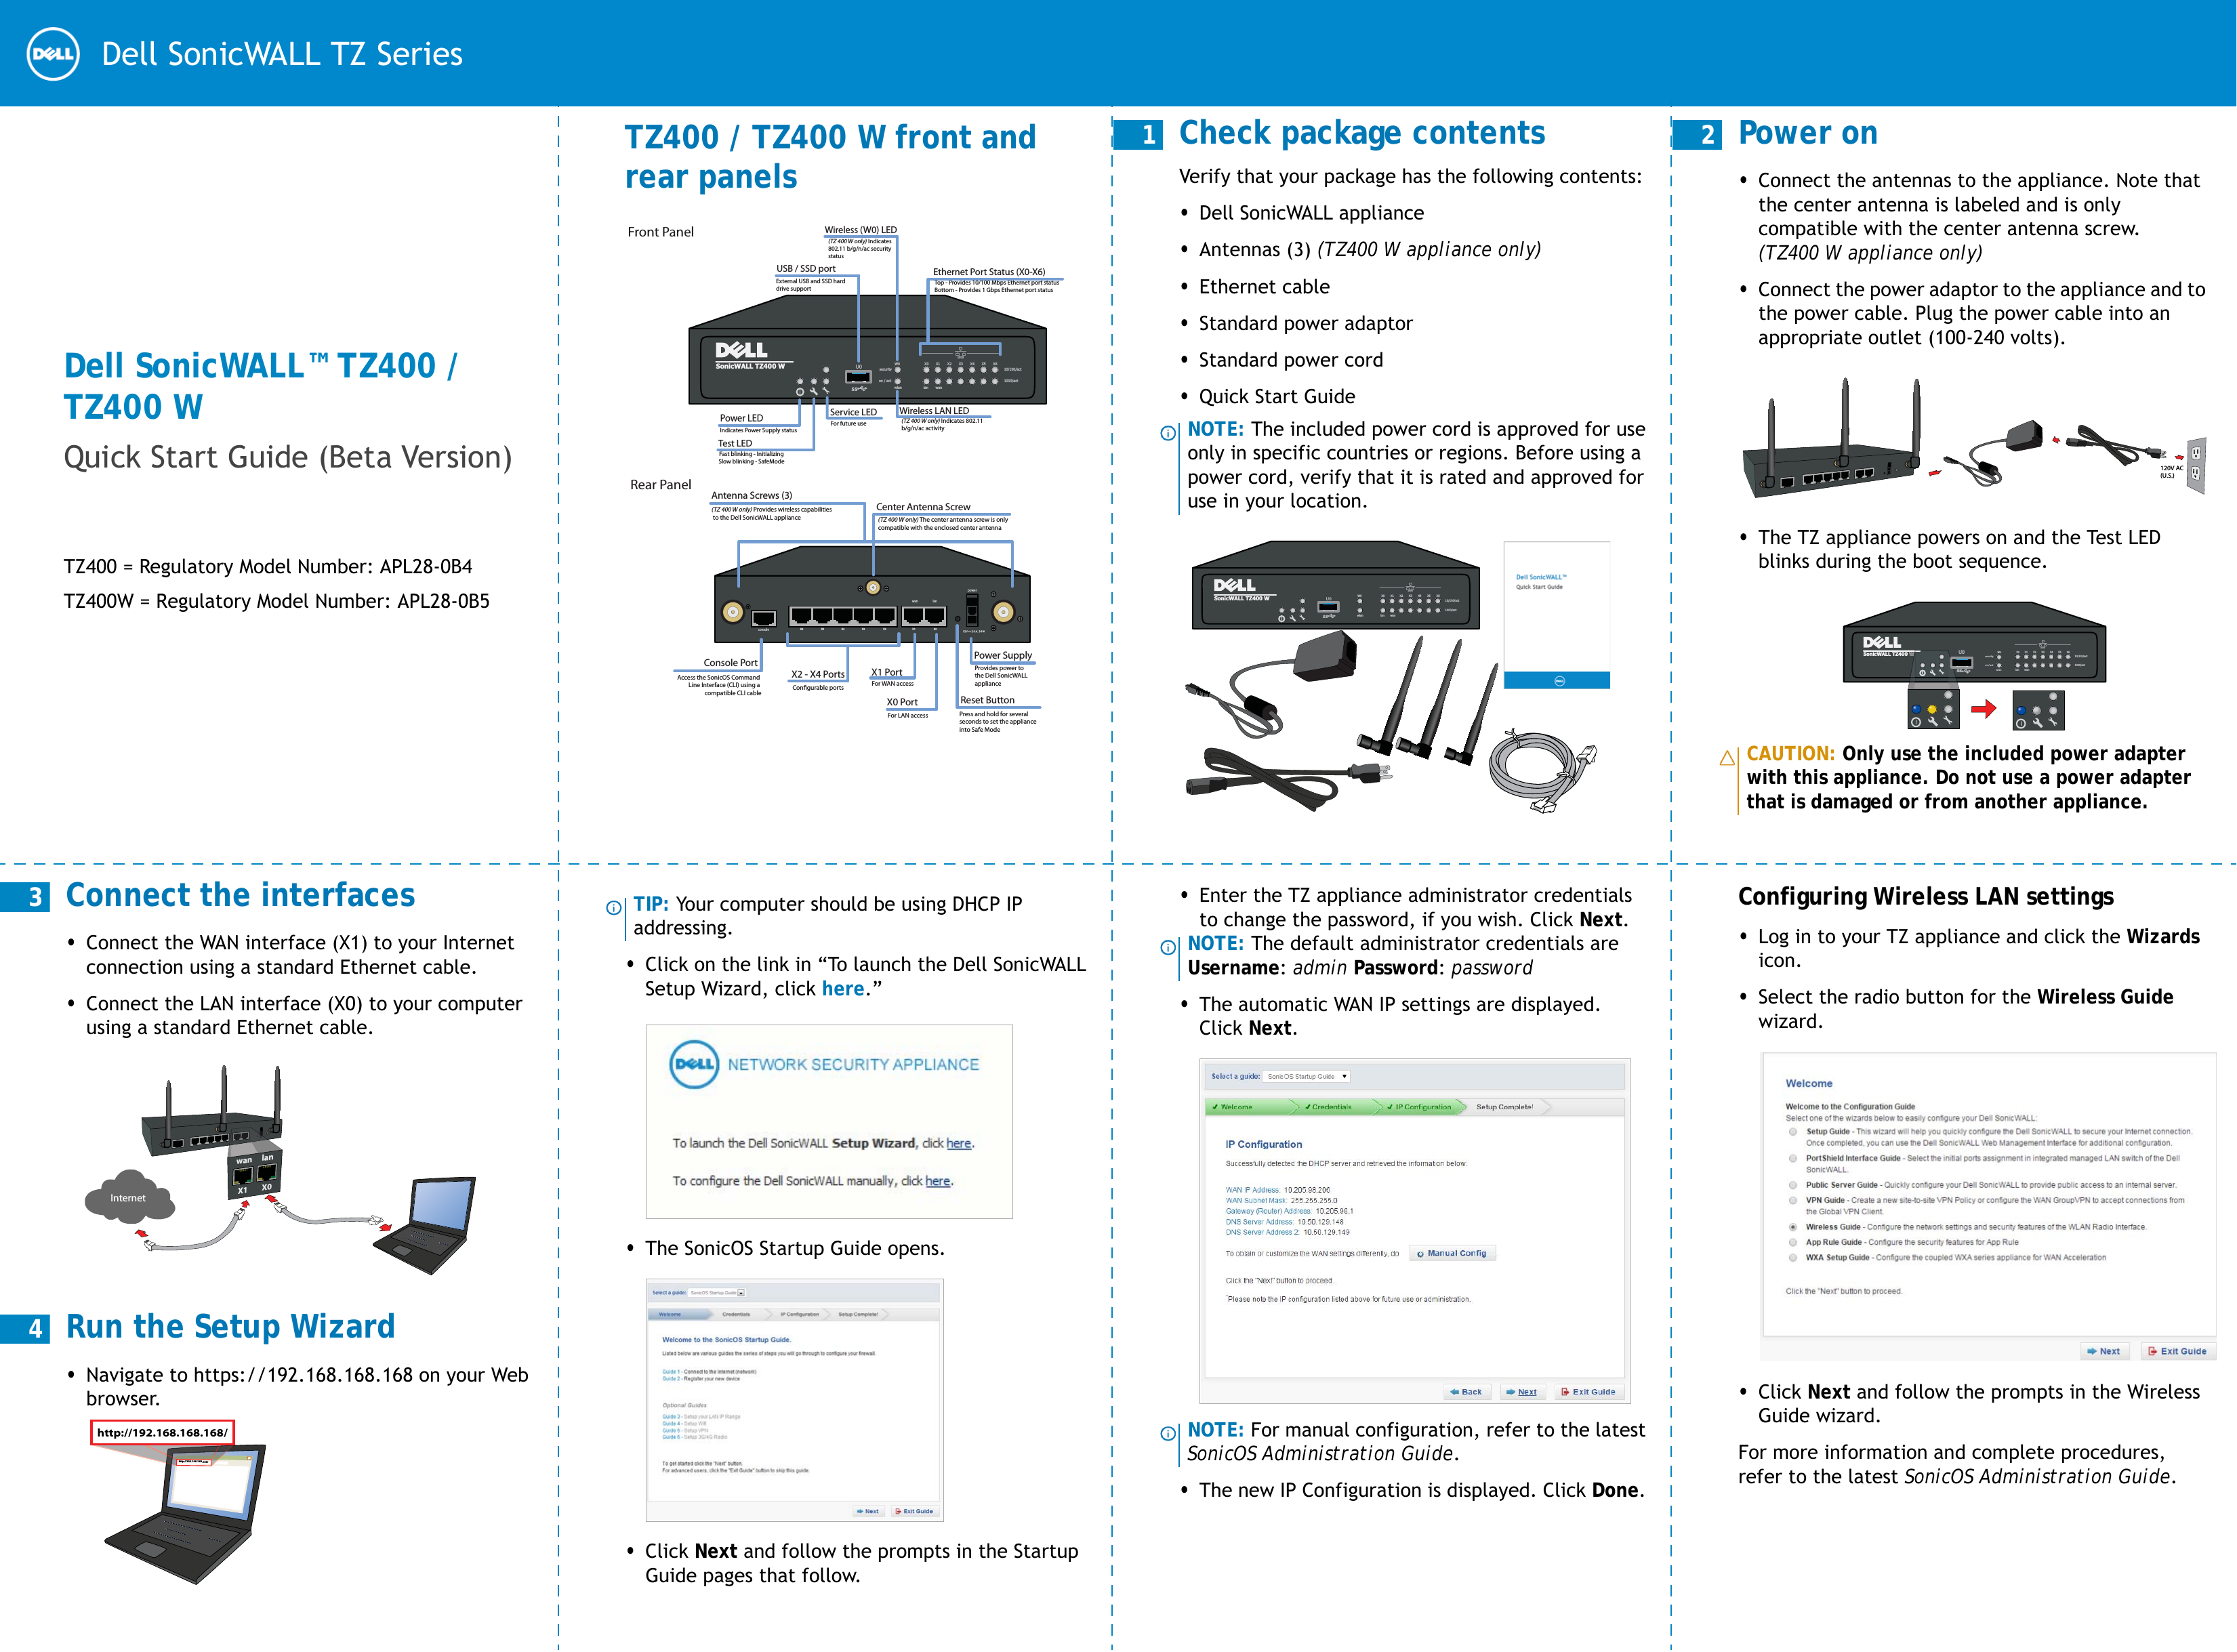
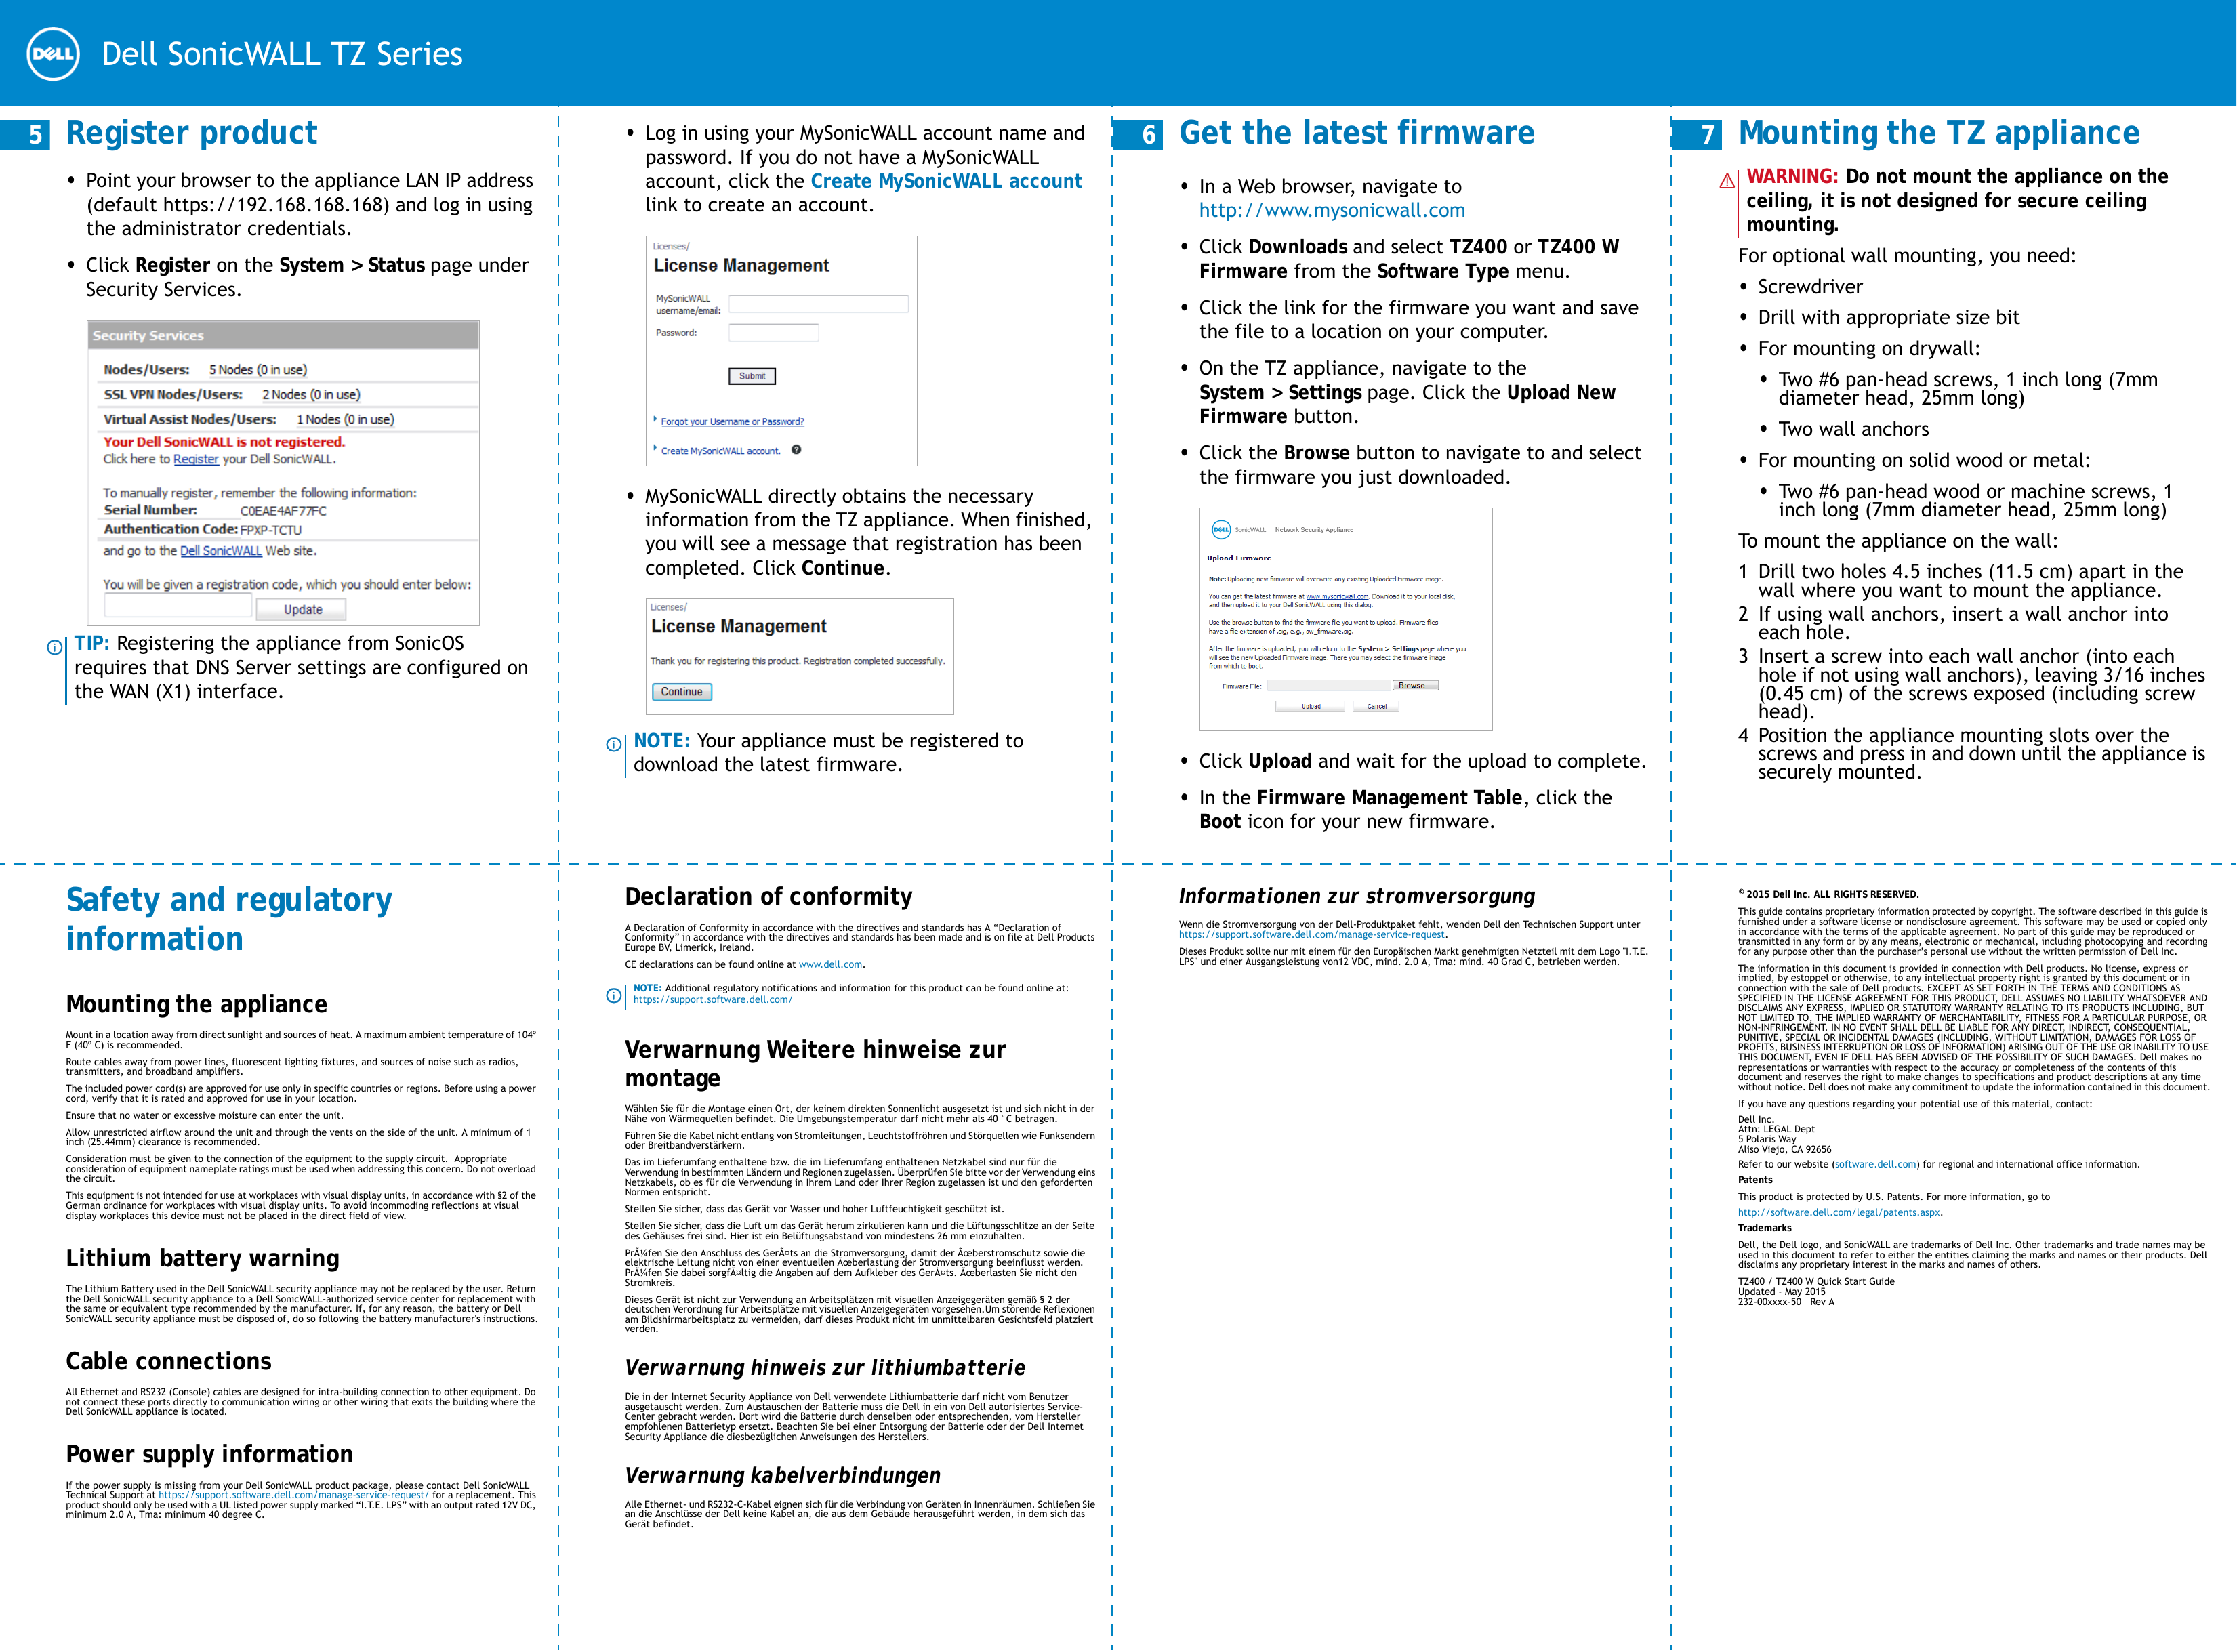
Dell APL280B5 Wireless Network Security Appliance User Manual Dell SonicWALL TZ400 TZ400 W Quick Start Guide

Dell Inc. Wireless Network Security Appliance Dell SonicWALL TZ400 TZ400 W Quick Start Guide

Contents

User Manual.pdf

Dell SonicWALL TZ SeriesTZ400 / TZ400 W front and rear panelsRear PanelFront Panelpowersecurityon / actSonicWALL TZ400 W1000X0W0lanwlanon / actsecuritywan1000/act10/100/actX1 X2 X3 X4 X5 X6U0sswanX0X1X2X3X4X5X6lanconsoleTest LEDEthernet Port Status (X0-X6) Top - Provides 10/100 Mbps Ethernet port statusBottom - Provides 1 Gbps Ethernet port statusWireless (W0) LED(TZ 400 W only) Indicates 802.11 b/g/n/ac security statusUSB / SSD portExternal USB and SSD hard drive supportPower LEDFast blinking - InitializingSlow blinking - SafeModeFor future useService LEDIndicates Power Supply statusWireless LAN LED(TZ 400 W only) Indicates 802.11 b/g/n/ac activityAntenna Screws (3)Center Antenna Screw(TZ 400 W only) Provides wireless capabilities to the Dell SonicWALL appliance (TZ 400 W only) The center antenna screw is only compatible with the enclosed center antennaReset ButtonPress and hold for several seconds to set the appliance into Safe ModePower SupplyProvides power to the Dell SonicWALL applianceX1 PortX0 PortFor WAN accessFor LAN accessX2 - X4 PortsConsole PortAccess the SonicOS Command Line Interface (CLI) using a compatible CLI cable Congurable ports     1  Check package contentsVerify that your package has the following contents:•Dell SonicWALL appliance•Antennas (3) (TZ400 W appliance only)•Ethernet cable •Standard power adaptor•Standard power cord•Quick Start GuideNOTE: The included power cord is approved for use only in specific countries or regions. Before using a power cord, verify that it is rated and approved for use in your location.SonicWALL TZ400 W1000X0W0lanwlan wan1000/act10/100/actX1 X2 X3 X4 X5 X6U0ss     2  Power on•Connect the antennas to the appliance. Note that the center antenna is labeled and is only compatible with the center antenna screw. (TZ400 W appliance only)•Connect the power adaptor to the appliance and to the power cable. Plug the power cable into an appropriate outlet (100-240 volts). •The TZ appliance powers on and the Test LED blinks during the boot sequence.  120V AC (U.S.)SonicWALL TZ400 WssU01000X0lan wan1000/act10/100/actX1 X2 X3 X4 X5 X6W0securityon / actwlanWWCAUTION: Only use the included power adapter with this appliance. Do not use a power adapter that is damaged or from another appliance.     3 Connect the interfaces•Connect the WAN interface (X1) to your Internet connection using a standard Ethernet cable.•Connect the LAN interface (X0) to your computer using a standard Ethernet cable.     4 Run the Setup Wizard•Navigate to https://192.168.168.168 on your Web browser.wanX1lanX0Internethttp://192.168.168.168/http://192.168.168.168/•Click on the link in “To launch the Dell SonicWALL Setup Wizard, click here.” •The SonicOS Startup Guide opens. •Click Next and follow the prompts in the Startup Guide pages that follow. TIP: Your computer should be using DHCP IP addressing.•Enter the TZ appliance administrator credentials to change the password, if you wish. Click Next.•The automatic WAN IP settings are displayed. Click Next.•The new IP Configuration is displayed. Click Done. NOTE: The default administrator credentials are Username: admin Password: passwordNOTE: For manual configuration, refer to the latest SonicOS Administration Guide.Configuring Wireless LAN settings•Log in to your TZ appliance and click the Wizards icon. •Select the radio button for the Wireless Guide wizard.•Click Next and follow the prompts in the Wireless Guide wizard. For more information and complete procedures, refer to the latest SonicOS Administration Guide. Dell SonicWALL™ TZ400 / TZ400 WQuick Start Guide (Beta Version)  TZ400 = Regulatory Model Number: APL28-0B4TZ400W = Regulatory Model Number: APL28-0B5
Dell SonicWALL TZ Series     5 Register product•Point your browser to the appliance LAN IP address (default https://192.168.168.168) and log in using the administrator credentials. •Click Register on the System > Status page under Security Services.TIP: Registering the appliance from SonicOS requires that DNS Server settings are configured on the WAN (X1) interface.•Log in using your MySonicWALL account name and password. If you do not have a MySonicWALL account, click the Create MySonicWALL account link to create an account.•MySonicWALL directly obtains the necessary information from the TZ appliance. When finished, you will see a message that registration has been completed. Click Continue.NOTE: Your appliance must be registered to download the latest firmware.     6  Get the latest firmware•In a Web browser, navigate to http://www.mysonicwall.com •Click Downloads and select TZ400 or TZ400 W Firmware from the Software Type menu.•Click the link for the firmware you want and save the file to a location on your computer. •On the TZ appliance, navigate to the System > Settings page. Click the Upload New Firmware button. •Click the Browse button to navigate to and select the firmware you just downloaded. •Click Upload and wait for the upload to complete.•In the Firmware Management Table, click the Boot icon for your new firmware.     7  Mounting the TZ applianceFor optional wall mounting, you need:•Screwdriver•Drill with appropriate size bit•For mounting on drywall: •Two #6 pan-head screws, 1 inch long (7mm diameter head, 25mm long)•Tw o  w a l l  a n c h o r s•For mounting on solid wood or metal: •Two #6 pan-head wood or machine screws, 1 inch long (7mm diameter head, 25mm long)To mount the appliance on the wall:1 Drill two holes 4.5 inches (11.5 cm) apart in the wall where you want to mount the appliance. 2If using wall anchors, insert a wall anchor into each hole.3 Insert a screw into each wall anchor (into each hole if not using wall anchors), leaving 3/16 inches (0.45 cm) of the screws exposed (including screw head).4 Position the appliance mounting slots over the screws and press in and down until the appliance is securely mounted.WARNING: Do not mount the appliance on the ceiling, it is not designed for secure ceiling mounting.Safety and regulatory informationMounting the applianceMount in a location away from direct sunlight and sources of heat. A maximum ambient temperature of 104º F (40º C) is recommended.Route cables away from power lines, fluorescent lighting fixtures, and sources of noise such as radios, transmitters, and broadband amplifiers.The included power cord(s) are approved for use only in specific countries or regions. Before using a power cord, verify that it is rated and approved for use in your location. Ensure that no water or excessive moisture can enter the unit.Allow unrestricted airflow around the unit and through the vents on the side of the unit. A minimum of 1 inch (25.44mm) clearance is recommended.Consideration must be given to the connection of the equipment to the supply circuit.  Appropriate consideration of equipment nameplate ratings must be used when addressing this concern. Do not overload the circuit.This equipment is not intended for use at workplaces with visual display units, in accordance with §2 of the German ordinance for workplaces with visual display units. To avoid incommoding reflections at visual display workplaces this device must not be placed in the direct field of view.Lithium battery warningThe Lithium Battery used in the Dell SonicWALL security appliance may not be replaced by the user. Return the Dell SonicWALL security appliance to a Dell SonicWALL-authorized service center for replacement with the same or equivalent type recommended by the manufacturer. If, for any reason, the battery or Dell SonicWALL security appliance must be disposed of, do so following the battery manufacturer's instructions.Cable connectionsAll Ethernet and RS232 (Console) cables are designed for intra-building connection to other equipment. Do not connect these ports directly to communication wiring or other wiring that exits the building where the Dell SonicWALL appliance is located. Power supply information If the power supply is missing from your Dell SonicWALL product package, please contact Dell SonicWALL Technical Support at https://support.software.dell.com/manage-service-request/ for a replacement. This product should only be used with a UL listed power supply marked “I.T.E. LPS” with an output rated 12V DC, minimum 2.0 A, Tma: minimum 40 degree C.Declaration of conformity A Declaration of Conformity in accordance with the directives and standards has A “Declaration of Conformity” in accordance with the directives and standards has been made and is on file at Dell Products Europe BV, Limerick, Ireland.CE declarations can be found online at www.dell.com.Verwarnung Weitere hinweise zur montageWählen Sie für die Montage einen Ort, der keinem direkten Sonnenlicht ausgesetzt ist und sich nicht in der Nähe von Wärmequellen befindet. Die Umgebungstemperatur darf nicht mehr als 40 °C betragen.Führen Sie die Kabel nicht entlang von Stromleitungen, Leuchtstoffröhren und Störquellen wie Funksendern oder Breitbandverstärkern.Das im Lieferumfang enthaltene bzw. die im Lieferumfang enthaltenen Netzkabel sind nur für die Verwendung in bestimmten Ländern und Regionen zugelassen. Überprüfen Sie bitte vor der Verwendung eins Netzkabels, ob es für die Verwendung in Ihrem Land oder Ihrer Region zugelassen ist und den geforderten Normen entspricht.Stellen Sie sicher, dass das Gerät vor Wasser und hoher Luftfeuchtigkeit geschützt ist.Stellen Sie sicher, dass die Luft um das Gerät herum zirkulieren kann und die Lüftungsschlitze an der Seite des Gehäuses frei sind. Hier ist ein Belüftungsabstand von mindestens 26 mm einzuhalten.Prüfen Sie den Anschluss des Geräts an die Stromversorgung, damit der Ãœberstromschutz sowie die elektrische Leitung nicht von einer eventuellen Ãœberlastung der Stromversorgung beeinflusst werden. Prüfen Sie dabei sorgfältig die Angaben auf dem Aufkleber des Geräts. Ãœberlasten Sie nicht den Stromkreis.Dieses Gerät ist nicht zur Verwendung an Arbeitsplätzen mit visuellen Anzeigegeräten gemäß § 2 der deutschen Verordnung für Arbeitsplätze mit visuellen Anzeigegeräten vorgesehen.Um störende Reflexionen am Bildshirmarbeitsplatz zu vermeiden, darf dieses Produkt nicht im unmittelbaren Gesichtsfeld platziert verden.Verwarnung hinweis zur lithiumbatterieDie in der Internet Security Appliance von Dell verwendete Lithiumbatterie darf nicht vom Benutzer ausgetauscht werden. Zum Austauschen der Batterie muss die Dell in ein von Dell autorisiertes Service-Center gebracht werden. Dort wird die Batterie durch denselben oder entsprechenden, vom Hersteller empfohlenen Batterietyp ersetzt. Beachten Sie bei einer Entsorgung der Batterie oder der Dell Internet Security Appliance die diesbezüglichen Anweisungen des Herstellers.Verwarnung kabelverbindungenAlle Ethernet- und RS232-C-Kabel eignen sich für die Verbindung von Geräten in Innenräumen. Schließen Sie an die Anschlüsse der Dell keine Kabel an, die aus dem Gebäude herausgeführt werden, in dem sich das Gerät befindet.NOTE: Additional regulatory notifications and information for this product can be found online at: https://support.software.dell.com/Informationen zur stromversorgung Wenn die Stromversorgung von der Dell-Produktpaket fehlt, wenden Dell den Technischen Support unter https://support.software.dell.com/manage-service-request.Dieses Produkt sollte nur mit einem für den Europäischen Markt genehmigten Netzteil mit dem Logo "I.T.E. LPS" und einer Ausgangsleistung von12 VDC, mind. 2.0 A, Tma: mind. 40 Grad C, betrieben werden.© 2015 Dell Inc. ALL RIGHTS RESERVED.This guide contains proprietary information protected by copyright. The software described in this guide is furnished under a software license or nondisclosure agreement. This software may be used or copied only in accordance with the terms of the applicable agreement. No part of this guide may be reproduced or transmitted in any form or by any means, electronic or mechanical, including photocopying and recording for any purpose other than the purchaser’s personal use without the written permission of Dell Inc.The information in this document is provided in connection with Dell products. No license, express or implied, by estoppel or otherwise, to any intellectual property right is granted by this document or in connection with the sale of Dell products. EXCEPT AS SET FORTH IN THE TERMS AND CONDITIONS AS SPECIFIED IN THE LICENSE AGREEMENT FOR THIS PRODUCT, DELL ASSUMES NO LIABILITY WHATSOEVER AND DISCLAIMS ANY EXPRESS, IMPLIED OR STATUTORY WARRANTY RELATING TO ITS PRODUCTS INCLUDING, BUT NOT LIMITED TO, THE IMPLIED WARRANTY OF MERCHANTABILITY, FITNESS FOR A PARTICULAR PURPOSE, OR NON-INFRINGEMENT. IN NO EVENT SHALL DELL BE LIABLE FOR ANY DIRECT, INDIRECT, CONSEQUENTIAL, PUNITIVE, SPECIAL OR INCIDENTAL DAMAGES (INCLUDING, WITHOUT LIMITATION, DAMAGES FOR LOSS OF PROFITS, BUSINESS INTERRUPTION OR LOSS OF INFORMATION) ARISING OUT OF THE USE OR INABILITY TO USE THIS DOCUMENT, EVEN IF DELL HAS BEEN ADVISED OF THE POSSIBILITY OF SUCH DAMAGES. Dell makes no representations or warranties with respect to the accuracy or completeness of the contents of this document and reserves the right to make changes to specifications and product descriptions at any time without notice. Dell does not make any commitment to update the information contained in this document.If you have any questions regarding your potential use of this material, contact:Dell Inc.Attn: LEGAL Dept5 Polaris WayAliso Viejo, CA 92656Refer to our website (software.dell.com) for regional and international office information.PatentsThis product is protected by U.S. Patents. For more information, go tohttp://software.dell.com/legal/patents.aspx.TrademarksDell, the Dell logo, and SonicWALL are trademarks of Dell Inc. Other trademarks and trade names may be used in this document to refer to either the entities claiming the marks and names or their products. Dell disclaims any proprietary interest in the marks and names of others.TZ400 / TZ400 W Quick Start GuideUpdated - May 2015232-00xxxx-50   Rev A

Navigation menu