Dell DWRFID1202 RFID 13.56MHz Wireless Module User Manual 01
Dell Inc. RFID 13.56MHz Wireless Module 01
Dell >
Contents
User Manual 01
Dell Precision M4800/M6800
Setup And Features Information
About Warnings
WARNING: A WARNING indicates a potential for property damage, personal injury,
or death.
M4800 — Front, Back and Base View
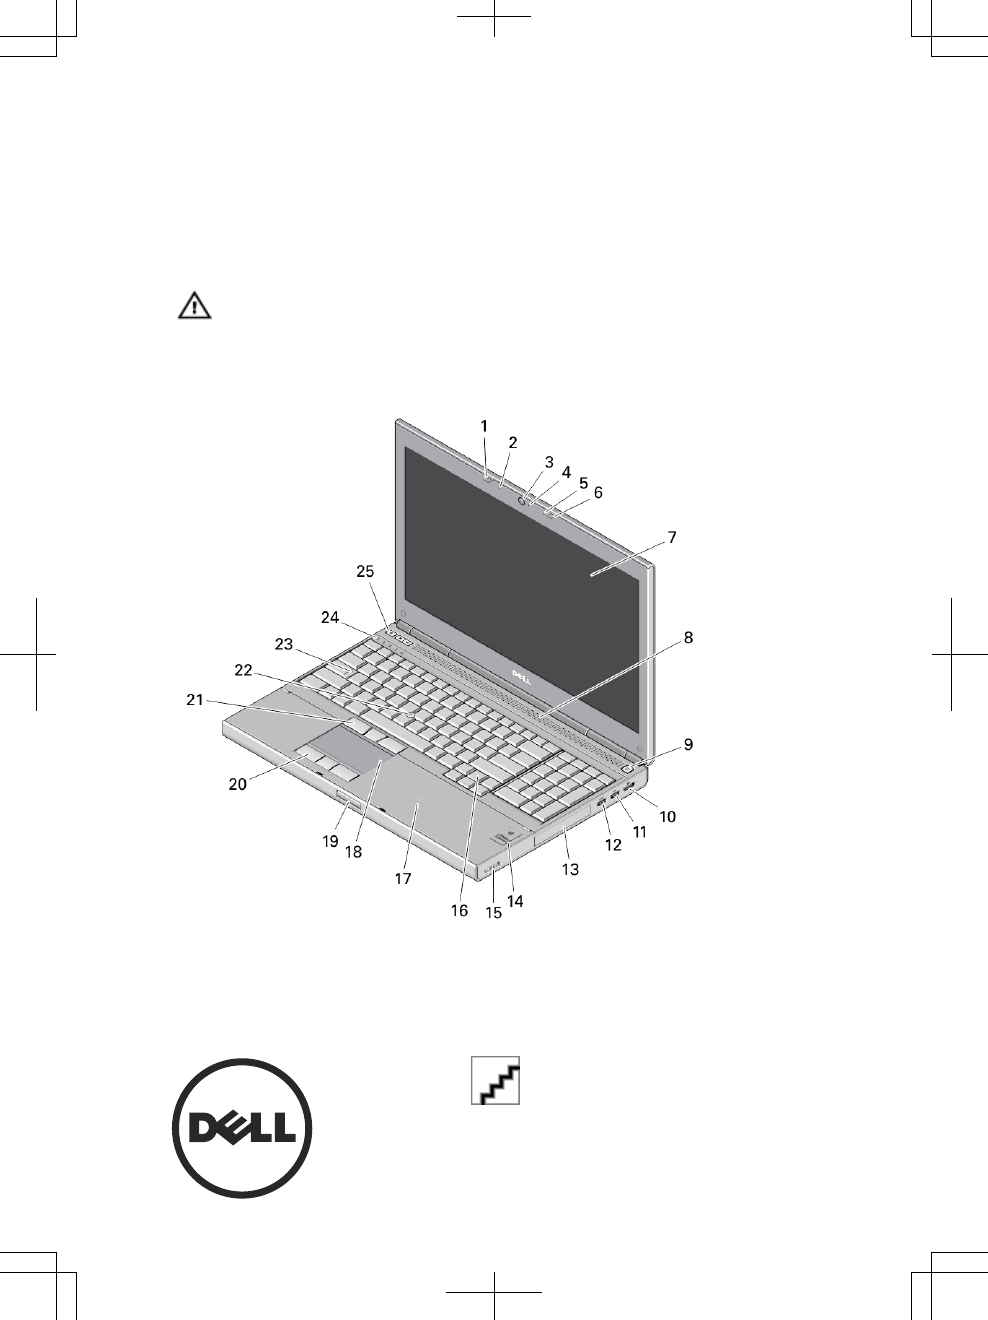
Figure 1. Front View
1. display latch 2. microphone
Regulatory Model: P30F, P20E
Regulatory Type: P20E001, P30F001
2013 - 04
3. camera (optional)
4. camera LED
5. microphone
6. display latch
7. display
8. speakers (2)
9. power button
10. DisplayPort connector
11. USB 3.0 connector
12. USB 3.0 connector with powershare
13. hard drive
14. fingerprint reader (optional)
15. wireless switch
16. keyboard
17. contactless card reader (optional)
18. touchpad
19. display latch release button
20. touchpad buttons (3)
21. track stick buttons (3)
22. track stick
23. caps lock LED
24. device status lights (hard drive,
battery, wireless, Bluetooth, number
lock status lights)
25. volume control buttons (mute,
volume decrease, volume increase
buttons)
Figure 2. Back View
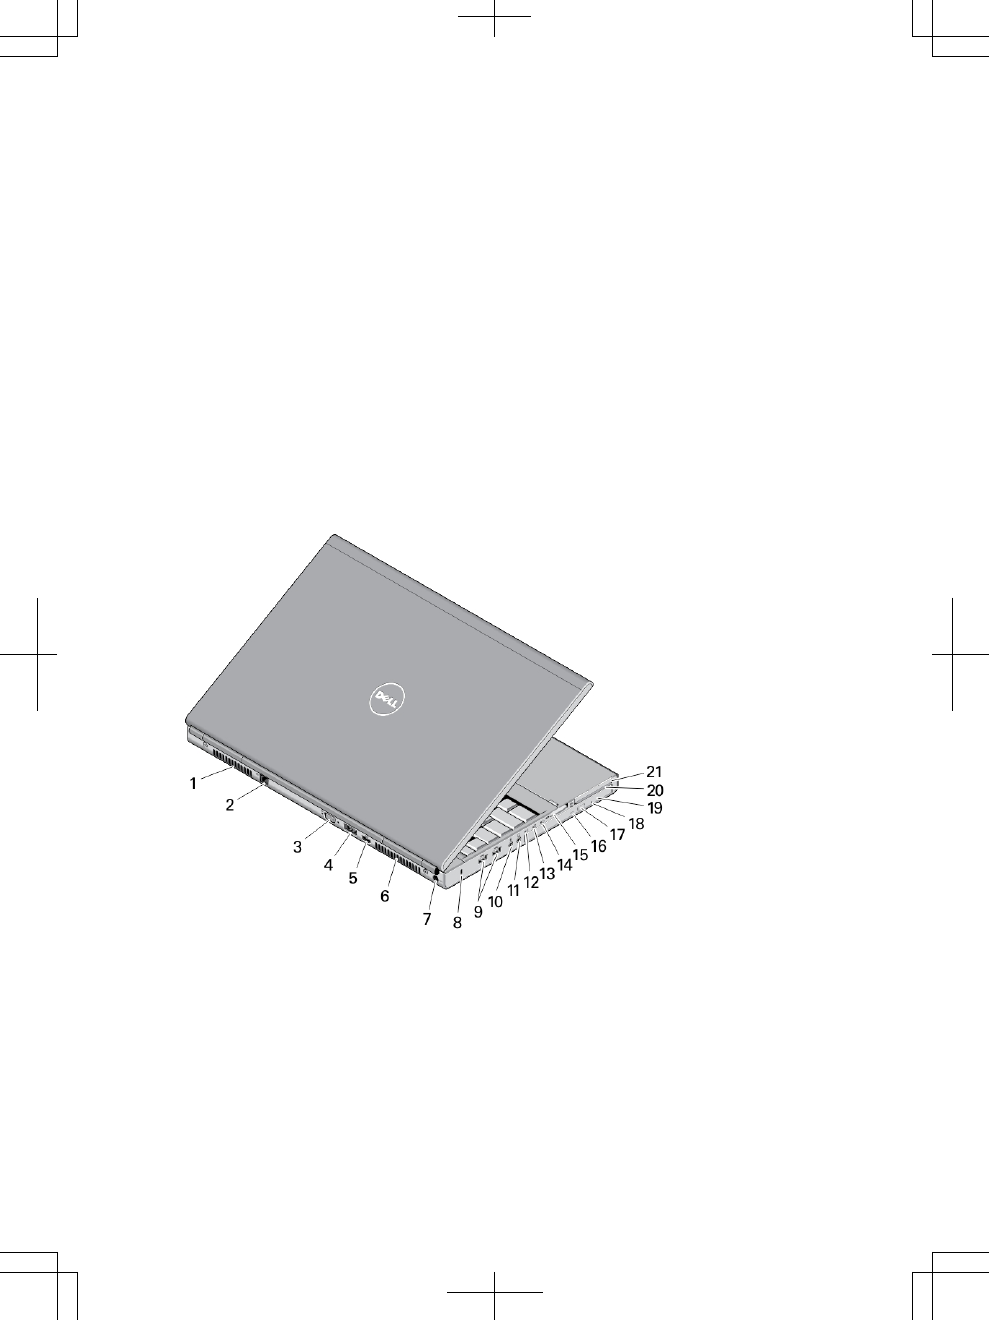
1. cooling vent
2. network connector
3. VGA connector
4. eSATA/USB 2.0 connector
5. HDMI connector
6. cooling vent
7. power connector
8. security cable slot
2
9. USB 3.0 connectors (2)
10. microphone connector
11. headphone connector
12. hard-drive status light
13. battery status light
14. power light
15. memory reader slot
16. optical drive status light
17. optical drive eject button
18. optical drive eject hole
19. optical drive
20. smart card reader slot (optional)
21. ExpressCard slot
Figure 3. Base View
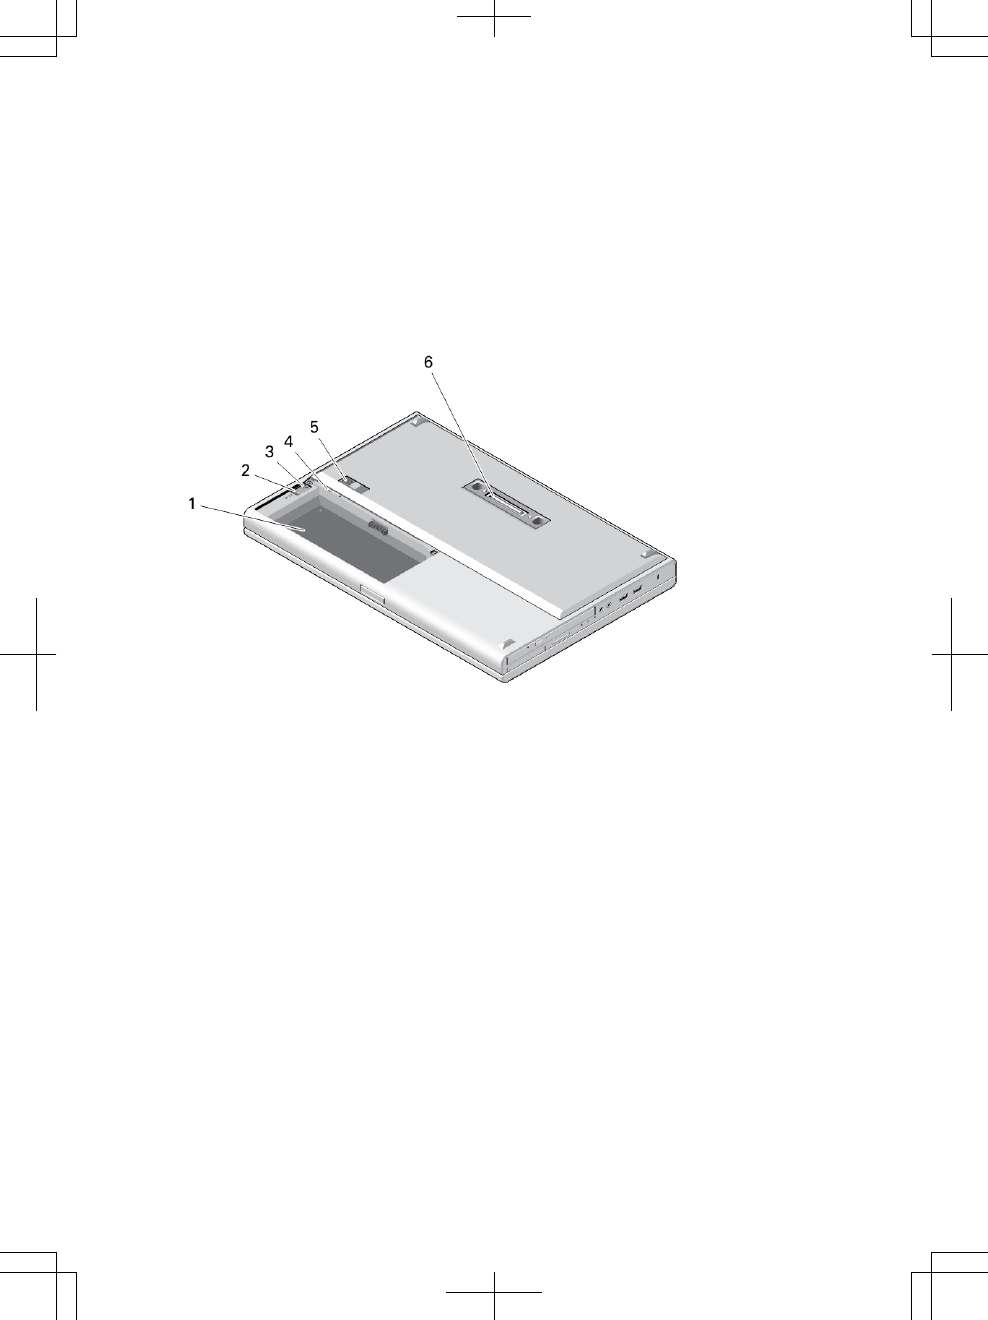
1. battery bay
2. HDD eject latch
3. HDD security screw
4. SIM slot
5. battery release latch
6. dock I/O port
3
M6800 — Front, Back and Base View
Figure 4. Front View
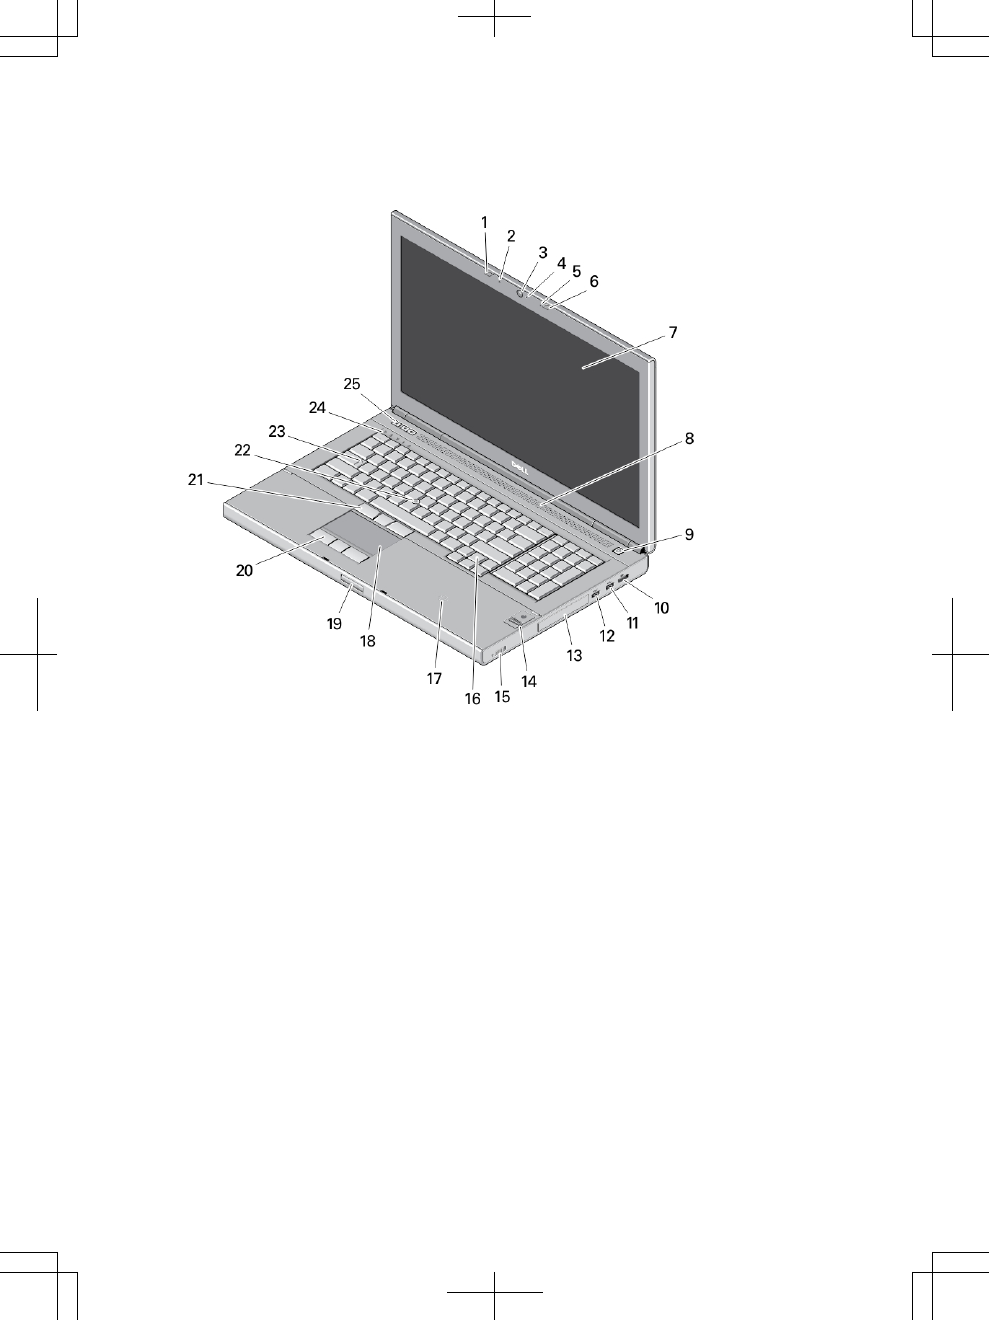
1. display latch
2. microphone
3. camera (optional)
4. camera LED
5. microphone
6. display latch
7. display
8. speakers (2)
9. power button
10. DisplayPort connector
11. USB 3.0 connector
12. USB 3.0 connector with powershare
13. hard drive
14. fingerprint reader (optional)
15. wireless switch
16. keyboard
17. contactless card reader (optional)
18. touchpad
19. display latch release button
20. touchpad buttons (3)
21. track stick buttons (3)
22. track stick
23. caps lock LED
24. device status lights (hard drive,
battery, wireless, Bluetooth, number
lock status lights)
4

25. volume control buttons (mute,
volume decrease, volume increase
buttons)
Figure 5. Back View
1. cooling vent
2. VGA connector
3. network connector
4. HDMI connector
5. eSATA/USB 2.0 connector
6. cooling vent
7. power connector
8. security cable slot
9. USB 3.0 connectors (2)
10. microphone connector
11. headphone connector
12. hard-drive status light
13. battery status light
14. power light
15. memory reader slot
16. optical drive status light
17. optical drive eject button
18. optical drive eject hole
19. optical drive
20. smart card reader slot (optional)
21. ExpressCard slot
5
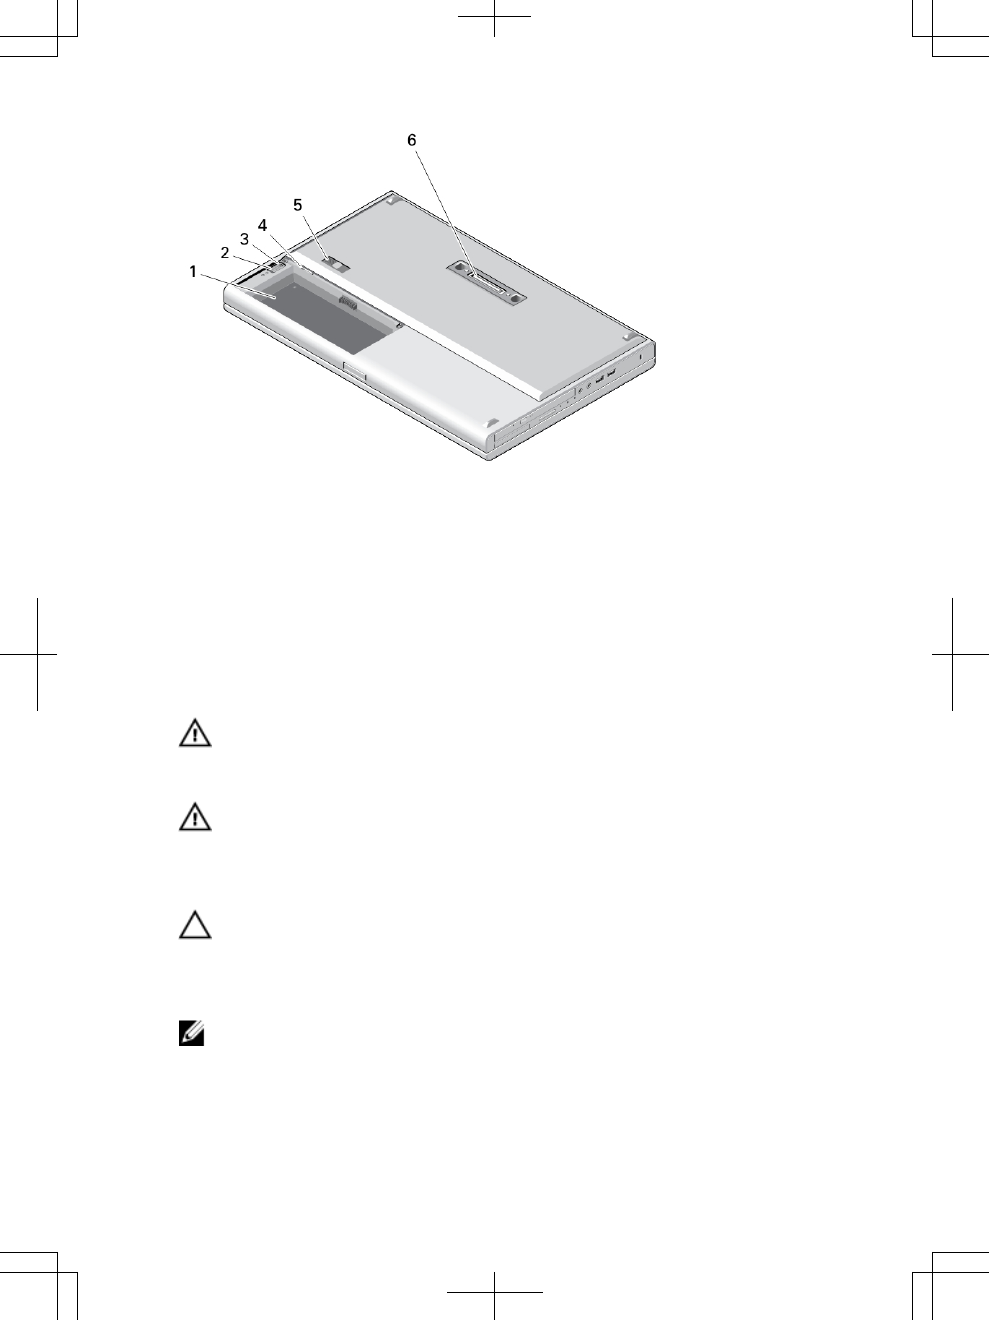
Figure 6. Base View
1. battery bay
2. HDD eject latch
3. HDD security screw
4. SIM slot
5. battery release latch
6. dock I/O port
Quick Setup
WARNING: Before you begin any of the procedures in this section, read the safety
information that shipped with your computer. For additional best practices
information, see www.dell.com/regulatory_compliance
WARNING: The AC adapter works with electrical outlets worldwide. However,
power connectors and power strips vary among countries. Using an incompatible
cable or improperly connecting the cable to the power strip or electrical outlet may
cause fire or equipment damage.
CAUTION: When you disconnect the AC adapter cable from the computer, grasp
the connector, not the cable itself, and pull firmly but gently to avoid damaging the
cable. When you wrap the AC adapter cable, ensure that you follow the angle of the
connector on the AC adapter to avoid damaging the cable.
NOTE: Some devices may not be included if you did not order them.
1. Connect the AC adapter to the AC adapter connector on the computer and to the
electrical outlet.
6
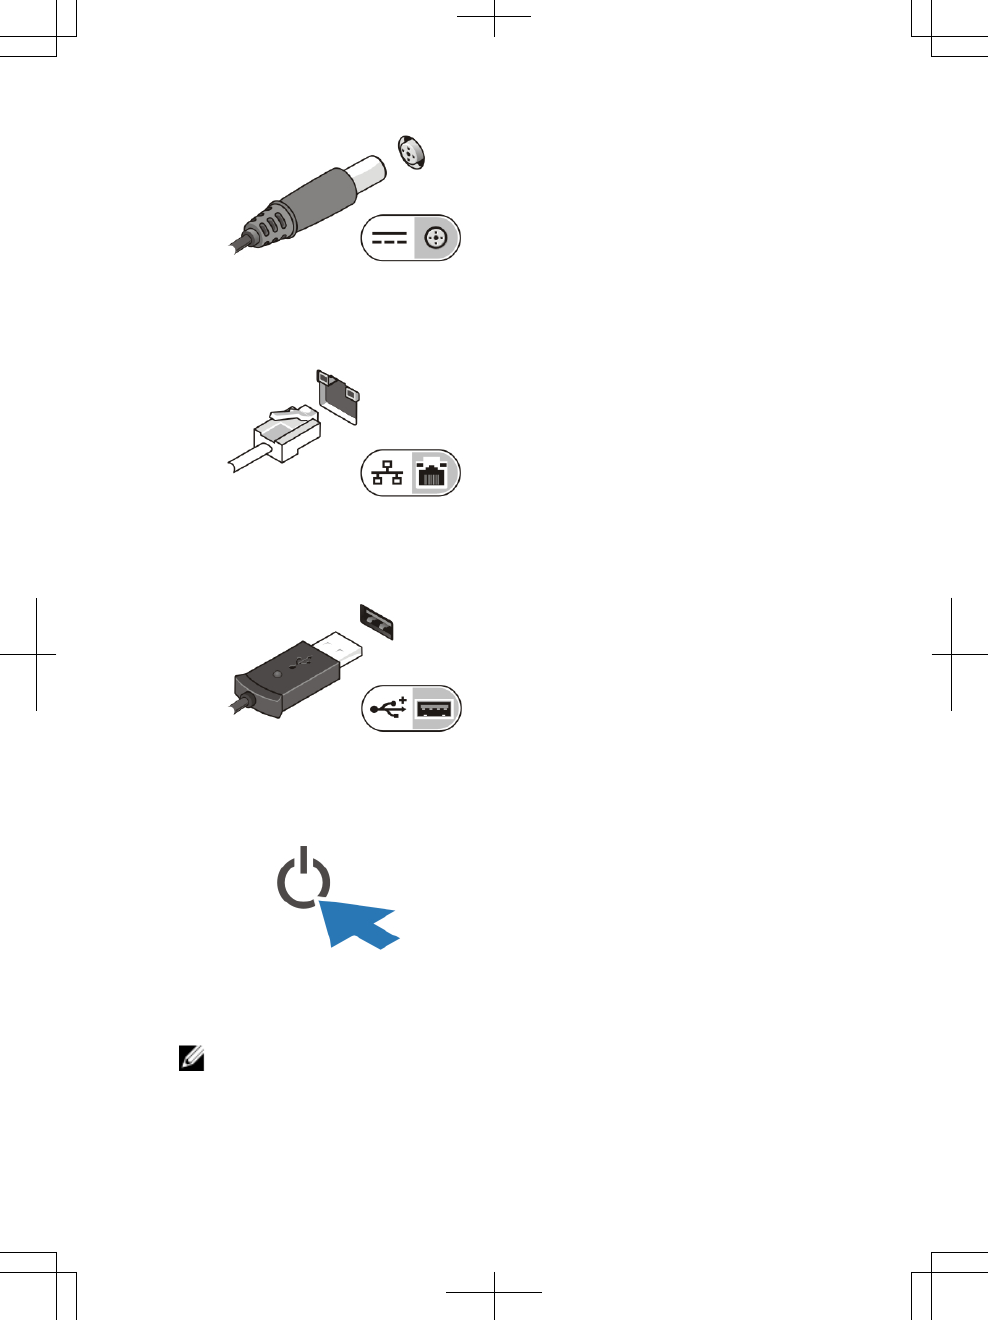
Figure 7. AC Adapter
2. Connect the network cable (optional).
Figure 8. Network Connector
3. Connect USB devices, such as a mouse or keyboard (optional).
Figure 9. USB Connector
4. Open the computer display and press the power button to turn on the computer.
Figure 10. Power Button
NOTE: It is recommended that you turn on and shut down your computer at least
once before you install any cards or connect the computer to a docking device or
other external device, such as a printer.
7
Specifications
NOTE: Offerings may vary by region. The following specifications are only those
required by law to ship with your computer. For more information regarding the
configuration of your computer, click Start → Help and Support and select the
option to view information about your computer.
NOTE: A 64-bit operating system is required to support systems with 2 GB or greater
graphics and system memory. Significant system memory may be used to support
graphics, depending on system memory size, operating system, and other factors. A
64-bit discrete graphics driver may be downloaded from dell.com/support.
Power
AC Adapter M4800: 180 W
M6800: 240 W
Output 19.5 V
Input voltage 100 VAC - 240 VAC
Coin-cell battery 3 V / 210 mA
Physical M4800 M6800
Height (Touch)
• Front: 36.1 mm (1.42
inches)
• Rear: 40.2 mm (1.58
inches)
Height (Non-Touch)
• Front: 32.9 mm
(1.29 inches)
• Rear: 36.7mm
(1.44 inches)
• Front: 33.1 mm (1.30
inches)
• Rear: 37.2 mm (1.46
inches)
Width 376 mm (14.80 inches) 416.7 mm (16.40 inches)
Depth 256 mm (10.07 inches) 270.6 mm (10.65 inches)
Weight (Minimum) 2.89 kg (6.38 lb) 3.58 kg (7.89 lb)
Environmental
Operating Temperature 0 °C to 35 °C (32 °F to 95 °F)
8

Information para NOM (únicamente para México)
The following information is provided on the device described in this document in
compliance with the requirements of the official Mexican standards (NOM).
Voltaje de alimentación 100 VAC – 240 VAC
Frecuencia 50 Hz – 60 Hz
Consumo eléctrico M4800: 2.34 A / 2.5 A
M6800: 3.5 A
Voltaje de salida 19.50 V de CC
Intensidad de salida 9.23 A / 12.3 A
Finding More Information and Resources
See the safety and regulatory documents that shipped with your computer and the
regulatory compliance website at www.dell.com/regulatory_compliance for more
information on:
• Safety best practices
• Regulatory certification
• Ergonomics
See www.dell.com for additional information on:
• Warranty
• Terms and Conditions (U.S. only)
• End User License Agreement
Additional information on your product is available at www.dell.com/support/manuals
© 2013 Dell Inc.
Trademarks used in this text: Dell™, the DELL logo, Dell Precision™, Precision ON™,
ExpressCharge™, Latitude™, Latitude ON™, OptiPlex™, Vostro™, and Wi-Fi Catcher™ are
trademarks of Dell Inc. Intel®, Pentium®, Xeon®, Core™, Atom™, Centrino®, and Celeron® are
registered trademarks or trademarks of Intel Corporation in the U.S. and other countries. AMD® is a
registered trademark and AMD Opteron™, AMD Phenom™, AMD Sempron™, AMD Athlon™,
ATI Radeon™, and ATI FirePro™ are trademarks of Advanced Micro Devices, Inc. Microsoft®,
Windows®, MS-DOS®, Windows Vista®, the Windows Vista start button, and Office Outlook® are
9

either trademarks or registered trademarks of Microsoft Corporation in the United States and/or
other countries. Blu-ray Disc™ is a trademark owned by the Blu-ray Disc Association (BDA) and
licensed for use on discs and players. The Bluetooth® word mark is a registered trademark and
owned by the Bluetooth® SIG, Inc. and any use of such mark by Dell Inc. is under license. Wi-Fi® is
a registered trademark of Wireless Ethernet Compatibility Alliance, Inc.
10