Dell SonicWALL WXA 1.3 WXA_1.3_UG User Manual To The 101a3494 Ecc8 4271 Bde7 A7f0031d42fd
User Manual: Dell Dell SonicWALL WXA 1.3 to the manual
Open the PDF directly: View PDF ![]() .
.
Page Count: 168 [warning: Documents this large are best viewed by clicking the View PDF Link!]
- Table of Contents
- Preface
- Introduction
- Viewing Status Information
- Configuring the WXA Series Appliance
- Viewing the TCP Acceleration Page
- Configuring TCP Acceleration
- Viewing the WFS Acceleration Page
- Configuring WFS Acceleration
- Viewing the Web Cache Page
- Configuring the Web Cache
- Viewing the System Page
- Viewing the Log Page
- Appendix A: Configuring the WXA to the Domain Without Using the WXA Management Interface
- Appendix B: Configuring the NetExtender WAN Acceleration Client

| 1
WXA 1.3
User’s Guide

2 | Dell SonicWALL WXA 1.3 User’s Guide
Notes, Cautions, and Warnings
© 2014 Dell Inc.
Trademarks: Dell™, the DELL logo, SonicWALL™, and all other SonicWALL product and service names and
slogans are trademarks of Dell Inc.
2014 – 02 P/N 232-002401-00 Rev. A
NOTE: A NOTE indicates important information that helps you make better use of your system.
CAUTION: A CAUTION indicates potential damage to hardware or loss of data if instructions
are not followed.
WARNING: A WARNING indicates a potential for property damage, personal injury, or death.

Table of Contents | 3
Table of Contents
Part: Introduction
Chapter 1 Preface . . . . . . . . . . . . . . . . . . . . . . . . . . . . . . . . . . . . . . . . . . . . . . . . .9
About this Guide . . . . . . . . . . . . . . . . . . . . . . . . . . . . . . . . . . . . . . . . . . . . . . . . . . 9
Organization of this Guide. . . . . . . . . . . . . . . . . . . . . . . . . . . . . . . . . . . . . . . . 9
Guide Conventions . . . . . . . . . . . . . . . . . . . . . . . . . . . . . . . . . . . . . . . . . . . . 11
Dell SonicWALL Technical Support. . . . . . . . . . . . . . . . . . . . . . . . . . . . . . . . 11
More Information on Dell SonicWALL Products . . . . . . . . . . . . . . . . . . . . . . 12
Current Documentation . . . . . . . . . . . . . . . . . . . . . . . . . . . . . . . . . . . . . . . . . 12
Chapter 2 Introduction . . . . . . . . . . . . . . . . . . . . . . . . . . . . . . . . . . . . . . . . . . . . 13
Introduction . . . . . . . . . . . . . . . . . . . . . . . . . . . . . . . . . . . . . . . . . . . . . . . . . . . . . 13
What is WAN Acceleration? . . . . . . . . . . . . . . . . . . . . . . . . . . . . . . . . . . . . . 13
New Features in WXA 1.3 . . . . . . . . . . . . . . . . . . . . . . . . . . . . . . . . . . . . . . . 15
Key Features in WXA 1.3 . . . . . . . . . . . . . . . . . . . . . . . . . . . . . . . . . . . . . . . 16
Deployment Prerequisites . . . . . . . . . . . . . . . . . . . . . . . . . . . . . . . . . . . . . . . 17
Deployment Considerations . . . . . . . . . . . . . . . . . . . . . . . . . . . . . . . . . . . . . 17
Supported Platforms . . . . . . . . . . . . . . . . . . . . . . . . . . . . . . . . . . . . . . . . . . . 18
WXA Series Appliance Management Interface . . . . . . . . . . . . . . . . . . . . . . . 18
Part: Status
Chapter 3 Viewing Status Information . . . . . . . . . . . . . . . . . . . . . . . . . . . . . . . . 25
WAN Acceleration > Status. . . . . . . . . . . . . . . . . . . . . . . . . . . . . . . . . . . . . . . . . 25
Status Tab . . . . . . . . . . . . . . . . . . . . . . . . . . . . . . . . . . . . . . . . . . . . . . . . . . . 26
Settings Tab . . . . . . . . . . . . . . . . . . . . . . . . . . . . . . . . . . . . . . . . . . . . . . . . . 31
Chapter 4 Configuring the WXA Series Appliance . . . . . . . . . . . . . . . . . . . . . . . 33
Configuring Network Interfaces . . . . . . . . . . . . . . . . . . . . . . . . . . . . . . . . . . . . . . 33
Part: TCP Acceleration
Chapter 5 Viewing the TCP Acceleration Page. . . . . . . . . . . . . . . . . . . . . . . . . . 41
WAN Acceleration > TCP Acceleration . . . . . . . . . . . . . . . . . . . . . . . . . . . . . . . . 41
Configuration Tab . . . . . . . . . . . . . . . . . . . . . . . . . . . . . . . . . . . . . . . . . . . . . 42
Statistics Tab. . . . . . . . . . . . . . . . . . . . . . . . . . . . . . . . . . . . . . . . . . . . . . . . . 43
Statistics Breakdown Tab . . . . . . . . . . . . . . . . . . . . . . . . . . . . . . . . . . . . . . . 44
Connections Tab . . . . . . . . . . . . . . . . . . . . . . . . . . . . . . . . . . . . . . . . . . . . . . 45
Chapter 6 Configuring TCP Acceleration . . . . . . . . . . . . . . . . . . . . . . . . . . . . . . 47
WAN Acceleration > TCP Acceleration . . . . . . . . . . . . . . . . . . . . . . . . . . . . . . . . 47
Configuring TCP Acceleration on a Site-to-Site VPN . . . . . . . . . . . . . . . . . . 47
Configuring TCP Acceleration on a Non-VPN (Routed Mode) . . . . . . . . . . . 49

4 | Dell SonicWALL WXA 1.3 User’s Guide
Configuring the TCP Acceleration > Configuration Tab. . . . . . . . . . . . . . . . . 56
Verifying the TCP Acceleration Configuration . . . . . . . . . . . . . . . . . . . . . . . . 59
Part: WFS Acceleration
Chapter 7 Viewing the WFS Acceleration Page . . . . . . . . . . . . . . . . . . . . . . . . . 63
WAN Acceleration > WFS Acceleration . . . . . . . . . . . . . . . . . . . . . . . . . . . . . . . 63
WFS Acceleration Page Using Unsigned SMB . . . . . . . . . . . . . . . . . . . . . . . 65
WFS Acceleration Page Using Signed SMB . . . . . . . . . . . . . . . . . . . . . . . . . 67
Chapter 8 Configuring WFS Acceleration. . . . . . . . . . . . . . . . . . . . . . . . . . . . . . 97
WAN Acceleration > WFS Acceleration . . . . . . . . . . . . . . . . . . . . . . . . . . . . . . . 97
Configuring WFS Acceleration Using Unsigned SMB . . . . . . . . . . . . . . . . . . 98
Configuring WFS Acceleration Using Signed SMB . . . . . . . . . . . . . . . . . . . . 99
Verifying the WFS Acceleration Configuration . . . . . . . . . . . . . . . . . . . . . . 117
Part: Web Cache
Chapter 9 Viewing the Web Cache Page. . . . . . . . . . . . . . . . . . . . . . . . . . . . . . 123
WAN Acceleration > Web Cache . . . . . . . . . . . . . . . . . . . . . . . . . . . . . . . . . . . 123
Status Tab . . . . . . . . . . . . . . . . . . . . . . . . . . . . . . . . . . . . . . . . . . . . . . . . . . 124
Statistics Tab. . . . . . . . . . . . . . . . . . . . . . . . . . . . . . . . . . . . . . . . . . . . . . . . 126
Tools Tab. . . . . . . . . . . . . . . . . . . . . . . . . . . . . . . . . . . . . . . . . . . . . . . . . . . 129
Chapter 10 Configuring the Web Cache . . . . . . . . . . . . . . . . . . . . . . . . . . . . . . 131
WAN Acceleration > Web Cache . . . . . . . . . . . . . . . . . . . . . . . . . . . . . . . . . . . 131
Configuring the Web Cache . . . . . . . . . . . . . . . . . . . . . . . . . . . . . . . . . . . . 132
Verifying Web Cache Operation . . . . . . . . . . . . . . . . . . . . . . . . . . . . . . . . . 134
Diagnosing and Testing Performance of the Web Cache . . . . . . . . . . . . . . 135
Part: System
Chapter 11 Viewing the System Page . . . . . . . . . . . . . . . . . . . . . . . . . . . . . . . . 139
WAN Acceleration > System . . . . . . . . . . . . . . . . . . . . . . . . . . . . . . . . . . . . . . . 139
System Status Tab . . . . . . . . . . . . . . . . . . . . . . . . . . . . . . . . . . . . . . . . . . . 140
Interface Status Tab . . . . . . . . . . . . . . . . . . . . . . . . . . . . . . . . . . . . . . . . . . 142
Management Tab . . . . . . . . . . . . . . . . . . . . . . . . . . . . . . . . . . . . . . . . . . . . 143
Settings Tab . . . . . . . . . . . . . . . . . . . . . . . . . . . . . . . . . . . . . . . . . . . . . . . . 144
Firmware Tab . . . . . . . . . . . . . . . . . . . . . . . . . . . . . . . . . . . . . . . . . . . . . . . 145
Part: Log
Chapter 12 Viewing the Log Page. . . . . . . . . . . . . . . . . . . . . . . . . . . . . . . . . . . 149
WAN Acceleration > Log . . . . . . . . . . . . . . . . . . . . . . . . . . . . . . . . . . . . . . . . . . 149
Part: Appendices
Appendix A: Configuring the WXA to the Domain Without Using the WXA Management Interface153
Automatically Joining the Domain . . . . . . . . . . . . . . . . . . . . . . . . . . . . . . . . . . . 153

Table of Contents | 5
Configuring Custom Zones for WXA . . . . . . . . . . . . . . . . . . . . . . . . . . . . . . . . . 156
Configuring Reverse Lookup. . . . . . . . . . . . . . . . . . . . . . . . . . . . . . . . . . . . . . . 157
Manually Adding SPN Hostnames in DNS . . . . . . . . . . . . . . . . . . . . . . . . . . . . 158
Appendix B: Configuring the NetExtender WAN Acceleration Client . . . . . . . 159
Overview . . . . . . . . . . . . . . . . . . . . . . . . . . . . . . . . . . . . . . . . . . . . . . . . . . . . . . 159
Requirements / Prerequisites . . . . . . . . . . . . . . . . . . . . . . . . . . . . . . . . . . . . . . 159
Deployment Considerations . . . . . . . . . . . . . . . . . . . . . . . . . . . . . . . . . . . . . . . 159
Enabling WXAC on the Central Site . . . . . . . . . . . . . . . . . . . . . . . . . . . . . . . . . 160
Configuring WXAC on a Remote PC. . . . . . . . . . . . . . . . . . . . . . . . . . . . . . . . . 164

6 | Dell SonicWALL WXA 1.3 User’s Guide

| 7
Introduction

8 | Dell SonicWALL WXA 1.3 User’s Guide

Preface | 9
Chapter 1
Preface
About this Guide
Welcome to the WXA 1.3 User’s Guide. This manual provides the information you need to
successfully activate, configure, and administer a WXA series appliance.
Note Always check http://www.sonicwall.com/us/support.html for the latest version of this manual
as well as other Dell SonicWALL products and services documentation.
Organization of this Guide
The WXA 1.3 User’s Guide organization is structured into the following parts that parallel the
WAN Acceleration Web Management Interface. Within these parts, individual chapters
correspond to the Dell SonicWALL WXA series appliance management interface layout.
Part 1 Introduction
Provides an overview of new Dell SonicWALL WXA series appliance features, guide
conventions, support information, and an overview of the WXA series appliance management
interface.
Part 2 Status
An overview of the Status page, providing a dashboard view of the System Information, TCP
Acceleration, WFS Acceleration, and Web Cache of your Dell SonicWALL WXA series
appliance.
Part 3 TCP Acceleration
Details the TCP Acceleration page, providing options to configure and monitor the TCP
Acceleration service. This section details the functions of the Configuration, Statistics, Statistics
breakdown, and Connections tabs.

10 | Dell SonicWALL WXA 1.3 User’s Guide
Part 4 WFS Acceleration
Covers the management interface functions and configuration procedures for the WFS
Acceleration page. The WFS Acceleration service can be configured to use Unsigned and/or
Signed SMB. Unsigned SMB is used for networks that do not require traffic signing. Signed
SMB is used for networks that require traffic signing for security reasons, and provides two
configuration modes for the WFS Acceleration service: Basic or Advanced. The Basic
configuration mode provides basic WFS Acceleration configuration options for a quick and easy
deployment of the WFS Acceleration feature. The Advanced configuration mode provides
detailed WFS Acceleration configuration options for the domain details and file shares.
Part 5 Web Cache
Covers the management interface functions and configuration procedures for the Web Cache
page. Configure, monitor, and diagnose the Web Cache feature using the Status, Statistics, and
Tools tabs.
Part 6 System
Details the System page, describing the management interface functions and configurations
procedures for the System Status, Interface Status, Management, Settings, and Firmware tabs.
Part 7 Log
Covers the Log page, which displays a detailed list of the Dell SonicWALL WXA series
appliance’s log event messages. This page has multiple options to customize how log event
messages are viewed.
Part 8 Appendices
This part contains appendices for configuring the WXA series appliance to join the domain
without using the WAN Acceleration management interface, and for configuring the
NetExtender WAN Acceleration Client (WXAC).

Preface | 11
Guide Conventions
The following conventions used in this guide are as follows:
Dell SonicWALL Technical Support
For timely resolution of technical support questions, visit Dell SonicWALL on the Internet at
http://www.sonicwall.com/us/Support.html. Web-based resources are available to help you
resolve most technical issues or contact Dell SonicWALL Technical Support. To contact Dell
SonicWALL telephone support, see the telephone numbers listed below:
North America Telephone Support
U.S./Canada: +1 888.793.2830 or +1 408.837.4317
International Telephone Support
Australia: + 1800.35.1642
Austria: +43(0)820.400.105
EMEA: +31(0)411.617.810
France: +44 193.257.3927
Germany: +44 193.257.3910
Hong Kong: +1 800.93.0997
India: 000.800.100.3395
Italy: +44 193.257.3928
Japan: 0120.569122
New Zealand: + 800.446489
Singapore: + 800.110.1441
Spain: +44 193.257.3921
Switzerland: +44 193.257.3929
UK: +44 193.257.3929
Convention Use
Bold Highlights items you can click or select on the WXA series
appliance management interface. For example, “Click the
Caching Strategy drop-down menu and select Minimal.”
Note: This only applies to sections in this document that contain
configuration procedures or management interface
descriptions
Italic Highlights a value to enter into a field. For example, “Type
192.168.168.168 in the IP Address field.”
Menu Item > Menu Item Indicates a multiple step Management Interface menu choice. For
example, “Navigate to the WAN Acceleration > System page
means select WAN Acceleration then select System.

12 | Dell SonicWALL WXA 1.3 User’s Guide
More Information on Dell SonicWALL Products
Contact Dell SonicWALL, Inc. for information about Dell SonicWALL products and services at:
Web:http://www.sonicwall.com
E-mail:sales@sonicwall.com
Phone:(408) 745-9600
Fax:(408) 745-9300
Current Documentation
Check the Dell SonicWALL documentation Web site for that latest versions of this manual and
all other Dell SonicWALL product documentation.
http://www.sonicwall.com/us/Support.html

Introduction | 13
Chapter 2
Introduction
Introduction
WXA 1.3 is the latest version of firmware for the Dell SonicWALL WXA series appliance. This
chapter provides an overview of the WAN Acceleration feature, the WAN Acceleration
management interface, deployment prerequisites and considerations, supported platforms, and
details the key features in the WXA 1.3 and previous releases. This chapter contains the
following sections:
• What is WAN Acceleration? on page 13
• New Features in WXA 1.3 on page 15
• Key Features in WXA 1.3 on page 16
• Deployment Prerequisites on page 17
• Deployment Considerations on page 17
• Supported Platforms on page 18
• WXA Series Appliance Management Interface on page 18
What is WAN Acceleration?
The WAN Acceleration service allows network administrators to accelerate WAN traffic
between a central site and a branch site, using Transmission Control Protocol (TCP)
acceleration methods, Windows File Sharing (WFS) acceleration, and Web caching. The Dell
SonicWALL WXA series appliance is deployed in conjunction with a Dell SonicWALL NSA/TZ
series appliance. In this type of deployment, the NSA/TZ series appliance provides dynamic
security services, such as attack prevention, Virtual Private Network (VPN), routing, and Web
Content Filtering. The WAN Acceleration service can increase application performance.
14 | Dell SonicWALL WXA 1.3 User’s Guide
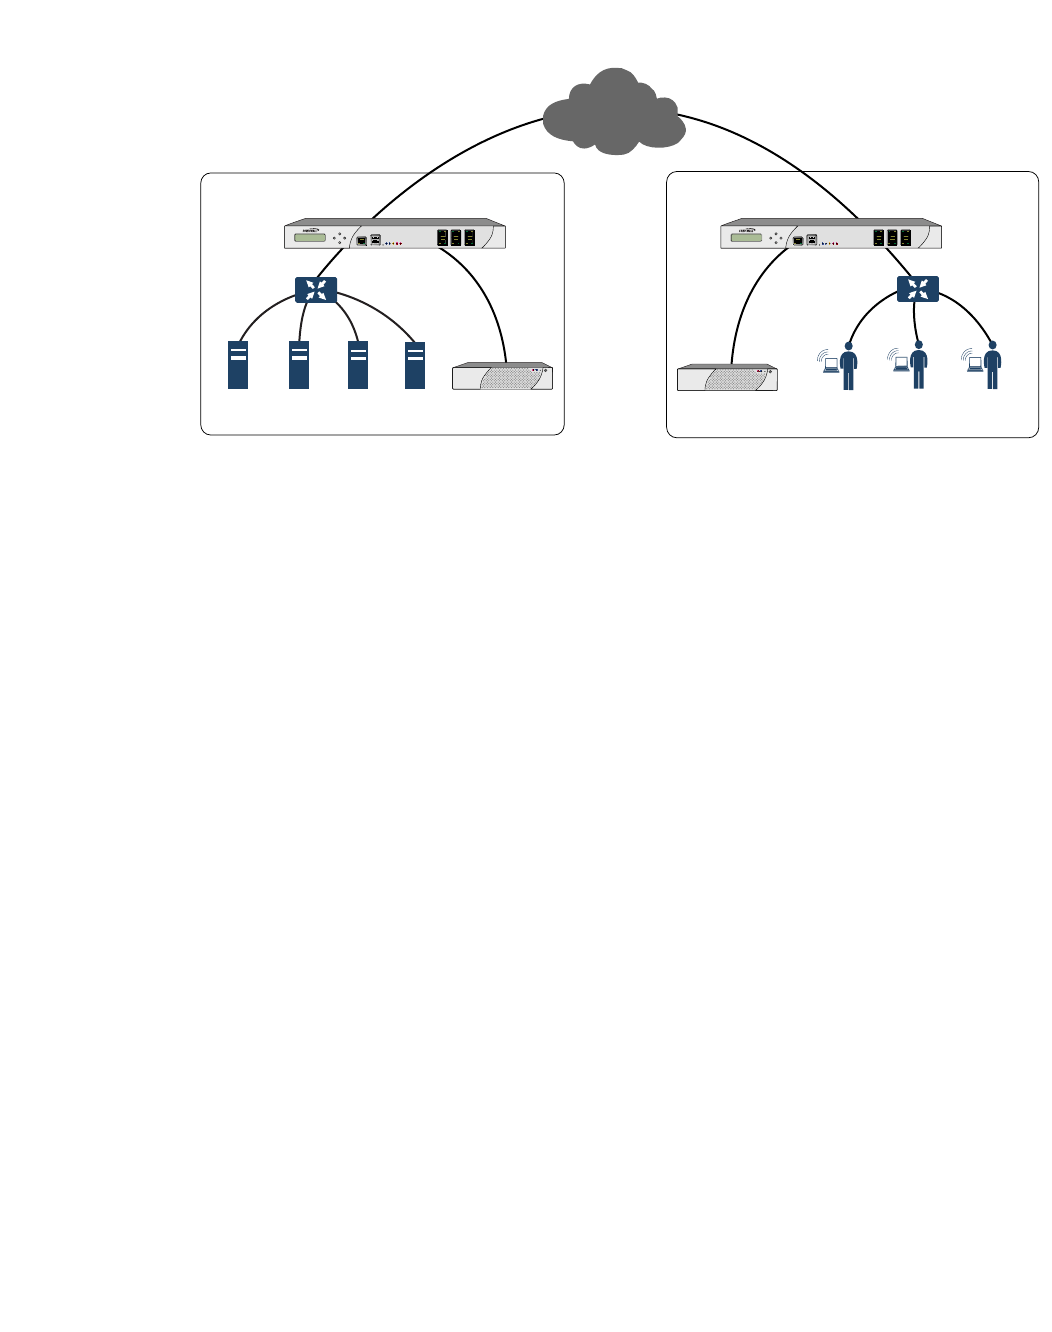
The illustration below displays the basic network topology for the Dell SonicWALL WXA series
appliance and the NSA/TZ series appliances.
Transmission Control Protocol Acceleration
The TCP Acceleration service is a process that decreases the amount of data passing over the
WAN by using compression, which accelerates selected traffic passing between a central site
and a branch site. The selected traffic is stored in the Dell SonicWALL WXA series appliances’
shared databases as blocks of data and tagged with reference indexes. This allows the WXA
series appliances to only send the reference indexes (which are smaller in size) over the WAN
instead of the actual data.
Refer to Configuring TCP Acceleration on page 47, for details on how to configure TCP
Acceleration.
Windows File Sharing Acceleration
WAN Acceleration refers to a wide range of technologies that are aimed at accelerating
applications, improving throughput, and reducing latency. Windows File Sharing (WFS)
Acceleration is a subset of WAN Acceleration.
The use of WFS Acceleration within your network reduces the impact of high-latency and low-
bandwidth links by approximating streaming behavior through the use of read-ahead and write-
behind functionality and differential file transfer to avoid re-transferring parts of files that have
not changed. WFS Acceleration allows branch users to access and share commonly used files
at near-LAN speeds over the WAN. Distributed enterprises that deploy WFS Acceleration
solutions are often able to consolidate storage to corporate central sites, eliminating the need
to back up and manage data that previously resided in their branch sites.
Internet
PC
PC
PC
Branch Site
Central Site
WXA series
appliance
NSA/TZ series
appliance
NSA/TZ series
appliance
WXA series
appliance
Domain
Controller
Switch Switch
File
Server
Email
Server
Web
Server

Introduction | 15
The WXA series appliance offers WFS Acceleration for Unsigned SMB and Signed SMB traffic.
In a network that supports unsigned SMB traffic, the WFS Acceleration service configuration is
greatly simplified. The reason for this is Unsigned SMB traffic does not have a security layer,
so the WXA series appliance can intercept the traffic without joining the domain, eliminating the
need to configure custom zones, configuring reverse lookup, and add file shares. In a network
that supports SMB signing, it is required that the WXA series appliance join the domain, due to
the presence of a security layer in Signed SMB traffic. Although this type of configuration is
more complex than unsigned SMB, it offers a more granular configuration of the WFS
Acceleration service. Supporting SMB signing provides the option to configure WFS
Acceleration in a Basic or Advanced configuration modes.
Refer to Configuring WFS Acceleration on page 97, for details on how to configure WFS
Acceleration.
Web Cache
The Web Cache feature stores copies of Web pages passing through the network that are
frequently and recently requested. So when a user requests one of these Web pages, it is
retrieved from the local web cache instead of the Internet, saving bandwidth and response time.
Minimal, Moderate, and Aggressive caching strategies are available, these determine which
objects are placed into the web cache and how long they stay there.
Refer to Configuring the Web Cache on page 131, for details on configuring the web cache.
New Features in WXA 1.3
The WXA 1.3 release includes the following new features:
• Increased Supported Connections— WXA 1.3 runs as a 64-bit system, offering
significant increases in concurrent connections over a 32-bit system.
• Extended Support for Localization— Firmware support for Brazilian Portuguese,
Simplified Chinese, Japanese, and Korean languages is available.
• Web Cache Improvements— Additional data fields and charts are added to the Web
Cache > Statistics page, allowing the user to filter the page to display data for particular
subnets and certain IP addresses.
• Manual Server Entry for Signed SMB— The option to manually enter a server or share
name is added to the Signed SMB configuration.

16 | Dell SonicWALL WXA 1.3 User’s Guide
Key Features in WXA 1.3
The WXA 1.3 release includes the following Key features:
• Wan Acceleration— The WAN Acceleration service allows network administrators to
accelerate WAN traffic between a central site and a branch site by using Transmission
Control Protocol (TCP) and Windows File Sharing (WFS).
• TCP Acceleration— The TCP Acceleration service is a process that decreases the amount
of data passing over the WAN by using compression, which accelerates selected traffic
passing between a central site and a branch site.
• WFS Acceleration— WAN Acceleration refers to a wide range of technologies that are
aimed at accelerating applications, improving throughput, and enabling bandwidth
scalability using Windows File Sharing (WFS).
–
Unsigned SMB— In a network that supports unsigned SMB traffic, the WFS
Acceleration service configuration is greatly simplified. The reason for this is unsigned
SMB traffic does not have a security layer, so the WXA series appliance can intercept
the traffic without joining the domain, eliminating the need to configure custom zones,
configuring reverse lookup, and add file shares. Unsigned SMB is enabled by default.
–
Signed SMB— In a network that supports SMB signing, it is required that the WXA
series appliance join the domain, due to the presence of a security layer in signed SMB
traffic. Although this type of configuration is more complex than unsigned SMB, it offers
a more granular configuration of the WFS Acceleration service. The WAN Acceleration
> WFS Acceleration page displays a warning when signed SMB traffic is detected on
the network. If this warning is present, please enable the Support SMB Signing
checkbox, join the WXA appliance to the domain, and access the signed shares through
the WXA appliance’s shares.
• WFS Basic Configuration Mode— The Basic configuration mode is a simplified and user
friendly way to have the Dell SonicWALL WXA series appliance join the domain, add
servers to the configuration, and create the necessary records on the domain. The Basic
mode is available when using Signed SMB and is the preferred mode for configuring WFS
Acceleration.
• Web Cache Management— The Web Cache feature stores copies of Web pages passing
through the network that are frequently and recently requested. When a user requests one
of these Web pages, it is retrieved from the local web cache instead of the Internet, which
can result in significant reductions in downloaded data and bandwidth usage.
–
YouTube Web Caching— The Web Cache feature is capable of caching YouTube
videos (currently only Flash video format is supported). This feature is only available
when using Moderate and Aggressive web caching strategies.
• WXA Setup Wizard (requires the NSA/TZ series appliance to be running SonicOS
5.9)— The WXA Setup Wizard in the SonicOS management interface guides you through
the setup of the WXA series appliance, allowing the user to easily enable TCP Acceleration,
WFS Acceleration (unsigned and signed SMB), and Web Caching. If you choose to use
signed SMB, the WFS Setup Wizard is automatically launched from the initial WXA Setup
Wizard. This wizard enables WFS Acceleration support for signed SMB, and walks the user
through joining the domain and configuring file servers.
• WAN Acceleration Client (requires the NSA/TZ series appliance to be running SonicOS
5.9)— The WAN Acceleration Client (WXAC) gives remote users the benefit of WAN
Acceleration when using SonicWALL NetExtender.

Introduction | 17
Deployment Prerequisites
The pre-requisites for deploying the WAN Acceleration service are as follows:
• A NSA/TZ series appliance is required to deploy the Dell SonicWALL WXA series
appliance.
• Traffic passing through the Dell SonicWALL WXA series appliance requires Internet
Protocol version 4 (IPv4). The WAN Acceleration service is not compatible with IPv6.
Deployment Considerations
Consider the following when deploying the Dell SonicWALL WXA series appliance:
• The WXA series appliance is supported to work with Dell SonicWALL E-class NSA, NSA,
or TZ series appliances running SonicOS 5.8.1.0 or higher firmware. Some WXA features
are not supported unless running SonicOS 5.8.1.11 or higher firmware.
• The WFS Acceleration service and Web Cache feature are not supported when running the
WXA 500 Live CD in Memory mode.
• Typically the WXA series appliances are deployed in a site-to-site VPN configuration
through their respective NSA/TZ series appliances. However, you can also use routing or
L2 Bridge Mode, refer to the SonicOS 5.8.1 Administrators Guide for details.
• If a WXA series appliance is used in a high availability configuration, a switched connection
to both appliances high availability pairs is required.
• The initial configuration of the WXA series appliance should be performed by using the
WXA Setup Wizard, which is available by clicking the Wizards button in the top-right corner
of the NSA/TZ series appliance’s management interface. However, this is currently only
available if running SonicOS 5.9 firmware. If your NSA/TZ series appliance is using 5.8.1.x
or 6.1.x firmware use the procedures in this chapter for the initial configuring of the WXA
series appliance. For more information on the WXA Setup Wizard refer to the SonicOS 5.9
Administrator’s Guide.
• Encrypted traffic is highly randomized and does not materially benefit from the WXA series
appliance’s WAN Acceleration service. Therefore, SSL and TLS traffic types are not
accelerated.
• WFS Acceleration using Signed SMB supports Windows file services using Active
Directory, Kerberos, and NTLM for authentication and authorization.
• WFS Acceleration using Signed SMB supports NTLM clients which provide credentials to
the Dell SonicWALL WXA series appliance and are valid in the domain. The Dell
SonicWALL WXA series appliance obtains the Kerberos credentials through the Domain
Controller. This permits client devices which have not joined the domain to be used by
users, who on behalf of the client, have valid domain credentials.
• Create a DHCP scope on the managing NSA/TZ security appliance before the WXA series
appliance is physically connected.
• If the branch offices have Domain Controllers and DNS Servers, it is recommended that you
use those DNS server addresses and domain DNS name in the DHCP scope. Configure
the Domain Name and Domain DNS server IP addresses in the configured DHCP scope.
The WXA appliance will auto-discover Kerberos, LDAP, and NTP servers based on this type
of information to assist in joining the appliance to the domain.
• Review the LDAP, Kerberos, and NTP services. In a multi-site domain where sites and
services are not explicitly configured, the WXA series appliance might not choose the
closest servers.

18 | Dell SonicWALL WXA 1.3 User’s Guide
• Dell SonicWALL recommends that the WXA series appliance retrieve NTP updates from the
Domain Controller.
• Dell SonicWALL recommends that the DNS server accept secure updates.
• Configure the zone properties of an interface to which the WXA appliance is connected as
a LAN zone. Refer to the following KB articles: for more information
–
https://www.fuzeqna.com/sonicwallkb/ext/kbdetail.aspx?kbid=10781
–
https://www.fuzeqna.com/sonicwallkb/ext/kbdetail.aspx?kbid=10738
Supported Platforms
WAN Acceleration is currently available in the SonicOS Management Interface on the following
appliance models:
• NSA E-Series appliance
• NSA Series appliance
• TZ Series appliance
WXA Series Appliance Management Interface
The Dell SonicWALL WXA series appliance’s Web-based management interface provides an
easy-to-use graphical interface for configuring your Dell SonicWALL WXA series appliance. All
configuration procedures for the Dell SonicWALL WXA series appliance are performed through
the Dell SonicWALL NSA/TZ series appliance’s management interface. The following sections
provide an overview of the key management interface objects:
• User Interface on page 18
• Navigating the Management Interface on page 19
• Common Icons in the Management Interface on page 19
• Status Bar on page 19
• Applying Changes on page 20
• Tooltips on page 20
• Getting Help on page 21
User Interface
Table statistics and log entries update within the user interface without requiring users to reload
their browsers. This lightweight user interface is designed to have no impact on the Web server,
CPU utilization, bandwidth or other performance factors. You can leave your browser window
on an updating page indefinitely with no impact to the performance of your Dell SonicWALL
WXA series appliance.
Introduction | 19
Navigating the Management Interface
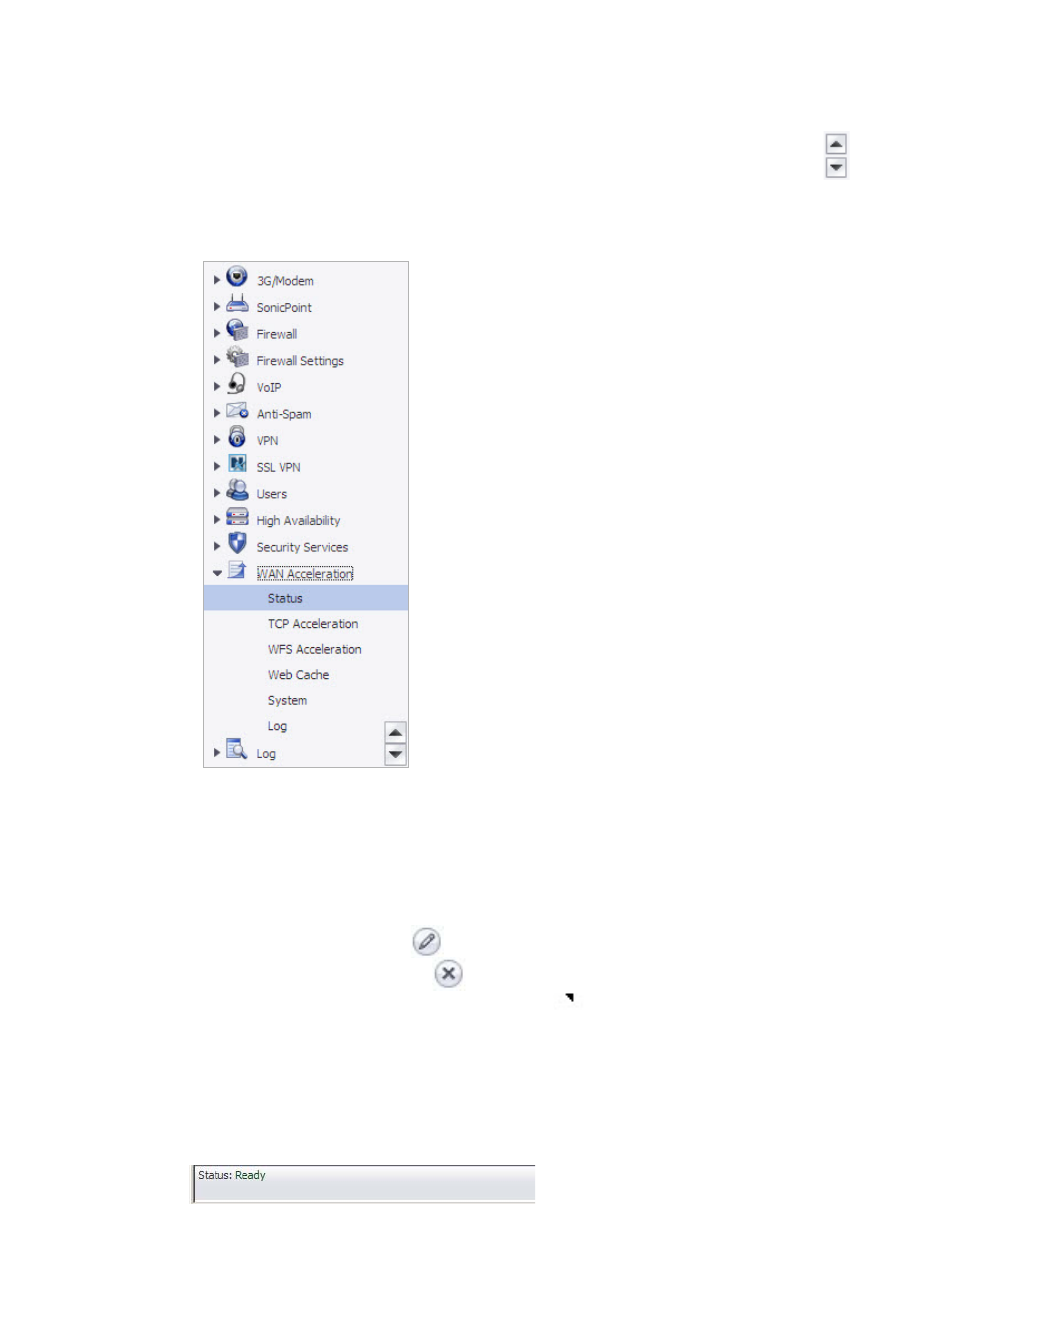
Navigating the WAN Acceleration management interface includes a hierarchy of menu buttons
on the navigation bar (left side of your browser window). When you click a menu button, related
management functions are displayed as submenu items in the navigation bar.
If the navigation bar continues below the bottom of your browser, an up-and-down arrow
symbol appears in the bottom right corner of the navigation bar. Mouse over the up or down
arrow to scroll the navigation bar up or down.
Common Icons in the Management Interface
The following describe the functions of common icons used in the WAN Acceleration
management interface:
• Clicking on the edit icon displays a window for editing the settings.
• Clicking on the delete icon deletes a table entry
• Moving the pointer over the Tooltip icon displays a description of the component.
Status Bar
The Status bar at the bottom of the management interface window displays the status of actions
executed in the management interface.
20 | Dell SonicWALL WXA 1.3 User’s Guide
Applying Changes
Clicking the Apply Changes button saves any configuration changes you made on the page.
If the settings are contained in a secondary window within the management interface, when you
click Apply, the settings are automatically applied to the WXA series appliance.
Tooltips
Tooltips are small pop-up windows that are displayed when you hover your mouse over a UI
element. They provide brief information describing the element. Tooltips are displayed for many
forms, buttons, table headings and entries.
Note Not all UI elements have Tooltips. If a Tooltip does not display after hovering your mouse
over an element for a couple of seconds, you can safely conclude that it does not have an
associated Tooltip.

Introduction | 21
Getting Help
Each Dell SonicWALL WXA series appliance includes Web-based online help available from
the management interface. Clicking the question mark button on the top-right corner of every
page accesses the context-sensitive help for the page.
Note Accessing the Dell SonicWALL WXA series appliance online help requires an active Internet
connection.

22 | Dell SonicWALL WXA 1.3 User’s Guide

| 23
Status

24 | Dell SonicWALL WXA 1.3 User’s Guide

Viewing Status Information | 25
Chapter 3
Viewing Status Information
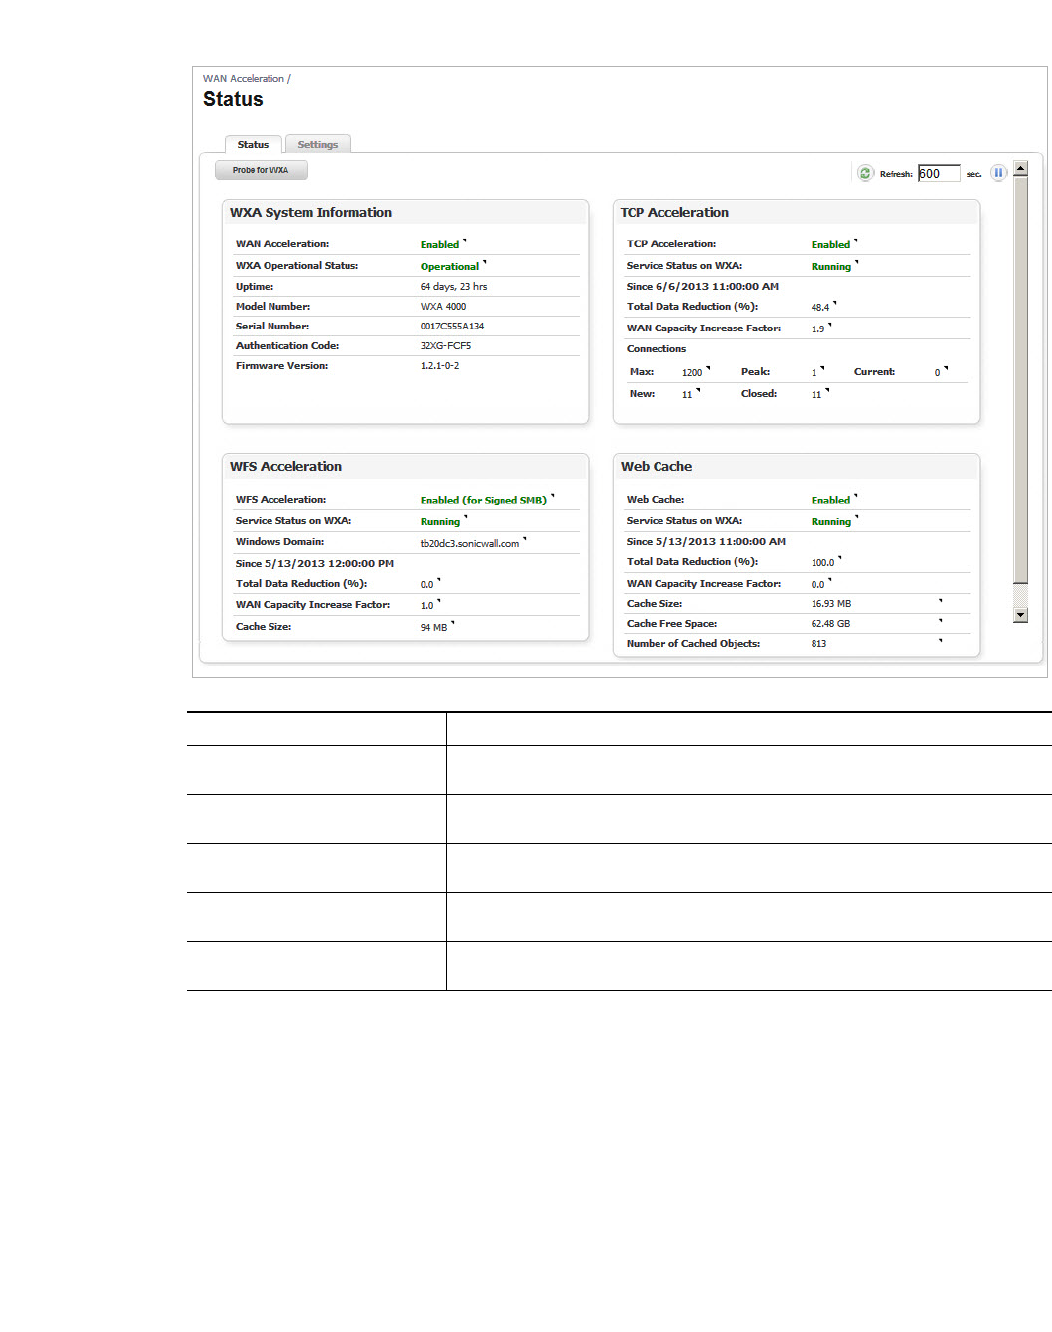
WAN Acceleration > Status
The Status page displays a Status tab with a dashboard view of the System Information, TCP
Acceleration, WFS Acceleration, and Web Cache of your WXA series appliance. It also displays
a Settings tab that provides top level control of the WAN Acceleration service. To configure the
WXA series appliance, see Configuring the WXA Series Appliance on page 33.
This chapter is an overview of the Status page management interface and includes the
following sections:
• Status Tab on page 26
–
Action Items on page 27
–
WXA System Information Panel on page 27
–
TCP Acceleration Panel on page 28
–
WFS Acceleration Panel on page 29
–
Web Cache Panel on page 30
• Settings Tab on page 31
–
Action Items on page 31
–
WXA Appliance Configuration Panel on page 31
–
WXAC on page 32
26 | Dell SonicWALL WXA 1.3 User’s Guide
Status Tab
Name Description
Action Items Provides the options to Refresh and Probe for the WXA series appliance.
See Action Items on page 27 for details.
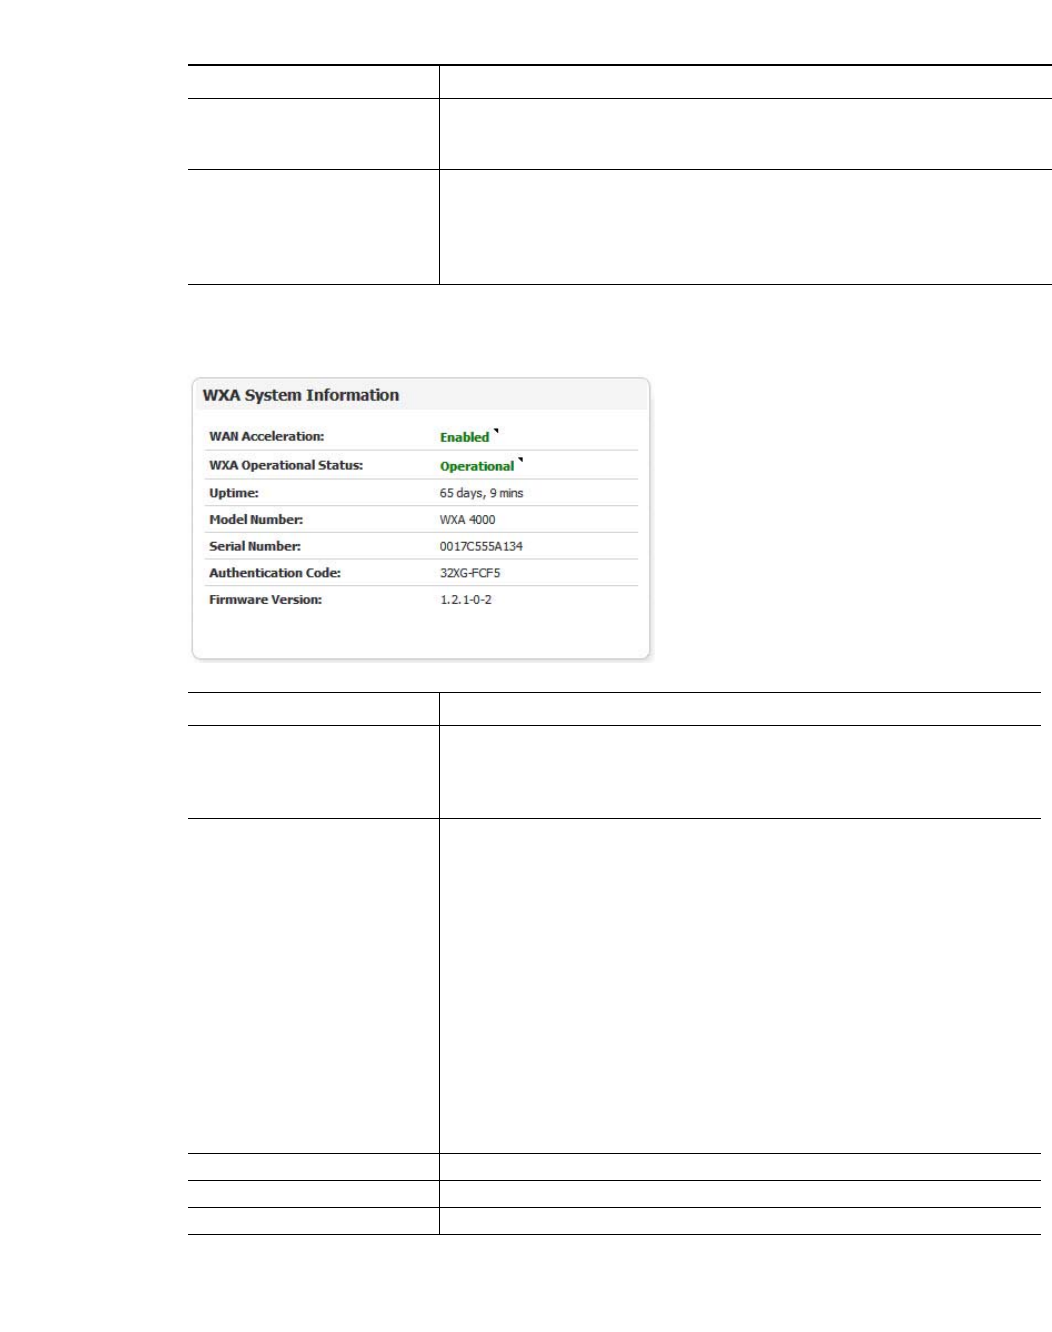
WXA System Information
Panel Displays system details of the WXA series appliance.
See WXA System Information Panel on page 27 for details.
TCP Acceleration Panel Displays the status of the TCP Acceleration feature.
See the TCP Acceleration Panel on page 28 for details.
WFS Acceleration Panel Displays the status of the WFS Acceleration feature.
See the WFS Acceleration Panel on page 29 for details.
Web Cache Panel Displays the status of the Web Caching feature.
See the Web Cache Panel on page 30 for more details.
Viewing Status Information | 27
Action Items
WXA System Information Panel
Name Description
Probe for WXA Checks for the presence of a WXA series appliance. This is a handshake
between the NSA/TZ series appliance and the WXA series appliance, and
confirms they are connected to each other.
Refresh Refreshes the Status page. The refresh interval can be entered in the text
field. The interval can be increased to a maximum of 999 seconds.
Click the Refresh symbol to manually update the Status page.
Click the Pause button to stop the auto-refresh of the Status page. To
resume auto-refresh, click the Start button.
Name Description
WAN Acceleration WAN Acceleration must be enabled (on the Settings tab) and a WXA
series appliance detected in order for traffic to be accelerated.
• Enabled—Indicates the WAN Acceleration service is enabled.
• Disabled—Indicates the WAN Acceleration service is disabled.
WXA Operational Status The current status of the WXA series appliance connection.
• Operational—Indicates the WAN Acceleration service is enabled and a
WXA series appliance is discovered and running.
• Unavailable—Indicates that probing did not detect a WXA series appli-
ance. Ensure the connection between the WXA series appliance and the
SonicOS series appliance is properly set up before continuing with further
configuration.
• Resetting—Indicates that either the status of the WAN Acceleration
service or the presence of a WXA series appliance has just changed and
the configuration is being reset accordingly. Refresh the page in a few
moments.
• Unknown—Indicates the presence and status of a WXA series appli-
ance is not known. This may be because the WAN Acceleration service is
disabled in which case probing is turned off. Alternatively it may be that
probing is just starting.
Uptime Displays the amount of time the appliance has been running.
Model Number Displays the WXA series appliance model number.
Serial Number Displays the WXA series appliance serial number.
28 | Dell SonicWALL WXA 1.3 User’s Guide
TCP Acceleration Panel
Authentication Code Displays the authentication code used to register the WXA series appli-
ance.
Note: This is also used as the password for a machine account when
automatically provisioning the WXA series appliance.
Firmware Version Displays the firmware version that is currently loaded on the WXA series
appliance.
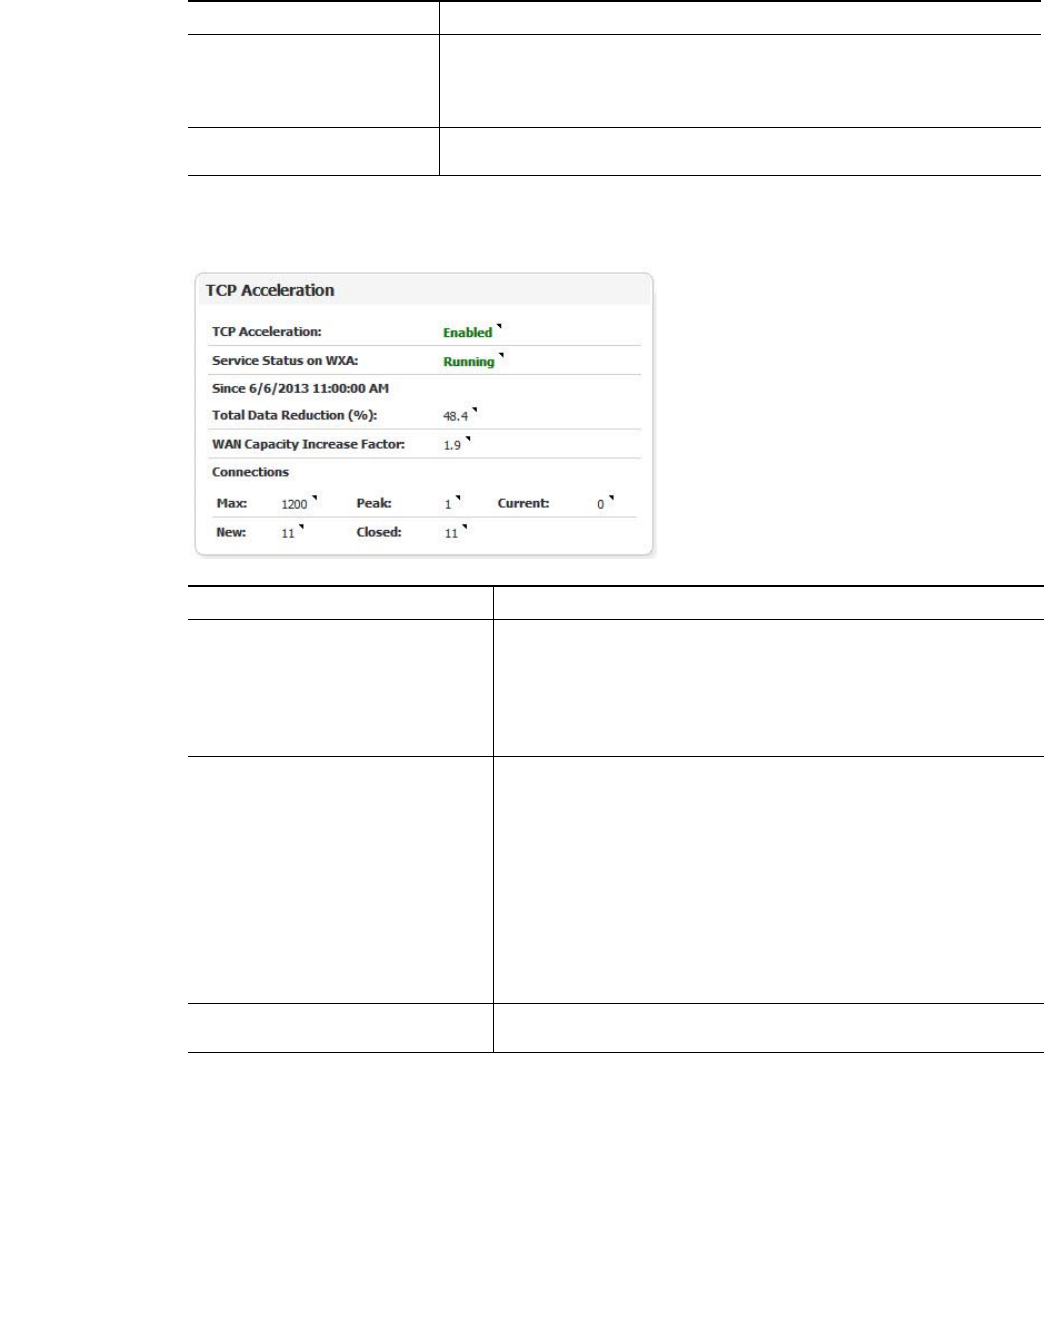
Name Description
Name Description
TCP Acceleration • Enabled—Indicates that both the WAN Acceleration service and
the specific TCP Acceleration switches are enabled. TCP traffic is
sent to the WXA series appliance in order to be accelerated across
the network.
• Disabled—Indicates the TCP Acceleration service or the general
WAN Acceleration service is disabled.
Service Status on WXA The current status of the TCP Acceleration service.
• Running—Indicates the TCP Acceleration service on the WXA
series appliance is accelerating TCP connections
• Ready—Indicates the TCP Acceleration service on the WXA
series appliance is up and ready to accelerate TCP connections as
soon as the component is enabled.
• Unavailable—Indicates the TCP Acceleration service is either
not running on the connected WXA series appliance or there is an
error.
• Unknown—Indicates the status of the TCP Acceleration service
on the WXA series appliance is not known at the moment.
Total Data Reduction (%) The total percentage of data reduced by the TCP Acceleration ser-
vice.
Viewing Status Information | 29
WFS Acceleration Panel
WAN Capacity Increase Factor The ratio of the amount of data conveyed, to the amount that is
actually sent. Use this as a guide for how much extra capacity the
WAN has gained without any increase in bandwidth.
Connections Displays the following information for TCP Acceleration connec-
tions:
• Max—The maximum number of TCP connections permitted at
any instant.
• Peak—The peak humber of TCP connections passing through the
WXA series appliance during the period covered by the statistics.
• Current—The current number of TCP connections passing
through the WXA series appliance.
• New - The number of new connections.
• Closed - The number of closed connections.
Name Description
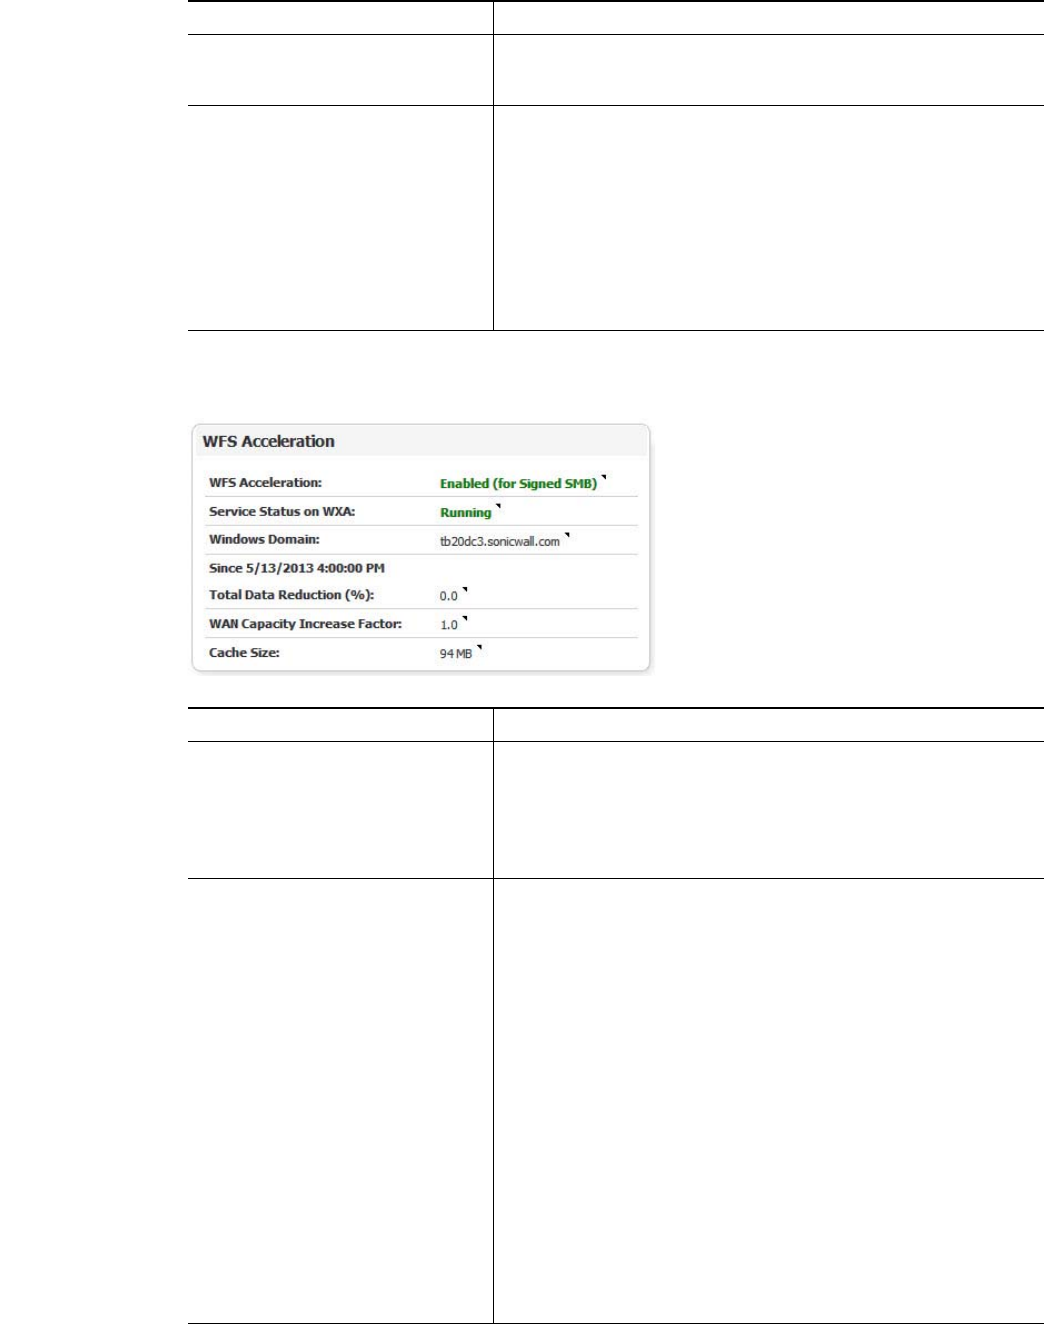
Name Description
WFS Acceleration • Enabled—Indicates that both the general WAN Acceleration ser-
vice and either of the specified WFS Acceleration (Supporting
Signed and Unsigned SMB) switches are enabled.
• Disabled—Indicates that both the general WAN Acceleration ser-
vice and either of the specified WFS Acceleration (Supporting
Signed and Unsigned SMB) switches are disabled.
Service Status on WXA Displays current status of the WFS Acceleration service, reflecting
both Unsigned and Signed SMB.
• Running—Indicates the WFS Acceleration service on the WXA
series appliance is accelerating wide area file sharing operations.
• Ready—Indicates the WFS Acceleration service on the WXA
series appliance is up and ready to accelerating wide area file shar-
ing operations as soon as the component is enabled.
Note: There are separate switches to control support for Signed
and Unsigned SMB traffic.
• No Domain—To accelerate Signed SMB traffic, the WXA series
appliance must join the Windows domain. This indicates that sup-
port for Signed SMB is enabled but either the WXA series appliance
has not joined the Domain or its status on the domain is unknown.
Note: This status will not display if using “Unsigned SMB” only.
• Unavailable—Indicates the WFS Acceleration service is not run-
ning on the connected WXA series appliance or there may be an
error.
• Unknown—Indicates the status of the WFS Acceleration service
on the connected WXA series appliance is not known at the present
time.
30 | Dell SonicWALL WXA 1.3 User’s Guide
Web Cache Panel
Windows Domain The Windows domain on which the WXA series appliance will
accelerate access to configured shares.
Note: This field is not displayed if using “Unsigned SMB” only.
Total Data Reduction (%) The total percentage of data reduced by the WFS Acceleration ser-
vice.
WAN Capacity Increase Factor Displays the total amount of WAN capacity increase over the speci-
fied period of time.
Cache Size Displays the amount of read-ahead data stored in the cache.
Note: The WFS Cache statistics displayed in this page only repre-
sent Signed SMB traffic. If you are using Unsigned SMB, the WFS
Cache statistics do not apply.
Name Description
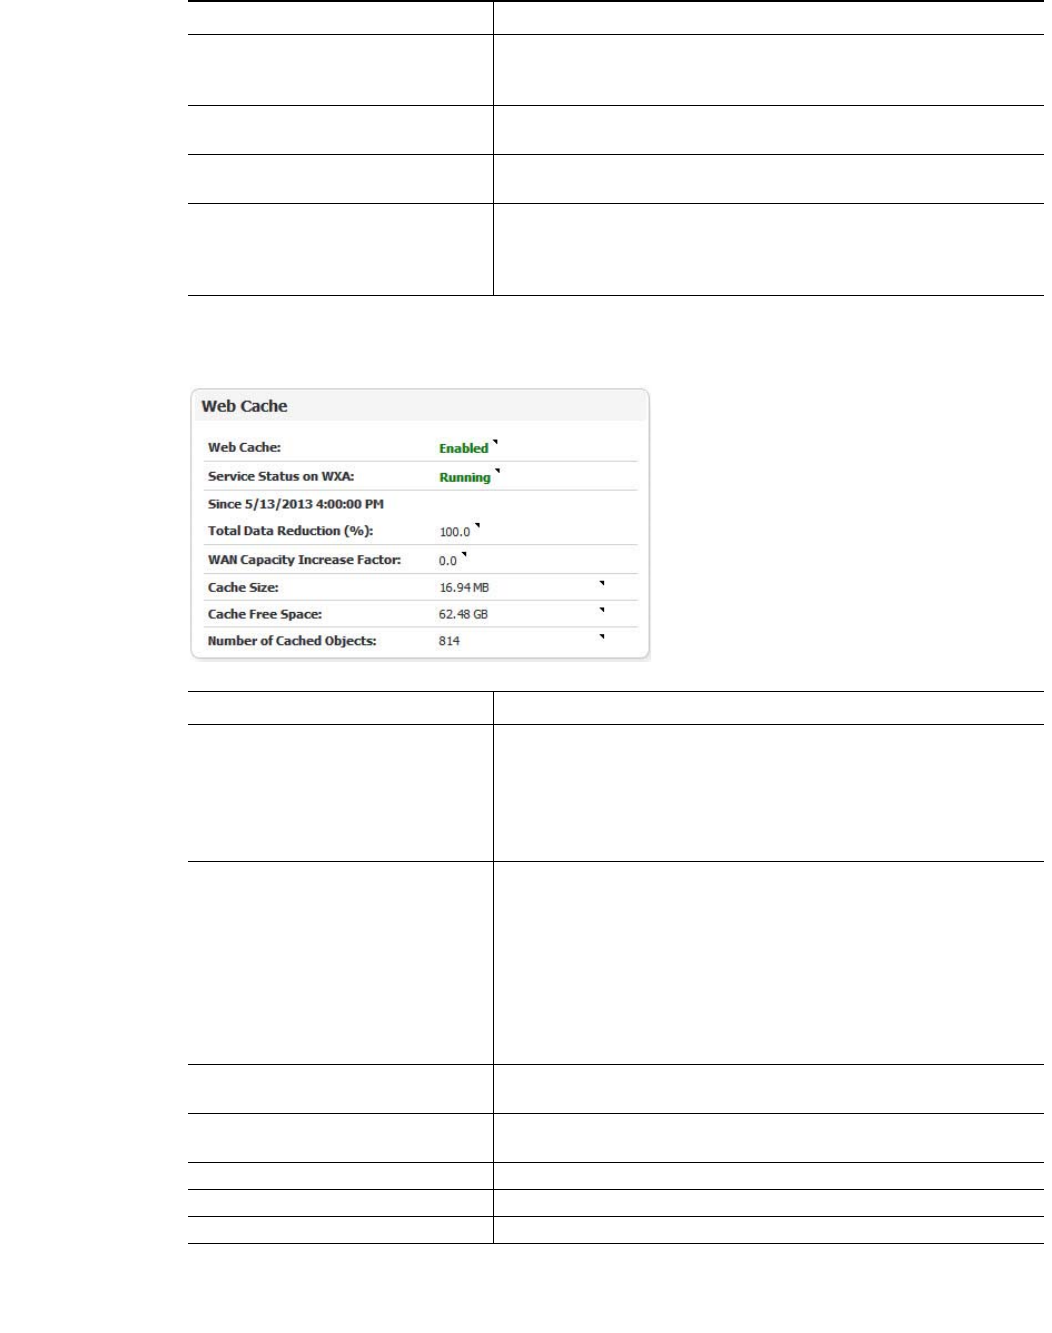
Name Description
Web Cache • Enabled—Indicates that WAN Acceleration is enabled and that
web traffic passing through the NSA/TZ series appliance is to be
redirected to the Web Cache on the WXA series appliance.
• Disabled—Indicates that the Web Cache is not enabled and web
traffic passing through the NSA/TZ series appliance is not redi-
rected to the Web Cache on the WXA series appliance.
Service Status on WXA The current operational status of the Web Cache.
• Running—Indicates the Web Cache service is running normally.
• Ready—Indicates the Web Cache service is ready to begin cach-
ing as soon as the component is enabled.
• Unavailable—Indicates the Web Cache service is not running on
the WXA series appliance, this may be due to an error.
• Unknown—Indicates that the status of the Web Cache service on
the connected WXA series appliance is not known at the present
moment.
Total Data Reduction (%) Displays the difference between the data conveyed and the data
sent, represented as a percentage.
WAN Capacity Increase Factor Indicates the total amount of WAN capacity increase over the speci-
fied period of time.
Cache Size Displays the current size of the cache used by the Web Cache.
Cache Free Space Displays the amount of disk space available to the Web Cache.
Number of Cached Objects Displays the number of objects currently stored in the Web Cache.
Viewing Status Information | 31
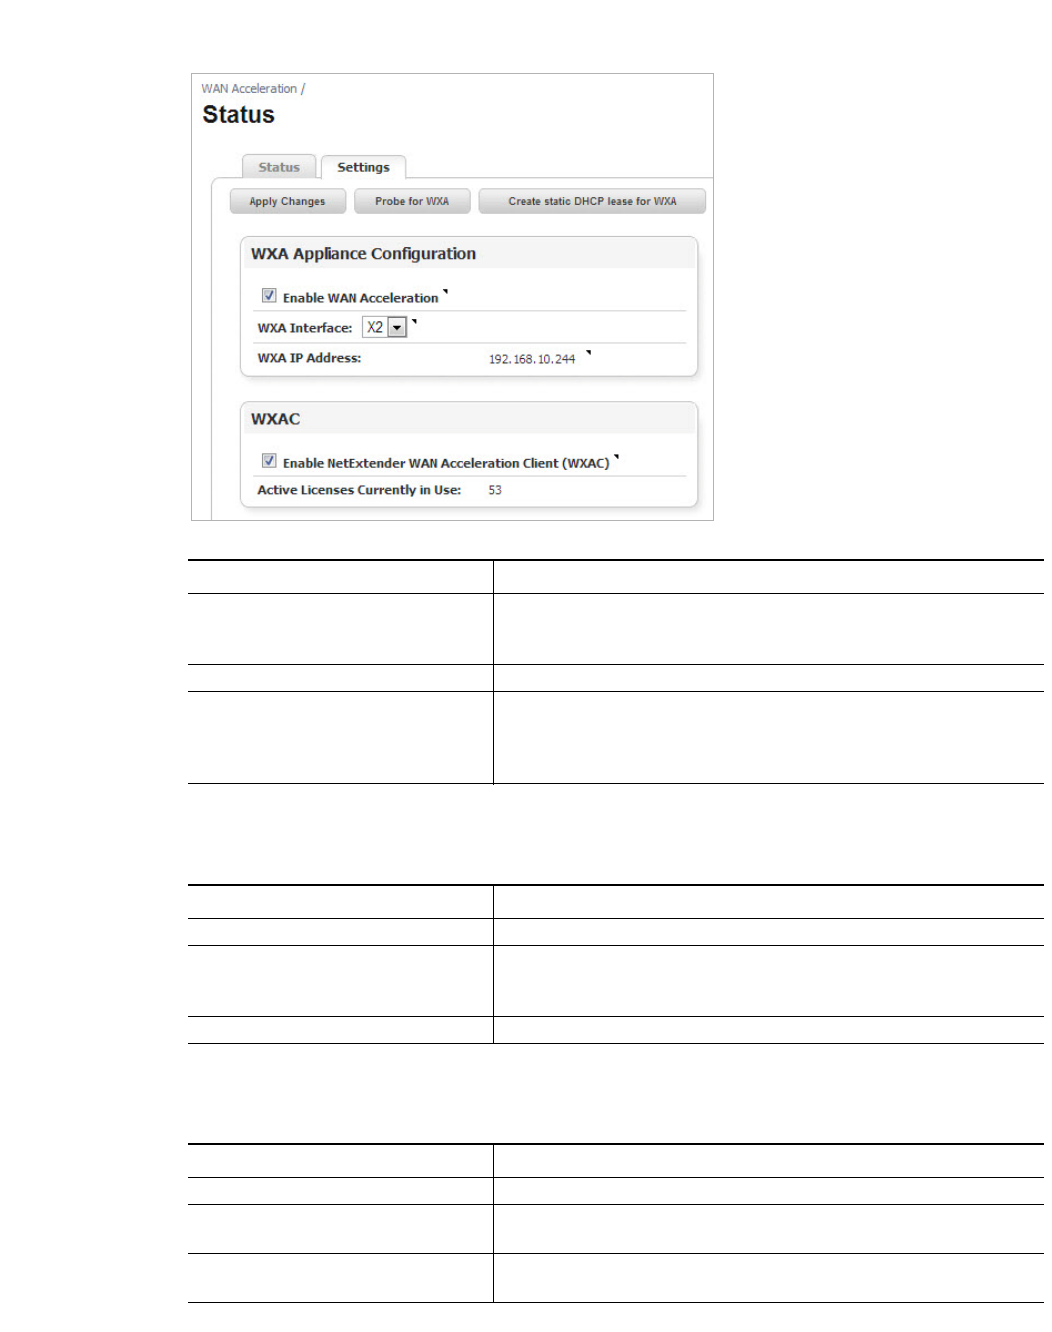
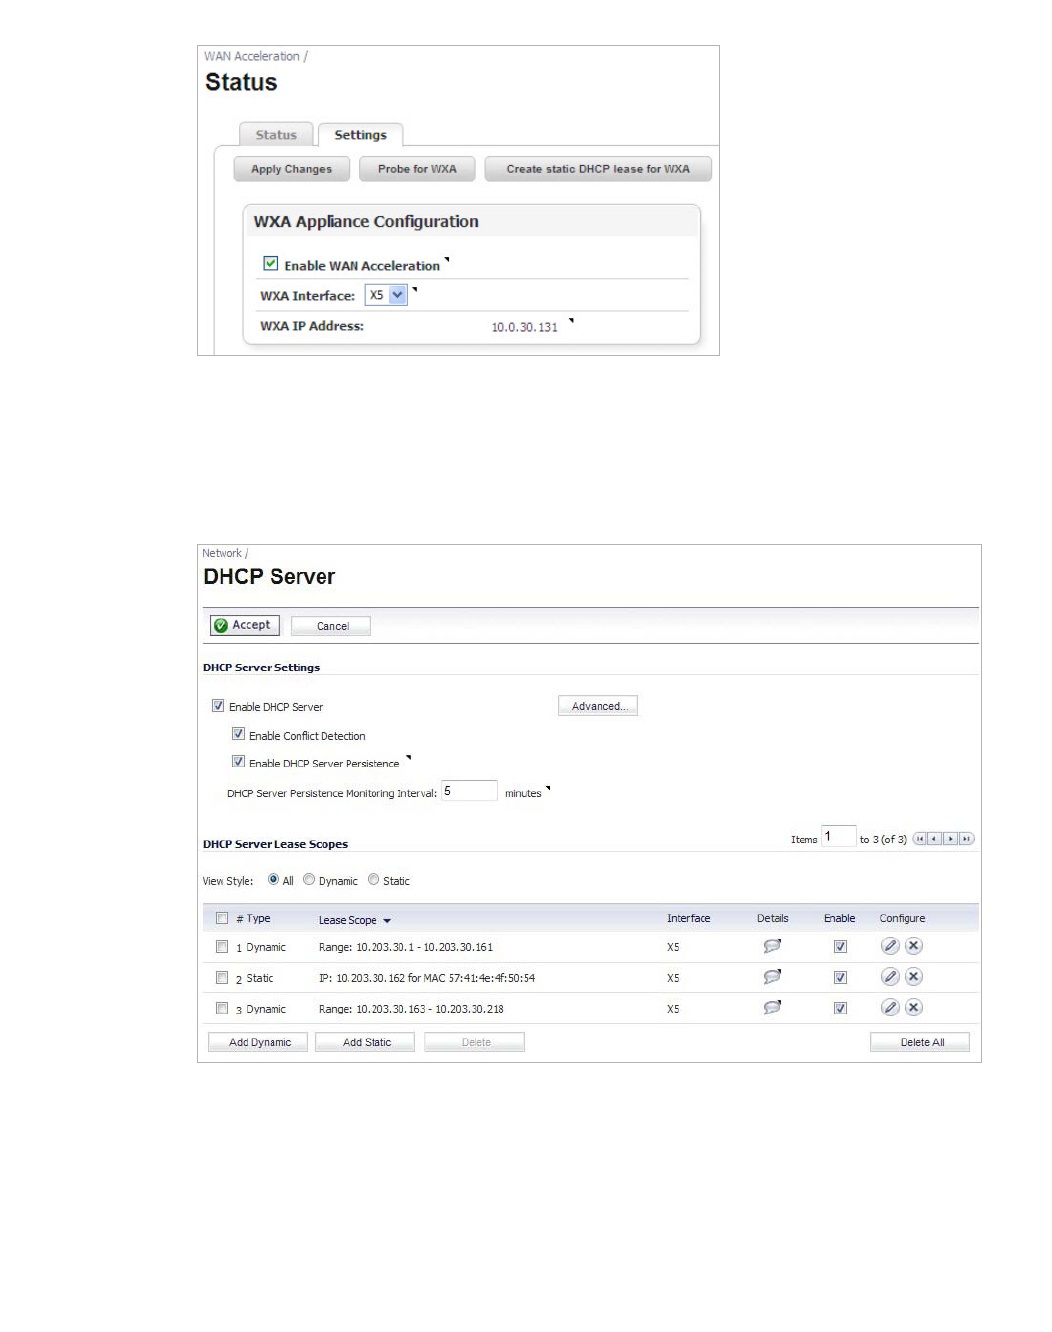
Settings Tab
Action Items
WXA Appliance Configuration Panel
Name Description
Action Items Provides the options to apply changes, probe for the presence of
the WXA series appliance, and create a static DHCP lease for the
WXA series appliance.
WXA Appliance Configuration Panel Enables and configures the WXA series appliance.
WXAC Panel Enables support for the NetExtender WAN Acceleration Client. See
WXAC on page 32 for details.
Note: This panel only displays if the NSA/TZ series appliance is
running SonicOS 5.9.
Name Description
Apply Changes Applies the latest configuration changes.
Probe for WXA Checks for the presence of a WXA series appliance. This is a hand-
shake between the NSA/TZ series appliance and the WXA series
appliance, and confirms they are connected to each other.
Create Static DHCP Lease for WXA Creates a static lease for the WXA series appliance.
Name Description
Enable WAN Acceleration Checkbox Enables or disables the WAN Acceleration feature.
WXA Interface Drop-Down Selects the NSA/TZ series appliance interface that the WXA series
appliance is connected to.
WXA IP Address Displays the IP address of the WXA series appliance.
Note: this field is read-only.

32 | Dell SonicWALL WXA 1.3 User’s Guide
WXAC
The NetExtender WAN Acceleration Client (WXAC) securely accelerates WAN traffic between
a remote PC and a central or branch office using SonicWALL NetExtender.The WXAC panel
will not display unless the NSA/TZ series appliance is running SonicOS 5.9 firmware.
Name Description
Enable NetExtender WAN Acceleration
Client (WXAC) Checkbox Enables support for NetExtender WXAC.
Note: WAN Acceleration must be enabled on NetExtender and a
WXAC licence must be purchased before you enable
WXAC on this page.
Active Licenses Currently in Use Displays the number of active WXAC licenses that are currently
in use.
NetExtender WAN Acceleration Client
(WXAC) is not licensed If the NSA/TZ series appliance detects that the WXAC licence is
not activated, the following displays:
To License the WXAC, navigate to the System >
Licenses page in the SonicOS management interface:

Configuring the WXA Series Appliance | 33
Chapter 4
Configuring the WXA Series Appliance
Configuring Network Interfaces
The initial configuration of the WXA series appliance should be performed by using the WXA
Setup Wizard, which is available by clicking the Wizards button in the top-right corner of the
NSA/TZ series appliance’s management interface. However, this is currently only available if
running SonicOS 5.9 firmware. If your NSA/TZ series appliance is using 5.8.1.x or 6.1.x
firmware use the procedures in this chapter for the initial configuring of the WXA series
appliance. For more information on the WXA Setup Wizard refer to the SonicOS 5.9
Administrator’s Guide.
The initial setup includes configuring network interfaces for the WXA series appliance, enabling
the WAN Acceleration service, and creating a static DHCP lease for the WXA series appliance.
All configuration procedures are performed on the NSA/TZ series appliance’s management
interface.
For licensing information, refer to the WXA 500 Live CD Getting Started Guide or WXA 5000
Virtual Appliance Getting Started Guide.
After completing the initial configuration steps in this chapter, refer to Configuring TCP
Acceleration on page 47 and Configuring WFS Acceleration on page 97 to configure the TCP
and WFS Acceleration services.
Note This configuration example uses the X5 interface, but you can use any spare interface on
the NSA/TZ security appliance.
34 | Dell SonicWALL WXA 1.3 User’s Guide
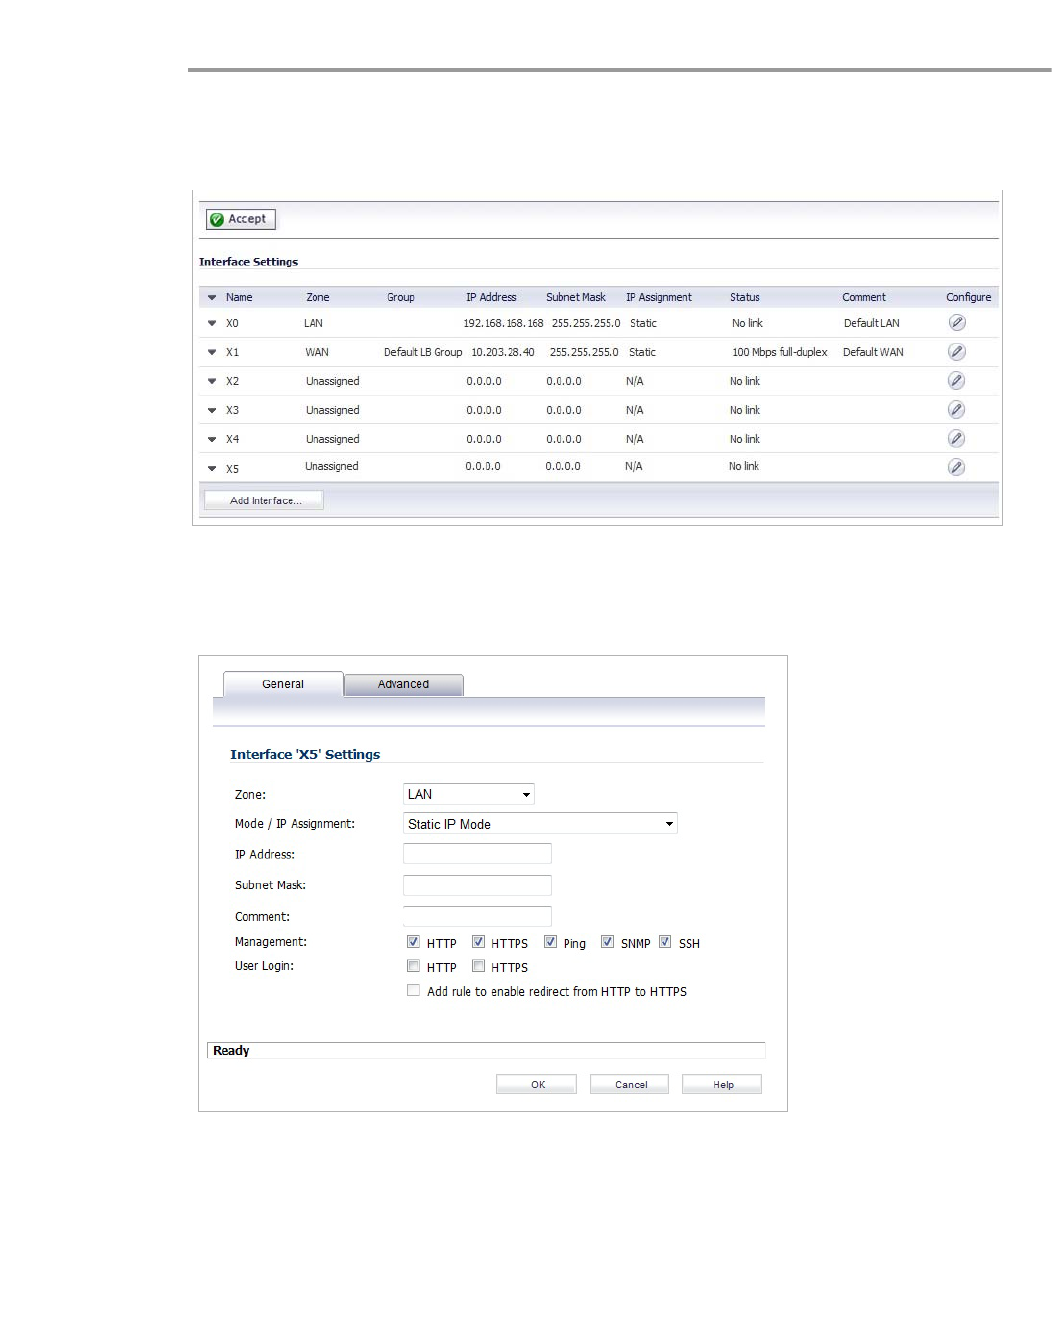
To configure your NSA/TZ security appliance to be used with the WXA series appliance,
perform the following steps:
Step 1 Open a Web browser.
Step 2 Access the SonicOS Management interface.
Step 3 Navigate to the Network > Interfaces page.
Step 4 Click the Edit button in the row for the interface you want the WXA series appliance to
connected to.
The Interface Settings > General tab is displayed.
Step 5 Enter and do the following:
• Zone: Drop-down — LAN
• Mode/IP Assignment: Drop-down — Static IP Mode
• IP Address: Text Field — Enter the IP Address for the port. This example uses
10.203.30.162.
• Subnet Mask: Text Field — Enter the subnet mask for the port. This should be a subnet
not already used on the network, and private to the WXA series appliance.
Configuring the WXA Series Appliance | 35
• (Optional) Comment: Text Field — Enter text that describes the device.
For example, WXA connection.
• (Optional) Management: checkboxes — Select the management methods.
• Click OK.
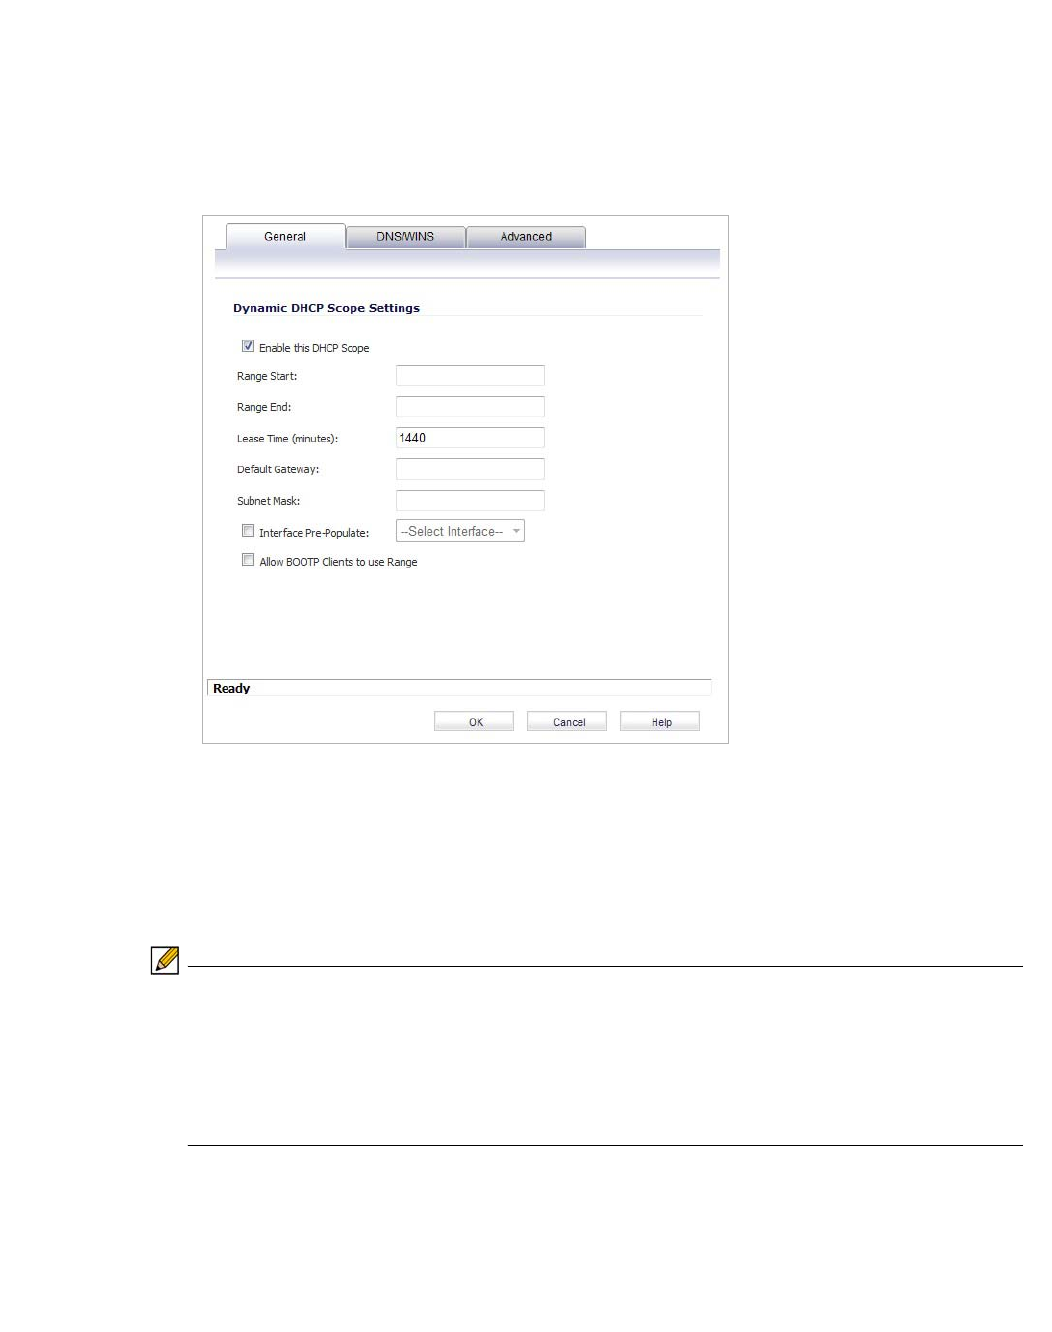
Step 6 Navigate to the Network > DHCP Server page.
Step 7 Under the DCHP Server Lease Scopes, click Add Dynamic.
The Dynamic Range Configuration window is displayed.
Step 8 Do the following:
a. Select the Enable this DHCP Scope checkbox.
b. Select the Interface Pre-Populate checkbox and then select port X5 in the Interface Pre-
Populate drop-down.
The information will be auto populated.
c. Click the OK button.
Note Configuring DNS is only required if you plan to use WFS Acceleration for Signed SMB. This
example assumes that the correct DNS server has already been entered in the Network >
DNS page. You can overwrite the DNS specified in the Network > DNS Server page. Click
the Edit button for the lease you want to change, and then click the DNS/WINS tab. Enter
the DNS IP Addresses in the text fields provided. You should also populate the Domain text-
field, this speeds up the WFS Acceleration configuration and auto-detection of the server in
the case that reverse DNS is not configured.
Step 9 Connect an Ethernet cable from the WXA series appliance to the X5 port on the NSA/TZ
security appliance.
36 | Dell SonicWALL WXA 1.3 User’s Guide
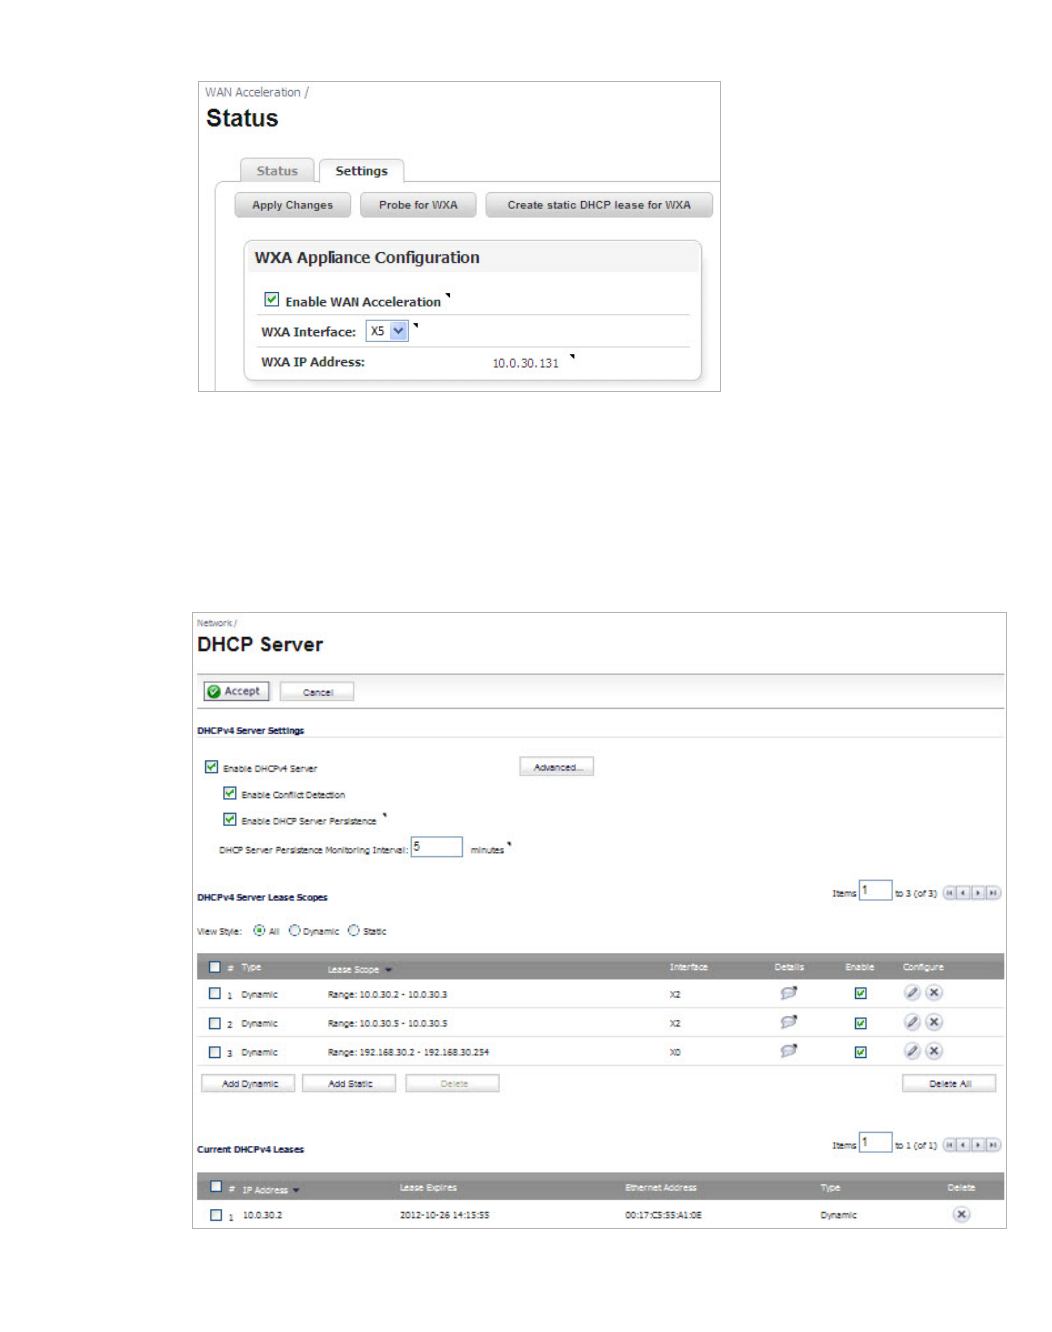
Step 10 Navigate to the WAN Acceleration > Status page.
Step 11 Click the Settings tab.
Step 12 In the WXA Appliance Configuration panel, click the WXA Interface drop-down list and select
the X5 interface.
Step 13 Select the Enable WAN Acceleration checkbox.
Step 14 Click the Apply Changes button.
Step 15 Confirm that the NSA/TZ series appliance has a DCHP lease for the WXA series appliance.
Navigate to the Network > DHCP Server page.
Configuring the WXA Series Appliance | 37
Step 16 Navigate to the WAN Acceleration > Status page.
Step 17 Click the Settings tab.
Step 18 Click Create static DHCP lease for WXA.
A DHCP lease will be set for the WXA series appliance.
Step 19 Verify that the lease was created. Navigate to the Network > DHCP Server page.
A dynamic range is set for the WXA appliance.

38 | Dell SonicWALL WXA 1.3 User’s Guide

| 39
TCP Acceleration

40 | Dell SonicWALL WXA 1.3 User’s Guide
Viewing the TCP Acceleration Page | 41
Chapter 5
Viewing the TCP Acceleration Page
WAN Acceleration > TCP Acceleration
The WAN Acceleration > TCP Acceleration page provides options to configure and monitor the
TCP Acceleration service. This chapter details the management interface functions of the
Configuration, Statistics, Statistics breakdown, and Connections tabs.
Name Description
Configuration Tab Enable the TCP Acceleration service and selects the mode, service object, and
exclude objects. The WAN Acceleration feature must be enabled before you can
enable or configure the TCP Acceleration service. Enable WAN Acceleration in
the WAN Acceleration > Status page. See Configuration Tab on page 42 for
details.
Statistics Tab Displays egress and ingress data for the TCP Acceleration service. See
Statistics Tab on page 43 for details.
Statistics Breakdown Graphs TCP Acceleration data by port, IP address and data reduction. See for
Statistics Breakdown Tab on page 44 details.
Connections Tab Displays a detailed list of the TCP Acceleration connection results, such as start
and end time stamps, source IP address and port, and destination IP address
and port. Use these results to monitor the performance of your TCP Acceleration
service. See Connections Tab on page 45 for details.
42 | Dell SonicWALL WXA 1.3 User’s Guide
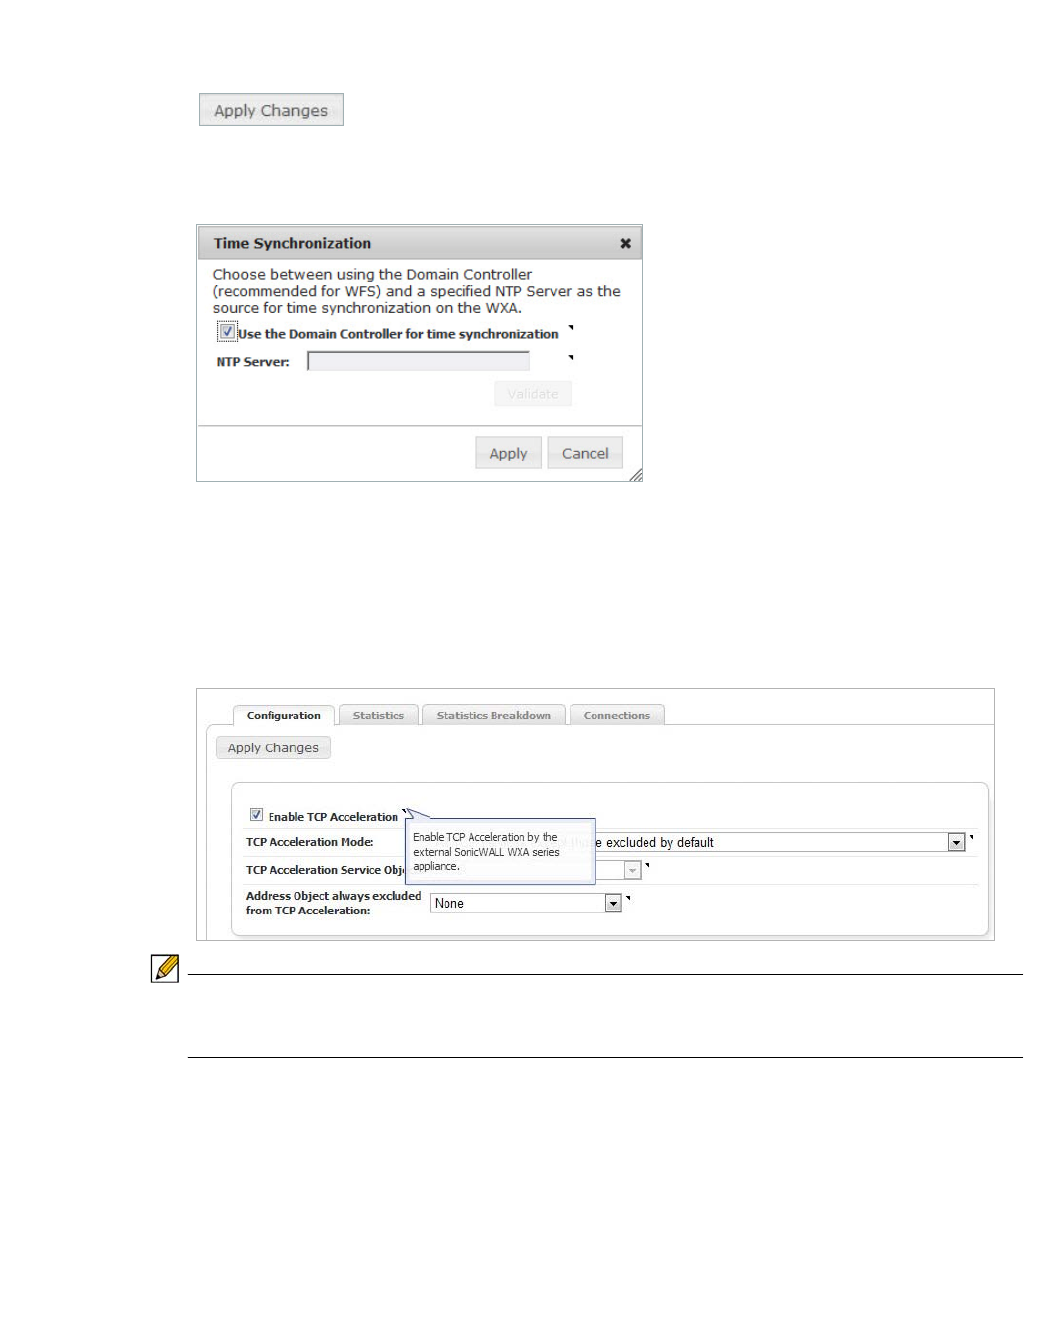
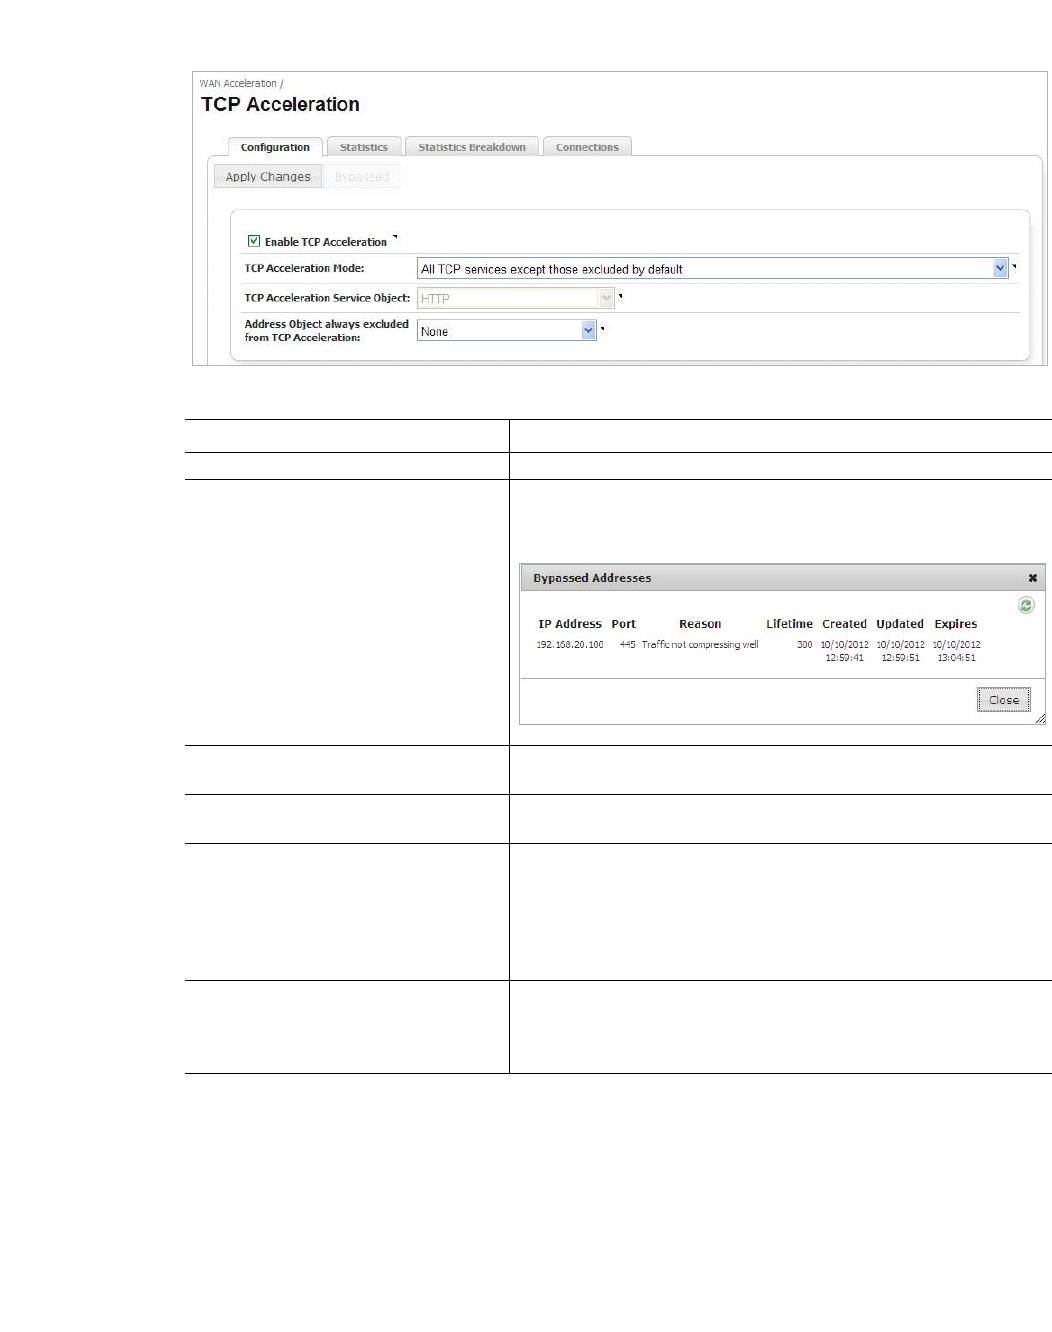
Configuration Tab
Name Description
Apply Changes Button Saves the changes to the configuration.
Bypassed Button Displays a pop-up window with a list of connections that have
either been excluded from the acceleration process or failed. This
button is greyed out if these conditions are not present.
Enable TCP Acceleration Enables or disables the TCP Acceleration service. This is selected
by default.
TCP Acceleration Mode Selects how the service object is used. Either as services to be
accelerated or as services to be excluded from acceleration.
TCP Acceleration Service Object Selects service objects for the TCP Acceleration service. To add
new service objects to the drop-down list, navigate to Network >
Address Objects and create new service objects.
Note: The option for choosing a TCP Acceleration service object is
greyed out if the TCP Acceleration mode does not support it.
Address object always excluded from
TCP Acceleration Selects address objects to always exclude from the TCP Accelera-
tion service. To add an address object to the drop-down list, navi-
gate to Network > Address Objects and create new address
objects.
Viewing the TCP Acceleration Page | 43
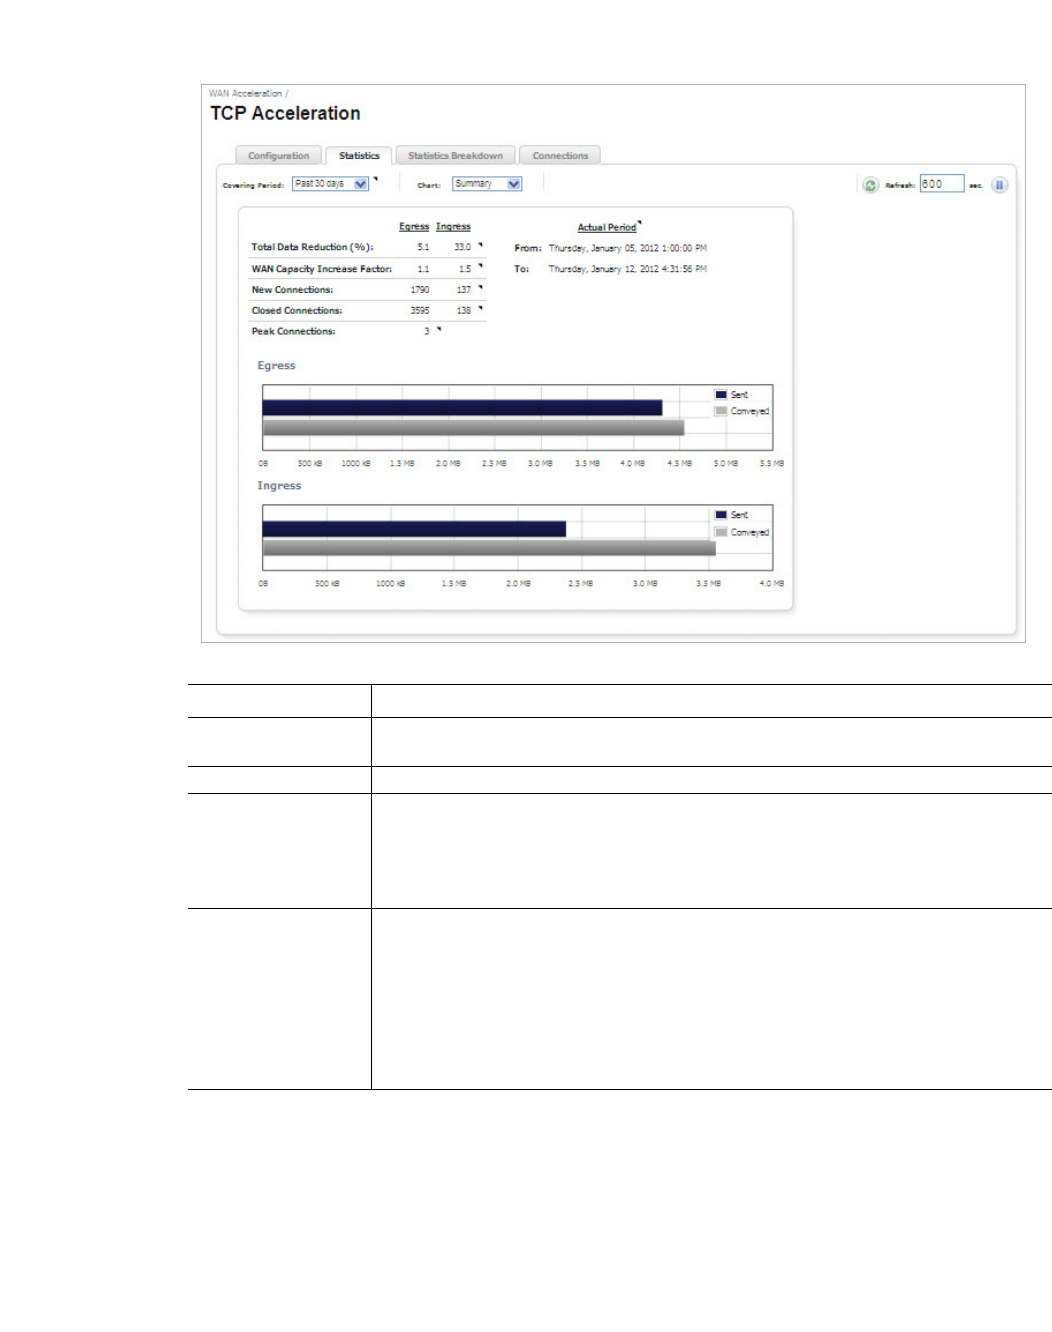
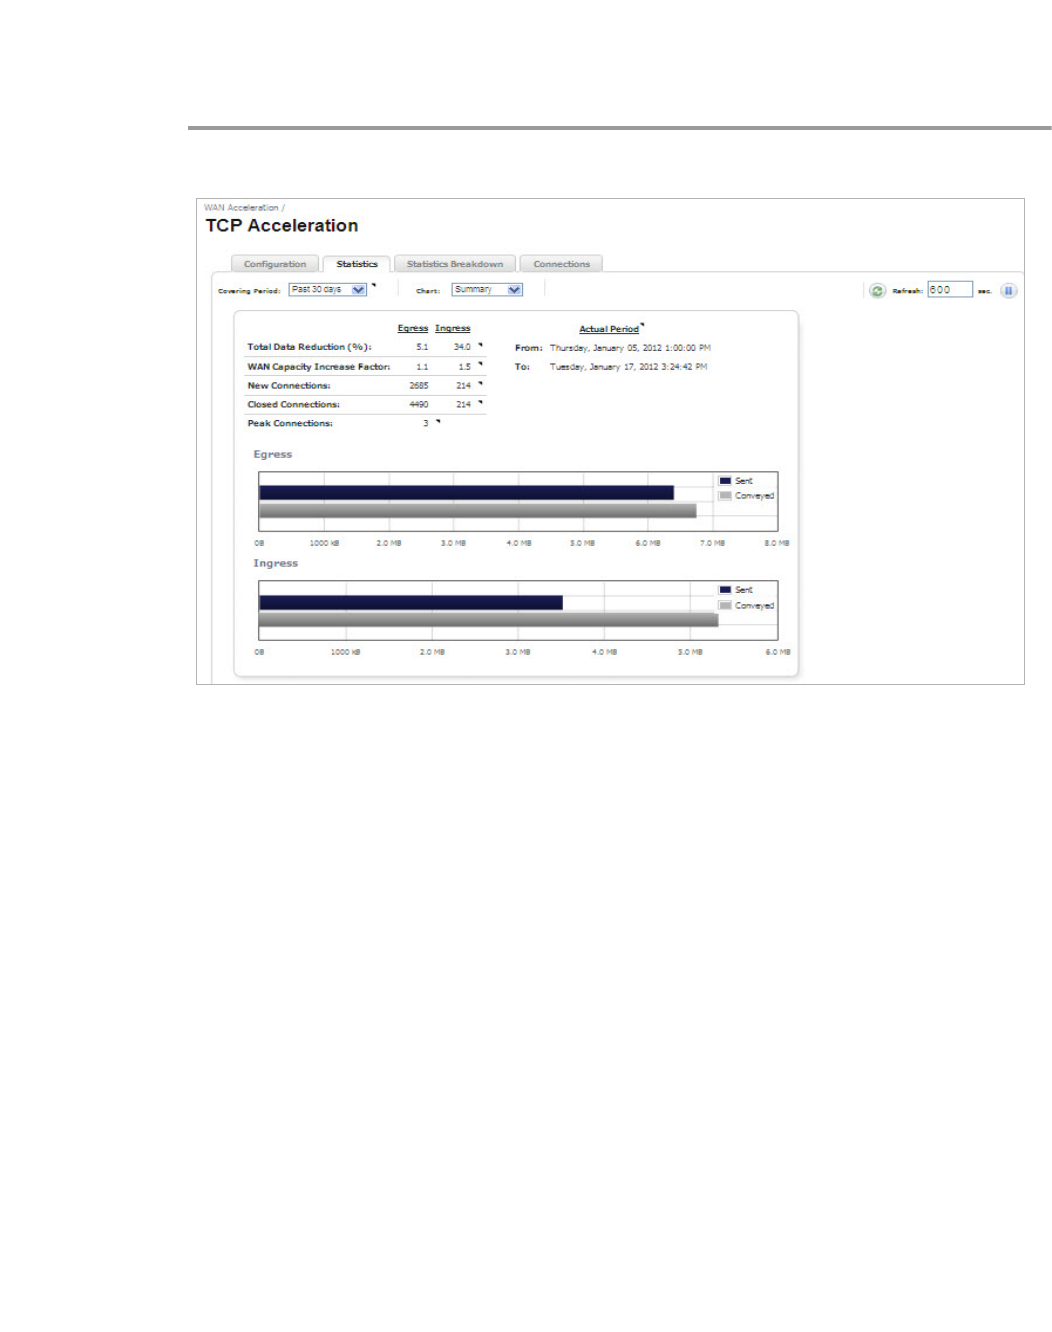
Statistics Tab
Name Description
Covering Period Click the Covering Period drop-down list and select the period of time the data dis-
plays on the Statistics tab.
Chart Selects the graph style used to display the TCP Acceleration data.
Refresh Actions Refreshes the data displayed in the WAN Acceleration > Statistics tab. The
refresh interval can be entered in the text field. The interval can be increased to a
maximum of 999 seconds.
Click the Refresh symbol to manually update the Statistics tab.
Click the Pause button to stop updates on the page.
Data and Graphs Displays read-only data for the following:
• Total Data Reduction percentage
• WAN capacity increase factor
• New Connections
• Closed Connections
• Peak Connections
• Egress/Ingress data illustrated with bar graphs (corresponding to the site you are
viewing from)
44 | Dell SonicWALL WXA 1.3 User’s Guide
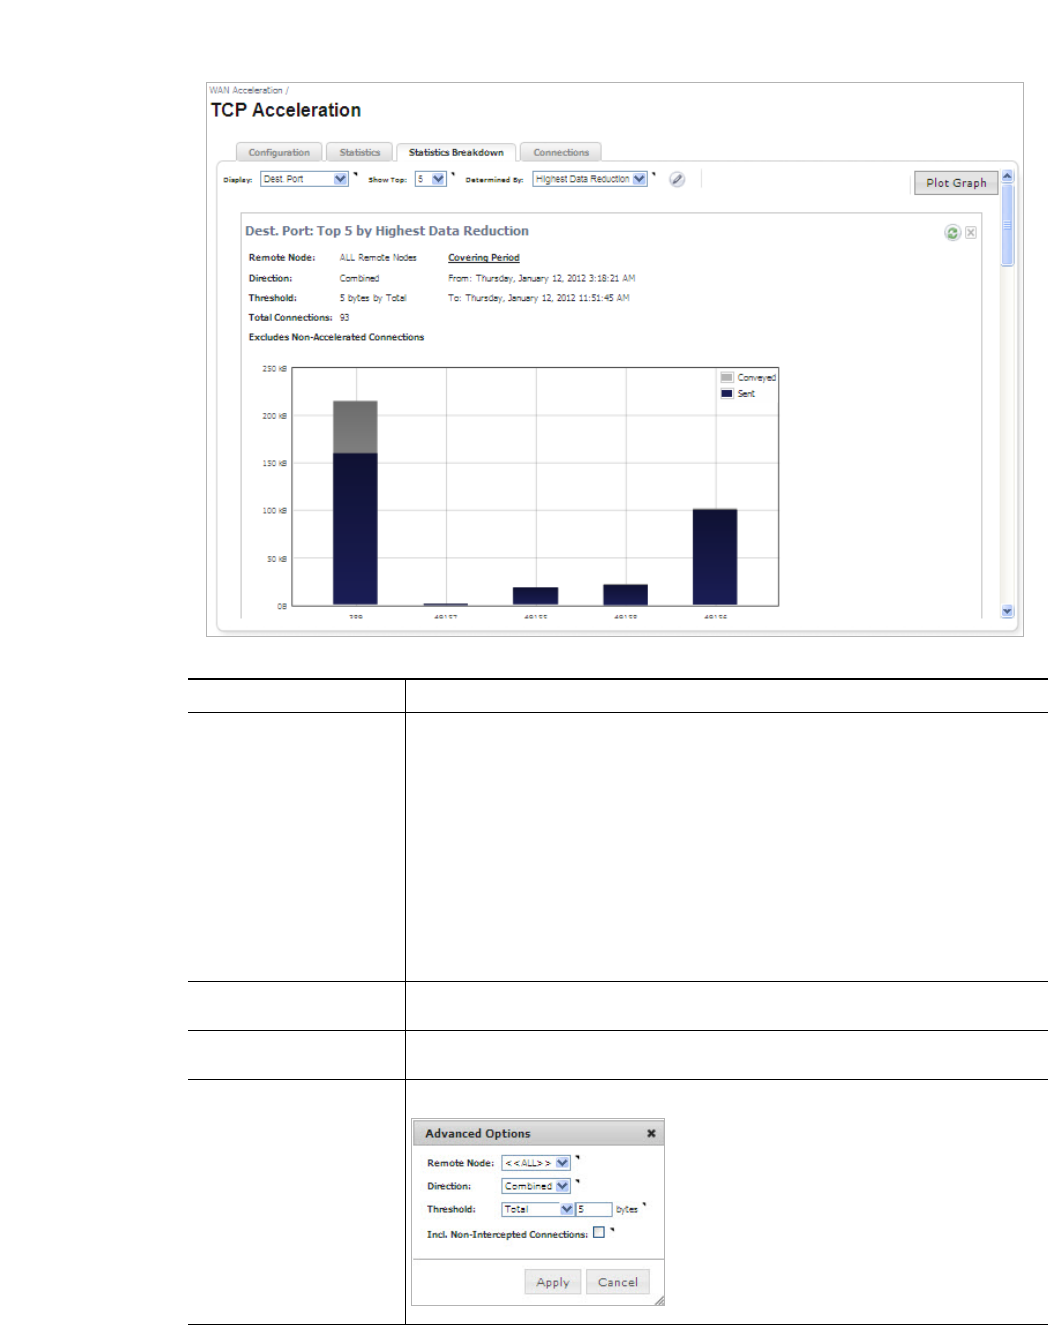
Statistics Breakdown Tab
Name Description
Display Drop-Down
Menu Selects one of the following options:
• Dest. Port - Displays the volume of data (or “Detemined By” value) com-
pared to the destination port numbers of the accelerated connections.
• Dest. Address - Displays the volume of data compared to the destination IP
address of the accelerated TCP connections.
• Src. Address - Displays the volume of data compared to the source IP
address of the accelerated TCP connections.
• Address on WAN - Displays the volume of data compared to the destination
address on the WAN of the accelerated TCP connections.
• Address on LAN - Displays the volume of data compared to the destination
address on the LAN of the accelerated TCP connections.
Note: Connections can be initiated by a machine on the LAN or WAN.
Show Top Drop-Down
Menu Selects how many ports or IP addresses display in the graph.
Determined By Drop-
Down Menu Selects the criteria that displays in the graph.
Configure Button Click the Configure button to access the advanced configuration options:
Viewing the TCP Acceleration Page | 45
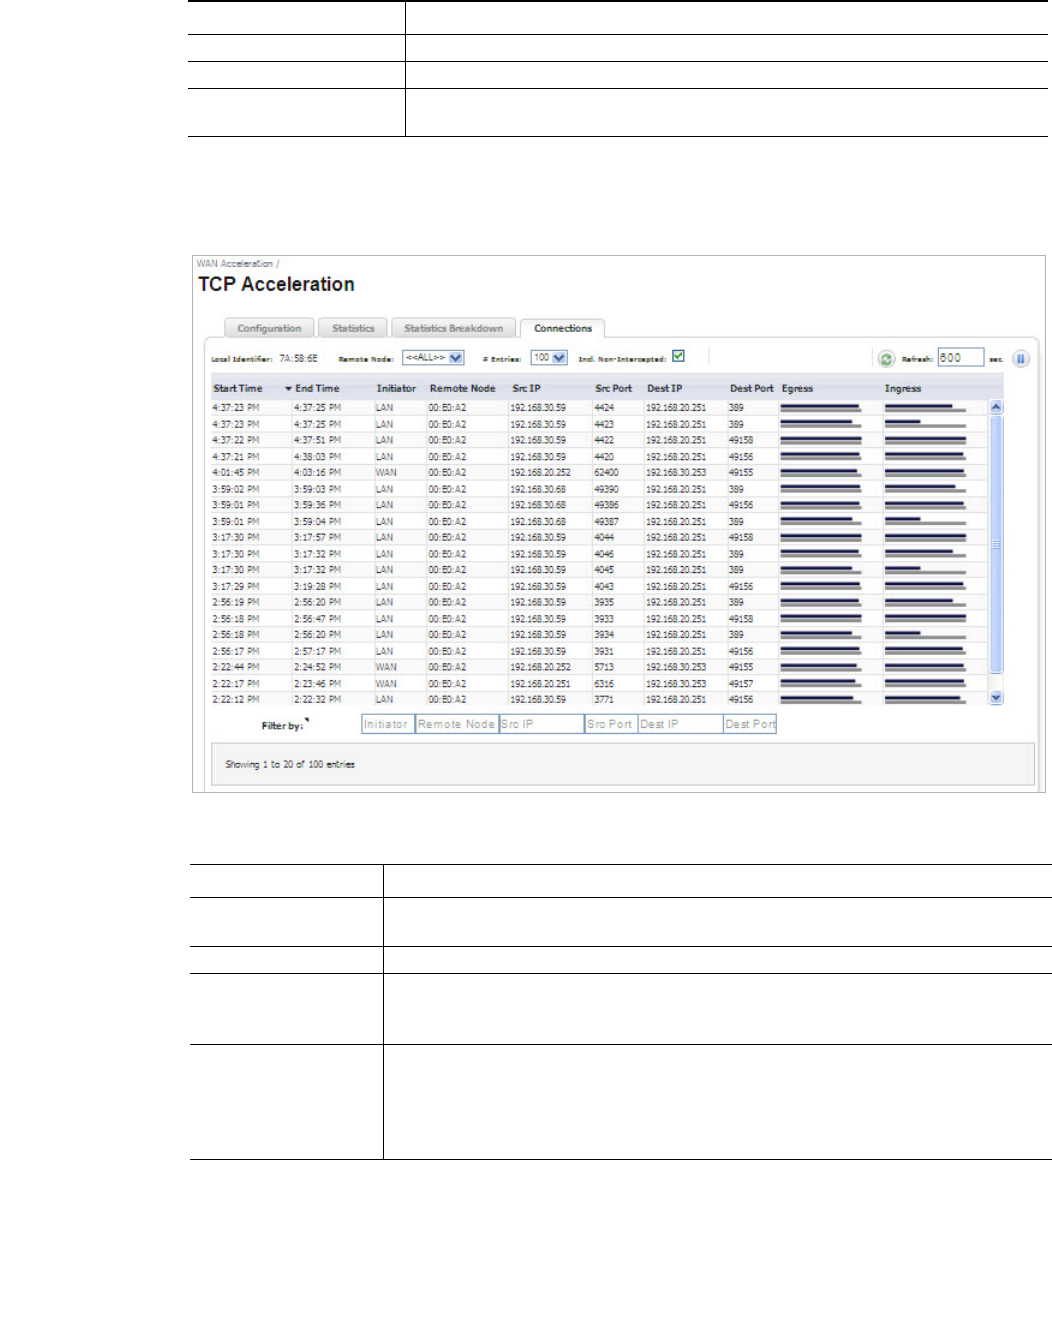
Connections Tab
Action Items
Plot Graph Displays a graphical representation of the selected criteria.
Refresh Button Refreshes the graph with the most recent TCP Acceleration data.
Data and Graphs Displays read-only data for the Remote Node, Direction, Threshold, Total Con-
nections, and Covering Period. This data is also displayed in the graph.
Name Description
Name Description
Remote Node Filters the table of connections based on the remote node (the WXA series appli-
ance at the far end of the connection).
# Entries Selects the number of entries to display in the Connections table.
Incl. Non-Intercepted Enables or disables the inclusion of non-intercepted traffic to display in the Con-
nections table. The definition of “Non-intercepted” is traffic that is diverted from the
NSA/TZ series appliance to the WXA series appliance, but is not accelerated.
Refresh Actions Refreshes the WAN Acceleration > Connections tab. The refresh interval can
be entered in the text field. The interval can be increased to a maximum of 999
seconds.
Click the Refresh symbol to manually update the Connections tab.
Click the Pause button to stop updates on the page.

46 | Dell SonicWALL WXA 1.3 User’s Guide
Column/Field Headings
Name Description
Start Time Indicates the starting time of a connection.
End Time Indicates the ending time of a connection.
Initiator Displays which end of the network initiated the connection. LAN for connections
started locally, and WAN for connections started from a remote site.
Remote Node Displays the WXA series appliance at the far end of the connection.
Src IP Displays the IP address where the connection started.
Src Port Displays the port number that the connection request was sent from.
Dest IP Displays the destination IP address.
Dest Port Displays the destination port number.
Egress Displays a bar graph that represents outgoing traffic on the network. The blue
colored bar is sent traffic and the grey bar is conveyed traffic.
Ingress Displays a bar graph that represents incoming traffic on the network. The blue
colored bar is sent traffic and the grey bar is conveyed traffic
Filter by Filter the results by entering text into the appropriate input box. A combination of
fields can be filtered.
Configuring TCP Acceleration | 47
Chapter 6
Configuring TCP Acceleration
WAN Acceleration > TCP Acceleration
The initial configuration of TCP Acceleration should be performed by using the WXA Setup
Wizard, which is available by clicking the Wizards button in the top-right corner of the NSA/TZ
series appliance’s management interface. However, this is currently only available if running
SonicOS 5.9 firmware. If your NSA/TZ series appliance is using 5.8.1.x or 6.1.x firmware use
the procedures in this chapter for configuring TCP acceleratoin.The TCP Acceleration service
can be deployed in three different deployment scenarios including: site-to-site VPN, routed
mode, and layer 2 bridge mode. This chapter explains how to permit and configure these
deployment scenarios in the following subsections:
• Configuring TCP Acceleration on a Site-to-Site VPN, page 47
• Configuring TCP Acceleration on a Non-VPN (Routed Mode), page 49
• Configuring the TCP Acceleration > Configuration Tab, page 56
• Verifying the TCP Acceleration Configuration on page 59
Configuring TCP Acceleration on a Site-to-Site VPN
Once your WXA series appliance is configured to permit TCP Acceleration, see Configuring the
TCP Acceleration > Configuration Tab, page 56 to finish configuring the TCP Acceleration
service.
To permit the TCP Acceleration service for use in a site-to-site Virtual Private Network (VPN),
follow the steps listed below:
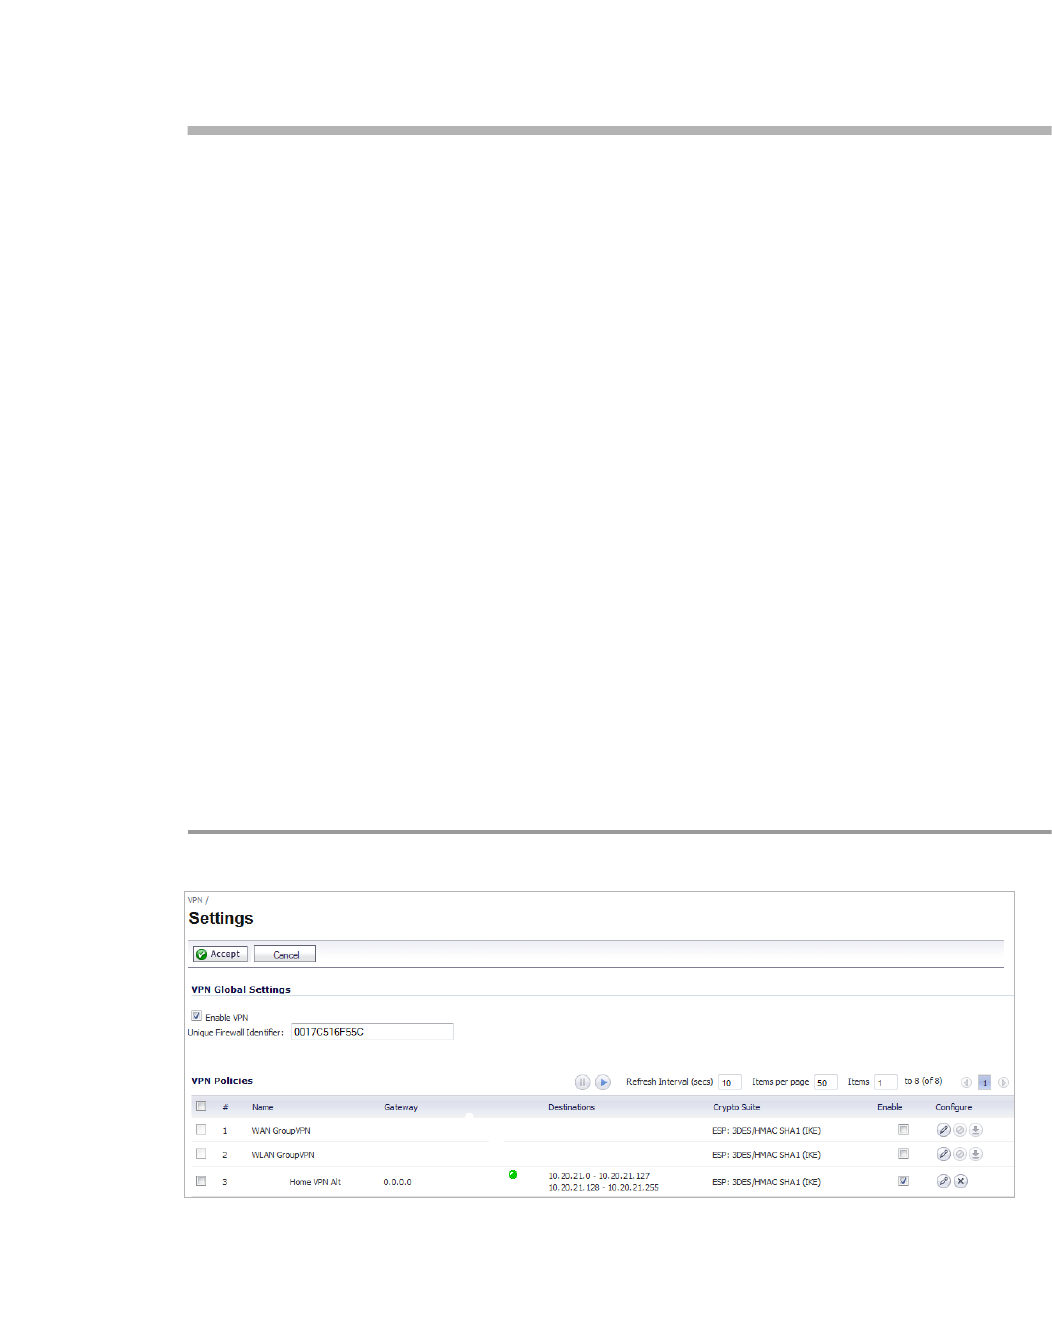
Step 1 Navigate to the VPN > Settings page.
Step 2 Click the Configure button for the VPN policy you wish to use.
48 | Dell SonicWALL WXA 1.3 User’s Guide
The Configure VPN Policy pop-up window displays.
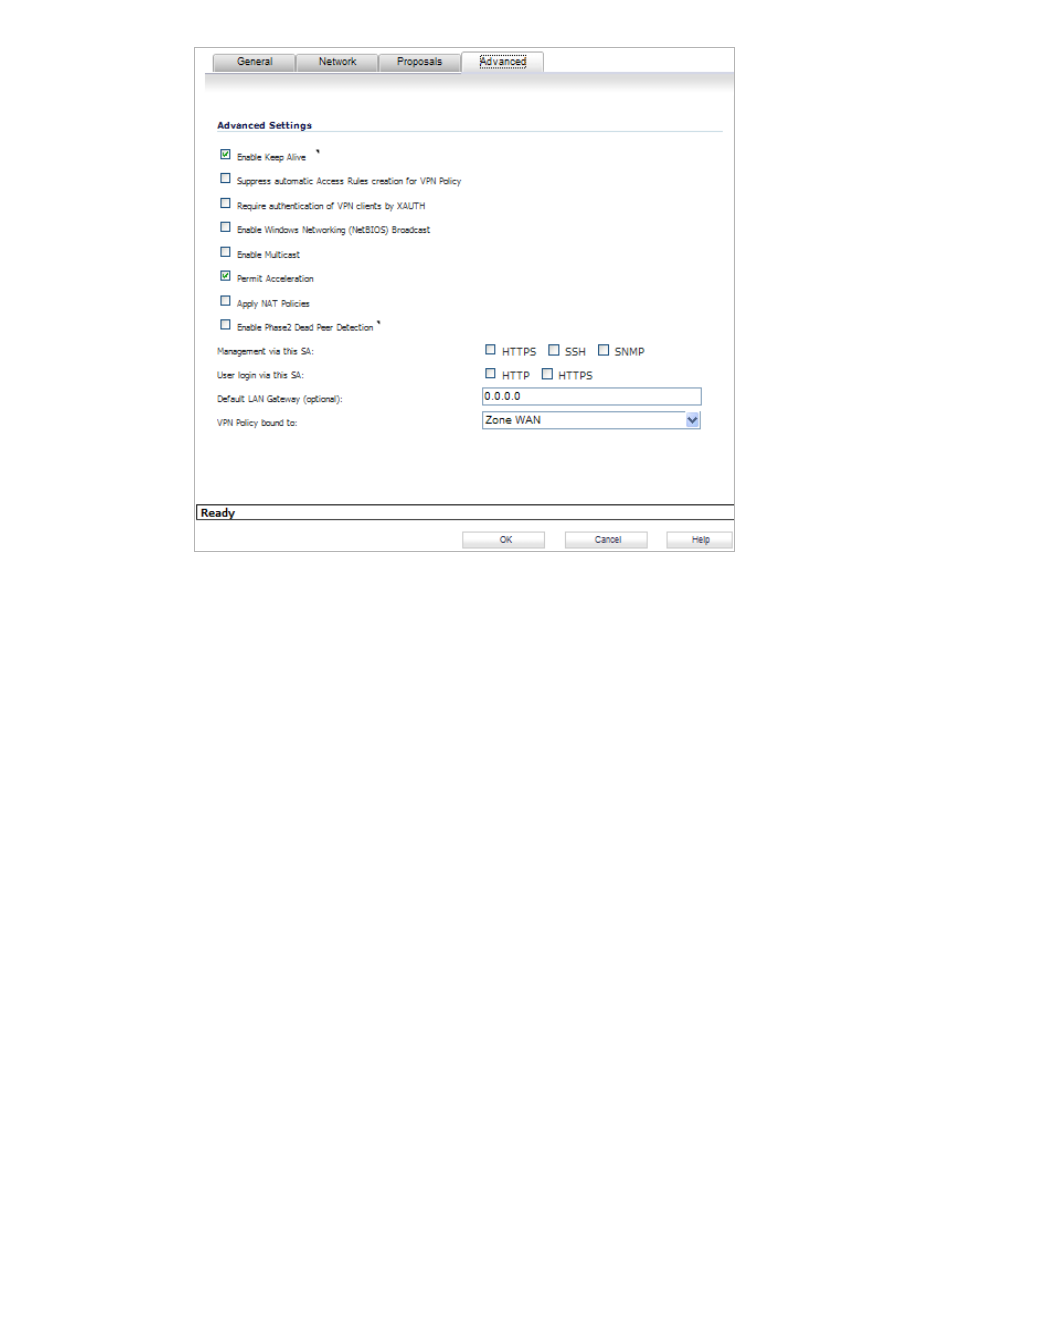
Step 3 Select the Advanced tab.
Step 4 Select the checkbox for Permit Acceleration.
Step 5 Click the OK button.

Configuring TCP Acceleration | 49
Configuring TCP Acceleration on a Non-VPN (Routed Mode)
If you do not have a VPN configured on your network and you are using a custom routing policy,
you need to add two routing policies on each site: One for outgoing traffic, and one for incoming
traffic. Both routing policies are configured to permit acceleration.
Note Once both routing policies have been created and configured to permit TCP Acceleration,
see Configuring the TCP Acceleration > Configuration Tab, page 56 to finish configuring the
TCP Acceleration service.
The illustration below displays the configuration between two non-VPN sites. Refer to this
Illustration as an example for the steps in the following sections:
• Configure Routing Policies for Outgoing Traffic on page 50
• Configure Routing Policies for Incoming Traffic on page 53
Internet
PC
Branch Site
Central Site
WXA series
appliance
NSA/TZ series
appliance
NSA/TZ series
appliance
WXA series
appliance
Web
Server
Switch
192.168.10.0
10.12.10.0
Router
Switch
192.168.20.0
10.26.55.0
Router
50 | Dell SonicWALL WXA 1.3 User’s Guide
Configure Routing Policies for Outgoing Traffic
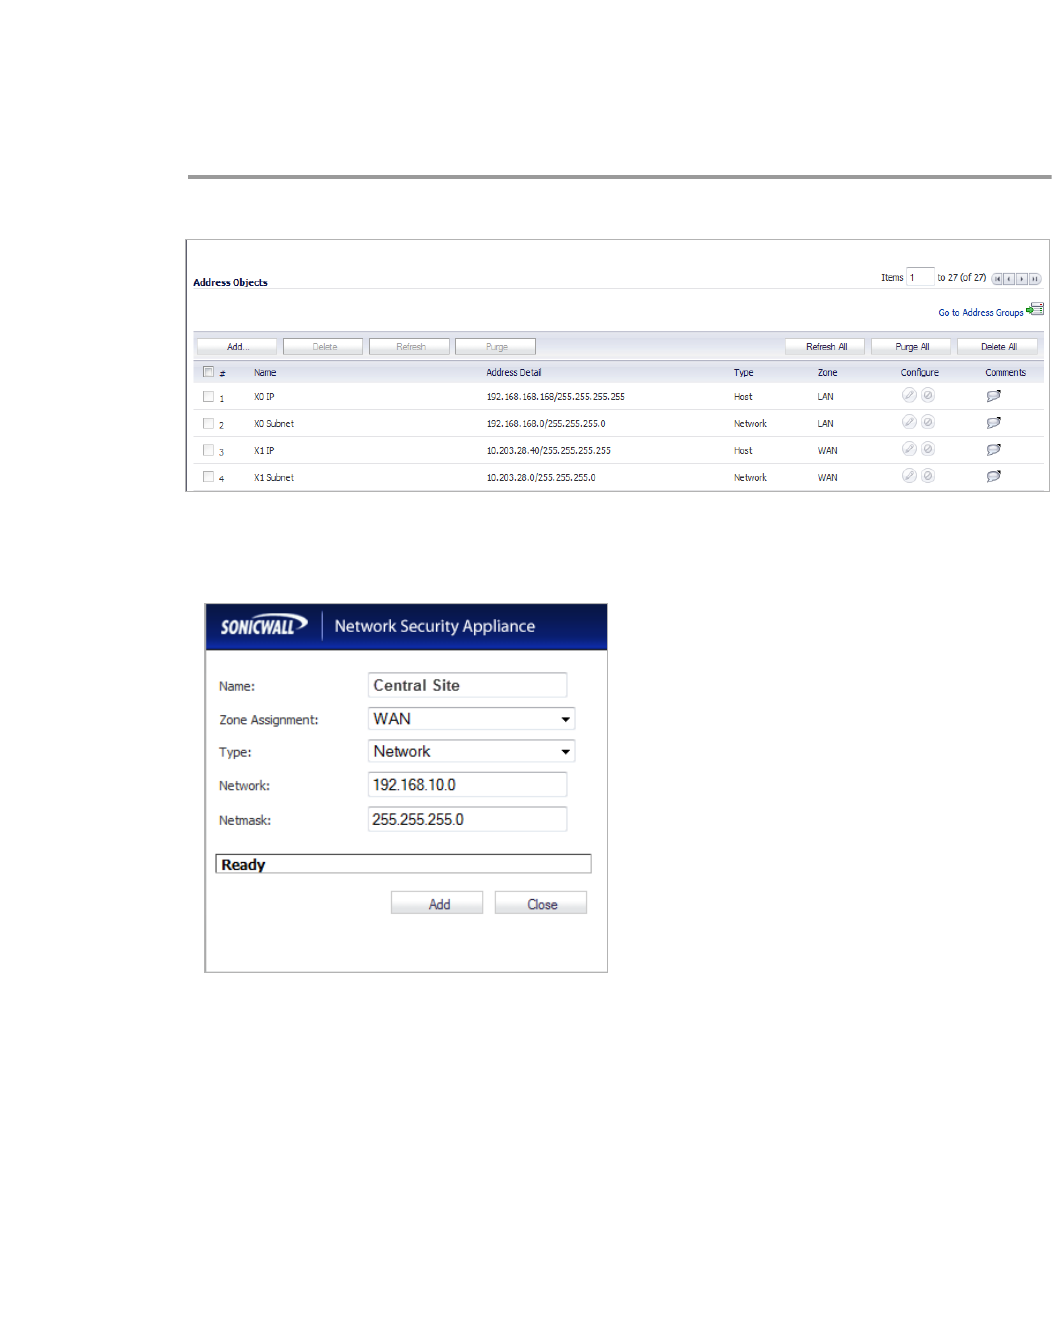
On the central site, configure a routing policy for outgoing traffic to the branch site. On the
branch site, configure a routing policy for outgoing traffic to the central site.
The steps in this section are an example of configuring a routing policy on the branch site, for
traffic going to the central site (outgoing):
Step 1 Navigate to the Network > Address Objects page.
Step 2 Click the Add button.
The Add Address Object Group pop-up window displays.
Step 3 Enter a name (Central Site) for the address object in the Name text field.
Step 4 Click the Zone Assignment drop-down, select WAN.
Step 5 Click the Type drop-down, select Network.
Step 6 Enter the LAN IP address of the Central Site (192.168.10.0) in the Network text field.
Step 7 Enter the netmask IP address (255.255.255.0) in the Netmask text field.
Step 8 Click the Add button.
Configuring TCP Acceleration | 51
Step 9 Navigate to the Network > Routing page.
Step 10 Click the Add button.
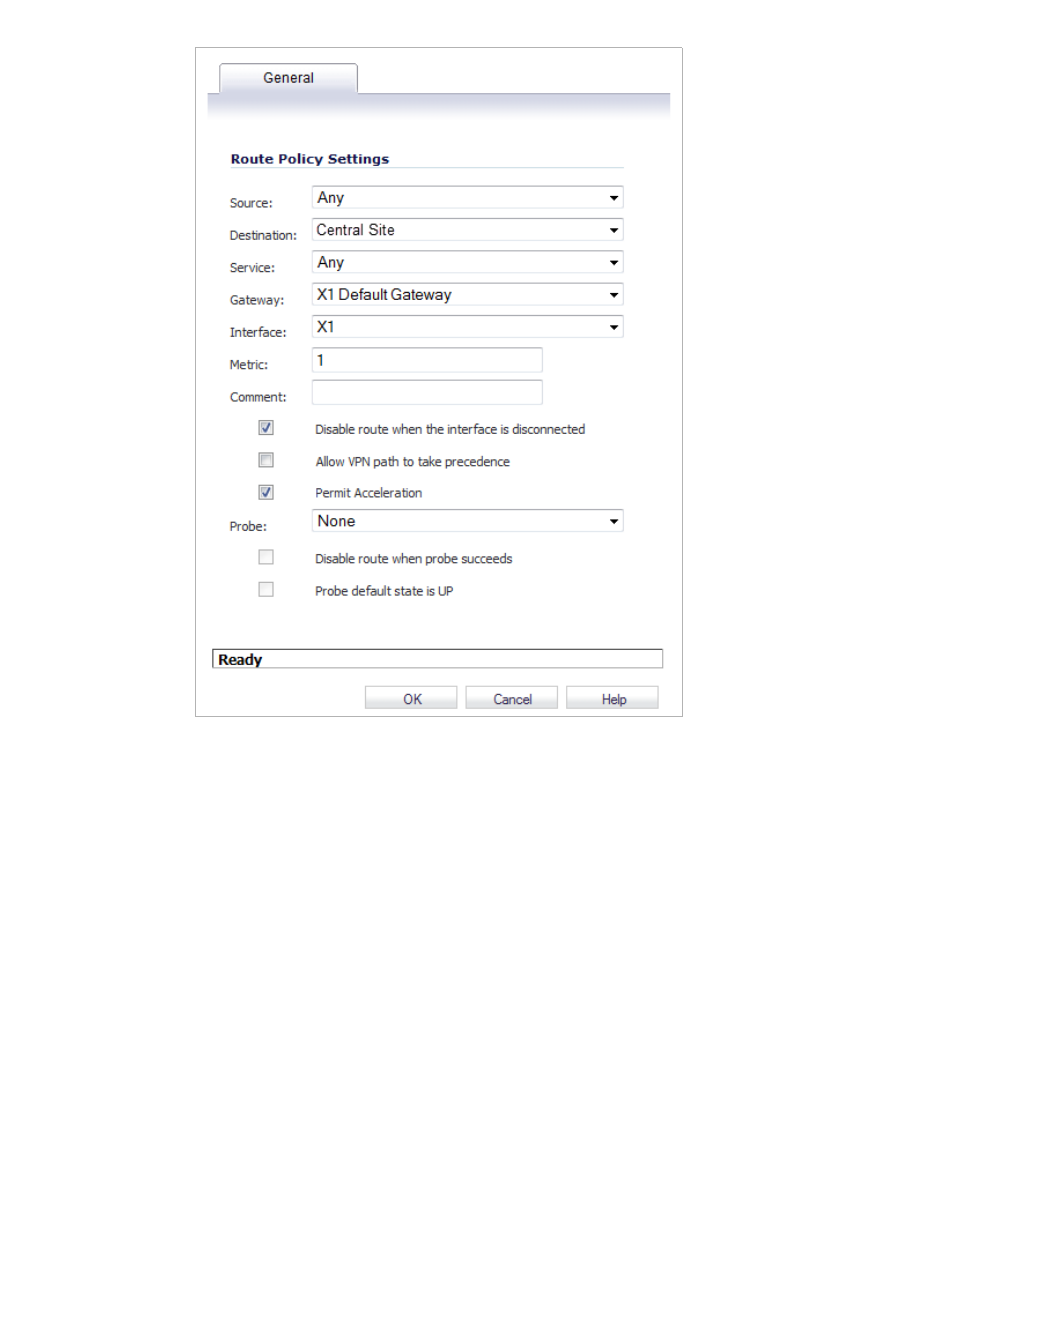
52 | Dell SonicWALL WXA 1.3 User’s Guide
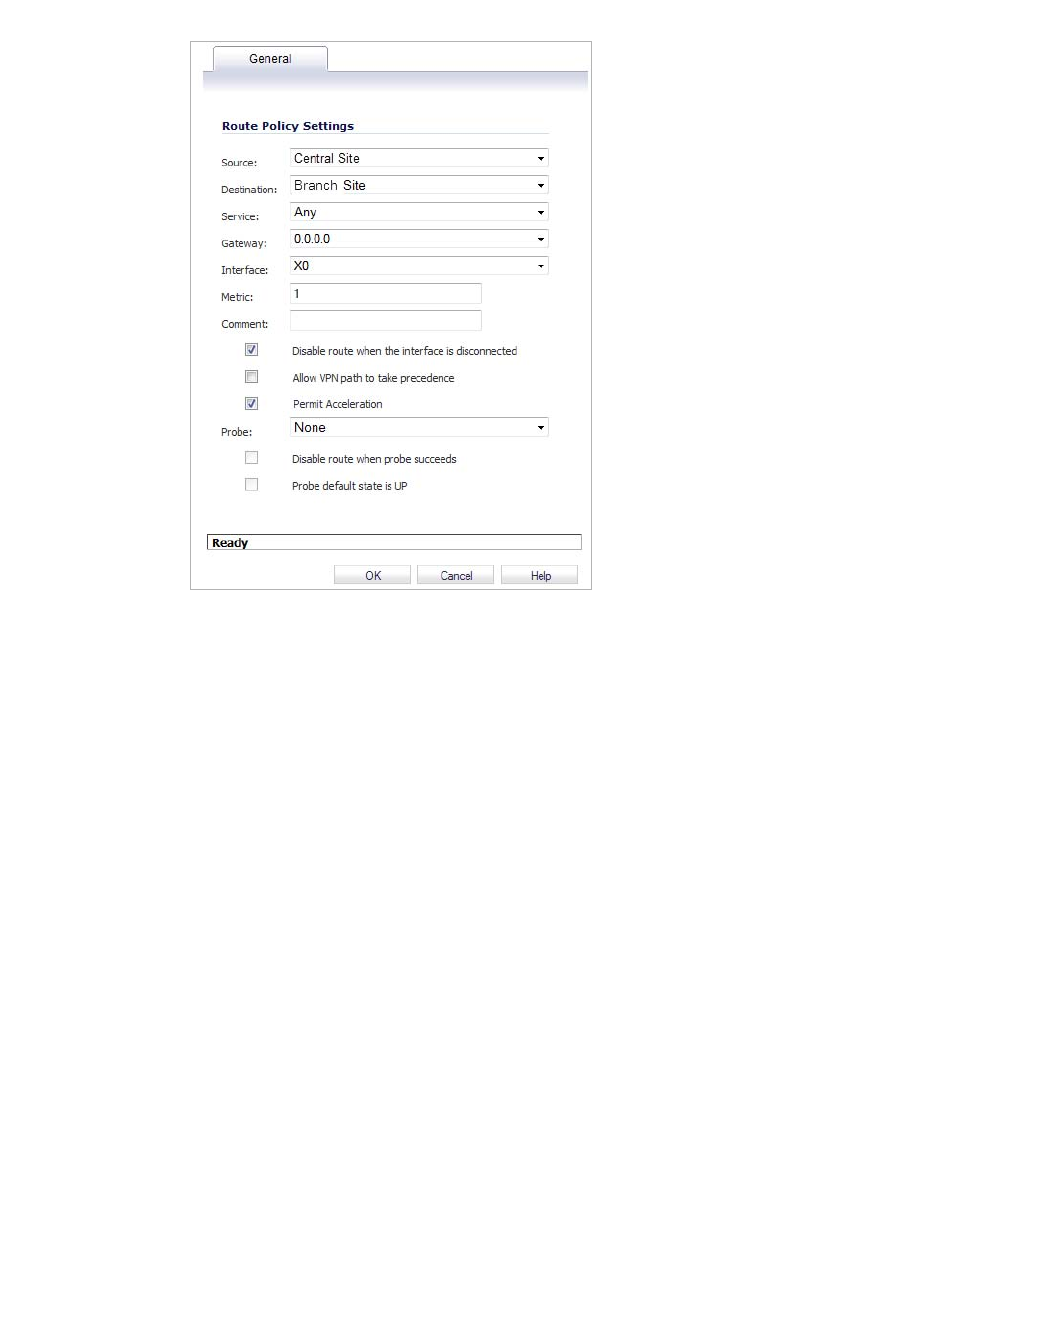
The Route Policy Settings pop-up window displays.
Step 11 Click the Source drop-down, select Any.
Step 12 Click the Destination drop-down, select the address object you created (Central Site.)
Step 13 Click the Service drop-down, select Any.
Step 14 Click the Gateway drop-down, select the X1 Default Gateway.
Step 15 Click the Interface drop-down, select the X1 interface.
Step 16 Enter 1 in the Metric text field.
This gives the route policy a high priority level. A larger metric number would have a lower
priority.
Step 17 Select the Permit Acceleration checkbox.
Step 18 Click the OK button.
Configuring TCP Acceleration | 53
Configure Routing Policies for Incoming Traffic
On the central site, configure a routing policy for incoming traffic from the branch site. On the
branch site, configure a routing policy for incoming traffic from the central site.
The steps in this section are an example of configuring a routing policy on the branch site, for
traffic coming from the central site (incoming):
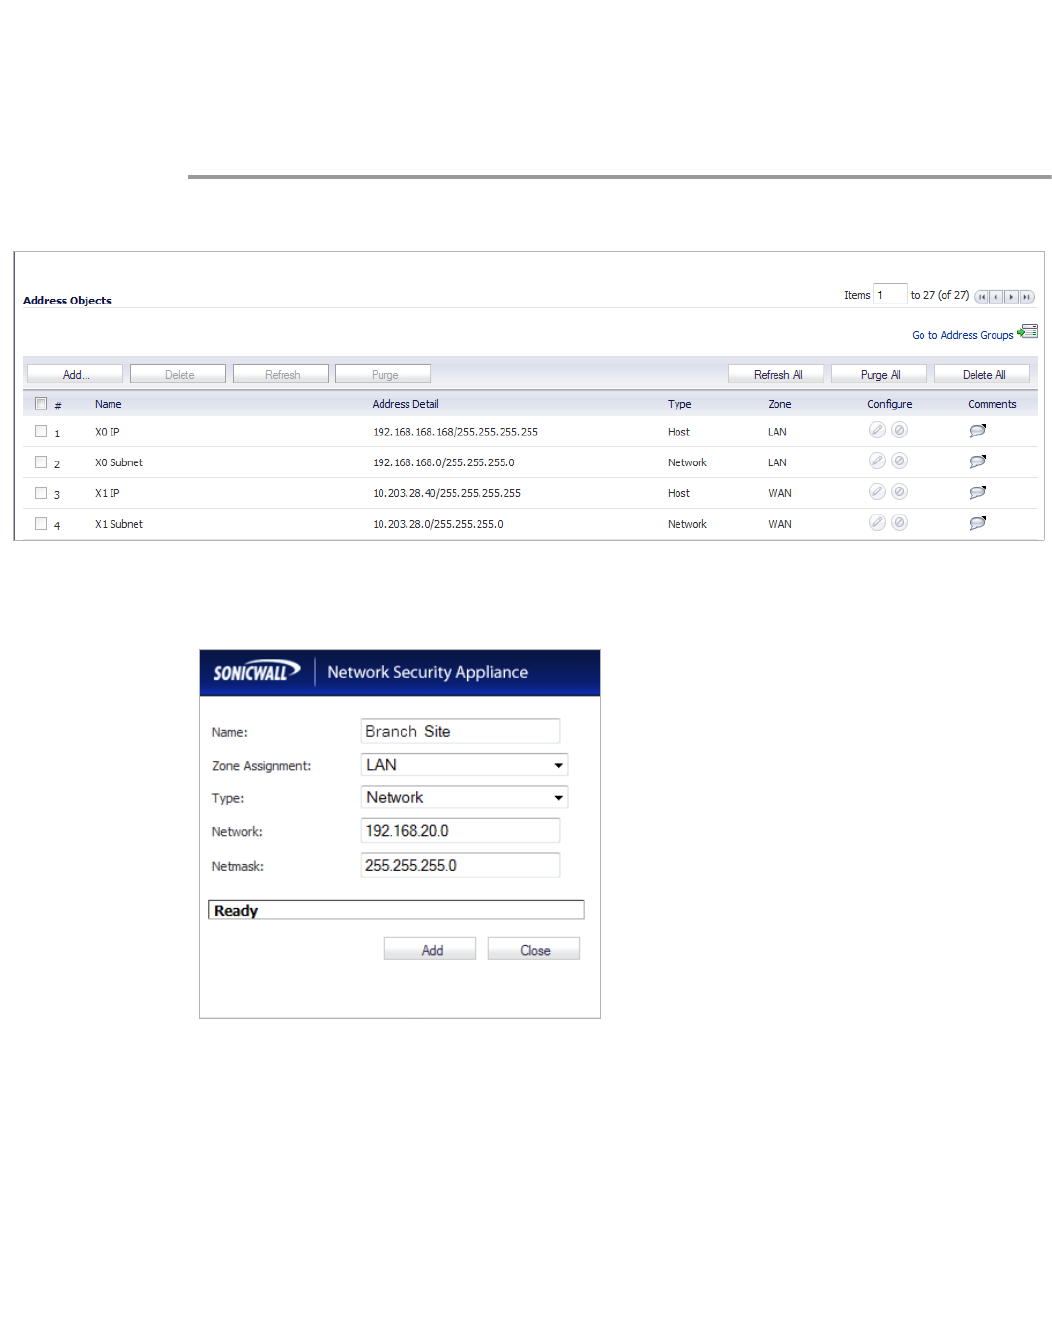
Step 1 Navigate to the Network > Address Objects page.
Step 2 Click the Add button.
The Add Address Object Group pop-up window displays.
Step 3 Enter a name (Branch Site) for the address object in the Name text field.
Step 4 Click the Zone Assignment drop-down, select LAN.
Step 5 Click the Type drop-down, select Network.
Step 6 Enter the LAN IP address of the Branch Site (192.168.20.0) in the Network text field.
Step 7 Enter the netmask IP address (255.255.255.0) in the Netmask text field.
Step 8 Click the Add button.

54 | Dell SonicWALL WXA 1.3 User’s Guide
Step 9 Navigate to the Network > Routing page.
Step 10 Click the Add button.
Configuring TCP Acceleration | 55
The Route Policy Settings pop-up window displays.
Step 11 Click the Source drop-down, select Central Site.
Step 12 Click the Destination drop-down, select the address object you created (Branch Site.)
Step 13 Click the Service drop-down, select Any.
Step 14 Click the Gateway drop-down, select (0.0.0.0).
Step 15 Click the Interface drop-down, select the X0 interface.
Step 16 Enter 1 in the Metric text field.
This gives the route policy a high priority level. A larger metric number would have a lower
priority.
Step 17 Select the Permit Acceleration checkbox.
Step 18 Click the OK button.
56 | Dell SonicWALL WXA 1.3 User’s Guide
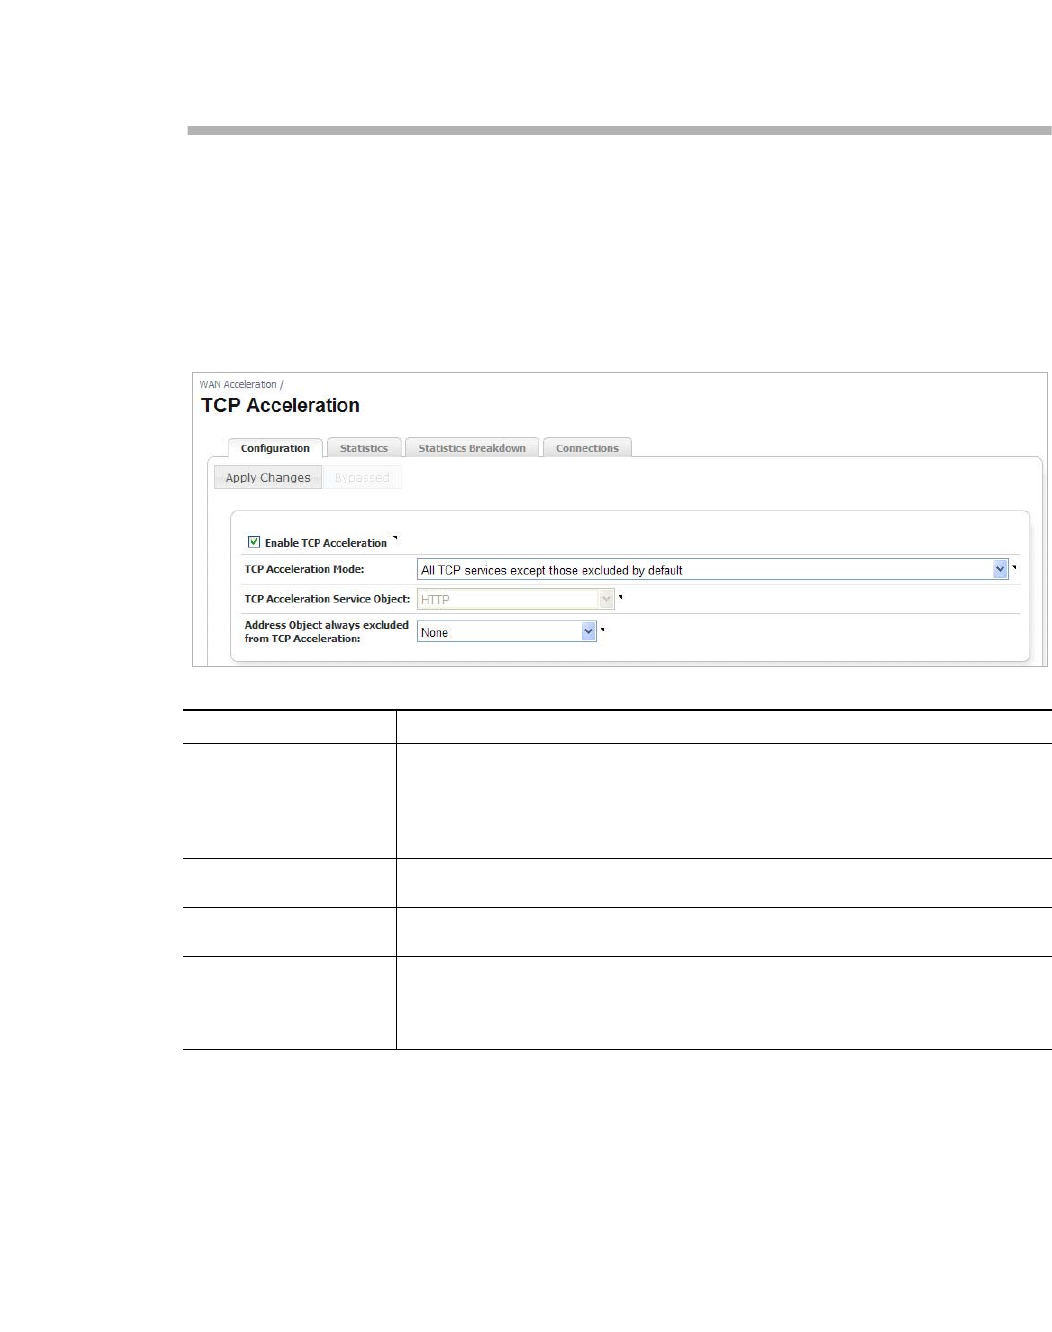
Configuring the TCP Acceleration > Configuration Tab
The Configuration tab gives you the option to select the mode, service object, and address
object or group that are included or excluded from the TCP Acceleration service.
To view a list, create, and edit service objects, navigate to the Network > Address Objects
page in the NSA/TZ series appliance management interface.
Below is three different examples of TCP Acceleration configurations:
Example 1
To configure acceleration of all the service objects, except those excluded by default. Follow
the steps below:
Step 1 Navigate to WAN Acceleration > TCP Acceleration.
Step 2 Select the Configuration tab.
Step 3 Select the Enable TCP Acceleration checkbox.
Step 4 Click the TCP Acceleration Mode drop-down, then select All TCP services except those
excluded by default.
By Default, the following ports are excluded from TCP Acceleration:
7, 22, 23, 37, 44, 49, 88, 107, 135, 136, 137, 138, 139, 179, 261, 443, 445, 448, 465, 513, 563,
585, 614, 636, 684, 695, 989, 990, 992, 993, 994, 995, 1494, 1701, 1718, 1719, 1720, 1723,
2000, 2001, 2002, 2003, 2252, 2427, 2478, 2479, 2482, 2484, 2492, 2598, 2679, 2727, 2762,
2998, 3077, 3078, 3183, 3191, 3220, 3269, 3389, 3410, 3424, 3471, 3496, 3509, 3529, 3539,
3660, 3661, 3713, 3747, 3864, 3885, 3896, 3897, 3995, 4031, 5007, 5060, 5061, 5631, 5900,
5901, 5902, 5903, 6000, 7674, 8443, 9802, 11751, 12109.
The option to choose a TCP Acceleration Service Object is read-only in this mode
Step 5 Click the Address Object always excluded from TCP Acceleration drop-down, then select
None.
Step 6 Click the Apply Changes button.
Configuring TCP Acceleration | 57
Example 2
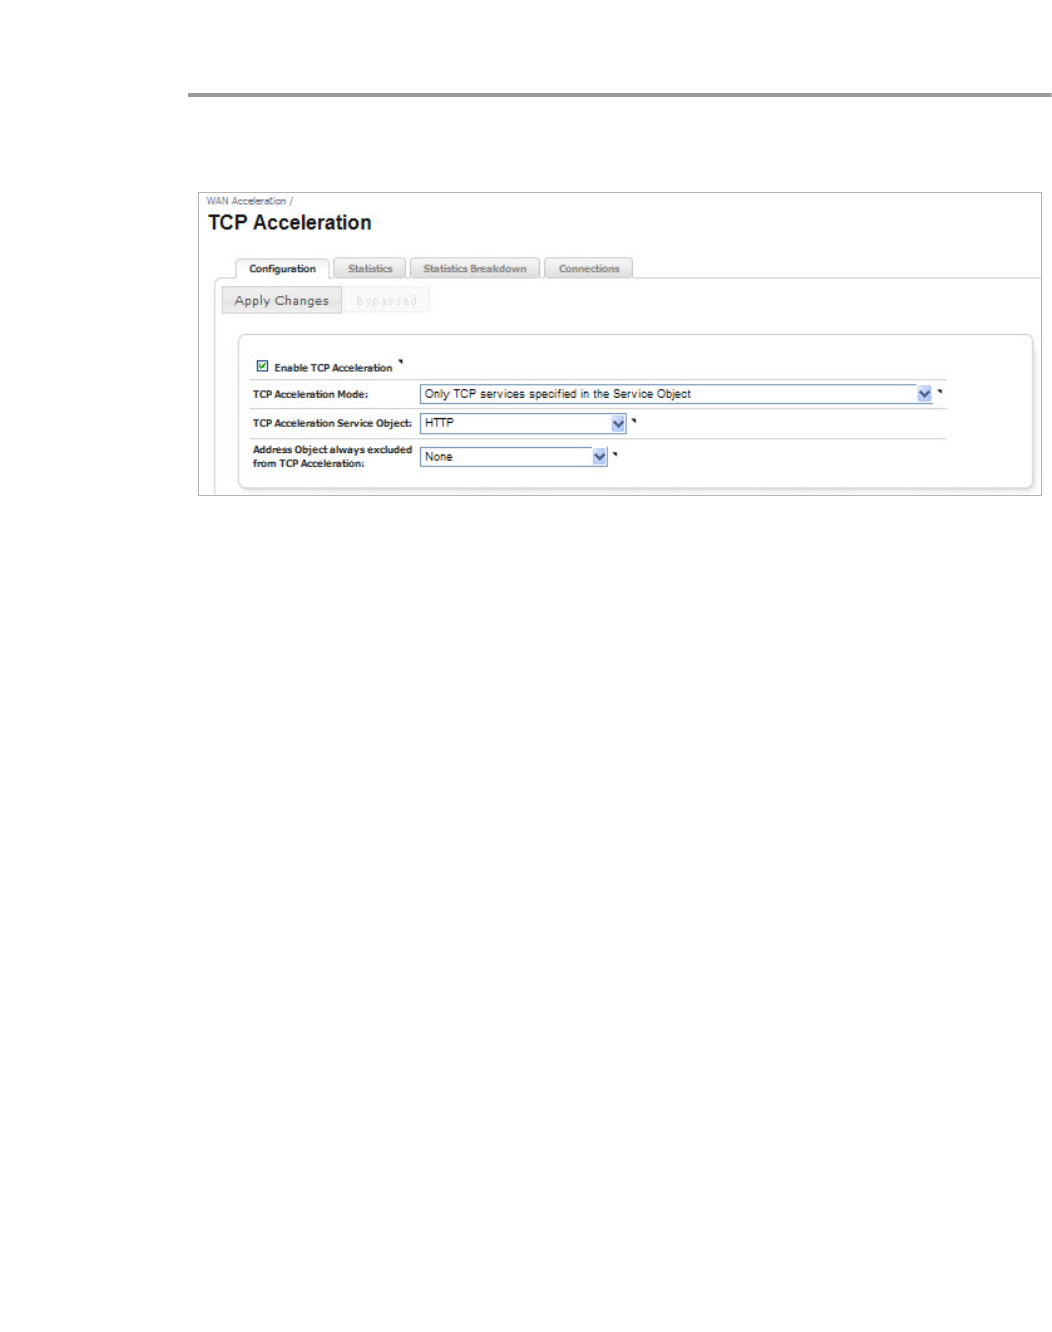
To configure acceleration of only the HTTP web traffic, follow the steps below:
Step 1 Navigate to WAN Acceleration > TCP Acceleration.
Step 2 Select the Configuration tab.
Step 3 Click the Enable TCP Acceleration checkbox.
Step 4 Click the TCP Acceleration Mode drop-down, then select Only TCP Services Specified in
the Service Object.
Step 5 Click the TCP Acceleration Service Object drop-down, the select HTTP.
Step 6 Click the Address Object always excluded from TCP Acceleration drop-down, then select
None.
Step 7 Click the Apply Changes button.
58 | Dell SonicWALL WXA 1.3 User’s Guide
Example 3
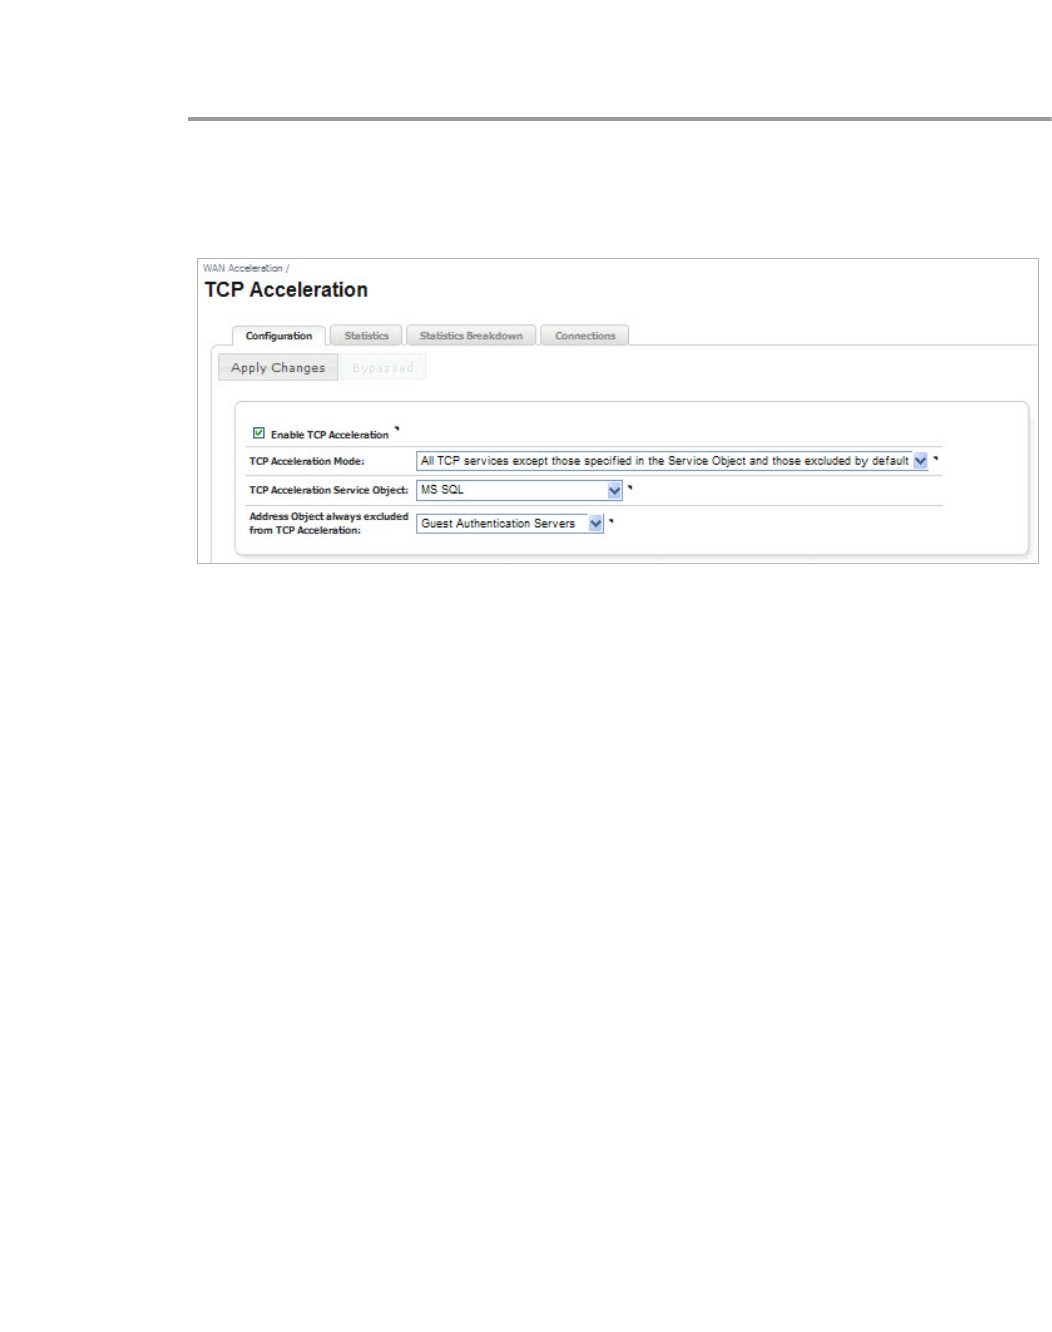
To configure acceleration of everything except Microsoft SQL database traffic or traffic to the
Guest Authentication Servers, follow the steps below:
Step 1 Navigate to WAN Acceleration > TCP Acceleration.
Step 2 Select the Configuration tab.
Figure 1 Configuring TCP Acceleration Example 3
Step 3 Select the Enable TCP Acceleration checkbox.
Step 4 Click the TCP Acceleration Mode drop-down, then select All TCP services except those
specified in the Service Object and those excluded by default.
Step 5 Click the TCP Acceleration Service Object, then select Microsoft Structured Query
Language (MS SQL).
Step 6 Click the Address Object always excluded from TCP Acceleration drop-down, then select
Guest Authentication Servers.
Step 7 Click the Apply Changes button.
Configuring TCP Acceleration | 59
Verifying the TCP Acceleration Configuration
After you complete the TCP Acceleration configuration procedures, verify TCP Acceleration is
working by checking the TCP Acceleration > Statistics Tab.
Step 1 Navigate to the TCP Acceleration > Statistics Tab.
Step 2 View the statistics data and graphs to verify TCP Acceleration.
This indicates if the WXA series appliance is using TCP Acceleration for data transfer.
If the Statistics tab data and graphs do not display any information, TCP traffic is not being
accelerated. The TCP Acceleration feature is not configured correctly or is disabled.
Refer to the Configuring the TCP Acceleration > Configuration Tab on page 56 and check the
TCP Acceleration configuration.

60 | Dell SonicWALL WXA 1.3 User’s Guide

| 61
WFS Acceleration

62 | Dell SonicWALL WXA 1.3 User’s Guide
Viewing the WFS Acceleration Page | 63
Chapter 7
Viewing the WFS Acceleration Page
WAN Acceleration > WFS Acceleration
This chapter describes the management interface features and options that are available on
the WAN Acceleration > WFS Acceleration page and is split up in two sections, Unsigned SMB
and Signed SMB. Some of the tabs and options on this page might be hidden depending on
which type of SMB signing and configuration mode is selected, see below for details.
In a network that supports unsigned SMB traffic, the WFS Acceleration service configuration is
greatly simplified. The reason for this is Unsigned SMB traffic does not have a security layer,
so the WXA series appliance can intercept the traffic without joining the domain, eliminating the
need to configure custom zones, configuring reverse lookup, and add file shares. In a network
that supports SMB signing, it is required that the WXA series appliance join the domain, due to
the presence of a security layer in Signed SMB traffic. Although this type of configuration is
more complex than unsigned SMB, it offers a more granular configuration of the WFS
Acceleration service. Supporting SMB signing provides the option to configure WFS
Acceleration in a Basic or Advanced configuration modes.
When using Unsigned SMB, only the Configuration and Statistics tabs are present.
64 | Dell SonicWALL WXA 1.3 User’s Guide
When using SMB Signing, additional tabs display depending on which configuration mode is
selected (Basic or Advanced), which is explained below:
The Basic configuration mode displays the Configuration, Statistics, Signed SMB Setup, and
Tools tabs.
The Advanced configuration mode displays the Configuration, Statistics, Domain Details,
Shares, and Tools tabs.
For detailed views and descriptions of the WFS Acceleration management interface, refer to
the sections below.
• WFS Acceleration Page Using Unsigned SMB on page 65
• WFS Acceleration Page Using Signed SMB on page 67
Viewing the WFS Acceleration Page | 65
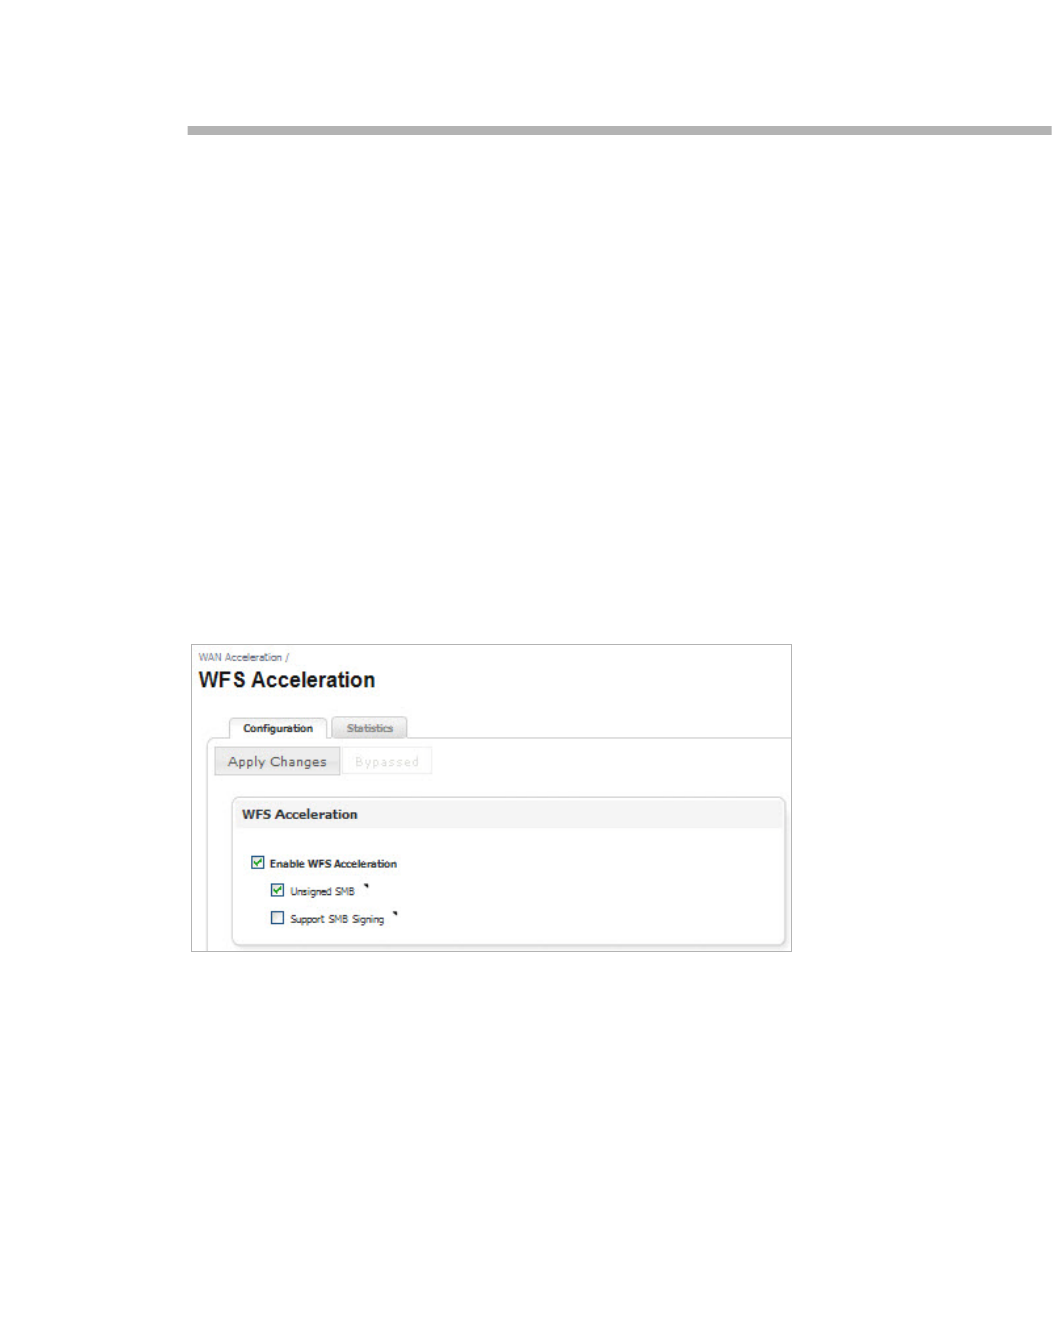
WFS Acceleration Page Using Unsigned SMB
Clicking the Unsigned SMB checkbox displays the Configuration and Statistics tabs, this
section details the options for those tabs.
Configuration Tab
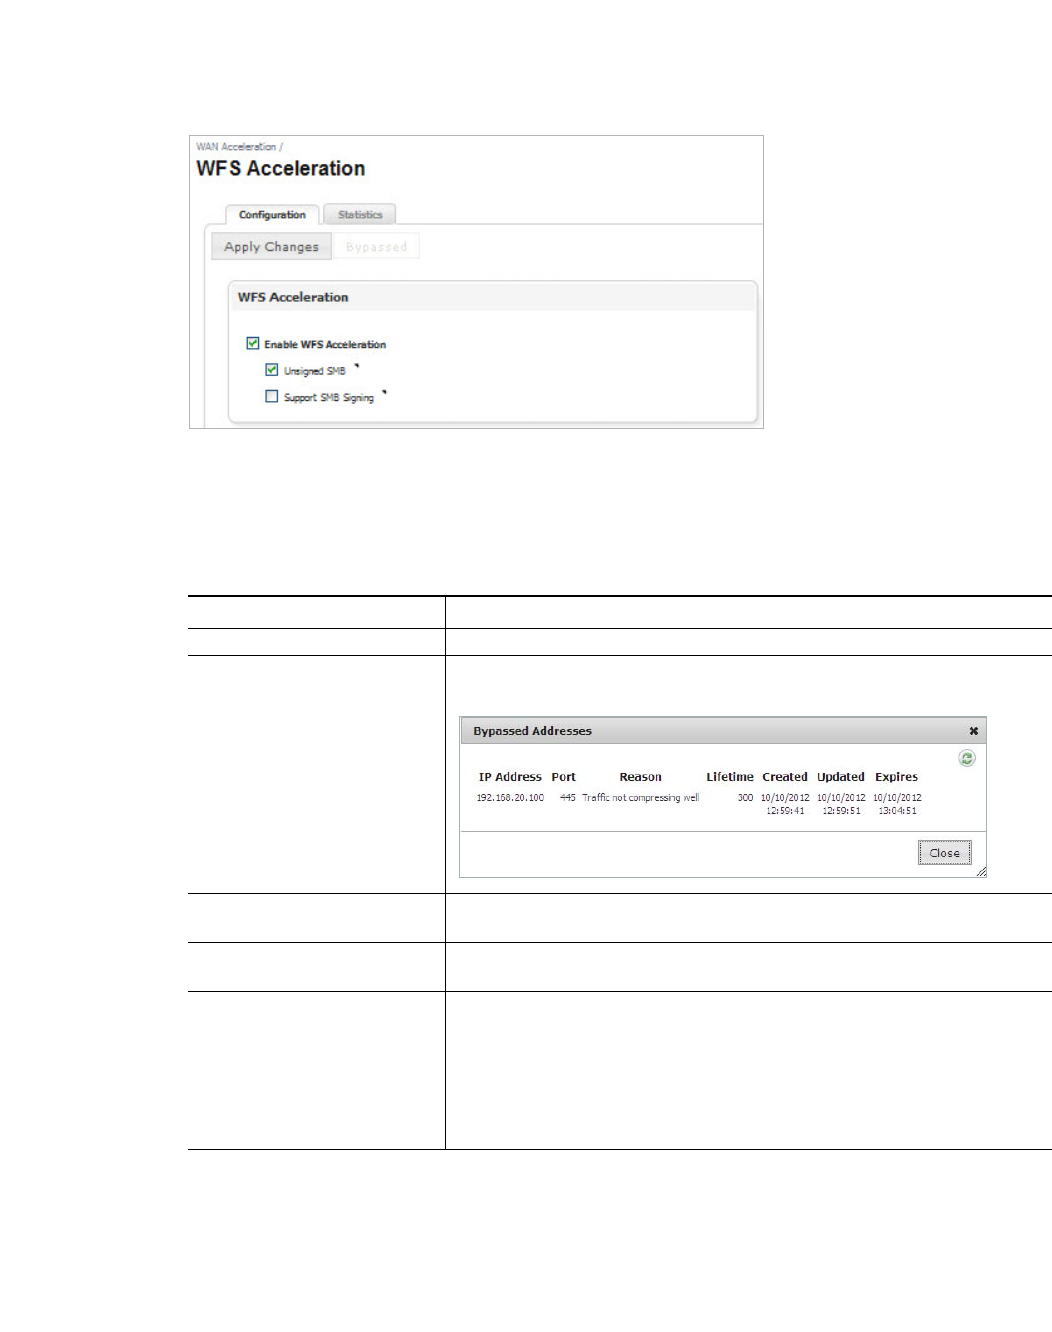
The Configuration tab using Unsigned SMB gives you the options to enable the WFS
Acceleration service and configure Server Message Block (SMB) signing settings.
Name Description
Apply Changes Button Applies the latest configuration settings.
Bypassed Displays a pop-up window with a list of connections that have either been
excluded from the acceleration process or failed.
Enable WFS Acceleration
Checkbox Enables the WFS Acceleration service on the WXA series appliance. This
checkbox is enabled when the Unsigned SMB checkbox is enabled.
Unsigned SMB Checkbox Enables transparent WFS Acceleration on networks that do not use SMB
signing. This checkbox is enabled by default.
Support SMB Signing Check-
box Enables support for SMB signing. This requires the WXA series appliance
to be joined to the domain. This checkbox is disabled by default. For more
information, refer to the WFS Acceleration Page Using Signed SMB on
page 67.
Note: If this checkbox is disabled, the WXA series appliance panel is
hidden.
66 | Dell SonicWALL WXA 1.3 User’s Guide
Statistics Tab
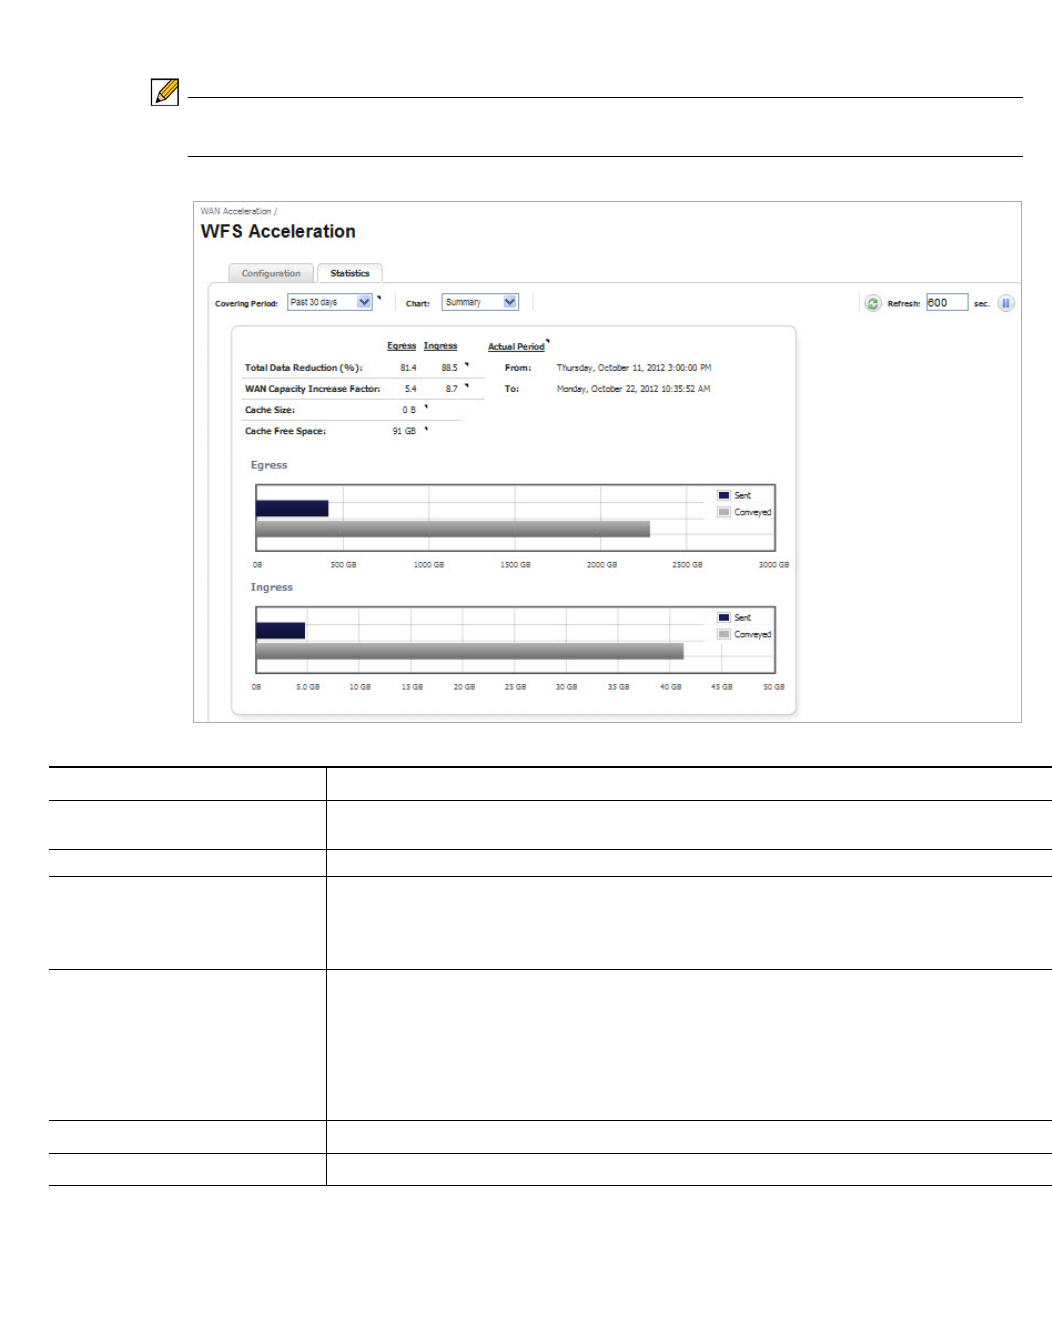
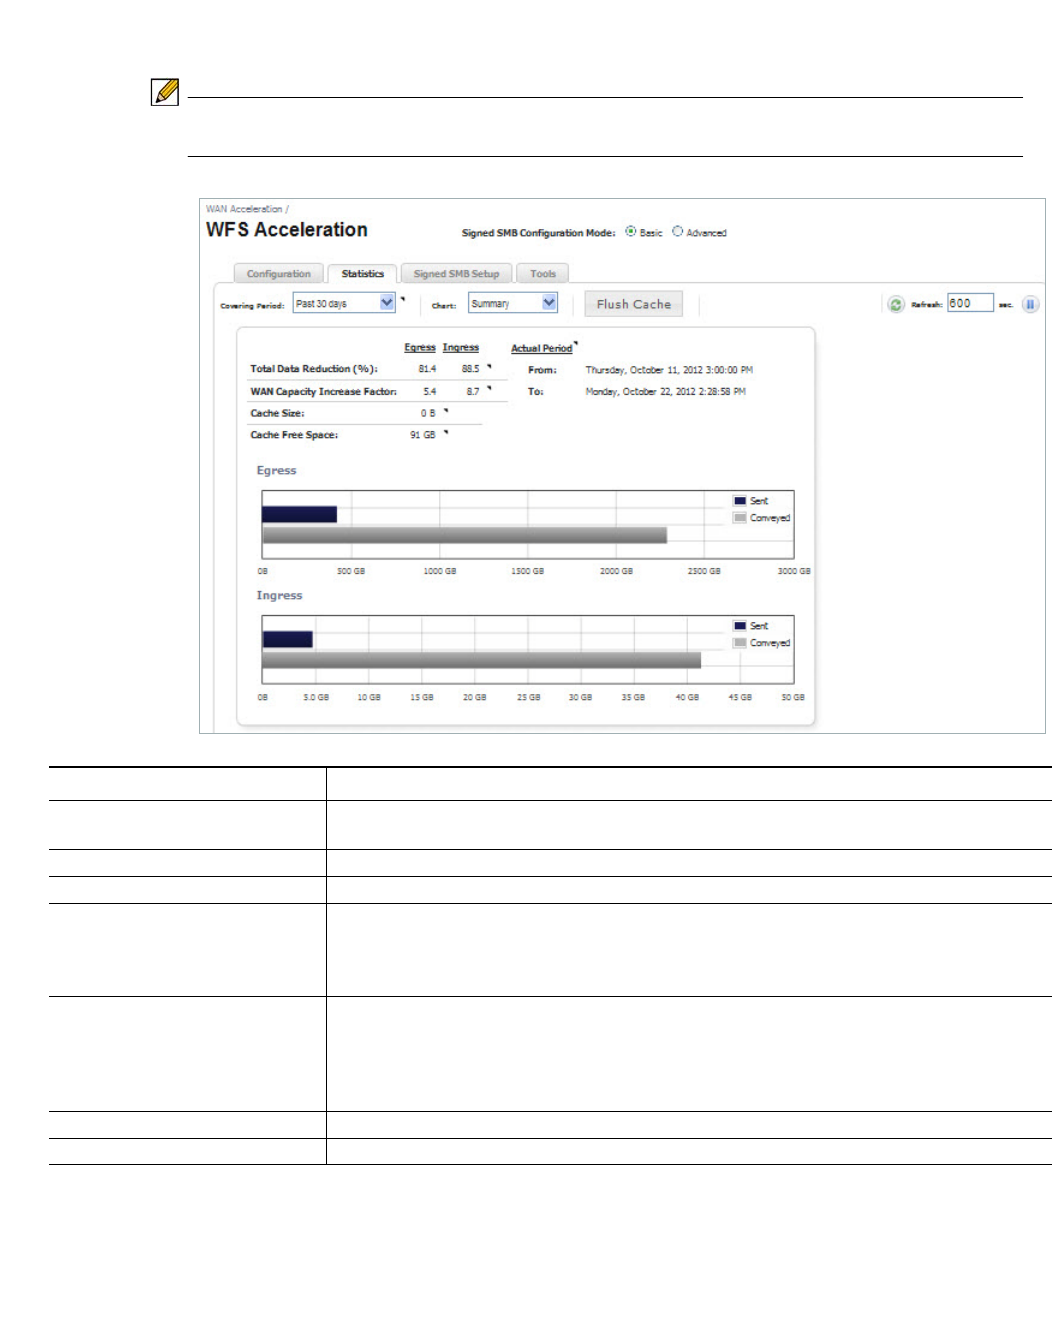
The Statistics tab displays performance statistics for the WFS Acceleration service.
Note The WFS Cache statistics displayed in this page only represent Signed SMB traffic. If you
are using Unsigned SMB, the WFS Cache statistics do not apply.
Name Description
Covering Period Drop-down Click the Covering Period drop-down list and select the period of time the data displays
on the Statistics tab.
Chart Drop-down Selects the graph style used to display the WFS Acceleration data.
Refresh Actions Refreshes the current page. The refresh interval can be entered in the text field. The max-
imum time interval that can be set is 999 seconds.
Click the Refresh symbol to manually update the page.
Click the Pause symbol to stop updates on the page.
Overview Table Displays read-only data for the following:
• Total Data Reduction percentage
• WAN capacity increase factor
• Cache Size
• Cache Free Space
Egress Charts Displays the egress (out going) sent and conveyed traffic in Bytes.
Ingress Charts Displays the ingress (incoming) sent and conveyed traffic in Bytes.

Viewing the WFS Acceleration Page | 67
WFS Acceleration Page Using Signed SMB
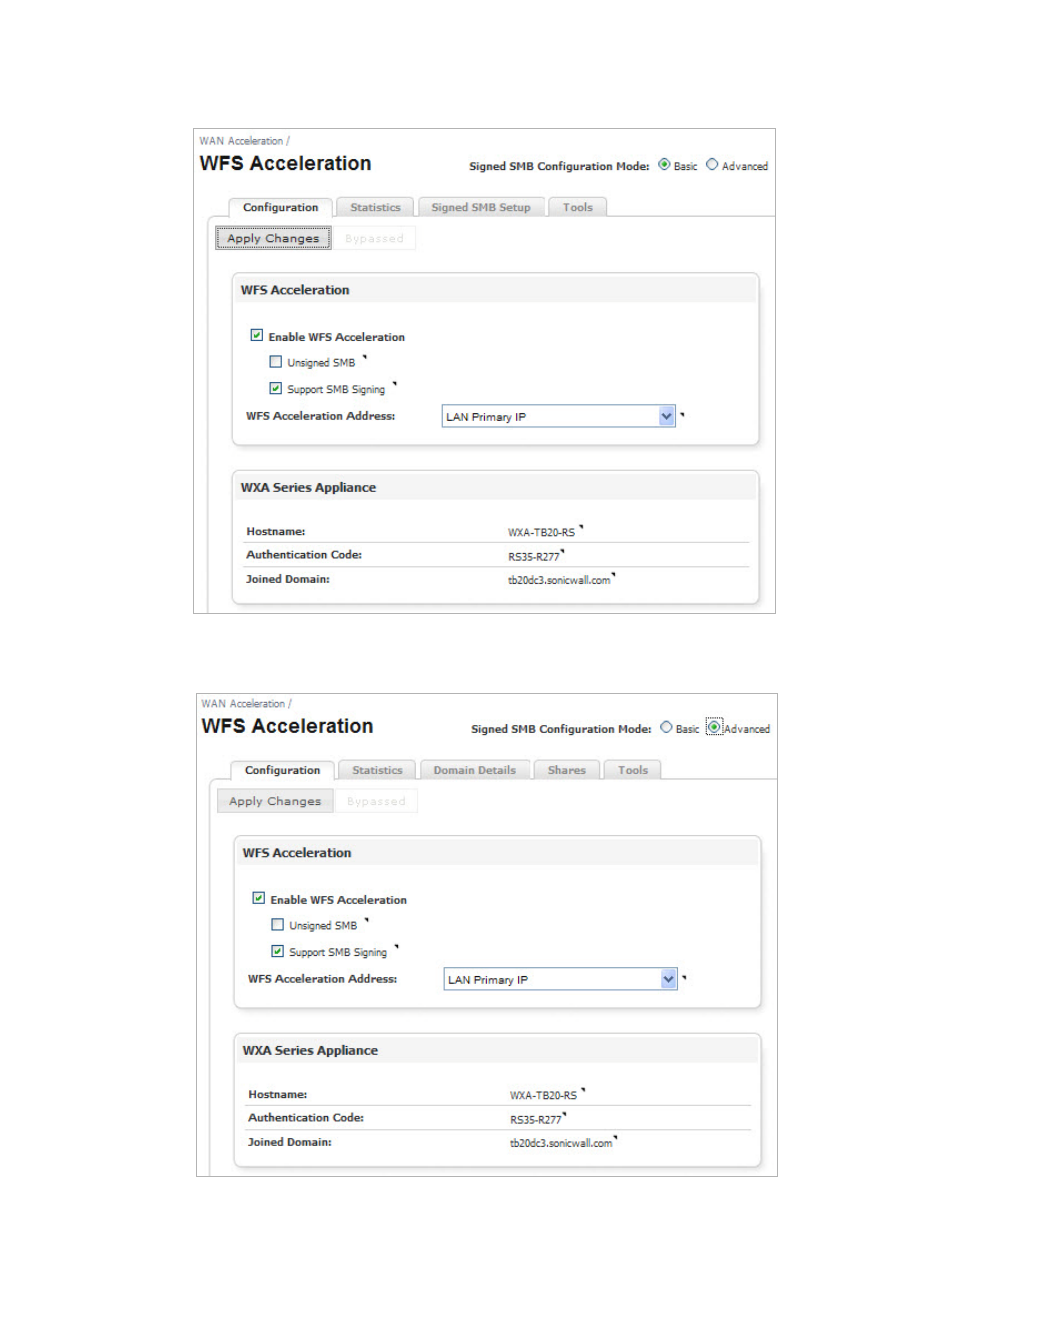
Clicking the Support SMB Signing checkbox displays the Basic (recommended) and
Advanced configuration mode radio buttons. These signed SMB configuration modes give you
the option to perform a simplified or more detailed WFS Acceleration configuration. The Basic
configuration mode displays a Signed SMB Setup tab, while the Advanced configuration mode
displays the Domain Details and Shares tabs in place of the Signed SMB Setup tab. All the
other tabs (Configuration, Statistics, and Tools) appear the same in both Basic and Advanced
configuration modes.
For detailed views and descriptions of the Basic and Advanced configuration mode
management interface, refer to the following sections:
• Basic Configuration Mode on page 67
• Advanced Configuration Mode on page 81
Basic Configuration Mode
Basic mode is the preferred way to configure WFS Acceleration due to its simplistic naming
convention and ease of use. However, you can select the Advanced radio button at any time,
directing you to the Domain Details Tab, page 82 if you wish to configure individual shares.
Note In Basic mode, a naming convention is used to circumvent some of the settings required in
Advanced mode. Therefore, servers configured in Advanced mode may not appear in the
Basic mode server lists, but will still be part of the configuration.
Name Description
Configuration Tab Enables WFS Acceleration and allows user to choose the IP address to associate
with the service. See Configuration Tab on page 68 for details.
Statistics Tab Displays performance statistics for the WFS Acceleration service. See Statistics
Tab on page 70 for details.
68 | Dell SonicWALL WXA 1.3 User’s Guide
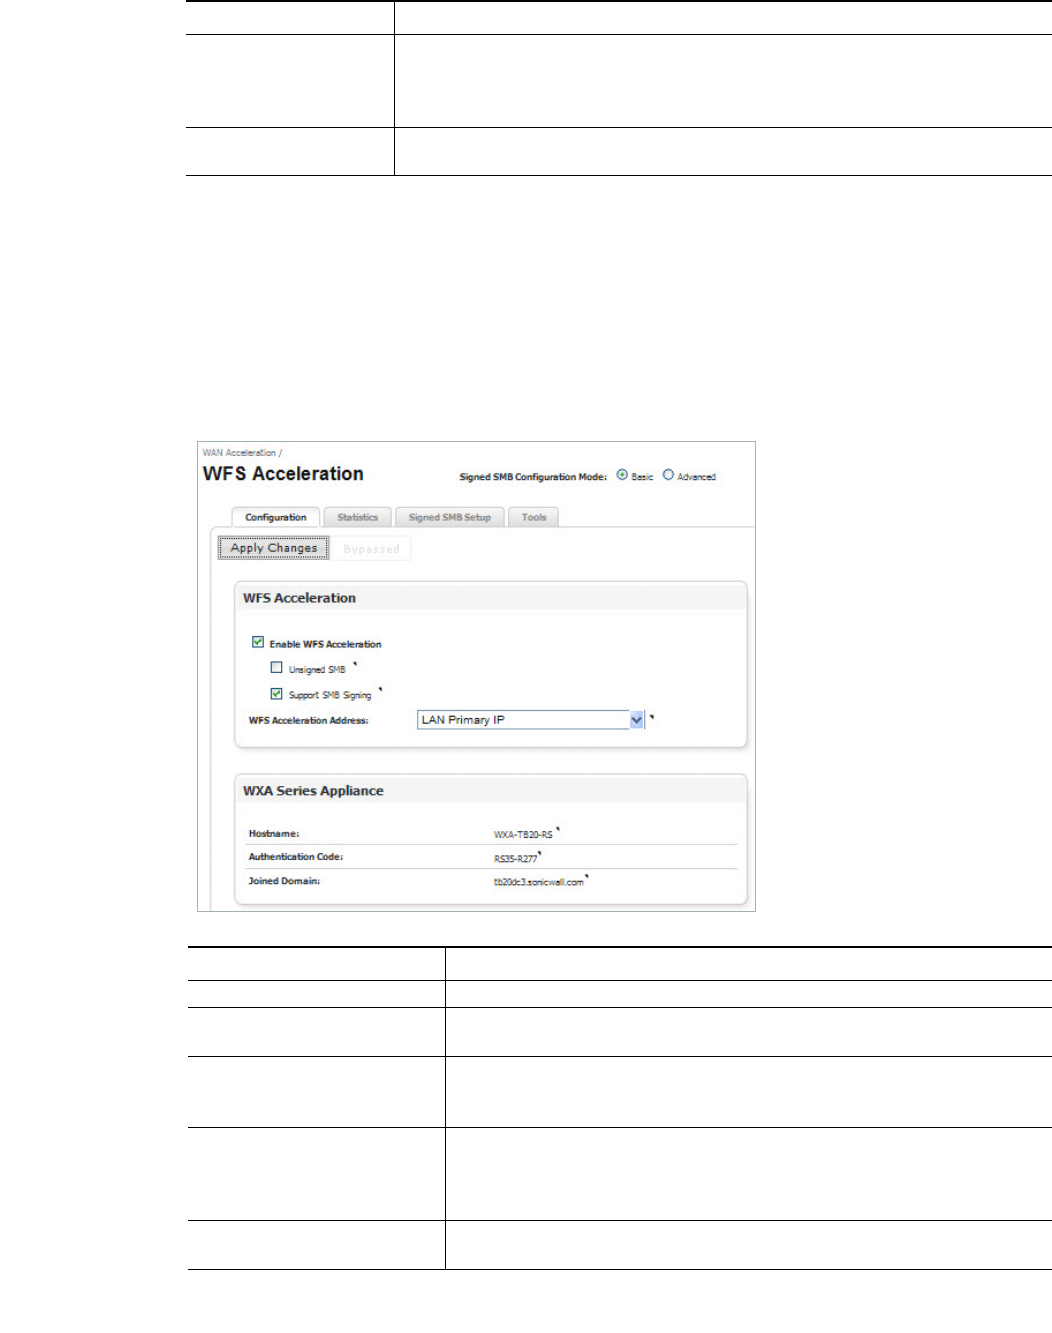
Configuration Tab
The Configuration tab allows you to enable the WFS Acceleration service, configure (SMB)
signing settings, select an IP address object for the WXA series appliance, and view info for the
WXA series appliance hostname (which can be configured, if the WXA series appliance is
unjoined), authentication code, and joined domain. The WXA series appliance panel and
Unsigned SMB checkbox may not display if the SonicOS firmware version is mismatched.
Figure 2 WFS Acceleration > Configuration
Signed SMB Setup Tab Configures the WXA series appliance to match the details of the domain it is join-
ing. This tab offers a simplified domain and file server configuration, making it a
quick and easy way to configure WFS Acceleration. See Signed SMB Setup Tab
on page 71 for details.
Tools Tab Provides diagnostic tools for the WFS Acceleration service. See Tools Tab on
page 77 for details.
Name Description
Name Description
Apply Changes Button Applies the latest configuration settings.
Enable WFS Acceleration
Checkbox Enables the WFS Acceleration service on the WXA series appliance. Ena-
bled when Support SMB Signing checkbox is enabled.
Unsigned SMB Checkbox Enables transparent WFS Acceleration on networks that do not use SMB
signing. Enabled by default. for more information refer to the WFS Accel-
eration Page Using Unsigned SMB on page 65.
Support SMB Signing Check-
box Enables support for SMB signing. This requires the WXA series appliance
to be joined to the domain. This checkbox is enabled by default.
Note: If this checkbox is disabled, the WXA series appliance panel is
hidden.
WFS Acceleration Address
Drop-down Menu Sets the address object that represents the IP address that the WXA series
appliance will use when connecting to servers and clients.

Viewing the WFS Acceleration Page | 69
Note You can verify the WFS Acceleration status on the WAN Acceleration > Status page.
Hostname Displays the hostname of the WXA series appliance.
Note: The address for the WXA series appliance normally remains private
because it is behind the managing NSA/TZ series appliance’s IP
address which is already used for routing across the network.
Authentication Code Displays the authentication code for the WXA series appliance.
Note: The authentication code is only needed when configuring a WXA
series appliance to auto-join itself to the domain.
Joined Domain Displays the domain that the WXA series appliance joined.
Name Description
70 | Dell SonicWALL WXA 1.3 User’s Guide
Statistics Tab
The Statistics tab displays performance statistics for the WFS Acceleration service.
Note The WFS Cache statistics displayed in this page only represent Signed SMB traffic. If you
are using Unsigned SMB, the WFS Cache statistics do not apply.
Name Description
Covering Period Drop-down Click the Covering Period drop-down list and select the period of time the data displays
on the Statistics tab.
Chart Drop-down Selects the graph style used to display the WFS Acceleration data.
Flush Cache Button Clears the WFS Acceleration cache on the WXA series appliance.
Refresh Actions Refreshes the current page. The refresh interval can be entered in the text field. The max-
imum time interval that can be set is 999 seconds.
Click the Refresh symbol to manually update the page.
Click the Pause symbol to stop updates on the page.
Overview Table Displays read-only data for the following:
• Egress/Ingress Total Data Reduction percentage
• Egress/Ingress WAN capacity increase factor
• Egress Cache Size
• Egress Cache Free Space
Egress Charts Displays the egress (out going) sent and conveyed traffic in Bytes.
Ingress Charts Displays the ingress (incoming) sent and conveyed traffic in Bytes.

Viewing the WFS Acceleration Page | 71
Signed SMB Setup Tab
The Signed SMB Setup tab offers a simplified and user friendly way to have the WXA series
appliance join the domain, add servers to the configuration, and to create the necessary
records on the domain.
Note There is a WFS Setup Wizard available for deployments running SonicOS 5.9 firmware. This
is the preferred way to configure Signed SMB. You can access the wizard by clicking the
Wizards link in the top-right corner of the managing NSA/TZ series appliance’s user
interface. Click the WXA setup Wizard, then select the WFS Setup Wizard. For more
information, refer to the “Wizards” section of the SonicOS 5.9 Administrator’s Guide.
The WXA series appliance should automatically discover the domain details if:
1. The DNS server can reverse resolve its own address into a hostname within the domain.
2. The domain is specified using DHCP and the DNS server resolves that to the address of a
Domain Controller.
Specifying the domain using DHCP is not directly considered auto-detecting and it is not a
requirement for the DNS server to be a Domain Controller, although it is most common.
However it is required for the DNS server to be a domain DNS server, problems can occur
if any non-domain DNS server is used. Also, some types of independent DNS caches and
servers might cause issues.
If the WXA series appliance has not joined the domain, the Signed SMB Setup tab displays a
Join Domain button and a note that the WXA series appliance has not yet joined the domain.
Figure 3 WFS Acceleration > Signed SMB Setup (Domain Not Joined)
Name Description
Join Domain button Joins the WXA series appliance to the domain. Your Administrator's
credentials must be entered to join the domain.
Domain: (read-only) Displays the domain your WXA series appliance is joined to.
Hostname: Displays the default or created hostname for your WXA series appli-
ance.
Configure button Configures the WXA series appliance hostname. You can create your
own hostname or leave the text field blank to use the default.
Delete button Deletes the configuration for the WXA series appliance hostname and
the domain it is configured to. If the WXA series appliance has not
joined the domain, a Delete button displays for the Hostname and can
be reverted back to the default hostname.

72 | Dell SonicWALL WXA 1.3 User’s Guide
The Configure Hostname pop-up window displays after clicking the Configure button in the
Hostname field:
Figure 4 Join Domain Pop-up Window
Name Description
Hostname (text field) Enter a hostname for your WXA series appliance. A default hostname is
chosen for you, leave the text field blank to use it.
Note: If you are configuring a WXA 5000 Virtual Appliance or WXA 500 Live
CD, a default hostname is not provided, you must enter one.
Apply button Applies the created or default hostname to the WXA series appliance.
Cancel button Cancels any entered information and closes the Configure Hostname pop-
up window.
Name Description
Join Domain button Joins the WXA series appliance to the domain.
Note: The join domain process adds the relevant domain records for the
WXA series appliance, which requires administrator’s credentials.
Cancel button Cancels any information entered and closes the Join Domain pop-up win-
dow.
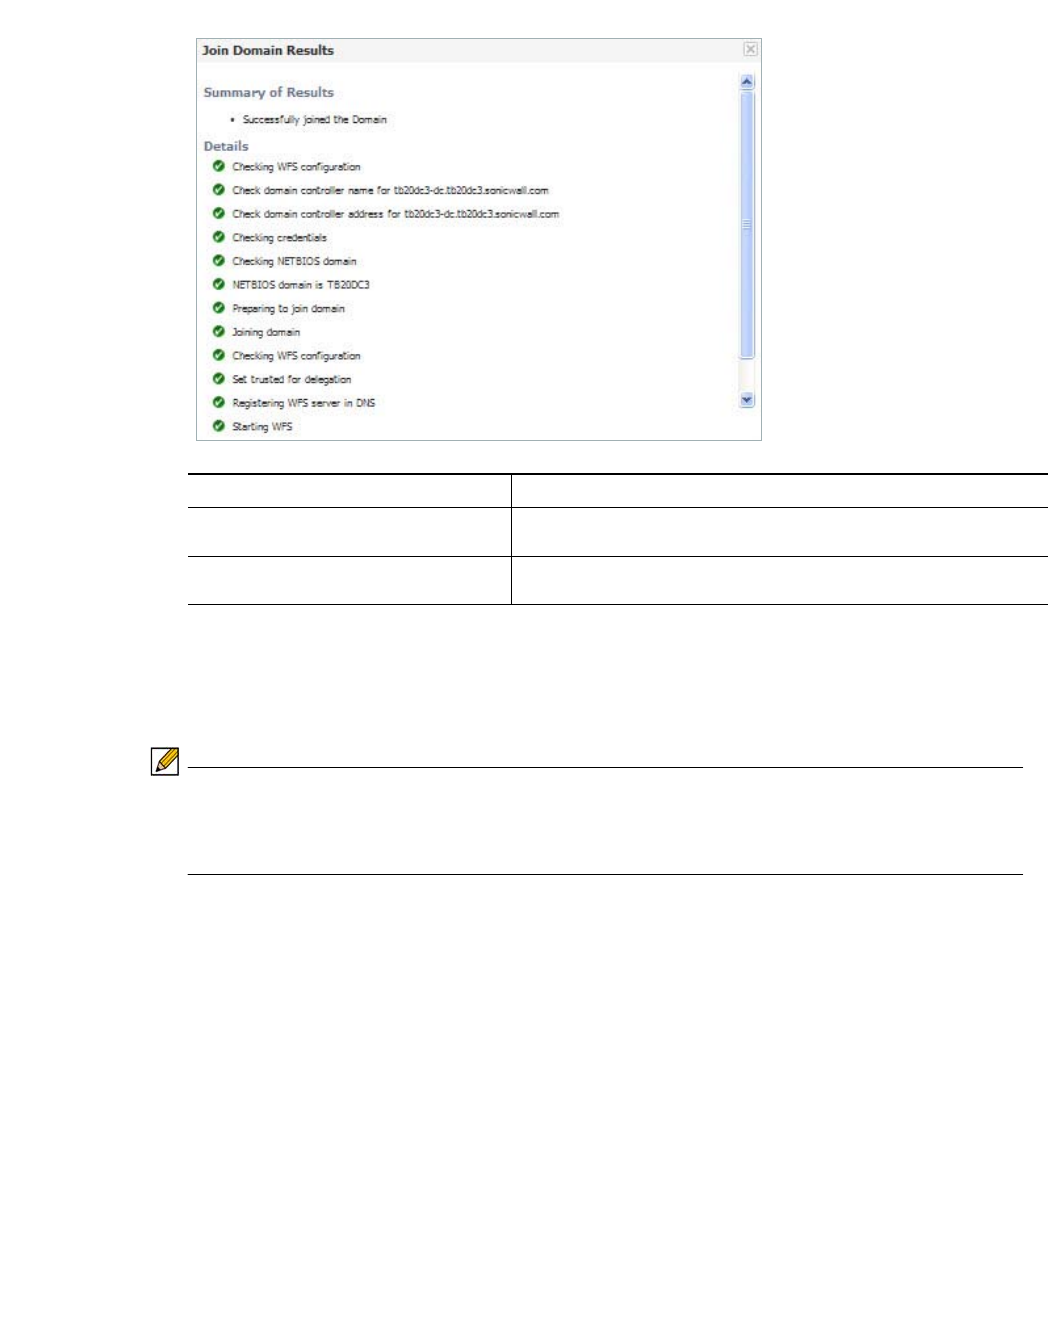
Viewing the WFS Acceleration Page | 73
Figure 5 Join Domain Results
If the WXA series appliance is joined to the domain, the Add Server and Update Domain
Records buttons display, along with the domain details and configured servers panels. Click the
Local radio button to configure servers on the local site and the Remote radio button to
configure servers on a site that is remote from the location of the local site.
Note The central site's administrator should configure their local servers first before the branch
site administrator configures their remote servers. For example, if you are at the central site,
you would configure the local File Servers so that they can be accessed from the branch
sites.
Name Description
Summary of Results (Read-only) Displays a summary of results after the WXA series appliance
joins the domain.
Details (Read-only) Details the steps performed in the domain joining procedure. A
green circle indicates a pass, and a red circle indicates a failure.
74 | Dell SonicWALL WXA 1.3 User’s Guide
The configured servers information changes when toggling between the Local and Remote
radio buttons, as seen in the two figures below:
Figure 6 Signed SMB Setup for the remote site
Figure 7 Signed SMB Setup for the local site
Name Description
Add Server button Configures the WXA security appliance to share files on a remote
server. See on page 75 and on page 76 for details.
Update Domain Records button Updates any missing SPN aliases to the Domain Controller, config-
ured remote servers to the Specific Trusted Host List on the com-
puter account, and any missing DNS records. It also removes
unwanted or outdated records. This button should be used when
deleting servers, as well as adding them. As seen in on page 77,
when this button is clicked, you will be prompted to enter your
Administrator’s credentials.
File Servers to Show: Local radio but-
ton Changes the management interface to configure local file servers.
File Servers to Show: Remote radio
button Changes the management interface to configure remote file serv-
ers.
Domain: (text field) Displays the name of the domain that the WXA series appliance is
joined to.
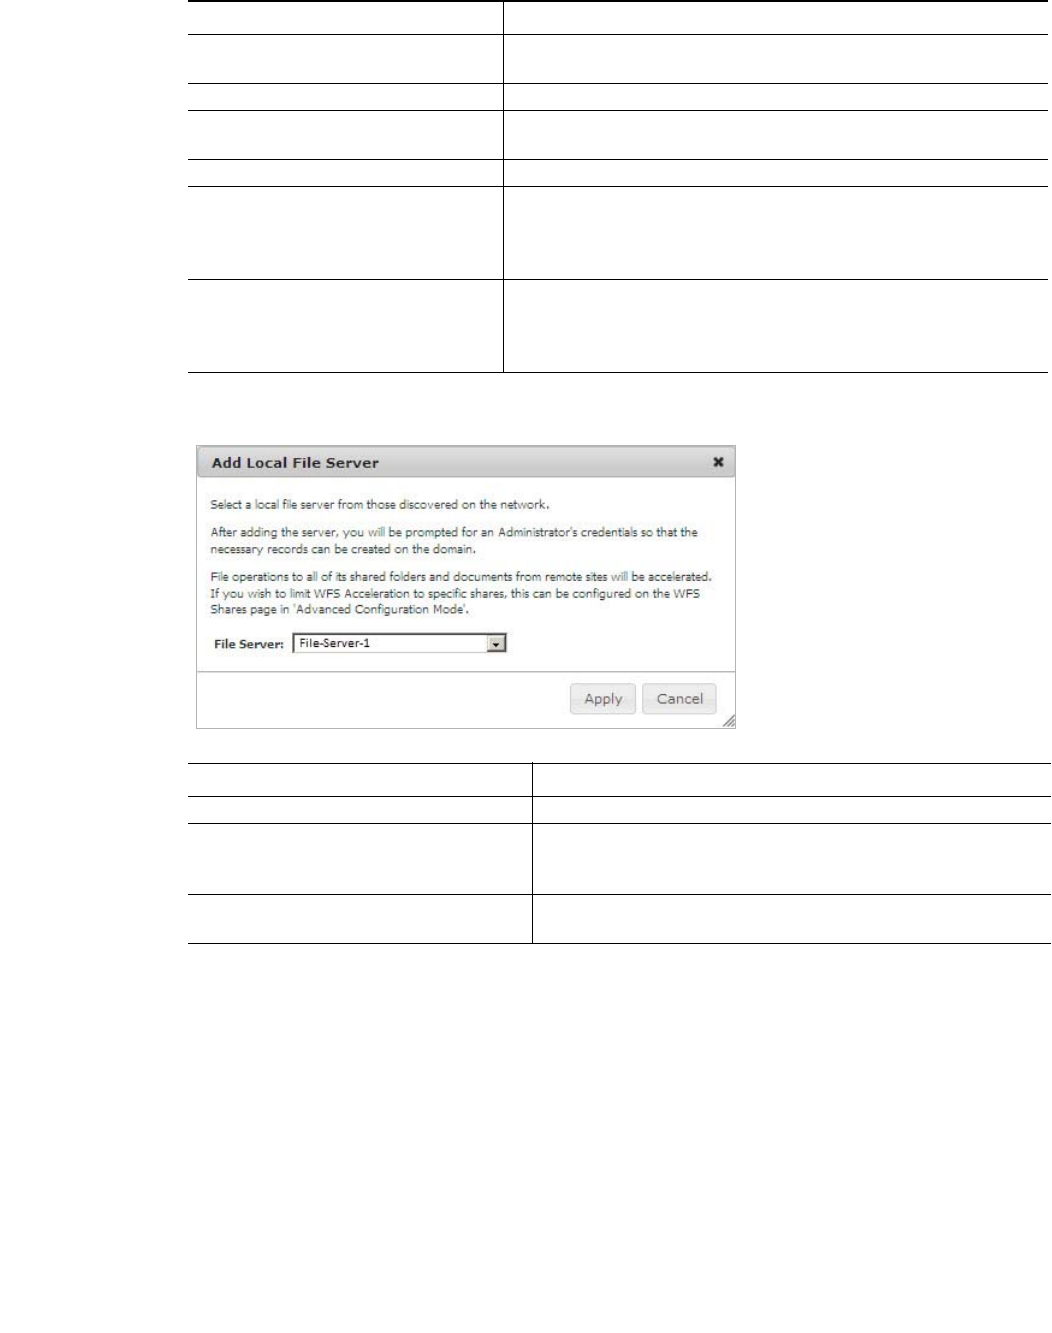
Viewing the WFS Acceleration Page | 75
Figure 8 Add Local File Server Pop-up Window
Hostname: (text field) Displays the default or created hostname for the WXA series appli-
ance.
File Server Displays the file server(s) configured to the WXA series appliance.
Via Next Hop WXA Displays the auto-generated name of the WXA series appliance on
the local site that is configured the local file server.
Local WXA Name Displays the name of the local WXA series appliance.
Domain Records Displays a green circle if the domain records are configured cor-
rectly and a red circle if they are not. Click the Update Domain
Records button to add any missing records and remove stale
records.
Remove button Removes the server from the configured list.
Note: It is recommended to use the “Update Domain Records”
button after removing a server, this deletes any unwanted
domain records.
Name Description
Name Description
File Server: (text field) Selects the local file server from the drop-down list.
Apply button Adds the file server to the WXA series appliance for sharing.
After clicking the Apply button, domain records are also added
to the server, requiring the Administrator’s credentials.
Cancel button Cancels the information entered and closes the Add Server
pop-up window.
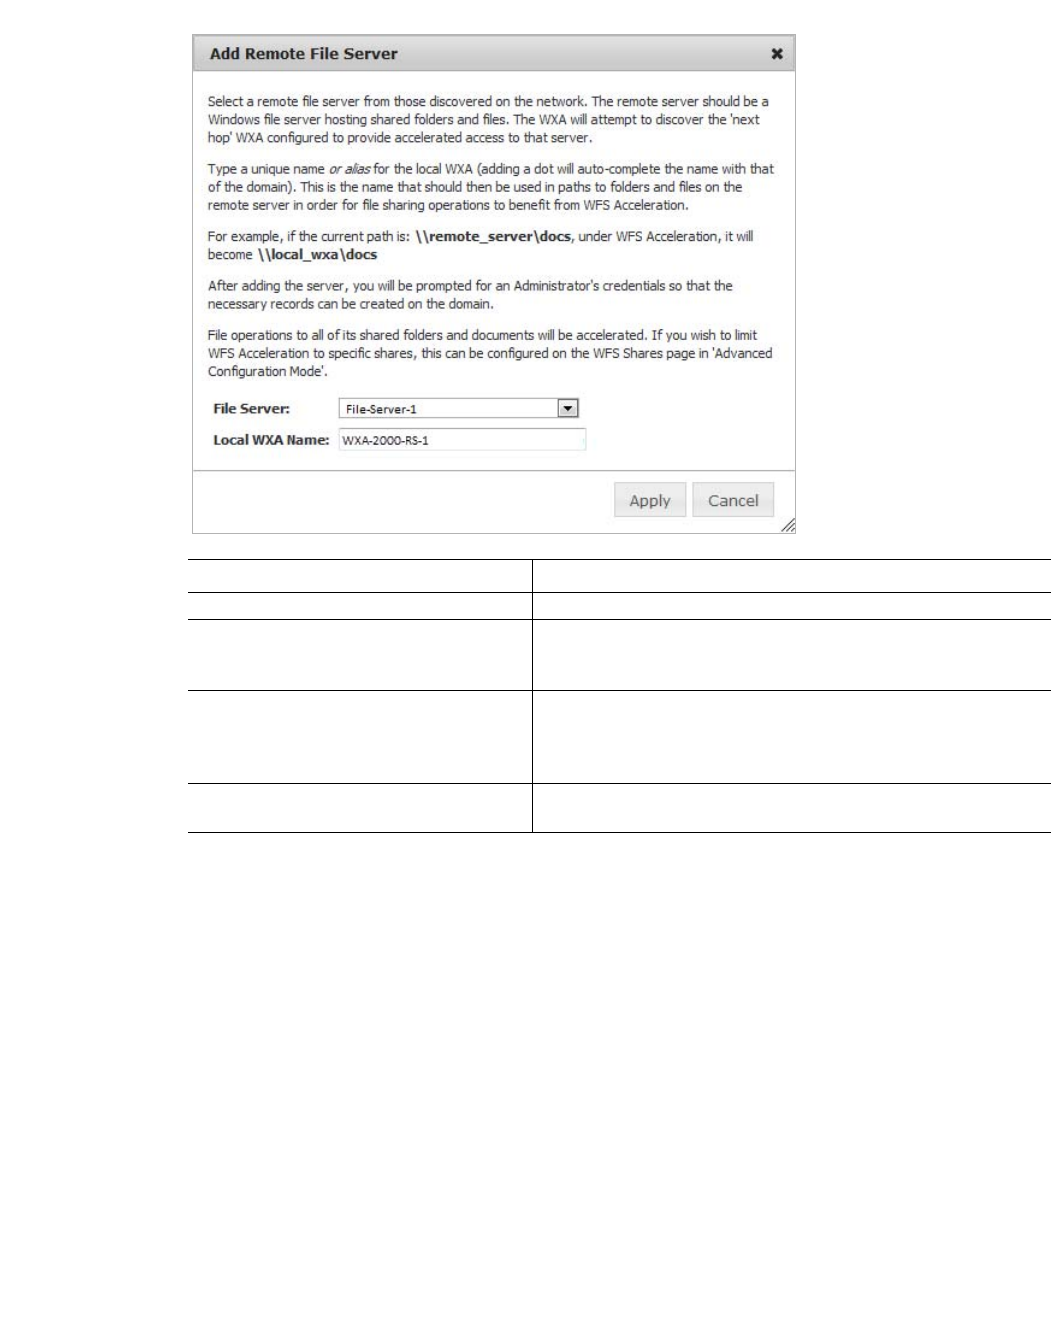
76 | Dell SonicWALL WXA 1.3 User’s Guide
Figure 9 Add Remote File Server Pop-up Window
Name Description
File Server: (text field) Selects the remote file server from the drop-down list.
Local WXA Name: (text field) Enter a name for your local WXA series appliance. Adding a
dot at the end of the name auto-completes the name with that
of the domain.
Apply button Adds the file server to the WXA series appliance for sharing.
After clicking the Apply button, an SPN Alias is created using
the local WXA name and the domain records are added to the
server, requiring the Administrator’s credentials.
Cancel button Cancels the information entered and closes the Add Server
pop-up window.
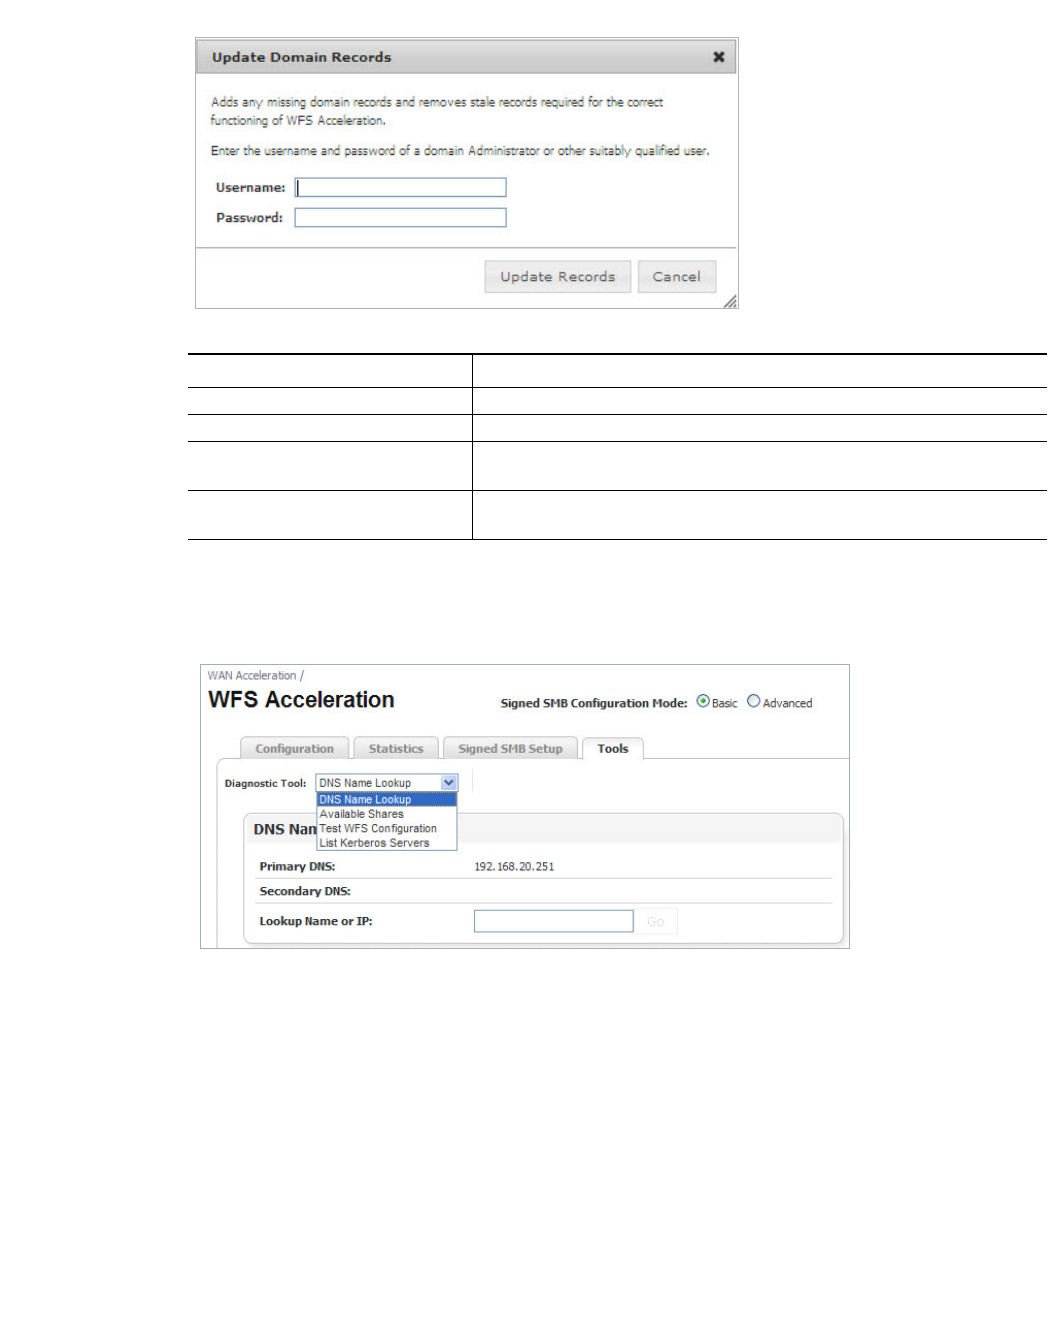
Viewing the WFS Acceleration Page | 77
Figure 10 Update Domain Records Pop-up Window
Tools Tab
The Tools tab provides diagnostic tools for the WFS Acceleration service.
The Diagnostic Tools drop-down provides the following selections:
• DNS Name Lookup — Performs a search on a specific Name or IP address, see on
page 78 for details.
• Available Shares — Displays information about available shares on a specific host, see
on page 79 for details.
• Test WFS Configuration — Performs a test on the WFS Acceleration configuration and
validates connectivity, see on page 80 for details.
• List Kerberos Servers — Displays a list of Kerberos servers that are available to use, see
on page 80 for details.
Name Description
Username (text field) Enter your Administrator’s username.
Password (text field) Enter your Administrator’s password.
Update Records button Updates any missing domain records required for the WFS Accelera-
tion feature to function correctly.
Cancel button Cancels any information entered and closes the Update Domain
Records pop-up window.
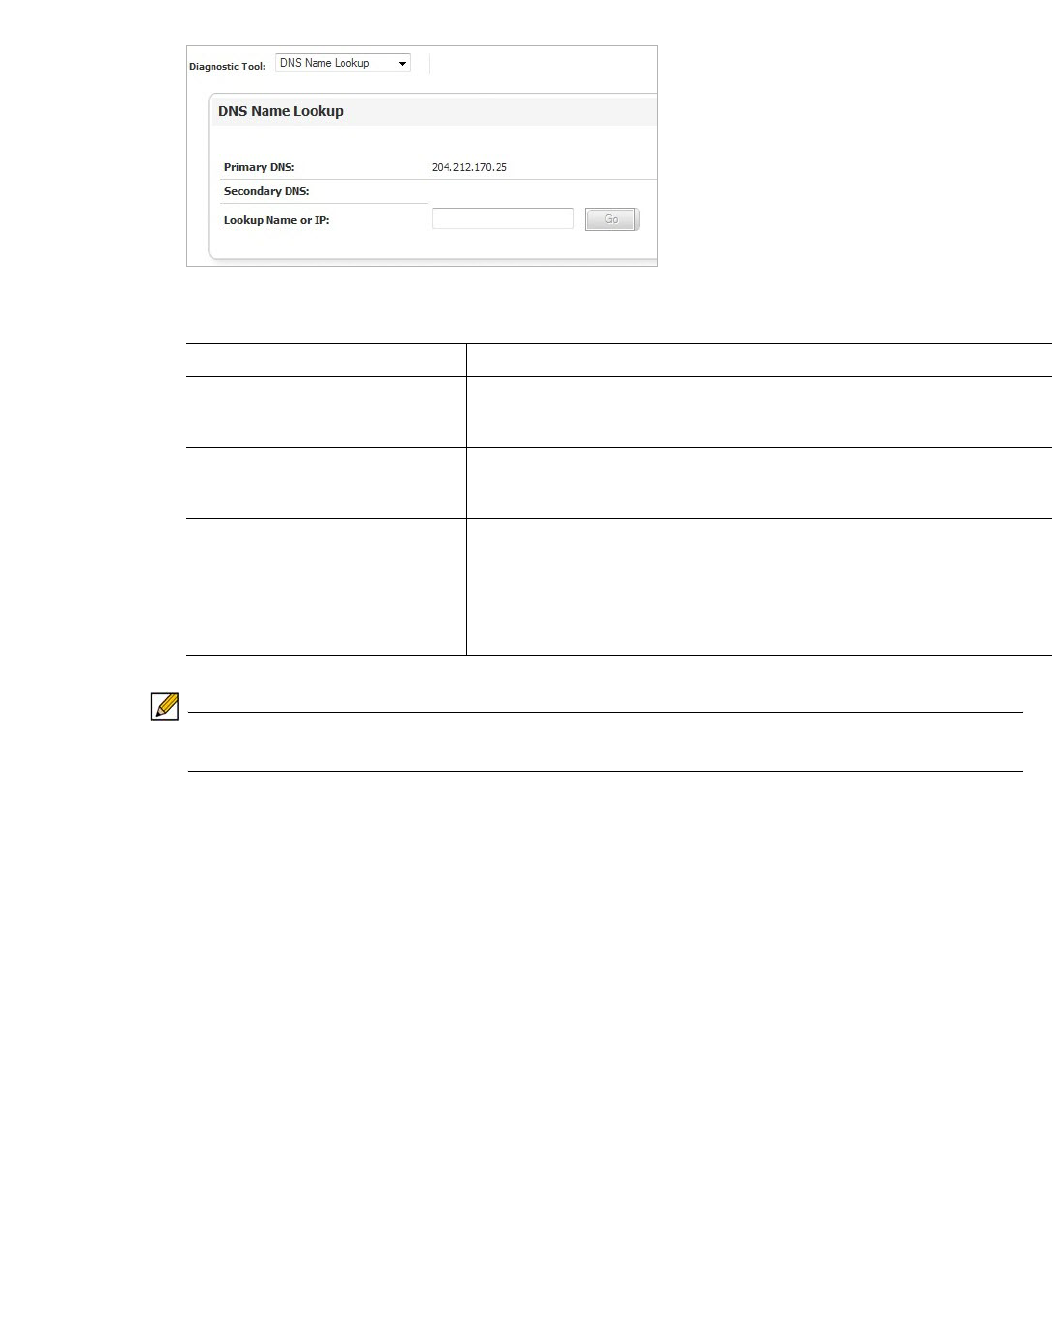
78 | Dell SonicWALL WXA 1.3 User’s Guide
Figure 11 DNS Name Lookup Panel
The DNS Name Lookup Panel displays the following information:
Note The DNS servers in the DNS Name Lookup should all be domain DNS servers. Non-domain
DNS servers can cause issues.
Name Description
Primary DNS: (read-only) Displays the primary DNS which was configured on NSA/TZ security
appliance using the Network > DNS page or Network > DHCP Server
> Edit > DNS/WINS tab.
Secondary DNS: (read-only) Displays the secondary DNS which was configured on NSA/TZ security
appliance using the Network > DNS page or Network > DHCP Server
> Edit > DNS/WINS tab.
Lookup Name or IP: Text Field Allows you to search for available DNS names or IP addresses. Click
Go to initiate the search. A response will be received from the DNS
server. It is used to verify whether the WXA series appliance can reach
the DNS server.
Note: Lookup of IP addresses only works if the DNS server has reverse
lookup zones configured.
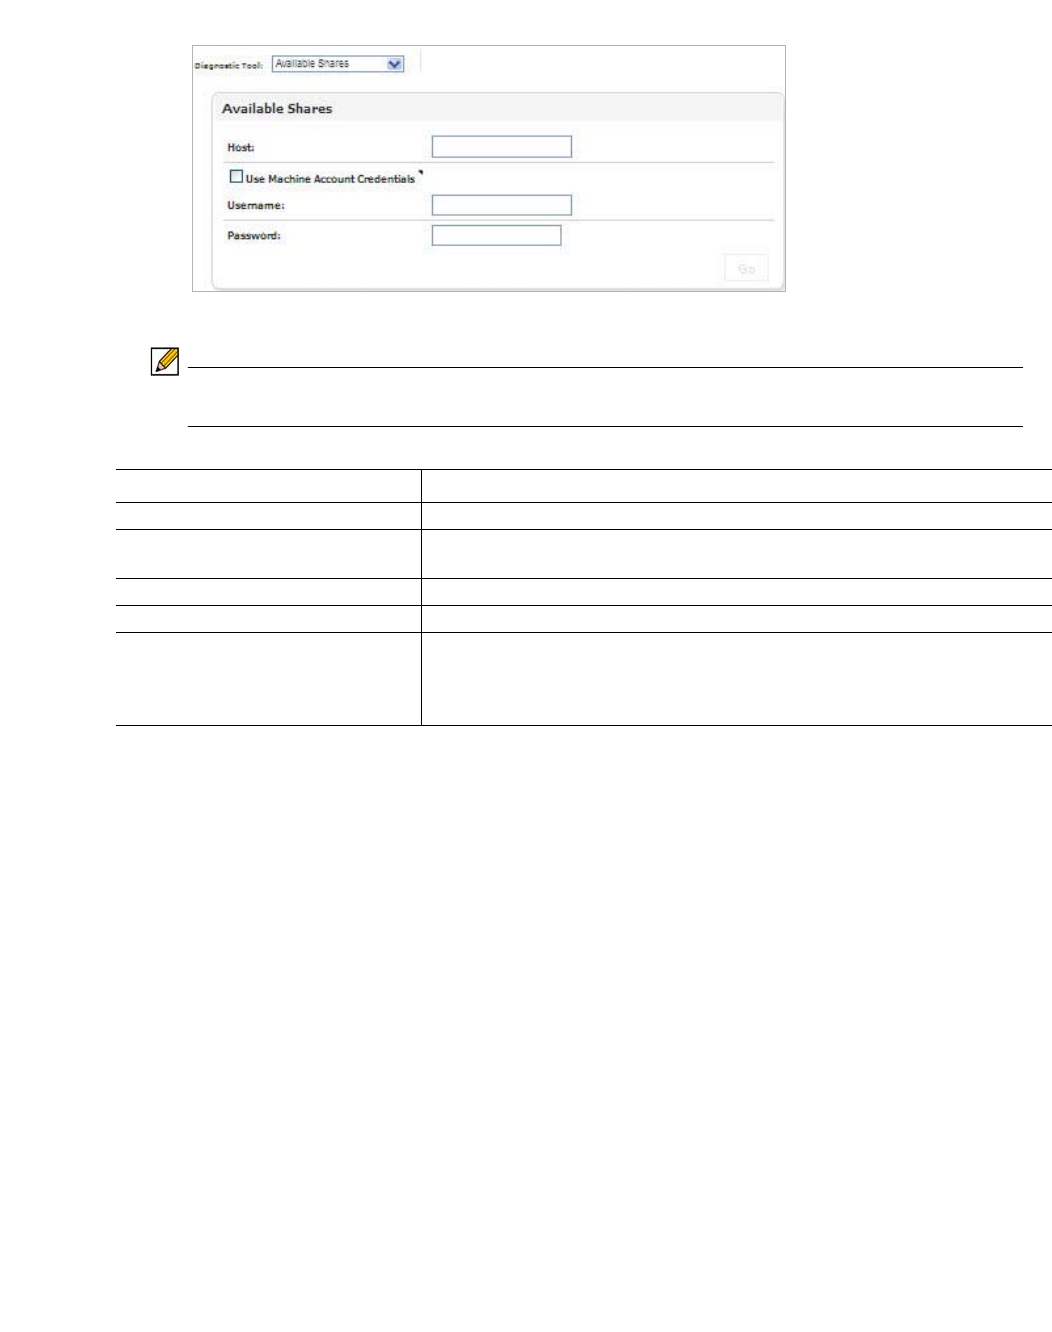
Viewing the WFS Acceleration Page | 79
Figure 12 Available Shares Panel
The Available Shares Panel provides the following configuration options:
Note If the WXA series appliance has already joined the domain, you can use the WXA series
appliance credentials, the username/password do not need to be entered.
Name Description
Host: Text Field The name of the server that the shares reside.
Use Machine Account Credentials
Checkbox Checks the shares available on the share entered in the Host text field using
the WXA series appliance’s machine account credentials.
Username: Text Field The username for the user’s account.
Password: Text Field The password for the user’s account.
Go Button Initiates the search. This displays a list of shares available on the server that
the system administrator specified. It is used to verify the connection between
the WXA series appliance and the server and that a list of shares can suc-
cessfully be obtain from that server.
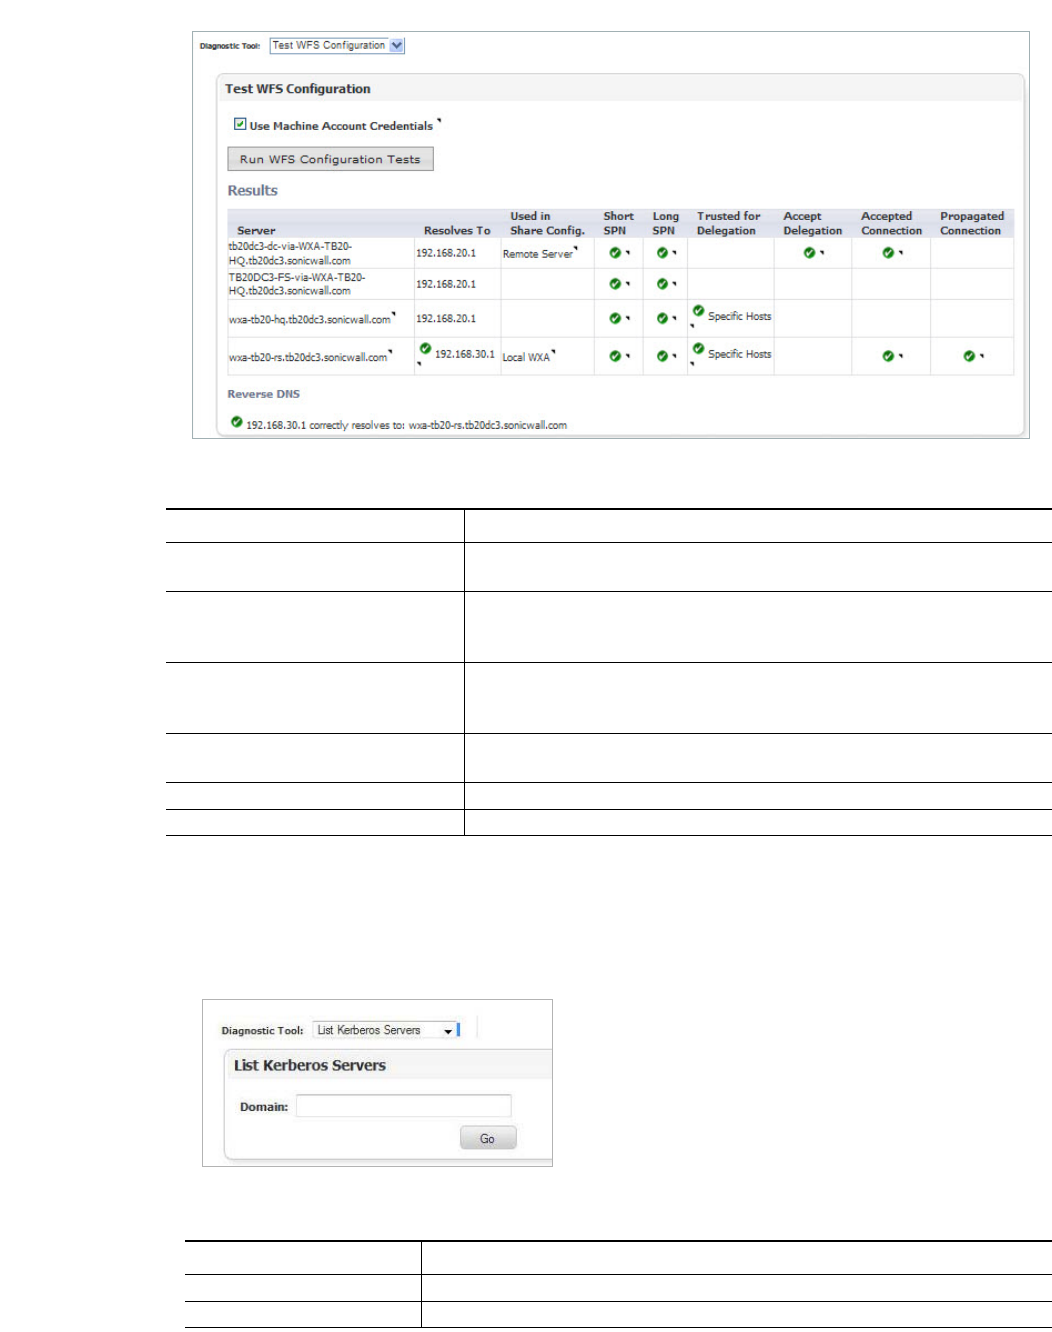
80 | Dell SonicWALL WXA 1.3 User’s Guide
Figure 13 Test WFS Configuration Option
The Test WFS Configuration Panel provides the following configuration options:
For more information on troubleshooting test results, refer to Verifying the WFS Acceleration
Configuration on page 117.
Figure 14 List Kerberos Servers Option
The List Kerberos Server Panel provides the following configuration options:
Name Description
Use Machine Account Credentials
Checkbox Checks the shares available on the share entered in the Host: text field
using the WXA series appliance’s machine account credentials.
Username: Text Field The username for the user’s account. This is only visible/required if the
WXA series appliance does not have its own machine account with
appropriate permissions.
Password: Text Field The password for the user’s account. This is only visible/required if the
WXA series appliance does not have its own machine account with
appropriate permissions.
Run WFS Configuration Tests But-
ton Initiates a test to ensure that the WFS Acceleration service is configured
correctly
Results Displays the results of the WFS Acceleration test.
Reverse DNS Displays the Reverse DNS address.
Name Description
Domain: Text Field Displays the domain for the Kerberos server.
Go Button Initiates the search and displays a list of the Kerberos servers.
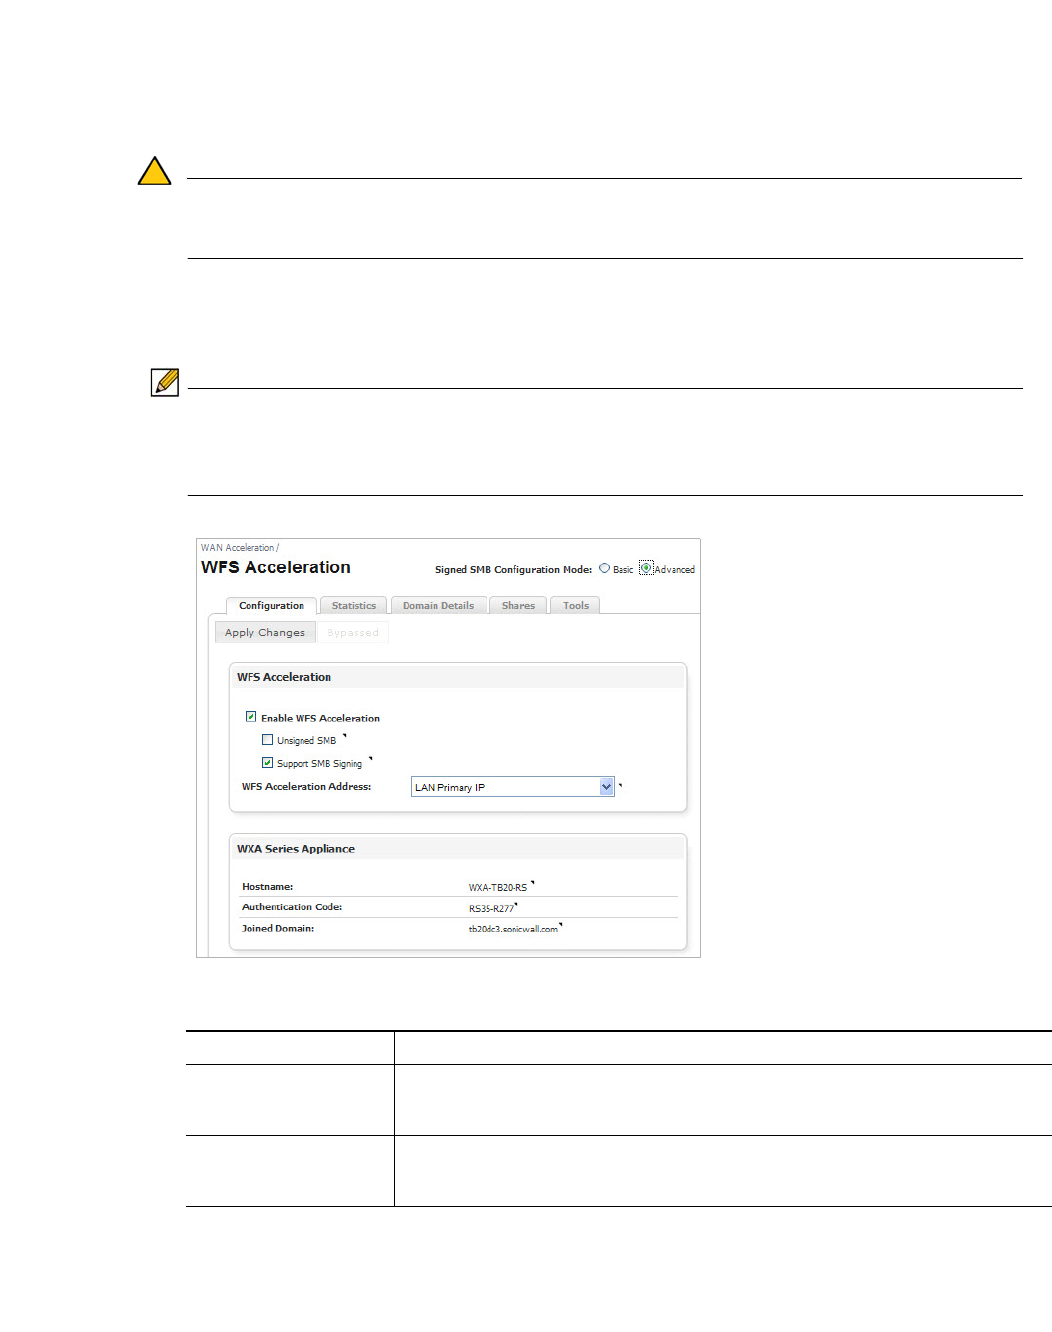
Viewing the WFS Acceleration Page | 81
Advanced Configuration Mode
Clicking the Advanced configuration mode radio button displays the Domain Details and
Shares tabs. All other tabs (Configuration, Statistics, and Tools) appear the same in both Basic
and Advanced configuration modes. For details on the Configuration, Statistics, and Tools tabs,
see the Basic Configuration Mode on page 67.
Caution Advanced configuration mode should only be used if you need to specifically define server
or share names. The preferred way to configure WFS Acceleration is to use the Basic
configuration mode.
While in the Domain Details or Shares tab, you can select the Basic radio button at any time,
directing you to the Signed SMB Setup Tab on page 71, if you wish to use the simplified
configuration procedure for the domain.
Note Servers configured in Advanced mode may not be visible in the WFS Acceleration >
Signed SMB Setup tab in Basic mode, due to the specific naming convention used in Basic
mode. However, the servers are still part of the configuration and file operations will still be
accelerated.
Name Description
Domain Details Tab Configures the WXA series appliance to match details of the domain it is joining.
This tab offers advanced configuration procedures for joining the domain. See the
Domain Details Tab, page 82 for details.
Shares Tab Configures the WXA series appliance to accelerate specific servers and shares.
Available only when using the Advanced configuration mode. See the Shares
Tab on page 91 for details.
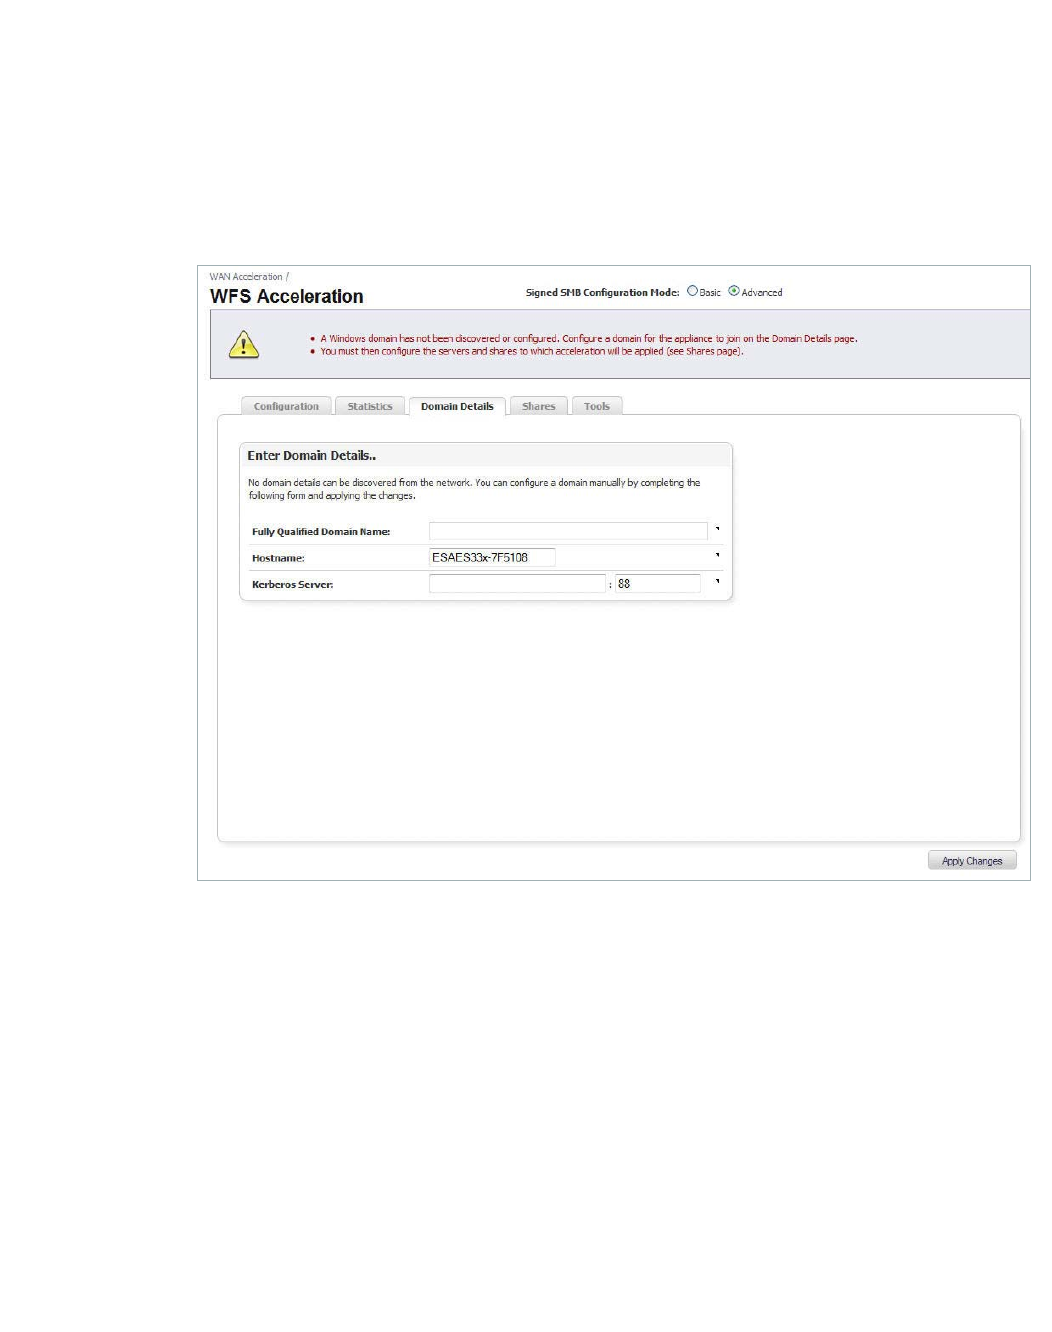
82 | Dell SonicWALL WXA 1.3 User’s Guide
Domain Details Tab
The Domain Details tab offers an advanced configuration of the domain, providing more options
and details than the Basic mode’s Signed SMB Setup tab. The WXA series appliance may
automatically discover the domain details if the DNS server configured on the NSA/TZ series
appliance is a domain controller and the DNS server is correctly configured in the domain.
If the domain name is not auto-discovered, the Domain Details tab requires you to enter the
basic details for a domain.
Figure 15 WFS Acceleration (Name Not Auto-discovered)
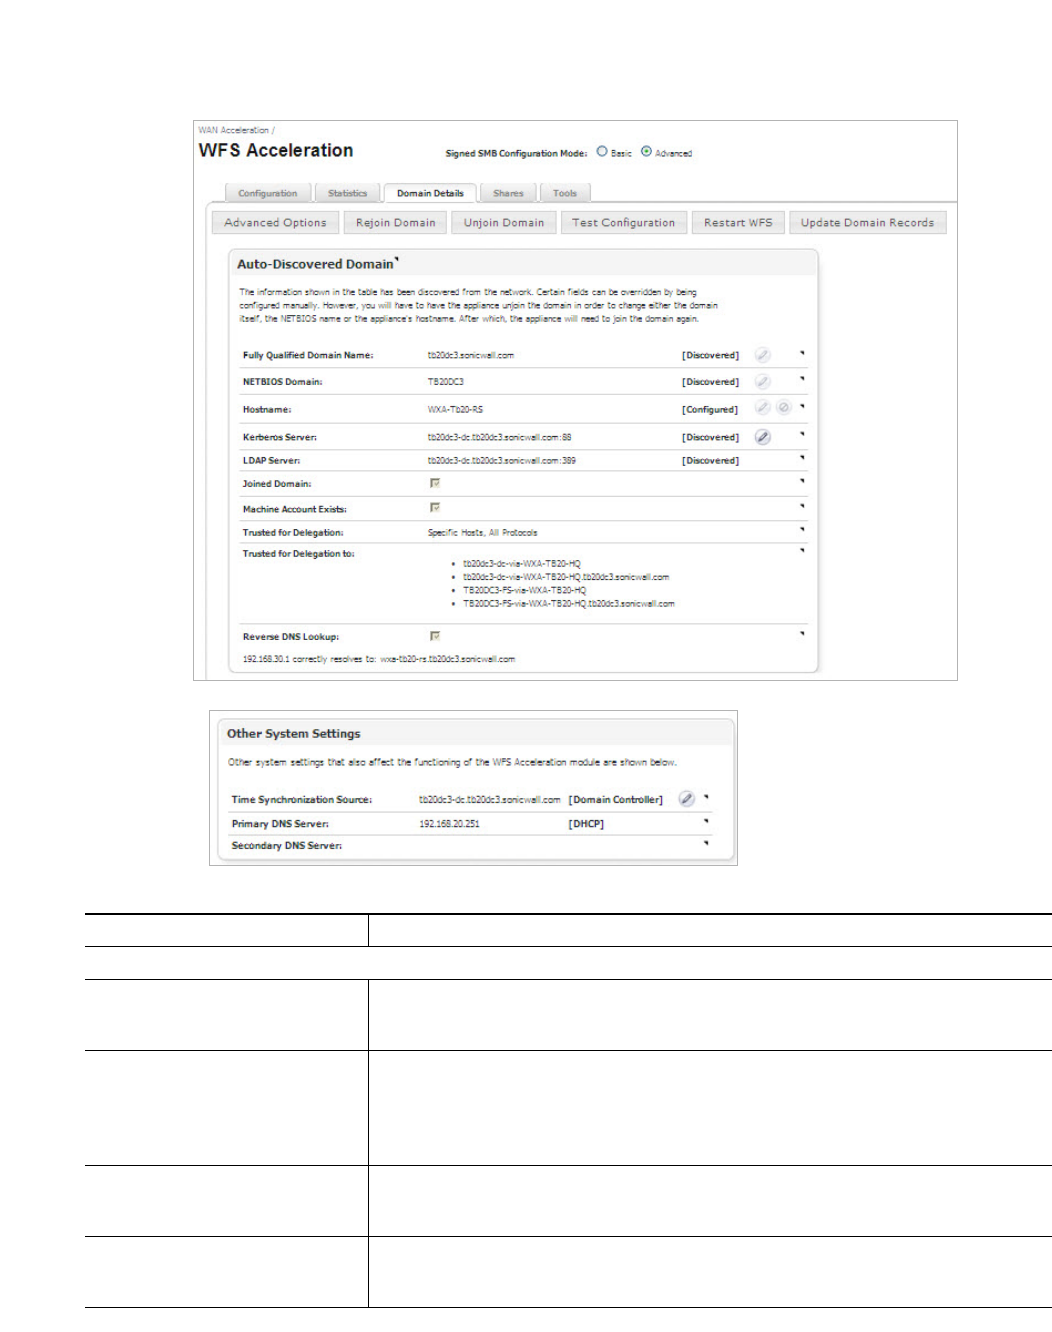
Viewing the WFS Acceleration Page | 83
If the domain name is auto-discovered, the Domain Details tab displays the configured domain
details and options for configuring the domain.
Figure 16 WFS Acceleration (Name Auto-discovered)
Name Description
Action Buttons
Advanced Options Configures the WFS Acceleration service in more detail with Client Signing, Server
Signing, and Max Transmit, which affect the CIFS packet size, see on page 87 for
details.
Join Domain/Rejoin Domain The WXA series appliance joins the domain (becomes part of the domain) that is
identified in the FQDN. The Join Domain Pop-up Window is displayed, see on
page 88 for details.
If the WXA series appliance has previously joined the domain, the Rejoin Domain
button is displayed. If this is the first time, a Join Domain button is displayed.
Unjoin Domain Removes all information about the current domain that the WXA series appliance
has joined. This button will no remove a configured domain, hostname, or servers/
shares from the configuration.
Test Configuration Tests the WFS Acceleration service and displays a WFS Configuration Test Results
pop-up window, see on page 89. If the WFS Acceleration service is not working cor-
rectly, reconfigure the domain details, and then retest.

84 | Dell SonicWALL WXA 1.3 User’s Guide
Restart WFS Restarts the WFS Acceleration service. All existing sessions and file transfers will be
terminated.
Update Domain Records Updates any missing domain records for SPN aliases, configured remote servers to
the “Specific Trusted Host List”, and missing DNS records. Displays an Update
Domain Pop-up window, see on page 90, detailing the results of the procedure.
Auto-discovered Domain Panel (the panel name changes depending on whether the domain is auto-
discovered or configured)
Fully Qualified Domain Name: The fully qualified domain name (FQDN) of your Windows domain that the WXA
series appliance joins. To change the FQDN, you must unjoin the domain. Click the
Edit button to modify the FQDN, see on page 85 for details.
NETBIOS Domain: If you configured the FQDN at initial setup and join (or tired to join) the domain, the
WXA series appliance should auto-discover the corresponding NETBIOS domain.
Click the Edit button to configure the FQDN and the NETBIOS Domain, see on
page 85 for details.
Changing the FQDN or the NETBIOS Domain after joining the Windows domain
requires the device to rejoin the domain.
Hostname: Displays the hostname for the WXA series appliance. Click the Edit button to modify
the hostname, see on page 85 for details.
Changing the hostname requires the old computer account to be manually deleted
from the domain controller.
Kerberos Server: The FQDN of the Kerberos server or an IP address (not recommended) on the Win-
dows Domain. Joining the domain with the Kerberos server specified as an IP
address causes a failure unless reverse DNS lookups have been configured on the
DNS server. The alternative is to provide the name of the Kerberos server.
The port number defaults to 88. This server is typically the domain controller.
To edit the server name, you must first unjoin the domain, and then click the Edit
button. The Kerberos Server pop-up window appears, see on page 86 for details.
LDAP Server: Sets the Lightweight Directory Access Protocol (LDAP) server on the network. The
port number defaults to 389. This server is typically the domain controller.
Joined Domain: Checkbox (Read-only) Indicates the device has joined the domain.
Machine Account Exists:
Checkbox (Read-only) Indicates an account matching the hostname of the device is found on
the domain.
The computer account password is set to the authorization code.
Trusted for Delegation: (Read-only) Indicates that the computer account of the WXA series appliance on the
Domain Controller is trusted for delegation. This is a necessity and requires the
administrator to configure the domain controller to confirm that the WXA series appli-
ance can be trusted for delegation.
Note: This field is updated by clicking the Update Domain Records button. It can
also be updated directly on the domain controller.
Trusted for Delegation to: (Read-only) Displays a list of all the trusted remote servers and WXA series appli-
ances.
Note: This field is updated by clicking the Update Domain Records button. It can
also be updated directly on the domain controller.
Reverse DNS Lookup: Displays DNS info if the WFS Acceleration address is correctly resolved to the WXA
series appliance’s hostname.
Other System Settings Panel
Time Synchronization Source: Displays the server that the WXA series appliance will synchronized its clock with.
This server is usually the Domain Control because the WXA series appliance’s clock
must closely match that of the Domain Controller’s clock.
Click the Edit button to modify the server, see on page 87.
Primary DNS Server: (Read-only) Displays the current primary DNS server IP address, which must be a
domain DNS server for WFS Acceleration to function properly.
Secondary DNS Server: (Read-only) Displays the current secondary DNS server IP address. This must also
be a domain DNS server for WFS Signed acceleration to function properly.
Name Description
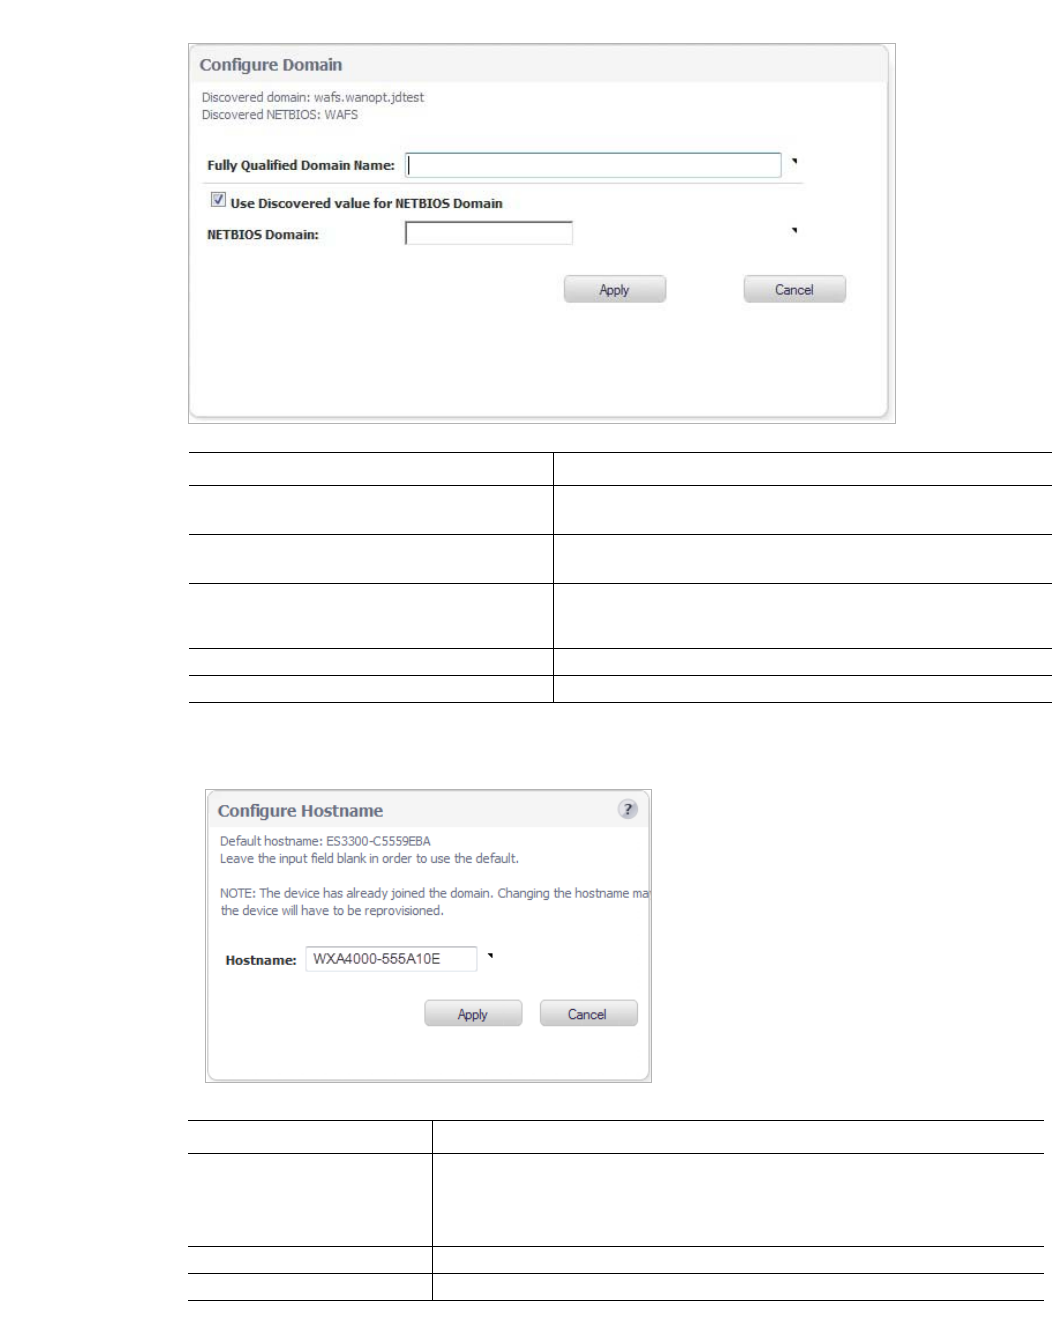
Viewing the WFS Acceleration Page | 85
Figure 17 Configure Domain Pop-up Window
Figure 18 Configure Hostname Pop-up Window
Name Description
Fully Qualified Domain Name: The FQDN for the Windows domain that the WXA series
appliance will join.
Use Discovered value for NETBIOS Domain
Checkbox When checked (enabled), uses the NETBIOS name that is
derived from the discovered domain.
NETBIOS Domain: Text Field Enter the NETBIOS name for the domain.
Note: Not necessary if the checkbox is selected.
Apply Button Applies all changes.
Cancel Button Cancels the operation.
Name Description
Hostname: Text Field Input the desired hostname or leave the input field blank to use the default
hostname.
Note: If you are configuring a WXA 5000 Virtual Appliance or WXA 500 Live
CD, a default hostname is not provided, you must enter one.
Apply Button Applies all changes.
Cancel Button Cancels the operation.
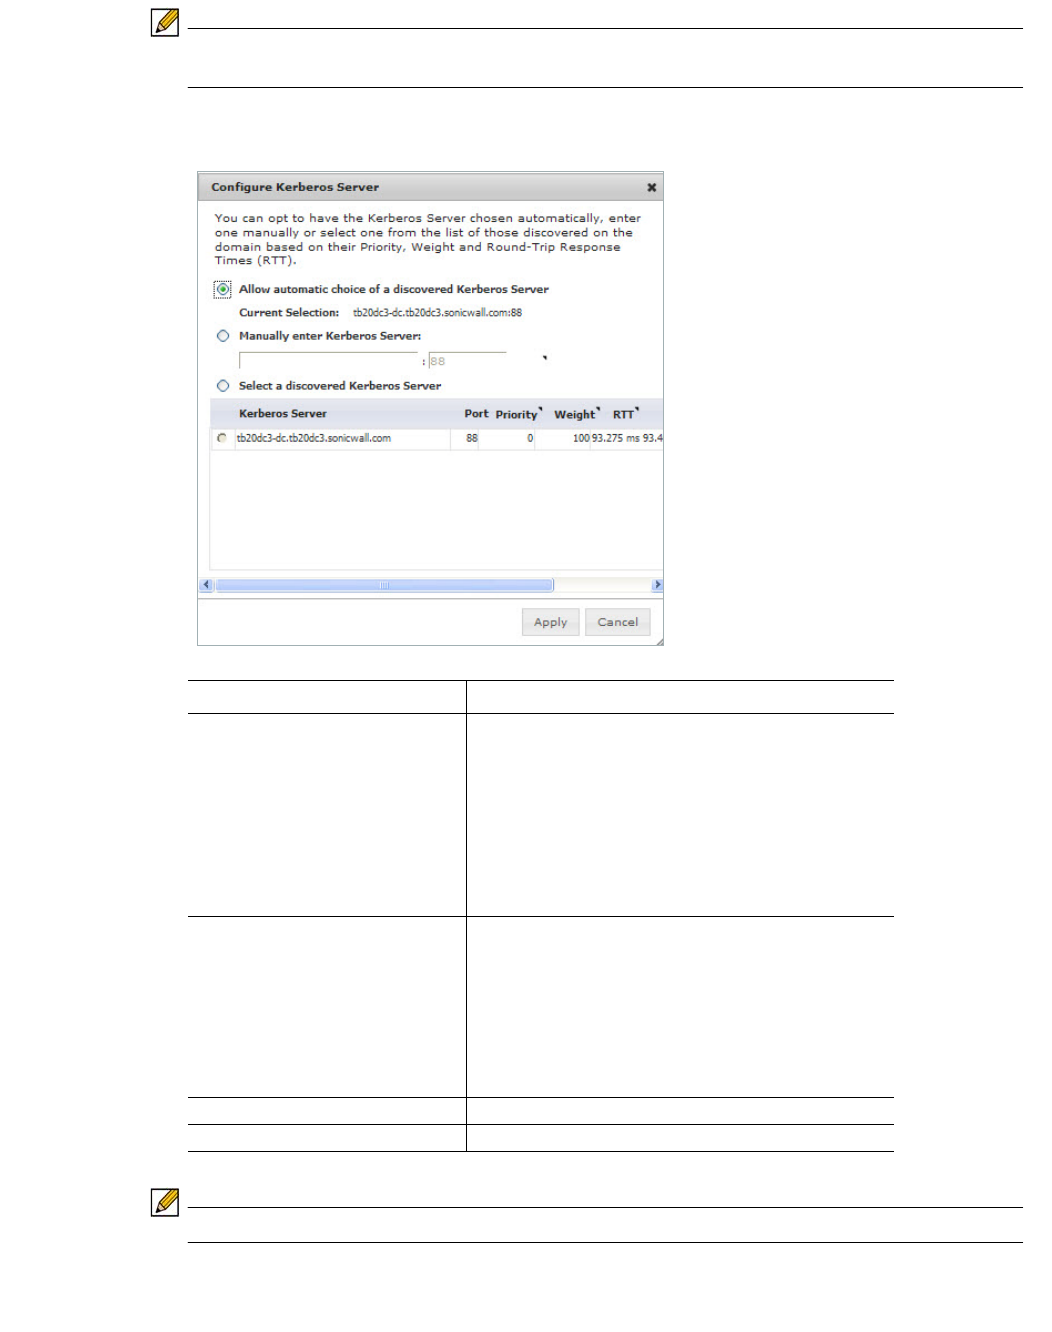
86 | Dell SonicWALL WXA 1.3 User’s Guide
Note If the device has already joined the domain, changing the host name requires the device to
unjoin the domain, and then rejoin the domain after the change is made.
Figure 19 Configure Kerberos Server Pop-up Window
Note The LDAP Server and the Kerberos Server are usually the same computer.
Name Description
Configure Kerberos Server radio
buttons Select the desired configuration from these options:
• Allow automatic choice of a discovered Kerberos
Server
Display the auto-selected server.
• Manually enter Kerberos Server
Enter the name and port number for the Kerberos
Server used for authentication to the domain.
• Select a discovered Kerberos Server
Choose one from the list.
Kerberos Server list LIst the discovered Kerberos Servers with informa-
tion on the following performance metrics:
• Priority - The priority of the Kerberos Server,
lower values are preferred.
• Weight - The relative weight for Kerberos Servers
with the same priority. Higher values are preferred.
• RTT- The round trip time for probes to the Kerbe-
ros Server.
Apply Button Applies all changes.
Cancel Button Cancels the operation.

Viewing the WFS Acceleration Page | 87
Figure 20 Time Synchronization Pop-up Window
Figure 21 Advanced Options Pop-up Window
Name Description
Use the Domain Controller for Time
Synchronization: Checkbox When enabled (checked) the domain controller is used as the time
synchronization source.
NTP Server: Text Field Overrides the domain controller synchronization by specify a NTP
server in the required field.
Validate Button Validates that the NTP Server specified can be connected and that
the server provide the current time.
Apply Button Applies all changes.
Cancel Button Cancels the operation.
Name Description
Client Signing: Drop-down Identifies the server message block (SMB) signing between the WXA
series appliance and the Windows client.
Server Signing: Drop-down Identifies the SMB signing between the WXA series appliance and
the server.
Max Transmit: Text Field Sets the largest block of data that can be written at any one time.
Apply Button Applies all changes.
Cancel Button Cancels the operation.
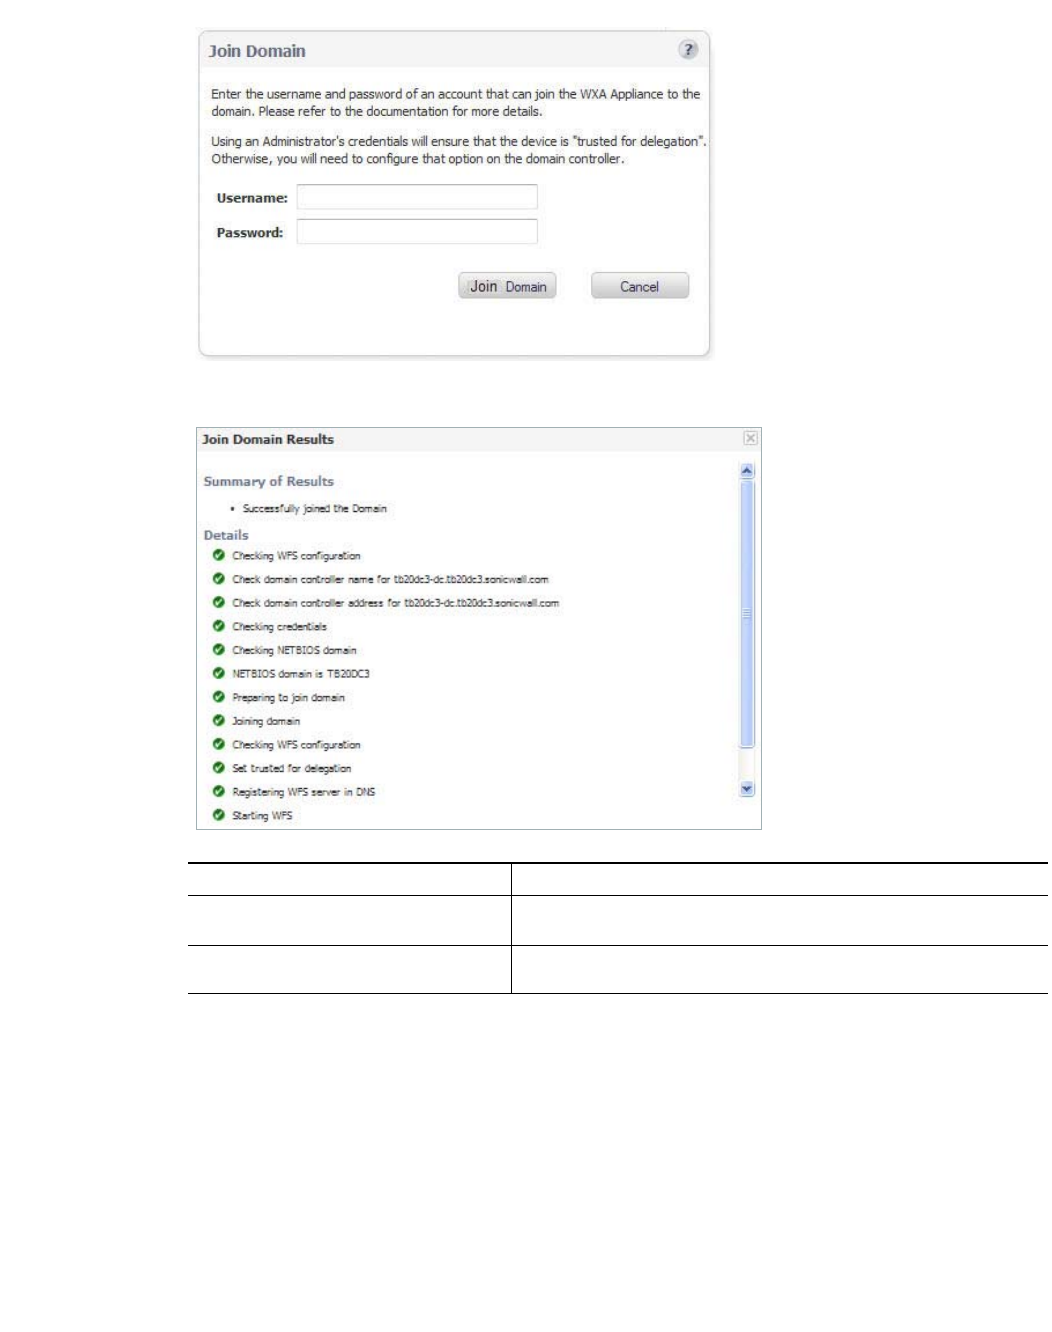
88 | Dell SonicWALL WXA 1.3 User’s Guide
Figure 22 Join Domain Pop-up Window
Enter the username and password of the domain administrator account.
Name Description
Summary of Results (Read-only) Displays a summary of results after the WXA series appliance
joins the domain.
Details (Read-only) Details the steps performed in the domain joining procedure. A
green circle indicates a pass, and a red circle indicates a failure.
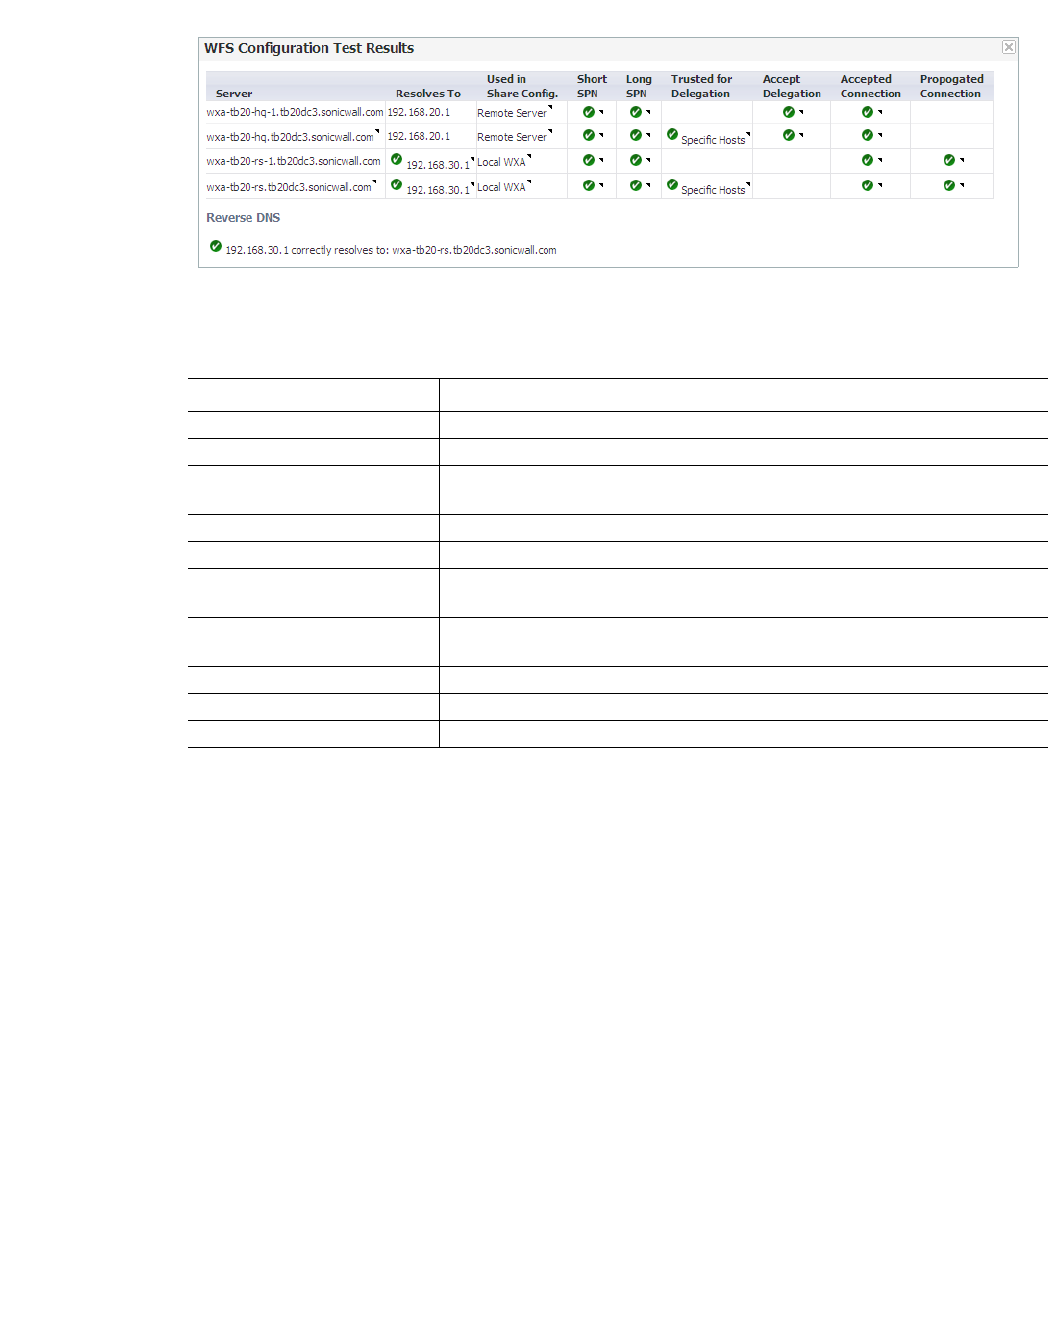
Viewing the WFS Acceleration Page | 89
Figure 23 WFS Configuration Test Results Pop-up Window
The WFS Configuration Test Results page displays the configuration status of the WFS
Acceleration service. A green circle indicates a successful configuration, and a red circle
indicates an error. Hover over the circle icons to display the details for that configuration.
For information on troubleshooting, refer to the Verifying the WFS Acceleration Configuration
on page 117.
Name Description
Server Display the remote server or local WXA names.
Resolves To Displays the IP address that the WXA series appliance is resolved to.
Used in Share Config. Displays the server that is used for sharing. This can be an actual server, or
a WXA series appliance.
Short SPN Verifies a short SPN is present on the machine account.
Long SPN Verifies a long SPN is present on the machine account.
Trusted for Delegation Lists the general server or specific hosts that are trusted for delegation by
the WXA series appliance.
Accept Delegation Displays the hosts that are trusted to present delegated credentials to the
WXA series appliance.
Accepted Connection Verifies the server accepted an authenticated connection.
Propagated Connection Verifies the server propagated an authenticated connection.
Reverse DNS Displays the Reverse DNS address path.
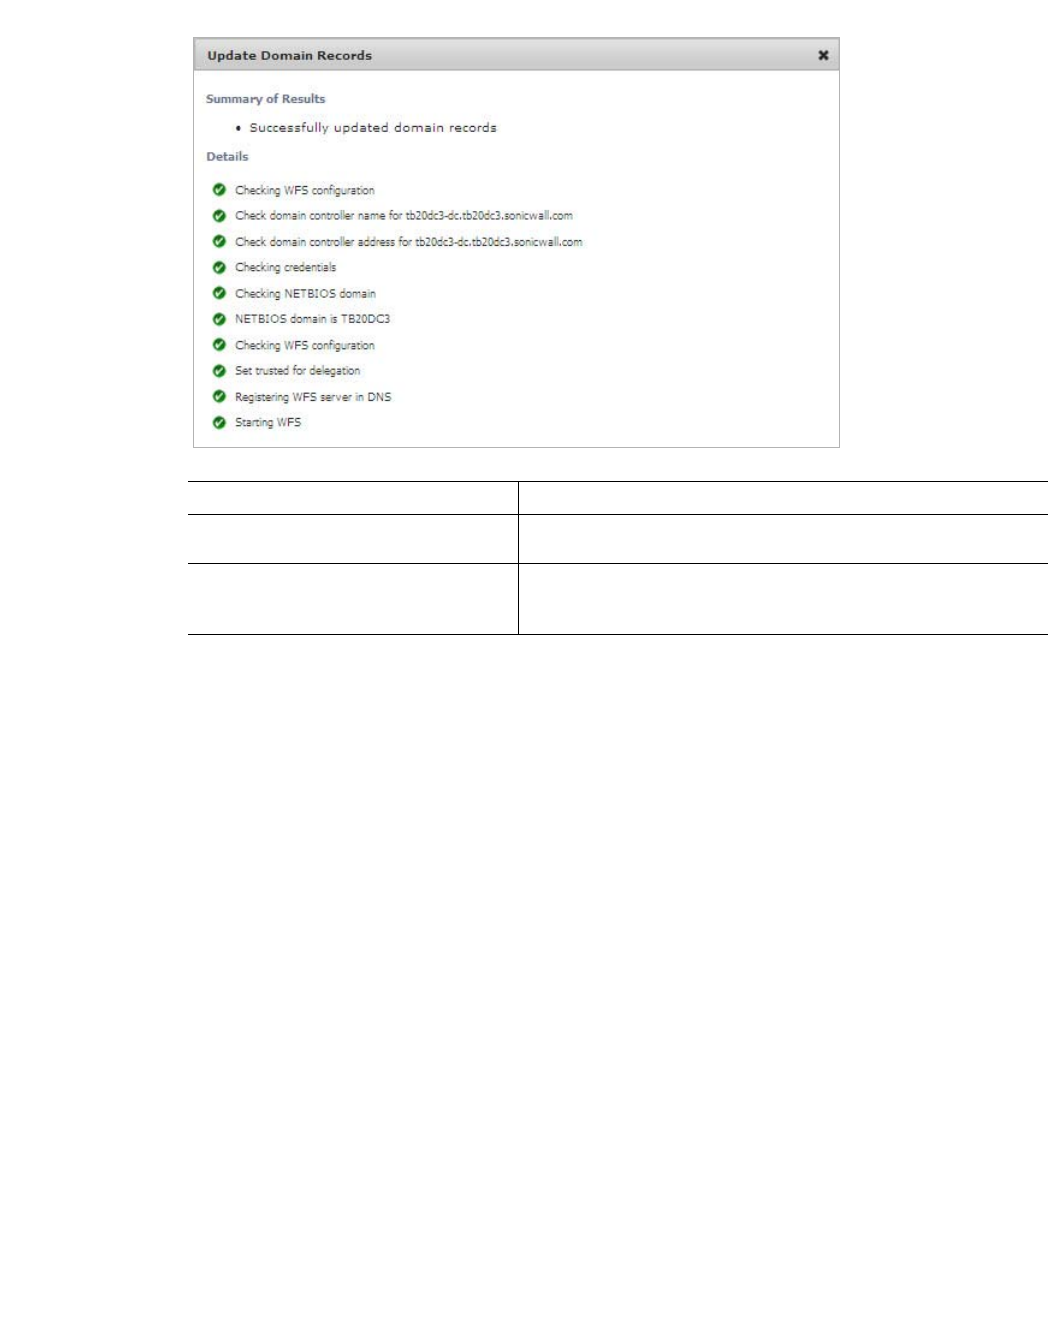
90 | Dell SonicWALL WXA 1.3 User’s Guide
Figure 24 Update Domain Records Pop-up Window
Name Description
Summary of Results (Read-only) Displays a summary of results after the WXA series appliance
runs the Update Domain Records feature.
Details (Read-only) Details the steps performed in the Update Domain Records pro-
cedure. A green circle indicates a pass, and a red circle indicates
a failure.
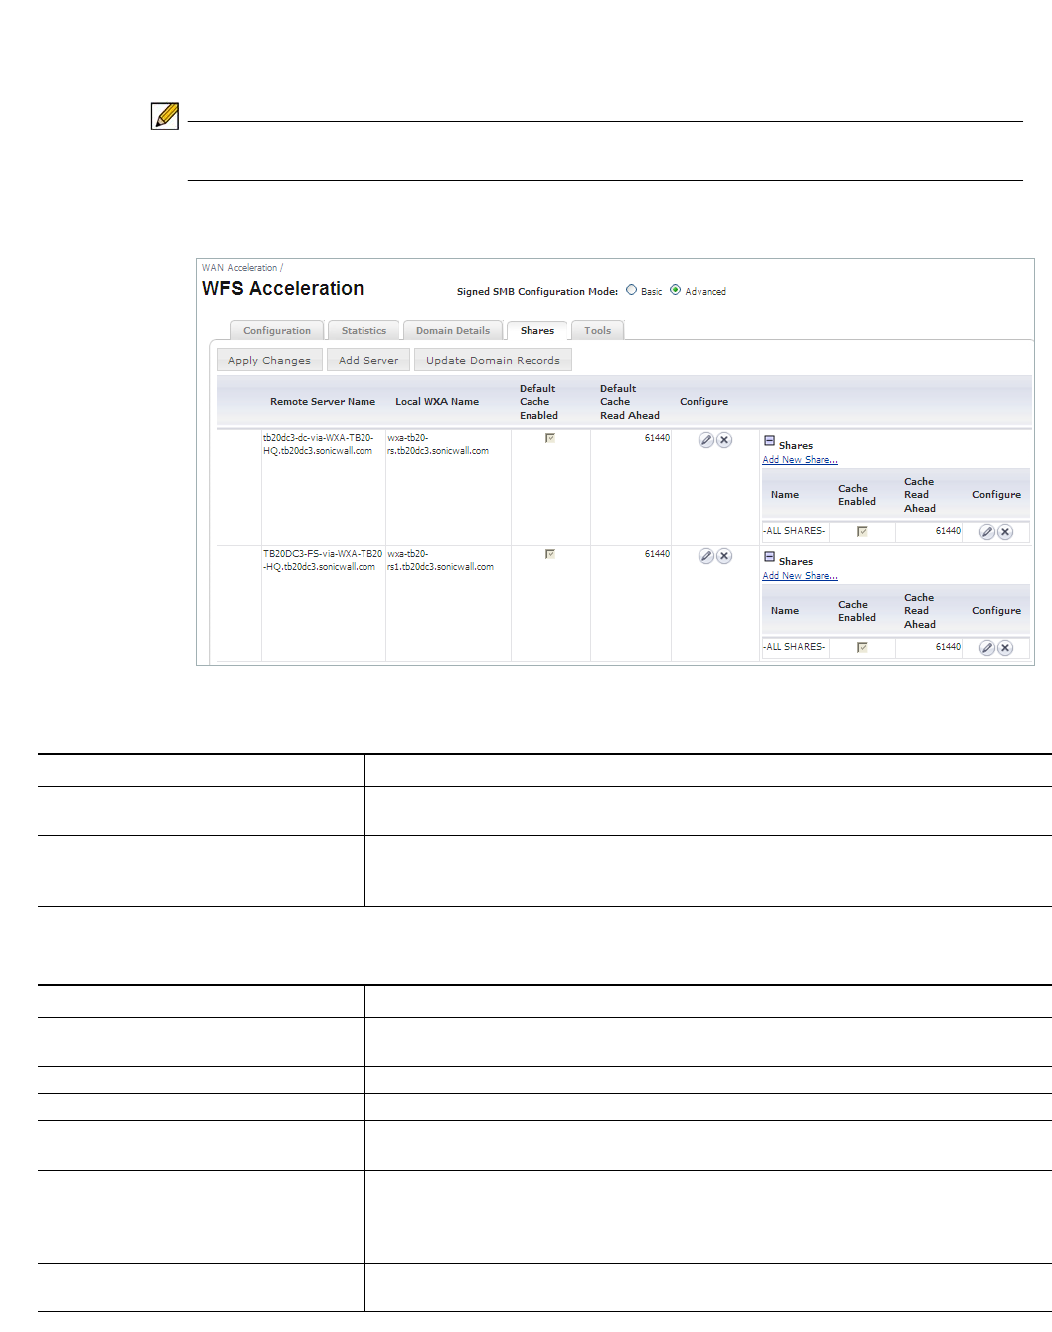
Viewing the WFS Acceleration Page | 91
Shares Tab
The Shares tab configures the WXA series appliance to accelerate specific shares and servers.
This tab is only available in Advanced configuration mode.
Note Basic mode is the preferred way to configure WFS Acceleration, only use Advanced mode
if you need to specifically define the server or share name.
Figure 25 WFS Acceleration > Shares
Action Items
Column Headings
Name Description
Add Server Button When clicked the Add Server pop-up is displayed, see on page 93. This window
allows you to configure a new remote server
Update Domain Records Updates any missing domain records for SPN aliases and “trusted for delegation”.
When clicked, the Update Domain Records pop-up window displays, see on
page 95, requiring you to enter the Administrator’s Credentials.
Name Description
Remote Server Name Column Displays the name of the remote server.
Note: This may not physically be remote, it might be on the local site.
Local WXA Name Column Displays the name or alias of the local WXA series appliance.
Default Cache Enabled Column Displays whether caching is enabled (checked) or disabled (unchecked).
Default Cache Read Ahead
Column Displays the size of the read-ahead buffer.
Configure Column Displays Edit and Delete buttons. Click the edit button to modify the configuration of
the server. Click the delete button to remove the file server from the configuration,
see on page 92. When the Edit button is clicked, the Edit Server Details window is
displayed, see on page 93.
Add New Share... Link Adds a new share to a remote server. When clicked, the Add Share Pop-up window
is displayed, see on page 94.
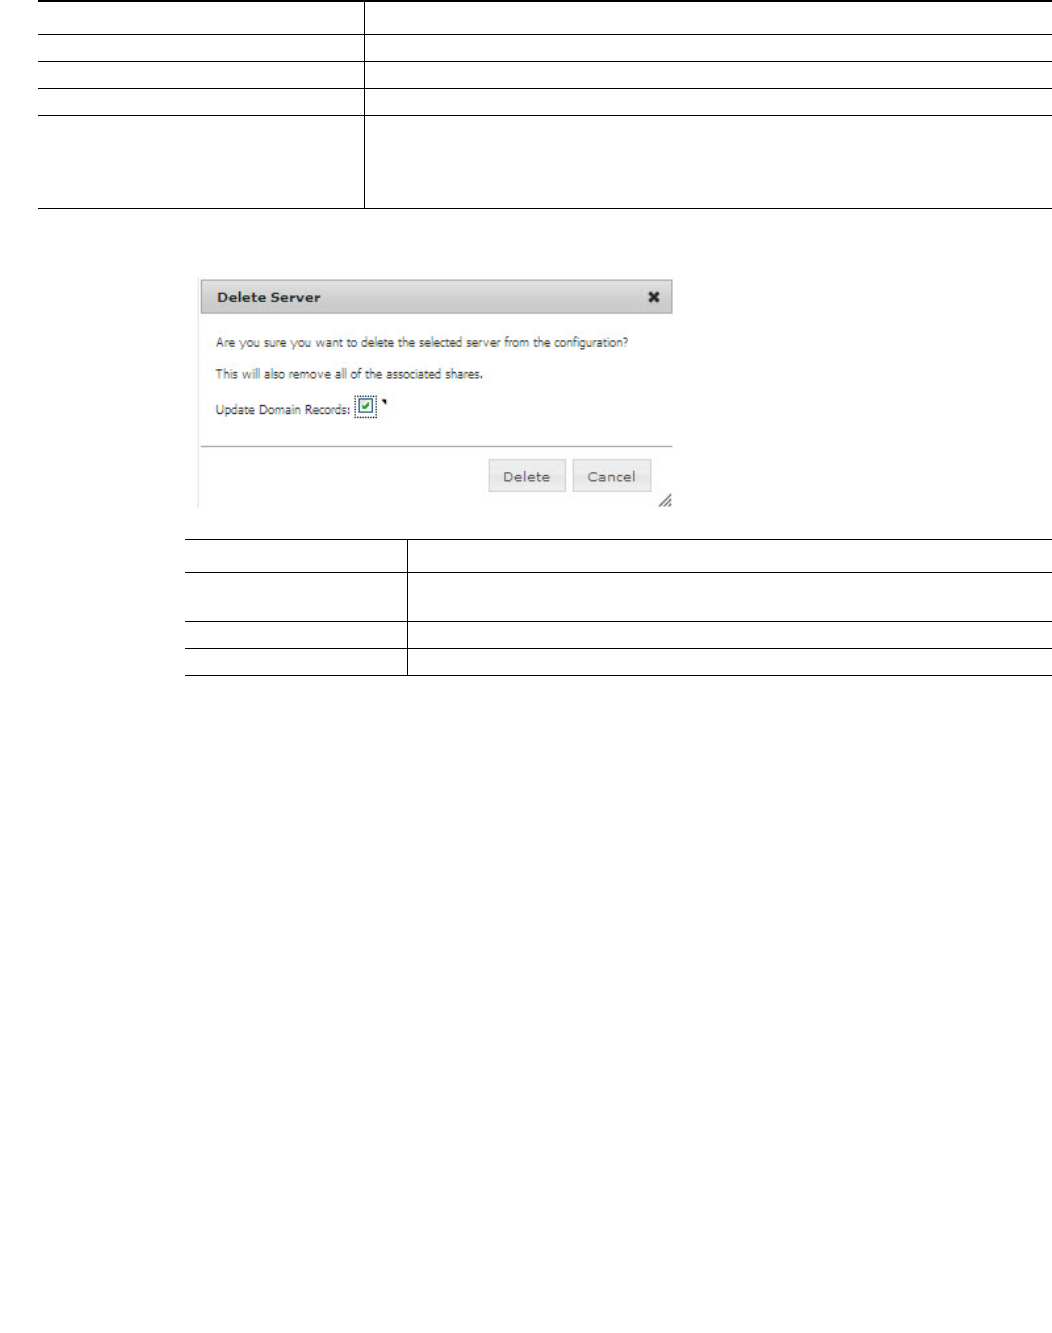
92 | Dell SonicWALL WXA 1.3 User’s Guide
Figure 26 Delete a Server
Name Column Displays the name of the shares set on the server.
Cache Enabled Column Indicates whether caching is enabled (checked) or disabled (unchecked).
Cache Read Ahead Column Displays the size of the read-ahead buffer.
Configure Column Displays an Edit and Delete button. Click the Edit button to modify the configuration
of the share. Click the Delete button to remove the share from using the server.
When the Edit button is clicked, The Edit Share Details pop-up window is displayed,
see on page 94.
Name Description
Name Description
Update Domain Records
checkbox Removes any domain records that are no longer needed as a result of remov-
ing the file server from the configuration.
Delete Deletes the file server from the configuration.
Cancel Cancels the “delete server” request and closes the pop-up window.
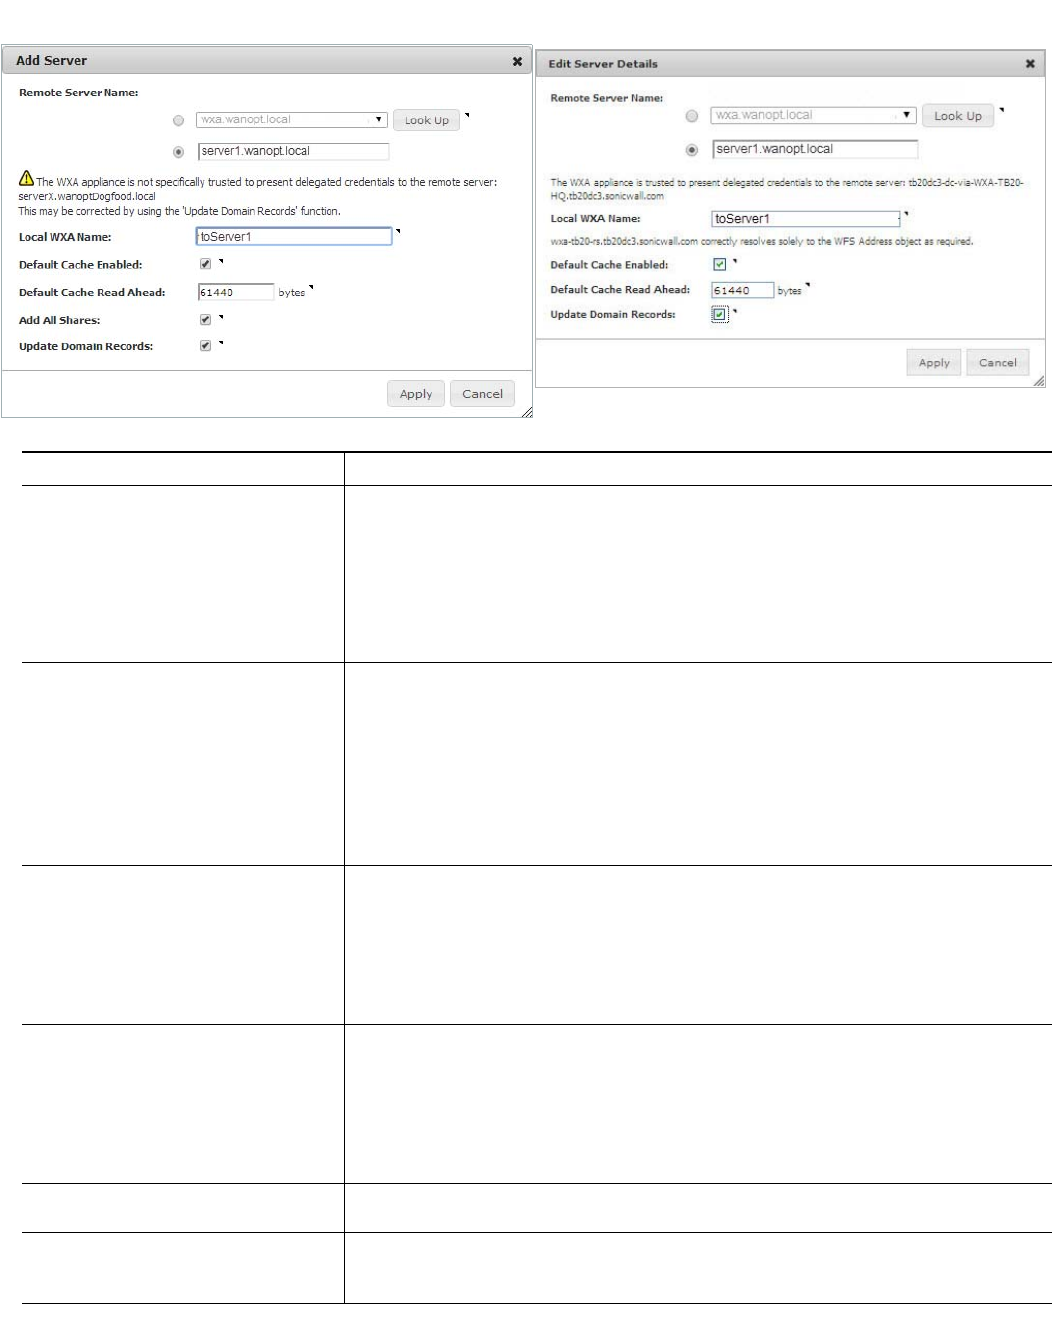
Viewing the WFS Acceleration Page | 93
Figure 27 Add Server and Edit Server Details Pop-up Windows
Name Description
Remote Server Name: Radio Buttons The Remote Server name can be selected from a list of remote servers found on the
network, or manually entered in the text field. Toggle the radio buttons to choose
between automatic or manual entry.
Note: The remote server can either be a Windows server or another WXA series
appliance acting as a proxy server.
Clicking the Look Up button verifies that the name entered is registered in the DNS
server.
Local WXA Name: Text Field Enter the name of the local WXA, this will forward to the remote server. Use this name
in paths to shares to get accelerated access to remote shares. A different local name
alias should be used for each remote server.
Note: If the Update Domain Records checkbox is enabled, the WXA series appliance will
attempt to create a DNS record for each of the service principal name (SPN)
aliases. The local device name must resolved to the public IP address. The DNS
Server IP address is identified on the Domain Details Tab, page 82 of this WXA.
These records can also be added later by clicking the Update Domain Records
button.
Default Cache Enabled: Checkbox When enabled (checked) shares are stored in the default cache. This option is enabled
by default.
When a file is requested, that is also available in the cache, the WXA series appliance
serves the data from that cache as long as the cache file is valid. If the original file has
changed, the parts of the cache that are still valid may be used. This process reduces
the need for data to be sent over the network. This option can be overridden for individ-
ual shares.
Default Cache Read Ahead: Text Field
(Add Server Pop-up only) The default size (measured in bytes) for read-ahead speed in the cache. The default
cache read ahead value is 61440 bytes.
To calculate this value, multiply the link latency (in milliseconds) by the measured site-
to-site bandwidth in (kilobytes per second) and divide that by the number of simultane-
ous file access users. This option can be overridden for individual shares.
Example equation: BDP/<expected number of user sessions> where BDP = link rate in
kilobytes * link latency.
Add All Shares: Checkbox When enabled (checked), all shares are added on the server for WFS Acceleration.
Otherwise, individual shares must be added manually.
Update Domain Records: Checkbox Updates any missing domain records for SPN aliases, configured remote servers to the
“Specific Trusted Host List”, and missing DNS records. Requires the user to enter
Admin credentials in a second pop-up window.
94 | Dell SonicWALL WXA 1.3 User’s Guide
Figure 28 Add Share and Edit Share Details Pop-up Windows
Apply Button Applies all changes.
Cancel Button Cancels the operation.
Name Description
Name Description
All Shares Option All shares are added to the server.
Share Name: Drop-down menu Provides a list of available shares on the remote server (not always
available).
Enter Name: Text Field Manually enter the name of a share.
Cache Enabled: Checkbox When enabled (checked), data is stored in the cache.
Cache Read Ahead: Text Field The number of bytes that the cache reads ahead. This service is only
functional when the Cache Enabled checkbox is selected. The default
cache read ahead is 61440 bytes.
Apply Button Applies all changes.
Cancel Button Cancels the operation.
Viewing the WFS Acceleration Page | 95
Figure 29 Update Domain Records
This pop-up window displays when the Update Domain Records button is clicked. Enter the
Administrator’s Credentials to resolve any missing domain records for SPN aliases, “trusted for
delegation”, and DNS records.
Name Description
Username Text Field Enter the Administrator’s Username.
Password Text Field Enter the Administrator’s Password.
Update Records Button Updates any missing domain records for SPN aliases and “trusted for
delegation”.
Cancel Button Cancels the Update Domain Records process.

96 | Dell SonicWALL WXA 1.3 User’s Guide

Configuring WFS Acceleration | 97
Chapter 8
Configuring WFS Acceleration
WAN Acceleration > WFS Acceleration
This chapter provides details on configuring the WFS Acceleration service. There are several
different ways to configure WFS Acceleration depending on the user requirements and type of
network environment used. If the Client PC is already joined to a domain, it is recommended to
use Signed SMB. If you are not sure of the Client PC’s domain joining status, it is recommended
to use Unsigned SMB to begin with.
Unsigned SMB
In a network that supports unsigned SMB traffic, the WFS Acceleration service configuration is
greatly simplified. The reason for this is unsigned SMB traffic does not have a security layer, so
the WXA series appliance can intercept the traffic without joining the domain, eliminating the
need to configure custom zones, configuring reverse lookup, and add file shares. Unsigned
SMB is enabled by default.
Signed SMB
In a network that supports SMB signing, it is required that the WXA series appliance join the
domain, due to the presence of a security layer in signed SMB traffic. Although this type of
configuration is more complex than unsigned SMB, it offers a more granular configuration of
the WFS Acceleration service. The WAN Acceleration > WFS Acceleration page displays a
warning when signed SMB traffic is detected on the network. If this warning is present, please
enable the Support SMB Signing checkbox, join the WXA appliance to the domain, and access
the signed shares through the WXA appliance’s shares.
Supporting SMB signing provides the option to configure WFS Acceleration in a Basic or
Advanced configuration mode.
The Basic configuration mode (recommended) is a simplified WFS Acceleration configuration
that concentrates on selecting the Windows File Servers that are hosting shares, and
distinguishing remote and local file server configurations in the management interface. A
Signed SMB Setup tab is displayed, providing options to easily add file servers and domain
records.
The Advanced configuration mode offers manual configuration of the domain details, file
servers, and file shares on the Domain Details and Shares tabs.
Caution Advanced configuration mode should only be used if you need to specifically define server
or share names. The preferred way to configure WFS Acceleration is to use the Basic
configuration mode.
To configure the WFS Acceleration service, refer to the section below that matches to your
desired configuration:
• Configuring WFS Acceleration Using Unsigned SMB on page 98
• Configuring WFS Acceleration Using Signed SMB on page 99
• Verifying the WFS Acceleration Configuration on page 117
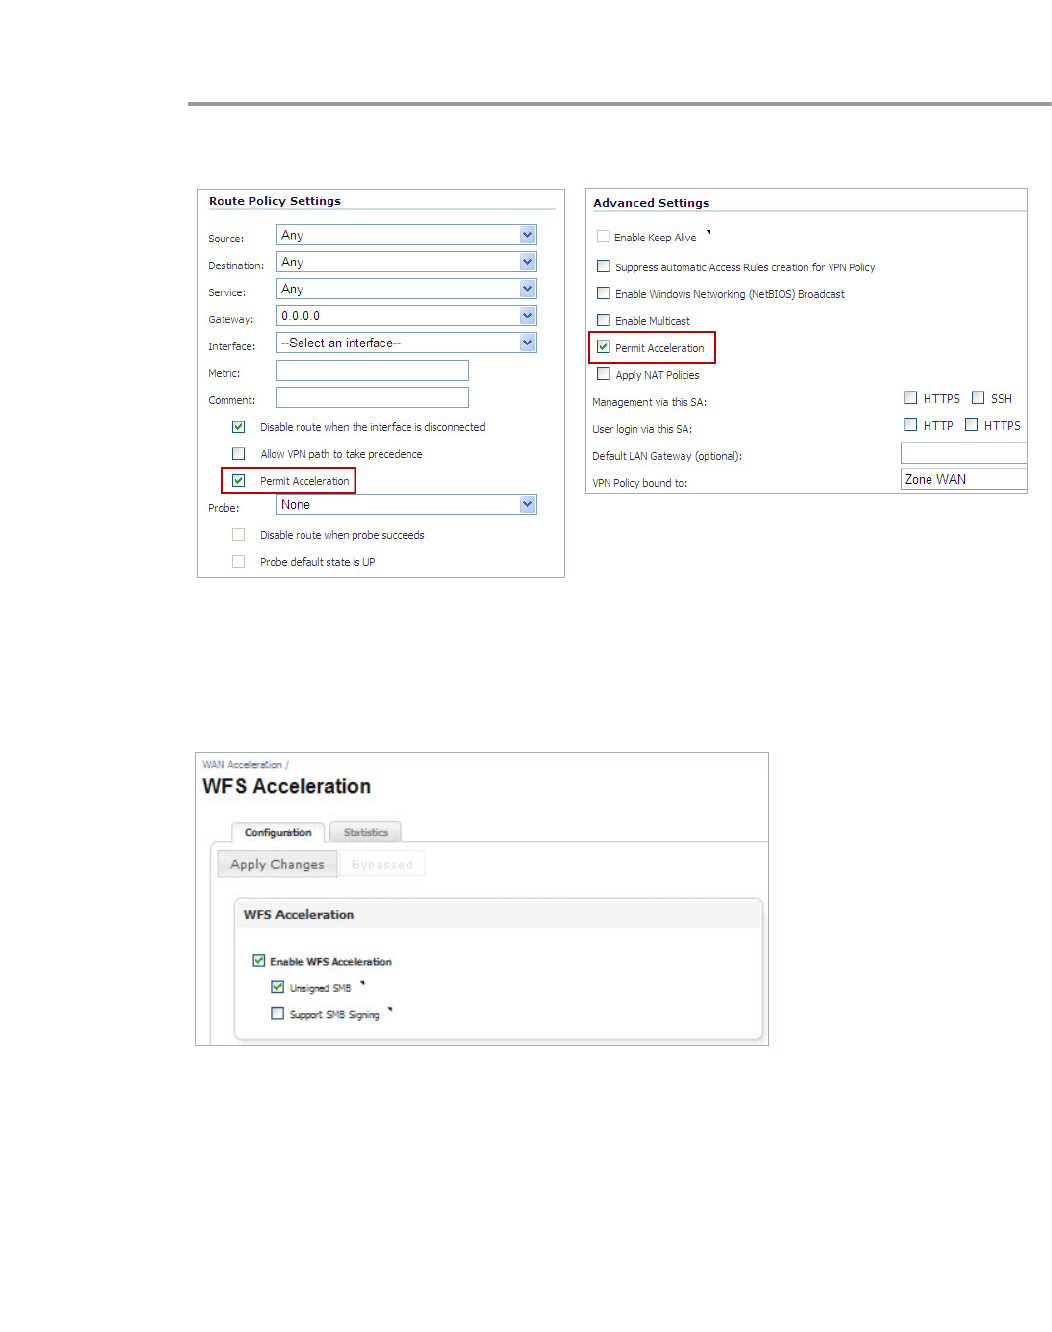
98 | Dell SonicWALL WXA 1.3 User’s Guide
Configuring WFS Acceleration Using Unsigned SMB
To configure the WFS Acceleration service using Unsigned SMB, perform the following:
Step 1 Permit acceleration for the relevant VPN or routed policies in the Network > Routing or VPN
> Settings pages in the SonicOS management interface.
Step 2 Configure a network interface on the NSA/TZ series appliance for the port you want to connect
the WXA series appliance to. The WXA series appliance must be connected to a NSA or TZ
series appliance on a port other than X0 and X1. See Configuring Network Interfaces on
page 33 for details.
Step 3 Navigate to the WAN Acceleration > WFS Acceleration page.
Step 4 Click the Configuration tab, and then select the Enable WFS Acceleration checkbox.
Step 5 Select the Unsigned SMB checkbox.
Step 6 Click the Apply Changes button.
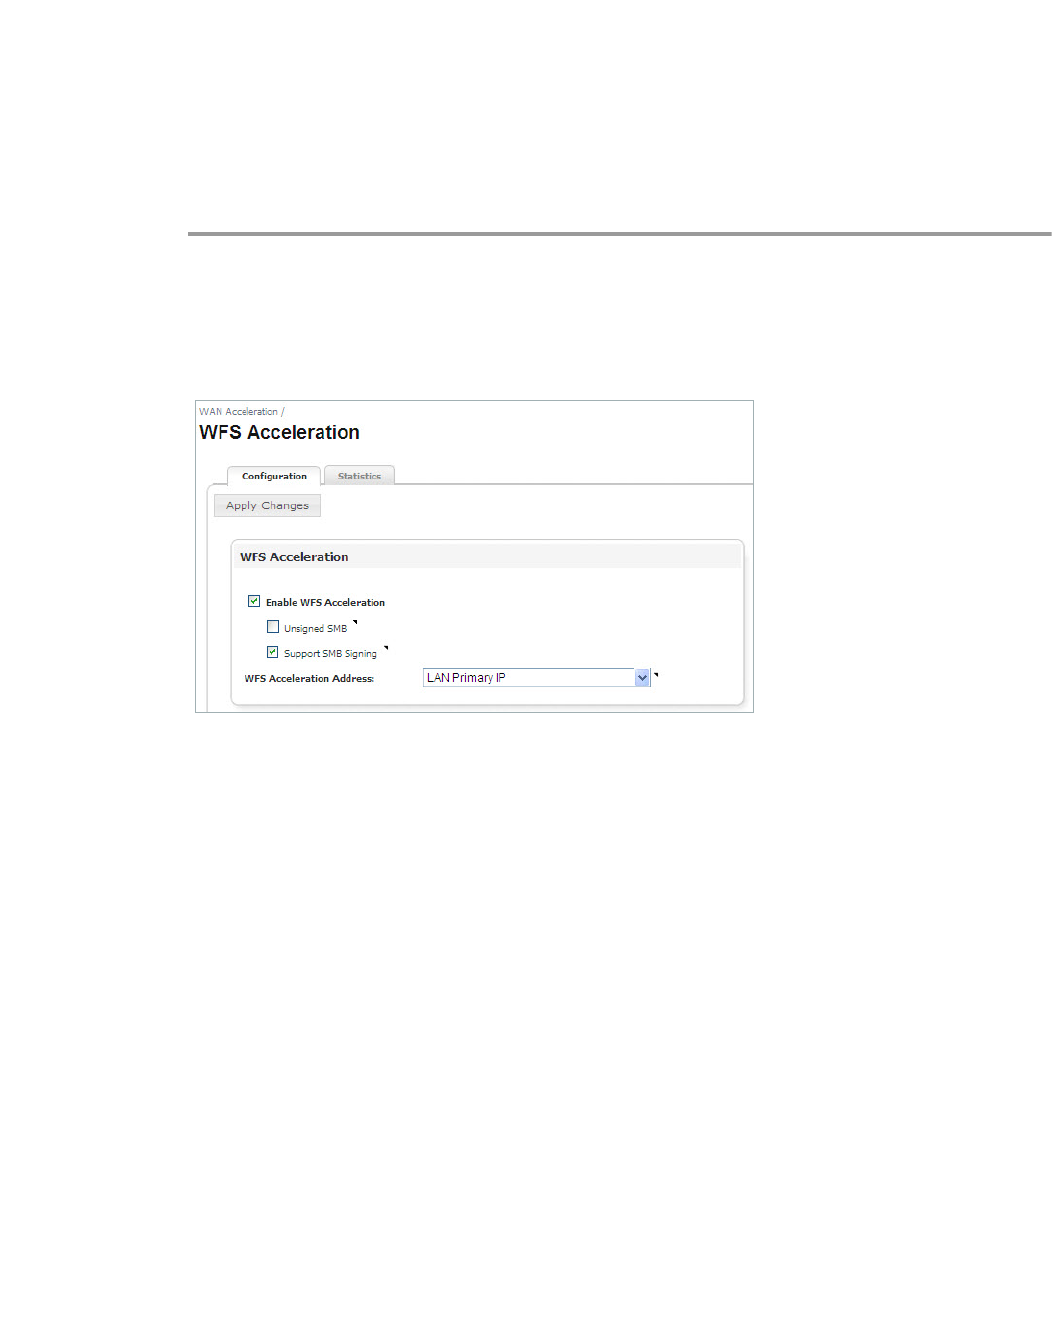
Configuring WFS Acceleration | 99
Configuring WFS Acceleration Using Signed SMB
The preferred way to configure WFS Acceleration for Signed SMB is to use the WXA Setup
Wizard. However, this is currently only available if running SonicOS 5.9 firmware. If your NSA/
TZ series appliance is using 5.8.1.x or 6.1.x firmware use the procedures in this section to
configure WFS Acceleration for Signed SMB. For more information on the WXA Setup Wizard
refer to the SonicOS 5.9 Administrator’s Guide.
To manually configure the WFS Acceleration service using signed SMB, perform the following:
Step 1 Configure a network interface on the NSA/TZ series appliance for the port you want to connect
the WXA series appliance to. The WXA series appliance must be connected to a NSA or TZ
series appliance on a port other than X0 and X1. See Configuring Network Interfaces on
page 33 for details.
Step 2 Navigate to the WAN Acceleration > WFS Acceleration page.
Step 3 Click the Configuration tab, and then select the Enable WFS Acceleration checkbox.
Step 4 Select the Support SMB Signing checkbox.
Step 5 Click the Apply Changes button.
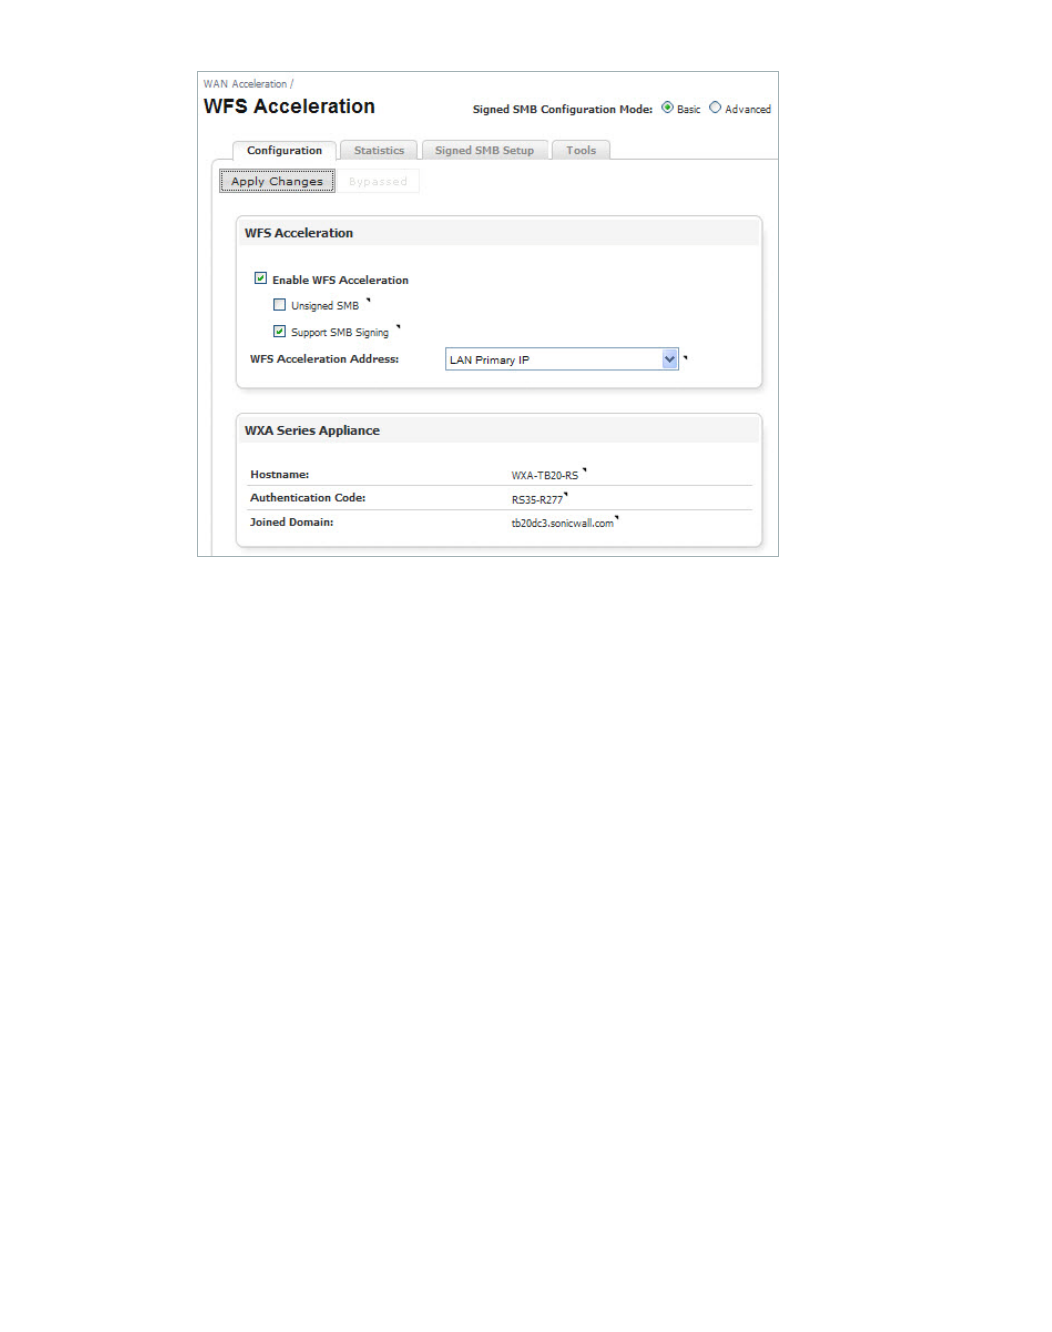
100 | Dell SonicWALL WXA 1.3 User’s Guide
The Signed SMB Setup and Tools tab, and Basic and Advanced configuration mode radio
buttons display:
Step 6 Select the Basic (Recommended) or Advanced configuration mode radio button.
• If you selected the Basic configuration mode, refer to the Basic Configuration Mode on
page 101 for Basic mode configuration procedures.
• If you selected the Advanced configuration mode, refer to the Advanced Configuration
Mode on page 109 for Advanced mode configuration procedures.
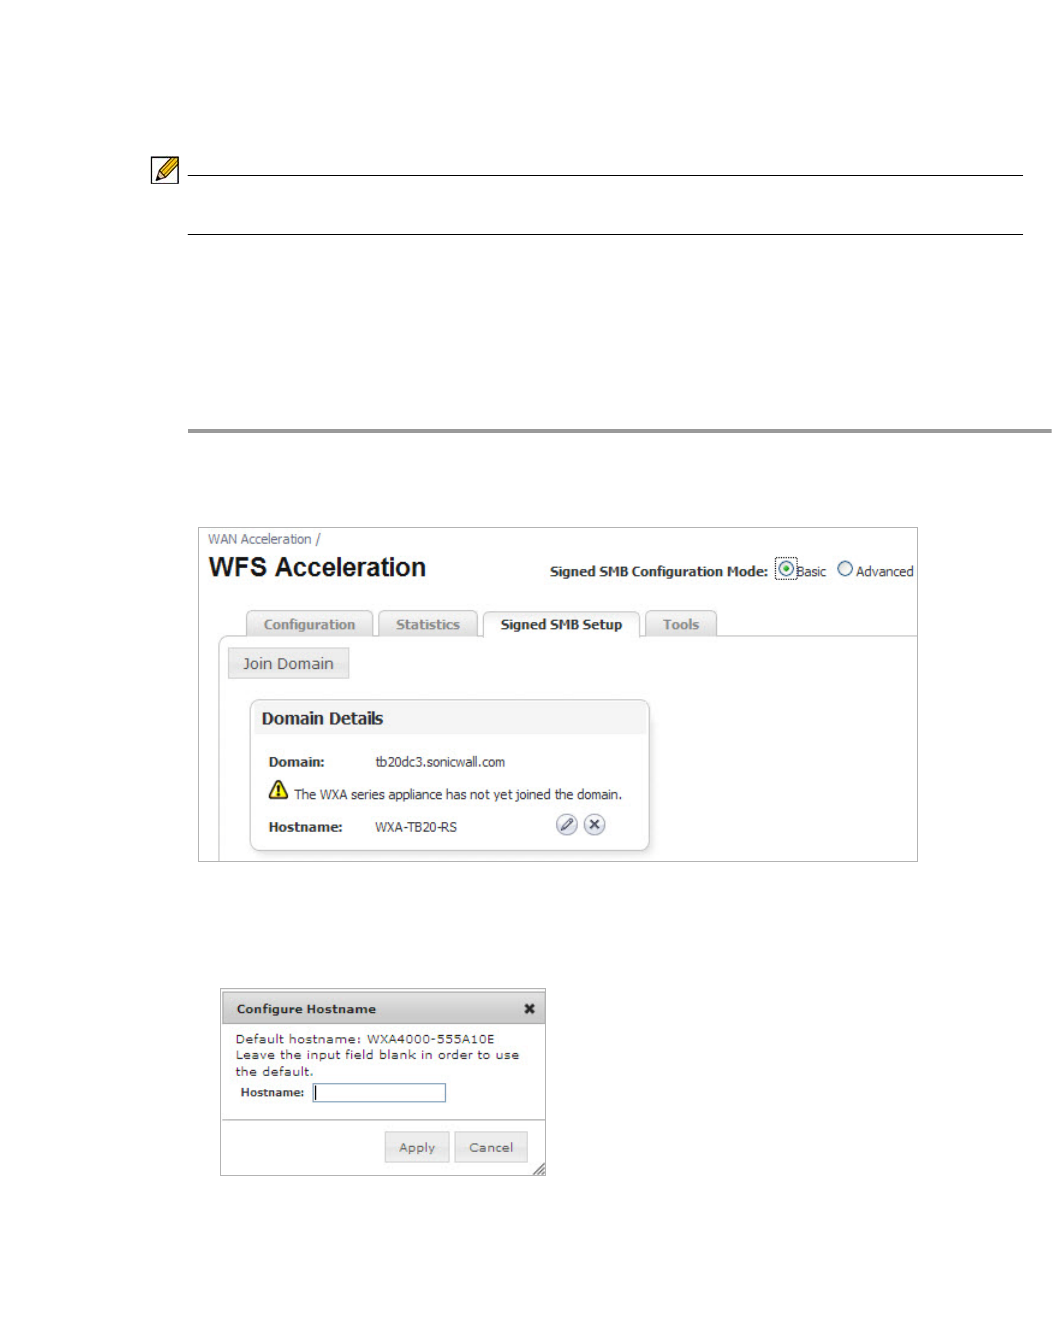
Configuring WFS Acceleration | 101
Basic Configuration Mode
To configure WFS Acceleration in Basic configuration mode, use the Signed SMB Setup tab to
join the domain, add file servers on the local and remote locations, and add domain records.
When initially configuring WFS Acceleration, always configure the Central site first (the site
where the file servers are physically located).
Note Basic mode is the preferred way to configure WFS Acceleration, only use Advanced mode
if you need to specifically define server or share names.
• Joining the Domain on page 101
• Adding File Shares on page 103
Joining the Domain
To join the domain, perform the following steps:
Step 1 In the WAN Acceleration > WFS Acceleration page, select the Signed SMB Setup Tab.
If this is the first time setting up WFS Acceleration, an initial Signed SMB Setup page displays:
Step 2 Enter the following in the Domain Details panel:
a. Click the Configure icon located next to Hostname.
A Configure Hostname pop-up window displays.
b. Enter a friendly hostname or leave the Hostname text field blank to use the default
hostname.The WXA series appliance automatically creates a hostname for you, but it is
recommended that you create your own friendly hostname.
c. Click the Apply button.
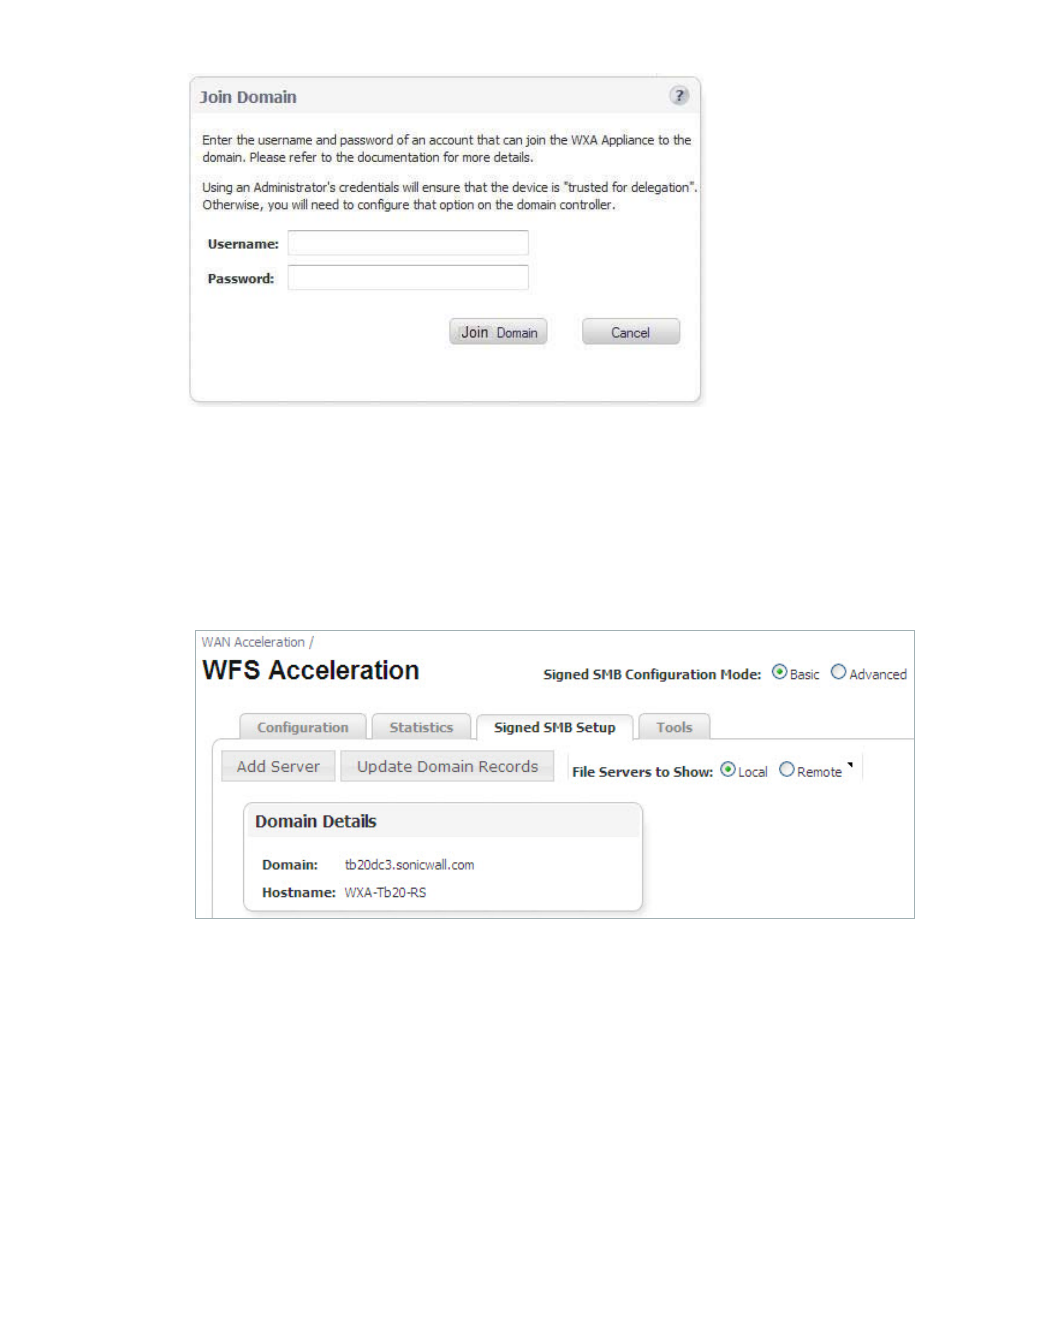
102 | Dell SonicWALL WXA 1.3 User’s Guide
Step 3 Click Join Domain.
The Join Domain pop-up window displays.
Step 4 Enter the username and password for the administrator of the domain or an account that can
join the WXA series appliance to the domain.
Step 5 Click the Join Domain button.
The WXA series appliance will create a computer account on the domain controller, using the
hostname entered in Join Domain pop-up window.
The Signed SMB Setup tab populates with the configured Domain Details:
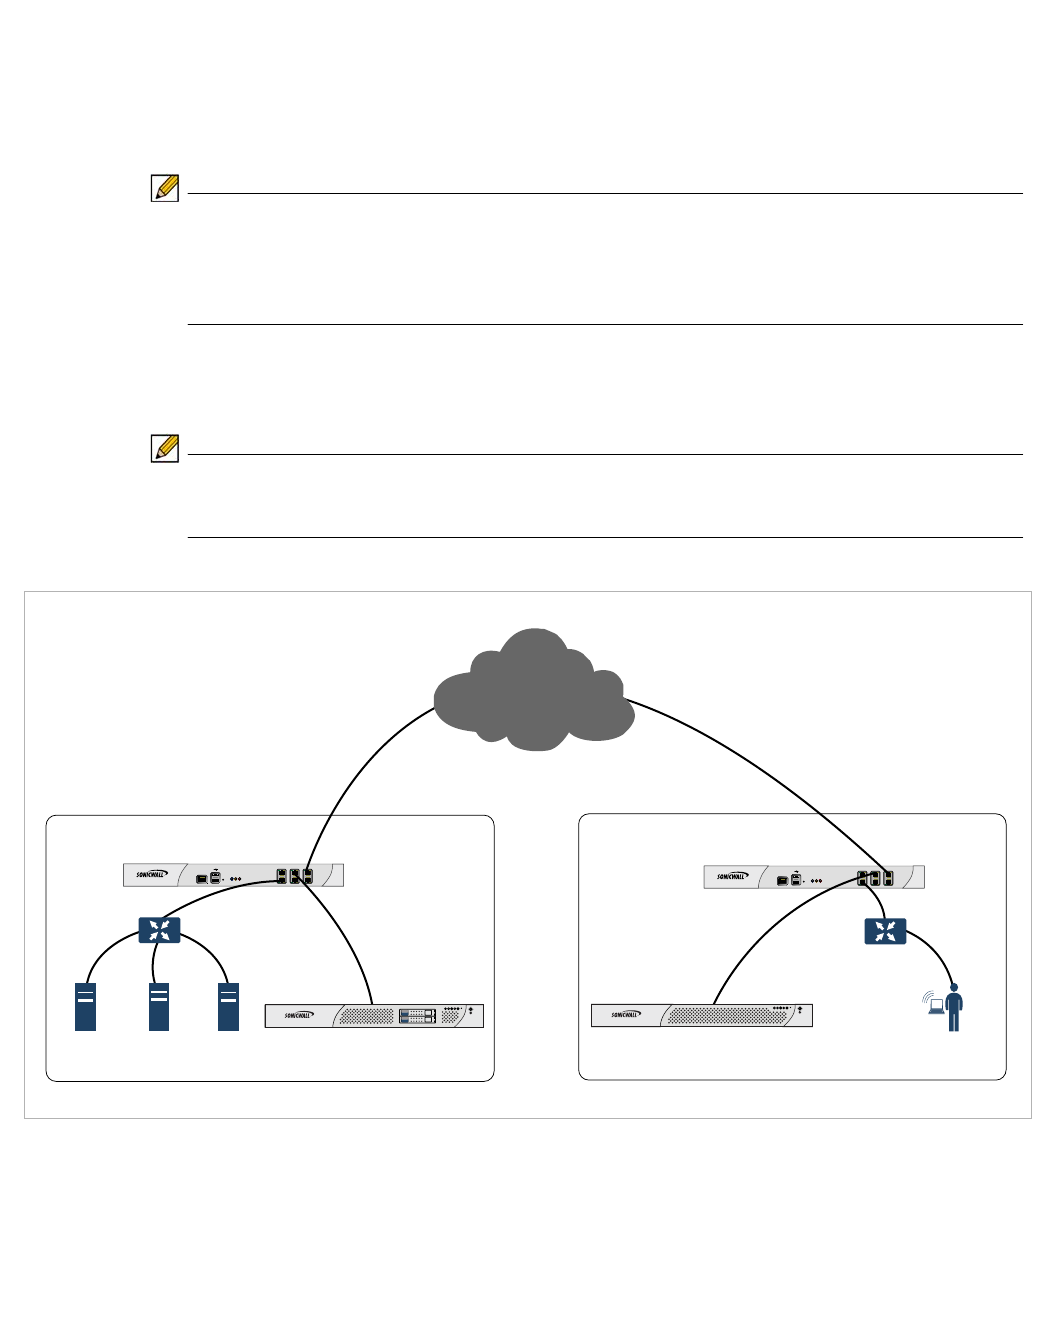
Configuring WFS Acceleration | 103
Adding File Shares
The Basic server configuration mode does not require you to create SPNs for the remote
servers or match remote and local WXA appliance names. In Basic mode, all available shares
are added when a server is configured. When adding a server using the Basic configuration
mode, the Administrator’s credentials must be entered, enabling the WXA series appliance to
add the SPN aliases for the share automatically.
Note If file servers were previously configured in the Advanced configuration mode, they might
not display in the Basic configuration mode’s “Signed SMB Setup” tab.
It is recommended to enter a dot after the Local WXA Name, this auto-completes the name
with that of the domain.
The following Illustration and configuration steps provide an example of how to add file shares.
In this example deployment scenario, the Central site contains all the file servers, and the
Branch site contains users that are accessing files from the Central site file servers.
Note When configuring shares on the Central site, the Branch site is considered “Remote”.
When configuring shares on the Branch site, the Central site is considered “Remote”.
PC
Branch Site
Central Site
WXA-4000-CS
NSA/TZ series
appliance
NSA/TZ series
appliance
WXA-2000-RS
Domain
Controller
Switch
Switch
File
Server 2
File
Server 1
X0
X1
X2
X3
PWR
TEST
ALARM
X4
X5
CONSOLE
Network Security Appliance
3500
X0
X1
X2
X3
PWR
TEST
ALARM
X4
X5
CONSOLE
Network Security Appliance
3500
WXA 4000
WAN Acceleration
D1
250GB
D0
250GB
Internet
WXA 2000
WAN Acceleration
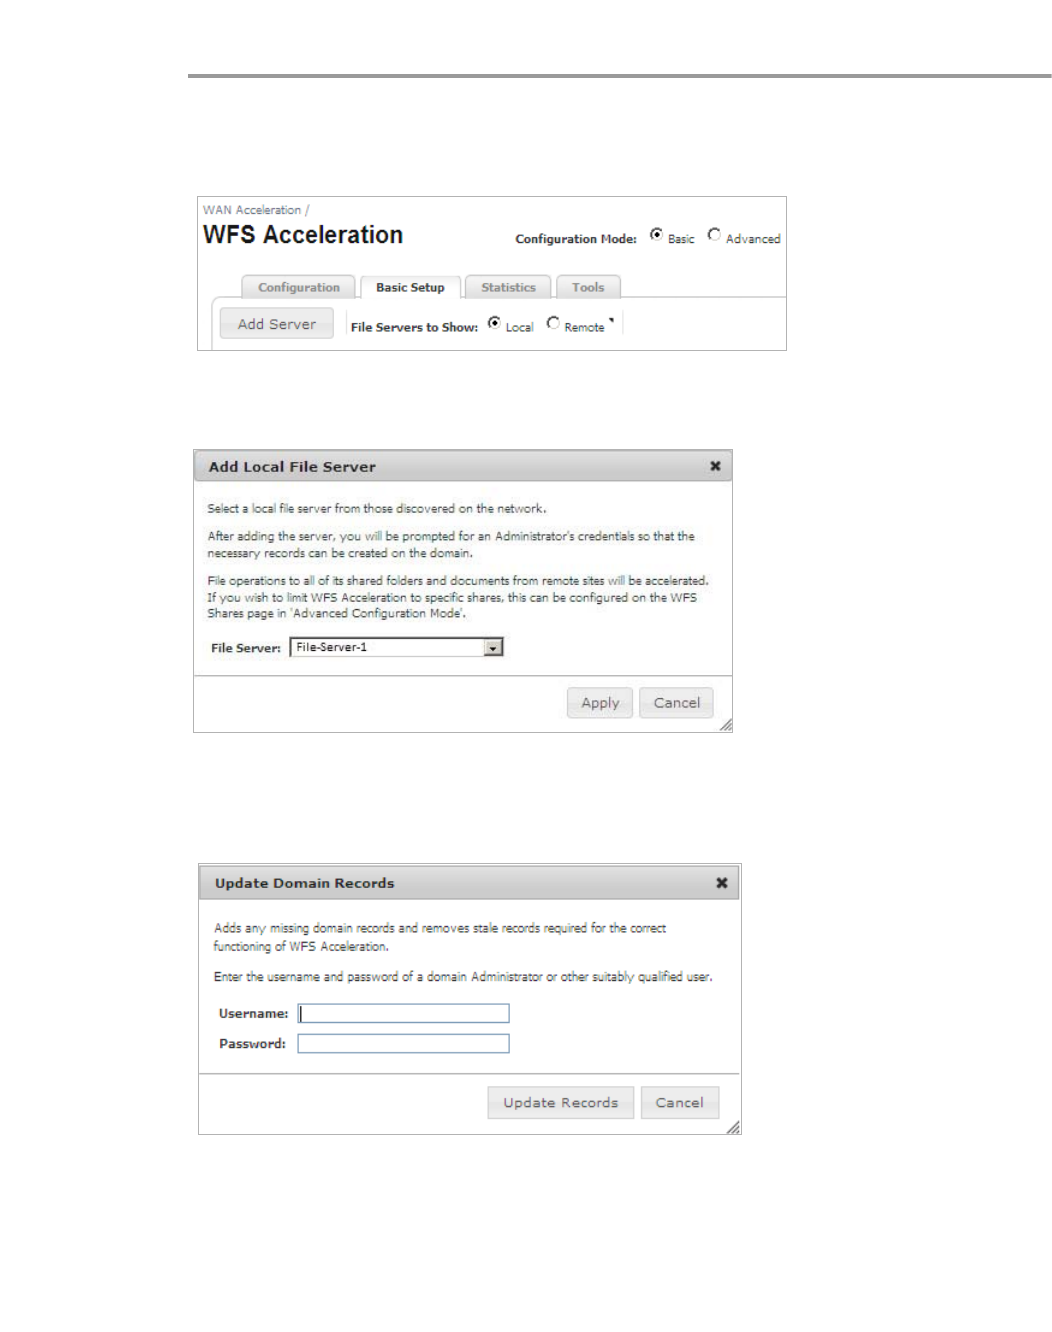
104 | Dell SonicWALL WXA 1.3 User’s Guide
Configure the WXA 4000 appliance on the Central Site
Add File Server 1:
Step 1 Navigate to the WAN Acceleration > WFS Acceleration > Signed SMB Setup tab.
Step 2 Click the File Servers to Show: Local radio button.
Always configure the central site first.
Step 3 Click the Add Server button.
The Add Server pop-up window displays:
Step 4 Click the File Server: drop-down list, and then select the Local Server Name: File-Server-1
Step 5 Click Apply.
The Update Domain Records pop-up window displays:
Step 6 Enter your Administrator credentials.
Step 7 Click the Update Records button.
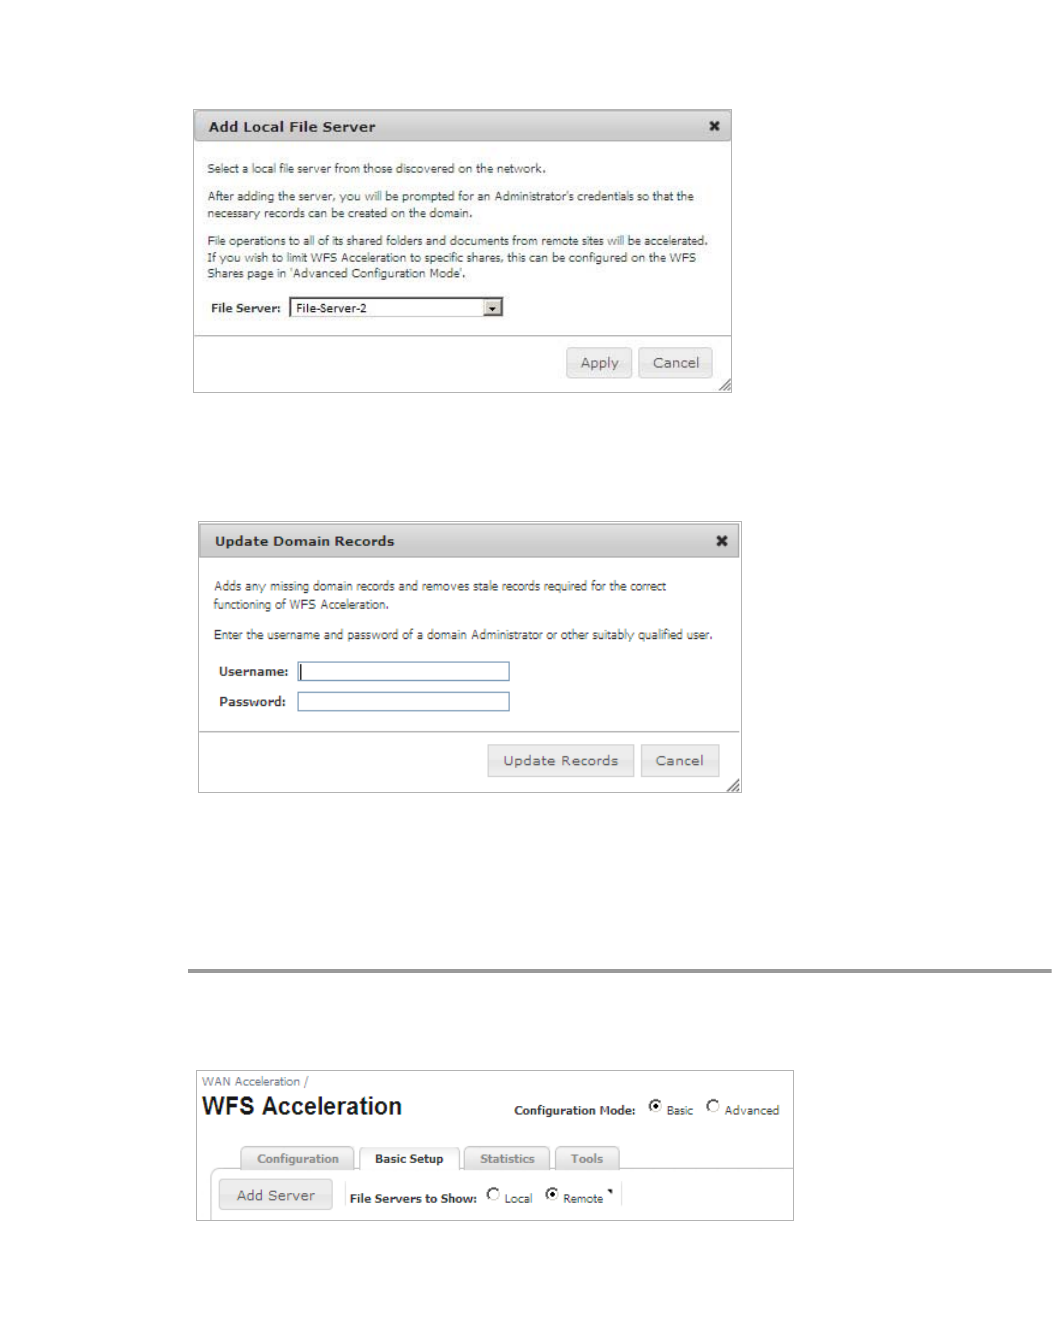
Configuring WFS Acceleration | 105
Add File Server 2:
Step 8 Click the Add Server button.
The Add Server pop-up window displays:
Step 9 Click the File Server: drop-down list, and then select Local Server Name: File-Server-2
Step 10 Click Apply.
The Update Domain Records pop-up window displays:
Step 11 Enter your Administrator credentials.
Step 12 Click the Update Records button.
Configure the WXA 2000 appliance on the Branch Site
Add File Server 1:
Step 1 Navigate to the WAN Acceleration > WFS Acceleration > Signed SMB Setup tab.
Step 2 Click the File Servers to Show: Remote radio button.
Step 3 Click the Add Server button.

106 | Dell SonicWALL WXA 1.3 User’s Guide
The Add Remote Server pop-up window displays:
Step 4 Click the File Server: drop-down list, and then select the name of the remote file server hosting
the shares: File-Server-1
Step 5 Enter a local WXA name: WXA-2000-RS-1
Note Adding a dot after the name will auto-complete the name with that of the domain. This (the
local WXA Name) is the name that should then be used in paths to folders and files on the
remote server in order for the file sharing operations to benefit from WFS Acceleration.
For example, if the current path is \\remote_server\docs under WFS Acceleration, it will
become \\local_Wxa\docs.
Step 6 Click Apply.
The Update Domain Records pop-up window displays:
Step 7 Enter your Administrator credentials.
Step 8 Click the Update Records button.
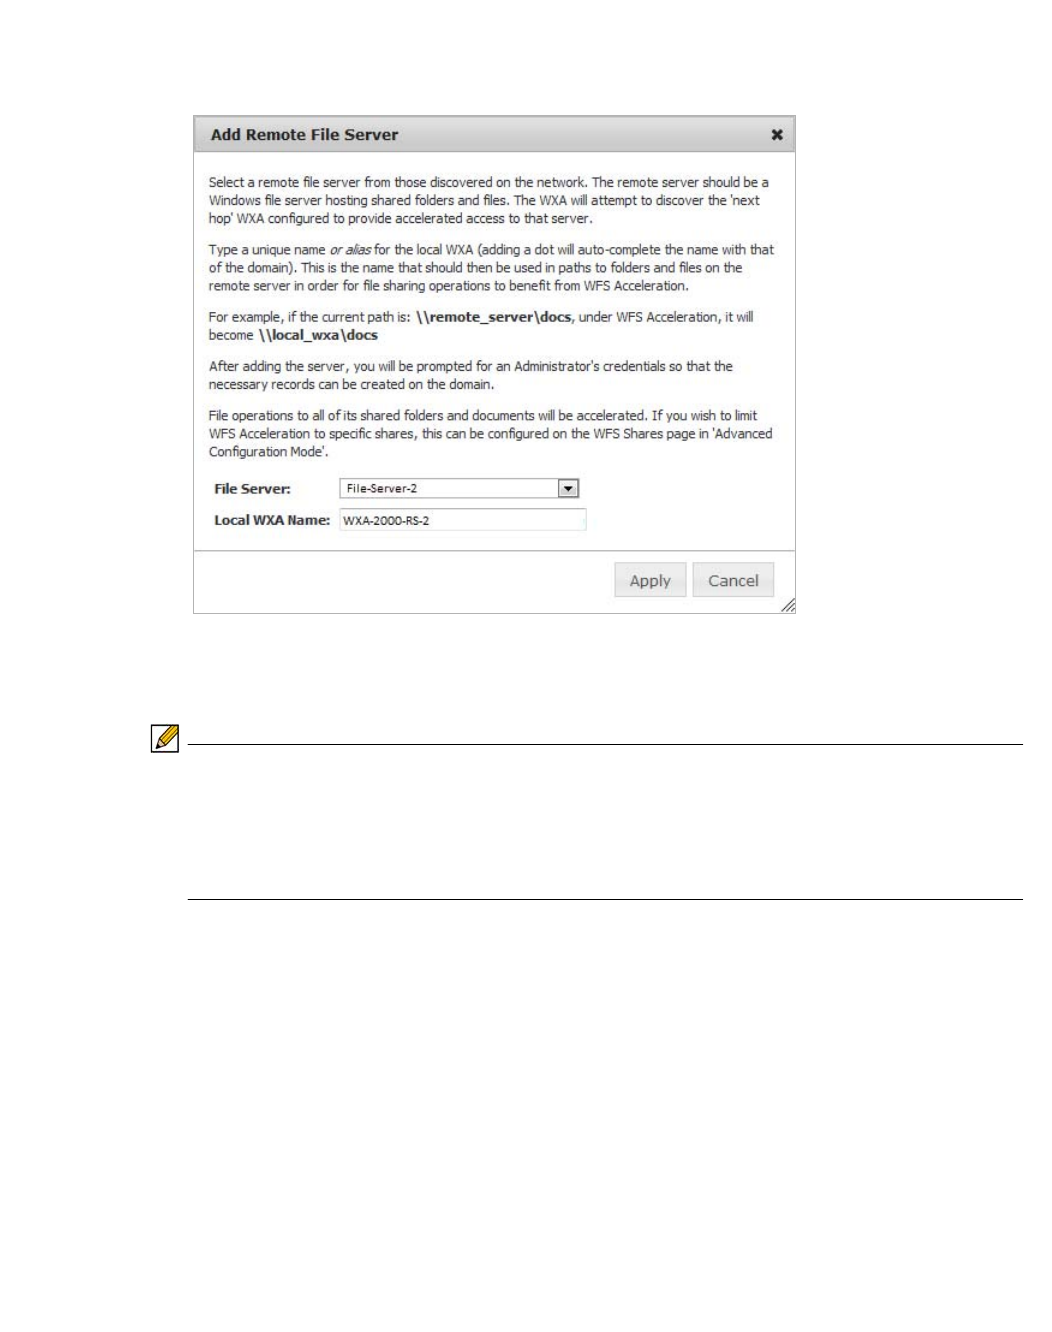
Configuring WFS Acceleration | 107
Add File Server 2:
Step 9 Click the Add Server button.
The Add Remote Server pop-up window displays:
Step 10 Click the File Server: drop-down list, and then select name of the remote file server hosting the
shares: File-Server-2
Step 11 Enter a local WXA name: WXA-2000-RS-2
Note Adding a dot after the name will auto-complete the name with that of the domain. This (the
local WXA Name) is the name that should then be used in paths to folders and files on the
remote server in order for the file sharing operations to benefit from WFS Acceleration.
For example, if the current path is \\remote_server\docs under WFS Acceleration, it will
become \\local_Wxa\docs.
Step 12 Click Apply.
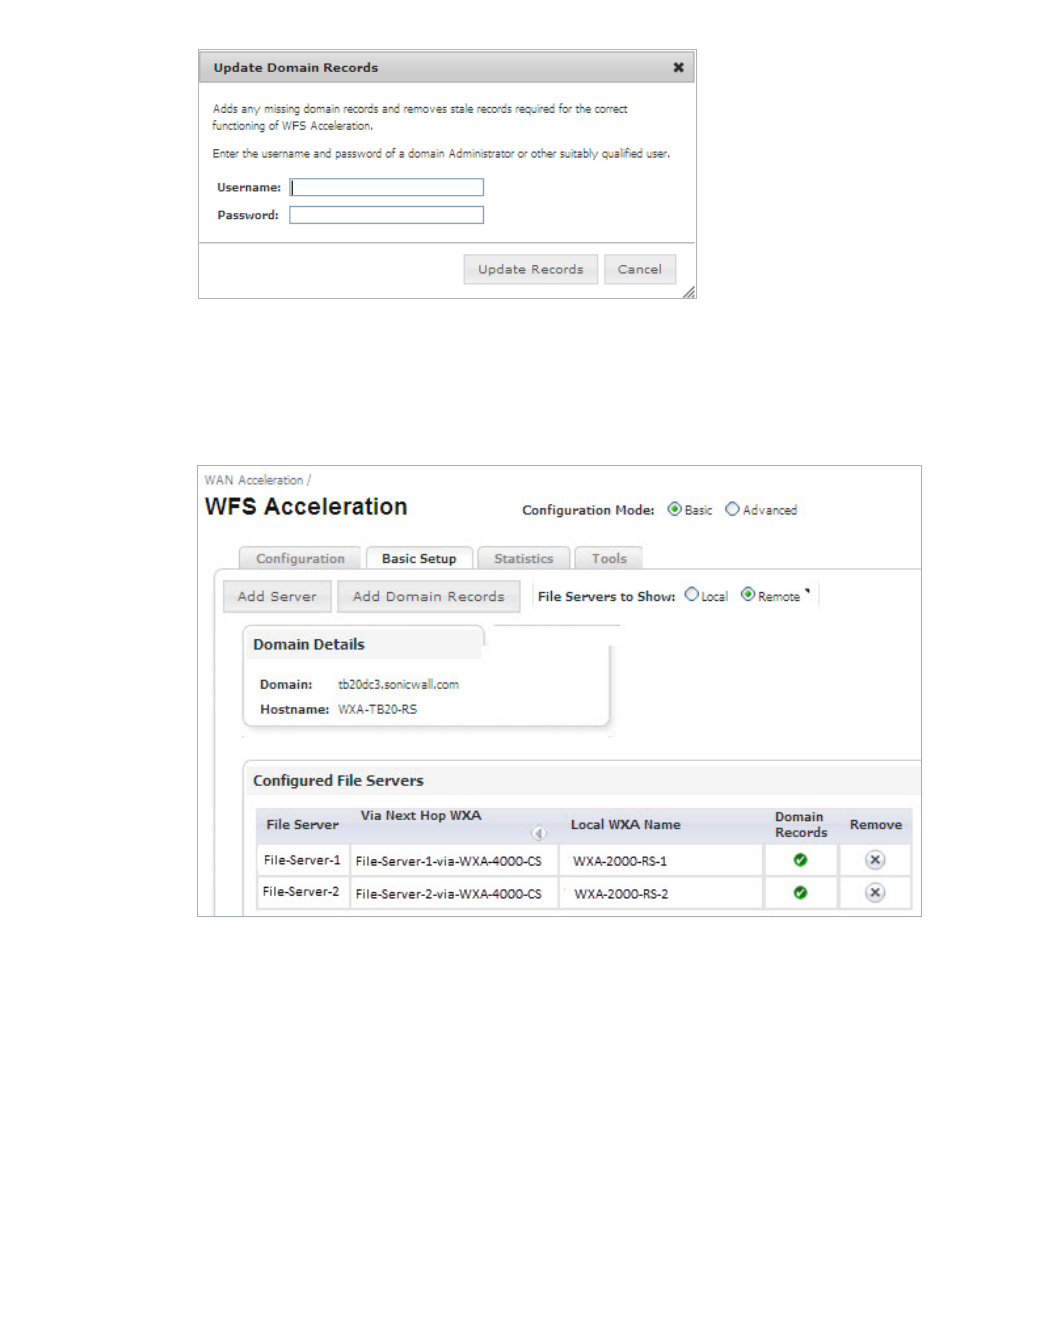
108 | Dell SonicWALL WXA 1.3 User’s Guide
The Update Domain Records pop-up window displays:
Step 13 Enter your Administrator credentials.
Step 14 Click the Update Records button.
The Configured File Servers panel in the Signed SMB Setup tab populates the configured file
server:
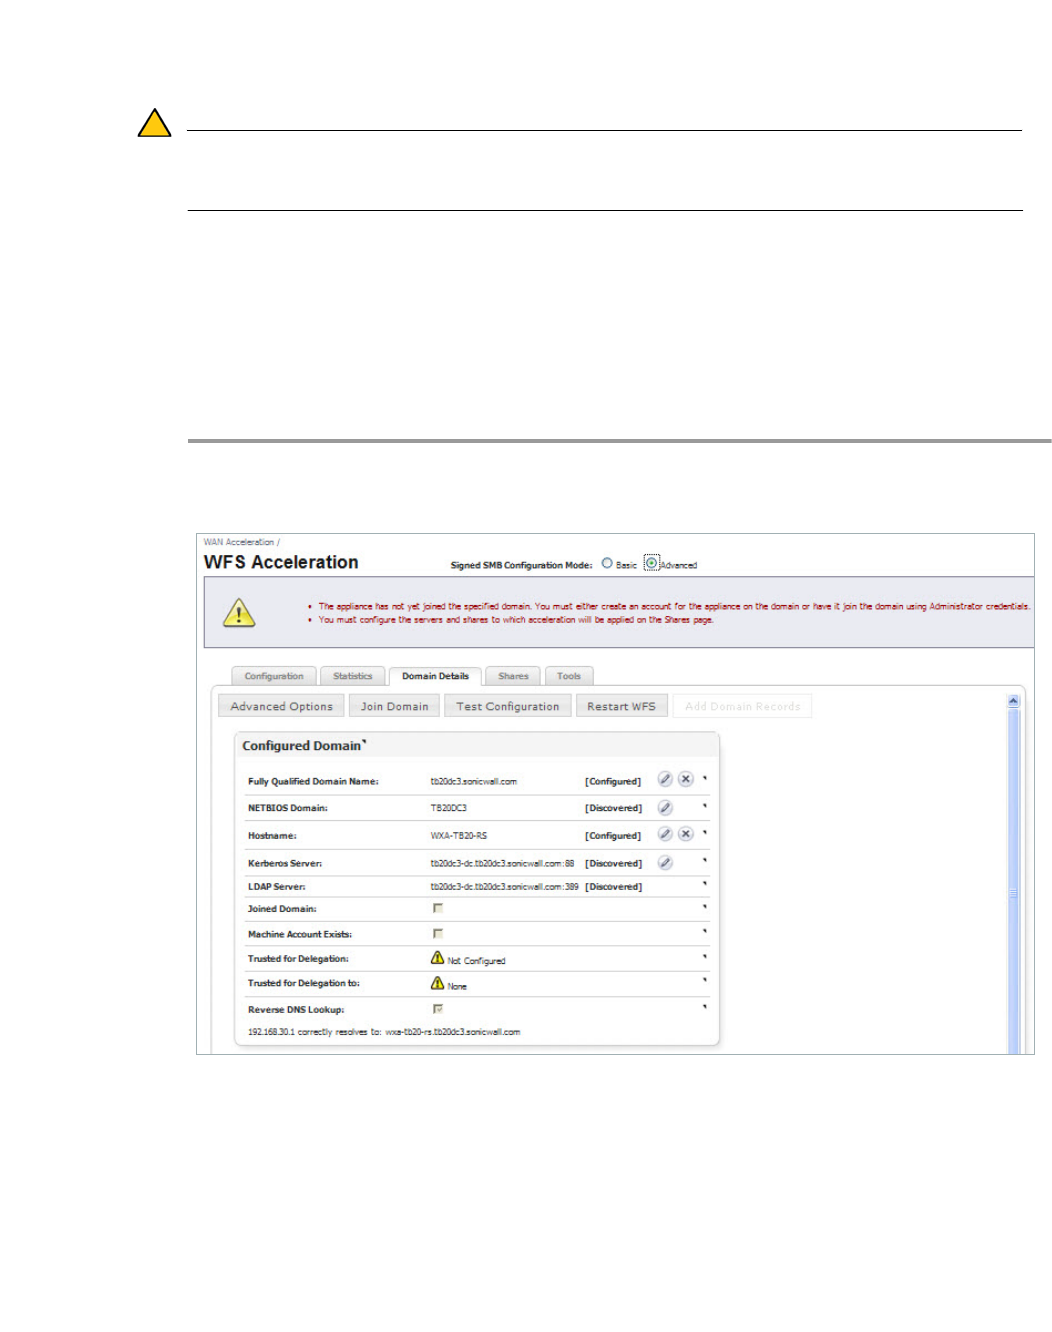
Configuring WFS Acceleration | 109
Advanced Configuration Mode
To configure WFS Acceleration in Advanced configuration mode, use the Domain Details and
Shares tabs to join the domain and add file shares.
Caution Advanced configuration mode should only be used if you need to specifically define server
or share names. The preferred way to configure WFS Acceleration is to use the Basic
configuration mode.
This section contains the following subsections:
• Joining the Domain on page 109
• Adding File Shares on page 111
Joining the Domain
To join the domain manually, perform the following steps on the WXA series appliance:
Step 1 In the WAN Acceleration > WFS Acceleration page, select the Domain Details Tab.
If this is the first time setting up WFS Acceleration, an initial Domain Details page displays:
Step 2 Click Join Domain.
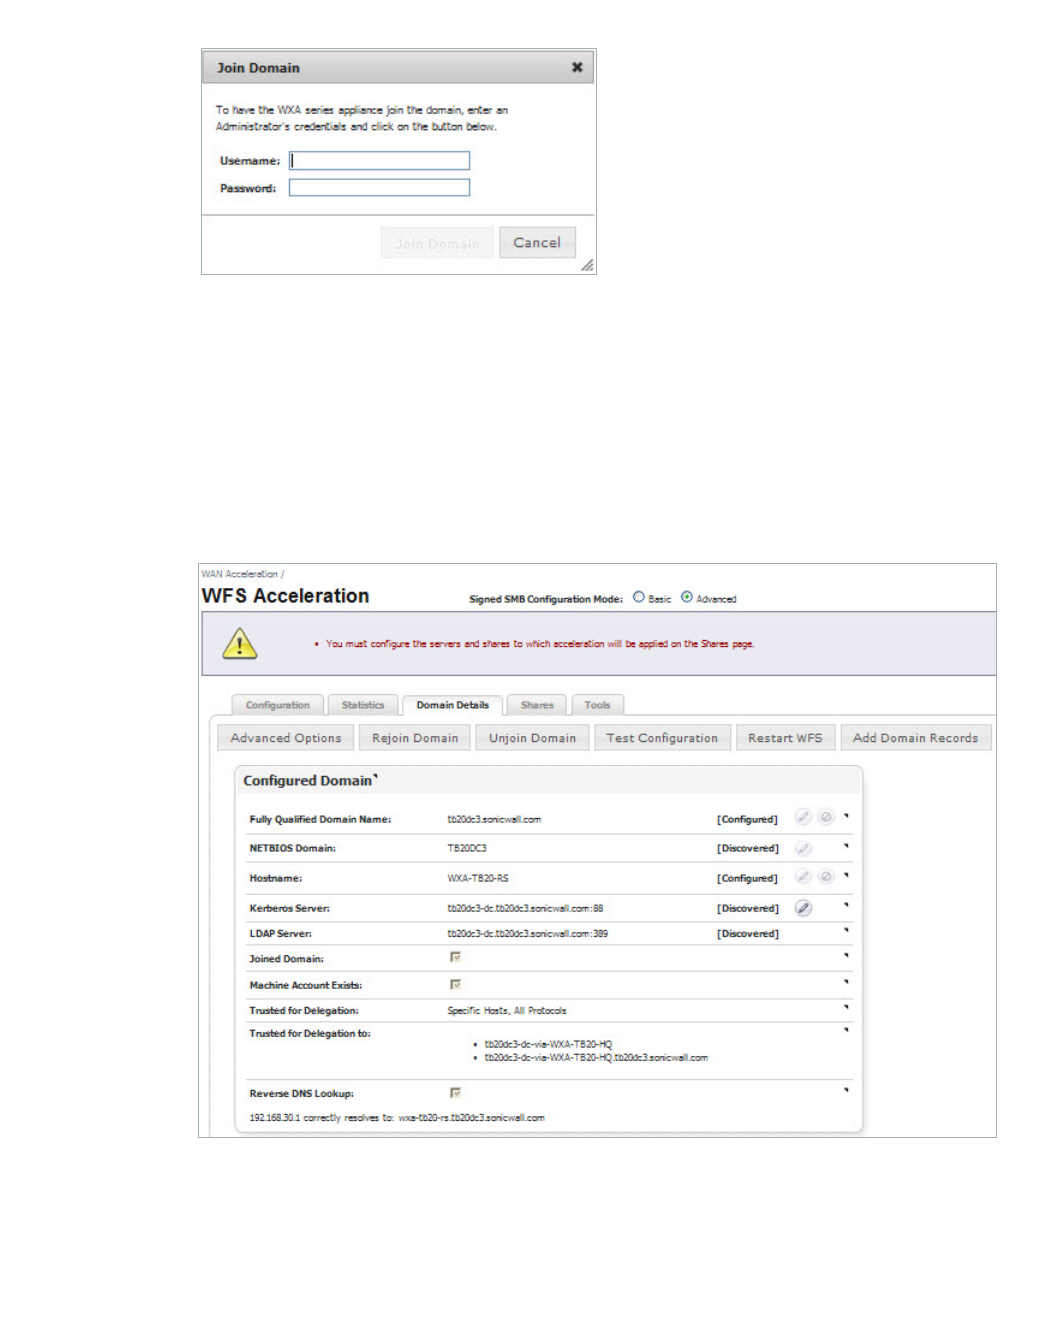
110 | Dell SonicWALL WXA 1.3 User’s Guide
The Join Domain pop-up window displays.
Step 3 Enter the username and password for the administrator of the domain or an account that can
join the WXA series appliance to the domain.
Step 4 Click the Join Domain button.
A Join Domain Results pop-up window displays, showing live results of the join domain
command.
The WXA series appliance will create a computer account on the domain controller, using the
hostname entered in Join Domain pop-up window.
The Domain Details tab populates with the configured Domain Details:
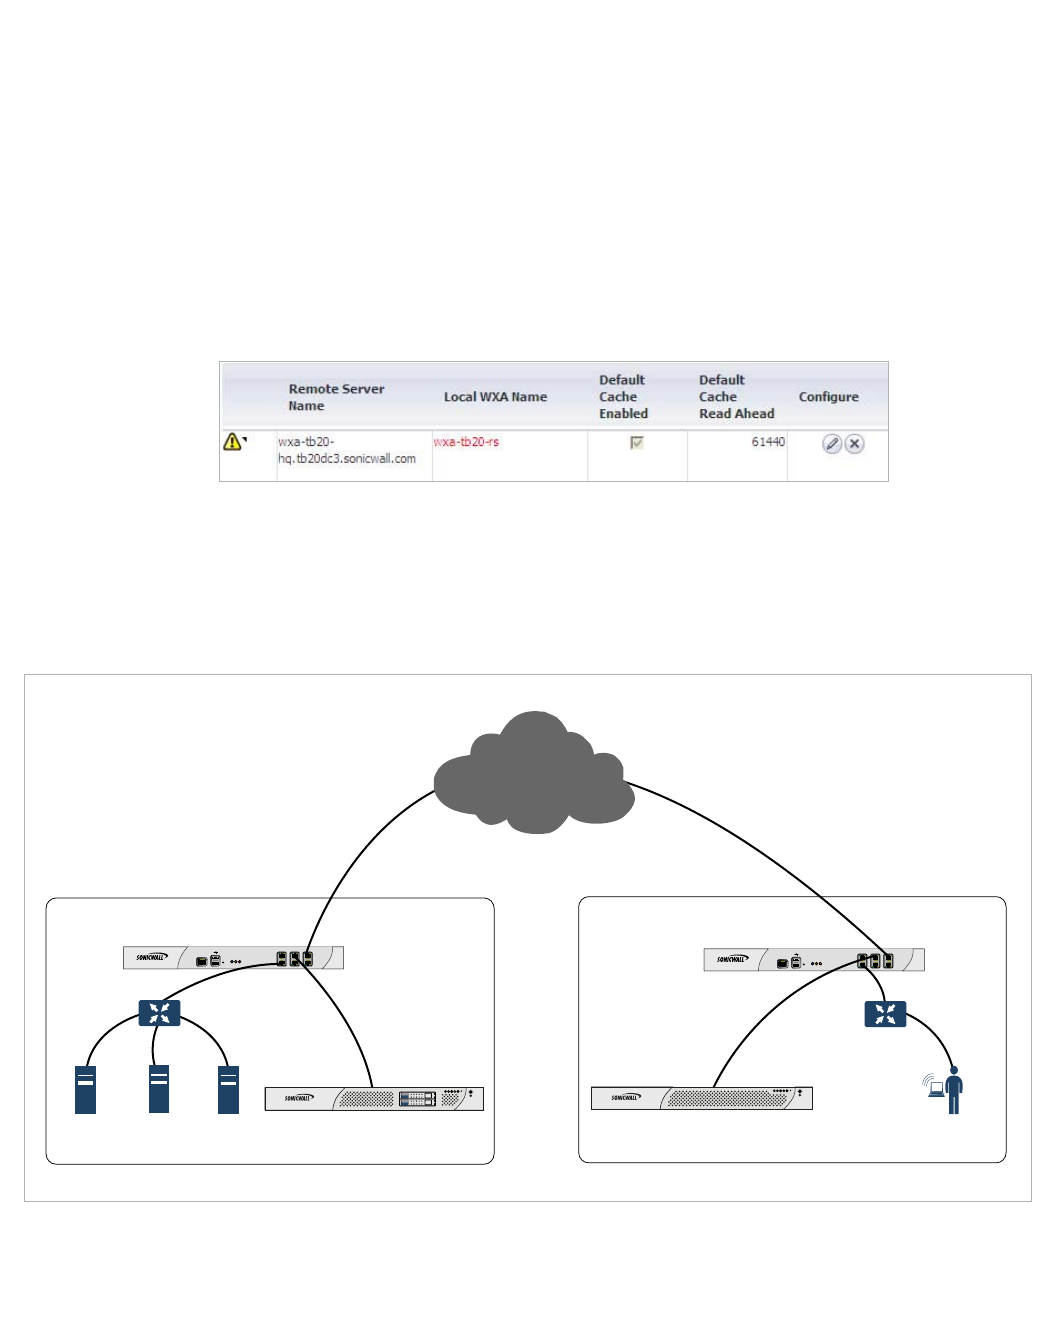
Configuring WFS Acceleration | 111
Adding File Shares
The Advanced mode offers a more detailed configuration process for adding file servers and
shares. Giving you manual configuration options such as enabling the default cache, selecting
the default cache read ahead, specifying individual shares, and adding domain records.
Note the following considerations before adding file shares:
• File servers configured in Advanced mode might not display when viewed in Basic mode.
• A unique Local WXA Name must be created for every remote file server added on the
Central Site.
• When adding a server, it is recommended to enter a period after the Local WXA Name, this
auto-completes the name with that of the domain (e.g WXA-4000-CS-1.my_domain.local).
If the period is not entered, a caution icon will appear in the Shares tab next to the Remote
Server name, noting that it is recommended to use the fully qualified name:
This section contains an example of configuring shares in a typical WXA deployment. If your
WXA deployment is different, you can still use this example as a guide to add file shares, the
basic principals are the same.
In this example, we are going to add shares that are hosted on File Server 1 and File Server 2,
use this network diagram as a reference and perform the following steps:
PC
Branch Site
Central Site
WXA-4000-CS
NSA/TZ series
appliance
NSA/TZ series
appliance
WXA-2000-RS
Domain
Controller
Switch
Switch
File
Server 2
File
Server 1
X0
X1
X2
X3
PWR
TEST
ALARM
X4
X5
CONSOLE
Network Security Appliance
3500
X0
X1
X2
X3
PWR
TEST
ALARM
X4
X5
CONSOLE
Network Security Appliance
3500
WXA 4000
WAN Acceleration
D1
250GB
D0
250GB
Internet
WXA 2000
WAN Acceleration
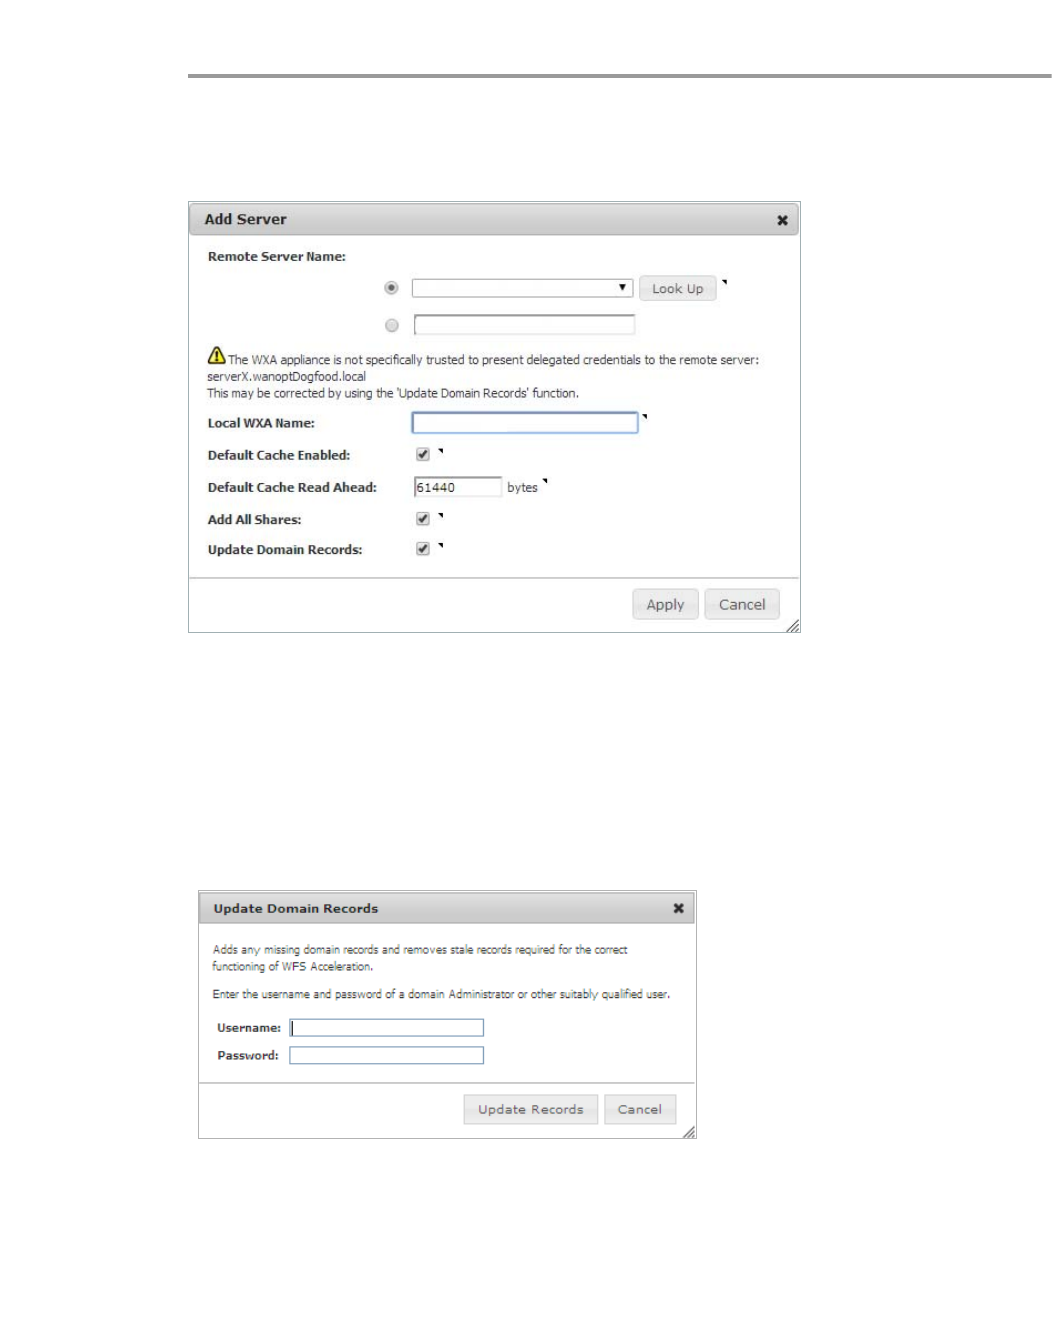
112 | Dell SonicWALL WXA 1.3 User’s Guide
Configure the WXA 4000 appliance on the Central Site
Add File Server 1:
Step 1 Navigate to the WAN Acceleration > WFS Acceleration > Shares tab.
Step 2 Click the Add Server button.
The Add Server pop-up window displays:
Step 3 Enter the Remote Server Name: Select File Server 1 from the drop-down list.
If the remote server is not in the list, toggle the radio button and enter it manually in the text
field.
Step 4 Enter a Local WXA Name: WXA-4000-CS-1
Then add a period after the name. This auto-completes the fully qualified domain name.
Step 5 Click Apply.
The Update Domain Records pop-up window displays:
Step 6 Enter your Administrator credentials.
Step 7 Click the Update Records button.
This automatically creates all the necessary SPN Aliases and DNS entries.

Configuring WFS Acceleration | 113
Add File Server 2:
Step 1 Click the Add Server button.
The Add Server pop-up window displays:
Step 2 Enter the Remote Server Name: Select File Server 2 from the drop-down list.
If the remote server is not in the list, toggle the radio button and enter it manually in the text
field.
Step 3 Enter a Local WXA Name: WXA-4000-CS-2
Then add a period after the name
Step 4 Click Apply.
The Update Domain Records pop-up window displays:
Step 5 Enter your Administrator credentials.
Step 6 Click the Update Records button.
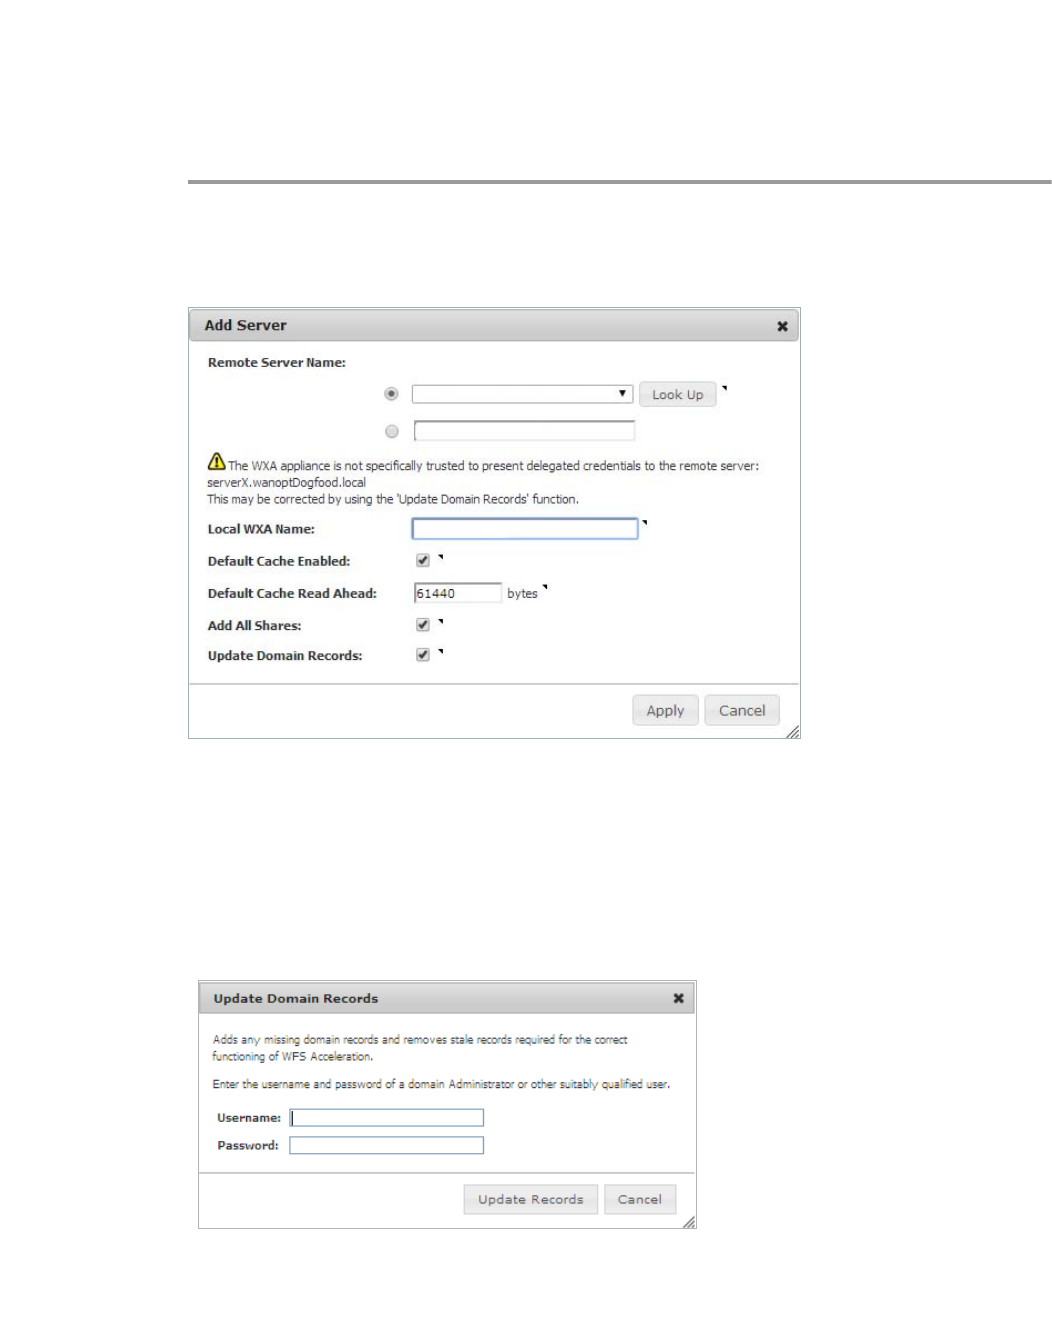
114 | Dell SonicWALL WXA 1.3 User’s Guide
Configure the WXA 2000 appliance on the Branch Site
When configuring the Branch Site to access a file server on the Central Site, the Remote Server
Name entered on the Branch Site must match the Local WXA Name of the Central Site's WXA
appliance. This allows the Central Site WXA appliance to provide accelerated access for the
particular file server in question.
Add File Server 1:
Step 1 Navigate to the WAN Acceleration > WFS Acceleration > Shares tab.
Step 2 Click the Add Server button.
The Add Server pop-up window displays:
Step 3 Enter the Remote Server Name: Select WXA-4000-CS-1 from the drop-down list.
If the remote server is not in the list, toggle the radio button and enter it manually in the text
field.
Step 4 Enter a Local WXA Name: WXA-2000-RS-1
Then add a period after the name
Step 5 Click Apply.
The Update Domain Records pop-up window displays:
Step 6 Enter your Administrator credentials.
Step 7 Click the Update Records button.
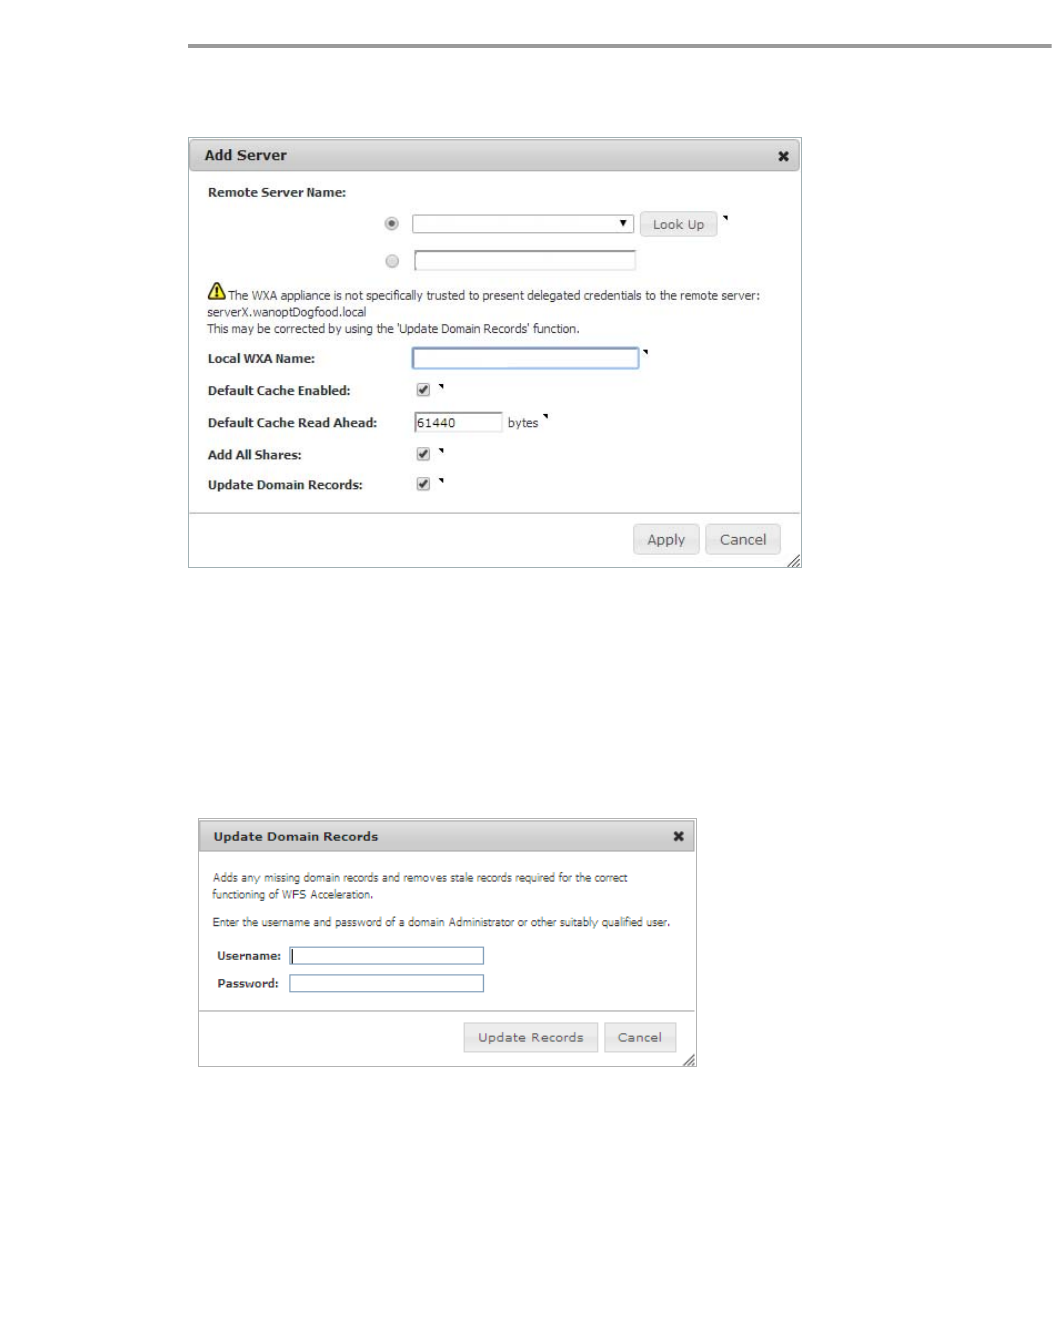
Configuring WFS Acceleration | 115
Add File Server 2:
Step 1 Click the Add Server button.
The Add Server pop-up window displays:
Step 2 Enter the Remote Server Name: Select WXA-4000-CS-2 from the drop-down list.
If the remote server is not in the list, toggle the radio button and enter it manually in the text
field.
Step 3 Enter a Local WXA Name: WXA-2000-RS-2
Then add a period after the name
Step 4 Click Apply.
The Update Domain Records pop-up window displays:
Step 5 Enter your Administrator credentials.
Step 6 Click the Update Records button.

116 | Dell SonicWALL WXA 1.3 User’s Guide
The Shares tab displays the configured file servers:
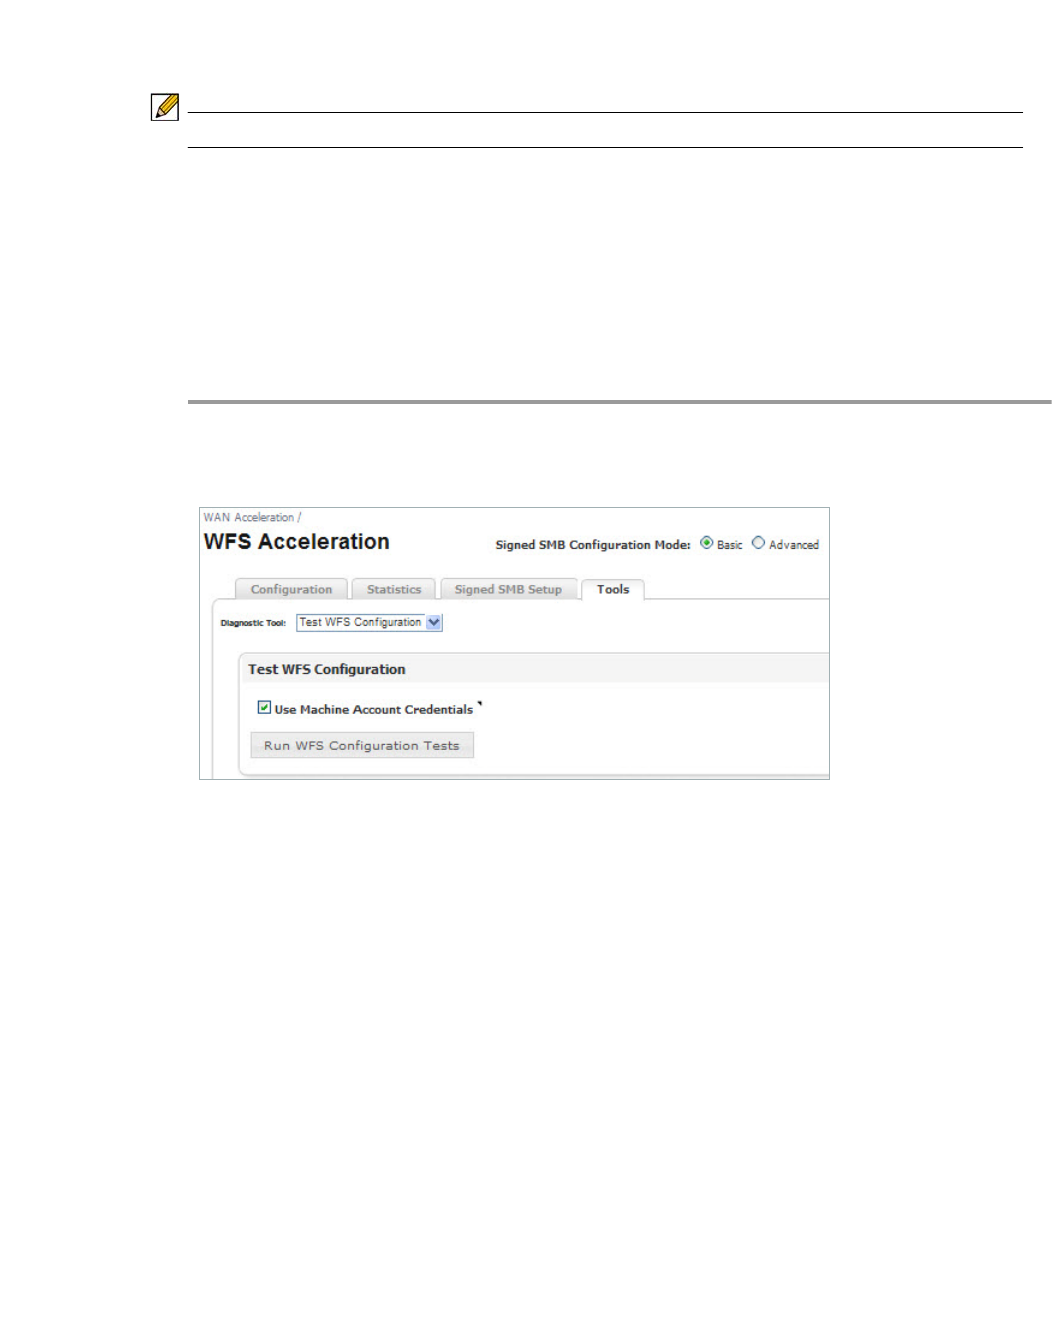
Configuring WFS Acceleration | 117
Verifying the WFS Acceleration Configuration
This section details how to verify that the WFS Acceleration service is configured correctly.
Note These verification procedures only apply to systems using Signed SMB.
After completing the step-by-step WFS Acceleration configuration procedures. Verify WFS
Acceleration is working by using the Test Configuration tool available in Basic and Advanced
modes.
Verifying WFS Acceleration in Basic Mode
To verify that the WFS Acceleration service was successful using the WFS Acceleration > Tools
tab in Basic mode, perform the following steps:
Step 1 Navigate to the WAN Acceleration > WFS Acceleration.
Step 2 Click the Tools tab.
Step 3 In the Diagnostic Tools drop-down, select Test WFS Configuration.
Step 4 Click Run WFS Configuration Test.
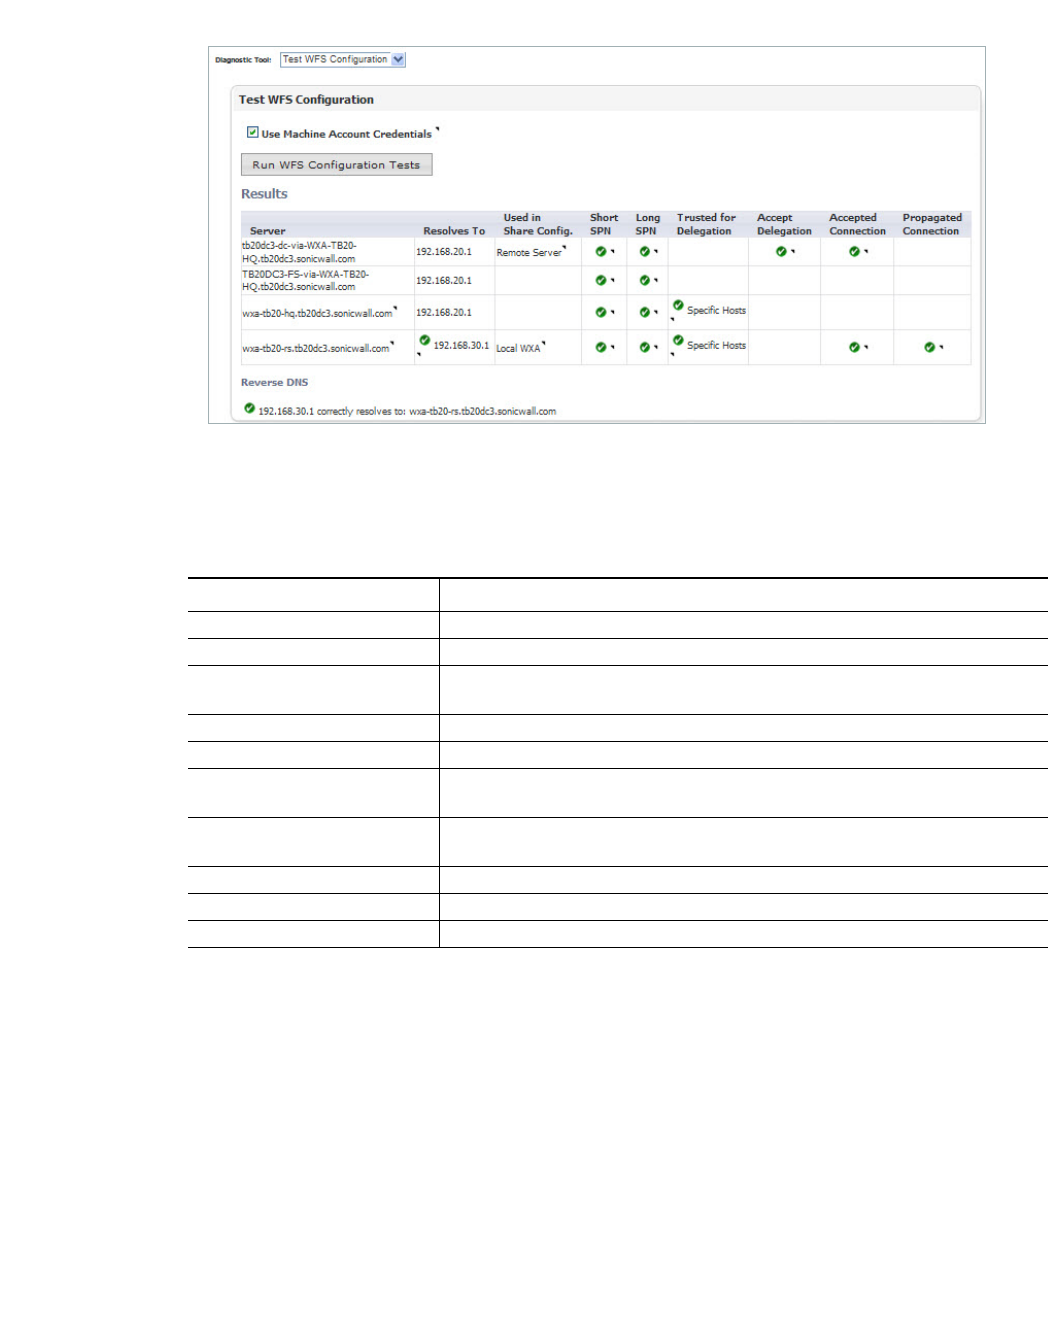
118 | Dell SonicWALL WXA 1.3 User’s Guide
The results display when the test is complete.
The Test WFS Configuration page displays the test results for the WFS Acceleration service. A
green circle indicates a successful configuration, and a red circle indicates an error. Hover over
the circle icons to display the details for that configuration. The results are listed in a table with
the following columns:
Name Description
Server Display the remote server or local WXA names.
Resolves To Displays the IP address that the WXA series appliance is resolved to.
Used in Share Config. Displays the server that is used for sharing. This can be an actual server, or
a WXA series appliance.
Short SPN Verifies a short SPN is present on the machine account.
Long SPN Verifies a long SPN is present on the machine account.
Trusted for Delegation Lists the general server or specific hosts that are trusted for delegation by
the WXA series appliance.
Accept Delegation Displays the hosts that are trusted to present delegated credentials to the
WXA series appliance.
Accepted Connection Verifies the server accepted an authenticated connection.
Propagated Connection Verifies the server propagated an authenticated connection.
Reverse DNS Displays the Reverse DNS address path.
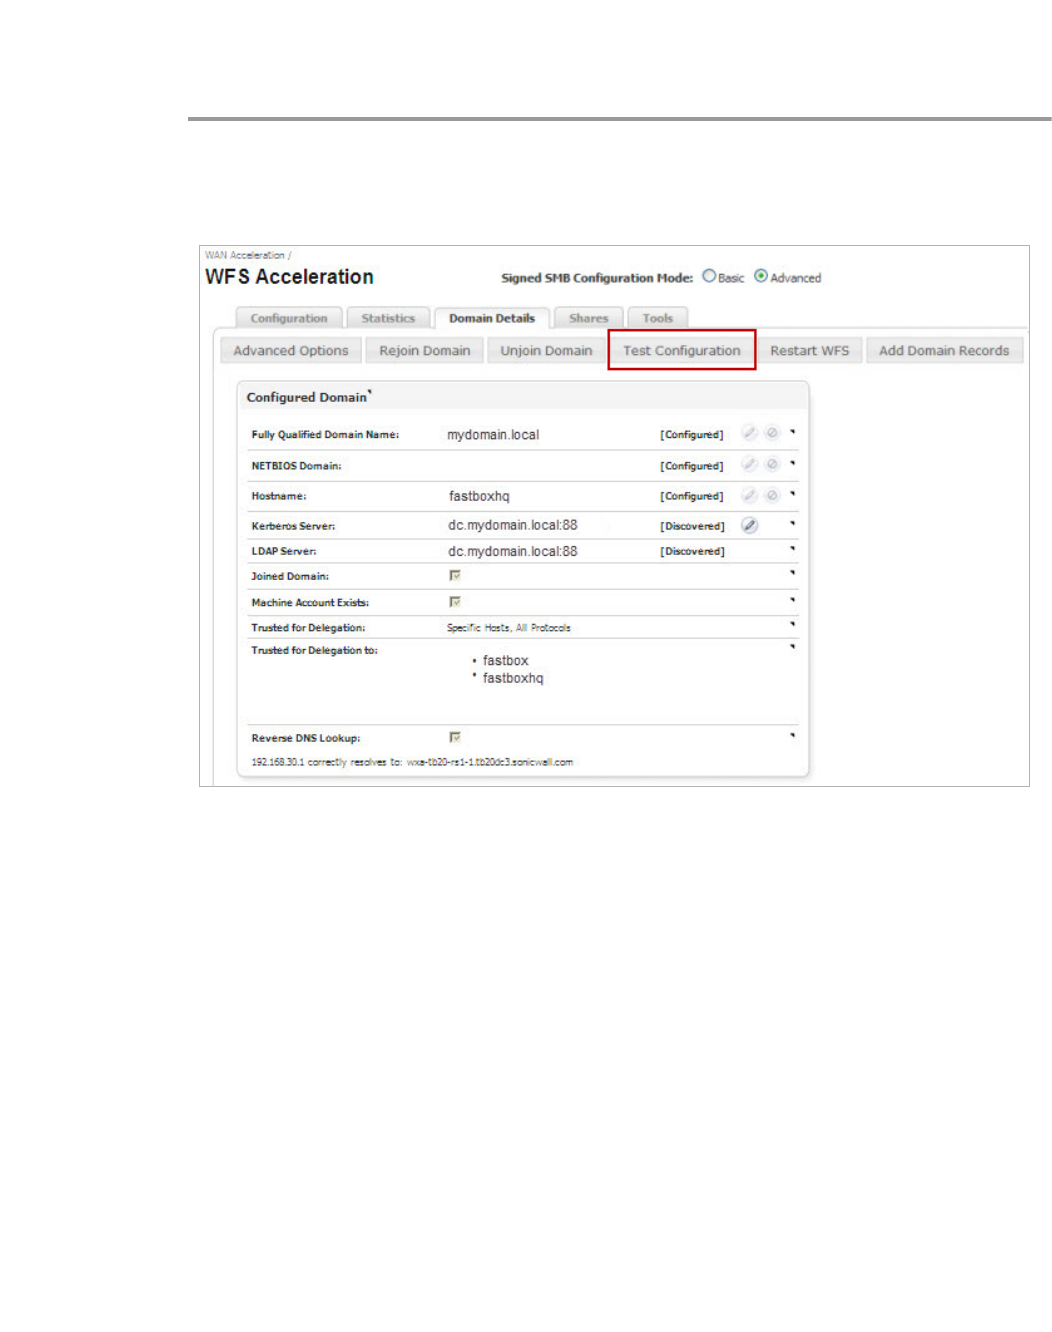
Configuring WFS Acceleration | 119
Verifying WFS Acceleration in Advanced Mode
To verify that the WFS Acceleration was successful using the Domain Details tab in Advanced
mode, perform the following steps:
Step 1 Navigate to the WAN Acceleration > WFS Acceleration page.
Step 2 Select Advanced configuration mode.
Step 3 Select the Domain Details tab.
Step 4 Click Test Configuration.
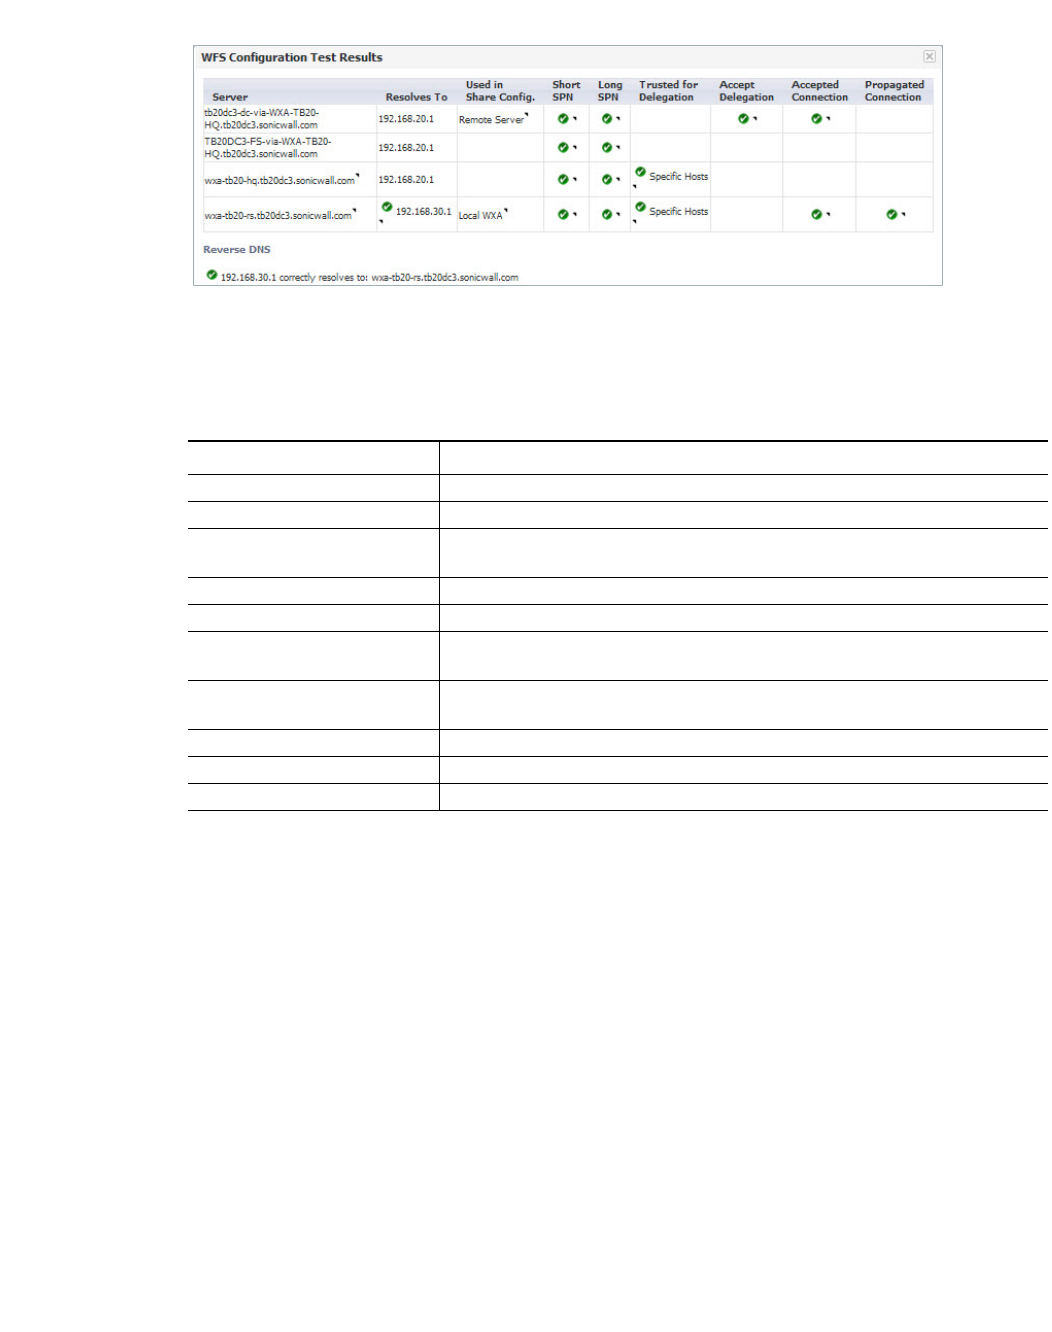
120 | Dell SonicWALL WXA 1.3 User’s Guide
The WFS Configuration Test Results pop-up window displays when the test is complete:
The WFS Configuration Test Results page displays the test results for the WFS Acceleration
service. A green circle indicates a successful configuration, and a red circle indicates an error.
Hover over the circle icons to display the details for that configuration. The results are listed in
a table with the following columns:
If the WFS Acceleration service is not functioning properly, refer to WAN Acceleration > WFS
Acceleration on page 97 and check the configuration settings.
Name Description
Server Display the remote server or local WXA names.
Resolves To Displays the IP address that the WXA series appliance is resolved to.
Used in Share Config. Displays the server that is used for sharing. This can be an actual server, or
a WXA series appliance.
Short SPN Verifies a short SPN is present on the machine account.
Long SPN Verifies a long SPN is present on the machine account.
Trusted for Delegation Lists the general server or specific hosts that are trusted for delegation by
the WXA series appliance.
Accept Delegation Displays the hosts that are trusted to present delegated credentials to the
WXA series appliance.
Accepted Connection Verifies the server accepted an authenticated connection.
Propagated Connection Verifies the server propagated an authenticated connection.
Reverse DNS Displays the Reverse DNS address path.

| 121
Web Cache

122 | Dell SonicWALL WXA 1.3 User’s Guide
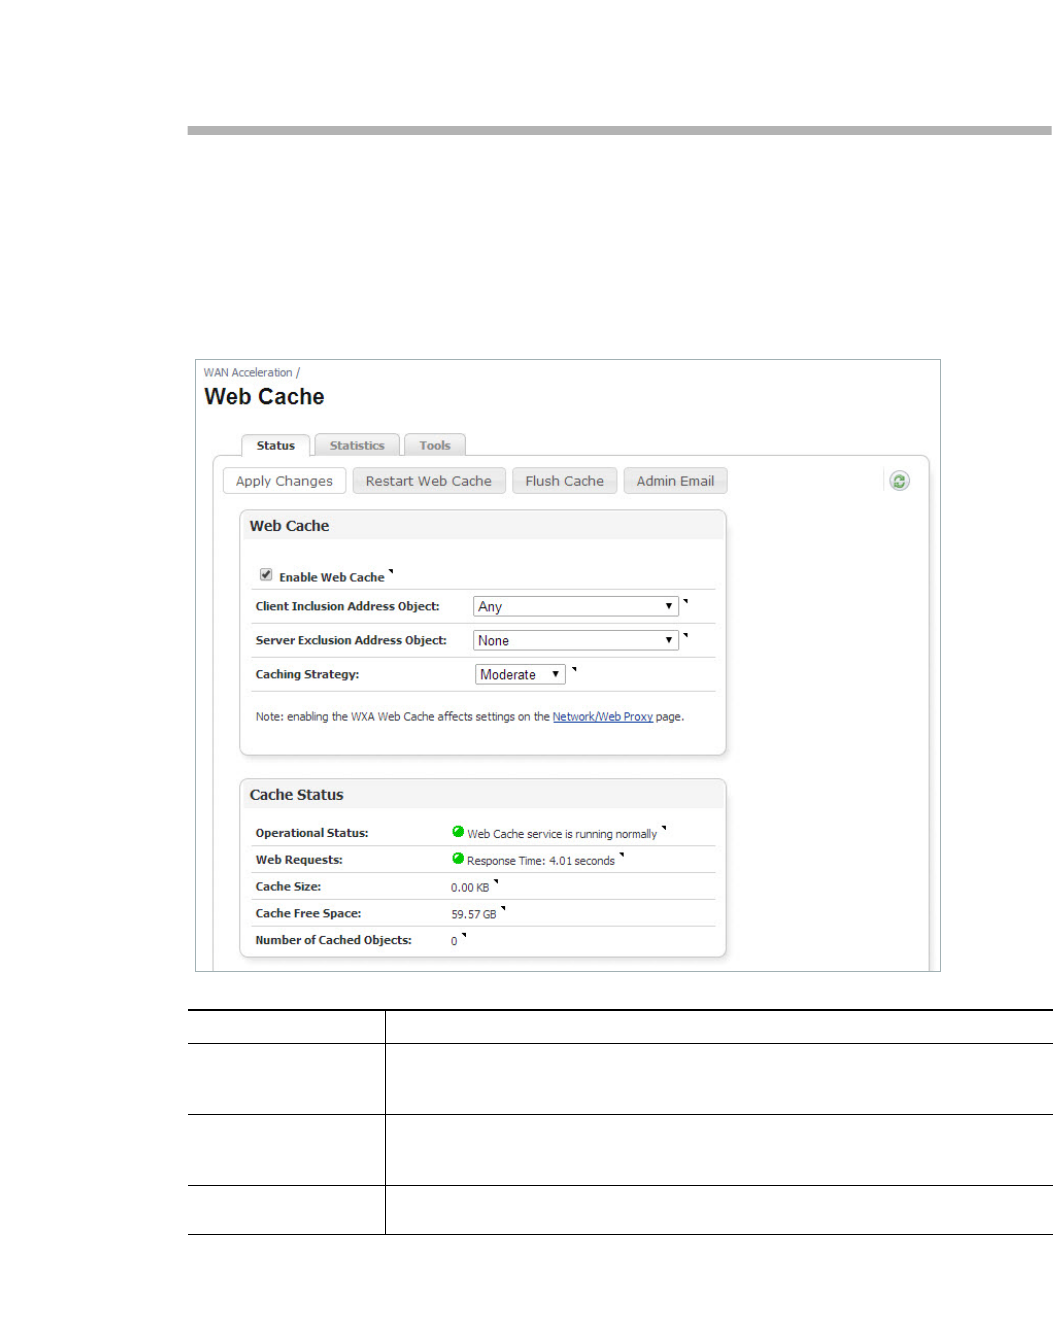
Viewing the Web Cache Page | 123
Chapter 9
Viewing the Web Cache Page
WAN Acceleration > Web Cache
This chapter is an overview of the WAN Acceleration > Web Cache management interface
page. The Web Cache page offers the Status, Statistics, and Tools tabs for configuring and
testing the Web Cache service.
Name Description
Status Tab Displays the Web Cache status and provides configuration options to enable,
restart, flush, and select the caching strategy for the web cache. See Status Tab
on page 124 for details.
Statistics Tab Displays data and graphs detailing the Web Cache data size, total data reduction,
WAN capacity increase factor, cache size cache free space, and number of cached
objects. See Statistics Tab on page 126 for details.
Tools Tab Offers DNS Name Lookup and Web Request diagnostics tools to test the Web
Cache performance. See Tools Tab on page 129 for details.
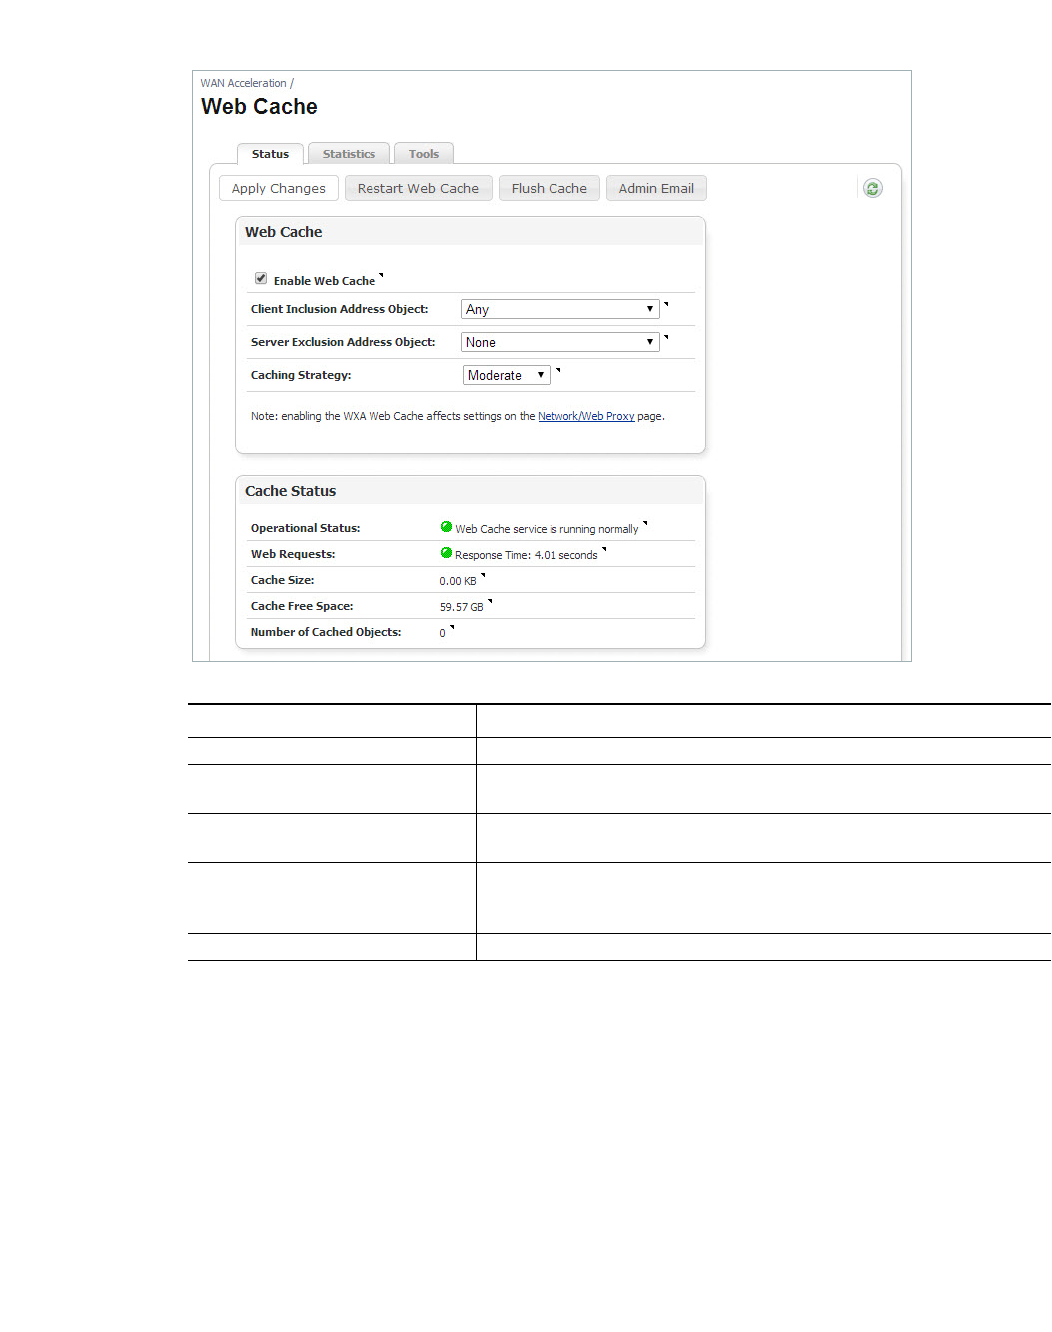
124 | Dell SonicWALL WXA 1.3 User’s Guide
Status Tab
Name Description
Apply Changes Button Applies the latest configuration changes.
Restart Web Cache Button Restarts the Web Cache service. This disconnects any currently open
connections.
Flush Cache Button Removes all the data from the Web Cache. This also restarts the Web
Cache service, disconnecting any open connections.
Admin Email Button Configures the Administrator’s Email address. The Administrator’s
Email address is shown in the Web Cache error pages, these are pre-
sented to a network user in the event of an error.
Refresh Button Refreshes the Web Cache status information.

Viewing the Web Cache Page | 125
Caution The Aggressive mode should be used with caution, it violates the HTTP standard and may
lead to unwanted consequences.
Web Cache Panel Enable or Disable directing web traffic passing through the NSA/TZ
series appliance to the WXA Web Cache via the Enable Web Cache
checkbox.
When the Web Cache is enabled, NAT polices are automatically cre-
ated. If they cause any problems in your network, you can include or
exclude objects to fix it by using the following options:
• In the Client Inclusion Address Object drop-down menu you can
select the Address Object or Group that represents the local subnets
whose web traffic should be diverted via the Web Cache. You can also
choose “Any” and the traffic from any source IP address is forwarded
to the WXA.
• In the Server Exclusion Address Object drop-down menu you
can select the Address Object or Group that contains the destination
address of web servers for which traffic should not be diverted via the
Web Cache. If you select “None” no web server is excluded and all
appropriate traffic is sent via the WXA.
The Caching Strategy determines which objects are placed into the
web cache and how long they stay there. Three options are available
for the Caching Strategy: Minimal, Moderate, and Aggressive. The fol-
lowing describes the different Caching Strategies:
• Minimal - All objects are cached unless the HTTP header specifi-
cally says not to, such as “no cache” or an “expire” time that occurs in
the past.
• Moderate - This is the default web caching strategy. In Moderate
caching mode, the Web Cache keeps objects in the cache for longer
than in Minimal mode. The Web Cache also enforces a minimum age
of 7 days on objects that don't include any 'no caching' control options
(such as no-cache, no-store or an explicit expiry time) in the HTTP
header.
• Aggressive - In Aggressive mode, the Web Cache ignores explicit
expiry time (enforcing a minimum age of 7 days), reload and no-cache
options in HTTP headers.
Note: The Web Cache never caches any data marked as “private” or
“auth” (requiring authorisation to access) in the HTTP header.
When switching from Aggressive or Moderate mode to Minimal
mode, any already cached objects that do not meet the Minimal
caching strategy will be refreshed by the cache.
YouTube caching is implemented in both Moderate and
Aggressive caching modes.
Cache Status Panel Provides read-only data for the Following:
• Operational Status - Displays the operational status of the Web
Cache service.
• Web Requests - Displays the response time in a value of seconds.
• Cache Size - Displays the current size of the cache used by the
Web Cache.
• Cache Free Space - Displays the amount of disk space available to
the Web Cache.
• Number of Cached Objects - Displays the number of objects cur-
rently stored in the Web Cache.
Name Description
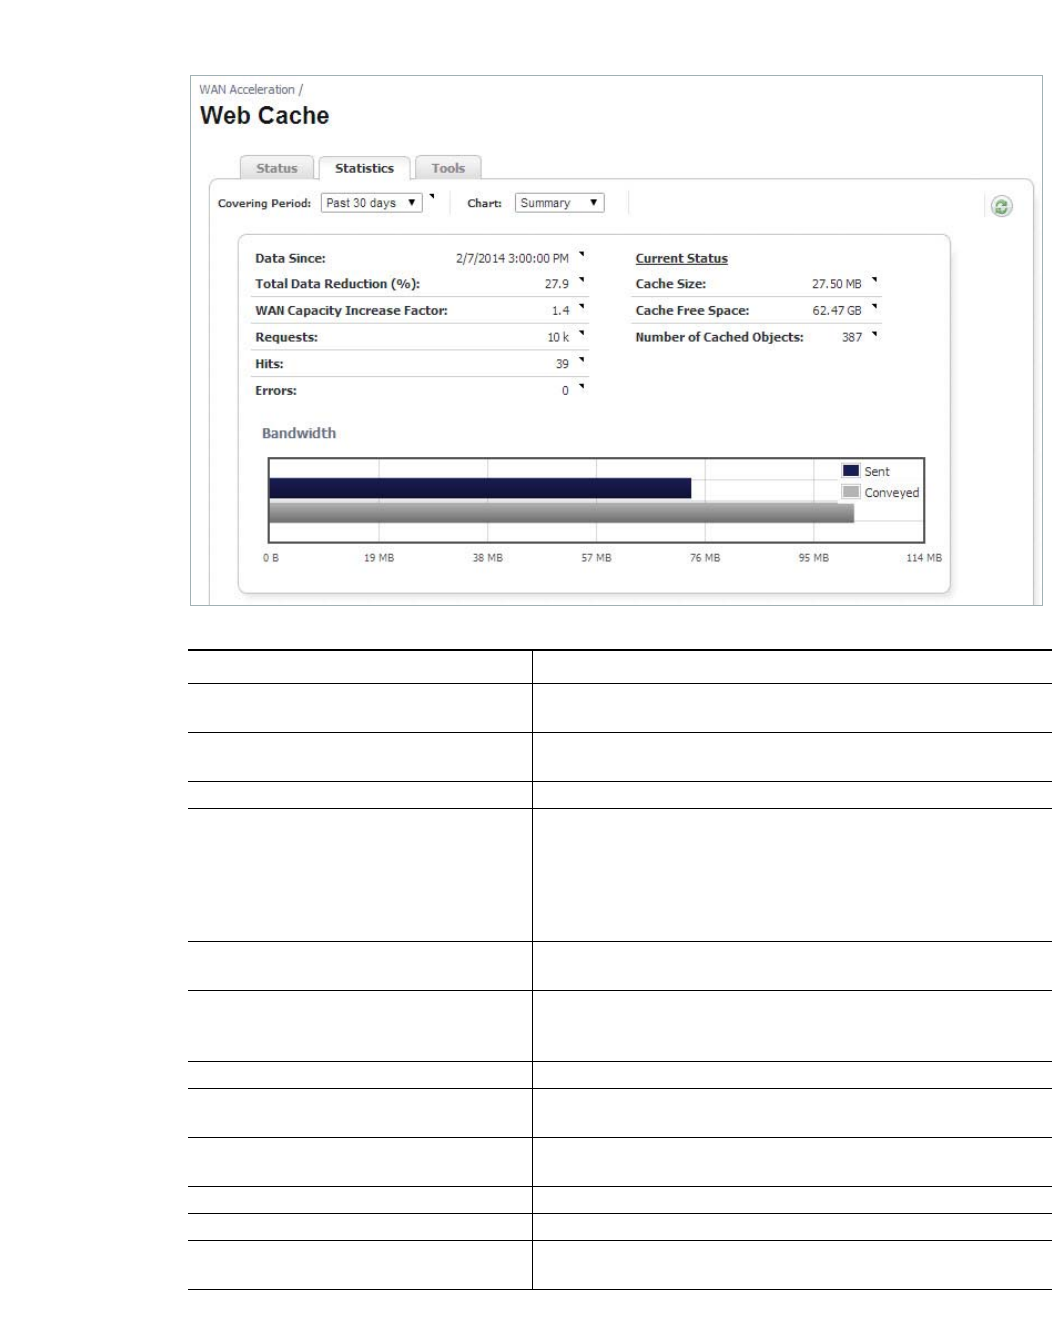
126 | Dell SonicWALL WXA 1.3 User’s Guide
Statistics Tab
Name Description
Covering Period Drop-Down Menu Click the Covering Period drop-down menu and select the
period of time the data displays on the Statistics tab.
Chart: Drop-Down Menu Selects what data displays in the graph. For details on the differ-
ent chart types, see Graphs on page 127.
Refresh Button Refreshes the Web Cache > Statistics tab.
Data Since Displays the actual period covered using the statistics
shown in the data and graphs.
Note: This might differ from the chosen covering period,
depending on the data stored and available on the
appliance.
Total Data Reduction (%) Displays the difference between the data conveyed and the
data sent, represented as a percentage.
WAN Capacity Increase Factor Displays the ratio of the amount of data conveyed to the amount
actually sent. This can be used as a guide to how much extra
capacity the WAN gained without any increase in bandwidth.
Requests The number of requests made during the selected period.
Hits The number of requests that were served from the Web Cache
during the selected period.
Errors The total number of errors encountered during the selected
period.
Cache Size Displays the current size of the cache used by the Web Cache.
Cache Free Space Displays the amount of disk space available to the Web Cache.
Number of Cached Objects Displays the number of objects currently stored in the Web
Cache.
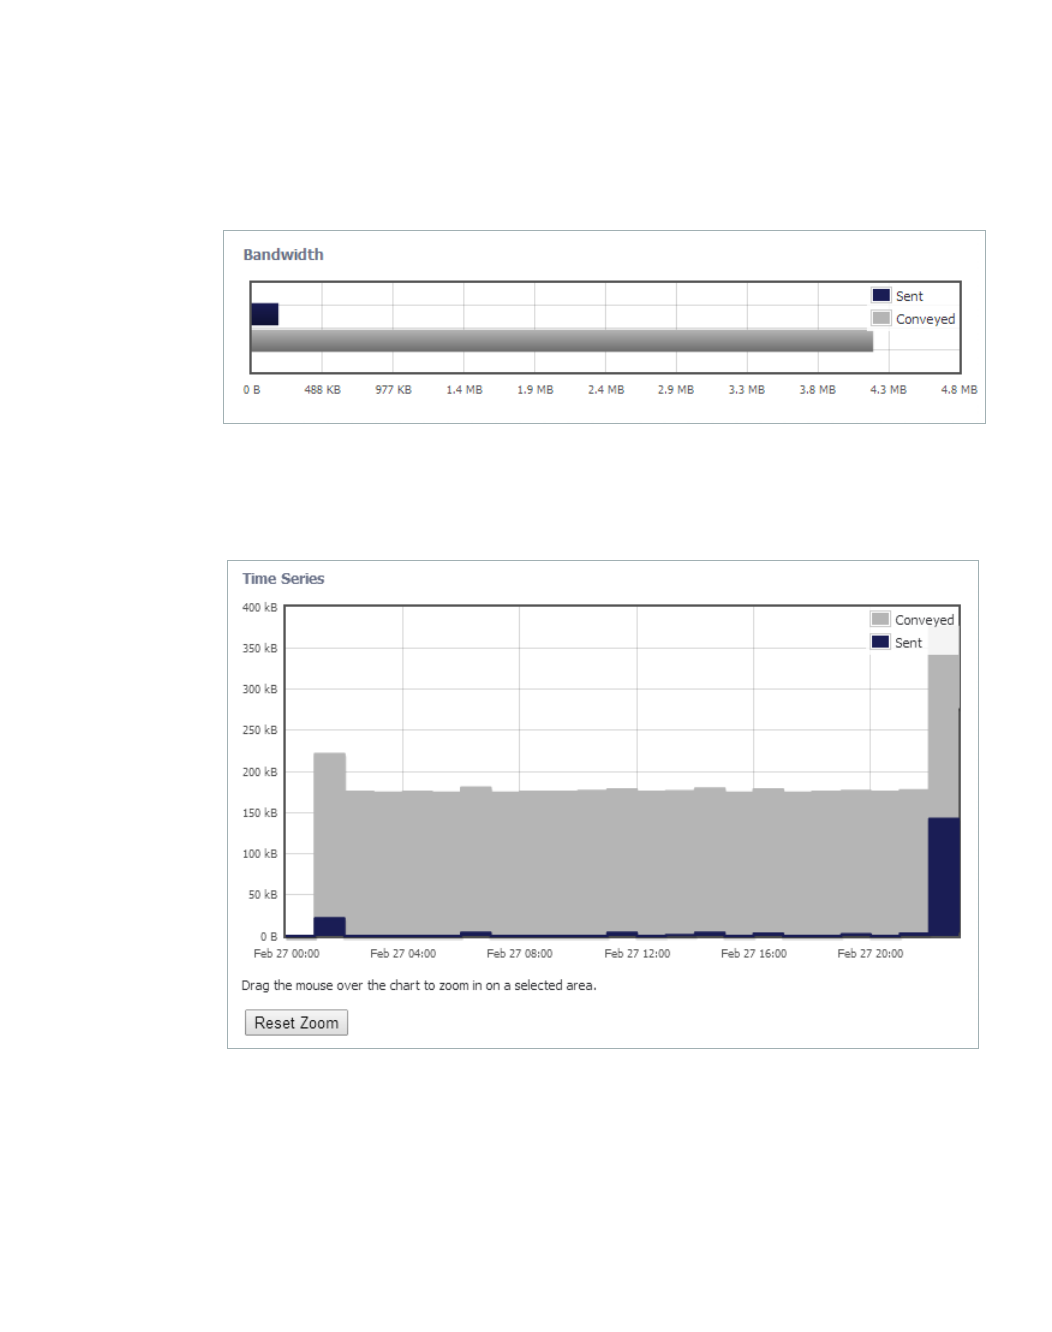
Viewing the Web Cache Page | 127
Graphs
The Statistics graphs display the Web Cache data for the selected Covering Period and Chart. The Conveyed
data is the number of bytes that would be sent from a web server without the use of the WXA series appli-
ance’s Web Cache. The Sent data is the bytes that are actually sent from web servers in response to the
user’s web request, with the remainder being served from the cache. A “Hit” is when an object is served from
the Web Cache instead of fetched from the internet. The following Chart types are available:
• Summary— The Summary chart graphically displays the sent and conveyed bandwidth
data.
• Time Series— The Time Series chart graphically displays the sent and conveyed data over
a specified period of time. You can drag the mouse over the chart to zoom in on a selected
area. To zoom back out, click the Reset Zoom button.
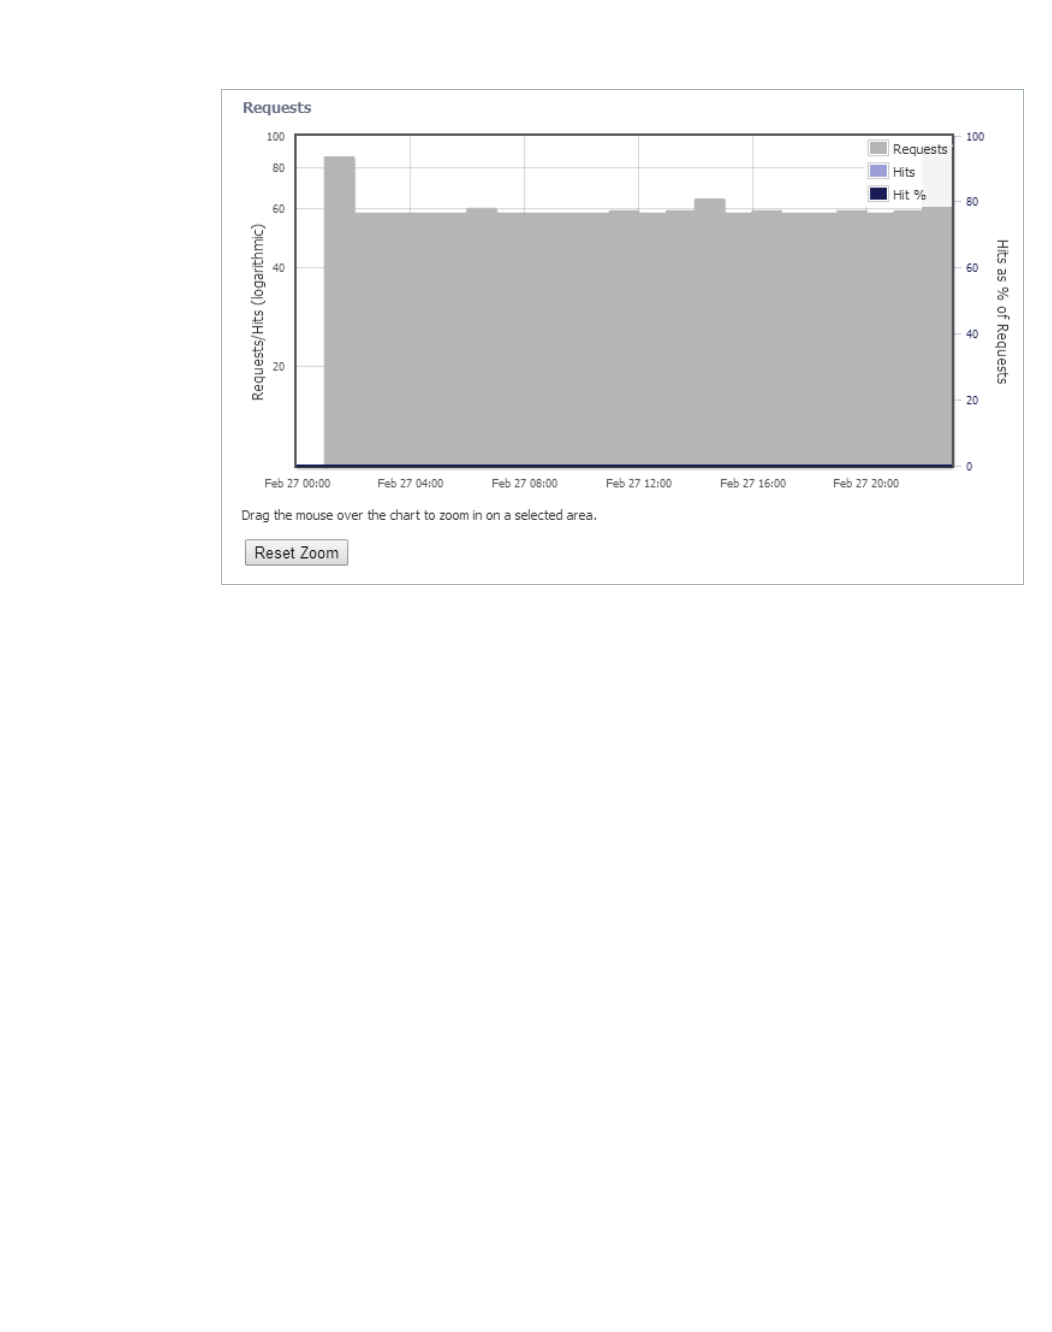
128 | Dell SonicWALL WXA 1.3 User’s Guide
• Requests— The Requests chart graphically displays the number of requests, hits, and
hits% over a selected period of time. You can drag the mouse over the chart to zoom in on
a selected area. To zoom back out, click the Reset Zoom button
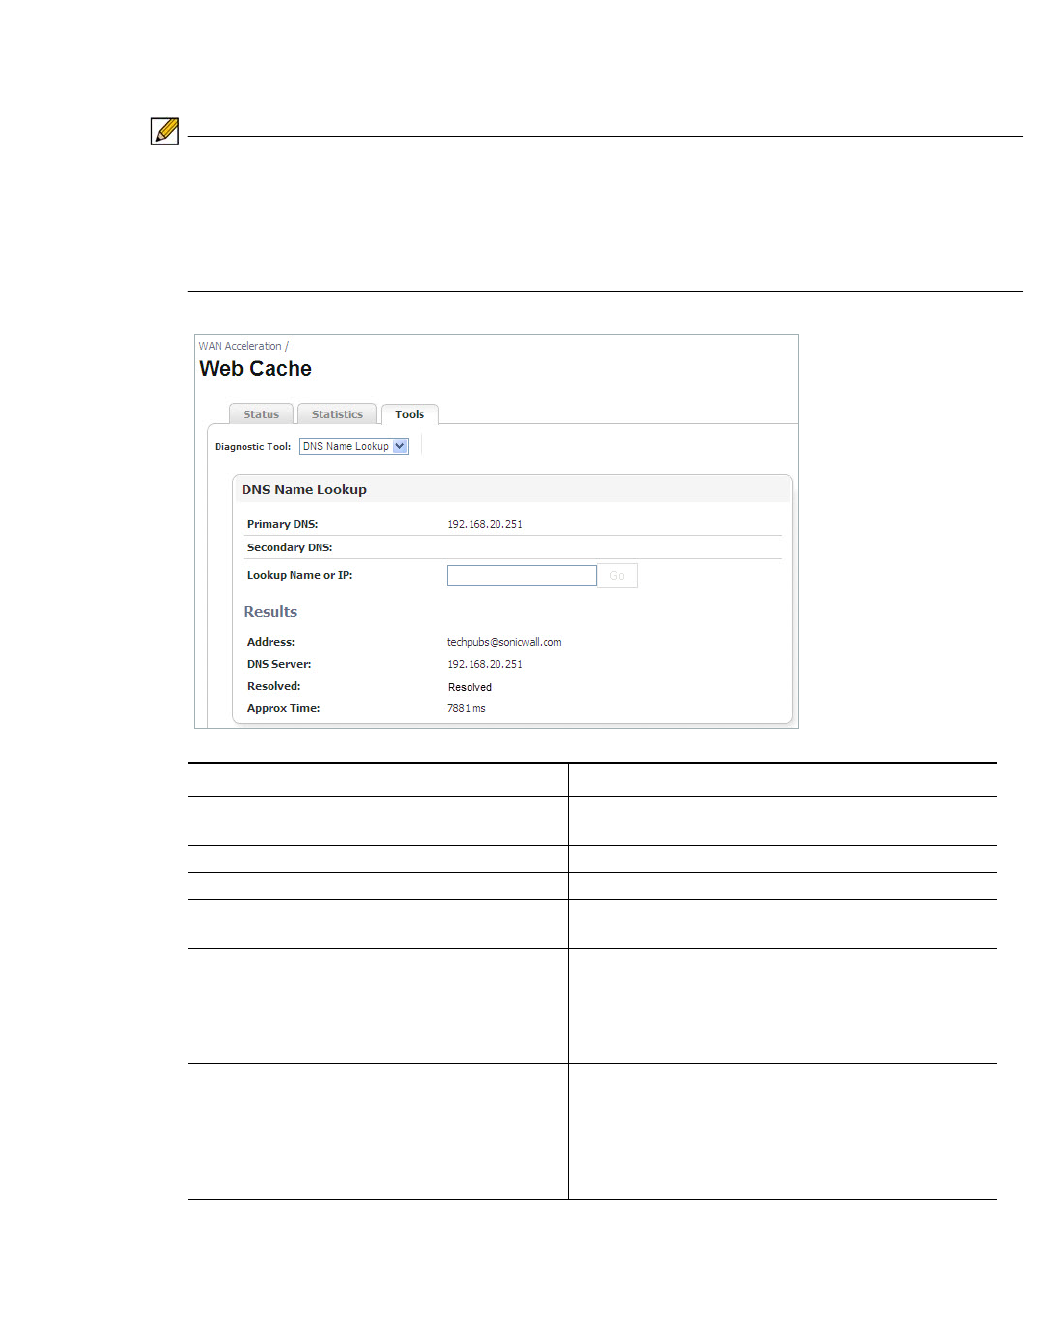
Viewing the Web Cache Page | 129
Tools Tab
Test the performance or diagnose the Web Caching feature by using the DNS Name Lookup or
Web Request diagnostic tools and viewing the results.
Note The Tools tab management interface options change depending on which diagnostic tool
(DNS Name Lookup or Web Request) is selected from the Diagnostic Tool drop-down menu.
The DNS servers used in these lookups are the DNS servers inherited from the NSA/TZ
series appliance’s settings. They may be different to the DNS servers actually used on a
user's PC.
Name Description
Diagnostic Tool > DNS Name Lookup Selects the tool type from the Diagnostic Tool drop-
down menu.
Primary DNS (read only) Displays the primary DNS IP address.
Secondary DNS (read only) Displays the secondary DNS IP address.
Lookup Name or IP Text Field Enter the DNS name or IP address you wish to look
up.
Go Button Initiates the search for the DNS name or IP address
entered in the “Lookup Name or IP” text field.
This button is greyed out until a DNS name or IP
address is entered into to “Lookup Name or IP” text
field.
Results Display the following results for the IP/Name
Lookup:
• Address
• DNS Server
• Resolved
• Approximate Time
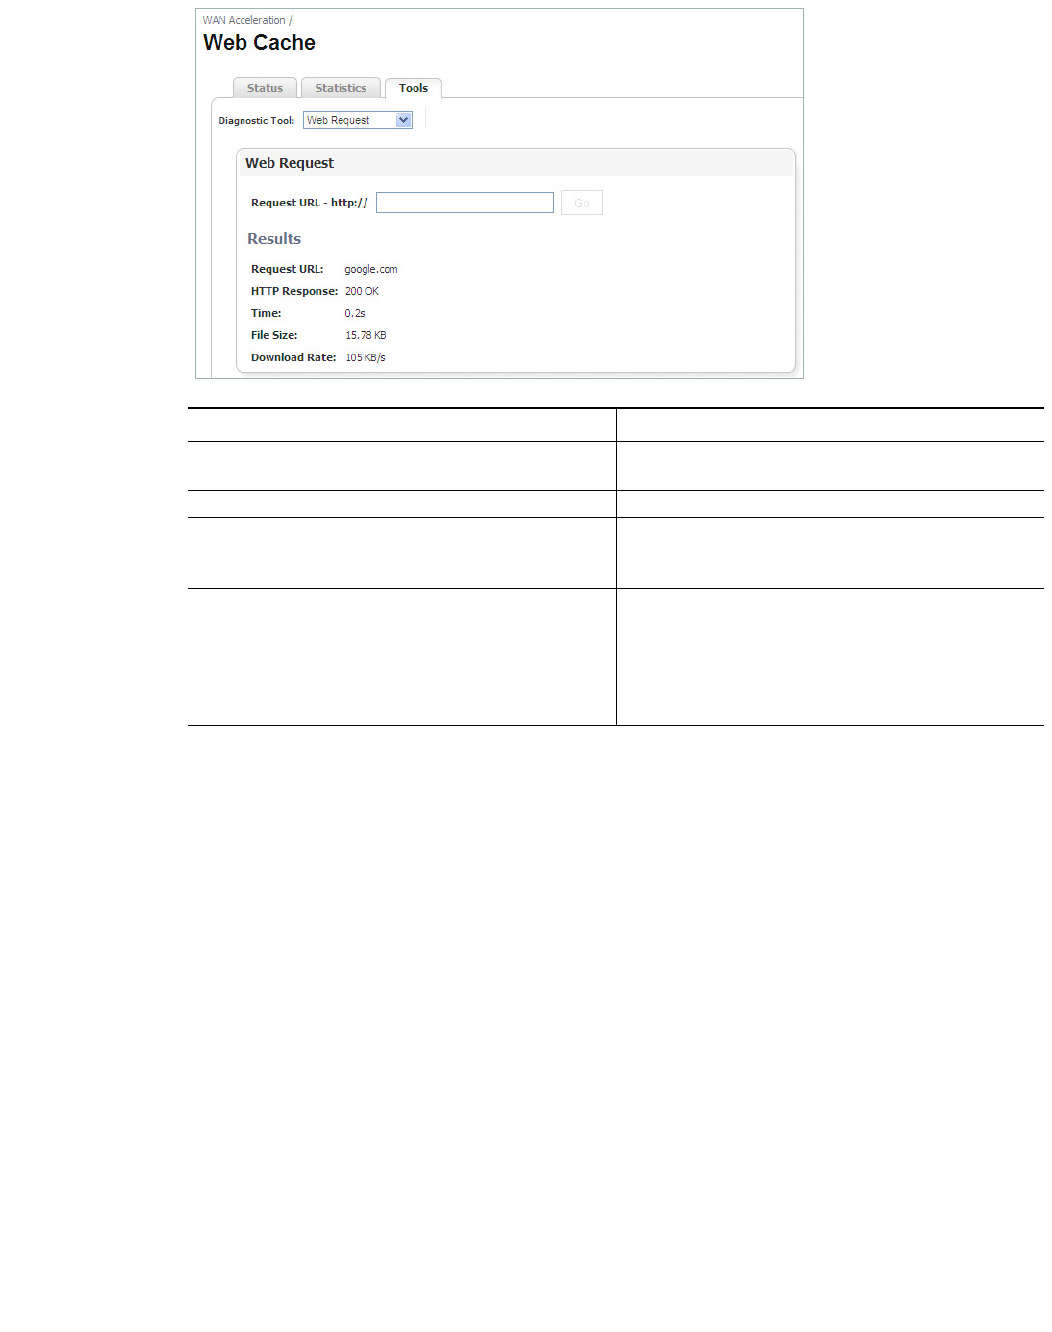
130 | Dell SonicWALL WXA 1.3 User’s Guide
Name Description
Diagnostic Tool > Web Request Selects the tool type from the Diagnostic Tool drop-
down menu.
Request URL - http:// Text Field Enter the URL you wish to test.
Go button Initiates the test for the requested URL.
This button is greyed out until a URL is entered into
to “Request URL” text field
Results Displays the following results for the requested URL:
• Request URL
• HTTP Response
• Time
• File Size
• Download Rate

Configuring the Web Cache | 131
Chapter 10
Configuring the Web Cache
WAN Acceleration > Web Cache
The Web Cache page provides options to enable, configure, view results, diagnose, and test
performance of the Web Cache feature. By enabling the Web Cache service, the NSA/TZ series
appliance immediately begins transparently forwarding HTTP connections to the WXA series
appliance and saving bandwidth.
Consider the following when configuring the Web Cache service:
• When the Web Cache checkbox is enabled, the Web Proxy fields are automatically
populated in the Network > Web Proxy page in the SonicOS management interface.
• There is no need to configure the HTTP clients with proxy settings since the NSA/TZ series
appliance transparently redirects standard HTTP connections onto the proxy.
• When the Web Cache is enabled, the NSA/TZ series appliance disables redirection of
HTTP connections to the WXA series appliance if it becomes unavailable.
• The Web Cache service is not available in WXA 500 Live CD Memory Mode.
To configure the Web Cache service, refer to the following sections:
• Configuring the Web Cache on page 132
• Verifying Web Cache Operation on page 134
• Diagnosing and Testing Performance of the Web Cache on page 135
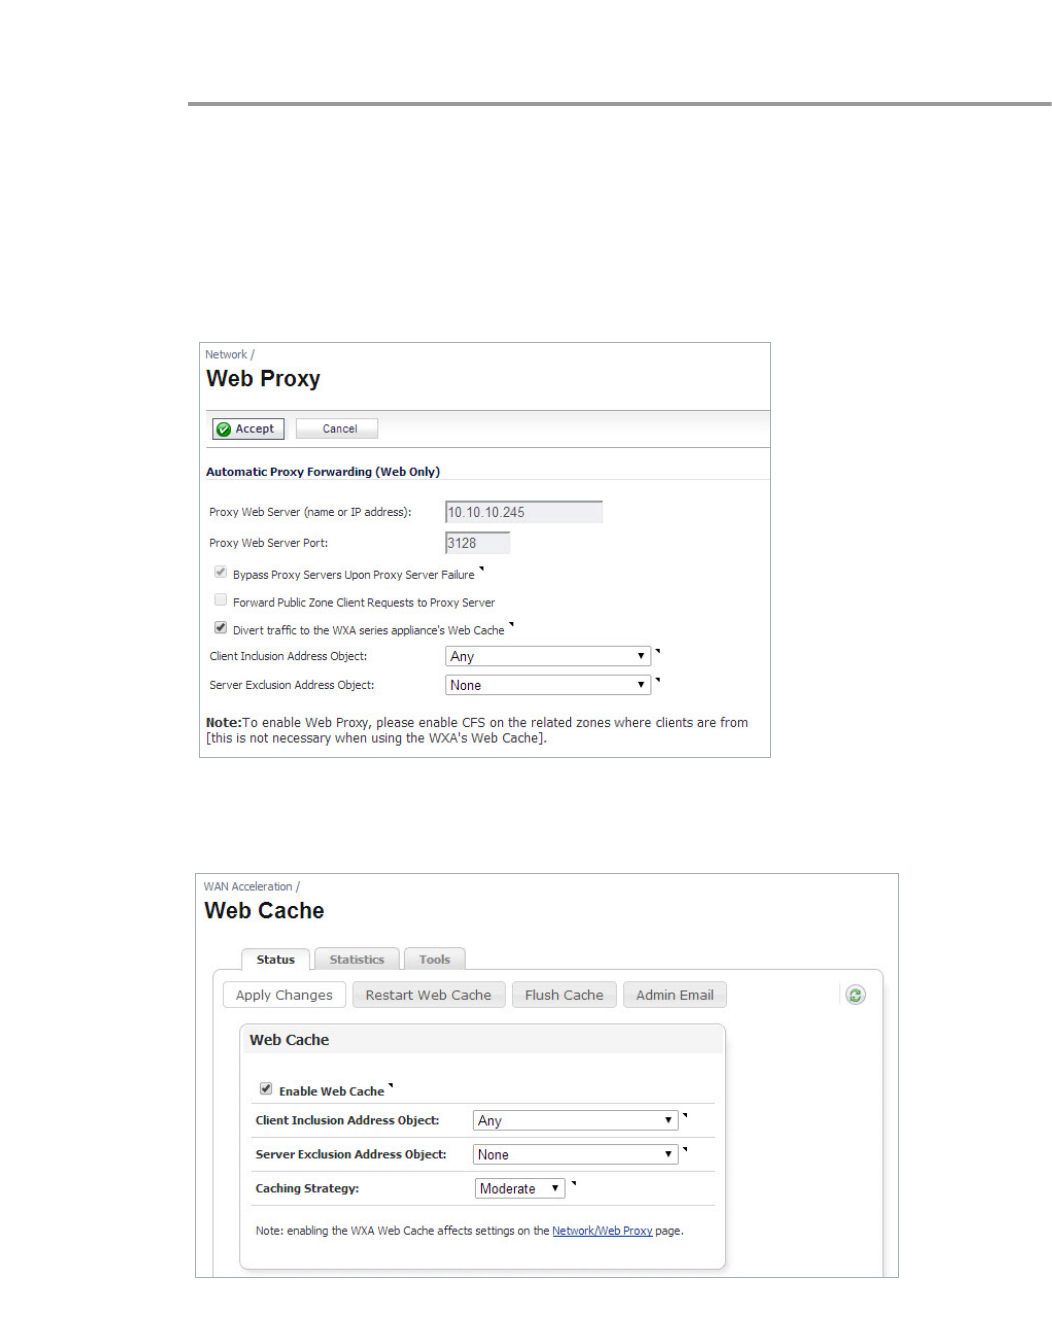
132 | Dell SonicWALL WXA 1.3 User’s Guide
Configuring the Web Cache
To configure the Web Cache page, perform the following:
Step 1 Login to the managing NSA/TZ series appliance, and then navigate to the Network > Web
Proxy page.
Step 2 Select the Divert traffic to the WXA series appliance’s Web Cache checkbox. This enables
the use of the associated WXA series appliance as a caching web proxy. Selecting this option
automatically fills in the Proxy Web Server and Proxy Web Server Port text-fields.
Step 3 NAT rules are automatically created for directing traffic via the WXA series appliance.
Step 4 Click the Accept button.
Step 5 Navigate to the WAN Acceleration > Web Cache page.
Step 6 Select the Enable Web Cache checkbox.

Configuring the Web Cache | 133
Step 7 In the Client Inclusion Address Object drop-down menu you can select the Address Object
or Group that represents the local subnets whose web traffic should be diverted via the Web
Cache. You can also choose “Any” and the traffic from any source IP address is forwarded to
the WXA.
Step 8 In the Server Exclusion Address Object drop-down menu you can select the Address Object
or Group that contains the destination address of web servers for which traffic should not be
diverted via the Web Cache. If you select “None” no web server is excluded and all appropriate
traffic is sent via the WXA.
Step 9 The Caching Strategy determines which objects are placed into the web cache and how long
they stay there. Click the Caching Strategy drop-down menu, and then select one of the web
caching strategies:
• Minimal - All objects are cached unless the HTTP header specifically says not to, such as
“no cache” or an “expire” time that occurs in the past.
• Moderate (default) - This is the default web caching strategy. In Moderate caching mode,
the Web Cache keeps objects in the cache for longer than in Minimal mode. The Web
Cache also enforces a minimum age of 7 days on objects that don't include any 'no caching'
control options (such as no-cache, no-store or an explicit expiry time) in the HTTP header.
• Aggressive - In Aggressive mode, the Web Cache ignores explicit expiry time (enforcing
a minimum age of 7 days), reload and no-cache options in HTTP headers.
Caution The Aggressive mode should be used with caution, it violates the HTTP standard and may
lead to unwanted consequences.
Step 10 Click the Apply Changes button.
Step 11 Verify the Web Cache service is working, see Verifying Web Cache Operation on page 134 for
details.
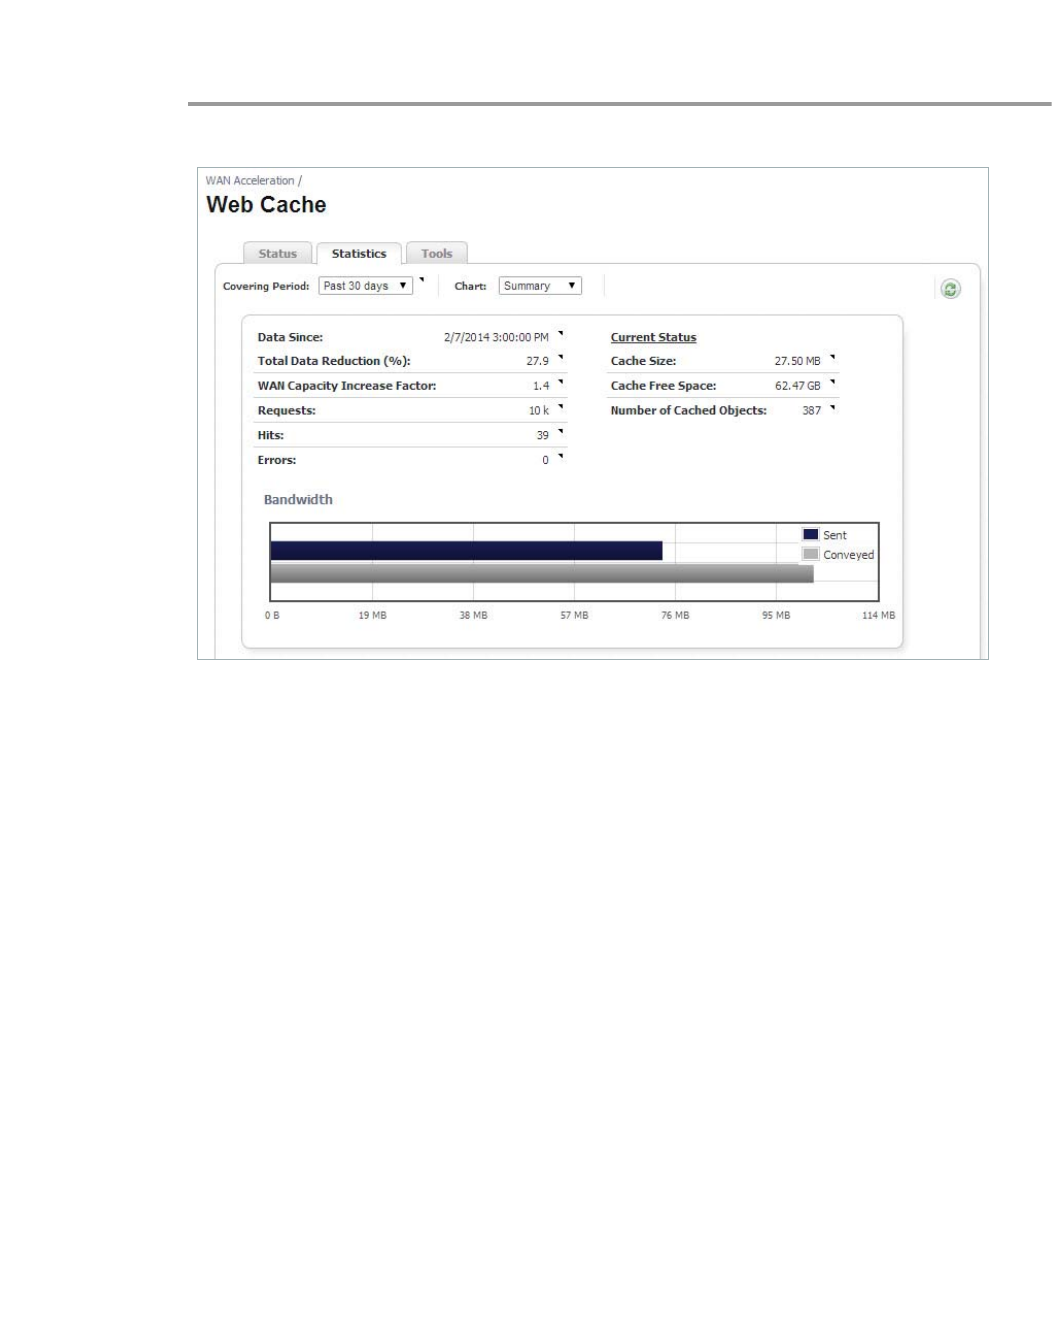
134 | Dell SonicWALL WXA 1.3 User’s Guide
Verifying Web Cache Operation
After Configuring the Web Cache service, perform the following verification steps:
Step 1 Navigate to the Web Cache > Statistics tab.
Step 2 View the number of cached objects to confirm the Web Cache service is working.
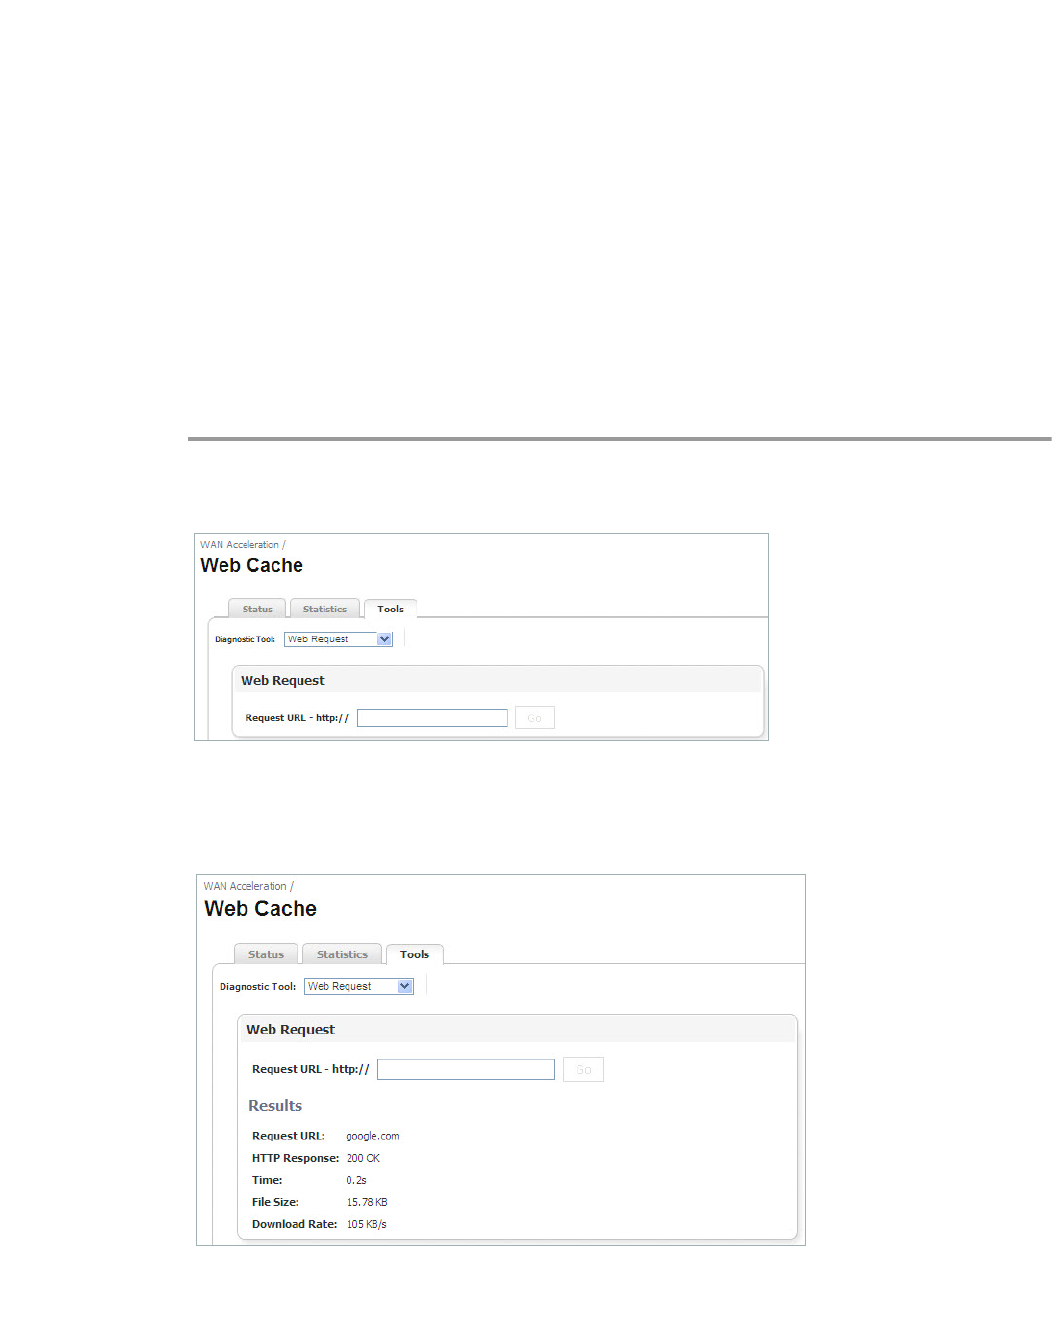
Configuring the Web Cache | 135
Diagnosing and Testing Performance of the Web Cache
Test the performance or diagnose the Web Caching features on the Web Cache > Tools tab by
using the Web Request diagnostic tools and viewing the results.
DNS Lookups are not used in the operation of the Web cache, but there is a DNS Name Lookup
tool provided on this page for the Administrator.
This section contains the following subsections:
• Web Request on page 135
• DNS Name Lookup on page 136
Web Request
The Web Request panel sends a request for the entered URL and displays the results including
the requested URL, HTTP response, process time, file size, and download rate. To configure
the Web Request panel, perform the following:
Step 1 Navigate to the Web Cache > Tools tab.
Step 2 Click the Diagnostic Tools drop-down menu and select Web Request.
Step 3 Enter a URL (e.g. google.com) in the Request URL - http:// text-field.
Step 4 Click the Go button.
The test results display:
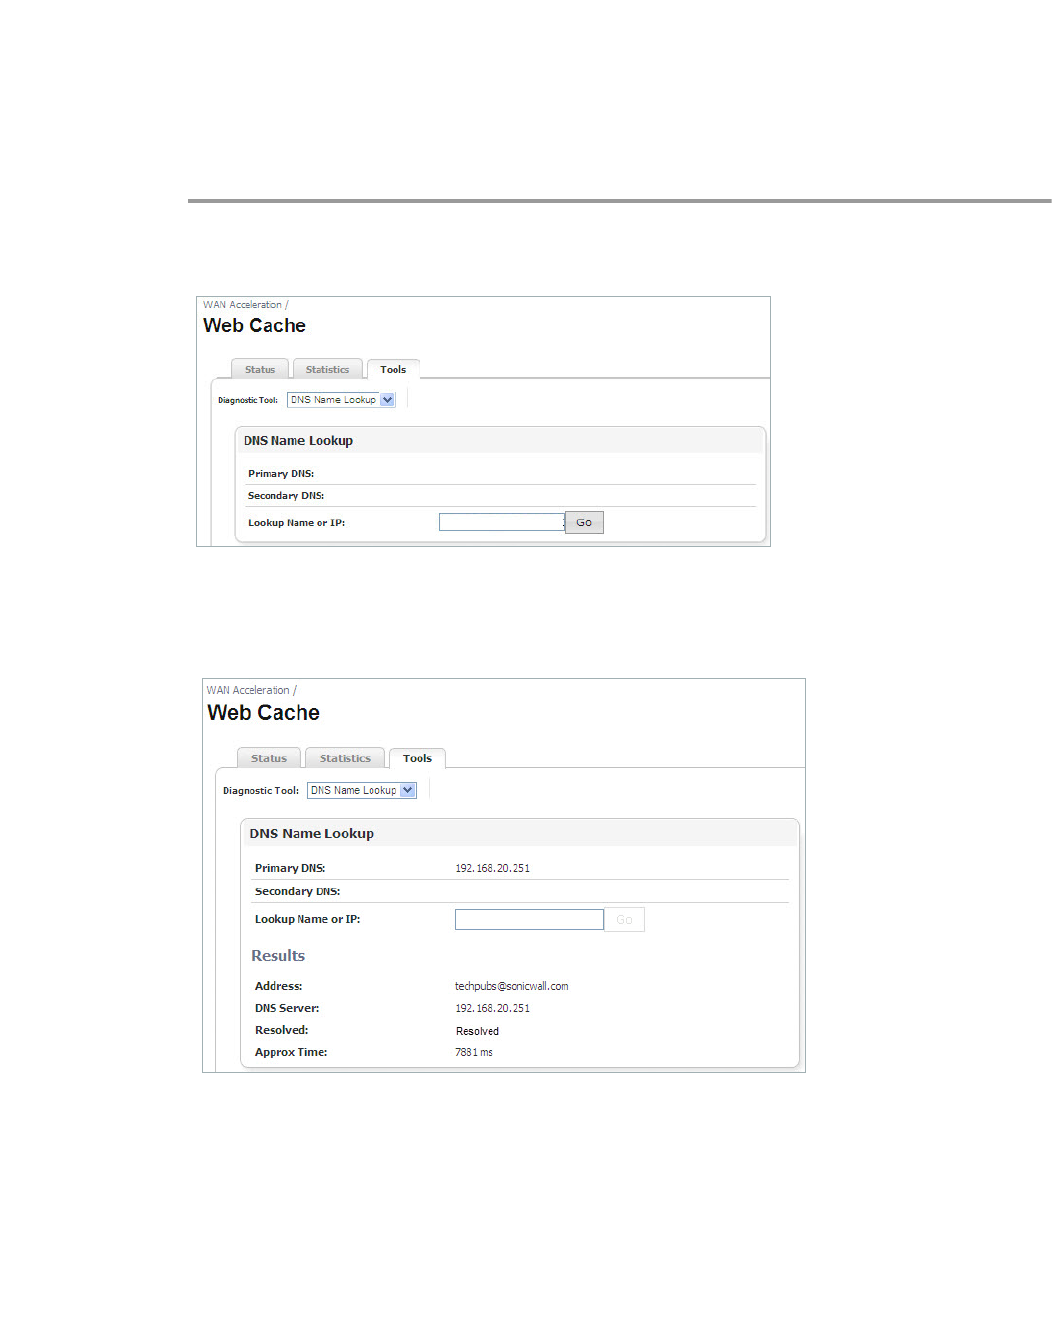
136 | Dell SonicWALL WXA 1.3 User’s Guide
DNS Name Lookup
The DNS Name Lookup panel searches for a name or IP address and displays results including
the address, DNS server, resolved status, and lookup time. The DNS servers used in these
lookups are the DNS servers inherited from the NSA/TZ series appliance’s settings. They may
be different to the DNS servers actually used on a user's PC.
To configure the DNS Name Lookup panel, perform the following:
Step 1 Navigate to the Web Cache > Tools tab.
Step 2 Click the Diagnostic Tool drop-down menu and select DNS Name Lookup.
Step 3 Enter a name or IP address (e.g. www.sonicwall.com) in the Lookup Name or IP text-field.
Step 4 Click the Go button.
The test results display:

| 137
System

138 | Dell SonicWALL WXA 1.3 User’s Guide
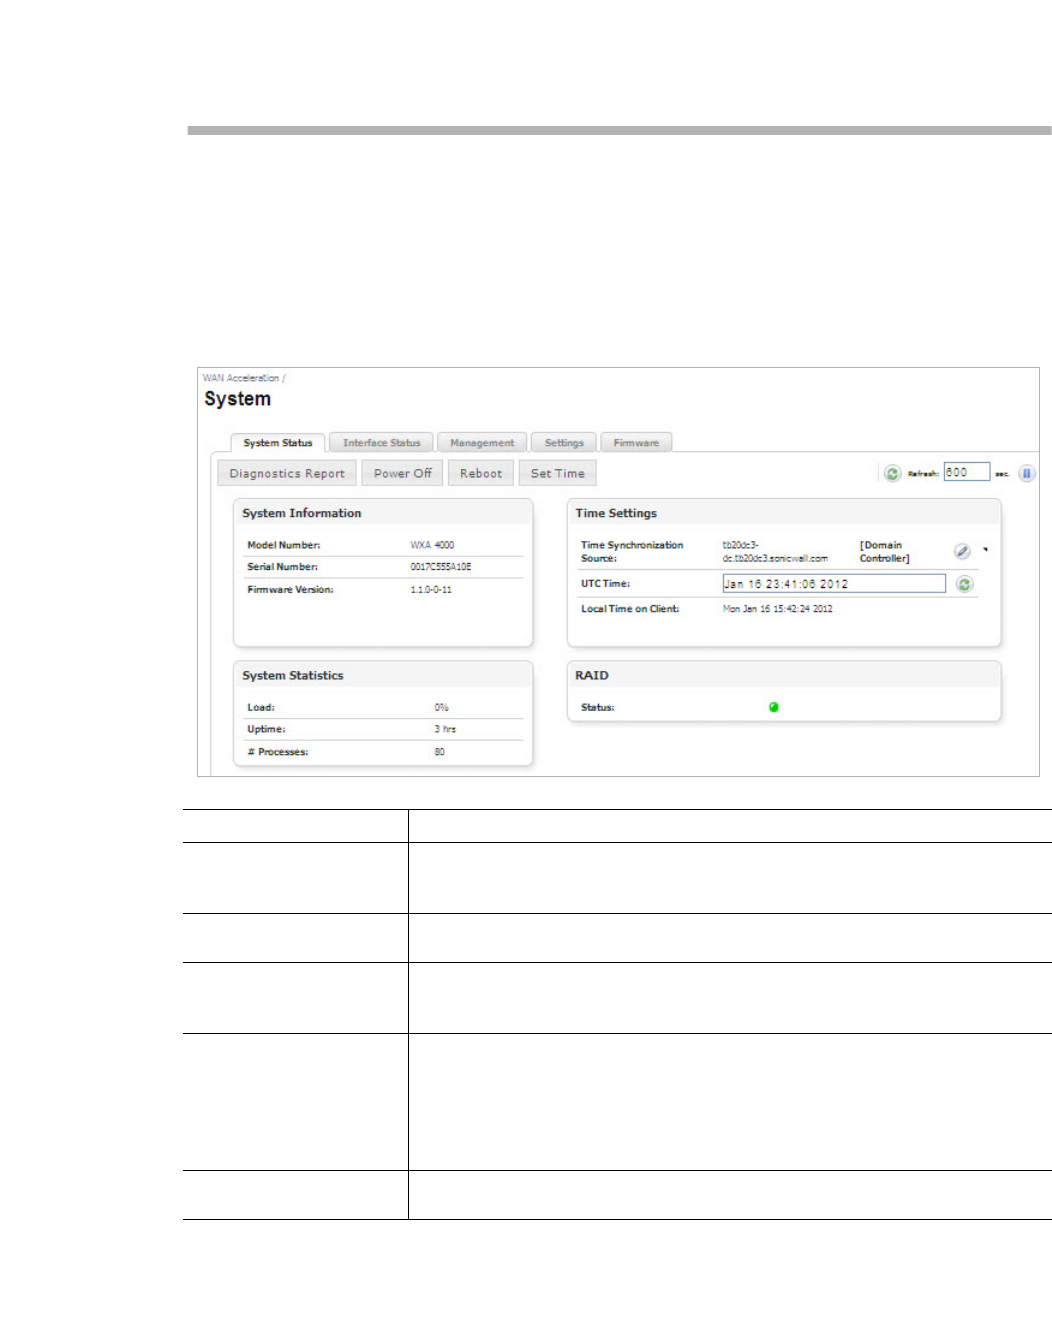
Viewing the System Page | 139
Chapter 11
Viewing the System Page
WAN Acceleration > System
The System page provides options to monitor and change the WAN Acceleration system
settings. This chapter details the management interface functions of the System Status,
Interface Status, Management, Settings, and Firmware tabs.
Name Description
System Status Tab Displays the system details about the WXA series appliance including system
information, time settings, and system statistics. See the System Status Tab on
page 140 for details.
Interface Status Tab Monitors the WAN Acceleration interface by displaying the status and statistics.
See the Interface Status Tab on page 142 for details.
Management Tab Displays details about the configuration of the Simple Network Management
Protocol (SNMP) and the Syslog Server functions. See the Management Tab
on page 143 for details.
Settings Tab Displays details about the configuration of the WXA series appliance and pro-
vides an option to browse for policies to upload.
A settings file is an XML document that captures the current configuration set-
tings of the WXA series appliance. The configuration settings can then be
restored on the WXA series appliance after a firmware upgrade or factory reset
is performed. See the Settings Tab on page 144 for details.
Firmware Tab Displays details about the current firmware and the steps for upgrading. See the
Firmware Tab on page 145 for details.
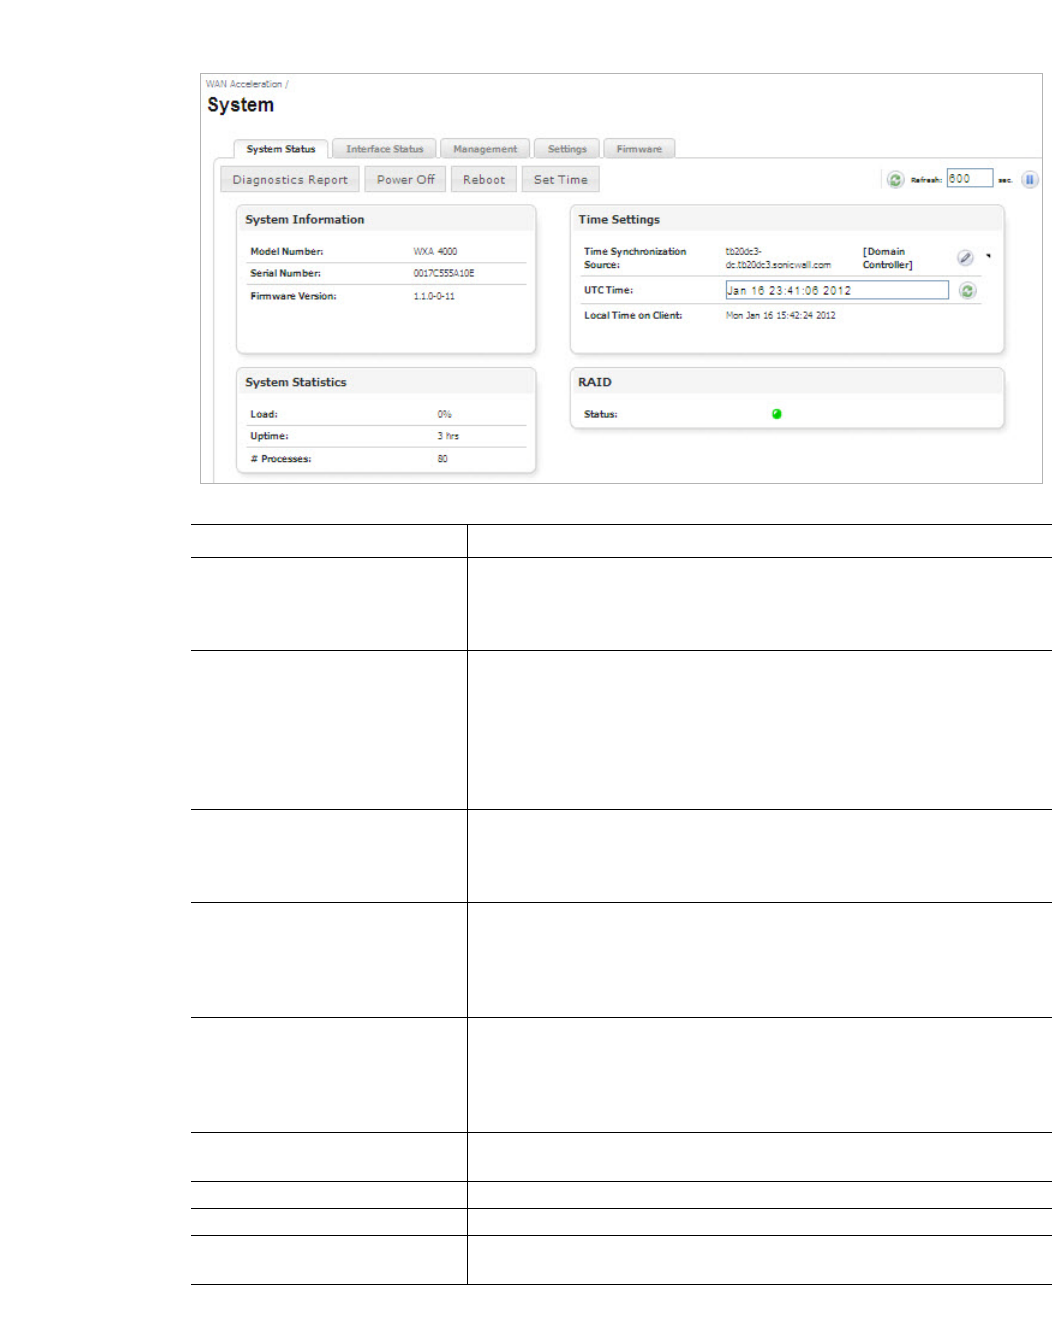
140 | Dell SonicWALL WXA 1.3 User’s Guide
System Status Tab
Name Description
System Information Panel (Read-only) Displays the following information:
• Model Number
• Serial Number
• Firmware Version.
Time Settings Panel Configure the time synchronization source , refresh the UTC time, or
view the local time on client. It is recommended to synchronize the time
between the WXA series appliance and the domain controller. However,
you can configure an NTP server to synchronize time with the WXA
series appliance if WFS Acceleration (Signed SMB) is not required. NTP
servers issue time as UTC, and time zones do not affect the time
received by the NTP servers.
System Statistics Panel (Read-only) Displays the following information:
• Load
• Uptime
• Number of processes
RAID Panel Indicates the RAID status (for the WXA 4000 only). A green circle indi-
cates the RAID is ok. A red circle indicates the RAID is inoperable,
unknown, or degraded. A yellow circle indicates the RAID is recovering,
initializing, initializing-paused, verifying, verifying-paused, rebuilding, or
rebuilding-paused.
Refresh Button Refreshes the System Status tab. The refresh interval can be entered in
the box to the right of the Refresh symbol. The interval can be increased
to a maximum of 999 seconds.
Click the Refresh button to manually update the System Status tab.
Click the Pause button to stop updates on the page.
Diagnostics Report Button Downloads a diagnostics report file. This file can be sent to Technical
Support and reviewed for diagnostic help.
Power Off Button Shuts down the WXA series appliance.
Reboot Button Reboots the WXA series appliance.
Set Time Button Resets the time on the appliance. If using a time synchronization source
(domain controller or NTP server) it will overwrite the time set manually.
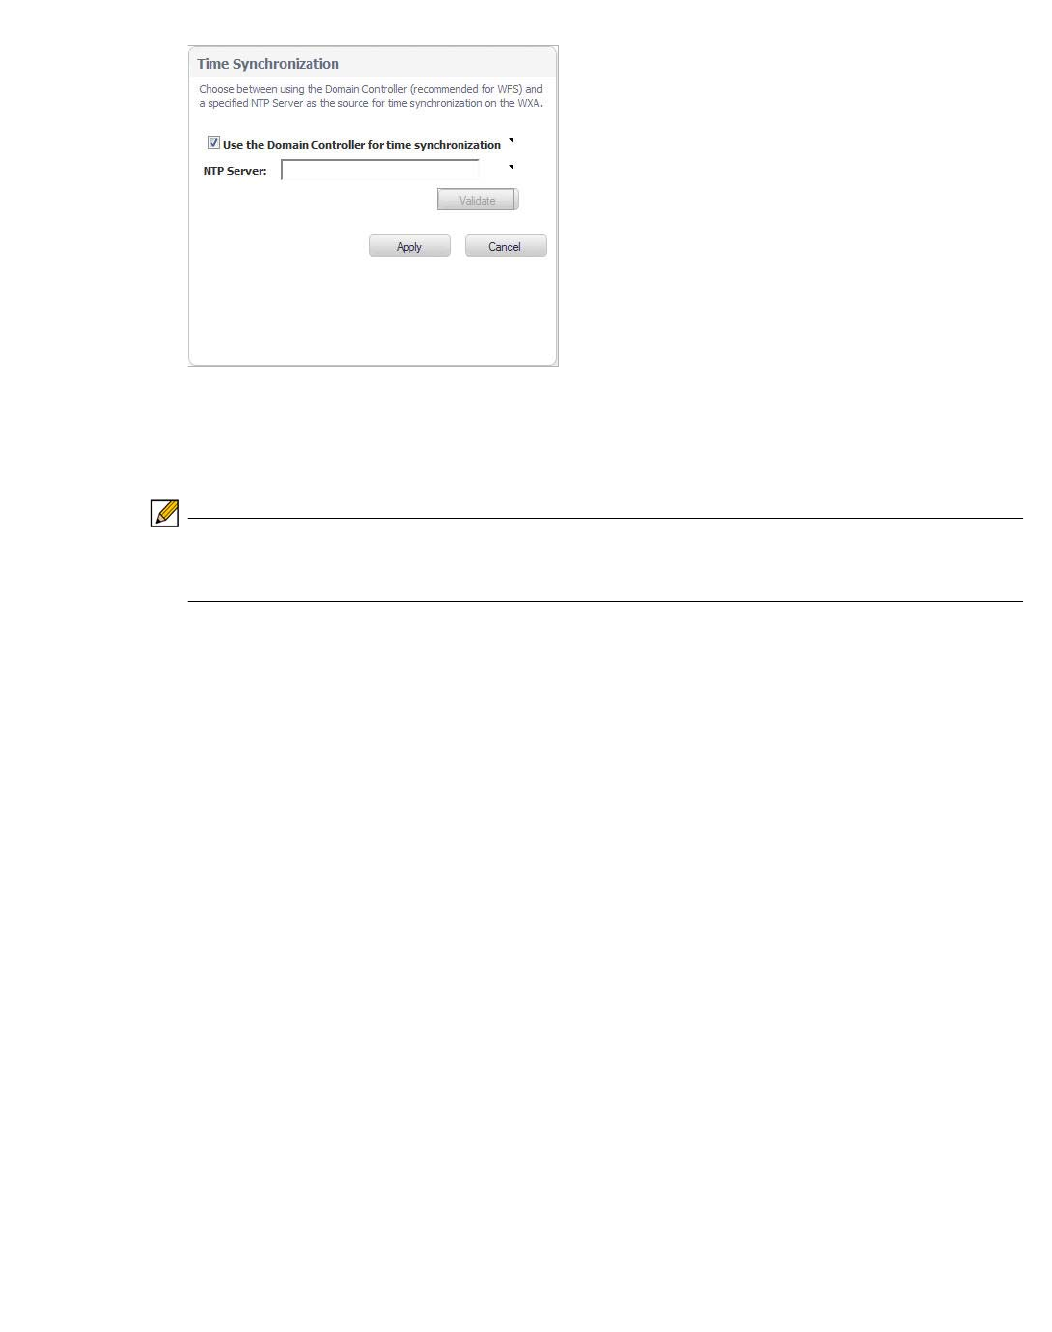
Viewing the System Page | 141
Figure 30 Time Settings > Time Synchronization Pop-up Window
• Use the Domain Controller for Time Synchronization: Checkbox — Select this
checkbox to use the domain controller as the time synchronization source.
• NTP Server: Text Field — Override the domain controller synchronization by specifying an
NTP server.
Note If WFS Acceleration Signed SMB is not enabled, the NAT polices that give the WXA access
to the network are not created. Therefore, time synchronization using the NTP server will
not work unless the Administrator creates the NAT rules manually.
• Validate Button — Validates that an NTP server is a valid time server and can be reached.
• Apply Button — Applies all changes.
• Cancel Button — Cancels the operation.
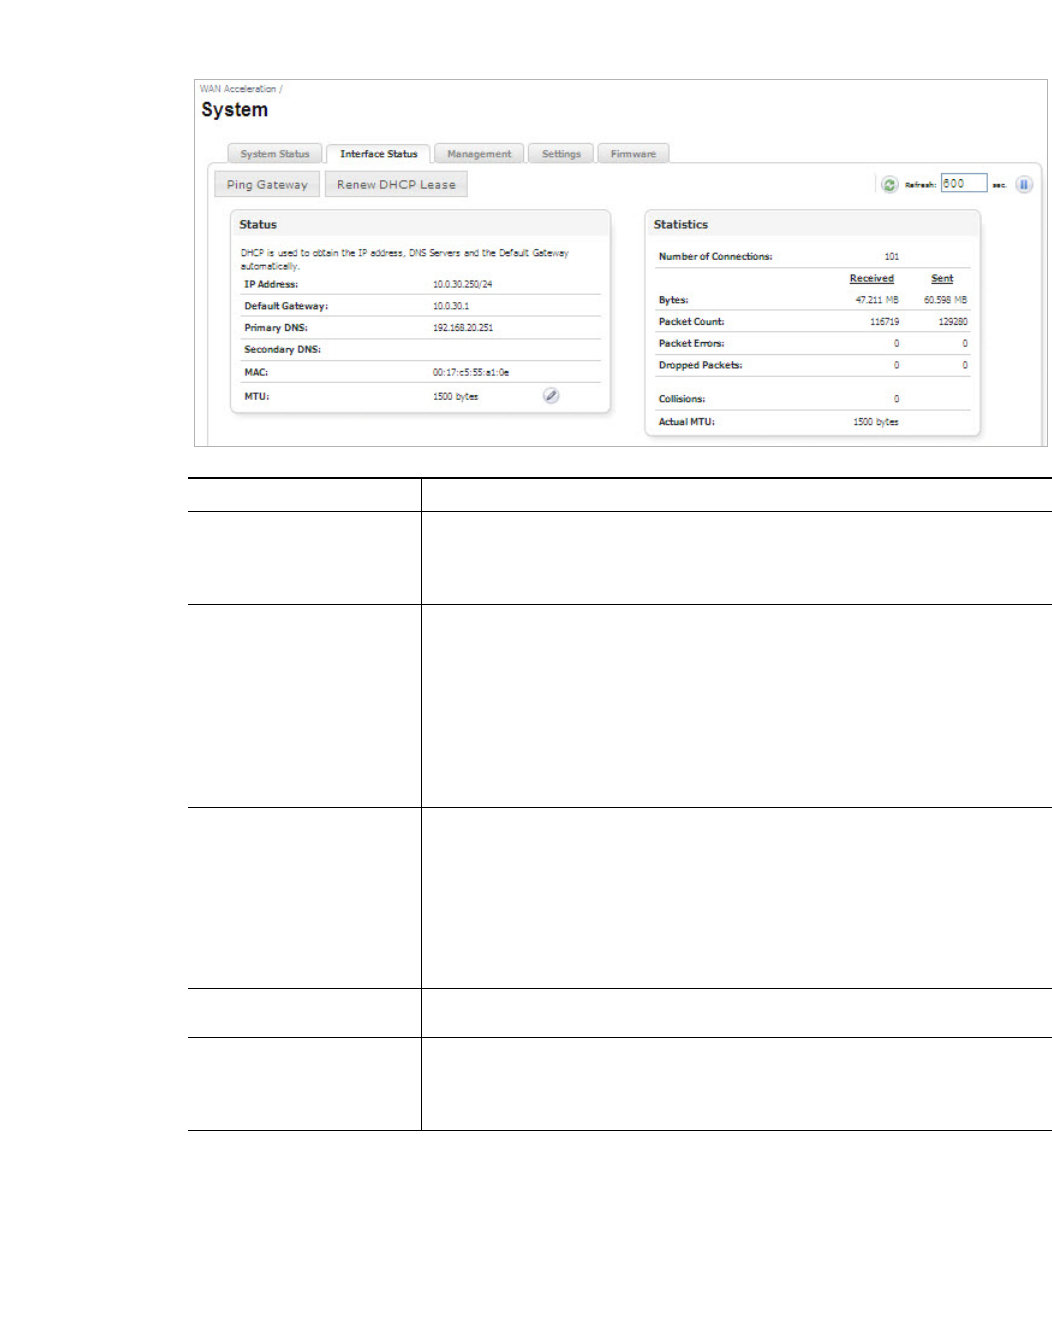
142 | Dell SonicWALL WXA 1.3 User’s Guide
Interface Status Tab
Name Description
Refresh Refreshes the Interface Status tab. The refresh interval can be entered in the
text field. The interval can be increased to a maximum of 999 seconds.
Click the Refresh button to manually update the Interface Status tab.
Click the Pause button to stop updates on the page.
Status Panel Displays the following (Read-Only) information:
• IP Address
• Default Gateway
• Primary DNS Server
• Secondary DNS Server
• MAC
• MTU
DHCP is used to obtain some of this information. You can also configure the
MTU in this panel, see on page 143.
Statistics Panel Displays the following (Read-Only) information:
• Packet flow information using active flows
• Number of bytes
• Packet Count
• Packet Errors
• Dropped Packets
• Collisions
• Actual MTU
Ping Gateway Sends a ping request to the NSA/TZ series appliance. The WXA series appli-
ance uses Address Resolution Protocol (ARP) to ping the gateway.
Renew DHCP Lease Renews the DHCP lease for the WXA series appliance.
Note: This can drop existing accelerated connections if a static lease has not
been configured (or has been changed) and the WXA address changes
as a result.

Viewing the System Page | 143
Figure 31 Maximum Transmission Unit
• MTU: Text Field — The Maximum Transmission Unit (MTU).
• Apply Button — Applies all changes.
• Cancel Button — Cancels the operation.
Management Tab
SNMP
Name Description
SNMP Panel Enables the simple network monitoring protocol server. Add read-only
and read-write communities for a specific client IP or subnet:
• Community Name—Enter the community name being used to
communicate with the SNMP feature.
• Access—Select none, read-only, or read-write.
• Any Source—Select the Any Source checkbox remove all source
restrictions.
• Source—Select the Source checkbox to enter a source manually.
• Apply—Applies all changes.
• Cancel—Cancels the operation.
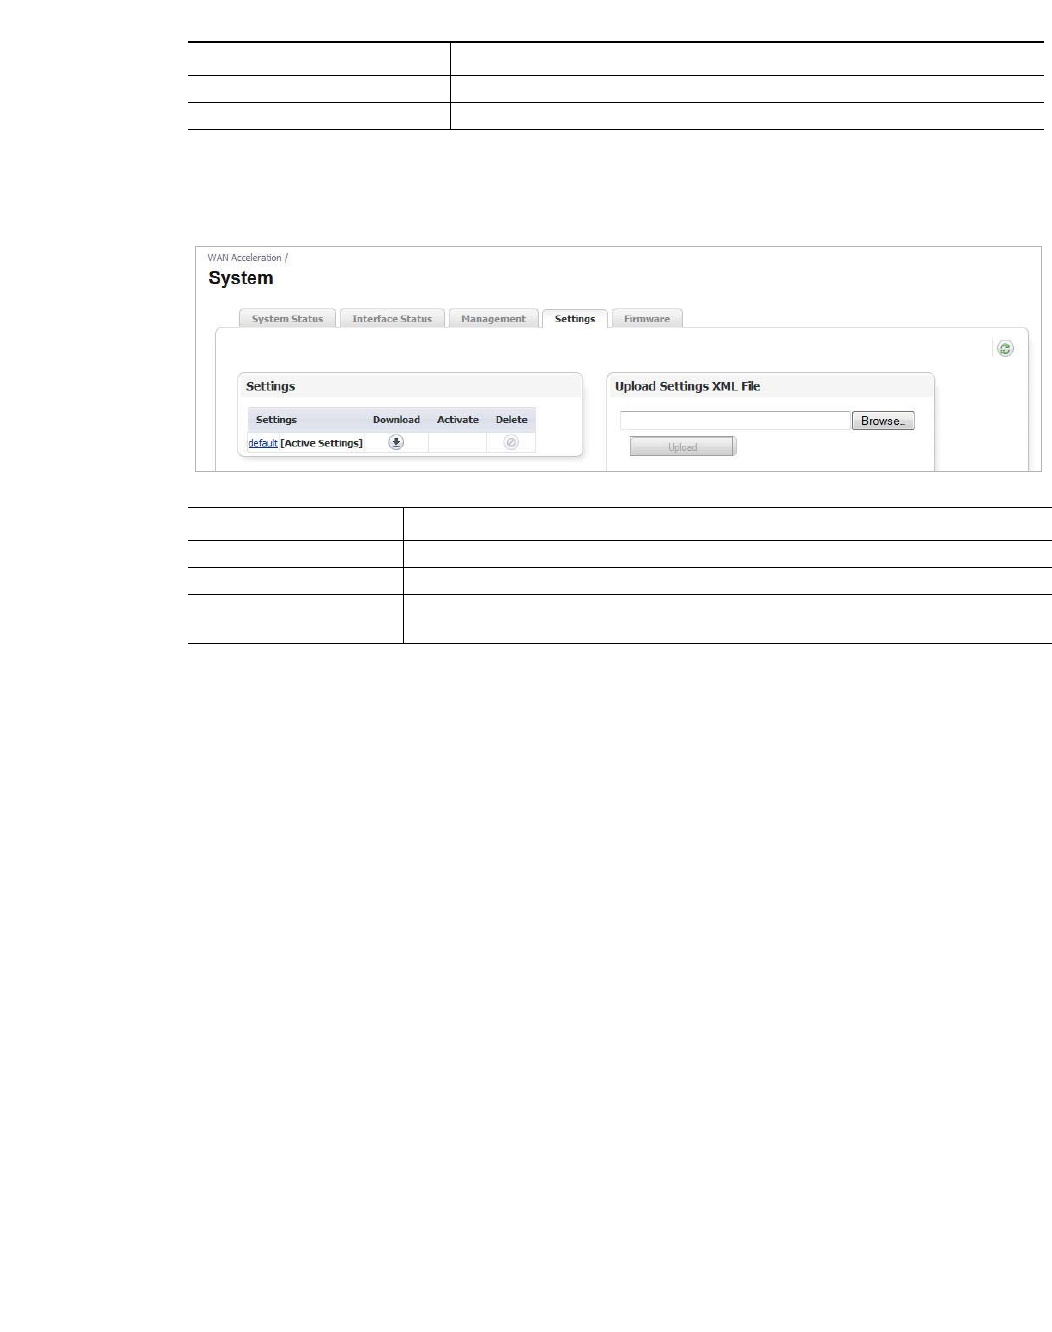
144 | Dell SonicWALL WXA 1.3 User’s Guide
Syslog Server
Settings Tab
Name Description
Syslog Server Panel Sets the server IP address to which log messages are sent.
Apply Changes Button Applies all changes.
Name Description
Refresh Refreshes the Settings tab.
Settings Panel Manage the settings by downloading new settings or delete old/unused settings.
Upload Settings XML File
Panel Search for settings XML file to upload from your PC. Once settings are
uploaded, they are added to the Settings panel and may be activated.
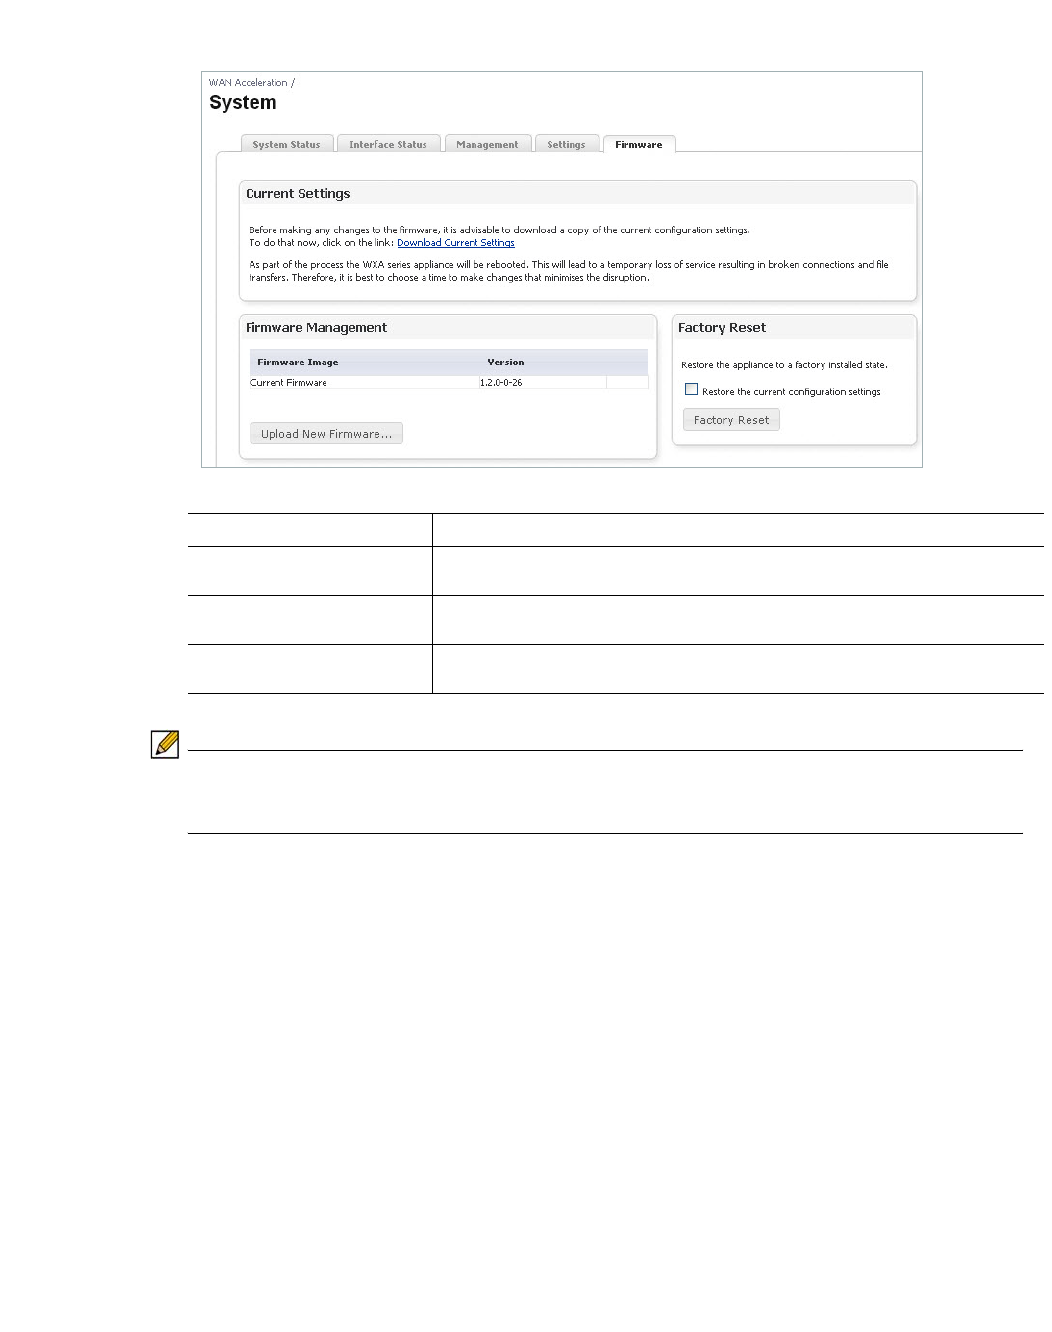
Viewing the System Page | 145
Firmware Tab
Note When performing a firmware upload, do NOT navigate away from the System > Firmware
tab. This could stop the uploading process or cause the management interface to become
unresponsive.
Name Description
Current Settings Panel Allows you to download a copy of the current settings. Perform this before
making any changes to the firmware.
Firmware Upgrade Panel Configures the WXA series appliance with the latest firmware. A step-by-
step procedure walks you through the firmware upgrade process.
Factory Reset Panel Restores the WXA series appliance to the factory default settings. A reset
option is available to restore the current configuration settings.

146 | Dell SonicWALL WXA 1.3 User’s Guide

| 147
Log

148 | Dell SonicWALL WXA 1.3 User’s Guide
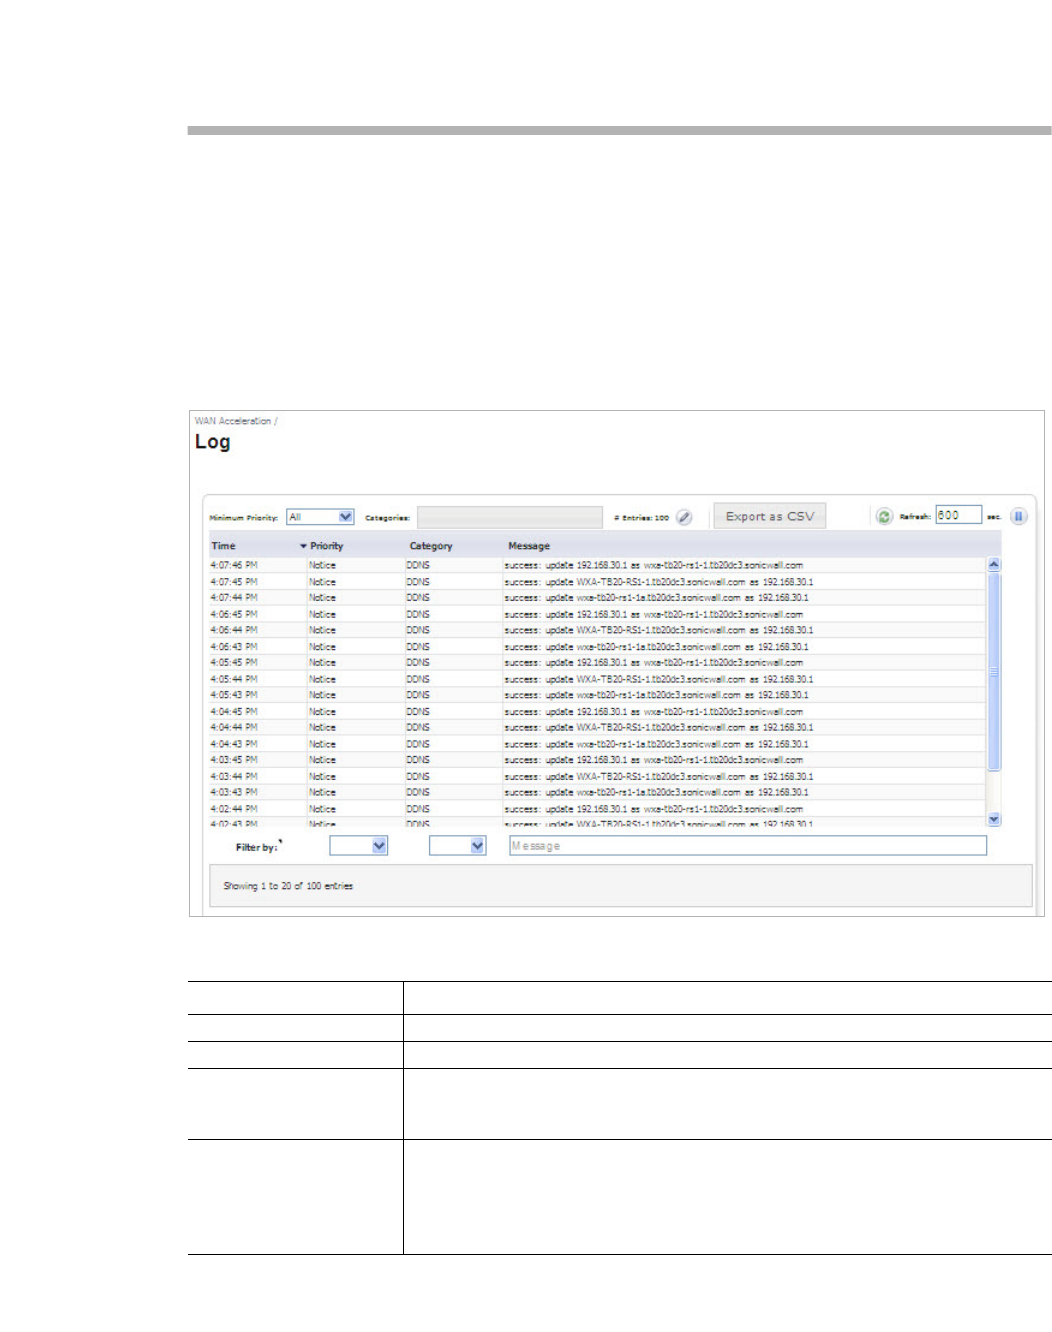
Viewing the Log Page | 149
Chapter 12
Viewing the Log Page
WAN Acceleration > Log
The Log page provides a detailed list of log event messages and provides multiple options to
change how the log messages display. The Minimum Priority and Categories drop-down menus
are used to determine which logs are retrieved from the WXA.The filters at the bottom of the
table then determine which of those entries are actually shown on the screen. Use the scroll
function to load more log entries as you scroll down the page.
Action Items
Name Description
Minimum Priority Displays the log entries of the selected priority or higher by using severity.
Categories Displays the log entries of the selected categories.
# Entries Selects the number of entries retrieved and displayed in the logs list. Depending
on the number selected, you may need to scroll through the table to view all the
log entries.
Refresh Refreshes the WAN Acceleration > Logs page. The refresh interval can be
entered in the box to the right of the Refresh symbol. The interval can be
increased to a maximum of 999 seconds.
Click the Refresh button to manually update the Logs page.
Click the Pause button to stop updates on the page

150 | Dell SonicWALL WXA 1.3 User’s Guide
Column Headings
Filter by Filter the results by selecting from the drop-down lists and entering text into the
priority, category, and message text fields. The filters you select determine
which of the log entries retrieved from the WXA series appliance are displayed
on the Log screen.
Export as CSV Download all logs as comma separated values for the time, priority, category,
and message fields.
Name Description
Name Description
Time Displays the time the event was logged.
Priority Organizes the log entries by priority.
Category Organizes the log entries by category.
Message Displays the log message.

| 151
Appendices

152 | Dell SonicWALL WXA 1.3 User’s Guide
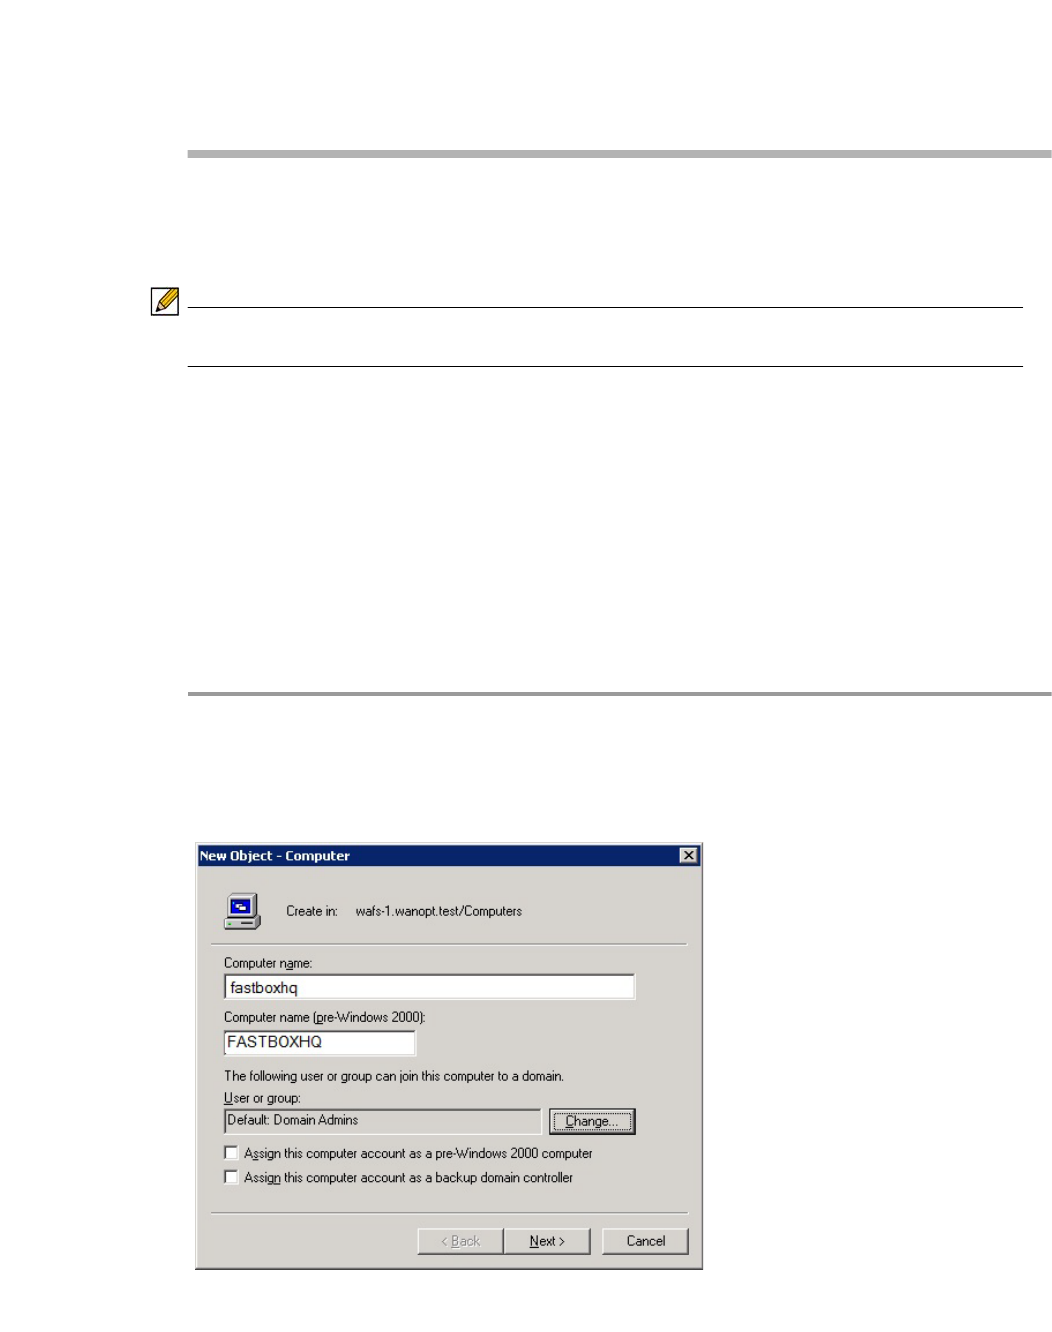
Appendix A: Configuring the WXA to the Domain Without Using the WXA Management Interface | 153
Appendix A: Configuring the WXA to the
Domain Without Using the WXA
Management Interface
This appendix contains procedures to configure the WXA series appliance to the domain
without using the WAN Acceleration management interface.
Note Although this type of configuration is supported, Dell SonicWALL does not recommend
configuring the domain this way.
This appendix contains the following subsections:
• Automatically Joining the Domain on page 153
• Configuring Custom Zones for WXA on page 156
• Configuring Reverse Lookup on page 157
• Manually Adding SPN Hostnames in DNS on page 158
Automatically Joining the Domain
To automatically join the WXA series appliance to the domain, perform the following steps:
Step 1 Access the domain controller and create a computer account. The computer account must use
the default hostname or a hostname specified in the Domain Details tab (the name of the WXA
series appliance). If a new hostname is entered in the Domain Details tab in the WAN
Acceleration management interface, it overrides the default hostname. The authentication code
should be used as the password for the computer account.
Step 2 Click Change....
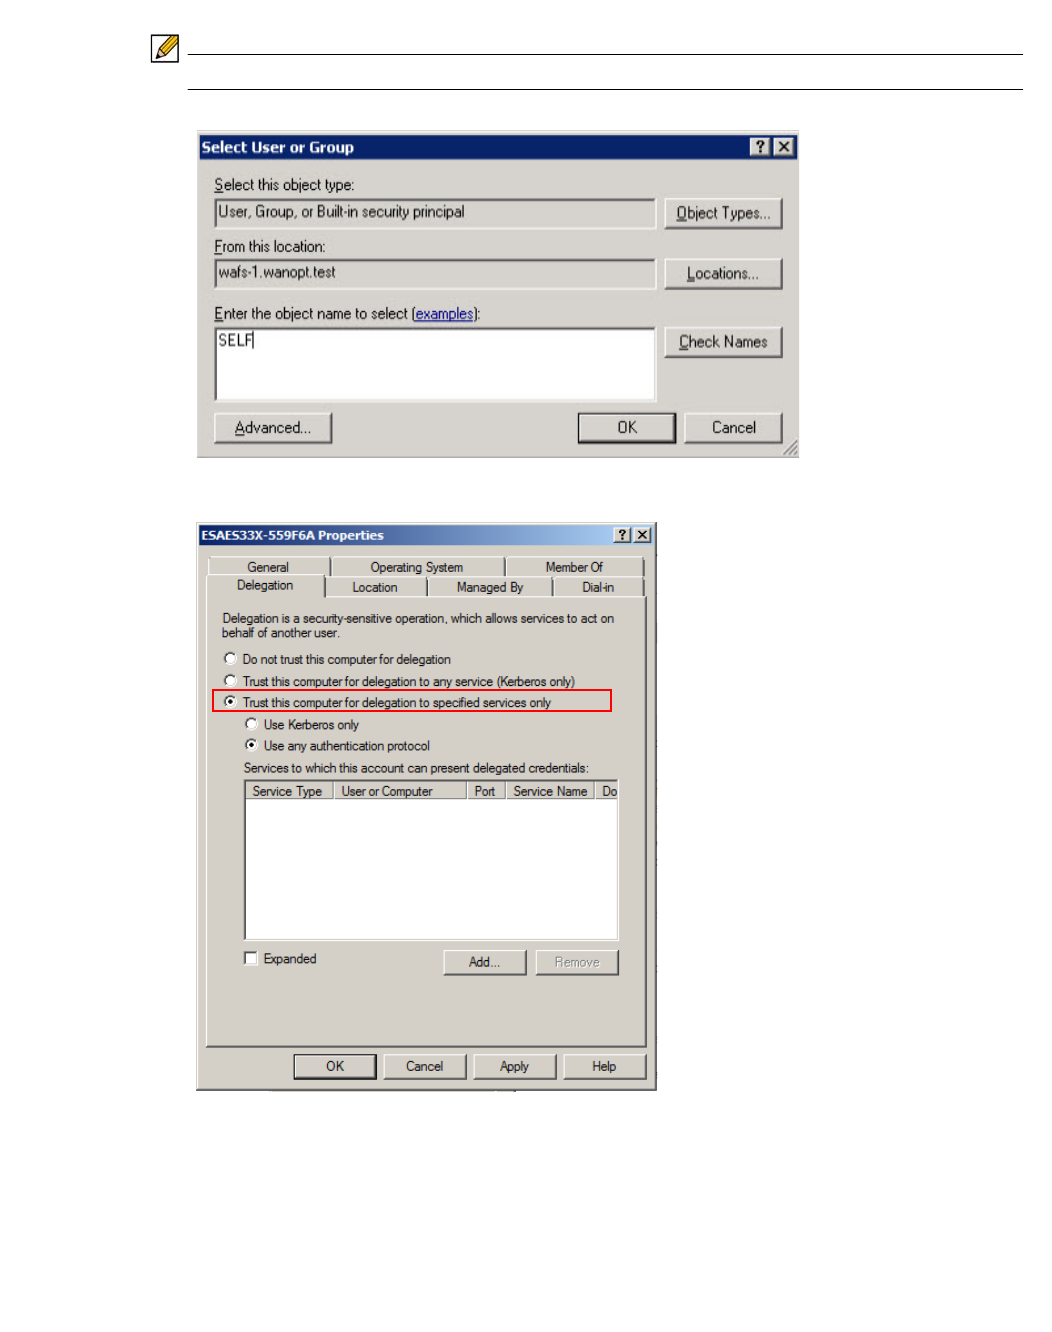
154 | Dell SonicWALL WXA 1.3 User’s Guide
Step 3 In the Enter the object name to select text field, enter SELF, and then click OK.
Note This is also required when manually joining using a non-admin account.
Step 4 Right click on the computer account, go to Properties.
Step 5 Select the setting Trust this computer for delegation to specified services only.
Step 6 Select the setting Use any authentication protocol.
Step 7 Click the Add... button.
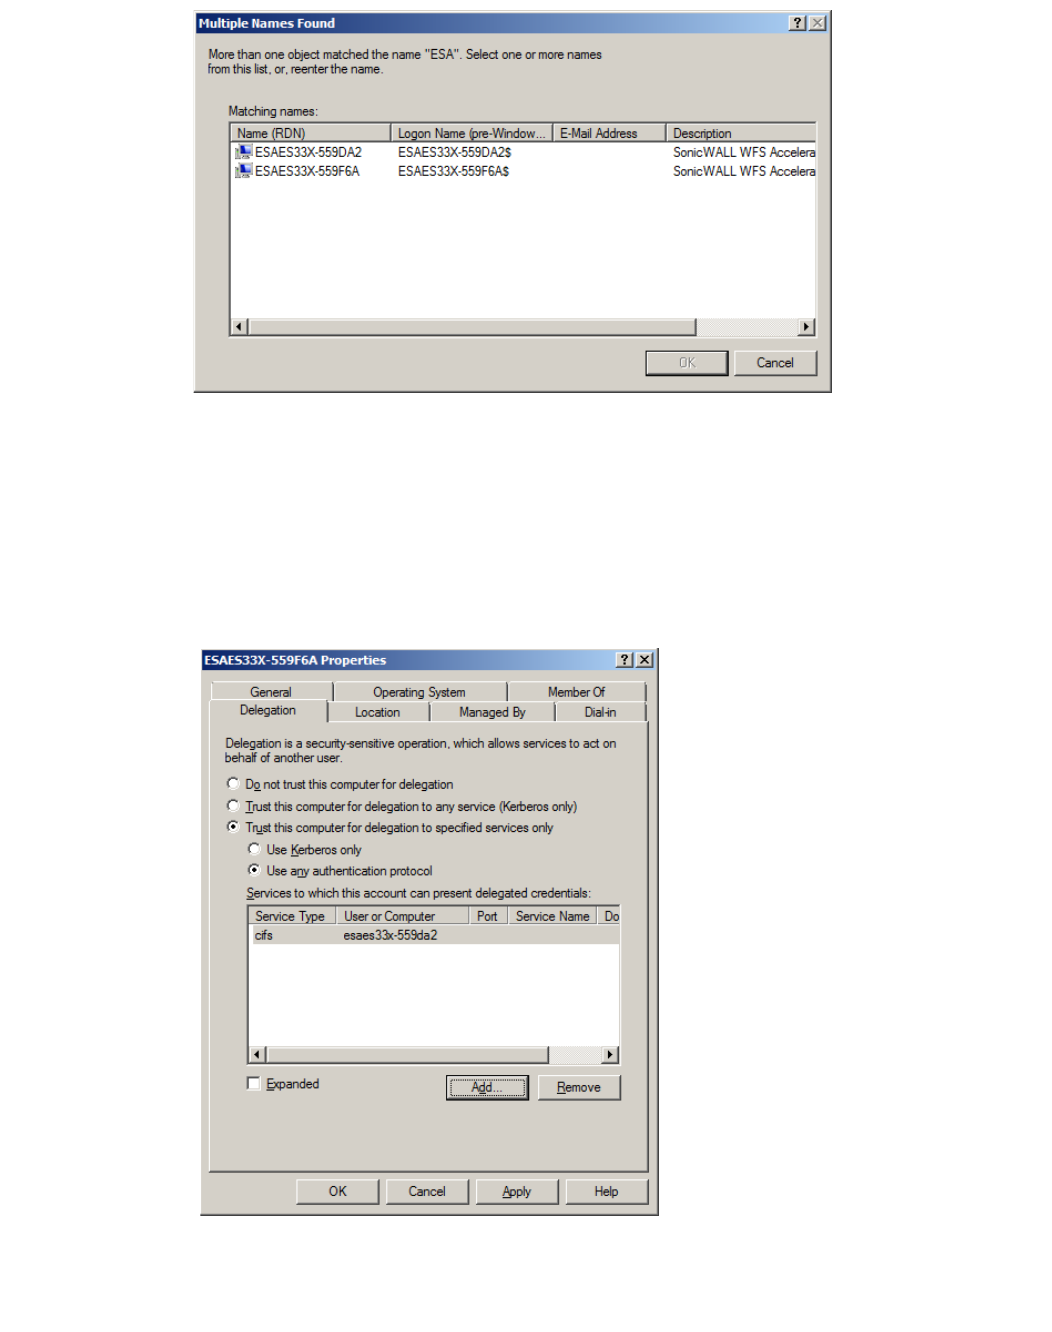
Appendix A: Configuring the WXA to the Domain Without Using the WXA Management Interface | 155
Step 8 Select the computer account to which the WXA series appliance computer account can present
delegation credentials. For example, if you were performing this configuration for a central site,
you would select the WXA series appliance computer account on the branch site. This enables
the branch site to connect to the central site, and then onto the domain controller/file server for
accelerated sharing.
Step 9 Select CIFS for the service.
Step 10 Click the OK button.
The computer account properties window populates with the configured account:
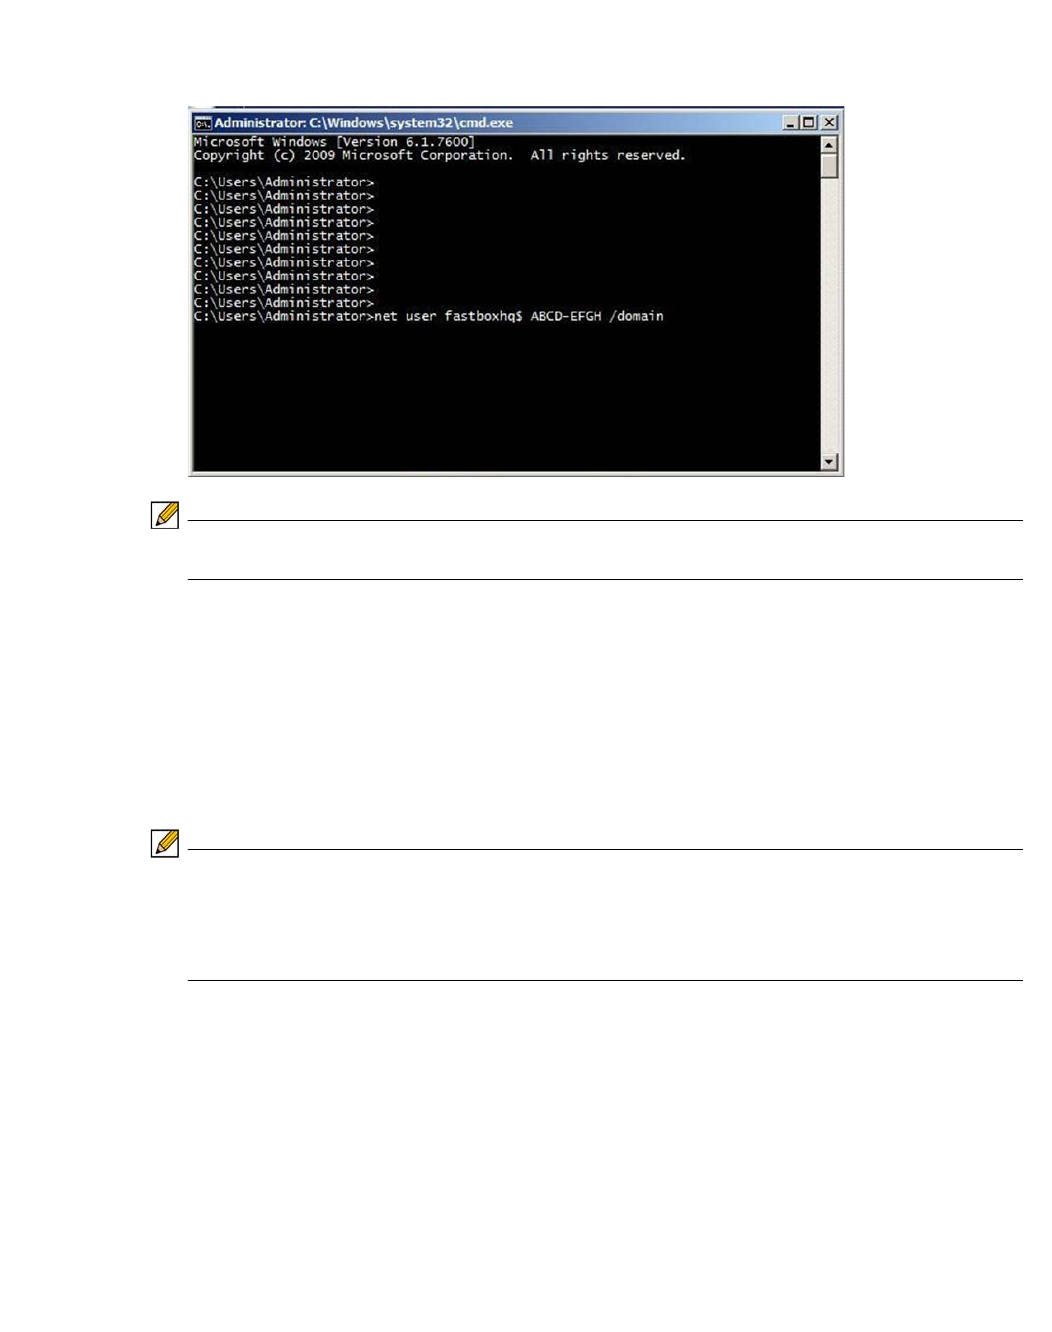
156 | Dell SonicWALL WXA 1.3 User’s Guide
If you typed SELF in the computer account for step 3, perform steps 11 and 12.
Step 11 Open a cmd.exe window.
Step 12 Set the password for the computer account, where ABCD-EFGH is the auth code.
Note The password for the computer account must be the auth code found on the WAN
Acceleration > Status page on the NSA/TZ security appliance.
Configuring Custom Zones for WXA
Dell SonicWALL recommends setting a LAN zone for the zone properties of the interface to
which the WXA appliance is connected to. Setting the WXA appliance to a LAN zone is
recommended because the default access rules associated with that zone allow traffic between
the WXA appliances at both locations; therefore, there is no need for additional configuration
to the access rules. Set a WAN > LAN zone if using Layer 2 Bridge mode.
Note Access rules are necessary for the traffic coming from VPN>LAN and LAN>VPN to be open
for WXA associated traffic and the default zone properties of the LAN takes care of handling
traffic without manually adding or modifying any access rules. Both WXA appliances
deployed at each location should be able to communicate with each other without being
blocked by access rules or firewall policies.
If you need to customize a zone for WFS acceleration, make sure VPN remote users are
allowed to access the WXA appliance. If additional domain controllers and file servers are
located in any zone other than the LAN, necessary access rules must be configured to allow
traffic from and to the WXA appliance to those zones as well as from and to the NSA/TZ security
appliance.
For example consider, at the central site, if the WXA appliance is deployed in the DMZ zone,
the access rules must be configured to allow traffic from VPN>DMZ and LAN>DMZ so that
traffic to the WXA appliance from the VPN and from the LAN zones are allowed to the WXA
appliance.

Appendix A: Configuring the WXA to the Domain Without Using the WXA Management Interface | 157
Configuring Reverse Lookup
After both WXA appliances are added to the domain, corresponding Computer Accounts for
WXA appliances, DNS Host name, and Pointer (PTR) records are automatically created on the
DC and DNS servers. For PTR records to be updated, relevant Reverse Lookup Zones must
be configured on the DNS servers. Networks used for Reverse Lookup Zones depend on
whether WFS acceleration is using NAT. If using NAT, the WXA appliance uses the NAT IP for
WFS services and only the X0 subnets are used as networks in Reverse Lookup Zones. If the
WXA appliances are not using NAT, the Reverse Lookup Zone network must also be configured
for WXA subnets on both locations.
To add a PTR record, perform the following steps:
Step 1 Navigate to your DNS on the data center and remote locations.
Step 2 Expand the Reverse Lookup Zones folder.
Step 3 Right-mouse click on the subnet you want to add a new PTR.
Step 4 Select New Pointer (PTR)... in the pop-up menu.
The New Resource Record window appears.
Step 5 Enter the subnet in the Host IP number field.
Step 6 Enter the Host (A) record name in the Host name text field, and then click OK.
Step 7 Verify that the PTR record is created in the Reverse Lookup Zone folder.
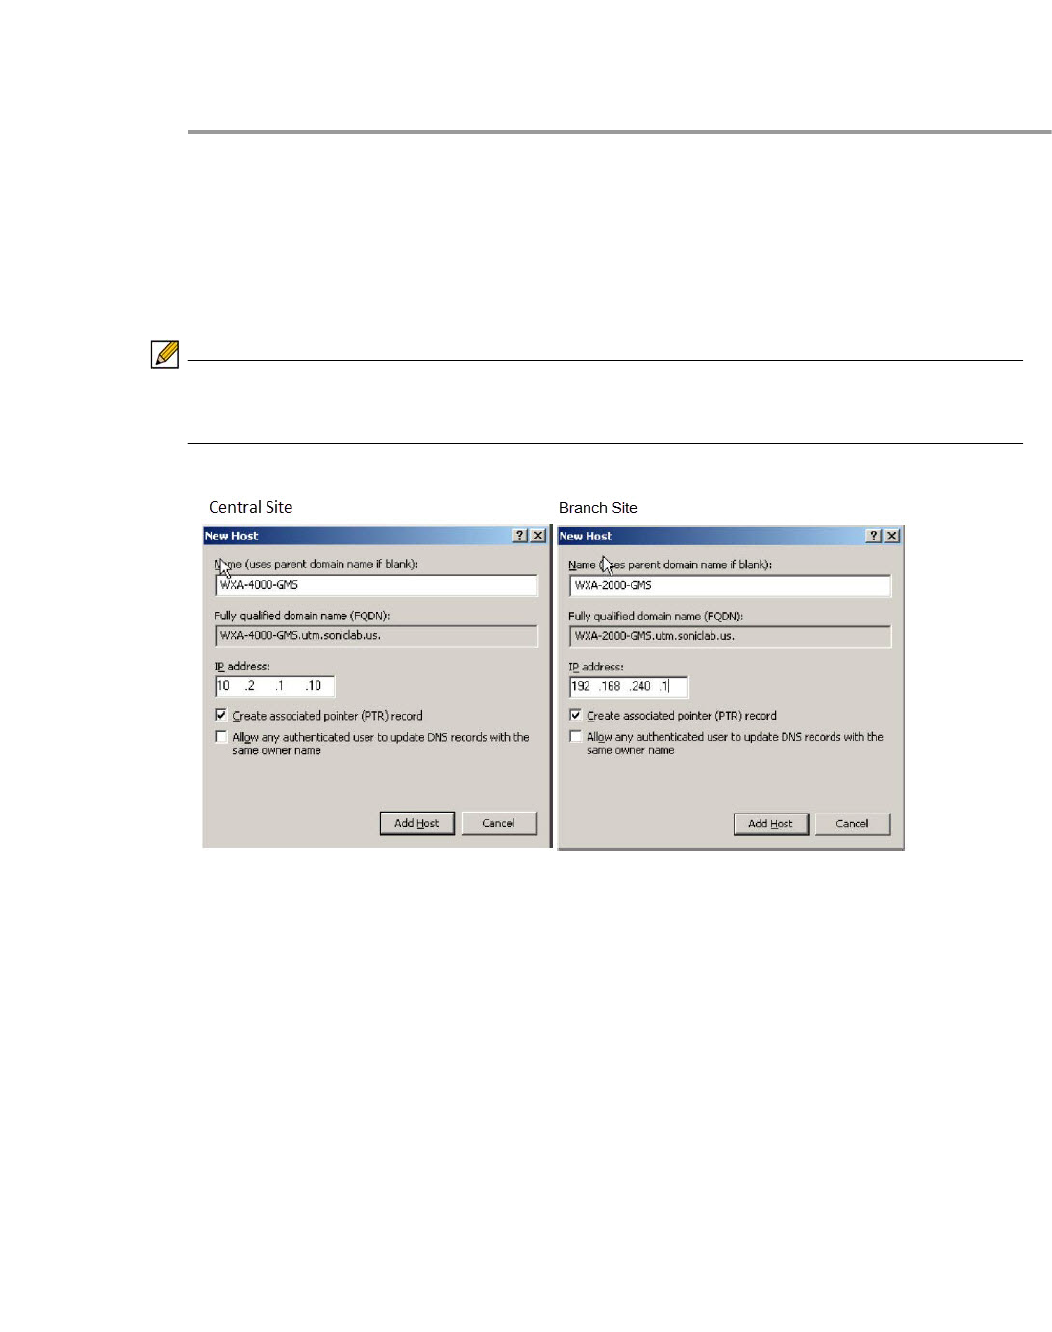
158 | Dell SonicWALL WXA 1.3 User’s Guide
Manually Adding SPN Hostnames in DNS
In the event that SPN hostnames are not added automatically, the Domain Administrator can
manually add SPN hostnames in the DNS. Perform the following steps:
Step 1 Navigate to the DNS on the central and branch sites.
Step 2 Expand the Forward Lookup Zones.
Step 3 Right click on the subnet you wish to add a new Host (A) record.
Step 4 Select New Host (A)... in the pop-up menu.
The New Host window is displayed.
Step 5 Enter the hostname for the central and remote DNS servers.
Note The newly created hostname for the central and branch sites should be updated with the
NAT IP of the X0 interface on the NSA/TZ series appliance that is located at the central and
branch site, respectively.
Step 6 Ping the IP addresses at the central and branch sites to verify correct connectivity.
E.g. The WXA-4000 resolves to X.X.1.100 and the WXA-2000 resolves to A.A.240.1.

Appendix B: Configuring the NetExtender WAN Acceleration Client | 159
Appendix B: Configuring the NetExtender
WAN Acceleration Client
This appendix provides configuration procedures for activating, installing, and enabling the
NetExtender WAN Acceleration Client (WXAC). The configuration procedures are split into two
parts: one for the Administrator enabling/allowing NetExtender WAN Acceleration Clients to
connect to the central site, and one for the client configuring the NetExtender WXAC on a
remote PC. Both of these configurations must be complete for the NetExtender WXAC to work.
This appendix contains the following sections:
• Overview on page 159
• Requirements / Prerequisites on page 159
• Deployment Considerations on page 159
• Enabling WXAC on the Central Site on page 160
• Configuring WXAC on a Remote PC on page 164
Overview
The NetExtender Client allows remote PCs to connect to the central site via a VPN connection,
the NetExtender WAN Acceleration Client (WXAC) is an addition to the NetExtender Client, and
accelerates traffic though the VPN connection. Using the NetExtender WXAC on a remote PC
means the traffic at the central site will pass through the central site's WXA appliance.
Requirements / Prerequisites
The NetExtender WXAC requires the following:
• A SonicOS NSA/TZ series appliance running SonicOS 5.9 firmware.
• A WXA series appliance running WXA 1.2 or higher firmware.
• The WXA series appliance is connected and configured to the managing NSA/TZ series
appliance.
• The TCP Acceleration service is enabled on the WXA appliance.
Deployment Considerations
Please consider the following when deploying the NetExtender WXAC:
• When a user tries to enable WXAC, while PPP software compression is on, a dialog pops
up and the user needs to choose whether to reconnect the SSL VPN session. But the user
doesn't need to enter the server information and credentials if he chooses to reconnect the
session.
• The NetExtender WXAC is supported on all NSA/TZ series appliances except the following:
– TZ 100 series
– TZ 105 series
– TZ 200 series
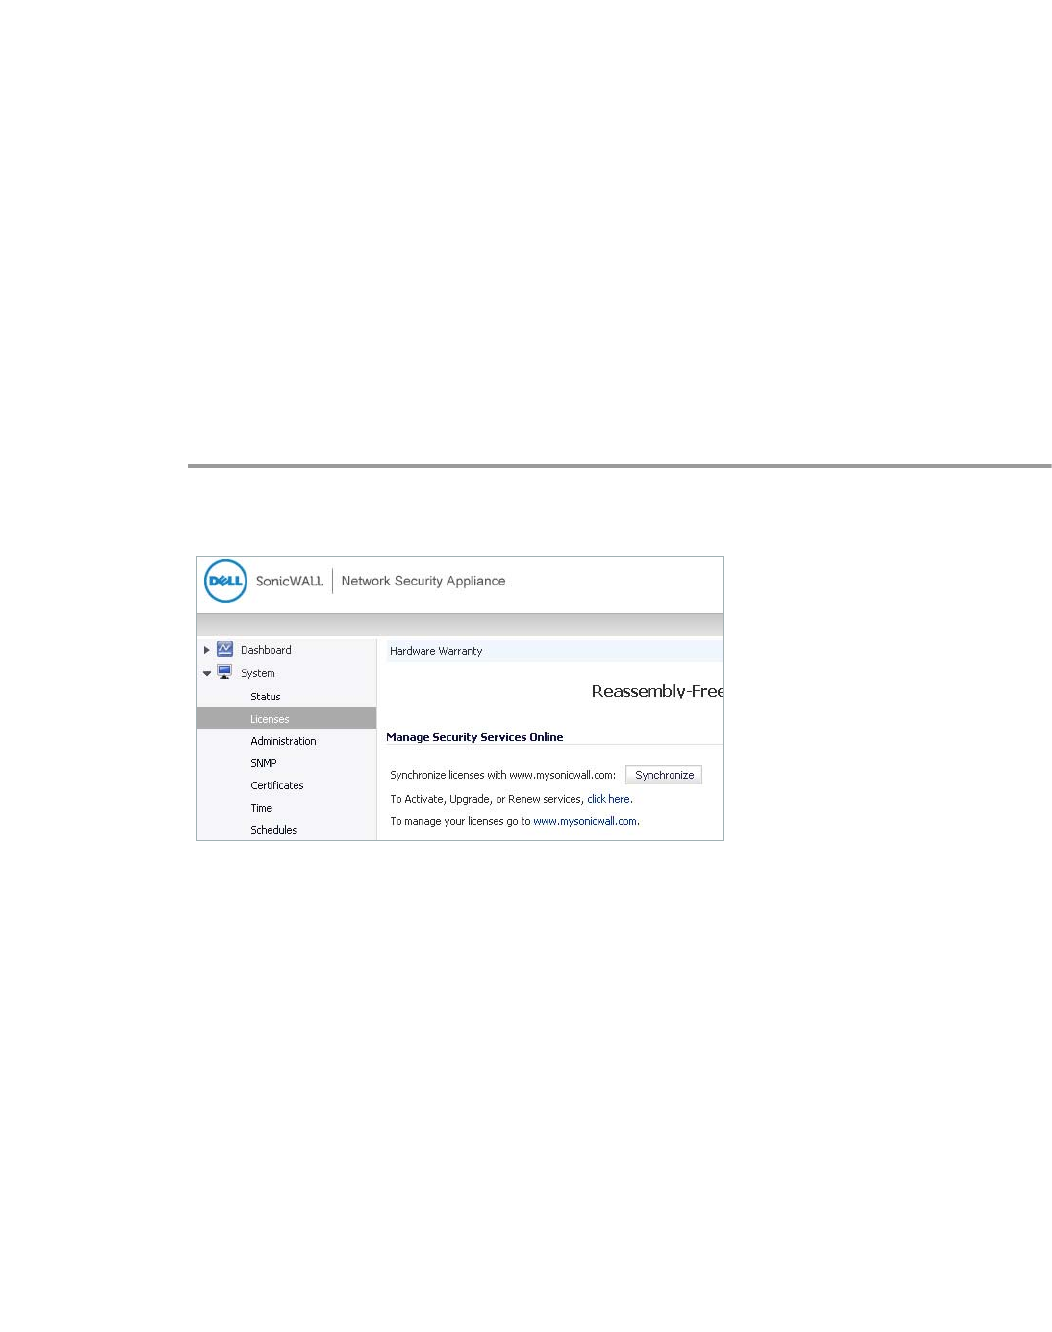
160 | Dell SonicWALL WXA 1.3 User’s Guide
• If the WXA appliance is not connected to a Dell SonicWALL NGFW, the WXAC tab will not
display in the NetExtender management interface.
• A link to install the WXAC will display on the NetExtender WXAC tab if WXAC is licensed
and enabled on the managing NSA/TZ series appliance, but not yet installed on the client
side.
• If the WXAC is disabled or not supported at the central site, the WXAC tab will not display
in the NetExtender Client on the remote PC.
Enabling WXAC on the Central Site
The NetExtender WXAC is used on remote PCs connecting to a central site. At the central site,
the Administrator has to allow those NetExtender WAN Acceleration Clients to connect to the
central site (location of the WXA, managing NSA/TZ, and server).
Please do the following to enable/allow WAN Acceleration Clients:
Activating the WXAC
Step 1 Login to the managing NSA/TZ series appliance.
Step 2 Navigate to the System > Licensing page.
Step 3 Scroll down to the Manage Security Services Online section, then click the link to Activate,
Upgrade, or Renew services.
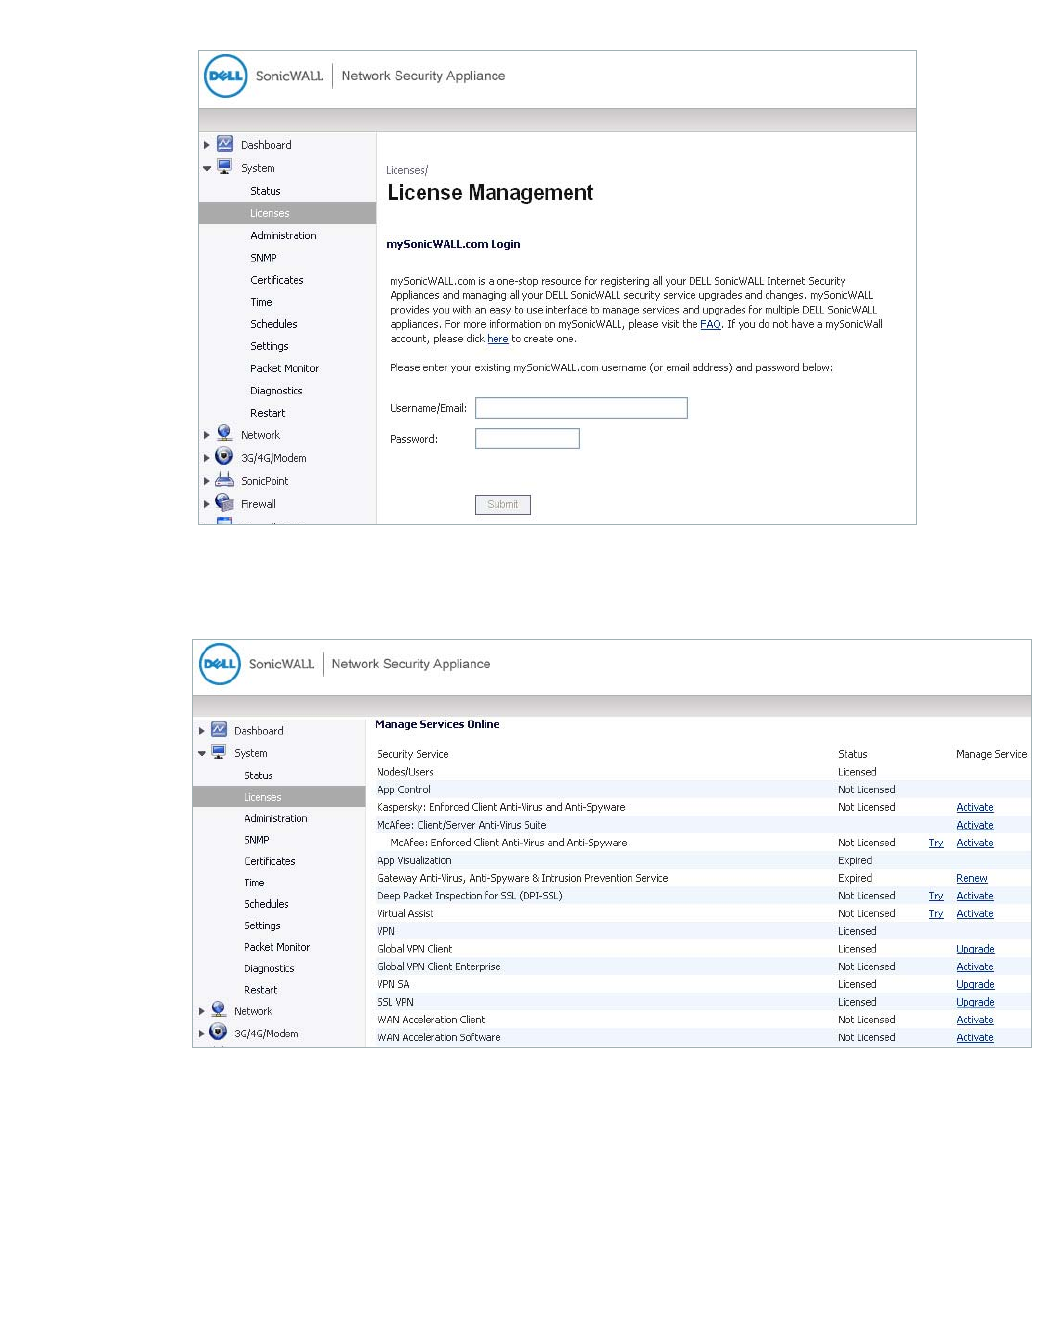
Appendix B: Configuring the NetExtender WAN Acceleration Client | 161
The License Management page displays:
Step 4 Enter your MySonicWALL credentials, then click the Submit button.
The Manage Online Services page displays:
Step 5 Click the Activate link in the Manage Service column for the WAN Acceleration Client.
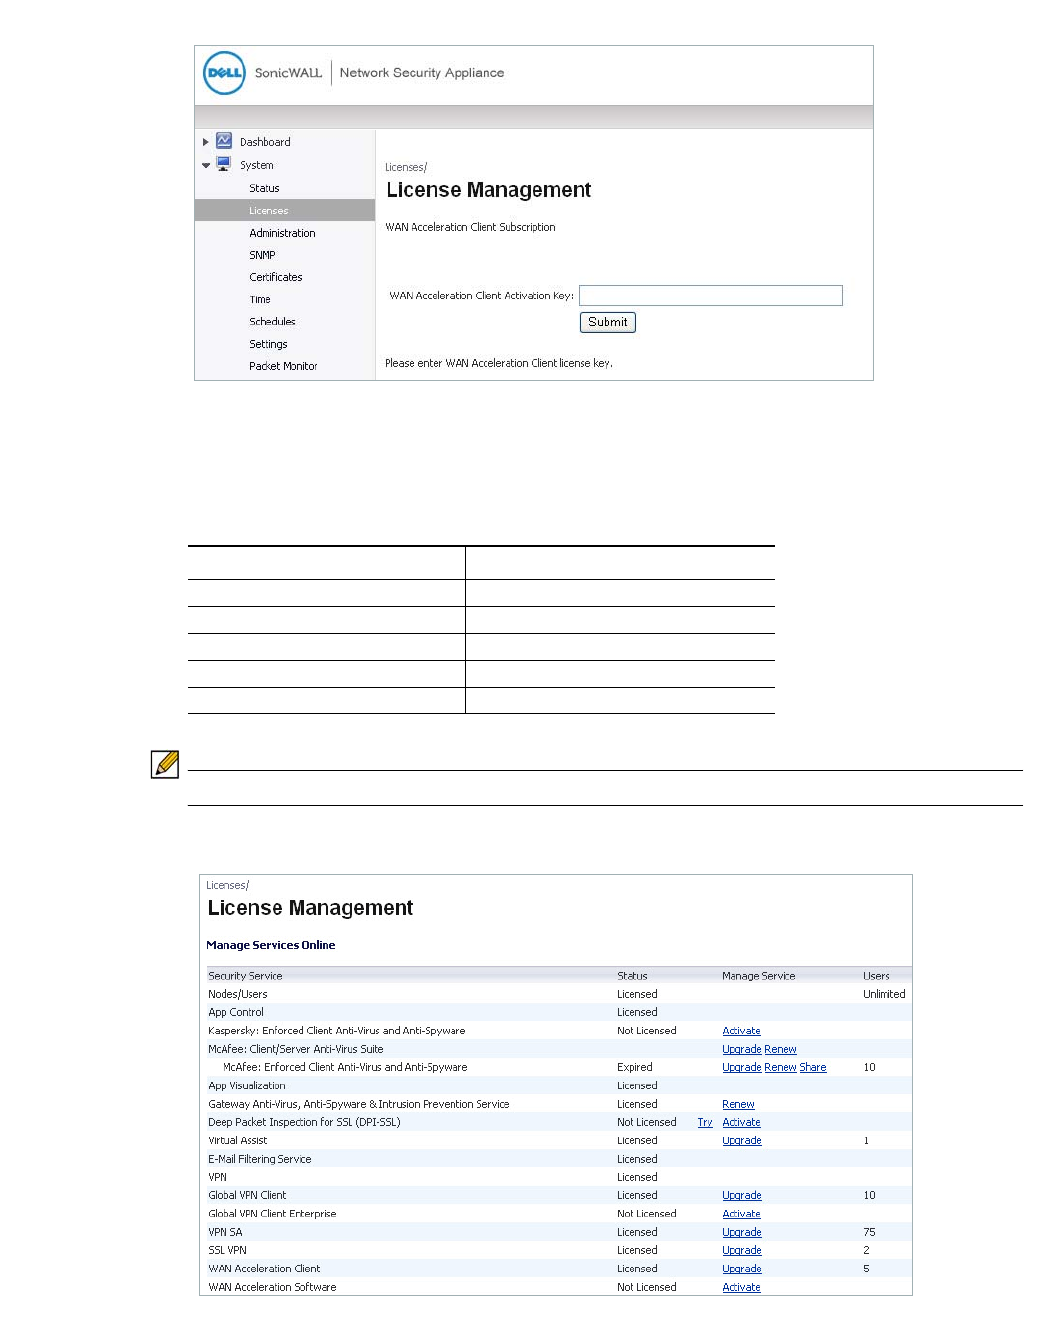
162 | Dell SonicWALL WXA 1.3 User’s Guide
The License Management page displays:
Step 6 In the WAN Acceleration Client Activation Key text-field, enter your WAN Acceleration Client
license key, then click the Submit button.
For reference, the table below displays the maximum numbers of supported client licences per
appliance:
Note Lower end NSA/TZ series appliances may support less clients.
The WAN Acceleration Client now displays as “Licensed”:
Appliance Number of Supported Clients
WXA 500 Live CD 20
WXA 2000 60
WXA 4000 120
WXA 5000 Virtual Appliance 120
WXA 6000 Software 120
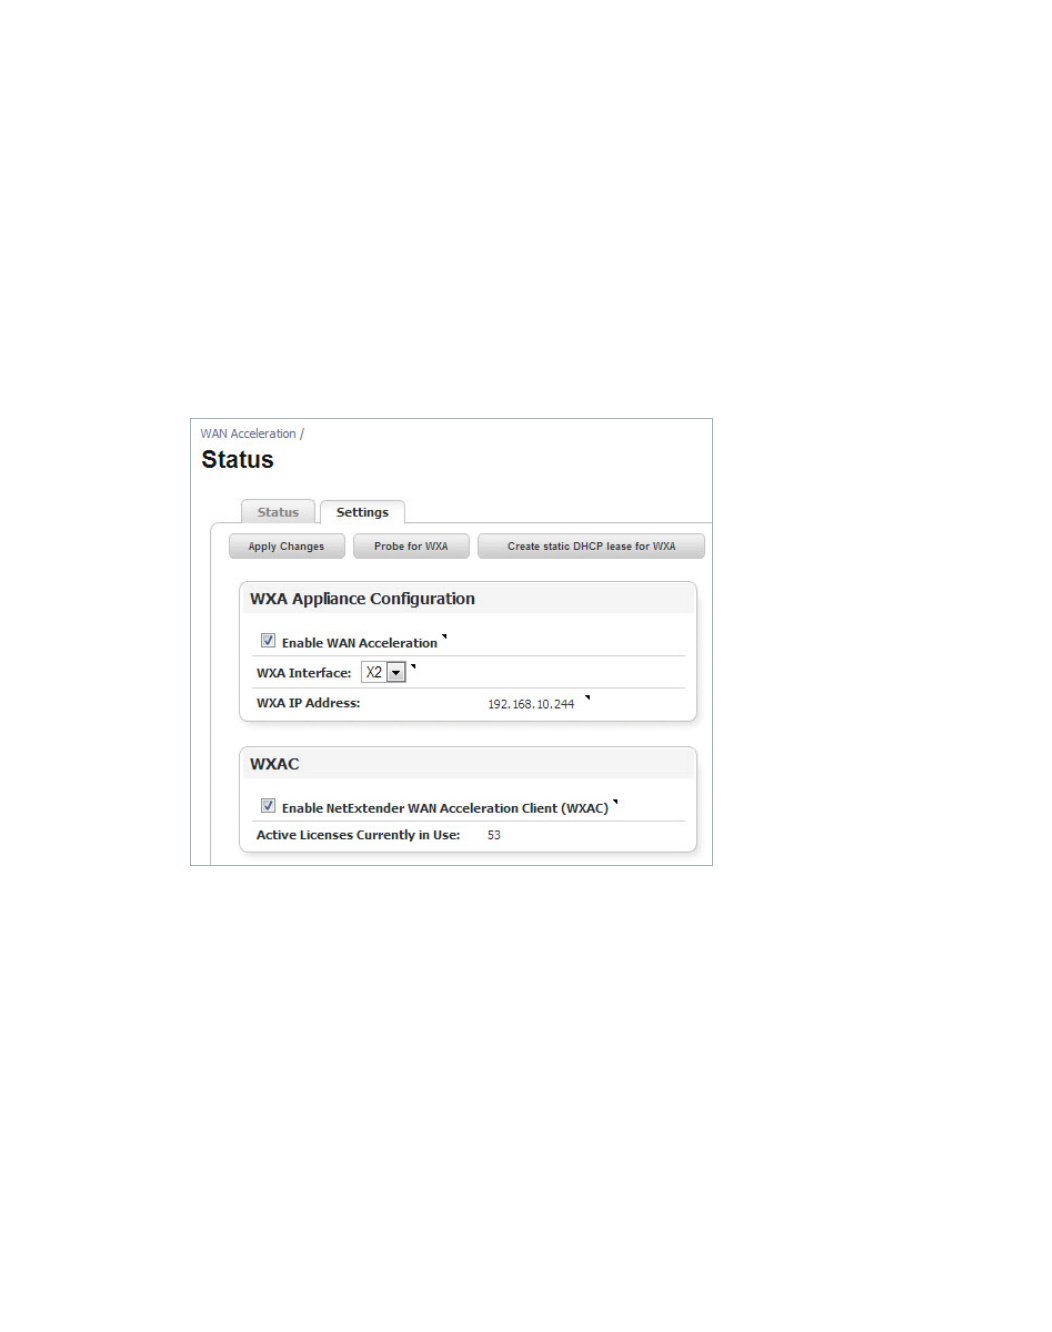
Appendix B: Configuring the NetExtender WAN Acceleration Client | 163
Configuring SSL VPN for the NetExtender WXAC Connection
Step 7 Navigate to the SSL VPN > Server page, and then configure the server settings.
Step 8 Navigate to the SSL VPN > Client page, and then configure the client settings.
Refer to the SonicOS 5.9 Administrator’s Guide for details on configuring the server and client
settings.
Configuring the User Credentials for the NetExtender WXAC
Step 9 Navigate to the Users > Local Users page and configure user credentials for the clients that
will be using the NetExtender WXAC.
Refer to the SonicOS 5.9 Administrator’s Guide for details on configuring user credentials.
Enabling WXAC on the WXA Appliance
Step 10 Navigate to the WAN Acceleration > Status page.
Step 11 Click the Settings tab.
Step 12 Select the Enable NetExtender WAN Acceleration Client (WXAC) checkbox.
Step 13 Click the Apply Changes button.
164 | Dell SonicWALL WXA 1.3 User’s Guide
Configuring WXAC on a Remote PC
This section shows the client user how to download and install the NetExtender Client (if not
already done), and then download, install, and enable NetExtender WXAC. These procedures
are performed on a remote PC that is connecting to a central site.
Downloading / Installing the NetExtender Client
If you already have the NetExtender Client installed on your PC, upgrade to version 7.0.197 or
higher.
If you do not have the NetExtender Client installed on your PC, perform the following:
Step 1 Open a Web browser, and then enter the WAN IP address of the NSA/TZ appliance that is on
the central site.
The NSA/TZ appliance login page displays:
Step 2 Click the Here link to login to sslvpn.
The Virtual Office login page displays:
Step 3 Enter the Username and Password to log into the Virtual Office.
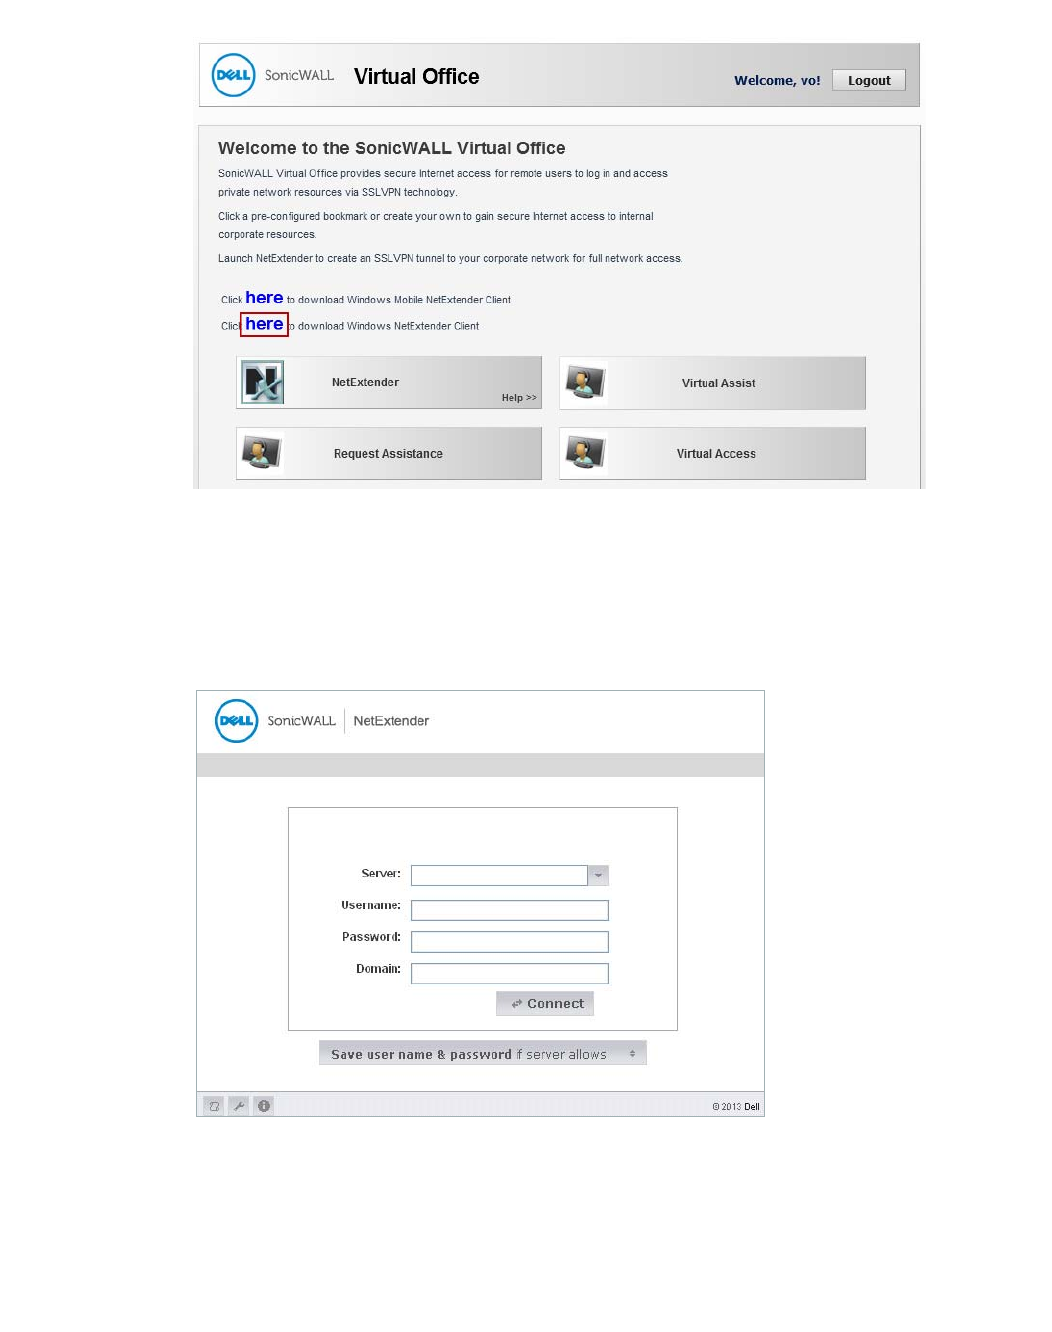
Appendix B: Configuring the NetExtender WAN Acceleration Client | 165
The Virtual Office main page displays:
Step 4 Click the Here link to download the NetExtender Client.
Step 5 Run the NetExtender Setup Wizard to install the NetExtender Client.
Refer to the SonicOS 5.9 Administrator’s Guide for details on the NetExtender Setup Wizard.
Downloading / Installing the NetExtender WXAC in the NetExtender Management Interface
Step 6 Open the NetExtender Client.
Step 7 Enter the following in the text-fields:
Server—the WAN IP address of the managing NSA/TZ appliance that is on the site where the
WXA appliance and server are located. Enter a colon (:) after the WAN IP address, and then
enter the server port number.
Username—the username created by the Administrator.
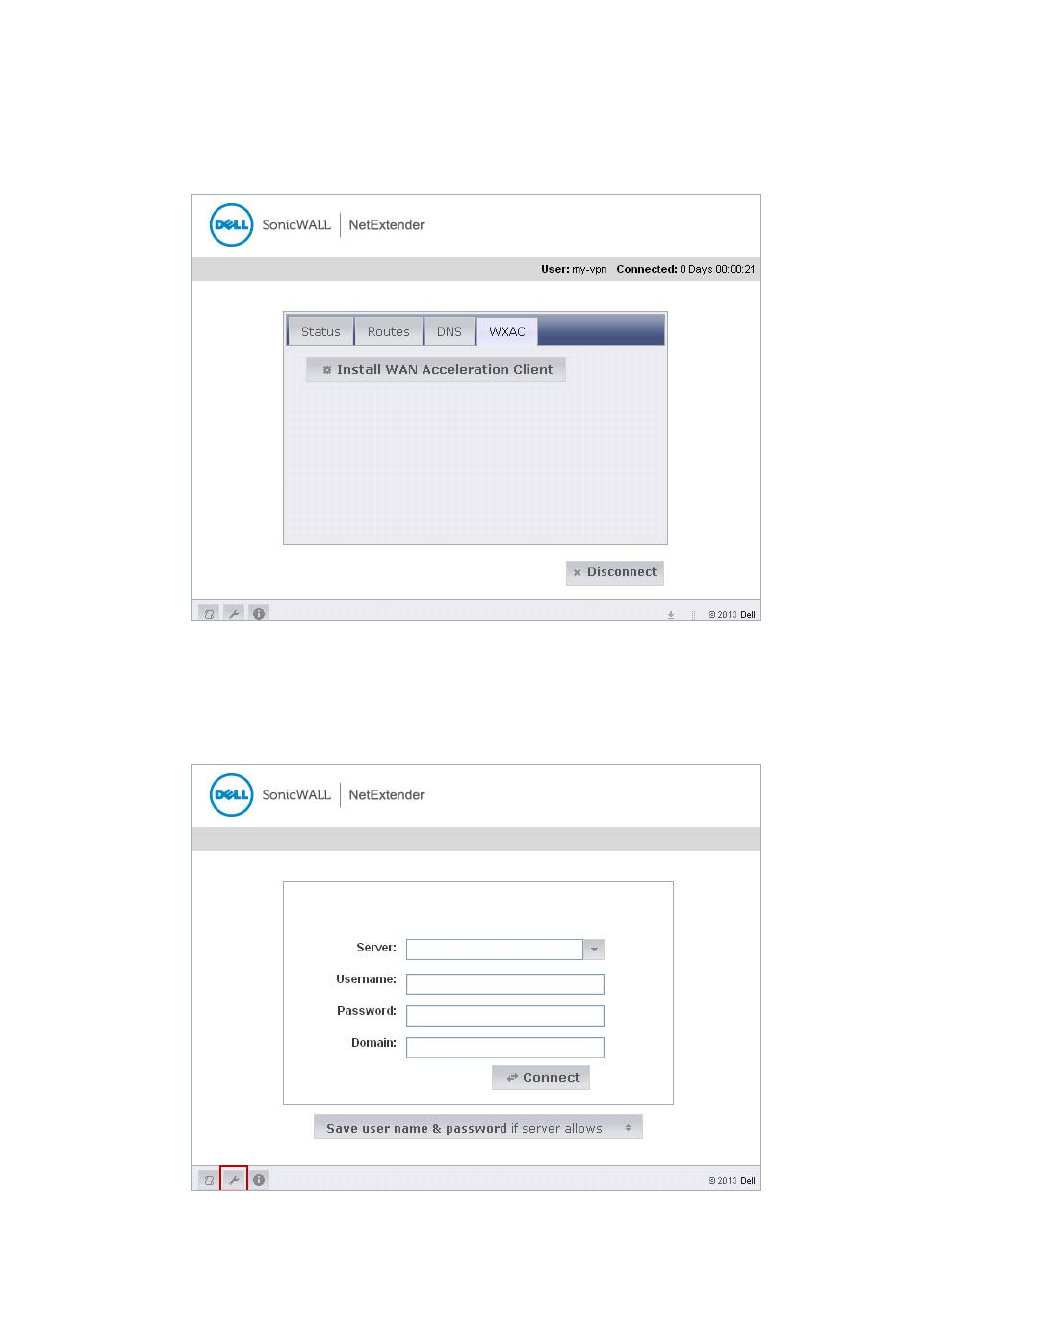
166 | Dell SonicWALL WXA 1.3 User’s Guide
Password—the password created by the Administrator.
Domain—the domain name displayed in the SSL VPN > Server Settings page of the
managing NSA/TZ appliance’s management interface.
Step 8 Click the Connect button.
Step 9 Once the NetExtender Client is connected, click the WXAC tab, and then click the Install WAN
Acceleration Client button.
If the WXAC is already installed, there will be an option to upgrade to the latest version.
Step 10 Once the WXAC is installed, click the Disconnect button.
The NetExtender Client login page displays:
Step 11 Enter the information from Step 4 in the text-fields, then click the Connect button
This reconnects you to the server, which is required in order to activate WAN Acceleration.
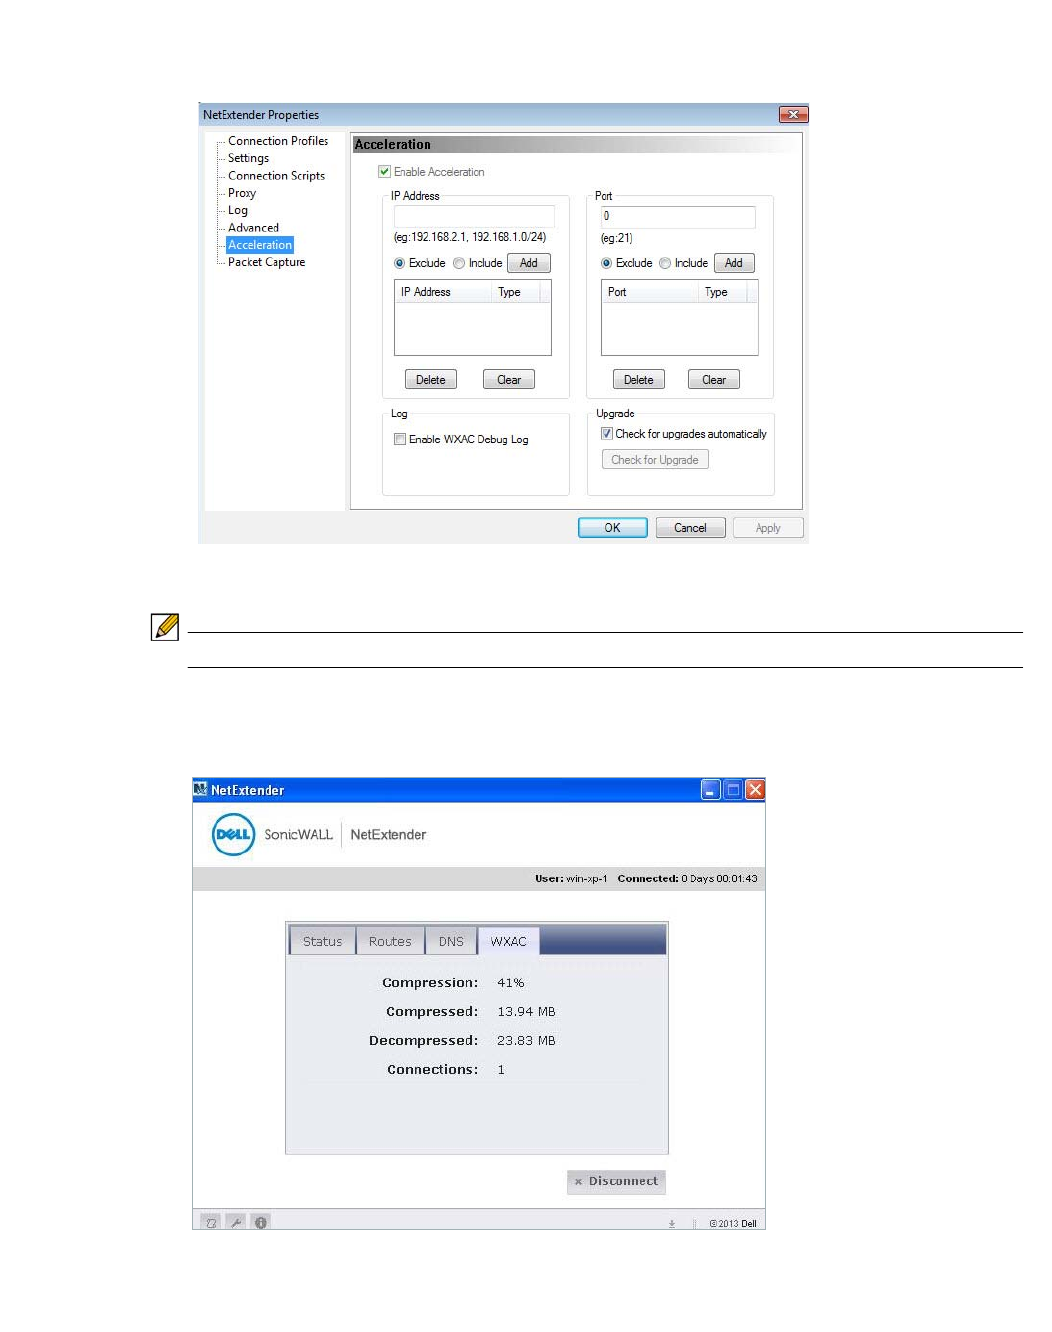
Appendix B: Configuring the NetExtender WAN Acceleration Client | 167
Step 12 Once you are connected, click the Properties button, then select Acceleration from the left-
navigation menu.
The Acceleration screen displays:
Step 13 Verify that the Enable Acceleration checkbox is selected.
Note The Enable Acceleration checkbox is selected by default.
Step 14 Exit the NetExtender Properties window, and then click the WXAC tab.
From this tab, you can view the WXAC data of files downloading from the server.

| 169
