Dell Lifecycle Controller 1 2 Update Manual Platform
2015-01-05
: Dell Dell-Dell-Lifecycle-Controller-1-2-Update-Manual-137591 dell-dell-lifecycle-controller-1-2-update-manual-137591 dell pdf
Open the PDF directly: View PDF ![]() .
.
Page Count: 60
- Introduction
- Using FTP Server
- Using a Local Drive
- Using a Network Share (CIFS or NFS)
- Using Single Component Update
- Roll Back to Previous Firmware Version
- View Current Version
- Testing Network Connectivity
- Checking the signature
- Platform Update Mechanism
- Trusted Platform Module Warning
- Using Dell Repository Manager

Lifecycle Controller Platform Update
in Dell PowerEdge 1 2th Generation
Servers
This Dell Technical White Paper provides detailed information about
the capabilities of Lifecycle Controller to perform firmware updates on
Dell’s 12th generation servers.
Sanjeev Nayaka, Anand Devadatta, and
Ravi BS

Learn more
Visit support.dell.com/manuals for more information on Lifecycle Controller.
© 2012 Dell Inc. All rights reserved. Dell and its affiliates cannot be responsible for errors or omissions in typography or
photography. Dell and the Dell logo are trademarks of Dell Inc. Microsoft, Windows, and the Windows logo are either
registered trademarks or trademarks of Microsoft Corporation in the United States and/or other countries. Intel and Xeon are
registered trademarks of Intel Corporation in the U.S. and other countries. Other trademarks and trade names may be used in
this document to refer to either the entities claiming the marks and names or their products. Dell disclaims proprietary
interest in the marks and names of others.
April 2012 | Rev 1.0

Executive Summary
Dell regularly releases firmware updates for various server components through the Dell FTP site
and SUU DVD. The firmware has new features and fixes for issues. To maximize system
performance and avoid unnecessary outages, Dell recommends updating your system with the
latest firmware.
This whitepaper aims to provide detailed information about the Platform Update feature
available in the Lifecycle Controller GUI.

Contents
Introduction ....................................................................................... 5
Supported Components ....................................................................... 5
About Platform Update ....................................................................... 6
Platform Update Methods .................................................................... 7
Using FTP Server .................................................................................. 7
Using Non-Proxy FTP Server ................................................................. 7
Using Proxy FTP Server ...................................................................... 13
Using a Local Drive .............................................................................. 17
Using a DVD .................................................................................... 17
Using a USB Flash Drive ...................................................................... 21
Creating a USB Flash Drive Repository ................................................. 25
Using a Network Share (CIFS or NFS) ......................................................... 26
Creating the Local CIFS or NFS Share Repository .................................... 32
Using Single Component Update .............................................................. 32
FTP .............................................................................................. 32
Local Drive (CD/DVD/USB) .................................................................. 34
Network Share (CIFS and NFS) .............................................................. 37
Roll Back to Previous Firmware Version ..................................................... 41
View Current Version ........................................................................... 44
Testing Network Connectivity ................................................................. 47
Checking the signature ......................................................................... 51
Catalog on FTP Server ....................................................................... 51
Single Component DUPs ..................................................................... 53
Platform Update Mechanism ................................................................... 54
Trusted Platform Module Warning ............................................................ 56
Using Dell Repository Manager ................................................................ 59
Saving the Repository Using DRM .......................................................... 59

Introduction
Lifecycle Controller allows an IT administrator to perform firmware updates and roll backs, and view
existing firmware versions even if the operating system is not installed or running. Using Lifecycle
Controller, the system can be updated using the repositories accessible through FTP or located on a
locally attached USB flash drive, DVD or network share.
After selecting the update repository, Lifecycle Controller automatically detects the applicable
update. Similarly, Lifecycle Controller can also roll back the component firmware to the previous
firmware version.
The Platform Update feature provides the following benefits:
A simplified system management experience and greater standardization. The update
process operates from a single point in the pre‐OS UEFI environment that works on all
supported servers.
A secure process, the system and data are protected through multiple layers of security
validation.
Reduced downtime - The number of reboots is minimized during the update process.
Further, since the update process runs in the UEFI environment, the boot time on the
system is reduced, eliminating the need to load a running operating system.
Supported Components
The following table lists the components that are supported through the Platform Update feature.
Table 1. Platform Update – Supported Components
Component Name
Update (Yes/No)
Rollback (Yes/No)
Reboot (Yes/No)
Lifecycle Controller
Yes
No
Yes
OS Driver Pack
Yes
No
No
Diagnostics
Yes
No
No
BIOS
Yes
Yes
Yes
RAID Controller
Yes
Yes
Yes
NIC
Yes
Yes
Yes
iDRAC
Yes
Yes
Yes
Power Supply
Yes
Yes
Yes
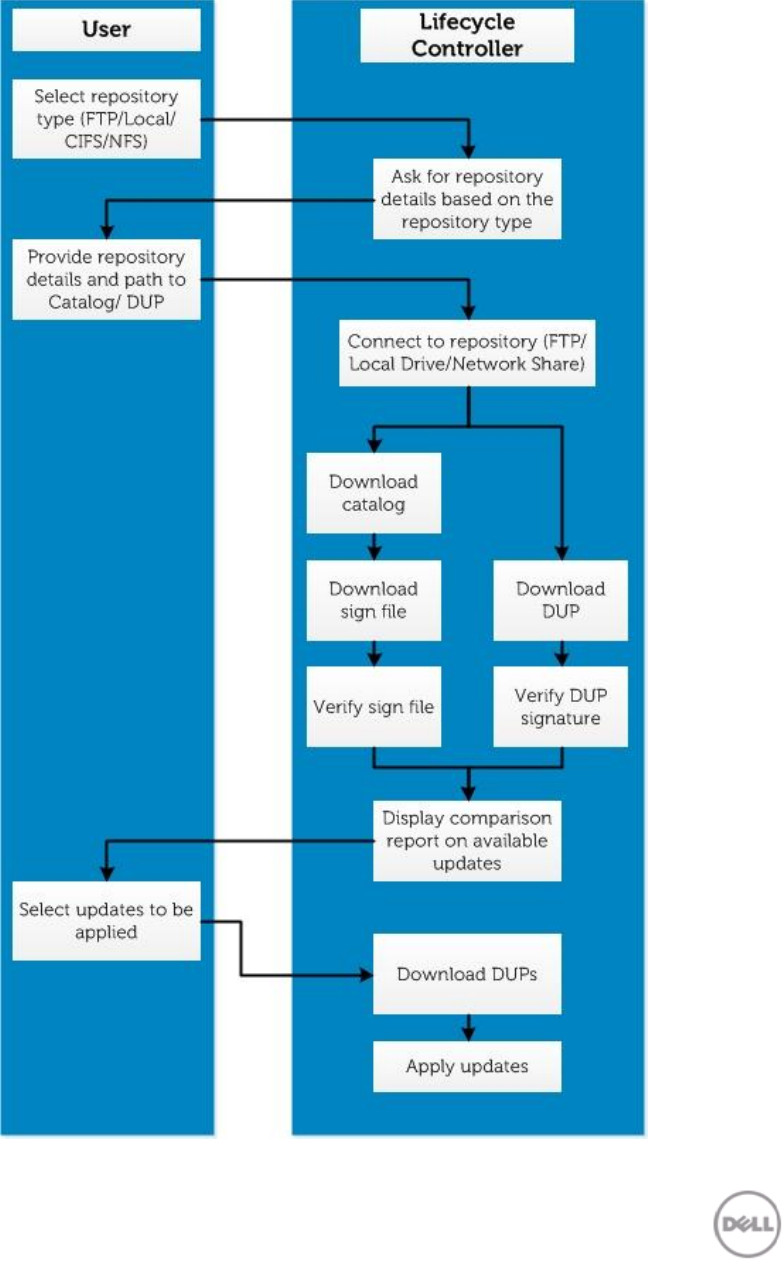
About Platform Update
The following figure provides a snapshot of the Platform Update process.
Platform Update Snapshot Figure 1.

Platform Update Methods
The following table lists the various methods of performing platform update.
Table 2. Platform Update Methods
FTP
Non-proxy
(Dell, Internal, or Service Provider)
Proxy
(Dell, Internal, or Service
Provider)
Local Drive (SUU DVD or USB Flash Drive)
Virtual Console
(Mapped on Client)
Attached Locally
Network Share (CIFS or NFS)
Using FTP Server
Lifecycle Controller provides options to update a server using the latest firmware available on the
Dell FTP server or on an internal FTP server.
Using Non-Proxy FTP Server
Lifecycle Controller can access the latest firmware from ftp.dell.com. Lifecycle Controller downloads
the DUPs from this location to perform platform update.
Before performing an update, make sure the following prerequisites are met:
The network settings are configured (Lifecycle Controller Settings Network
Settings).
The updates are downloaded using the Dell Repository Manager, and the repository is
created on an internal FTP server.
To update the platform using Dell FTP, internal, or service provider’s FTP server:
1. Launch Lifecycle Controller: Press <F10> key within 10 seconds of the logo being displayed during
boot.
2. Click Platform Update Launch Platform Update.
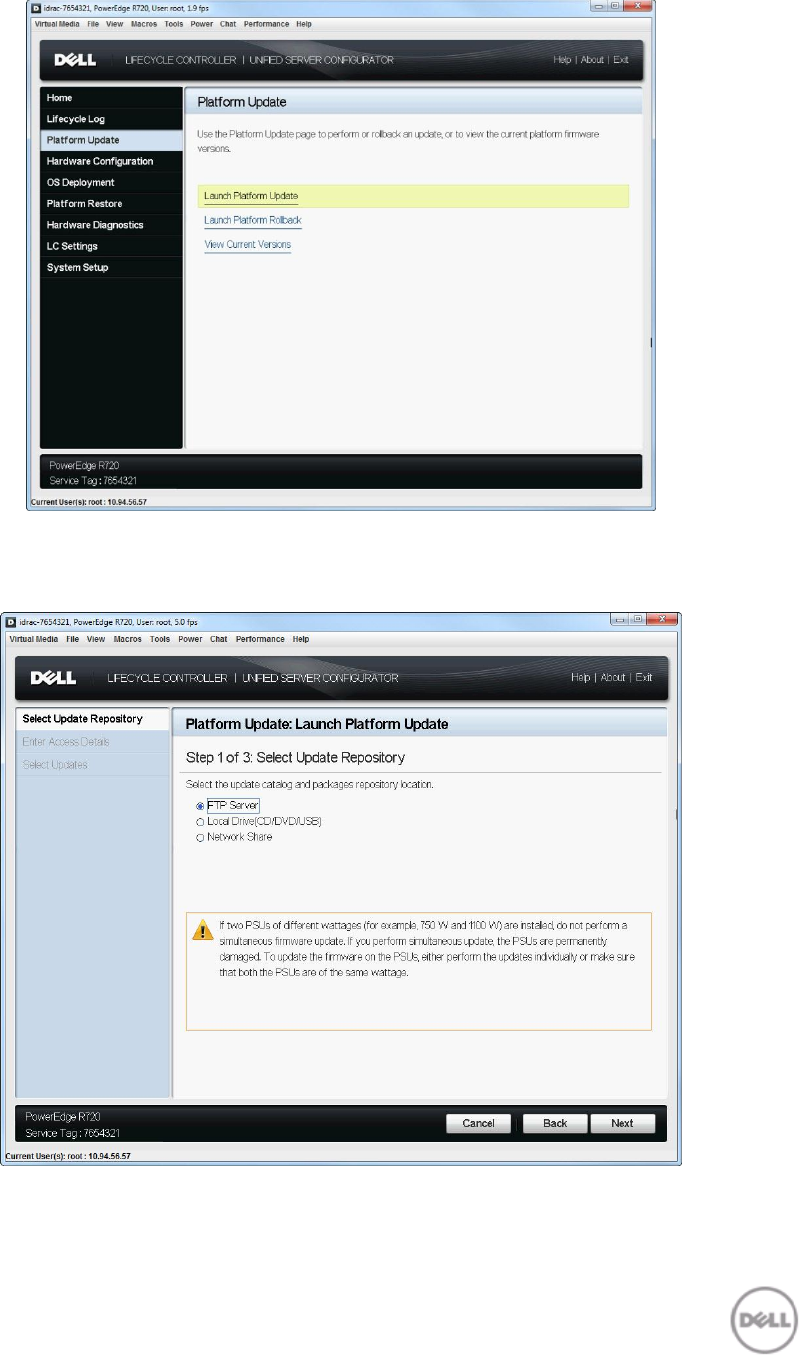
Select Platform Update Figure 2.
The Select Update Repository page is displayed.
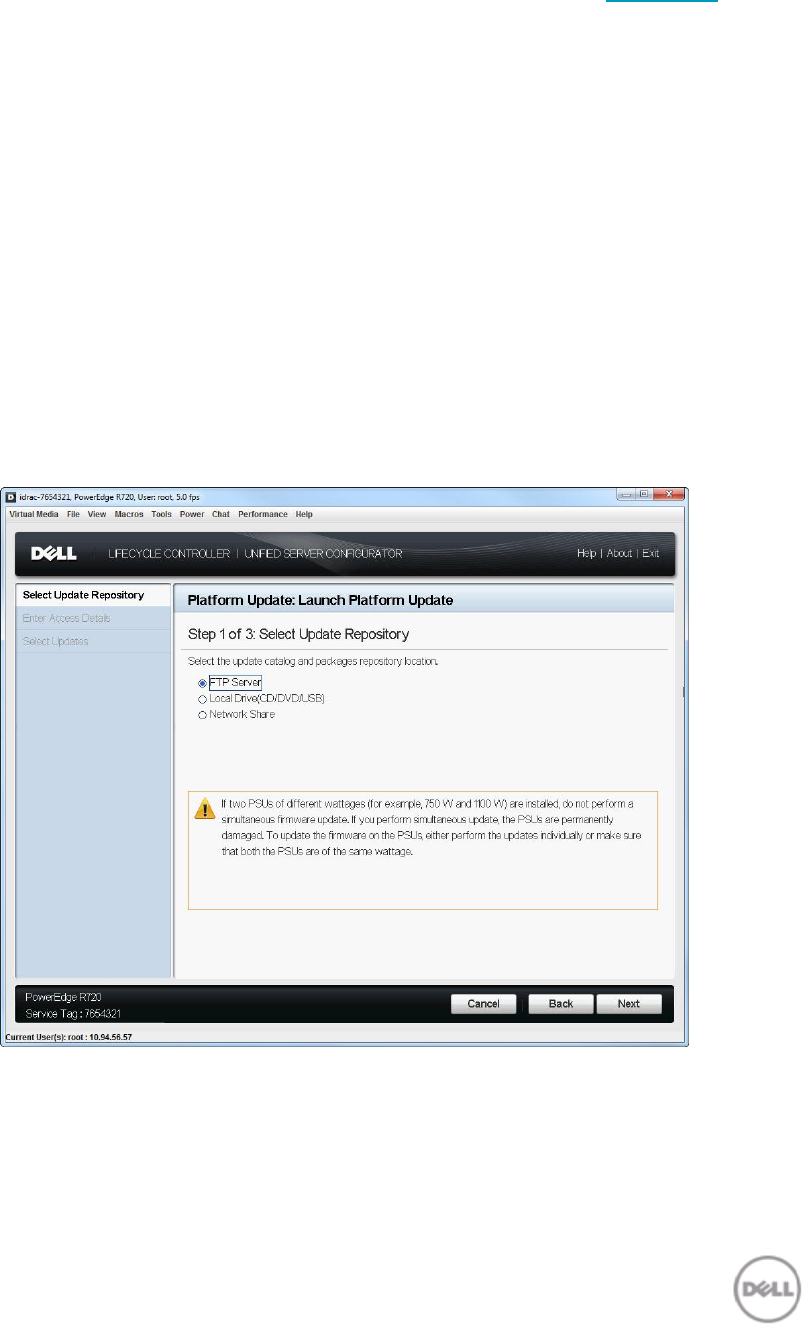
Select Update Repository Figure 3.
3. Select FTP Server as the source location and click Next.
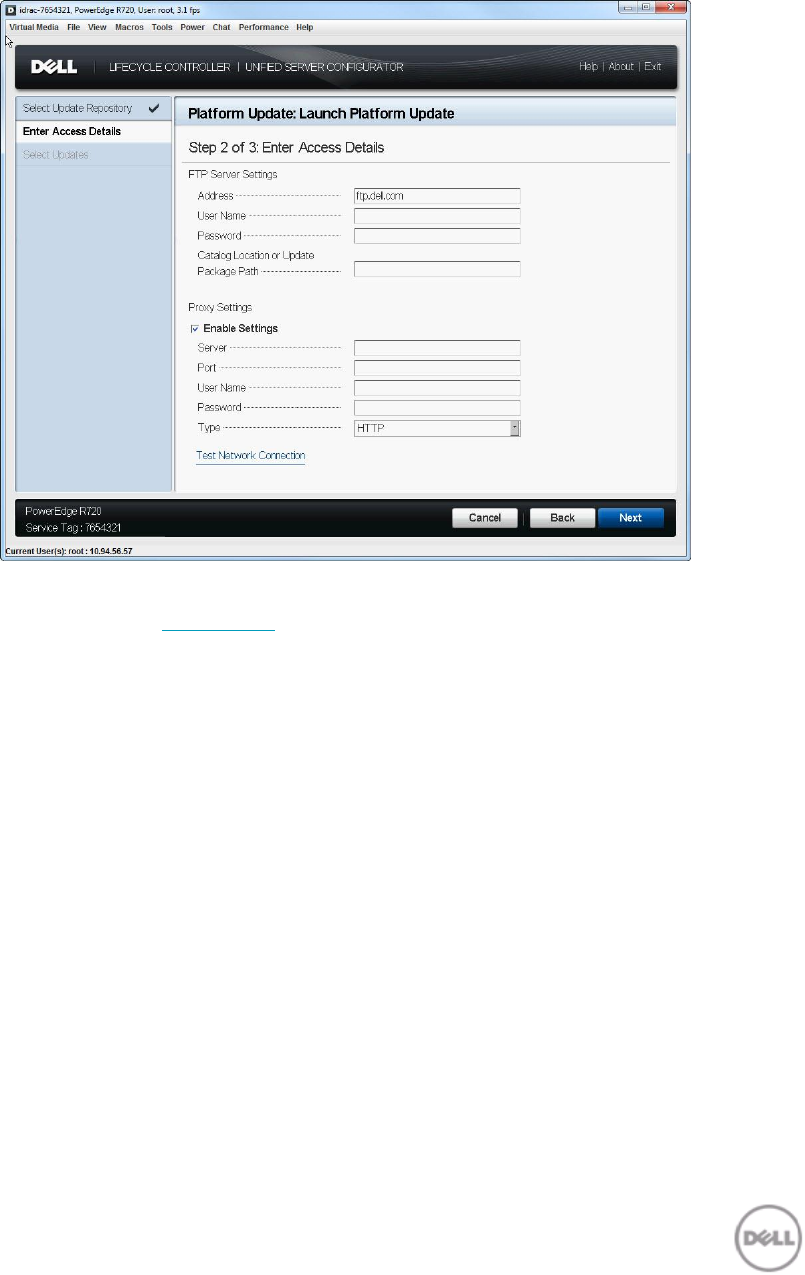
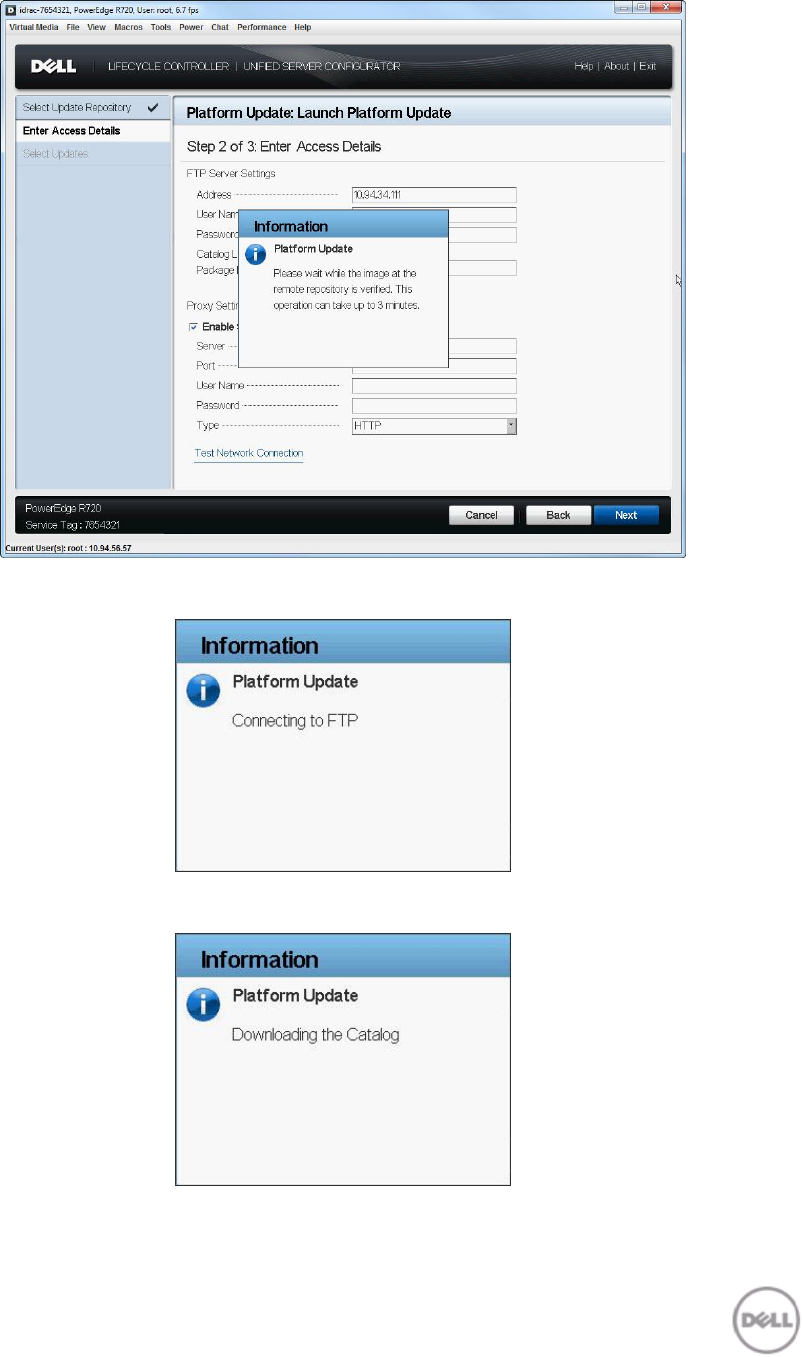
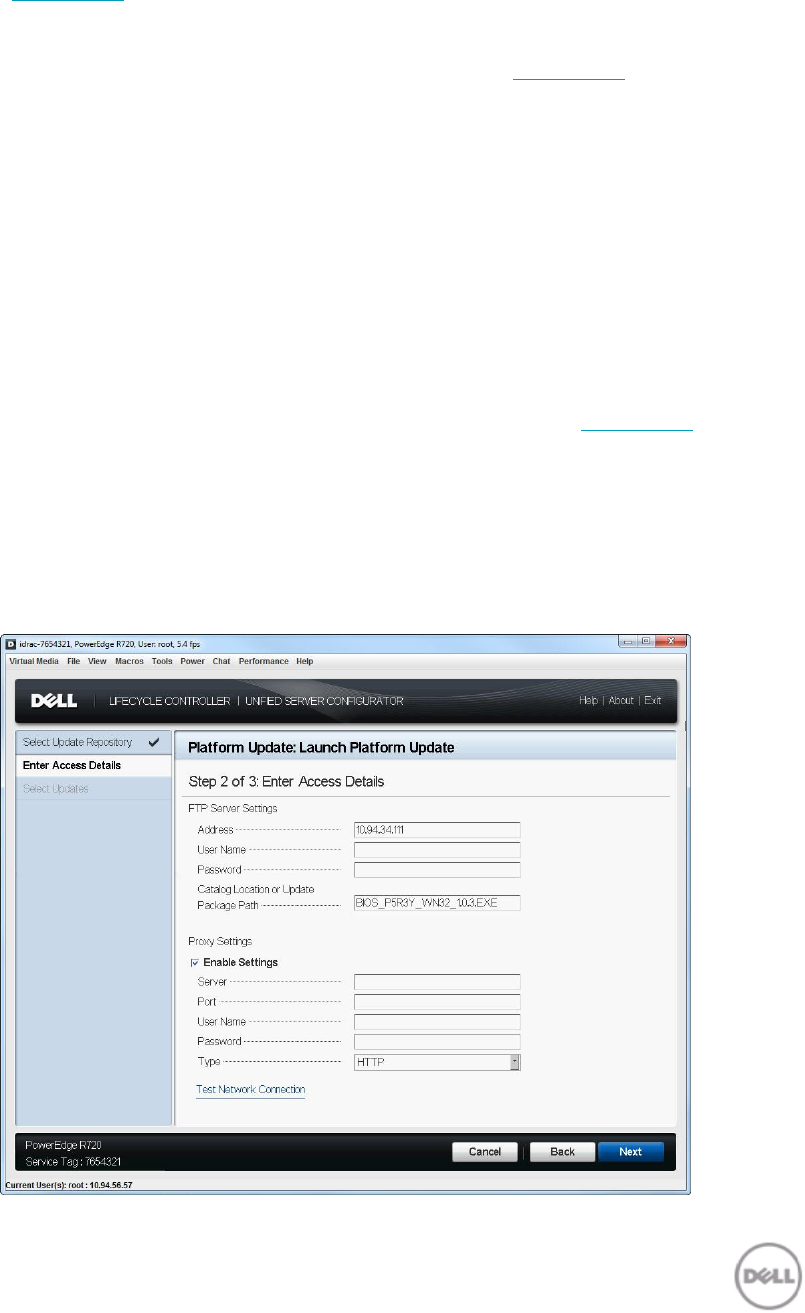
The Enter Access Details page is displayed.
Enter Access Details Figure 4.
4. In the Address box, type the host name or IP address of the FTP server and click Next:
Dell FTP Server (ftp.dell.com)
Internal or service provider’s FTP server (contact your system administrator or service
provider for the information)
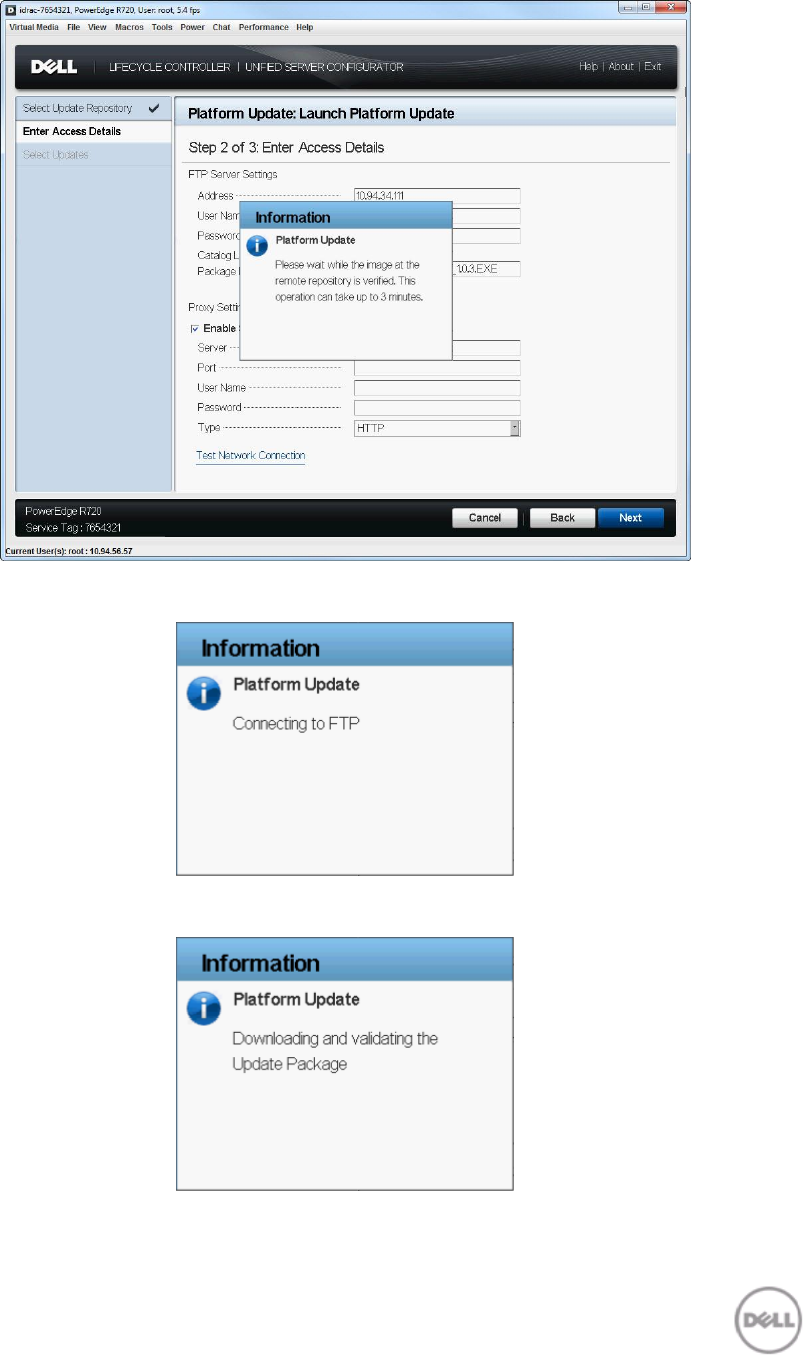
The latest firmware is downloaded from Dell FTP server, internal FTP server, or service
provider’s FTP server, and the Select Updates page is displayed.
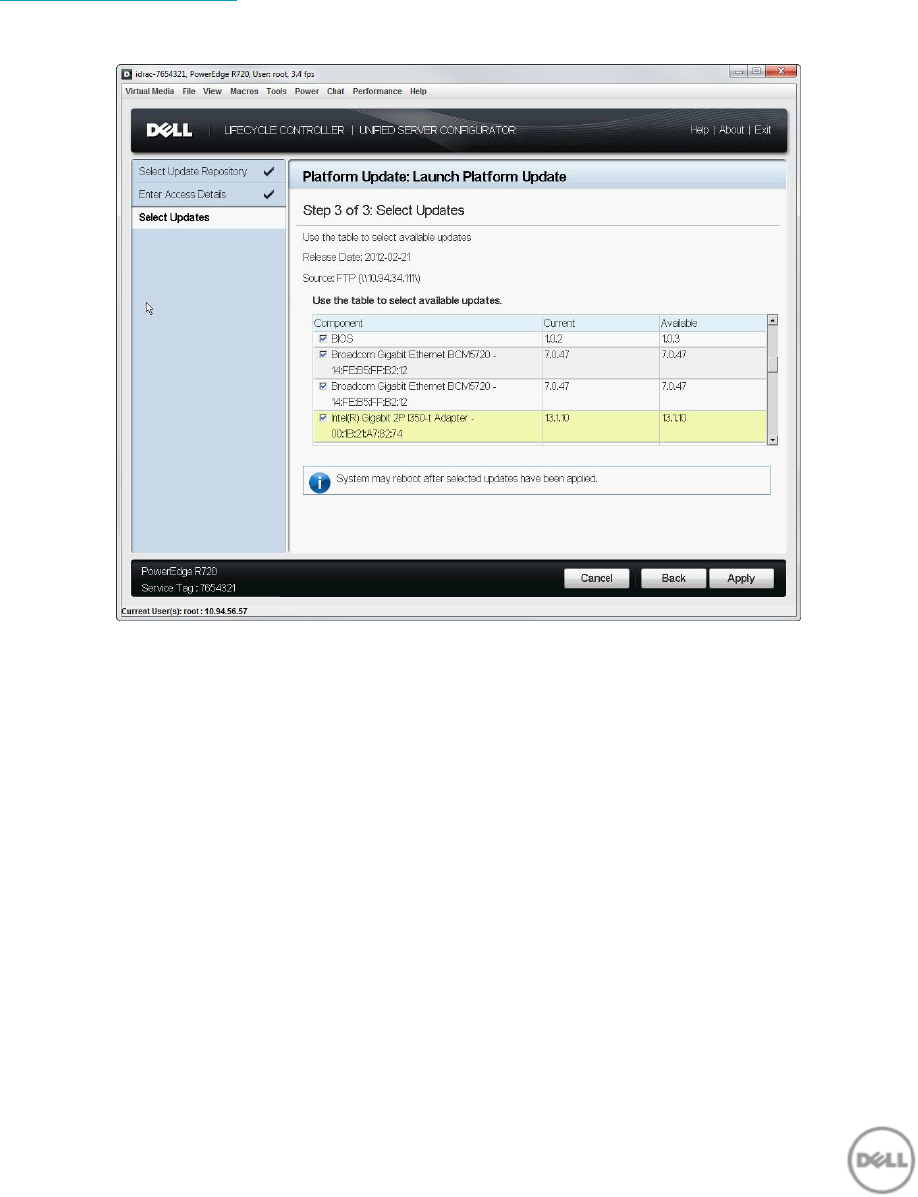
Select Updates - FTP Figure 5.
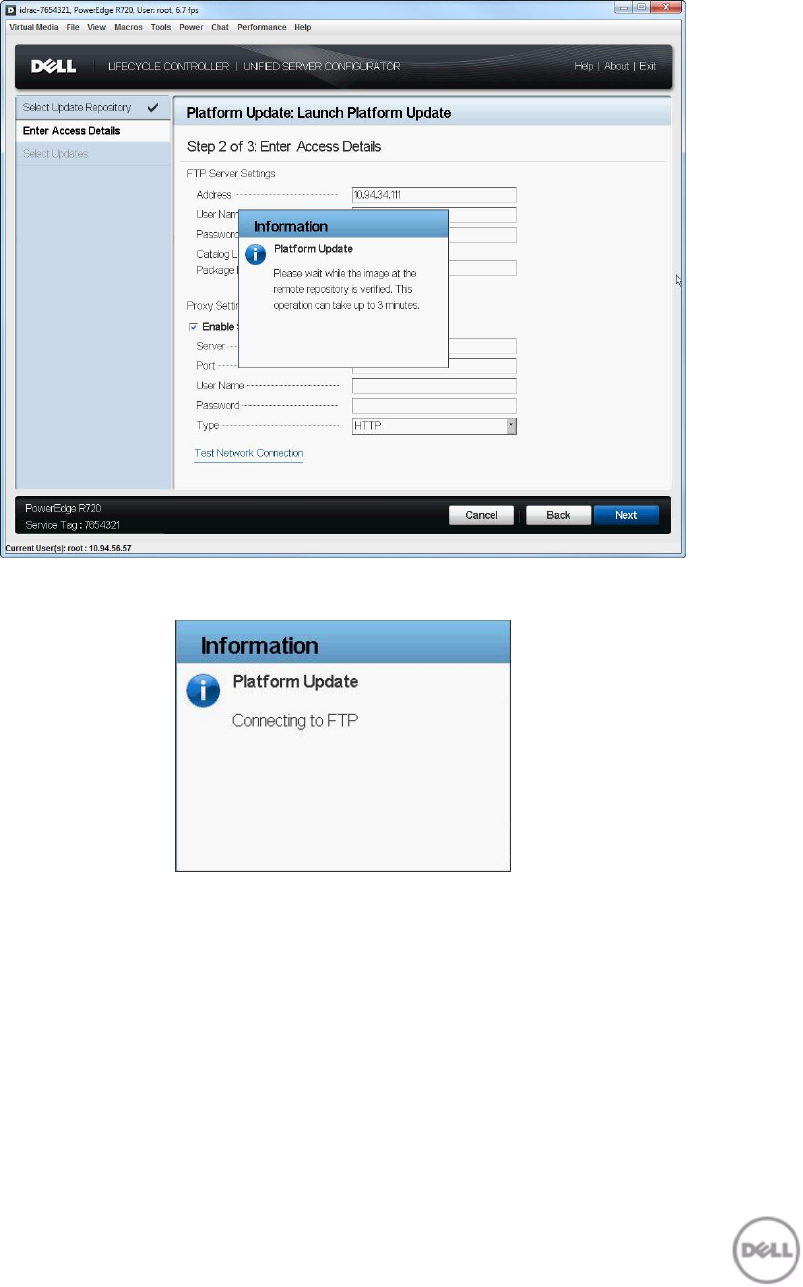
Connecting to FTP
Figure 6.
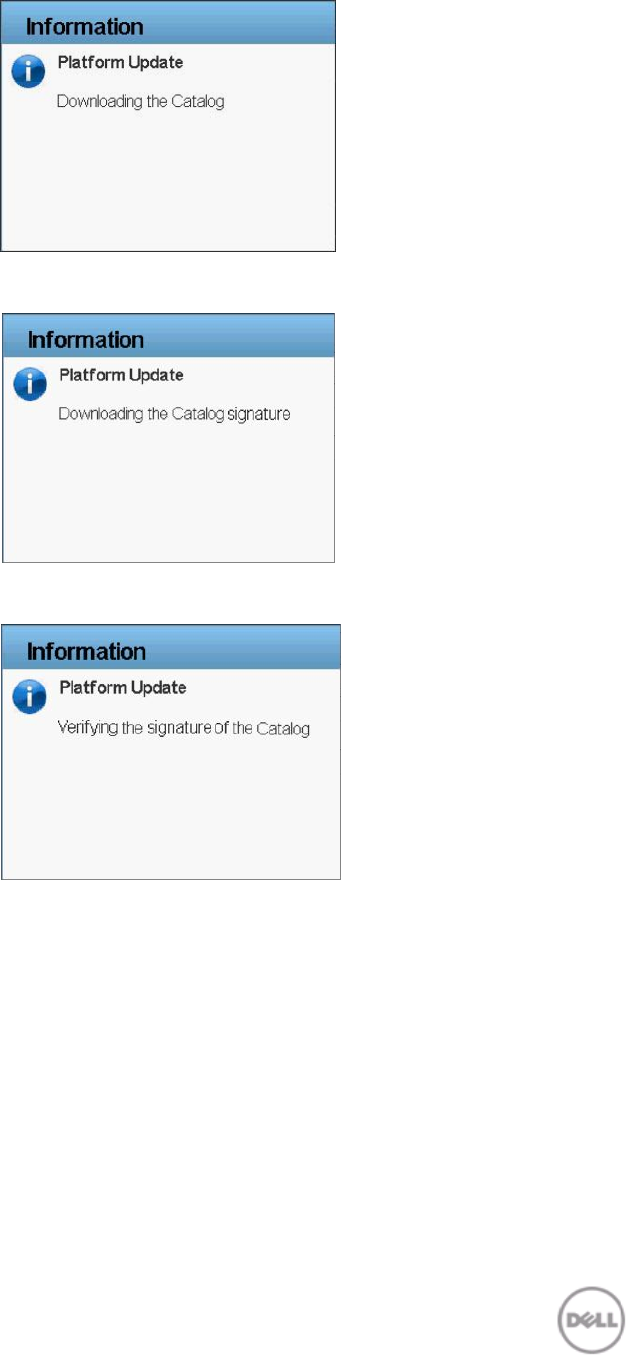
Downloading Catalog Figure 7.
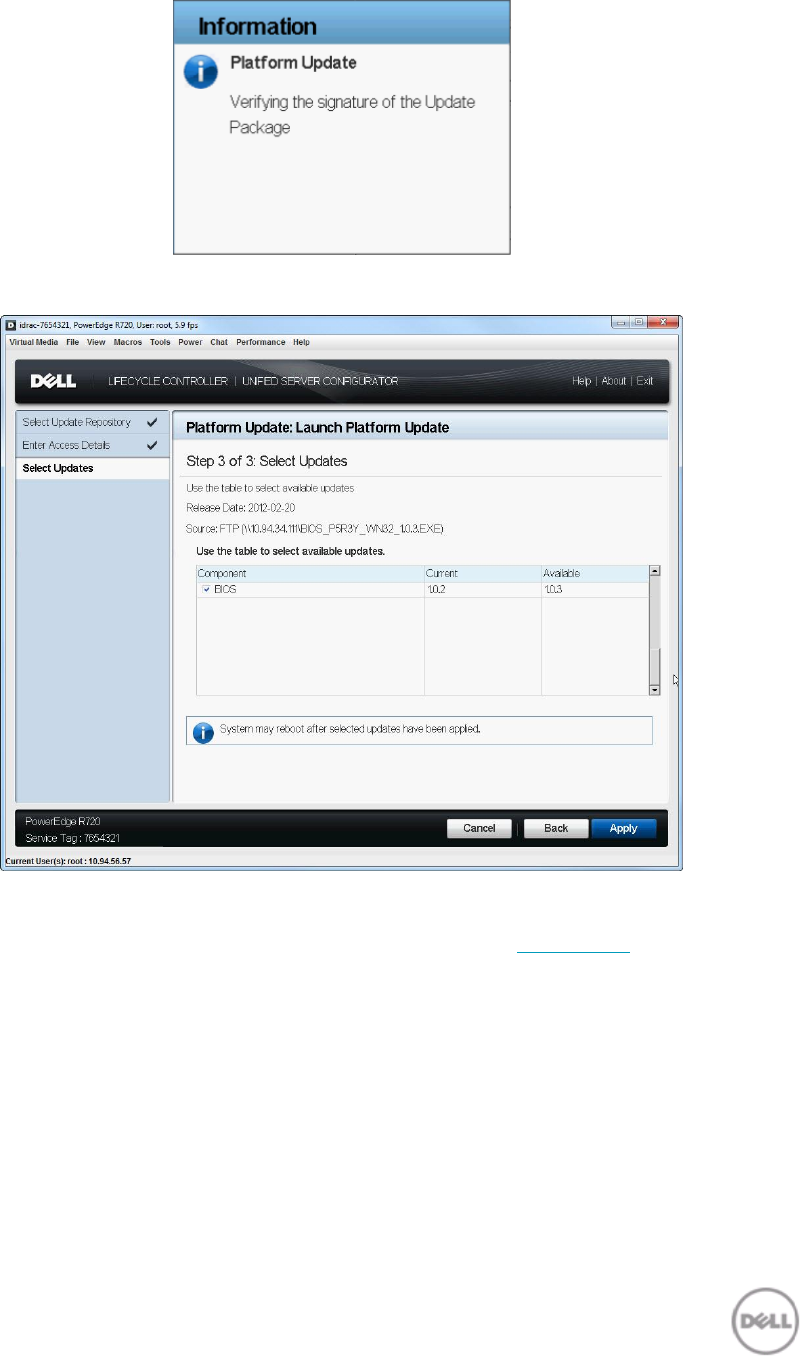
Downloading Catalog Signature Figure 8.
Verifying Catalog Signature Figure 9.
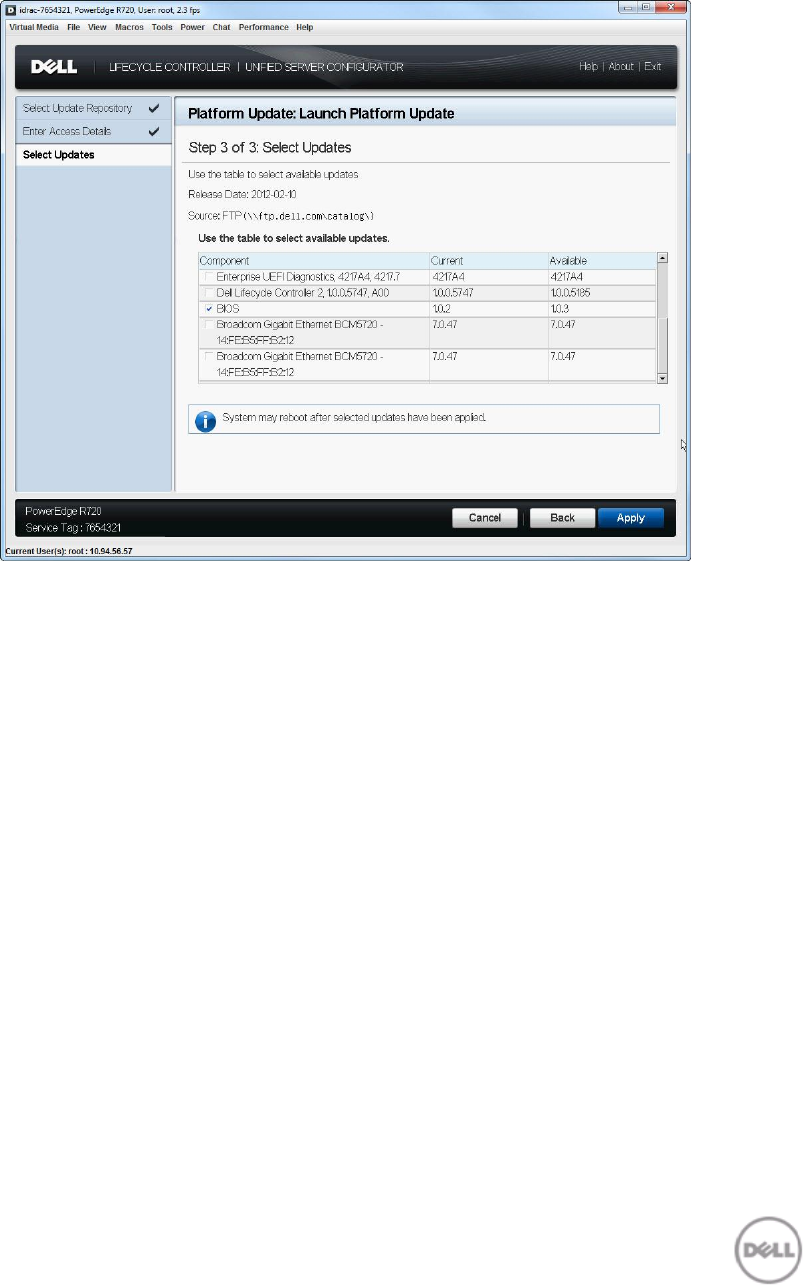
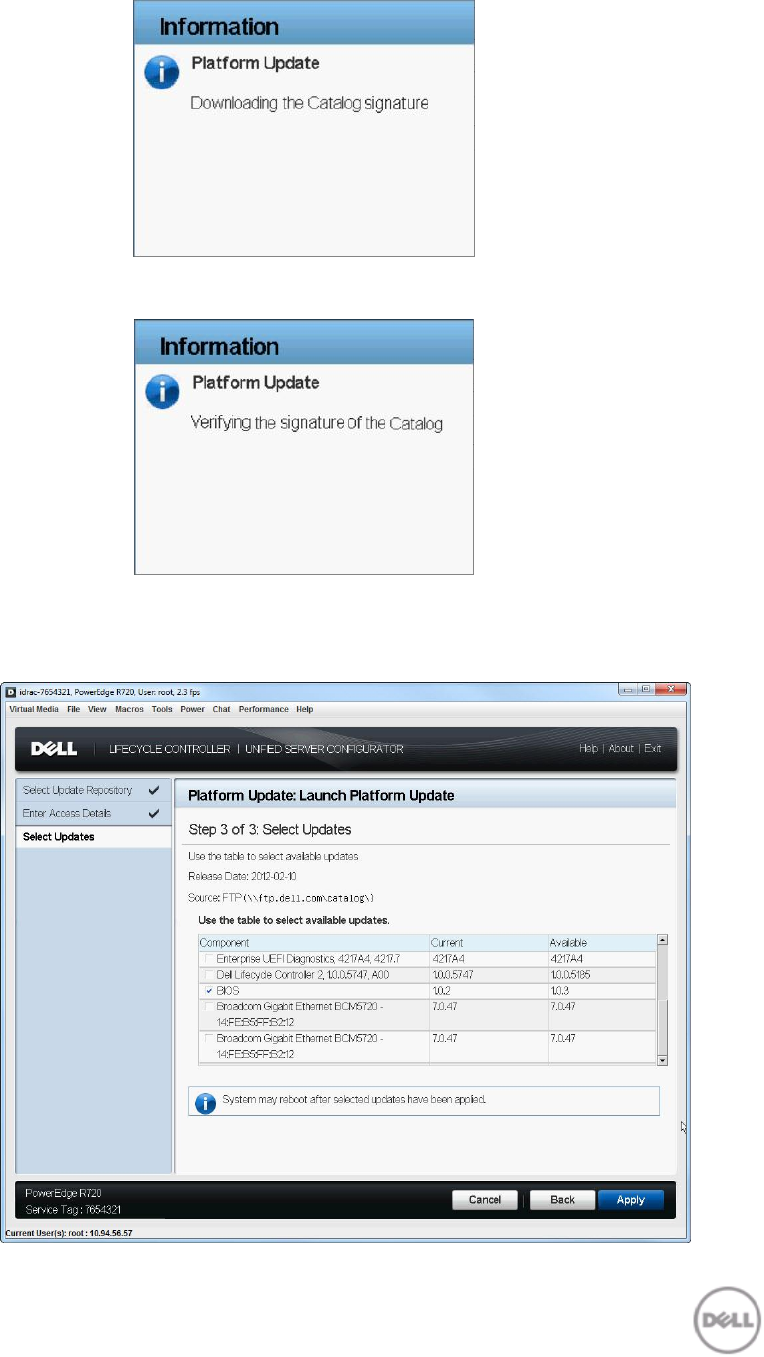
5. For a component, compare the currently installed firmware version and the later version under
the Current and Available columns.
Components (current and available version) Figure 10.
6. Select the required components.
NOTE: By default, Lifecycle Controller selects the components for which a later version is
available.
7. Click Apply.
After the update process is complete, the system reboots.
NOTE: When applying more than one update, the system may need to reboot between updates.
In this case, the system boots directly into Lifecycle Controller and automatically continues the
update process.
NOTE: If the iDRAC firmware update is interrupted for any reason, wait for up to 30 minutes
before you attempt another firmware update.
NOTE: Do not perform an AC power cycle during the update process. However, if the system is
turned off before the update process is complete, a message Lifecycle Controller update
required may be displayed during Power-On Self-Test (POST). In such cases, use the LC Repair
Package to repair Lifecycle Controller. For more information, see Lifecycle Controller User’s
Guide.
Using Proxy FTP Server
Lifecycle Controller can be used to perform updates with firmware available at ftp.dell.com, or by
using an internal, or service provider’s FTP server when you are connected to the Internet through a
proxy server.
Before performing the update, make sure the following prerequisites are met:
Network settings are configured (Lifecycle Controller Settings Network Settings).
Updates are downloaded using the Dell Repository Manager and the repository is
created on an internal FTP server.
The proxy server supports either HTTP or SOCKS4 protocols.
Information related to proxy server such as IP address or host name of the proxy server,
login credentials, and the port number are readily available.
To update the platform using the Dell FTP server:
1. Launch Lifecycle Controller: Press <F10> key within 10 seconds of the logo being displayed during
boot.
2. Click Platform Update Launch Platform Update.
The Select Update Repository page is displayed.
Select Update Repository Figure 11.
3. Select FTP as the source location and click Next.
The Enter Access Details page is displayed.
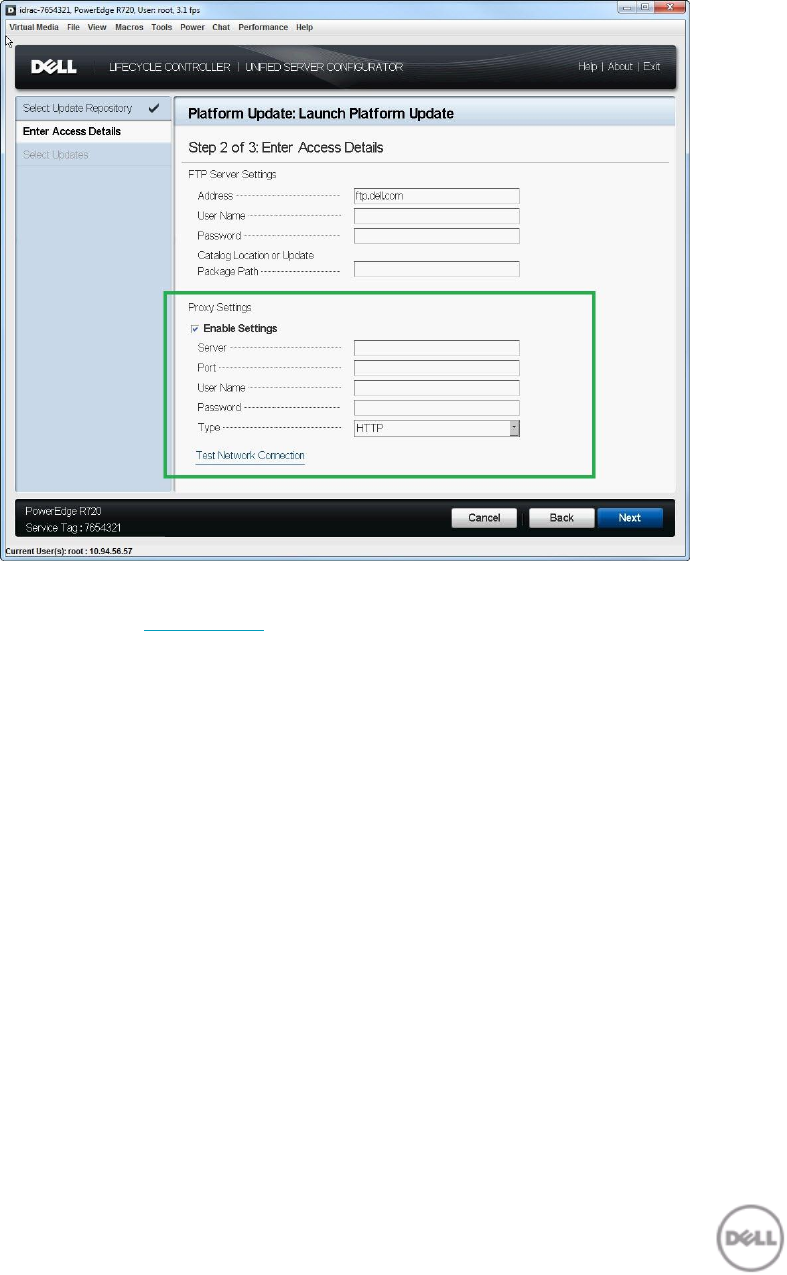
Enter Access Details Figure 12.
4. In the Address box, type the host name or IP address of the FTP server.
Dell FTP Server (ftp.dell.com)
Internal or service provider’s FTP server (contact your system administrator or service
provider for the information)
5. Provide the proxy server credentials and click Next.
The latest firmware is downloaded from the Dell FTP server, internal FTP server, or service
provider’s FTP server, and the Select Updates page is displayed.
NOTE: Click Test Network Connection to check the network connectivity between Lifecycle
Controller and the proxy server. For more information, see Testing Network Connectivity.
Select Updates - FTP Figure 13.
Connecting to FTP Figure 14.
Downloading Catalog Figure 15.
Downloading Catalog Signature Figure 16.
Verifying Catalog Signature Figure 17.
6. For a component, compare the currently installed firmware version and the later version under
the Current and Available columns.
Components (Current and Available Version)
Figure 18.

7. Select the required components.
NOTE: By default, Lifecycle Controller selects the components for which a later version is
available.
8. Click Apply.
After the update process is complete, the system reboots.
NOTE: When applying more than one update, the system may need to reboot between updates.
In this case, the system boots directly into Lifecycle Controller and automatically continues the
update process.
NOTE: If the iDRAC firmware update is interrupted for any reason, wait for up to 30 minutes
before you attempt another firmware update.
Using a Local Drive
Lifecycle Controller allows you to perform platform updates using locally available DVDs or USBs, or
by using Virtual Media. This flexibility improves the efficiency of the update process when there is
heavy network traffic. After selecting the update repository, Lifecycle Controller automatically
detects any necessary updates and then performs those updates either on components you
specifically select, or on all components Lifecycle Controller has identified by default.
Using a DVD
Use either Server Update Utility (SUU) DVDs or custom DVDs (SUU ISO downloaded from
support.dell.com and written to a DVD) to perform platform updates. The available DVDs are:
OpenManage SUU DVD to update all the server components such as Lifecycle Controller,
Dell Diagnostics, BIOS, Raid Controller, NIC, iDRAC and Power Supply.
Lifecycle Controller OS Driver Packs DVD to update the operating system driver packs.
To update using SUU DVDs:
1. Launch Lifecycle Controller: Press <F10> key within 10 seconds of the logo being displayed during
boot.
2. Click Platform Update Launch Platform Update.
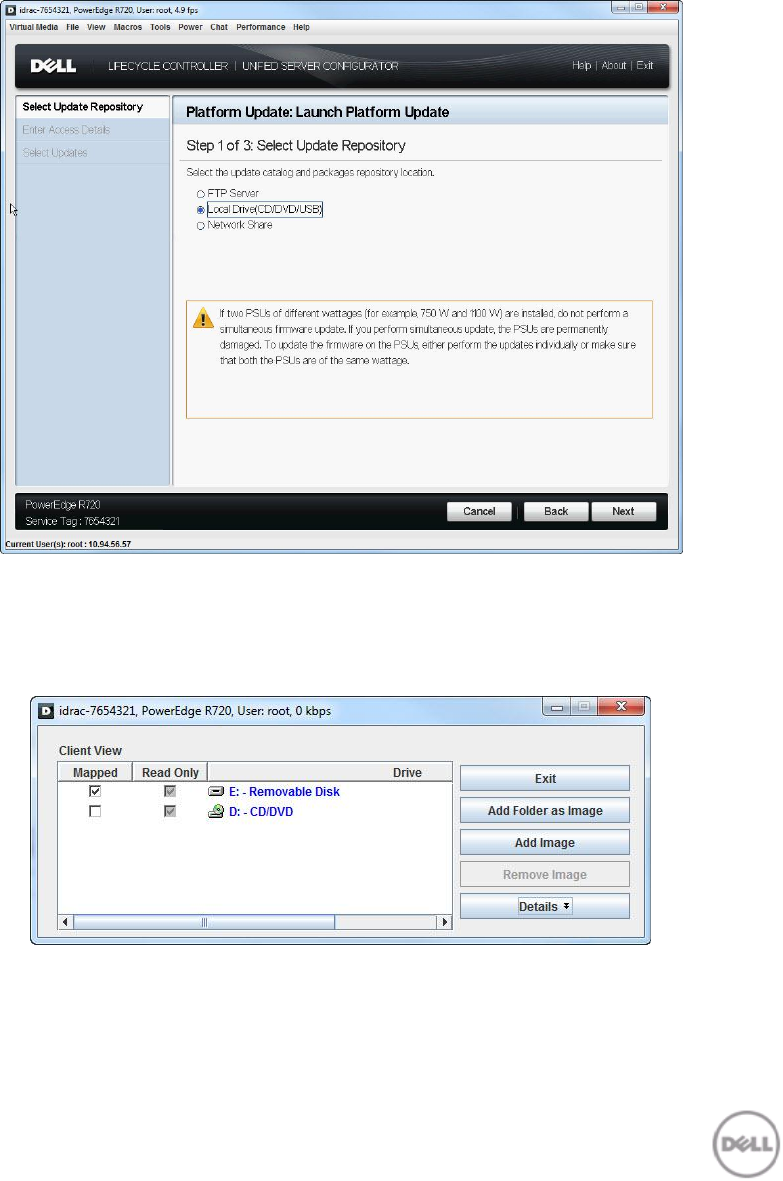
The Select Update Repository page is displayed.
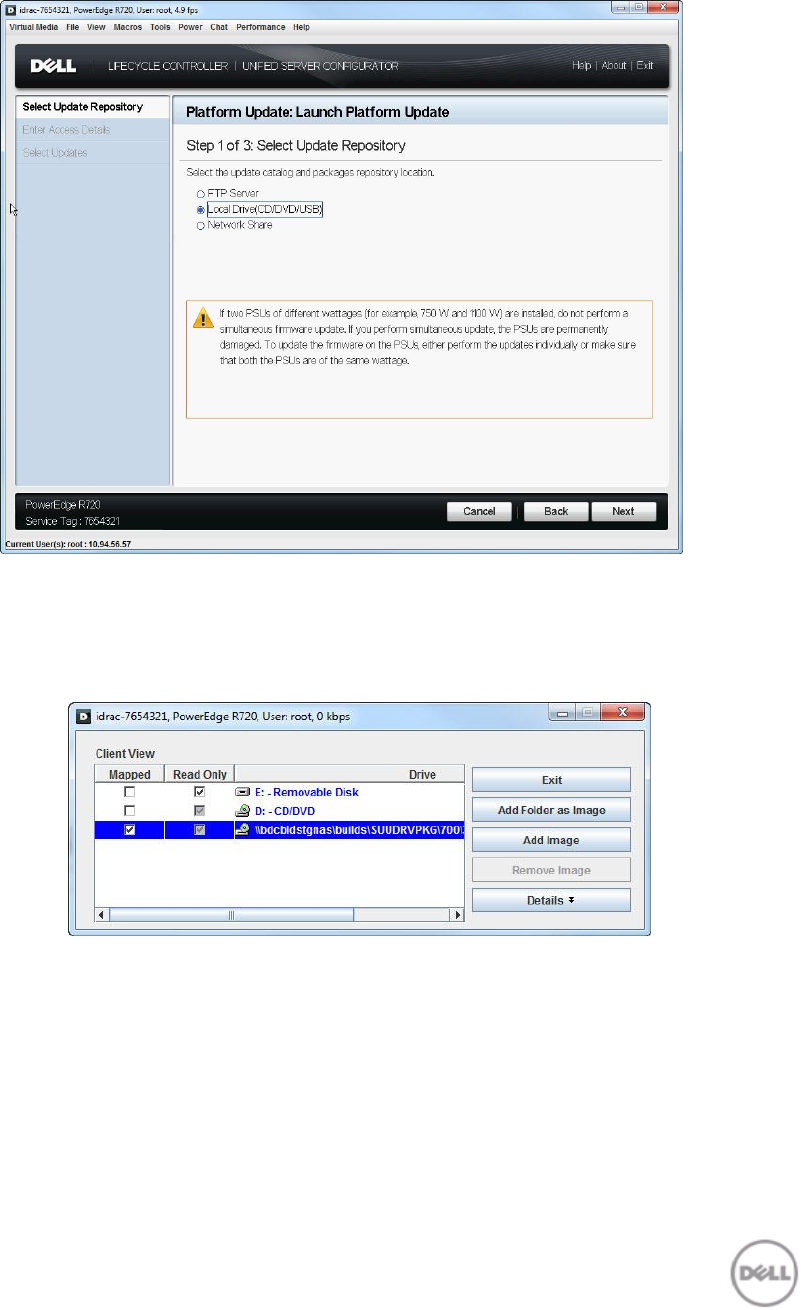
Select Update Repository Figure 19.
3. Insert the appropriate DVD in the locally-attached CD/DVD drive. Alternatively, insert the
appropriate DVD in the client and use the Virtual Media feature to access the attached CD/DVD
drive. For more information, see iDRAC7 User’s Guide.
DVD Mapped To the Client Drive Figure 20.
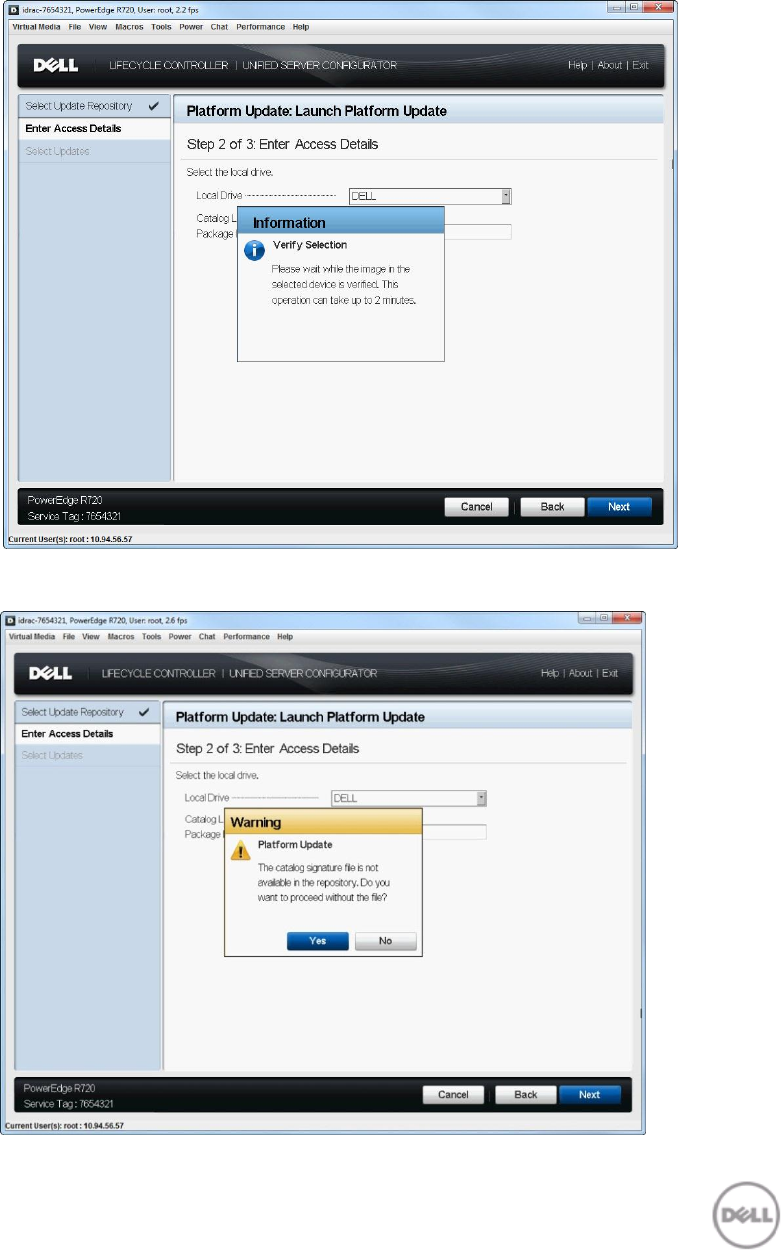
4. Select Local Drive (CD/DVD/USB) as the source location and click Next.
The Enter Access Details page is displayed. However, if the catalog is not signed, a warning
message is displayed. Click Yes to continue.
Enter Access Details Figure 21.
Verifying Selection Figure 22.
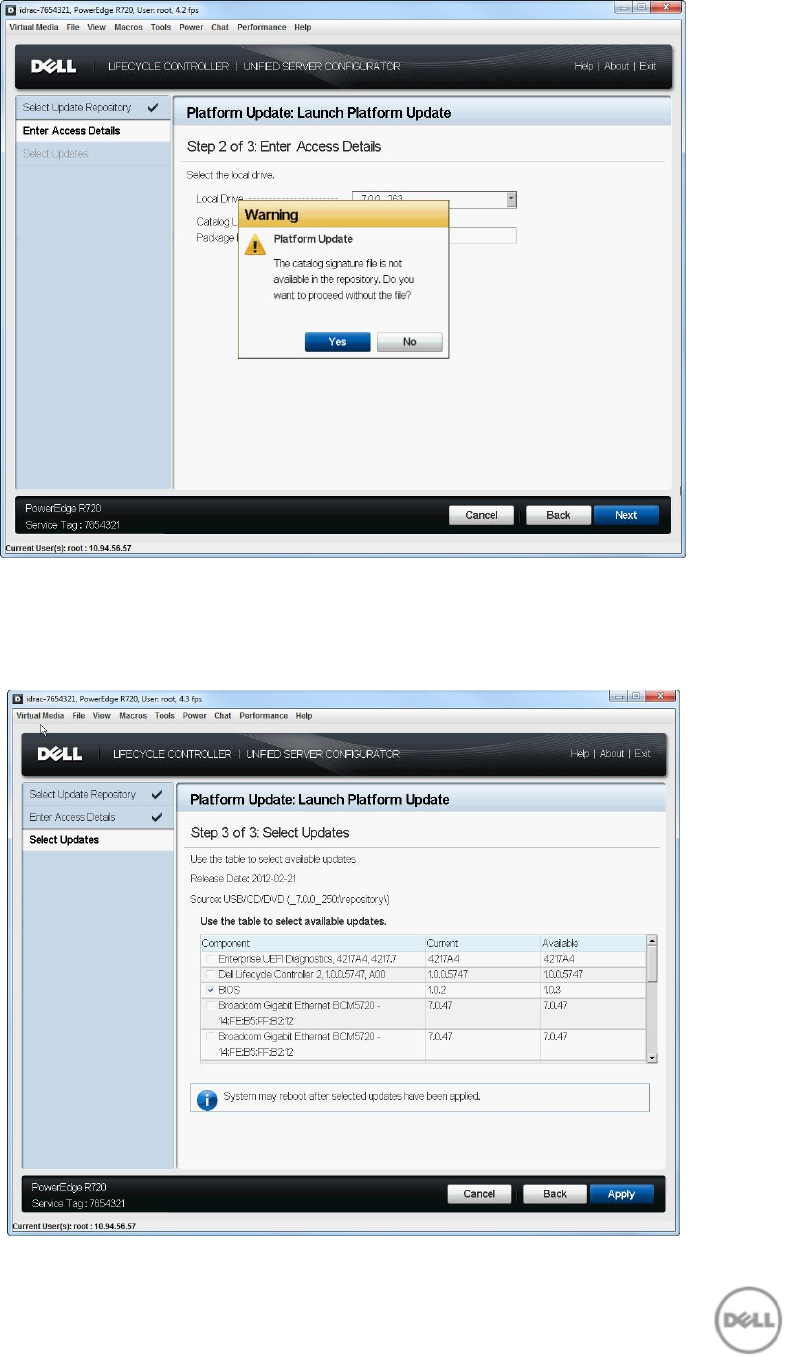
Warning Message Figure 23.
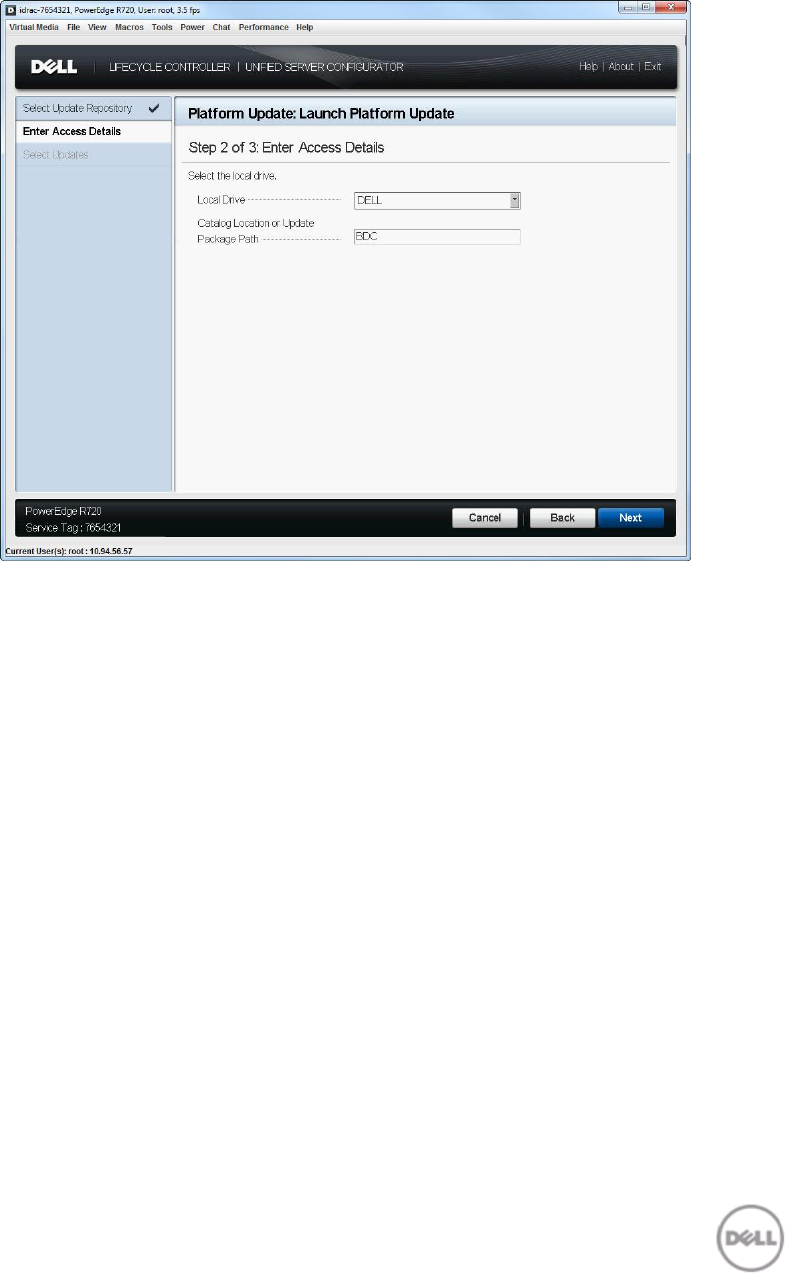
5. From the Local Drive drop-down menu, select the appropriate drive and click Next.
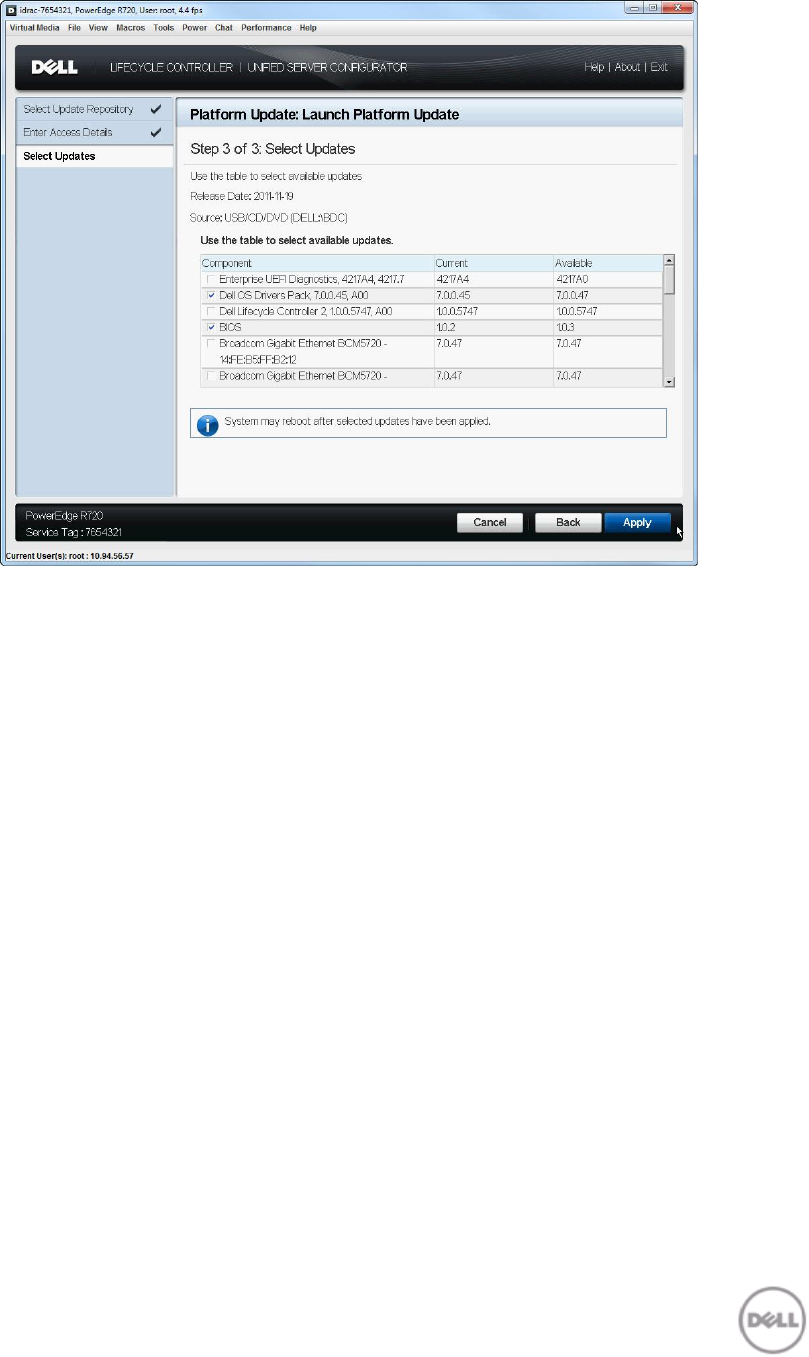
The Select Updates page is displayed.
Select Updates (BIOS)
Figure 24.
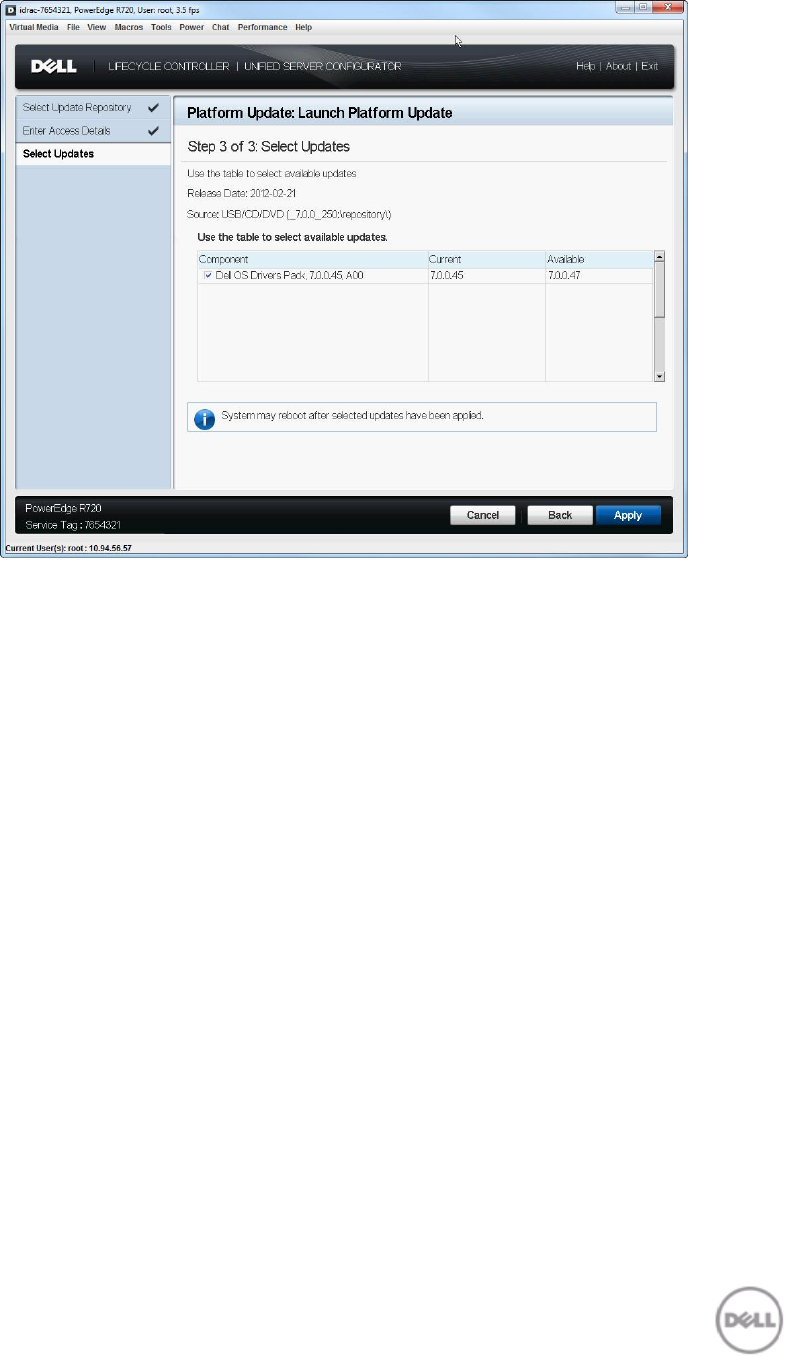
Select Updates (OS Driver Pack) Figure 25.
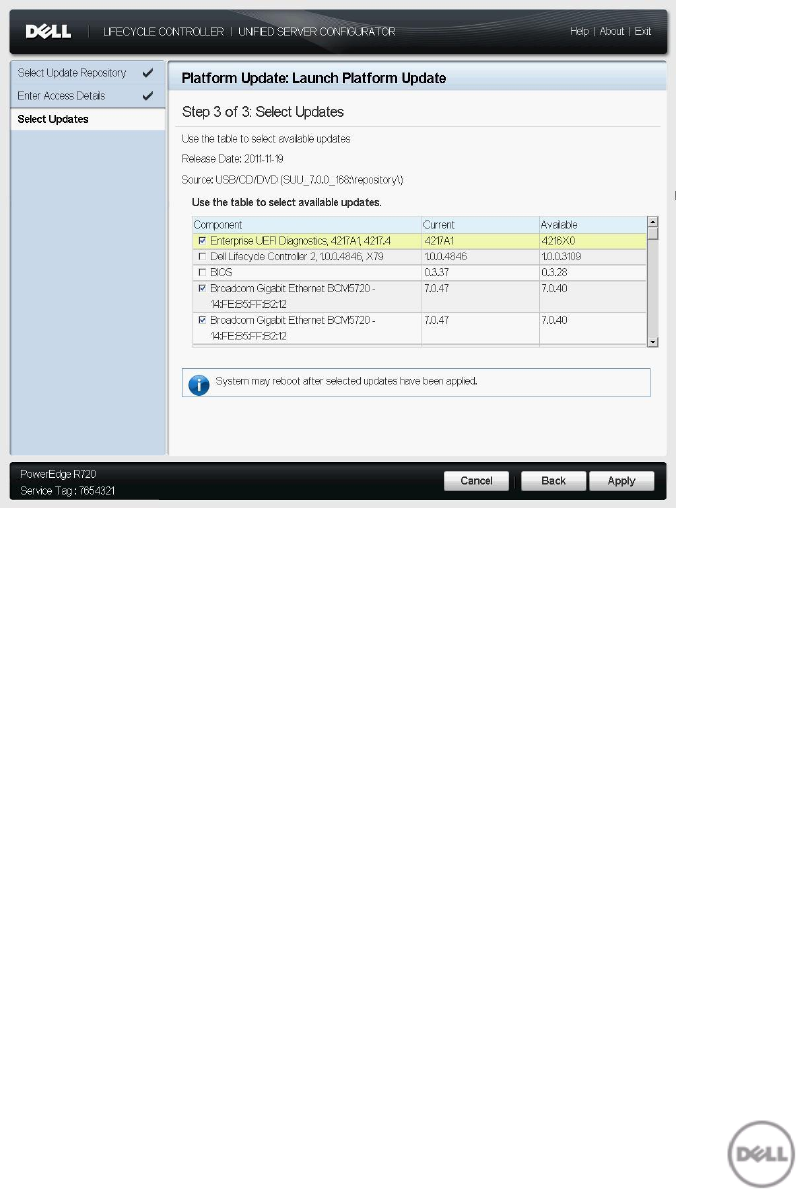
6. For a component, compare the currently installed firmware version and the later version under
the Current and Available columns and select the required components.
NOTE: By default, Lifecycle Controller selects the components for which a later version is
available.
7. Click Apply.
After the update process is complete, the system reboots.
NOTE: When applying more than one update, the system may need to reboot between updates.
In this case, the system boots directly into Lifecycle Controller and automatically continues the
update process.
NOTE: If the iDRAC firmware update is interrupted for any reason, wait for up to 30 minutes
before you attempt another firmware update.
Using a USB Flash Drive
You can download the repository from the SUU DVD or an FTP to a USB flash drive, and access the
updates from this drive. For more information, see Creating a USB Flash Drive Repository.
Before you perform the updates, make sure the following pre-requisites are met:
The updates are downloaded using the Dell Repository Manager and the repository is
created on a USB.
NOTE: To download the complete repository, make sure that the USB flash drive has
more than 8 GB of free space.
Connect the USB flash drive to the system.
To update the platform using USB:
1. Launch Lifecycle Controller: Press <F10> key within 10 seconds of the logo being displayed during
boot.
2. Click Platform Update Launch Platform Update.
The Select Update Repository page is displayed.
Select Update Repository Figure 26.
3. Insert the USB flash drive to the host. Alternatively, insert the USB flash drive to the client
system and use the Virtual Media feature to access it. For more information, see iDRAC7 User’s
Guide.
USB Flash Drive Attached To the Client Figure 27.
4. Select Local Drive (CD/DVD/USB) as the source location and click Next.
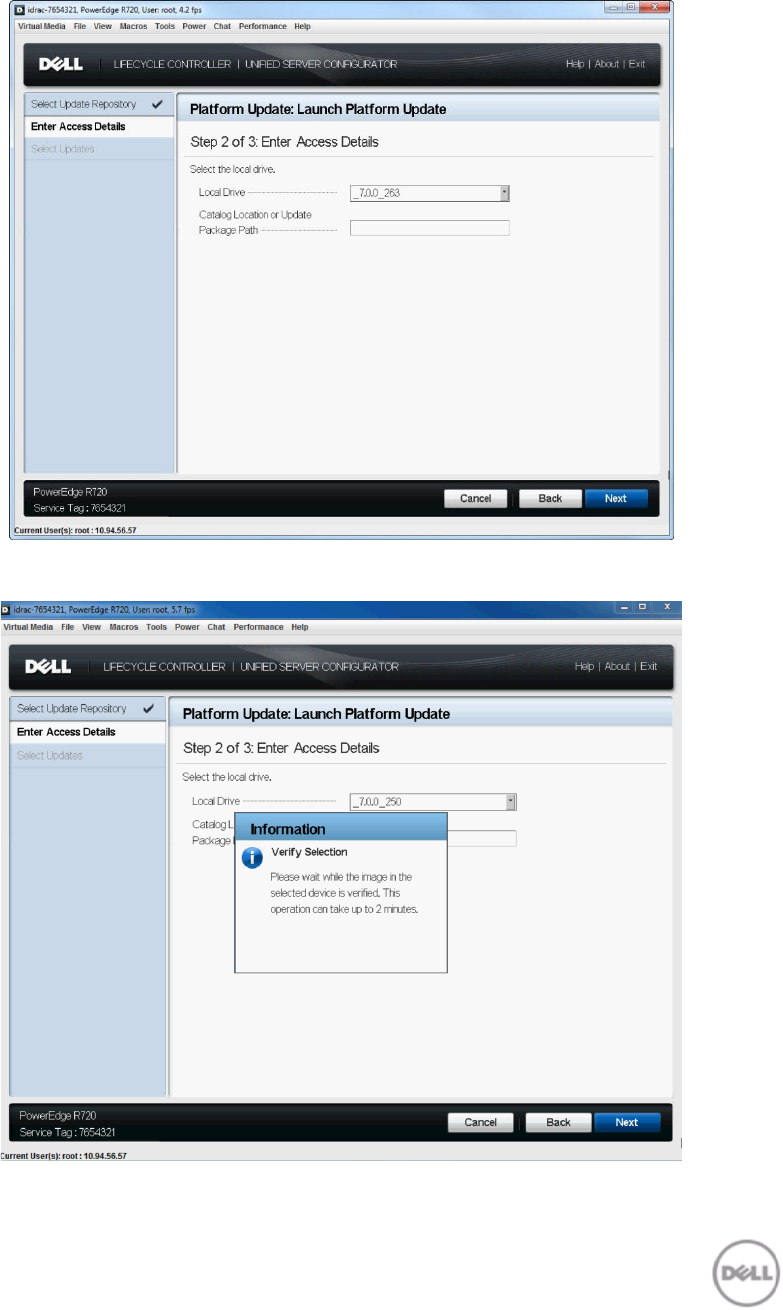
The Enter Access Details page is displayed.
Enter Access Details Figure 28.
5. From the Local Drive drop-down menu, select the appropriate drive.
6. Enter the path to the catalog file and click Next.
The Select Updates page is displayed. However, if the catalog is not signed, it displays a warning
message. Click Yes to continue.
Verifying Selection Figure 29.
Warning Message Figure 30.
Select Updates Figure 31.
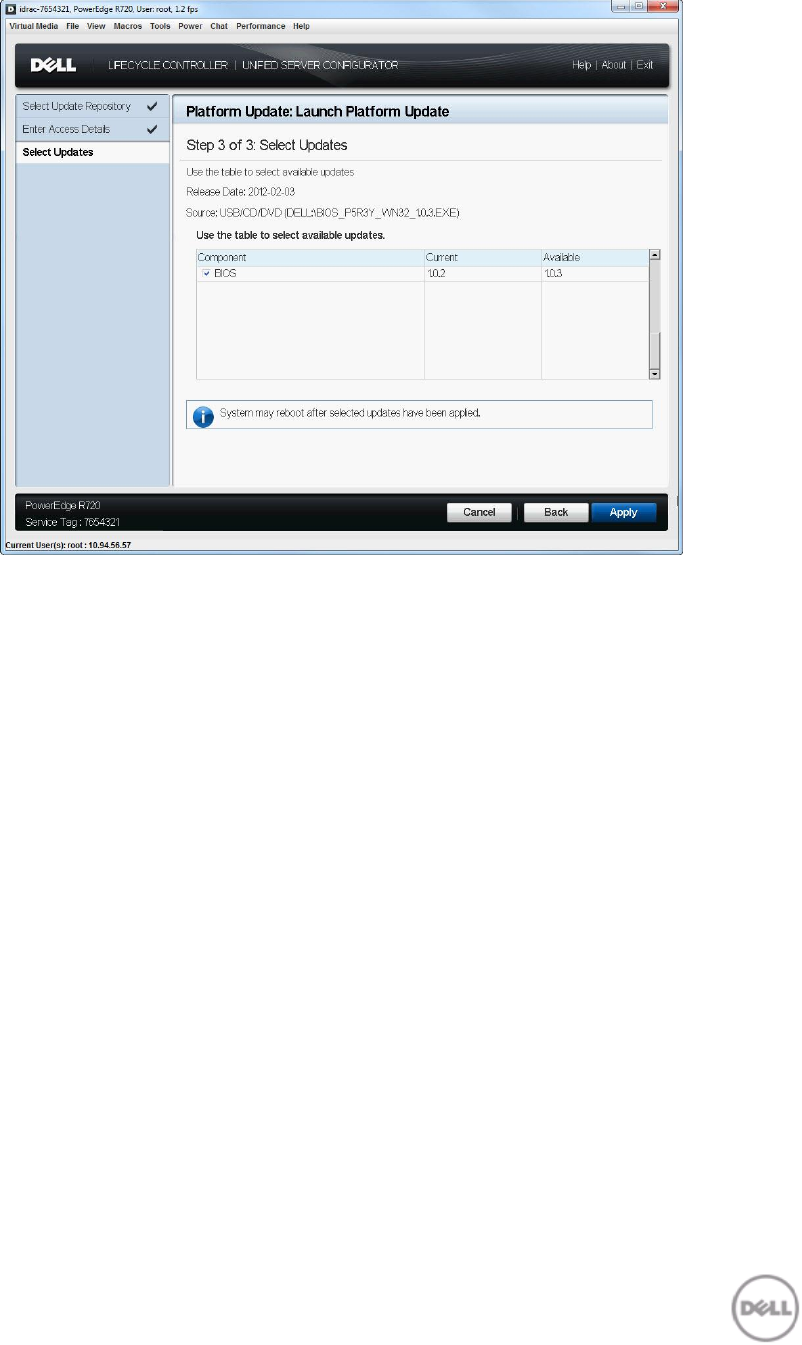
7. For a component, compare the currently installed firmware version and the later version under
the Current and Available columns and select the required components.
NOTE: By default, Lifecycle Controller selects the components for which a later version is
available.
8. Click Apply.
After the update process is complete, the system reboots.
NOTE: When applying more than one update, the system may need to reboot between updates.
In this case, the system boots directly into Lifecycle Controller and automatically continues the
update process.
NOTE: If the iDRAC firmware update is interrupted for any reason, wait for up to 30 minutes
before you attempt another firmware update.
Creating a USB Flash Drive Repository
1. Create a folder named “catalog” in the root directory of the USB device.
2. Copy all files from the repository folder of the SUU DVD to the “catalog” folder.
Using a Network Share (CIFS or NFS)
If you are accessing the updates from a CIFS or NFS share, select Network Share.
To update the platform using CIFS or NFS network share option:
1. Launch Lifecycle Controller: Press <F10> key within 10 seconds of the logo being displayed during
boot.
2. Click Platform Update Launch Platform Update.
The Select Update Repository page is displayed.
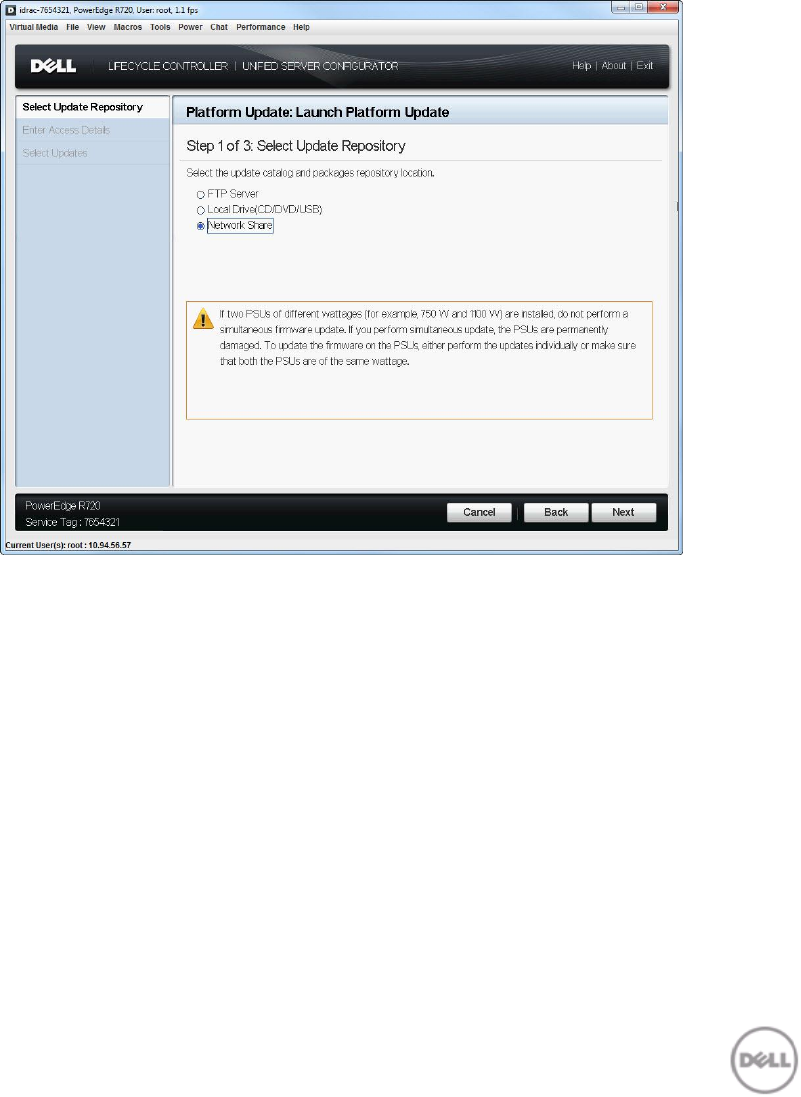
Select Update Repository Figure 32.
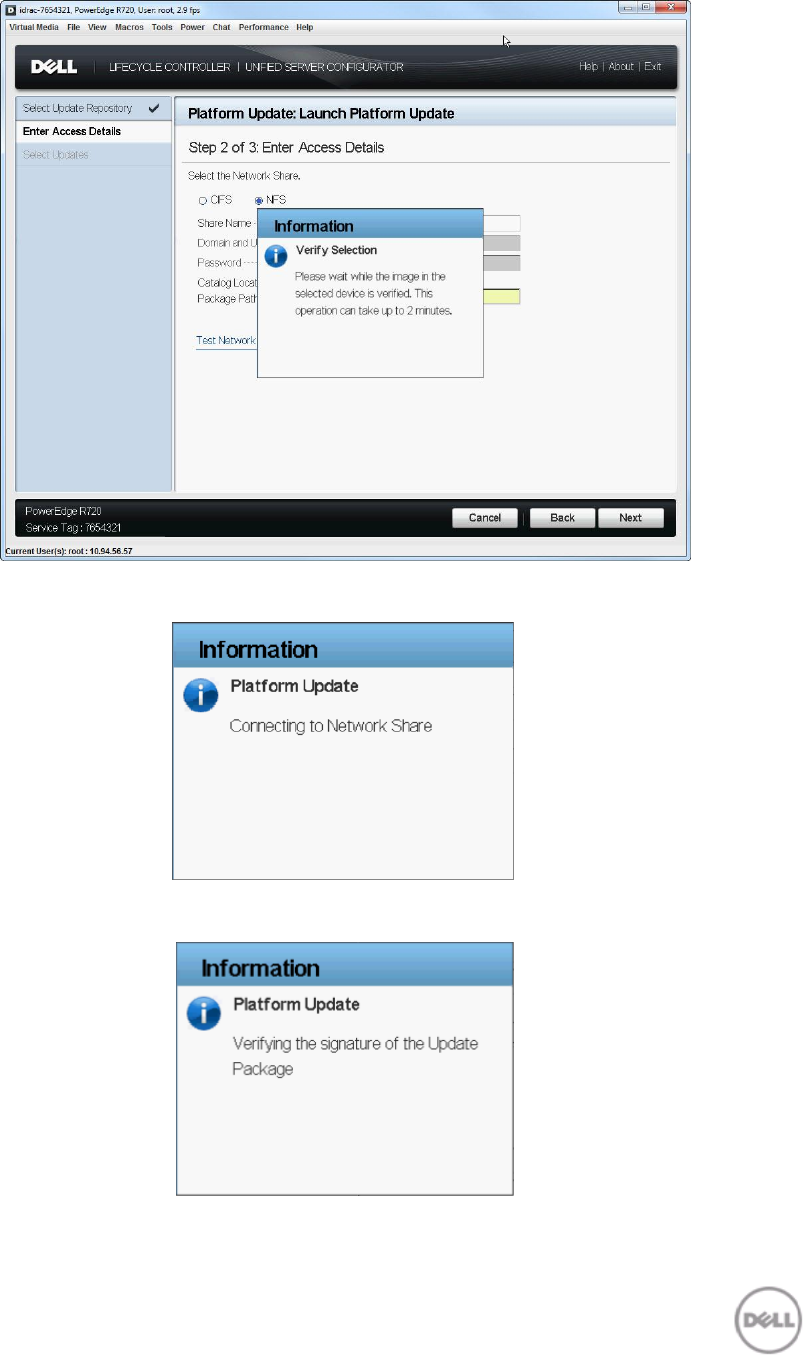
3. Select Network Share as the source location and click Next.
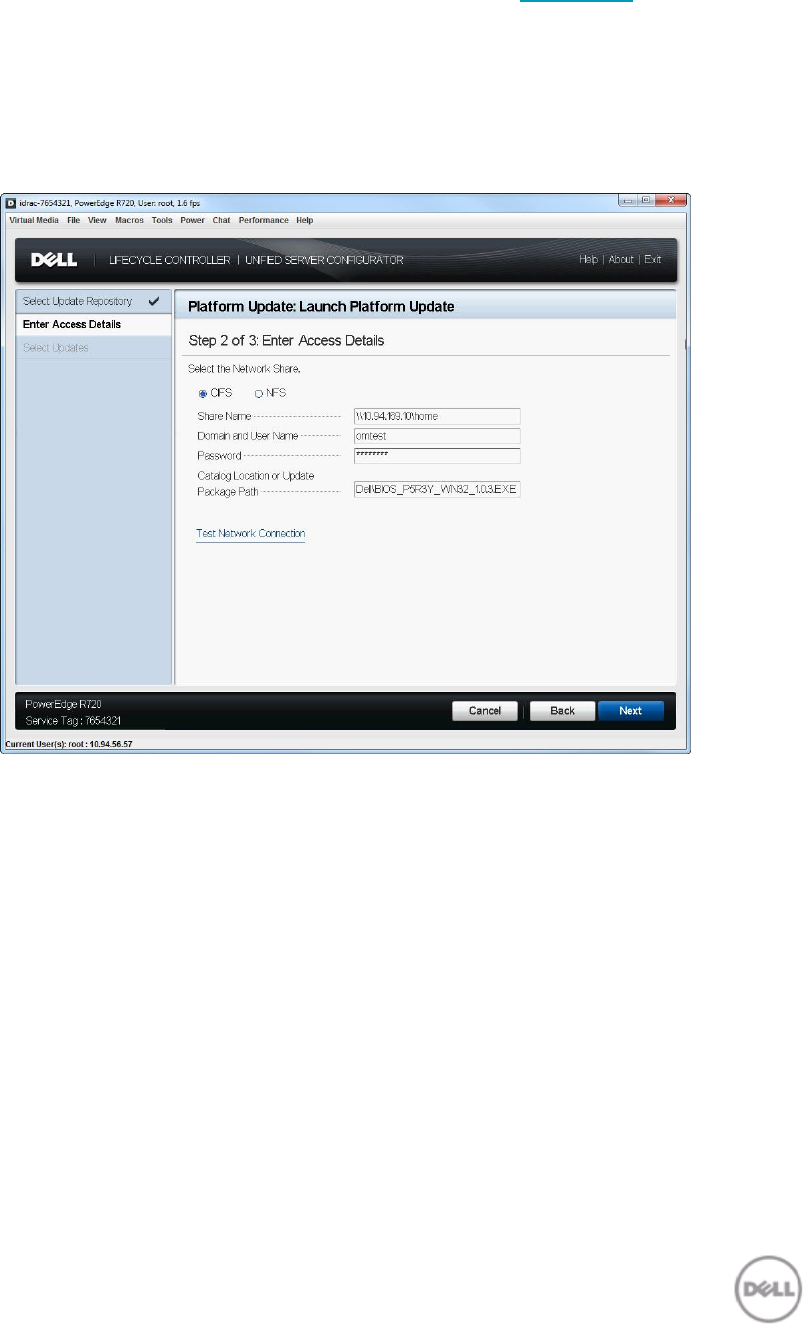
The Enter Access Details page is displayed.
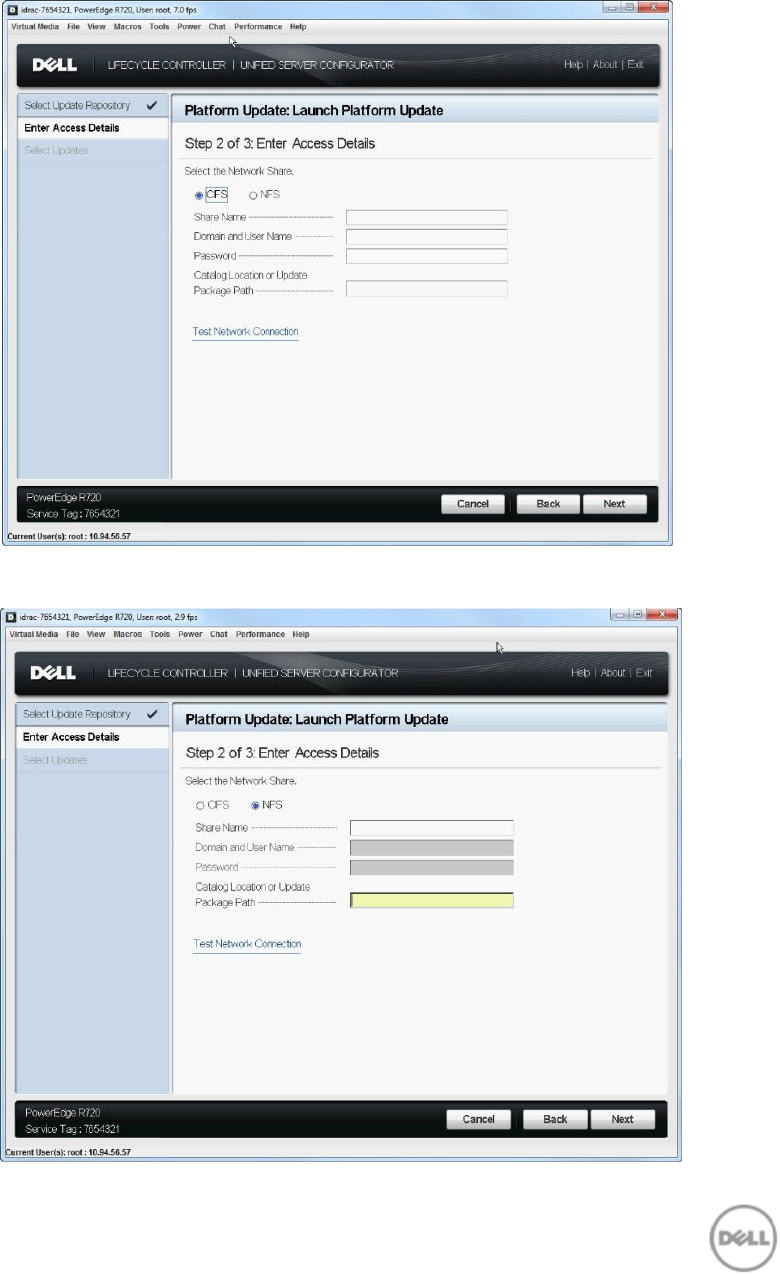
Enter Access Details - CIFS Figure 33.
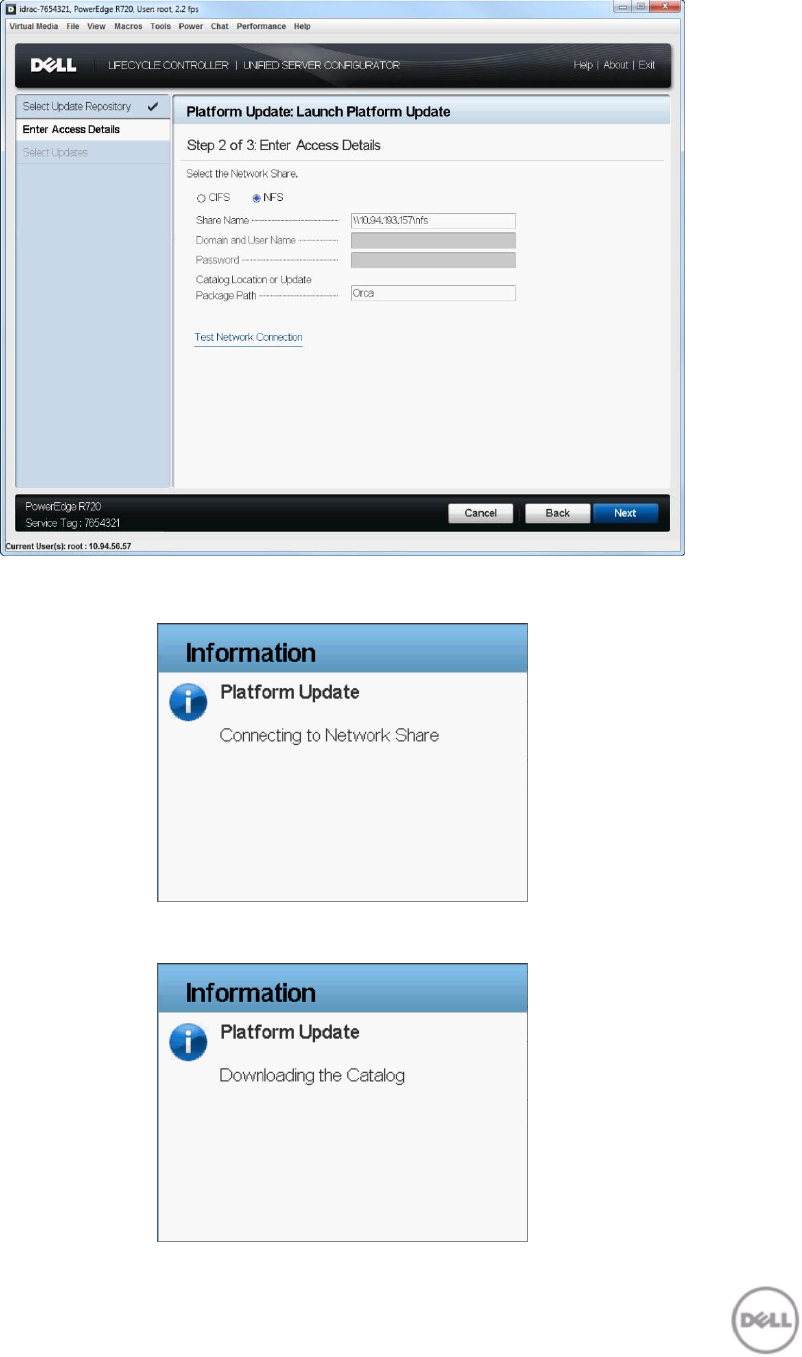
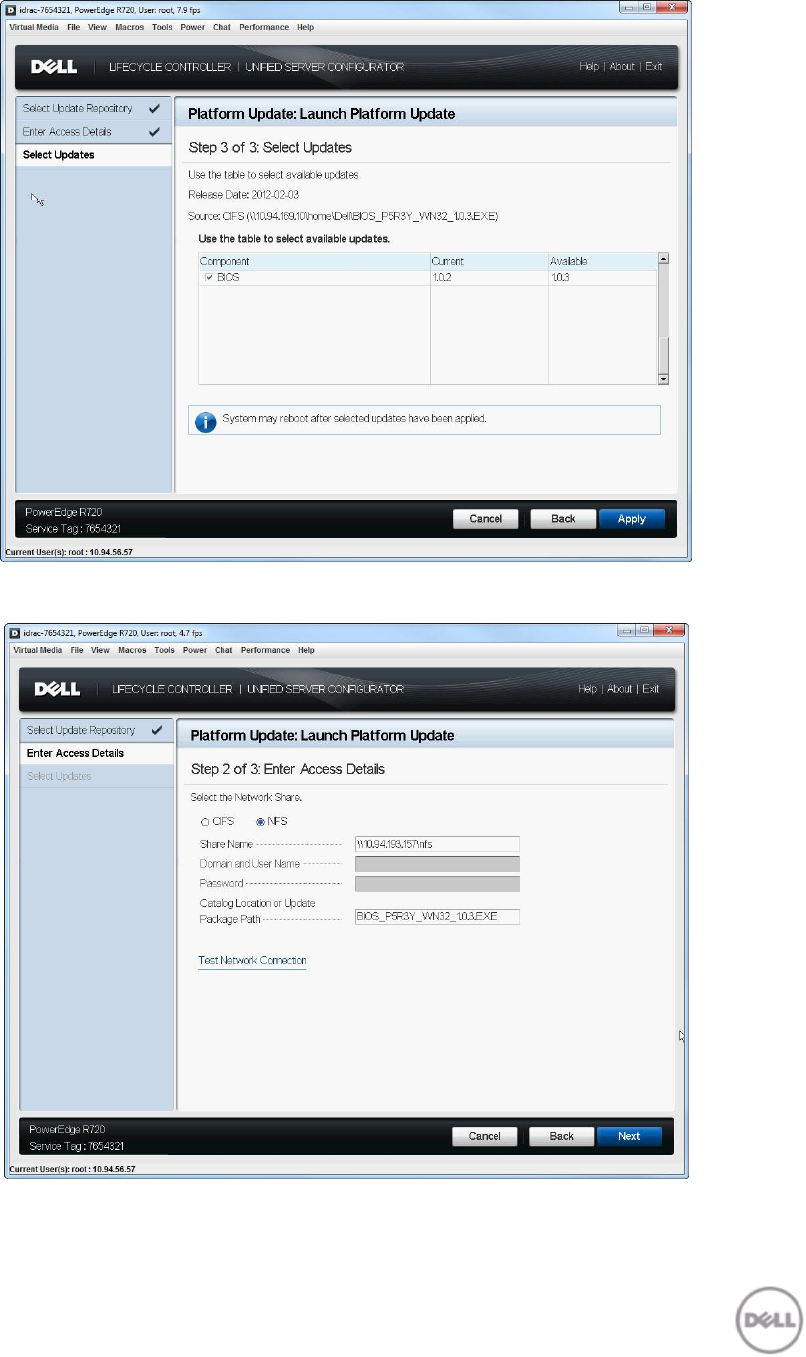
Enter Access Details - NFS
Figure 34.
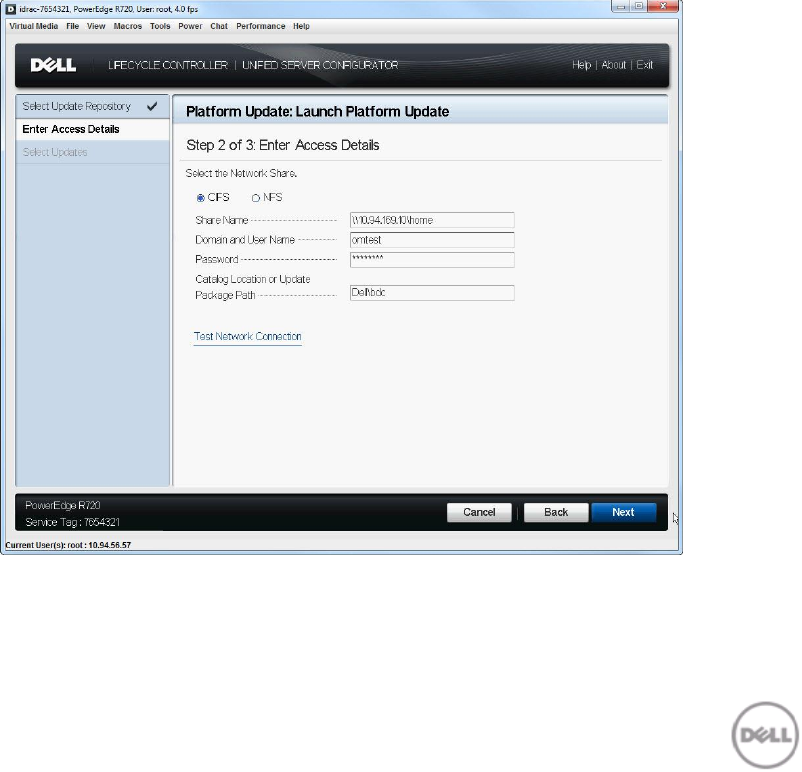
4. Select CIFS or NFS, enter the following details, and click Next.
Share Name (CIFS or NFS) — Path to the shared folder where the Update Packages or
repository is located. For example, \\192.168.20.26\sharename or
\\servername\sharename.
Domain and User Name (CIFS) — Domain and user name required to log on to the
network share. For example, login-name@myDomain. If there is no domain, type only
the login-name. For example, login-name.
Password (CIFS) — Password to authenticate the user name.
NOTE: For NFS option, the Domain and User Name and Password text boxes are
grayed-out as the NFS protocol does not support user name and password.
Catalog Location or Update package path (CIFS or NFS)
o For single DUPs – If the DUP is located in the root directory, enter the name of
the DUP (for example, APP_WIN_RYYYZZZ.EXE). If the DUP is present in a sub-
directory, enter both the sub-directory name and name of the DUP (for
example, subdirectory\APP_WIN_RYYYZZZ.EXE).
o For Catalog file – If the catalog file is located in the root directory, do not
enter the file name. If the catalog file is located in a sub-directory, enter the
sub-directory name (for example, subdirectory).
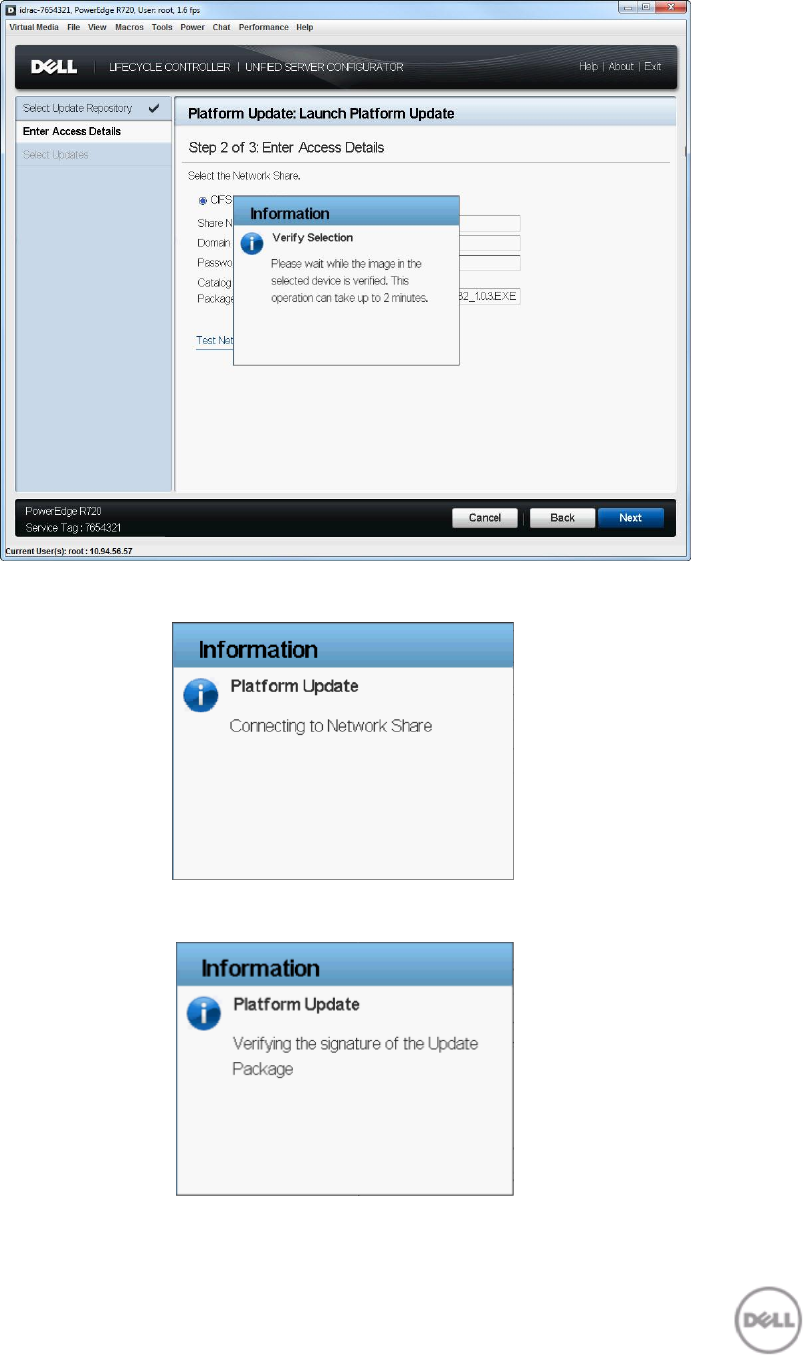
The selected image in the specified location is validated and the Select Updates page is
displayed. However, if the catalog is not signed, a warning message is displayed. Click Yes to
continue.
Enter Access Details - CIFS Figure 35.
Enter Access Details - NFS Figure 36.
Connecting to Network Share Figure 37.
Downloading Catalog Figure 38.
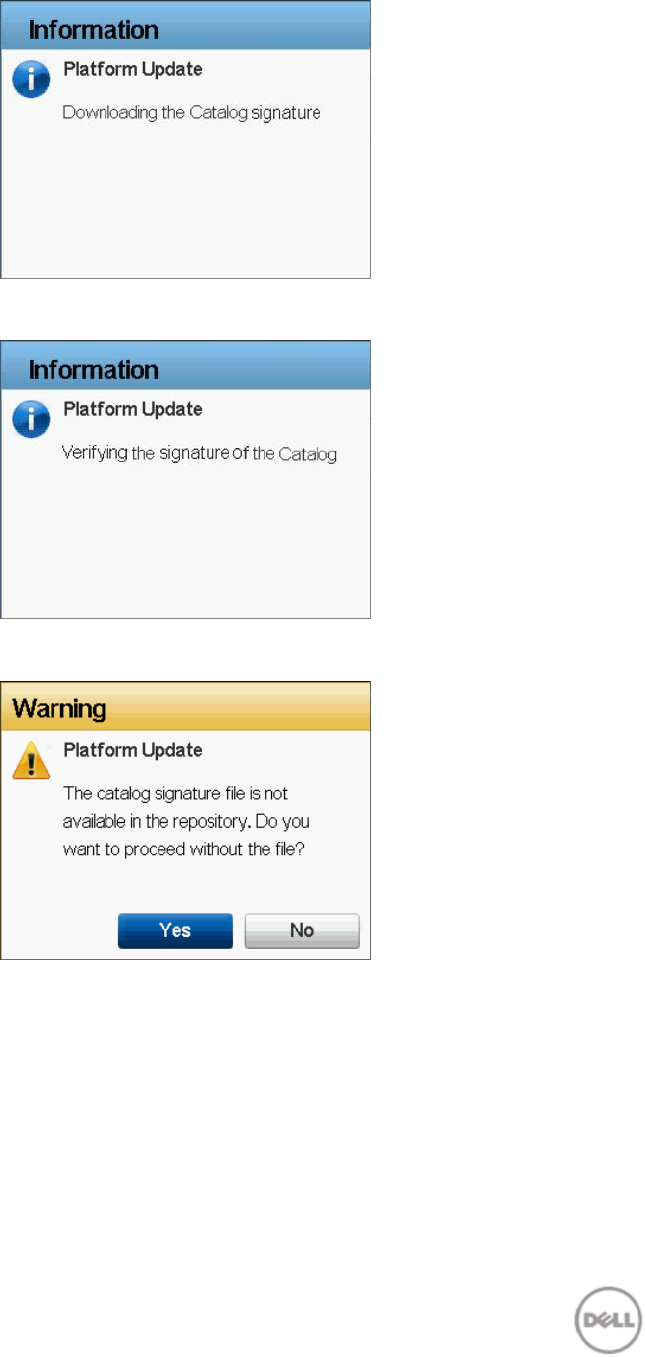
Downloading Catalog Signature Figure 39.
Verifying Catalog Signature Figure 40.
Warning Message
Figure 41.
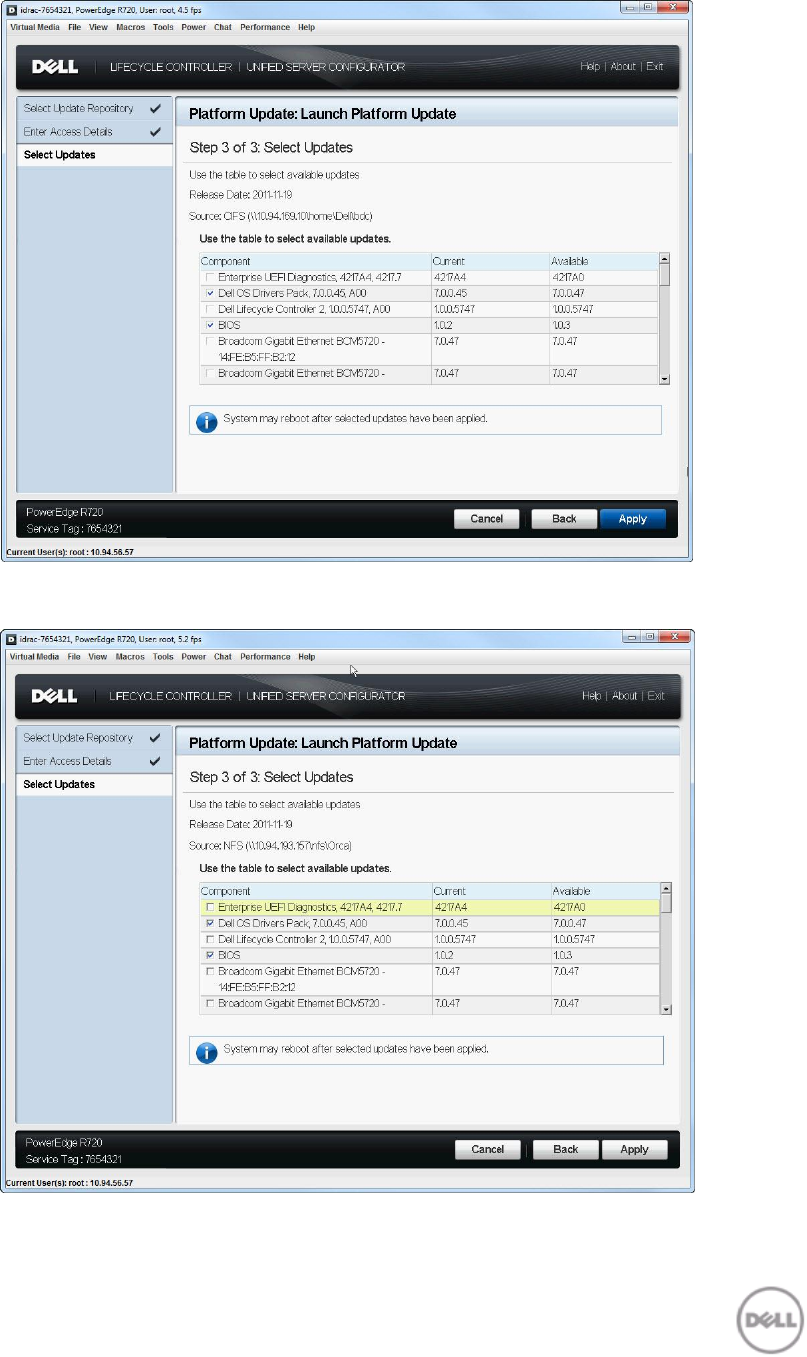
Select Updates - CIFS Figure 42.
Select Updates - NFS Figure 43.
Creating the Local CIFS or NFS Share Repository
If your organization uses a private network that cannot access external sites such as
ftp.dell.com, you can provide platform updates from a locally-configured network
share device.
If a CIFS or NFS share is available, you can copy the repository created using Dell
Repository Manager or the repository downloaded from ftp.dell.com.
Using Single Component Update
You can perform single component DUP update whenever components such as RAID, NIC, Diagnostic,
OS Driver Pack, PSU, and iDRAC are partially corrupt, or when a specific component must be
updated. Lifecycle Controller supports DUPs only in .exe format.
NOTE: If the DUP is located in the root directory, enter the name of the DUP (for example,
APP_WIN_RYYYZZZ.EXE). If the Update package is present in a sub-directory, enter both the sub-
directory name and name of the Update Package (for example,
subdirectory\APP_WIN_RYYYZZZ.EXE).
The following screens provide the workflow to update using FTP, local drive, or network share:
FTP
Provide the Dell Update Package (only .exe) location on the Dell FTP server (ftp.dell.com), internal
FTP server, or service provider’s FTP server.
NOTE: If the DUP is located in the root directory, enter the name of the Update Package (for
example, APP_WIN_RYYYZZZ.EXE). If the DUP is present in a sub-directory, enter both the sub-
directory name and name of the DUP (for example, subdirectory\APP_WIN_RYYYZZZ.EXE).
The selected image in the specified location is validated and the Select Updates page is displayed.
Enter Access Details – FTP Figure 44.
Warning Message Figure 45.
Connecting to FTP Figure 46.
Downloading and Validating Update Package Figure 47.
Verifying Update Package Signature Figure 48.
Select Updates – Single Component DUP Figure 49.
Local Drive (CD/DVD/USB)
Download the Dell Update Package (only .exe) from the Dell FTP site (ftp.dell.com), copy from the
Server Update Utility DVD, or from support.dell.com.
NOTE: If the DUP is located in the root directory, enter the name of the Update Package (for
example, APP_WIN_RYYYZZZ.EXE). If the Update package is present in a sub-directory, enter both
the sub-directory name and name of the Update Package (for example,
subdirectory\APP_WIN_RYYYZZZ.EXE).
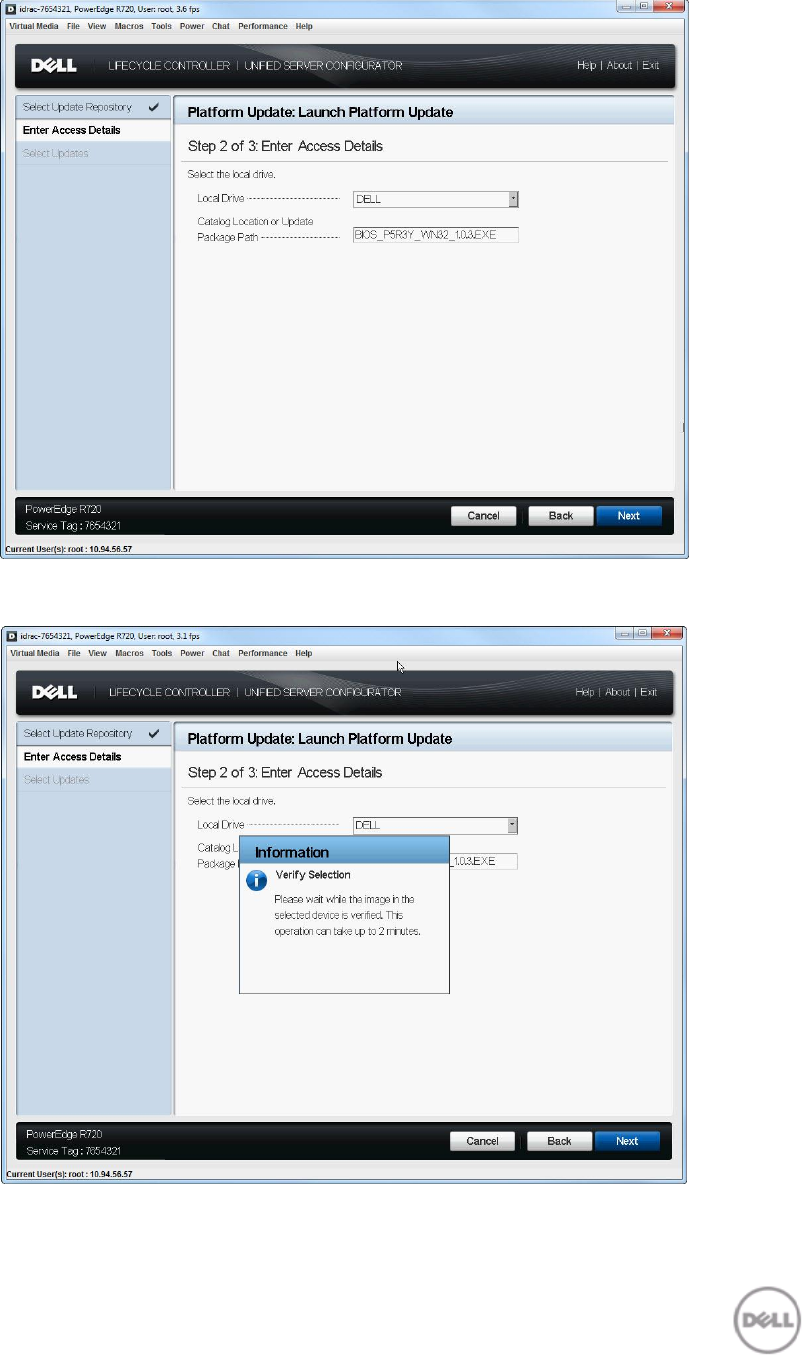
Enter Access Details – Local Drive Figure 50.
Verify Selection Figure 51.
Select Updates – Local Drive Figure 52.
Network Share (CIFS and NFS)
Download the Dell Update Package (only .exe) from the Dell FTP site (ftp.dell.com), copy the Server
Update Utility DVD, or from support.dell.com to a CIFS or NFS network share.
NOTE: If the DUP is located in the root directory, enter the name of the update package (for
example, APP_WIN_RYYYZZZ.EXE). If the update package is present in a sub-directory, enter both
the sub-directory name and name of the update package (for example,
subdirectory\APP_WIN_RYYYZZZ.EXE).
Enter Access Details – Network Share (CIFS) Figure 53.
Verify Selection Figure 54.
Connecting to Network Share Figure 55.
Verifying Update Package Signature Figure 56.
Select Updates – Network Share (CIFS) Figure 57.
Enter Access Details – Network Share (NFS) Figure 58.
Verify Selection Figure 59.
Connecting to Network Share Figure 60.
Verifying Update Package Signature Figure 61.

Select Updates – Network Share (NFS) Figure 62.
Roll Back to Previous Firmware Version
Lifecycle Controller allows roll back to a previously-installed version of component firmware such as
BIOS, iDRAC, RAID Controller, NIC, and Power supply.
Important
The Dell Diagnostics, OS driver packs, and Lifecycle Controller firmware cannot be
rolled back to previous versions.
The previous version is available only if the component firmware is updated at least
once to a different version.
The previous version of the firmware image is overwritten every time an update is
performed.
Every time a rollback is performed, the previously installed firmware becomes the
current version, and the previous version will not be available. However, for iDRAC,
previously installed version becomes the current version and the current version is
stored as the previous version.
The earlier version of the firmware is available only if any of the following tools are
used to update the firmware: Lifecycle Controller Platform Update feature, Lifecycle
Controller-Remote Services, or the Dell Update Package. However, the previous version
of PSU firmware is available if Lifecycle Controller Platform Update feature or
Lifecycle Controller-Remote Services is used to update the firmware.
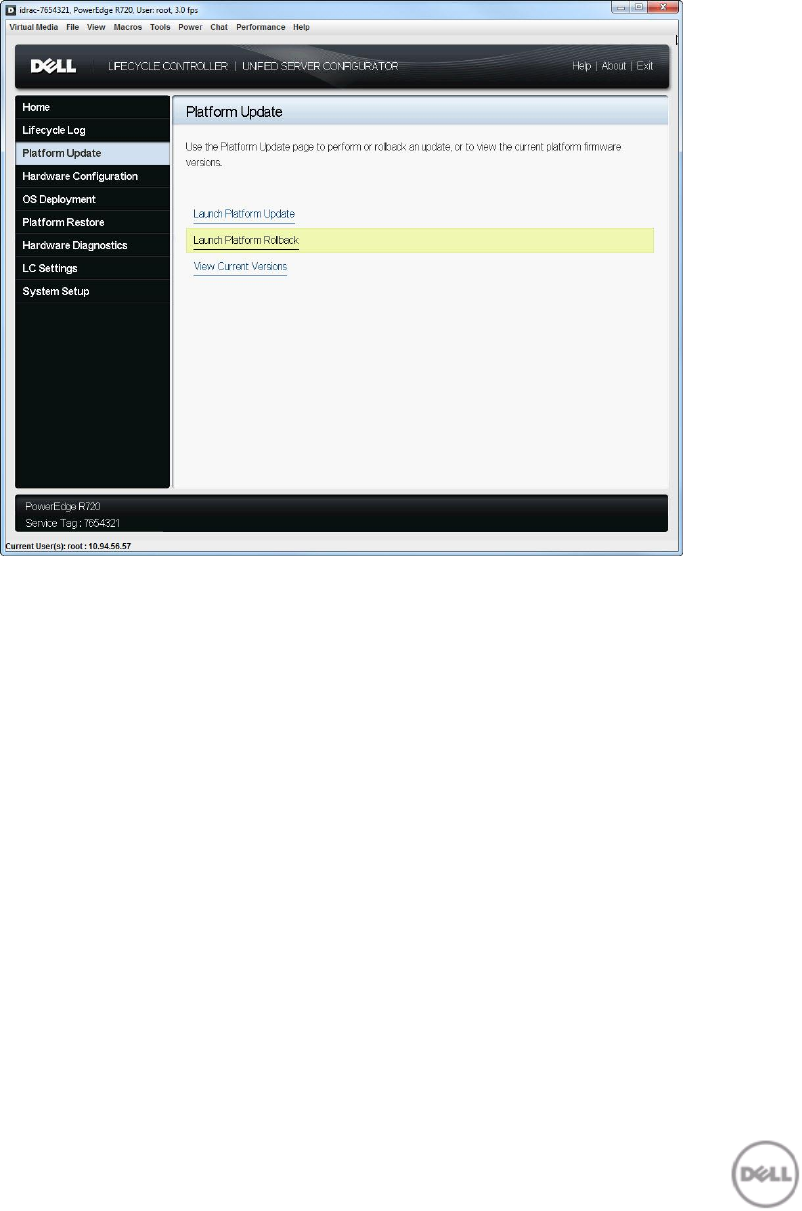
To rollback a firmware version to a previously-installed image:
1. Launch Lifecycle Controller: Press <F10> key within 10 seconds of the logo being displayed during
boot.
2. Click Platform Update Launch Platform Rollback.
Platform Update Figure 63.
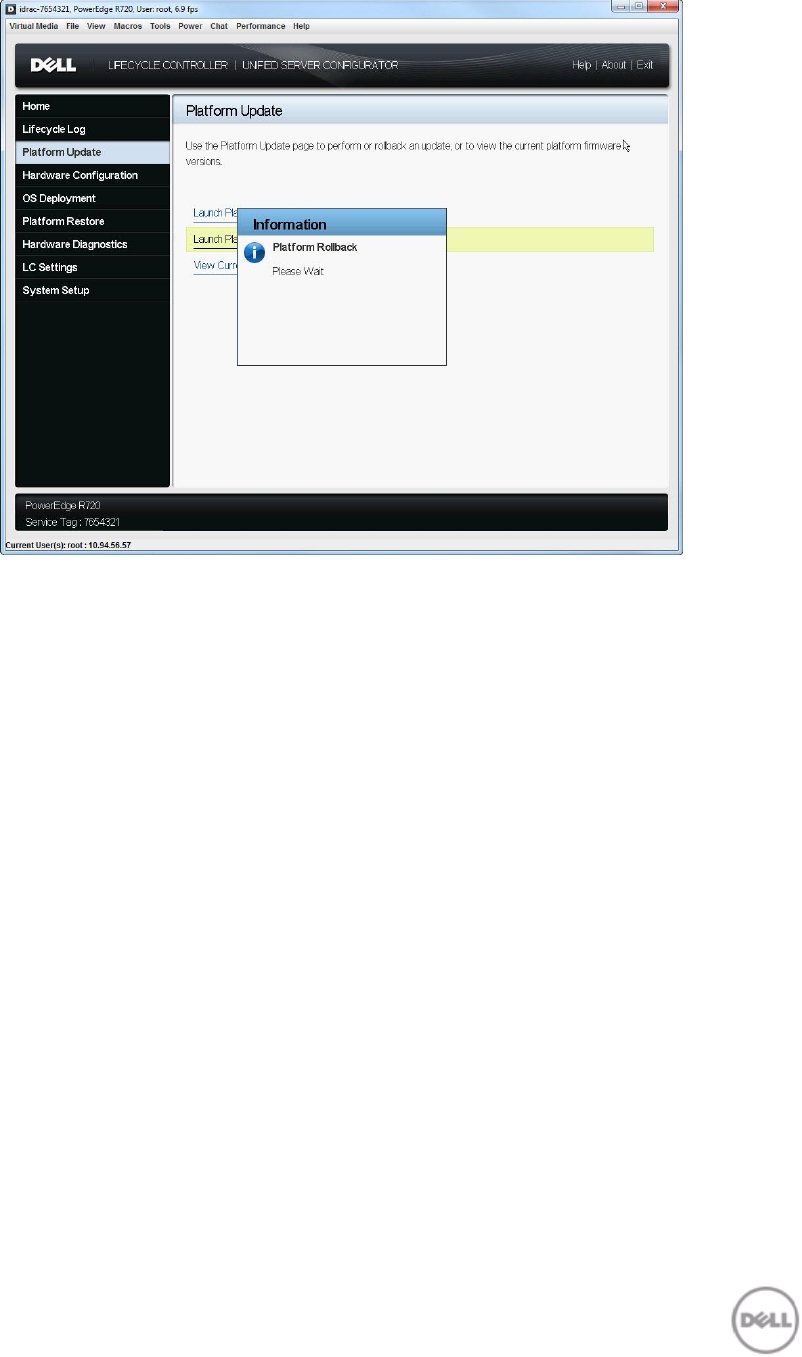
Launching Platform Rollback Figure 64.
The Select Components page displays a list of available rollback images with the following details.
Component — Displays the available updates.
Current — Displays the component version currently installed on the system.
Previous — Displays the version number of the previous version.
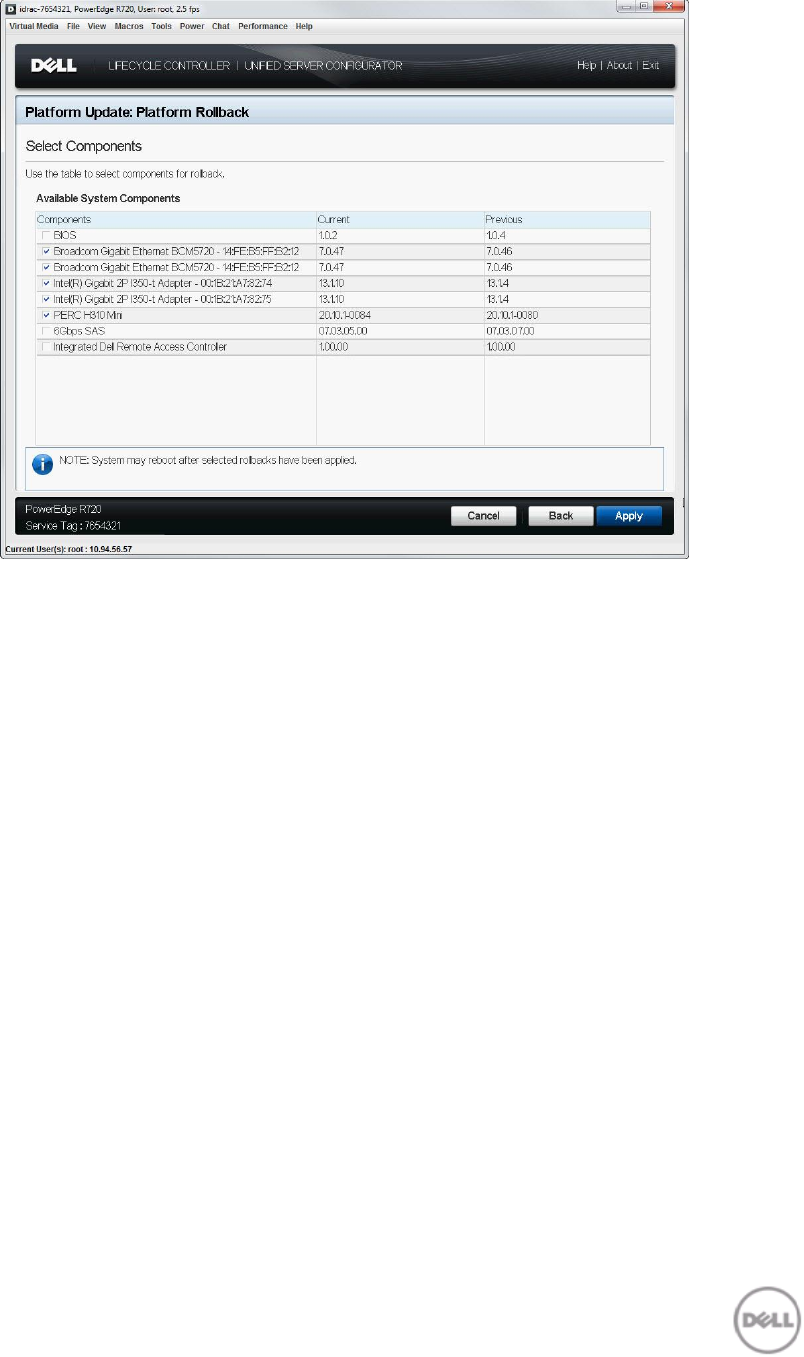
Platform Rollback – Select Components Figure 65.
3. Select the components and click Apply.
4. Select the rollback image that you want to apply to the system and click Apply.
After the rollback process is complete, the system reboots. When applying more than one
update, the system may need to reboot between each rollback. In such scenarios, the system
boots directly into Lifecycle Controller and continues the rollback process.
View Current Version
Lifecycle Controller enables the user to check the firmware version of the currently installed
components in the system. It displays the firmware version of the component along with the time
stamp when the firmware version was last updated, rolled back, or newly-installed component.
If Collect System Inventory On Restart (CSIOR) is enabled, the inventory collection starts before
launching Lifecycle Controller every time the system is booted. Therefore the View Current Versions
page always displays the latest information. For more information about CSIOR, see Lifecycle
Controller User’s Guide.

To view the currently installed firmware versions:
1. Launch Lifecycle Controller: Press <F10> key within 10 seconds of the logo being displayed during
boot.
2. Click Platform Update View Current Versions.
Platform Update
Figure 66.

Launching View Current Versions Figure 67.
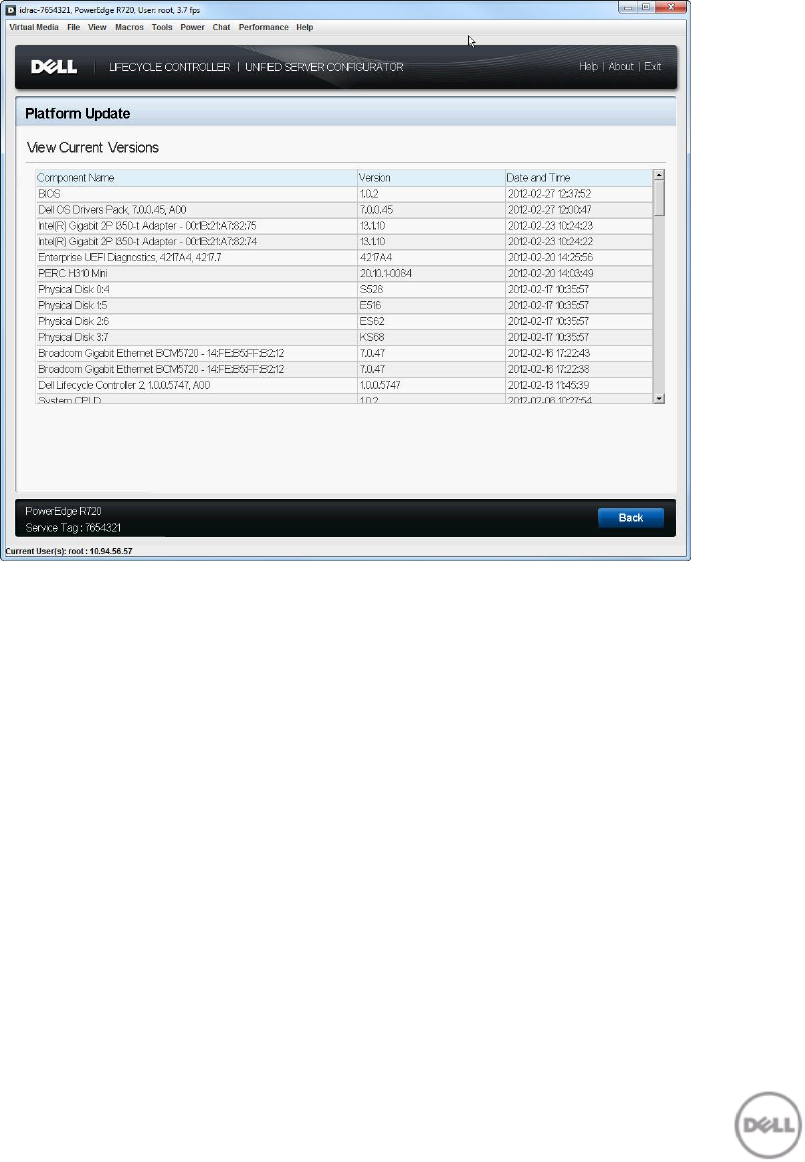
The View Current Versions page displays a list of installed components with the following
information:
Component Name — Displays the name of the currently installed component.
Version — Displays the firmware version currently installed for that component.
Date and Time — The time the component was installed in the system, updated, or
rolled back. The format is yyyy-mm-dd hh:mm:ss.
View Current Versions Figure 68.
Testing Network Connectivity
Lifecycle Controller provides the Test Network Connection feature to perform a ping test to the
following server types:
Repository host server – FTP server or the CIFS or NFS share.
DNS server if it is configured in the Network settings page.
Gateway server if it is configured in the Network setting page.
FTP proxy server if it is configured in the FTP access details page.
Before using this feature, make sure that Lifecycle Controller network settings are configured. For
more information on configuring the network settings, see the Lifecycle Controller User’s Guide.
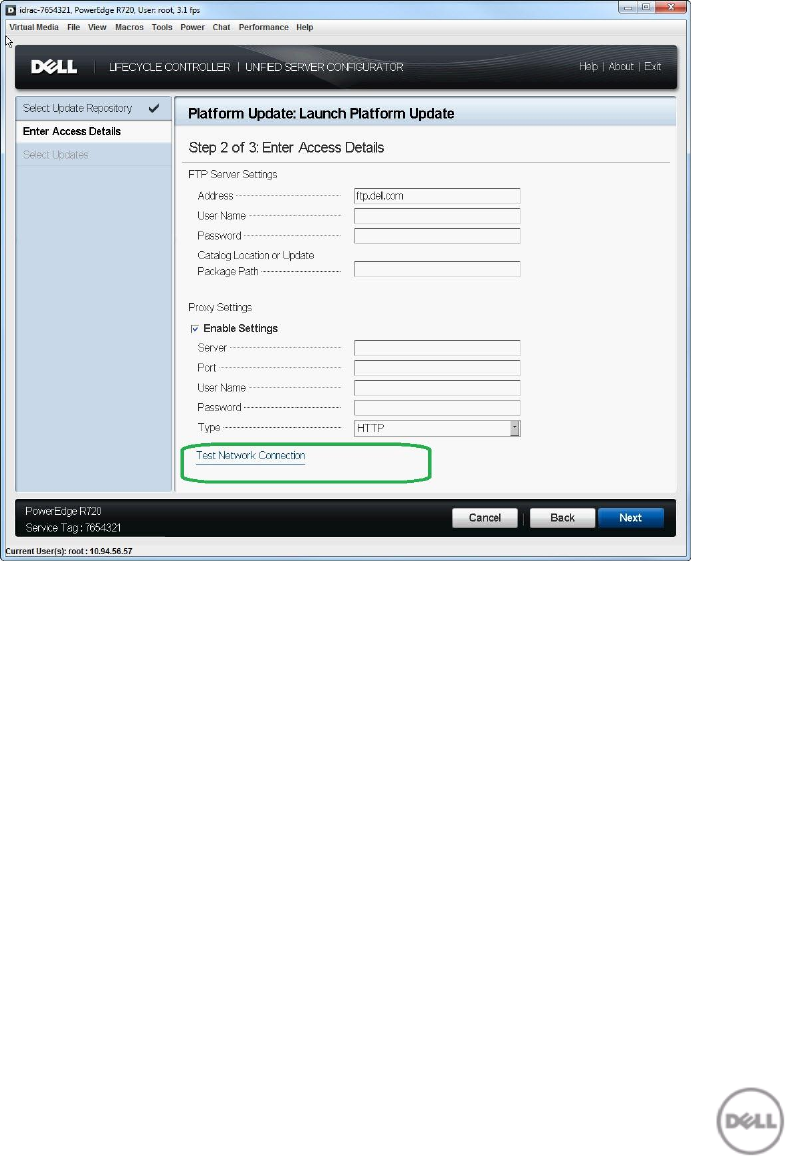
To test the network connection:
1. Launch Lifecycle Controller: Press <F10> key within 10 seconds of the logo being displayed during
boot.
2. Click Platform Update Launch Platform Update FTP Server or Network Share and click
Next.
The Enter Access Details page is displayed.
Select Test Network Connection - FTP Figure 69.
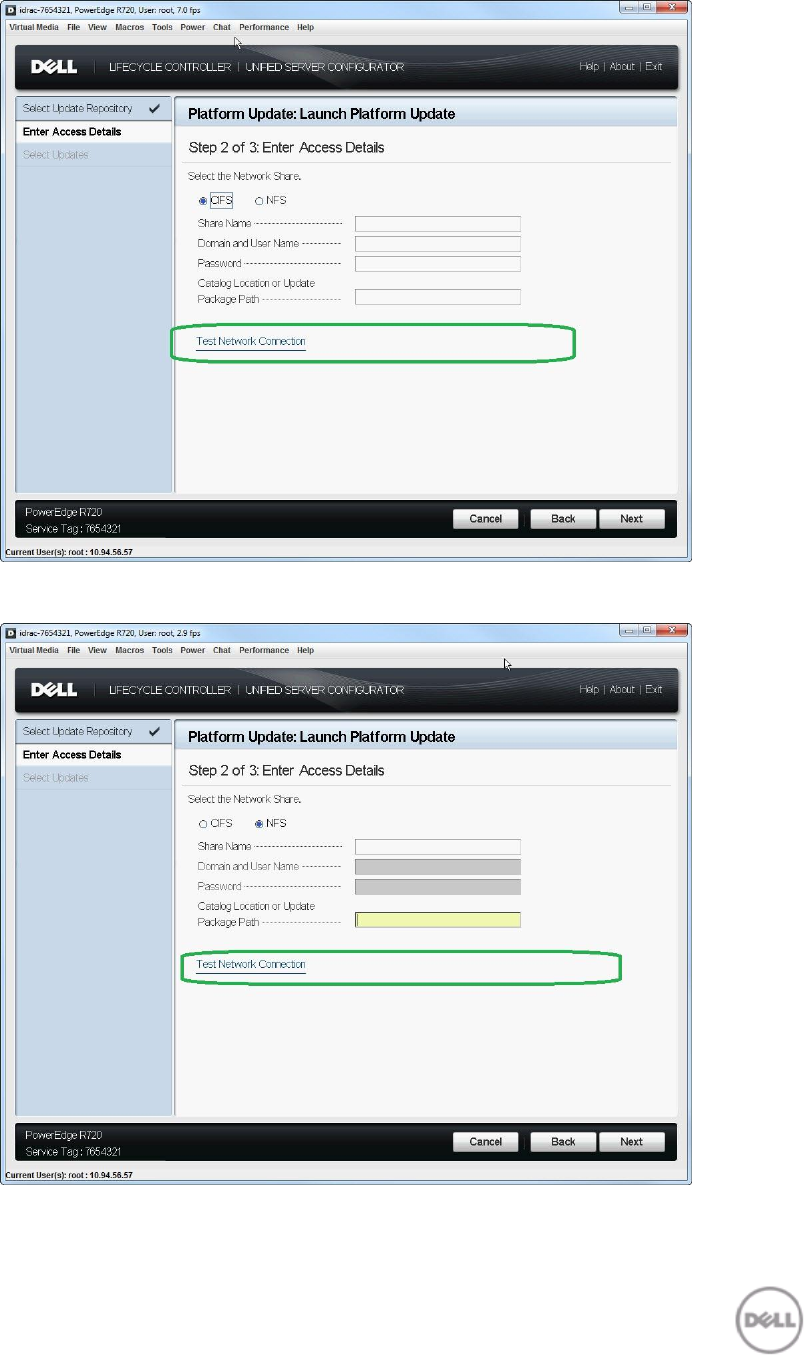
Select Test Network Connection – CIFS Figure 70.
Select Test Network Connection – NFS Figure 71.
3. Specify the FTP Server or Network Share details.
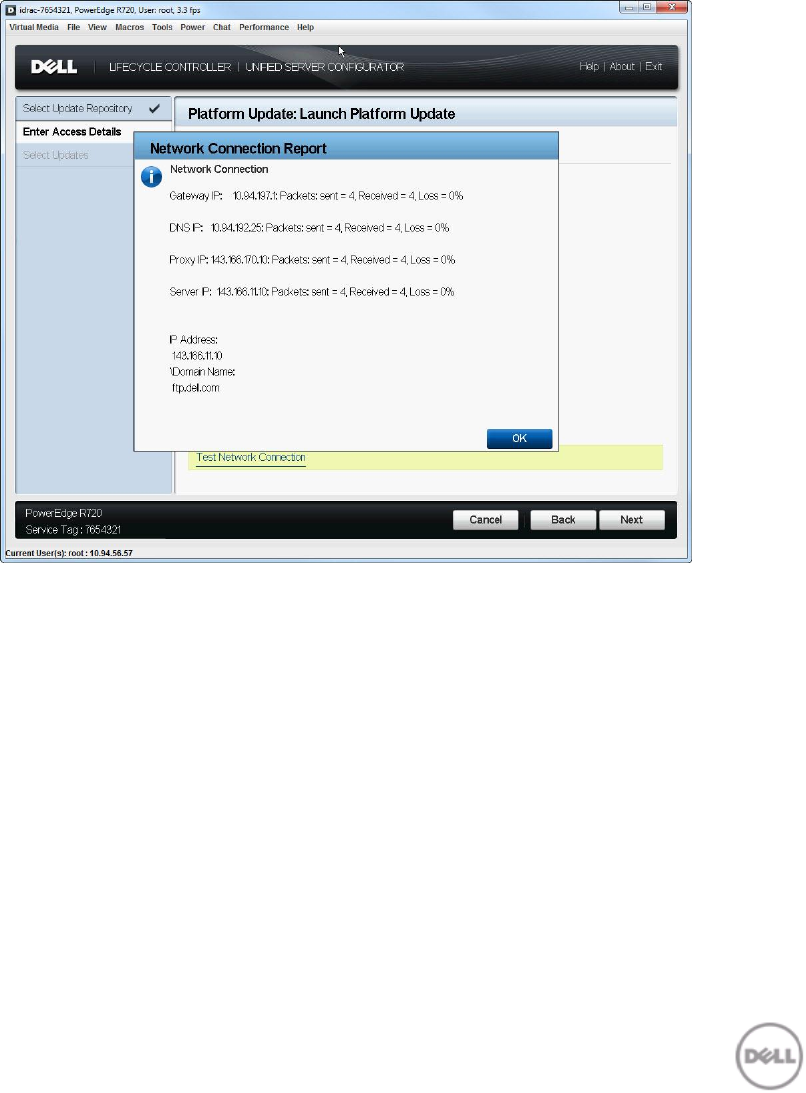
4. Click Test Network Connection.
After the test is complete, the Network Connection Report is generated with the following
details:
Parameters specified in the Network Settings page - Gateway IP and DNS IP.
Parameters specified in the Enter Access Details page – Proxy IP (only if you have
specified FTP proxy server) and Server IP (FTP address or network share address.)
NOTE: The report always displays the IP address of the host name.
Network Connection Report - FTP Figure 72.

Network Connection Report – Network Share Figure 73.
Checking the signature
Catalog on FTP Server
The catalog present on ftp.dell.com is signed with the signature file present in the same location.
NOTE: If a catalog is created using Dell Repository Manager, the catalog does not have an associated
signature file.
On the Enter Access Details page, after you click Next, the following messages are displayed when
Lifecycle Controller connects to a repository:
Connecting to FTP Figure 74.
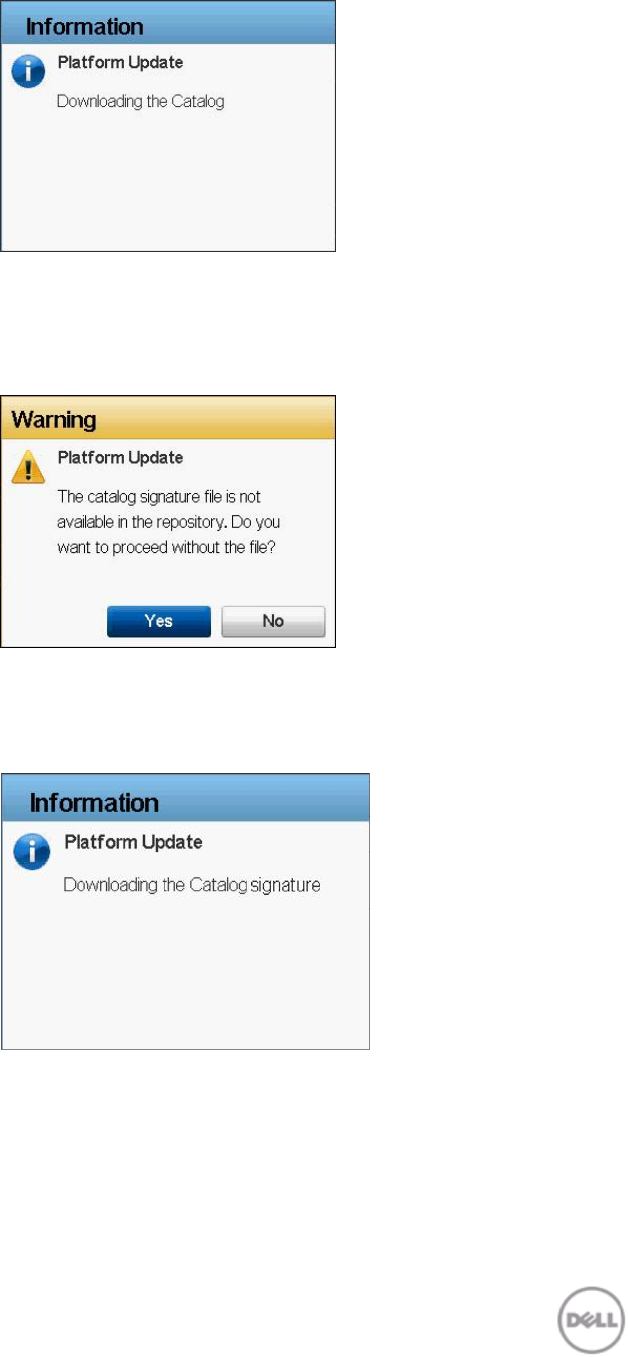
Downloading Catalog Figure 75.
Lifecycle Controller attempts to locate the catalog signature file. If the signature file is not
present, a warning message is displayed. To continue, click Yes to open the Select Updates
page.
Warning Message Figure 76.
If the sign file is present, it is downloaded and verified. This ensures that updates are performed
only for an authenticated catalog.
Downloading Catalog Signature Figure 77.
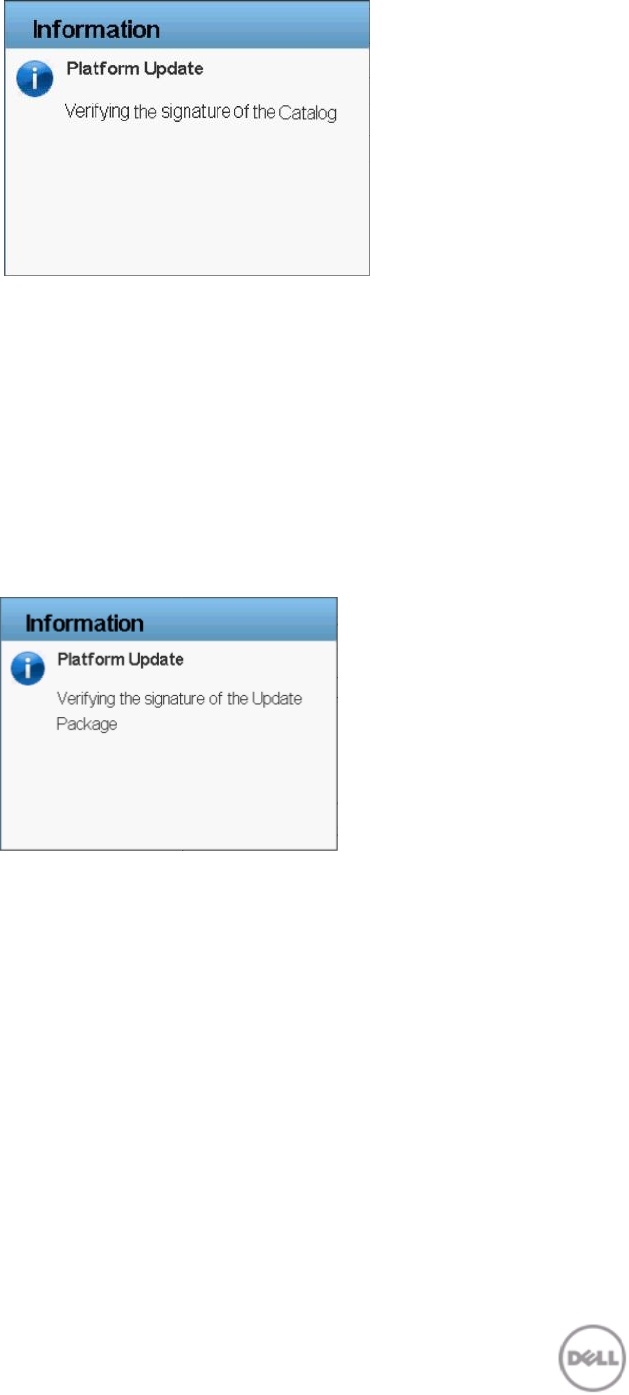
Verifying Catalog Signature Figure 78.
NOTE: As Lifecycle Controller performs a validation against an authenticated signature file and if
it detects any signature mismatch, the firmware update does not continue.
5. After the catalog signature is verified, the Available Updates page is displayed. For more
information, see Using FTP Server.
Single Component DUPs
On the Enter Access Details page, after you click Next, the following messages are displayed while
performing updates using single component DUP:
NOTE: Single component DUP contains the signature within the package.
Verifying Update Package Signature Figure 79.
If Lifecycle Controller detects a signature mismatch, the firmware update does not continue. This
ensures that updates are performed only against an authenticated catalog.
Platform Update Mechanism
This section provides the background operations that are performed after you do the following tasks:
1. Select the repository location.
2. Select the components and click Apply.
Select Updates Figure 80.
The system reboots after the update process is complete for a component. However, if multiple
components are selected, the system directly boots into Lifecycle Controller and automatically
continues the update process for the next component. For more information on post-update
behavior, see Supported Components.
NOTE: If the iDRAC firmware update is interrupted for any reason, you must wait for up to 30
minutes before you can attempt another firmware update.
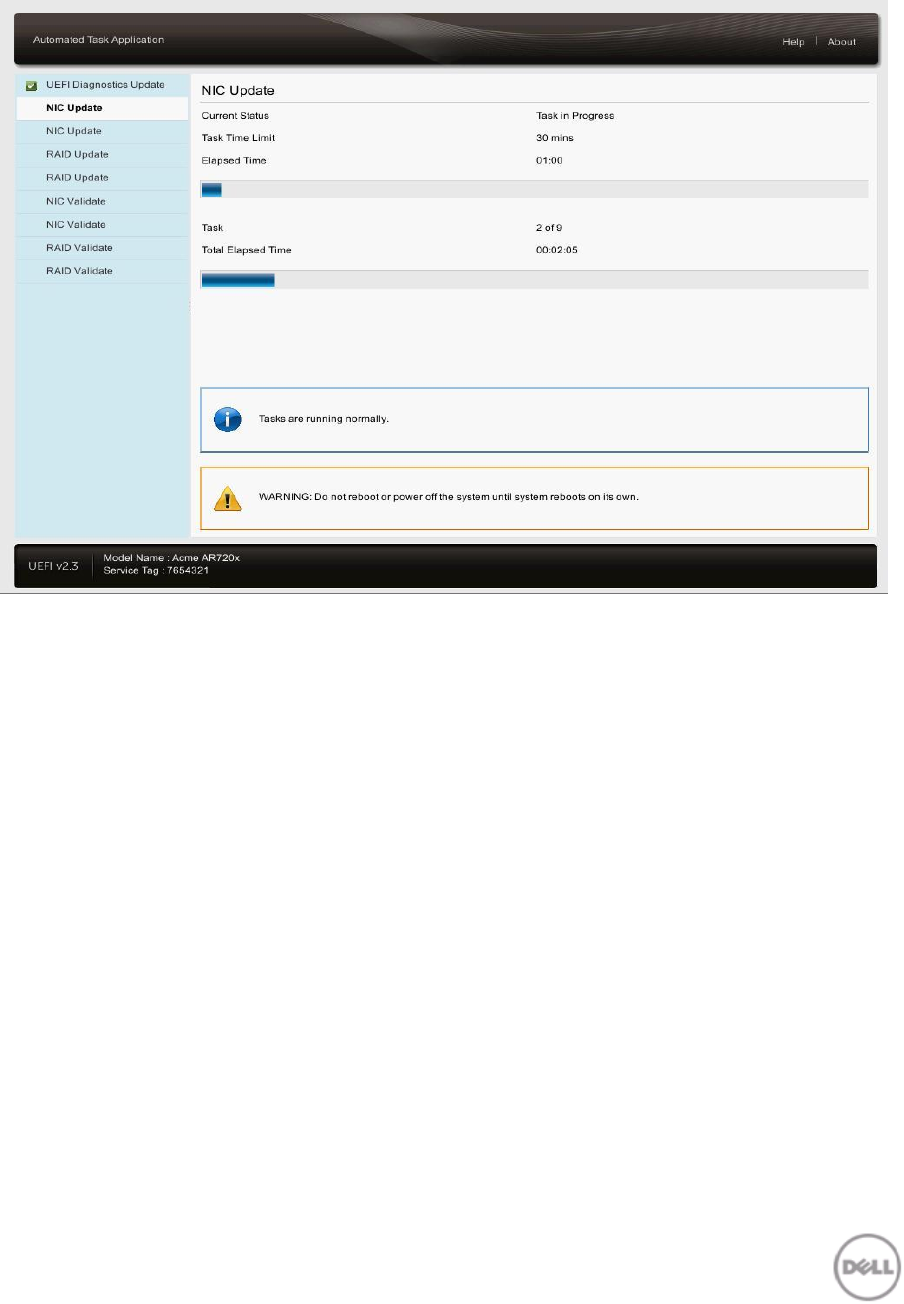
Post Update Behavior Figure 81.
NOTE: The time taken for each component update has a set limit. The update is completed within
this limit. For more information, see Figure 81.
Security is important, and the update process is designed to ensure both system and data are
protected. The update process uses multiple layers of security validation:
External data is temporarily stored in non‐volatile storage. The data is then validated
using Dell’s private key signature to prevent intrusion of tampered data from external
sources.
Access control is restricted on Lifecycle Controller, and Lifecycle Controller partitions
are opened as read-only. Only authorized programs are allowed to open the partitions
as read/write.
Only validated data is staged in Lifecycle Controller for application to the related
components.
Trusted Platform Module Warning
If BitLocker protection is enabled on your system, updating components such as RAID, BIOS, and NIC
requires you to enter a recovery password or insert a USB flash drive containing a recovery key during
the next system boot. This situation occurs only if the Trusted Platform Module (TPM) security setting
is set to “On with Pre-boot Measurements.”
For information on how to set TPM settings, see the BIOS User’s Guide available at
support.dell.com/manuals.
Platform Update – Select Updates Figure 82.
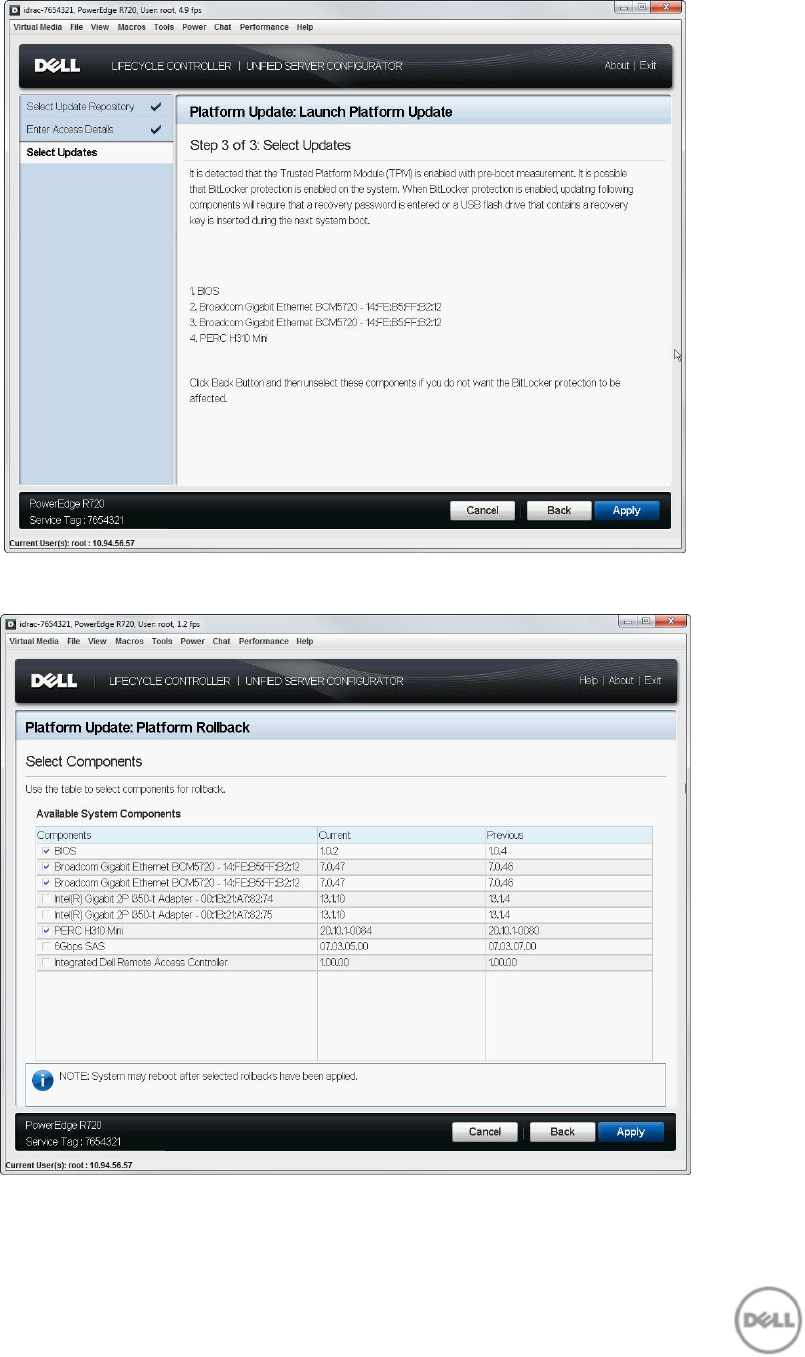
Platform Update – Select Updates TPM Warning Figure 83.
Platform Rollback – Select Updates Figure 84.
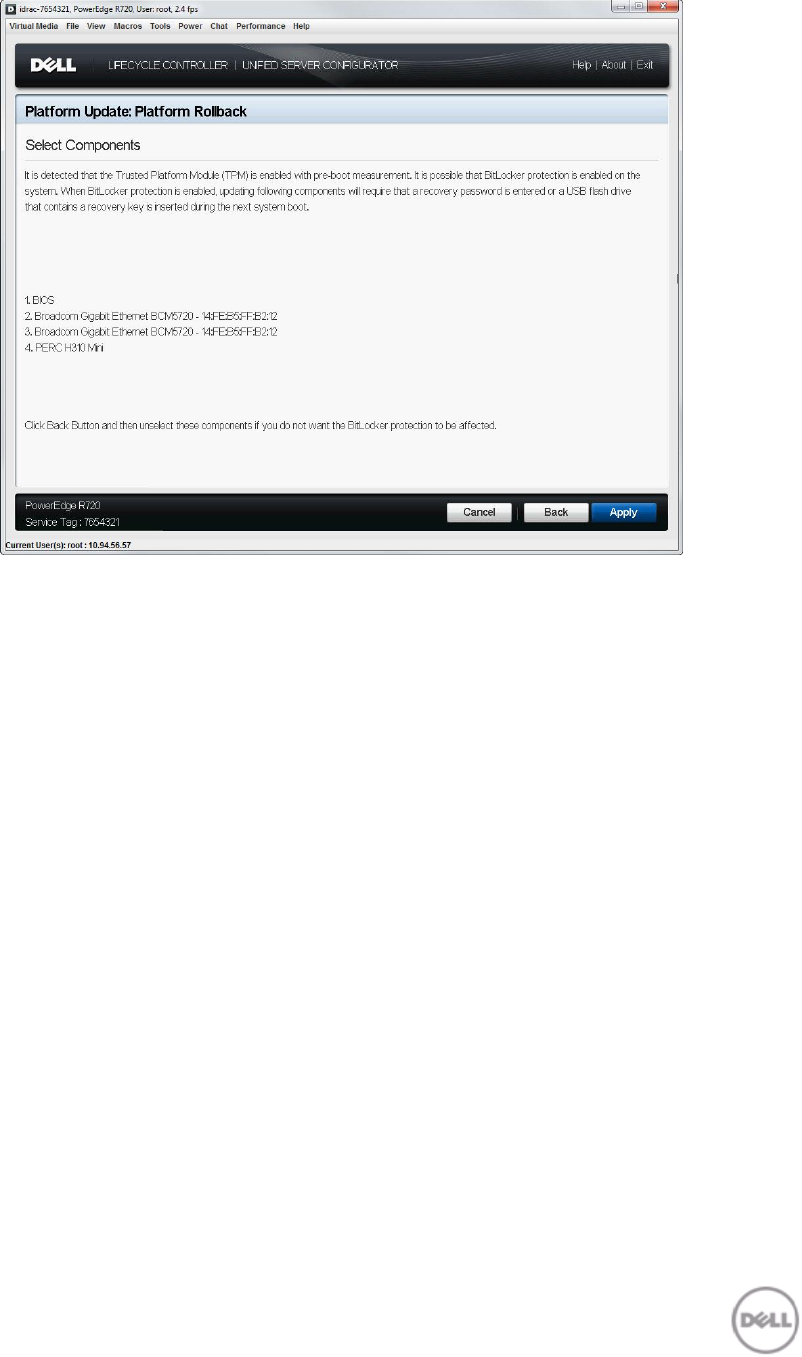
Platform Rollback – TPM Warning Figure 85.

Using Dell Repository Manager
Dell Repository Manager (DRM) is an effective Microsoft Windows-based application that simplifies
change management tasks. It helps to maintain Dell systems with the latest BIOS, firmware, drivers,
and applications. It operates in server and client modes, obtaining updates for both Dell systems and
client systems. The client mode of DRM manages the Dell catalog for client systems that contains the
set of updates for supported Dell client systems running Windows operating system.
You can use access the repositories created using DRM from Lifecycle Controller.
Saving the Repository Using DRM
You can create a repository using any of the following options:
Download the repository from Dell FTP server (ftp.dell.com)
SUU DVD.
For more information on managing repositories, see Dell Repository Manager User’s Guide.
To save the created repository for using through Lifecycle Controller:
1. Click Floppy and from the save repository dialog box, select Save full repository.
2. Click Browse and provide the destination location (USB flash drive, Network Share, or local FTP)
for saving the repository.
3. Click Save to save the repository in the specified location.
To use the created repository, see the following sections:
Using FTP Server
Using a Local Drive
Using a Network Share (CIFS or NFS)
For more information on Dell Repository Manager, its features, and usage see:
support.dell.com/support/edocs/SOFTWARE/smdrm
delltechcenter.com/page/Repository+Manager

