Dell E View Laptop Stand Owners Manual User Guide
2014-11-13
: Dell Dell-E-View-Laptop-Stand-Owners-Manual-111463 dell-e-view-laptop-stand-owners-manual-111463 dell pdf
Open the PDF directly: View PDF ![]() .
.
Page Count: 20
- Dell™ E-View Laptop Stand User’s Guide
- Contents
- About Your Dell™ E-View Laptop Stand
- Using the E-View Laptop Stand
- Unlocking the Laptop Stand
- Adjusting the Height of the Laptop Stand
- Adjusting the Tilt of the Laptop Stand
- Moving the Laptop Stand From Side-to-Side
- Connecting the Laptop Stand to a Port Replicator
- Connecting a Laptop to a Port Replicator in the Laptop Stand
- Disconnecting a Laptop From a Port Replicator on a Laptop Stand
- Removing the Port Replicator From the Laptop Stand
- Specifications
- Finding Information

www.dell.com | support.dell.com
Dell™ E-View Laptop Stand
User’s Guide

Notes, Notices, and Cautions
NOTE: A NOTE indicates important information that helps you make better use of
your computer.
NOTICE: A NOTICE indicates either potential damage to hardware or loss of data
and tells you how to avoid the problem.
CAUTION: A CAUTION indicates a potential for property damage, personal injury,
or death.
____________________
Information in this document is subject to change without notice.
© 2008 Dell Inc. All rights reserved.
Reproduction in any manner whatsoever without the written permission of Dell Inc. is strictly
forbidden.
Trademarks used in this text: Dell, the DELL logo.
Other trademarks and trade names may be used in this document to refer to either the entities claiming
the marks and names or their products. Dell Inc. disclaims any proprietary interest in trademarks and
trade names other than its own.
May 2008 Rev. A00

Contents 3
Contents
1 About Your Dell™ E-View Laptop Stand . . 5
2 Using the E-View Laptop Stand . . . . . . . . . 7
Unlocking the Laptop Stand . . . . . . . . . . . . . . . . 7
Adjusting the Height of the Laptop Stand . . . . . . . . . 8
Adjusting the Tilt of the Laptop Stand . . . . . . . . . . . 9
Moving the Laptop Stand From Side-to-Side . . . . . . 10
Connecting the Laptop Stand to a Port Replicator . . . 11
Connecting a Laptop to a Port Replicator
in the Laptop Stand . . . . . . . . . . . . . . . . . . . 13
Disconnecting a Laptop From a Port Replicator
on a Laptop Stand . . . . . . . . . . . . . . . . . . . . 14
Removing the Port Replicator From the Laptop Stand . 15
3 Specifications . . . . . . . . . . . . . . . . . . . . . 17
4 Finding Information . . . . . . . . . . . . . . . . . 19

4Contents
About Your Dell™ E-View Laptop Stand 5
1
About Your Dell™ E-View Laptop
Stand
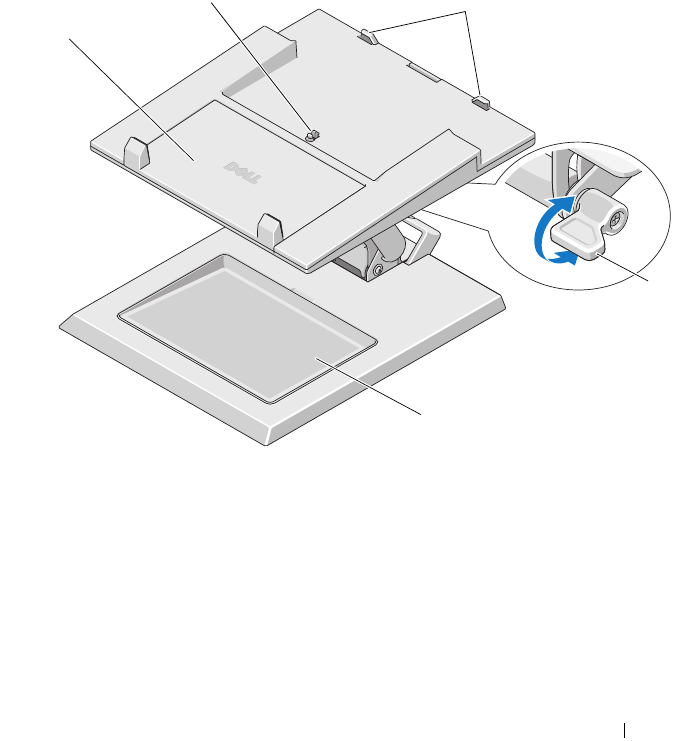
The Dell™ E-View Laptop Stand supports E-Family laptop computers
ranging in size from 12.1 inches to 17 inches.
1 size adjustment tray for laptop 2 release tab for port replicator
3 guide stops for port replicator 4 tilt lock
5 removable tray
1
23
5
4
6About Your Dell™ E-View Laptop Stand
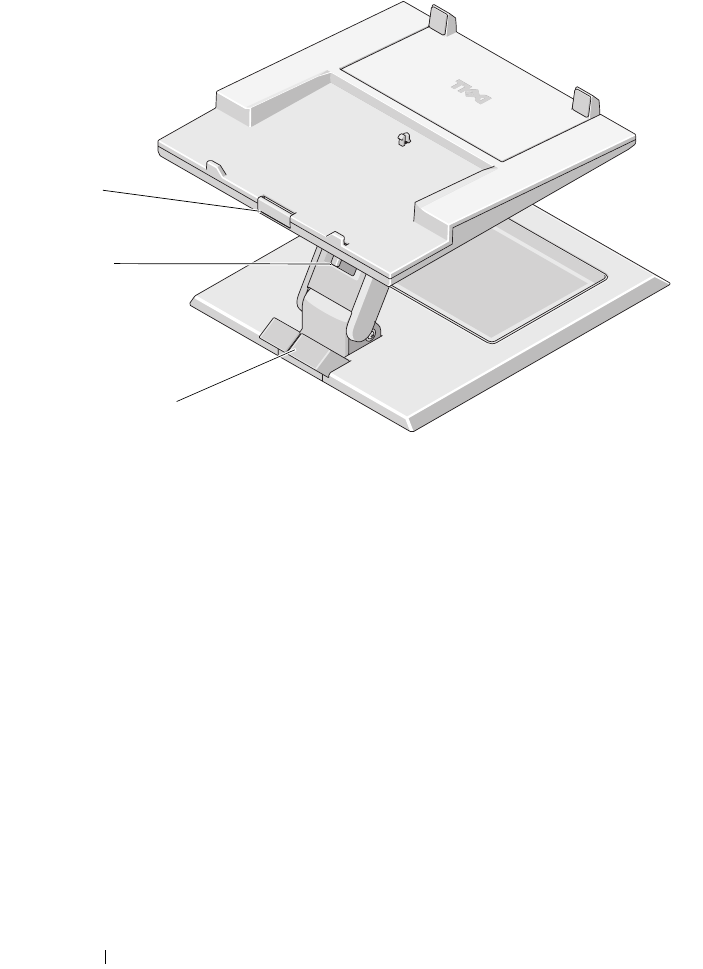
1 release button for port replicator 2 height adjustment lock/unlock switch
3 cable holder
1
2
3
Using the E-View Laptop Stand 7
2
Using the E-View Laptop Stand
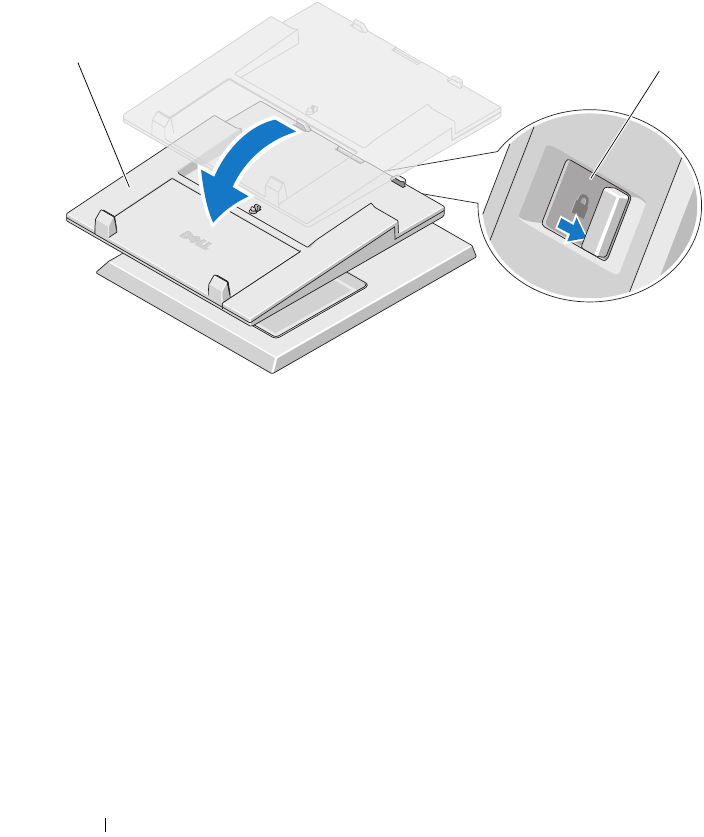
Unlocking the Laptop Stand
The laptop stand ships in the locked position. To unlock the laptop stand:
1
Push down on the front of the laptop stand to tilt it forward.
2
Move the lock/unlock switch to the unlocked position.
1 lock/unlock switch 2 unlocked position
1
2
8Using the E-View Laptop Stand
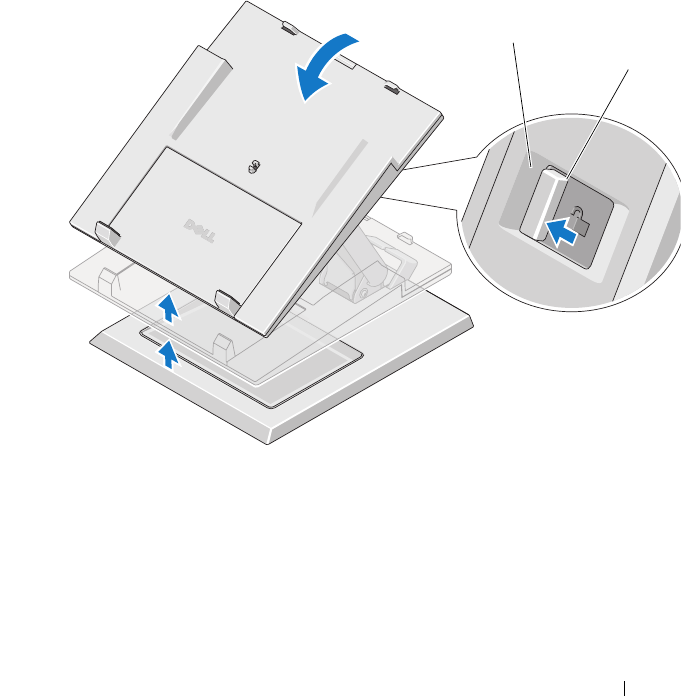
Adjusting the Height of the Laptop Stand
1
Lift or lower the top of the laptop stand to the desired height.
2
Move the lock/unlock switch to the locked position to lock the laptop
stand in place.
1 top of laptop stand 2 locked position
2
1
Using the E-View Laptop Stand 9
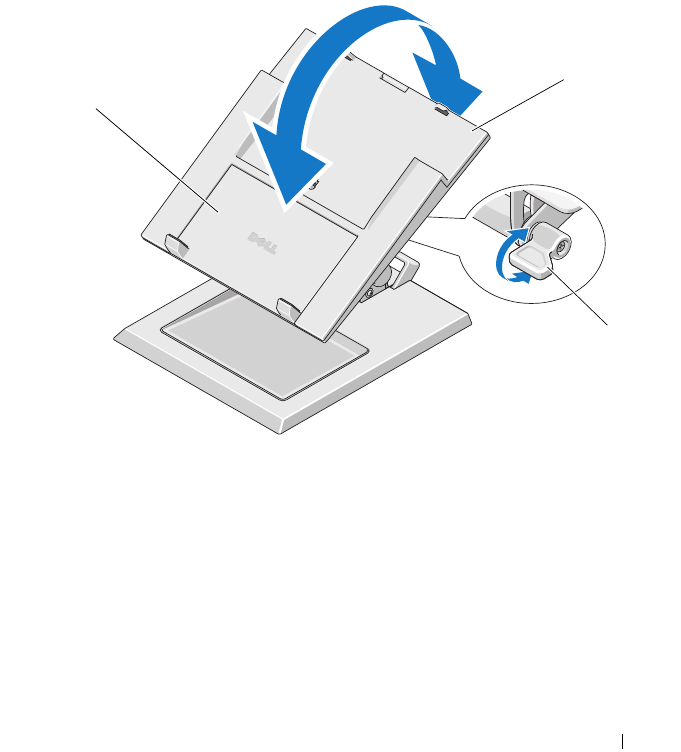
Adjusting the Tilt of the Laptop Stand
In addition to adjusting the height of the laptop stand, you can also tilt the
stand forward.
1
Turn the tilt lock counter-clockwise.
2
Push down on the front of the laptop stand while simultaneously lifting
the back of the laptop stand to tilt it forward to the desired angle.
3
Turn the tilt lock clockwise to lock the stand in place.
1 front top of laptop stand 2 back of laptop stand
3 tilt lock
1
2
3
10 Using the E-View Laptop Stand
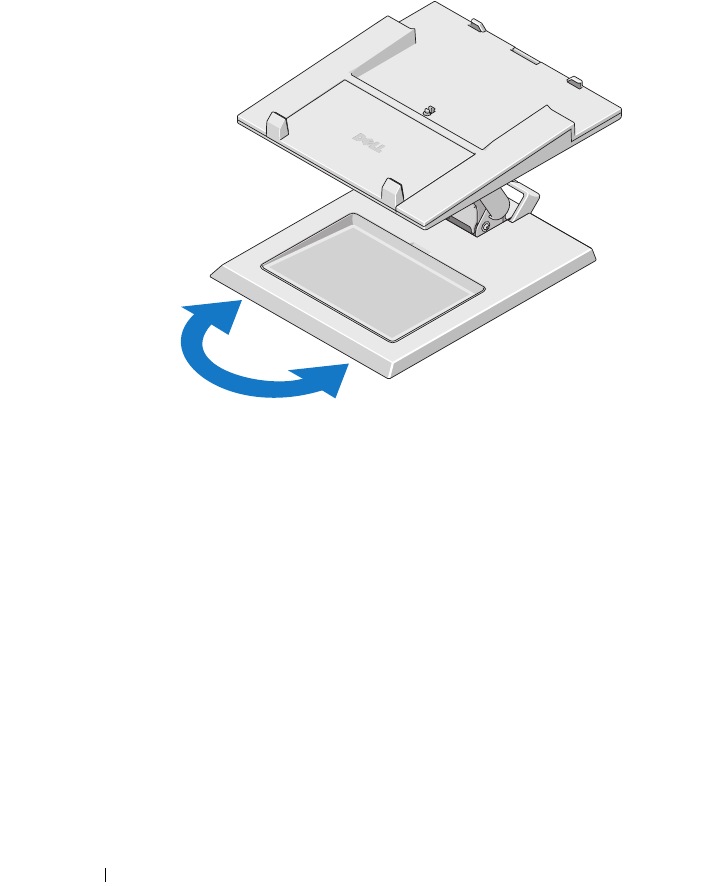
Moving the Laptop Stand From Side-to-Side
You can move the laptop stand from side-to-side from the front of the base.
Using the E-View Laptop Stand 11
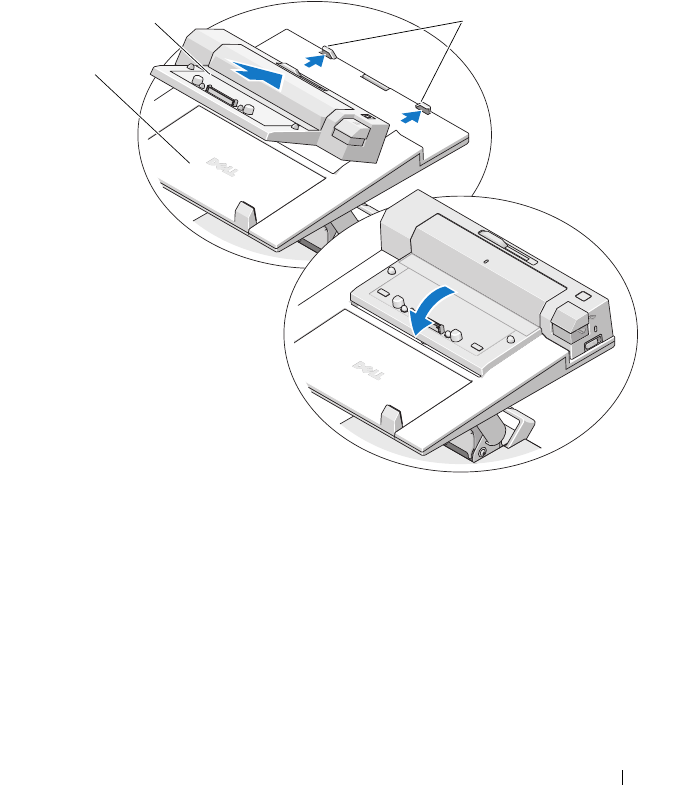
Connecting the Laptop Stand to a Port Replicator
1
With the front of the port replicator raised slightly, slide the port replicator
toward the back of laptop stand until the port replicator rests against the
guide posts.
2
Push down on the port replicator to secure it to the release tab on the
laptop stand.
3
Follow the procedures for setting up your port replicator. See the
E-Port
User’s Guide
or the
E-Port Plus User’s Guide
that shipped with your port
replicator or on
support.dell.com
.
1 top of laptop stand 2 port replicator
3 guide stops for the docking stand
1
23
12 Using the E-View Laptop Stand
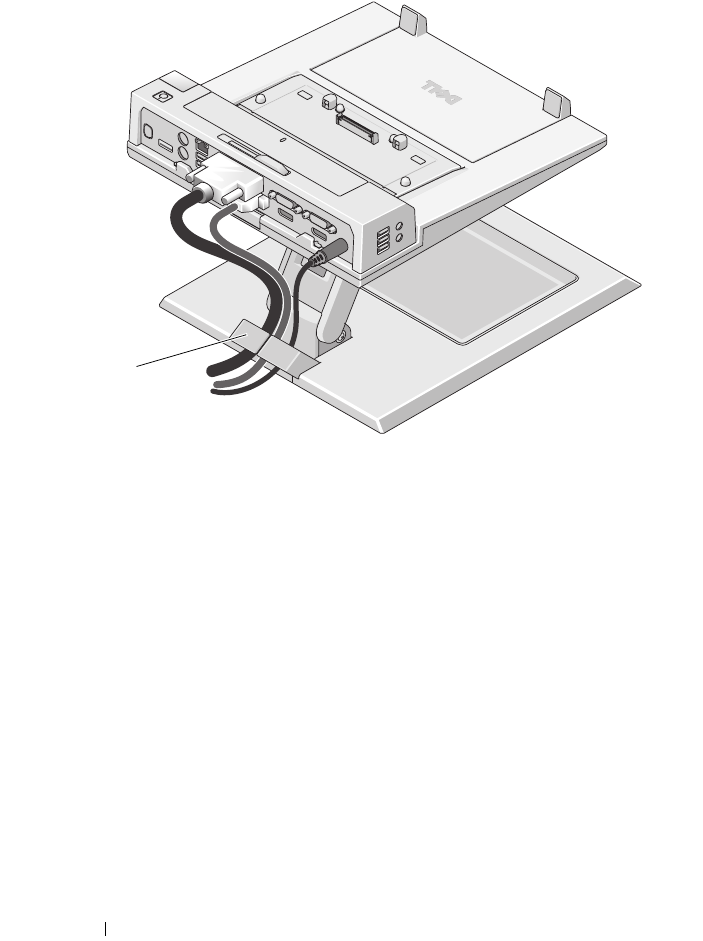
4
Route all cables through the cable holder.
1 cable holder
1
Using the E-View Laptop Stand 13
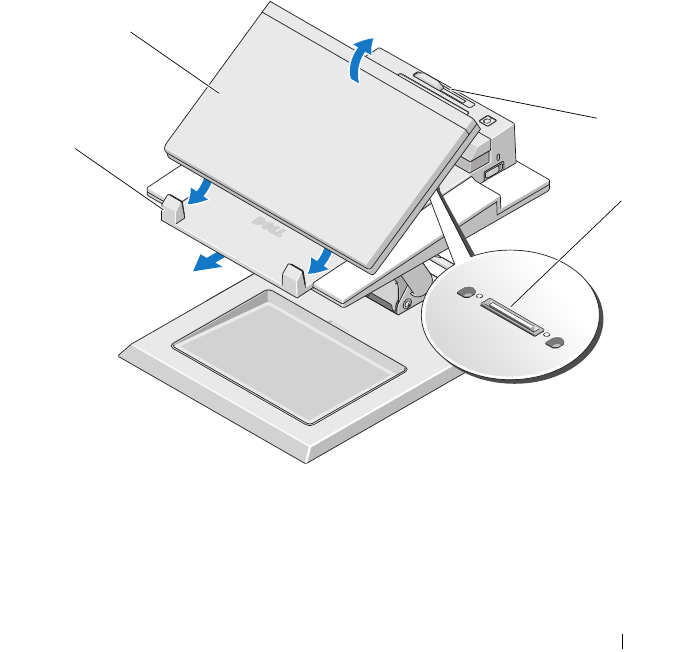
Connecting a Laptop to a Port Replicator in the
Laptop Stand
1
Hold the laptop at an angle and place the front of the laptop on the size
adjustment tray.
2
Use your laptop to slide the tray out if you need to adjust the space to
accomodate a larger laptop.
3
Center the laptop with port replicator and lower the back of the laptop
onto the port replicator.
4
Push down on the laptop to connect the laptop to the port replicator. You
should feel the laptop click into place.
1 laptop 2 battery size adjuster
3 port replicator docking connector 4 size adjustment tray
1
2
3
4
14 Using the E-View Laptop Stand
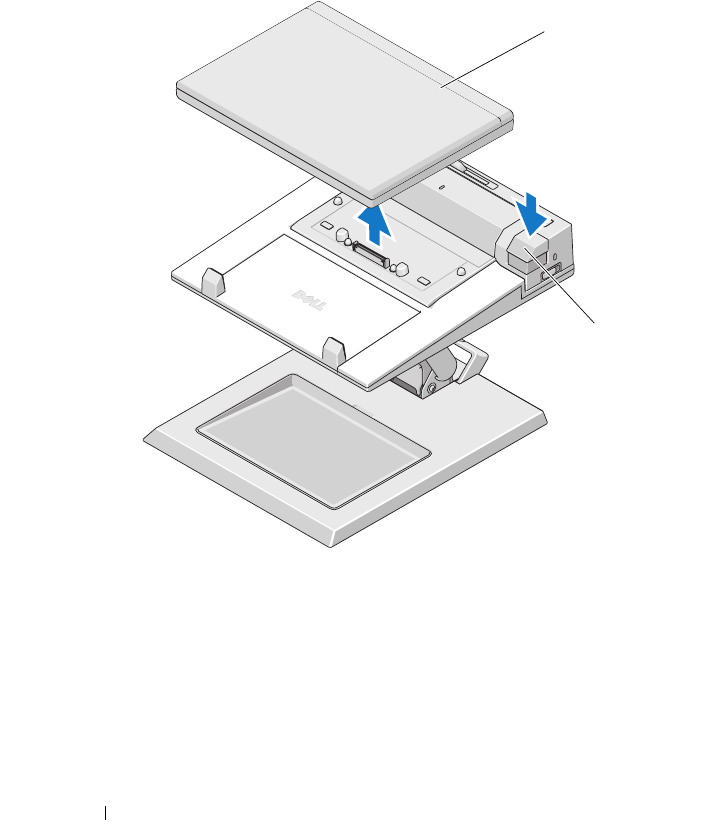
Disconnecting a Laptop From a Port Replicator on
a Laptop Stand
1
Push the laptop eject button on the port replicator.
2
Lift the laptop away from the port replicator and laptop stand.
1 laptop 2 eject button on port replicator
1
2
Using the E-View Laptop Stand 15
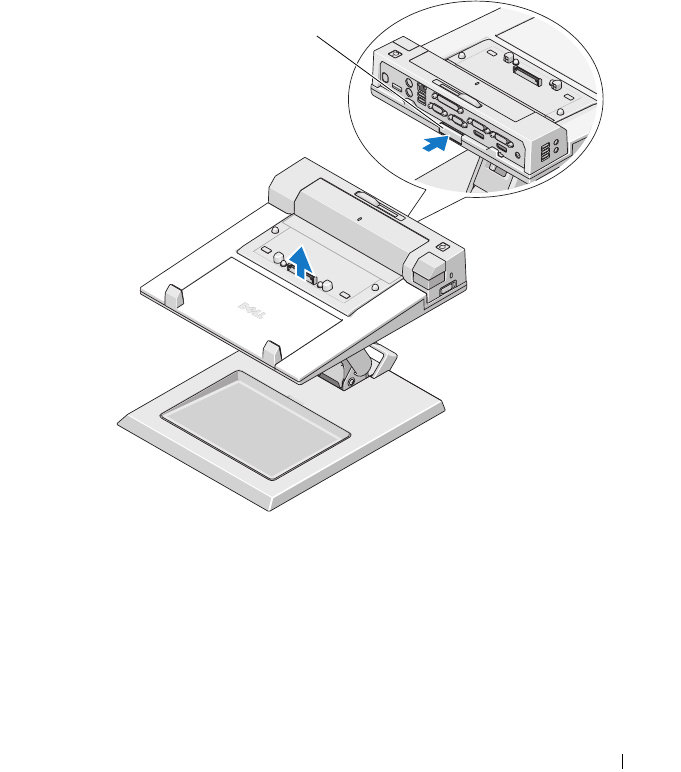
Removing the Port Replicator From the Laptop
Stand
1
Disconnect all cables from the port replicator.
2
Press the release button on the back of the laptop stand, then lift the front
of the port replicator to release it from the release tab on the laptop stand.
3
Remove the port replicator from the laptop stand.
1 release button on laptop stand
1

16 Using the E-View Laptop Stand

Specifications 17
3
Specifications
Physical
Height 102 mm (4.02 inches)
Depth 353 mm (13.90 inches)
Width 288 mm (11.34 inches)
Laptop Stand Weight 2.8 kg (6.17 lb)
Product Support Specifications
Laptop size
supports Dell™ 12.1–17 inch E-Family
laptops
Laptop weight range
supports 1.0–5.0 kg (2.20–11.02 lb)
Port replicator sizes
supports Dell E-Family docking devices
(E-Port and E-Port Plus)
Port replicator weight
1.0 kg (2.20 lb)
Product Features
Tilt adjustment range tilt angle up= 0–2 degrees
tilt angle down= –25 degrees +1 degree
Height adjustment 104 mm + 4 mm (4.09 inches + 0.16
inch)
Side-to-side pan full 360-degree rotation
Locking feature includes a locking device that allows you
to lock the height of the platform at the
desired height.
Safety, Testing, and Environmental Specifications
Operating temperature
0°C
to 40
°C
(32
°F to 104°F)

18 Specifications

Finding Information 19
4
Finding Information
Documents Contents
Safety, Regulatory, Warranty, and Support
Documentation
This type of information may have
shipped with your computer. For
additional regulatory information, see the
Regulatory Compliance Homepage on
www.dell.com at the following location:
www.dell.com/regulatory_compliance.
• Warranty information
• Terms and Conditions (U.S. only)
• Safety instructions
•Regulatory information
• Ergonomics information
• End User License Agreement

20 Finding Information
