Dell Lifecycle Controller Integration Version 2 0 1 For Microsoft System Center Configuration Manage Owners Manual SCCM Intallation Guide
2014-11-13
: Dell Dell-Lifecycle-Controller-Integration-Version-2-0-1-For-Microsoft-System-Center-Configuration-Manage-Owners-Manual-117713 dell-lifecycle-controller-integration-version-2-0-1-for-microsoft-system-center-configuration-manage-owners-manual-117713 dell pdf
Open the PDF directly: View PDF ![]() .
.
Page Count: 23
- Dell Lifecycle Controller Integration For Microsoft System Center Configuration Manager Version 2.0.1 Installation Guide
- Introduction
- Prerequisites
- Configuring An Account For Use With Discovery And Handshake
- Configuring User Access To WMI
- Providing User Permissions For DCOM
- Providing User Permissions For DCOM Config WMI
- Setting Namespace Security And Granting Permissions
- Validating User Permissions From The Dell Provisioning Server
- Providing Share And Folder Permissions
- Enabling Remote PowerShell Commands For Dell Provisioning Server
- Software Prerequisites And Requirements
- Configuring An Account For Use With Discovery And Handshake
- Installing DLCI For Configuration Manager
- Troubleshooting

Dell Lifecycle Controller Integration For Microsoft
System Center Configuration Manager
Version 2.0.1 Installation Guide

Notes, Cautions, and Warnings
NOTE: A NOTE indicates important information that helps you make better use of your computer.
CAUTION: A CAUTION indicates either potential damage to hardware or loss of data and tells you how to avoid the
problem.
WARNING: A WARNING indicates a potential for property damage, personal injury, or death.
© 2012 Dell Inc.
Trademarks used in this text: Dell™, the Dell logo, Dell Boomi™, Dell Precision™ , OptiPlex™, Latitude™, PowerEdge™, PowerVault™,
PowerConnect™, OpenManage™, EqualLogic™, Compellent™, KACE™, FlexAddress™, Force10™ and Vostro™ are trademarks of Dell
Inc. Intel®, Pentium®, Xeon®, Core® and Celeron® are registered trademarks of Intel Corporation in the U.S. and other countries. AMD®
is a registered trademark and AMD Opteron™, AMD Phenom™ and AMD Sempron™ are trademarks of Advanced Micro Devices, Inc.
Microsoft®, Windows®, Windows Server®, Internet Explorer®, MS-DOS®, Windows Vista® and Active Directory® are either trademarks
or registered trademarks of Microsoft Corporation in the United States and/or other countries. Red Hat® and Red Hat®
Enterprise Linux® are registered trademarks of Red Hat, Inc. in the United States and/or other countries. Novell® and SUSE® are
registered trademarks of Novell Inc. in the United States and other countries. Oracle® is a registered trademark of Oracle Corporation
and/or its affiliates. Citrix®, Xen®, XenServer® and XenMotion® are either registered trademarks or trademarks of Citrix Systems, Inc. in
the United States and/or other countries. VMware®, Virtual SMP®, vMotion®, vCenter® and vSphere® are registered trademarks or
trademarks of VMware, Inc. in the United States or other countries. IBM® is a registered trademark of International Business Machines
Corporation.
2012 - 10
Rev. A00
Contents
Notes, Cautions, and Warnings...................................................................................................2
1 Introduction..................................................................................................................................5
2 Prerequisites................................................................................................................................7
Configuring An Account For Use With Discovery And Handshake..........................................................................7
Configuring User Access To WMI......................................................................................................................7
Providing User Permissions For DCOM..............................................................................................................8
Providing User Permissions For DCOM Config WMI.........................................................................................8
Setting Namespace Security And Granting Permissions..................................................................................8
Validating User Permissions From The Dell Provisioning Server......................................................................8
Providing Share And Folder Permissions...........................................................................................................9
Enabling Remote PowerShell Commands For Dell Provisioning Server............................................................9
Software Prerequisites And Requirements............................................................................................................10
Component-Specific Prerequisites..................................................................................................................11
Enabling Or Disabling WMI Traffic Using Firewall...........................................................................................13
Providing Read And Execute Permissions To Users Using PowerShell..........................................................14
3 Installing DLCI For Configuration Manager..........................................................................15
To Install DLCI For Configuration Manager............................................................................................................15
Installing Both DLCU And DPS.........................................................................................................................16
Installing DLCU Only.........................................................................................................................................16
Installing DPS Only...........................................................................................................................................17
Working With DLCI On A User Account Control Enabled System..........................................................................17
To Use DLCI For Configuration Manager On A UAC-Enabled System.............................................................18
Using The Repair Option In The Installer................................................................................................................18
Upgrading DLCI For Configuration Manager From A Previous Version.................................................................18
Prerequisites For Upgrading............................................................................................................................18
Upgrading To DLCI For Configuration Manager Version 2.0.1.........................................................................19
Using The Modify Option In The Installer...............................................................................................................20
Installing A Feature That You Did Not Install Earlier........................................................................................20
Removing A Feature That You Had Installed Earlier........................................................................................20
Uninstalling DLCI For Configuration Manager........................................................................................................21
For Microsoft Windows Server 2003................................................................................................................21
For Microsoft Windows Server 2008................................................................................................................21
4 Troubleshooting.........................................................................................................................23
1
Introduction
This guide provides information on software prerequisites and requirements to install, upgrade, and uninstall Dell
Lifecycle Controller Integration (DLCI) for Microsoft System Center Configuration Manager 2007 (Configuration Manager)
and Microsoft System Center 2012 Configuration Manager (Configuration Manager).
5
6

2
Prerequisites
You require familiarity with deploying operating systems using Dell Server Deployment Pack for Microsoft System
Center Configuration Manager (DSDP for Configuration Manager version 2.0 or later).
For more information, see the
Dell Server Deployment Pack for Microsoft System Center Configuration Manager User’s
Guide
available at support.dell.com/manuals. Before you install Dell Lifecycle Controller Integration for Configuration
Manager 2007/2012, complete the following:
1. Configure an account for use with Discovery and Handshake. For more information, see Configuring An Account
For Use With Discovery And Handshake.
2. Make sure that the software prerequisites and requirements are available. For more information, see Software
Prerequisites And Requirements.
3. Make sure that the component specific prerequisites are available. For more information, see Component-Specific
Prerequisites.
Configuring An Account For Use With Discovery And Handshake
If you do not want to use an administrator account for the Dell Provisioning Service (DPS) to access the Configuration
Manager server, create a user account with minimal permissions.
NOTE: If you install DLCI by providing user credentials authenticated in Active Directory, and then perform the
discovery and handshake with a target system using a Non-Active Directory authenticated user credentials, the
discovery and handshake with the target system fails; to resolve this, disable the Active directory credentials.
To create a user account with minimal user permissions:
1. Create a user account on the domain, as the DPS impersonates this account while writing the Data Discovery
Record (DDR) to inbox of the site server.
2. In the Configuration Manager 2007 console, check for the user name under Security Rights → Users. In the
Configuration Manager 2012 console check, for the user name under Administration → Security → Administrative
Users. Provide the user with the following permissions:
–Collection — Read, Modify and Create
–Site — Read, and Import computer entry
3. Configure user access to Windows Management Instrumentation (WMI). For more information, see Configuring
User Access To WMI.
4. Provide share and folder permissions to write files to the DDR inbox. For more information, see Providing Share And
Folder Permissions.
Configuring User Access To WMI
To configure user access to WMI remotely:
NOTE: Make sure that firewall of the system does not block the WMI connection.
7

1. Grant the Dell Provisioning Server user permissions needed for the Distributed Component Object Model (DCOM)
on this system, remotely using dcomcnfg.exe. For more information, see Providing User Permissions For DCOM.
2. Grant the Dell Provisioning Server user permissions needed for the DCOM Config Windows Management and
Instrumentation (WMI) components, using dcomcnfg.exe. For more information, see Providing User Permissions
For DCOM Config WMI.
3. Set the namespace security and grant permissions. For more information, see Setting Namespace Security And
Granting Permissions.
4. From the Dell Provisioning Server, validate user permissions of the account. For more information, see Validating
User Permissions From The Dell Provisioning Server.
Providing User Permissions For DCOM
To grant user permissions for DCOM:
1. Launch dcomcnfg.exe.
2. From the left pane, in the Component Services console, expand Computers, right-click the Provisioning Server
Computer, and select Properties.
3. On COM Security:
– From Access Permissions, click Edit Limits and select Remote Access.
– From Launch and Activation Permission, click Edit Limits and select Local Launch, Remote Launch, and
Remote Activation.
Providing User Permissions For DCOM Config WMI
To grant user permissions for DCOM Config WMI:
1. Launch dcomcnfg.exe.
2. Expand My Computer → DCOM Config.
3. Right-click Windows Management and Instrumentation, and select Properties.
4. On Security, from Launch and Activation Permission, click Edit and select the Remote Launch and Remote
Activation permissions.
Setting Namespace Security And Granting Permissions
To set namespace security and grant permissions:
1. Launch wmimgmt.msc to set the namespace security.
2. In the WMI Control pane, right-click WMI Control, select Properties, and then select Security.
3. Navigate to ROOT\SMS Namespace.
4. Select the Execute Methods, Provide Write, Enable Account, and Remote Enable permissions.
Alternatively, the Configuration Manager user becomes a member of the SMS_Admin group, and you can grant Remote
Enable to the existing permissions of the group.
Validating User Permissions From The Dell Provisioning Server
To validate user permissions:
1. Use WBEMTest to verify that you can connect to the Site Server using WMI.
8
Make sure that you select Packet privacy in the Authentication level group box when connecting to the
Site_<sitecode> Namespace.
2. After establishing the connection, run the query Select*from SMS_Site. If permissions are properly
assigned, this command returns a record with the site code.
Providing Share And Folder Permissions
To grant share and folder permissions to write files to the DDR inbox:
1. Do the following:
– From the Configuration Manager 2007 console, under Computer Management, grant the user permission to
write to the SMS_<sitecode> share.
– From the Configuration Manager 2012 console, under Administration, grant the user permission to write to
the SMS_<sitecode> share.
2. Using File Explorer, go to the share location SMS_<sitecode> share, and then to the ddm.box folder. Grant full
control to the domain user for the following folders:
–SMS_<sitecode>
– inboxes
–ddm.box
3. Add a configuration point to provide full control permission at this registry location: HKEY_LOCAL_MACHINE
\SOFTWARE\Wow6432Node\DELL\Provisioning Service\Repository.
4. Validate these permissions by temporarily mapping a drive from the Dell Provisioning Server with user credentials,
and then creating, writing, modifying, and deleting a new file.
Enabling Remote PowerShell Commands For Dell Provisioning Server
If you want to set up DPS on one server and, set up Configuration Manager and Dell Lifecycle Controller Utility (DLCU) on
another server; then, on the servers where DLCU and DPS are installed, run these PowerShell commands to enable
remote calls from DPS.
Support Information:
• DPS for Configuration Manager 2007 does not support Configuration Manager 2012
• DPS for Configuration Manager 2012 does not support Configuration Manager 2007
• DPS for DLCI 1.3 does not support DLCI 2.0.1
• DPS for DLCI 2.0.1 does not support DLCI 1.3
Prerequisites:
• PowerShell 2.0 is installed and available on the DLCU and DPS servers.
• The servers on which DPS and DLCU are installed, are in the same domain.
To enable remote PowerShell commands:
1. In the DLCU server, in the PowerShell command line, run enable- PSRemoting.
2. In the confirmation message, type Y. enable-PSRemoting configures the DLCU server to receive remote
commands.
3. (Optional) if the configuration is distributed, then run Set-PSSessionConfiguration
Microsoft.PowerShell -ShowSecurityDescriptorUI.
4. In the DPS server, in the PowerShell command line, run Set- ExecutionPolicy RemoteSigned.
9

5. In the confirmation message, type Y. Set-ExecutionPolicy changes the user preference for the Windows
PowerShell execution policy.
Software Prerequisites And Requirements
Before you install DLCI for Configuration Manager, complete the following prerequisites:
1. Install Microsoft System Center 2012 Configuration Manager, Microsoft System Center Configuration Manager 2007
SP1, R2/SP2, or R3. For details on how to download and install Configuration Manager, see technet.microsoft.com.
2. Make sure that at least 40 MB of free disk space is available on the system to install DLCI.
3. Install Dell Server Deployment Pack (DSDP) for Configuration Manager version 2.0. For details on how to install
DSDP for Configuration Manager, see the
Dell Server Deployment Pack for Microsoft System Center Configuration
Manager User’s Guide
available at support.dell.com/manuals.
4. For Microsoft System Center Configuration Manager 2007 SP1, R2/SP2, or R3, install .NET versions 3.5 SP1 or 4.0.
5. For Microsoft System Center 2012 Configuration Manager, install .NET version 4.0.
6. On Microsoft Windows Server 2008 and 2008 R2 systems where you are installing DPS, install Windows Remote
Management (WinRM) and .NET 4.0.
7. Enable PowerShell 2.0 in the system where DPS is installed. For more information see, Enabling Remote PowerShell
Commands For Dell Provisioning Server.
8. Make sure that the required KB articles are available:
If you are installing DLCI on Windows 2003, then do this update: KB947870 — Error message when you run the
Icacls.exe utility to set ownership of a file or of a folder on a computer that is running Windows Server 2003 SP2:
"Access is denied". See support.microsoft.com/kb/947870.
If you are installing DLCI on Windows 2008 R2 64–bit, then do this update: KB981506 — "SSL Certificate add failed,
Error: 1312" error message when you try to add a CTL in Windows Server 2008 R2 or in Windows 7. See
support.microsoft.com/kb/981506.
9. This release of DLCI is licensed. To work with DLCI, you must install and set up Dell Connections License Manager
(DCLM).
For more information on setting up DCLM, see documentation at support.dell.com/manuals.
Once you install and set up DCLM, to work with DLCI, you must procure a license, and import the license into
DCLM. This license is required for DLCI to access the target systems.
To procure the license, contact Dell sales.
10. If you are not a user with administrator privileges and you want to automatically configure Dell Provisioning Server;
Also, you are planning on installing DPS on one server and Dell Lifecycle Controller Integration on another server,
then consider the following:
– To configure firewall settings before installing DPS, see Enabling Or Disabling WMI Traffic Using Firewall.
– On the system where Dell Lifecycle Controller Integration is being installed, provide Write permission for
the <Configuration Manager Admin Console Install Dir >\XmlStorage\Extensions\DLCPlugin folder.
– Provide write permissions using PowerShell, see Providing Read And Execute Permissions To Users Using
PowerShell.
11. For working with the deploying non-Windows operating systems on target systems task, complete these
prerequisites:
– For deploying non-Windows operating systems, you require Network File System (NFS); Either Client for
NFS or Services for Network File System.
However, Client for NFS is not available on operating systems such as Windows 7 Professional Edition
(without service pack, or with SP1), and Windows Vista Business.
– Install Client for NFS on the system where site server/admin console or Dell Lifecycle Controller Integration
is installed. NFS share name is case-sensitive.
10

– NFS is configured to have Anonymous/Unmapped read access for all systems. The NFS has read and write
access for site server and Admin console. Confirm that the site server, Admin console, and the system on
which the NFS share is present are in the same domain. NFS must contain at least 60% of free space. It is
recommended that NFS share is hosted on a private network with no access to Internet. However, make
NFS accessible from site server, admin console, and all the iDRACs.
To configure NFS:
* For Windows 2008, see technet.microsoft.com/enus/ library/cc753302(v=ws.10).aspx
* For Windows 2008, R2 see technet.microsoft.com/enus/ library/dd758767(v=ws.10).aspx
– Status messages are received at port 4434. Confirm that a firewall exception is set for this port, else the
TaskViewer will not receive any operating system deployment status messages from the server on which
the operating system is being installed.
To change the port on which TaskViewer can get the status messages: In the DLCTaskManager.exe.config
configuration file, modify key= "NON_WIN_OSD_STATUS_PORT" and for example, value="4434".
Ensure that the new port is not in use.
– Connect the network adapter to the network for the server on which the operating system is deployed.
– Confirm that virtual disk is available on the target system.
– Servers with ESXi deployed are moved to another collection Managed Dell Lifecycle Controller (ESXi 5).
– If DHCP lookup fails while deployment then the server times out and it is not moved into Managed Dell
Lifecycle Controller (ESXi 5).
It is recommended that the network adapter is connected to the network port in the server on which the operating
system is being deployed. For information on component-specific software prerequisites and requirements, see
Component-Specific Prerequisites.
Component-Specific Prerequisites
The DLCI for Configuration Manager installer verifies the following prerequisites before installation:
During Initial Startup
•Regsrv32.exe
• WinRM
• Client for NFS
• PowerShell 2.0
• For Configuration Manager 2007
– Microsoft Windows Server 2003 SP1 or later
– Microsoft .NET version 3.5 SP1 or 4.0
• For Configuration Manager 2012
– Microsoft Windows Server 2008 R2 or later
– Microsoft .NET version 4.0
For DLCU
• Installation on primary Site Server or Configuration Manager Admin console
• Dell Server Deployment Pack 2.0 or later
• Windows Automation Install Kit (Windows AIK)
• For working with non-Windows operation system deployment feature, on a server running Red Hat Linux
operating system, preferably use Network File System version 3.0 (NFSv3).
11
For DPS
• Internet Information Services (IIS) 6, IIS 7, or IIS 7.5
• IIS WMI compatibility is enabled on IIS 7
• IIS6 WMI Metabase compatibility is enabled on IIS 7
•icacls.exe
• For Configuration Manager 2007
– Microsoft Windows Server 2003 SP2 or later
• For Configuration Manager 2012
– Microsoft Windows Server 2008 R2
DPS and DLCU are present in the same domain.
Supported Operating Systems
The following table provides information on supported operating systems for the Dell Provisioning Server. The matrix
presented in the table lists the operating systems supported to install DLCI for Configuration Manager.
For information, on the supported configurations for Configuration Manager 2007, see: technet.microsoft.com/en-us/
library/cc161860.aspx.
For information, on the supported configurations for Configuration Manager 2012, see: technet.microsoft.com/en-us/
library/gg682077.aspx.
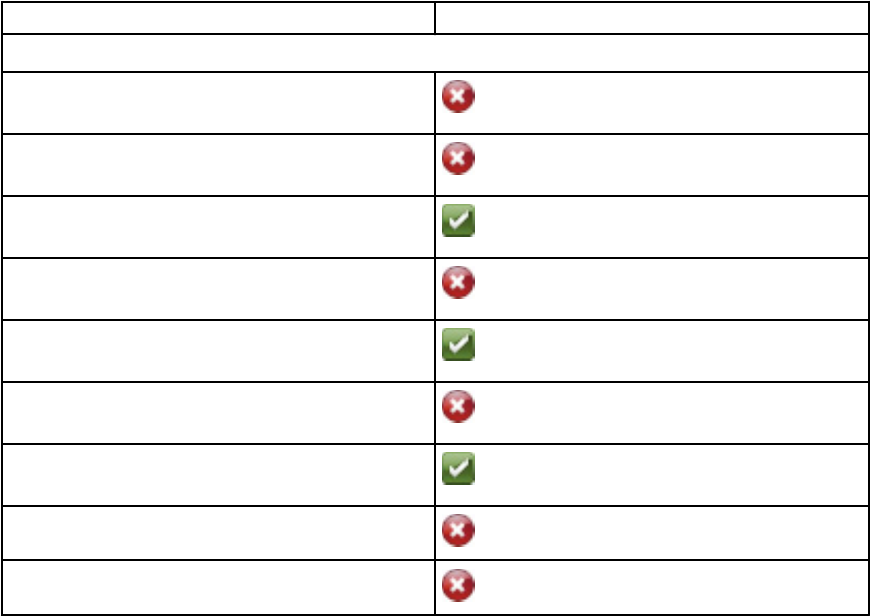
Table 1. Support Matrix for Dell Provisioning Server
Operating Systems Dell Provisioning Service
The following operating systems are supported for Configuration Manager 2007 only.
Windows Server 2003 SP1 — Standard and Enterprise x86
Editions
Windows Server 2003 SP1 — Standard, Enterprise, and
Datacenter x64 Editions
Windows Server 2003 SP2 — Standard and Enterprise x86
Editions
Windows Server 2003 SP2 — Standard, Enterprise, and
Datacenter x64 Editions
Windows Server 2003 R2 SP2 — Standard and Enterprise
x86 Editions
Windows Server 2003 R2 SP2 — Standard, Enterprise, and
Datacenter x64 Editions
Windows Server 2008 — Standard and Enterprise x86
Editions
Windows XP SP2 x86 Professional Edition
Windows XP SP3 x86 Professional Edition
12

Operating Systems Dell Provisioning Service
Windows XP SP2 x86 Business Edition
Windows XP SP3 x86 Business Edition
Windows Vista x86 Business Edition
Windows Vista SP1 x86 Business Edition
Windows 7 x86 Edition
Windows Server 2008 SP2 — Standard and Enterprise x86
Editions
The following operating systems are supported for Configuration Manager 2007/2012.
Windows Server 2008 — Standard, Enterprise, and
Datacenter x64 Editions
Windows Server 2008 SP2 — Standard, Enterprise, and
Datacenter x64 Editions
Windows Server 2008 R2 — Standard, Enterprise, and
Datacenter Editions
Windows XP SP2 x64 Professional Edition
Windows XP SP3 x64 Professional Edition
Windows XP SP2 x64 Business Edition
Windows XP SP3 x64 Business Edition
Windows Vista x64 Business Edition
Windows Vista SP1 x64 Business Edition
Windows 7 x64 Edition
Enabling Or Disabling WMI Traffic Using Firewall
If firewall is enabled on Dell Lifecycle Controller Utility for Configuration Manager 2012, then, to run remote PowerShell
commands for the WMI class, you must enable the WMI traffic.
To enable WMI traffic using firewall user interface:
1. In Control Panel, click Security and then click Windows Firewall.
2. Click Change Settings, and then click Exceptions.
13
3. In Exceptions , to enable WMI traffic, select Windows Management Instrumentation (WMI), to disable WMI traffic,
clear Windows Management Instrumentation (WMI).
Providing Read And Execute Permissions To Users Using PowerShell
Non-administrator users require permissions to configure Dell Provisioning Server.
To provide permissions in PowerShell:
1. In PowerShell, run this command: Set-PSSessionConfiguration Microsoft.PowerShell -
ShowSecurityDescriptorUI.
2. In the confirmation message, type Y.
The window with options to add users and set permissions is displayed.
3. Add the non-administrator users, and provide them permissions.
14

3
Installing DLCI For Configuration Manager
The Dell Lifecycle Controller Integration (DLCI) for Configuration Manager installer contains two components — Dell
Lifecycle Controller Utility (DLCU) and Dell Provisioning Service (DPS).
DLCU is a plug-in for Configuration Manager; select this option when you have Configuration Manager installed on a site
server.
DPS is a component for provisioning Dell servers into Configuration Manager. Configuration Manager installation is not
required.
The server on which DPS is installed is known as Dell Provisioning Server.
You can install both the components together or install them individually on separate systems.
It is recommended that you close Configuration Manager before installing, upgrading, or uninstalling the DLCI for
Configuration Manager.
To Install DLCI For Configuration Manager
1. Go to support.dell.com → Drivers & Downloads.
2. Select the product, which is ideally a Dell PowerEdge
yx2x
(12th generation or 12 G) system.
In the server name format
yxxx
; y denotes alphabets, for example M, R, or T; and x denotes numbers.
3. Select the operating system.
4. In Category, select All.
5. Click Lifecycle Controller from the list displayed.
6. Click Download against Dell Lifecycle Controller Integration.
7. Download Dell_Lifecycle_Controller_Integration_2.0.1_Axx.zip and extract the contents to a folder on the system.
8. To install the package, if UAC is enabled see, Working With DLCI On A User Account Control Enabled System, else
double-click Dell_Lifecycle_Controller_Integration_2.0.1.xxx.msi.
The Welcome screen is displayed.
9. Click Next.
The license agreement is displayed.
10. Accept the license agreement and click Next.
The Custom Setup screen is displayed.
11. Select the option to install either the Dell Lifecycle Controller Utility or the Dell Provisioning Service, or both.
If you are installing DPS on a system where Configuration Manager is not available, both the options, DLCI for
Configuration Manager 2007 and DLCI for Configuration Manager 2012 are available. When you clear either option,
the space required on the hard drive is incorrect in Feature Description.
You can select from the following custom options based on your requirement:
–Installing Both DLCU and DPS
–Installing DLCU Only
–Installing DPS Only
15

Installing Both DLCU And DPS
To install the DLCU and DPS on a Site Server or Admin Console:
1. From Custom Setup, select both Dell Lifecycle Controller Utility and Dell Provisioning Service and click Next.
The Custom Setup Confirmation screen showing both the options is displayed.
2. Click Next.
The Dell Provisioning Service User Credentials for Configuration Manager Access screen is displayed.
3. Perform one of the following actions:
a) On a Site Server, enter an account (with required privileges) for use by Dell Provisioning Service to access
Configuration Manager, on all newly discovered systems with iDRAC, and click Next.
b) On a Configuration Manager Admin Console with IIS, enter the primary site server name, user name, and
password that is provisioned on all newly discovered systems with iDRAC, and click Next.
To automatically configure the Dell Provisioning Server, select Automatically configure Dell Provisioning Server
user permissions.
NOTE: If the user name is not part of SMS_Admins group, then you must provide additional permissions to
the WMI namespace, for more information see, Setting Namespace Security And Granting Permissions.
The Dell Lifecycle Controller Utility User Credentials for iDRAC Access screen is displayed.
4. Enter the iDRAC credentials, retain the default settings for skipping CN and CA checks, and then click Next.
The Change Firewall Setting screen is displayed.
5. Select the Add Provision Web Site Port in the firewall exception list option. This enables the DPS to discover the
target systems even when firewall is enabled.
NOTE: This screen is displayed only when you select the Dell Provisioning Service in the installer.
6. Click Next.
The Ready to Install the Program window is displayed.
7. Click Install.
The Progress bar is displayed. After installation, the completion message is displayed.
8. Click Next.
9. In Installation Completed Successfully, click Finish.
NOTE: As part of the installation, a provisioning website is created and configured under Internet Information
Services (IIS).
Installing DLCU Only
For information on component-specific requirements, see Component-Specific Prerequisites.
NOTE: Make sure that you install the DLCU on the Site Server before using it on the Admin Console.
To install only the DLCU:
1. In Custom Setup, select Dell Lifecycle Controller Utility, clear Dell Provisioning Service, and click Next.
In the Custom Setup Confirmation screen, the selected component is displayed.
2. Click Next.
3. In Dell Lifecycle Controller Utility User Credentials for iDRAC Access, enter the user name and password for out-of-
band controller management. This account is provisioned on the iDRAC.
16

Retain the default settings for skipping CN and CA checks.
NOTE: This screen is displayed only if you are installing DLCI for Configuration Manager on a Site Server.
4. Click Next.
The Ready to Install the Program screen is displayed.
5. Click Install.
The Progress bar is displayed. After installation, the completion message is displayed.
6. Click Next.
7. In Installation Completed Successfully, click Finish.
Installing DPS Only
For information on component-specific requirements, see Component-Specific Prerequisites.
To install only the DPS:
1. In Custom Setup, select Dell Provisioning Service, clear Dell Lifecycle Controller Utility and click Next.
In the Custom Setup Confirmation screen, the selected component is displayed.
2. Click Next.
3. In the Dell Provisioning Service User Credentials for Configuration Manager Access screen, enter the primary site
server name or IP of the server, user name, and password.
To automatically configure the Dell Provisioning Server, select Automatically configure Dell Provisioning Server
user permissions.
NOTE: If the user name is not part of SMS_Admins group, then you must provide additional permissions to the
WMI namespace, for more information see, Setting Namespace Security And Granting Permissions.
4. Click Next.
The Change Firewall Setting screen is displayed.
5. Select Add Provision Web Site Port in the firewall exception list. This enables the DPS to discover the target
systems even when firewall is enabled.
NOTE: This screen is displayed only when you select the Dell Provisioning Service in the installer.
6. Click Next.
The Ready to Install the Program message is displayed.
7. Click Install.
The Progress bar is displayed. After installation, the completion message is displayed.
8. Click Next and then click Finish.
Working With DLCI On A User Account Control Enabled System
The minimum permissions required to install or uninstall the DLCU feature on a site server are as follows:
• You are a local administrator or a domain administrator on the server.
• On a Microsoft Windows Server 2008 operating system with User Account Control (UAC) enabled, launch the
msi file from a command prompt using Run As Administrator.
• The minimum permissions on Configuration Manager are:
– Site = Read
– Package = Read, Delete, and Create
17

To Use DLCI For Configuration Manager On A UAC-Enabled System
1. Right-click Command Prompt and select Run As Administrator.
2. Run Dell_Lifecycle_Controller_Integration_2.0.1.xxx.msi from the folder where you have extracted it.
3. Follow the instruction in the installation wizard to install DLCI on the system.
Using The Repair Option In The Installer
1. To repair the installation of DLCI for Configuration Manager, if UAC is enabled see, Working With DLCI On A User
Account Control Enabled System, else double-click Dell_Lifecycle_Controller_Integration_2.0.1.xxx.msi.
The Welcome screen is displayed.
2. Click Next.
3. In Program Maintenance, select Repair and click Next.
The Ready to Repair the Program screen is displayed.
4. Click Install.
A progress screen displays the progress of the installation. Once the installation is complete, the InstallShield
Wizard Completed window is displayed.
5. Click Finish.
Upgrading DLCI For Configuration Manager From A Previous
Version
NOTE: DLCI for Configuration Manager supports upgrading from version 1.3 to later versions. To upgrade from
version 1.0, or version 1.1, you must first uninstall version 1.0 or 1.1 and then install version 2.0.1. When you uninstall
version 1.0 or 1.1, the previous settings are not retained and you must rediscover the target systems after you
install version 2.0.1.
Prerequisites For Upgrading
Before you upgrade to DLCI for Configuration Manager version 2.0.1, you must upgrade the firmware on the target
systems. If the blade servers are part of the Chassis, then upgrade the Chassis Management Controller (CMC) firmware
before upgrading other firmware.
If you are using Dell Update Packages (DUPs) to perform the updates on the
yx1x
(11th generation or 11G servers), then
update firmware as follows:
NOTE: In the server name format
yxxx
; y denotes alphabets, for example M, R, or T; and x denotes numbers.
1. Upgrade the BIOS of the target systems to the latest version.
2. Upgrade Lifecycle Controller on the target systems to version 1.5.5 or later. For more information, see the
Dell
Lifecycle Controller USC/USC-LCE Version 1.5 User’s Guide
available at support.dell.com/manuals. To upgrade
Lifecycle Controller, use the Firmware Upgrade Tool in DLCI for Configuration Manager version 2.0.1. Lifecycle
Controller version 1.5.5 is delivered as part of iDRAC version 1.9 for rack and tower servers and iDRAC version 3.4
for blade servers.
3. Upgrade iDRAC on the target systems to version 1.9 or later for monolithic systems and iDRAC version 3.4 or later
for modular systems. For more information, see the
Integrated Dell Remote Access Controller 6 (iDRAC7) Version
1.9 User’s Guide
, and the
Integrated Dell Remote Access Controller 6 (iDRAC6) Enterprise for Blade Servers
Version 3.4 User’s Guide
available at support.dell.com/manuals.
18

4. Enable PowerShell 2.0 in the system where DPS is installed. For more information see, Enabling Remote
PowerShell Commands For Dell Provisioning Server.
NOTE: You cannot abort the upgrade process by closing the installation wizard. If you close the installation
wizard, the following message is displayed: Are you sure you want to cancel Dell
Lifecycle Controller Integration installation? The upgrade process continues
irrespective of the selection you make on the message box.
If you are updating iDRAC firmware to version 3.0 or greater from an iDRAC on version less than 2.3, then first update the
iDRAC firmware to version 2.3 before updating to version 3.0 or greater on 11G servers.
If you are using Dell Update Packages (DUPs) to perform the updates on the
yx2x
(12th generation or 12G servers), then
update the firmware as follows:
1. Upgrade Lifecycle Controller on the target systems to version 1.0.8 or later. For more information, see the
Dell
Lifecycle Controller 2 Version 1.00 User’s Guide
available at support.dell.com/manuals. To upgrade Lifecycle
Controller, use the Firmware Upgrade Tool in DLCI for Configuration Manager version 2.0.1.
2. Upgrade the BIOS of the target systems to the latest version.
3. Upgrade iDRAC on the target systems to version 1.20.20. For more information, see the
Integrated Dell Remote
Access Controller 7(iDRAC7) Version 1.20.20 User’s Guide
available at support.dell.com/manuals.
4. Enable PowerShell 2.0 in the system where DPS is installed. For more information see, Enabling Remote
PowerShell Commands For Dell Provisioning Server.
NOTE: You cannot abort the upgrade process by closing the installation wizard. If you close the installation
wizard, the following message is displayed: Are you sure you want to cancel Dell
Lifecycle Controller Integration installation? The upgrade process continues
irrespective of the selection you make on the message box.
Upgrading To DLCI For Configuration Manager Version 2.0.1
In DLCI for Configuration Manager version 1.3 or version 2.0, if Platform Restore is run on a collection where servers are
identified by hostname (instead of service tag) and the server profiles are exported to a share, then to import the server
profiles after upgrading to DLCI 2.0.1.
1. Open the share location where profiles are exported.
2. For the filename formats <prefix>-<hostname>. Rename the filename format to <prefix>-<servicetag>.
3. Do step 2 to all exported files.
If you have scheduled a firmware update in DLCI for Configuration Manager version 1.3 or version 2.0, and the hostname
is changed (due OS deployment), then after upgrade to DLCI 2.0.1, the firmware update schedule will not run. Configure
the firmware update schedule and run the schedule again.
In DLCI for Configuration Manager 1.3 or version 2.0, in the System Viewer utility, the cached network paths in the Export
Lifecycle Controller Logs, Firmware Update, and Platform Restore workflows saved after hostname is changed are not
retained after upgrading to DLCI 2.0.1.
Upgrading DLCI For Configuration Manager From Version 1.3 To Version 2.0.1
To upgrade DLCI for Configuration Manager from version 1.3 to version 2.0.1:
1. Run the Dell_Lifecycle_Controller_Integration_2.0.1.xxx.msi file from the folder where you have extracted it.
2. A dialog box displays the message that another version of DLCI for Configuration Manager is found; asking you if
you want to upgrade. Click Yes to continue.
The Welcome screen is displayed.
3. Click Next.
The license agreement is displayed.
19

4. Accept the license agreement and click Next.
The Custom Setup screen is displayed.
5. Select one or both the components. Follow the steps provided:
–Installing Both DLCU And DPS
–Installing DLCU Only
–Installing DPS Only
NOTE: You cannot abort the upgrade process by closing the installation wizard. If you close the installation wizard,
the following message is displayed: Are you sure you want to cancel Dell Lifecycle
Controller Integration installation? The upgrade process continues irrespective of the selection
you make on the message box.
Using The Modify Option In The Installer
The Modify option in the DLCI for Configuration Manager installer, modifies the program features that are installed. This
option enables you to perform the following actions:
•Installing A Feature That You Did Not Install Earlier
•Removing A Feature That You Had Installed Earlier
If you uninstall DLCU in the DLCI server using the Modify option, then uninstall DPS and install again.
Installing A Feature That You Did Not Install Earlier
To install a feature that you did not install earlier:
1. Run Dell_Lifecycle_Controller_Integration_2.0.1.xxx.msi from the folder where you have extracted it.
2. Click Next.
The installer displays three options.
3. Select the Modify option.
The Custom Setup screen is displayed.
4. In Custom Setup, select the feature that you did not install earlier.
5. Click Next.
6. In Ready to Modify the Program, click Install to begin installing the feature.
When the installation process completes, click Finish to exit the installer.
Removing A Feature That You Had Installed Earlier
To remove a feature that you had installed earlier:
1. Run Dell_Lifecycle_Controller_Integration_2.0.0.xxx.msi from the folder where you have extracted it.
2. Click Next.
The installer displays three options.
3. Select the Modify option.
The Custom Setup screen is displayed.
4. In Custom Setup, select the feature that you want to remove.
5. Click the feature and select the option This feature will not be available and click Next.
20

6. Click Install.
The installer removes the feature.
Uninstalling DLCI For Configuration Manager
To uninstall the DLCI for Configuration Manager:
For Microsoft Windows Server 2003
1. Click Start → Control Panel → Add or Remove Programs .
2. Select Dell Lifecycle Controller Integration 2.0.1 and click Remove.
3. Follow the instructions to complete the uninstallation.
Or, if you are uninstalling by using the package that you downloaded and if UAC is enabled, see Working With DLCI
On A User Account Control Enabled System, else double-click Dell_Lifecycle_Controller_Integration_2.0.1.xxx.msi,
select Remove, and follow the instructions on the screen.
For Microsoft Windows Server 2008
1. Click Start → Control Panel → Add or Remove Programs .
2. Select Dell Lifecycle Controller Utility 2.0.1 and click Uninstall.
3. Follow the instructions to complete the uninstallation.
Or, if you are uninstalling by using the package that you downloaded and if UAC is enabled, see, Working With
DLCI On A User Account Control Enabled System, else double-click
Dell_Lifecycle_Controller_Integration_2.0.1.xxx.msi, select Remove, and follow the instructions on the screen.
21
22

4
Troubleshooting
Errors During Dell Provisioning Service (DPS) Installation On
System
When installing DPS on a system other than the site server, if you specify incorrect system name or user credentials for
accessing the site server, the information is not authenticated by the installer, and the installation is completed.
However, when DPS is trying to access the site server, failure to access the site server occurs. When such failure
occurs; from the DPS installation directory location, in the file import.log, check the log information for this error
message:
ERROR2011-10-14 03:01:02 - SCCMProxy::Connect()-Failed to connect - Error The
RPC server is unavailable. (Exception from HRESULT: 0x800706BA)at
Microsoft.ConfigurationManagement.ManagementProvider.WqlQueryEngine.WqlConnectio
nManager.Connect(String configMgrServerPath)
If the error message is present, then install DPS again and provide the correct system name.
23
