Dell Data Protection Encryption Security Enterprise Basic Installation Guide V8.17.1 User Manual Deployment Guide9 En Us
User Manual: Dell dell-data-protection-encryption - Encryption Enterprise Basic Installation Guide v8.17.1
Open the PDF directly: View PDF ![]() .
.
Page Count: 70
- Dell Data Security Encryption Enterprise Basic Installation Guide v8.17.1
- Introduction
- Requirements
- Install Using the Master Installer
- Uninstall Using the Master Installer
- Uninstall Using the Child Installers
- Uninstall Using the Dell Data Security Uninstaller
- Download the Software
- Extract the Child Installers from the Master Installer
- Configure Key Server for Uninstallation of Encryption Client Activated Against Security Management Server
- Use the Administrative Download Utility (CMGAd)
- Troubleshooting
- Glossary

Dell Data Security
Encryption Enterprise Basic Installation Guide v8.17.1

Notes, cautions, and warnings
NOTE: A NOTE indicates important information that helps you make better use of your product.
CAUTION: A CAUTION indicates either potential damage to hardware or loss of data and tells you how to avoid the problem.
WARNING: A WARNING indicates a potential for property damage, personal injury, or death.
© 2018 Dell Inc. All rights reserved.Dell, EMC, and other trademarks are trademarks of Dell Inc. or its subsidiaries. Other trademarks may
be trademarks of their respective owners.
Registered trademarks and trademarks used in the Dell Encryption, Endpoint Security Suite Pro, Endpoint Security Suite Enterprise, and
Data Guardian suite of documents: DellTM and the Dell logo, Dell PrecisionTM, OptiPlexTM, ControlVaultTM, LatitudeTM, XPS®, and KACETM
are trademarks of Dell Inc. Cylance®, CylancePROTECT, and the Cylance logo are registered trademarks of Cylance, Inc. in the U.S. and
other countries. McAfee® and the McAfee logo are trademarks or registered trademarks of McAfee, Inc. in the US and other countries.
Intel®, Pentium®, Intel Core Inside Duo®, Itanium®, and Xeon® are registered trademarks of Intel Corporation in the U.S. and other
countries. Adobe®, Acrobat®, and Flash® are registered trademarks of Adobe Systems Incorporated. Authen Tec® and Eikon® are
registered trademarks of Authen Tec. AMD® is a registered trademark of Advanced Micro Devices, Inc. Microsoft®, Windows®, and
Windows Server®, Internet Explorer®, MS-DOS®, Windows Vista®, MSN®, ActiveX®, Active Directory®, Access®, ActiveSync®,
BitLocker®, BitLocker To Go®, Excel®, Hyper-V®, Silverlight®, Outlook®, PowerPoint®, OneDrive®, SQL Server®, and Visual C++® are
either trademarks or registered trademarks of Microsoft Corporation in the United States and/or other countries. VMware® is a registered
trademark or trademark of VMware, Inc. in the United States or other countries. Box® is a registered trademark of Box. DropboxSM is a
service mark of Dropbox, Inc. GoogleTM, AndroidTM, GoogleTM ChromeTM, GmailTM, YouTube®, and GoogleTM Play are either trademarks or
registered trademarks of Google Inc. in the United States and other countries. Apple®, Aperture®, App StoreSM, Apple Remote
DesktopTM, Apple TV®, Boot CampTM, FileVaultTM, iCloud®SM, iPad®, iPhone®, iPhoto®, iTunes Music Store®, Macintosh®, Safari®,
and Siri® are either servicemarks, trademarks, or registered trademarks of Apple, Inc. in the United States and/or other countries. GO ID®,
RSA®, and SecurID® are registered trademarks of Dell EMC. EnCaseTM and Guidance Software® are either trademarks or registered
trademarks of Guidance Software. Entrust® is a registered trademark of Entrust®, Inc. in the United States and other countries.
InstallShield® is a registered trademark of Flexera Software in the United States, China, European Community, Hong Kong, Japan, Taiwan,
and United Kingdom. Micron® and RealSSD® are registered trademarks of Micron Technology, Inc. in the United States and other
countries. Mozilla® Firefox® is a registered trademark of Mozilla Foundation in the United States and/or other countries. iOS® is a
trademark or registered trademark of Cisco Systems, Inc. in the United States and certain other countries and is used under license.
Oracle® and Java® are registered trademarks of Oracle and/or its aliates. Other names may be trademarks of their respective owners.
SAMSUNGTM is a trademark of SAMSUNG in the United States or other countries. Seagate® is a registered trademark of Seagate
Technology LLC in the United States and/or other countries. Travelstar® is a registered trademark of HGST, Inc. in the United States and
other countries. UNIX® is a registered trademark of The Open Group. VALIDITYTM is a trademark of Validity Sensors, Inc. in the United
States and other countries. VeriSign® and other related marks are the trademarks or registered trademarks of VeriSign, Inc. or its aliates
or subsidiaries in the U.S. and other countries and licensed to Symantec Corporation. KVM on IP® is a registered trademark of Video
Products. Yahoo!® is a registered trademark of Yahoo! Inc. This product uses parts of the 7-Zip program. The source code can be found at
7-zip.org. Licensing is under the GNU LGPL license + unRAR restrictions (7-zip.org/license.txt).
Encryption Enterprise Basic Installation Guide
2018 - 01
Rev. A01

Contents
1 Introduction....................................................................................................................................................5
Before You Begin................................................................................................................................................................5
Using This Guide................................................................................................................................................................ 6
Contact Dell ProSupport...................................................................................................................................................6
2 Requirements................................................................................................................................................ 8
All Clients.............................................................................................................................................................................8
All Clients - Prerequisites.............................................................................................................................................8
All Clients - Hardware.................................................................................................................................................. 9
All Clients - Localization...............................................................................................................................................9
Encryption Client................................................................................................................................................................9
Encryption Client Prerequisites.................................................................................................................................10
Encryption Client Operating Systems...................................................................................................................... 10
Encryption Client Operating Systems with Deferred Activation...........................................................................10
Encryption External Media Operating Systems...................................................................................................... 10
Full Disk Encryption...........................................................................................................................................................11
Full Disk Encryption Client Prerequisites..................................................................................................................12
Full Disk Encryption Client Hardware....................................................................................................................... 12
Full Disk Encryption Client Operating Systems.......................................................................................................12
SED Client..........................................................................................................................................................................12
SED Client Hardware..................................................................................................................................................13
SED Client International KeyboardsSED Client LocalizationSED Client Operating Systems.............................13
Advanced Authentication Client..................................................................................................................................... 14
Advanced Authentication Client Hardware............................................................................................................. 14
Advanced Authentication Client Operating Systems.............................................................................................15
BitLocker Manager Client................................................................................................................................................15
BitLocker Manager Client Hardware........................................................................................................................15
BitLocker Manager Client Operating Systems........................................................................................................16
3 Install Using the Master Installer...................................................................................................................17
Install Interactively Using the Master Installer...............................................................................................................17
Install by Command Line Using the Master Installer.................................................................................................... 21
4 Uninstall Using the Master Installer..............................................................................................................23
Uninstall the Master Installer.......................................................................................................................................... 23
Command Line Uninstallation................................................................................................................................... 23
5 Uninstall Using the Child Installers............................................................................................................... 24
Uninstall Encryption and Server Encryption Client......................................................................................................25
Process........................................................................................................................................................................25
Command Line Uninstallation................................................................................................................................... 25
Uninstall Encryption External Media........................................................................................................................ 27
Uninstall SED and Advanced Authentication Clients................................................................................................... 27
Dell Data Security Encryption Enterprise
Contents
3

Process........................................................................................................................................................................ 27
Deactivate the PBA....................................................................................................................................................27
Uninstall SED Client and Advanced Authentication Clients..................................................................................28
Uninstall BitLocker Manager Client................................................................................................................................28
Command Line Uninstallation................................................................................................................................... 28
6 Uninstall Using the Dell Data Security Uninstaller........................................................................................ 29
Uninstall ............................................................................................................................................................................29
7 Download the Software................................................................................................................................34
8 Extract the Child Installers from the Master Installer...................................................................................38
9 Congure Key Server for Uninstallation of Encryption Client Activated Against Security Management
Server.............................................................................................................................................................39
Services Panel - Add Domain Account User................................................................................................................ 39
Key Server Cong File - Add User for Security Management Server Communication.......................................... 40
Services Panel - Restart Key Server Service............................................................................................................... 40
Remote Management Console - Add Forensic Administrator.....................................................................................41
10 Use the Administrative Download Utility (CMGAd).................................................................................... 42
Use the Administrative Download Utility in Forensic Mode........................................................................................42
Use the Administrative Download Utility in Admin Mode............................................................................................44
11 Troubleshooting.......................................................................................................................................... 46
All Clients - Troubleshooting........................................................................................................................................... 46
All Clients - Protection Status........................................................................................................................................ 46
Encryption and Server Encryption Client Troubleshooting......................................................................................... 46
Upgrade to the Windows 10 Creators Update....................................................................................................... 46
Activation on a Server Operating System...............................................................................................................47
Encryption External Media and PCS Interactions..................................................................................................50
Use WSScan...............................................................................................................................................................50
Check Encryption Removal Agent Status...............................................................................................................53
Dell ControlVault Drivers................................................................................................................................................. 54
Update Dell ControlVault Drivers and Firmware.....................................................................................................54
12 Glossary..................................................................................................................................................... 69
4Dell Data Security Encryption Enterprise
Contents

Introduction
This guide details how to install and congure the application using the master installer. This guide gives basic installation assistance. See
the Advanced Installation Guide if you need information about installing the child installers, Security Management Server/Security
Management Server Virtual conguration, or information beyond basic assistance with the master installer.
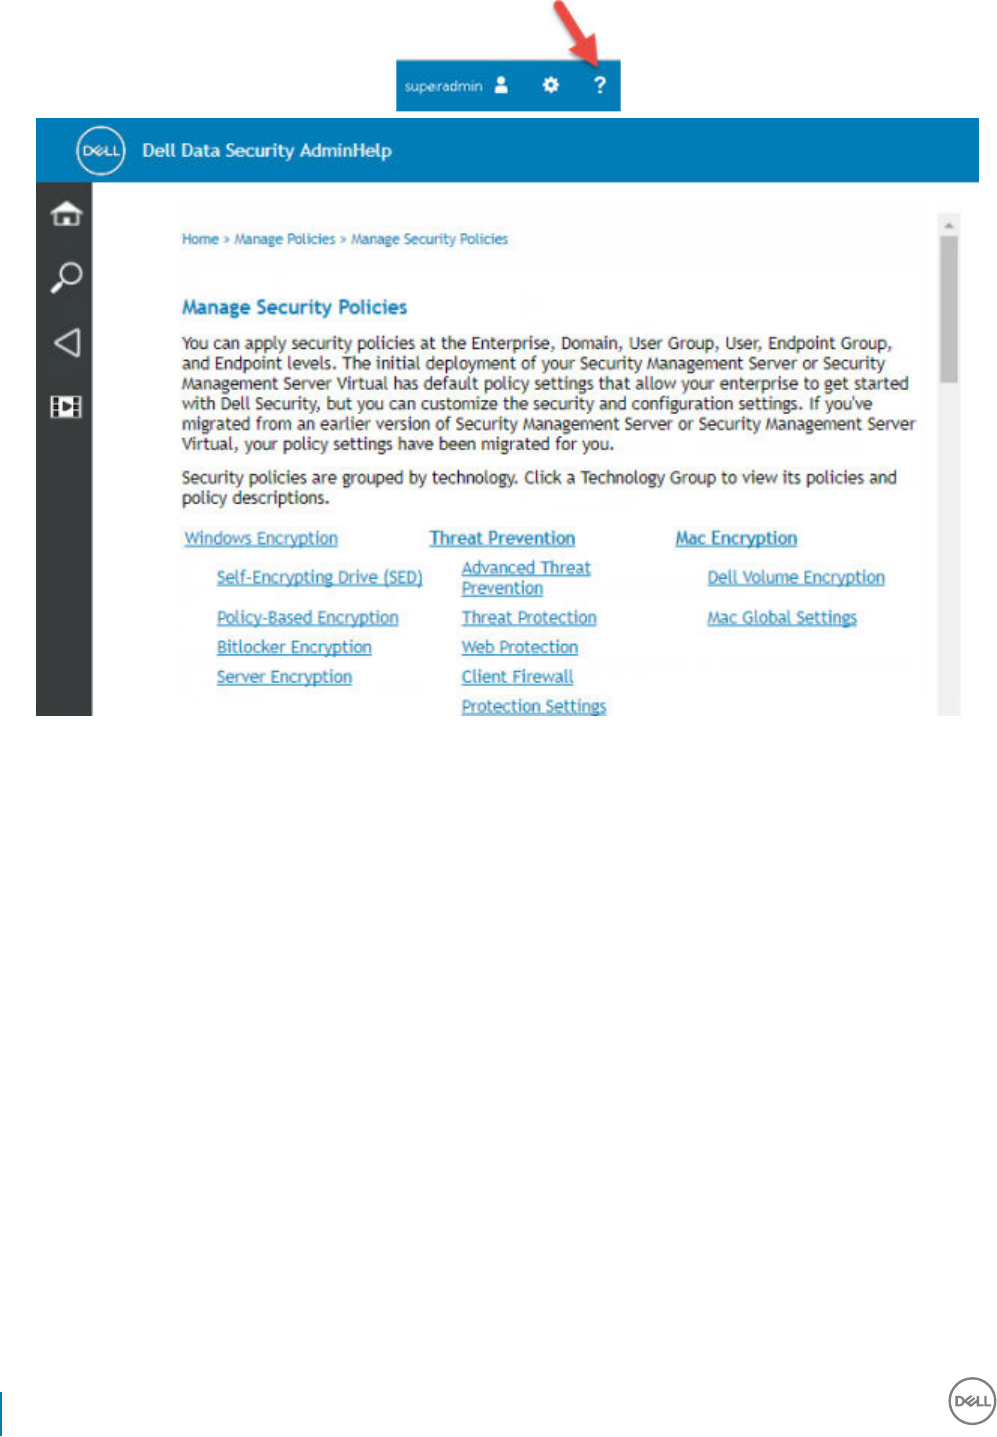
All policy information and their descriptions are found in the AdminHelp.
Before You Begin
1 Install the Security Management Server/Security Management Server Virtual before deploying clients. Locate the correct guide as
shown below, follow the instructions, and then return to this guide.
•Dell Security Management Server Installation and Migration Guide
•Dell Security Management Server Virtual Quick Start Guide and Installation Guide
Verify that polices are set as desired. Browse through the AdminHelp, available from the ? at the far right of the screen. The
AdminHelp is page-level help designed to help you set and modify policy and understand your options with your Security
Management Server/Security Management Server Virtual.
1
Dell Data Security Encryption Enterprise
Introduction
5
2 Thoroughly read the Requirements chapter of this document.
3 Deploy clients to end users.
Using This Guide
Use this guide in the following order.
• See Requirements for client prerequisites.
• Select one of the following:
•Install Interactively Using the Master Installer
or
•Install by Command Line Using the Master Installer
Contact Dell ProSupport
Call 877-459-7304, extension 4310039 for 24x7 phone support for your Dell product.
Additionally, online support for Dell products is available at dell.com/support. Online support includes drivers, manuals, technical advisories,
FAQs, and emerging issues.
Be sure to help us quickly connect you to the right technical expert by having your Service Tag or Express Service Code available when you
call.
6Dell Data Security Encryption Enterprise
Introduction

Requirements
All Clients
• IT best practices should be followed during deployment. This includes, but is not limited to, controlled test environments for initial tests,
and staggered deployments to users.
• The user account performing the installation/upgrade/uninstallation must be a local or domain administrator user, which can be
temporarily assigned by a deployment tool such as Microsoft SMS or Dell KACE. A non-administrator user that has elevated privileges is
not supported.
• Back up all important data before beginning installation/uninstallation.
• Do not make changes to the computer, including inserting or removing external (USB) drives during installation.
• Ensure that outbound port 443 is available to communicate with the Security Management Server/Security Management Server
Virtual if your master installer clients will be entitled using Dell Digital Delivery (DDD). The entitlement functionality will not work if port
443 is blocked (for any reason). DDD is not used if installing using the child installers.
• Be sure to periodically check www.dell.com/support for the most current documentation and Technical Advisories.
•NOTE: The Dell Data Security line of products does not support Windows Insider Preview releases.
All Clients - Prerequisites
• The master installer installs the following prerequisites if not already installed on the computer.
Prerequisite
• Visual C++ 2012 Update 4 or later Redistributable Package (x86 and x64)
• Visual C++ 2015 Update 3 or later Redistributable Package (x86 and x64)
Visual C++ 2015 requires Windows Update KB2999226 if installed on Windows 7.
Microsoft .Net Framework 4.5.2 (or later) is required for the master installer and child installer clients. The installer does not install the
Microsoft .Net Framework component.
To verify the version of Microsoft .Net installed, follow these instructions on the computer targeted for installation: http://
msdn.microsoft.com/en-us/library/hh925568(v=vs.110).aspx. To install Microsoft .Net Framework 4.5.2, go to https://
www.microsoft.com/en-us/download/details.aspx?id=42643.
• Drivers and rmware for ControlVault, ngerprint readers and smart cards (as shown below) are not included in the master installer or
child installer executable les. The drivers and rmware must be kept up-to-date, and can be downloaded from http://www.dell.com/
support and selecting your computer model. Download the appropriate drivers and rmware based on your authentication hardware.
• ControlVault
• NEXT Biometrics Fingerprint Driver
• Validity Fingerprint Reader 495 Driver
• O2Micro Smart Card Driver
If installing on non-Dell hardware, download updated drivers and rmware from that vendor's website. Installation instructions for
ControlVault drivers are provided in Update Dell ControlVault Drivers and Firmware.
2
8 Dell Data Security Encryption Enterprise
Requirements

All Clients - Hardware
• The following table details the minimum supported computer hardware.
Hardware
• Intel Pentium or AMD Processor
• 110 MB of available disk space
• 512MB RAM
NOTE: Additional free disk space is required to encrypt the les on the endpoint. This size varies based on policies and size of
drive.
All Clients - Localization
• The Encryption and BitLocker Manager clients are Multilingual User Interface (MUI) compliant and are localized in the following
languages. Full Disk Encryption is only supported with English operating systems.
Language Support
• EN - English • JA - Japanese
• ES - Spanish • KO - Korean
• FR - French • PT-BR - Portuguese, Brazilian
• IT - Italian • PT-PT - Portuguese, Portugal (Iberian)
• DE - German
Encryption Client
• The client computer must have network connectivity to activate.
• Turn o sleep mode during the initial encryption sweep to prevent an unattended computer from going to sleep. Encryption cannot
occur on a sleeping computer (nor can decryption).
• The Encryption client does not support dual boot congurations since it is possible to encrypt system les of the other operating
system, which would interfere with its operation.
• The Encryption client has been tested and is compatible with McAfee, the Symantec client, Kaspersky, and MalwareBytes. Hard-coded
exclusions are in place in for these anti-virus providers to prevent incompatibilities between anti-virus scanning and encryption. The
Encryption client has also been tested with the Microsoft Enhanced Mitigation Experience Toolkit.
If your organization uses an anti-virus provider that is not listed, see http://www.dell.com/support/article/us/en/19/SLN288353/ or
Contact Dell ProSupport for help.
• Operating system re-install is not supported. To re-install the operating system, perform a backup of the target computer, wipe the
computer, install the operating system, then recover the encrypted data following established recovery procedures.
Dell Data Security Encryption Enterprise
Requirements
9

Encryption Client Prerequisites
Encryption Client Operating Systems
• The following table details supported operating systems.
Windows Operating Systems (32- and 64-bit)
• Windows 7 SP0-SP1: Enterprise, Professional, Ultimate
• Windows Embedded Standard 7 with Application Compatibility template (hardware encryption is not supported)
• Windows 8: Enterprise, Pro
• Windows 8.1 Update 0-1: Enterprise Edition, Pro Edition
• Windows Embedded 8.1 Industry Enterprise (hardware encryption is not supported)
• Windows 10: Home, Education, Enterprise, Pro Version 1607 (Anniversary Update/Redstone 1) through Version 1709 (Fall Creators
Update/Redstone 3)
• VMware Workstation 5.5 and higher
NOTE:
When using UEFI mode, the Secure Hibernation policy is not supported.
Encryption Client Operating Systems with Deferred Activation
• Deferred activation allows the Active Directory user account used during activation to be independent of the account used to login to
the endpoint. Instead of the network provider capturing the authentication information, the user instead manually species the Active
Directory-based account when prompted. Once the credentials are entered, the authentication information is securely sent to the Dell
Server which validates it against the congured Active Directory domains. For more information, see http://www.dell.com/support/
article/us/en/19/sln306341.
• The following table details supported operating systems with deferred activation.
Windows Operating Systems (32- and 64-bit)
• Windows 7 SP0-SP1: Home Basic, Home Premium, Enterprise, Professional, Ultimate
• Windows Embedded Standard 7 with Application Compatibility template (hardware encryption is not supported)
• Windows 8: Home Basic, Home Premium, Enterprise, Pro
• Windows 8.1 Update 0-1: Enterprise Edition, Pro Edition
• Windows Embedded 8.1 Industry Enterprise (hardware encryption is not supported)
• Windows 10: Home, Education, Enterprise, Pro Version 1607 (Anniversary Update/Redstone 1) through Version 1709 (Fall Creators
Update/Redstone 3)
• VMware Workstation 5.5 and higher
Encryption External Media Operating Systems
• The following table details the operating systems supported when accessing media protected by Encryption External Media.
NOTE:
External media must have approximately 55MB available plus open space on the media that is equal to the largest le to be
encrypted to host Encryption External Media.
10 Dell Data Security Encryption Enterprise
Requirements

Windows Operating Systems Supported to Access Encryption External Media-Protected Media (32- and 64-bit)
• Windows 7 SP0-SP1: Home Basic, Home Premium, Enterprise, Professional, Ultimate
• Windows Embedded Standard 7 with Application Compatibility template (hardware encryption is not supported)
• Windows 8: Home Basic, Home Premium, Enterprise, Pro
• Windows 8.1 Update 0-1: Enterprise Edition, Pro Edition
• Windows Embedded 8.1 Industry Enterprise (hardware encryption is not supported)
• Windows 10: Home, Education, Enterprise, Pro Version 1607 (Anniversary Update/Redstone 1) through Version 1709 (Fall Creators
Update/Redstone 3)
Mac Operating Systems Supported to Access Encryption External Media-Protected Media (64-bit kernels)
• Mac OS X El Capitan 10.11.6
• macOS Sierra 10.12.6
• macOS High Sierra 10.13.2 - 10.13.3
Full Disk Encryption
Full Disk Encryption can only be installed through command line interface (CLI). Should you wish to install Full Disk Encryption, download
the Encryption Enterprise Advanced Install Guide for instructions.
• Full Disk Encryption requires activation against a Dell Server running v9.8.2 or later.
• Full Disk Encryption requires UEFI boot mode.
• The client computer must have network connectivity or access code to activate.
• A wired connection is required for the PBA to communicate with the Dell Server.
• A SED can not be present on the target computer.
• Full Disk Encryption is not supported with the Encryption client in this release. Do not install Full Disk Encryption on a computer on
which the Encryption client is installed.
• Full Disk Encryption is not supported with BitLocker or BitLocker Manager. Do not install Full Disk Encryption on a computer on which
BitLocker or BitLocker Manager is installed.
• Any NVMe drive that is being leveraged for PBA – The BIOS’ SATA operation must be set to RAID ON, as Dell’s PBA management does
not support AHCI on NVMe drives.
• Any NVMe drive that is being leveraged for PBA – The BIOS's boot mode must be UEFI and Legacy option ROMs must be disabled.
• Any non-NVMe drive that is being leveraged for PBA – The BIOS’ SATA operation must be set to AHCI, as Dell’s PBA management
does not support RAID with non-NVMe drives.
• RAID ON is not supported because access to read and write RAID-related data (at a sector that is not available on a locked non-
NVMe drive) is not accessible at start-up, and cannot wait to read this data until after the user is logged on.
• The operating system will crash when switched from RAID ON > AHCI if the AHCI controller drivers are not pre-installed. For
instructions on how to switch from RAID > AHCI (or vice versa), see http://www.dell.com/support/article/us/en/19/SLN306460.
Dell recommends Intel Rapid Storage Technology Driver version 15.2.0.0 or later, with NVMe drives.
• Turn o sleep mode during the initial encryption sweep to prevent an unattended computer from going to sleep. Encryption cannot
occur on a sleeping computer (nor can decryption).
• The Full Disk Encryption client does not support dual boot congurations since it is possible to encrypt system les of the other
operating system, which would interfere with its operation.
• Operating system re-install is not supported. To re-install the operating system, perform a backup of the target computer, wipe the
computer, install the operating system, then recover the encrypted data following established recovery procedures.
• In-place operating system upgrade is not supported with Full Disk Encryption installed. Uninstall and decrypt the Full Disk Encryption
client, upgrade to the new operating system, and then re-install the Full Disk Encryption client.
NOTE: Full Disk Encryption must be congured with Encryption Algorithms set to AES 256 and Encryption Mode set to CBC.
Dell Data Security Encryption Enterprise
Requirements
11

Full Disk Encryption Client Prerequisites
• Microsoft .Net Framework 4.5.2 (or later) is required for the master installer and child installer clients. The installer does not install the
Microsoft .Net Framework component.
To verify the version of Microsoft .Net installed, follow these instructions on the computer targeted for installation: http://
msdn.microsoft.com/en-us/library/hh925568(v=vs.110).aspx. To install Microsoft .Net Framework 4.5.2, go to https://
www.microsoft.com/en-us/download/details.aspx?id=42643.
Full Disk Encryption Client Hardware
• The following table details supported hardware.
Optional Embedded Hardware
• TPM 1.2 or 2.0
Full Disk Encryption Client Operating Systems
• The following table details supported operating systems.
Windows Operating Systems (64-bit)
• Windows 10: Education, Enterprise, Pro Version 1607 (Anniversary Update/Redstone 1) through Version 1709 (Fall Creators
Update/Redstone 3)
SED Client
• The computer must have a wired network connection to successfully install SED management.
• IPv6 is not supported.
• Be prepared to shut down and restart the computer after you apply policies and are ready to begin enforcing them.
• Computers equipped with self-encrypting drives cannot be used with HCA cards. Incompatibilities exist that prevent the provisioning of
the HCA. Dell does not sell computers with self-encrypting drives that support the HCA module. This unsupported conguration would
be an after-market conguration.
• If the computer targeted for encryption is equipped with a self-encrypting drive, ensure that the Active Directory option, User Must
Change Password at Next Logon, is disabled. Preboot Authentication does not support this Active Directory option.
• Dell recommends that you do not change the authentication method after the PBA has been activated. If you must switch to a dierent
authentication method, you must either:
• Remove all the users from the PBA.
or
• Deactivate the PBA, change the authentication method, and then re-activate the PBA.
IMPORTANT:
Due to the nature of RAID and SEDs, SED management does not support RAID. The issue with RAID=On with SEDs is that RAID
requires access to the disk to read and write RAID-related data at a high sector not available on a locked SED from start and cannot
wait to read this data until after the user is logged on. Change the SATA operation in the BIOS from RAID=On to AHCI to resolve
the issue. If the operating system does not have the AHCI controller drivers pre-installed, the operating system will blue screen
when switched from RAID=On to AHCI.
12 Dell Data Security Encryption Enterprise
Requirements

•Conguration of self-encrypting drives for Dell’s SED management dier between NVMe and non-NVMe (SATA) drives, as follows.
• Any NVMe drive that is being leveraged as an SED – The BIOS’ SATA operation must be set to RAID ON, as Dell’s SED
management does not support AHCI on NVMe drives.
• Any NVMe drive that is being leveraged as an SED – The BIOS's boot mode must be UEFI and Legacy option ROMs must be
disabled.
• Any non-NVMe drive that is being leveraged as an SED – The BIOS’ SATA operation must be set to AHCI, as Dell’s SED
management does not support RAID with non-NVMe drives.
• RAID ON is not supported because access to read and write RAID-related data (at a sector that is not available on a locked non-
NVMe drive) is not accessible at start-up, and cannot wait to read this data until after the user is logged on.
• The operating system will crash when switched from RAID ON > AHCI if the AHCI controller drivers are not pre-installed. For
instructions on how to switch from RAID > AHCI (or vice versa), see http://www.dell.com/support/article/us/en/19/
SLN306460.
Supported OPAL compliant SEDs require updated Intel Rapid Storage Technology Drivers, located at http://www.dell.com/support/
home/us/en/04/product-support/product/dell-data-protection-encryption/drivers. Dell recommends Intel Rapid Storage Technology
Driver version 15.2.0.0 or later, with NVMe drives.
• SED Management is not supported with Server Encryption.
SED Client Hardware
SED Client International Keyboards
• The following table lists international keyboards supported with Preboot Authentication on UEFI and non-UEFI computers.
International Keyboard Support - UEFI
• DE-CH - Swiss German
• DE-FR - Swiss French
International Keyboard Support - Non-UEFI
• AR - Arabic (using Latin letters)
• DE-CH - Swiss German
• DE-FR - Swiss French
SED Client Localization
The SED and Advanced Authentication clients are Multilingual User Interface (MUI) compliant and are localized the following languages.
UEFI Mode and Preboot Authentication are supported in the following languages except Russian, Traditional Chinese, or Simplied Chinese.
Language Support
• EN - English • KO - Korean
• FR - French • ZH-CN - Chinese, Simplied
• IT - Italian • ZH-TW - Chinese, Traditional/Taiwan
Dell Data Security Encryption Enterprise
Requirements
13

Language Support
• DE - German • PT-BR - Portuguese, Brazilian
• ES - Spanish • PT-PT - Portuguese, Portugal (Iberian)
• JA - Japanese • RU - Russian
SED Client Operating Systems
• The following table details the supported operating systems.
Windows Operating Systems (32- and 64-bit)
• Windows 7 SP0-SP1: Enterprise, Professional (supported with Legacy Boot mode but not UEFI)
NOTE:
Legacy Boot mode is supported on Windows 7. UEFI is not supported on Windows 7.
NVMe self-encrypting drives are not supported with Windows 7.
• Windows 8: Enterprise, Pro,
• Windows 8.1: Enterprise Edition, Pro Edition
• Windows 10: Home, Education, Enterprise, Pro Version 1607 (Anniversary Update/Redstone 1) through Version 1709 (Fall Creators
Update/Redstone 3)
Advanced Authentication Client
• Advanced Authentication features are available only when Preboot Authentication is enabled. When using Advanced Authentication,
users will be securing access to the computer using advanced authentication credentials that are managed and enrolled using
Advanced Authentication. Advanced Authentication will be the primary manager of the authentication credentials for Windows Sign-in,
including Windows password, ngerprint, and smart cards. Picture password, PIN, and ngerprint credentials enrolled using the
Microsoft Operating System will not be recognized at Windows Sign-in.
To continue using the Microsoft Operating System to manage user credentials, do not install Advanced Authentication or uninstall it.
• An SED does not require a TPM to provide Advanced Authentication or encryption.
NOTE: PBA authentication methods cannot be changed between Password and SmartCard when the user account exists
within the PBA.
Advanced Authentication Client Hardware
• The following table details supported authentication hardware.
Fingerprint and Smart Card Readers
• Validity VFS495 in Secure Mode
• ControlVault Swipe Reader
• UPEK TCS1 FIPS 201 Secure Reader 1.6.3.379
• Authentec Eikon and Eikon To Go USB Readers
14 Dell Data Security Encryption Enterprise
Requirements

Contactless Cards
• Contactless Cards using Contactless Card Readers built-in to specied Dell laptops
Smart Cards
• PKCS #11 Smart Cards using the ActivIdentity client
NOTE:
The ActivIdentity client is not pre-loaded and must be installed separately.
• CSP Cards
• Common Access Cards (CACs)
• Class B/SIPR Net Cards
Advanced Authentication Client Operating Systems
Windows Operating Systems
• The following table details supported operating systems.
Windows Operating Systems (32- and 64-bit)
• Windows 7 SP0-SP1: Enterprise, Professional, Ultimate
• Windows 8: Enterprise, Pro
• Windows 8.1 Update 0-1: Enterprise Edition, Pro Edition
• Windows 10: Home, Education, Enterprise, Pro Version 1607 (Anniversary Update/Redstone 1) through Version 1709 (Fall Creators
Update/Redstone 3)
NOTE: UEFI mode is not supported on Windows 7.
BitLocker Manager Client
• Consider reviewing Microsoft BitLocker requirements if BitLocker is not yet deployed in your environment,
• Ensure that the PBA partition is already set up. If BitLocker Manager is installed before the PBA partition is set up, BitLocker cannot be
enabled and BitLocker Manager will not be operational.
• A Security Management Server/Security Management Server Virtual is required to use BitLocker Manager.
• Ensure a signing certicate is available within the database. For more information, see http://www.dell.com/support/article/us/en/19/
sln307028.
• The keyboard, mouse, and video components must be directly connected to the computer. Do not use a KVM switch to manage
peripherals as the KVM switch can interfere with the computer's ability to properly identify hardware.
• Turn on and enable the TPM. BitLocker Manager will take ownership of the TPM and will not require a reboot. However, if a TPM
ownership already exists, BitLocker Manager will begin the encryption setup process (no restart is required). The point is that the TPM
must be "owned" and enabled.
• BitLocker Manager is not supported with Server Encryption.
BitLocker Manager Client Hardware
• The following table details supported hardware.
Optional Embedded Hardware
• TPM 1.2 or 2.0
Dell Data Security Encryption Enterprise
Requirements
15

BitLocker Manager Client Operating Systems
• The following table details supported operating systems.
Windows Operating Systems
• Windows 7 SP0-SP1: Enterprise, Ultimate (32- and 64-bit)
• Windows 8: Enterprise (64-bit)
• Windows 8.1: Enterprise Edition, Pro Edition (64-bit)
• Windows 10: Home, Education, Enterprise, Pro Version 1607 (Anniversary Update/Redstone 1) through Version 1709 (Fall Creators
Update/Redstone 3)
• Windows Server 2008 R2: Standard Edition, Enterprise Edition (64-bit)
• Windows Server 2012 R2: Standard Edition, Enterprise Edition (64-bit)
• Windows Server 2016
Windows updates KB3133977 and KB3125574 must not be installed if installing BitLocker Manager on Windows 7.
16 Dell Data Security Encryption Enterprise
Requirements

Install Using the Master Installer
• Command line switches and parameters are case-sensitive.
• To install using non-default ports, use the child installers instead of the master installer.
• Master installer log les are located at C:\ProgramData\Dell\Dell Data Protection\Installer.
• Instruct users to see the following document and help les for application assistance:
• See the Dell Encrypt Help to learn how to use the feature of the Encryption client. Access the help from <Install dir>:\Program Files
\Dell\Dell Data Protection\Encryption\Help.
• See the Encryption External Media Help to learn how the features of Encryption External Media. Access the help from <Install dir>:
\Program Files\Dell\Dell Data Protection\Encryption\EMS.
• See the Encryption Enterprise Help to learn how to use the features of Advanced Authentication. Access the help from <Install dir>:
\Program Files\Dell\Dell Data Protection\Client Security Framework\Help.
• Users should update their policies by right-clicking the Dell Encryption icon in the system tray and selecting Check for Policy Updates
after installation completes.
• The master installer installs the entire suite of products. There are two methods to install using the master installer. Choose one of the
following.
•Install Interactively Using the Master Installer
or
•Install by Command Line Using the Master Installer
Install Interactively Using the Master Installer
• The master installer can be located at:
•From support.dell.com - If needed, Obtain the Software from support.dell.com and then Extract the Child Installers from the
Master Installer.
•From Your Dell FTP Account - Locate the installation bundle at Dell-Encryption-8.x.x.xxx.zip
• Use these instructions to install Dell Encryption Enterprise interactively using the master installer. This method can be used to install the
suite of products on one computer at a time.
1 Locate DDSSetup.exe in the Dell installation media. Copy it to the local computer.
2 Double-click to launch the installer. This may take several minutes.
3 Click Next in the Welcome dialog.
4 Read the license agreement, accept the terms, and click Next.
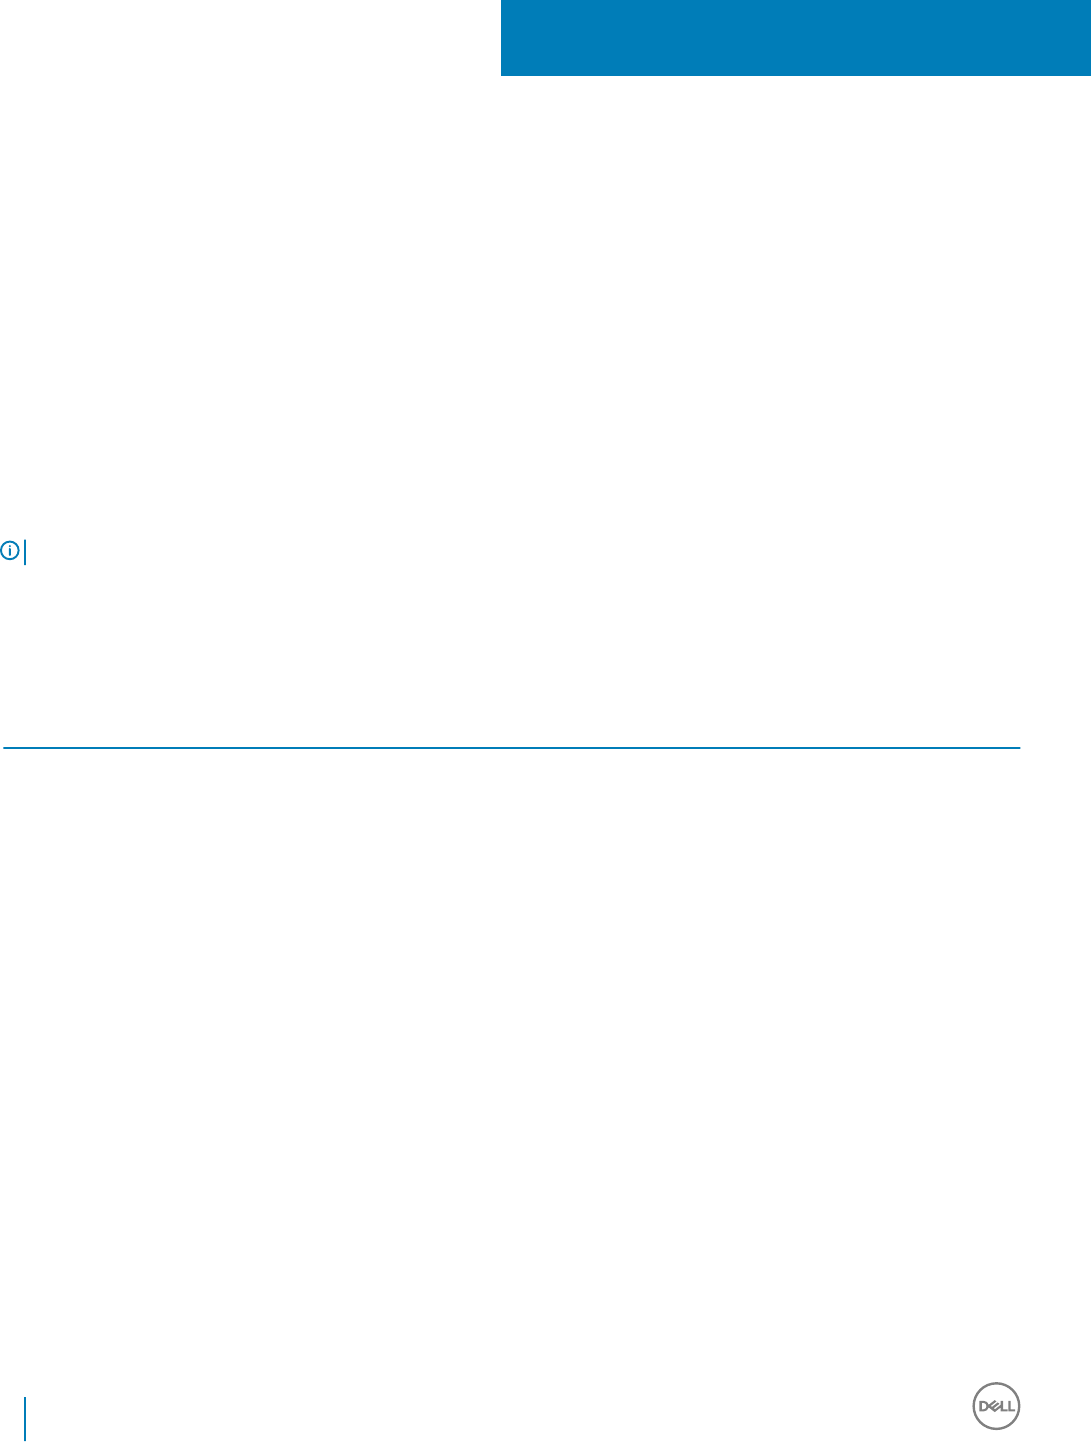
5 Select Encryption Enterprise and click Next.
Select the Encryption External Media only check box if you intend to install Encryption External Media only
3
Dell Data Security Encryption Enterprise
Install Using the Master Installer
17
6 In the Enterprise Server Name eld, enter the fully qualied host name of the Security Management Server/Security Management
Server Virtual that will manage the target user, such as server.organization.com.
In the Device Server URL eld, enter the URL of the Device Server (Security Server) with which the client will communicate.
If your Security Management Server is pre-v7.7, the format is https://server.organization.com:8081/xapi.
If your Security Management Server is v7.7 or later, the format is https://server.organization.com:8443/xapi/ (including trailing
forward slash).
Click Next.
18 Dell Data Security Encryption Enterprise
Install Using the Master Installer

7 Click Next to install the product in the default location of C:\Program Files\Dell\Dell Data Protection\. Dell recommends installing in
the default location only, as problems may arise when installing in other locations.
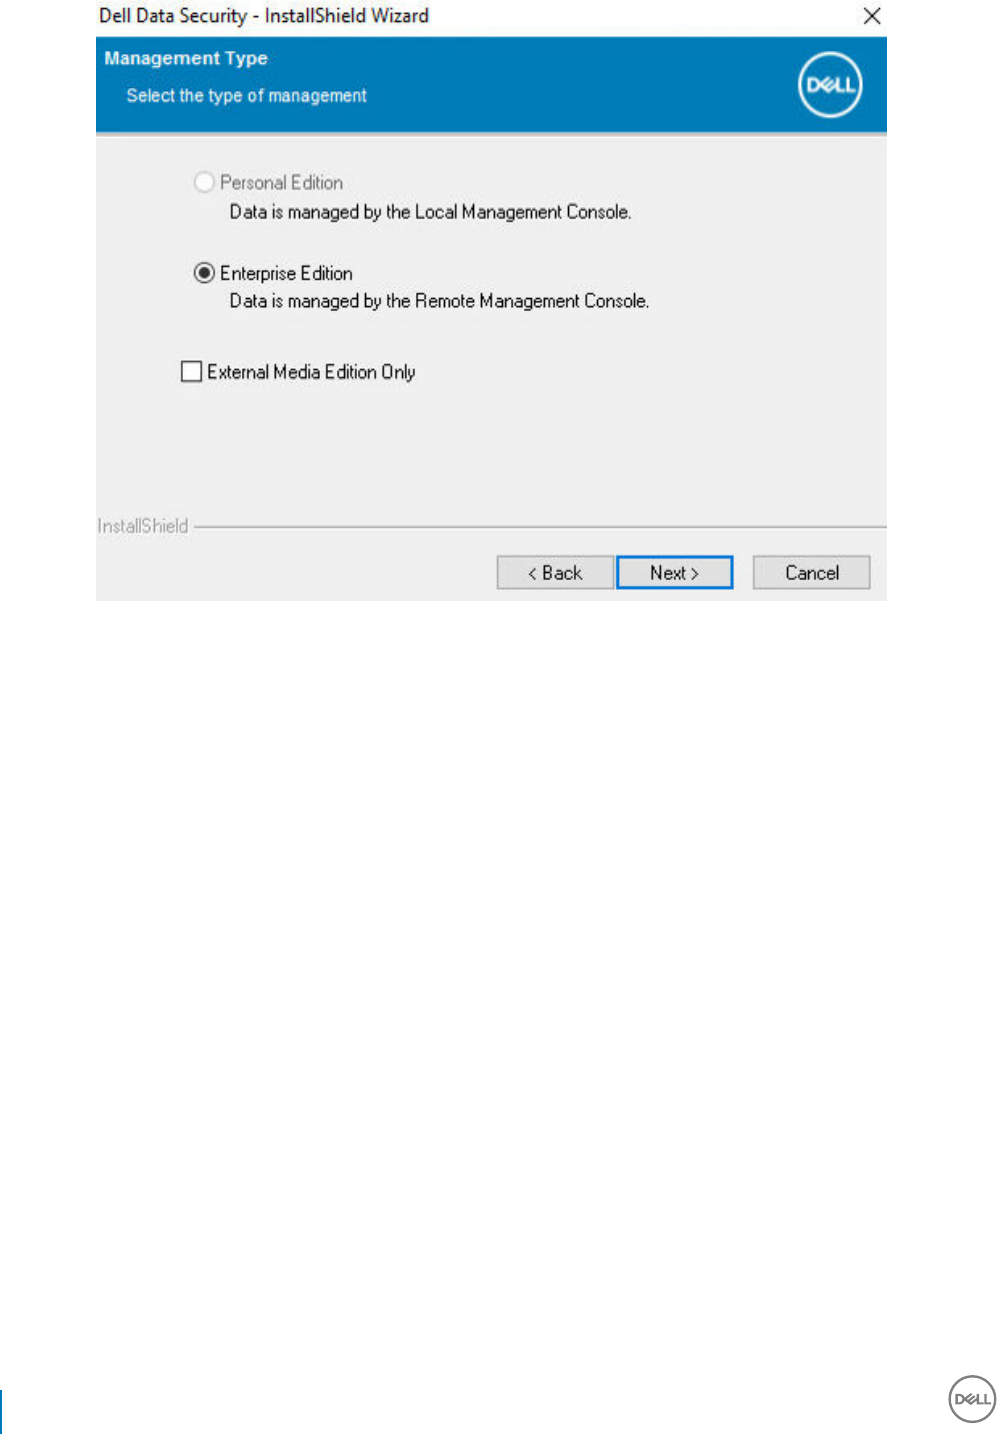
8 Select the components to be installed.
Security Framework installs the underlying security framework and Advanced Authentication, the advanced authentication client that
manages multiple authentication methods, including PBA and credentials such as ngerprints and passwords.
Advanced Authentication installs the les and services required for Advanced Authentication. .
Encryption installs the Encryption client, the component that enforces security policy, whether a computer is connected to the
network, disconnected from the network, lost, or stolen.
BitLocker Manager installs the BitLocker Manager client, designed to enhance the security of BitLocker deployments by simplifying
and reducing the cost of ownership through centralized management of BitLocker encryption policies.
Click Next when your selections are complete.
Dell Data Security Encryption Enterprise
Install Using the Master Installer
19
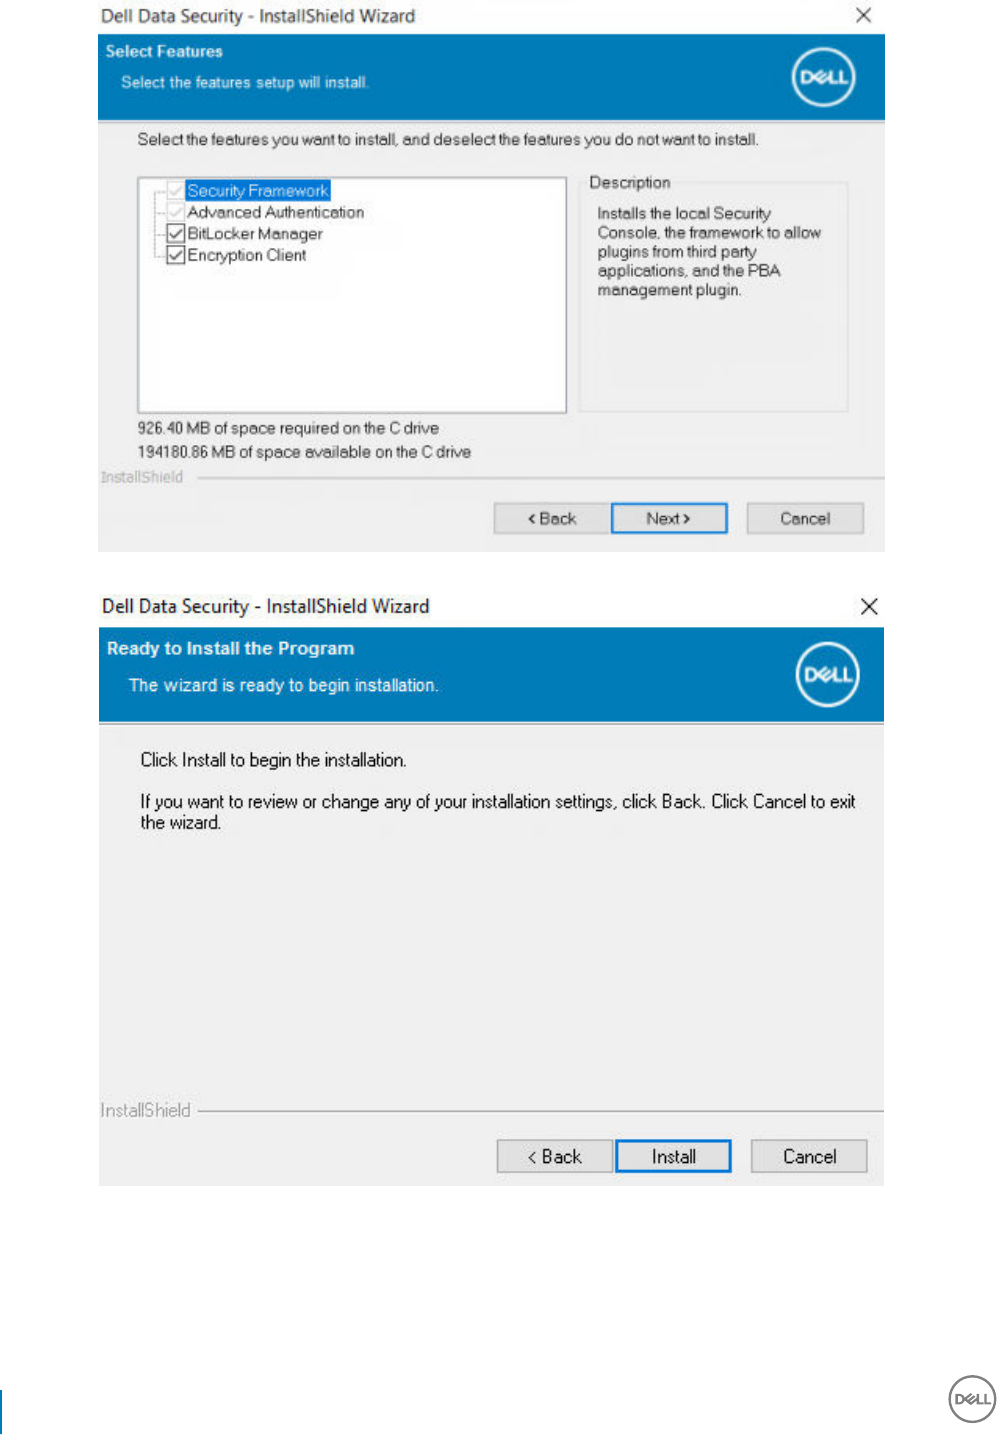
9 Click Install to begin the installation. Installation will take several minutes.
10 Select Yes, I want to restart my computer now and click Finish.
20 Dell Data Security Encryption Enterprise
Install Using the Master Installer
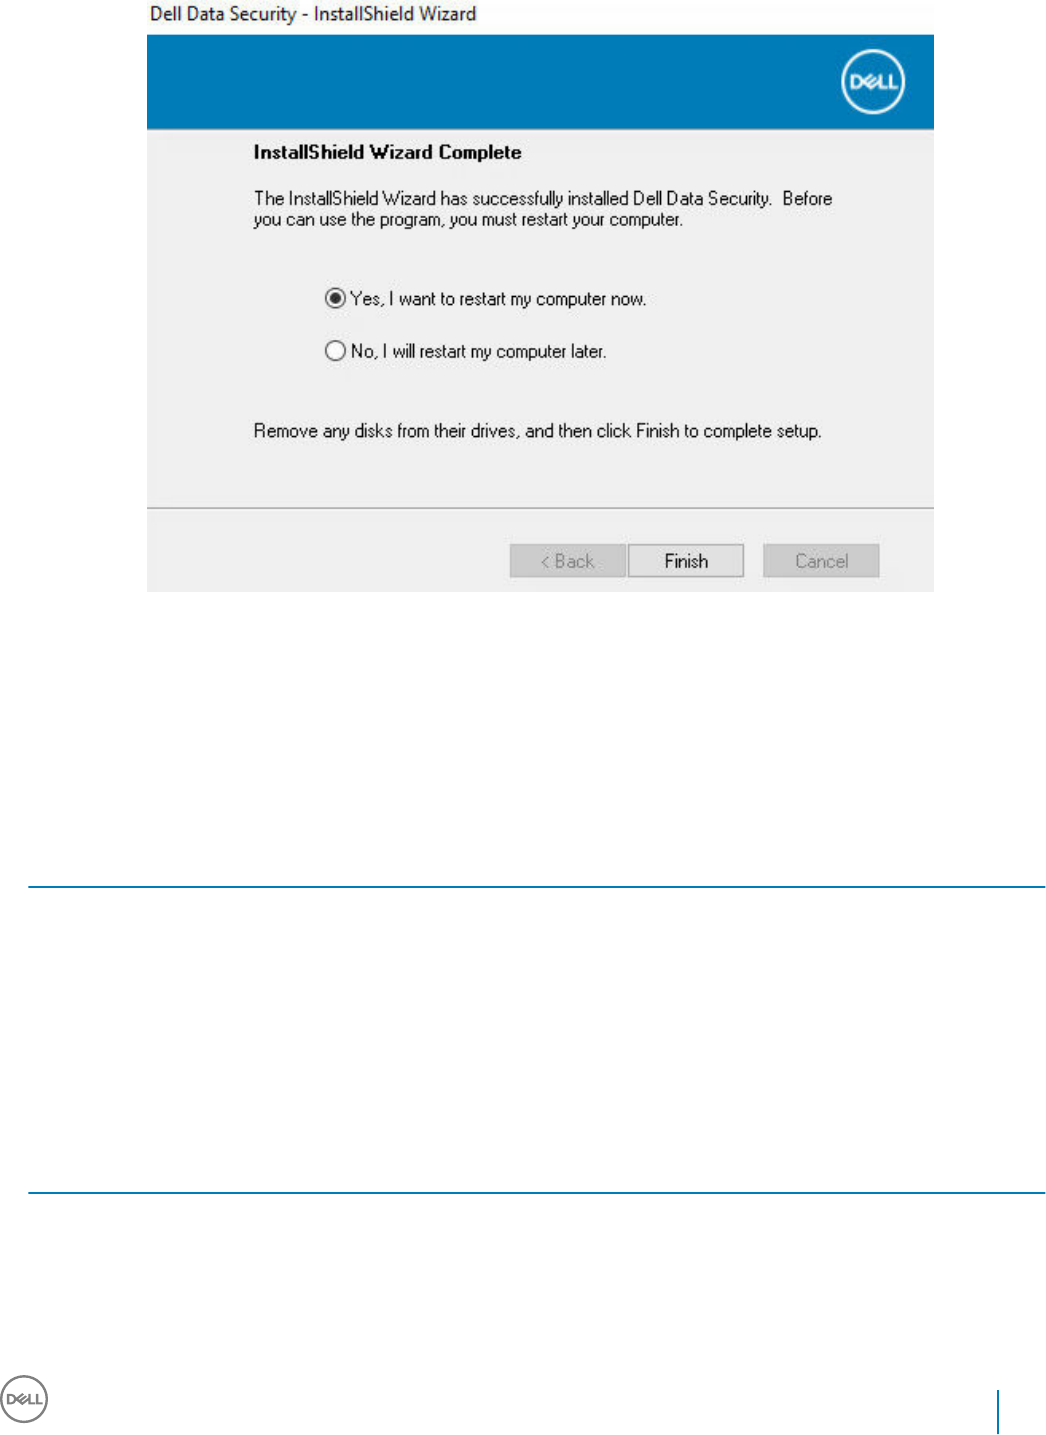
Installation is complete.
Install by Command Line Using the Master Installer
• The switches must be specied rst in a command line installation. Other parameters go inside an argument that is passed to the /v
switch.
Switches
• The following table describes the switches that can be used with the master installer.
Switch Description
-y -gm2 Pre-extraction of master installer. The -y and -gm2 switches must be used together.
Do not separate the switches.
/S Silent installation
/z Pass variables to the .msi inside the DDSSetup.exe
Parameters
• The following table describes the parameters that can be used with the master installer.
Parameter Description
SUPPRESSREBOOT Suppresses the automatic reboot after the installation completes. Can be used in SILENT mode.
SERVER Species the URL of the Security Management Server/Security Management Server Virtual.
InstallPath Species the path for the installation. Can be used in SILENT mode.
Dell Data Security Encryption Enterprise
Install Using the Master Installer
21

Parameter Description
FEATURES Species the components that can be installed in SILENT mode.
DE = Drive Encryption (Encryption client)
EME = Encryption External Media only
BLM = BitLocker Manager
SED = SED Management (EMAgent/Manager, PBA/GPE Drivers)
BLM_ONLY=1 Must be used when using FEATURES=BLM in the command line to exclude the SED Management plugin.
Example Command Line
• Command line parameters are case-sensitive.
• This example installs all components using the master installer on standard ports, silently, in the default location of C:\Program Files\Dell
\Dell Data Protection\, and congures it to use the specied Security Management Server/Security Management Server Virtual.
"DDSSetup.exe" -y -gm2 /S /z"\"SERVER=server.organization.com\""
• This example installs SED Management and Encryption External Media with the master installer, on standard ports, silently, with a
suppressed reboot, in the default location of C:\Program Files\Dell\Dell Data Protection\, and congures it to use the specied Security
Management Server/Security Management Server Virtual.
"DDSSetup.exe" -y -gm2 /S /z"\"SERVER=server.organization.com, FEATURES=EME-SED,
SUPPRESSREBOOT=1\""
• This example installs SED Management with the master installer, on standard ports, silently, with a suppressed reboot, in the default
location of C:\Program Files\Dell\Dell Data Protection\, and congures it to use the specied Security Management Server/Security
Management Server Virtual.
"DDSSetup.exe" -y -gm2 /S /z"\"SERVER=server.organization.com, FEATURES=SED,
SUPPRESSREBOOT=1\""
• This example installs SED Management with the master installer, on standard ports, silently, in the default location of C:\Program Files
\Dell\Dell Data Protection\, and congures it to use the specied Security Management Server/Security Management Server Virtual.
"DDSSetup.exe" -y -gm2 /S /z"\"SERVER=server.organization.com, FEATURES=SED\""
• This example installs the Encryption client and BitLocker Manager (without the SED Management plugin), with the master installer, on
standard ports, silently, in the default location of C:\Program Files\Dell\Dell Data Protection\, and congures it to use the specied
Security Management Server/Security Management Server Virtual.
"DDSSetup.exe" -y -gm2 /S /z"\"SERVER=server.organization.com, FEATURES=DE-BLM, BLM_ONLY=1\""
• This example installs BitLocker Manager (with the SED Management plugin) and Encryption External Media, with the master installer,
on standard ports, silently, with a suppressed reboot, in the default location of C:\Program Files\Dell\Dell Data Protection\, and
congures it to use the specied Security Management Server/Security Management Server Virtual.
"DDSSetup.exe" -y -gm2 /S /z"\"SERVER=server.organization.com, FEATURES=BLM-EME,
SUPPRESSREBOOT=1\""
• This example installs BitLocker Manager (without the SED Management plugin) and Encryption External Media, with the master
installer, on standard ports, silently, with a suppressed reboot, in the default location of C:\Program Files\Dell\Dell Data Protection\, and
congures it to use the specied Security Management Server/Security Management Server Virtual.
"DDSSetup.exe" -y -gm2 /S /z"\"SERVER=server.organization.com, FEATURES=BLM-EME, BLM_ONLY=1,
SUPPRESSREBOOT=1\""
22 Dell Data Security Encryption Enterprise
Install Using the Master Installer

Uninstall Using the Master Installer
• Each component must be uninstalled separately, followed by uninstallation of the master installer. The clients must be uninstalled in a
specic order to prevent uninstallation failures.
• Follow the instructions in Extract the Child Installers from the Master Installer to obtain child installers.
• Ensure that the same version of master installer (and thereby clients) is used for uninstallation as installation.
• This chapter refers you to other chapters that contain detailed instructions of how to uninstall the child installers. This chapter explains
the last step only, uninstalling the master installer.
• Uninstall the clients in the following order.
aUninstall Encryption Client.
bUninstall SED and Advanced Authentication Clients.
cUninstall BitLocker Manager Client.
• Proceed to Uninstall the Master Installer.
Uninstall the Master Installer
Now that all of the individual clients have been uninstalled, the master installer can be uninstalled.
Command Line Uninstallation
• The following example silently uninstalls the master installer.
"DDSSetup.exe" -y -gm2 /S /x
Reboot the computer when nished.
4
Dell Data Security Encryption Enterprise
Uninstall Using the Master Installer
23

Uninstall Using the Child Installers
• To uninstall each client individually, the child executable les must rst be extracted from the master installer, as shown in Extract the
Child Installers from the Master Installer Alternatively, run an administrative installation to extract the .msi.
• Ensure that the same versions of client are used for uninstallation as installation.
• Command line switches and parameters are case-sensitive.
• Be sure to enclose a value that contains one or more special characters, such as a blank space in the command line, in escaped
quotation marks. Command line parameters are case-sensitive.
• Use these installers to uninstall the clients using a scripted installation, batch les, or any other push technology available to your
organization.
• Log les - Windows creates unique child installer uninstallation log les for the logged in user at %temp%, located at C:\Users
\<UserName>\AppData\Local\Temp.
If you decide to add separate a log le when you run the installer, ensure that the log le has a unique name, as child installer log les do
not append. The standard .msi command can be used be create a log le by using /l C:\<any directory>\<any log le name>.log. Dell
does not recommend using "/l*v" (verbose logging) in a command line uninstallation, as the username/password is recorded in the log
le.
• All child installers use the same basic .msi switches and display options, except where noted, for command line uninstallations. The
switches must be specied rst. The /v switch is required and takes an argument. Other parameters go inside an argument that is
passed to the /v switch.
Display options can be specied at the end of the argument passed to the /v switch to achieve the expected behavior. Do not use
both /q and /qn in the same command line. Only use ! and - after /qb.
Switch Meaning
/v Pass variables to the .msi inside the setup.exe. The content must always be enclosed in
plain-text quotes.
/s Silent mode
/x Uninstall mode
/a Administrative install (will copy all les inside the .msi)
NOTE:
With /v, the Microsoft default options are available. For a list of options, see https://msdn.microsoft.com/en-us/library/windows/
desktop/aa367988(v=vs.85).aspx.
Option Meaning
/q No Progress dialog, restarts itself after process completion
/qb Progress dialog with Cancel button, prompts for restart
/qb- Progress dialog with Cancel button, restarts itself after process completion
/qb! Progress dialog without Cancel button, prompts for restart
5
24 Dell Data Security Encryption Enterprise
Uninstall Using the Child Installers

Option Meaning
/qb!- Progress dialog without Cancel button, restarts itself after process completion
/qn No user interface
Uninstall Encryption and Server Encryption Client
• To reduce decryption time, run the Windows Disk Cleanup Wizard to remove temporary les and other unneeded data.
• Plan to decrypt overnight, if possible.
• Turn o sleep mode to prevent an unattended computer from going to sleep. Decryption cannot occur on a sleeping computer.
• Shut down all processes and applications to minimize decryption failures because of locked les.
• Once the uninstall is complete and decryption is in progress, disable all network connectivity. Otherwise, new policies may be acquired
that re-enable encryption.
• Follow your existing process for decrypting data, such as issuing a policy update.
• Windows and Encryption External Media Encryption clients update the Security Management Server/Security Management Server
Virtual to change the status to Unprotected at the beginning of a Encryption client uninstall process. However, in the event that the
client cannot contact the Security Management Server/Security Management Server Virtual, regardless of the reason, the status
cannot be updated. In this case, you will need to manually Remove Endpoint in the Remote Management Console. If your organization
uses this workow for compliance purposes, Dell recommends that you verify that Unprotected has been set as expected, either in the
Remote Management Console or Compliance Reporter.
Process
• The Key Server (and Security Management Server) must be congured prior to uninstallation if using the Encryption Removal Agent's
Download Keys from Server option. See Congure Key Server for Uninstallation of Encryption Client Activated Against Security
Management Server for instructions. No prior action is needed if the client to uninstall is activated against a Security Management
Server Virtual, as Security Management Server Virtual does not use the Key Server.
• You must use the Dell Administrative Utility (CMGAd) prior launching the Encryption Removal Agent if using the Encryption Removal
Agent's Import Keys from a le option. This utility is used to obtain the encryption key bundle. See Use the Administrative Download
Utility (CMGAd) for instructions. The utility can be located in the Dell installation media.
Command Line Uninstallation
• Once extracted from the master installer, the Encryption client installer can be located at C:\extracted\Encryption
\DDPE_XXbit_setup.exe.
• The following table details the parameters available for the uninstallation.
Parameter Selection
CMG_DECRYPT Property for selecting the type of Encryption Removal Agent
installation:
3 - Use LSARecovery bundle
2 - Use previously downloaded forensics key material
1 - Download keys from the Dell Server
0 - Do not install Encryption Removal Agent
CMGSILENTMODE Property for silent uninstallation:
1 - Silent
Dell Data Security Encryption Enterprise
Uninstall Using the Child Installers
25

Parameter Selection
0 - Not Silent
Required Properties
DA_SERVER FQHN for the Security Management Server hosting the negotiate
session.
DA_PORT Port on the Security Management Server for request (default is
8050).
SVCPN Username in UPN format that the Key Server Service is logged
on as on the Security Management Server.
DA_RUNAS Username in SAM compatible format under whose context the
key fetch request will be made. This user must be in the Key
Server list in the Security Management Server.
DA_RUNASPWD Password for the runas user.
FORENSIC_ADMIN The Forensic Administrator account on the Dell Server, which can
be used for forensic requests for uninstalls or keys.
FORENSIC_ADMIN_PWD The password for the Forensic Administrator account.
Optional Properties
SVCLOGONUN Username in UPN format for Encryption Removal Agent Service
log on as parameter.
SVCLOGONPWD Password for log on as user.
• The following example silently uninstalls the Encryption client and downloads the encryption keys from the Security Management
Server.
DDPE_XXbit_setup.exe /s /x /v"CMG_DECRYPT=1 CMGSILENTMODE=1 DA_SERVER=server.organization.com
DA_PORT=8050 SVCPN=administrator@organization.com DA_RUNAS=domain\username
DA_RUNASPWD=password /qn"
MSI Command:
msiexec.exe /s /x "Dell Data Protection Encryption.msi" /qn REBOOT="ReallySuppress"
CMG_DECRYPT="1" CMGSILENTMODE="1" DA_SERVER="server.organization.com" DA_PORT="8050"
SVCPN="administrator@domain.com" DA_RUNAS="domain\username" DA_RUNASPWD="password" /qn
Reboot the computer when nished.
• The following example silently uninstalls the Encryption client and downloads the encryptions keys using a Forensic Administrator
account.
DDPE_XXbit_setup.exe /s /x /v"CMG_DECRYPT=1 CMGSILENTMODE=1
FORENSIC_ADMIN=forensicadmin@organization.com FORENSIC_ADMIN_PWD=tempchangeit /qn"
MSI Command:
msiexec.exe /s /x "Dell Data Protection Encryption.msi" /qn CMG_DECRYPT=1 CMGSILENTMODE=1
FORENSIC_ADMIN=forensicadmin@organization.com FORENSIC_ADMIN_PWD=tempchangeit
REBOOT=REALLYSUPPRESS
Reboot the computer when nished.
26 Dell Data Security Encryption Enterprise
Uninstall Using the Child Installers

IMPORTANT:
Dell recommends the following actions when using a Forensic Administrator password on the command line:
1 Create a Forensic Administrator account in the Remote Management Console for the purpose of performing the silent
uninstallation.
2 Use a temporary password for that account that is unique to that account and time period.
3 After the silent uninstallation has been completed, remove the temporary account from the list of administrators or change its
password.
NOTE:
Some older clients may require escape characters of \" around the values of parameters. For example:
DDPE_XXbit_setup.exe /x /v"CMG_DECRYPT=\"1\" CMGSILENTMODE=\"1\" DA_SERVER=
\"server.organization.com\" DA_PORT=\"8050\" SVCPN=\"administrator@organization.com\"
DA_RUNAS=\"domain\username\" DA_RUNASPWD=\"password\" /qn"
Uninstall Encryption External Media
Once extracted from the master installer, the Encryption client installer can be located at C:\extracted\Encryption
\DDPE_XXbit_setup.exe.
Command Line Uninstallation
Run a command line similar to the following:
DDPE_XXbit_setup.exe /s /x /v"/qn"
Reboot the computer when nished.
Uninstall SED and Advanced Authentication Clients
• Network connection to the Security Management Server/Security Management Server Virtual is required for PBA deactivation.
Process
• Deactivate the PBA, which removes all PBA data from the computer and unlocks the SED keys.
• Uninstall the SED client.
• Uninstall the Advanced Authentication client.
Deactivate the PBA
1 As a Dell administrator, log in to the Remote Management Console.
2 In the left pane, click Protect & Manage > Endpoints.
3 Select the appropriate Endpoint Type.
4 Select Show >Visible, Hidden, or All.
5 If you know the Hostname of the computer, enter it in the Hostname eld (wildcards are supported). You may leave the eld blank to
display all computers. Click Search.
If you do not know the Hostname, scroll through the list to locate the computer.
A computer or list of computers displays based on your search lter.
6 Select the Details icon of the desired computer.
Dell Data Security Encryption Enterprise
Uninstall Using the Child Installers
27

7 Click Security Policies on the top menu.
8 Select Self-Encrypting Drives.from the Policy Category drop-down menu.
9 Expand the SED Administration area and change the Enable SED Management and Activate PBA policies from True to False.
10 Click Save.
11 In the left pane, click Actions > Commit Policies.
12 Click Apply Changes.
Wait for the policy to propagate from the Security Management Server/Security Management Server Virtual to the computer
targeted for deactivation.
Uninstall the SED and Authentication clients after the PBA is deactivated.
Uninstall SED Client and Advanced Authentication Clients
Command Line Uninstallation
• Once extracted from the master installer, the SED client installer can be located at C:\extracted\Advanced Authentication\<x64/x86>
\setup.exe.
• The following example silently uninstalls the Advanced Authentication client.
setup.exe /x /s /v" /qn"
Shut down and restart the computer when nished.
• Once extracted from the master installer, the SED client installer can be located at C:\extracted\Encryption Management Agent
\EMAgent_XXbit_setup.exe.
• The following example silently uninstalls the SED client.
EMAgent_XXbit_setup.exe /x /s /v" /qn"
Shut down and restart the computer when nished.
Uninstall BitLocker Manager Client
Command Line Uninstallation
• Once extracted from the master installer, the BitLocker client installer can be located at C:\extracted\Encryption Management Agent
\EMAgent_XXbit_setup.exe.
• The following example silently uninstalls the BitLocker Manager client.
EMAgent_XXbit_setup.exe /x /s /v" /qn"
Reboot the computer when nished.
28 Dell Data Security Encryption Enterprise
Uninstall Using the Child Installers
Uninstall Using the Dell Data Security Uninstaller
Uninstall
Dell provides the Data Security Uninstaller as a master uninstaller. This utility gathers the currently installed products and removes them in
the appropriate order.
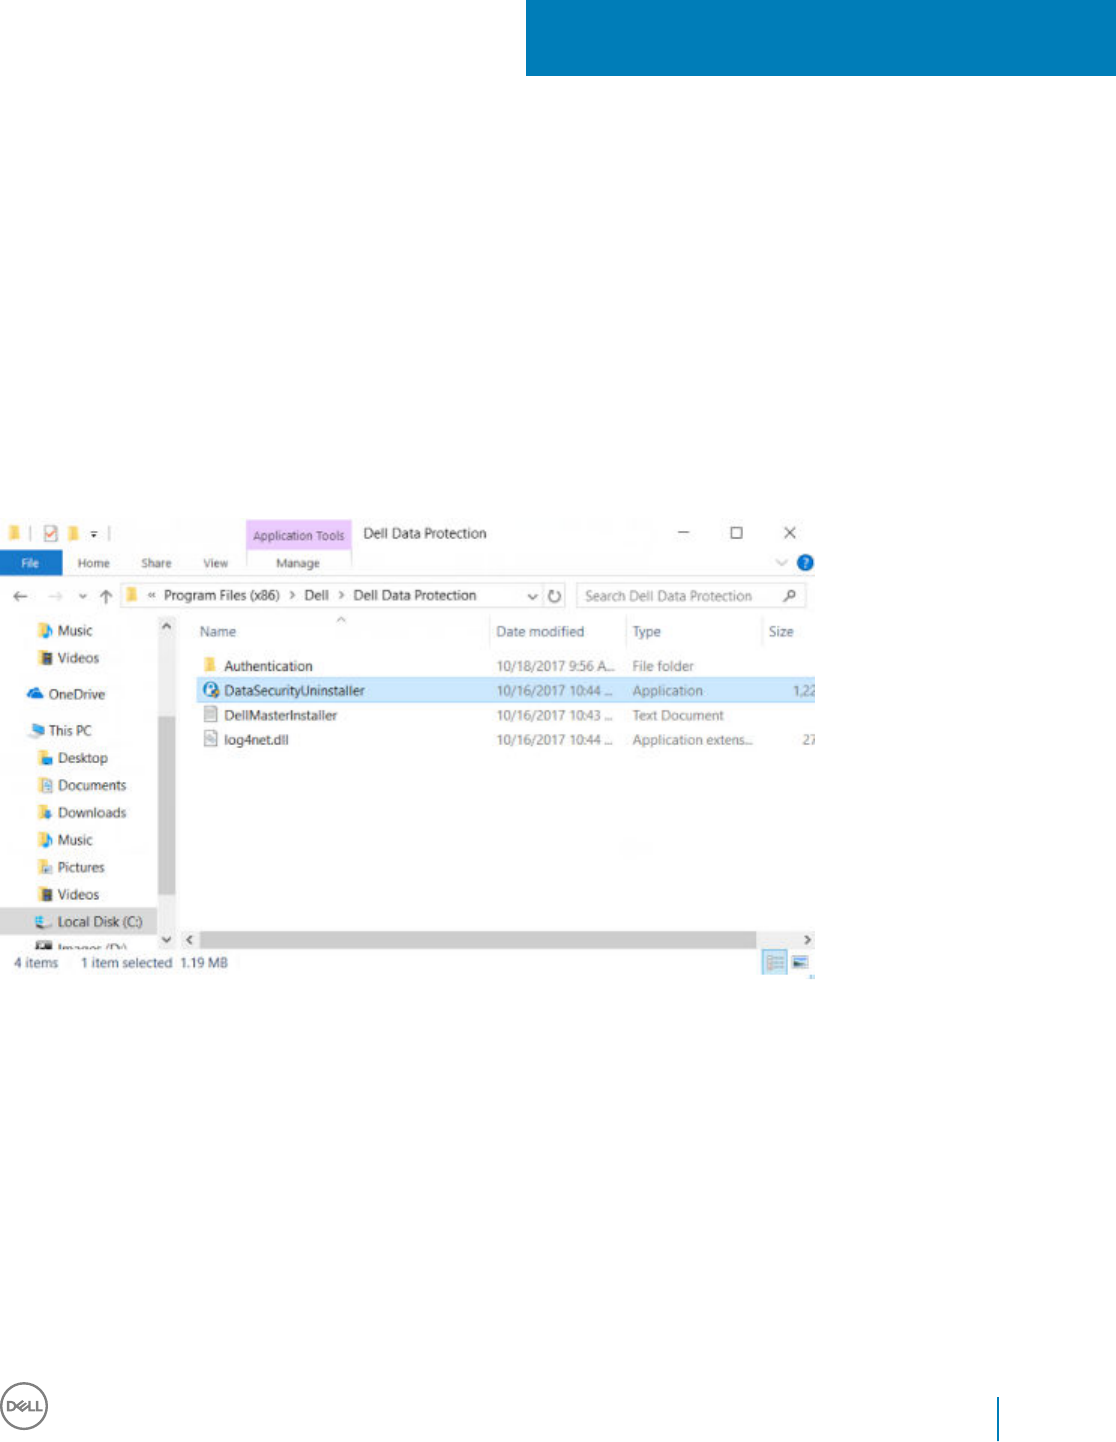
This Data Security Uninstaller is available in the following location: C:\Program Files (x86)\Dell\Dell Data Protection
For more information or to use command line interface (CLI), see http://www.dell.com/support/article/us/en/19/sln307791.
Logs are generated in C:\ProgramData\Dell\Dell Data Protection\ for all of the components that are removed.
To run the utility, open the containing folder, right-click the DataSecurityUninstaller.exe, and run it as administrator.
Click Next.
6
Dell Data Security Encryption Enterprise
Uninstall Using the Dell Data Security Uninstaller
29
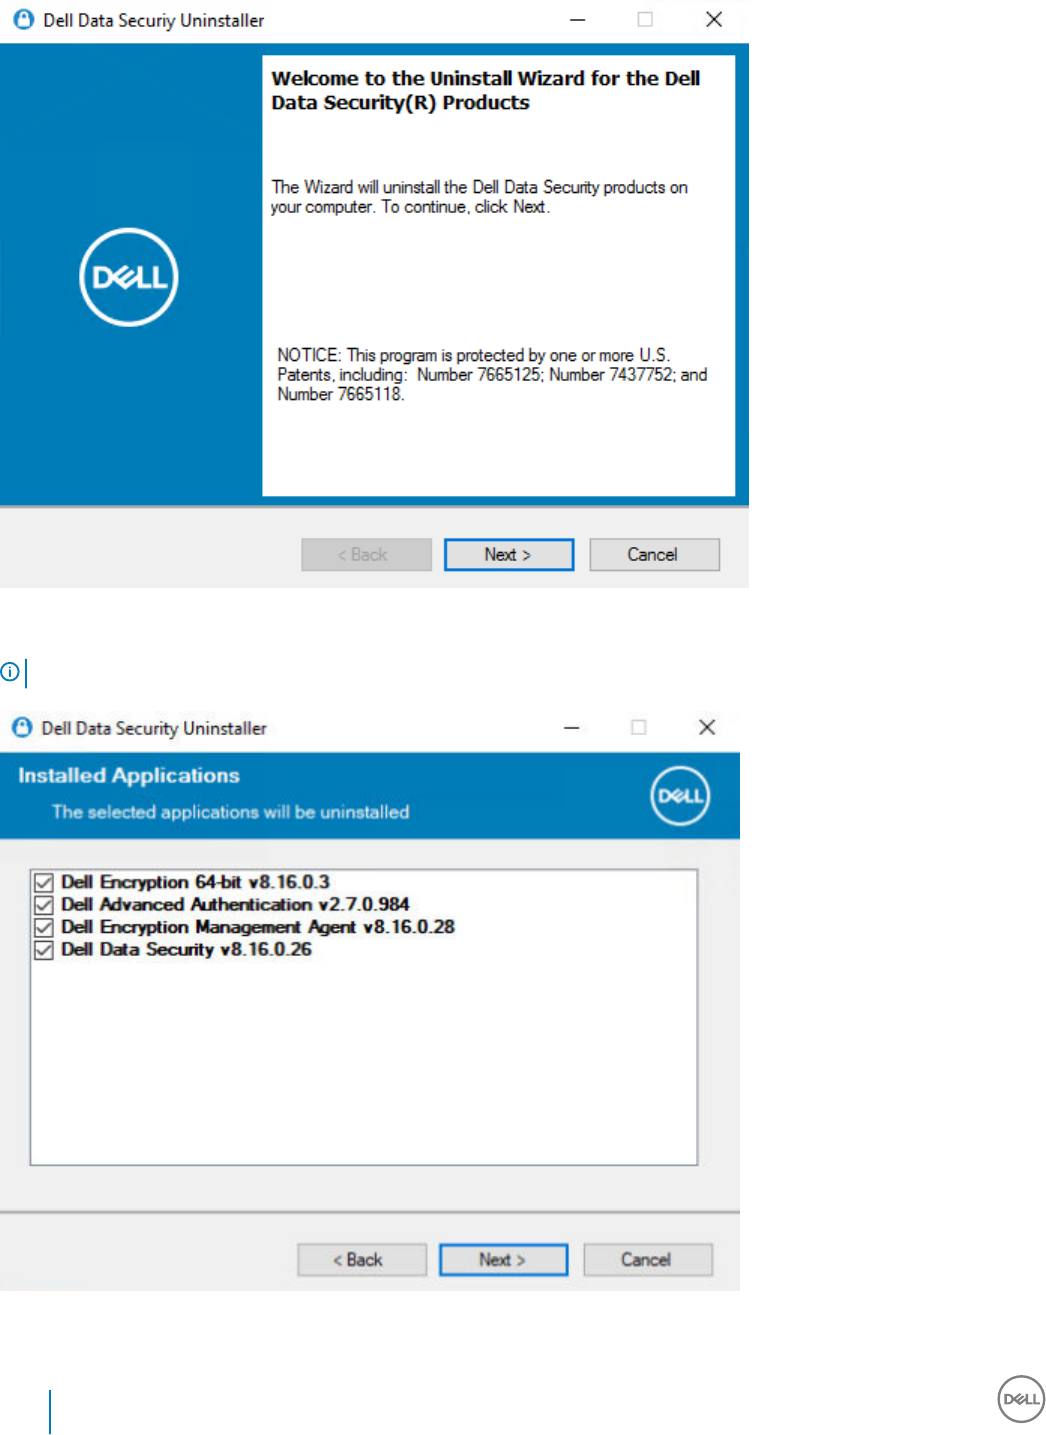
Optionally de-select any application from removal and then select Next.
NOTE: Required dependencies will automatically be checked or un-checked.
30 Dell Data Security Encryption Enterprise
Uninstall Using the Dell Data Security Uninstaller
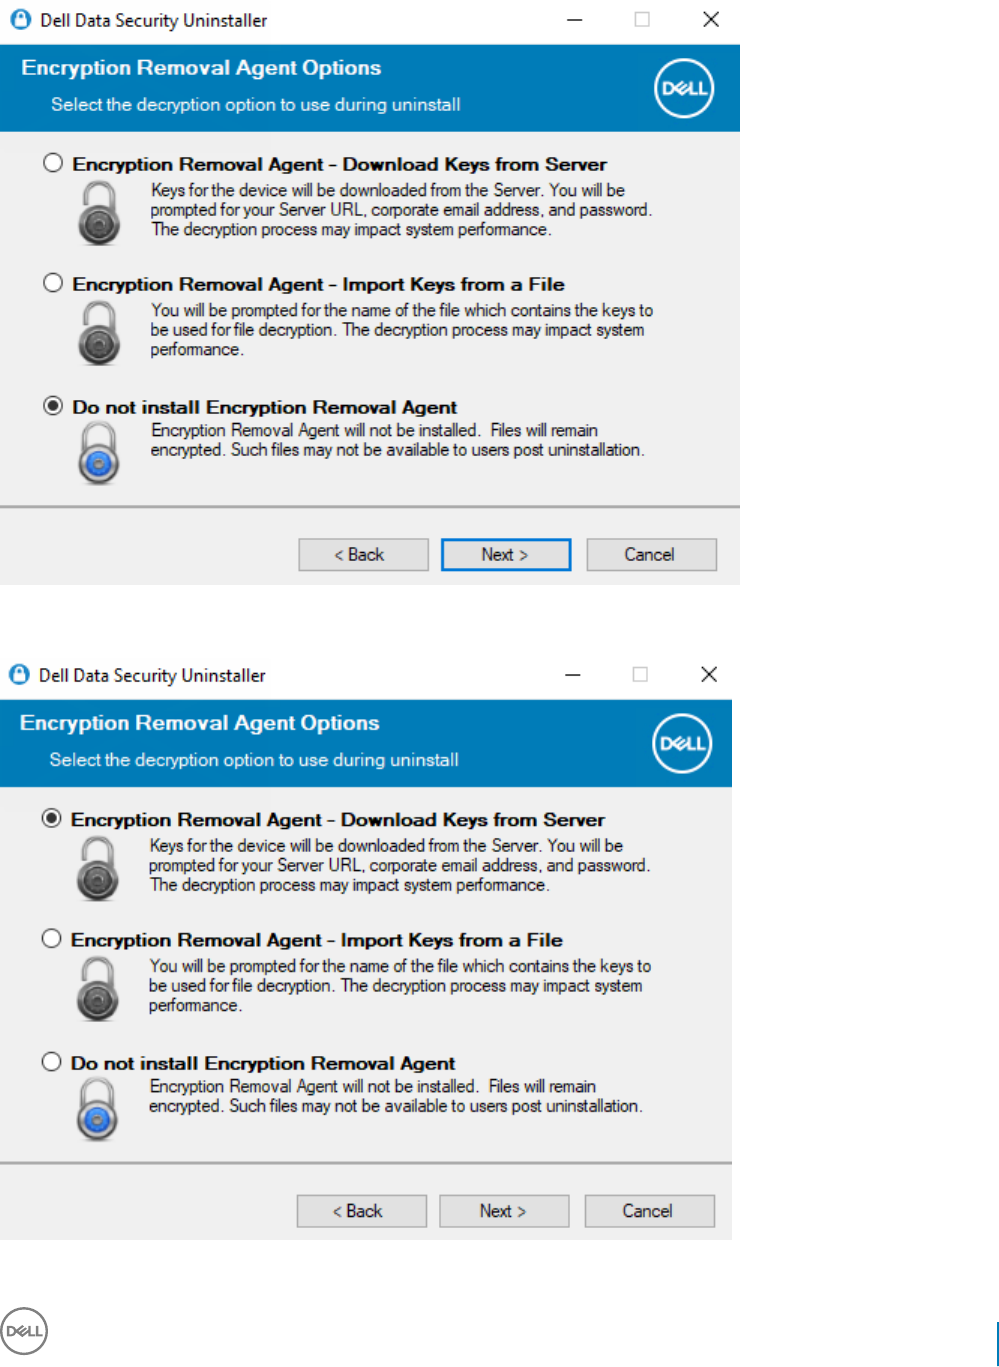
To remove applications without installing the Encryption Removal Agent, choose Do not install Encryption Removal Agent and select
Next.
Select Encryption Removal Agent - Download Keys from Server.
Dell Data Security Encryption Enterprise
Uninstall Using the Dell Data Security Uninstaller
31
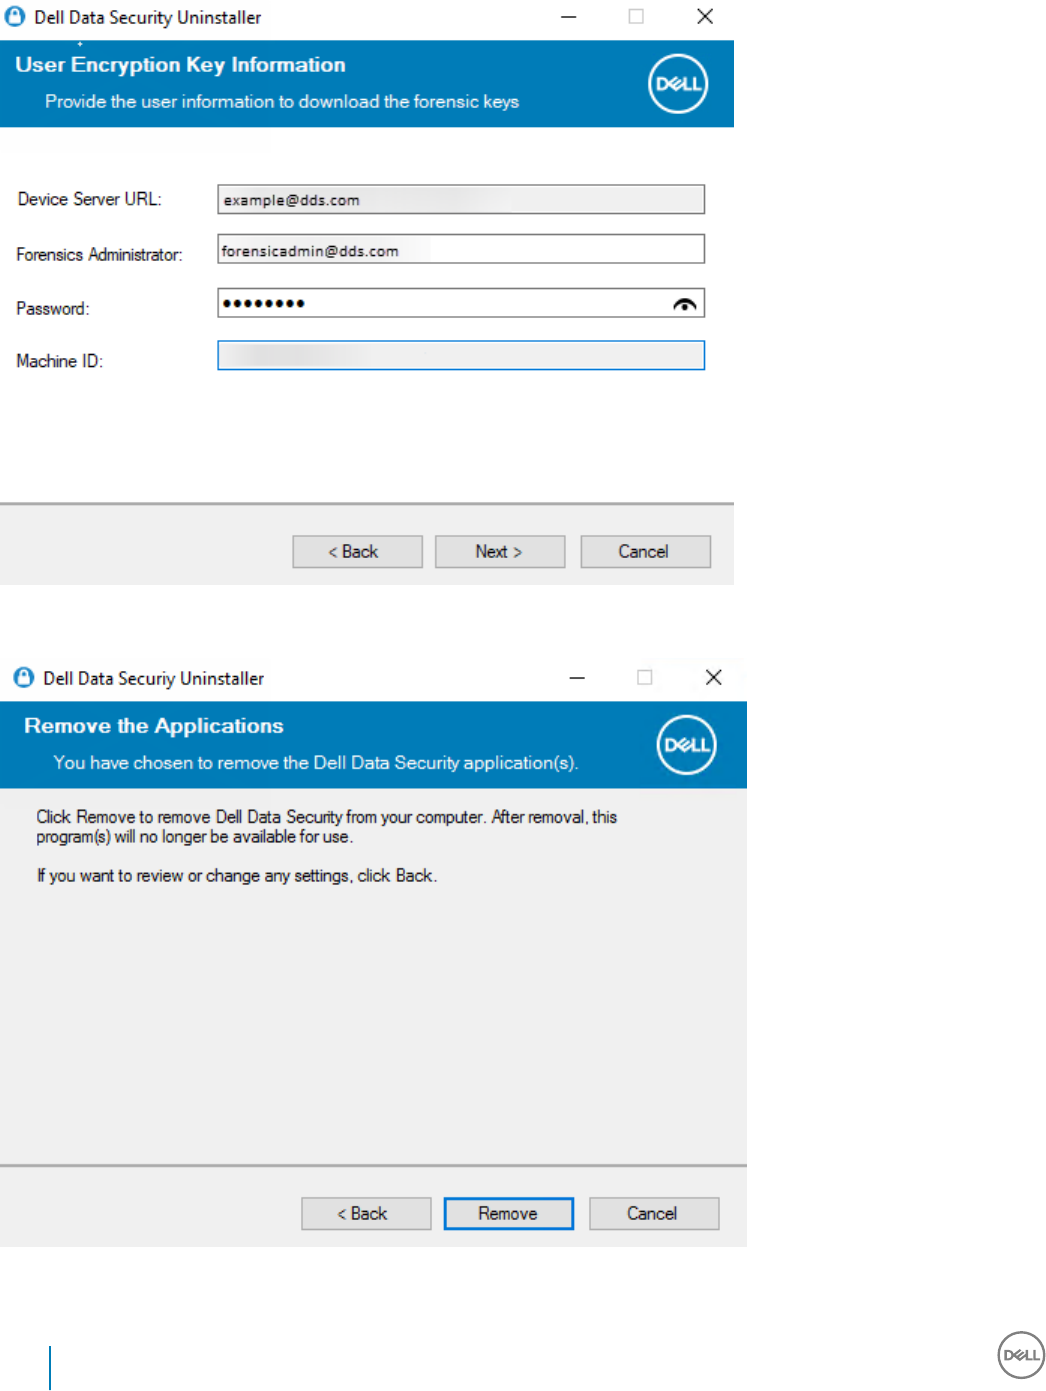
Enter the fully qualied credentials of a Forensic Administrator and select Next.
Select Remove to begin the uninstall.
Click Finish to complete removal and reboot the computer. Reboot machine after clicking nished is selected by default.
32 Dell Data Security Encryption Enterprise
Uninstall Using the Dell Data Security Uninstaller
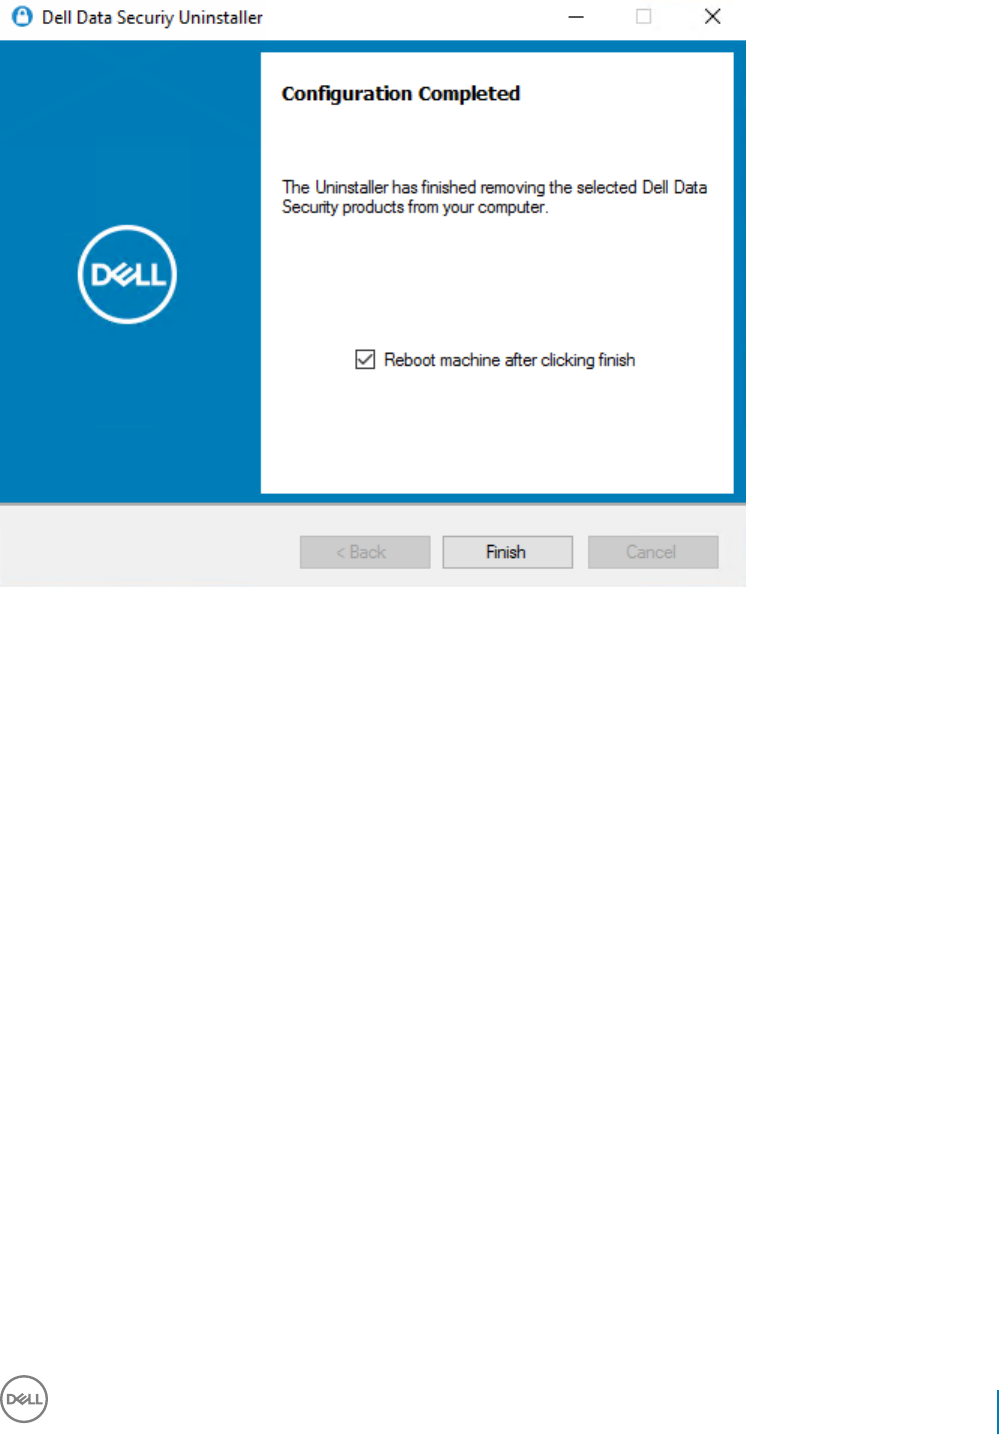
Uninstallation and removal is complete.
Dell Data Security Encryption Enterprise
Uninstall Using the Dell Data Security Uninstaller
33
Download the Software
This section details obtaining the software from dell.com/support. If you already have the software, you can skip this section.
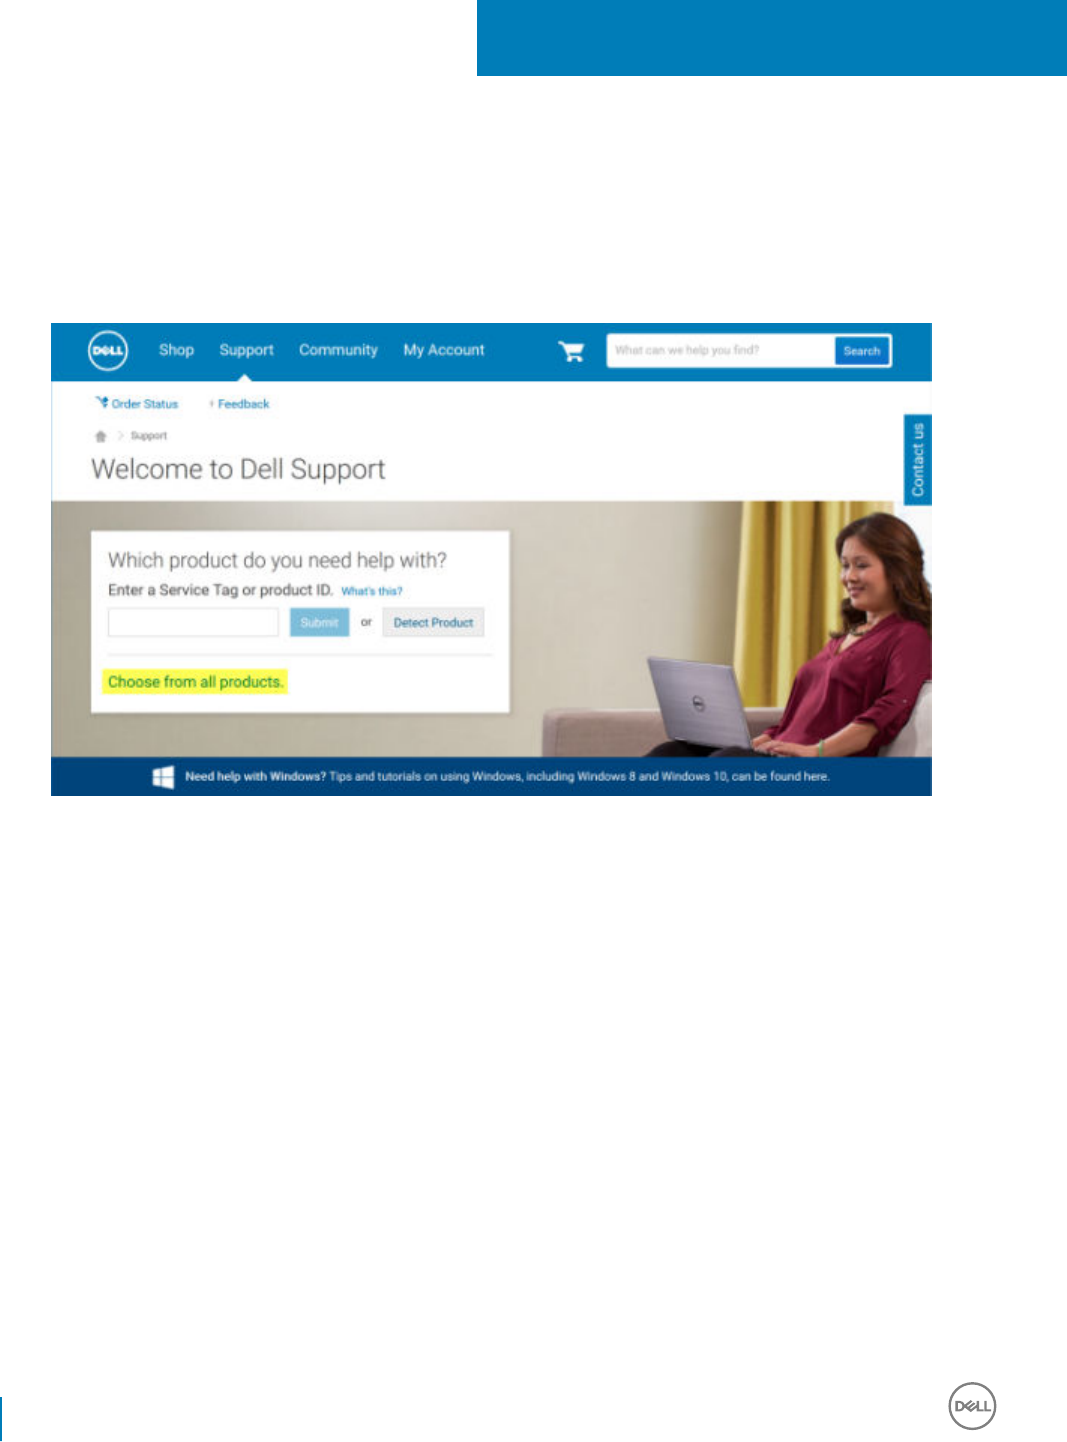
Go to dell.com/support to begin.
1 On the Dell Support webpage, select Choose from all products.
2 Select Software & Security from the list of products.
7
34 Dell Data Security Encryption Enterprise
Download the Software
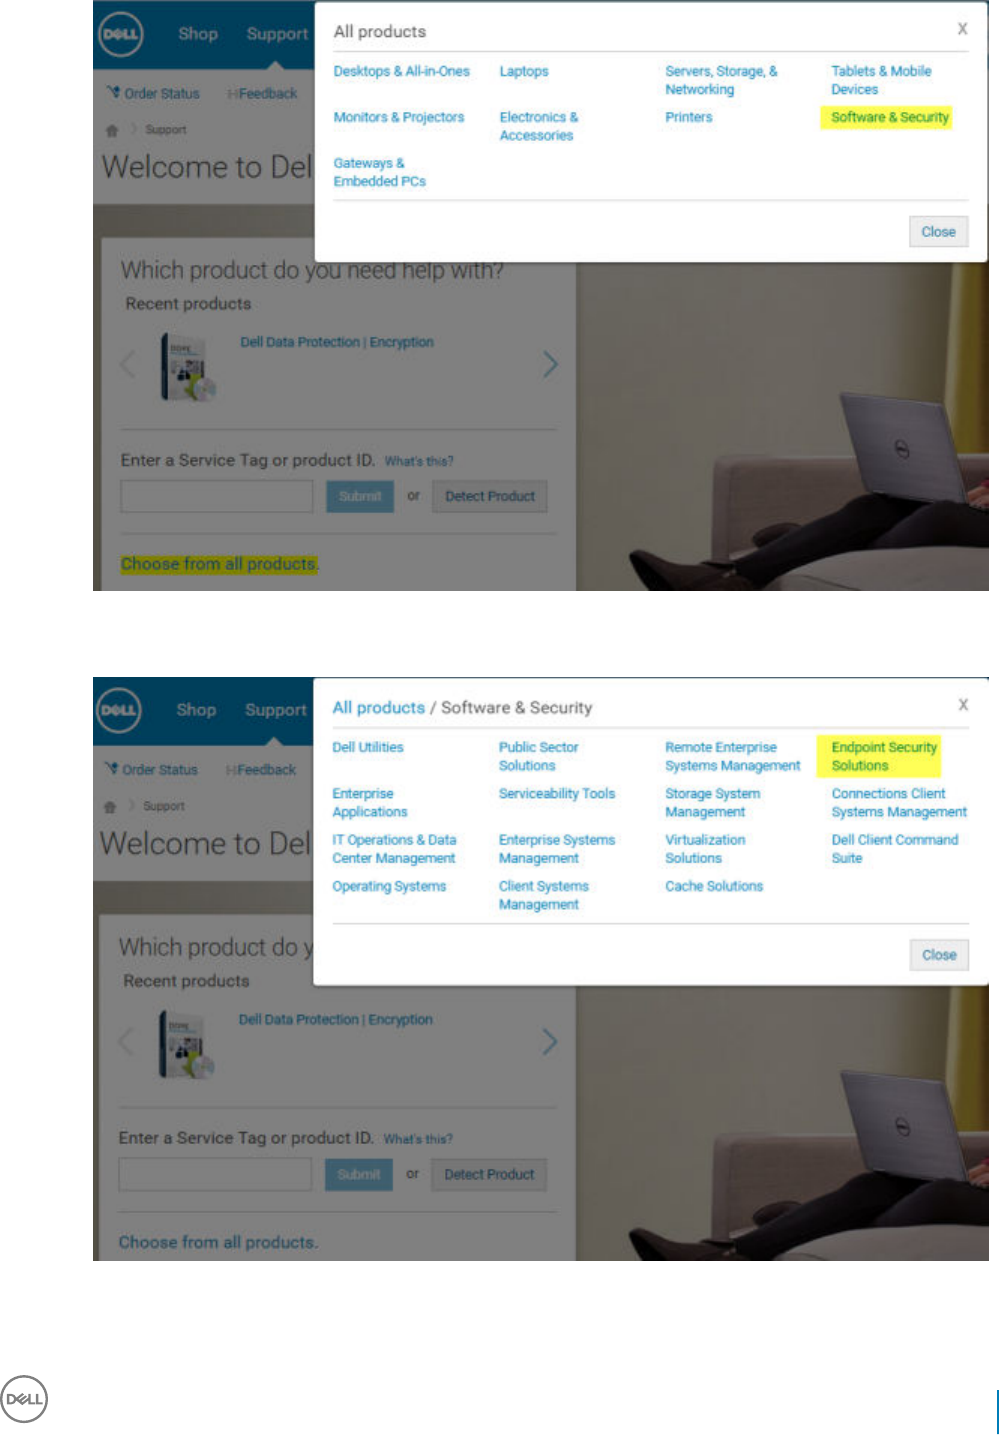
3 Select Endpoint Security Solutions in the Software and Security section.
After this selection has been made once, the website will remember.
4 Select the Dell product.
Examples:
Dell Data Security Encryption Enterprise
Download the Software
35
Dell Encryption Enterprise
Dell Endpoint Security Suite Pro
Dell Endpoint Security Suite Enterprise
Dell Data Guardian
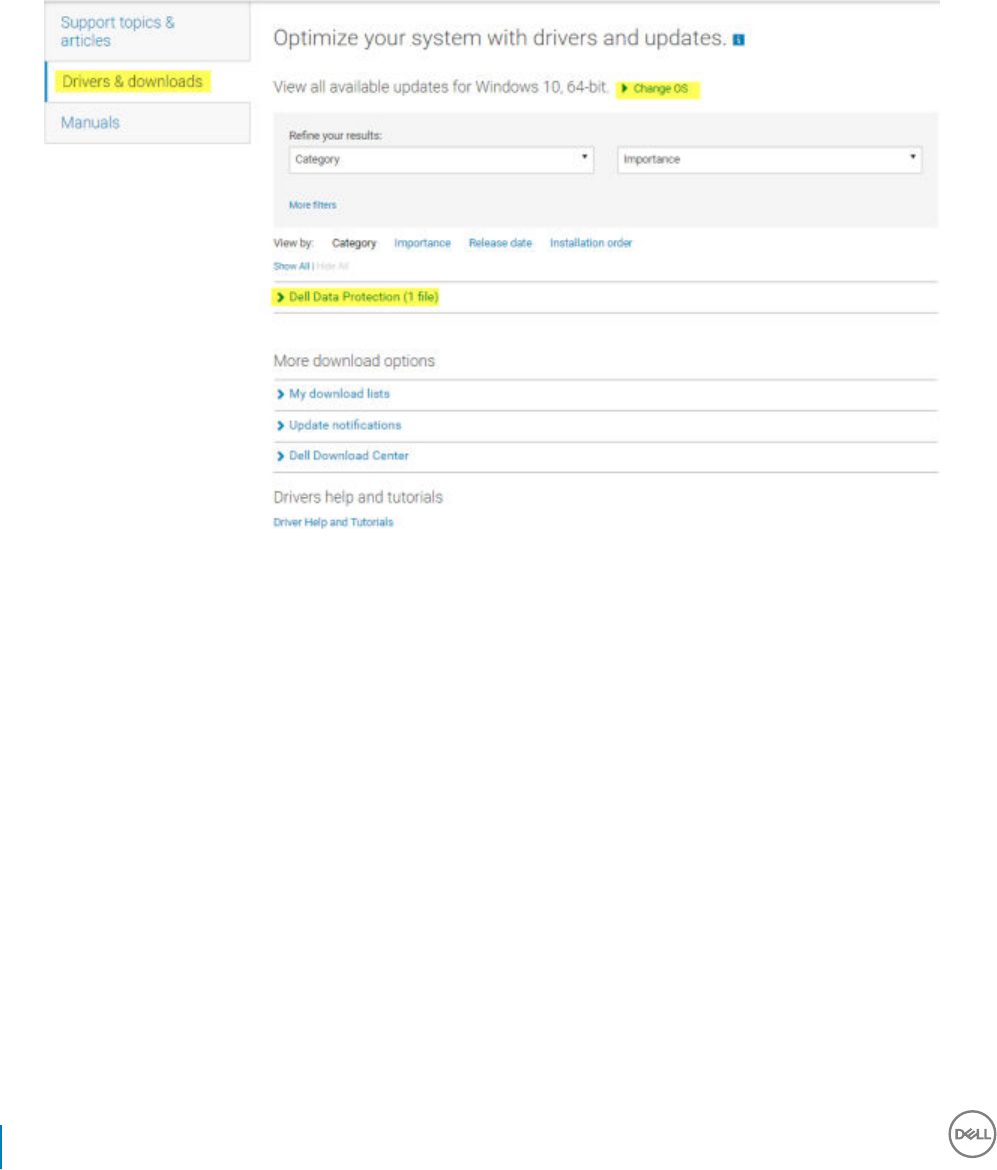
5 Select Drivers & downloads.
6 Select the desired client operating system type.
7 Select Dell Data Security (4 les) in the matches. This is only an example, so it will likely look slightly dierent. For example, there may
not be 4 les to choose from.
36 Dell Data Security Encryption Enterprise
Download the Software
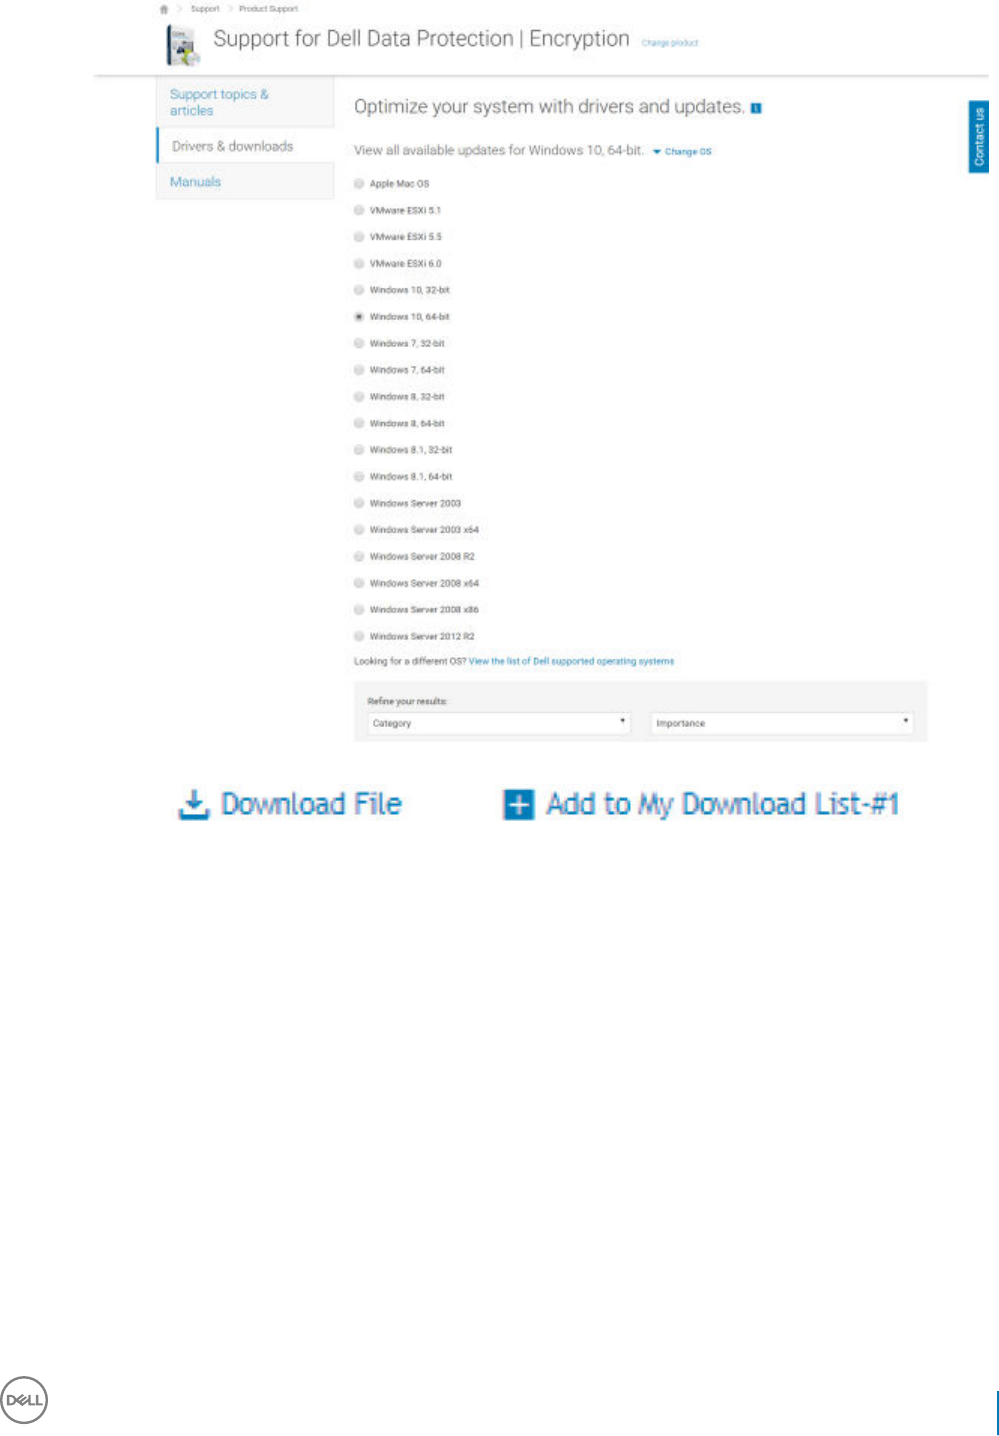
8 Select Download File or Add to My Download List #XX.
Dell Data Security Encryption Enterprise
Download the Software
37
Extract the Child Installers from the Master
Installer
• The master installer is not a master uninstaller. Each client must be uninstalled individually, followed by uninstallation of the master
installer. Use this process to extract the clients from the master installer so that they can be used for uninstallation.
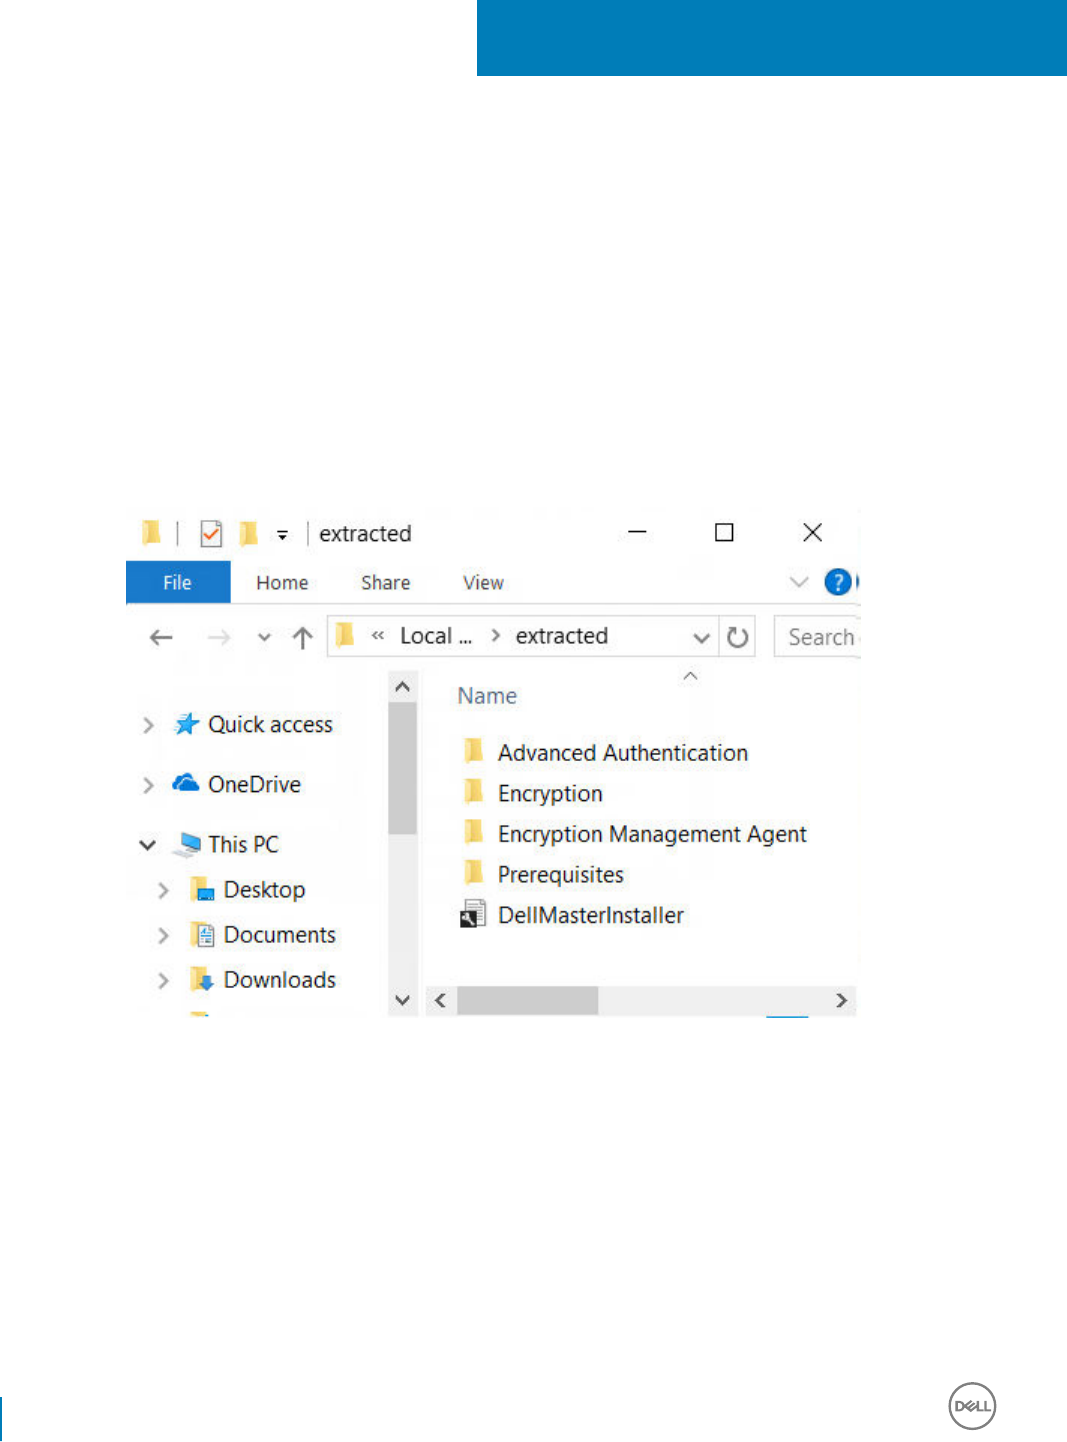
1 From the Dell installation media, copy the DDSSetup.exe le to the local computer.
2 Open a command prompt in the same location as the DDSSetup.exe le and enter:
DDSSetup.exe /z"\"EXTRACT_INSTALLERS=C:\extracted\""
The extraction path cannot exceed 63 characters.
The extracted child installers are located at C:\extracted\.
8
38 Dell Data Security Encryption Enterprise
Extract the Child Installers from the Master Installer
Congure Key Server for Uninstallation of
Encryption Client Activated Against Security
Management Server
• This section explains how to congure components for use with Kerberos Authentication/Authorization when using an Security
Management Server. The Security Management Server Virtual does not use the Key Server.
• If Kerberos Authentication/Authorization is to be used, then the server that contains the Key Server component will need to be part of
the aected domain.
• Because the Security Management Server Virtual does not use the Key Server, typical uninstallation is aected. When an Encryption
client that is activated against a Security Management Server Virtual is uninstalled, standard forensic key retrieval through the Security
Server is used, instead of the Key Server's Kerberos method. See Command Line Uninstallation for more information.
Services Panel - Add Domain Account User
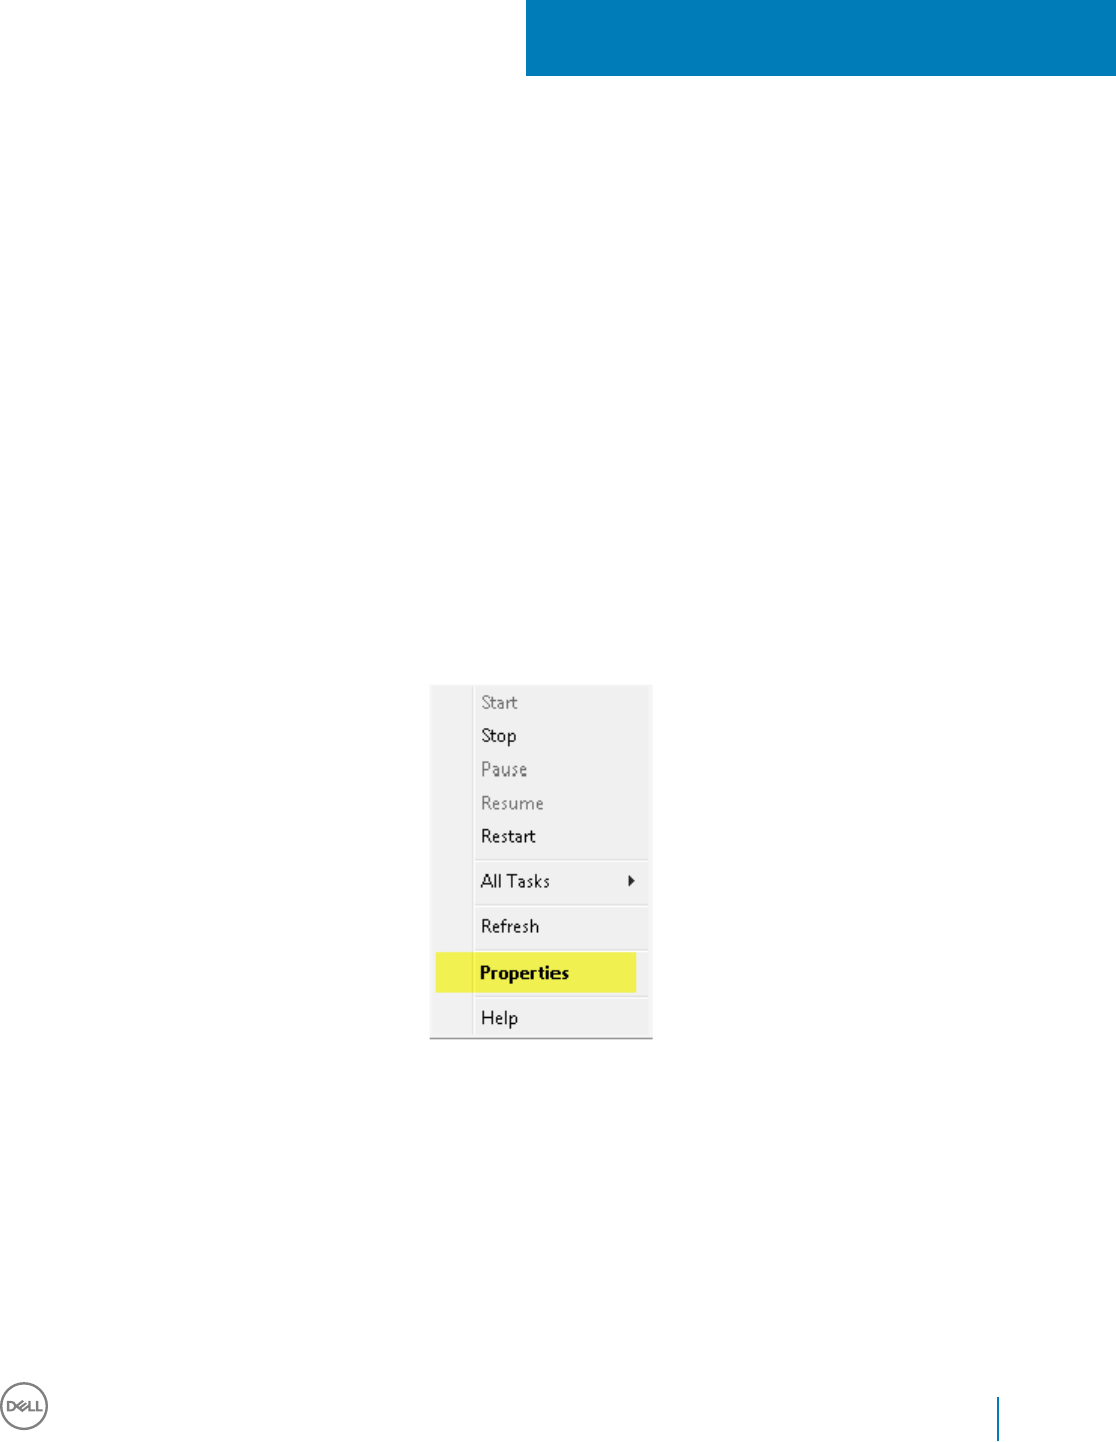
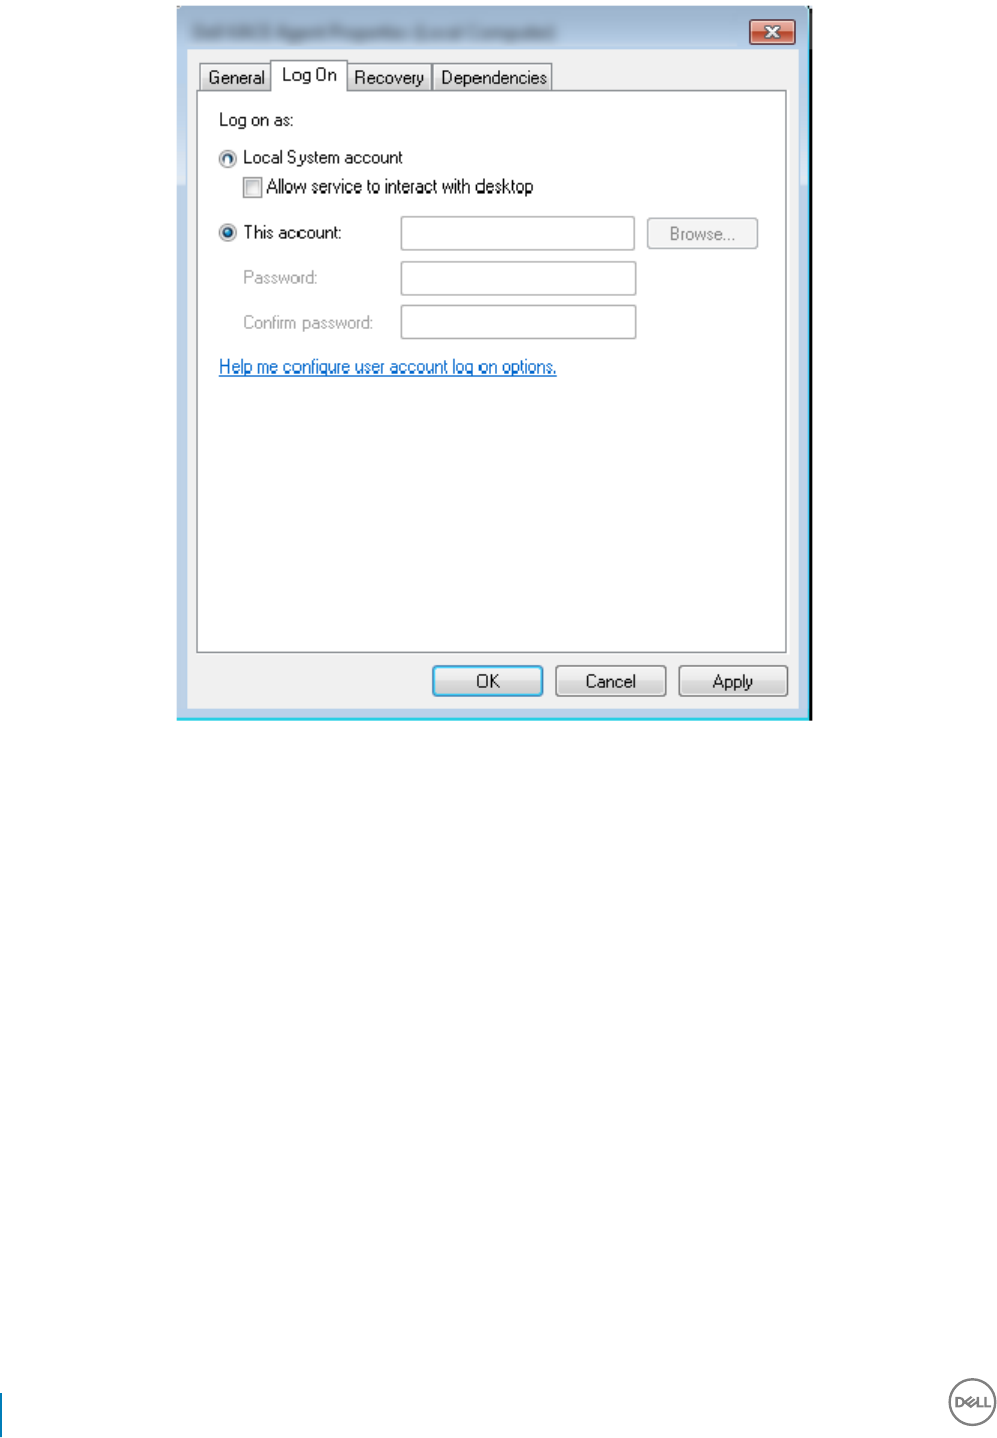
1 On the Security Management Server, navigate to the Services panel (Start > Run... > services.msc > OK).
2 Right-click Key Server and select Properties.
3 Select the Log On tab and select the This account: option.
In the This account: eld, add the domain account user. This domain user must have at least local administrator rights to the Key
Server folder (must be able to write to the Key Server cong le, as well as the ability to write to the log.txt le).
Enter and conrm the password for the domain user.
Click OK.
9
Dell Data Security Encryption Enterprise
Congure Key Server for Uninstallation of Encryption Client Activated Against Security Management Server
39
4 Restart the Key Server Service (leave the Services panel open for further operation).
5 Navigate to <Key Server install dir> log.txt to verify that the Service started properly.
Key Server Cong File - Add User for Security
Management Server Communication
1 Navigate to <Key Server install dir>.
2 Open Credant.KeyServer.exe.cong with a text editor.
3 Go to <add key="user" value="superadmin" /> and change the "superadmin" value to the name of the appropriate user (you may also
leave as "superadmin").
4 Go to <add key="epw" value="<encrypted value of the password>" /> and change "epw" to "password". Then change "<encrypted
value of the password>" to the password of the user from Step 3. This password is re-encrypted when the Security Management
Server restarts.
If using "superadmin" in Step 3, and the superadmin password is not "changeit", it must be changed here. Save and close the le.
Services Panel - Restart Key Server Service
1 Go back to the Services panel (Start > Run... > services.msc > OK).
2 Restart the Key Server Service.
3 Navigate to <Key Server install dir> log.txt to verify that the Service started properly.
4 Close the Services panel.
40 Dell Data Security Encryption Enterprise
Congure Key Server for Uninstallation of Encryption Client Activated Against Security Management Server
Remote Management Console - Add Forensic
Administrator
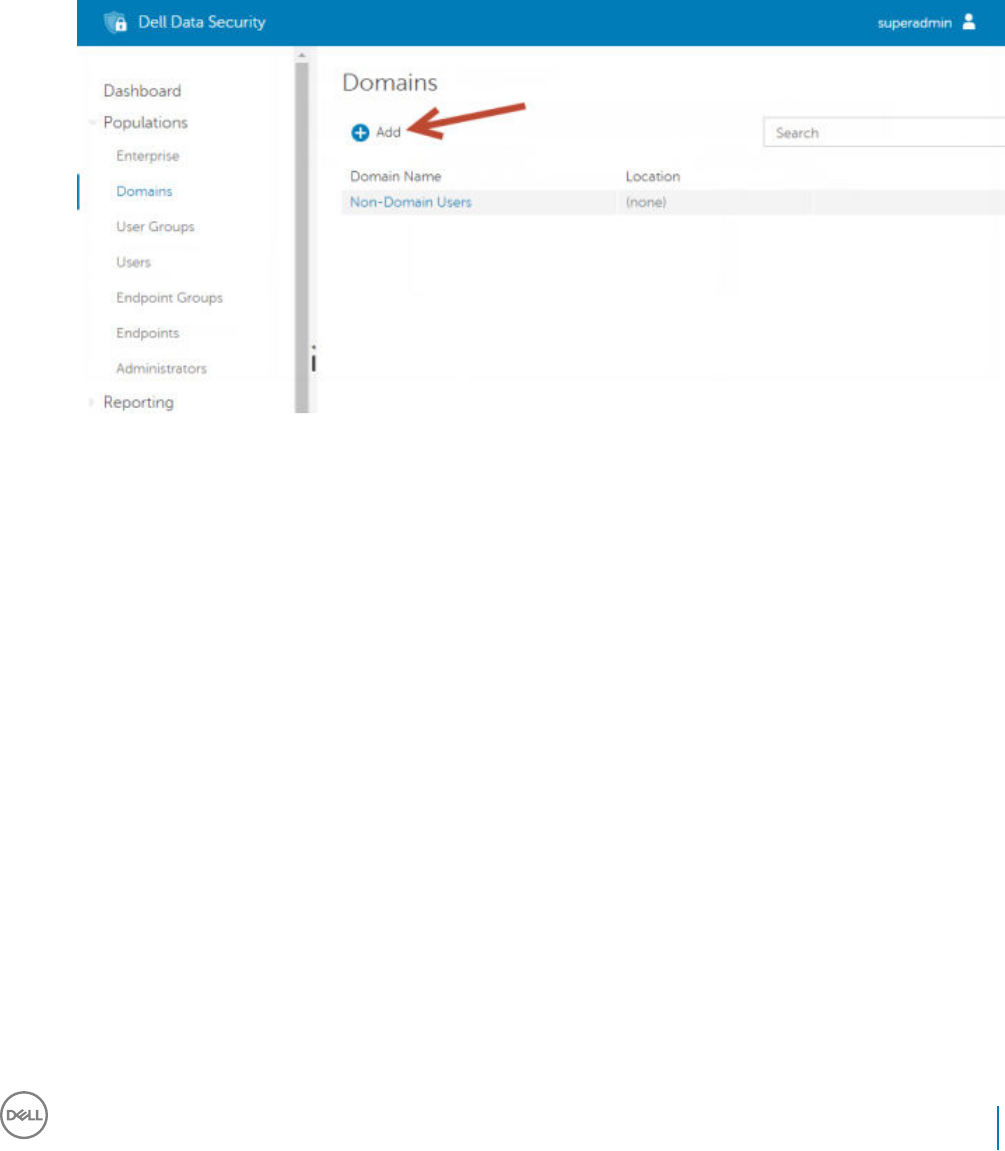
1 If needed, log on to the Remote Management Console.
2 Click Populations > Domains.
3 Select the appropriate Domain.
4 Click the Key Server tab.
5 In the Account eld, add the user that will be performing the administrator activities. The format is DOMAIN\UserName. Click Add
Account.
6 Click Users in the left menu. In the search box, search for the username added in Step 5. Click Search.
7 Once the correct user is located, click the Admin tab.
8 Select Forensic Administrator and click Update.
The components are now congured for Kerberos Authentication/Authorization.
Dell Data Security Encryption Enterprise
Congure Key Server for Uninstallation of Encryption Client Activated Against Security Management Server
41

Use the Administrative Download Utility
(CMGAd)
• This utility allows the download of a key material bundle for use on a computer that is not connected to an Security Management
Server/Security Management Server Virtual.
• This utility uses one of the following methods to download a key bundle, depending on the command line parameter passed to the
application:
• Forensic Mode - Used if -f is passed on the command line or if no command line parameter is used.
• Admin Mode - Used if -a is passed on the command line.
Log les can be located at C:\ProgramData\CmgAdmin.log
Use the Administrative Download Utility in Forensic
Mode
1 Double-click cmgad.exe to launch the utility or open a command prompt where CMGAd is located and type cmgad.exe -f (or
cmgad.exe).
2 Enter the following information (some elds may be pre-populated).
Device Server URL: Fully qualied Security Server (Device Server) URL. The format is https://securityserver.domain.com:8443/xapi/.
If your Security Management Server is pre-v7.7, the format is https://deviceserver.domain.com:8081/xapi (dierent port number,
without the trailing slash).
Dell Admin: Name of the administrator with forensic administrator credentials (enabled in the Remote Management Console), such as
jdoe
Password: Forensic administrator password
MCID: Machine ID, such as machineID.domain.com
DCID: First eight digits of the 16-digit Shield ID
TIP:
Usually, specifying either the MCID or DCID are sucient. However, if both are known, it is helpful to enter both. Each parameter
contains dierent information about the client and client computer.
Click Next.
10
42 Dell Data Security Encryption Enterprise
Use the Administrative Download Utility (CMGAd)
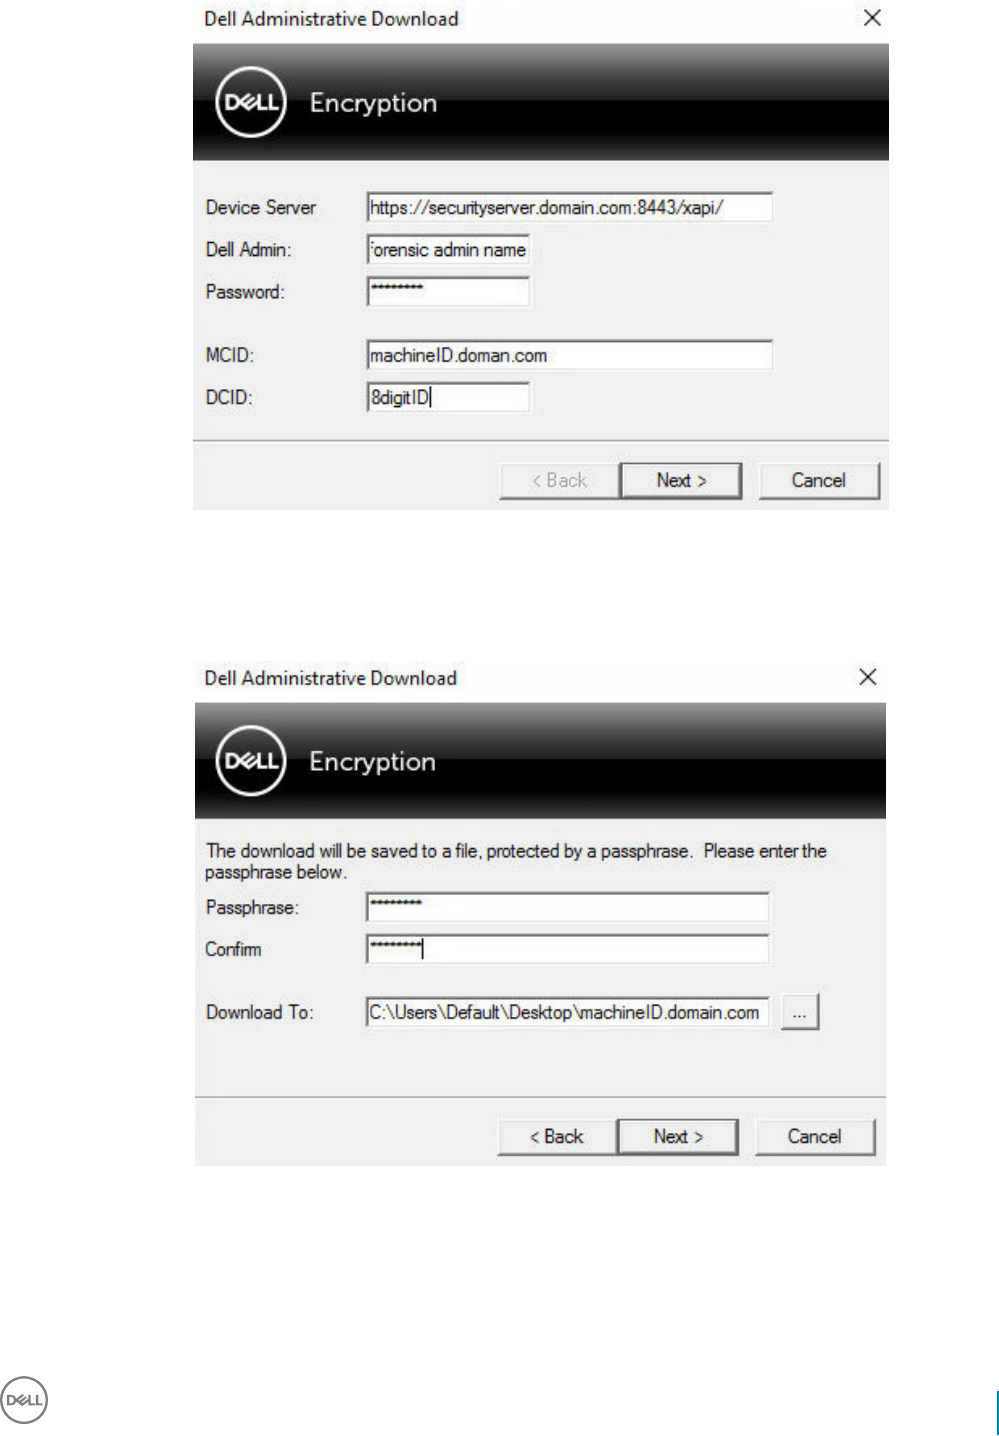
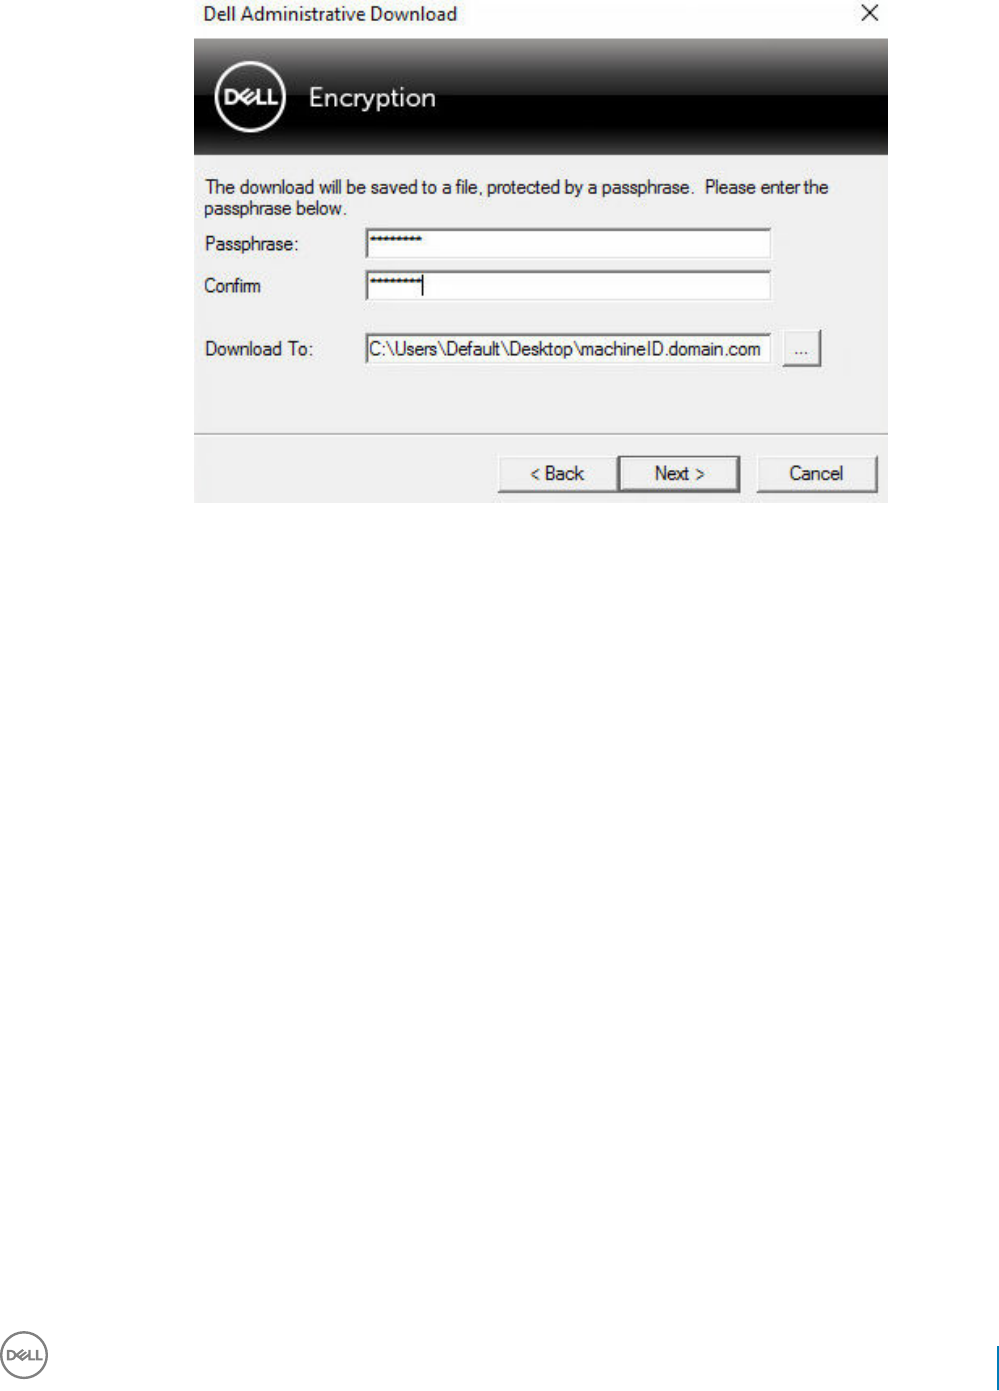
3 In the Passphrase: eld, type a passphrase to protect the download le. The passphrase must be at least eight characters long, and
contain at least one alphabetic and one numeric character. Conrm the passphrase.
Either accept the default name and location of where the le will be saved to or click ... to select a dierent location.
Click Next.
A message displays, indicating that the key material was successfully unlocked. Files are now accessible.
4 Click Finish when complete.
Dell Data Security Encryption Enterprise
Use the Administrative Download Utility (CMGAd)
43
Use the Administrative Download Utility in Admin
Mode
The Security Management Server Virtual does not use the Key Server, so Admin mode cannot be used to obtain a key bundle from a
Security Management Server Virtual. Use Forensic mode to obtain the key bundle if the client is activated against a Security Management
Server Virtual.
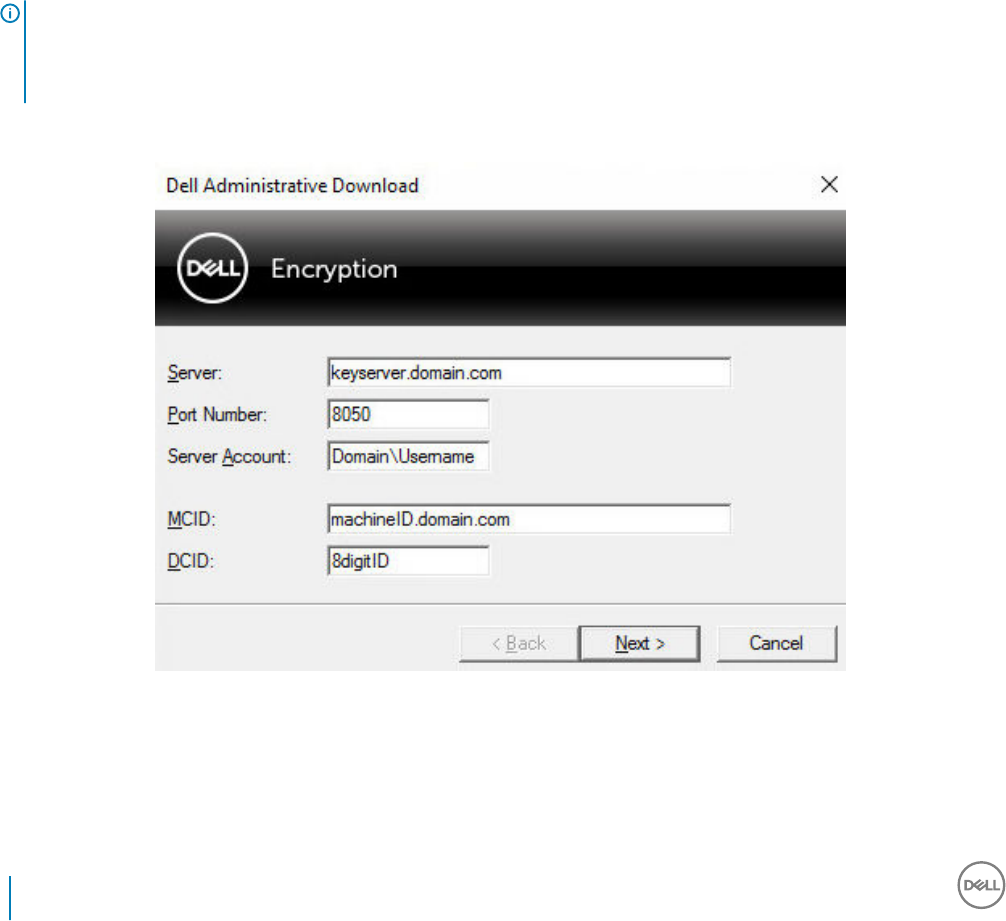
1 Open a command prompt where CMGAd is located and type cmgad.exe -a.
2 Enter the following information (some elds may be pre-populated).
Server: Fully qualied hostname of the Key Server, such as keyserver.domain.com
Port Number: The default port is 8050
Server Account: The domain user the Key Server is running as. The format is domain\username. The domain user running the utility
must be authorized to perform the download from the Key Server
MCID: Machine ID, such as machineID.domain.com
DCID: First eight digits of the 16-digit Shield ID
TIP:
Usually, specifying either the MCID or DCID are sucient. However, if both are known, it is helpful to enter both. Each parameter
contains dierent information about the client and client computer.
Click Next.
3 In the Passphrase: eld, type a passphrase to protect the download le. The passphrase must be at least eight characters long, and
contain at least one alphabetic and one numeric character.
Conrm the passphrase.
Either accept the default name and location of where the le will be saved or click ... to select a dierent location.
44 Dell Data Security Encryption Enterprise
Use the Administrative Download Utility (CMGAd)
Click Next.
A message displays, indicating that the key material was successfully unlocked. Files are now accessible.
4 Click Finish when complete.
Dell Data Security Encryption Enterprise
Use the Administrative Download Utility (CMGAd)
45

Troubleshooting
All Clients - Troubleshooting
•Master installer log les are located at C:\ProgramData\Dell\Dell Data Protection\Installer.
• Windows creates unique child installer installation log les for the logged in user at %temp%, located at C:\Users\<UserName>
\AppData\Local\Temp.
• Windows creates log les for client prerequisites, such as Visual C++, for the logged in user at %temp%, located at C:\Users
\<UserName>\AppData\Local\Temp. For example, C:\Users\<UserName>\AppData\Local\Temp
\dd_vcredist_amd64_20160109003943.log
• Follow the instructions at http://msdn.microsoft.com to verify the version of Microsoft .Net that is installed on the computer targeted
for installation.
Go to https://www.microsoft.com/en-us/download/details.aspx?id=30653to download the full version of Microsoft .Net Framework
4.5.2 or later.
• See this document if the computer targeted for installation has (or has had in the past) Dell Access installed. DDP|A is not compatible
with this suite of products.
All Clients - Protection Status
A new method for deriving a device's protected status has been implemented in the Dell Security Management Server v9.8.2. Previously,
the Endpoint Protected Status area in the management console's Dashboard would only denote the state of Encryption per device.
Protected status is now denoted if any of the following criteria have been met:
• Advanced Threat Prevention is installed and enabled.
• Web Protection or Client Firewall is installed and either Web Protection or Client Firewall's policy is enabled.
• Dell Data Guardian is installed and enabled.
• Self-Encrypting Drive Management is installed, enabled, and the Pre-Boot Authentication (PBA) is enabled.
• BitLocker Manager is installed, enabled, and encryption has completed.
• Dell Encryption (Mac) is installed and enabled, and policy-based encryption has been enforced.
• Dell Encryption (Windows) is installed, enabled, Policy-Based Encryption has been set for the endpoint, and device sweeps are
completed.
Encryption and Server Encryption Client
Troubleshooting
Upgrade to the Windows 10 Creators Update
To upgrade to the Windows 10 Fall Creators Update version, follow the instructions in the following article: http://www.dell.com/support/
article/us/en/19/SLN298382.
11
46 Dell Data Security Encryption Enterprise
Troubleshooting

Activation on a Server Operating System
When Encryption is installed on a server operating system, activation requires two phases of activation: initial activation and device
activation.
Troubleshooting Initial Activation
Initial activation fails when:
• A valid UPN cannot be constructed using the supplied credentials.
• The credentials are not found in the enterprise vault.
• The credentials used to activate are not the Domain Administrator's credentials.
Error Message: Unknown user name or bad password
The user name or password does not match.
Possible Solution: Try to log in again, ensuring that you type the user name and password exactly.
Error Message: Activation failed because the user account does not have domain admin rights.
The credentials used to activate do not have domain administrator rights, or the administrator's username was not in UPN format.
Possible Solution: In the Activation dialog, enter credentials for a domain Administrator and ensure that they are in UPN format.
Error Messages: A connection with the server could not be established.
or
The operation timed out.
Server Encryption could not communicate with port 8449 over HTTPS to the Dell Server.
Possible Solutions
• Connect directly to your network and try to activate again.
• If connected by VPN, try connecting directly to the network and try again to activate.
• Check the Dell Server URL to ensure it matches the URL supplied by the administrator. The URL and other data that the user entered
into the installer are stored in the registry. Check the accuracy of the data under [HKLM\SOFTWARE\Microsoft\Windows NT
\CurrentVersion\Winlogon\CMGShield] and [HKLM\SOFTWARE\Microsoft\Windows NT\CurrentVersion\Winlogon\CMGShield
\Servlet].
• Disconnect the server from the network. Restart the server and reconnect to the network.
Error Message: Activation failed because the Server is unable to support this request.
Possible Solutions
• Server Encryption cannot be activated against a legacy server; the Dell Server version must be version 9.1 or higher. If necessary,
upgrade your Dell Server to version 9.1 or higher.
• Check the Dell Server URL to ensure it matches the URL supplied by the administrator. The URL and other data that the user entered
into the installer are stored in the registry.
• Check the accuracy of the data under [HKLM\Software\Microsoft\Windows NT\CurrentVersion\Winlogon\CMGShield] and [HKLM
\Software\Microsoft\Windows NT\CurrentVersion\Winlogon\CMGShield\Servlet].
Initial Activation Process
The following diagram illustrates a successful initial activation.
Dell Data Security Encryption Enterprise
Troubleshooting
47
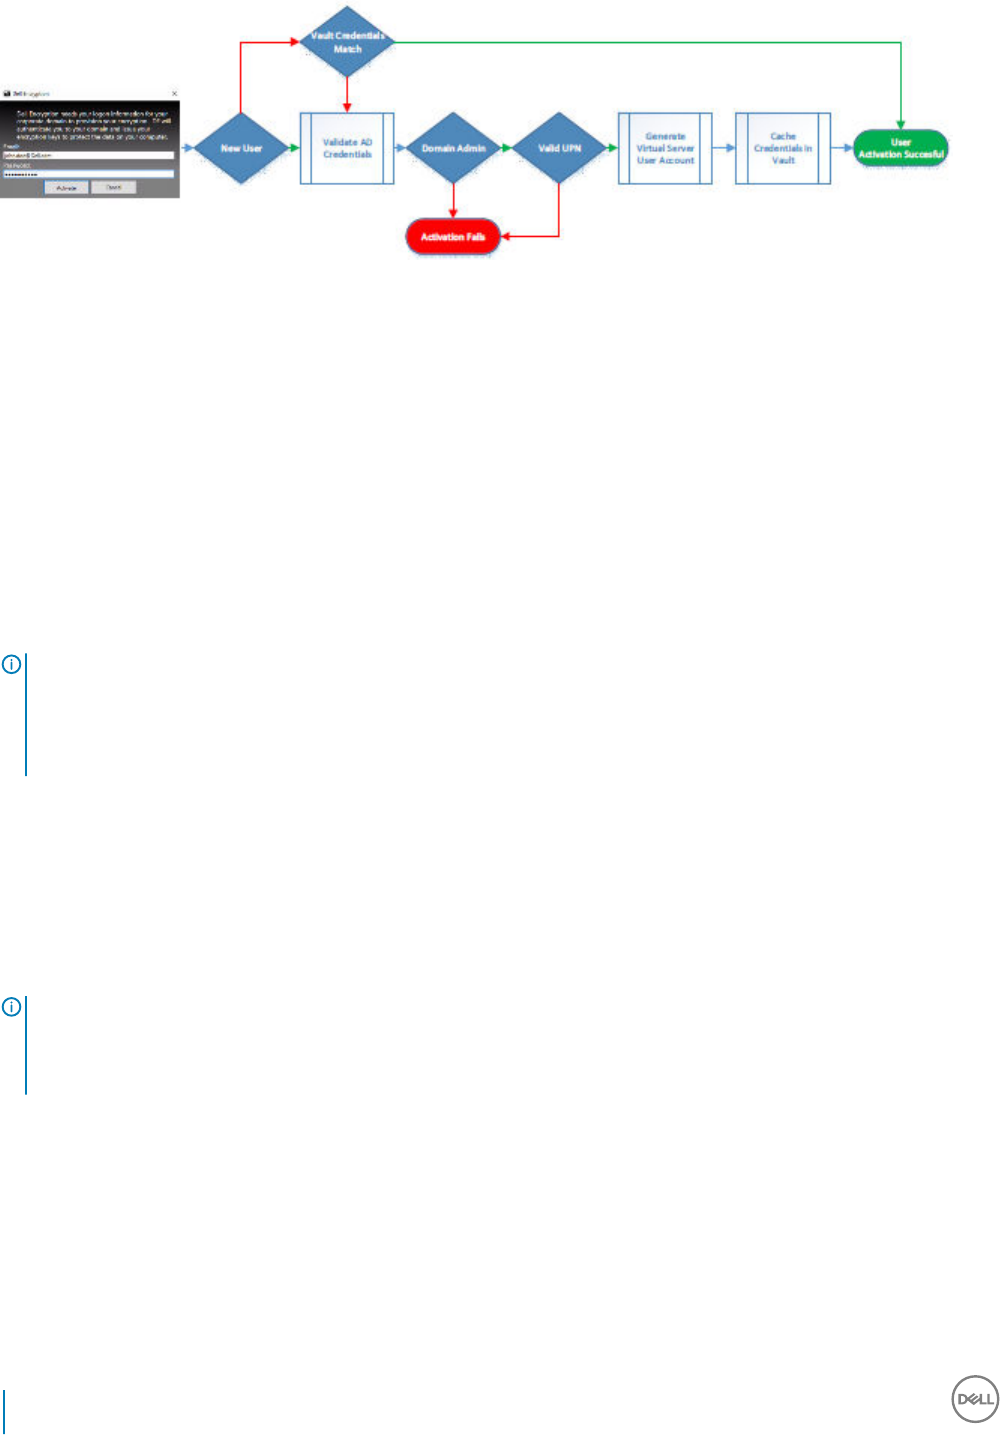
The initial activation process of Server Encryption requires a live user to access the server. The user can be of any type: domain or non-
domain, remote-desktop-connected or interactive user, but the user must have access to Domain Administrator credentials.
The Activation dialog box displays when one of the two following things happens:
• A new (unmanaged) user logs on to the computer.
• When a new user right-clicks the Encryption client icon in the system tray and selects Activate Dell Encryption.
The initial activation process is as follows:
1 The user logs in.
2 Detecting a new (unmanaged) user, the Activate dialog displays. The user clicks Cancel.
3 The user opens the Server Encryption's About box to conrm that it is running in Server mode.
4 The user right-clicks the Encryption client icon in the system tray and selects Activate Dell Encryption.
5 The user enters Domain Administrator credentials in the Activate dialog.
NOTE:
The requirement for Domain Administrator credentials is a safety measure that prevents Server Encryption from being rolled out
to other server environments that do not support it. To disable the requirement for Domain Administrator credentials, see Before
You Begin.
6 Dell Server checks for the credentials in the enterprise vault (Active Directory or equivalent) to verify that the credentials are Domain
Administrator credentials.
7 A UPN is constructed using the credentials.
8 With the UPN, the Dell Server creates a new user account for the virtual server user, and stores the credentials in the Dell Server's
vault.
The virtual server user account is for the exclusive use of the Encryption client. It will be used to authenticate with the server, to
handle Common encryption keys, and to receive policy updates.
NOTE:
Password and DPAPI authentication are disabled for this account so that only the virtual server user can access encryption keys
on the computer. This account does not correspond to any other user account on the computer or on the domain.
9 When activation is successful, the user restarts the computer, which kicks o the second part of activation, Authentication and
Device Activation.
Troubleshooting Authentication and Device Activation
Device activation fails when:
• The initial activation failed.
• The connection to the server could not be established.
• The trust certicate could not be validated.
48 Dell Data Security Encryption Enterprise
Troubleshooting
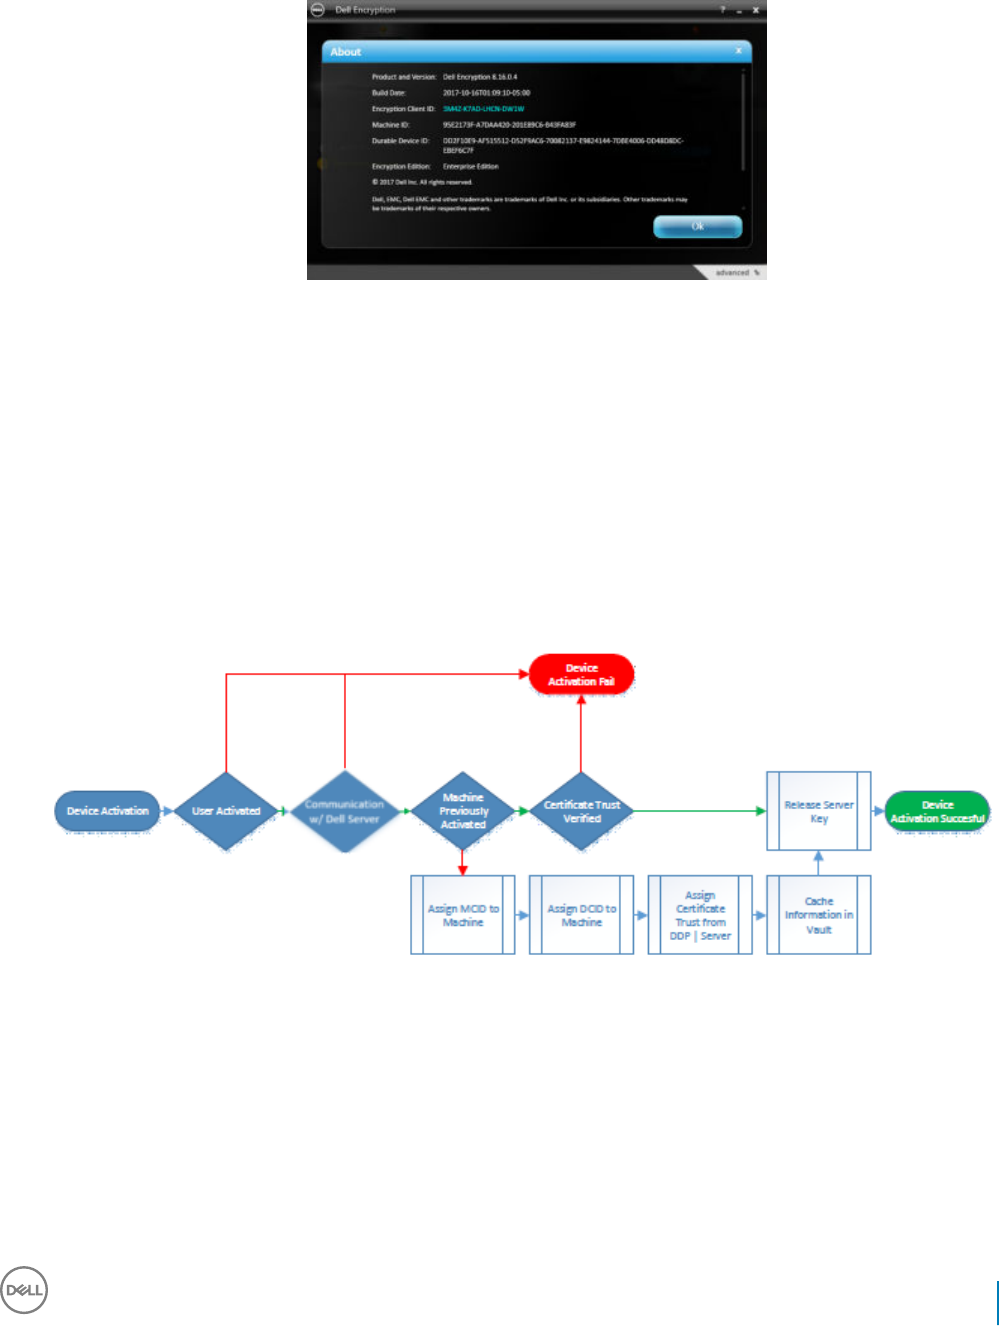
After activation, when the computer is restarted, Server Encryption automatically logs in as the virtual server user, requesting the Machine
key from the Security Management Server. This takes place even before any user can log in.
• Open the About dialog to conrm that Server Encryption is authenticated and in Server mode.
• If the Encryption client ID is red, encryption has not yet been activated.
• In the Remote Management Console, the version of a server with Server Encryption installed is listed as Shield for Server.
• If the Machine key retrieval fails due to a network failure, Server Encryption registers for network notications with the operating
system.
• If the Machine key retrieval fails:
• The virtual server user logon is still successful.
• Set up the Retry Interval Upon network Failure policy to make key retrieval attempts on a timed interval.
Refer to AdminHelp, available in the Remote Management Console, for details on the Retry Interval Upon network Failure policy.
Authentication and Device Activation Process
The following diagram illustrates successful authentication and device activation.
1 When restarted after a successful initial activation, a computer with Server Encryption automatically authenticates using the virtual
server user account and runs the Encryption client in Server mode.
2 The computer checks its device activation status with the Dell Server:
• If the computer has not previously device-activated, the Dell Server assigns the computer an MCID, a DCID, and a trust
certicate, and stores all of the information in the Dell Server's vault.
• If the computer had previously been device-activated, the Dell Server veries the trust certicate.
3 After the Dell Server assigns the trust certicate to the server, the server can access its encryption keys.
4 Device activation is successful.
Dell Data Security Encryption Enterprise
Troubleshooting
49

NOTE:
When running in Server mode, the Encryption client must have access to the same certicate as was used for device activation
to access the encryption keys.
Encryption External Media and PCS Interactions
To Ensure Media is Not Read-Only and the Port is Not Blocked
The Encryption External Media Access to unShielded Media policy interacts with Port Control System - Storage Class: External Drive
Control policy. If you intend to set the Encryption External Media Access to unShielded Media policy to Full Access, ensure that the Storage
Class: External Drive Control policy is also set to Full Access to ensure that the media is not set to read-only and the port is not blocked.
To Encrypt Data Written to CD/DVD
• Set Windows Media Encryption = On.
• Set EMS Exclude CD/DVD Encryption = not selected.
• Set Subclass Storage: Optical Drive Control = UDF Only.
Use WSScan
• WSScan allows you to ensure that all data is decrypted when uninstalling the Encryption client as well as view encryption status and
identify unencrypted les that should be encrypted.
• Administrator privileges are required to run this utility.
Run WSScan
1 From the Dell installation media, copy WSScan.exe to the Windows computer to scan.
2 Launch a command line at the location above and enter wsscan.exe at the command prompt. WSScan launches.
3 Click Advanced.
4 Select the type of drive to scan from the drop-down menu: All Drives, Fixed Drives, Removable Drives, or CDROMs/ DVDROMs.
5 Select the desired Encryption Report Type from the drop-down menu: Encrypted FIles, Unencrypted FIles, All FIles, or Unencrypted
FIles in Violation:
•Encrypted FIles - To ensure that all data is decrypted when uninstalling the Encryption client. Follow your existing process for
decrypting data, such as issuing a decryption policy update. After decrypting data, but before performing a restart in preparation
for uninstall, run WSScan to ensure that all data is decrypted.
•Unencrypted FIles - To identify les that are not encrypted, with an indication of whether the les should be encrypted (Y/N).
•All FIles - To list all encrypted and unencrypted les, with an indication of whether the les should be encrypted (Y/N).
•Unencrypted FIles in Violation - To identify les that are not encrypted that should be encrypted.
6 Click Search.
50 Dell Data Security Encryption Enterprise
Troubleshooting
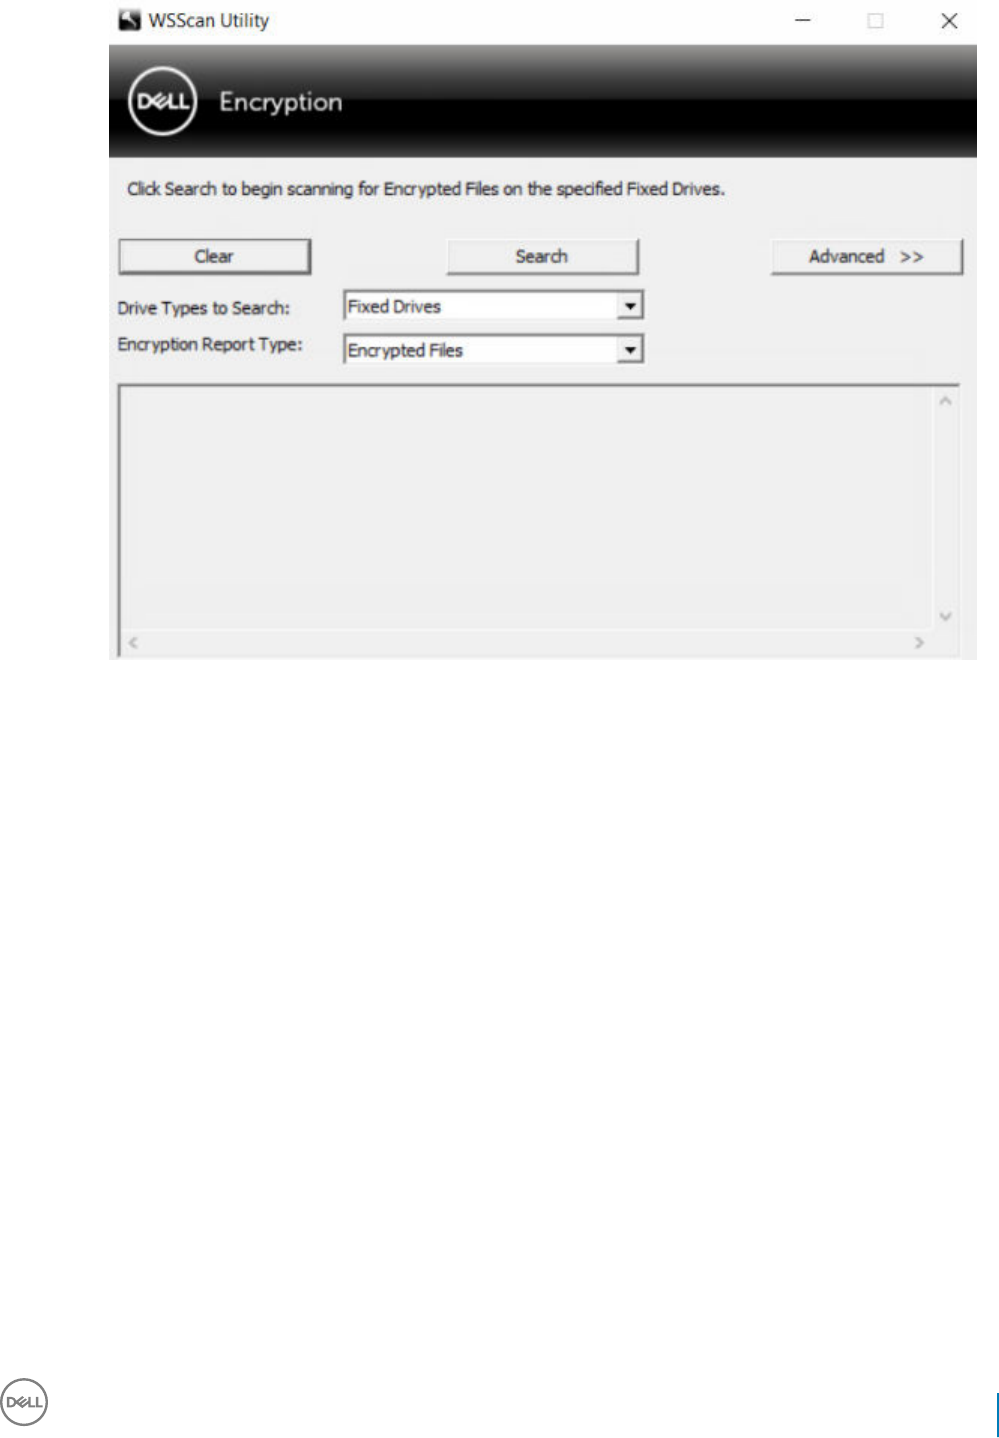
OR
1 Click Advanced to toggle the view to Simple to scan a particular folder.
2 Go to Scan Settings and enter the folder path in the Search Path eld. If this eld is used, the selection in the drop-down box is
ignored.
3 If you do not want to write WSScan output to a le, clear the Output to File check box.
4 Change the default path and lename in Path, if desired.
5 Select Add to Existing File if you do not want to overwrite any existing WSScan output les.
6 Choose the output format:
• Select Report Format for a report style list of scanned output. This is the default format.
• Select Value Delimited File for output that can be imported into a spreadsheet application. The default delimiter is "|", although it
can be changed to up to 9 alphanumeric, space, or keyboard punctuation characters.
• Select the Quoted Values option to enclose each value in double quotation marks.
• Select Fixed Width File for non-delimited output containing a continuous line of xed-length information about each encrypted le.
7 Click Search.
Click Stop Searching to stop your search. Click Clear to clear displayed messages.
Dell Data Security Encryption Enterprise
Troubleshooting
51
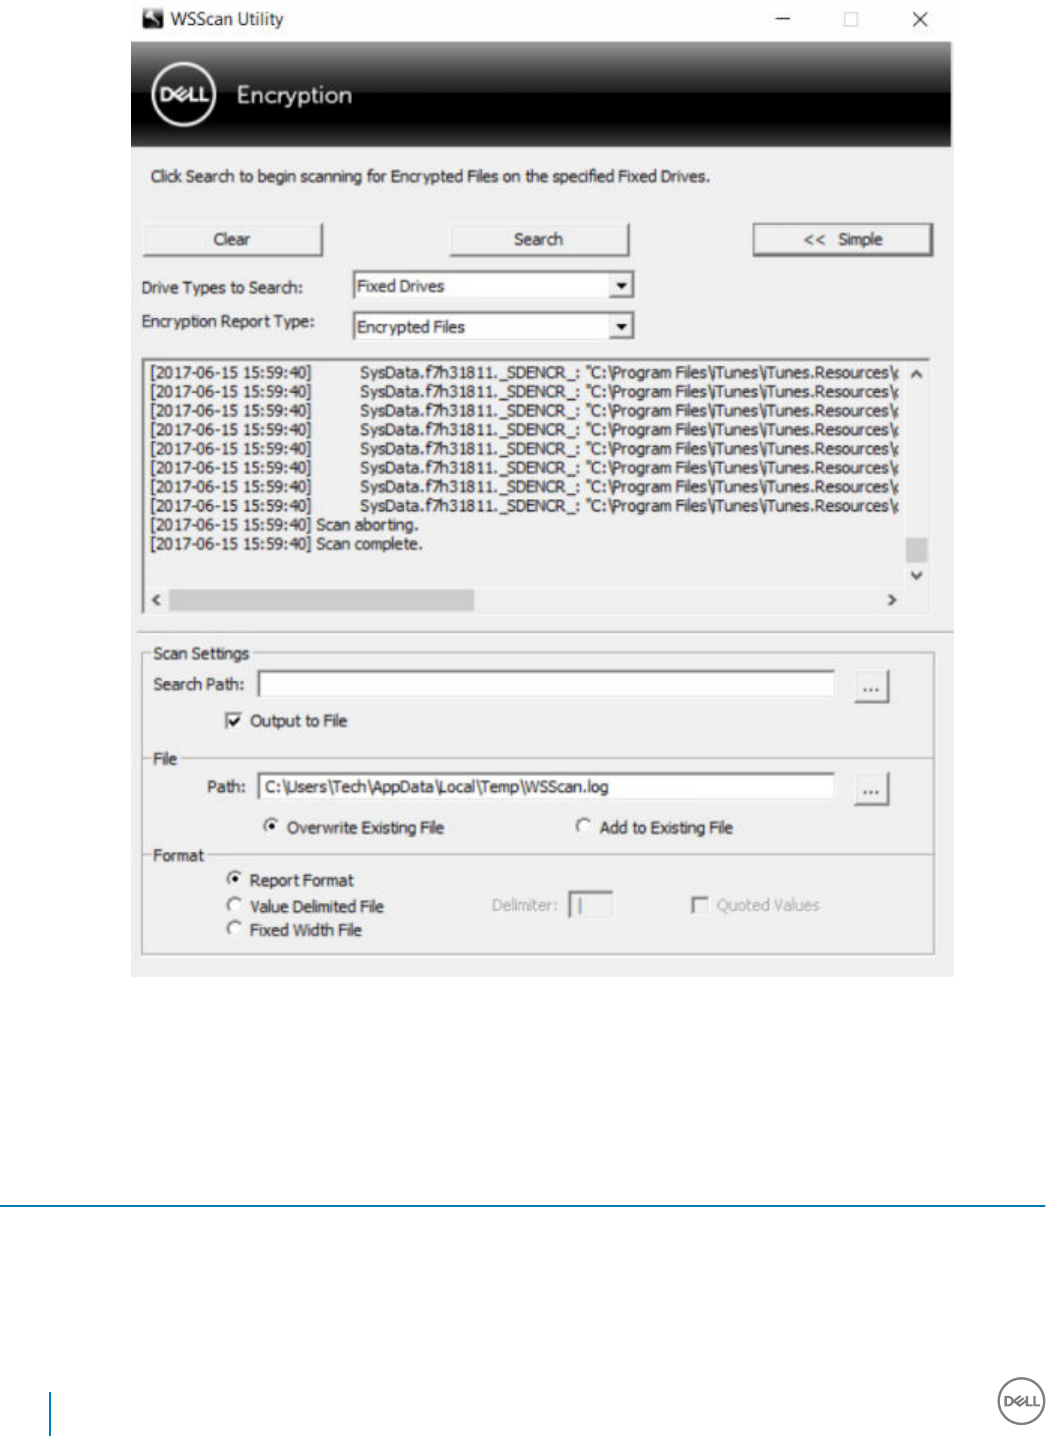
WSScan Output
WSScan information about encrypted les contains the following information.
Example Output:
[2015-07-28 07:52:33] SysData.7vdlxrsb._SDENCR_: "c:\temp\Dell - test.log" is still AES256 encrypted
Output Meaning
Date/time stamp The date and time the le was scanned.
Encryption type The type of encryption used to encrypt the le.
SysData: SDE Encryption Key.
52 Dell Data Security Encryption Enterprise
Troubleshooting

Output Meaning
User: User Encryption Key.
Common: Common Encryption Key.
WSScan does not report les encrypted using Encrypt for Sharing.
KCID The Key Computer ID.
As shown in the example above, "7vdlxrsb"
If you are scanning a mapped network drive, the scanning report does not return a KCID.
UCID The User ID.
As shown in the example above, "_SDENCR_"
The UCID is shared by all the users of that computer.
File The path of the encrypted le.
As shown in the example above, "c:\temp\Dell - test.log"
Algorithm The encryption algorithm being used to encrypt the le.
As shown in the example above, "is still AES256 encrypted"
RIJNDAEL 128
RIJNDAEL 256
AES 128
AES 256
3DES
Check Encryption Removal Agent Status
The Encryption Removal Agent displays its status in the description area of the Services panel (Start > Run... > services.msc > OK) as
follows. Periodically refresh the Service (highlight the Service > right-click > Refresh) to update its status.
•Waiting for SDE Deactivation - The Encryption client is still installed, is still congured, or both. Decryption does not start until the
Encryption client is uninstalled.
•Initial sweep - The Service is making an initial sweep, calculating the number of encrypted les and bytes. The initial sweep occurs one
time.
•Decryption sweep - The Service is decrypting les and possibly requesting to decrypt locked les.
•Decrypt on Reboot (partial) - The decryption sweep is complete and some locked les (but not all) are to be decrypted on the next
restart.
•Decrypt on Reboot - The decryption sweep is complete and all locked les are to be decrypted on the next restart.
•All les could not be decrypted - The decryption sweep is complete, but all les could not be decrypted. This status means one of the
following occurred:
• The locked les could not be scheduled for decryption because they were too big, or an error occurred while making the request to
unlock them.
• An input/output error occurred while decrypting les.
• The les could not be decrypted by policy.
• The les are marked as should be encrypted.
Dell Data Security Encryption Enterprise
Troubleshooting
53
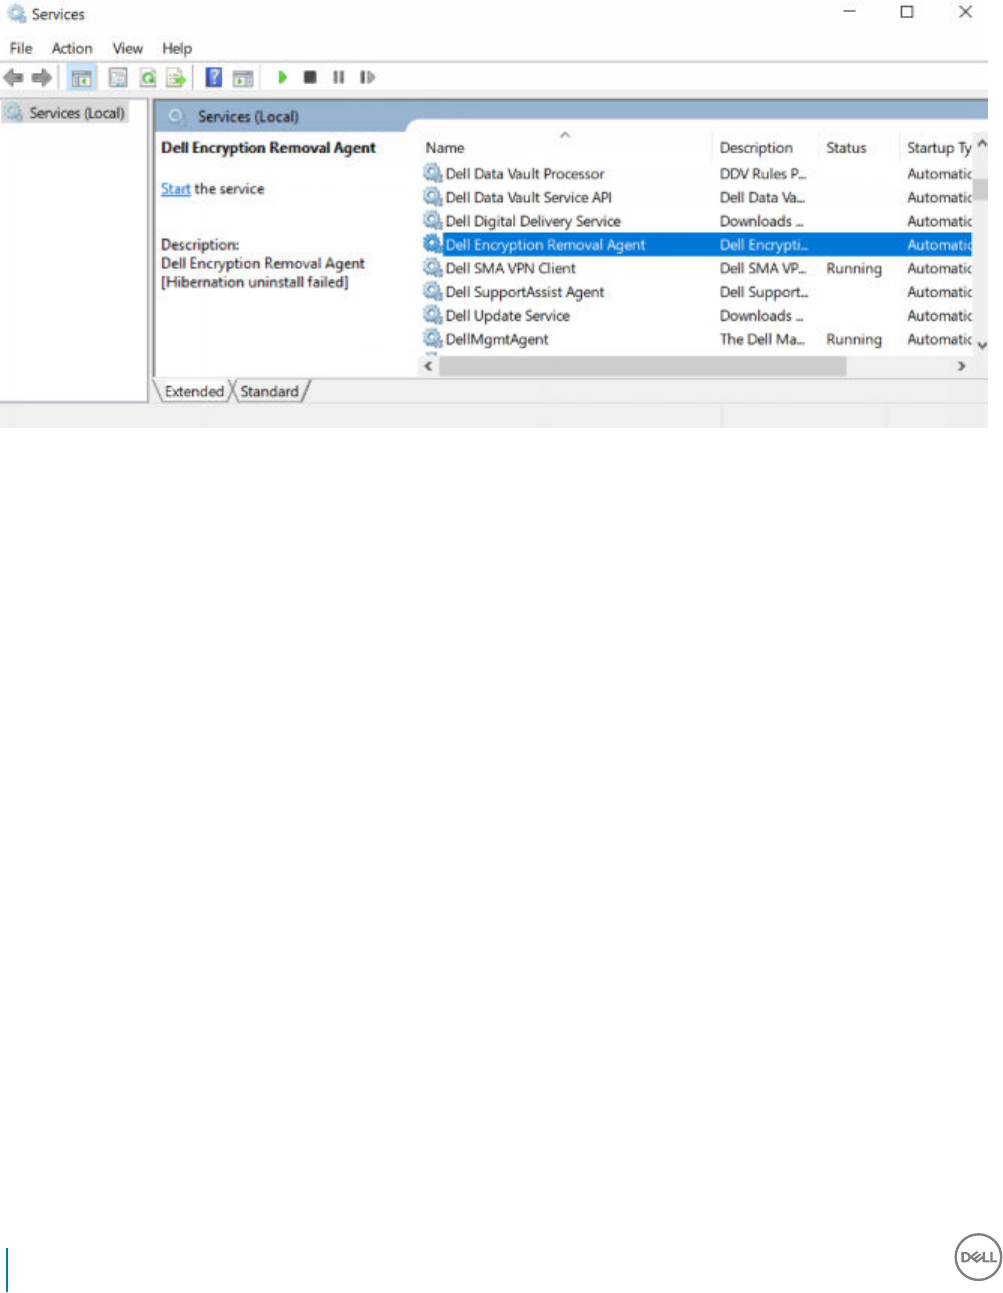
• An error occurred during the decryption sweep.
• In all cases, a log le is created (if logging is congured) when LogVerbosity=2 (or higher) is set. To troubleshoot, set the log
verbosity to 2 and restart the Encryption Removal Agent Service to force another decryption sweep.
•Complete - The decryption sweep is complete. The Service, the executable, the driver, and the driver executable are all scheduled for
deletion on the next restart.
Dell ControlVault Drivers
Update Dell ControlVault Drivers and Firmware
• Dell ControlVault drivers and rmware that are installed on Dell computers at the factory are outdated and should be updated by
following this procedure, in this order.
• If an error message is received during client installation prompting you to exit the installer to update Dell ControlVault drivers, the
message may be safely dismissed to continue with the installation of the client. The Dell ControlVault drivers (and rmware) can be
updated after the client installation is complete.
Download Latest Drivers
1 Go to support.dell.com.
54 Dell Data Security Encryption Enterprise
Troubleshooting
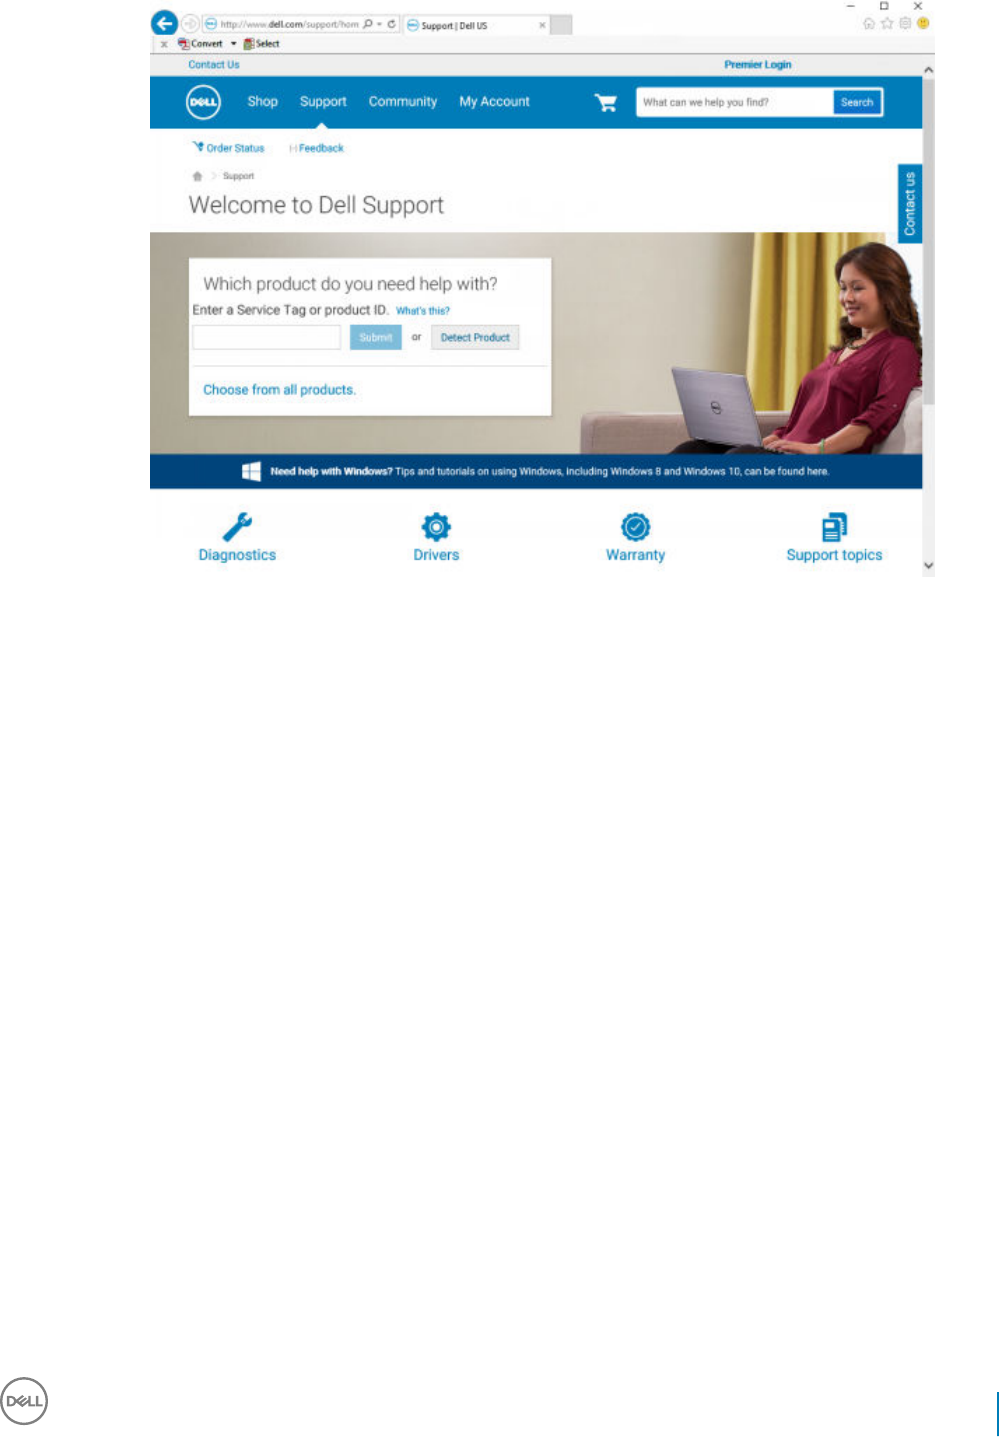
2 Select your computer model.
Dell Data Security Encryption Enterprise
Troubleshooting
55
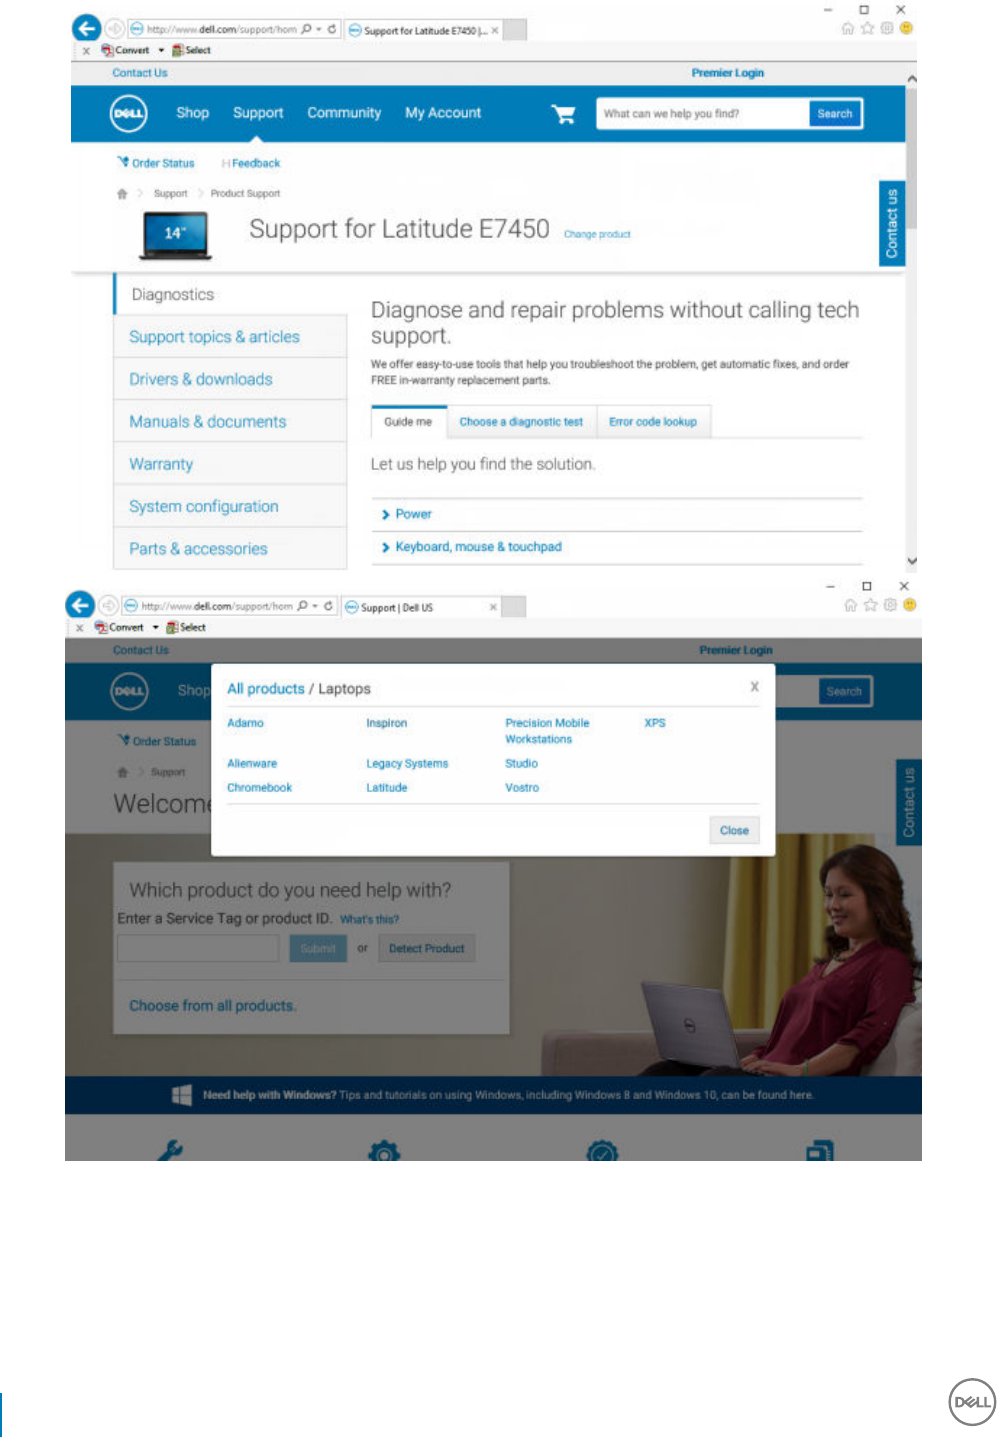
3 Select Drivers & Downloads.
56 Dell Data Security Encryption Enterprise
Troubleshooting
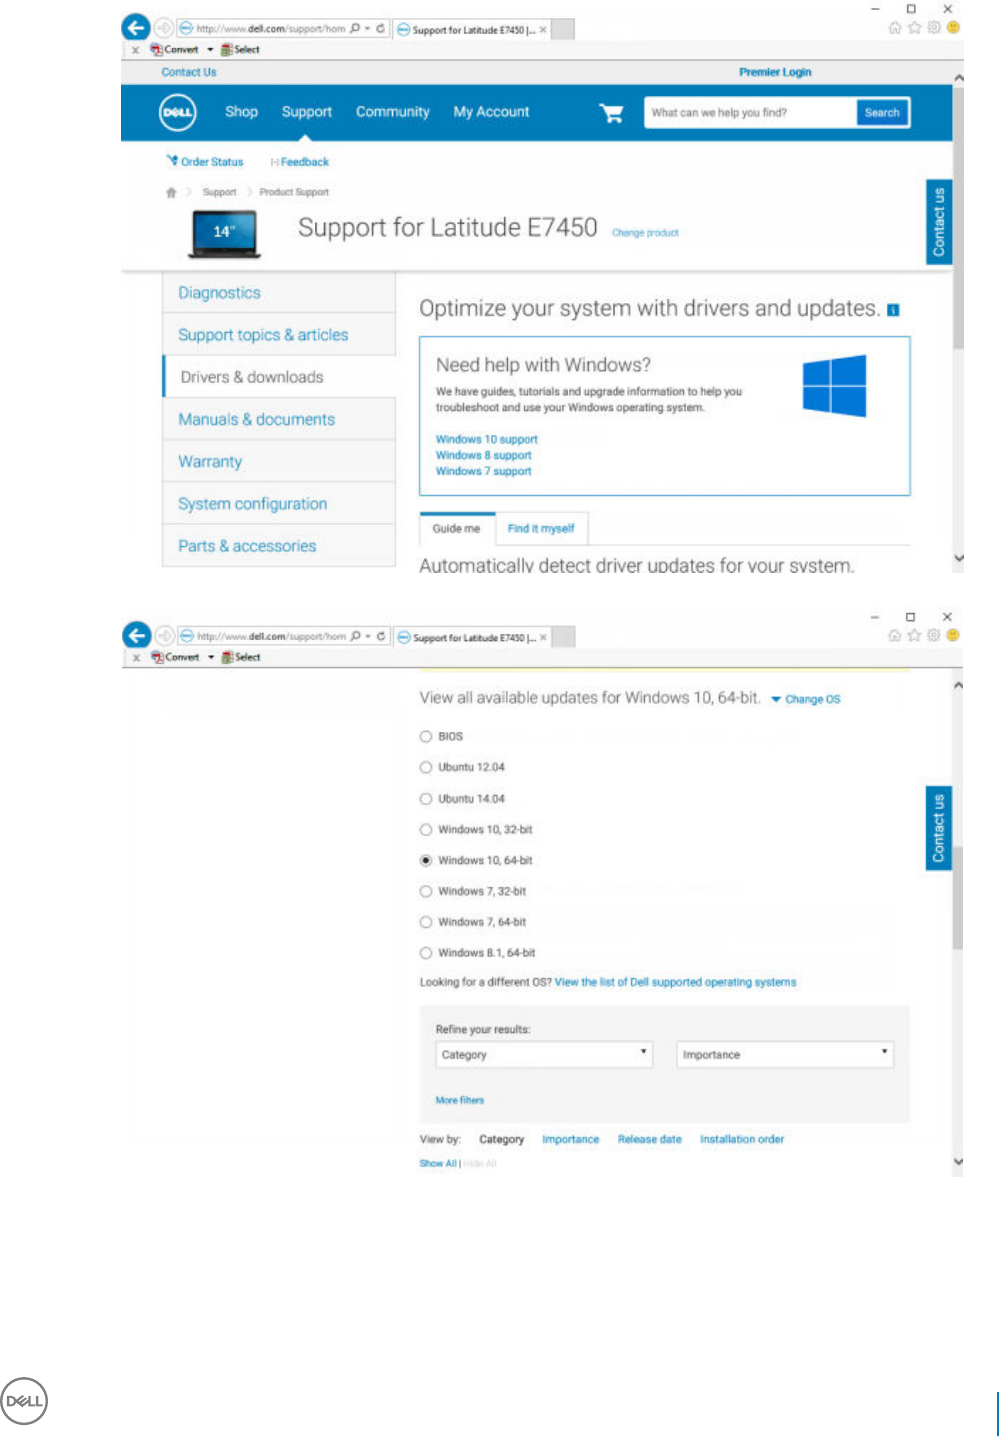
4 Select the Operating System of the target computer.
5 Expand the Security category.
Dell Data Security Encryption Enterprise
Troubleshooting
57
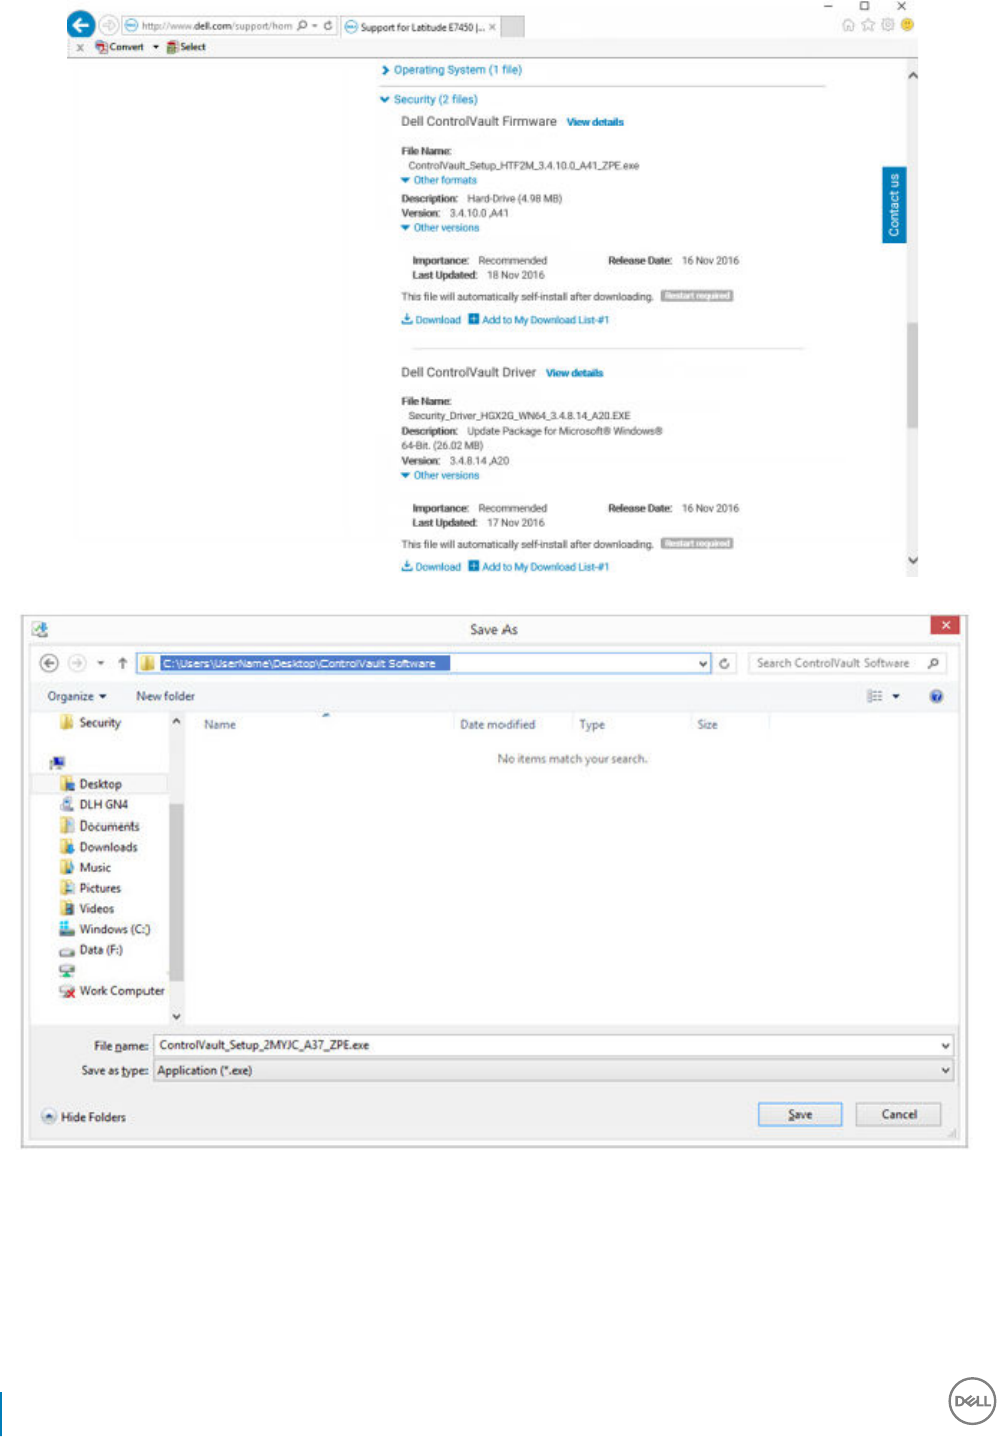
6 Download and save the Dell ControlVault Drivers.
7 Download and save the Dell ControlVault Firmware.
58 Dell Data Security Encryption Enterprise
Troubleshooting
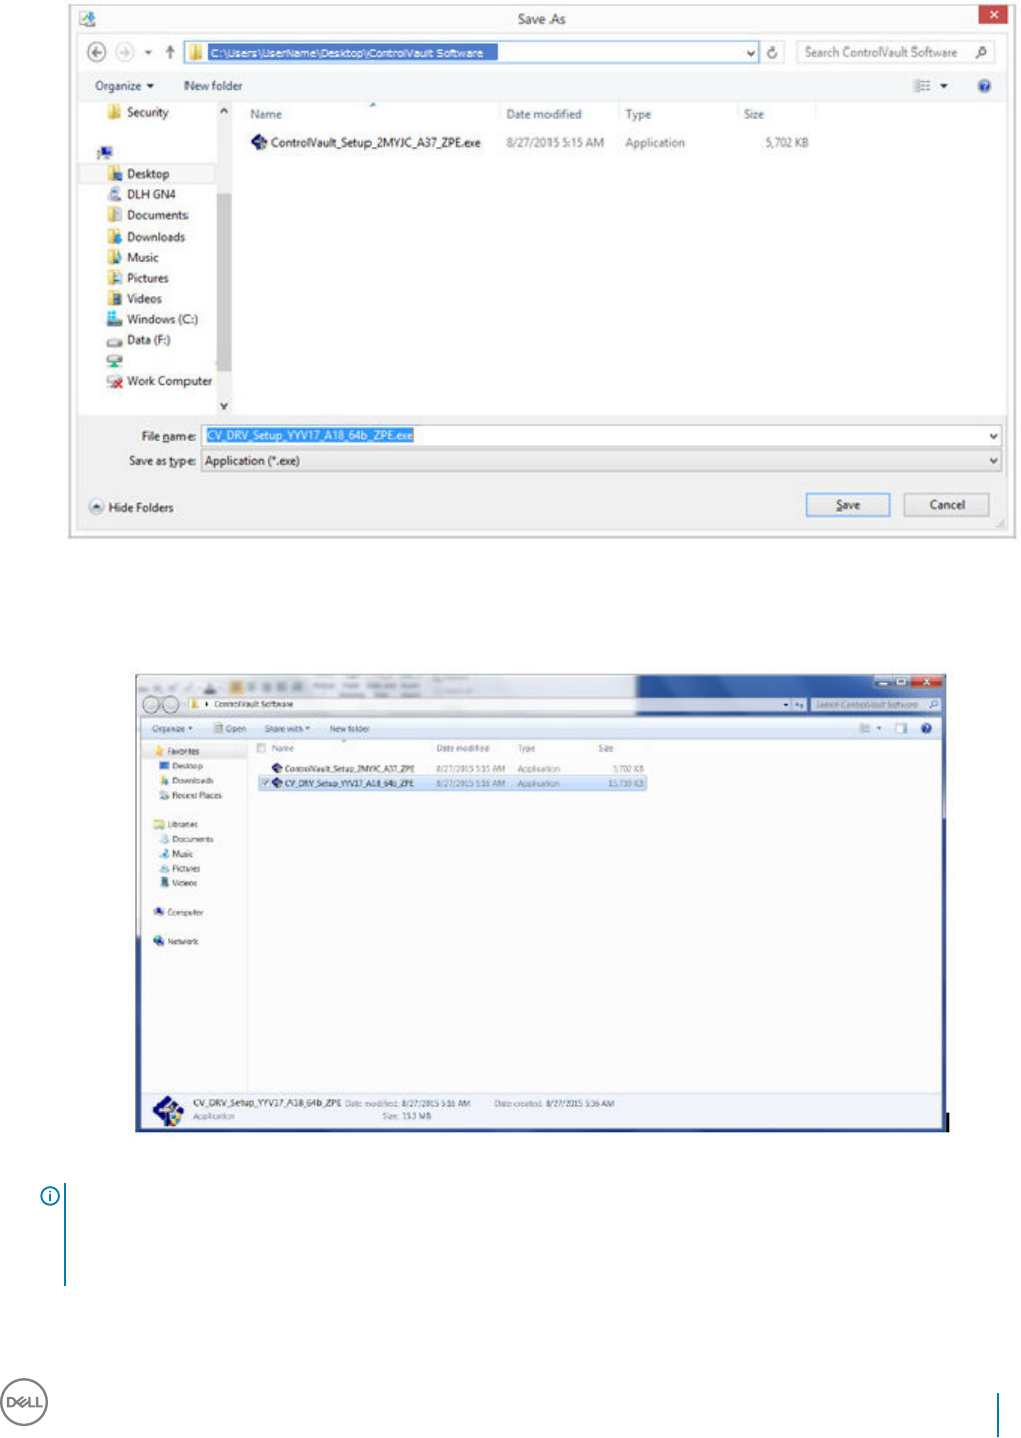
8 Copy the drivers and rmware to the target computers, if needed.
Install Dell ControlVault Driver
1 Navigate to the folder which you downloaded the driver installation le.
2 Double-click the Dell ControlVault driver to launch the self-extracting executable le.
TIP:
Be sure to install the driver rst. The lename of the driver at the time of this document creation is
ControlVault_Setup_2MYJC_A37_ZPE.exe.
3 Click Continue to begin.
Dell Data Security Encryption Enterprise
Troubleshooting
59
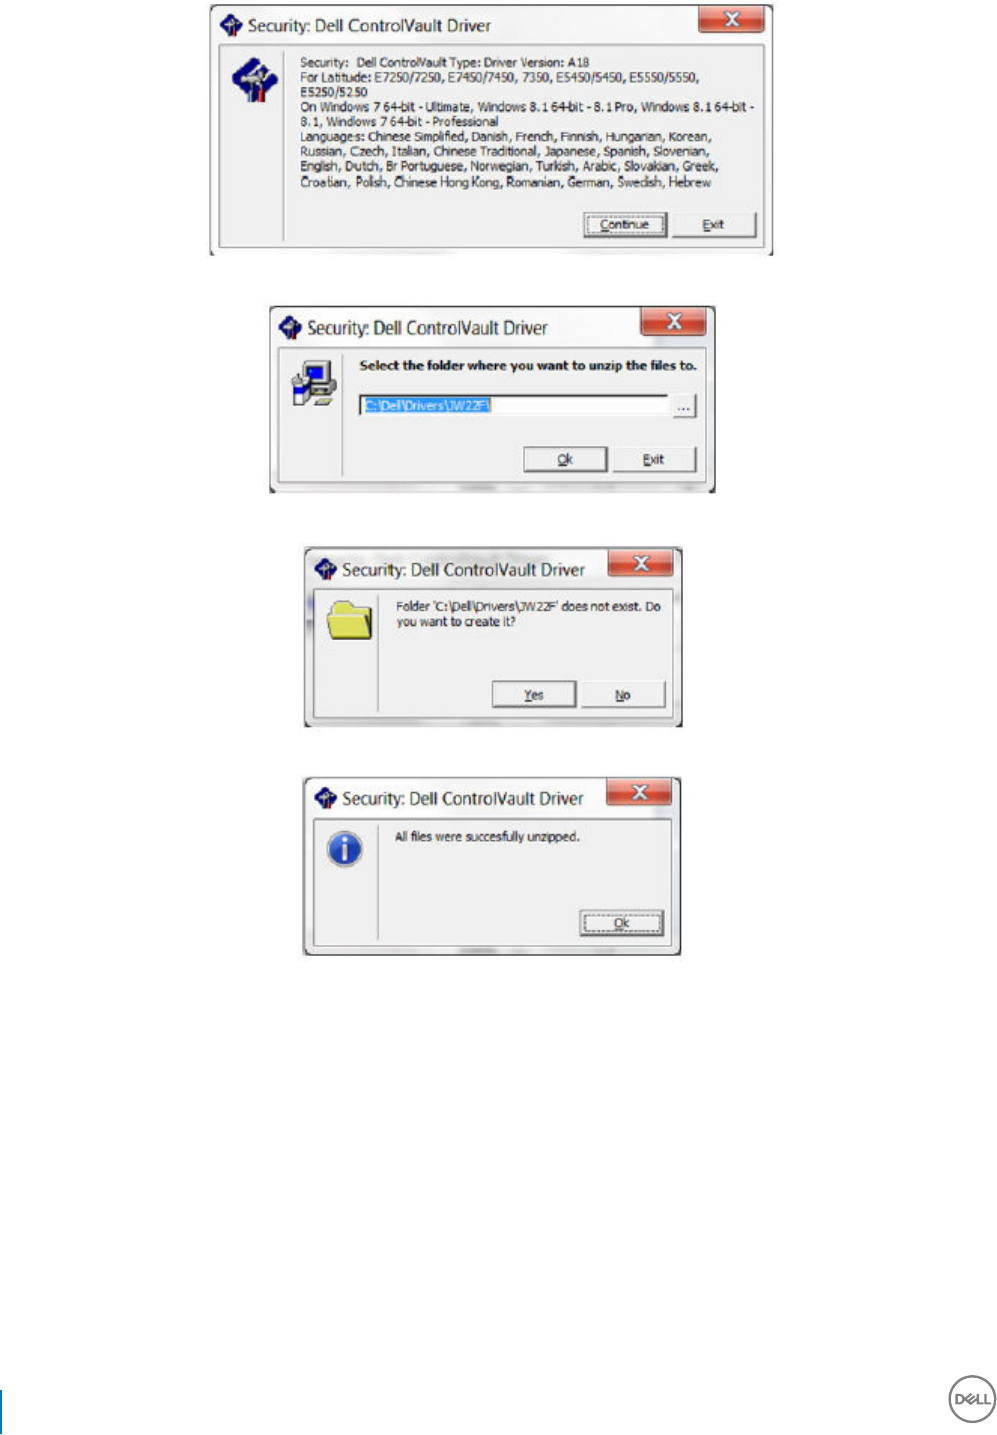
4 Click Ok to unzip the driver les in the default location of C:\Dell\Drivers\<New Folder>.
5 Click Yes to allow the creation of a new folder.
6 Click Ok when the successfully unzipped message displays.
7 The folder which contains the les should display after extraction. If not, navigate to the folder to which you extracted the les. In this
case, the folder is JW22F.
60 Dell Data Security Encryption Enterprise
Troubleshooting
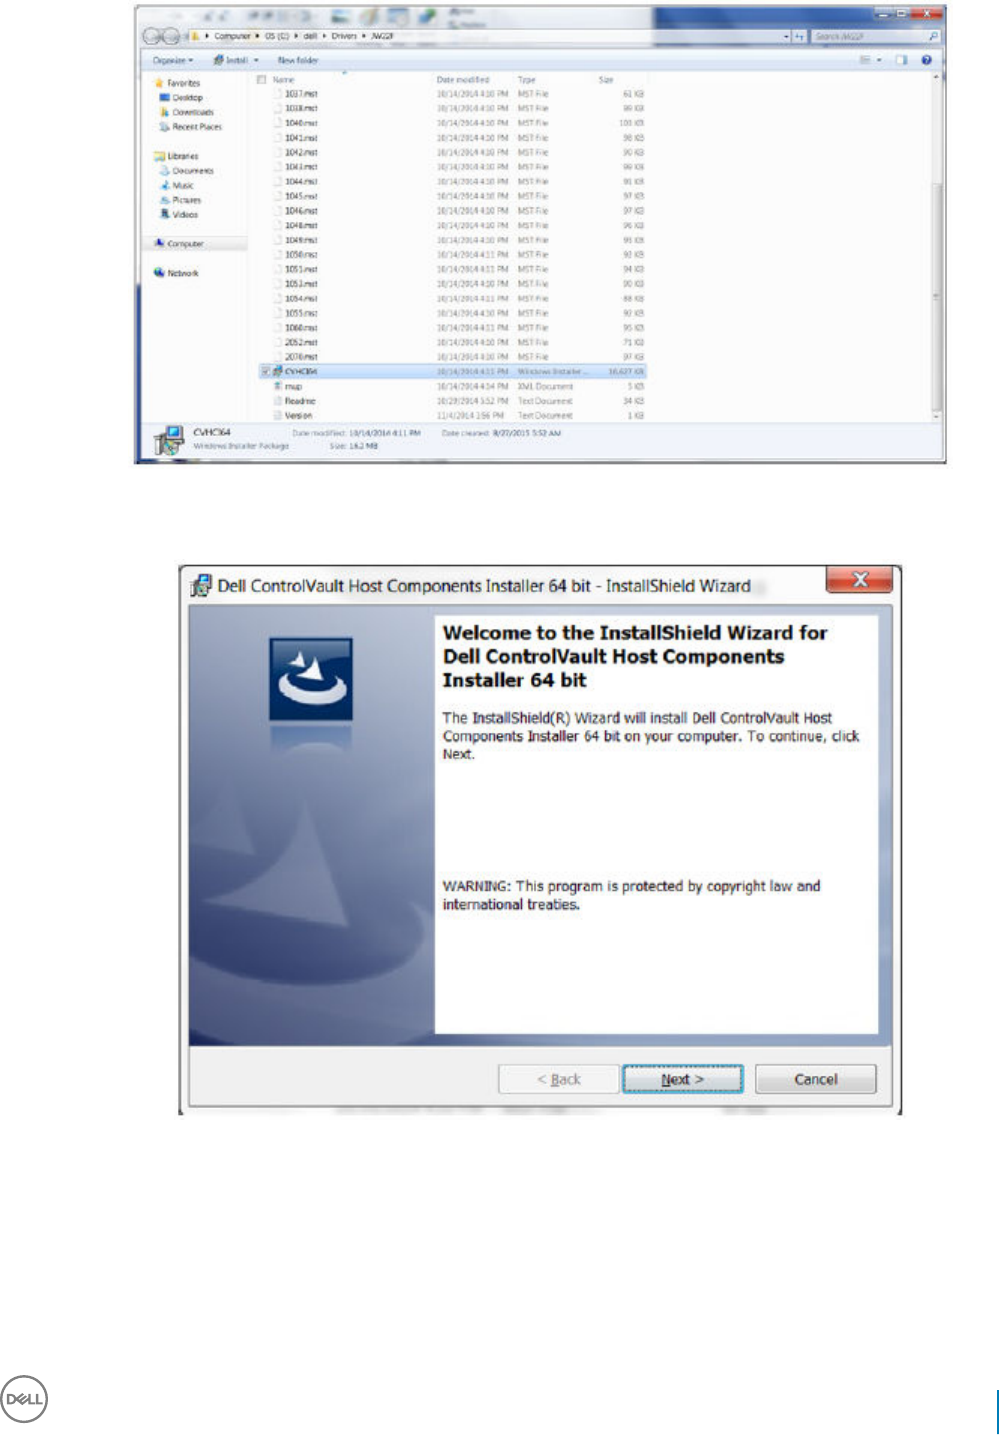
8 Double-click CVHCI64.MSI to launch the driver installer. [this example is CVHCI64.MSI in this example (CVHCI for a 32-bit
computer)].
9 Click Next at the Welcome screen.
10 Click Next to install the drivers in the default location of C:\Program Files\Broadcom Corporation\Broadcom USH Host Components\.
Dell Data Security Encryption Enterprise
Troubleshooting
61
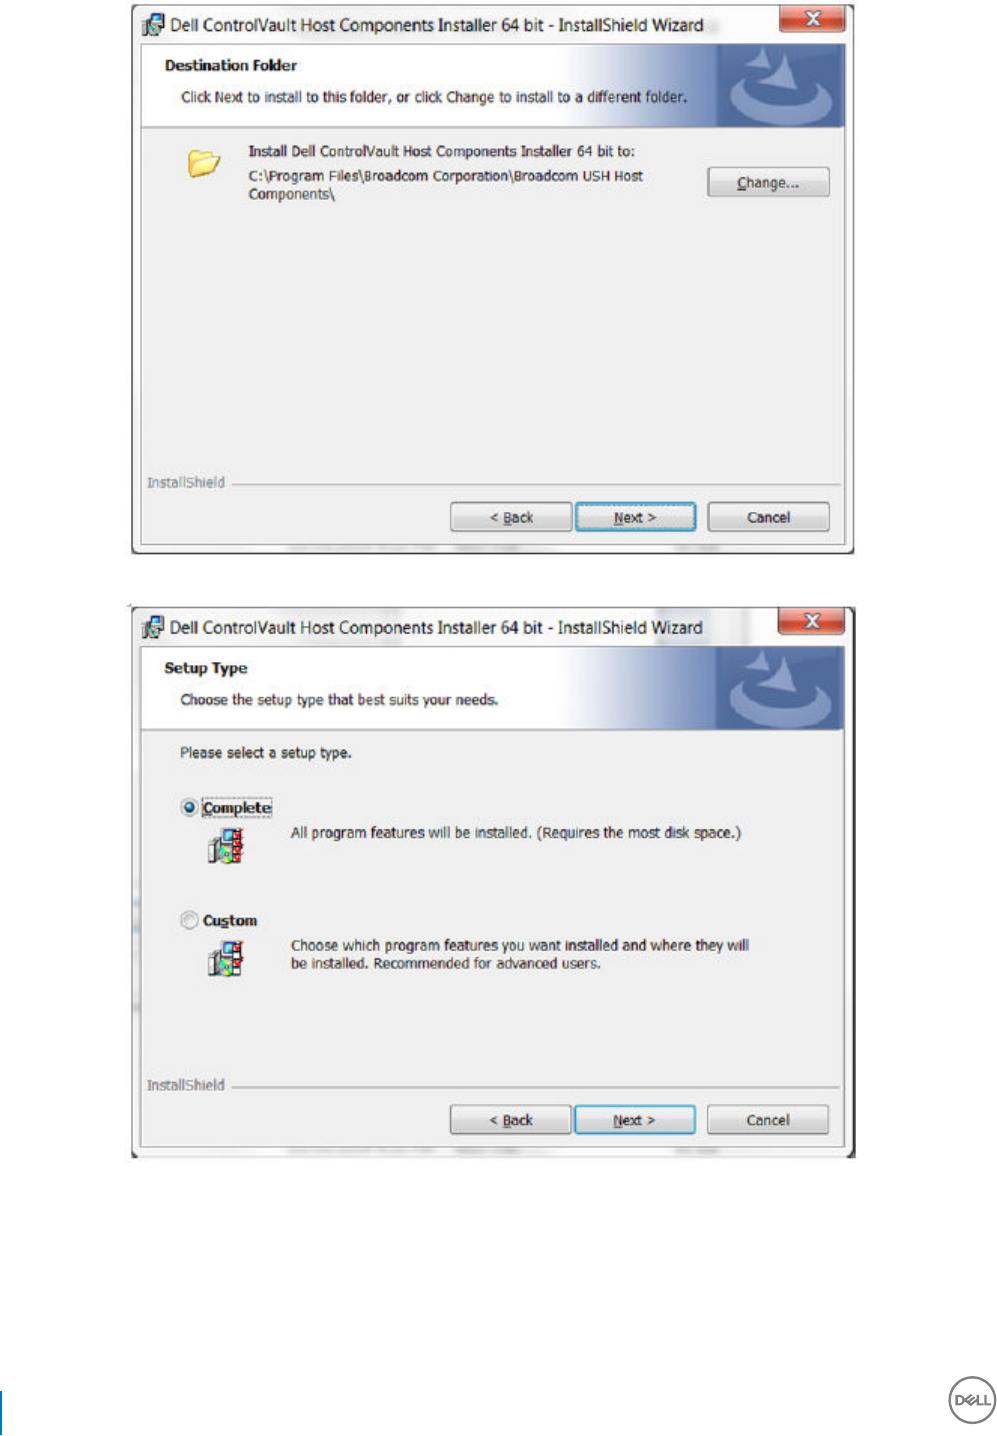
11 Select the Complete option and click Next.
12 Click Install to begin the installation of the drivers.
62 Dell Data Security Encryption Enterprise
Troubleshooting
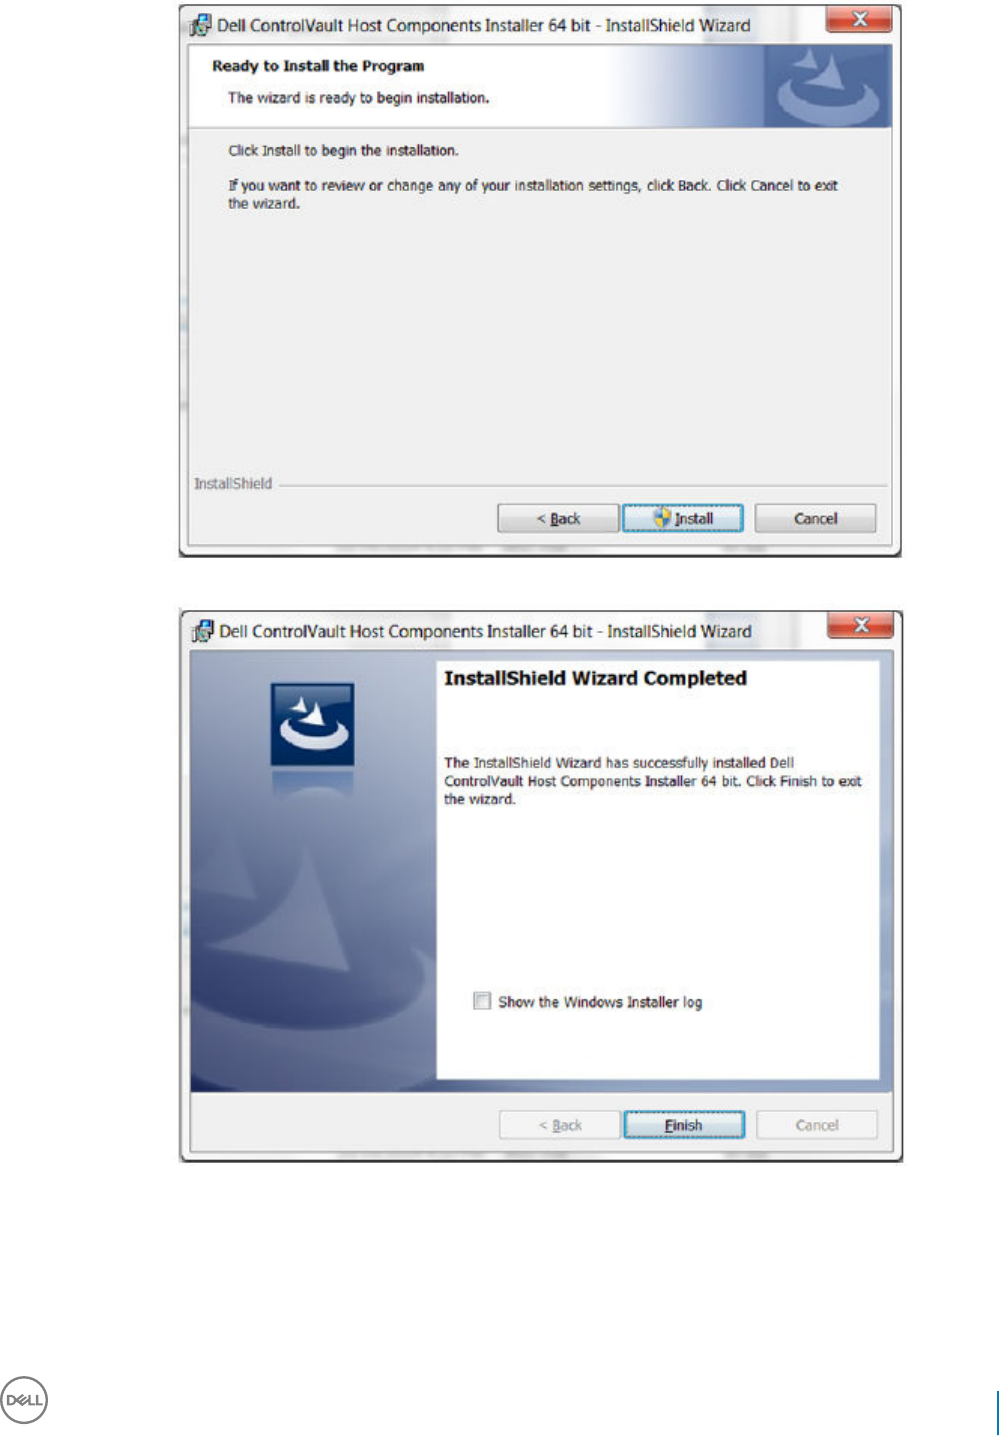
13 Optionally check the box to display the installer log le. Click Finish to exit the wizard.
Verify Driver Installation
• The Device Manager will have a Dell ControlVault device (and other devices) depending on the operating system and hardware
conguration.
Install Dell ControlVault Firmware
Dell Data Security Encryption Enterprise
Troubleshooting
63
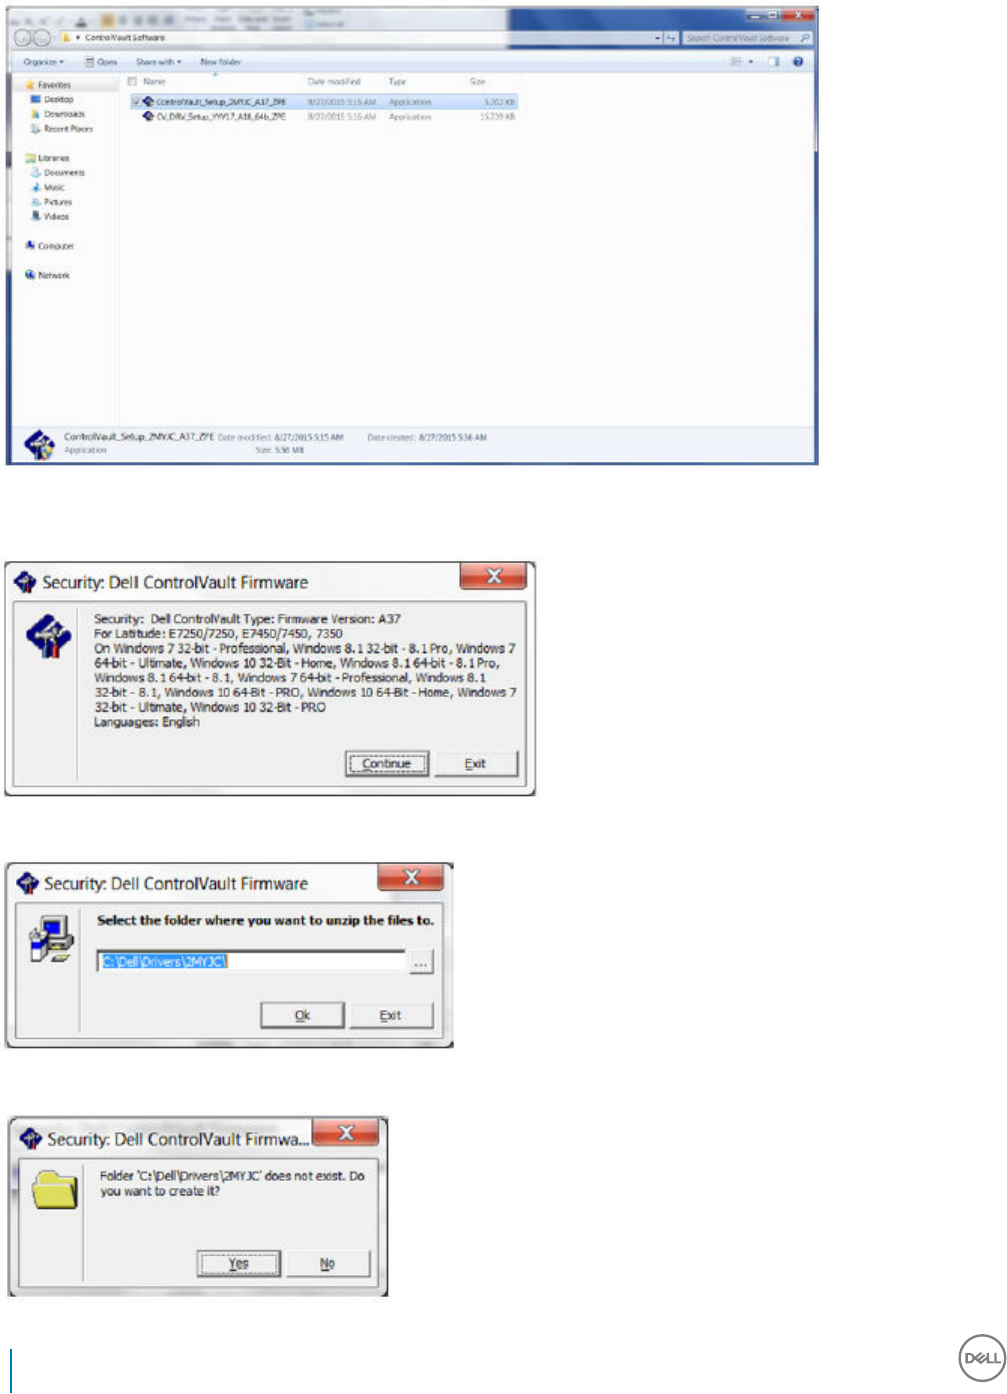
1 Navigate to the folder which you downloaded the rmware installation le.
2 Double-click the Dell ControlVault rmware to launch the self-extracting executable le.
3 Click Continue to begin.
4 Click Ok to unzip the driver les in the default location of C:\Dell\Drivers\<New Folder>.
5 Click Yes to allow the creation of a new folder.
64 Dell Data Security Encryption Enterprise
Troubleshooting
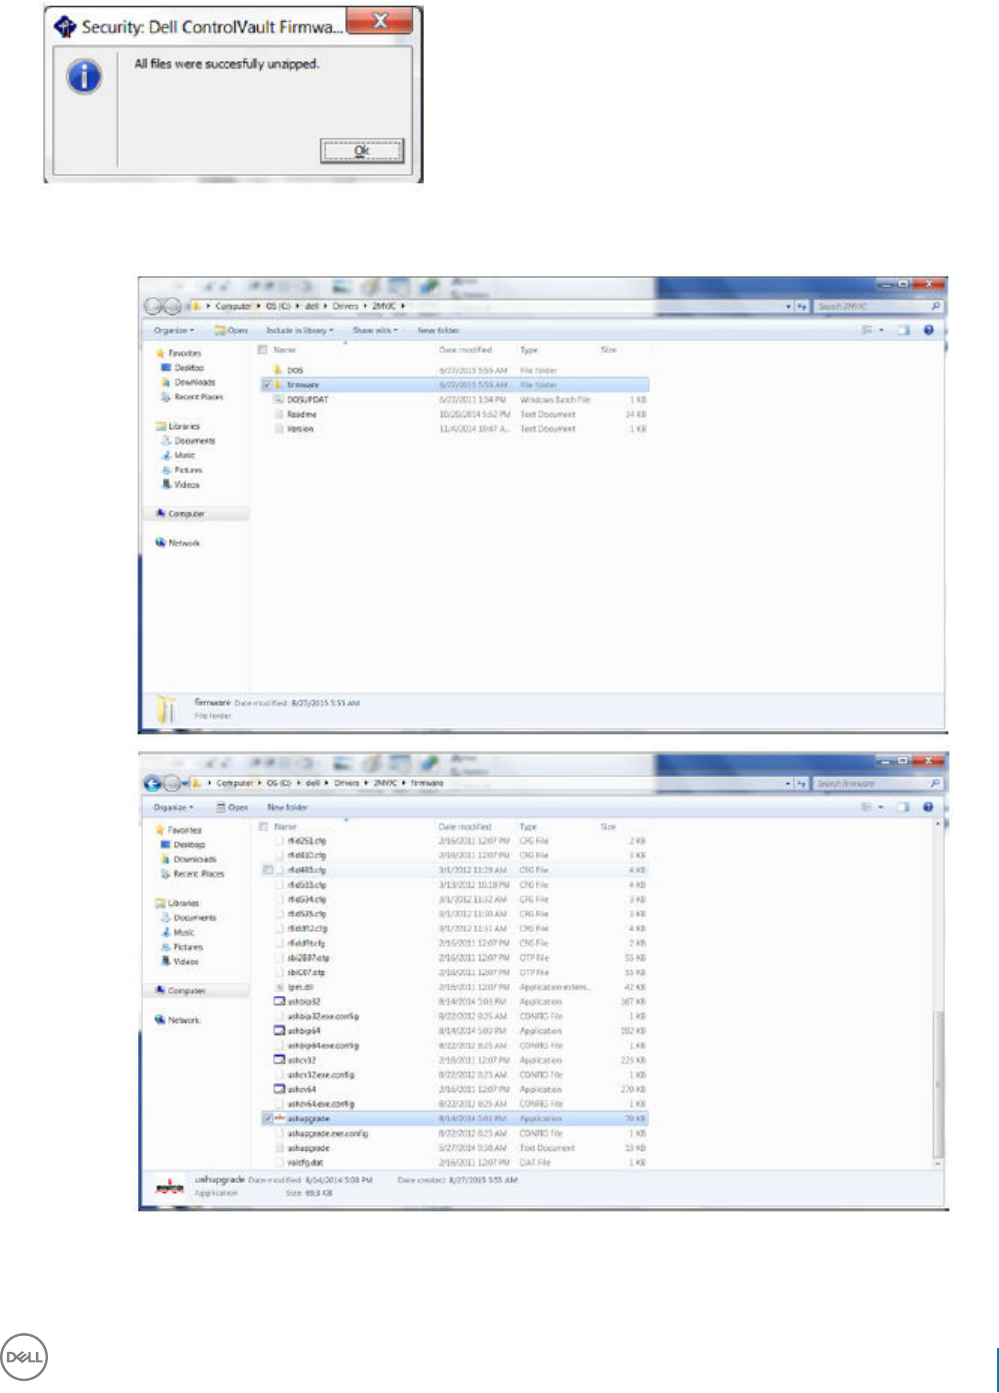
6 Click Ok when the successfully unzipped message displays.
7 The folder which contains the les should display after extraction. If not, navigate to the folder to which you extracted the les. Select
the rmware folder.
8 Double-click ushupgrade.exe to launch the rmware installer.
9 Click Start to begin the rmware upgrade.
Dell Data Security Encryption Enterprise
Troubleshooting
65
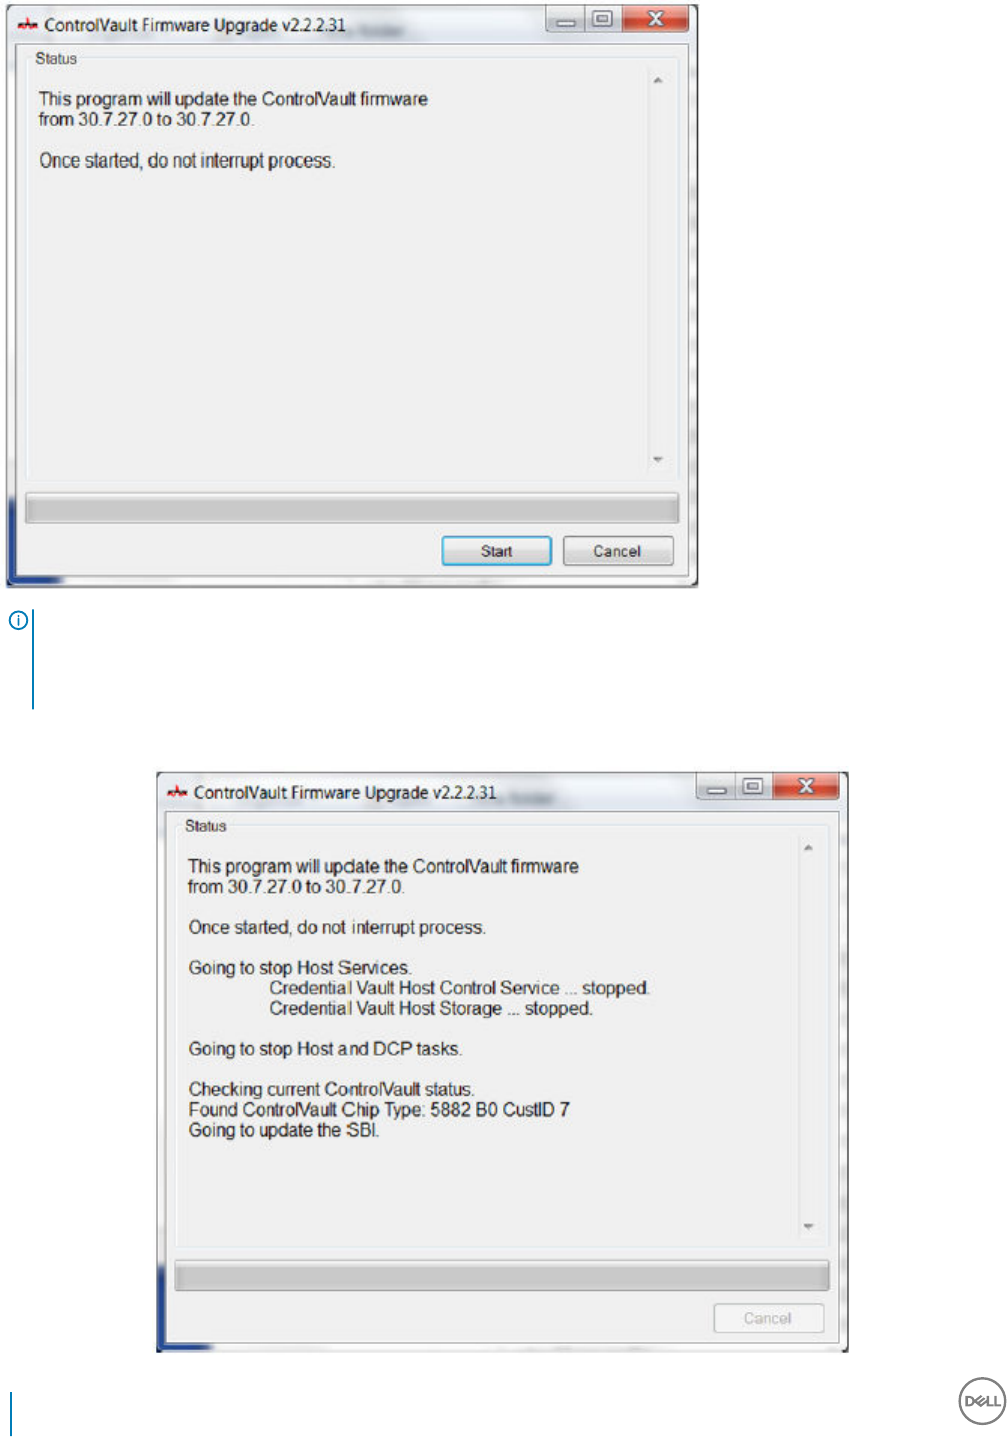
IMPORTANT:
You may be asked to enter the admin password if upgrading from an older version of rmware. Enter Broadcom as the
password and click Enter if presented with this dialog.
Several status messages display.
66 Dell Data Security Encryption Enterprise
Troubleshooting
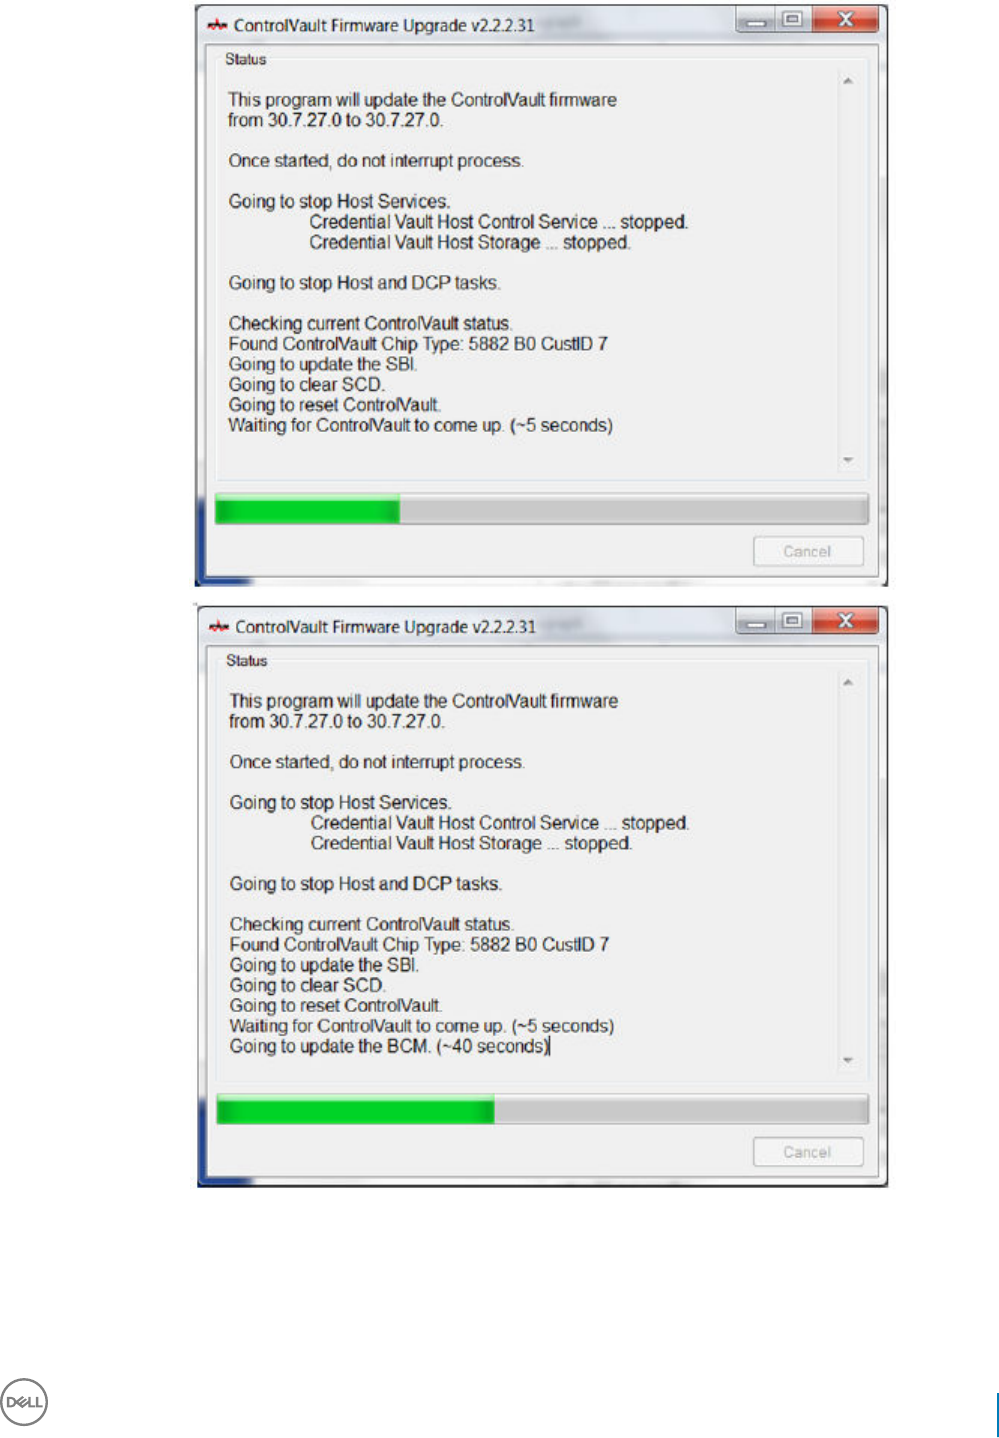
Dell Data Security Encryption Enterprise
Troubleshooting
67
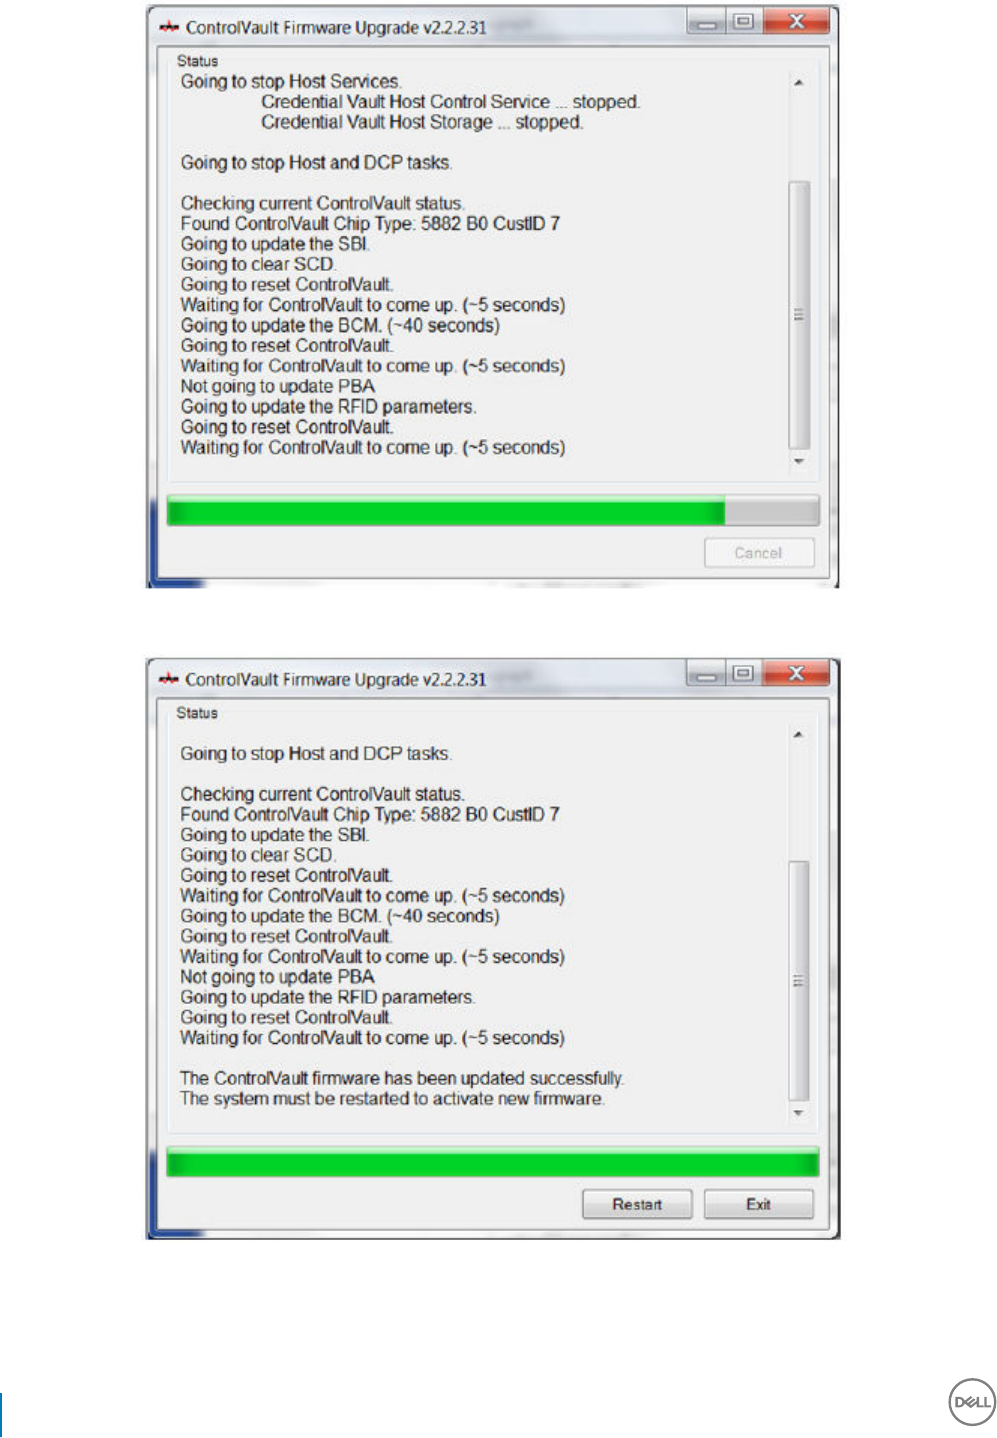
10 Click Restart to complete the rmware upgrade.
The update of the Dell ControlVault drivers and rmware is complete.
68 Dell Data Security Encryption Enterprise
Troubleshooting

Glossary
Advanced Authentication - The Advanced Authentication product supports login with self-encrypting drives, SSO, and manages user
credentials and passwords. In addition, Advanced Authentication can be used to access not only PCs, but any website, SaaS, or application.
Once users enroll their credentials, Advanced Authentication allows use of those credentials to logon to the device and perform password
replacement.
BitLocker Manager - Windows BitLocker is designed to help protect Windows computers by encrypting both data and operating system
les. To improve the security of BitLocker deployments and to simplify and reduce the cost of ownership, Dell provides a single, central
management console that addresses many security concerns and oers an integrated approach to managing encryption across other non-
BitLocker platforms, whether physical, virtual, or cloud-based. BitLocker Manager supports BitLocker encryption for operating systems,
xed drives, and BitLocker To Go. BitLocker Manager enables you to seamlessly integrate BitLocker into your existing encryption needs and
to manage BitLocker with the minimum eort while streamlining security and compliance. BitLocker Manager provides integrated
management for key recovery, policy management and enforcement, automated TPM management, FIPS compliance, and compliance
reporting.
Deactivate - Deactivation occurs when SED management is turned OFF in the Remote Management Console. Once the computer is
deactivated, the PBA database is deleted and there is no longer any record of cached users.
Encryption External Media - This service within the Dell Encryption client applies policies to removable media and external storage devices.
Encryption External Media Access Code - This service within the Security Management Server/Security Management Server Virtual
allows for recovery of Encryption External Media protected devices where the user forgets their password and can no longer login.
Completing this process allows the user to reset the password set on the removable media or external storage device.
Encryption Client - The Encryption client is the on-device component that enforces security policies, whether an endpoint is connected to
the network, disconnected from the network, lost, or stolen. Creating a trusted computing environment for endpoints, the Encryption client
operates as a layer on top of the device operating system, and provides consistently-enforced authentication, encryption, and authorization
to maximize the protection of sensitive information.
Endpoint - a computer that is managed by Security Management Server/Security Management Server Virtual.
Encryption Sweep - An encryption sweep is the process of scanning the folders to be encrypted on a managed endpoint to ensure the
contained les are in the proper encryption state. Ordinary le creation and rename operations do not trigger an encryption sweep. It is
important to understand when an encryption sweep may happen and what may aect the resulting sweep times, as follows: - An
encryption sweep will occur upon initial receipt of a policy that has encryption enabled. This can occur immediately after activation if your
policy has encryption enabled. - If the Scan Workstation on Logon policy is enabled, folders specied for encryption will be swept on each
user logon. - A sweep can be re-triggered under certain subsequent policy changes. Any policy change related to the denition of the
encryption folders, encryption algorithms, encryption key usage (common versus user), will trigger a sweep. In addition, toggling between
encryption enabled and disabled will trigger an encryption sweep.
Machine key – When encryption is installed on a server, the Machine key protects a server’s le encryption and policy keys. The Machine
Key is stored on the Security Management Server/Security Management Server Virtual. The new Server exchanges certicates with the
Dell Server during activation and uses the certicate for subsequent authentication events.
SED Management - SED Management provides a platform for securely managing self-encrypting drives. Although SEDs provide their own
encryption, they lack a platform to manage their encryption and available policies. SED Management is a central, scalable management
component, which allows you to more eectively protect and manage your data. SED Management ensures that you will be able to
administer your enterprise more quickly and easily.
12
Dell Data Security Encryption Enterprise
Glossary
69

Server user – A virtual user account created by Dell Server Encryption for the purpose of handling encryption keys and policy updates. This
user account does not correspond to any other user account on the computer or within the domain, and it has no username and password
that can be used physically. The account is assigned a unique UCID value in the Dell Server/Security Management Server Virtual Remote
Management Console.
70 Dell Data Security Encryption Enterprise
Glossary
