Dell Dp Endpt Security Suite Data Endpoint Pro Advanced Installation Guide V1.8 User Manual Administrator Guide6 En Us
User Manual: Dell dell-dp-endpt-security-suite - Endpoint Security Suite Pro Advanced Installation Guide v1.8
Open the PDF directly: View PDF ![]() .
.
Page Count: 126 [warning: Documents this large are best viewed by clicking the View PDF Link!]
- Dell Data Security Endpoint Security Suite Pro Advanced Installation Guide v1.8
- Introduction
- Requirements
- Registry Settings
- Install Using the Master Installer
- Uninstall Using the Endpoint Security Suite Pro Master Installer
- Install Using the Child Installers
- Uninstall Using the Child Installers
- Commonly Used Scenarios
- Pre-Installation Configuration for SED UEFI, and BitLocker Manager
- Set GPO on Domain Controller to Enable Entitlements
- Extract the Child Installers from the Endpoint Security Suite Pro Master Installer
- Configure Key Server for Uninstallation of Encryption Client Activated Against Security Management Server
- Use the Administrative Download Utility (CMGAd)
- Configure Deferred Activation
- Troubleshooting
- Glossary

Dell Data Security
Endpoint Security Suite Pro Advanced Installation Guide
v1.8

Notes, cautions, and warnings
NOTE: A NOTE indicates important information that helps you make better use of your product.
CAUTION: A CAUTION indicates either potential damage to hardware or loss of data and tells you how to avoid the problem.
WARNING: A WARNING indicates a potential for property damage, personal injury, or death.
© 2017 Dell Inc. All rights reserved.Dell, EMC, and other trademarks are trademarks of Dell Inc. or its subsidiaries. Other trademarks may
be trademarks of their respective owners.
Registered trademarks and trademarks used in the Dell Encryption, Endpoint Security Suite Pro, Endpoint Security Suite Enterprise, and
Data Guardian suite of documents: DellTM and the Dell logo, Dell PrecisionTM, OptiPlexTM, ControlVaultTM, LatitudeTM, XPS®, and KACETM
are trademarks of Dell Inc. Cylance®, CylancePROTECT, and the Cylance logo are registered trademarks of Cylance, Inc. in the U.S. and
other countries. McAfee® and the McAfee logo are trademarks or registered trademarks of McAfee, Inc. in the US and other countries.
Intel®, Pentium®, Intel Core Inside Duo®, Itanium®, and Xeon® are registered trademarks of Intel Corporation in the U.S. and other
countries. Adobe®, Acrobat®, and Flash® are registered trademarks of Adobe Systems Incorporated. Authen Tec® and Eikon® are
registered trademarks of Authen Tec. AMD® is a registered trademark of Advanced Micro Devices, Inc. Microsoft®, Windows®, and
Windows Server®, Internet Explorer®, MS-DOS®, Windows Vista®, MSN®, ActiveX®, Active Directory®, Access®, ActiveSync®,
BitLocker®, BitLocker To Go®, Excel®, Hyper-V®, Silverlight®, Outlook®, PowerPoint®, OneDrive®, SQL Server®, and Visual C++® are
either trademarks or registered trademarks of Microsoft Corporation in the United States and/or other countries. VMware® is a registered
trademark or trademark of VMware, Inc. in the United States or other countries. Box® is a registered trademark of Box. DropboxSM is a
service mark of Dropbox, Inc. GoogleTM, AndroidTM, GoogleTM ChromeTM, GmailTM, YouTube®, and GoogleTM Play are either trademarks or
registered trademarks of Google Inc. in the United States and other countries. Apple®, Aperture®, App StoreSM, Apple Remote
DesktopTM, Apple TV®, Boot CampTM, FileVaultTM, iCloud®SM, iPad®, iPhone®, iPhoto®, iTunes Music Store®, Macintosh®, Safari®,
and Siri® are either servicemarks, trademarks, or registered trademarks of Apple, Inc. in the United States and/or other countries. GO ID®,
RSA®, and SecurID® are registered trademarks of Dell EMC. EnCaseTM and Guidance Software® are either trademarks or registered
trademarks of Guidance Software. Entrust® is a registered trademark of Entrust®, Inc. in the United States and other countries.
InstallShield® is a registered trademark of Flexera Software in the United States, China, European Community, Hong Kong, Japan, Taiwan,
and United Kingdom. Micron® and RealSSD® are registered trademarks of Micron Technology, Inc. in the United States and other
countries. Mozilla® Firefox® is a registered trademark of Mozilla Foundation in the United States and/or other countries. iOS® is a
trademark or registered trademark of Cisco Systems, Inc. in the United States and certain other countries and is used under license.
Oracle® and Java® are registered trademarks of Oracle and/or its aliates. Other names may be trademarks of their respective owners.
SAMSUNGTM is a trademark of SAMSUNG in the United States or other countries. Seagate® is a registered trademark of Seagate
Technology LLC in the United States and/or other countries. Travelstar® is a registered trademark of HGST, Inc. in the United States and
other countries. UNIX® is a registered trademark of The Open Group. VALIDITYTM is a trademark of Validity Sensors, Inc. in the United
States and other countries. VeriSign® and other related marks are the trademarks or registered trademarks of VeriSign, Inc. or its aliates
or subsidiaries in the U.S. and other countries and licensed to Symantec Corporation. KVM on IP® is a registered trademark of Video
Products. Yahoo!® is a registered trademark of Yahoo! Inc. This product uses parts of the 7-Zip program. The source code can be found at
7-zip.org. Licensing is under the GNU LGPL license + unRAR restrictions (7-zip.org/license.txt).
Endpoint Security Suite Pro Advanced Installation Guide
2017 - 08
Rev. A01

Contents
1 Introduction....................................................................................................................................................6
Before You Begin................................................................................................................................................................6
Using This Guide.................................................................................................................................................................7
Contact Dell ProSupport................................................................................................................................................... 7
2 Requirements................................................................................................................................................ 9
All Clients.............................................................................................................................................................................9
All Clients - Prerequisites.............................................................................................................................................9
All Clients - Hardware.................................................................................................................................................. 9
All Clients - Localization............................................................................................................................................. 10
Encryption Client.............................................................................................................................................................. 10
Encryption Client Prerequisites.................................................................................................................................10
Encryption Client Hardware....................................................................................................................................... 11
Encryption Client Operating Systems....................................................................................................................... 11
Encryption Client Operating Systems with Deferred Activation............................................................................11
Encryption External Media Operating Systems....................................................................................................... 11
Threat Protection Client...................................................................................................................................................12
Threat Protection Client Operating Systems.......................................................................................................... 12
Threat Protection Client Ports.................................................................................................................................. 12
SED Client..........................................................................................................................................................................13
OPAL Drivers...............................................................................................................................................................14
SED Client Prerequisites............................................................................................................................................ 14
SED Client Hardware..................................................................................................................................................14
Authentication Options with SED Client..................................................................................................................15
SED Client International KeyboardsSED Client LocalizationSED Client Operating Systems.............................16
Advanced Authentication Client......................................................................................................................................17
Advanced Authentication Client Hardware..............................................................................................................17
Advanced Authentication Client Operating Systems............................................................................................. 18
BitLocker Manager Client................................................................................................................................................ 18
BitLocker Manager Client Prerequisites...................................................................................................................19
BitLocker Manager Client Operating Systems........................................................................................................19
3 Registry Settings......................................................................................................................................... 20
Encryption Client Registry Settings...............................................................................................................................20
Threat Protection Client Registry Settings...................................................................................................................24
SED Client Registry Settings.......................................................................................................................................... 24
Advanced Authentication Client Registry Settings......................................................................................................26
BitLocker Manager Client Registry Settings................................................................................................................ 26
4 Install Using the Master Installer..................................................................................................................28
Install Interactively Using the Master Installer..............................................................................................................28
Install by Command Line Using the Master Installer.................................................................................................... 31
Dell Data Security Endpoint Security Suite Pro
Contents
3

5 Uninstall Using the Endpoint Security Suite Pro Master Installer................................................................. 33
Uninstall the Endpoint Security Suite Pro Master Installer.........................................................................................33
Command Line Uninstallation................................................................................................................................... 33
6 Install Using the Child Installers................................................................................................................... 34
Install Drivers.................................................................................................................................................................... 35
Install Encryption Client...................................................................................................................................................35
Command Line Installation........................................................................................................................................35
Install Threat Protection Clients..................................................................................................................................... 37
Command Line Installation........................................................................................................................................38
Install SED Management and Advanced Authentication Clients................................................................................39
Command Line Installation........................................................................................................................................39
Install BitLocker Manager Client.................................................................................................................................... 40
Command Line Installation........................................................................................................................................40
7 Uninstall Using the Child Installers............................................................................................................... 42
Uninstall Threat Protection Clients................................................................................................................................ 43
Command Line Uninstallation................................................................................................................................... 43
Uninstall Encryption Client..............................................................................................................................................43
Process........................................................................................................................................................................43
Command Line Uninstallation................................................................................................................................... 44
Uninstall SED and Advanced Authentication Clients...................................................................................................45
Process........................................................................................................................................................................45
Deactivate the PBA................................................................................................................................................... 45
Uninstall SED Client and Advanced Authentication Clients..................................................................................46
Uninstall BitLocker Manager Client............................................................................................................................... 46
Command Line Uninstallation................................................................................................................................... 46
8 Commonly Used Scenarios.......................................................................................................................... 47
Encryption Client, Threat Protection, and Advanced Authentication........................................................................48
Encryption Client and Threat Protection...................................................................................................................... 49
SED Client (including Advanced Authentication) and Encryption External Media..................................................49
BitLocker Manager and Encryption External Media....................................................................................................50
9 Pre-Installation Conguration for SED UEFI, and BitLocker Manager...........................................................51
Initialize the TPM..............................................................................................................................................................51
Pre-Installation Conguration for UEFI Computers......................................................................................................51
Enable Network Connectivity During UEFI Preboot Authentication....................................................................51
Disable Legacy Option ROMs...................................................................................................................................52
Pre-Installation Conguration to Set Up a BitLocker PBA Partition..........................................................................52
10 Set GPO on Domain Controller to Enable Entitlements.............................................................................. 53
11 Extract the Child Installers from the Endpoint Security Suite Pro Master Installer......................................56
12 Congure Key Server for Uninstallation of Encryption Client Activated Against Security Management
Server.............................................................................................................................................................57
4Dell Data Security Endpoint Security Suite Pro
Contents

Services Panel - Add Domain Account User................................................................................................................ 57
Key Server Cong File - Add User for Security Management Server Communication.......................................... 58
Sample Conguration File......................................................................................................................................... 59
Services Panel - Restart Key Server Service............................................................................................................... 59
Remote Management Console - Add Forensic Administrator....................................................................................59
13 Use the Administrative Download Utility (CMGAd)..................................................................................... 61
Use the Administrative Download Utility in Forensic Mode........................................................................................ 61
Use the Administrative Download Utility in Admin Mode........................................................................................... 63
14 Congure Deferred Activation.................................................................................................................... 65
Deferred Activation Customization................................................................................................................................65
Prepare the Computer for Installation...........................................................................................................................66
Install the Encryption Client with Deferred Activation................................................................................................ 66
Activate the Encryption Client with Deferred Activation............................................................................................66
Troubleshoot Deferred Activation.................................................................................................................................. 67
Troubleshoot Activation.............................................................................................................................................67
15 Troubleshooting..........................................................................................................................................70
All Clients - Troubleshooting........................................................................................................................................... 70
All Clients - Protection Status........................................................................................................................................ 70
Encryption Client Troubleshooting................................................................................................................................. 70
Upgrade to the Windows 10 Creators Update....................................................................................................... 70
(Optional) Create an Encryption Removal Agent Log File.................................................................................... 70
Find TSS Version.........................................................................................................................................................71
Encryption External Media and PCS Interactions...................................................................................................71
Use WSScan................................................................................................................................................................71
Use WSProbe............................................................................................................................................................. 75
Check Encryption Removal Agent Status...............................................................................................................76
SED Client Troubleshooting.............................................................................................................................................77
Use the Initial Access Code Policy........................................................................................................................... 77
Create a PBA Log File for Troubleshooting............................................................................................................. 78
Dell ControlVault Drivers................................................................................................................................................. 79
Update Dell ControlVault Drivers and Firmware.....................................................................................................79
UEFI Computers...............................................................................................................................................................93
Troubleshoot Network Connection..........................................................................................................................93
TPM and BitLocker..........................................................................................................................................................93
TPM and BitLocker Error Codes..............................................................................................................................93
16 Glossary....................................................................................................................................................124
Dell Data Security Endpoint Security Suite Pro
Contents
5
Introduction
This guide details how to install and congure Threat Protection, the Encryption client, SED management client, Advanced Authentication,
and BitLocker Manager.
All policy information, and their descriptions are found in the AdminHelp.
Before You Begin
1 Install the Security Management Server/Security Management Server Virtual before deploying clients. Locate the correct guide as
shown below, follow the instructions, and then return to this guide.
•Dell Security Management Server Installation and Migration Guide
•Dell Security Management Server Virtual Quick Start Guide and Installation Guide
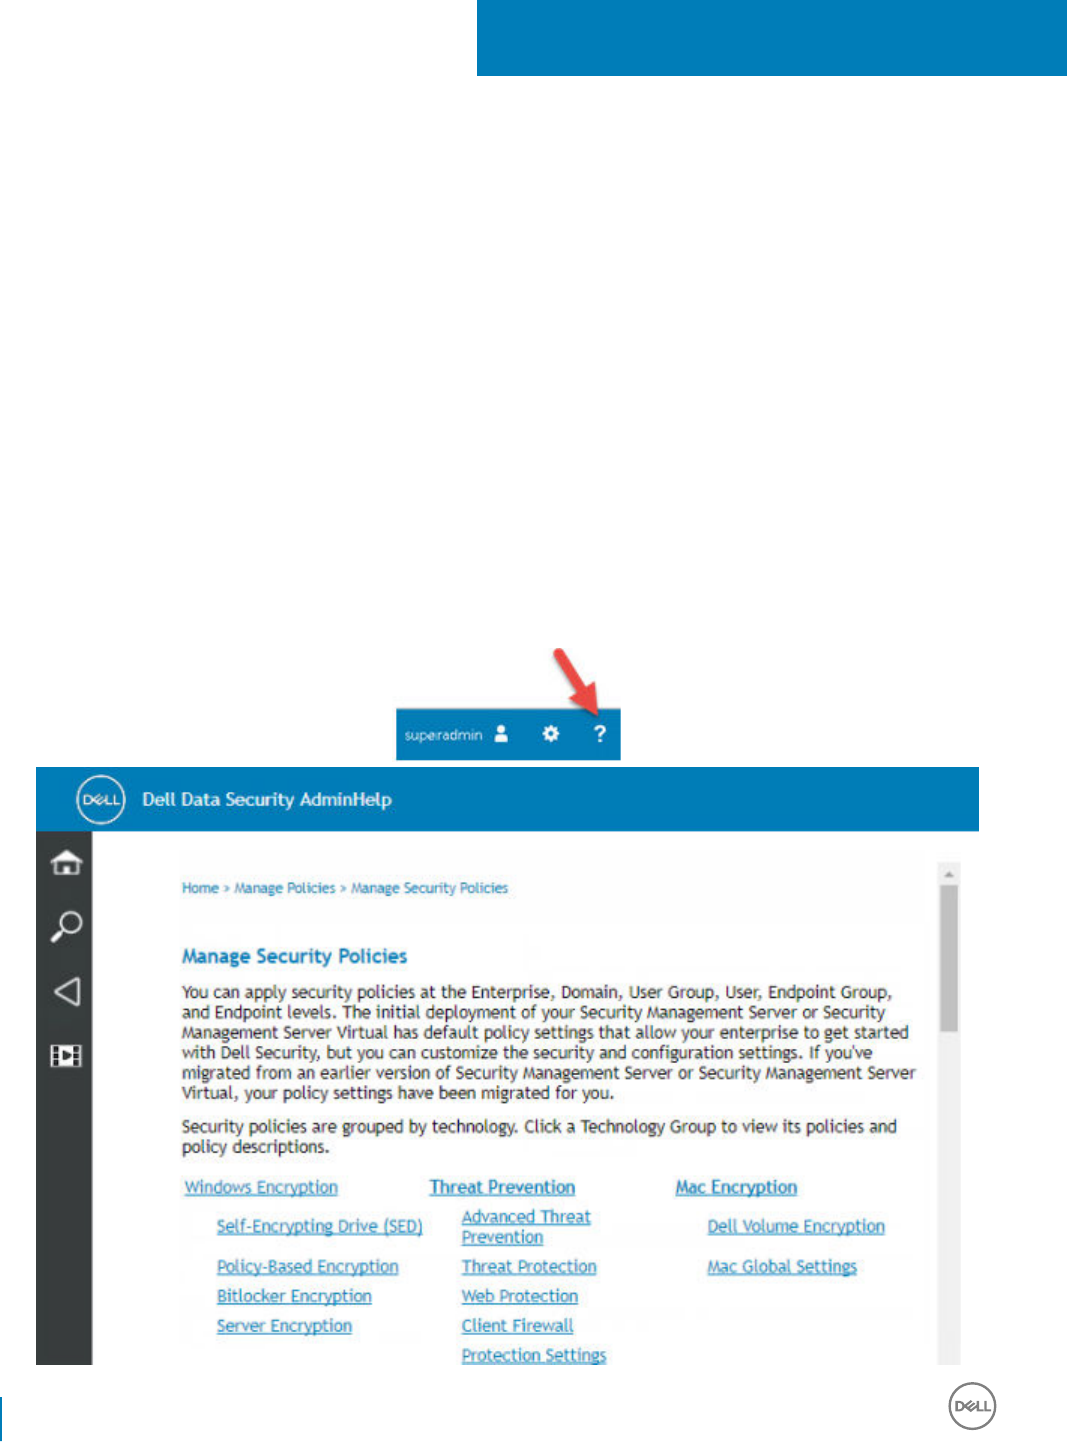
Verify that polices are set as desired. Browse through the AdminHelp, available from the ? at the far right of the screen. The
AdminHelp is page-level help designed to help you set and modify policy and understand your options with your Security
Management Server/Security Management Server Virtual.
1
6 Dell Data Security Endpoint Security Suite Pro
Introduction

2 Thoroughly read the Requirements chapter of this document.
3 Deploy clients to end users.
Using This Guide
Use this guide in the following order.
• See Requirements for client prerequisites, computer hardware and software information, limitations, and special registry modications
needed for features.
• If needed, see Pre-Installation Conguration for SED UEFI, and BitLocker.
• If your clients will be entitled using Dell Digital Delivery (DDD), see Set GPO on Domain Controller to Enable Entitlements.
• If installing clients using the Endpoint Security Suite Pro master installer, see:
•Install Interactively Using the Master Installer
or
•Install by Command Line Using the Master Installer
• If installing clients using the child installers, the child installer executable les must be extracted from the master installer. See Extract
the Child Installers from the Master Installer, then return here.
• Install Child Installers by Command line:
•Install Drivers - Download the appropriate drivers and rmware based on your authentication hardware.
•Install Encryption Client - use these instructions to install the Encryption client, which is the component that enforces security
policy, whether a computer is connected to the network, disconnected from the network, lost, or stolen.
•Install Threat Protection Clients - use these instructions to install the Threat Protection clients, which are comprised of the
following policy-based Threat Protection features:
• Malware Protection - Checks for viruses, spyware, unwanted programs, and other threats by automatically scanning items
when users access them or on demand at any time.
• Client Firewall - Monitors communication between the computer and resources on the network and the Internet. Intercepts
suspicious communications.
• Web Filter - Displays safety ratings and reports for websites during online browsing and searching. Web Filtering enables the
site administrator to block access to websites based on safety rating or content.
•Install SED Management and Advanced Authentication Clients - use these instructions to install encryption software for SEDs.
Although SEDs provide their own encryption, they lack a platform to manage their encryption and policies. With SED
management, all policies, storage, and retrieval of encryption keys are available from a single console, reducing the risk that
computers are unprotected in the event of loss or unauthorized access.
The Advanced Authentication client manages multiple authentication methods, including PBA for SEDs, Single Sign-on (SSO),
and user credentials such as ngerprints and passwords. In addition, it provides Advanced Authentication capabilities to access
websites and applications.
•Install BitLocker Manager Client - use these instructions to install the BitLocker Manager client, designed to improve the
security of BitLocker deployments and to simplify and reduce the cost of ownership.
NOTE:
Most child installers can be installed interactively, but installations are not described in this guide.
• See Commonly Used Scenarios for scripts of our most commonly used scenarios.
Contact Dell ProSupport
Call 877-459-7304, extension 4310039 for 24x7 phone support for your Dell product.
Dell Data Security Endpoint Security Suite Pro
Introduction
7

Additionally, online support for Dell products is available at dell.com/support. Online support includes drivers, manuals, technical advisories,
FAQs, and emerging issues.
Be sure to help us quickly connect you to the right technical expert by having your Service Code available when you call.
For phone numbers outside of the United States, check Dell ProSupport International Phone Numbers.
8 Dell Data Security Endpoint Security Suite Pro
Introduction

Requirements
All Clients
These requirements apply to all clients. Requirements listed in other sections apply to specic clients.
• IT best practices should be followed during deployment. This includes, but is not limited to, controlled test environments for initial tests,
and staggered deployments to users.
• The user account performing the installation/upgrade/uninstallation must be a local or domain administrator user, which can be
temporarily assigned by a deployment tool such as Microsoft SMS or Dell KACE. A non-administrator user that has elevated privileges is
not supported.
• Back up all important data before beginning installation/uninstallation.
• Do not make changes to the computer, including inserting or removing external (USB) drives during installation.
• Ensure that outbound port 443 is available to communicate with the Security Management Server/Security Management Server
Virtual if your master installer clients will be entitled using Dell Digital Delivery (DDD). The entitlement functionality will not work if port
443 is blocked (for any reason). DDD is not used if installing using the child installers.
• Be sure to periodically check www.dell.com/support for the most current documentation and Technical Advisories.
All Clients - Prerequisites
• Microsoft .Net Framework 4.5.2 (or later) is required for the Endpoint Security Suite Pro master installer and child installer clients. The
installer does not install the Microsoft .Net Framework component.
All computers shipped from the Dell factory are pre-installed with the full version of Microsoft .Net Framework 4.5.2 (or later).
However, if you are not installing on Dell hardware or are upgrading the client on older Dell hardware, you should verify which version of
Microsoft .Net is installed and update the version prior to installing the client to prevent installation/upgrade failures. To verify the
version of Microsoft .Net installed, follow these instructions on the computer targeted for installation: http://msdn.microsoft.com/en-
us/library/hh925568(v=vs.110).aspx. To install Microsoft .Net Framework 4.5.2, go to https://www.microsoft.com/en-us/download/
details.aspx?id=42643.
• Drivers and rmware for ControlVault, ngerprint readers and smart cards (as shown below) are not included in the Endpoint Security
Suite Pro master installer or child installer executable les. The drivers and rmware must be kept up-to-date, and can be downloaded
from http://www.dell.com/support and selecting your computer model. Download the appropriate drivers and rmware based on your
authentication hardware.
• ControlVault
• NEXT Biometrics Fingerprint Driver
• Validity Fingerprint Reader 495 Driver
• O2Micro Smart Card Driver
All Clients - Hardware
• The following table details supported computer hardware.
Hardware
• Minimum hardware requirements must meet the minimum specications of the operating system.
2
Dell Data Security Endpoint Security Suite Pro
Requirements
9

All Clients - Localization
• The Encryption, Threat Protection, and BitLocker Manager clients are Multilingual User Interface (MUI) compliant and are localized in
the following languages.
Language Support
• EN - English • JA - Japanese
• ES - Spanish • KO - Korean
• FR - French • PT-BR - Portuguese, Brazilian
• IT - Italian • PT-PT - Portuguese, Portugal (Iberian)
• DE - German
Encryption Client
• The client computer must have network connectivity to activate.
• To reduce initial encryption time, run the Windows Disk Cleanup Wizard to remove temporary les and any other unnecessary data.
• Turn o sleep mode during the initial encryption sweep to prevent an unattended computer from going to sleep. Encryption cannot
occur on a sleeping computer (nor can decryption).
• The Encryption client does not support dual boot congurations since it is possible to encrypt system les of the other operating
system, which would interfere with its operation.
• The Encryption client now supports Audit Mode. Audit Mode allows administrators to deploy the Encryption client as part of the
corporate image, rather than using a third-party SCCM or similar solutions to deploy the Encryption client. For instructions about how
to install the Encryption client in a corporate image, see http://www.dell.com/support/article/us/en/19/SLN304039.
• The Encryption client has been tested and is compatible with McAfee, the Symantec client, Kaspersky, and MalwareBytes. Hard-coded
exclusions are in place in for these anti-virus providers to prevent incompatibilities between anti-virus scanning and encryption. The
Encryption client has also been tested with the Microsoft Enhanced Mitigation Experience Toolkit.
If your organization uses an anti-virus provider that is not listed, see http://www.dell.com/support/article/us/en/19/SLN288353/ or
Contact Dell ProSupport for help.
• The TPM is used for sealing the GPK. Therefore, if running the Encryption client, clear the TPM in the BIOS before installing a new
operating system on the client computer.
• Operating system re-install is not supported. To re-install the operating system, perform a backup of the target computer, wipe the
computer, install the operating system, then recover the encrypted data following established recovery procedures.
Encryption Client Prerequisites
• The master installer installs the following prerequisites if not already installed on the computer. When using the child installer, you must
install this component before installing the Encryption client.
Prerequisite
• Visual C++ 2012 Update 4 or later Redistributable Package (x86 and x64)
• Visual C++ 2015 Update 3 or later Redistributable Package (x86 and x64)
10 Dell Data Security Endpoint Security Suite Pro
Requirements

Encryption Client Hardware
• The following table details supported hardware.
Optional Embedded Hardware
• TPM 1.2 or 2.0
Encryption Client Operating Systems
• The following table details supported operating systems.
Windows Operating Systems (32- and 64-bit)
• Windows 7 SP0-SP1: Enterprise, Professional, Ultimate
• Windows Embedded Standard 7 with Application Compatibility template (hardware encryption is not supported)
• Windows 8: Enterprise, Pro
• Windows 8.1 Update 0-1: Enterprise Edition, Pro Edition
• Windows Embedded 8.1 Industry Enterprise (hardware encryption is not supported)
• Windows 10: Education, Enterprise, Pro through Creators Update (Redstone 2)
• VMware Workstation 5.5 and higher
NOTE:
When using UEFI mode, the Secure Hibernation policy is not supported.
Encryption Client Operating Systems with Deferred Activation
• Deferred activation allows the Active Directory user account used during activation to be independent of the account used to login to
the endpoint. Instead of the network provider capturing the authentication information, the user instead manually species the Active
Directory-based account when prompted. Once the credentials are entered, the authentication information is securely sent to the Dell
Server which validates it against the congured Active Directory domains. For more information, see http://www.dell.com/support/
article/us/en/19/sln306341.
• The following table details supported operating systems with deferred activation.
Windows Operating Systems (32- and 64-bit)
• Windows 7 SP0-SP1: Home Basic, Home Premium, Enterprise, Professional, Ultimate
• Windows Embedded Standard 7 with Application Compatibility template (hardware encryption is not supported)
• Windows 8: Home Basic, Home Premium, Enterprise, Pro
• Windows 8.1 Update 0-1: Enterprise Edition, Pro Edition
• Windows Embedded 8.1 Industry Enterprise (hardware encryption is not supported)
• Windows 10: Home Basic, Home Premium, Education, Enterprise, Pro through Creators Update (Redstone 2)
• VMware Workstation 5.5 and higher
Encryption External Media Operating Systems
• The following table details the operating systems supported when accessing media protected by Encryption External Media.
Dell Data Security Endpoint Security Suite Pro
Requirements
11

NOTE:
External media must have approximately 55MB available plus open space on the media that is equal to the largest le to be
encrypted to host Encryption External Media.
NOTE:
Windows XP is supported when using Encryption External Media Explorer only.
Windows Operating Systems Supported to Access Encryption External Media-Protected Media (32- and 64-bit)
• Windows 7 SP0-SP1: Home Basic, Home Premium, Enterprise, Professional, Ultimate
• Windows Embedded Standard 7 with Application Compatibility template (hardware encryption is not supported)
• Windows 8: Home Basic, Home Premium, Enterprise, Pro
• Windows 8.1 Update 0-1: Enterprise Edition, Pro Edition
• Windows Embedded 8.1 Industry Enterprise (hardware encryption is not supported)
• Windows 10: Home Basic, Home Premium, Education, Enterprise, Pro through Creators Update (Redstone 2)
Mac Operating Systems Supported to Access Encryption External Media-Protected Media (64-bit kernels)
• Mac OS X Yosemite 10.10.5
• Mac OS X El Capitan 10.11.6
• macOS Sierra 10.12.5 and 10.12.6
Threat Protection Client
• The Threat Protection clients cannot be installed without the Encryption client being detected on the computer. Installation will fail if
attempted.
• To successfully install Threat Protection, the computer must have network connectivity.
• Uninstall other vendors' anti-virus, anti-malware, anti-spyware, and rewall applications before installing the Threat Protection clients to
prevent installation failures. Conicting software does not include Windows Defender and Endpoint Security Suite Pro.
• The Web Protection feature is supported with Internet Explorer only.
Threat Protection Client Operating Systems
• The following table details supported operating systems.
Windows Operating Systems (32- and 64-bit)
• Windows 7 SP0-SP1: Enterprise, Professional, Ultimate
• Windows 8: Enterprise, Pro
• Windows 8.1 Update 0-1: Enterprise Edition, Pro Edition
• Windows 10: Education, Enterprise, Pro through Creators Update (Redstone 1)
Threat Protection Client Ports
• To ensure that Threat Protection clients receive the most current Threat Protection updates, ports 443 and 80 must be available for the
client to communicate with the various destination servers. If the ports are blocked for any reason, anti-virus signature updates (DAT
les) cannot be downloaded, so computers may not have the most current protection. Ensure that client computers can access the
URLs, as follows.
12 Dell Data Security Endpoint Security Suite Pro
Requirements

Use Application
Protocol
Transport
Protocol
Port Number Destination Direction Notes
Anti-virus Updates HTTP TCP 443/fallback
80
vs.mcafeeasap.com Outbound
Anti-virus Engine/
Signature Updates
SSL TCP 443 vs.mcafeeasap.com Outbound
Anti-Spam Engine HTTP TCP 443 vs.mcafeeasap.com Outbound
Anti-Spam Rules
and Streaming
Updates
HTTP TCP 80 vs.mcafeeasap.com Outbound Packet types:
X-SU3X-SU3-
Component-Name
X-SU3-Component-
Type X-SU3-Status
Reputation
Service
SSL TCP 443 tunnel.web.trustedsource.org Outbound
Reputation
Service Feedback
SSL TCP 443 gtifeedback.trustedsource.or
g
Outbound
Quarantine
Manager
HTTP
HTTPS
TCP 80
443
Your Security Management
Server/Security
Management Server Virtual
Bi-directional
URL Reputation
Database Update
HTTP TCP 80 list.smartlter.com Outbound
URL Reputation
Lookup
SSL TCP 443 tunnel.web.trustedsource.org Outbound
SED Client
• The computer must have a wired network connection to successfully install SED management.
• IPv6 is not supported.
• Be prepared to shut down and restart the computer after you apply policies and are ready to begin enforcing them.
• Computers equipped with self-encrypting drives cannot be used with HCA cards. Incompatibilities exist that prevent the provisioning of
the HCA. Dell does not sell computers with self-encrypting drives that support the HCA module. This unsupported conguration would
be an after-market conguration.
• If the computer targeted for encryption is equipped with a self-encrypting drive, ensure that the Active Directory option, User Must
Change Password at Next Logon, is disabled. Preboot Authentication does not support this Active Directory option.
• Dell recommends that you do not change the authentication method after the PBA has been activated. If you must switch to a dierent
authentication method, you must either:
• Remove all the users from the PBA.
or
• Deactivate the PBA, change the authentication method, and then re-activate the PBA.
IMPORTANT:
Due to the nature of RAID and SEDs, SED management does not support RAID. The issue with RAID=On with SEDs is that
RAID requires access to the disk to read and write RAID-related data at a high sector not available on a locked SED from start
and cannot wait to read this data until after the user is logged on. Change the SATA operation in the BIOS from RAID=On to
AHCI to resolve the issue. If the operating system does not have the AHCI controller drivers pre-installed, the operating system
will blue screen when switched from RAID=On to AHCI.
Dell Data Security Endpoint Security Suite Pro
Requirements
13

•Conguration of self-encrypting drives for Dell’s SED management dier between NVMe and non-NVMe (SATA) drives, as follows.
• Any NVMe drive that is being leveraged as an SED – The BIOS’ SATA operation must be set to RAID ON, as Dell’s SED
management does not support AHCI on NVMe drives.
• Any NVMe drive that is being leveraged as an SED – The BIOS's boot mode must be UEFI and Legacy option ROMs must be
disabled.
• Any non-NVMe drive that is being leveraged as an SED – The BIOS’ SATA operation must be set to AHCI, as Dell’s SED
management does not support RAID with non-NVMe drives.
• RAID ON is not supported because access to read and write RAID-related data (at a sector that is not available on a locked non-
NVMe drive) is not accessible at start-up, and cannot wait to read this data until after the user is logged on.
• The operating system will crash when switched from RAID ON > AHCI if the AHCI controller drivers are not pre-installed. For
instructions on how to switch from RAID > AHCI (or vice versa), see http://www.dell.com/support/article/us/en/19/
SLN306460.
Supported OPAL compliant SEDs require updated Intel Rapid Storage Technology Drivers, located at http://www.dell.com/support/
home/us/en/19/product-support/product/dell-dp-endpt-security-suite/drivers. Dell recommends Intel Rapid Storage Technology
Driver version 15.2.0.0 or later, with NVMe drives.
• SED Management is not supported with Server Encryption.
OPAL Drivers
• Supported OPAL compliant SEDs require updated Intel Rapid Storage Technology Drivers, located at http://www.dell.com/support.
SED Client Prerequisites
• The Endpoint Security Suite Pro master installer installs the following prerequisites if not already installed on the computer. When using
the child installer, you must install these components before installing SED management.
Prerequisites
• Visual C++ 2012 Update 4 or later Redistributable Package (x86 and x64)
• Visual C++ 2015 Update 3 or later Redistributable Package (x86 and x64)
SED Client Hardware
OPAL Compliant SEDs
• For the most up-to-date list of Opal compliant SEDs supported with the SED management, refer to this KB article: http://
www.dell.com/support/article/us/en/19/SLN296720.
Dell Computer Models Supported with UEFI
• The following table details Dell computer models supported with UEFI.
Dell Computer Models - UEFI Support
• Latitude 3180
• Latitude 3189
• Latitude 3380
• Latitude 3480
• Latitude 3580
• Latitude 5280
• Latitude 5480
•Precision M3510
• Precision M3520
• Precision M4800
• Precision M5510
• Precision M5520
• Precision M6800
• Precision M7510
• Precision M7520
• Optiplex 3040 Micro, Mini
Tower, Small Form Factor
• Optiplex 3046
• OptiPlex 3050 All-In-One
• OptiPlex 3050 Tower, Small
Form Factor, Micro
• Optiplex 5040 Mini Tower,
Small Form Factor
• Venue Pro 11 (Models
5175/5179)
• Venue Pro 11 (Model 7139)
14 Dell Data Security Endpoint Security Suite Pro
Requirements

Dell Computer Models - UEFI Support
• Latitude 5580
• Latitude 7370
• Latitude 7380
• Latitude E5270
• Latitude E5285
• Latitude E5289 2-in-1
• Latitude E5470
• Latitude E5570
• Latitude E7240
• Latitude E7250
• Latitude E7260
• Latitude E7265
• Latitude E7270
• Latitude E7275
• Latitude E7280
• Latitude E7350
• Latitude 7389 2-in-1
• Latitude E7440
• Latitude E7450
• Latitude E7460
• Latitude E7470
• Latitude E7480
• Latitude 12 Rugged Extreme
• Latitude 12 Rugged Tablet
(Model 7202)
• Latitude 14 Rugged Extreme
• Latitude 14 Rugged
•Precision M7710
• Precision M7720
• Precision D5720 All-in-One
• Precision T3420
• Precision T3620
• Precision T7810
• XPS 15 9560
• OptiPlex 5050 Tower, Small
Form Factor, Micro
• OptiPlex 7020
• Optiplex 7040 Micro, Mini
Tower, Small Form Factor
• OptiPlex 7050 Tower, Small
Form Factor, Micro
• Optiplex 3240 All-In-One
• OptiPlex 5250 All-In-One
• Optiplex 7440 All-In-One
• OptiPlex 7450 All-In-One
• OptiPlex 9020 Micro
NOTE:
Authentication features are supported with UEFI mode on these computers running Windows 8, Windows 8.1, and Windows 10
with qualied Opal Compliant SEDs. Other computers running Windows 7, Windows 8, Windows 8.1, and Windows 10 support
Legacy Boot mode.
• For a list of docking stations and adapters supported with the SED client, see http://www.dell.com/support/article/us/en/19/
sln296720/.
Authentication Options with SED Client
•Specic hardware is required, to use smart cards and to authenticate on UEFI computers. Conguration is required to use smart cards
with Preboot Authentication. The following tables show authentication options available by operating system, when hardware and
conguration requirements are met.
Non-UEFI
PBA
Password Fingerprin
t
Contacted
Smart
card
SIPR Card
Windows 7 SP0-
SP1
X1X1 2
Windows 8 X1X1 2
Dell Data Security Endpoint Security Suite Pro
Requirements
15

Non-UEFI
PBA
Password Fingerprin
t
Contacted
Smart
card
SIPR Card
Windows 8.1 X1X1 2
Windows 10 X1X1 2
1. Available when authentication drivers are downloaded from
support.dell.com.
2. Available with a supported OPAL SED.
UEFI
PBA - on supported Dell computers
Password Fingerprin
t
Contacted
Smart
card
SIPR Card
Windows 7
Windows 8 X1X1
Windows 8.1 X1X1
Windows 10 X1X1
1. Available with a supported OPAL SED on supported UEFI computers.
SED Client International Keyboards
• The following table lists international keyboards supported with Preboot Authentication on UEFI and non-UEFI computers.
International Keyboard Support - UEFI
• DE-CH - Swiss German
• DE-FR - Swiss French
International Keyboard Support - Non-UEFI
• AR - Arabic (using Latin letters)
• DE-CH - Swiss German
• DE-FR - Swiss French
SED Client Localization
The SED and Advanced Authentication clients are Multilingual User Interface (MUI) compliant and are localized the following languages.
UEFI Mode and Preboot Authentication are supported in the following languages except Russian, Traditional Chinese, or Simplied Chinese.
16 Dell Data Security Endpoint Security Suite Pro
Requirements

Language Support
• EN - English • KO - Korean
• FR - French • ZH-CN - Chinese, Simplied
• IT - Italian • ZH-TW - Chinese, Traditional/Taiwan
• DE - German • PT-BR - Portuguese, Brazilian
• ES - Spanish • PT-PT - Portuguese, Portugal (Iberian)
• JA - Japanese • RU - Russian
SED Client Operating Systems
• The following table details the supported operating systems.
Windows Operating Systems (32- and 64-bit)
• Windows 7 SP0-SP1: Enterprise, Professional (supported with Legacy Boot mode but not UEFI)
NOTE:
Legacy Boot mode is supported on Windows 7. UEFI is not supported on Windows 7.
NVMe self-encrypting drives are not supported with Windows 7.
• Windows 8: Enterprise, Pro,
• Windows 8.1: Enterprise Edition, Pro Edition
• Windows 10: Education, Enterprise, Pro through Creators Update (Redstone 2)
Advanced Authentication Client
• When using Advanced Authentication, users will be securing access to the computer using advanced authentication credentials that are
managed and enrolled using Advanced Authentication. Advanced Authentication will be the primary manager of the authentication
credentials for Windows Sign-in, including Windows password, ngerprint, and smart cards. Picture password, PIN, and ngerprint
credentials enrolled using the Microsoft Operating System will not be recognized at Windows Sign-in.
To continue using the Microsoft Operating System to manage user credentials, do not install Advanced Authentication or uninstall it.
• An SED does not require a TPM to provide Advanced Authentication or encryption.
Advanced Authentication Client Hardware
• The following table details supported authentication hardware.
Fingerprint and Smart Card Readers
• Validity VFS495 in Secure Mode
• ControlVault Swipe Reader
• UPEK TCS1 FIPS 201 Secure Reader 1.6.3.379
• Authentec Eikon and Eikon To Go USB Readers
Dell Data Security Endpoint Security Suite Pro
Requirements
17

Contactless Cards
• Contactless Cards using Contactless Card Readers built-in to specied Dell laptops
Smart Cards
• PKCS #11 Smart Cards using the ActivIdentity client
NOTE:
The ActivIdentity client is not pre-loaded and must be installed separately.
• CSP Cards
• Common Access Cards (CACs)
• Class B/SIPR Net Cards
• The following table details Dell computer models supported with SIPR Net cards.
Dell Computer Models - Class B/SIPR Net Card Support
• Latitude E6440
• Latitude E6540
• Precision M2800
• Precision M4800
• Precision M6800
• Latitude 14 Rugged Extreme
• Latitude 12 Rugged Extreme
• Latitude 14 Rugged
Advanced Authentication Client Operating Systems
Windows Operating Systems
• The following table details supported operating systems.
Windows Operating Systems (32- and 64-bit)
• Windows 7 SP0-SP1: Enterprise, Professional, Ultimate
• Windows 8: Enterprise, Pro
• Windows 8.1 Update 0-1: Enterprise Edition, Pro Edition
• Windows 10: Education, Enterprise, Pro through Creators Update (Redstone 2)
NOTE: UEFI mode is not supported on Windows 7.
BitLocker Manager Client
• Consider reviewing Microsoft BitLocker requirements if BitLocker is not yet deployed in your environment,
• Ensure that the PBA partition is already set up. If BitLocker Manager is installed before the PBA partition is set up, BitLocker cannot be
enabled and BitLocker Manager will not be operational. See Pre-Installation Conguration to Set Up a BitLocker PBA Partition.
• The keyboard, mouse, and video components must be directly connected to the computer. Do not use a KVM switch to manage
peripherals as the KVM switch can interfere with the computer's ability to properly identify hardware.
• Turn on and enable the TPM. BitLocker Manager will take ownership of the TPM and will not require a reboot. However, if a TPM
ownership already exists, BitLocker Manager will begin the encryption setup process (no restart is required). The point is that the TPM
must be "owned" and enabled.
• The BitLocker Manager client will use the approved AES FIPS validated algorithms if FIPS mode is enabled for the GPO security setting
"System cryptography: Use FIPS compliant algorithms for encryption, hashing, and signing" on the device and you manage that device
via our product. We do not force this mode as default for BitLocker-encrypted clients because Microsoft now suggests customers not
use their FIPS validated encryption due to numerous issues with application compatibility, recovery, and media encryption: http://
blogs.technet.com.
18 Dell Data Security Endpoint Security Suite Pro
Requirements

BitLocker Manager Client Prerequisites
• The Endpoint Security Suite Pro master installer installs the following prerequisites if not already installed on the computer. When using
the child installer, you must install these components before installing BitLocker Manager.
Prerequisites
• Visual C++ 2012 Update 4 or later Redistributable Package (x86 and x64)
• Visual C++ 2015 Update 3 or later Redistributable Package (x86 and x64)
BitLocker Manager Client Operating Systems
• The following table details supported operating systems.
Windows Operating Systems
• Windows 7 SP0-SP1: Enterprise, Ultimate (32- and 64-bit)
• Windows 8: Enterprise (64-bit)
• Windows 8.1: Enterprise Edition, Pro Edition (64-bit)
• Windows 10: Education, Enterprise, Pro through Creators Update (Redstone 2)
• Windows Server 2008 R2: Standard Edition, Enterprise Edition (64-bit)
• Windows Server 2012
• Windows Server 2012 R2: Standard Edition, Enterprise Edition (64-bit)
• Windows Server 2016
Dell Data Security Endpoint Security Suite Pro
Requirements
19

Registry Settings
• This section details all Dell ProSupport approved registry settings for local client computers, regardless of the reason for the registry
setting. If a registry setting overlaps two products, it will be listed in each category.
• These registry changes should be done by Administrators only and may not be appropriate or work in all scenarios.
Encryption Client Registry Settings
• If a self-signed certicate is used on the Dell Security Management Server for Windows, certicate trust validation must remain
disabled on the client computer (trust validation is disabled by default with Security Management Server for Windows). Before enabling
trust validation on the client computer, the following requirements must be met.
• A certicate signed by a root authority, such as EnTrust or Verisign, must be imported into Security Management Server/Security
Management Server Virtual.
• The full chain of trust of the certicate must be stored in the Microsoft keystore on the client computer.
• To enable trust validation for the Encryption client, change the value of the following registry entry to 0 on the client computer.
[HKLM\SOFTWARE\Microsoft\Windows NT\CurrentVersion\Winlogon\CMGShield]
"IgnoreCertErrors"=DWORD:00000000
0 = Fail if a certicate error is encountered
1= Ignores errors
• To use smart cards with Windows Authentication, the following registry value must be set on the client computer.
[HKLM\SOFTWARE\DigitalPersona\Policies\Default\SmartCards]
"MSSmartcardSupport"=DWORD:1
• To create an Encryption Removal Agent log le, create the following registry entry on the computer targeted for decryption. See
(Optional) Create an Encryption Removal Agent Log File.
[HKLM\Software\Credant\DecryptionAgent]
"LogVerbosity"=DWORD:2
0: no logging
1: logs errors that prevent the Service from running
2: logs errors that prevent complete data decryption (recommended level)
3: logs information about all decrypting volumes and les
5: logs debugging information
• By default, during installation, the system tray icon is displayed. Use the following registry setting to hide the system tray icon for all
managed users on a computer after the original installation. Create or modify the registry setting as follows:
[HKLM\Software\CREDANT\CMGShield]
"HIDESYSTRAYICON"=DWORD:1
3
20 Dell Data Security Endpoint Security Suite Pro
Registry Settings

• By default, all temporary les in the c:\windows\temp directory are automatically deleted during installation. Deletion of temporary les
speeds initial encryption and occurs before the initial encryption sweep.
However, if your organization uses a third-party application that requires the le structure within the \temp directory to be preserved,
you should prevent this deletion.
To disable temporary le deletion, create or modify the registry setting as follows:
[HKLM\SOFTWARE\CREDANT\CMGShield]
"DeleteTempFiles"=REG_DWORD:0
Not deleting temporary les increases initial encryption time.
• The Encryption client displays the length of each policy update delay prompt for ve minutes each time. If the user does not respond to
the prompt, the next delay begins. The nal delay prompt includes a countdown and progress bar, and it displays until the user
responds, or the nal delay expires and the required logo/reboot occurs.
You can change the behavior of the user prompt to begin or delay encryption, to prevent encryption processing following no user
response to the prompt. To do this, set the registry the following registry value:
[HKLM\Software\Microsoft\Windows NT\CurrentVersion\Winlogon\CMGShield]
"SnoozeBeforeSweep"=DWORD:1
Any non-zero value will change the default behavior to snooze. With no user interaction, encryption processing will be delayed up to the
number of congurable allowed delays. Encryption processing begins when the nal delay expires.
Calculate the maximum possible delay as follows (a maximum delay would involve the user never responding to a delay prompt, each of
which displays for 5 minutes):
(NUMBER OF POLICY UPDATE DELAYS ALLOWED × LENGTH OF EACH POLICY UPDATE DELAY) + (5 MINUTES × [NUMBER OF
POLICY UPDATE DELAYS ALLOWED - 1])
• Use the following registry setting to have the Encryption client poll the Security Management Server/Security Management Server
Virtual for a forced policy update. Create or modify the registry setting as follows:
[HKLM\SOFTWARE\Credant\CMGShield\Notify]
"PingProxy"=DWORD value:1
The registry setting will automatically disappear when done.
• Use the following registry settings to either allow the Encryption client to send an optimized inventory to the Security Management
Server/Security Management Server Virtual, send a full inventory to the Security Management Server/Security Management Server
Virtual, or to send a full inventory for all activated users to the Security Management Server/Security Management Server Virtual.
• Send Optimized Inventory to Security Management Server/Security Management Server Virtual:
Create or modify the registry setting as follows:
[HKLM\SOFTWARE\Microsoft\Windows NT\CurrentVersion\Winlogon\CMGShield]
"OnlySendInvChanges"=REG_DWORD:1
If no entry is present, optimized inventory is sent to the Security Management Server/Security Management Server Virtual.
• Send Full Inventory to Security Management Server/Security Management Server Virtual:
Create or modify the registry setting as follows:
[HKLM\SOFTWARE\Microsoft\Windows NT\CurrentVersion\Winlogon\CMGShield]
Dell Data Security Endpoint Security Suite Pro
Registry Settings
21

"OnlySendInvChanges"=REG_DWORD:0
If no entry is present, optimized inventory is sent to the Security Management Server/Security Management Server Virtual.
• Send Full Inventory for All Activated Users
[HKLM\SOFTWARE\Microsoft\Windows NT\CurrentVersion\Winlogon\CMGShield]
"RefreshInventory"=REG_DWORD:1
This entry is deleted from the registry as soon as it is processed. The value is saved in the vault, so even if the computer is rebooted
before the inventory upload takes place, the Encryption client still honors this request the next successful inventory upload.
This entry supersedes the OnlySendInvChanges registry value.
• Slotted Activation is a feature that allows you to spread activations of clients over a set time period in order to ease Security
Management Server/Security Management Server Virtual load during a mass deployment. Activations are delayed based on
algorithmically generated time slots to provide a smooth distribution of activation times.
For users requiring activation through VPN, a slotted activation conguration for the client may be required, to delay initial activation for
long enough to allow time for the VPN client to establish a network connection.
These registry entries require a restart of the computer for the updates to take eect.
•Slotted Activation
To enable or disable this feature, create a DWORD with the name SlottedActivation under the following parent key:
[HKLM\Software\Microsoft\Windows NT\CurrentVersion\Winlogon\CMGShield\]
•Activation Slot
To enable or disable this feature, create a subkey with the name ActivationSlot under the following parent key:
[HKLM\Software\Microsoft\Windows NT\CurrentVersion\Winlogon\CMGShield\]
Activation Slot - a string that denes the period within which the Dell Encryption client will attempt to activate with the Security
Management Server/Security Management Server Virtual. These values are dened in seconds, and the syntax is dened by
<lowervalue>,<uppervalue>. An example would be 120,300. This means that the Encryption client will attempt to activate at a
random time between 2 minutes and 5 minutes after user login.
•Calendar Repeat
To enable or disable this feature, create a subkey with the name CalRepeat under the following parent key:
[HKLM\Software\Microsoft\Windows NT\CurrentVersion\Winlogon\CMGShield\ActivationSlot]
CalRepeat - A DWORD that denes the time period in seconds that the activation slot interval occurs. Use this setting to
override the time period in seconds that the activation slot interval occurs. 25200 seconds are available for slotting activations
during a seven-hour period. The default setting is 86400 seconds, which represents a daily repeat. The suggested decimal value
is 600, which represents 10 minutes.
•Slot Interval
To enable or disable this feature, create a subkey with the name SlotInterval under the following parent key:
[HKLM\Software\Microsoft\Windows NT\CurrentVersion\Winlogon\CMGShield\ActivationSlot]
Slot Interval - A string value that denes the intervals between slot activations. The suggested setting is 45,120. This represents
activation time being randomly assigned between 45 and 120 seconds.
•Missed Threshold
To enable or disable this feature, create a subkey with the name MissThreshold under the following parent key:
22 Dell Data Security Endpoint Security Suite Pro
Registry Settings

[HKLM\Software\Microsoft\Windows NT\CurrentVersion\Winlogon\CMGShield\ActivationSlot]
MissThreshold - a DWORD value that contains a positive integer that denes the number of attempts to activate before a log
o is required. If the MissThreshold is reached, activation attempts will cease until the next login for the unactivated user. The
count for MissThreshold is always reset on logo.
The following registry keys collect slotted activation user data:
[HKCU/Software/CREDANT/ActivationSlot] (per-user data)
Deferred time to attempt the slotted activation, which is set when the user logs onto the network for the rst time after slotted
activation is enabled. The activation slot is recalculated for each activation attempt.
[HKCU/Software/CREDANT/SlotAttemptCount] (per-user data)
Number of failed or missed attempts, when the time slot arrives and activation is attempted but fails. When this number
reaches the value set in ACTIVATION_SLOT_MISSTHRESHOLD, the computer attempts one immediate activation upon
connecting to the network.
• To detect unmanaged users on the client computer, set the following registry value on the client computer:
[HKLM\SOFTWARE\Credant\CMGShield\ManagedUsers\]
"UnmanagedUserDetected"=DWORD value:1
Detect unmanaged users on this computer=1
Do not detect unmanaged users on this computer=0
• To enable silent automatic reactivation in the rare case that a user becomes deactivated, the following registry value must be set on the
client computer.
[HKEY_LOCAL_MACHINE\SYSTEM\CurrentControlSet\Services\CMGShield]
"AutoReactivation"=DWORD:00000001
0=Disabled (default)
1=Enabled
• System Data Encryption (SDE) is enforced based on the policy value for SDE Encryption Rules. Additional directories are protected by
default when the SDE Encryption Enabled policy is Selected. For more information, search "SDE Encryption Rules" in AdminHelp. When
the Encryption client is processing a policy update that includes an active SDE policy, the current user prole directory is encrypted by
default with the SDUser key (a User key) rather than the SDE key (a Device key). The SDUser key is also used to encrypt les or
folders that are copied (not moved) into a user directory that is not a encrypted with SDE.
To disable the SDUser key and use the SDE key to encrypt these user directories, create the following registry entry on the computer:
[HKEY_LOCAL_MACHINE\SOFTWARE\Credant\CMGShield]
"EnableSDUserKeyUsage"=DWORD:00000000
If this registry key is not present or is set to anything other than 0, the SDUser key will be used to encrypt these user directories.
For more information about SDUser, see www.dell.com/support/article/us/en/19/SLN304916
• Setting the registry entry, EnableNGMetadata, if issues occur related with Microsoft updates on computers with Common key-
encrypted data or with encrypting, decrypting, or unzipping large numbers of les within a folder.
Set the EnableNGMetadata registry entry in the following location:
[HKEY_LOCAL_MACHINE\System\CurrentControlSet\Services\CmgShieldFFE]
Dell Data Security Endpoint Security Suite Pro
Registry Settings
23

"EnableNGMetadata" = DWORD:1
0=Disabled (default)
1=Enabled
• The non-domain activation feature can be enabled by contacting Dell ProSupport and requesting instructions.
Threat Protection Client Registry Settings
• Threat Protection events that the client sends to the Security Management Server/Security Management Server Virtual are not
automatically archived on the client computer. Set the following registry key to archive events on the client computer, for example, if
Security Management Server/Security Management Server Virtual access is unavailable.
[HKLM\Software\Dell\Dell Data Protection\ThreatProtection]
"ArchiveEvents"=DWORD:1
0=Disabled, 1=Enabled
Log verbosity is set to Warning by default. To congure Debug log verbosity, set the following registry key.
[HKLM\Software\Dell\Dell Data Protection]
"LogVerbosity"=DWORD:10
10=Debug verbosity
• Pop-up notications display on the client computer when a threat is detected. Set this registry key to 1 to suppress the notications.
[HKLM\Software\Dell\Dell Data Protection]
"DDPTPHideToasters"=DWORD:1
0=Disabled (default), 1=Enabled (suppress notications)
To display notications of a minimum severity level, set this registry key.
[HKLM\Software\Dell\Dell Data Protection]
"DDPTPEventSeverityFilter"=DWORD:3
0=Information (displays all events), 1=Warning, 2=Minor, 3=Major (default, show Major and Critical only), 4=Critical
If "DDPTPHideToasters" is set to 1, settings for "DDPTPEventSeverityFilter" are ignored.
SED Client Registry Settings
• To set the retry interval when the Security Management Server/Security Management Server Virtual is unavailable to communicate
with the SED client, add the following registry value.
[HKLM\System\CurrentControlSet\Services\DellMgmtAgent\Parameters]
"CommErrorSleepSecs"=DWORD:300
This value is the number of seconds the SED client waits to attempt to contact the Security Management Server/Security
Management Server Virtual if it is unavailable to communicate with the SED client. The default is 300 seconds (5 minutes).
24 Dell Data Security Endpoint Security Suite Pro
Registry Settings

• If a self-signed certicate is used on the Security Management Server/Security Management Server Virtual for SED management,
SSL/TLS trust validation must remain disabled on the client computer (SSL/TLS trust validation is disabled by default with SED
management). Before enabling SSL/TLS trust validation on the client computer, the following requirements must be met.
• A certicate signed by a root authority, such as EnTrust or Verisign, must be imported into Security Management Server/Security
Management Server Virtual.
• The full chain of trust of the certicate must be stored in the Microsoft keystore on the client computer.
• To enable SSL/TLS trust validation for SED management, change the value of the following registry entry to 0 on the client
computer.
[HKLM\System\CurrentControlSet\Services\DellMgmtAgent\Parameters]
"DisableSSLCertTrust"=DWORD:0
0 = Enabled
1 = Disabled
• To use smart cards with Windows Authentication, the following registry value must be set on the client computer.
[HKLM\SOFTWARE\DigitalPersona\Policies\Default\SmartCards]
"MSSmartcardSupport"=DWORD:1
• To use smart cards with Preboot Authentication, the following registry value must be set on the client computer. Also set the
Authentication Method policy to Smart Card in the Remote Management Console, and commit the change.
[HKLM\SOFTWARE\DigitalPersona\Policies\Default\SmartCards]
"MSSmartcardSupport"=DWORD:1
• To determine if the PBA is activated, ensure that the following value is set:
[HKLM\SYSTEM\CurrentControlSet\services\DellMgmtAgent\Parameters]
"PBAIsActivated"=DWORD (32-bit):1
A value of 1 means that the PBA is activated. A value of 0 means the PBA is not activated.
• To set the interval at which the SED client will attempt to contact the Security Management Server/Security Management Server
Virtual when it is unavailable to communicate with the SED client, set the following value on the client computer:
[HKLM\System\CurrentControlSet\Services\DellMgmtAgent\Parameters]
"CommErrorSleepSecs"=DWORD Value:300
This value is the number of seconds the SED client waits to attempt to contact the Security Management Server/Security
Management Server Virtual if it is unavailable to communicate with the SED client. The default is 300 seconds (5 minutes).
• The Security Server host may be changed from the original installation location if needed. The host information is read by the client
computer every time a policy poll occurs. Change the following registry value on the client computer:
[HKLM\SYSTEM\CurrentControlSet\services\DellMgmtAgent]
"ServerHost"=REG_SZ:<newname>.<organization>.com
• The Security Server port may be changed from the original installation location if needed. This value is read by the client computer
every time a policy poll occurs. Change the following registry value on the client computer:
[HKLM\SYSTEM\CurrentControlSet\services\DellMgmtAgent]
ServerPort=REG_SZ:8888
Dell Data Security Endpoint Security Suite Pro
Registry Settings
25

• The Security Server URL may be changed from the original install location if needed. This value is read by the client computer every
time a policy poll occurs. Change the following registry value on the client computer:
[HKLM\SYSTEM\CurrentControlSet\services\DellMgmtAgent]
"ServerUrl"=REG_SZ:https://<newname>.<organization>.com:8888/agent
Advanced Authentication Client Registry Settings
• If you do not want the Advanced Authentication client to change the services associated with smart cards and biometric devices to a
startup type of "automatic", disable the service startup feature. Disabling this feature also suppresses warnings associated with the
required services not running.
When disabled, Advanced Authentication will not attempt to start these services:
• SCardSvr - Manages access to smart cards read by the computer. If this service is stopped, this computer will be unable to read
smart cards. If this service is disabled, any services that explicitly depend on it will fail to start.
• SCPolicySvc - Allows the system to be congured to lock the user desktop upon smart card removal.
• WbioSrvc - The Windows biometric service gives client applications the ability to capture, compare, manipulate, and store biometric
data without gaining direct access to any biometric hardware or samples. The service is hosted in a privileged SVCHOST process.
By default, if the registry key does not exist or the value is set to 0, this feature is enabled.
[HKLM\SOFTWARE\DELL\Dell Data Protection]
SmartCardServiceCheck=REG_DWORD:0
0 = Enabled
1 = Disabled
• To use smart cards with Windows Authentication, the following registry value must be set on the client computer.
[HKLM\SOFTWARE\DigitalPersona\Policies\Default\SmartCards]
"MSSmartcardSupport"=DWORD:1
• To use smart cards with SED Preboot Authentication, the following registry value must be set on the client computer that is equipped
with an SED.
[HKLM\SOFTWARE\DigitalPersona\Policies\Default\SmartCards]
"MSSmartcardSupport"=DWORD:1
Set the Authentication Method policy to Smart Card in the Remote Management Console, and commit the change.
BitLocker Manager Client Registry Settings
• If a self-signed certicate is used on the Security Management Server/Security Management Server Virtual for BitLocker Manager,
SSL/TLS trust validation must remain disabled on the client computer (SSL/TLS trust validation is disabled by default with BitLocker
Manager). Before enabling SSL/TLS trust validation on the client computer, the following requirements must be met.
• A certicate signed by a root authority, such as EnTrust or Verisign, must be imported into Security Management Server/Security
Management Server Virtual .
• The full chain of trust of the certicate must be stored in the Microsoft keystore on the client computer.
• To enable SSL/TLS trust validation for BitLocker Manager, change the value of the following registry entry to 0 on the client
computer.
[HKLM\System\CurrentControlSet\Services\DellMgmtAgent\Parameters]
26 Dell Data Security Endpoint Security Suite Pro
Registry Settings

"DisableSSLCertTrust"=DWORD:0
0 = Enabled
1 = Disabled
Dell Data Security Endpoint Security Suite Pro
Registry Settings
27

Install Using the Master Installer
• Command line switches and parameters are case-sensitive.
• To install using non-default ports, use the child installers instead of the master installer.
• Endpoint Security Suite Pro master installer log les are located at C:\ProgramData\Dell\Dell Data Protection\Installer.
• Instruct users to see the following document and help les for application assistance:
• See the Dell Encrypt Help to learn how to use the feature of the Encryption client. Access the help from <Install dir>:\Program Files
\Dell\Dell Data Protection\Encryption\Help.
• See the Encryption External Media Help to learn how the features of Encryption External Media. Access the help from <Install dir>:
\Program Files\Dell\Dell Data Protection\Encryption\EMS.
• See the Endpoint Security Suite Pro Help to learn how to use the features of Advanced Authentication and Threat Protection.
Access the help from <Install dir>:\Program Files\Dell\Dell Data Protection\Client Security Framework\Help.
• Users should update their policies by right-clicking the Dell Encryption icon in the system tray and selecting Check for Policy Updates
after installation completes.
• The master installer installs the entire suite of products. There are two methods to install using the master installer. Choose one of the
following.
•Install Interactively Using the Master Installer
or
•Install by Command Line Using the Master Installer
Install Interactively Using the Master Installer
• The Endpoint Security Suite Pro master installer can be located at:
•From Your Dell FTP Account - Locate the installation bundle at Endpoint-Security-Suite-Pro_Ent-1.x.x.xxx.zip
• Use these instructions to install Endpoint Security Suite Pro interactively using the Endpoint Security Suite Pro master installer. This
method can be used to install the suite of products on one computer at a time.
1 Locate DDSSuite.exe in the Dell installation media. Copy it to the local computer.
2 Double-click to launch the installer. This may take several minutes.
3 Click Next in the Welcome dialog.
4 Read the license agreement, accept the terms, and click Next.
5 In the Enterprise Server Name eld, enter the fully qualied host name of the Security Management Server/Security Management
Server Virtual that will manage the target user, such as server.organization.com.
In the Device Server URL eld, enter the URL of the Device Server (Security Server) with which the client will communicate.
The format is https://server.organization.com:8443/xapi/ (including trailing forward slash).
Click Next.
4
28 Dell Data Security Endpoint Security Suite Pro
Install Using the Master Installer
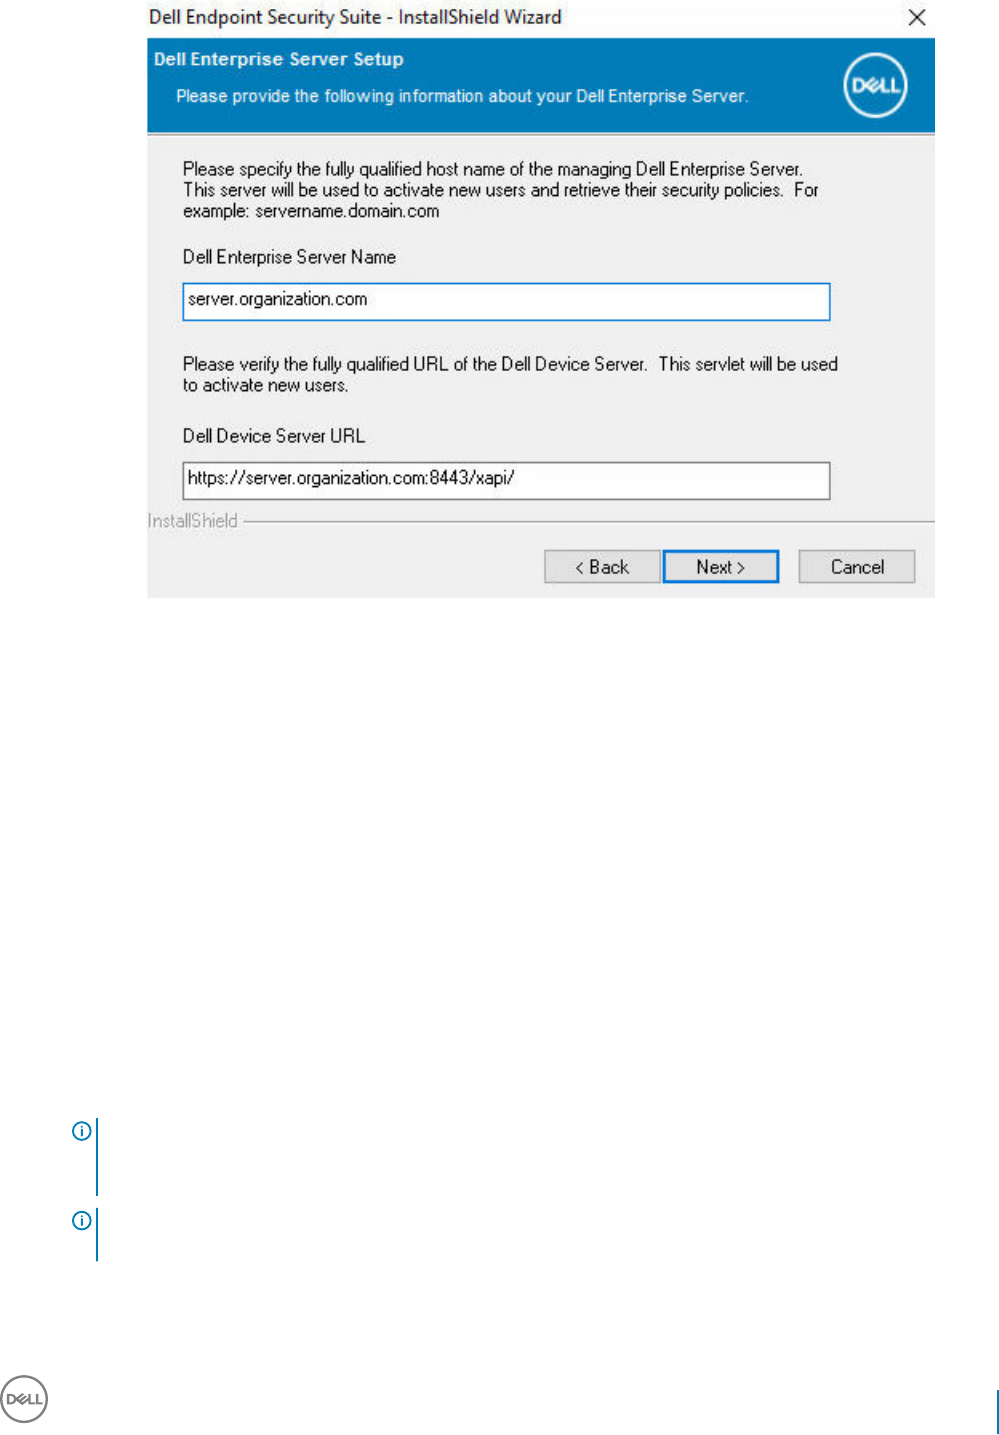
6 Click Next to install the product in the default location of C:\Program Files\Dell\Dell Data Protection\. Dell recommends installing in
the default location only, as problems may arise when installing in other locations.
7 Select the components to be installed.
Security Framework installs the underlying security framework and Advanced Authentication, the advanced authentication client that
manages multiple authentication methods, including PBA and credentials such as ngerprints and passwords.
Advanced Authentication installs the les and services required for Advanced Authentication.
Encryption installs the Encryption client, the component that enforces security policy, whether a computer is connected to the
network, disconnected from the network, lost, or stolen.
Threat Protection installs the Threat Protection clients, which are malware and antivirus protection to scan for viruses, spyware, and
unwanted programs, client rewall to monitor communication between the computer and resources on the network and the Internet,
and web ltering to display safety ratings or block access to websites during online browsing.
BitLocker Manager installs the BitLocker Manager client, designed to enhance the security of BitLocker deployments by simplifying
and reducing the cost of ownership through centralized management of BitLocker encryption policies.
Advanced Threat Prevention installs the Advanced Threat Prevention client, which is next-generation antivirus protection that uses
algorithmic science and machine learning to identify, classify, and prevent both known and unknown cyberthreats from executing or
harming endpoints.
NOTE: Threat Protection and Advanced Threat Prevention cannot reside on the same computer. The installer
automatically prevents the selection of both components. Should you wish to install Advanced Threat Prevention,
download the Endpoint Security Suite Enterprise
Advanced Installation Guide
for instructions.
NOTE: If the installer detects a Windows version later than Anniversary Update (Redstone 1), the Threat Protection
option does not display.
Click Next when your selections are complete.
Dell Data Security Endpoint Security Suite Pro
Install Using the Master Installer
29
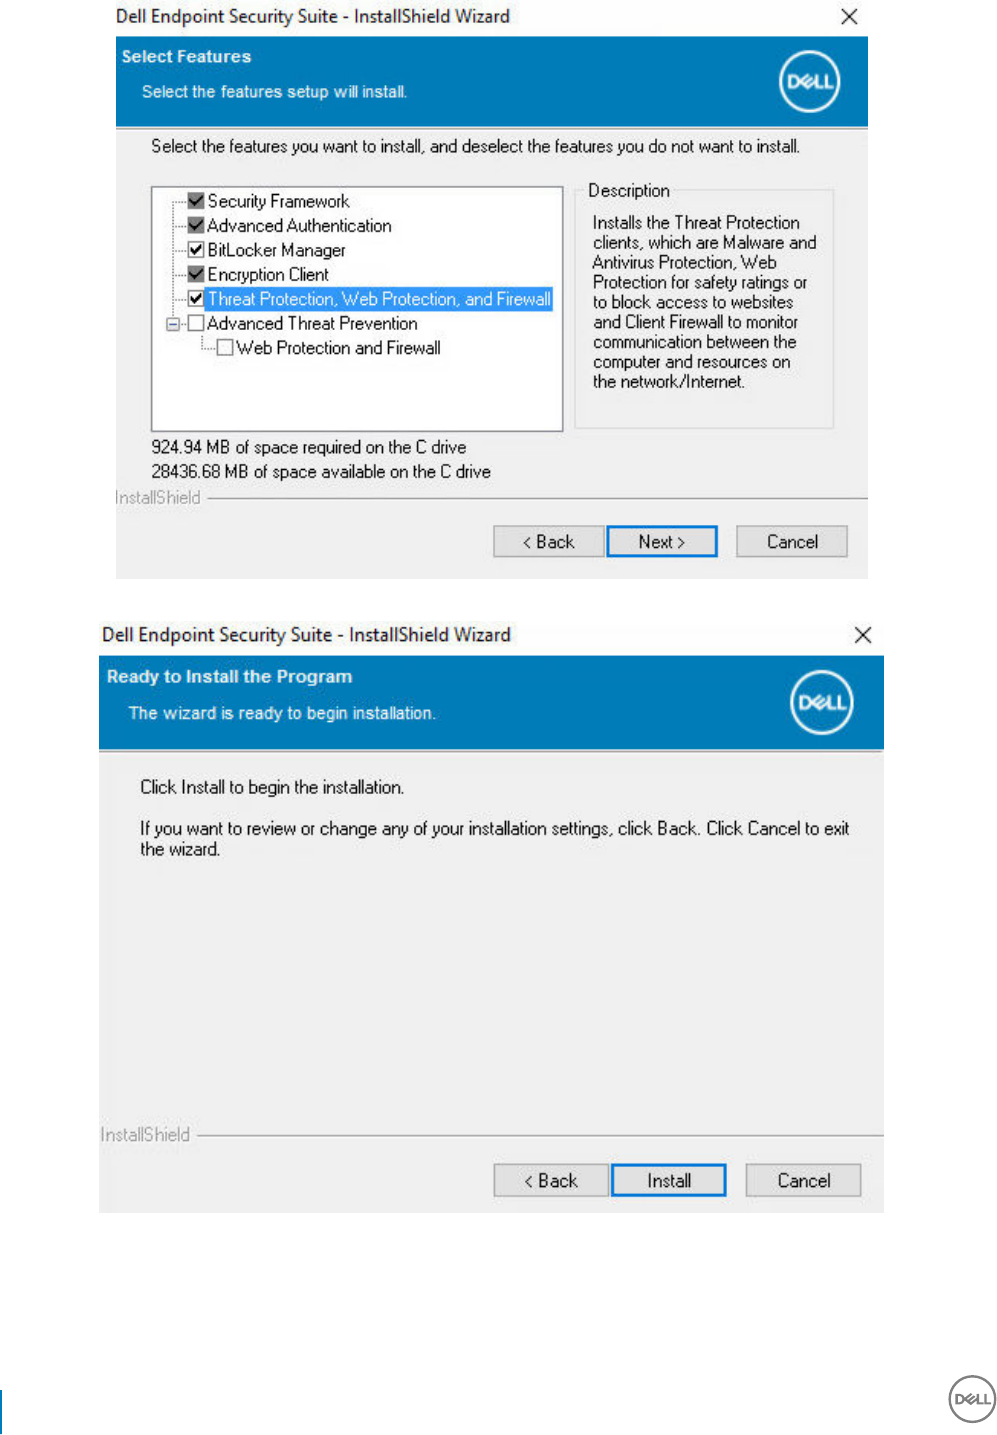
8 Click Install to begin the installation. Installation will take several minutes.
9 Select Yes, I want to restart my computer now and click Finish.
30 Dell Data Security Endpoint Security Suite Pro
Install Using the Master Installer
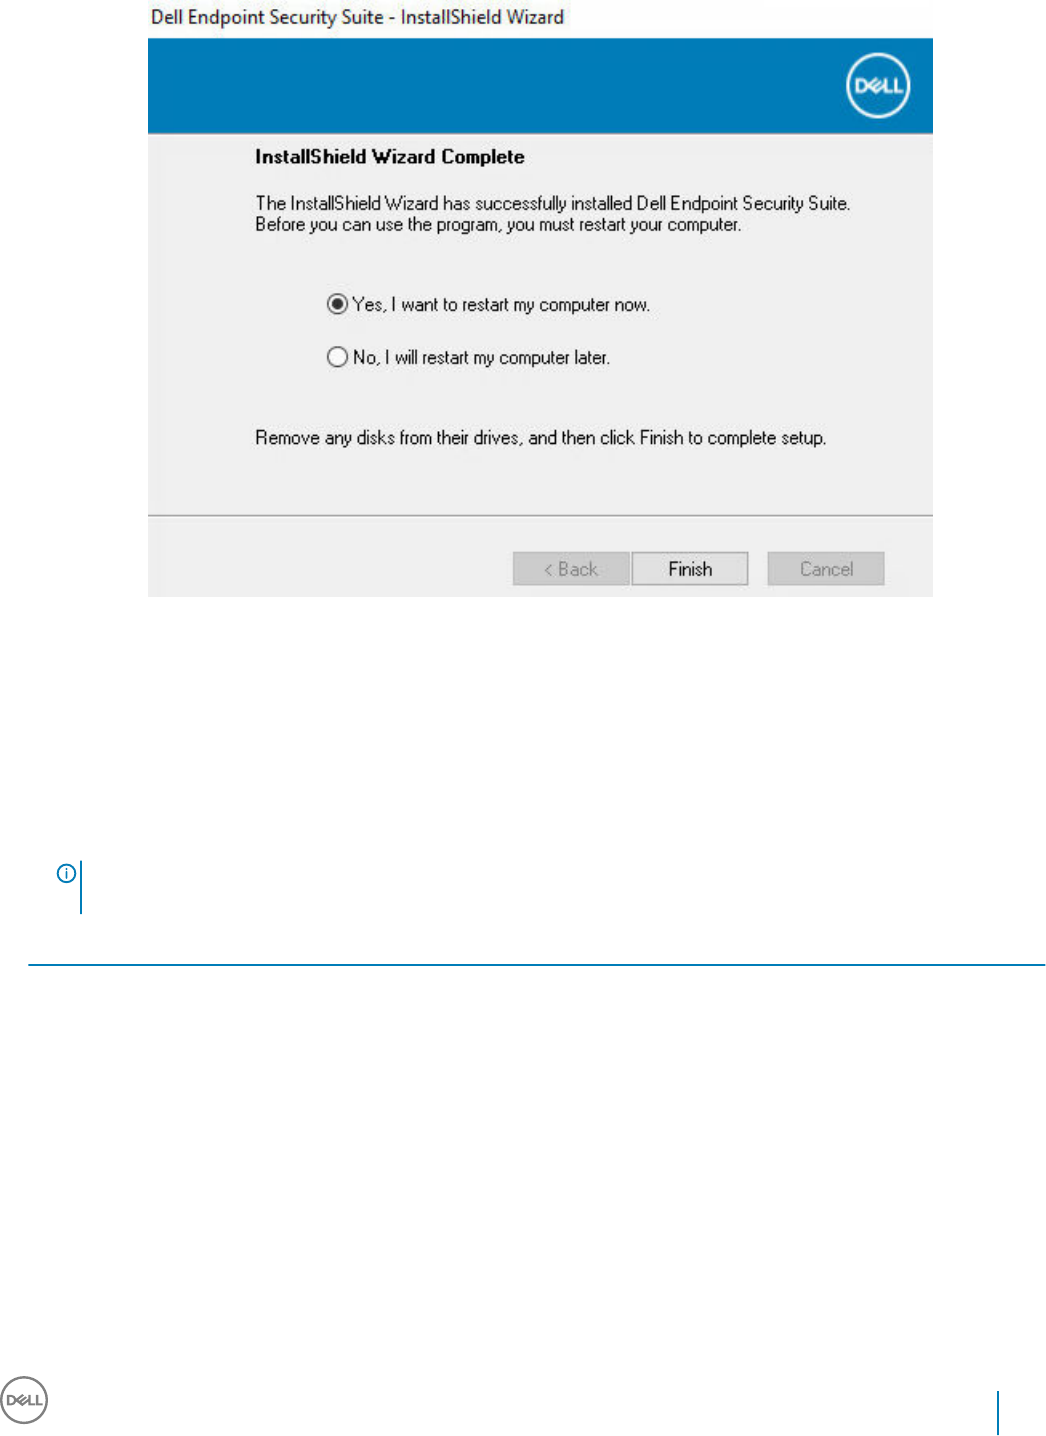
Installation is complete.
Install by Command Line Using the Master Installer
• The switches must be specied rst in a command line installation. Other parameters go inside an argument that is passed to the /v
switch.
Switches
• The following table describes the switches that can be used with the Endpoint Security Suite Pro master installer.
NOTE: If you attempt to install the optional Threat Protection features on a Windows 10 Anniversary Update (Redstone 2)
or later, an incompatibility warning displays.
Switch Description
-y -gm2 Pre-extraction of Endpoint Security Suite Pro master installer. The -y and -gm2 switches must be used
together.
Do not separate the switches.
/S Silent installation
/z Pass variables to the .msi inside the DDSSuite.exe
Parameters
• The following table describes the parameters that can be used with the Endpoint Security Suite Pro master installer. The Endpoint
Security Suite Pro master installer cannot exclude individual components but can receive commands to specify which components
should be installed.
Dell Data Security Endpoint Security Suite Pro
Install Using the Master Installer
31

Parameter Description
SUPPRESSREBOOT Suppresses the automatic reboot after the installation completes. Can be used in SILENT mode.
SERVER Species the URL of the Security Management Server/Security Management Server Virtual.
InstallPath Species the path for the installation. Can be used in SILENT mode.
FEATURES Species the components that can be installed in SILENT mode.
DE-TP = Threat Protection and Encryption
DE = Drive Encryption (Encryption client)
BLM = BitLocker Manager
SED = SED Management (EMAgent/Manager, PBA/GPE Drivers)
BLM_ONLY=1 Must be used when using FEATURES=BLM in the command line to exclude the SED Management plugin.
Example Command Line
• Command line parameters are case-sensitive.
• This example installs all components using the Endpoint Security Suite Pro master installer on standard ports, silently, in the default
location of C:\Program Files\Dell\Dell Data Protection\, and congures it to use the specied Security Management Server/Security
Management Server Virtual.
"DDSSuite.exe" -y -gm2 /S /z"\"SERVER=server.organization.com\""
• This example installs Threat Protection and Encryption
only
using the Endpoint Security Suite Pro master installer on standard ports,
silently, in the default location of C:\Program Files\Dell\Dell Data Protection\, and congures it to use the specied Security
Management Server/Security Management Server Virtual.
"DDSSuite.exe" -y -gm2 /S /z"\"SERVER=server.organization.com, FEATURES=DE-TP\""
• This example installs Threat Protection, Encryption, and SED Management using the Endpoint Security Suite Pro master installer, on
standard ports, silently, with a suppressed reboot, in the default location of C:\Program Files\Dell\Dell Data Protection\, and congures
it to use the specied Security Management Server/Security Management Server Virtual.
"DDSSuite.exe" -y -gm2 /S /z"\"SERVER=server.organization.com, FEATURES=DE-TP, SED,
SUPPRESSREBOOT=1\""
•
32 Dell Data Security Endpoint Security Suite Pro
Install Using the Master Installer

Uninstall Using the Endpoint Security Suite Pro
Master Installer
• Each component must be uninstalled separately, followed by uninstallation of the Endpoint Security Suite Pro master installer. The
clients must be uninstalled in a specic order to prevent uninstallation failures.
• Follow the instructions in Extract the Child Installers from the Master Installer to obtain child installers.
• Ensure that the same version of Endpoint Security Suite Pro master installer (and thereby clients) is used for uninstallation as
installation.
• This chapter refers you to other chapters that contain detailed instructions of how to uninstall the child installers. This chapter explains
the last step only, uninstalling the master installer.
• Uninstall the clients in the following order.
aUninstall Threat Protection Clients.
bUninstall Encryption Client.
cUninstall SED and Advanced Authentication Clients.
dUninstall BitLocker Manager Client.
The Driver package does not need to be uninstalled.
• Proceed to Uninstall the Master Installer.
Uninstall the Endpoint Security Suite Pro Master
Installer
Now that all of the individual clients have been uninstalled, the master installer can be uninstalled.
Command Line Uninstallation
• The following example silently uninstalls the Endpoint Security Suite Pro master installer.
"DDSSuite.exe" -y -gm2 /S /x
Reboot the computer when nished.
5
Dell Data Security Endpoint Security Suite Pro
Uninstall Using the Endpoint Security Suite Pro Master Installer
33

Install Using the Child Installers
• To install each client individually, the child executable les must rst be extracted from the Endpoint Security Suite Pro master installer,
as shown in Extract the Child Installers from the Master Installer.
• Command examples included in this section assume the commands are run from C:\extracted.
• Command line switches and parameters are case-sensitive.
• Be sure to enclose a value that contains one or more special characters, such as a blank space in the command line, in escaped
quotation marks.
• Use these installers to install the clients using a scripted installation, batch les, or any other push technology available to your
organization.
• The reboot has been suppressed in the command line examples. However, an eventual reboot is required. Encryption cannot begin until
the computer has rebooted.
• Log les - Windows creates unique child installer installation log les for the logged in user at %temp%, located at C:\Users
\<UserName>\AppData\Local\Temp.
If you decide to add separate a log le when you run the installer, ensure that the log le has a unique name, as child installer log les do
not append. The standard .msi command can be used be create a log le by using /l*v C:\<any directory>\<any log le name>.log.
• All child installers use the same basic .msi switches and display options, except where noted, for command line installations. The
switches must be specied rst. The /v switch is required and takes an argument. Other parameters go inside an argument that is
passed to the /v switch.
Display options can be specied at the end of the argument passed to the /v switch to achieve the expected behavior. Do not use
both /q and /qn in the same command line. Only use ! and - after /qb.
Switch Meaning
/v Pass variables to the .msi inside the setup.exe. The content must always be enclosed in
plain-text quotes.
/s Silent mode
/x Uninstall mode
/a Administrative install (will copy all les inside the .msi)
NOTE:
With /v, the Microsoft default options are available. For a list of options, see https://msdn.microsoft.com/en-us/library/
windows/desktop/aa367988(v=vs.85).aspx.
Option Meaning
/q No Progress dialog, restarts itself after process completion
/qb Progress dialog with Cancel button, prompts for restart
/qb- Progress dialog with Cancel button, restarts itself after process completion
/qb! Progress dialog without Cancel button, prompts for restart
6
34 Dell Data Security Endpoint Security Suite Pro
Install Using the Child Installers

Option Meaning
/qb!- Progress dialog without Cancel button, restarts itself after process completion
/qn No user interface
/norestart Suppress reboot
• Instruct users to see the following document and help les for application assistance:
• See the Dell Encrypt Help to learn how to use the feature of the Encryption client. Access the help from <Install dir>:\Program Files
\Dell\Dell Data Protection\Encryption\Help.
• See the Encryption External Media Help to learn how the features of Encryption External Media. Access the help from <Install dir>:
\Program Files\Dell\Dell Data Protection\Encryption\EMS.
• See the Endpoint Security Suite Pro Help to learn how to use the features of Advanced Authentication and Threat Protection.
Access the help from <Install dir>:\Program Files\Dell\Dell Data Protection\Client Security Framework\Help.
Install Drivers
• Drivers and rmware for ControlVault, ngerprint readers and smart cards are not included in the Endpoint Security Suite Pro master
installer or child installer executable les. The drivers and rmware must be kept up-to-date, and can be downloaded from http://
www.dell.com/support and selecting your computer model. Download the appropriate drivers and rmware based on your
authentication hardware.
• ControlVault
• NEXT Biometrics Fingerprint Driver
• Validity Fingerprint Reader 495 Driver
• O2Micro Smart Card Driver
If installing on non-Dell hardware, download updated drivers and rmware from that vendor's website.
Install Encryption Client
• Review Encryption Client Requirements if your organization is using a certicate signed by a root authority, such as EnTrust or Verisign.
A registry setting change is needed on the client computer to enable certicate validation.
• Users should update their policies by right-clicking the Dell Data Security icon in the system tray and selecting Check for Policy
Updates after installation completes.
• The Encryption client installer can be located at:
•From Your Dell FTP Account - Locate the installation bundle at Endpoint-Security-Suite-1.x.x.xxx.zip and then Extract the Child
Installers from the Master Installer. After extraction, locate the le at C:\extracted\Encryption.
Command Line Installation
• The following table details the parameters available for the installation.
Parameters
SERVERHOSTNAME=<ServerName> (FQDN of the Dell Server for re-activation)
POLICYPROXYHOSTNAME=<RGKName> (FQDN of the default Policy Proxy)
MANAGEDDOMAIN=<MyDomain> (Domain to be used for the device)
Dell Data Security Endpoint Security Suite Pro
Install Using the Child Installers
35

Parameters
DEVICESERVERURL=<DeviceServerName/SecurityServerName> (URL used for activation; usually includes server name, port, and
xapi)
GKPORT=<NewGKPort> (Gatekeeper port)
MACHINEID=<MachineName> (Computer name)
RECOVERYID=<RecoveryID> (Recovery ID)
REBOOT=ReallySuppress (Null allows for automatic reboots, ReallySuppress disables reboot)
HIDEOVERLAYICONS=1 (0 enables overlay icons, 1 disables overlay icons)
HIDESYSTRAYICON=1 (0 enables the systray icon, 1 disables the systray icon)
For a list of basic .msi switches and display options that can be used in command lines, refer to Install Using the Child Installers.
• The following table details additional optional parameters related with activation.
Parameters
SLOTTEDACTIVATON=1 (0 disables delayed/scheduled activations, 1 enables delayed/scheduled activations)
SLOTINTERVAL=45,120 (Schedules activations through x,x notation where the rst value is the lower limit of the schedule and the
second value is the upper limit - in seconds)
CALREPEAT=600 (MUST match or exceed the upper limit set in SLOTINTERVAL. Number of seconds the Encryption client waits
before generating an activation attempt based on SLOTINTERVAL.)
Example Command Line
• The following example installs the client with default parameters (Encryption client, Encrypt for Sharing, no dialogue, no progress bar,
automatic restart, installed in the default location of C:\Program Files\Dell\Dell Data Protection).
DDPE_XXbit_setup.exe /s /v"SERVERHOSTNAME=server.organization.com
POLICYPROXYHOSTNAME=rgk.organization.com MANAGEDDOMAIN=ORGANIZATION DEVICESERVERURL=https://
server.organization.com:8443/xapi/ /qn"
MSI Command:
msiexec.exe /i "Dell Data Protection Encryption.msi" /qn REBOOT="ReallySuppress"
SERVERHOSTNAME="server.organization.com" POLICYPROXYHOSTNAME="rgk.organization.com"
MANAGEDDOMAIN="ORGANIZATION" DEVICESERVERURL="https://server.organization.com:8443/xapi/"
• The following example installs the Encryption client and Encrypt for Sharing, hides the Data Security Console system tray icon, hides
the overlay icons, no dialogue, no progress bar, suppresses restart, installed in the default location of C:\Program Files\Dell\Dell Data
Protection.
DDPE_XXbit_setup.exe /s /v"SERVERHOSTNAME=server.organization.com
POLICYPROXYHOSTNAME=rgk.organization.com MANAGEDDOMAIN=ORGANIZATION DEVICESERVERURL=https://
server.organization.com:8443/xapi/ HIDESYSTRAYICON=1 HIDEOVERLAYICONS=1
REBOOT=ReallySuppress /qn"
MSI Command:
msiexec.exe /i "Dell Data Protection Encryption.msi" /qn REBOOT="ReallySuppress"
SERVERHOSTNAME="server.organization.com" POLICYPROXYHOSTNAME="rgk.organization.com"
MANAGEDDOMAIN="ORGANIZATION" DEVICESERVERURL="https://server.organization.com:8443/xapi/"
HIDESYSTRAYICON="1" HIDEOVERLAYICONS="1"
•Example Command Line to Install in Deferred Activation Mode
• The following example installs the client with Deferred Activation in the default location of C:\Program Files\Dell\Dell Data Protection)
36 Dell Data Security Endpoint Security Suite Pro
Install Using the Child Installers

DDPE_XXbit_setup.exe /s /v"OPTIN=1 SERVERHOSTNAME=server.organization.com
POLICYPROXYHOSTNAME=rgk.organization.com DEVICESERVERURL=https://server.organization.com:8443/
xapi/ MANAGEDDOMAIN=ORGANIZATION"
MSI Command:
msiexec.exe /i "Dell Data Protection Encryption.msi" OPTIN="1"
SERVERHOSTNAME="server.organization.com" POLICYPROXYHOSTNAME="rgk.organization.com"
DEVICESERVERURL="https://server.organization.com:8443/xapi/" MANAGEDDOMAIN="ORGANIZATION"
• The following example installs the client with Deferred Activation and with default parameters (Encryption client, Encrypt for Sharing,
no dialogue, no progress bar, no restart, no Encryption overlay icons, installed in the default location of C:\Program Files\Dell\Dell Data
Protection).
DDPE_XXbit_setup.exe /s /v"SERVERHOSTNAME=server.organization.com
POLICYPROXYHOSTNAME=rgk.organization.com MANAGEDDOMAIN=ORGANIZATION DEVICESERVERURL=https://
server.organization.com:8443/xapi/ OPTIN=1 HIDEOVERLAYICONS=1 REBOOT=ReallySuppress /qn"
MSI Command:
msiexec.exe /i "Dell Data Protection Encryption.msi" /qn REBOOT="ReallySuppress" OPTIN="1"
SERVERHOSTNAME="server.organization.com" POLICYPROXYHOSTNAME="rgk.organization.com"
MANAGEDDOMAIN="ORGANIZATION" DEVICESERVERURL="https://server.organization.com:8443/xapi/"
HIDEOVERLAYICONS="1"
NOTE:
Some older clients may require escape characters of \" around the values of parameters. For example:
DDPE_XXbit_setup.exe /v"CMG_DECRYPT=\"1\" CMGSILENTMODE=\"1\" DA_SERVER=
\"server.organization.com\" DA_PORT=\"8050\" SVCPN=\"administrator@organization.com\"
DA_RUNAS=\"domain\username\" DA_RUNASPWD=\"password\" /qn"
Install Threat Protection Clients
• Threat Protection and Advanced Threat Prevention cannot reside on the same computer. Do not install both of these components on
the same computer, as compatibility issues will occur. If you wish to install Advanced Threat Prevention, download the Endpoint
Security Suite Enterprise Advanced Installation Guide for instructions.
• The installers must be run in a specic order. Failure to install the components in the proper order will result in installation failure. Run
the installers in the following order:
NOTE: If you attempt to install the optional Threat Protection features on a Windows 10 Anniversary Update (Redstone 2) or
later, an incompatibility warning displays.
1\Advanced Authentication (Threat Protection needs the Dell Encryption Management Agent component).
2\Advanced Authentication (Advanced Authentication and Auth should be installed together)
3 The Encryption client is required with the Threat Protection components. Go to Example Command Line for an example installation.
4 Threat Protection Clients, as shown in Command Line Installation.
• The SED and Advanced Authentication client installers can be located at:
•From Your Dell FTP Account - Locate the installation bundle at Endpoint-Security-Suite-1.x.x.xxx.zip and then Extract the Child
Installers from the Master Installer. After extraction, locate the le at C:\extracted\Encryption Management Agent and C:
\extracted\Advanced Authentication\<x64/x86>.
• The Encryption client installer can be located at:
•From Your Dell FTP Account - Locate the installation bundle at Endpoint-Security-Suite-1.x.x.xxx.zip and then Extract the Child
Installers from the Master Installer. After extraction, locate the le at C:\extracted\Encryption.
• The Threat Protection client installers can be located at:
•From Your Dell FTP Account - Locate the installation bundle at Endpoint-Security-Suite-1.x.x.xxx.zip and then Extract the Child
Installers from the Master Installer. After extraction, locate the le at C:\extracted\Threat Protection.
Dell Data Security Endpoint Security Suite Pro
Install Using the Child Installers
37

Command Line Installation
• The following table details the parameters available for the EnsMgmtSdkInstaller.exe le.
Parameters Description
LoadCert Load the certicate at the specied directory.
• The following table details the parameters available for the EPsetup.exe le.
Parameters Description
ADDLOCAL="tp,fw,wc" Identies the modules to install:
tp=Threat Protection
fw=Client Firewall
wc=Web Protection
NOTE: All three modules must be installed.
override "hips" Do not install Host Intrusion Prevention
INSTALLDIR Non-default installation location
nocontentupdate Tells the installer not to update content les automatically as part of the installation process.
Dell recommends scheduling an update as soon as installation has completed.
nopreservesettings Do not save settings.
• The following table details the parameters available for the DellThreatProtection.msi le.
Parameters Description
Reboot=ReallySuppress Suppresses the reboot.
ARP 0=No entry in Add/Remove Programs
1=Entry in Add/Remove Programs
• The following table details the parameters available for the EnsMgmtSdkInstaller.exe le.
Parameters Description
ProtectProcesses Specify the le name and location of processes to protect.
InstallSDK Installs the SDK at the specied location.
RemoveRightClick Removes the right-click menu option for end users.
RemoveMcTray Removes the system tray.
Example Command Line
\Threat Protection\SDK
• The following command line loads the certicate default parameters.
38 Dell Data Security Endpoint Security Suite Pro
Install Using the Child Installers

"Threat Protection\SDK\EnsMgmtSdkInstaller.exe" -LoadCert >"C:\ProgramData\Dell\Dell Data
Protection\Installer Logs\McAfeeSDKInstallerBeforeEndPoint.log"
NOTE:
This installer can be skipped if upgrading.
Then:
\Threat Protection\EndPointSecurity
• The following example installs the Threat Protection, Web Protection, and Client Firewall with default parameters (silent mode, install
Threat Protection, Client Firewall, and Web Protection, override the Host Intrusion Prevention, no content update, no settings saved).
"Threat Protection\EndPointSecurity\EPsetup.exe" ADDLOCAL="tp,fw,wc" /override"hips" /
nocontentupdate /nopreservesettings /qn
Then:
\Threat Protection\ThreatProtection\WinXXR
• The following example installs the client with default parameters (suppress the reboot, no dialogue, no progress bar, no entry in the
Control Panel Programs list).
"Threat Protection\ThreatProtection\WinXXR\DellThreatProtection.msi" /qn REBOOT=ReallySuppress
ARPSYSTEMCOMPONENT=1
\Threat Protection\SDK
• The following example installs the Threat Protection SDK.
"Threat Protection\SDK\EnsMgmtSdkInstaller.exe" -ProtectProcesses "C:\Program Files\Dell\Dell
Data Protection\Threat Protection\DellAVAgent.exe" -InstallSDK -RemoveRightClick -RemoveMcTray
>"C:\ProgramData\Dell\Dell Data Protection\Installer Logs\McAfeeSDKInstallerAfterEndPoint.log"
Install SED Management and Advanced
Authentication Clients
• The SED client is required for Advanced Authentication in v8.x.
• Review SED Client Requirements if your organization is using a certicate signed by a root authority, such as EnTrust or Verisign. A
registry setting change is needed on the client computer to enable SSL/TLS trust validation.
• Users log in to the PBA using their Windows credentials.
• The SED and Advanced Authentication client installers can be located at:
•From Your Dell FTP Account - Locate the installation bundle at Endpoint-Security-Suite-1.x.x.xxx.zip and then Extract the Child
Installers from the Master Installer. After extraction, locate the le at C:\extracted\Encryption Management Agent and C:
\extracted\Advanced Authentication\<x64/x86>.
Command Line Installation
• The following table details the parameters available for the installation.
Parameters
CM_EDITION=1 <remote management>
INSTALLDIR=<change the installation destination>
SERVERHOST=<securityserver.organization.com>
SERVERPORT=8888
Dell Data Security Endpoint Security Suite Pro
Install Using the Child Installers
39

Parameters
SECURITYSERVERHOST=<securityserver.organization.com>
SECURITYSERVERPORT=8443
ARPSYSTEMCOMPONENT=1 <no entry in the Control Panel Programs list>
For a list of basic .msi switches and display options that can be used in command lines, refer to Install Using the Child Installers.
Example Command Line
\Encryption Management Agent
• The following example installs remotely managed SED (silent installation, no reboot, no entry in the Control Panel Programs list, installed
in the default location of C:\Program Files\Dell\Dell Data Protection).
EMAgent_XXbit_setup.exe /s /v"CM_EDITION=1 SERVERHOST=server.organization.com SERVERPORT=8888
SECURITYSERVERHOST=server.organization.com SECURITYSERVERPORT=8443 ARPSYSTEMCOMPONENT=1 /
norestart /qn"
Then:
\Advanced Authentication\<x64/x86>
• The following example installs Advanced Authentication (silent installation, no reboot)
setup.exe /s /v"/norestart /qn ARPSYSTEMCOMPONENT=1"
Install BitLocker Manager Client
• Review BitLocker Manager Client Requirements if your organization is using a certicate signed by a root authority, such as EnTrust or
Verisign. A registry setting change is needed on the client computer to enable SSL/TLS trust validation.
• The BitLocker Manager client installers can be located at:
•From Your Dell FTP Account - Locate the installation bundle at Endpoint-Security-Suite-1.x.x.xxx.zip and then Extract the Child
Installers from the Master Installer. After extraction, locate the le at C:\extracted\Encryption Management Agent.
Command Line Installation
• The following table details the parameters available for the installation.
Parameters
CM_EDITION=1 <remote management>
INSTALLDIR=<change the installation destination>
SERVERHOST=<securityserver.organization.com>
SERVERPORT=8888
SECURITYSERVERHOST=<securityserver.organization.com>
SECURITYSERVERPORT=8443
FEATURE=BLM <install BitLocker Manager only>
FEATURE=BLM,SED <install BitLocker Manager with SED>
40 Dell Data Security Endpoint Security Suite Pro
Install Using the Child Installers

Parameters
ARPSYSTEMCOMPONENT=1 <no entry in the Control Panel Programs list>
For a list of basic .msi switches and display options that can be used in command lines, refer to Install Using the Child Installers.
Example Command Line
• The following example installs BitLocker Manager only (silent installation, no reboot, no entry in the Control Panel Programs list, installed
in the default location of C:\Program Files\Dell\Dell Data Protection)
EMAgent_XXbit_setup.exe /s /v"CM_EDITION=1 SERVERHOST=server.organization.com SERVERPORT=8888
SECURITYSERVERHOST=server.organization.com SECURITYSERVERPORT=8443 FEATURE=BLM /norestart /qn"
• The following example installs BitLocker Manager with SED (silent installation, no reboot, no entry in the Control Panel Programs list,
installed in the default location of C:\Program Files\Dell\Dell Data Protection)
EMAgent_XXbit_setup.exe /s /v"CM_EDITION=1 SERVERHOST=server.organization.com SERVERPORT=8888
SECURITYSERVERHOST=server.organization.com SECURITYSERVERPORT=8443 FEATURE=BLM,SED /
norestart /qn"
Dell Data Security Endpoint Security Suite Pro
Install Using the Child Installers
41

Uninstall Using the Child Installers
• To uninstall each client individually, the child executable les must rst be extracted from the Endpoint Security Suite Pro master
installer, as shown in Extract the Child Installers from the Master Installer Alternatively, run an administrative installation to extract
the .msi.
• Ensure that the same versions of client are used for uninstallation as installation.
• Command line switches and parameters are case-sensitive.
• Be sure to enclose a value that contains one or more special characters, such as a blank space in the command line, in escaped
quotation marks. Command line parameters are case-sensitive.
• Use these installers to uninstall the clients using a scripted installation, batch les, or any other push technology available to your
organization.
• Log les - Windows creates unique child installer uninstallation log les for the logged in user at %temp%, located at C:\Users
\<UserName>\AppData\Local\Temp.
If you decide to add separate a log le when you run the installer, ensure that the log le has a unique name, as child installer log les do
not append. The standard .msi command can be used be create a log le by using /l C:\<any directory>\<any log le name>.log. Dell
does not recommend using "/l*v" (verbose logging) in a command line uninstallation, as the username/password is recorded in the log
le.
• All child installers use the same basic .msi switches and display options, except where noted, for command line uninstallations. The
switches must be specied rst. The /v switch is required and takes an argument. Other parameters go inside an argument that is
passed to the /v switch.
Display options can be specied at the end of the argument passed to the /v switch to achieve the expected behavior. Do not use
both /q and /qn in the same command line. Only use ! and - after /qb.
Switch Meaning
/v Pass variables to the .msi inside the setup.exe. The content must always be enclosed in
plain-text quotes.
/s Silent mode
/x Uninstall mode
/a Administrative install (will copy all les inside the .msi)
NOTE:
With /v, the Microsoft default options are available. For a list of options, see https://msdn.microsoft.com/en-us/library/
windows/desktop/aa367988(v=vs.85).aspx.
Option Meaning
/q No Progress dialog, restarts itself after process completion
/qb Progress dialog with Cancel button, prompts for restart
/qb- Progress dialog with Cancel button, restarts itself after process completion
/qb! Progress dialog without Cancel button, prompts for restart
7
42 Dell Data Security Endpoint Security Suite Pro
Uninstall Using the Child Installers

Option Meaning
/qb!- Progress dialog without Cancel button, restarts itself after process completion
/qn No user interface
Uninstall Threat Protection Clients
Command Line Uninstallation
• Once extracted from the Endpoint Security Suite Pro master installer, the Threat Protection client installer can be located at C:
\extracted\Threat Protection\ThreatProtection\WinXXR\DellThreatProtection.msi.
• Go to Add/Remove Programs in the Control Panel and uninstall the following components in this order.
• McAfee Endpoint Security Firewall
• McAfee Endpoint Security Threat Prevention
• McAfee Endpoint Security Web Control
• McAfee Agent
• Then:
• The following example uninstalls the Threat Protection client .
MSIEXEC.EXE /x "DellThreatProtection.msi"
Uninstall Encryption Client
• To reduce decryption time, run the Windows Disk Cleanup Wizard to remove temporary les and other unneeded data.
• Plan to decrypt overnight, if possible.
• Turn o sleep mode to prevent an unattended computer from going to sleep. Decryption cannot occur on a sleeping computer.
• Shut down all processes and applications to minimize decryption failures because of locked les.
• Once the uninstall is complete and decryption is in progress, disable all network connectivity. Otherwise, new policies may be acquired
that re-enable encryption.
• Follow your existing process for decrypting data, such as issuing a policy update.
• Windows Encryption clients update the Security Management Server/Security Management Server Virtual to change the status to
Unprotected at the beginning of a Encryption client uninstall process. However, in the event that the client cannot contact the Security
Management Server/Security Management Server Virtual, regardless of the reason, the status cannot be updated. In this case, you will
need to manually Remove Endpoint in the Remote Management Console. If your organization uses this workow for compliance
purposes, Dell recommends that you verify that Unprotected has been set as expected, either in the Remote Management Console or
Compliance Reporter.
Process
•Before beginning the uninstall process, see (Optional) Create an Encryption Removal Agent Log File. This log le is useful for
troubleshooting an uninstall/decryption operation. If you do not intend to decrypt les during the uninstall process, you do not need to
create an Encryption Removal Agent log le.
• The Key Server (and Security Management Server) must be congured prior to uninstallation if using the Encryption Removal Agent's
Download Keys from Server option. See Congure Key Server for Uninstallation of Encryption Client Activated Against Security
Management Server for instructions. No prior action is needed if the client to uninstall is activated against a Security Management
Server Virtual, as Security Management Server Virtual does not use the Key Server.
• You must use the Dell Administrative Utility (CMGAd) prior launching the Encryption Removal Agent if using the Encryption Removal
Agent's Import Keys from a le option. This utility is used to obtain the encryption key bundle. See Use the Administrative Download
Utility (CMGAd) for instructions. The utility can be located in the Dell installation media.
Dell Data Security Endpoint Security Suite Pro
Uninstall Using the Child Installers
43

• Run WSScan to ensure that all data is decrypted after uninstallation is complete, but before restarting the computer. See Use WSScan
for instructions.
• Periodically Check Encryption Removal Agent Status. Data decryption is still in process if the Encryption Removal Agent Service still
exists in the Services panel.
Command Line Uninstallation
• Once extracted from the Endpoint Security Suite Pro master installer, the Encryption client installer can be located at C:\extracted
\Encryption\DDPE_XXbit_setup.exe.
• The following table details the parameters available for the uninstallation.
Parameter Selection
CMG_DECRYPT Property for selecting the type of Encryption Removal Agent
installation:
3 - Use LSARecovery bundle
2 - Use previously downloaded forensics key material
1 - Download keys from the Dell Server
0 - Do not install Encryption Removal Agent
CMGSILENTMODE Property for silent uninstallation:
1 - Silent
0 - Not Silent
Required Properties
DA_SERVER FQHN for the Security Management Server hosting the negotiate
session.
DA_PORT Port on the Security Management Server for request (default is
8050).
SVCPN Username in UPN format that the Key Server Service is logged
on as on the Security Management Server.
DA_RUNAS Username in SAM compatible format under whose context the
key fetch request will be made. This user must be in the Key
Server list in the Security Management Server.
DA_RUNASPWD Password for the runas user.
FORENSIC_ADMIN The Forensic Administrator account on the Dell Server, which can
be used for forensic requests for uninstalls or keys.
FORENSIC_ADMIN_PWD The password for the Forensic Administrator account.
Optional Properties
SVCLOGONUN Username in UPN format for Encryption Removal Agent Service
log on as parameter.
SVCLOGONPWD Password for log on as user.
44 Dell Data Security Endpoint Security Suite Pro
Uninstall Using the Child Installers

• The following example silently uninstalls the Encryption client and downloads the encryption keys from the Security Management
Server.
DDPE_XXbit_setup.exe /s /x /v"CMG_DECRYPT=1 CMGSILENTMODE=1 DA_SERVER=server.organization.com
DA_PORT=8050 SVCPN=administrator@organization.com DA_RUNAS=domain\username
DA_RUNASPWD=password /qn"
MSI Command:
msiexec.exe /s /x "Dell Data Protection Encryption.msi" /qn REBOOT="ReallySuppress"
CMG_DECRYPT="1" CMGSILENTMODE="1" DA_SERVER="server.organization.com" DA_PORT="8050"
SVCPN="administrator@domain.com" DA_RUNAS="domain\username" DA_RUNASPWD="password" /qn
Reboot the computer when nished.
• The following example silently uninstalls the Encryption client and downloads the encryptions keys using a Forensic Administrator
account.
DDPE_XXbit_setup.exe /s /x /v"CMG_DECRYPT=1 CMGSILENTMODE=1
FORENSIC_ADMIN=forensicadmin@organization.com FORENSIC_ADMIN_PWD=tempchangeit /qn"
MSI Command:
msiexec.exe /s /x "Dell Data Protection Encryption.msi" /qn CMG_DECRYPT=1 CMGSILENTMODE=1
FORENSIC_ADMIN=forensicadmin@organization.com FORENSIC_ADMIN_PWD=tempchangeit
REBOOT=REALLYSUPPRESS
Reboot the computer when nished.
IMPORTANT:
Dell recommends the following actions when using a Forensic Administrator password on the command line:
1 Create a Forensic Administrator account in the Remote Management Console for the purpose of performing the silent
uninstallation.
2 Use a temporary password for that account that is unique to that account and time period.
3 After the silent uninstallation has been completed, remove the temporary account from the list of administrators or change its
password.
NOTE:
Some older clients may require escape characters of \" around the values of parameters. For example:
DDPE_XXbit_setup.exe /x /v"CMG_DECRYPT=\"1\" CMGSILENTMODE=\"1\" DA_SERVER=
\"server.organization.com\" DA_PORT=\"8050\" SVCPN=\"administrator@organization.com\"
DA_RUNAS=\"domain\username\" DA_RUNASPWD=\"password\" /qn"
Uninstall SED and Advanced Authentication Clients
• Network connection to the Security Management Server/Security Management Server Virtual is required for PBA deactivation.
Process
• Deactivate the PBA, which removes all PBA data from the computer and unlocks the SED keys.
• Uninstall the SED client.
• Uninstall the Advanced Authentication client.
Deactivate the PBA
1 As a Dell administrator, log in to the Remote Management Console.
Dell Data Security Endpoint Security Suite Pro
Uninstall Using the Child Installers
45

2 In the left pane, click Protect & Manage > Endpoints.
3 Select the appropriate Endpoint Type.
4 Select Show >Visible, Hidden, or All.
5 If you know the Hostname of the computer, enter it in the Hostname eld (wildcards are supported). You may leave the eld blank to
display all computers. Click Search.
If you do not know the Hostname, scroll through the list to locate the computer.
A computer or list of computers displays based on your search lter.
6 Select the Details icon of the desired computer.
7 Click Security Policies on the top menu.
8 Select Self-Encrypting Drives.from the Policy Category drop-down menu.
9 Expand the SED Administration area and change the Enable SED Management and Activate PBA policies from True to False.
10 Click Save.
11 In the left pane, click Actions > Commit Policies.
12 Click Apply Changes.
Wait for the policy to propagate from the Security Management Server/Security Management Server Virtual to the computer
targeted for deactivation.
Uninstall the SED and Authentication clients after the PBA is deactivated.
Uninstall SED Client and Advanced Authentication Clients
Command Line Uninstallation
• Once extracted from the master installer, the SED client installer can be located at C:\extracted\Advanced Authentication\<x64/x86>
\setup.exe.
• The following example silently uninstalls the Advanced Authentication client.
setup.exe /x /s /v" /qn"
Shut down and restart the computer when nished.
• Once extracted from the master installer, the SED client installer can be located at C:\extracted\Encryption Management Agent
\EMAgent_XXbit_setup.exe.
• The following example silently uninstalls the SED client.
EMAgent_XXbit_setup.exe /x /s /v" /qn"
Shut down and restart the computer when nished.
Uninstall BitLocker Manager Client
Command Line Uninstallation
• Once extracted from the Endpoint Security Suite Pro master installer, the BitLocker client installer can be located at C:\extracted
\Encryption Management Agent\EMAgent_XXbit_setup.exe.
• The following example silently uninstalls the BitLocker Manager client.
EMAgent_XXbit_setup.exe /x /s /v" /qn"
Reboot the computer when nished.
46 Dell Data Security Endpoint Security Suite Pro
Uninstall Using the Child Installers

Commonly Used Scenarios
• To install each client individually, the child executable les must rst be extracted from the Endpoint Security Suite Pro master installer,
as shown in Extract the Child Installers from the Master Installer.
• The SED client is required for Advanced Authentication in v8.x, which is why it is part of the command line in the following examples.
• Command line switches and parameters are case-sensitive.
• Be sure to enclose a value that contains one or more special characters, such as a blank space in the command line, in escaped
quotation marks.
• Use these installers to install the clients using a scripted installation, batch les, or any other push technology available to your
organization.
• The reboot has been suppressed in the command line examples. However, an eventual reboot is required. Encryption cannot begin until
the computer has rebooted.
• Log les - Windows creates unique child installer installation log les for the logged in user at %temp%, located at C:\Users
\<UserName>\AppData\Local\Temp.
If you decide to add separate a log le when you run the installer, ensure that the log le has a unique name, as child installer log les do
not append. The standard .msi command can be used be create a log le by using /l*v C:\<any directory>\<any log le name>.log.
• All child installers use the same basic .msi switches and display options, except where noted, for command line installations. The
switches must be specied rst. The /v switch is required and takes an argument. Other parameters go inside an argument that is
passed to the /v switch.
Display options can be specied at the end of the argument passed to the /v switch to achieve the expected behavior. Do not use
both /q and /qn in the same command line. Only use ! and - after /qb.
Switch Meaning
/v Pass variables to the .msi inside the *.exe
/s Silent mode
/i Install mode
Option Meaning
/q No Progress dialog, restarts itself after process completion
/qb Progress dialog with Cancel button, prompts for restart
/qb- Progress dialog with Cancel button, restarts itself after process completion
/qb! Progress dialog without Cancel button, prompts for restart
/qb!- Progress dialog without Cancel button, restarts itself after process completion
/qn No user interface
• Instruct users to see the following document and help les for application assistance:
• See the Dell Encrypt Help to learn how to use the feature of the Encryption client. Access the help from <Install dir>:\Program Files
\Dell\Dell Data Protection\Encryption\Help.
• See the Encryption External Media Help to learn how the features of Encryption External Media. Access the help from <Install dir>:
\Program Files\Dell\Dell Data Protection\Encryption\EMS
8
Dell Data Security Endpoint Security Suite Pro
Commonly Used Scenarios
47

• See the Endpoint Security Suite Pro Help to learn how to use the features of Advanced Authentication and Threat Protection.
Access the help from <Install dir>:\Program Files\Dell\Dell Data Protection\Endpoint Security Suite\Threat Protection\Help.
Encryption Client, Threat Protection, and Advanced
Authentication
• The following example installs remotely managed SED (silent installation, no reboot, no entry in the Control Panel Programs list, installed
in the default location of C:\Program Files\Dell\Dell Data Protection).
EMAgent_XXbit_setup.exe /s /v"CM_EDITION=1 SERVERHOST=server.organization.com SERVERPORT=8888
SECURITYSERVERHOST=server.organization.com SECURITYSERVERPORT=8443 ARPSYSTEMCOMPONENT=1 /
norestart /qn"
Then:
• The following example installs Advanced Authentication (silent installation, no reboot, installed in the default location of C:\Program
Files\Dell\Dell Data Protection\Authentication).
setup.exe /s /v"/norestart /qn ARPSYSTEMCOMPONENT=1"
• The following example installs the Encryption client with default parameters (Encryption client and Encrypt for Sharing, no dialogue, no
progress bar, no restart, installed in the default location of C:\Program Files\Dell\Dell Data Protection).
DDPE_XXbit_setup.exe /s /v"SERVERHOSTNAME=server.organization.com
POLICYPROXYHOSTNAME=rgk.organization.com MANAGEDDOMAIN=ORGANIZATION DEVICESERVERURL=https://
server.organization.com:8443/xapi/ /norestart /qn"
•\Threat Protection\SDK
The following command line loads the certicate default parameters.
EnsMgmtSdkInstaller.exe -LoadCert >"C:\ProgramData\Dell\Dell Data Protection\Installer Logs
\McAfeeSDKInstallerBeforeEndPoint.log"
NOTE:
This installer can be skipped if upgrading.
Then:
\Threat Protection\EndPointSecurity
• The following example installs the Threat Protection with default parameters (silent mode, install Threat Protection, Client Firewall, and
Web Protection, override the Host Intrusion Prevention, no content update, no settings saved).
EPsetup.exe /qn ADDLOCAL="tp,fw,wc" /override"hips" /nocontentupdate /nopreservesettings /qn
Then:
\Threat Protection\ThreatProtection\WinXXR
• The following example installs the client with default parameters (suppress the reboot, no dialogue, no progress bar, no entry in the
Control Panel Programs list).
"DellThreatProtection.msi" /qn REBOOT=ReallySuppress ARPSYSTEMCOMPONENT=1
\Threat Protection\SDK
• The following example installs the Threat Protection SDK.
EnsMgmtSdkInstaller.exe -ProtectProcesses "C:\Program Files\Dell\Dell Data Protection\Threat
Protection\DellAVAgent.exe" -InstallSDK -RemoveRightClick -RemoveMcTray >"C:\ProgramData\Dell
\Dell Data Protection\Installer Logs\McAfeeSDKInstallerAfterEndPoint.log"
48 Dell Data Security Endpoint Security Suite Pro
Commonly Used Scenarios

Encryption Client and Threat Protection
• The following example installs drivers for Trusted Software Stack (TSS) for the TPM and Microsoft hotxes at the specied location,
does not create an entry in the Control Panel Programs list, and suppresses the reboot.
These drivers must be installed when installing the Encryption client.
setup.exe /S /z"\"InstallPath=<c:\location>, ARPSYSTEMCOMPONENT=1, SUPPRESSREBOOT=1\""
Then:
• The following example installs the Encryption client with default parameters (Encryption client and Encrypt for Sharing, no dialogue, no
progress bar, no restart, installed in the default location of C:\Program Files\Dell\Dell Data Protection).
DDPE_XXbit_setup.exe /s /v"SERVERHOSTNAME=server.organization.com
POLICYPROXYHOSTNAME=rgk.organization.com MANAGEDDOMAIN=ORGANIZATION DEVICESERVERURL=https://
server.organization.com:8443/xapi/ /norestart /qn"
Then:
• The following example installs the Threat Protection client with default parameters (silent mode, install Threat Protection, Client
Firewall, and Web Protection, overrides the Host Intrusion Prevention, no content update, no settings saved).
EPsetup.exe /qn ADDLOCAL="tp,fw,wc" /override"hips" /nocontentupdate /nopreservesettings
Then:
• The following example installs the Threat Protection client with default parameters (suppress the reboot, no dialogue, no progress bar,
install at the specied location C:\Program Files\Dell\Dell Data Protection, no entry in the Control Panel Programs list).
MSIEXEC.EXE /I "DellThreatProtection.msi" /qn REBOOT=ReallySuppress INSTALLDIR="C:\Program
Files\Dell\Dell Data Protection\" ARPSYSTEMCOMPONENT=1 "
Then:
• The following example installs the Threat Protection client with default parameters.
EnsMgmtSDKInstaller.exe -LoadCert -ProtectProcesses "C:\Program Files\Dell\Dell Data
Protection\Threat Protection\DellAVAgent.exe" -InstallSDK -RemoveRightClick -RemoveMcTray >
"C:\ProgramData\Dell\Dell Data Protection\Installer Logs\SDKInstaller.log"
SED Client (including Advanced Authentication) and
Encryption External Media
• The following example installs remotely managed SED (silent installation, no reboot, no entry in the Control Panel Programs list, installed
in the default location of C:\Program Files\Dell\Dell Data Protection).
EMAgent_XXbit_setup.exe /s /v"CM_EDITION=1 SERVERHOST=server.organization.com SERVERPORT=8888
SECURITYSERVERHOST=server.organization.com SECURITYSERVERPORT=8443 ARPSYSTEMCOMPONENT=1 /
norestart /qn"
Then:
• The following example installs Advanced Authentication (silent installation, no reboot, installed in the default location of C:\Program
Files\Dell\Dell Data Protection\Authentication).
setup.exe /s /v"/norestart /qn ARPSYSTEMCOMPONENT=1"
Then:
• The following example installs Encryption External Media only (silent installation, no reboot, installed in the default location of C:
\Program Files\Dell\Dell Data Protection).
DDPE_XXbit_setup.exe /s /v"EME=1 SERVERHOSTNAME=server.organization.com
POLICYPROXYHOSTNAME=rgk.organization.com DEVICESERVERURL=https://server.organization.com:8443/
xapi/ MANAGEDDOMAIN=ORGANIZATION /norestart /qn"
Dell Data Security Endpoint Security Suite Pro
Commonly Used Scenarios
49

BitLocker Manager and Encryption External Media
• The following example installs BitLocker Manager (silent installation, no reboot, no entry in the Control Panel Programs list, installed in
the default location of C:\Program Files\Dell\Dell Data Protection).
EMAgent_XXbit_setup.exe /s /v"CM_EDITION=1 SERVERHOST=server.organization.com SERVERPORT=8888
SECURITYSERVERHOST=server.organization.com SECURITYSERVERPORT=8443 FEATURE=BLM /norestart /qn"
Then:
• The following example installs Encryption External Media only (silent installation, no reboot, installed in the default location of C:
\Program Files\Dell\Dell Data Protection).
DDPE_XXbit_setup.exe /s /v"EME=1 SERVERHOSTNAME=server.organization.com
POLICYPROXYHOSTNAME=rgk.organization.com DEVICESERVERURL=https://server.organization.com:8443/
xapi/ MANAGEDDOMAIN=ORGANIZATION /norestart /qn"
50 Dell Data Security Endpoint Security Suite Pro
Commonly Used Scenarios
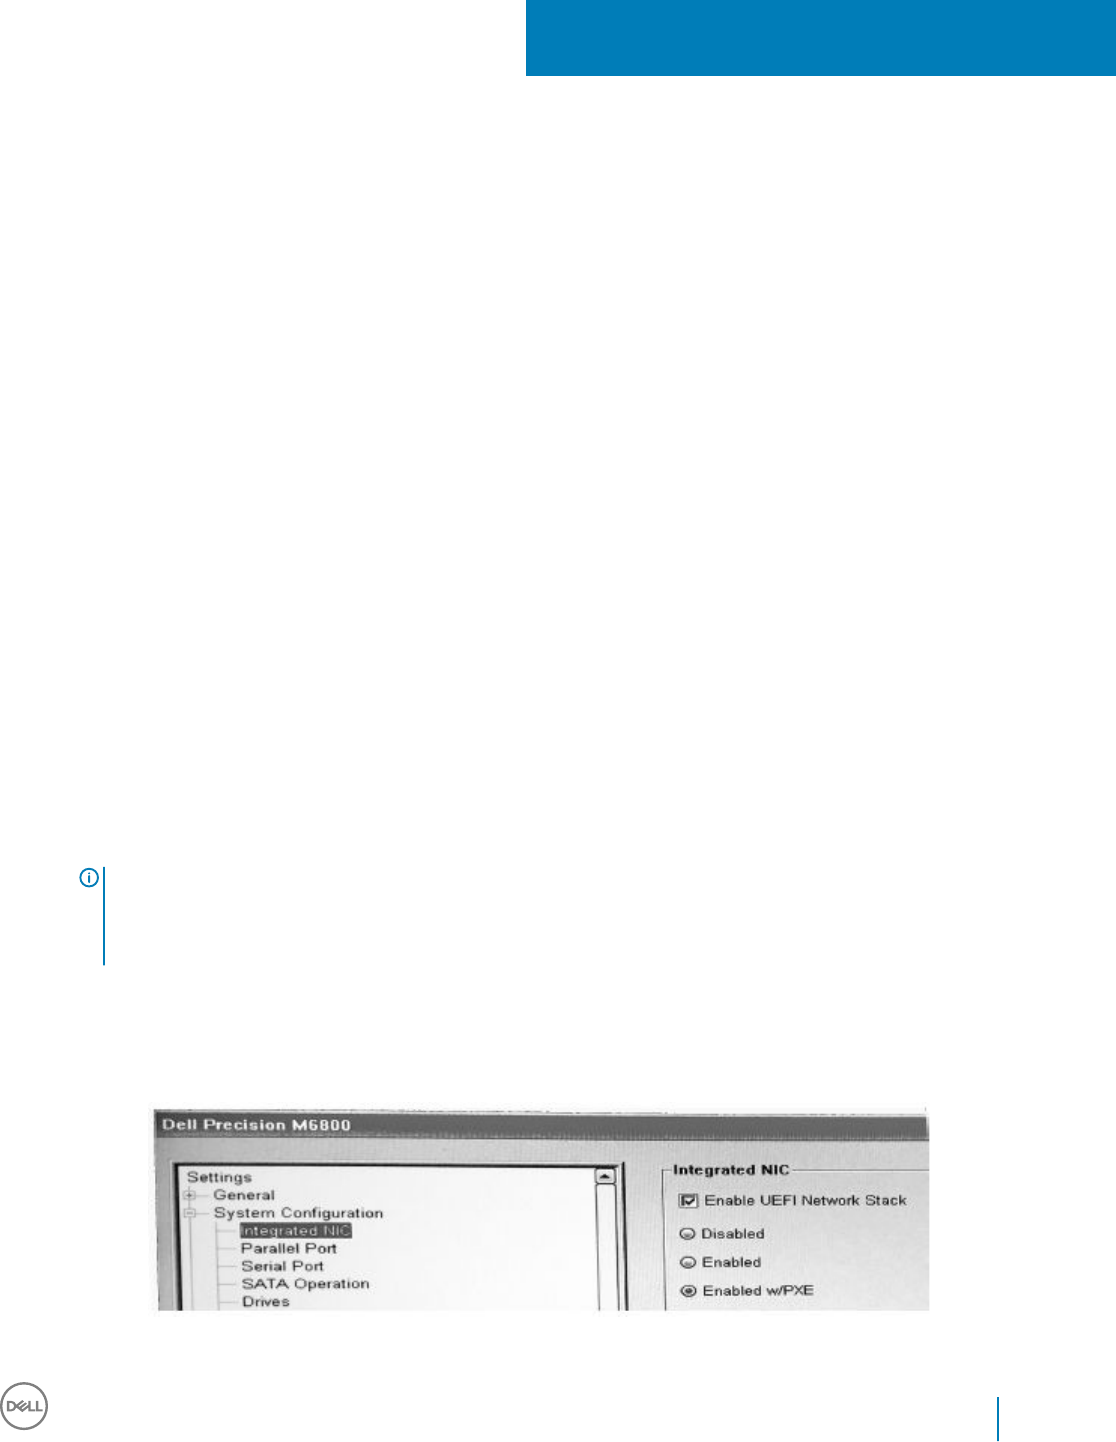
Pre-Installation Conguration for SED UEFI, and
BitLocker Manager
Initialize the TPM
• You must be a member of the local Administrators group, or equivalent.
• The computer must be equipped with a compatible BIOS and a TPM.
• Follow the instructions located at http://technet.microsoft.com/en-us/library/cc753140.aspx.
Pre-Installation Conguration for UEFI Computers
Enable Network Connectivity During UEFI Preboot
Authentication
In order for preboot authentication to succeed on a computer with UEFI rmware, the PBA must have network connectivity. By default,
computers with UEFI rmware do not have network connectivity until the operating system is loaded, which occurs after PBA mode.
The following procedure enables network connectivity during PBA for UEFI-enabled computers. Because the conguration steps vary from
one UEFI computer model to the next, the following procedure is only an example.
1 Boot into the UEFI rmware conguration.
2 Press F2 continuously during boot until you see a message in the upper right screen similar to "preparing one-time boot menu."
3 Enter the BIOS administrator password, if prompted.
NOTE:
Typically, you will not see this prompt if this is a new computer since the BIOS password has not yet been
congured.
4 Select System Conguration.
5 Select Integrated NIC.
6 Select the Enable UEFI Network Stack check box.
7 Select either Enabled or Enabled w/PXE.
8 Select Apply
9
Dell Data Security Endpoint Security Suite Pro
Pre-Installation Conguration for SED UEFI, and BitLocker Manager
51

NOTE:
Computers without UEFI rmware do not require conguration.
Disable Legacy Option ROMs
Ensure that the Enable Legacy Option ROMs setting is disabled in the BIOS.
1 Restart the computer.
2 As it is restarting, press F12 repeatedly to bring up the UEFI computer's boot settings.
3 Press the down arrow, highlight the BIOS Settings option, and press Enter.
4 Select Settings > General > Advanced Boot Options.
5 Clear the Enable Legacy Option ROMs check box and click Apply.
Pre-Installation Conguration to Set Up a BitLocker
PBA Partition
• You must create the PBA partition before installing BitLocker Manager.
• Turn on and activate the TPM before installing BitLocker Manager. BitLocker Manager will take ownership of the TPM (a reboot will
not be required). However, if the TPM's ownership already exists, BitLocker Manager will begin the encryption setup process. The point
is that the TPM must be "owned".
• You may need to partition the disk manually. See Microsoft's description of the BitLocker Drive Preparation Tool for further information.
• Use the BdeHdCfg.exe command to create the PBA partition. The default parameter indicates that the command line tool will follow
the same process as the BitLocker Setup Wizard.
BdeHdCfg -target default
TIP:
For more options available for the BdeHdCfg command, see Microsoft's BdeHdCfg.exe Parameter Reference.
52 Dell Data Security Endpoint Security Suite Pro
Pre-Installation Conguration for SED UEFI, and BitLocker Manager
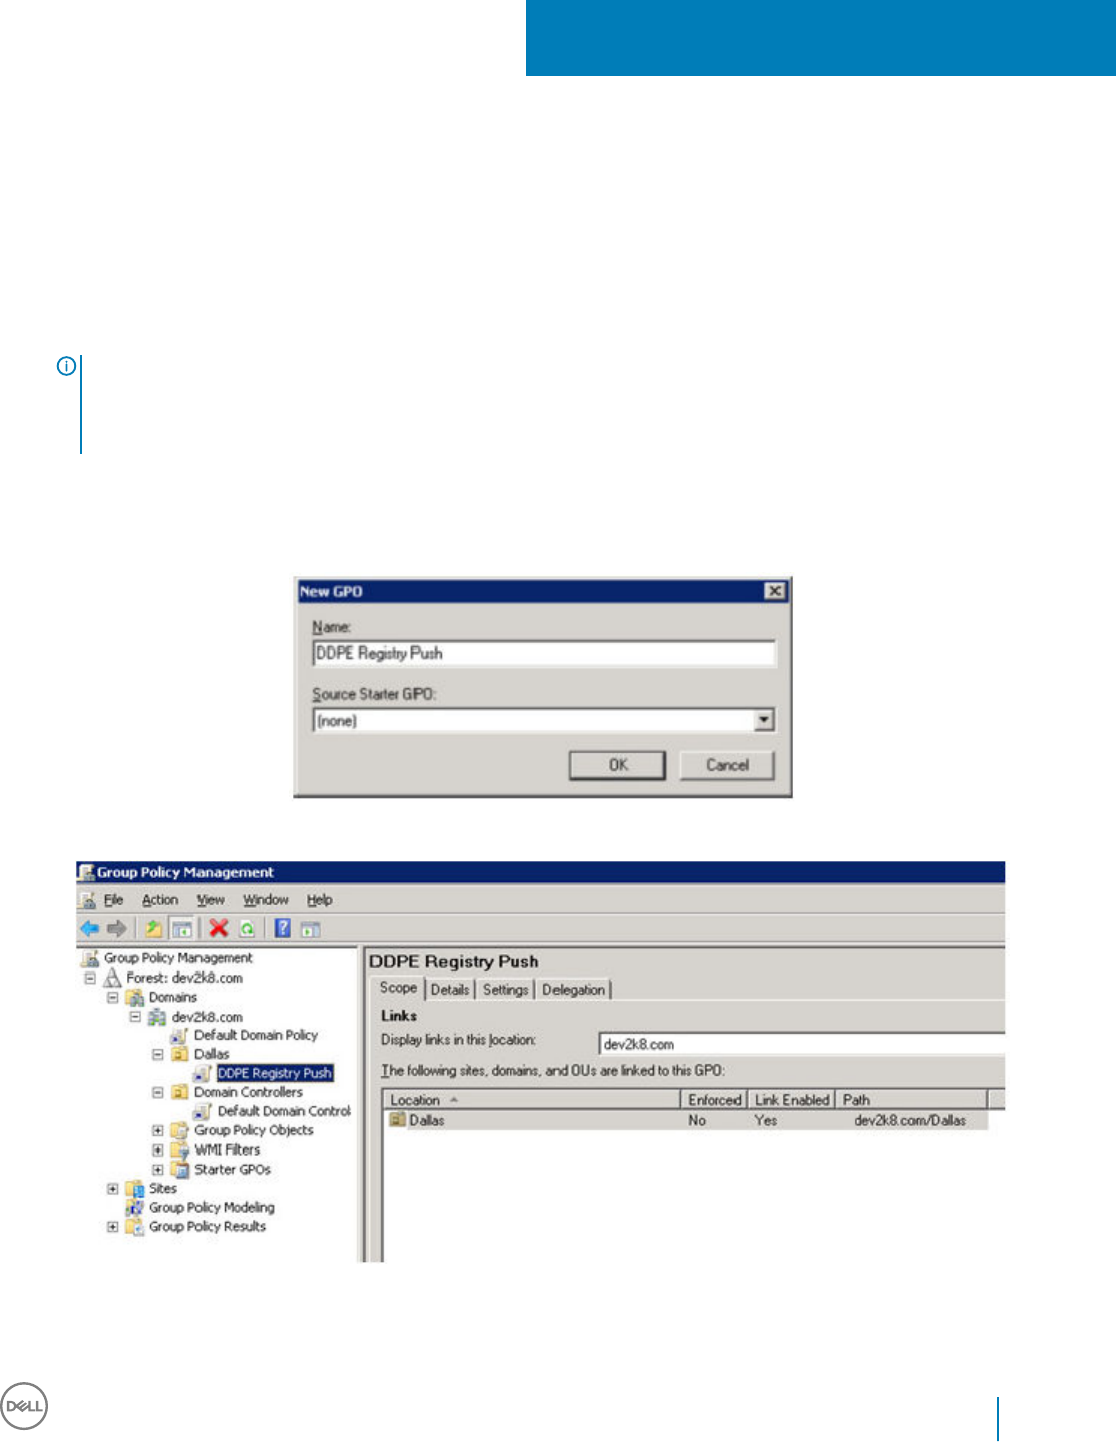
Set GPO on Domain Controller to Enable
Entitlements
• If your clients will be entitled from Dell Digital Delivery (DDD), follow these instructions to set the GPO on the domain controller to
enable entitlements (this may not be the same server running the Security Management Server/Security Management Server Virtual).
• The workstation must be a member of the OU where the GPO is applied.
NOTE:
Ensure that outbound port 443 is available to communicate with the Security Management Server/Security Management
Server Virtual. If port 443 is blocked (for any reason), the entitlement functionality will not work.
1On the Domain Controller to manage the clients, click Start > Administrative Tools > Group Policy Management.
2 Right-click the OU where the policy should be applied and select Create a GPO in this domain, and Link it here....
3 Enter a name for the new GPO, select (none) for Source Starter GPO, and click OK.
4 Right-click the GPO that was created and select Edit.
5 The Group Policy Management Editor loads. Access Computer Conguration > Preferences > Windows Settings > Registry.
10
Dell Data Security Endpoint Security Suite Pro
Set GPO on Domain Controller to Enable Entitlements
53

6 Right-click the Registry and select New > Registry Item. Complete the following.
Action: Create
Hive: HKEY_LOCAL_MACHINE
Key Path: SOFTWARE\Dell\Dell Data Protection
Value name: Server
Value type: REG_SZ
Value data: <IP address of the Security Management Server/Security Management Server Virtual>
7 Click OK.
54 Dell Data Security Endpoint Security Suite Pro
Set GPO on Domain Controller to Enable Entitlements
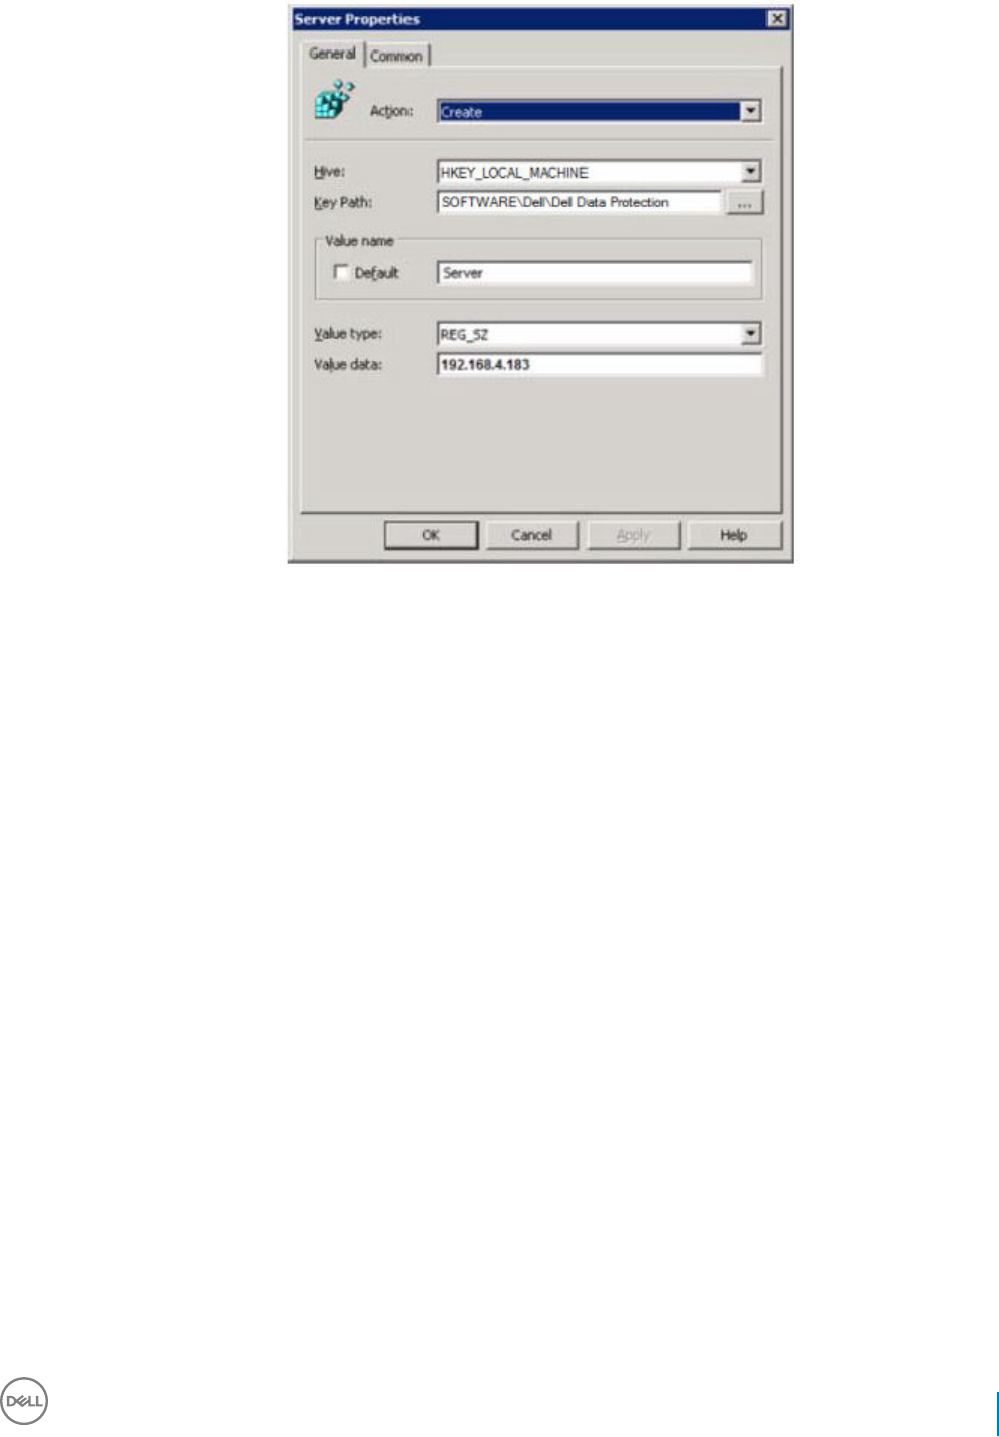
8 Log out and then back into the workstation, or run gpupdate /force to apply the group policy.
Dell Data Security Endpoint Security Suite Pro
Set GPO on Domain Controller to Enable Entitlements
55
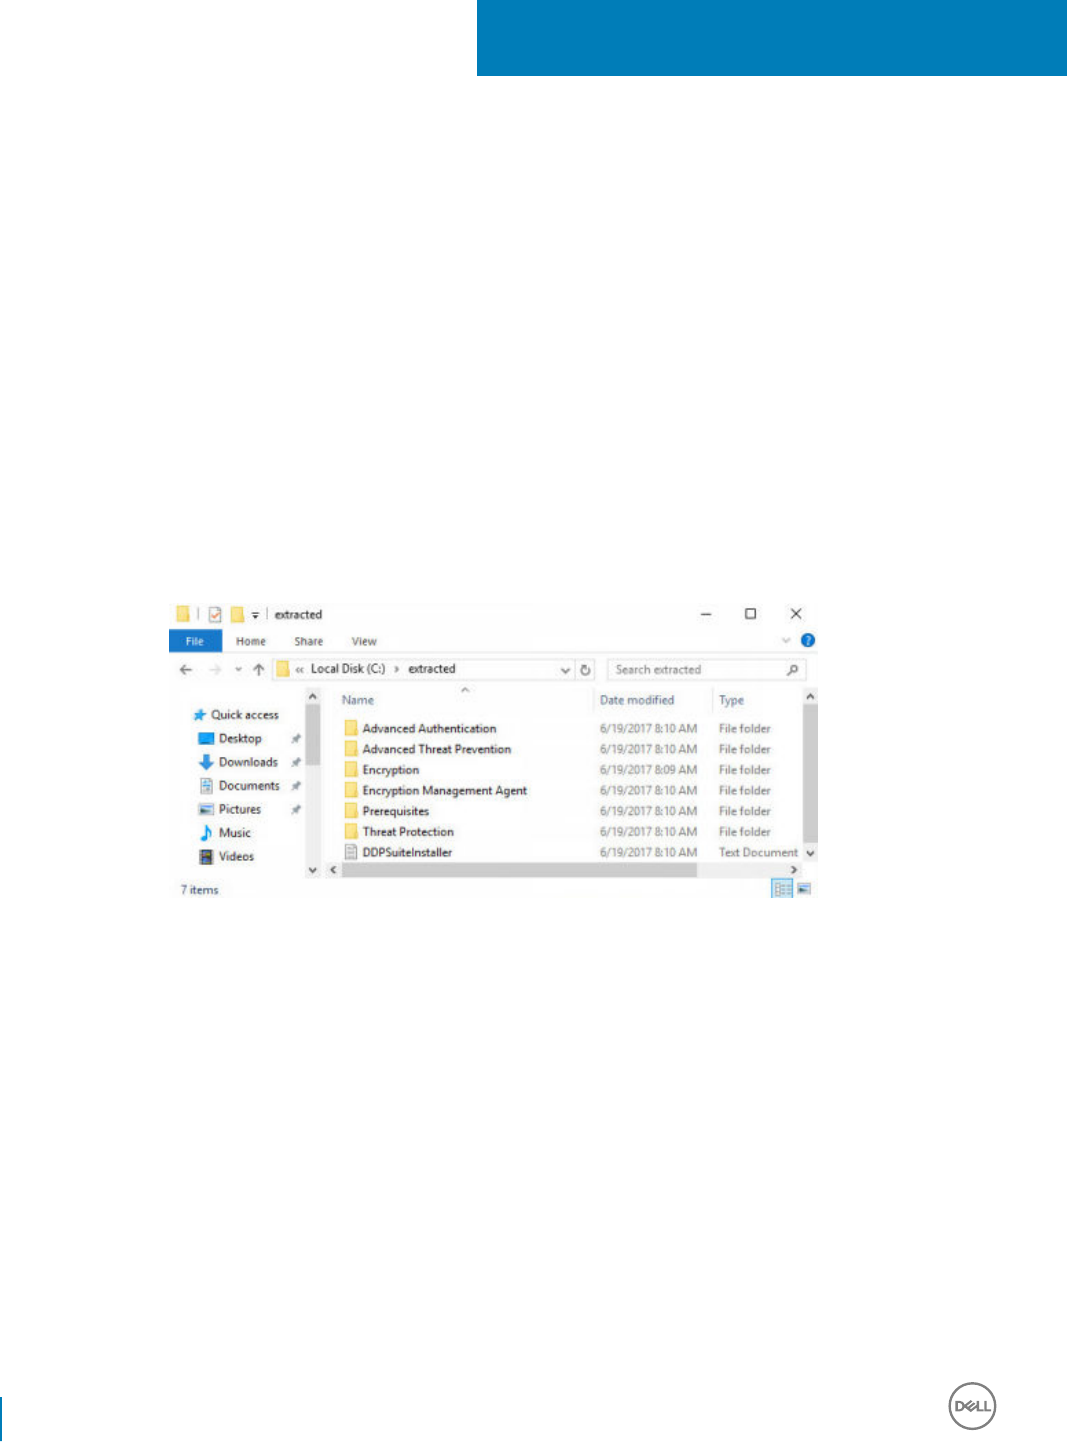
Extract the Child Installers from the Endpoint
Security Suite Pro Master Installer
• To install each client individually, extract the child executable les from the installer.
• The master installer is not a master uninstaller. Each client must be uninstalled individually, followed by uninstallation of the master
installer. Use this process to extract the clients from the master installer so that they can be used for uninstallation.
1 From the Dell installation media, copy the DDSSuite.exe le to the local computer.
2 Open a command prompt in the same location as the DDSSuite.exe le and enter:
DDSSuite.exe /z"\"EXTRACT_INSTALLERS=C:\extracted\""
The extraction path cannot exceed 63 characters.
Before you begin installation, ensure that all prerequisites have been met and all required software has been installed for each child
installer that you plan to install. Refer to Requirements for details.
The extracted child installers are located at C:\extracted\.
11
56 Dell Data Security Endpoint Security Suite Pro
Extract the Child Installers from the Endpoint Security Suite Pro Master Installer

Congure Key Server for Uninstallation of
Encryption Client Activated Against Security
Management Server
• This section explains how to congure components for use with Kerberos Authentication/Authorization when using an Security
Management Server. The Security Management Server Virtual does not use the Key Server.
The Key Server is a Service that listens for clients to connect on a socket. Once a client connects, a secure connection is negotiated,
authenticated, and encrypted using Kerberos APIs (if a secure connection cannot be negotiated, the client is disconnected).
The Key Server then checks with the Security Server (formerly the Device Server) to see if the user running the client is allowed to
access keys. This access is granted on the Remote Management Console via individual domains.
• If Kerberos Authentication/Authorization is to be used, then the server that contains the Key Server component will need to be part of
the aected domain.
• Because the Security Management Server Virtual does not use the Key Server, typical uninstallation is aected. When an Encryption
client that is activated against a Security Management Server Virtual is uninstalled, standard forensic key retrieval through the Security
Server is used, instead of the Key Server's Kerberos method. See Command Line Uninstallation for more information.
Services Panel - Add Domain Account User
1 On the Security Management Server, navigate to the Services panel (Start > Run... > services.msc > OK).
2 Right-click Key Server and select Properties.
3 Select the Log On tab and select the This account: option.
In the This account: eld, add the domain account user. This domain user must have at least local administrator rights to the Key
Server folder (must be able to write to the Key Server cong le, as well as the ability to write to the log.txt le).
Enter and conrm the password for the domain user.
Click OK.
12
Dell Data Security Endpoint Security Suite Pro
Congure Key Server for Uninstallation of Encryption Client Activated Against Security Management Server
57
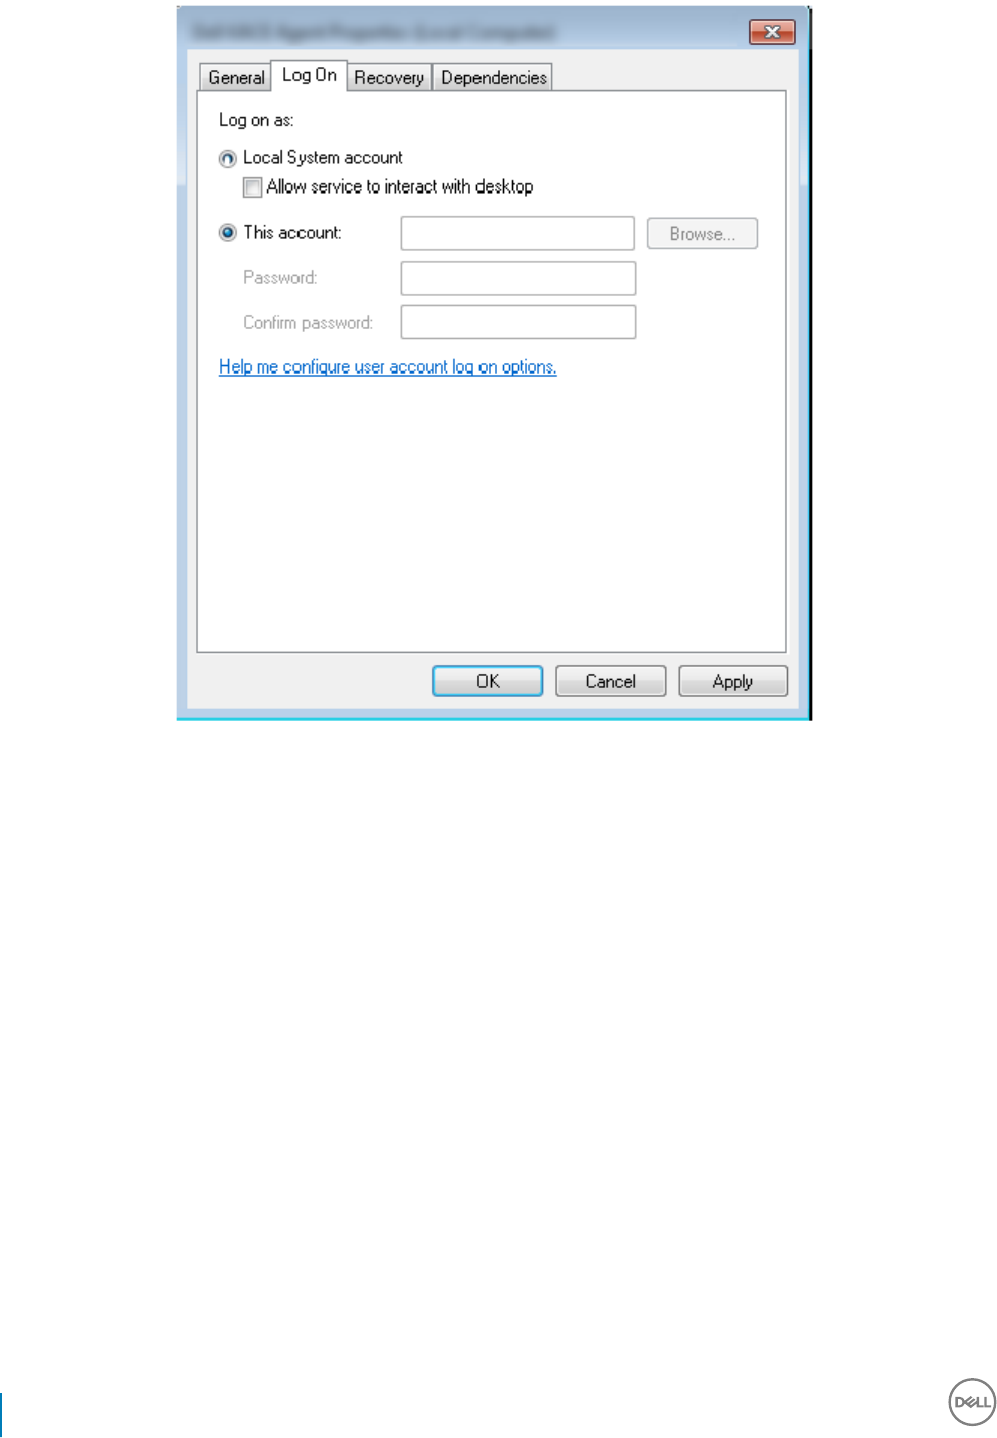
4 Restart the Key Server Service (leave the Services panel open for further operation).
5 Navigate to <Key Server install dir> log.txt to verify that the Service started properly.
Key Server Cong File - Add User for Security
Management Server Communication
1 Navigate to <Key Server install dir>.
2 Open Credant.KeyServer.exe.cong with a text editor.
3 Go to <add key="user" value="superadmin" /> and change the "superadmin" value to the name of the appropriate user (you may also
leave as "superadmin").
The "superadmin" format can be any method that can authenticate to the Security Management Server. The SAM account name,
UPN, or domain\username is acceptable. Any method that can authenticate to the Security Management Server is acceptable
because validation is required for that user account for authorization against Active Directory.
For example, in a multi-domain environment, only entering a SAM account name such as "jdoe" will likely fail because the Security
Management Server will not be able to authenticate "jdoe" because it cannot nd "jdoe". In a multi-domain environment, the UPN is
recommended, although the domain\username format is acceptable. In a single domain environment, the SAM account name is
acceptable.
4 Go to <add key="epw" value="<encrypted value of the password>" /> and change "epw" to "password". Then change "<encrypted
value of the password>" to the password of the user from Step 3. This password is re-encrypted when the Security Management
Server restarts.
If using "superadmin" in Step 3, and the superadmin password is not "changeit", it must be changed here. Save and close the le.
58 Dell Data Security Endpoint Security Suite Pro
Congure Key Server for Uninstallation of Encryption Client Activated Against Security Management Server

Sample Conguration File
<?xml version="1.0" encoding="utf-8" ?>
<conguration>
<appSettings>
<add key="port" value="8050" /> [TCP port the Key Server will listen to. Default is 8050.]
<add key="maxConnections" value="2000" /> [number of active socket connections the Key Server will allow]
<add key="url" value="https://keyserver.domain.com:8443/xapi/" /> [Security Server (formerly Device Server) URL (the format is
8081/xapi for a pre-v7.7 Security Management Server)]
<add key="verifyCerticate" value="false" /> [true veries certs/set to false to not verify or if using self-signed certs]
<add key="user" value="superadmin" /> [User name used to communicate with the Security Server. This user must have the administrator
role selected in the Remote Management Console. The "superadmin" format can be any method that can authenticate to the Security
Management Server. The SAM account name, UPN, or domain\username is acceptable. Any method that can authenticate to the Security
Management Server is acceptable because validation is required for that user account for authorization against Active Directory. For
example, in a multi-domain environment, only entering a SAM account name such as "jdoe" will likely fail because the Security Management
Server will not be able to authenticate "jdoe" because it cannot nd "jdoe". In a multi-domain environment, the UPN is recommended,
although the domain\username format is acceptable. In a single domain environment, the SAM account name is acceptable.]
<add key="cacheExpiration" value="30" /> [How often (in seconds) the Service should check to see who is allowed to ask for keys.
The Service keeps a cache and keeps track of how old it is. Once the cache is older than the value, it gets a new list. When a user
connects, the Key Server needs to download authorized users from the Security Server. If there is no cache of these users, or the list has
not been downloaded in the last "x" seconds, it will be downloaded again. There is no polling, but this value congures how stale the list can
become before it is refreshed when it is needed.]
<add key="epw" value="encrypted value of the password" /> [Password used to communicate with the Security Server. If the
superadmin password has been changed, it must be changed here.]
</appSettings>
</conguration>
Services Panel - Restart Key Server Service
1 Go back to the Services panel (Start > Run... > services.msc > OK).
2 Restart the Key Server Service.
3 Navigate to <Key Server install dir> log.txt to verify that the Service started properly.
4 Close the Services panel.
Remote Management Console - Add Forensic
Administrator
1 If needed, log on to the Remote Management Console.
2 Click Populations > Domains.
3 Select the appropriate Domain.
4 Click the Key Server tab.
Dell Data Security Endpoint Security Suite Pro
Congure Key Server for Uninstallation of Encryption Client Activated Against Security Management Server
59
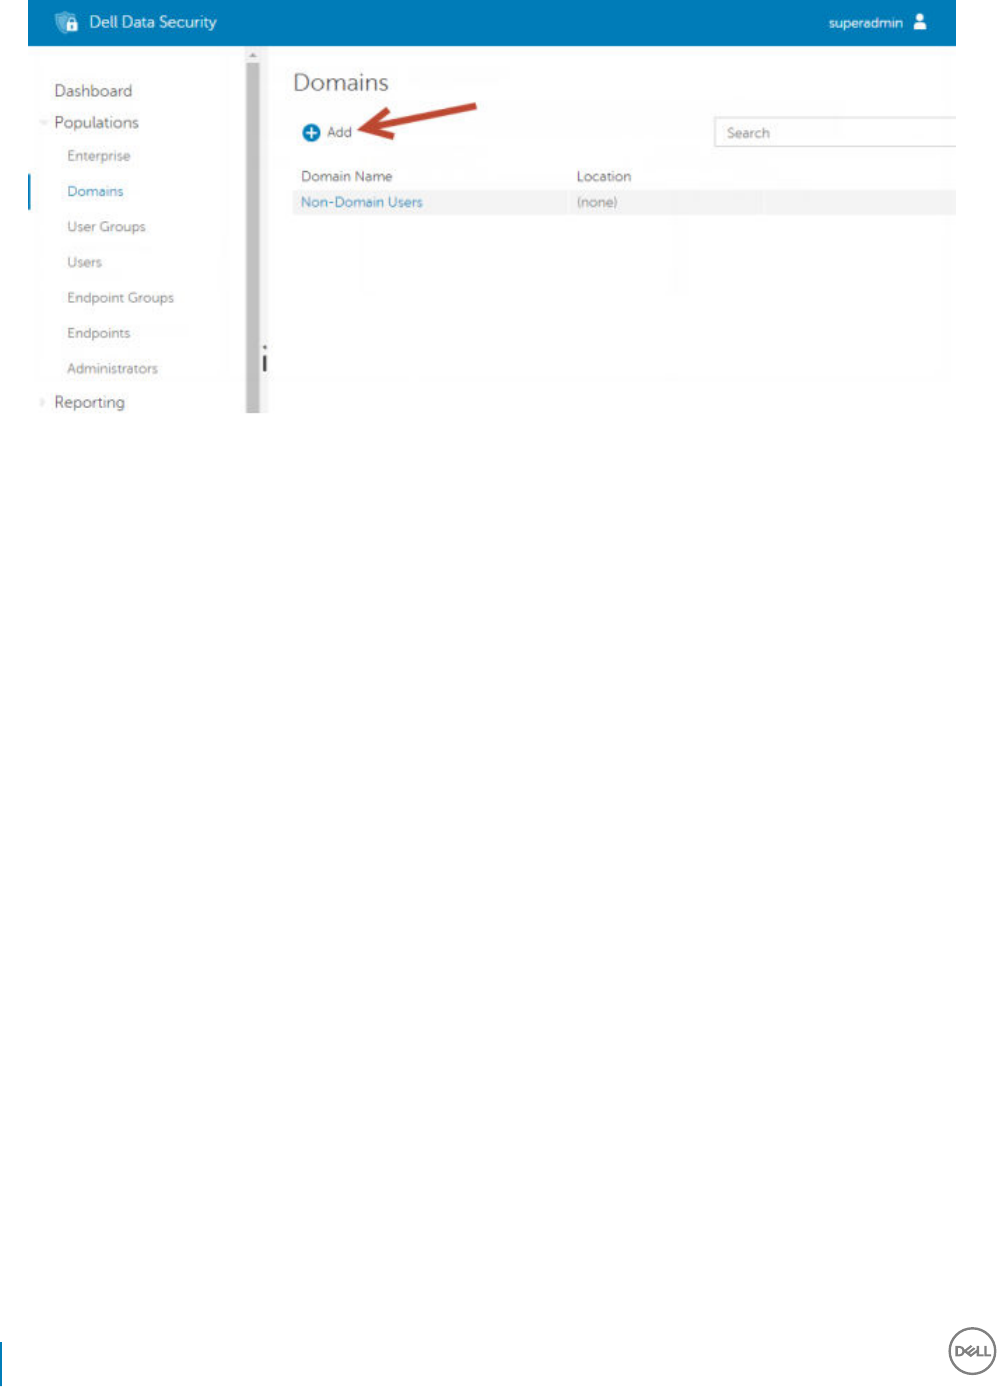
5 In the Account eld, add the user that will be performing the administrator activities. The format is DOMAIN\UserName. Click Add
Account.
6 Click Users in the left menu. In the search box, search for the username added in Step 5. Click Search.
7 Once the correct user is located, click the Admin tab.
8 Select Forensic Administrator and click Update.
The components are now congured for Kerberos Authentication/Authorization.
60 Dell Data Security Endpoint Security Suite Pro
Congure Key Server for Uninstallation of Encryption Client Activated Against Security Management Server

Use the Administrative Download Utility
(CMGAd)
• This utility allows the download of a key material bundle for use on a computer that is not connected to an Security Management
Server/Security Management Server Virtual.
• This utility uses one of the following methods to download a key bundle, depending on the command line parameter passed to the
application:
• Forensic Mode - Used if -f is passed on the command line or if no command line parameter is used.
• Admin Mode - Used if -a is passed on the command line.
Log les can be located at C:\ProgramData\CmgAdmin.log
Use the Administrative Download Utility in Forensic
Mode
1 Double-click cmgad.exe to launch the utility or open a command prompt where CMGAd is located and type cmgad.exe -f (or
cmgad.exe).
2 Enter the following information (some elds may be pre-populated).
Device Server URL: Fully qualied Security Server (Device Server) URL. The format is https://securityserver.domain.com:8443/xapi/.
Dell Admin: Name of the administrator with forensic administrator credentials (enabled in the Remote Management Console), such as
jdoe
Password: Forensic administrator password
MCID: Machine ID, such as machineID.domain.com
DCID: First eight digits of the 16-digit Shield ID
TIP:
Usually, specifying either the MCID or DCID are sucient. However, if both are known, it is helpful to enter both. Each
parameter contains dierent information about the client and client computer.
Click Next.
13
Dell Data Security Endpoint Security Suite Pro
Use the Administrative Download Utility (CMGAd)
61
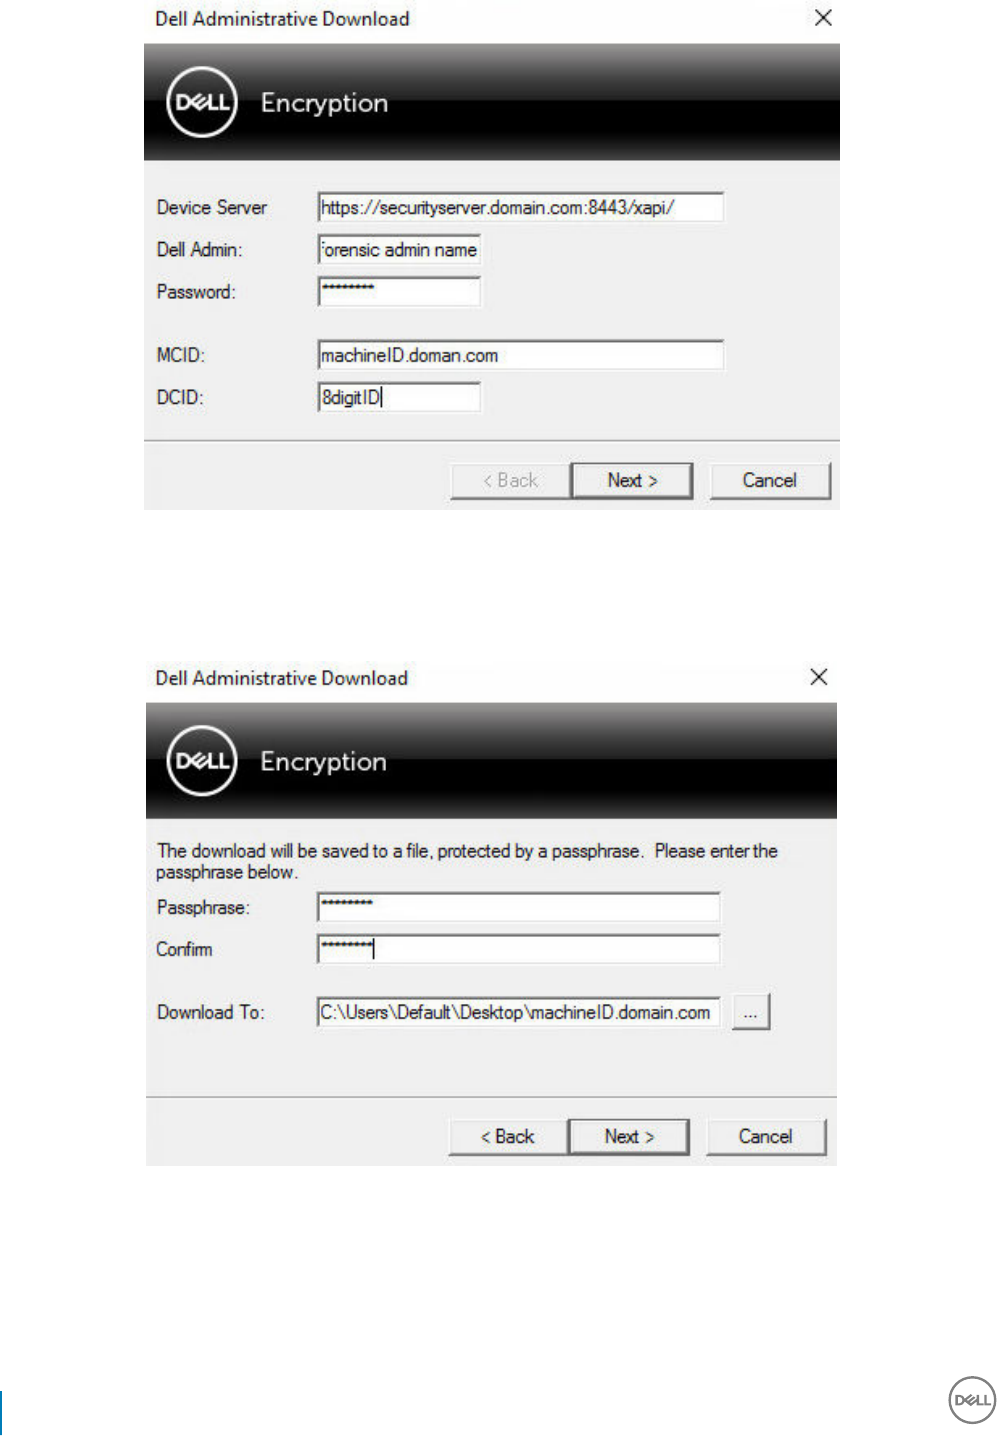
3 In the Passphrase: eld, type a passphrase to protect the download le. The passphrase must be at least eight characters long, and
contain at least one alphabetic and one numeric character. Conrm the passphrase.
Either accept the default name and location of where the le will be saved to or click ... to select a dierent location.
Click Next.
A message displays, indicating that the key material was successfully unlocked. Files are now accessible.
4 Click Finish when complete.
62 Dell Data Security Endpoint Security Suite Pro
Use the Administrative Download Utility (CMGAd)
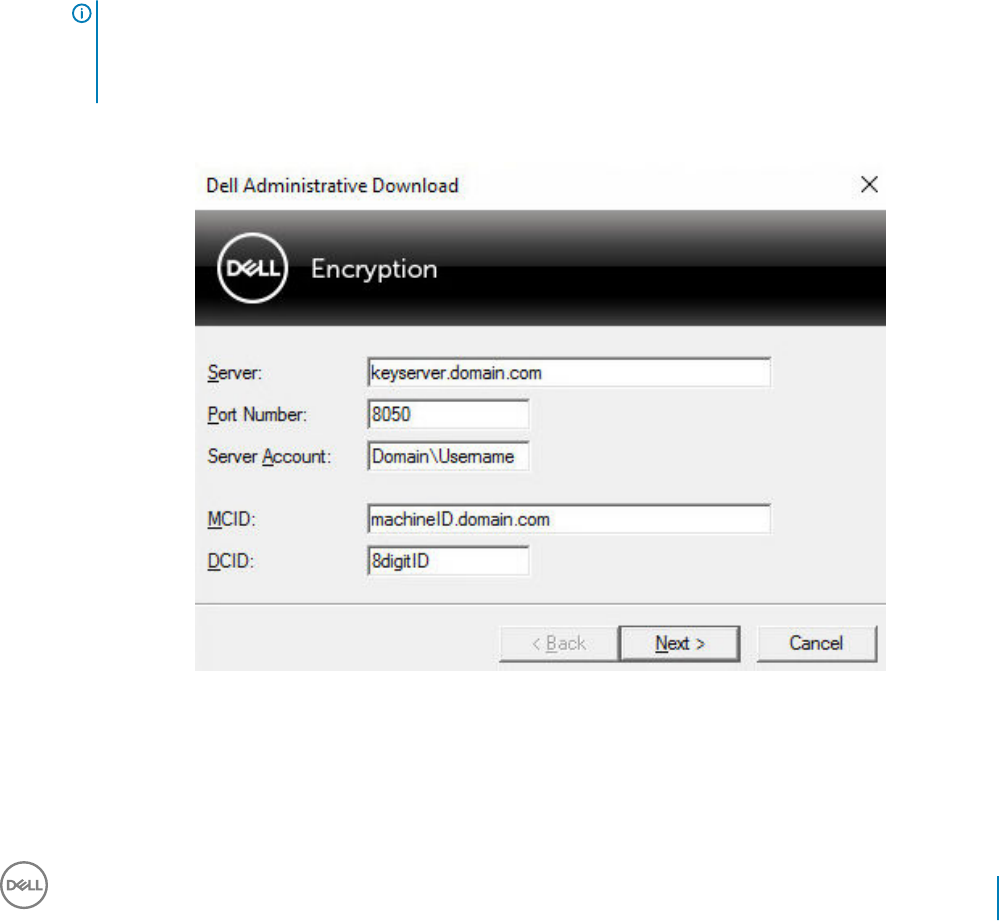
Use the Administrative Download Utility in Admin
Mode
The Security Management Server Virtual does not use the Key Server, so Admin mode cannot be used to obtain a key bundle from a
Security Management Server Virtual. Use Forensic mode to obtain the key bundle if the client is activated against a Security Management
Server Virtual.
1 Open a command prompt where CMGAd is located and type cmgad.exe -a.
2 Enter the following information (some elds may be pre-populated).
Server: Fully qualied hostname of the Key Server, such as keyserver.domain.com
Port Number: The default port is 8050
Server Account: The domain user the Key Server is running as. The format is domain\username. The domain user running the utility
must be authorized to perform the download from the Key Server
MCID: Machine ID, such as machineID.domain.com
DCID: First eight digits of the 16-digit Shield ID
TIP:
Usually, specifying either the MCID or DCID are sucient. However, if both are known, it is helpful to enter both. Each
parameter contains dierent information about the client and client computer.
Click Next.
3 In the Passphrase: eld, type a passphrase to protect the download le. The passphrase must be at least eight characters long, and
contain at least one alphabetic and one numeric character.
Conrm the passphrase.
Either accept the default name and location of where the le will be saved or click ... to select a dierent location.
Dell Data Security Endpoint Security Suite Pro
Use the Administrative Download Utility (CMGAd)
63
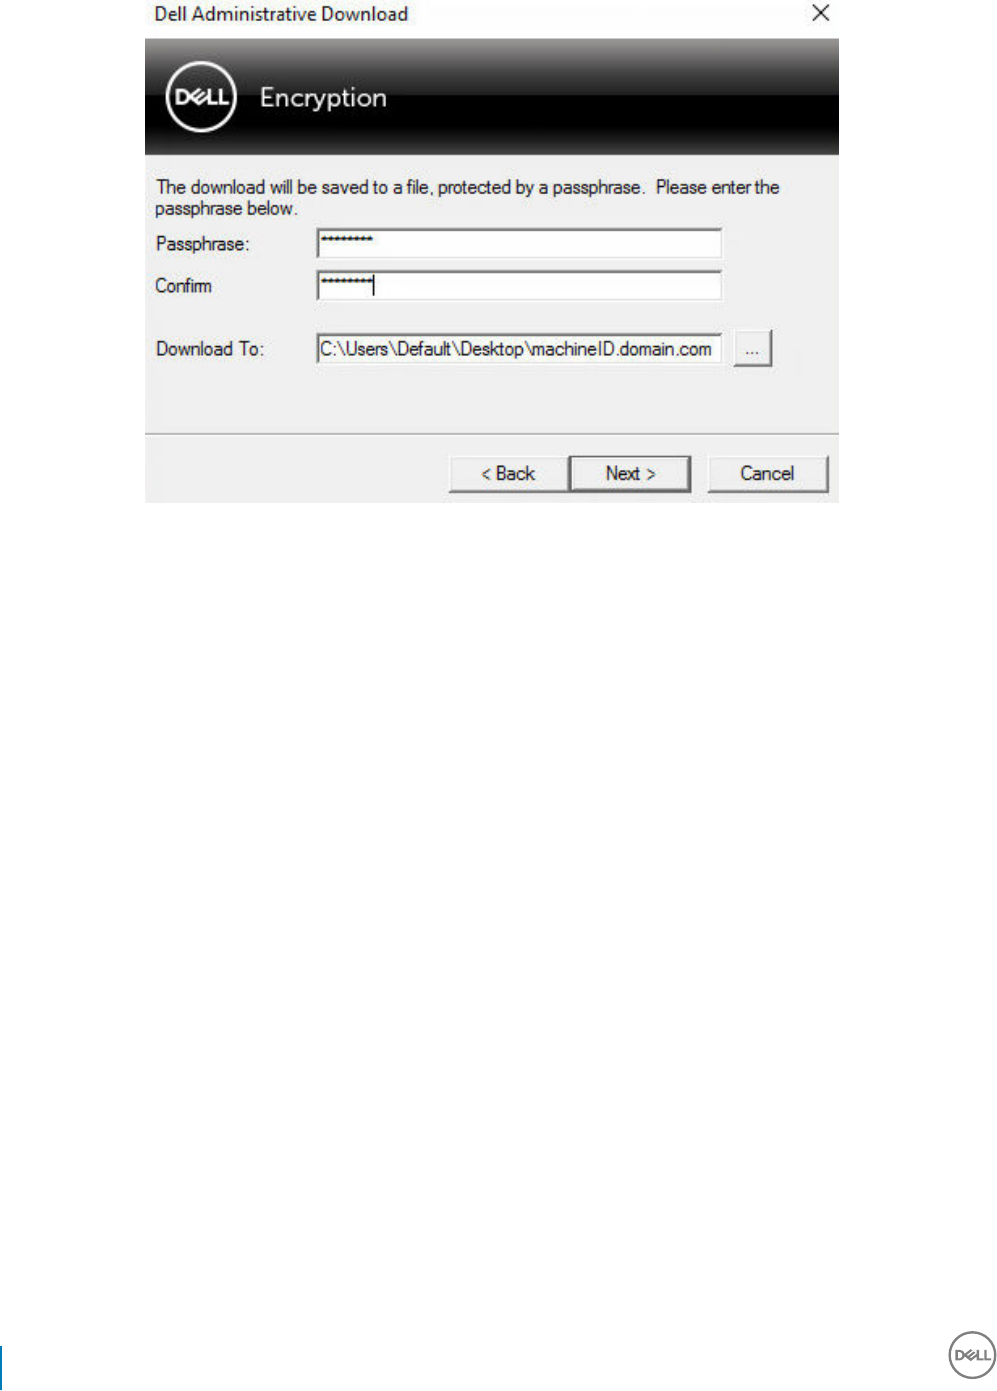
Click Next.
A message displays, indicating that the key material was successfully unlocked. Files are now accessible.
4 Click Finish when complete.
64 Dell Data Security Endpoint Security Suite Pro
Use the Administrative Download Utility (CMGAd)
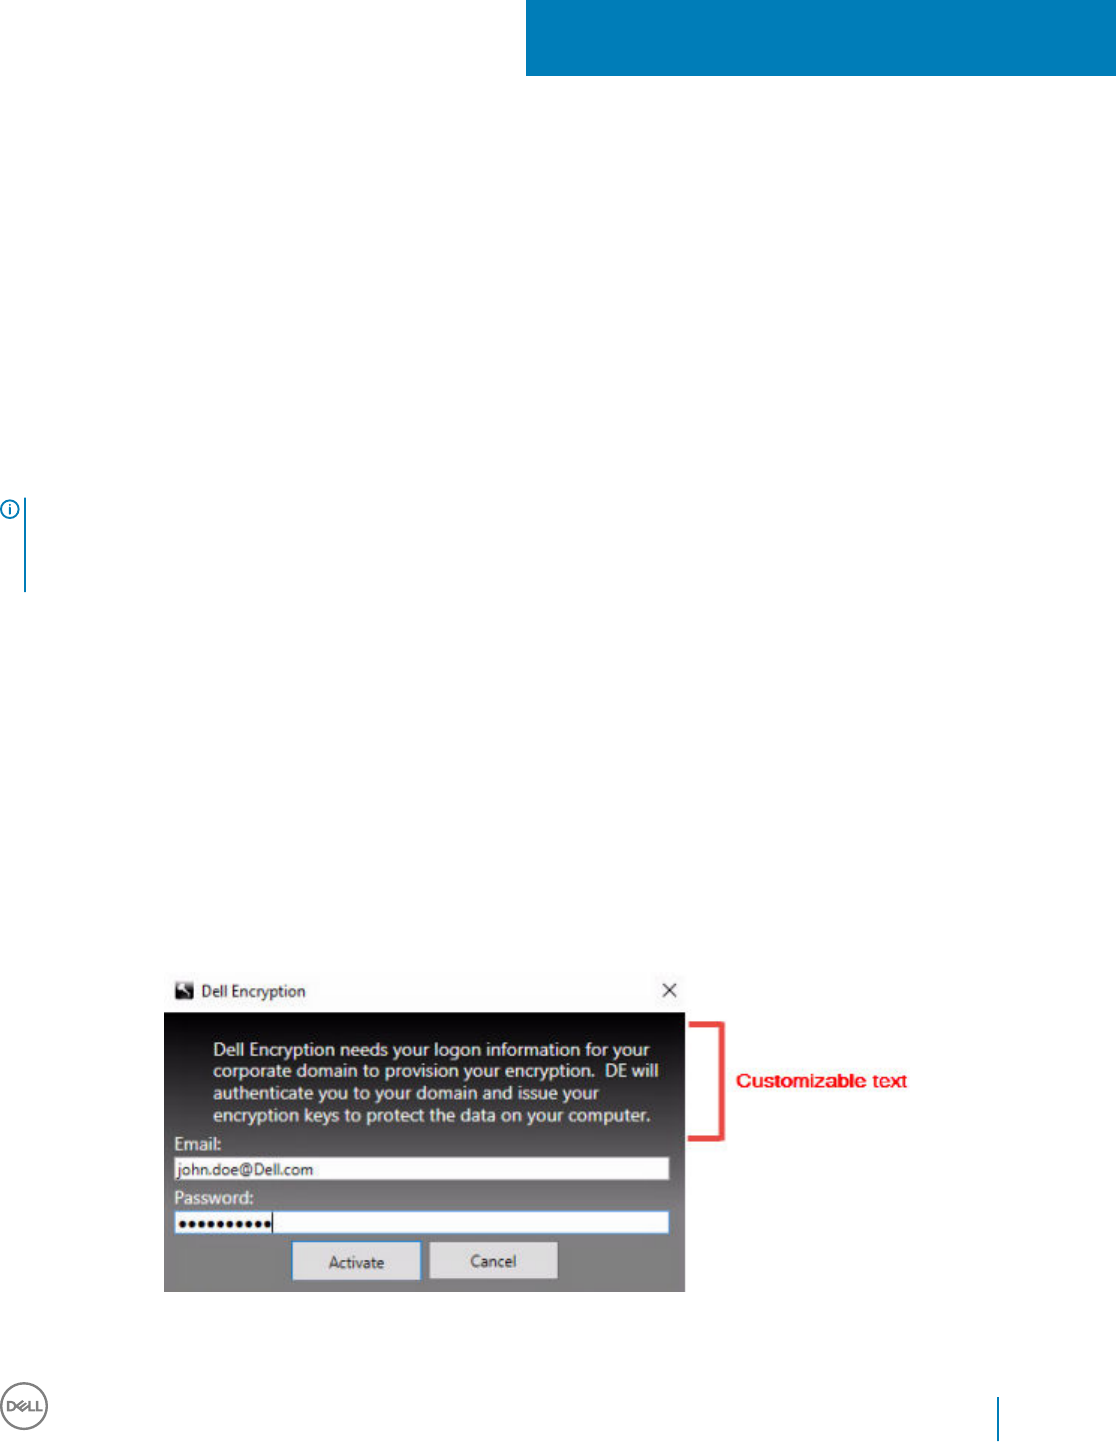
Congure Deferred Activation
The Encryption client with Deferred Activation diers from the Encryption client activation in two ways:
Device-based Encryption policies
The Encryption client policies are user-based; the Encryption client with Deferred Activation's encryption policies are device-based. User
encryption is converted to Common encryption. This dierence allows the user to bring a personal device to use within the organization's
domain, while the organization maintains its security by centrally managing encryption policies.
Activation
With the Encryption client, activation is automatic. When Endpoint Security Suite Pro with Deferred Activation is installed, automatic
activation is disabled. Instead, the user chooses whether to activate encryption, and when to activate it.
IMPORTANT:
Before a user permanently leaves the organization and while his email address is still active, the user must run the Encryption Removal
Agent and uninstall the Encryption client from his personal computer.
Deferred Activation Customization
These client-side tasks allow Deferred Activation customization.
• Add a disclaimer to the Activation Logon dialog box
• Disable automatic re-activation (optional)
Add a disclaimer to the Activation Logon dialog box
The Activation Logon dialog displays at these times:
• When an unmanaged user logs on.
• When the user decides to activate encryption and selects Activate Encryption from the system tray Encryption icon menu.
14
Dell Data Security Endpoint Security Suite Pro
Congure Deferred Activation
65

Prepare the Computer for Installation
If the data is encrypted with a non-Dell encryption product, before installing the Encryption client, decrypt data using the existing
encryption software, and then uninstall the existing encryption software. If the computer does not restart automatically, restart the
computer.
Create a Windows Password
Dell highly recommends that a Windows password be created (if one does not already exist) to protect access to the encrypted data.
Creating a password for the computer prevents others from logging on to your user account without your password.
Uninstall Previous Versions of the Encryption Client
Before uninstalling a previous version of the Encryption client, stop or pause an encryption sweep, if necessary.
If the computer is running a version of Dell Encryption earlier than v8.6, uninstall the Encryption client from the command line. For
instructions, see Uninstall Encryption and Server Encryption Client.
NOTE:
If you plan to install the latest version of the Encryption client immediately after uninstallation, it is not necessary to run the Encryption
Removal Agent to decrypt the les.
To upgrade a previous version of the Encryption client installed with Deferred Activation, use the Control Panel/Uninstall a Program
utility. This uninstallation method is possible even if OPTIN is disabled.
NOTE:
If no users were previously activated, the Encryption client clears the OPTIN setting from the SDE vault since the setting is left-over
from a previous installation. The Encryption client blocks Deferred Activations if users previously activated but the OPTIN ag is not set
in the SDE vault.
Install the Encryption Client with Deferred Activation
To install the Encryption client with Deferred Activation, install the Encryption client with the OPTIN=1 parameter. For more information
about client installation with the OPTIN=1 parameter, see Install Encryption Client.
Activate the Encryption Client with Deferred
Activation
• Activation associates a domain user with a local user account and a specic computer.
• Multiple users can activate on the same computer, provided they use unique local accounts and have unique domain email addresses.
• A user can activate the Encryption client only once per domain account.
Before you activate the Encryption client:
• Log in to the local account that you use the most often. The data associated with this account is the data that will be encrypted.
• Connect to your organization's network.
1 Log on to the workstation or server.
2 Enter the domain email address and password and click Activate.
66 Dell Data Security Endpoint Security Suite Pro
Congure Deferred Activation
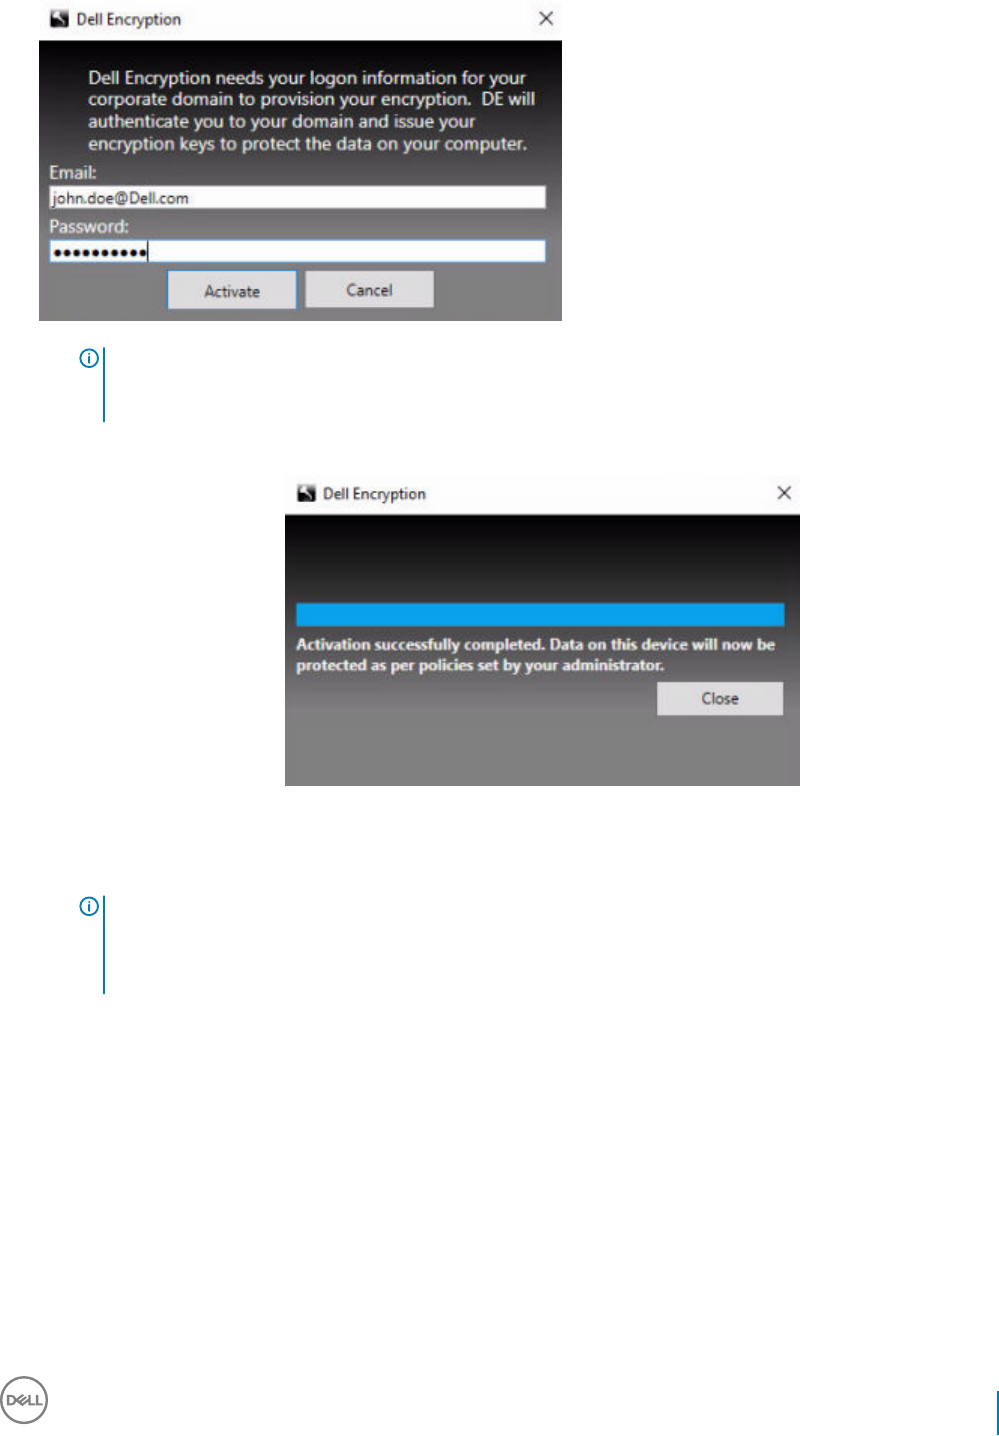
NOTE:
Non-domain or personal email addresses cannot be used for activation.
3Click Close.
The Dell Server combines the encryption key bundle with the user's credentials and with the computer's unique ID (machine ID),
creating an unbreakable relationship between the key bundle, the specic computer, and the user.
4 Restart the computer to begin the encryption sweep.
NOTE:
The Local Management Console, accessible from the system tray icon, shows the policies sent by the Server, not the
eective policy.
Troubleshoot Deferred Activation
Troubleshoot Activation
Problem: Cannot access certain les and folders
Inability to access certain les and folders is a symptom of being logged in with a dierent account than the one under which the user
activated.
The Activation Logon dialog automatically displays even though the user has previously activated.
Possible Solution
Dell Data Security Endpoint Security Suite Pro
Congure Deferred Activation
67

Log out and log back in with the credentials of the activated account and try to access the les again.
In the rare event that the Encryption client cannot authenticate the user, the Activation Logon dialog prompts the user for credentials to
authenticate and access encryption keys. To use the automatic re-activation feature, the AutoReactivation and AutoPromptForActivation
registry keys must BOTH be enabled. Although the feature is enabled by default, it can be manually disabled. For more information, see
Disable Automatic Re-activation.
Error Message: Server Authentication Failed
The Server was not able to authenticate the email address and password.
Possible Solutions
• Use the email address associated with the organization. Personal email addresses cannot be used for activation.
• Re-enter the email address and password and ensure there are no typographical errors.
• Ask the administrator to verify that the email account is active and is not locked.
• Ask the administrator to reset the user's domain password.
Error Message: Network connection error
The Encryption client could not communicate with the Dell Server.
Possible Solutions
• Connect directly to the organization's network and try to activate again.
• If VPN access is required to connect to the network, check the VPN connection and try again.
• Check the Dell Server URL to ensure it matches the URL provided by the administrator.
The URL and other data that the user entered into the installer are stored in the registry. Check the accuracy of the data under [HKLM
\SOFTWARE\Microsoft\Windows NT\CurrentVersion\Winlogon\CMGShield] and [HKLM\SOFTWARE\Microsoft\Windows NT
\CurrentVersion\Winlogon\CMGShield\Servlet]
• Disconnect and reconnect:
Disconnect the computer from the network.
Reconnect to the network.
Restart the computer.
Try to connect to the network again.
Error Message: Legacy Server Not Supported
Encryption cannot be activated against a legacy server; the Dell Server must be v9.1 or higher.
Possible Solution
• Check the Dell Server URL to ensure it matches the URL provided by the administrator.
The URL and other data that the user entered into the installer are stored in the registry.
• Check the accuracy of the data under [HKLM\Software\Microsoft\Windows NT\CurrentVersion\Winlogon\CMGShield] and [HKLM
\Software\Microsoft\Windows NT\CurrentVersion\Winlogon\CMGShield\Servlet]
Error Message: Domain User Already Activated
A second user has logged on to the local computer and tried to activate against a domain account that has already been activated.
A user can activate the Encryption client only once per domain account.
Possible Solution
68 Dell Data Security Endpoint Security Suite Pro
Congure Deferred Activation

Decrypt and uninstall the Encryption client while logged in as the second activated user.
Error Message: Server Error General
An error has occurred on the Server.
Possible Solution
The administrator should check the Server logs to ensure services are running.
The user should try to activate later.
Tools
CMGAd
Use the CMGAd utility prior to launching the Encryption Removal Agent to obtain the encryption key bundle. The CMGAd utility and its
instructions are located in the Dell installation media (Dell-Oine-Admin-XXbit)
Log Files
In C:\ProgramData\Dell\Dell Data Protection\Encryption, look for the log le called CmgSysTray.
Search for the phrase "Manual activation result".
The error code is on the same line, followed by " status = "; the status indicates what went wrong.
Dell Data Security Endpoint Security Suite Pro
Congure Deferred Activation
69

Troubleshooting
All Clients - Troubleshooting
•Endpoint Security Suite Pro master installer log les are located at C:\ProgramData\Dell\Dell Data Protection\Installer.
• Windows creates unique child installer installation log les for the logged in user at %temp%, located at C:\Users\<UserName>
\AppData\Local\Temp.
• Windows creates log les for client prerequisites, such as Visual C++, for the logged in user at %temp%, located at C:\Users
\<UserName>\AppData\Local\Temp. For example, C:\Users\<UserName>\AppData\Local\Temp
\dd_vcredist_amd64_20160109003943.log
• Follow the instructions at http://msdn.microsoft.com to verify the version of Microsoft .Net that is installed on the computer targeted
for installation.
Go to https://www.microsoft.com/en-us/download/details.aspx?id=30653to download the full version of Microsoft .Net Framework
4.5.2 or later.
• See this document if the computer targeted for installation has (or has had in the past) Dell Access installed. DDP|A is not compatible
with this suite of products.
All Clients - Protection Status
A new method for deriving a device's protected status has been implemented in the Dell Security Management Server v9.8.2. Previously,
the Endpoint Protected Status area in the management console's Dashboard would only denote the state of Encryption per device.
Protected status is now denoted if any of the following criteria have been met:
• Advanced Threat Prevention is installed and enabled.
• Dell Data Guardian is installed and enabled.
• Self-Encrypting Drive Management is installed, enabled, and the Pre-Boot Authentication (PBA) is enabled.
• BitLocker Manager is installed, enabled, and encryption has completed.
• Dell Encryption (Mac) is installed and enabled, and policy-based encryption has been enforced.
• Dell Encryption (Windows) is installed, enabled, Policy-Based Encryption has been set for the endpoint, and the most recent policy has
been applied for the last logged on user.
Encryption Client Troubleshooting
Upgrade to the Windows 10 Creators Update
To upgrade to the Windows 10 Creators Update version, follow the instructions in the following article: http://www.dell.com/support/
article/us/en/19/SLN298382.
(Optional) Create an Encryption Removal Agent Log File
• Before beginning the uninstall process, you can optionally create an Encryption Removal Agent log le. This log le is useful for
troubleshooting an uninstall/decryption operation. If you do not intend to decrypt les during the uninstall process, you do not need to
create this log le.
15
70 Dell Data Security Endpoint Security Suite Pro
Troubleshooting

• The Encryption Removal Agent log le is not created until after the Encryption Removal Agent Service runs, which does not happen
until the computer is restarted. Once the client is successfully uninstalled and the computer is fully decrypted, the log le is
permanently deleted.
• The log le path is C:\ProgramData\Dell\Dell Data Protection\Encryption.
• Create the following registry entry on the computer targeted for decryption.
[HKLM\Software\Credant\DecryptionAgent]
"LogVerbosity"=DWORD:2
0: no logging
1: logs errors that prevent the Service from running
2: logs errors that prevent complete data decryption (recommended level)
3: logs information about all decrypting volumes and les
5: logs debugging information
Find TSS Version
• TSS is a component that interfaces with the TPM. To nd the TSS version, go to (default location) C:\Program Files\Dell\Dell Data
Protection\Drivers\TSS\bin > tcsd_win32.exe. Right-click the le and select Properties. Verify the le version on the Details tab.
Encryption External Media and PCS Interactions
To Ensure Media is Not Read-Only and the Port is Not Blocked
The Encryption External Media Access to unShielded Media policy interacts with Port Control System - Storage Class: External Drive
Control policy. If you intend to set the Encryption External Media Access to unShielded Media policy to Full Access, ensure that the Storage
Class: External Drive Control policy is also set to Full Access to ensure that the media is not set to read-only and the port is not blocked.
To Encrypt Data Written to CD/DVD
• Set Windows Media Encryption = On.
• Set EMS Exclude CD/DVD Encryption = not selected.
• Set Subclass Storage: Optical Drive Control = UDF Only.
Use WSScan
• WSScan allows you to ensure that all data is decrypted when uninstalling the Encryption client as well as view encryption status and
identify unencrypted les that should be encrypted.
• Administrator privileges are required to run this utility.
Run WSScan
1 From the Dell installation media, copy WSScan.exe to the Windows computer to scan.
2 Launch a command line at the location above and enter wsscan.exe at the command prompt. WSScan launches.
3 Click Advanced.
4 Select the type of drive to scan from the drop-down menu: All Drives, Fixed Drives, Removable Drives, or CDROMs/ DVDROMs.
5 Select the desired Encryption Report Type from the drop-down menu: Encrypted FIles, Unencrypted FIles, All FIles, or Unencrypted
FIles in Violation:
Dell Data Security Endpoint Security Suite Pro
Troubleshooting
71
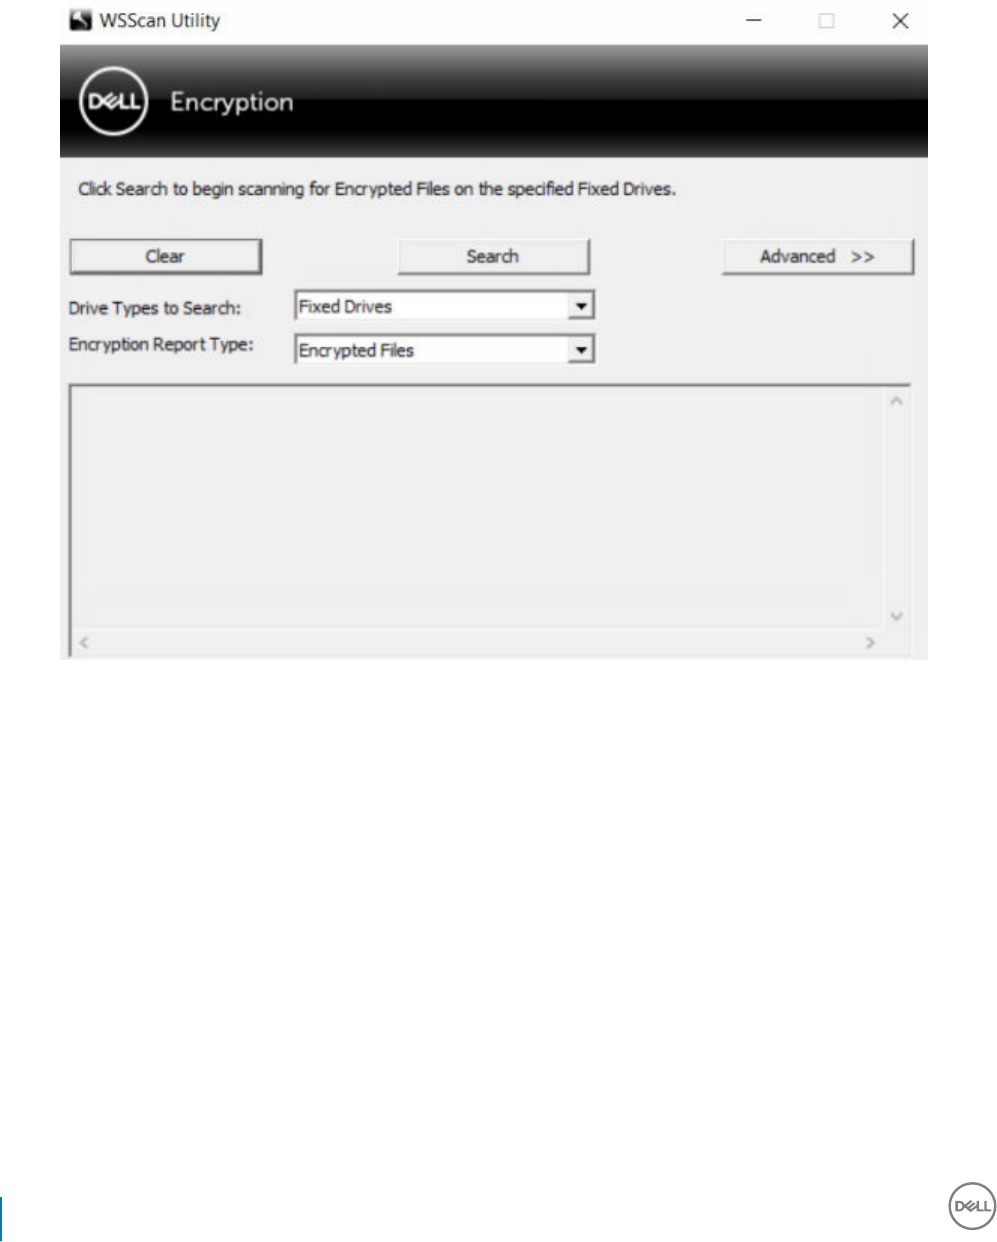
•Encrypted FIles - To ensure that all data is decrypted when uninstalling the Encryption client. Follow your existing process for
decrypting data, such as issuing a decryption policy update. After decrypting data, but before performing a restart in preparation
for uninstall, run WSScan to ensure that all data is decrypted.
•Unencrypted FIles - To identify les that are not encrypted, with an indication of whether the les should be encrypted (Y/N).
•All FIles - To list all encrypted and unencrypted les, with an indication of whether the les should be encrypted (Y/N).
•Unencrypted FIles in Violation - To identify les that are not encrypted that should be encrypted.
6 Click Search.
OR
1 Click Advanced to toggle the view to Simple to scan a particular folder.
2 Go to Scan Settings and enter the folder path in the Search Path eld. If this eld is used, the selection in the drop-down box is
ignored.
3 If you do not want to write WSScan output to a le, clear the Output to File check box.
4 Change the default path and lename in Path, if desired.
5 Select Add to Existing File if you do not want to overwrite any existing WSScan output les.
6 Choose the output format:
• Select Report Format for a report style list of scanned output. This is the default format.
• Select Value Delimited File for output that can be imported into a spreadsheet application. The default delimiter is "|", although it
can be changed to up to 9 alphanumeric, space, or keyboard punctuation characters.
• Select the Quoted Values option to enclose each value in double quotation marks.
• Select Fixed Width File for non-delimited output containing a continuous line of xed-length information about each encrypted le.
7 Click Search.
Click Stop Searching to stop your search. Click Clear to clear displayed messages.
72 Dell Data Security Endpoint Security Suite Pro
Troubleshooting
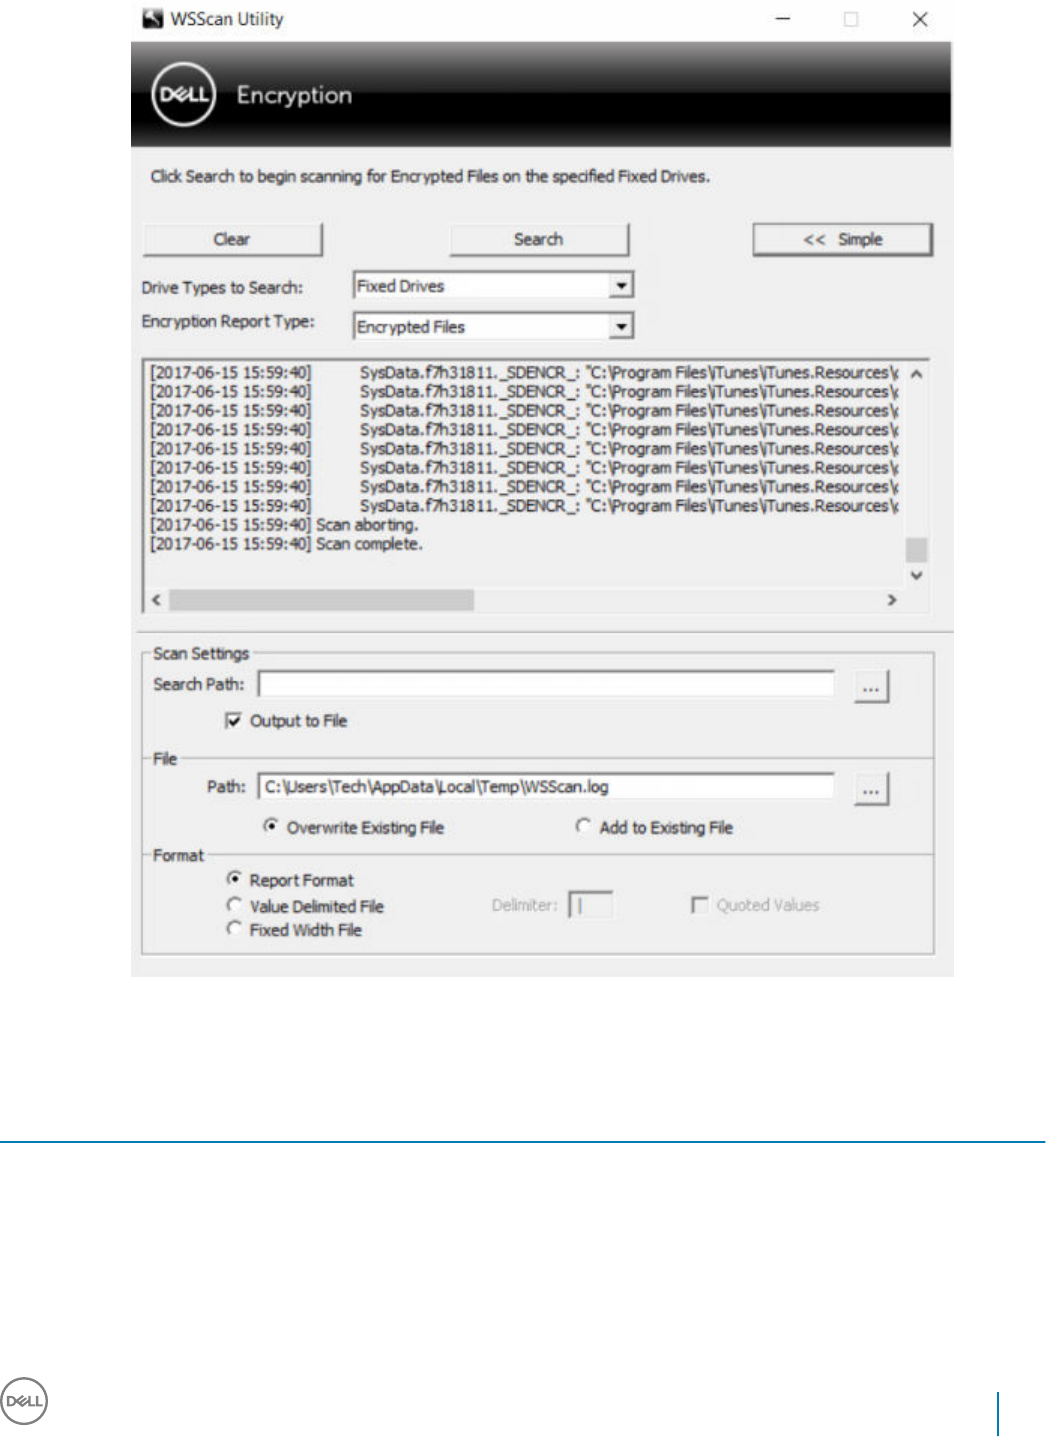
WSScan Command Line Usage
WSScan [-ta] [-tf] [-tr] [-tc] [drive] [-s] [-o<filepath>] [-a] [-f<format specifier>] [-r] [-
u[a][-|v]] [-d<delimeter>] [-q] [-e] [-x<exclusion directory>] [-y<sleep time>]
Switch Meaning
Drive Drive to scan. If not specied, the default is all local xed hard drives. Can be a mapped network
drive.
-ta Scan all drives
-tf Scan xed drives (default)
-tr Scan removable drives
Dell Data Security Endpoint Security Suite Pro
Troubleshooting
73

Switch Meaning
-tc Scan CDROMs/DVDROMs
-s Silent operation
-o Output le path
-a Append to output le. The default behavior truncates the output le.
-f Report format specier (Report, Fixed, Delimited)
-r Run WSScan without administrator privileges. Some les may not be visible if this mode is used.
-u Include unencrypted les in output le.
This switch is sensitive to order: "u" must be rst, "a" must be second (or omitted), "-" or "v" must
be last.
-u- Only include unencrypted les in output le
-ua Report unencrypted les also, but use all user policies to display the "should" eld.
-ua- Report unencrypted les only, but use all user policies to display the "should" eld.
-uv Report unencrypted les that violate policy only (Is=No / Should=Y)
-uav Report unencrypted les that violate policy only (Is=No / Should=Y), using all user policies.
-d Species what to use as a value separator for delimited output
-q Species the values that should be in enclosed in quotes for delimited output
-e Include extended encryption elds in delimited output
-x Exclude directory from scan. Multiple exclusions are allowed.
-y Sleep time (in milliseconds) between directories. This switch results in slower scans, but potentially
a more responsive CPU.
WSScan Output
WSScan information about encrypted les contains the following information.
Example Output:
[2015-07-28 07:52:33] SysData.7vdlxrsb._SDENCR_: "c:\temp\Dell - test.log" is still AES256 encrypted
Output Meaning
Date/time stamp The date and time the le was scanned.
Encryption type The type of encryption used to encrypt the le.
SysData: SDE Encryption Key.
User: User Encryption Key.
Common: Common Encryption Key.
74 Dell Data Security Endpoint Security Suite Pro
Troubleshooting

Output Meaning
WSScan does not report les encrypted using Encrypt for Sharing.
KCID The Key Computer ID.
As shown in the example above, "7vdlxrsb"
If you are scanning a mapped network drive, the scanning report does not return a KCID.
UCID The User ID.
As shown in the example above, "_SDENCR_"
The UCID is shared by all the users of that computer.
File The path of the encrypted le.
As shown in the example above, "c:\temp\Dell - test.log"
Algorithm The encryption algorithm being used to encrypt the le.
As shown in the example above, "is still AES256 encrypted"
RIJNDAEL 128
RIJNDAEL 256
AES 128
AES 256
3DES
Use WSProbe
The Probing Utility is for use with all versions of the Encryption client, with the exception of Encryption External Media policies. Use the
Probing Utility to:
• Scan or schedule scanning of an encrypted computer. The Probing Utility observes your Workstation Scan Priority policy.
• Temporarily disable or re-enable the current user Application Data Encryption List.
• Add or remove process names on the privileged list.
• Troubleshoot as instructed by Dell ProSupport.
Approaches to Data Encryption
If you specify policies to encrypt data on Windows devices, you can use any of the following approaches:
• The rst approach is to accept the default behavior of the client. If you specify folders in Common Encrypted Folders or User
Encrypted Folders, or set Encrypt "My Documents", Encrypt Outlook Personal Folders, Encrypt Temporary Files, Encrypt Temporary
Internet Files, or Encrypt Windows Paging File to selected, aected les are encrypted either when they are created, or (after being
created by an unmanaged user) when a managed user logs on. The client also scans folders specied in or related to these policies for
possible encryption/decryption when a folder is renamed, or when the client receives changes to these policies.
• You can also set Scan Workstation on Logon to Selected. If Scan Workstation on Logon is Selected, when a user logs on, the client
compares how les in currently- and previously-encrypted folders are encrypted to the user policies, and makes any necessary changes.
• To encrypt les that meet your encryption criteria but were created prior to your encryption policies going into eect, but do not want
the performance impact of frequent scanning, you can use this utility to scan or schedule scanning of the computer.
Dell Data Security Endpoint Security Suite Pro
Troubleshooting
75

Prerequisites
• The Windows device you want to work with must be encrypted.
• The user you want to work with must be logged on.
Use the Probing Utility
WSProbe.exe is located in the installation media.
Syntax
wsprobe [path]
wsprobe [-h]
wsprobe [-f path]
wsprobe [-u n] [-x process_names] [-i process_names]
Parameters
Parameter To
path Optionally specify a particular path on the device that you want to scan for possible encryption/
decryption. If you do not specify a path, this utility scans all folders related to your encryption
policies.
-h View command line Help.
-f Troubleshoot as instructed by Dell ProSupport
-u Temporarily disable or re-enable the user Application Data Encryption List. This list is only eective
if Encryption Enabled is selected for the current user. Specify 0 to disable or 1 to re-enable. The
current policy in force for the user is reinstated at the next logon.
-x Add process names to the privileged list. The computer and installer process names on this list,
plus those you add using this parameter or HKLM\Software\CREDANT\CMGShield
\EUWPrivilegedList, are ignored if specied in the Application Data Encryption List. Separate
process names with commas. If your list includes one or more spaces, enclose the list in double
quotes.
-i Remove process names previously added to the privileged list (you cannot remove hard-coded
process names). Separate process names with commas. If your list includes one or more spaces,
enclose the list in double quotes.
Check Encryption Removal Agent Status
The Encryption Removal Agent displays its status in the description area of the Services panel (Start > Run... > services.msc > OK) as
follows. Periodically refresh the Service (highlight the Service > right-click > Refresh) to update its status.
•Waiting for SDE Deactivation - The Encryption client is still installed, is still congured, or both. Decryption does not start until the
Encryption client is uninstalled.
•Initial sweep - The Service is making an initial sweep, calculating the number of encrypted les and bytes. The initial sweep occurs one
time.
•Decryption sweep - The Service is decrypting les and possibly requesting to decrypt locked les.
•Decrypt on Reboot (partial) - The decryption sweep is complete and some locked les (but not all) are to be decrypted on the next
restart.
•Decrypt on Reboot - The decryption sweep is complete and all locked les are to be decrypted on the next restart.
76 Dell Data Security Endpoint Security Suite Pro
Troubleshooting
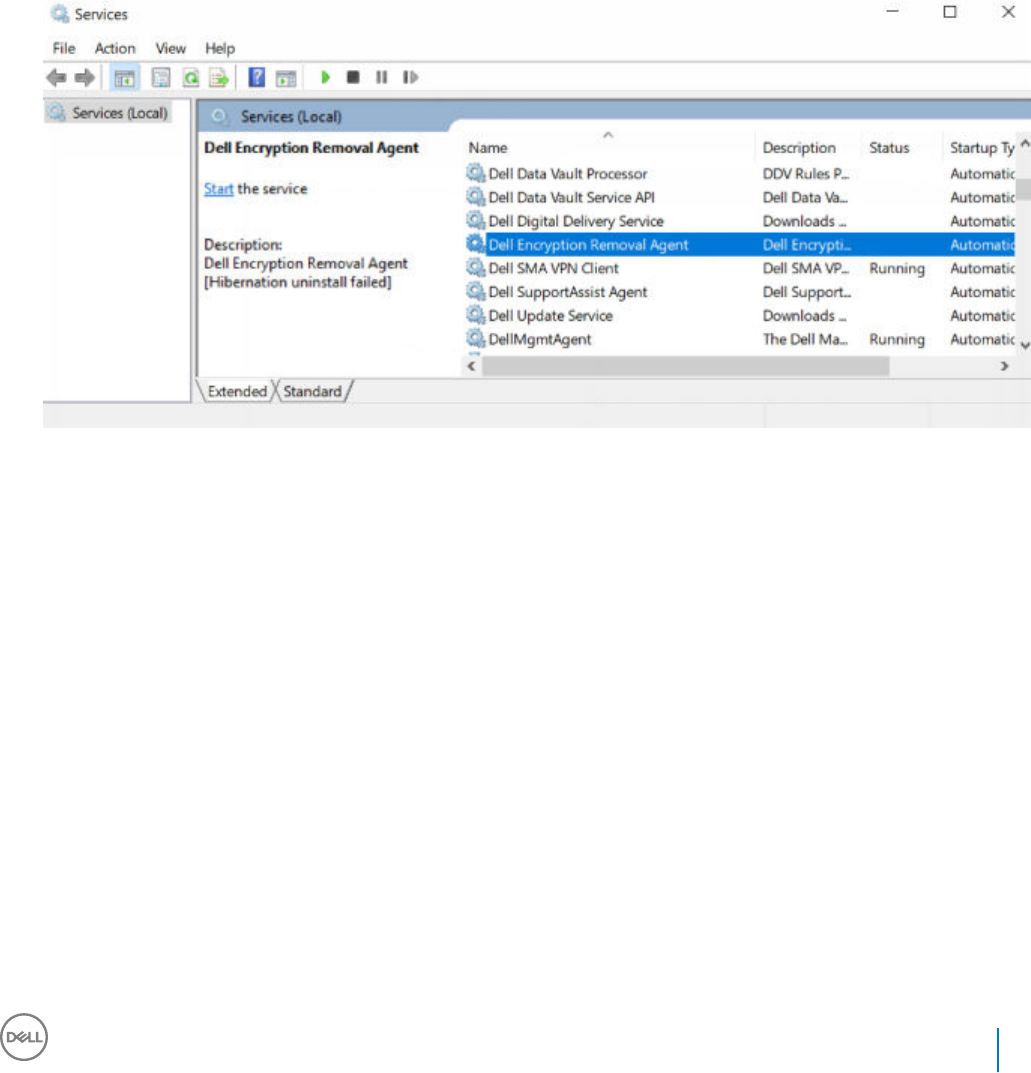
•All les could not be decrypted - The decryption sweep is complete, but all les could not be decrypted. This status means one of the
following occurred:
• The locked les could not be scheduled for decryption because they were too big, or an error occurred while making the request to
unlock them.
• An input/output error occurred while decrypting les.
• The les could not be decrypted by policy.
• The les are marked as should be encrypted.
• An error occurred during the decryption sweep.
• In all cases, a log le is created (if logging is congured) when LogVerbosity=2 (or higher) is set. To troubleshoot, set the log
verbosity to 2 and restart the Encryption Removal Agent Service to force another decryption sweep. See (Optional) Create an
Encryption Removal Agent Log File for instructions.
•Complete - The decryption sweep is complete. The Service, the executable, the driver, and the driver executable are all scheduled for
deletion on the next restart.
SED Client Troubleshooting
Use the Initial Access Code Policy
• This policy is used to log on to a computer when network access is unavailable. Meaning, access to the Security Management Server/
Security Management Server Virtual and AD are both unavailable. Only use the Initial Access Code policy if absolutely necessary. Dell
does not recommend this method to log in. Using the Initial Access Code policy does not provide the same level of security as the usual
method of logging in using username, domain, and password.
In addition to being a less secure method of logging in, if an end user is activated using the Initial Access Code, then there is no record
on the Security Management Server/Security Management Server Virtual of that user activating on this computer. In turn, there is no
way to generate a Response Code from the Security Management Server/Security Management Server Virtual for the end user if they
fail password and self help questions.
• The Initial Access Code can only be used one time, immediately after activation. After an end user has logged in, the Initial Access Code
will not be available again. The rst domain login that occurs after the Initial Access Code is entered will be cached, and the Initial
Access Code entry eld will not be displayed again.
• The Initial Access Code will only display under the following circumstances:
• A user has never activated inside the PBA.
• The client has no connectivity to the network or Security Management Server/Security Management Server Virtual.
Dell Data Security Endpoint Security Suite Pro
Troubleshooting
77

Use Initial Access Code
1 Set a value for the Initial Access Code policy in the Remote Management Console.
2 Save and commit the policy.
3 Start the local computer.
4 Enter the Initial Access Code when the Access Code screen displays.
5 Click the blue arrow.
6 Click OK when the Legal Notice screen displays.
7 Log in to Windows with the user credentials for this computer. These credentials must be part of the domain.
8 After logging in, open the Data Security Console and verify that the PBA user was successfully created.
Click Log in the top menu and look for the message Created PBA user for <domain\username>, which indicates the process was
successful.
9 Shut down and restart the computer.
10 At the login screen, enter the username, domain, and password that was previously used to log in to Windows.
You must match the username format that was used when creating the PBA user. Thus, if you used the format domain/username,
you must enter domain/username for the Username.
11 (Credant Manager only) Respond to the Question and Answer prompts.
Click the blue arrow.
12 Click Login when the Legal Notice screen displays.
Windows now launches and the computer can be used as usual.
Create a PBA Log File for Troubleshooting
• There may be cases when a PBA log le is needed for troubleshooting PBA issues, such as:
• You are unable to see the network connection icon, yet you know there is network connectivity. The log le contains DHCP
information to resolve the issue.
• You are unable to see the Security Management Server/Security Management Server Virtual connection icon. The log le contains
information to help diagnose Security Management Server/Security Management Server Virtual connectivity issues.
• Authentication fails even when entering correct credentials. The log le used with the Security Management Server/Security
Management Server Virtual Server logs can help diagnose the issue.
Capture Logs When Booting Into the PBA (Legacy PBA)
1 Create a folder on a USB drive and name it \CredantSED, at the root level of the USB drive.
2 Create a le named actions.txt and place it in the \CredantSED folder.
3 In actions.txt, add the line:
get logs
4 Save and close the le.
Do not insert the USB drive when the computer is powered down. If the USB drive is already inserted during the shutdown state,
remove the USB drive.
5 Power on the computer and log in to the PBA. Insert the USB drive into the computer that the logs are to be collected from during
this step.
6 After inserting the USB drive, wait for 5-10 seconds, then remove the drive.
A credpbaenv.tgz le is created in the \CredantSED folder that contains the needed log les.
Capture Logs When Booting Into the PBA (UEFI PBA)
78 Dell Data Security Endpoint Security Suite Pro
Troubleshooting
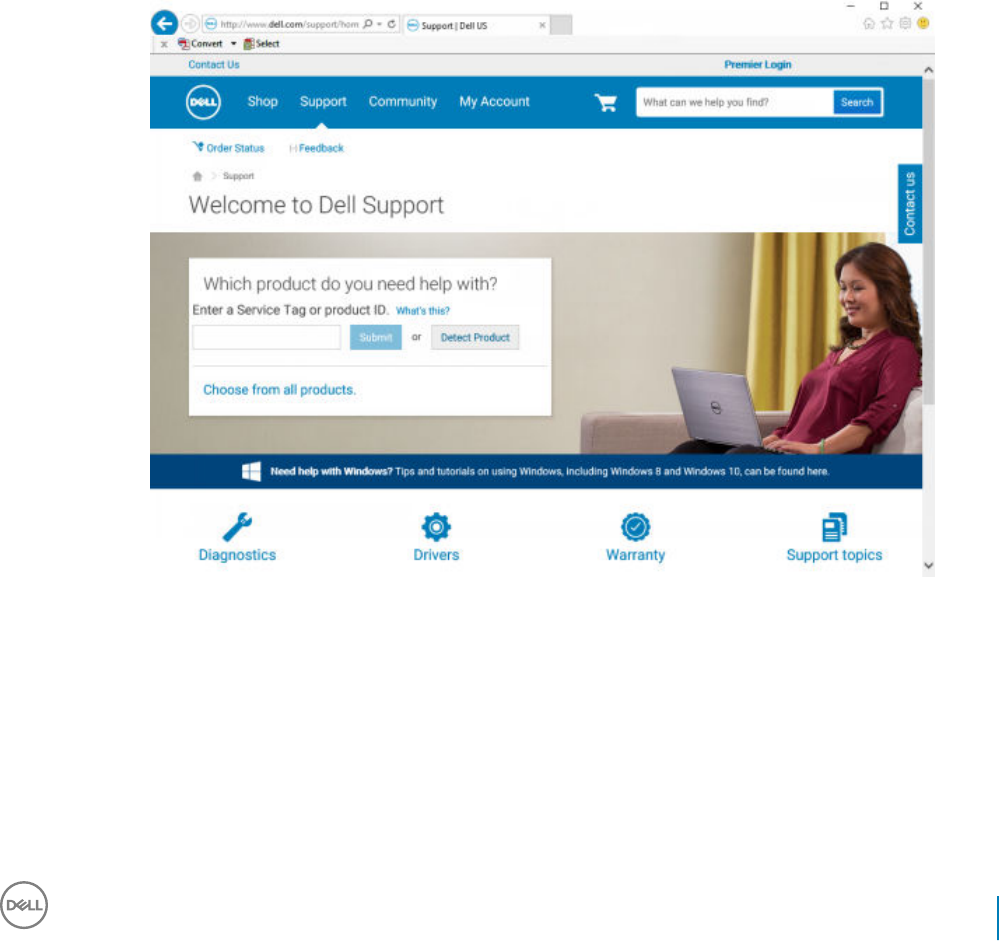
1 Create a le called PBAErr.log at the root level of the USB drive.
2 Insert the USB drive before powering on the computer.
3 Remove the USB drive after reproducing the issue requiring the logs.
The PBAErr.log le will be updated and written in real-time.
Dell ControlVault Drivers
Update Dell ControlVault Drivers and Firmware
• Dell ControlVault drivers and rmware that are installed on Dell computers at the factory are outdated and should be updated by
following this procedure, in this order.
• If an error message is received during client installation prompting you to exit the installer to update Dell ControlVault drivers, the
message may be safely dismissed to continue with the installation of the client. The Dell ControlVault drivers (and rmware) can be
updated after the client installation is complete.
Download Latest Drivers
1 Go to support.dell.com.
2 Select your computer model.
Dell Data Security Endpoint Security Suite Pro
Troubleshooting
79
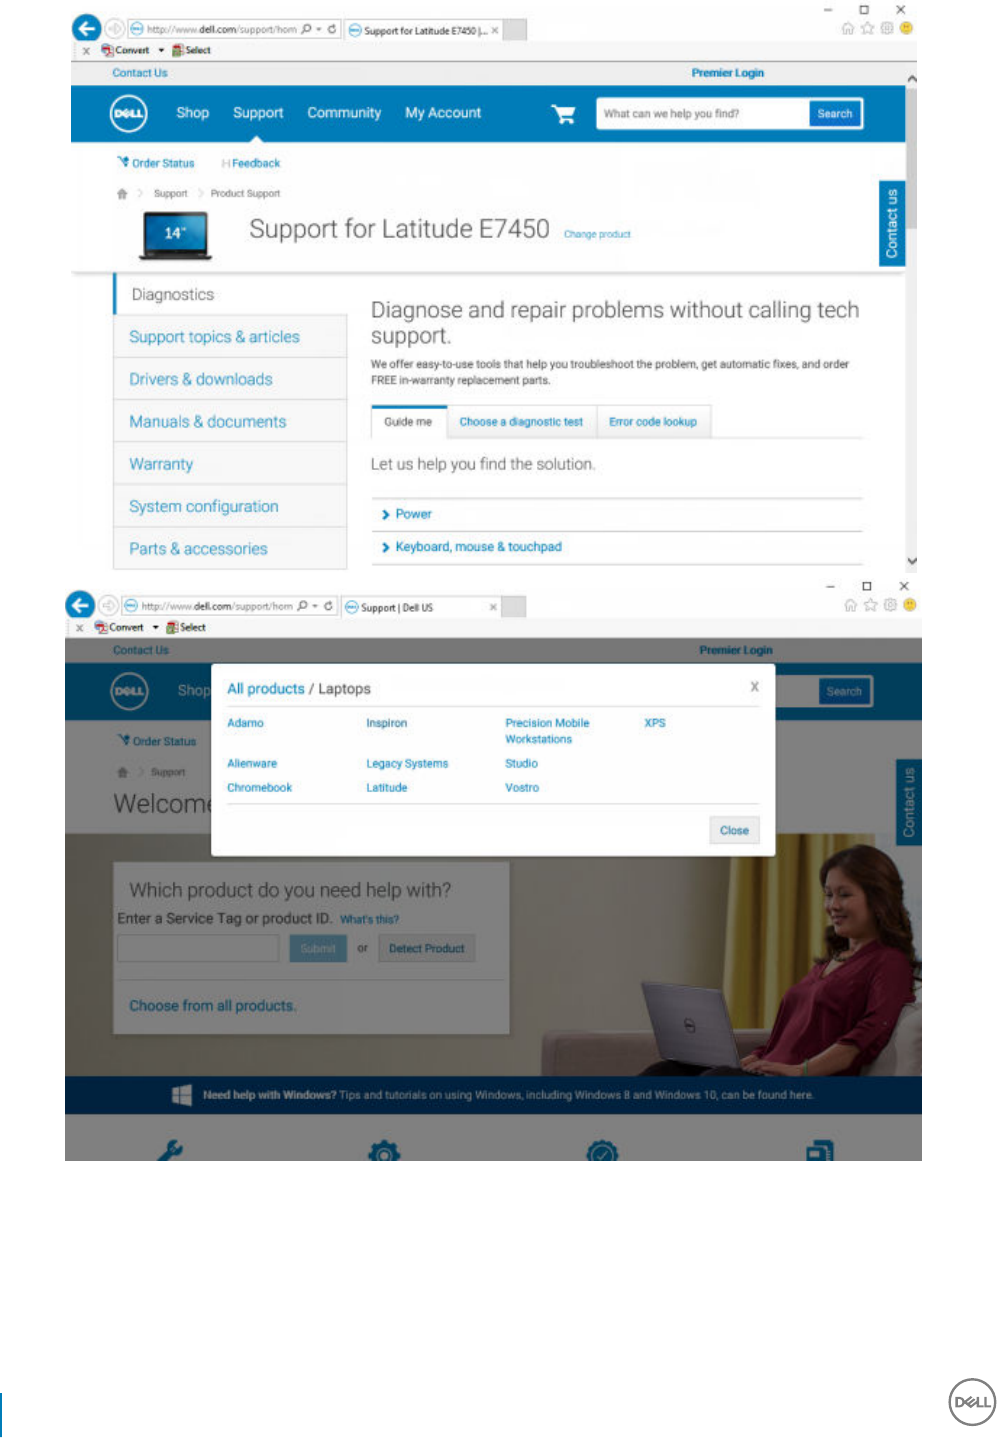
3 Select Drivers & Downloads.
80 Dell Data Security Endpoint Security Suite Pro
Troubleshooting

4 Select the Operating System of the target computer.
5 Expand the Security category.
Dell Data Security Endpoint Security Suite Pro
Troubleshooting
81
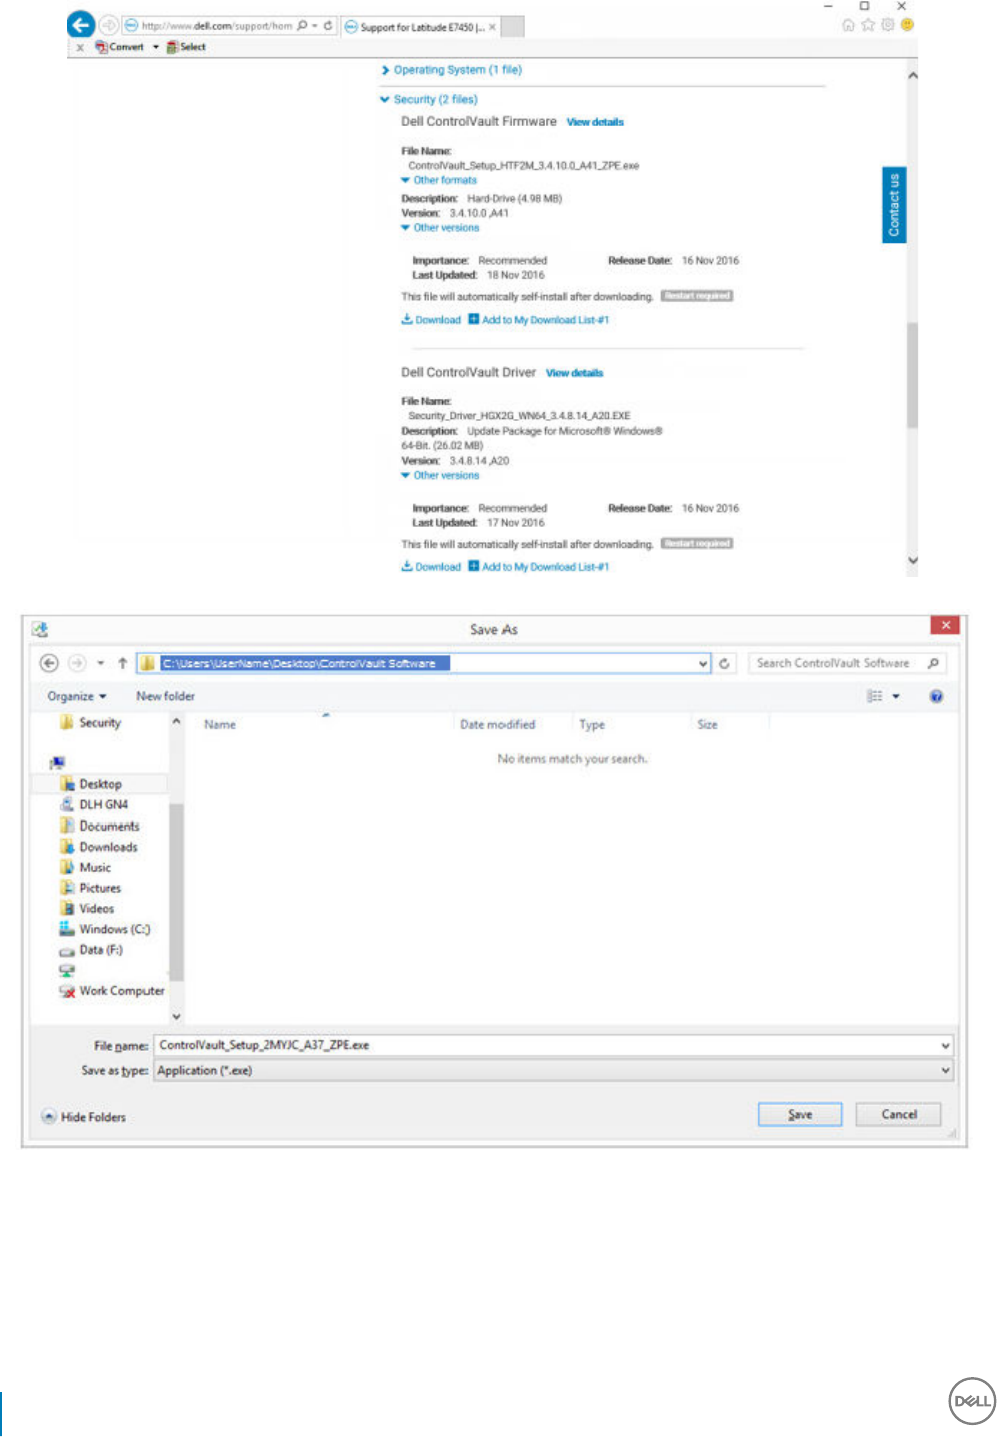
6 Download and save the Dell ControlVault Drivers.
7 Download and save the Dell ControlVault Firmware.
82 Dell Data Security Endpoint Security Suite Pro
Troubleshooting
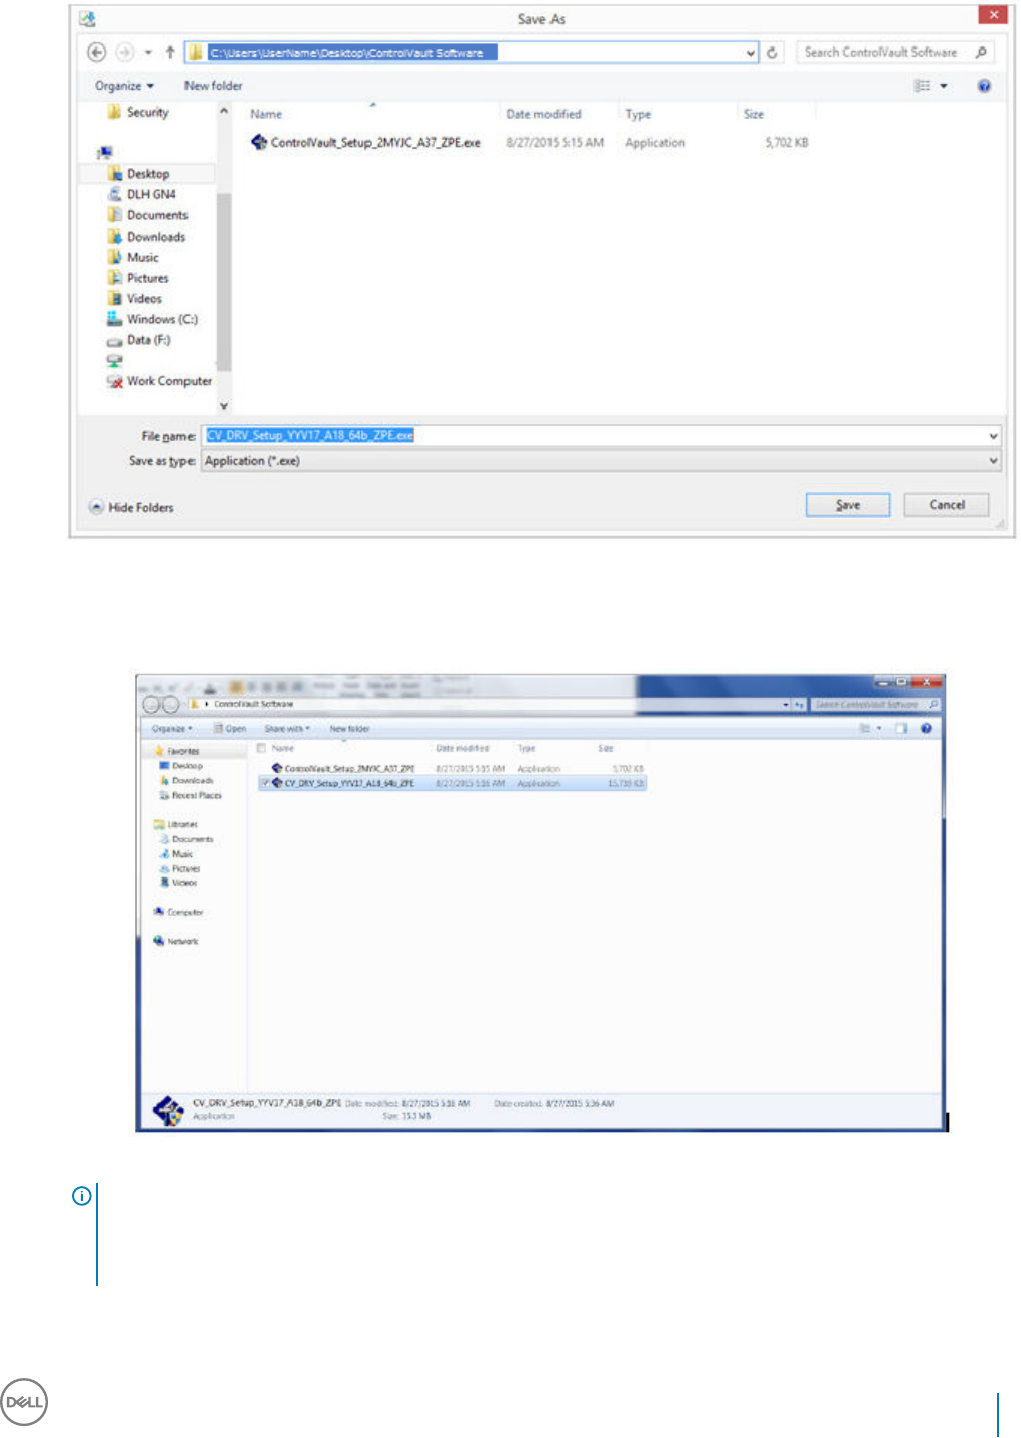
8 Copy the drivers and rmware to the target computers, if needed.
Install Dell ControlVault Driver
1 Navigate to the folder which you downloaded the driver installation le.
2 Double-click the Dell ControlVault driver to launch the self-extracting executable le.
TIP:
Be sure to install the driver rst. The lename of the driver at the time of this document creation is
ControlVault_Setup_2MYJC_A37_ZPE.exe.
3 Click Continue to begin.
Dell Data Security Endpoint Security Suite Pro
Troubleshooting
83
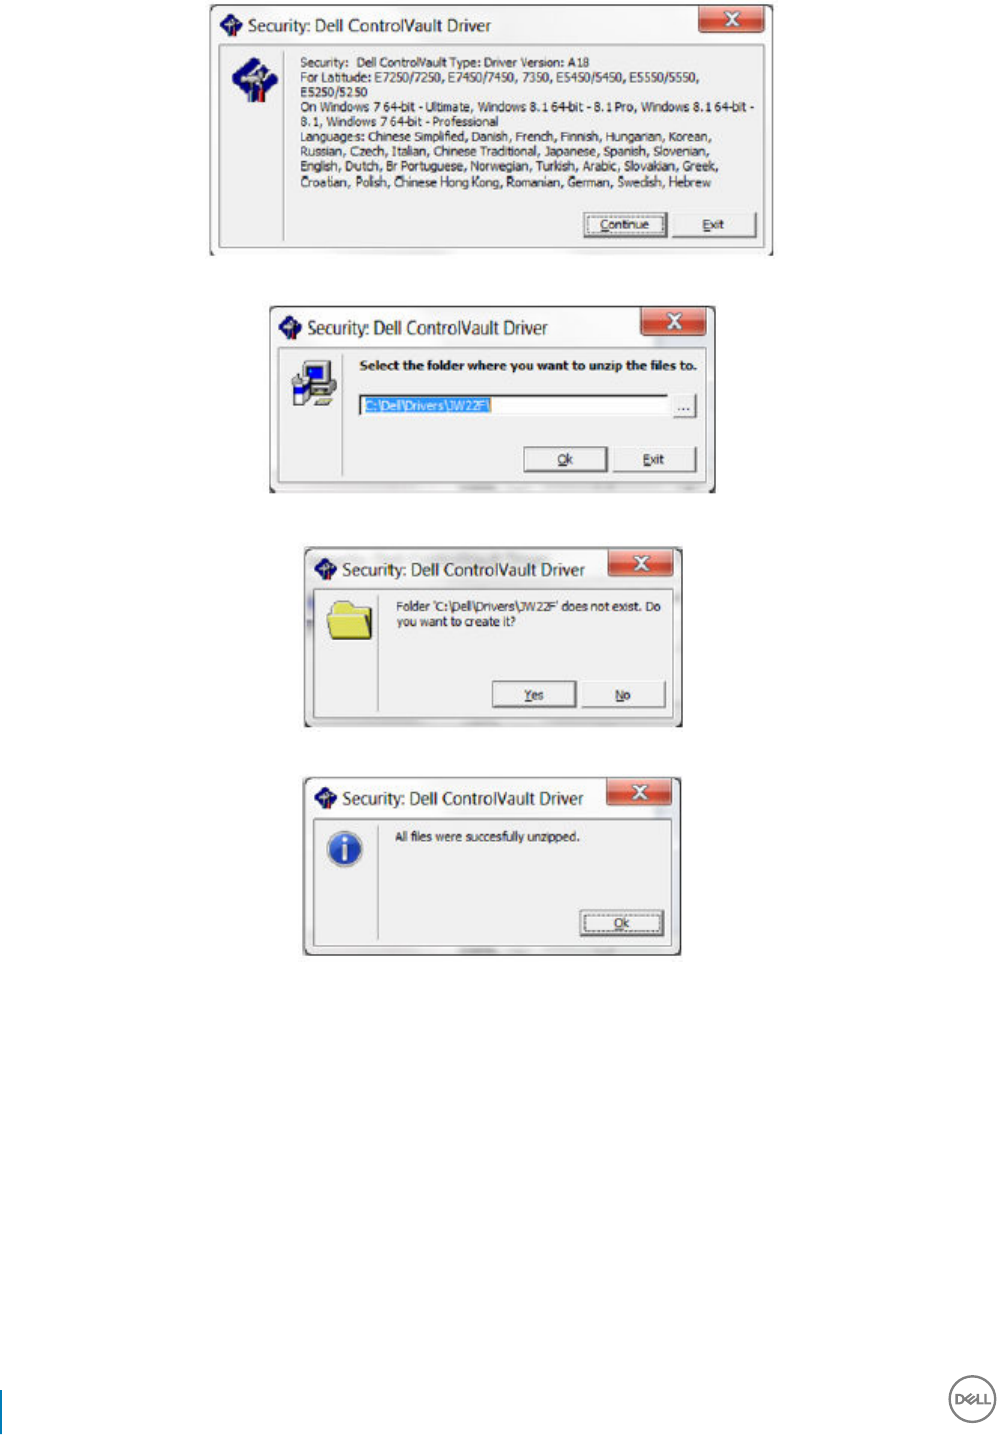
4 Click Ok to unzip the driver les in the default location of C:\Dell\Drivers\<New Folder>.
5 Click Yes to allow the creation of a new folder.
6 Click Ok when the successfully unzipped message displays.
7 The folder which contains the les should display after extraction. If not, navigate to the folder to which you extracted the les. In this
case, the folder is JW22F.
84 Dell Data Security Endpoint Security Suite Pro
Troubleshooting
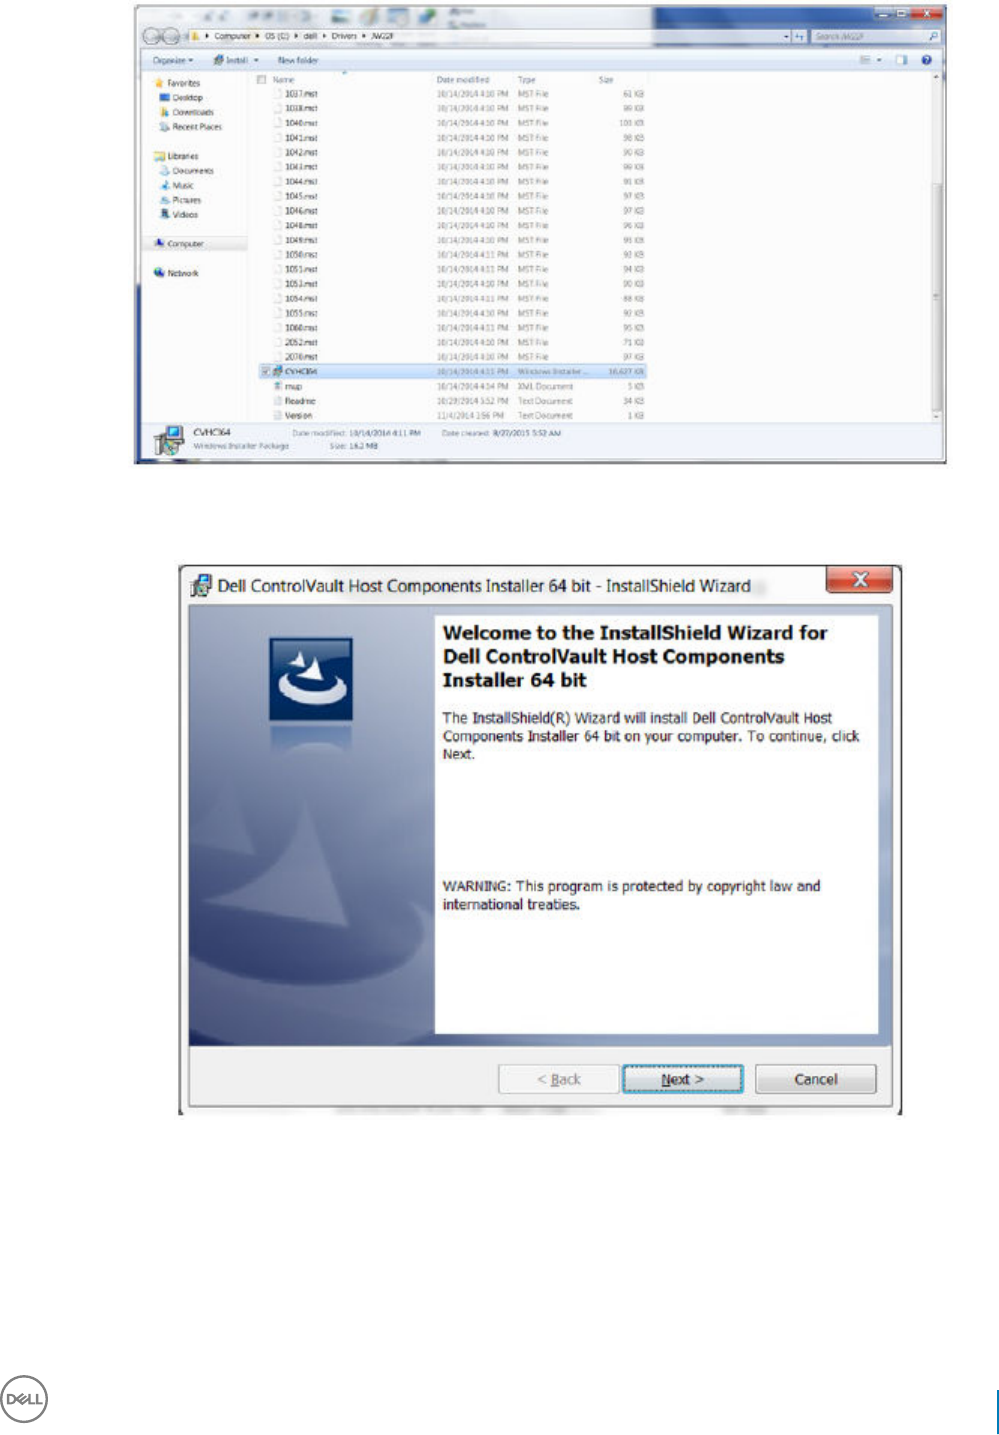
8 Double-click CVHCI64.MSI to launch the driver installer. [this example is CVHCI64.MSI in this example (CVHCI for a 32-bit
computer)].
9 Click Next at the Welcome screen.
10 Click Next to install the drivers in the default location of C:\Program Files\Broadcom Corporation\Broadcom USH Host Components\.
Dell Data Security Endpoint Security Suite Pro
Troubleshooting
85
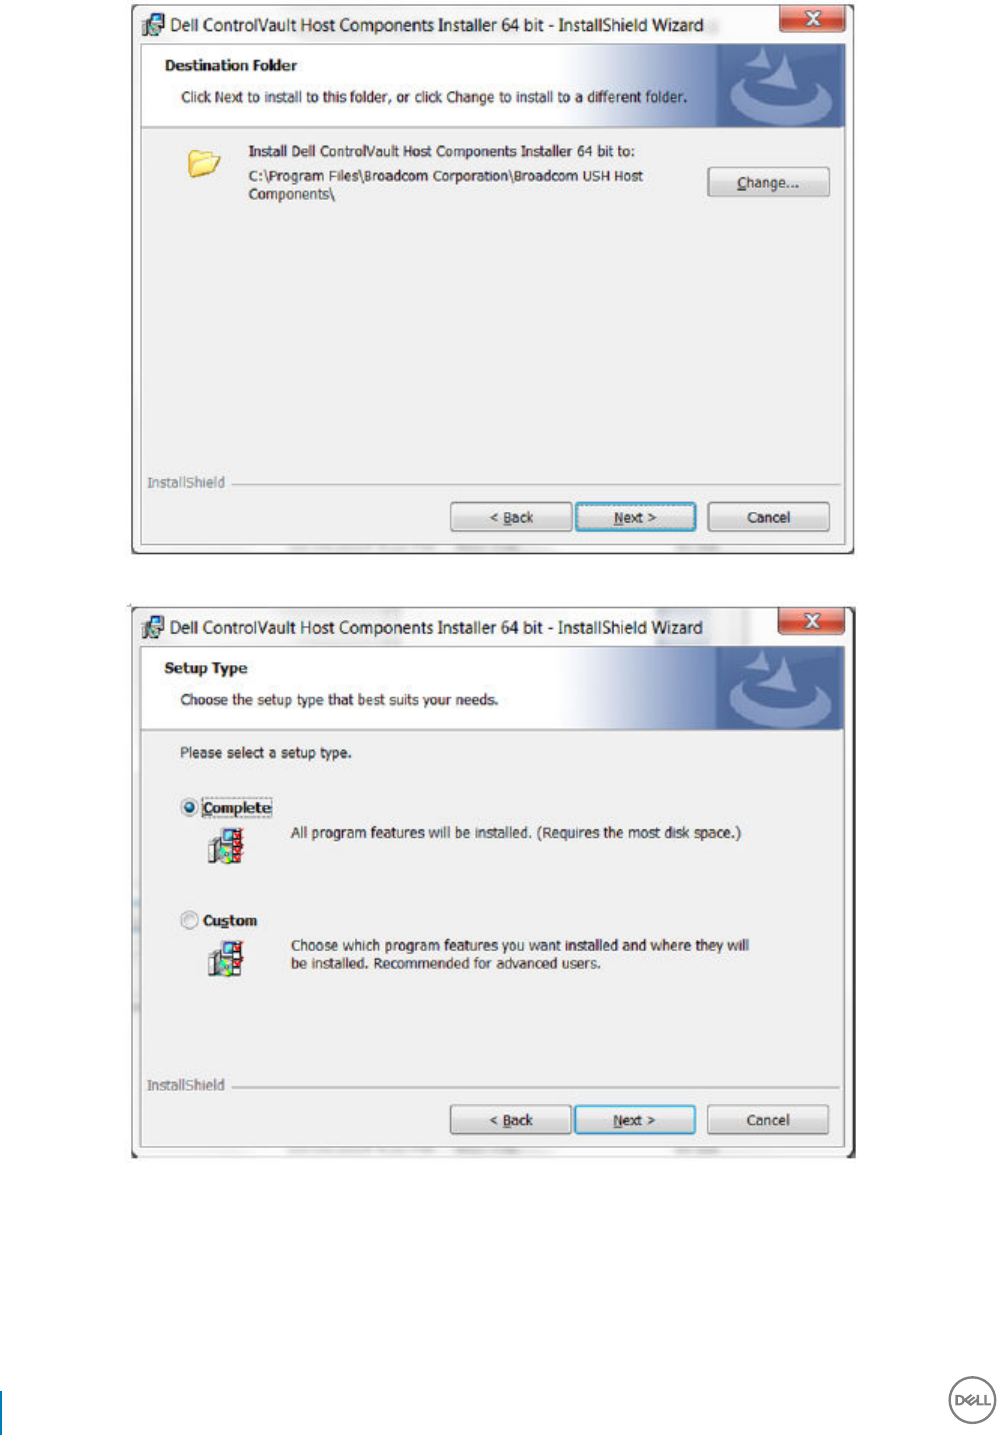
11 Select the Complete option and click Next.
12 Click Install to begin the installation of the drivers.
86 Dell Data Security Endpoint Security Suite Pro
Troubleshooting

13 Optionally check the box to display the installer log le. Click Finish to exit the wizard.
Verify Driver Installation
• The Device Manager will have a Dell ControlVault device (and other devices) depending on the operating system and hardware
conguration.
Install Dell ControlVault Firmware
Dell Data Security Endpoint Security Suite Pro
Troubleshooting
87
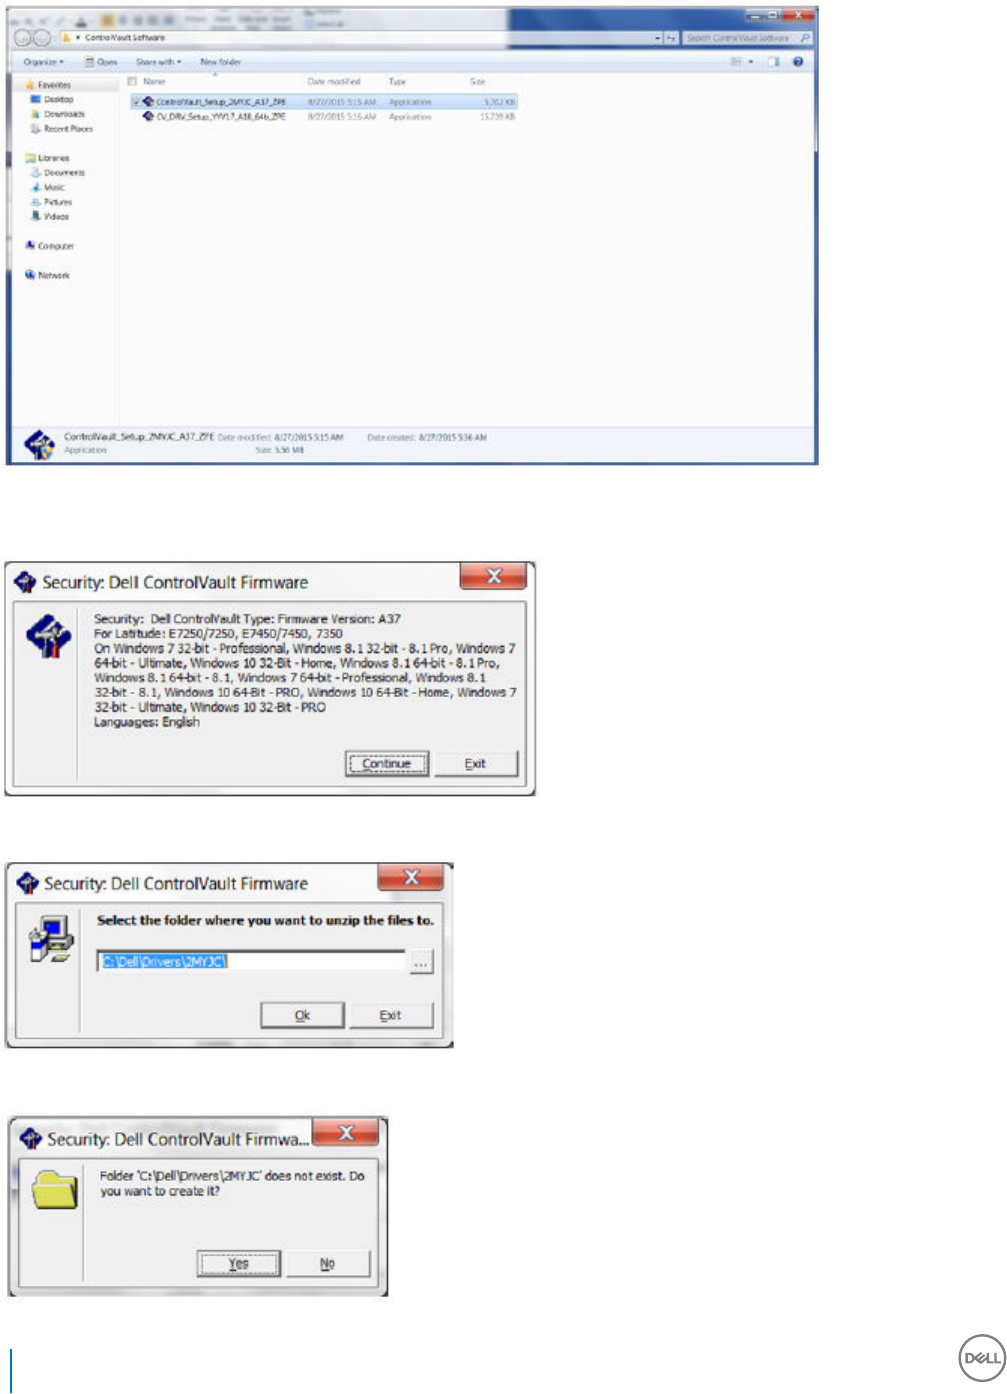
1 Navigate to the folder which you downloaded the rmware installation le.
2 Double-click the Dell ControlVault rmware to launch the self-extracting executable le.
3 Click Continue to begin.
4 Click Ok to unzip the driver les in the default location of C:\Dell\Drivers\<New Folder>.
5 Click Yes to allow the creation of a new folder.
88 Dell Data Security Endpoint Security Suite Pro
Troubleshooting
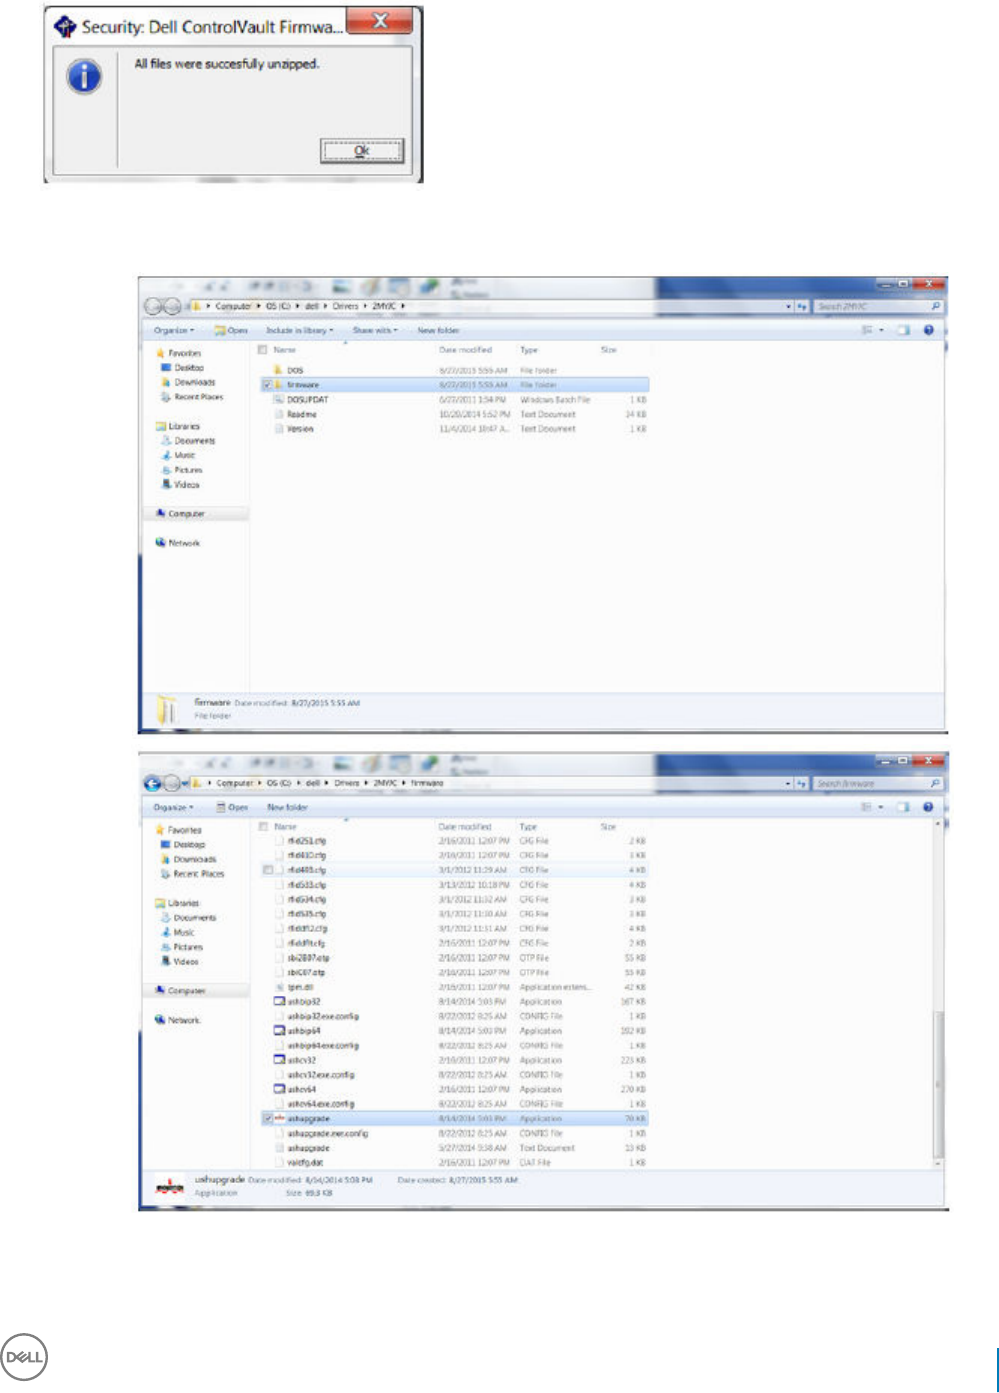
6 Click Ok when the successfully unzipped message displays.
7 The folder which contains the les should display after extraction. If not, navigate to the folder to which you extracted the les. Select
the rmware folder.
8 Double-click ushupgrade.exe to launch the rmware installer.
9 Click Start to begin the rmware upgrade.
Dell Data Security Endpoint Security Suite Pro
Troubleshooting
89
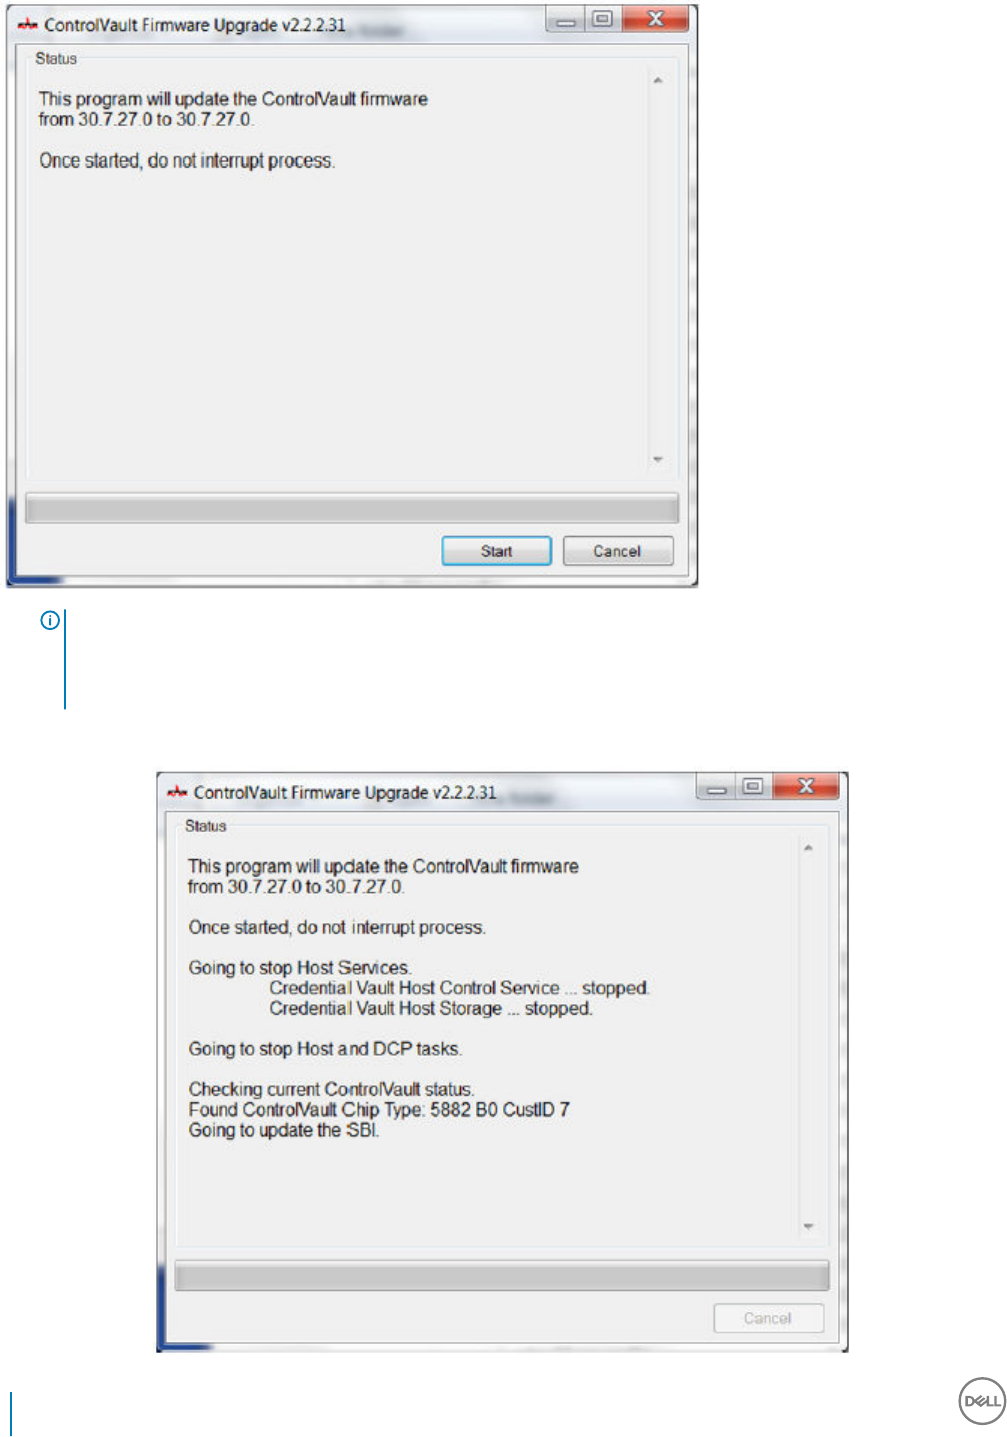
IMPORTANT:
You may be asked to enter the admin password if upgrading from an older version of rmware. Enter Broadcom as the
password and click Enter if presented with this dialog.
Several status messages display.
90 Dell Data Security Endpoint Security Suite Pro
Troubleshooting
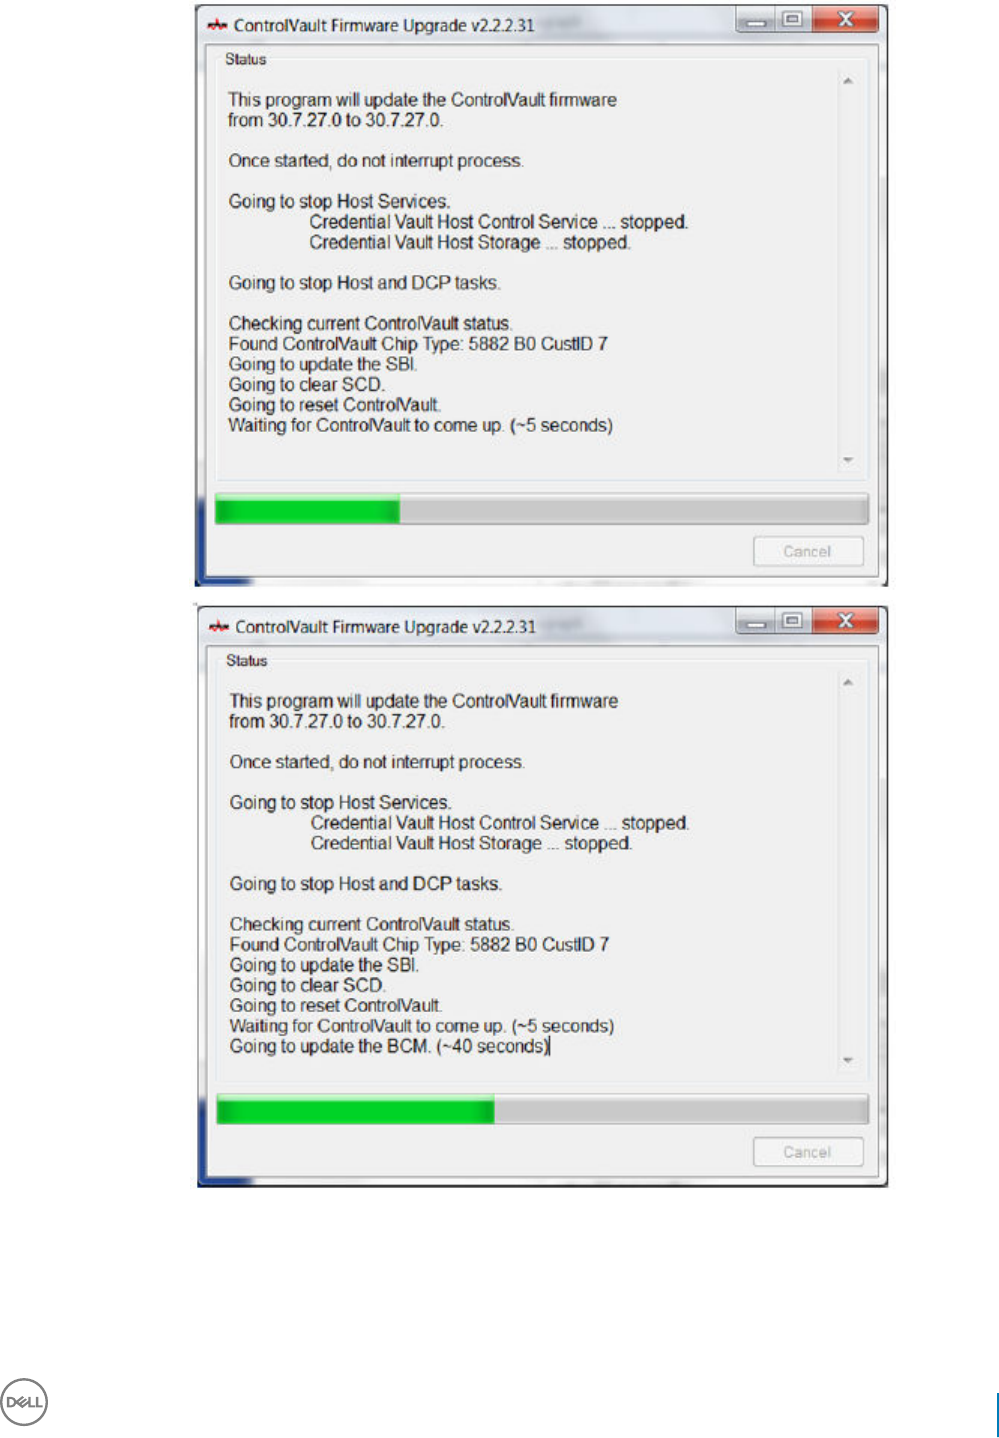
Dell Data Security Endpoint Security Suite Pro
Troubleshooting
91
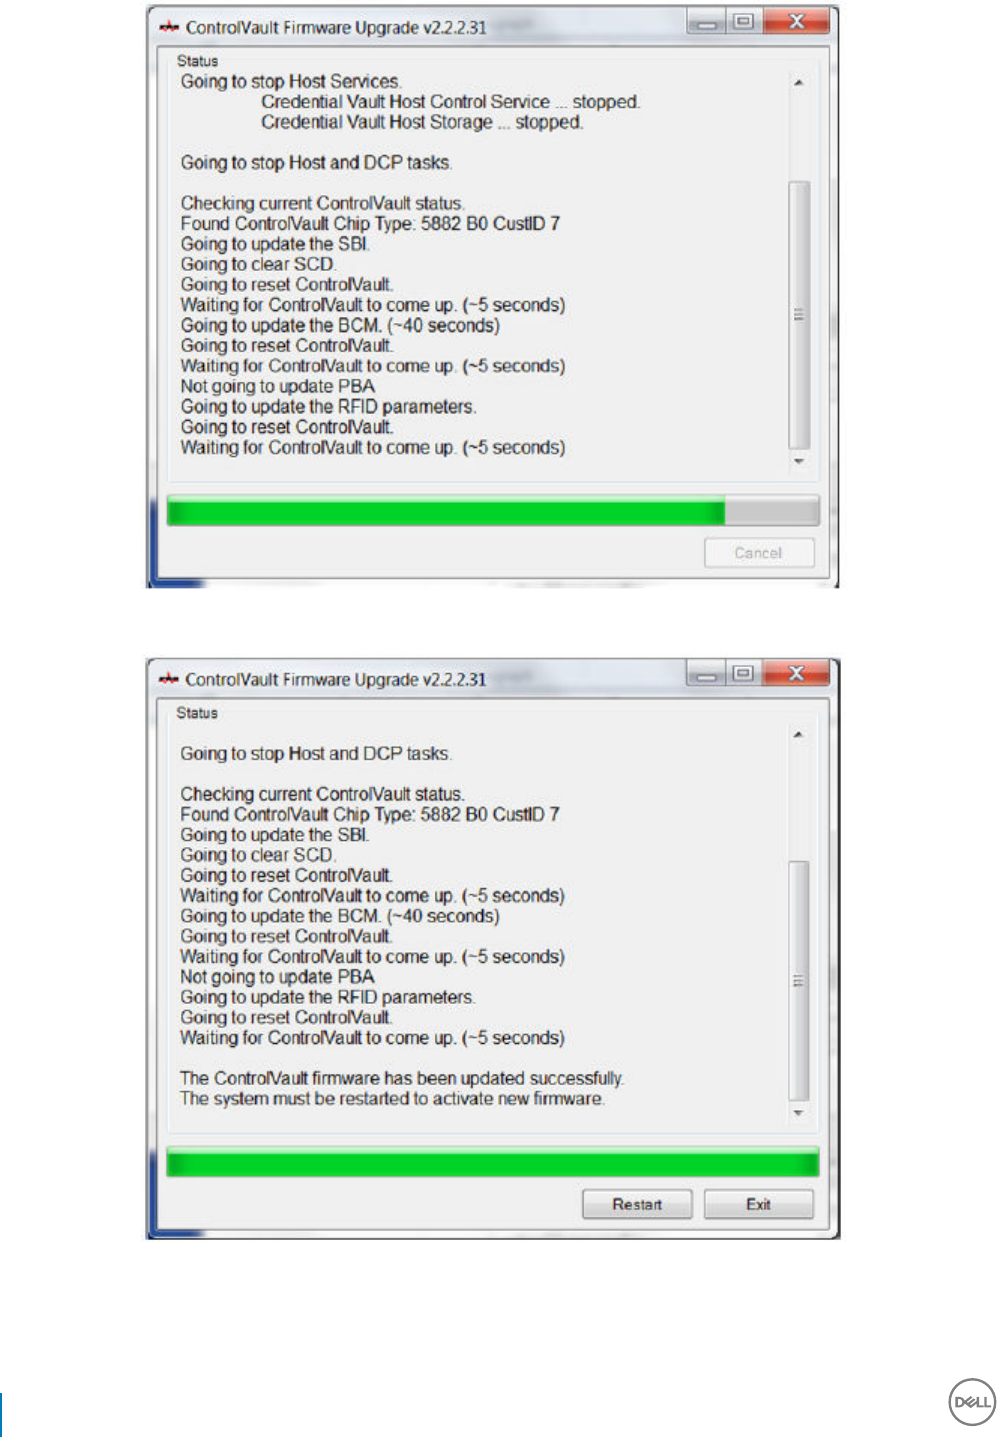
10 Click Restart to complete the rmware upgrade.
The update of the Dell ControlVault drivers and rmware is complete.
92 Dell Data Security Endpoint Security Suite Pro
Troubleshooting

UEFI Computers
Troubleshoot Network Connection
• In order for preboot authentication to succeed on a computer with UEFI rmware, the PBA mode must have network connectivity. By
default, computers with UEFI rmware do not have network connectivity until the operating system is loaded, which occurs after PBA
mode. If the computer procedure outlined in Pre-Installation Conguration for UEFI Computers is successful and is congured properly,
the network connection icon displays on the preboot authentication screen when the computer is connected to the network.
• Check the network cable to ensure it is connected to the computer if the network connection icon still does not display during preboot
authentication. Restart the computer to restart PBA mode if it was not connected or was loose.
TPM and BitLocker
TPM and BitLocker Error Codes
Constant/Value Description
TPM_E_ERROR_MASK
0x80280000
This is an error mask to convert TPM hardware errors to win errors.
TPM_E_AUTHFAIL
0x80280001
Authentication failed.
TPM_E_BADINDEX
0x80280002
The index to a PCR, DIR or other register is incorrect.
TPM_E_BAD_PARAMETER
0x80280003
One or more parameters is bad.
TPM_E_AUDITFAILURE
0x80280004
An operation completed successfully but the auditing of that
operation failed.
TPM_E_CLEAR_DISABLED
0x80280005
The clear disable ag is set and all clear operations now require
physical access.
TPM_E_DEACTIVATED
0x80280006
Activate the TPM.
TPM_E_DISABLED
0x80280007
Enable the TPM.
TPM_E_DISABLED_CMD The target command has been disabled.
Dell Data Security Endpoint Security Suite Pro
Troubleshooting
93

Constant/Value Description
0x80280008
TPM_E_FAIL
0x80280009
The operation failed.
TPM_E_BAD_ORDINAL
0x8028000A
The ordinal was unknown or inconsistent.
TPM_E_INSTALL_DISABLED
0x8028000B
The ability to install an owner is disabled.
TPM_E_INVALID_KEYHANDLE
0x8028000C
The key handle cannot be interpreted.
TPM_E_KEYNOTFOUND
0x8028000D
The key handle points to an invalid key.
TPM_E_INAPPROPRIATE_ENC
0x8028000E
Unacceptable encryption scheme.
TPM_E_MIGRATEFAIL
0x8028000F
Migration authorization failed.
TPM_E_INVALID_PCR_INFO
0x80280010
PCR information could not be interpreted.
TPM_E_NOSPACE
0x80280011
No room to load key.
TPM_E_NOSRK
0x80280012
There is no Storage Root Key (SRK) set.
TPM_E_NOTSEALED_BLOB
0x80280013
An encrypted blob is invalid or was not created by this TPM.
TPM_E_OWNER_SET
0x80280014
The TPM already has an owner.
TPM_E_RESOURCES
0x80280015
The TPM has insucient internal resources to perform the
requested action.
TPM_E_SHORTRANDOM
0x80280016
A random string was too short.
TPM_E_SIZE The TPM does not have the space to perform the operation.
94 Dell Data Security Endpoint Security Suite Pro
Troubleshooting

Constant/Value Description
0x80280017
TPM_E_WRONGPCRVAL
0x80280018
The named PCR value does not match the current PCR value.
TPM_E_BAD_PARAM_SIZE
0x80280019
The paramSize argument to the command has the incorrect value
TPM_E_SHA_THREAD
0x8028001A
There is no existing SHA-1 thread.
TPM_E_SHA_ERROR
0x8028001B
The calculation is unable to proceed because the existing SHA-1
thread has already encountered an error.
TPM_E_FAILEDSELFTEST
0x8028001C
The TPM hardware device reported a failure during its internal self
test. Try restarting the computer to resolve the problem. If the
problem continues, you might need to replace your TPM hardware
or motherboard.
TPM_E_AUTH2FAIL
0x8028001D
The authorization for the second key in a 2 key function failed
authorization.
TPM_E_BADTAG
0x8028001E
The tag value sent to for a command is invalid.
TPM_E_IOERROR
0x8028001F
An IO error occurred transmitting information to the TPM.
TPM_E_ENCRYPT_ERROR
0x80280020
The encryption process had a problem.
TPM_E_DECRYPT_ERROR
0x80280021
The decryption process did not complete.
TPM_E_INVALID_AUTHHANDLE
0x80280022
An invalid handle was used.
TPM_E_NO_ENDORSEMENT
0x80280023
The TPM does not have an Endorsement Key (EK) installed.
TPM_E_INVALID_KEYUSAGE
0x80280024
The usage of a key is not allowed.
TPM_E_WRONG_ENTITYTYPE
0x80280025
The submitted entity type is not allowed.
Dell Data Security Endpoint Security Suite Pro
Troubleshooting
95

Constant/Value Description
TPM_E_INVALID_POSTINIT
0x80280026
The command was received in the wrong sequence relative to
TPM_Init and a subsequent TPM_Startup.
TPM_E_INAPPROPRIATE_SIG
0x80280027
Signed data cannot include additional DER information.
TPM_E_BAD_KEY_PROPERTY
0x80280028
The key properties in TPM_KEY_PARMs are not supported by this
TPM.
TPM_E_BAD_MIGRATION
0x80280029
The migration properties of this key are incorrect.
TPM_E_BAD_SCHEME
0x8028002A
The signature or encryption scheme for this key is incorrect or not
permitted in this situation.
TPM_E_BAD_DATASIZE
0x8028002B
The size of the data (or blob) parameter is bad or inconsistent with
the referenced key.
TPM_E_BAD_MODE
0x8028002C
A mode parameter is bad, such as capArea or subCapArea for
TPM_GetCapability, phsicalPresence parameter for
TPM_PhysicalPresence, or migrationType for
TPM_CreateMigrationBlob.
TPM_E_BAD_PRESENCE
0x8028002D
Either the physicalPresence or physicalPresenceLock bits have the
wrong value.
TPM_E_BAD_VERSION
0x8028002E
The TPM cannot perform this version of the capability.
TPM_E_NO_WRAP_TRANSPORT
0x8028002F
The TPM does not allow for wrapped transport sessions.
TPM_E_AUDITFAIL_UNSUCCESSFUL
0x80280030
TPM audit construction failed and the underlying command was
returning a failure code also.
TPM_E_AUDITFAIL_SUCCESSFUL
0x80280031
TPM audit construction failed and the underlying command was
returning success.
TPM_E_NOTRESETABLE
0x80280032
Attempt to reset a PCR register that does not have the resettable
attribute.
TPM_E_NOTLOCAL
0x80280033
Attempt to reset a PCR register that requires locality and locality
modier not part of command transport.
TPM_E_BAD_TYPE
0x80280034
Make identity blob not properly typed.
96 Dell Data Security Endpoint Security Suite Pro
Troubleshooting

Constant/Value Description
TPM_E_INVALID_RESOURCE
0x80280035
When saving context identied resource type does not match
actual resource.
TPM_E_NOTFIPS
0x80280036
The TPM is attempting to execute a command only available when
in FIPS mode.
TPM_E_INVALID_FAMILY
0x80280037
The command is attempting to use an invalid family ID.
TPM_E_NO_NV_PERMISSION
0x80280038
The permission to manipulate the NV storage is not available.
TPM_E_REQUIRES_SIGN
0x80280039
The operation requires a signed command.
TPM_E_KEY_NOTSUPPORTED
0x8028003A
Wrong operation to load an NV key.
TPM_E_AUTH_CONFLICT
0x8028003B
NV_LoadKey blob requires both owner and blob authorization.
TPM_E_AREA_LOCKED
0x8028003C
The NV area is locked and not writtable.
TPM_E_BAD_LOCALITY
0x8028003D
The locality is incorrect for the attempted operation.
TPM_E_READ_ONLY
0x8028003E
The NV area is read only and cannot be written to.
TPM_E_PER_NOWRITE
0x8028003F
There is no protection on the write to the NV area.
TPM_E_FAMILYCOUNT
0x80280040
The family count value does not match.
TPM_E_WRITE_LOCKED
0x80280041
The NV area has already been written to.
TPM_E_BAD_ATTRIBUTES
0x80280042
The NV area attributes conict.
TPM_E_INVALID_STRUCTURE
0x80280043
The structure tag and version are invalid or inconsistent.
Dell Data Security Endpoint Security Suite Pro
Troubleshooting
97

Constant/Value Description
TPM_E_KEY_OWNER_CONTROL
0x80280044
The key is under control of the TPM Owner and can only be evicted
by the TPM Owner.
TPM_E_BAD_COUNTER
0x80280045
The counter handle is incorrect.
TPM_E_NOT_FULLWRITE
0x80280046
The write is not a complete write of the area.
TPM_E_CONTEXT_GAP
0x80280047
The gap between saved context counts is too large.
TPM_E_MAXNVWRITES
0x80280048
The maximum number of NV writes without an owner has been
exceeded.
TPM_E_NOOPERATOR
0x80280049
No operator AuthData value is set.
TPM_E_RESOURCEMISSING
0x8028004A
The resource pointed to by context is not loaded.
TPM_E_DELEGATE_LOCK
0x8028004B
The delegate administration is locked.
TPM_E_DELEGATE_FAMILY
0x8028004C
Attempt to manage a family other than the delegated family.
TPM_E_DELEGATE_ADMIN
0x8028004D
Delegation table management not enabled.
TPM_E_TRANSPORT_NOTEXCLUSIVE
0x8028004E
There was a command executed outside of an exclusive transport
session.
TPM_E_OWNER_CONTROL
0x8028004F
Attempt to context save a owner evict controlled key.
TPM_E_DAA_RESOURCES
0x80280050
The DAA command has no resources available to execute the
command.
TPM_E_DAA_INPUT_DATA0
0x80280051
The consistency check on DAA parameter inputData0 has failed.
TPM_E_DAA_INPUT_DATA1
0x80280052
The consistency check on DAA parameter inputData1 has failed.
98 Dell Data Security Endpoint Security Suite Pro
Troubleshooting

Constant/Value Description
TPM_E_DAA_ISSUER_SETTINGS
0x80280053
The consistency check on DAA_issuerSettings has failed.
TPM_E_DAA_TPM_SETTINGS
0x80280054
The consistency check on DAA_tpmSpecic has failed.
TPM_E_DAA_STAGE
0x80280055
The atomic process indicated by the submitted DAA command is
not the expected process.
TPM_E_DAA_ISSUER_VALIDITY
0x80280056
The issuer's validity check has detected an inconsistency.
TPM_E_DAA_WRONG_W
0x80280057
The consistency check on w has failed.
TPM_E_BAD_HANDLE
0x80280058
The handle is incorrect.
TPM_E_BAD_DELEGATE
0x80280059
Delegation is not correct.
TPM_E_BADCONTEXT
0x8028005A
The context blob is invalid.
TPM_E_TOOMANYCONTEXTS
0x8028005B
Too many contexts held by the TPM.
TPM_E_MA_TICKET_SIGNATURE
0x8028005C
Migration authority signature validation failure.
TPM_E_MA_DESTINATION
0x8028005D
Migration destination not authenticated.
TPM_E_MA_SOURCE
0x8028005E
Migration source incorrect.
TPM_E_MA_AUTHORITY
0x8028005F
Incorrect migration authority.
TPM_E_PERMANENTEK
0x80280061
Attempt to revoke the EK and the EK is not revocable.
TPM_E_BAD_SIGNATURE
0x80280062
Bad signature of CMK ticket.
Dell Data Security Endpoint Security Suite Pro
Troubleshooting
99

Constant/Value Description
TPM_E_NOCONTEXTSPACE
0x80280063
There is no room in the context list for additional contexts.
TPM_E_COMMAND_BLOCKED
0x80280400
The command was blocked.
TPM_E_INVALID_HANDLE
0x80280401
The specied handle was not found.
TPM_E_DUPLICATE_VHANDLE
0x80280402
The TPM returned a duplicate handle and the command needs to
be resubmitted.
TPM_E_EMBEDDED_COMMAND_BLOCKED
0x80280403
The command within the transport was blocked.
TPM_E_EMBEDDED_COMMAND_UNSUPPORTED
0x80280404
The command within the transport is not supported.
TPM_E_RETRY
0x80280800
The TPM is too busy to respond to the command immediately, but
the command could be resubmitted at a later time.
TPM_E_NEEDS_SELFTEST
0x80280801
SelfTestFull has not been run.
TPM_E_DOING_SELFTEST
0x80280802
The TPM is currently executing a full self test.
TPM_E_DEFEND_LOCK_RUNNING
0x80280803
The TPM is defending against dictionary attacks and is in a time-out
period.
TBS_E_INTERNAL_ERROR
0x80284001
An internal software error has been detected.
TBS_E_BAD_PARAMETER
0x80284002
One or more input parameters is bad.
TBS_E_INVALID_OUTPUT_POINTER
0x80284003
A specied output pointer is bad.
TBS_E_INVALID_CONTEXT
0x80284004
The specied context handle does not refer to a valid context.
TBS_E_INSUFFICIENT_BUFFER
0x80284005
A specied output buer is too small.
100 Dell Data Security Endpoint Security Suite Pro
Troubleshooting

Constant/Value Description
TBS_E_IOERROR
0x80284006
An error occurred while communicating with the TPM.
TBS_E_INVALID_CONTEXT_PARAM
0x80284007
One or more context parameters is invalid.
TBS_E_SERVICE_NOT_RUNNING
0x80284008
The TBS service is not running and could not be started.
TBS_E_TOO_MANY_TBS_CONTEXTS
0x80284009
A new context could not be created because there are too many
open contexts.
TBS_E_TOO_MANY_RESOURCES
0x8028400A
A new virtual resource could not be created because there are too
many open virtual resources.
TBS_E_SERVICE_START_PENDING
0x8028400B
The TBS service has been started but is not yet running.
TBS_E_PPI_NOT_SUPPORTED
0x8028400C
The physical presence interface is not supported.
TBS_E_COMMAND_CANCELED
0x8028400D
The command was canceled.
TBS_E_BUFFER_TOO_LARGE
0x8028400E
The input or output buer is too large.
TBS_E_TPM_NOT_FOUND
0x8028400F
A compatible TPM Security Device cannot be found on this
computer.
TBS_E_SERVICE_DISABLED
0x80284010
The TBS service has been disabled.
TBS_E_NO_EVENT_LOG
0x80284011
No TCG event log is available.
TBS_E_ACCESS_DENIED
0x80284012
The caller does not have the appropriate rights to perform the
requested operation.
TBS_E_PROVISIONING_NOT_ALLOWED
0x80284013
The TPM provisioning action is not allowed by the specied ags.
For provisioning to be successful, one of several actions may be
required. The TPM management console (tpm.msc) action to make
the TPM Ready may help. For further information, see the
documentation for the Win32_Tpm WMI method 'Provision'. (The
actions that may be required include importing the TPM Owner
Authorization value into the system, calling the Win32_Tpm WMI
method for provisioning the TPM and specifying TRUE for either
'ForceClear_Allowed' or 'PhysicalPresencePrompts_Allowed' (as
Dell Data Security Endpoint Security Suite Pro
Troubleshooting
101

Constant/Value Description
indicated by the value returned in the Additional Information), or
enabling the TPM in the system BIOS.)
TBS_E_PPI_FUNCTION_UNSUPPORTED
0x80284014
The Physical Presence Interface of this rmware does not support
the requested method.
TBS_E_OWNERAUTH_NOT_FOUND
0x80284015
The requested TPM OwnerAuth value was not found.
TBS_E_PROVISIONING_INCOMPLETE
0x80284016
The TPM provisioning did not complete. For more information on
completing the provisioning, call the Win32_Tpm WMI method for
provisioning the TPM ('Provision') and check the returned
Information.
TPMAPI_E_INVALID_STATE
0x80290100
The command buer is not in the correct state.
TPMAPI_E_NOT_ENOUGH_DATA
0x80290101
The command buer does not contain enough data to satisfy the
request.
TPMAPI_E_TOO_MUCH_DATA
0x80290102
The command buer cannot contain any more data.
TPMAPI_E_INVALID_OUTPUT_POINTER
0x80290103
One or more output parameters was NULL or invalid.
TPMAPI_E_INVALID_PARAMETER
0x80290104
One or more input parameters is invalid.
TPMAPI_E_OUT_OF_MEMORY
0x80290105
Not enough memory was available to satisfy the request.
TPMAPI_E_BUFFER_TOO_SMALL
0x80290106
The specied buer was too small.
TPMAPI_E_INTERNAL_ERROR
0x80290107
An internal error was detected.
TPMAPI_E_ACCESS_DENIED
0x80290108
The caller does not have the appropriate rights to perform the
requested operation.
TPMAPI_E_AUTHORIZATION_FAILED
0x80290109
The specied authorization information was invalid.
TPMAPI_E_INVALID_CONTEXT_HANDLE
0x8029010A
The specied context handle was not valid.
102 Dell Data Security Endpoint Security Suite Pro
Troubleshooting

Constant/Value Description
TPMAPI_E_TBS_COMMUNICATION_ERROR
0x8029010B
An error occurred while communicating with the TBS.
TPMAPI_E_TPM_COMMAND_ERROR
0x8029010C
The TPM returned an unexpected result.
TPMAPI_E_MESSAGE_TOO_LARGE
0x8029010D
The message was too large for the encoding scheme.
TPMAPI_E_INVALID_ENCODING
0x8029010E
The encoding in the blob was not recognized.
TPMAPI_E_INVALID_KEY_SIZE
0x8029010F
The key size is not valid.
TPMAPI_E_ENCRYPTION_FAILED
0x80290110
The encryption operation failed.
TPMAPI_E_INVALID_KEY_PARAMS
0x80290111
The key parameters structure was not valid
TPMAPI_E_INVALID_MIGRATION_AUTHORIZATION_BLOB
0x80290112
The requested supplied data does not appear to be a valid migration
authorization blob.
TPMAPI_E_INVALID_PCR_INDEX
0x80290113
The specied PCR index was invalid
TPMAPI_E_INVALID_DELEGATE_BLOB
0x80290114
The data given does not appear to be a valid delegate blob.
TPMAPI_E_INVALID_CONTEXT_PARAMS
0x80290115
One or more of the specied context parameters was not valid.
TPMAPI_E_INVALID_KEY_BLOB
0x80290116
The data given does not appear to be a valid key blob
TPMAPI_E_INVALID_PCR_DATA
0x80290117
The specied PCR data was invalid.
TPMAPI_E_INVALID_OWNER_AUTH
0x80290118
The format of the owner auth data was invalid.
TPMAPI_E_FIPS_RNG_CHECK_FAILED
0x80290119
The random number generated did not pass FIPS RNG check.
Dell Data Security Endpoint Security Suite Pro
Troubleshooting
103

Constant/Value Description
TPMAPI_E_EMPTY_TCG_LOG
0x8029011A
The TCG Event Log does not contain any data.
TPMAPI_E_INVALID_TCG_LOG_ENTRY
0x8029011B
An entry in the TCG Event Log was invalid.
TPMAPI_E_TCG_SEPARATOR_ABSENT
0x8029011C
A TCG Separator was not found.
TPMAPI_E_TCG_INVALID_DIGEST_ENTRY
0x8029011D
A digest value in a TCG Log entry did not match hashed data.
TPMAPI_E_POLICY_DENIES_OPERATION
0x8029011E
The requested operation was blocked by current TPM policy. Please
contact your system administrator for assistance.
TBSIMP_E_BUFFER_TOO_SMALL
0x80290200
The specied buer was too small.
TBSIMP_E_CLEANUP_FAILED
0x80290201
The context could not be cleaned up.
TBSIMP_E_INVALID_CONTEXT_HANDLE
0x80290202
The specied context handle is invalid.
TBSIMP_E_INVALID_CONTEXT_PARAM
0x80290203
An invalid context parameter was specied.
TBSIMP_E_TPM_ERROR
0x80290204
An error occurred while communicating with the TPM
TBSIMP_E_HASH_BAD_KEY
0x80290205
No entry with the specied key was found.
TBSIMP_E_DUPLICATE_VHANDLE
0x80290206
The specied virtual handle matches a virtual handle already in use.
TBSIMP_E_INVALID_OUTPUT_POINTER
0x80290207
The pointer to the returned handle location was NULL or invalid
TBSIMP_E_INVALID_PARAMETER
0x80290208
One or more parameters is invalid
TBSIMP_E_RPC_INIT_FAILED
0x80290209
The RPC subsystem could not be initialized.
104 Dell Data Security Endpoint Security Suite Pro
Troubleshooting

Constant/Value Description
TBSIMP_E_SCHEDULER_NOT_RUNNING
0x8029020A
The TBS scheduler is not running.
TBSIMP_E_COMMAND_CANCELED
0x8029020B
The command was canceled.
TBSIMP_E_OUT_OF_MEMORY
0x8029020C
There was not enough memory to fulll the request
TBSIMP_E_LIST_NO_MORE_ITEMS
0x8029020D
The specied list is empty, or the iteration has reached the end of
the list.
TBSIMP_E_LIST_NOT_FOUND
0x8029020E
The specied item was not found in the list.
TBSIMP_E_NOT_ENOUGH_SPACE
0x8029020F
The TPM does not have enough space to load the requested
resource.
TBSIMP_E_NOT_ENOUGH_TPM_CONTEXTS
0x80290210
There are too many TPM contexts in use.
TBSIMP_E_COMMAND_FAILED
0x80290211
The TPM command failed.
TBSIMP_E_UNKNOWN_ORDINAL
0x80290212
The TBS does not recognize the specied ordinal.
TBSIMP_E_RESOURCE_EXPIRED
0x80290213
The requested resource is no longer available.
TBSIMP_E_INVALID_RESOURCE
0x80290214
The resource type did not match.
TBSIMP_E_NOTHING_TO_UNLOAD
0x80290215
No resources can be unloaded.
TBSIMP_E_HASH_TABLE_FULL
0x80290216
No new entries can be added to the hash table.
TBSIMP_E_TOO_MANY_TBS_CONTEXTS
0x80290217
A new TBS context could not be created because there are too
many open contexts.
TBSIMP_E_TOO_MANY_RESOURCES
0x80290218
A new virtual resource could not be created because there are too
many open virtual resources.
Dell Data Security Endpoint Security Suite Pro
Troubleshooting
105

Constant/Value Description
TBSIMP_E_PPI_NOT_SUPPORTED
0x80290219
The physical presence interface is not supported.
TBSIMP_E_TPM_INCOMPATIBLE
0x8029021A
TBS is not compatible with the version of TPM found on the
system.
TBSIMP_E_NO_EVENT_LOG
0x8029021B
No TCG event log is available.
TPM_E_PPI_ACPI_FAILURE
0x80290300
A general error was detected when attempting to acquire the
BIOS's response to a Physical Presence command.
TPM_E_PPI_USER_ABORT
0x80290301
The user failed to conrm the TPM operation request.
TPM_E_PPI_BIOS_FAILURE
0x80290302
The BIOS failure prevented the successful execution of the
requested TPM operation (e.g. invalid TPM operation request, BIOS
communication error with the TPM).
TPM_E_PPI_NOT_SUPPORTED
0x80290303
The BIOS does not support the physical presence interface.
TPM_E_PPI_BLOCKED_IN_BIOS
0x80290304
The Physical Presence command was blocked by current BIOS
settings. The system owner may be able to recongure the BIOS
settings to allow the command.
TPM_E_PCP_ERROR_MASK
0x80290400
This is an error mask to convert Platform Crypto Provider errors to
win errors.
TPM_E_PCP_DEVICE_NOT_READY
0x80290401
The Platform Crypto Device is currently not ready. It needs to be
fully provisioned to be operational.
TPM_E_PCP_INVALID_HANDLE
0x80290402
The handle provided to the Platform Crypto Provider is invalid.
TPM_E_PCP_INVALID_PARAMETER
0x80290403
A parameter provided to the Platform Crypto Provider is invalid.
TPM_E_PCP_FLAG_NOT_SUPPORTED
0x80290404
A provided ag to the Platform Crypto Provider is not supported.
TPM_E_PCP_NOT_SUPPORTED
0x80290405
The requested operation is not supported by this Platform Crypto
Provider.
TPM_E_PCP_BUFFER_TOO_SMALL
0x80290406
The buer is too small to contain all data. No information has been
written to the buer.
106 Dell Data Security Endpoint Security Suite Pro
Troubleshooting

Constant/Value Description
TPM_E_PCP_INTERNAL_ERROR
0x80290407
An unexpected internal error has occurred in the Platform Crypto
Provider.
TPM_E_PCP_AUTHENTICATION_FAILED
0x80290408
The authorization to use a provider object has failed.
TPM_E_PCP_AUTHENTICATION_IGNORED
0x80290409
The Platform Crypto Device has ignored the authorization for the
provider object, to mitigate against a dictionary attack.
TPM_E_PCP_POLICY_NOT_FOUND
0x8029040A
The referenced policy was not found.
TPM_E_PCP_PROFILE_NOT_FOUND
0x8029040B
The referenced prole was not found.
TPM_E_PCP_VALIDATION_FAILED
0x8029040C
The validation was not successful.
PLA_E_DCS_NOT_FOUND
0x80300002
Data Collector Set was not found.
PLA_E_DCS_IN_USE
0x803000AA
The Data Collector Set or one of its dependencies is already in use.
PLA_E_TOO_MANY_FOLDERS
0x80300045
Unable to start Data Collector Set because there are too many
folders.
PLA_E_NO_MIN_DISK
0x80300070
Not enough free disk space to start Data Collector Set.
PLA_E_DCS_ALREADY_EXISTS
0x803000B7
Data Collector Set already exists.
PLA_S_PROPERTY_IGNORED
0x00300100
Property value will be ignored.
PLA_E_PROPERTY_CONFLICT
0x80300101
Property value conict.
PLA_E_DCS_SINGLETON_REQUIRED
0x80300102
The current conguration for this Data Collector Set requires that it
contain exactly one Data Collector.
PLA_E_CREDENTIALS_REQUIRED
0x80300103
A user account is required in order to commit the current Data
Collector Set properties.
Dell Data Security Endpoint Security Suite Pro
Troubleshooting
107

Constant/Value Description
PLA_E_DCS_NOT_RUNNING
0x80300104
Data Collector Set is not running.
PLA_E_CONFLICT_INCL_EXCL_API
0x80300105
A conict was detected in the list of include/exclude APIs. Do not
specify the same API in both the include list and the exclude list.
PLA_E_NETWORK_EXE_NOT_VALID
0x80300106
The executable path you have specied refers to a network share or
UNC path.
PLA_E_EXE_ALREADY_CONFIGURED
0x80300107
The executable path you have specied is already congured for
API tracing.
PLA_E_EXE_PATH_NOT_VALID
0x80300108
The executable path you have specied does not exist. Verify that
the specied path is correct.
PLA_E_DC_ALREADY_EXISTS
0x80300109
Data Collector already exists.
PLA_E_DCS_START_WAIT_TIMEOUT
0x8030010A
The wait for the Data Collector Set start notication has timed out.
PLA_E_DC_START_WAIT_TIMEOUT
0x8030010B
The wait for the Data Collector to start has timed out.
PLA_E_REPORT_WAIT_TIMEOUT
0x8030010C
The wait for the report generation tool to nish has timed out.
PLA_E_NO_DUPLICATES
0x8030010D
Duplicate items are not allowed.
PLA_E_EXE_FULL_PATH_REQUIRED
0x8030010E
When specifying the executable that you want to trace, you must
specify a full path to the executable and not just a lename.
PLA_E_INVALID_SESSION_NAME
0x8030010F
The session name provided is invalid.
PLA_E_PLA_CHANNEL_NOT_ENABLED
0x80300110
The Event Log channel Microsoft-Windows-Diagnosis-PLA/
Operational must be enabled to perform this operation.
PLA_E_TASKSCHED_CHANNEL_NOT_ENABLED
0x80300111
The Event Log channel Microsoft-Windows-TaskScheduler must be
enabled to perform this operation.
PLA_E_RULES_MANAGER_FAILED
0x80300112
The execution of the Rules Manager failed.
108 Dell Data Security Endpoint Security Suite Pro
Troubleshooting

Constant/Value Description
PLA_E_CABAPI_FAILURE
0x80300113
An error occurred while attempting to compress or extract the data.
FVE_E_LOCKED_VOLUME
0x80310000
This drive is locked by BitLocker Drive Encryption. You must unlock
this drive from Control Panel.
FVE_E_NOT_ENCRYPTED
0x80310001
The drive is not encrypted.
FVE_E_NO_TPM_BIOS
0x80310002
The BIOS did not correctly communicate with the TPM. Contact
the computer manufacturer for BIOS upgrade instructions.
FVE_E_NO_MBR_METRIC
0x80310003
The BIOS did not correctly communicate with the master boot
record (MBR). Contact the computer manufacturer for BIOS
upgrade instructions.
FVE_E_NO_BOOTSECTOR_METRIC
0x80310004
A required TPM measurement is missing. If there is a bootable CD
or DVD in your computer, remove it, restart the computer, and turn
on BitLocker again. If the problem persists, ensure the master boot
record is up to date.
FVE_E_NO_BOOTMGR_METRIC
0x80310005
The boot sector of this drive is not compatible with BitLocker Drive
Encryption. Use the Bootrec.exe tool in the Windows Recovery
Environment to update or repair the boot manager (BOOTMGR).
FVE_E_WRONG_BOOTMGR
0x80310006
The boot manager of this operating system is not compatible with
BitLocker Drive Encryption. Use the Bootrec.exe tool in the
Windows Recovery Environment to update or repair the boot
manager (BOOTMGR).
FVE_E_SECURE_KEY_REQUIRED
0x80310007
At least one secure key protector is required for this operation to be
performed.
FVE_E_NOT_ACTIVATED
0x80310008
BitLocker Drive Encryption is not enabled on this drive. Turn on
BitLocker.
FVE_E_ACTION_NOT_ALLOWED
0x80310009
BitLocker Drive Encryption cannot perform requested action. This
condition may occur when two requests are issued at the same
time. Wait a few moments and then try the action again.
FVE_E_AD_SCHEMA_NOT_INSTALLED
0x8031000A
The Active Directory Domain Services forest does not contain the
required attributes and classes to host BitLocker Drive Encryption
or TPM information. Contact your domain administrator to verify
that any required BitLocker Active Directory schema extensions
have been installed.
FVE_E_AD_INVALID_DATATYPE
0x8031000B
The type of the data obtained from Active Directory was not
expected. The BitLocker recovery information may be missing or
corrupted.
FVE_E_AD_INVALID_DATASIZE
0x8031000C
The size of the data obtained from Active Directory was not
expected. The BitLocker recovery information may be missing or
corrupted.
Dell Data Security Endpoint Security Suite Pro
Troubleshooting
109

Constant/Value Description
FVE_E_AD_NO_VALUES
0x8031000D
The attribute read from Active Directory does not contain any
values. The BitLocker recovery information may be missing or
corrupted.
FVE_E_AD_ATTR_NOT_SET
0x8031000E
The attribute was not set. Verify that you are logged on with a
domain account that has the ability to write information to Active
Directory objects.
FVE_E_AD_GUID_NOT_FOUND
0x8031000F
The specied attribute cannot be found in Active Directory Domain
Services. Contact your domain administrator to verify that any
required BitLocker Active Directory schema extensions have been
installed.
FVE_E_BAD_INFORMATION
0x80310010
The BitLocker metadata for the encrypted drive is not valid. You can
attempt to repair the drive to restore access.
FVE_E_TOO_SMALL
0x80310011
The drive cannot be encrypted because it does not have enough
free space. Delete any unnecessary data on the drive to create
additional free space and then try again.
FVE_E_SYSTEM_VOLUME
0x80310012
The drive cannot be encrypted because it contains system boot
information. Create a separate partition for use as the system drive
that contains the boot information and a second partition for use as
the operating system drive and then encrypt the operating system
drive.
FVE_E_FAILED_WRONG_FS
0x80310013
The drive cannot be encrypted because the le system is not
supported.
FVE_E_BAD_PARTITION_SIZE
0x80310014
The le system size is larger than the partition size in the partition
table. This drive may be corrupt or may have been tampered with.
To use it with BitLocker, you must reformat the partition.
FVE_E_NOT_SUPPORTED
0x80310015
This drive cannot be encrypted.
FVE_E_BAD_DATA
0x80310016
The data is not valid.
FVE_E_VOLUME_NOT_BOUND
0x80310017
The data drive specied is not set to automatically unlock on the
current computer and cannot be unlocked automatically.
FVE_E_TPM_NOT_OWNED
0x80310018
You must initialize the TPM before you can use BitLocker Drive
Encryption.
FVE_E_NOT_DATA_VOLUME
0x80310019
The operation attempted cannot be performed on an operating
system drive.
FVE_E_AD_INSUFFICIENT_BUFFER
0x8031001A
The buer supplied to a function was insucient to contain the
returned data. Increase the buer size before running the function
again.
FVE_E_CONV_READ A read operation failed while converting the drive. The drive was
not converted. Please re-enable BitLocker.
110 Dell Data Security Endpoint Security Suite Pro
Troubleshooting

Constant/Value Description
0x8031001B
FVE_E_CONV_WRITE
0x8031001C
A write operation failed while converting the drive. The drive was
not converted. Please re-enable BitLocker.
FVE_E_KEY_REQUIRED
0x8031001D
One or more BitLocker key protectors are required. You cannot
delete the last key on this drive.
FVE_E_CLUSTERING_NOT_SUPPORTED
0x8031001E
Cluster congurations are not supported by BitLocker Drive
Encryption.
FVE_E_VOLUME_BOUND_ALREADY
0x8031001F
The drive specied is already congured to be automatically
unlocked on the current computer.
FVE_E_OS_NOT_PROTECTED
0x80310020
The operating system drive is not protected by BitLocker Drive
Encryption.
FVE_E_PROTECTION_DISABLED
0x80310021
BitLocker Drive Encryption has been suspended on this drive. All
BitLocker key protectors congured for this drive are eectively
disabled, and the drive will be automatically unlocked using an
unencrypted (clear) key.
FVE_E_RECOVERY_KEY_REQUIRED
0x80310022
The drive you are attempting to lock does not have any key
protectors available for encryption because BitLocker protection is
currently suspended. Re-enable BitLocker to lock this drive.
FVE_E_FOREIGN_VOLUME
0x80310023
BitLocker cannot use the TPM to protect a data drive. TPM
protection can only be used with the operating system drive.
FVE_E_OVERLAPPED_UPDATE
0x80310024
The BitLocker metadata for the encrypted drive cannot be updated
because it was locked for updating by another process. Please try
this process again.
FVE_E_TPM_SRK_AUTH_NOT_ZERO
0x80310025
The authorization data for the storage root key (SRK) of the TPM
is not zero and is therefore incompatible with BitLocker. Please
initialize the TPM before attempting to use it with BitLocker.
FVE_E_FAILED_SECTOR_SIZE
0x80310026
The drive encryption algorithm cannot be used on this sector size.
FVE_E_FAILED_AUTHENTICATION
0x80310027
The drive cannot be unlocked with the key provided. Conrm that
you have provided the correct key and try again.
FVE_E_NOT_OS_VOLUME
0x80310028
The drive specied is not the operating system drive.
FVE_E_AUTOUNLOCK_ENABLED
0x80310029
BitLocker Drive Encryption cannot be turned o on the operating
system drive until the auto unlock feature has been disabled for the
xed data drives and removable data drives associated with this
computer.
Dell Data Security Endpoint Security Suite Pro
Troubleshooting
111

Constant/Value Description
FVE_E_WRONG_BOOTSECTOR
0x8031002A
The system partition boot sector does not perform TPM
measurements. Use the Bootrec.exe tool in the Windows Recovery
Environment to update or repair the boot sector.
FVE_E_WRONG_SYSTEM_FS
0x8031002B
BitLocker Drive Encryption operating system drives must be
formatted with the NTFS le system in order to be encrypted.
Convert the drive to NTFS, and then turn on BitLocker.
FVE_E_POLICY_PASSWORD_REQUIRED
0x8031002C
Group Policy settings require that a recovery password be specied
before encrypting the drive.
FVE_E_CANNOT_SET_FVEK_ENCRYPTED
0x8031002D
The drive encryption algorithm and key cannot be set on a
previously encrypted drive. To encrypt this drive with BitLocker
Drive Encryption, remove the previous encryption and then turn on
BitLocker.
FVE_E_CANNOT_ENCRYPT_NO_KEY
0x8031002E
BitLocker Drive Encryption cannot encrypt the specied drive
because an encryption key is not available. Add a key protector to
encrypt this drive.
FVE_E_BOOTABLE_CDDVD
0x80310030
BitLocker Drive Encryption detected bootable media (CD or DVD) in
the computer. Remove the media and restart the computer before
conguring BitLocker.
FVE_E_PROTECTOR_EXISTS
0x80310031
This key protector cannot be added. Only one key protector of this
type is allowed for this drive.
FVE_E_RELATIVE_PATH
0x80310032
The recovery password le was not found because a relative path
was specied. Recovery passwords must be saved to a fully
qualied path. Environment variables congured on the computer
can be used in the path.
FVE_E_PROTECTOR_NOT_FOUND
0x80310033
The specied key protector was not found on the drive. Try another
key protector.
FVE_E_INVALID_KEY_FORMAT
0x80310034
The recovery key provided is corrupt and cannot be used to access
the drive. An alternative recovery method, such as recovery
password, a data recovery agent, or a backup version of the
recovery key must be used to recover access to the drive.
FVE_E_INVALID_PASSWORD_FORMAT
0x80310035
The format of the recovery password provided is invalid. BitLocker
recovery passwords are 48 digits. Verify that the recovery password
is in the correct format and then try again.
FVE_E_FIPS_RNG_CHECK_FAILED
0x80310036
The random number generator check test failed.
FVE_E_FIPS_PREVENTS_RECOVERY_PASSWORD
0x80310037
The Group Policy setting requiring FIPS compliance prevents a local
recovery password from being generated or used by BitLocker Drive
Encryption. When operating in FIPS-compliant mode, BitLocker
recovery options can be either a recovery key stored on a USB
drive or recovery through a data recovery agent.
FVE_E_FIPS_PREVENTS_EXTERNAL_KEY_EXPORT
0x80310038
The Group Policy setting requiring FIPS compliance prevents the
recovery password from being saved to Active Directory. When
operating in FIPS-compliant mode, BitLocker recovery options can
be either a recovery key stored on a USB drive or recovery through
112 Dell Data Security Endpoint Security Suite Pro
Troubleshooting

Constant/Value Description
a data recovery agent. Check your Group Policy settings
conguration.
FVE_E_NOT_DECRYPTED
0x80310039
The drive must be fully decrypted to complete this operation.
FVE_E_INVALID_PROTECTOR_TYPE
0x8031003A
The key protector specied cannot be used for this operation.
FVE_E_NO_PROTECTORS_TO_TEST
0x8031003B
No key protectors exist on the drive to perform the hardware test.
FVE_E_KEYFILE_NOT_FOUND
0x8031003C
The BitLocker startup key or recovery password cannot be found
on the USB device. Verify that you have the correct USB device,
that the USB device is plugged into the computer on an active USB
port, restart the computer, and then try again. If the problem
persists, contact the computer manufacturer for BIOS upgrade
instructions.
FVE_E_KEYFILE_INVALID
0x8031003D
The BitLocker startup key or recovery password le provided is
corrupt or invalid. Verify that you have the correct startup key or
recovery password le and try again.
FVE_E_KEYFILE_NO_VMK
0x8031003E
The BitLocker encryption key cannot be obtained from the startup
key or recovery password. Verify that you have the correct startup
key or recovery password and try again.
FVE_E_TPM_DISABLED
0x8031003F
The TPM is disabled. The TPM must be enabled, initialized, and
have valid ownership before it can be used with BitLocker Drive
Encryption.
FVE_E_NOT_ALLOWED_IN_SAFE_MODE
0x80310040
The BitLocker conguration of the specied drive cannot be
managed because this computer is currently operating in Safe
Mode. While in Safe Mode, BitLocker Drive Encryption can only be
used for recovery purposes.
FVE_E_TPM_INVALID_PCR
0x80310041
The TPM was not able to unlock the drive because the system boot
information has changed or a PIN was not provided correctly. Verify
that the drive has not been tampered with and that changes to the
system boot information were caused by a trusted source. After
verifying that the drive is safe to access, use the BitLocker recovery
console to unlock the drive and then suspend and resume BitLocker
to update system boot information that BitLocker associates with
this drive.
FVE_E_TPM_NO_VMK
0x80310042
The BitLocker encryption key cannot be obtained from the TPM.
FVE_E_PIN_INVALID
0x80310043
The BitLocker encryption key cannot be obtained from the TPM
and PIN.
FVE_E_AUTH_INVALID_APPLICATION
0x80310044
A boot application has changed since BitLocker Drive Encryption
was enabled.
Dell Data Security Endpoint Security Suite Pro
Troubleshooting
113

Constant/Value Description
FVE_E_AUTH_INVALID_CONFIG
0x80310045
The Boot Conguration Data (BCD) settings have changed since
BitLocker Drive Encryption was enabled.
FVE_E_FIPS_DISABLE_PROTECTION_NOT_ALLOWED
0x80310046
The Group Policy setting requiring FIPS compliance prohibits the
use of unencrypted keys, which prevents BitLocker from being
suspended on this drive. Please contact your domain administrator
for more information.
FVE_E_FS_NOT_EXTENDED
0x80310047
This drive cannot be encrypted by BitLocker Drive Encryption
because the le system does not extend to the end of the drive.
Repartition this drive and then try again.
FVE_E_FIRMWARE_TYPE_NOT_SUPPORTED
0x80310048
BitLocker Drive Encryption cannot be enabled on the operating
system drive. Contact the computer manufacturer for BIOS
upgrade instructions.
FVE_E_NO_LICENSE
0x80310049
This version of Windows does not include BitLocker Drive
Encryption. To use BitLocker Drive Encryption, please upgrade the
operating system.
FVE_E_NOT_ON_STACK
0x8031004A
BitLocker Drive Encryption cannot be used because critical
BitLocker system les are missing or corrupted. Use Windows
Startup Repair to restore these les to your computer.
FVE_E_FS_MOUNTED
0x8031004B
The drive cannot be locked when the drive is in use.
FVE_E_TOKEN_NOT_IMPERSONATED
0x8031004C
The access token associated with the current thread is not an
impersonated token.
FVE_E_DRY_RUN_FAILED
0x8031004D
The BitLocker encryption key cannot be obtained. Verify that the
TPM is enabled and ownership has been taken. If this computer
does not have a TPM, verify that the USB drive is inserted and
available.
FVE_E_REBOOT_REQUIRED
0x8031004E
You must restart your computer before continuing with BitLocker
Drive Encryption.
FVE_E_DEBUGGER_ENABLED
0x8031004F
Drive encryption cannot occur while boot debugging is enabled. Use
the bcdedit command-line tool to turn o boot debugging.
FVE_E_RAW_ACCESS
0x80310050
No action was taken as BitLocker Drive Encryption is in raw access
mode.
FVE_E_RAW_BLOCKED
0x80310051
BitLocker Drive Encryption cannot enter raw access mode for this
drive because the drive is currently in use.
FVE_E_BCD_APPLICATIONS_PATH_INCORRECT
0x80310052
The path specied in the Boot Conguration Data (BCD) for a
BitLocker Drive Encryption integrity-protected application is
incorrect. Please verify and correct your BCD settings and try
again.
114 Dell Data Security Endpoint Security Suite Pro
Troubleshooting

Constant/Value Description
FVE_E_NOT_ALLOWED_IN_VERSION
0x80310053
BitLocker Drive Encryption can only be used for limited provisioning
or recovery purposes when the computer is running in pre-
installation or recovery environments.
FVE_E_NO_AUTOUNLOCK_MASTER_KEY
0x80310054
The auto-unlock master key was not available from the operating
system drive.
FVE_E_MOR_FAILED
0x80310055
The system rmware failed to enable clearing of system memory
when the computer was restarted.
FVE_E_HIDDEN_VOLUME
0x80310056
The hidden drive cannot be encrypted.
FVE_E_TRANSIENT_STATE
0x80310057
BitLocker encryption keys were ignored because the drive was in a
transient state.
FVE_E_PUBKEY_NOT_ALLOWED
0x80310058
Public key based protectors are not allowed on this drive.
FVE_E_VOLUME_HANDLE_OPEN
0x80310059
BitLocker Drive Encryption is already performing an operation on
this drive. Please complete all operations before continuing.
FVE_E_NO_FEATURE_LICENSE
0x8031005A
This version of Windows does not support this feature of BitLocker
Drive Encryption. To use this feature, upgrade the operating system.
FVE_E_INVALID_STARTUP_OPTIONS
0x8031005B
The Group Policy settings for BitLocker startup options are in
conict and cannot be applied. Contact your system administrator
for more information.
FVE_E_POLICY_RECOVERY_PASSWORD_NOT_ALLOWED
0x8031005C
Group policy settings do not permit the creation of a recovery
password.
FVE_E_POLICY_RECOVERY_PASSWORD_REQUIRED
0x8031005D
Group policy settings require the creation of a recovery password.
FVE_E_POLICY_RECOVERY_KEY_NOT_ALLOWED
0x8031005E
Group policy settings do not permit the creation of a recovery key.
FVE_E_POLICY_RECOVERY_KEY_REQUIRED
0x8031005F
Group policy settings require the creation of a recovery key.
FVE_E_POLICY_STARTUP_PIN_NOT_ALLOWED
0x80310060
Group policy settings do not permit the use of a PIN at startup.
Please choose a dierent BitLocker startup option.
FVE_E_POLICY_STARTUP_PIN_REQUIRED
0x80310061
Group policy settings require the use of a PIN at startup. Please
choose this BitLocker startup option.
Dell Data Security Endpoint Security Suite Pro
Troubleshooting
115

Constant/Value Description
FVE_E_POLICY_STARTUP_KEY_NOT_ALLOWED
0x80310062
Group policy settings do not permit the use of a startup key. Please
choose a dierent BitLocker startup option.
FVE_E_POLICY_STARTUP_KEY_REQUIRED
0x80310063
Group policy settings require the use of a startup key. Please
choose this BitLocker startup option.
FVE_E_POLICY_STARTUP_PIN_KEY_NOT_ALLOWED0x8031006
4
Group policy settings do not permit the use of a startup key and
PIN. Please choose a dierent BitLocker startup option.
FVE_E_POLICY_STARTUP_PIN_KEY_REQUIRED
0x80310065
Group policy settings require the use of a startup key and PIN.
Please choose this BitLocker startup option.
FVE_E_POLICY_STARTUP_TPM_NOT_ALLOWED
0x80310066
Group policy does not permit the use of TPM-only at startup.
Please choose a dierent BitLocker startup option.
FVE_E_POLICY_STARTUP_TPM_REQUIRED
0x80310067
Group policy settings require the use of TPM-only at startup. Please
choose this BitLocker startup option.
FVE_E_POLICY_INVALID_PIN_LENGTH
0x80310068
The PIN provided does not meet minimum or maximum length
requirements.
FVE_E_KEY_PROTECTOR_NOT_SUPPORTED
0x80310069
The key protector is not supported by the version of BitLocker
Drive Encryption currently on the drive. Upgrade the drive to add
the key protector.
FVE_E_POLICY_PASSPHRASE_NOT_ALLOWED
0x8031006A
Group policy settings do not permit the creation of a password.
FVE_E_POLICY_PASSPHRASE_REQUIRED
0x8031006B
Group policy settings require the creation of a password.
FVE_E_FIPS_PREVENTS_PASSPHRASE
0x8031006C
The group policy setting requiring FIPS compliance prevented the
password from being generated or used. Please contact your
domain administrator for more information.
FVE_E_OS_VOLUME_PASSPHRASE_NOT_ALLOWED
0x8031006D
A password cannot be added to the operating system drive.
FVE_E_INVALID_BITLOCKER_OID
0x8031006E
The BitLocker object identier (OID) on the drive appears to be
invalid or corrupt. Use manage-BDE to reset the OID on this drive.
FVE_E_VOLUME_TOO_SMALL
0x8031006F
The drive is too small to be protected using BitLocker Drive
Encryption.
FVE_E_DV_NOT_SUPPORTED_ON_FS
0x80310070
The selected discovery drive type is incompatible with the le
system on the drive. BitLocker To Go discovery drives must be
created on FAT formatted drives.
116 Dell Data Security Endpoint Security Suite Pro
Troubleshooting

Constant/Value Description
FVE_E_DV_NOT_ALLOWED_BY_GP
0x80310071
The selected discovery drive type is not allowed by the computer's
Group Policy settings. Verify that Group Policy settings allow the
creation of discovery drives for use with BitLocker To Go.
FVE_E_POLICY_USER_CERTIFICATE_NOT_ALLOWED
0x80310072
Group Policy settings do not permit user certicates such as smart
cards to be used with BitLocker Drive Encryption.
FVE_E_POLICY_USER_CERTIFICATE_REQUIRED
0x80310073
Group Policy settings require that you have a valid user certicate,
such as a smart card, to be used with BitLocker Drive Encryption.
FVE_E_POLICY_USER_CERT_MUST_BE_HW
0x80310074
Group Policy settings requires that you use a smart card-based key
protector with BitLocker Drive Encryption.
FVE_E_POLICY_USER_CONFIGURE_FDV_AUTOUNLOCK_NOT_
ALLOWED
0x80310075
Group Policy settings do not permit BitLocker-protected xed data
drives to be automatically unlocked.
FVE_E_POLICY_USER_CONFIGURE_RDV_AUTOUNLOCK_NOT_
ALLOWED
0x80310076
Group Policy settings do not permit BitLocker-protected removable
data drives to be automatically unlocked.
FVE_E_POLICY_USER_CONFIGURE_RDV_NOT_ALLOWED
0x80310077
Group Policy settings do not permit you to congure BitLocker
Drive Encryption on removable data drives.
FVE_E_POLICY_USER_ENABLE_RDV_NOT_ALLOWED
0x80310078
Group Policy settings do not permit you to turn on BitLocker Drive
Encryption on removable data drives. Please contact your system
administrator if you need to turn on BitLocker.
FVE_E_POLICY_USER_DISABLE_RDV_NOT_ALLOWED
0x80310079
Group Policy settings do not permit turning o BitLocker Drive
Encryption on removable data drives. Please contact your system
administrator if you need to turn o BitLocker.
FVE_E_POLICY_INVALID_PASSPHRASE_LENGTH
0x80310080
Your password does not meet minimum password length
requirements. By default, passwords must be at least 8 characters
in length. Check with your system administrator for the password
length requirement in your organization.
FVE_E_POLICY_PASSPHRASE_TOO_SIMPLE
0x80310081
Your password does not meet the complexity requirements set by
your system administrator. Try adding upper and lowercase
characters, numbers, and symbols.
FVE_E_RECOVERY_PARTITION
0x80310082
This drive cannot be encrypted because it is reserved for Windows
System Recovery Options.
FVE_E_POLICY_CONFLICT_FDV_RK_OFF_AUK_ON
0x80310083
BitLocker Drive Encryption cannot be applied to this drive because
of conicting Group Policy settings. BitLocker cannot be congured
to automatically unlock xed data drives when user recovery
options are disabled. If you want BitLocker-protected xed data
drives to be automatically unlocked after key validation has
occurred, please ask your system administrator to resolve the
settings conict before enabling BitLocker.
FVE_E_POLICY_CONFLICT_RDV_RK_OFF_AUK_ON BitLocker Drive Encryption cannot be applied to this drive because
of conicting Group Policy settings. BitLocker cannot be congured
Dell Data Security Endpoint Security Suite Pro
Troubleshooting
117

Constant/Value Description
0x80310084 to automatically unlock removable data drives when user recovery
option are disabled. If you want BitLocker-protected removable data
drives to be automatically unlocked after key validation has
occurred, please ask your system administrator to resolve the
settings conict before enabling BitLocker.
FVE_E_NON_BITLOCKER_OID
0x80310085
The Enhanced Key Usage (EKU) attribute of the specied
certicate does not permit it to be used for BitLocker Drive
Encryption. BitLocker does not require that a certicate have an
EKU attribute, but if one is congured it must be set to an object
identier (OID) that matches the OID congured for BitLocker.
FVE_E_POLICY_PROHIBITS_SELFSIGNED
0x80310086
BitLocker Drive Encryption cannot be applied to this drive as
currently congured because of Group Policy settings. The
certicate you provided for drive encryption is self-signed. Current
Group Policy settings do not permit the use of self-signed
certicates. Obtain a new certicate from your certication
authority before attempting to enable BitLocker.
FVE_E_POLICY_CONFLICT_RO_AND_STARTUP_KEY_REQUIRED
0x80310087
BitLocker Encryption cannot be applied to this drive because of
conicting Group Policy settings. When write access to drives not
protected by BitLocker is denied, the use of a USB startup key
cannot be required. Please have your system administrator resolve
these policy conicts before attempting to enable BitLocker.
FVE_E_CONV_RECOVERY_FAILED
0x80310088
BitLocker Drive Encryption cannot be applied to this drive because
there are conicting Group Policy settings for recovery options on
operating system drives. Storing recovery information to Active
Directory Domain Services cannot be required when the generation
of recovery passwords is not permitted. Please have your system
administrator resolve these policy conicts before attempting to
enable BitLocker.
FVE_E_VIRTUALIZED_SPACE_TOO_BIG
0x80310089
The requested virtualization size is too big.
FVE_E_POLICY_CONFLICT_OSV_RP_OFF_ADB_ON
0x80310090
BitLocker Drive Encryption cannot be applied to this drive because
there are conicting Group Policy settings for recovery options on
operating system drives. Storing recovery information to Active
Directory Domain Services cannot be required when the generation
of recovery passwords is not permitted. Please have your system
administrator resolve these policy conicts before attempting to
enable BitLocker.
FVE_E_POLICY_CONFLICT_FDV_RP_OFF_ADB_ON
0x80310091
BitLocker Drive Encryption cannot be applied to this drive because
there are conicting Group Policy settings for recovery options on
xed data drives. Storing recovery information to Active Directory
Domain Services cannot be required when the generation of
recovery passwords is not permitted. Please have your system
administrator resolve these policy conicts before attempting to
enable BitLocker.
FVE_E_POLICY_CONFLICT_RDV_RP_OFF_ADB_ON
0x80310092
BitLocker Drive Encryption cannot be applied to this drive because
there are conicting Group Policy settings for recovery options on
removable data drives. Storing recovery information to Active
Directory Domain Services cannot be required when the generation
of recovery passwords is not permitted. Please have your system
administrator resolve these policy conicts before attempting to
enable BitLocker.
118 Dell Data Security Endpoint Security Suite Pro
Troubleshooting

Constant/Value Description
FVE_E_NON_BITLOCKER_KU
0x80310093
The Key Usage (KU) attribute of the specied certicate does not
permit it to be used for BitLocker Drive Encryption. BitLocker does
not require that a certicate have a KU attribute, but if one is
congured it must be set to either Key Encipherment or Key
Agreement.
FVE_E_PRIVATEKEY_AUTH_FAILED
0x80310094
The private key associated with the specied certicate cannot be
authorized. The private key authorization was either not provided or
the provided authorization was invalid.
FVE_E_REMOVAL_OF_DRA_FAILED
0x80310095
Removal of the data recovery agent certicate must be done using
the Certicates snap-in.
FVE_E_OPERATION_NOT_SUPPORTED_ON_VISTA_VOLUME
0x80310096
This drive was encrypted using the version of BitLocker Drive
Encryption included with Windows Vista and Windows Server 2008
which does not support organizational identiers. To specify
organizational identiers for this drive upgrade the drive encryption
to the latest version using the "manage-bde -upgrade" command.
FVE_E_CANT_LOCK_AUTOUNLOCK_ENABLED_VOLUME
0x80310097
The drive cannot be locked because it is automatically unlocked on
this computer. Remove the automatic unlock protector to lock this
drive.
FVE_E_FIPS_HASH_KDF_NOT_ALLOWED
0x80310098
The default BitLocker Key Derivation Function SP800-56A for ECC
smart cards is not supported by your smart card. The Group Policy
setting requiring FIPS-compliance prevents BitLocker from using
any other key derivation function for encryption. You have to use a
FIPS compliant smart card in FIPS restricted environments.
FVE_E_ENH_PIN_INVALID
0x80310099
The BitLocker encryption key could not be obtained from the TPM
and enhanced PIN. Try using a PIN containing only numerals.
FVE_E_INVALID_PIN_CHARS
0x8031009A
The requested TPM PIN contains invalid characters.
FVE_E_INVALID_DATUM_TYPE
0x8031009B
The management information stored on the drive contained an
unknown type. If you are using an old version of Windows, try
accessing the drive from the latest version.
FVE_E_EFI_ONLY
0x8031009C
The feature is only supported on EFI systems.
FVE_E_MULTIPLE_NKP_CERTS
0x8031009D
More than one Network Key Protector certicate has been found
on the system.
FVE_E_REMOVAL_OF_NKP_FAILED
0x8031009E
Removal of the Network Key Protector certicate must be done
using the Certicates snap-in.
FVE_E_INVALID_NKP_CERT
0x8031009F
An invalid certicate has been found in the Network Key Protector
certicate store.
FVE_E_NO_EXISTING_PIN
0x803100A0
This drive is not protected with a PIN.
Dell Data Security Endpoint Security Suite Pro
Troubleshooting
119

Constant/Value Description
FVE_E_PROTECTOR_CHANGE_PIN_MISMATCH
0x803100A1
Please enter the correct current PIN.
FVE_E_PROTECTOR_CHANGE_BY_STD_USER_DISALLOWED
0x803100A2
You must be logged on with an administrator account to change the
PIN or password. Click the link to reset the PIN or password as an
administrator.
FVE_E_PROTECTOR_CHANGE_MAX_PIN_CHANGE_ATTEMPT
S_REACHED
0x803100A3
BitLocker has disabled PIN and password changes after too many
failed requests. Click the link to reset the PIN or password as an
administrator.
FVE_E_POLICY_PASSPHRASE_REQUIRES_ASCII
0x803100A4
Your system administrator requires that passwords contain only
printable ASCII characters. This includes unaccented letters (A-Z, a-
z), numbers (0-9), space, arithmetic signs, common punctuation,
separators, and the following symbols: # $ & @ ^ _ ~ .
FVE_E_FULL_ENCRYPTION_NOT_ALLOWED_ON_TP_STORAGE
0x803100A5
BitLocker Drive Encryption only supports used space only
encryption on thin provisioned storage.
FVE_E_WIPE_NOT_ALLOWED_ON_TP_STORAGE
0x803100A6
BitLocker Drive Encryption does not support wiping free space on
thin provisioned storage.
FVE_E_KEY_LENGTH_NOT_SUPPORTED_BY_EDRIVE
0x803100A7
The required authentication key length is not supported by the
drive.
FVE_E_NO_EXISTING_PASSPHRASE
0x803100A8
This drive is not protected with a password.
FVE_E_PROTECTOR_CHANGE_PASSPHRASE_MISMATCH
0x803100A9
Please enter the correct current password.
FVE_E_PASSPHRASE_TOO_LONG
0x803100AA
The password cannot exceed 256 characters.
FVE_E_NO_PASSPHRASE_WITH_TPM
0x803100AB
A password key protector cannot be added because a TPM
protector exists on the drive.
FVE_E_NO_TPM_WITH_PASSPHRASE
0x803100AC
A TPM key protector cannot be added because a password
protector exists on the drive.
FVE_E_NOT_ALLOWED_ON_CSV_STACK
0x803100AD
This command can only be performed from the coordinator node
for the specied CSV volume.
FVE_E_NOT_ALLOWED_ON_CLUSTER
0x803100AE
This command cannot be performed on a volume when it is part of
a cluster.
FVE_E_EDRIVE_NO_FAILOVER_TO_SW BitLocker did not revert to using BitLocker software encryption due
to group policy conguration.
120 Dell Data Security Endpoint Security Suite Pro
Troubleshooting

Constant/Value Description
0x803100AF
FVE_E_EDRIVE_BAND_IN_USE
0x803100B0
The drive cannot be managed by BitLocker because the drive's
hardware encryption feature is already in use.
FVE_E_EDRIVE_DISALLOWED_BY_GP
0x803100B1
Group Policy settings do not allow the use of hardware-based
encryption.
FVE_E_EDRIVE_INCOMPATIBLE_VOLUME
0x803100B2
The drive specied does not support hardware-based encryption.
FVE_E_NOT_ALLOWED_TO_UPGRADE_WHILE_CONVERTING
0x803100B3
BitLocker cannot be upgraded during disk encryption or decryption.
FVE_E_EDRIVE_DV_NOT_SUPPORTED
0x803100B4
Discovery Volumes are not supported for volumes using hardware
encryption.
FVE_E_NO_PREBOOT_KEYBOARD_DETECTED
0x803100B5
No preboot keyboard detected. The user may not be able to provide
required input to unlock the volume.
FVE_E_NO_PREBOOT_KEYBOARD_OR_WINRE_DETECTED
0x803100B6
No preboot keyboard or Windows Recovery Environment detected.
The user may not be able to provide required input to unlock the
volume.
FVE_E_POLICY_REQUIRES_STARTUP_PIN_ON_TOUCH_DEVICE
0x803100B7
Group Policy settings require the creation of a startup PIN, but a
preboot keyboard is not available on this device. The user may not
be able to provide required input to unlock the volume.
FVE_E_POLICY_REQUIRES_RECOVERY_PASSWORD_ON_TOUC
H_DEVICE
0x803100B8
Group Policy settings require the creation of a recovery password,
but neither a preboot keyboard nor Windows Recovery
Environment is available on this device. The user may not be able to
provide required input to unlock the volume.
FVE_E_WIPE_CANCEL_NOT_APPLICABLE
0x803100B9
Wipe of free space is not currently taking place.
FVE_E_SECUREBOOT_DISABLED
0x803100BA
BitLocker cannot use Secure Boot for platform integrity because
Secure Boot has been disabled.
FVE_E_SECUREBOOT_CONFIGURATION_INVALID
0x803100BB
BitLocker cannot use Secure Boot for platform integrity because
the Secure Boot conguration does not meet the requirements for
BitLocker.
FVE_E_EDRIVE_DRY_RUN_FAILED
0x803100BC
Your computer does not support BitLocker hardware-based
encryption. Check with your computer manufacturer for rmware
updates.
FVE_E_SHADOW_COPY_PRESENT
0x803100BD
BitLocker cannot be enabled on the volume because it contains a
Volume Shadow Copy. Remove all Volume Shadow Copies before
encrypting the volume.
Dell Data Security Endpoint Security Suite Pro
Troubleshooting
121

Constant/Value Description
FVE_E_POLICY_INVALID_ENHANCED_BCD_SETTINGS
0x803100BE
BitLocker Drive Encryption cannot be applied to this drive because
the Group Policy setting for Enhanced Boot Conguration Data
contains invalid data. Please have your system administrator resolve
this invalid conguration before attempting to enable BitLocker.
FVE_E_EDRIVE_INCOMPATIBLE_FIRMWARE
0x803100BF
This PC's rmware is not capable of supporting hardware
encryption.
FVE_E_PROTECTOR_CHANGE_MAX_PASSPHRASE_CHANGE_
ATTEMPTS_REACHED
0x803100C0
BitLocker has disabled password changes after too many failed
requests. Click the link to reset the password as an administrator.
FVE_E_PASSPHRASE_PROTECTOR_CHANGE_BY_STD_USER_
DISALLOWED
0x803100C1
You must be logged on with an administrator account to change the
password. Click the link to reset the password as an administrator.
FVE_E_LIVEID_ACCOUNT_SUSPENDED
0x803100C2
BitLocker cannot save the recovery password because the
specied Microsoft account is Suspended.
FVE_E_LIVEID_ACCOUNT_BLOCKED
0x803100C3
BitLocker cannot save the recovery password because the
specied Microsoft account is Blocked.
FVE_E_NOT_PROVISIONED_ON_ALL_VOLUMES
0x803100C4
This PC is not provisioned to support device encryption. Please
enable BitLocker on all volumes to comply with device encryption
policy.
FVE_E_DE_FIXED_DATA_NOT_SUPPORTED
0x803100C5
This PC cannot support device encryption because unencrypted
xed data volumes are present.
FVE_E_DE_HARDWARE_NOT_COMPLIANT
0x803100C6
This PC does not meet the hardware requirements to support
device encryption.
FVE_E_DE_WINRE_NOT_CONFIGURED
0x803100C7
This PC cannot support device encryption because WinRE is not
properly congured.
FVE_E_DE_PROTECTION_SUSPENDED
0x803100C8
Protection is enabled on the volume but has been suspended. This
is likely to have happened due to an update being applied to your
system. Please try again after a reboot.
FVE_E_DE_OS_VOLUME_NOT_PROTECTED
0x803100C9
This PC is not provisioned to support device encryption.
FVE_E_DE_DEVICE_LOCKEDOUT
0x803100CA
Device Lock has been triggered due to too many incorrect
password attempts.
FVE_E_DE_PROTECTION_NOT_YET_ENABLED
0x803100CB
Protection has not been enabled on the volume. Enabling protection
requires a connected account. If you already have a connected
account and are seeing this error, please refer to the event log for
more information.
122 Dell Data Security Endpoint Security Suite Pro
Troubleshooting

Constant/Value Description
FVE_E_INVALID_PIN_CHARS_DETAILED
0x803100CC
Your PIN can only contain numbers from 0 to 9.
FVE_E_DEVICE_LOCKOUT_COUNTER_UNAVAILABLE
0x803100CD
BitLocker cannot use hardware replay protection because no
counter is available on your PC.
FVE_E_DEVICELOCKOUT_COUNTER_MISMATCH
0x803100CE
Device Lockout state validation failed due to counter mismatch.
FVE_E_BUFFER_TOO_LARGE
0x803100CF
The input buer is too large.
Dell Data Security Endpoint Security Suite Pro
Troubleshooting
123

Glossary
Activate - Activation occurs when the computer has been registered with the Security Management Server/Security Management Server
Virtual and has received at least an initial set of policies.
Active Directory (AD) - A directory service created by Microsoft for Windows domain networks.
Advanced Authentication - The Advanced Authentication product supports login with self-encrypting drives, SSO, and manages user
credentials and passwords. In addition, Advanced Authentication can be used to access not only PCs, but any website, SaaS, or application.
Once users enroll their credentials, Advanced Authentication allows use of those credentials to logon to the device and perform password
replacement.
Application Data Encryption - Application Data Encryption encrypts any le written by a protected application, using a category 2 override.
This means that any directory that has a category 2 protection or better, or any location that has specic extensions protected with
category 2 or better, will cause ADE to not encrypt those les.
BitLocker Manager - Windows BitLocker is designed to help protect Windows computers by encrypting both data and operating system
les. To improve the security of BitLocker deployments and to simplify and reduce the cost of ownership, Dell provides a single, central
management console that addresses many security concerns and oers an integrated approach to managing encryption across other non-
BitLocker platforms, whether physical, virtual, or cloud-based. BitLocker Manager supports BitLocker encryption for operating systems,
xed drives, and BitLocker To Go. BitLocker Manager enables you to seamlessly integrate BitLocker into your existing encryption needs and
to manage BitLocker with the minimum eort while streamlining security and compliance. BitLocker Manager provides integrated
management for key recovery, policy management and enforcement, automated TPM management, FIPS compliance, and compliance
reporting.
Cached Credentials - Cached credentials are credentials that are added to the PBA database when a user successfully authenticates with
Active Directory. This information about the user is retained so that a user can log in when they do not have a connection to Active
Directory (for example, when taking their laptop home).
Common Encryption – The Common key makes encrypted les accessible to all managed users on the device where they were created.
Deactivate - Deactivation occurs when SED management is turned OFF in the Remote Management Console. Once the computer is
deactivated, the PBA database is deleted and there is no longer any record of cached users.
Encryption External Media - This service within the Dell Encryption client applies policies to removable media and external storage devices.
Encryption External Media Access Code - This service within the Security Management Server/Security Management Server Virtual
allows for recovery of Encryption External Media protected devices where the user forgets their password and can no longer login.
Completing this process allows the user to reset the password set on the removable media or external storage device.
Encryption Client - The Encryption client is the on-device component that enforces security policies, whether an endpoint is connected to
the network, disconnected from the network, lost, or stolen. Creating a trusted computing environment for endpoints, the Encryption client
operates as a layer on top of the device operating system, and provides consistently-enforced authentication, encryption, and authorization
to maximize the protection of sensitive information.
Endpoint - a computer that is managed by Security Management Server/Security Management Server Virtual.
Encryption Keys - In most cases, the Encryption client uses the User key plus two additional encryption keys. However, there are
exceptions: All SDE policies and the Secure Windows Credentials policy use the SDE key. The Encrypt Windows Paging File policy and
Secure Windows Hibernation File policy use their own key, the General Purpose Key (GPK). The Common key makes les accessible to all
managed users on the device where they were created. The User key makes les accessible only to the user who created them, only on
16
124 Dell Data Security Endpoint Security Suite Pro
Glossary

the device where they were created. The User Roaming key makes les accessible only to the user who created them, on any Shielded
Windows (or Mac) device.
Encryption Sweep - An encryption sweep is the process of scanning the folders to be encrypted on a managed endpoint to ensure the
contained les are in the proper encryption state. Ordinary le creation and rename operations do not trigger an encryption sweep. It is
important to understand when an encryption sweep may happen and what may aect the resulting sweep times, as follows: - An
encryption sweep will occur upon initial receipt of a policy that has encryption enabled. This can occur immediately after activation if your
policy has encryption enabled. - If the Scan Workstation on Logon policy is enabled, folders specied for encryption will be swept on each
user logon. - A sweep can be re-triggered under certain subsequent policy changes. Any policy change related to the denition of the
encryption folders, encryption algorithms, encryption key usage (common versus user), will trigger a sweep. In addition, toggling between
encryption enabled and disabled will trigger an encryption sweep.
Malware Protection (Full Scan) -Malware Protection Full Scan scans the following locations for threats:
• The computer memory for installed rootkits.
• Hidden processes, and other behavior that suggests malware is attempting to hide itself.
• The memory of all running processes, all drives and their subfolders on the computer.
Malware Protection (Quick Scan) -Malware Protection Quick Scan scans the following locations for threats:
• The memory of all running processes.
• The les that the Windows Registry references.
• The contents of the Windows folder.
• The contents of the Temp folder.
On-Access Malware Protection - When a user accesses les, folders, and programs, the on-access scanner intercepts the operation and
scans the item.
Preboot Authentication (PBA) - Preboot Authentication serves as an extension of the BIOS or boot rmware and guarantees a secure,
tamper-proof environment external to the operating system as a trusted authentication layer. The PBA prevents anything being read from
the hard disk, such as the operating system, until the user has conrmed they have the correct credentials.
SED Management - SED Management provides a platform for securely managing self-encrypting drives. Although SEDs provide their own
encryption, they lack a platform to manage their encryption and available policies. SED Management is a central, scalable management
component, which allows you to more eectively protect and manage your data. SED Management ensures that you will be able to
administer your enterprise more quickly and easily.
System Data Encryption (SDE) - SDE is designed to encrypt the operating system and program les. To accomplish this purpose, SDE
must be able to open its key while the operating system is booting. Its intent is to prevent alteration or oine attacks on the operating
system by an attacker. SDE is not intended for user data. Common and User key encryption are intended for sensitive user data because
they require a user password in order to unlock encryption keys. SDE policies do not encrypt the les needed by the operating system to
start the boot process. SDE policies do not require preboot authentication or interfere with the Master Boot Record in any way. When the
computer boots up, the encrypted les are available before any user logs in (to enable patch management, SMS, backup and recovery
tools). Disabling SDE encryption triggers automatic decryption of all SDE encrypted les and directories for the relevant users, regardless of
other SDE policies, such as SDE Encryption Rules.
Threat Protection - The Threat Protection product is based on centrally managed policies that protect enterprise computers against
security threats. Threat Protection consists of: - Malware Protection - Checks for viruses, spyware, unwanted programs, and other threats
by automatically scanning items when accessed or based on schedules dened in policy. - Client Firewall - Monitors communication
between the computer and resources on the network and the Internet and intercepts potentially malicious communications. - Web
Protection - Blocks unsafe websites and downloads from those websites during online browsing and searching, based on safety ratings and
reports for websites.
Trusted Platform Module (TPM) - TPM is a security chip with three major functions: secure storage, measurement, and attestation. The
Encryption client uses TPM for its secure storage function. The TPM can also provide encrypted containers for the software vault.
Dell Data Security Endpoint Security Suite Pro
Glossary
125

User Encryption – The User key makes les accessible only to the user who created them, only on the device where they were created.
When running Dell Server Encryption, User Encryption is converted to Common Encryption. One exception is made for external media
devices; when inserted into a server with Encryption installed, les are encrypted with the User Roaming key.
126 Dell Data Security Endpoint Security Suite Pro
Glossary
