Dell E157fpt Monitor User's Guide User Manual En Us
Dell-Car-Video-System-26007-Users-Manual-542978 dell-car-video-system-26007-users-manual-542978
Dell-E157Fpt-Monitor-Users-Manual-112881 dell-e157fpt-monitor-users-manual-112881
26007 e9784806-e32f-435b-a958-d3c85e229012 Dell Car Video System 26007 User Guide |
User Manual: Dell dell-e157fpt Dell E157FPT Monitor User's Guide
Open the PDF directly: View PDF ![]() .
.
Page Count: 52

Dell™E157FPTTouchScreenMonitorContents
Information in this document is subject to change without notice.
©2007DellInc.Allrightsreserved.
Reproduction in any manner whatsoever without the written permission of Dell Inc. is strictly forbidden.
Trademarks used in this text: Dell, the DELL logo, Inspiron, Dell Precision, Dimension, OptiPlex, Latitude, PowerEdge, PowerVault, PowerApp, and Dell OpenManage are trademarks of Dell
Inc.; Intel, Pentium, and Celeron are registered trademarks of Intel Corporation; Microsoft and Windows are registered trademarks of Microsoft Corporation.
Other trademarks and trade names may be used in this document to refer to either the entities claiming the marks and names or their products. Dell Inc. disclaims any
proprietary interest in trademarks and trade names other than its own.
February2007Rev.A02
About Your Monitor
Front View
Back View
Side View
Bottom view
Specifications
Caring for Your Monitor
Setting Up Your Monitor
Connecting Your Monitor
Using the OSD
On-Screen Menu/Display (OSD)
Special OSD Functions
OSD Warning Messages
Setting the Optimal Resolution
Using the Touch Screen Software
About Your Touch Screen Software
Installing Touch Screen Software
Uninstalling Touch Screen Software
Using the Touch Screen Control Panel
Advanced Settings
Dell Right Mouse Button Tool (RMBT)
Tool Tray
Center Desktop Tool
Edge Acceleration Tool (EAT)
Solving Problems
General Problems
Touch screen Problems
Appendix
Warranty Information
CAUTION:General Safety Instructions
CAUTION: Monitor Safety Instructions
Contacting Dell
Regulatory Notices
Your Monitor Setup Guide
Notes, Notices, and Cautions
NOTE: A NOTE indicates important information that helps you make better use of your computer.
NOTICE: A NOTICE indicates either potential damage to hardware or loss of data and tells you how to avoid the problem.
CAUTION: A CAUTION indicates a potential for property damage, personal injury, or death.
Back to Contents Page
About Your Monitor
Dell™E157FPTTouchScreenMonitorContents
Front View
Back View
Side View
Bottom view
Specifications
Caring for Your Monitor
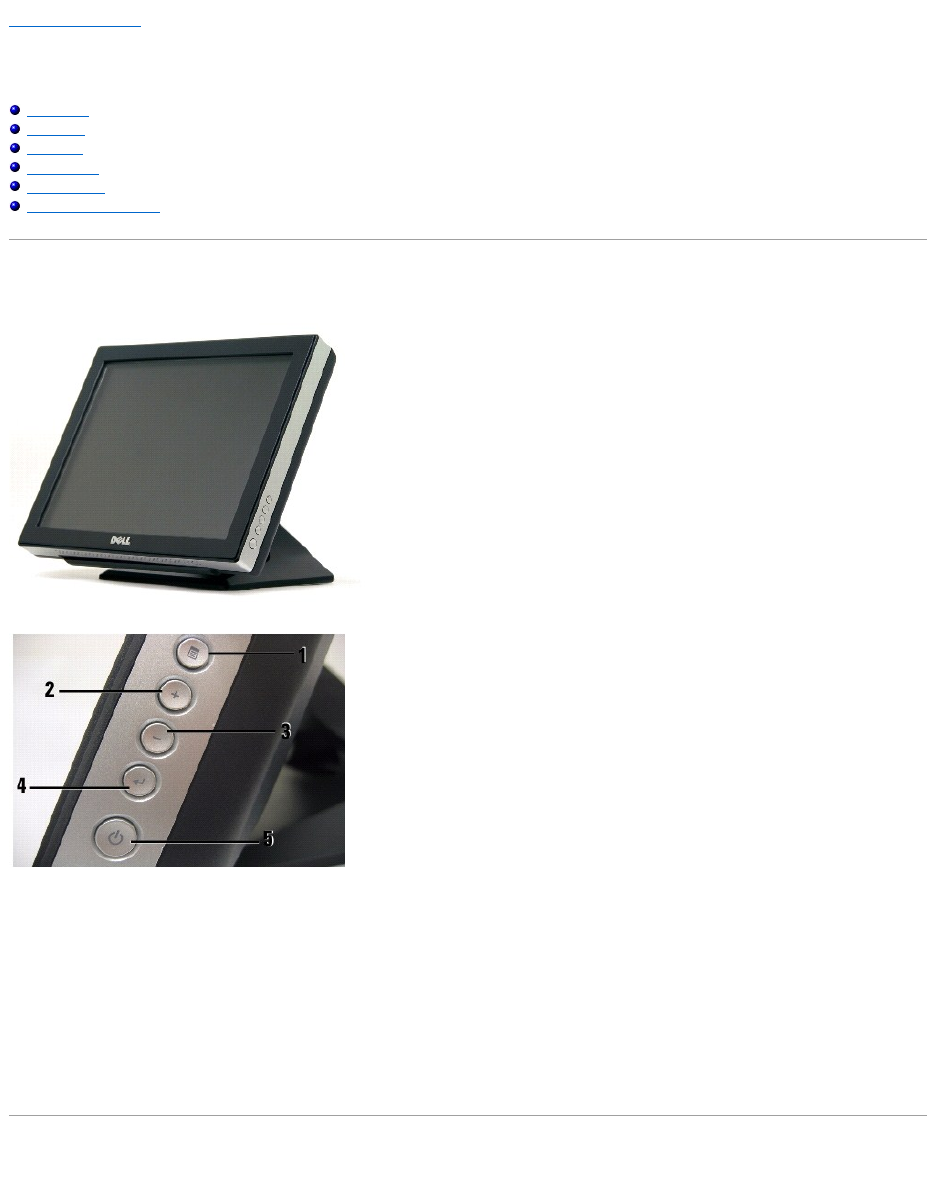
Front View
1. Menu button - Enters/exits the OSD menu.
2. Adjust up / Contrast button - Adjusts screen contrast, increases value of the selected OSD item, and moves the OSD selection cursor in the clockwise
direction.
3. Adjust down /Volume button - Adjusts volume, decreases value of the selected OSD item, and moves the OSD selection cursor in the counter-clockwise
direction.
4. Select button- Enters an OSD item for adjustment.
5. Power button- Enables/disables monitor power.
Back View

1. Cable holder
2. Monitor stand
3. Tilt-adjust knob
4. Mounting holes for optional Magnetic Stripe Reader (MSR) device
5. Cable cover
6. Optional MSR device
7. USB cable holder
1. Video connector
2. Audio connector
3. Power status LED indicator
4. Touch status LED indicator
5. Serial connector
6. USB connector
7. AC power
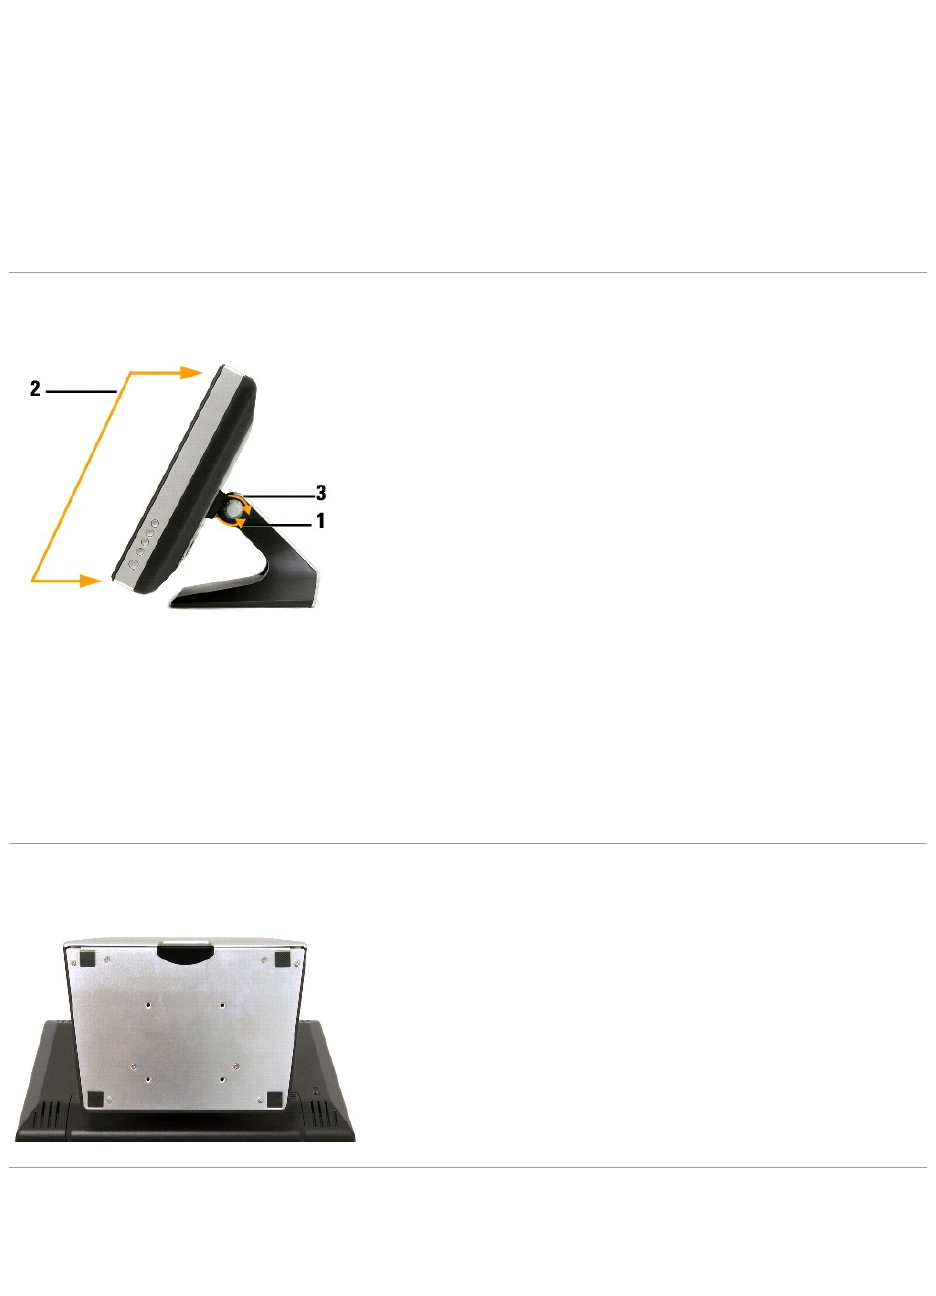
Side View
To adjust monitor angle:
1. Loosen tilt-adjust knob.
2. Position monitor as desired (range is from 30o to 90o).
3. Tighten tilt-adjust knob. Do not over tighten.
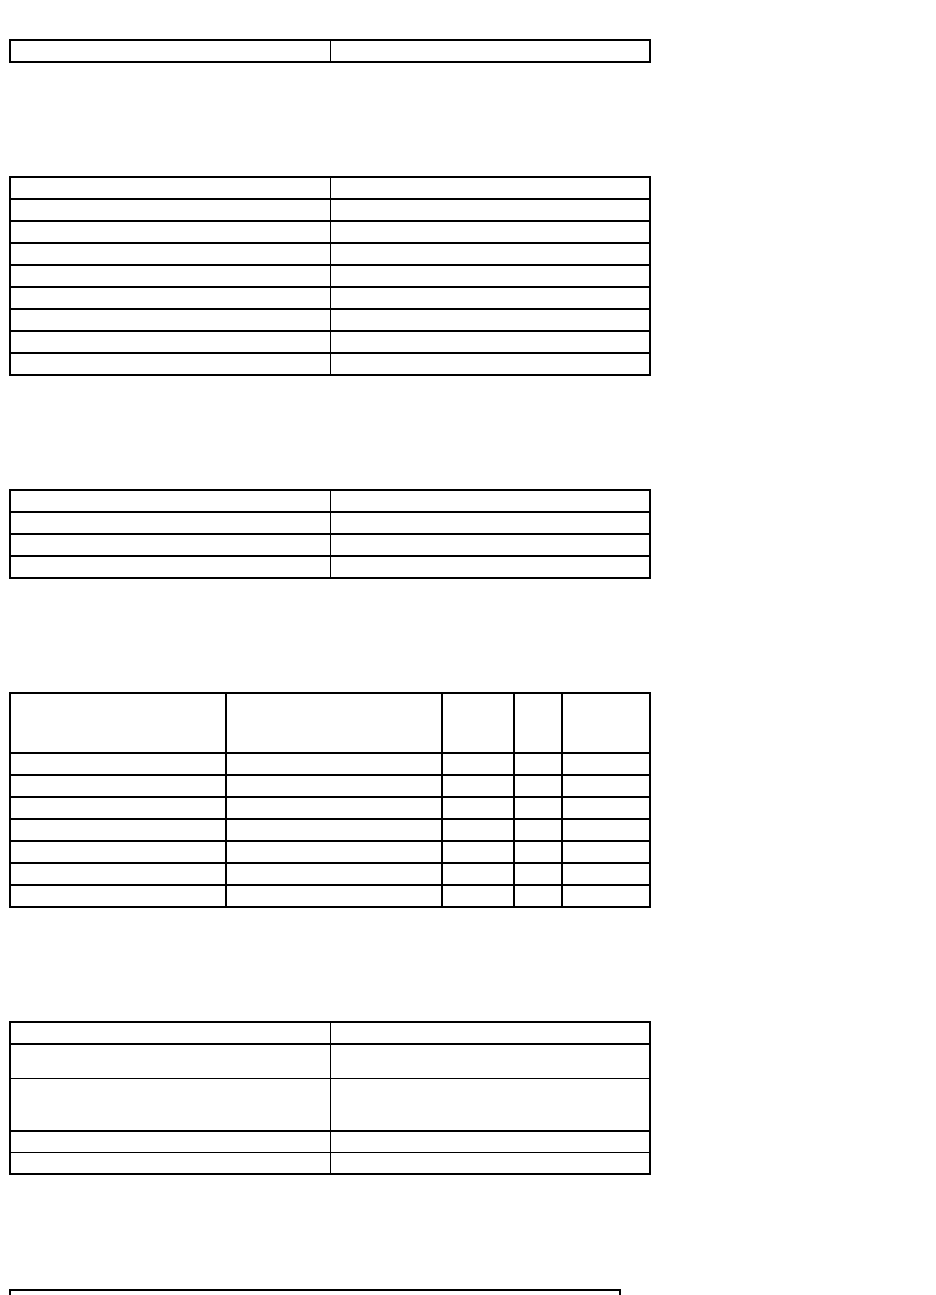
Bottom view
Specifications
The following tables provide information about your touch screen monitor.
General
Flat Panel
The following table shows physical and optical properties of the monitor's display panel.
Resolution
The following table shows the scan rate and pixel resolution capabilities of the monitor's display.
Preset Display Modes
Dell guarantees image size and centering for all preset modes listed in the following table.
Electrical
The following table shows electrical input requirements of the monitor.
Physical Characteristics
The following table shows the physical attributes of the monitor.
Model number
E157FPT
Screen type
Active matrix - TFT LCD
Screen dimensions
Diagonal 15 inches (381 mm)
Horizontal 11.9 inches (304 mm)
Vertical 8.9 inches (228 mm)
Pixel pitch
0.297x0.297mm
Viewing angle
125°(vertical)typical,140°(horizontal)typical
Luminance output
230 cd/m2 typical
Contrast ratio
500 : 1 typical
LCD surface coating
Hardness 3H, antiglare treatment
Horizontal scan range
30 kHz to 61 kHz (automatic)
Vertical scan range
56 Hz to 76 Hz (automatic)
Optimal preset resolution
1024 x 768 at 60 Hz
Highest preset resolution
1024 x 768 at 75 Hz
Display mode
Horizontal
Frequency (kHz)
Vertical
Frequency
(Hz)
Pixel
Clock
(MHz)
Sync
Polarity
(Horizontal /
Vertical)
DOS 720 x 400
31.5
70.1
28.3
-/+
VGA 640 x 480
31.5
60.0
25.18
-/-
VESA 640 x 480
37.5
75.0
31.5
-/-
VESA 800 x 600
37.9
60.3
40.0
+/+
VESA 800 x 600
46.9
75.0
49.5
+/+
VESA 1024 x 768
48.4
60.0
65.0
-/-
VESA 1024 x 768
60.0
75.5
78.8
+/+
Video input signals
Analog RGB, 0.700 volts, 75 ohm impedance
Synchronization input signals
Separate horizontal and vertical; 3.3V CMOS or 5V
TTL level, positive or negative sync.
AC input voltage / frequency / current
100~240 VAC , 50 /60 Hz,
0.6A (RMS) max
Inrush current at 110 V
30 A max
Inrush current at 220 V
60 A max
Environmental
The following table shows tolerable ambient environments while on (operating) and while off (non-operating).
Power Management Modes
During normal operation, the monitor's LED light is green. The LED indicates altered LED colors when monitor operates in different modes.
We recommend switching the monitor off when it is not in use for a long period of time.
Zero power consumption in OFF mode can only be achieved by disconnecting the mains cable from the display.
ENERGY STAR is a U.S. registered mark. As an ENERGY STAR Partner, DELL has determined that this product meets the ENERGY STAR guidelines for energy
efficiency.
Dimensions: (with stand)
Height
11.10 inches (282 mm )
Width
13.98 inches (355 mm )
Depth
8.90 inches (226 mm )
Dimensons (without stand)
Height
11.10 inches (282 mm )
Width
13.98 inches (355 mm )
Depth
2.40 inches (61 mm )
Stand dimensions:
Height
5.47 inches (139 mm )
Width
9.76 inches (248 mm )
Depth
3.58 inches (91 mm )
Weight with packaging
18.04 lb (8.2 kg ) max
Weight with stand assembly and video cable
14.08 lb (6.4 kg ) max
Weight without stand assembly (For wall mount or VESA mount considerations)
10.56 lb (4.8 kg ) max
Weight of stand assembly
3.52 lb (1.6 kg ) max
Temperature:
Operating
32°to104°F(0°to40°C)
Nonoperating
-4°to140°F(-20°to60°C)
Humidity:
Operating
10% to 80% (noncondensing)
Nonoperating
5% to 90% (noncondensing)
Altitude
Operating
3,658 m (12,000 ft)
Nonoperating
12,192 m (40,000 ft)
Thermal dissipation
89 BTU/hour (maximum)
75 BTU/hour (typical)
Power
Mode
Consumption
Indicator
On
32w maximum, 26w typical
Green
Power Save
less than 2w
Amber
Switch Off
less than 1w
Off
This display is ENERGY STAR-compliant.
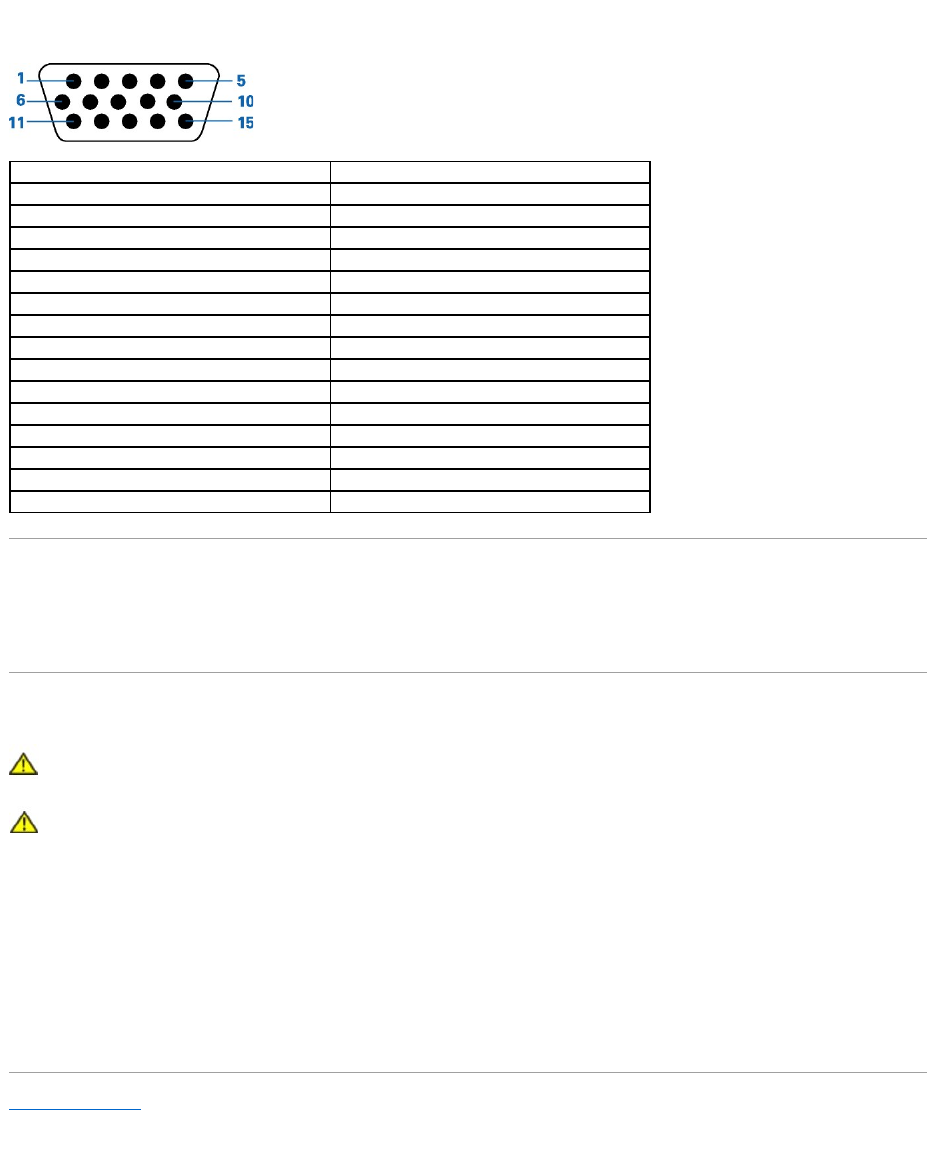
Pin Assignments - 15-pin D-sub connector
Plug and Play Capability
You can install the display in any Plug and Play-compatible system. The display automatically provides the computer system with its Extended Display
Identification Data (EDID) using Display Data Channel (DDC) protocols so the system can configure itself and optimize the display settings. If desired, you can
select different settings, but in most cases display installation is automatic.
Caring for Your Monitor
CAUTION: Read and follow the safety instructions before cleaning the monitor.
CAUTION: Before cleaning the monitor, unplug the monitor from the electrical outlet.
The following tips will help keep your touchmonitor functioning at the optimal level.
lTo avoid risk of electric shock, do not disassemble the monitor. The unit is not user-serviceable.
lUnplug the monitor from the power outlet before cleaning.
lFor cleaning, do not use alcohol (methyl, ethyl or isopropyl) or any strong solvent. Do not use thinner or benzene, abrasive cleaners, or compressed air.
lTo clean the display unit cabinet, use a cloth dampened with a mild detergent.
lAvoid getting liquids inside your touchmonitor. If liquid does get inside, have a qualified service technician check it before you power it on again.
lTo clean the touch screen, use window or glass cleaner. Apply cleaner to a rag and wipe the touch screen. Never apply the cleaner directly to the touch
screen.
Back to Contents Page
Pin Number
15-Pin Side of the Signal Cable
1
Video-Red
2
Video-Green
3
Video-Blue
4
GND
5
GND
6
GND-R
7
GND-G
8
GND-B
9
PC5V
10
GND
11
GND
12
DDC data
13
H-sync
14
V-sync
15
DDC clock

Back to Contents Page
Appendix
Dell™E157FPTTouchScreenMonitorContents
Warranty Information
CAUTION:General Safety Instructions
CAUTION: Monitor Safety Instructions
Contacting Dell
Regulatory Notices
Your Monitor Setup Guide
Warranty Information
U.S. Terms and Conditions of Sale
PLEASE READ THIS DOCUMENT CAREFULLY! IT CONTAINS VERY IMPORTANT INFORMATION ABOUT YOUR RIGHTS AND OBLIGATIONS, AS WELL AS
LIMITATIONS AND EXCLUSIONS THAT MAY APPLY TO YOU. THIS DOCUMENT CONTAINS A DISPUTE RESOLUTION CLAUSE.
These terms and conditions ("Agreement") apply to your purchase of computer systems and/or related products and/or services and support sold in the United
States ("Product") by the Dell entity named on the invoice or acknowledgement ("Dell") provided to you. By accepting delivery of the Product, you accept and
are bound to the terms and conditions of this Agreement. If you do not wish to be bound by this Agreement, you must notify Dell immediately and return your
purchase pursuant to Dell's Return Policy. (See:http://support.dell.com/ContactUs/ByPhone.aspx?c=us&l=en&s=gen for our contact information.) If
returned, Product(s) must remain in the boxes in which they were shipped. THIS AGREEMENT SHALL APPLY UNLESS (I) YOU HAVE A SEPARATE PURCHASE
AGREEMENT WITH DELL, IN WHICH CASE THE SEPARATE AGREEMENT SHALL GOVERN; OR (II) OTHER DELL TERMS AND CONDITIONS APPLY TO THE
TRANSACTION.
1. Other Documents. This Agreement may NOT be altered, supplemented, or amended by the use of any other document(s) unless otherwise agreed to in
a written agreement signed by both you and Dell. If you do not receive an invoice or acknowledgement in the mail, via e-mail, or with your Product,
information about your purchase may be obtained at https://support.dell.com/dellcare/Invoice.aspx or by contacting your sales representative.
2. Payment Terms; Orders; Quotes; Interest. Terms of payment are within Dell's sole discretion, and unless otherwise agreed to by Dell, payment must
be received by Dell prior to Dell's acceptance of an order. Payment for the products will be made by credit card, wire transfer, or some other prearranged
payment method unless credit terms have been agreed to by Dell. Invoices are due and payable within the time period noted on the reverse side of this
invoice, measured from the date of the invoice. Payment terms are within Dell's sole discretion, and, unless otherwise agreed to by Dell, payment must
be made at the time of purchase. Payment for Product may be made by credit card, wire transfer, or some other prearranged payment method. Dell may
invoice parts of an order separately. Your order is subject to cancellation by Dell, at Dell's sole discretion. Unless you and Dell have agreed to a different
discount,Dell'sstandardpricingpolicyforDell™-branded systems, which include both hardware and services in one discounted price, allocates the
discount off list price applicable to the service portion of the system to be equal to the overall calculated percentage discount off list price on the entire
system. Dell is not responsible for pricing, typographical, or other errors, in any offer by Dell and reserves the right to cancel any orders resulting from
such errors.
3. Shipping Charges; Taxes; Title; Risk of Loss. Shipping and handling are additional unless otherwise expressly indicated at the time of sale. Title to
products passes from Dell to Customer on shipment from Dell's facility. Loss or damage that occurs during shipping by a carrier selected by Dell is Dell's
responsibility. Loss or damage that occurs during shipping by a carrier selected by you is your responsibility. You must notify Dell within 21 days of the
date of your invoice or acknowledgement if you believe any part of your purchase is missing, wrong or damaged. Unless you provide Dell with a valid
and correct tax exemption certificate applicable to your purchase of Product and the Product ship-to location, you are responsible for sales and other
taxes associated with the order. Shipping dates are estimates only. Title to software will remain with the applicable licensor(s).
4. Warranties. THE LIMITED WARRANTIES APPLICABLE TO DELL-BRANDED HARDWARE PRODUCT CAN BE FOUND AT
http://www.dell.com/policy/legal/warranty.htm OR IN THE DOCUMENTATION DELL PROVIDES WITH THE PRODUCT. DELL MAKES NO WARRANTIES
FOR SERVICE, SOFTWARE, OR NON-DELL BRANDED PRODUCT. SUCH PRODUCT IS PROVIDED BY DELL "AS IS". WARRANTY AND SERVICE FOR NON-DELL
BRANDED PRODUCT, IF ANY, IS PROVIDED BY THE ORIGINAL MANUFACTURER, NOT BY DELL. DELL MAKES NO EXPRESS WARRANTIES EXCEPT THOSE
STATED IN DELL'S APPLICABLE WARRANTY STATEMENT IN EFFECT ON THE DATE OF THE INVOICE, PACKING SLIP OR ACKNOWLEDGEMENT. WARRANTIES
AND SERVICE WILL BE EFFECTIVE, AND DELL WILL BE OBLIGATED TO HONOR ANY SUCH WARRANTIES AND SERVICES, ONLY UPON DELL'S RECEIPT OF
PAYMENT IN FULL FOR THE ITEM TO BE WARRANTED OR SERVICED.
5. Software. All software is provided subject to the license agreement that is part of the software package and you agree that you will be bound by such
license agreement.
6. Return Policies; Exchanges. Dell's return policy can be found at http://www.dell.com/policy/legal/warranty.htm. You must contact us directly before
you attempt to return Product to obtain a Return Material Authorization Number for you to include with your return. You must return Product to us in
their original or equivalent packaging. You are responsible for risk of loss, shipping and handling fees for returning or exchanging Product. Additional
fees may apply. If you fail to follow the return or exchange instructions and policies provided by Dell, Dell is not responsible whatsoever for Product that
is lost, damaged, modified or otherwise processed for disposal or resale. At Dell's discretion, credit for partial returns may be less than invoice or
individual component prices due to bundled or promotional pricing.
7. Changed or Discontinued Product. Dell's policy is one of ongoing update and revision. Dell may revise and discontinue Product at any time without
notice to you and this may affect information saved in your online "cart." Dell will ship Product that have the functionality and performance of the Product
ordered, but changes between what is shipped and what is described in a specification sheet or catalog are possible. Parts used in repairing or
servicing Product may be new, equivalent-to-new, or reconditioned.
8. Service and Support. Service offerings may vary from Product to Product. If you purchase optional services and support from Dell, Dell and/or your third-
party service provider will provide such service and support to you in the United States in accordance with the terms and conditions located at
http://www.dell.com/us/en/gen/services/service_service_contracts.htm or as mailed to you. You may contact Dell for more information, see
http://www1.us.dell.com/content/topics/segtopic.aspx/contact/contact?c= us&l=en&s=gen for contact information. Dell and/or the third-party
service provider may at their discretion, revise their general and optional service and support programs and the terms and conditions that govern them
without prior notice to you. Dell has no obligation to provide service or support until Dell has received full payment for the Product or service/support

contract you purchased. Dell is not obligated to provide service or support you purchase through a third party and not Dell.
9. Limitation of Liability. DELL DOES NOT ACCEPT LIABILITY BEYOND THE REMEDIES SET FORTH HEREIN, INCLUDING BUT NOT LIMITED TO ANY LIABILITY
FOR PRODUCT NOT BEING AVAILABLE FOR USE, LOST PROFITS, LOSS OF BUSINESS OR FOR LOST OR CORRUPTED DATA OR SOFTWARE, OR THE
PROVISION OF SERVICES AND SUPPORT. EXCEPT AS EXPRESSLY PROVIDED HEREIN, DELL WILL NOT BE LIABLE FOR ANY CONSEQUENTIAL, SPECIAL,
INDIRECT, OR PUNITIVE DAMAGES, EVEN IF ADVISED OF THE POSSIBILITY OF SUCH DAMAGES, OR FOR ANY CLAIM BY ANY THIRD PARTY. YOU AGREE THAT
FOR ANY LIABILITY RELATED TO THE PURCHASE OF PRODUCT, DELL IS NOT LIABLE OR RESPONSIBLE FOR ANY AMOUNT OF DAMAGES ABOVE THE AMOUNT
INVOICED FOR THE APPLICABLE PRODUCT. NOTWITHSTANDING ANYTHING IN THIS AGREEMENT TO THE CONTRARY, THE REMEDIES SET FORTH IN THIS
AGREEMENT SHALL APPLY EVEN IF SUCH REMEDIES FAIL THEIR ESSENTIAL PURPOSE. DELL IS NOT LIABLE TO YOU FOR WARRANTIES, SUPPORT, OR
SERVICE MADE BY OR PURCHASED FROM A THIRD PARTY AND NOT DIRECTLY FROM DELL. DELL IS NOT RESPONSIBLE FOR
REPRESENTATIONS OR OMISSIONS MADE BY A THIRD PARTY.
10. Applicable Law; Not For Resale or Export. You agree to comply with all applicable laws and regulations of the various states and of the United States.
You agree and represent that you are buying only for your own internal use only, and not for resale or export. Dell has separate terms and conditions
governing resale of Product by third parties and transactions outside the United States. Terms and conditions for resale are located at:
www.dell.com/policy/legal/termsofsale.htm.
11. Governing Law. THE PARTIES AGREE THAT THIS AGREEMENT, ANY SALES THERE UNDER, OR ANY CLAIM, DISPUTE OR CONTROVERSY
(WHETHER IN CONTRACT, TORT, OR OTHERWISE, WHETHER PREEXISTING, PRESENT OR FUTURE, AND INCLUDING STATUTORY, COMMON
LAW, AND EQUITABLE CLAIMS) BETWEEN CUSTOMER AND DELL arising from or relating to this agreement, its interpretation, or the breach,
termination or validity thereof, the relationships which result from this agreement, Dell's advertising, or any related purchase SHALL, TO THE
MAXIMUM EXTENT PERMITTED BY APPLICABLE LAW, BE GOVERNED BY THE LAWS OF THE STATE OF TEXAS, WITHOUT REGARD TO CONFLICTS
OF LAWS RULES.
12. Headings. The section headings used herein are for convenience of reference only and do not form a part of these terms and conditions, and no
construction or inference shall be derived there from.
Dell-branded hardware products purchased in the U.S. come with either a 90-day, 1-year, 2-year, 3-year, or 4-year limited warranty depending on the product
purchased. To determine which warranty came with your hardware product(s), see your packing slip or invoice.
What is covered by this limited warranty?
This limited warranty covers defects in materials and workmanship in your—our end-user customer's—Dell-branded hardware products, including Dell-branded
peripheral products.
What is not covered by this limited warranty?
This limited warranty does not cover:
l Software, including the operating system and software added to the Dell-branded hardware products through our factory-integration system, third-
party software, or the reloading of software
lNon-Dell-branded and Solution Provider Direct products and accessories
lProblems that result from:
¡ External causes such as accident, abuse, misuse, or problems with electrical power
¡Servicing not authorized by Dell
¡Usage that is not in accordance with product instructions
¡Failure to follow the product instructions or failure to perform preventive maintenance
¡Problems caused by using accessories, parts, or components not supplied by Dell
lProducts with missing or altered Service Tags or serial numbers
l Products for which Dell has not received payment
THIS WARRANTY GIVES YOU SPECIFIC LEGAL RIGHTS, AND YOU MAY ALSO HAVE OTHER RIGHTS WHICH VARY FROM STATE TO STATE (OR
JURISDICTION TO JURISDICTION). DELL'S RESPONSIBILITY FOR MALFUNCTIONS AND DEFECTS IN HARDWARE IS LIMITED TO REPAIR AND
REPLACEMENT AS SET FORTH IN THIS WARRANTY STATEMENT. ALL EXPRESS AND IMPLIED WARRANTIES FOR THE PRODUCT, INCLUDING BUT NOT
LIMITED TO ANY IMPLIED WARRANTIES AND CONDITIONS OF MERCHANTABILITY AND FITNESS FOR A PARTICULAR PURPOSE, ARE LIMITED IN
TIME TO THE TERM OF THE LIMITED WARRANTY PERIOD REFLECTED ON YOUR PACKING SLIP OR INVOICE. NO WARRANTIES, WHETHER EXPRESS
OR IMPLIED, WILL APPLY AFTER THE LIMITED WARRANTY PERIOD HAS EXPIRED. SOME STATES DO NOT ALLOW LIMITATIONS ON HOW LONG AN
IMPLIED WARRANTY LASTS, SO THIS LIMITATION MAY NOT APPLY TO YOU.
WE DO NOT ACCEPT LIABILITY BEYOND THE REMEDIES PROVIDED FOR IN THIS LIMITED WARRANTY OR FOR CONSEQUENTIAL OR INCIDENTAL
DAMAGES, INCLUDING, WITHOUT LIMITATION, ANY LIABILITY FOR THIRD-PARTY CLAIMS AGAINST YOU FOR DAMAGES, FOR PRODUCTS NOT
BEING AVAILABLE FOR USE, OR FOR LOST DATA OR LOST SOFTWARE. OUR LIABILITY WILL BE NO MORE THAN THE AMOUNT YOU PAID FOR THE
PRODUCT THAT IS THE SUBJECT OF A CLAIM. THIS IS THE MAXIMUM AMOUNT FOR WHICH WE ARE RESPONSIBLE.
SOME STATES DO NOT ALLOW THE EXCLUSION OR LIMITATION OF INCIDENTAL OR CONSEQUENTIAL DAMAGES, SO THE ABOVE LIMITATION OR
EXCLUSION MAY NOT APPLY TO YOU.
How long does this limited warranty last?
This limited warranty lasts for the time period indicated on your packing slip or invoice, except for the following Dell-branded hardware:
lPortable computer batteries carry the lesser of either a 1-year limited warranty or the length of the limited warranty for the Dell computer with which
the battery is shipped.
lThe limited warranty for Power Adapters purchased independent of a system is one year. Power Adapters purchased with a system are covered by the
system limited warranty.
lYour PERC 5 battery may provide up to 72 hours of controller cache memory backup power when new. Under the 1-year limited warranty, we warrant
that the battery will provide at least 24 hours of backup coverage during the 1-year limited warranty period.
lProjector lamps carry a 90-day limited warranty.
lMemory carries a lifetime limited warranty.
lThe limited warranty for monitors purchased independently of a system lasts for the time period indicated on your packing slip or invoice. Monitors
purchased with a system are covered by the system limited warranty.
lPDAs, earphones, and remote inline controls carry a 1-year limited warranty.
lOther add-on hardware carries the longer of either a 1-year limited warranty for new parts and a 90-day limited warranty for reconditioned parts or, for
both new and reconditioned parts, the remainder of the warranty for the Dell computer on which such parts are installed.
The limited warranty on all Dell-branded products begins on the date of the packing slip or invoice. The warranty period is not extended if we repair or replace
a warranted product or any parts. Dell may change the availability of limited warranties, at its discretion, but any changes will not be retroactive.
What do I do if I need warranty service?
Before the warranty expires, please call us at the relevant number listed in the following table. Please also have your Dell Service Tag or order number
available.
What will Dell do?
During the 90 days of the 90-day limited warranty and the first year of all other limited warranties: During the 90 days of the 90-day limited warranty
and the first year of all other limited warranties, we will repair any Dell-branded hardware products returned to us that prove to be defective in materials or
workmanship. If we are not able to repair the product, we will replace it with a comparable product that is new or refurbished.
When you contact us, we will issue a Return Material Authorization Number for you to include with your return. You must return the products to us in their
original or equivalent packaging, prepay shipping charges, and insure the shipment or accept the risk if the product is lost or damaged in shipment. We will
return the repaired or replacement products to you. We will pay to ship the repaired or replaced products to you if you use an address in the United States
(excluding Puerto Rico and U.S. possessions and territories). Otherwise, we will ship the product to you freight collect.
If we determine that the issue is not covered under this warranty, we will notify you and inform you of service alternatives that are available to you on a fee
basis.
Web Support
support.dell.com/ContactUs/ContactUsHome.aspx?c=us&l=en&s=gen
Individual Home Consumers:
U.S. Only
Hardware Warranty Support
1-800-624-9896
Customer Service
1-800-624-9897
Individual Home Consumers who purchased through an Employee Purchase Program:
Hardware Warranty Support and Customer Service
1-800-822-8965
Home and Small Business Commercial Customers:
Support and Customer Service
1-800-456-3355
Medium, Large, or Global Commercial Customers, Healthcare Customers, and Value-Added Resellers (VARs):
Support and Customer Service
1-800-822-8965
Government and Education Customers:
Support and Customer Service
1-800-234-1490
Dell-Branded Memory
1-888-363-5150
NOTE: Before you ship the product(s) to us, make sure to back up the data on the hard drive(s) and any other storage device(s) in the product(s).
Remove any confidential, proprietary, or personal information and removable media such as floppy disks, CDs, or PC Cards. We are not responsible for
any of your confidential, proprietary, or personal information; lost or corrupted data; or damaged or lost removable media.

During the remaining years: For the remaining period of the limited warranty, we will replace any defective part with new or refurbished parts, if we agree
that it needs to be replaced. When you contact us, we will require a valid credit card number at the time you request a replacement part, but we will not
charge you for the replacement part as long as you return the original part to us within 30 days after we ship the replacement part to you. If we do not
receive the original part within 30 days, we will charge to your credit card the then-current standard price for that part.
We will pay to ship the part to you if you use an address in the United States (excluding Puerto Rico and U.S. possessions and territories). Otherwise, we will
ship the part freight collect. We will also include a prepaid shipping container with each replacement part for your use in returning the replaced part to us.
What if I purchased a service contract?
If your service contract is with Dell, service will be provided to you under the terms of the service agreement. Please refer to that contract for details on how to
obtain service.
If you purchased through us a service contract with one of our third-party service providers, please refer to that contract for details on how to obtain service.
How will you fix my product?
We use new and refurbished parts made by various manufacturers in performing warranty repairs and in building replacement parts and systems. Refurbished
parts and systems are parts or systems that have been returned to Dell, some of which were never used by a customer. All parts and systems are inspected
and tested for quality. Replacement parts and systems are covered for the remaining period of the limited warranty for the product you bought. Dell owns all
parts removed from repaired products.
May I transfer the limited warranty?
Limited warranties on systems may be transferred if the current owner transfers ownership of the system and records the transfer with us. The limited
warranty on Dell-branded memory may not be transferred. You may record your transfer by going to Dell's website:
l If you are an Individual Home Consumer, go to www.dell.com/us/en/dhs/topics/sbtopic_015_ccare.htm
l If you are a Home Office, Small, Medium, Large, or Global Commercial Customer, go to www.dell.com/us/en/dhs/topics/sbtopic_015_ccare.htm
l If you are a Government, Education, or Healthcare Customer, or an Individual Home Consumer who purchased through an Employee Purchase
Program, go to www.dell.com/us/en/dhs/topics/sbtopic_015_ccare.htm
lIf you do not have Internet access, call your customer care representative or call 1-800-624-9897.
All requests to transfer ownership are at Dell's sole discretion. All such transfers will be subject to the terms and conditions of the original service or limited
warranty agreement and Dell's terms and conditions of sale located at www.dell.com. Dell cannot guarantee the authenticity of the products, limited
warranties, service or support, or the accuracy of the listings of products you purchase from a third party.
Dell Return Policy (U.S. Only)
Dell values our relationship with you and offers a return policy for most products that you purchase directly from Dell. Under this policy, you may return to Dell,
within the applicable return policy period, products that you purchased directly from Dell for a credit or a refund of the purchase price paid, less shipping and
handling and applicable restocking fees.
Hardware Products and Accessories:UnlessyouhaveaseparateagreementwithDellorexceptasprovidedinthesectionbelow,allhardware,accessories,
peripherals, parts and software that is unopened and still in its/their sealed package or, if delivered electronically, software you have not accepted by clicking
the "I agree to these Terms and Conditions" button, may be returned within twenty-one (21) days from the date on the packing slip or invoice for a credit or a
refund of the purchase price paid, less shipping and handling and applicable restocking fees.
Exceptions to Dell's 21-day return policy:
lPowerEdge™,PowerConnect™andPowerVault™productsmaybereturnedwithinthirty(30)daysfromthedateonthepackingsliporinvoice,except
thatnewPowerEdge™SCserversandnseriesproductspurchasedfromtheSmallandMediumBusinessSalesDivisionmayonlybereturnedwithin
fourteen (14) days from the date on the packing slip or invoice.
lApplication software or an operating system that has been installed by Dell may not be returned unless you return the entire computer under the 21-
day return policy, if applicable to your purchase (if not applicable to your purchase, you may not return application software or an operating system).
lDell/EMC storage products, EMC-branded products, Unisys-brandedproducts,PowerVault™160Ttapelibraries,enterprisesoftware,non-Dell branded
enterprise products, software and/or software licenses purchased under any type of volume purchase agreement or any non-Dell customized hardware
and/or software product(s) may not be returned at any time.
Restocking Fees: Unless the product is defective or the return is a direct result of a Dell error, a restocking fee of 15% may be charged on hardware,
accessories, peripherals, parts and unopened software still in its/their sealed package.
How to Return: To return products, you must contact Dell customer service (www.dell.com/us/en/gen/contact.htm) and receive a Credit Return
Authorization Number within the return policy period applicable to the product you want to return. You must obtain a Credit Return Authorization Number in
order to return the product. See "Contacting Dell" or "Getting Help" in your customer documentation or the above website to find the appropriate contact
information for obtaining customer assistance.
You must ship the products to Dell within five (5) days of the date that Dell issues the Credit Return Authorization Number. You must:
NOTE: Before you replace parts, make sure to back up the data on the hard drive(s) and any other storage device(s) in the product(s). We are not
responsible for lost or corrupted data.
lShip back all products you are seeking to return to Dell. At Dell's discretion, credit for partial returns may be less than invoice or individual component
prices due to bundled or promotional pricing and any unadvertised discounts or concessions.
lReturn the products in their original packaging, in as-new condition along with any media, documentation, and all other items that were included in the
original shipment.
lShip the product(s) at your expense, and insure the shipment or accept the risk of loss or damage during shipment.
Upon receipt of the complete returned purchase, Dell will issue a credit or a refund of the purchase price paid, less shipping and handling and applicable
restocking fees.
CAUTION:General Safety Instructions
Use the following safety guidelines to help ensure your own personal safety and to help protect your equipment and working environment from potential
damage.
IMPORTANT NOTICE FOR USE IN HEALTHCARE ENVIRONMENTS: Dell products are not medical devices and are not listed under UL or IEC 60601 (or
equivalent). As a result, they must not be used within 6 feet of a patient or in a manner that directly or indirectly contacts a patient.
SAFETY: General Safety
When setting up the equipment for use:
lPlace the equipment on a hard, level surface. Leave 10.2 cm (4 in) minimum of clearance on all vented sides of the computer to permit the airflow
required for proper ventilation. Restricting airflow can damage the computer or cause a fire.
lDo not stack equipment or place equipment so close together that it is subject to re-circulated or preheated air.
lEnsure that nothing rests on your equipment's cables and that the cables are not located where they can be stepped on or tripped over.
lDo not place your equipment in a closed-in wall unit or on a bed, sofa, or rug.
lKeep your device away from radiators and heat sources.
lKeep your equipment away from extremely hot or cold temperatures to ensure that it is used within the specified operating range.
lDo not push any objects into the air vents or openings of your equipment. Doing so can cause fire or electric shock by shorting out interior components.
lAvoid placing loose papers underneath your device. Do not place your device in a closed-in wall unit, or on a soft, fabric surface such as a bed, sofa,
carpet, or a rug.
When operating your equipment:
lDo not use your equipment in a wet environment, for example, near a bath tub, sink, or swimming pool or in a wet basement.
lDo not use AC powered equipment during an electrical storm. Battery powered devices may be used if all cables have been disconnected.
lIf your device includes an integrated or optional (PC card) modem, disconnect the modem cable if an electrical storm is approaching to avoid the remote
risk of electric shock from lightning via the telephone line.
lIf your device includes a modem, the cable used with the modem should be manufactured with a minimum wire size of 26 American wire gauge (AWG)
and an FCC compliant RJ-11 modular plug.
lThis product may contain Optical Disk Drives (ODD), such as a CD-ROM, CDR/W, DVD drive, etc., which have built-in laser devices. To prevent any risk of
exposure to laser radiation, do not disable or open any ODD assembly for any reason.
These ODDs comply with safety requirements and are classified as Class 1 Laser Products, under the US DHHS Standard and IEC/EN60825-1 Laser
Safety Standard. These ODD devices contain no user adjustments nor any user serviceable or replaceable parts.
lDo not spill food or liquids on your equipment.
lBefore you clean your equipment, disconnect it from the electrical outlet. Clean your device with a soft cloth dampened with water. Do not use liquids or
aerosol cleaners, which may contain flammable substances.
lClean the portable computer or monitor display with a soft, clean cloth and water. Apply the water to the cloth, then stroke the cloth across the display
in one direction, moving from the top of the display to the bottom. Remove moisture from the display quickly and keep the display dry. Long-term
exposure to moisture can damage the display. Do not use a commercial window cleaner to clean your display.
NOTE: Before you ship the product(s) to us, make sure to back up the data on the hard drive(s) and any other storage device(s) in the product
(s). Remove any confidential, proprietary or personal information, removable media, such as floppy disks, CDs, or PC Cards. We are not
responsible for any of your confidential, proprietary or personal information; lost or corrupted data; or damaged or lost removable media.
NOTE: In this section, equipment refers to all portable devices (computers, port replicators, media bases, docking stations, and similar devices), desktop
computers, and monitors. After reading this section, be sure to read the safety instructions pertaining to your specific equipment.
NOTE: Review the weight limits referenced in your computer documentation before placing a monitor or other devices on top of your computer.
CAUTION: Do not operate your equipment with any cover(s) (including computer covers, bezels, filler brackets, front-panel inserts, etc.)
removed.

lIf your equipment does not operate normally - in particular, if there are any unusual sounds or smells coming from it - unplug it immediately and contact
an authorized dealer or service center.
SAFETY: When Working Inside Your Device
Do not attempt to service the equipment yourself, except as explained in your Dell documentation or in instructions otherwise provided to you by Dell.
Always follow installation and service instructions closely.
lTo help avoid the potential hazard of electric shock, do not connect or disconnect any cables, or perform maintenance or reconfiguration of your
equipment during an electrical storm.
PC Cards may become very warm during normal operation. Use care when removing PC Cards after their continuous operation.
SAFETY: General Power Safety
Observe the following guidelines when connecting your equipment to a power source:
lCheck the voltage rating before you connect the equipment to an electrical outlet to ensure that the required voltage and frequency match the
available power source.
lYour device is equipped with either an internal power source or an external adapter. For internal power sources, your device is equipped with one of
the following:
¡An auto-sensing voltage circuit - Devices with an auto-sensing voltage circuit do not have a voltage selection switch on the back panel and
automatically detect the correct operating voltage.
OR
¡A manual voltage selection switch - Devices with a voltage selection switch on the back panel must be manually set to operate at the correct
operating voltage. Set the switch to the position that most closely matches the voltage used in your location.
To help avoid damaging a computer with a manual voltage selection switch, set the switch for the voltage that most closely matches the AC power available in
your location.
For Japan, the voltage selection switch must be set to the 115-V position even though the AC power available in Japan is 100 V. Also, ensure that your
monitor and attached devices are electrically rated to operate with the AC power available in your location.
lDo not plug the equipment power cables into an electrical outlet if the power cable is damaged.
lTo prevent electric shock, plug the equipment power cables into properly grounded electrical outlets. If the equipment is provided with a 3-prong power
cable, do not use adapter plugs that bypass the grounding feature, or remove the grounding feature from the plug or adapter.
lNorway and Sweden: If this product is provided with a 3-prong power cable, connect the power cable to a grounded electrical outlet only.
lIf you use an extension power cable, ensure that the total ampere rating of the products plugged in to the extension power cable does not exceed the
ampere rating of the extension cable.
lIf you must use an extension cable or power strip, ensure the extension cable or power strip is connected to a wall power outlet and not to another
extension cable or power strip. The extension cable or power strip must be designed for grounded plugs and plugged into a grounded wall outlet.
lIf you are using a multiple-outlet power strip, use caution when plugging the power cable into the power strip. Some power strips may allow you to
insert a plug incorrectly. Incorrect insertion of the power plug could result in permanent damage to your equipment, as well as risk of electric shock
and/or fire. Ensure that the ground prong of the power plug is inserted into the mating ground contact of the power strip.
lBe sure to grasp the plug, not the cable, when disconnecting equipment from an electric socket.
If your equipment uses an AC adapter:
lUse only the Dell provided AC adapter approved for use with this device. Use of another AC adapter may cause a fire or explosion.
Refer to your system rating label for information on the proper adapter model approved for use with your device.
lPlace the AC adapter in a ventilated area, such as a desk top or on the floor, when you use it to run the computer or to charge the battery. Do not
cover the AC adapter with papers or other items that will reduce cooling; also, do not use the AC adapter inside a carrying case.
lThe AC adapter may become hot during normal operation of your computer. Use care when handling the adapter during or immediately after operation.
lIt is recommended that you lay the adapter on the floor or desk so that the green light is visible. This will alert you if the adapter should accidentally go
off due to external effects. If for any reason the green light goes off, disconnect the AC power cord from the wall for a period of ten seconds, and then
reconnect the power cord.
lJapan Only: Use only the Dell-provided AC power cable with the AC adapter. Use of any other power cable may damage the device or AC adapter or
may present risk of fire or electric shock.
NOTE: The switch on your system may be different than the one pictured.
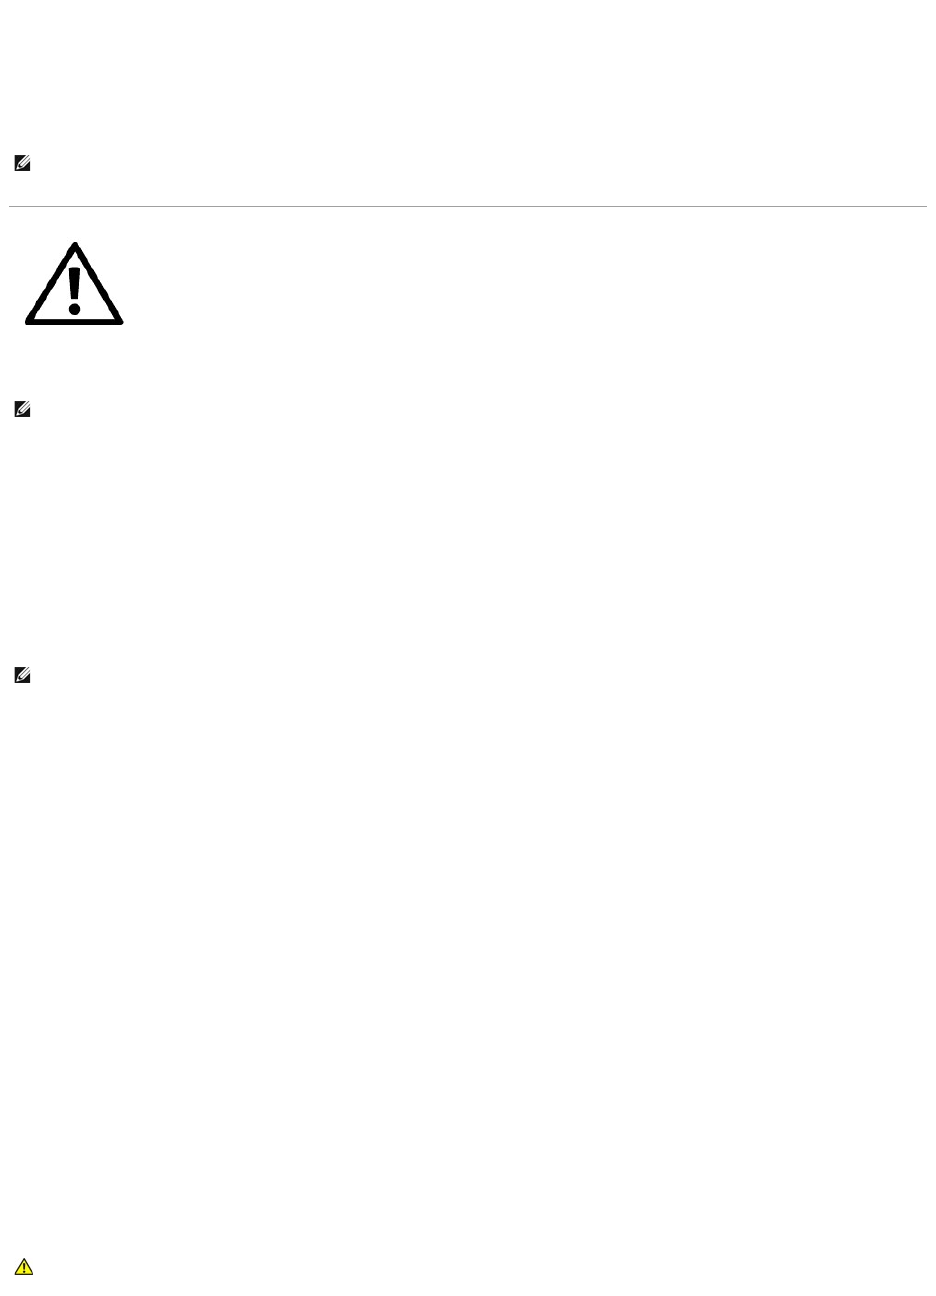
Connecting the AC Plug Adapter (Japan Only)
1. Connect the metal ground connector to the grounding source on the outlet:
a. Loosen the grounding source.
b. Slide the metal ground connector behind the grounding source, and then tighten the grounding source.
2. Connect the AC power cable to the outlet.
SAFETY: If Your Device Gets Wet
1. Disconnect the AC adapter from the electrical outlet, and then, if possible, disconnect the AC adapter from the device.
2. Turn off any attached external devices, then disconnect them from their power sources, and then from the device.
3. For Portables : Remove the main battery from the battery bay, and if necessary, the second battery from the module bay.
Wipe off the batteries and put them in a safer place to dry.
4. Contact Dell support (see your User's Guide or Owner's Manual for the appropriate contact information).
SAFETY: If You Drop or Damage Your Computer or Monitor
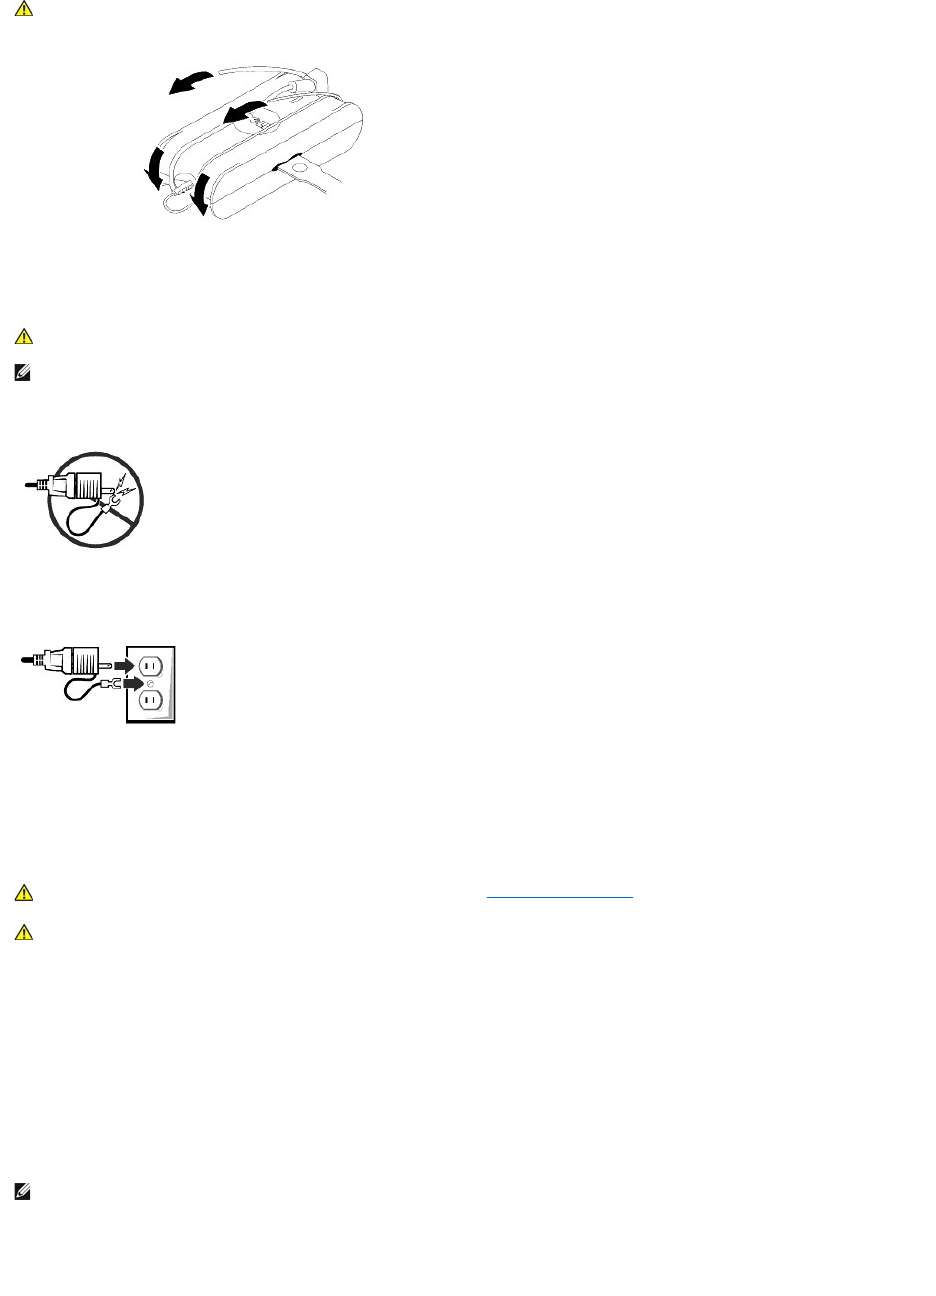
CAUTION: When preparing your AC adapter for travel, wrap both of the cords around the adapter in the same direction as shown in the following
picture. Failure to wrap the cords in the correct direction can result in damage to the cords not covered by the adapter warranty. Never use an AC
adapter that shows signs of damage or excessive wear.
CAUTION: When using the AC plug adapter, do not permit contact between the green ground wire and power leads because electrical shock, fire,
or damage to your computer can occur.
NOTE: Some devices available in Japan do not include the AC plug adapter.
CAUTION: Before you begin any of the procedures in this section, see the SAFETY: General Safety section of this document.
CAUTION: Perform this procedure only after you are certain that it is safe to do so. If the computer is connected to an electrical outlet, turn off
the AC power at the circuit breaker, if possible, before attempting to remove the power cables from the electrical outlet. Use the utmost caution
when removing wet cables from a live power source.
NOTE: See the Limited Warranties and Return Policy section of this document or separate paper warranty document that shipped with your monitor or
computer for information on your warranty coverage.
1. Save and close any open files, exit any open programs, and shut down the computer.
2. Disconnect the computer or monitor AC adapter from the electrical outlet, and then, if possible, disconnect the AC adapter from the computer or monitor.
3. Turn off any attached external devices, then disconnect them from their power sources, and then from the computer.
4. If provided, remove and then reinstall the battery. If not battery powered, connect the device to the electrical outlet.
5. Turn on the device.
If the device does not start, or if and smoke or unusual odors are detected, or if you cannot identify the damaged components, contact Dell (see your User's
Guide or Owner's Manual for the appropriate contact information).
CAUTION: Monitor Safety Instructions
Review the sections on General Safety Instructions and Power Safety in this document.
Read and follow these instructions when connecting and using your computer monitor:
lAlways be sure that your monitor is electrically rated to operate with the AC power available in your location.
NOTE: This monitor does not need or have a voltage selection switch for setting the AC voltage input. It will automatically accept any AC input voltage
according to the ranges defined in the "Electrical Specifications" section in the User's Guide.
lPlace the monitor on a solid surface and treat it carefully. The screen is made of glass and can be damaged if dropped or hit sharply.
lKeep flat panel monitor in room temperature conditions. Excessive cold or hot conditions can have an adverse effect on the liquid crystal of the display.
lDo not subject the monitor to severe vibration or high impact conditions. For example, do not place the monitor inside a car trunk.
lUnplug the monitor when it is going to be left unused for an extended period of time.
lTo avoid electric shock, do not attempt to remove any cover or touch the inside of the monitor. Only a qualified service technician should open the
monitor case.
Contacting Dell
You can contact Dell through the Internet and by phone:
lFor support through the web, go to support.dell.com.
lFor worldwide support through the web, use the Choose A Country/Region menu near the bottom of the page, or see the web addresses listed in the
following table.
lFor support by e-mail, see the e-mail addresses listed in the following table.
lFor support by phone, use the phone numbers and codes provided in the following table. If you need assistance in determining which codes to use,
contact a local or an international operator.
CAUTION: Before you begin any of the procedures in this section, see the SAFETY: General Safety and Power Safety sections of this document.
CAUTION: If any internal components can be seen through damaged portions, or if smoke or unusual odors are detected, disconnect the device
from the electrical outlet and contact Dell support. See your User's Guide or Owner's Manual for the appropriate contact information.
NOTE: See the Limited Warranties and Return Policy section of this document or separate paper warranty document that shipped with your monitor or
computer for information on your warranty coverage.
CAUTION: Use of controls, adjustments, or procedures other than those specified in this documentation may result in exposure to shock,
electrical hazards, and/or mechanical hazards.
NOTE: Toll-free numbers are for use within the country for which they are listed.
NOTE: Incertaincountries,supportspecifictoDell™XPS™computersisavailableataseparatetelephonenumberlistedforparticipatingcountries.If
you do not see a telephone number listed that is specific for XPS computers, you may contact Dell through the support number listed and your call will be
routed appropriately.
NOTE: The contact information provided was deemed correct at the time that this document went to print and is subject to change.

Country (City)
International Access Code
Country Code
City Code
Service Type
Area Codes,
Local Numbers, and
Toll-Free Numbers
Web and E-mail Address
Anguilla
Online Support
www.dell.com/ai
E-mail Address
la-techsupport@dell.com
Technical Support, Customer Service, Sales
toll-free:800-335-0031
Antigua and Barbuda
Online Support
www.dell.com/ag
la-techsupport@dell.com
Technical Support, Customer Service, Sales
1-800-805-5924
Aomen
Country Code: 853
Technical Support
toll-free:0800-105
Customer Service (Xiamen, China)
34 160 910
Transaction Sales (Xiamen, China)
29 693 115
Argentina (Buenos Aires)
International Access Code: 00
Country Code: 54
City Code: 11
Online Support
www.dell.com/ar
E-mail for Desktops and Portables
la-techsupport@dell.com
E-mail for Servers and EMC®Storage Products
la_enterprise@dell.com
Customer Service
toll-free:0-800-444-0730
Technical Support – DellPowerApp™,DellPowerEdge™,Dell
PowerConnect™,andDellPowerVault™
toll-free:0-800-222-0154
Technical Support Services
toll-free:0-800-444-0724
Sales
0-810-444-3355
Aruba
Online Support
www.dell.com/aw
la-techsupport@dell.com
Technical Support, Customer Service, Sales
toll-free:800-1578
Australia (Sydney)
International Access Code:
0011
Country Code: 61
City Code: 2
Online Support
support.ap.dell.com
support.ap.dell.com/contactus
Technical Support
Technical Support for XPS computers only
toll-free:1300790877
Home and Home Office
toll-free:1300-655-533
Medium and Large Business
toll-free:1800-633-559
Small Business, Education, Local Government
toll-free:1800-060-889
Customer Service
toll-free:1300-662-196
Austria (Vienna)
International Access Code: 900
Country Code: 43
City Code: 1
Online Support
support.euro.dell.com
tech_support_central_europe@dell.com
Technical Support for XPS computers only
082024053081
Home/Small Business Sales
082024053000
Home/Small Business Fax
082024053049
Home/Small Business Customer Service
082024053014
Home/Small Business Support
082024053017
Preferred Accounts/Corporate Customer Service
082024053016
Preferred Accounts/Corporate Support
082024053017
Switchboard
082024053000
Bahamas
Online Support
www.dell.com/bs
la-techsupport@dell.com
Technical Support, Customer Service, Sales
toll-free:1-866-874-3038
Barbados
Online Support
www.dell.com/bb
la-techsupport@dell.com
Technical Support, Customer Service, Sales
1-800-534-3142
Belgium (Brussels)
International Access Code: 00
Country Code: 32
City Code: 2
Online Support
support.euro.dell.com
Technical Support for XPS computers only
024819296
General Support
024819288
General Support Fax
024819295
Customer Service
027131565
Corporate Sales
024819100
Fax
024819299
Switchboard
024819100
www.dell.com/bm
Bermuda
Online Support
la-techsupport@dell.com
Technical Support, Customer Service, Sales
1-877-890-0751
Bolivia
Online Support
www.dell.com/bo
la-techsupport@dell.com
Technical Support, Customer Service, Sales
toll-free:800-10-0238
Brazil
International Access Code: 00
Country Code: 55
City Code: 51
Online Support
www.dell.com/br
BR_TechSupport@dell.com
Customer Service and Tech Support
08009703355
Technical Support Fax
5121045470
Customer Service Fax
5121045480
Sales
08009703390
British Virgin Islands
Technical Support, Customer Service, Sales
toll-free:1-866-278-6820
Brunei
Country Code: 673
Technical Support (Penang, Malaysia)
6046334966
Customer Service (Penang, Malaysia)
6046333101
or toll-free: 801 1012
Transaction Sales (Penang, Malaysia)
6046333101
or toll-free: 801 1012
Canada (North York, Ontario)
International Access Code: 011
Online Order Status
www.dell.ca/ostatus
Online Support
support.ca.dell.com
AutoTech (automated Hardware and Warranty Support)
toll-free:1-800-247-9362
Customer Service
Home/Home Office
toll-free:1-800-847-4096
Small Business
toll-free:1-800-906-3355
Medium/Large Business, Government, Education
toll-free:1-800-387-5757
Hardware Warranty Phone Support
XPS Computers Only
toll-free:1-866-398-8977
Computers for Home/Home Office
toll-free:1-800-847-4096
Computers for Small/Medium/Large Business, Government
toll-free:1-800-387-5757
Printers, Projectors, Televisions, Handheld, Digital Jukebox, and
Wireless
1-877-335-5767
Sales
Home and Home Office Sales
toll-free:1-800-999-3355
Small Business
toll-free:1-800-387-5752
Medium/Large Business, Government
toll-free:1-800-387-5755
Spare Parts and Extended Service
18664403355
Cayman Islands
Online Support
la-techsupport@dell.com
Technical Support, Customer Service, Sales
1-877-262-5415
Chile (Santiago)
Country Code: 56
City Code: 2
Online Support
www.dell.com/cl
la-techsupport@dell.com
Sales and Customer Support
toll-free:1230-020-3397
or 800-20-1385
China (Xiamen)
Country Code: 86
City Code: 592
Online Support
support.dell.com/cn
Technical Support E-mail
support.dell.com/cn/email
Customer Service E-mail
customer_cn@dell.com
Technical Support Fax
5928181350
Technical Support – XPS computers only
toll-free:8008580540
Technical Support – Dell™Dimension™andDellInspiron™
toll-free:8008582969
Technical Support – DellOptiPlex™,DellLatitude™,andDell
Precision™
toll-free:8008580950
Technical Support – Servers and Storage
toll-free:8008580960
Technical Support – Projectors, PDAs, Switches, Routers, etc.
toll-free:8008582920
Technical Support – Printers
toll-free:8008582311
Customer Service
toll-free:8008582060
Customer Service Fax
5928181308
Home and Small Business
toll-free:8008582222
Preferred Accounts Division
toll-free:8008582557
Large Corporate Accounts GCP
toll-free:8008582055

Large Corporate Accounts Key Accounts
toll-free:8008582628
Large Corporate Accounts North
toll-free:8008582999
Large Corporate Accounts North Government and Education
toll-free:8008582955
Large Corporate Accounts East
toll-free:8008582020
Large Corporate Accounts East Government and Education
toll-free:8008582669
Large Corporate Accounts Queue Team
toll-free:8008582572
Large Corporate Accounts South
toll-free:8008582355
Large Corporate Accounts West
toll-free:8008582811
Large Corporate Accounts Spare Parts
toll-free:8008582621
Colombia
Online Support
www.dell.com/co
la-techsupport@dell.com
Technical Support, Customer Service, Sales
01-800-915-4755
Costa Rica
Online Support
www.dell.com/cr
la-techsupport@dell.com
Technical Support, Customer Service, Sales
0800-012-0231
Czech Republic (Prague)
International Access Code: 00
Country Code: 420
Online Support
support.euro.dell.com
czech_dell@dell.com
Technical Support
225372727
Customer Service
225372707
Fax
225372714
Technical Fax
225372728
Switchboard
225372711
Denmark (Copenhagen)
International Access Code: 00
Country Code: 45
Online Support
support.euro.dell.com
Technical Support for XPS computers only
7010 0074
Technical Support
70230182
Customer Service – Relational
70230184
Home/Small Business Customer Service
32875505
Switchboard – Relational
32871200
Switchboard Fax – Relational
32871201
Switchboard – Home/Small Business
32875000
Switchboard Fax – Home/Small Business
32875001
Dominica
Online Support
www.dell.com/dm
la-techsupport@dell.com
Technical Support, Customer Service, Sales
toll-free:1-866-278-6821
Dominican Republic
Online Support
www.dell.com/do
la-techsupport@dell.com
Technical Support, Customer Service, Sales
1-800-156-1588
Ecuador
Online Support
www.dell.com/ec
la-techsupport@dell.com
Technical Support, Customer Service, Sales (calling from Quito)
toll-free:999-119-877-655-3355
Technical Support, Customer Service, Sales (calling from Guayaquil)
toll-free:1800-999-119-877-655-3355
El Salvador
Online Support
www.dell.com/sv
la-techsupport@dell.com
Technical Support, Customer Service, Sales
800-6132
Finland (Helsinki)
International Access Code: 990
Country Code: 358
City Code: 9
Online Support
support.euro.dell.com
fi_support@dell.com
Technical Support
0207533555
Customer Service
0207533538
Switchboard
0207533533
Fax
0207533530
Sales under 500 employees
0207533540
Sales over 500 employees
0207533533
Online Support
support.euro.dell.com
Technical Support for XPS computers only
0825 387 129
Home and Small Business
Technical Support
0825387270

France (Paris) (Montpellier)
International Access Code: 00
Country Code: 33
City Codes: (1) (4)
Customer Service
0825823833
Switchboard
0825004700
Switchboard (calls from outside of France)
0499754000
Sales
0825004700
Fax
0825004701
Fax (calls from outside of France)
0499754001
Corporate
Technical Support
0825004719
Customer Service
0825338339
Switchboard
0155947100
Sales
0155947100
Fax
0155947101
Germany (Frankfurt)
International Access Code: 00
Country Code: 49
City Code: 69
Online Support
support.euro.dell.com
tech_support_central_europe@dell.com
Technical Support for XPS computers only
06997927222
Technical Support
0699792-7200
Home/Small Business Customer Service
0180-5-224400
Global Segment Customer Service
0699792-7320
Preferred Accounts Customer Service
0699792-7320
Large Accounts Customer Service
0699792-7320
Public Accounts Customer Service
0699792-7320
Switchboard
0699792-7000
Greece
International Access Code: 00
Country Code: 30
Online Support
support.euro.dell.com
Technical Support
00800-44 14 95 18
Gold Service Technical Support
00800-44 14 00 83
Switchboard
2108129810
Gold Service Switchboard
2108129811
Sales
2108129800
Fax
2108129812
Grenada
Online Support
www.dell.com/gd
la-techsupport@dell.com
Technical Support, Customer Service, Sales
toll-free:1-866-540-3355
Guatemala
Online Support
www.dell.com/gt
la-techsupport@dell.com
Technical Support, Customer Service, Sales
1-800-999-0136
Guyana
Online Support
la-techsupport@dell.com
Technical Support, Customer Service, Sales
toll-free:1-877-270-4609
Hong Kong
International Access Code: 001
Country Code: 852
Online Support
support.ap.dell.com
support.dell.com/cn/email
Technical Support – XPS computers only
00852-34166923
Technical Support – Dimension and Inspiron
00852-29693188
Technical Support – OptiPlex, Latitude, and Dell Precision
00852-29693191
Technical Support – Servers and Storage
00852-29693196
Technical Support – Projectors, PDAs, Switches, Routers, etc.
00852-34160906
Customer Service
00852-34160910
Large Corporate Accounts
00852-34160907
Global Customer Programs
00852-34160908
Medium Business Division
00852-34160912
Home and Small Business Division
00852-29693105
Online Support
support.ap.dell.com
Portable and Desktop Support
Desktop Support E-mail
india_support_desktop@dell.com
Portable Support E-mail
india_support_notebook@dell.com
Phone Numbers
080-25068032 or 080-25068034
or your city STD code + 60003355
or toll-free:1-800-425-8045
Server Support
E-mail
india_support_Server@dell.com

India
Phone Numbers
080-25068032 or 080-25068034
or your city STD code + 60003355
or toll-free:18004258045
Gold Support Only
E-mail
eec_ap@dell.com
Phone Numbers
080-25068033
or your city STD code + 60003355
or toll-free:1-800-425-9045
XPS Support Only
E-mail
Indiaxps_AP@dell.com
Phone Numbers
080-25068066
or toll-free:1-800-425-2066
Customer Service
Home and Small Business
India_care_HSB@dell.com
toll-free: 1800-4254051
Large Corporate Accounts
India_care_REL@dell.com
toll-free: 1800-4252067
Sales
Large Corporate Accounts
1600338044
Home and Small Business
1600338046
Ireland (Cherrywood)
International Access Code: 00
Country Code: 353
City Code: 1
Online Support
support.euro.dell.com
dell_direct_support@dell.com
Technical Support
XPS computers only
1850200722
Business computers
1850543543
Home computers
1850 543 543
At Home Support
1850 200 889
Sales
Home
1850 333 200
Small Business
1850 664 656
Medium Business
1850 200 646
Large Business
1850 200 646
Sales E-mail
Dell_IRL_Outlet@dell.com
Customer Service
Home and Small Business
012044014
Business (greater than 200 employees)
1850200982
General
Fax/Sales Fax
012040103
Switchboard
012044444
U.K. Customer Service (dial within U.K. only)
08709060010
Corporate Customer Service (dial within U.K. only)
08709074499
U.K. Sales (dial within U.K. only)
08709074000
Italy (Milan)
International Access Code: 00
Country Code: 39
City Code: 02
Online Support
support.euro.dell.com
Home and Small Business
Technical Support
0257782690
Customer Service
0269682114
Fax
0269682113
Switchboard
0269682112
Corporate
Technical Support
0257782690
Customer Service
0257782555
Fax
0257503530
Switchboard
02577821
Jamaica
Online Support
la-techsupport@dell.com
Technical Support, Customer Service, Sales (dial from within Jamaica
only)
1-800-440-9205
Online Support
support.jp.dell.com
Technical Support – XPS computers only
toll-free:0120-937-786
Technical Support outside of Japan – XPS computers only
81-44-520-1235
Technical Support – Dimension and Inspiron
toll-free: 0120-198-226

Japan (Kawasaki)
International Access Code: 001
Country Code: 81
City Code: 44
Technical Support outside of Japan – Dimension and Inspiron
81-44-520-1435
Technical Support – Dell Precision, OptiPlex, and Latitude
toll-free: 0120-198-433
Technical Support outside of Japan – Dell Precision, OptiPlex, and
Latitude
81-44-556-3894
Technical Support – Dell PowerApp, Dell PowerEdge, Dell
PowerConnect, and Dell PowerVault
toll-free: 0120-198-498
Technical Support outside of Japan – PowerApp, PowerEdge,
PowerConnect, and PowerVault
81-44-556-4162
Technical Support – Projectors, PDAs, Printers, Routers
toll-free: 0120-981-690
Technical Support outside of Japan – Projectors, PDAs, Printers,
Routers
81-44-556-3468
Faxbox Service
044-556-3490
24-Hour Automated Order Status Service
044-556-3801
Customer Service
044-556-4240
Business Sales Division – up to 400 employees
044-556-1465
Preferred Accounts Division Sales – over 400 employees
044-556-3433
Public Sales – government agencies, educational institutions, and
medical institutions
044-556-5963
Global Segment Japan
044-556-3469
Individual User
044-556-1657
Individual User Online Sales
044-556-2203
Individual User Real Site Sales
044-556-4649
Switchboard
044-556-4300
Korea (Seoul)
International Access Code: 001
Country Code: 82
City Code: 2
Online Support
support.ap.dell.com
Technical Support for XPS computers only
toll-free:080-999-0283
Technical Support, Customer Service
toll-free:080-200-3800
Technical Support – Dimension, PDA, Electronics, and Accessories
toll-free: 080-200-3801
Sales
toll-free:080-200-3600
Fax
2194-6202
Switchboard
2194-6000
Latin America
Customer Technical Support (Austin, Texas, U.S.A.)
512728-4093
Customer Service (Austin, Texas, U.S.A.)
512728-3619
Fax (Technical Support and Customer Service) (Austin, Texas,
U.S.A.)
512728-3883
Sales (Austin, Texas, U.S.A.)
512728-4397
Sales Fax (Austin, Texas, U.S.A.)
512728-4600
or512728-3772
Luxembourg
International Access Code: 00
Country Code: 352
Online Support
support.euro.dell.com
Support
3420808075
Home/Small Business Sales
+32(0)27131596
Corporate Sales
26257781
Customer Service
+32(0)24819119
Fax
26257782
Malaysia (Penang)
International Access Code: 00
Country Code: 60
City Code: 4
Online Support
support.ap.dell.com
Technical Support – XPS computers only
toll-free: 1 800 885 784
Technical Support – Dell Precision, OptiPlex, and Latitude
toll-free:1800880193
Technical Support – Dimension, Inspiron, and Electronics and
Accessories
toll-free:1800881306
Technical Support – PowerApp, PowerEdge, PowerConnect, and
PowerVault
toll-free:1800881386
Customer Service
toll-free:1800881306(option6)
Transaction Sales
toll-free:1800888202
Corporate Sales
toll-free:1800888213
Mexico
International Access Code: 00
Country Code: 52
Online Support
www.dell.com/mx
la-techsupport@dell.com
Technical Support
001-866-563-4425
Sales
50-81-8800
or 001-800-888-3355
Customer Service
001-877-384-8979
or 001-877-269-3383
50-81-8800

Main
or 001-800-888-3355
or 001-866-851-1754
Montserrat
Online Support
la-techsupport@dell.com
Technical Support, Customer Service, Sales
toll-free:1-866-278-6822
Netherlands Antilles
Online Support
la-techsupport@dell.com
Technical Support, Customer Service, Sales
001-800-882-1519
Netherlands (Amsterdam)
International Access Code: 00
Country Code: 31
City Code: 20
Online Support
support.euro.dell.com
Technical Support for XPS computers only
0206744594
Technical Support
0206744500
Technical Support Fax
0206744766
Home/Small Business Customer Service
0206744200
Relational Customer Service
0206744325
Home/Small Business Sales
0206745500
Relational Sales
0206745000
Home/Small Business Sales Fax
0206744775
Relational Sales Fax
0206744750
Switchboard
0206745000
Switchboard Fax
0206744750
New Zealand
International Access Code: 00
Country Code: 64
Online Support
support.ap.dell.com
support.ap.dell.com/contactus
Technical Support for XPS computers only
toll-free:0800335540
Technical Support, Customer Service, Sales
0800441567
Nicaragua
Online Support
www.dell.com/ni
la-techsupport@dell.com
Technical Support, Customer Service, Sales
001-800-220-1377
Norway (Lysaker)
International Access Code: 00
Country Code: 47
Online Support
support.euro.dell.com
Technical Support for XPS computers only
815 35 043
Technical Support
67116882
Relational Customer Service
67117575
Home/Small Business Customer Service
23162298
Switchboard
67116800
Fax Switchboard
67116865
Panama
Online Support
www.dell.com/pa
la-techsupport@dell.com
Technical Support, Customer Service, Sales
011-800-507-1264
Peru
Online Support
www.dell.com/pe
la-techsupport@dell.com
Technical Support, Customer Service, Sales
0800-50-669
Poland (Warsaw)
International Access Code: 011
Country Code: 48
City Code: 22
Online Support
support.euro.dell.com
pl_support_tech@dell.com
Customer Service Phone
5795700
Customer Service
5795999
Sales
5795999
Customer Service Fax
5795806
Reception Desk Fax
5795998
Switchboard
5795999
Portugal
International Access Code: 00
Country Code: 351
Online Support
support.euro.dell.com
Technical Support
707200149
Customer Service
800300413
Sales
800300410or800300411or800300412or
214220710
Fax
214240112
Puerto Rico
Online Support
www.dell.com/pr
la-techsupport@dell.com
Technical Support
toll-free:1-866-390-4695
or 1-866-851-1760

Customer Service and Sales
1-877-537-3355
St. Kitts and Nevis
Online Support
www.dell.com/kn
la-techsupport@dell.com
Technical Support, Customer Service, Sales
toll-free:1-866-540-3355
St. Lucia
Online Support
www.dell.com/lc
la-techsupport@dell.com
Technical Support, Customer Service, Sales
toll-free:1-866-464-4352
St. Vincent and the
Grenadines
Online Support
www.dell.com/vc
la-techsupport@dell.com
Technical Support, Customer Service, Sales
toll-free:1-866-464-4353
Singapore (Singapore)
International Access Code: 005
Country Code: 65
NOTE: The phone numbers in this section should be called from
within Singapore or Malaysia only.
Online Support
support.ap.dell.com
Technical Support – XPS computers only
toll-free:18003947464
Technical Support – Dimension, Inspiron, and Electronics and
Accessories
toll-free:18003947430
Technical Support – OptiPlex, Latitude, and Dell Precision
toll-free:18003947488
Technical Support – PowerApp, PowerEdge, PowerConnect, and
PowerVault
toll-free:18003947478
Customer Service
toll-free:18003947430(option6)
Transaction Sales
toll-free:18003947412
Corporate Sales
toll-free:18003947419
Slovakia (Prague)
International Access Code: 00
Country Code: 421
Online Support
support.euro.dell.com
czech_dell@dell.com
Technical Support
0254415727
Customer Service
420225372707
Fax
0254418328
Tech Fax
0254418328
Switchboard (Sales)
0254417585
South Africa (Johannesburg)
International Access Code:
09/091
Country Code: 27
City Code: 11
Online Support
support.euro.dell.com
dell_za_support@dell.com
Gold Queue
0117097713
Technical Support
0117097710
Customer Service
0117097707
Sales
0117097700
Fax
0117060495
Switchboard
0117097700
Southeast Asian and Pacific
Countries
Technical Support, Customer Service, and Sales (Penang, Malaysia)
6046334810
Spain (Madrid)
International Access Code: 00
Country Code: 34
City Code: 91
Online Support
support.euro.dell.com
Home and Small Business
Technical Support
902100130
Customer Service
902118540
Sales
902118541
Switchboard
902118541
Fax
902118539
Corporate
Technical Support
902100130
Customer Service
902115236
Switchboard
917229200
Fax
917229583
Sweden (Upplands Vasby)
International Access Code: 00
Country Code: 46
Online Support
support.euro.dell.com
Technical Support for XPS computers only
77 134 03 40
Technical Support
0859005199
Relational Customer Service
0859005642
Home/Small Business Customer Service
0858770527
Employee Purchase Program (EPP) Support
0201401444

City Code: 8
Technical Support Fax
0859005594
Sales
0858770581
Switzerland (Geneva)
International Access Code: 00
Country Code: 41
City Code: 22
Online Support
support.euro.dell.com
Tech_support_central_Europe@dell.com
Technical Support for XPS computers only
0848 338 857
Technical Support – Home and Small Business
0844811411
Technical Support – Corporate
0844822844
Customer Service – Home and Small Business
0848802202
Customer Service – Corporate
0848821721
Main
0848 335 599
Fax
0227990190
Sales
0227990101
Taiwan
International Access Code: 002
Country Code: 886
Online Support
support.ap.dell.com
support.dell.com/cn/email
Technical Support – XPS computers only
toll-free:00801863085
Technical Support – OptiPlex, Latitude, Inspiron, Dimension, and
Electronics and Accessories
toll-free:00801861011
Technical Support – Servers and Storage
toll-free:00801601256
Customer Service
toll-free:00801601250
(option5)
Transaction Sales
toll-free:00801651228
Corporate Sales
toll-free:00801651227
Thailand
International Access Code: 001
Country Code: 66
Online Support
support.ap.dell.com
Technical Support (OptiPlex, Latitude, and Dell Precision)
toll-free:1800006007
Technical Support (PowerApp, PowerEdge, PowerConnect, and
PowerVault)
toll-free:1800060009
Customer Service
toll-free:1800006007
(option7)
Corporate Sales
toll-free:1800006009
Transaction Sales
toll-free:1800006006
Trinidad/Tobago
Online Support
www.dell.com/tt
la-techsupport@dell.com
Technical Support, Customer Service, Sales
toll-free:1-888-799-5908
Turks and Caicos Islands
Online Support
www.dell.com/tc
la-techsupport@dell.com
Technical Support, Customer Service, Sales
toll-free:1-877-441-4735
U.K. (Bracknell)
International Access Code: 00
Country Code: 44
City Code: 1344
Online Support
support.euro.dell.com
dell_direct_support@dell.com
Customer Service Online support.euro.dell.com/uk/en/ECare/form/home.asp
Sales
Home and Small Business Sales
08709074000
Corporate/Public Sector Sales
01344860456
Customer Service
Home and Small Business
08709060010
Corporate
01344373185
Preferred Accounts (500–5000 employees)
08709060010
Global Accounts
01344373186
Central Government
01344373193
Local Government & Education
01344373199
Health
01344373194
Technical Support
XPS Computers Only
0870 366 4180
Corporate/Preferred Accounts/PCA (1000+ employees)
08709080500
Other Dell Products
08703530800
General
Home and Small Business Fax
08709074006
Uruguay
Online Support
www.dell.com/uy
la-techsupport@dell.com
Regulatory Notices
FCC Notice (U.S. Only)
FCC Class B
This equipment generates, uses, and can radiate radio frequency energy and, if not installed and used in accordance with the manufacturer's instruction
manual, may cause interference with radio and television reception. This equipment has been tested and found to comply with the limits for a Class B digital
device pursuant to Part 15 of the FCC Rules.
This device complies with Part 15 of the FCC Rules. Operation is subject to the following two conditions:
1. This device may not cause harmful interference.
2. This device must accept any interference received, including interference that may cause undesired operation.
Technical Support, Customer Service, Sales
toll-free:000-413-598-2521
U.S.A. (Austin, Texas)
International Access Code: 011
Country Code: 1
Dell Services for the Deaf, Hard-of-Hearing, or Speech-Impaired
toll-free:1-877-DELLTTY
(1-877-335-5889)
Fax
toll-free:1-800-727-8320
Technical Support
support.dell.com
XPS
toll-free:1-800-232-8544
Home and Home Office
toll-free:1-800-624-9896
Portable and Desktop AutoTech
toll-free:1-800-247-9362
Small Business
toll-free:1-800-456-3355
Medium and Large Business
toll-free:1-877-671-3355
State and Local Government
toll-free:1-800-981-3355
Federal Government
toll-free:1-800-727-1100
Healthcare
toll-free:1-800-274-1550
K-12 Education
toll-free:1-888-977-3355
Higher Education
toll-free:1-800-274-7799
Printers, Projectors, PDAs, and MP3 Players
toll-free:1-877-459-7298
Customer Service
toll-free:1-800-624-9897
Automated Order Status
toll-free:1-800-433-9014
Small Business
toll-free:1-800-456-3355
Medium and Large Business
toll-free:1-877-671-3355
State and Local Government
toll-free:1-800-981-3355
Federal Government
toll-free:1-800-727-1100
Healthcare
toll-free:1-800-274-1550
K-12 Education
toll-free:1-888-977-3355
Higher Education
toll-free:1-800-274-7799
Employee Purchase Program (EPP)
toll-free:1-800-695-8133
Financial Services
www.dellfinancialservices.com
Leases and Loans
toll-free:1-877-577-3355
Dell Preferred Accounts (DPA)
toll-free:1-800-283-2210
Sales
1-800-289-3355or1-800-879-3355
Dell Outlet Store
toll-free:1-888-798-7561
Software and Peripherals Sales
toll-free:1-800-671-3355
U.S. Virgin Islands
Online Support
www.dell.com/vi
la-techsupport@dell.com
Technical Support, Customer Service, Sales
toll-free:1-877-702-4360
Venezuela
Online Support
www.dell.com/ve
la-techsupport@dell.com
Technical Support, Customer Service, Sales
0800-100-4752

These limits are designed to provide reasonable protection against harmful interference in a residential installation. However, there is no guarantee that
interference will not occur in a particular installation. If this equipment does cause harmful interference with radio or television reception, which can be
determined by turning the equipment off and on, you are encouraged to try to correct the interference by one or more of the following measures:
lReorient the receiving antenna.
lRelocate the system with respect to the receiver.
lMove the system away from the receiver.
lPlug the system into a different outlet so that the system and the receiver are on different branch circuits.
Ifnecessary,consultarepresentativeofDellInc.oranexperiencedradio/televisiontechnicianforadditionalsuggestions.ductname.EXAMPLE:Dell™
Latitude™D410
The following information is provided on the device or devices covered in this document in compliance with the FCC regulations:
lProduct name: E157FPT
lModel number: E157FPTe
lCompany name:
Dell Inc.
Worldwide Regulatory Compliance & Environmental Affairs
One Dell Way
Round Rock, TX 78682 USA
512-338-4400
Recycling Information
Dell recommends that customers dispose of their used computer hardware, monitors, printers, and other peripherals in an environmentally sound manner.
Potential methods include reuse of parts or whole products and recycling of products, components, and/or materials.
For specific information on Dell's worldwide recycling programs, see www.dell.com/recyclingworldwide.
Your Monitor Setup Guide
To view PDF files (files with an extension of .pdf), click the document title. To save PDF files to your hard drive, right-click the document title, then choose Save
Target As in Microsoft Internet Explorer, or Save Link As in Netscape Navigator, and then specify a location on your hard drive to which you want to save the
files.
Setup Guide (.pdf)
Attaching the Magnetic Stripe Reader (MSR) (.pdf)
Back to Contents Page
NOTICE: The FCC regulations provide that changes or modifications not expressly approved by Dell Inc. could void your authority to operate this
equipment.
NOTE: For Further regulatory information, see your Product Information Guide.
NOTE: PDF files require Adobe Acrobat Reader, which can be downloaded from the Adobe website at www.adobe.com.
NOTE: To view a PDF file, launch Acrobat Reader. Then click File Open and select the PDF file.
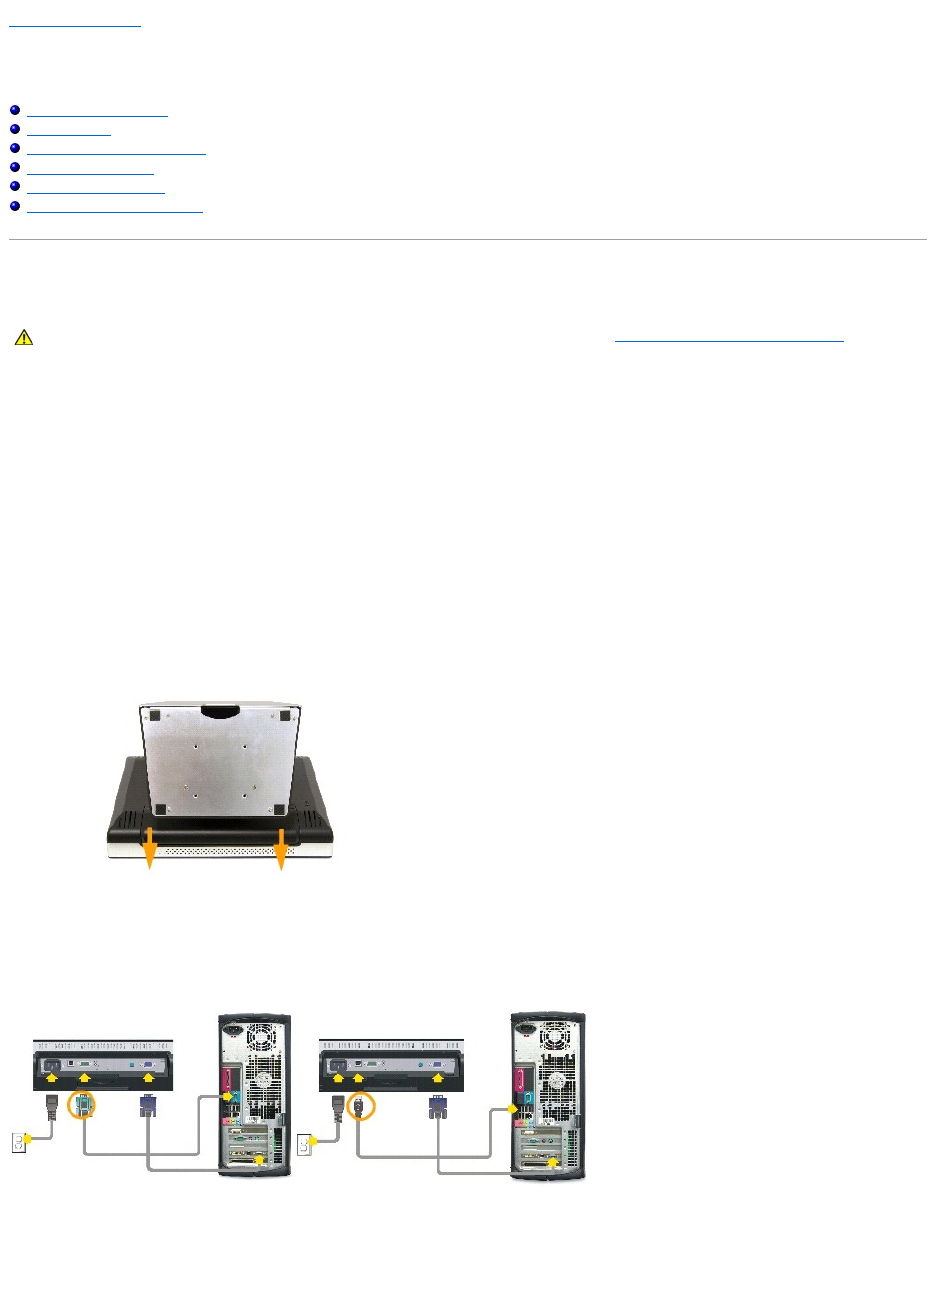
Back to Contents Page
Setting Up Your Monitor
Dell™E157FPTTouchScreenMonitorContents
Connecting Your Monitor
Using the OSD
On-Screen Menu/Display (OSD)
Special OSD Functions
OSD Warning Messages
Setting the Optimal Resolution
Connecting Your Monitor
1. Turn off your computer and unplug its power cable.
2. If you have NOT purchased the optional Magnetic Stripe Reader (MSR) kit, skip to step 3.
If you have purchased the optional MSR kit, remove the MSR and its accessories from the shipping carton.
¡Place the MSR on the rear left side of the monitor.
¡The MSR's large tab should extend towards the center of the monitor. Align the two holes in the MSR tab with the two corresponding holes
in the back surface of the monitor, then fasten the MSR to the monitor using the two screws provided in the MSR Kit.
¡Connect the USB cable from the MSR Kit to the USB connector on the lower end of the MSR tab.
¡Run the USB cable through the cable holder on the back of the monitor. Connect the other end of the USB cable to a USB connector on the
back of your computer.
3. Place the monitor face down, then remove the cable cover below the stand.
4. Connect the video cable to the corresponding video connector on the back of your computer. (The graphic is for illustration only. System appearance
may vary).
5. Connect either the USB touch screen cable or the serial touch screen cable to the back of your computer and then to back of the display.
6. Connect the power cable for your display to the power connector on the back of the display.
CAUTION: Before you begin any of the procedures in this section, follow the instructions in the CAUTION:General Safety Instructions section.
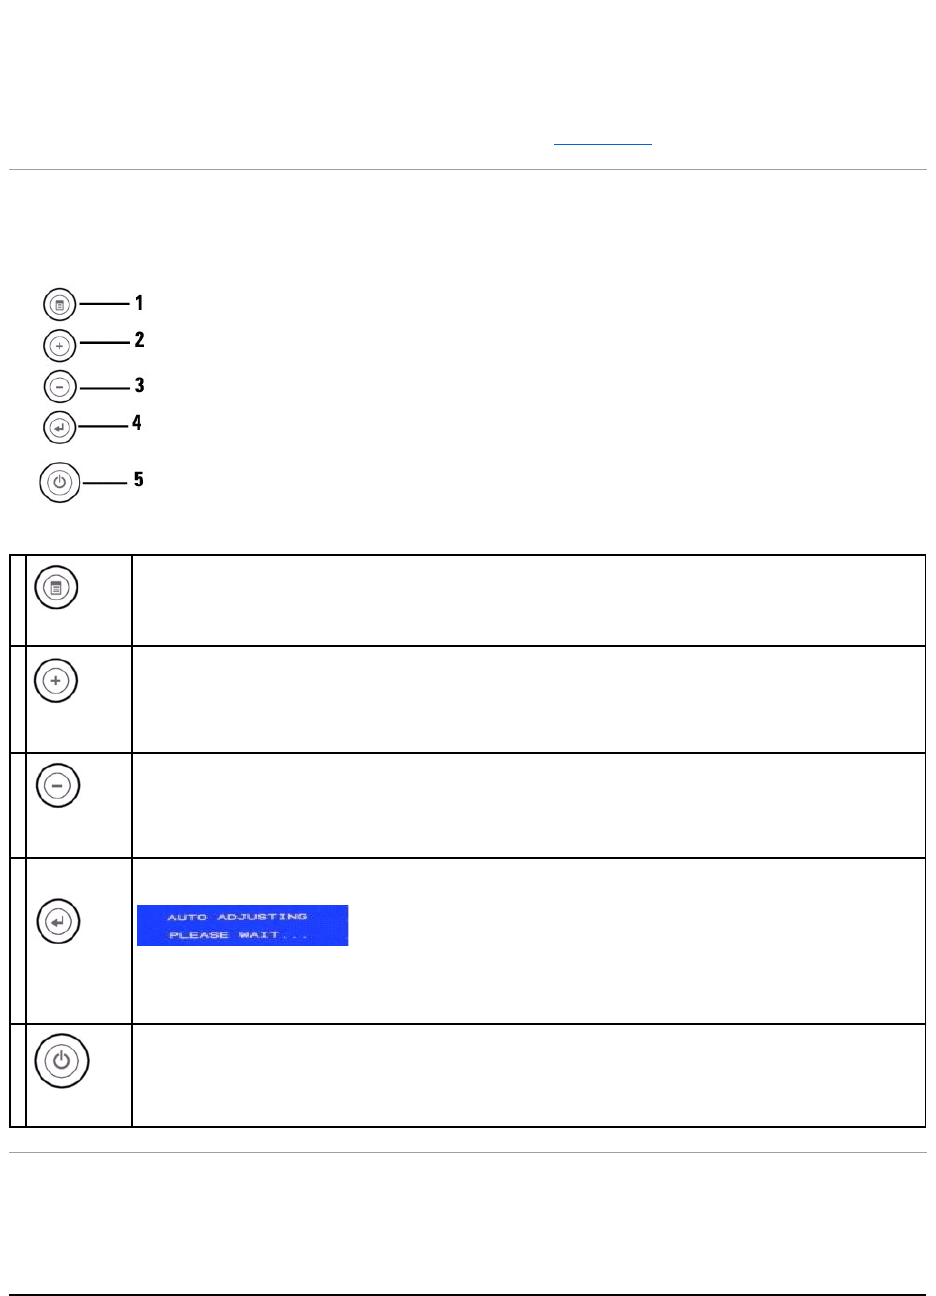
7. Replace the cable cover.
8. Plug the power cables of your computer and your display into a nearby outlet. Your monitor is equipped with an automatic power supply for a voltage
range from 100 to 240 Volt at a frequency of 50/60 Hz. Be sure that your local power is within the supported range. If you are unsure, ask your
electricity supplier.
9. Turn on power to the monitor and your computer.
If your monitor displays an image, installation is complete. If it does not display an image, see Solving Problems.
Using the OSD
Use the control buttons on the right side of the monitor to adjust the characteristics of the image being displayed. As you use these buttons to adjust the
controls, an on-screen display (OSD) shows their numeric values.
The following table describes the OSD menu buttons and their functions.
On-Screen Menu/Display (OSD)
Direct Access Functions
1
MENU
The 'MENU' button is used to open the on-screen display (OSD), exit from menus and sub-menus, and to exit the OSD.
2
Adjust Up /
Contrast
If pressed before the OSD appears, this button directly accesses the Contrast control function.
If pressed while the OSD menu is showing, this button either increases the value of the OSD item being adjusted, or it moves the OSD
item selection cursor clockwise around the OSD menu.
3
Adjust Down /
Volume
If pressed before the OSD appears, this button directly accesses the Volume adjustment function.
If pressed while the OSD menu is showing, this button either decreases the value of the OSD item being adjusted, or it moves the OSD
item selection cursor counter-clockwise around the OSD menu.
4
Select / Auto
Adjust
If pressed before the OSD appears, this button activates automatic setup and adjustment. The following dialog will appear on screen
as the monitor self-adjusts to the current input:
The Auto Adjustment button allows the monitor to self-adjust to the incoming video signal. After using 'Auto Adjustment', you can
further tune your monitor by using the 'Pixel Clock' and 'Phase' controls in the OSD.
If pressed while the OSD menu is showing, this button selects an OSD item for adjustment.
5
Power Button
The power status LED is located on the connector panel, near the power cord connector. A green LED indicates the monitor is on and
fully functional. An amber LED indicates the monitor is in DPMS power save mode.
The Power button turns the monitor on and off.
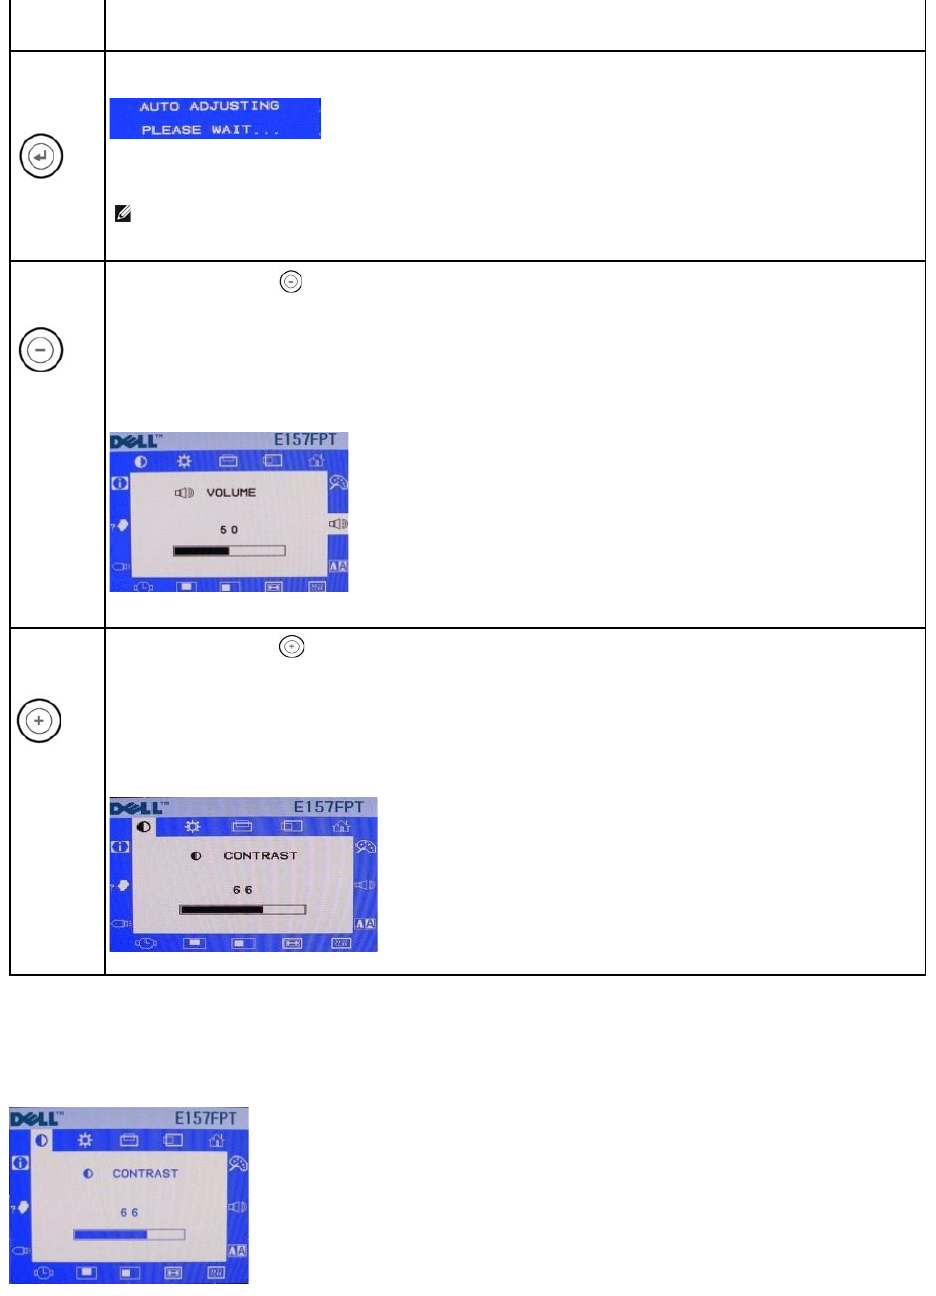
Accessing the Menu System
1. With the menu off, press the 'MENU' button to open the OSD system and display the main features menu.
Function
Adjustment Method
Auto
Adjustment
While the OSD menu is not showing, use this button to activate automatic setup and adjustment. The following dialog will appear on screen
as the monitor self-adjusts to the current input:
The Auto Adjustment button allows the monitor to self-adjust to the incoming video signal. After using 'Auto Adjustment', you can further
tune your monitor by using the 'Pixel Clock' and 'Phase' controls in the OSD.
NOTE: Auto Adjust will not occur if you press the button while there are no active video input signals, or attached cables.
Volume
With the menu off, press the button to display the
'Volume adjustment function.
The "Volume" function adjusts the sound level from the internal speakers.
"+" increase 'volume'
" - "decrease 'volume'
Contrast
With the menu off, press the button to display the Contrast adjustment function.
The 'Contrast' function adjusts the degree of difference between darkness and lightness on the display screen.
"+" increase the 'contrast'
"-" decrease the 'contrast'
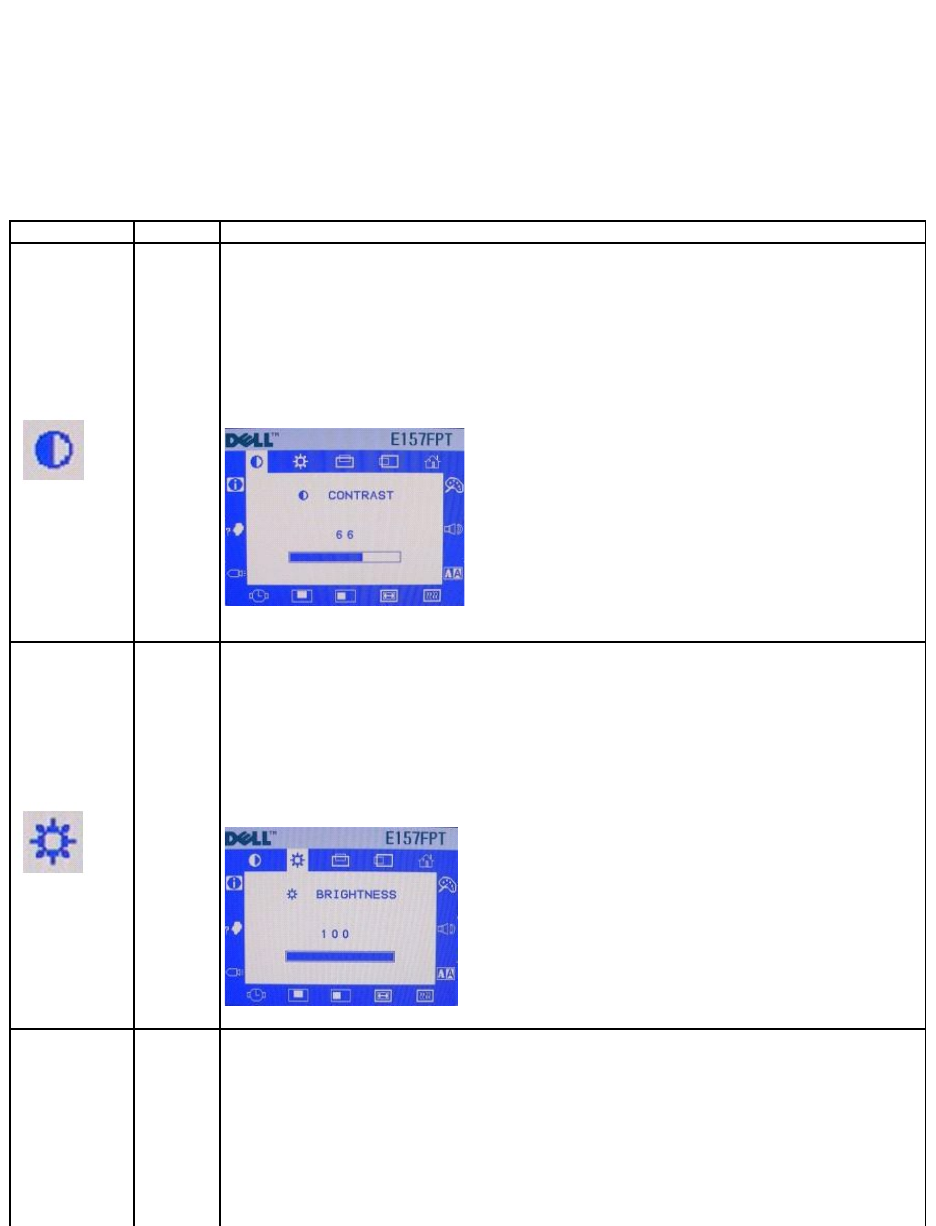
The OSD menu will open with the Contrast function selected.
2. Press the - and + buttons to move the OSD highlight cursor to other function icons. As you move from one icon to another, the function name appears,
to reflect the function or group of functions (sub-menus) represented by that icon. See the table below for a complete list of all the functions available
for the monitor.
3. Press the 'Select' button once to activate the highlighted function.
4. Use the - and + buttons, according to the slide bar or numbers on the menu, to make your changes.
5. Press the 'Select' button to return to the main menu and select another function. Or press the 'Menu' button to exit from the OSD.
Icon
Menu Name
Description
CONTRAST
The CONTRAST function varies the intensity difference between dark and light areas on the screen.
Pressing "+" will increase the contrast.
Pressing "-" will decrease the contrast.
Minimum is 0. Maximum is 100.
BRIGHTNESS
The BRIGHTNESS function varies the luminance of the entire screen.
Pressing "+" will increase the brightness.
Pressing "-" will decrease the brightness.
Minimum is 0. Maximum is 100.
The V-POSITION function moves the picture up or down in relation to the monitor bezel.
Pressing "+" will move the picture up.
Pressing "-" will move the picture down.
Minimum is 0. Maximum is 100.
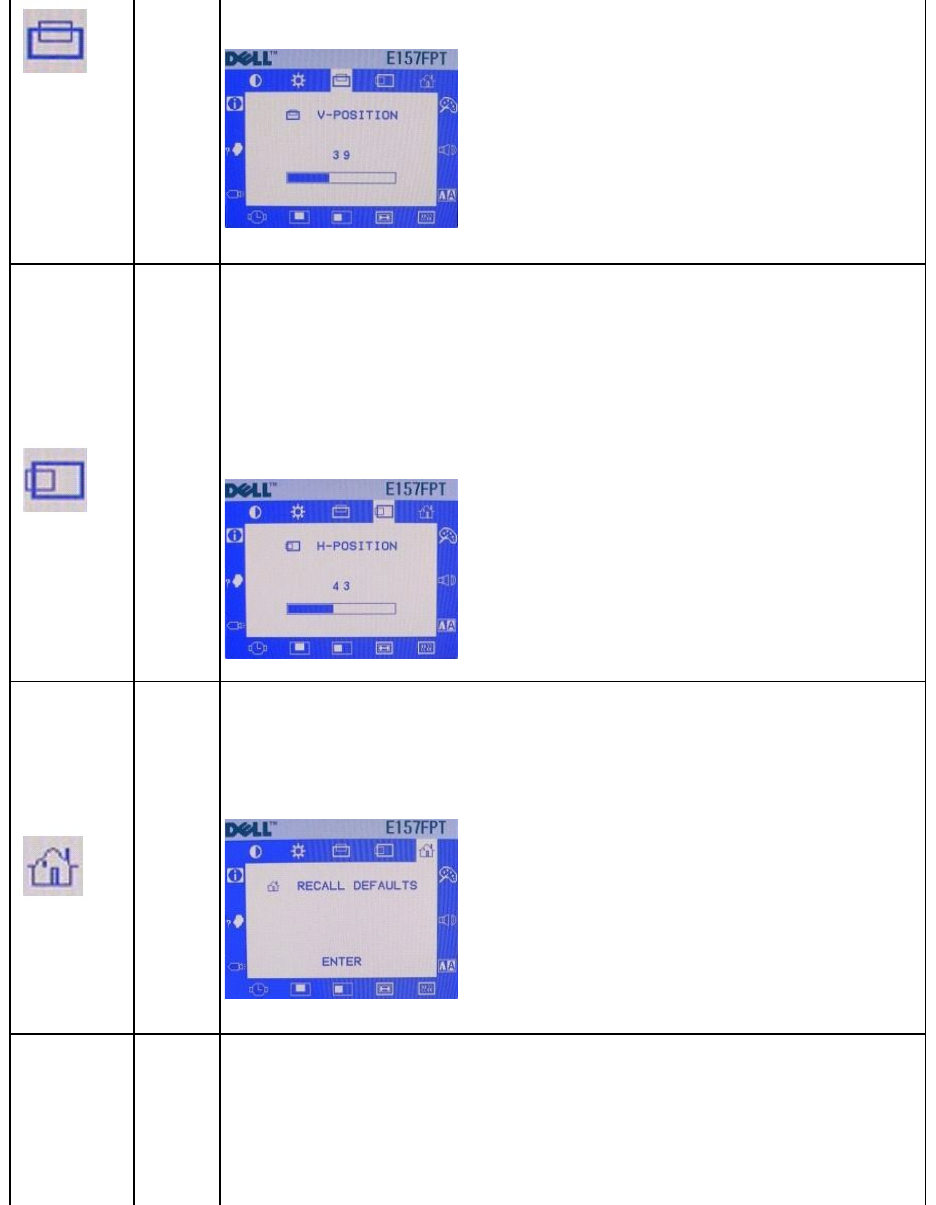
V-POSITION
H-POSITION
The H-POSITION function moves the picture left or right in relation to the monitor bezel.
Pressing "+" will move the picture right.
Pressing "-" will move the picture left.
Minimum is 0. Maximum is 100.
RECALL
DEFAULTS
The RECALL DEFAULTS function is used to return all monitor settings to their factory stored values. All settings previously
saved by the user will be replaced by their factory values.
Pressing "Select" will recall all defaults.
Pressing "+", "-", or "Menu" will exit without recalling the factory values.
The COLOR TEMP function allows selection between several white color temperatures. Choices are 9300K, 6500K,
5500K, 7500K, and USER. Higher numbers will yield a blue tint, and lower numbers will yield a red tint. Selection is a
matter of personal preference.
With the selection cursor highlighting the COLOR TEMP icon, press "Select" to enter the function.
Pressing "+" or "-" will now move the selection cursor between the choices. The screen tint will change, as the cursor is
moved. Select the desired choice by pressing "Select".
Choosing the User choice will open a sub-menu (described below) which allows individual control of the three primary
colors. This choice is recommended only for advanced users.
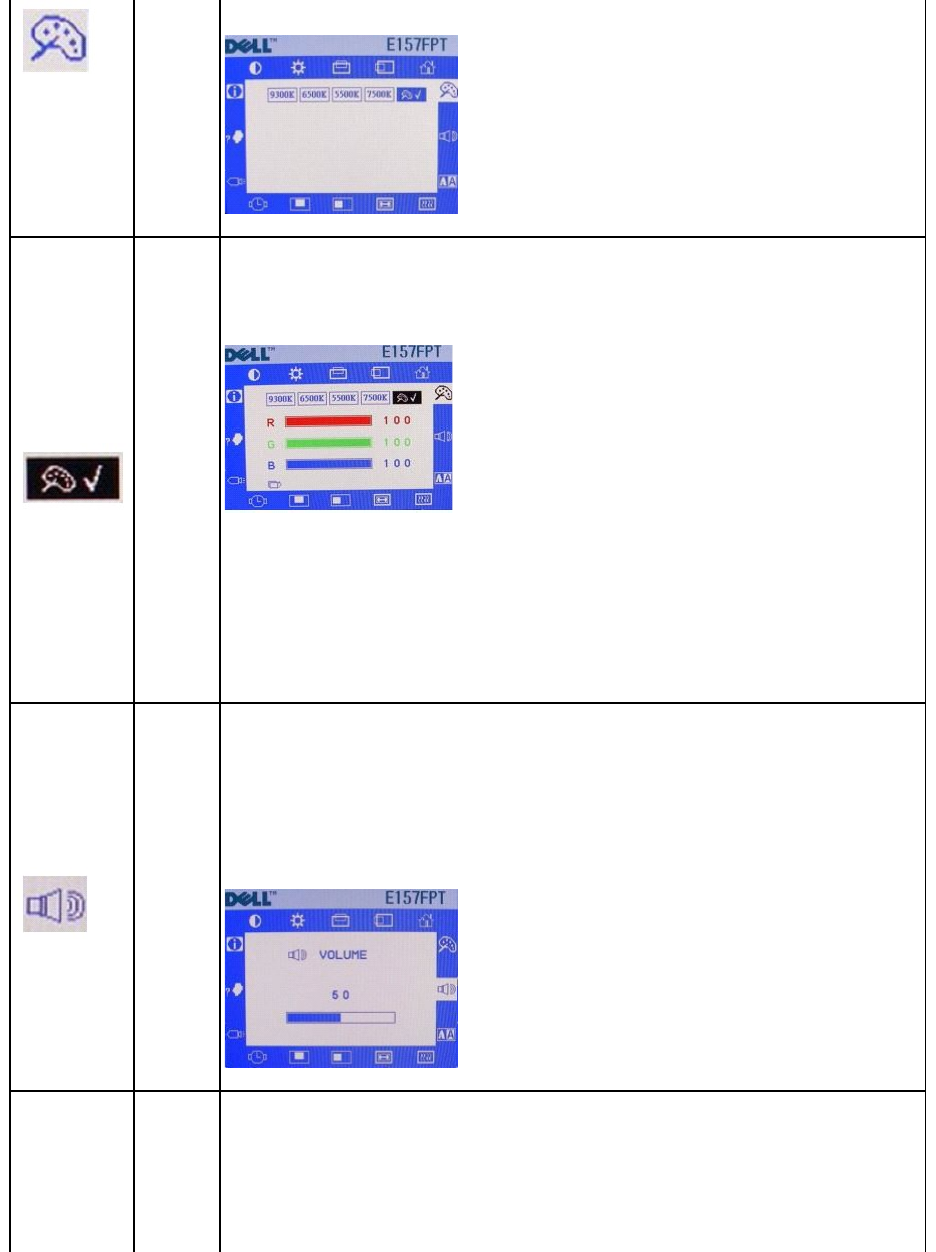
COLOR TEMP
COLOR TEMP
USER
The COLOR TEMP USER function is one of the available COLOR TEMP choices (see above). It allows individual intensity
adjustment of the three primary colors (red, blue, green).
This choice is recommended only for advanced users.
When the USER choice is chosen in the COLOR TEMP function (see above) the COLOR TEMP USER function appears,
showing red, blue, and green adjustment bars.
Pressing "+" or "-" will move the selection cursor between the red, blue, green, and exit choices. With the selection
cursor highlighting the desired R, B, or G icon, press "Select" to enable adjustment of that color. The selected color bar
will turn black. Pressing "+" or "-" will increase or decrease that color's intensity, lengthen or shorten its color bar, and
change the whole screen's tint. Press "Select" to save the color's adjustment. Press "+" or "-" to move the selection
cursor to another color. When satisfied with all color adjustments, move the selection cursor over the Exit icon and press
"Select".
For each color bar, minimum is 0 and maximum is 100.
VOLUME
The VOLUME function varies the audio's loudness from the monitor's internal speakers.
Pressing "+" will increase the volume.
Pressing "-" will decrease the volume.
Minimum is 0. Maximum is 100.
The SHARPNESS function varies the focus of the screen's video. This adjustment should be done while viewing an entire
screen of text characters.
The normal setting is 0. A setting of 0 is recommended, unless the user is absolutely sure that another setting improves
focus quality.
Minimum (and normal) is 0. Maximum is 100.
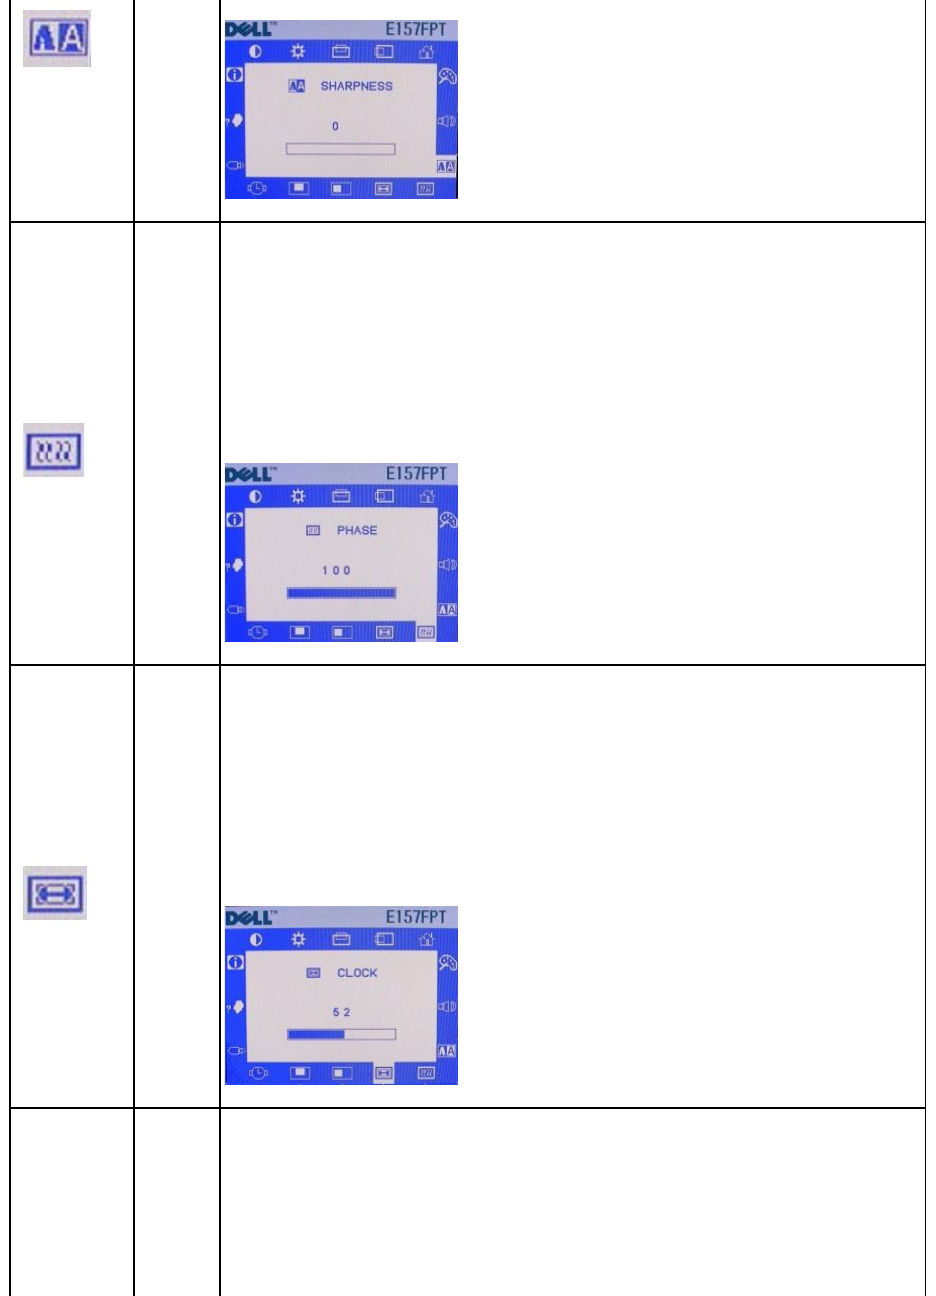
SHARPNESS
PHASE
The PHASE function allows for manual fine adjustment of screen interference.
This function is recommended only for advanced users. It is normally adjusted automatically by the AUTO ADJUST
function. If a manual setting for improved performance cannot be determined using this function, use the AUTO ADJUST
function (described below) to set PHASE automatically.
Minimum is 0. Maximum is 100.
CLOCK
The CLOCK function allows for manual fine adjustment of the monitor's dot clock.
This function is recommended only for advanced users. It is normally adjusted automatically by the AUTO ADJUST
function. If a manual setting for improved performance cannot be determined using this function, use the AUTO ADJUST
function (described below) to set CLOCK automatically.
Minimum is 0. Maximum is 100.
The OSD H-POSITION function moves the OSD Menu window left or right in relation to the monitor bezel.
Pressing "+" will move the OSD Menu right.
Pressing "-" will move the OSD Menu left.
Minimum is 0. Maximum is 100.
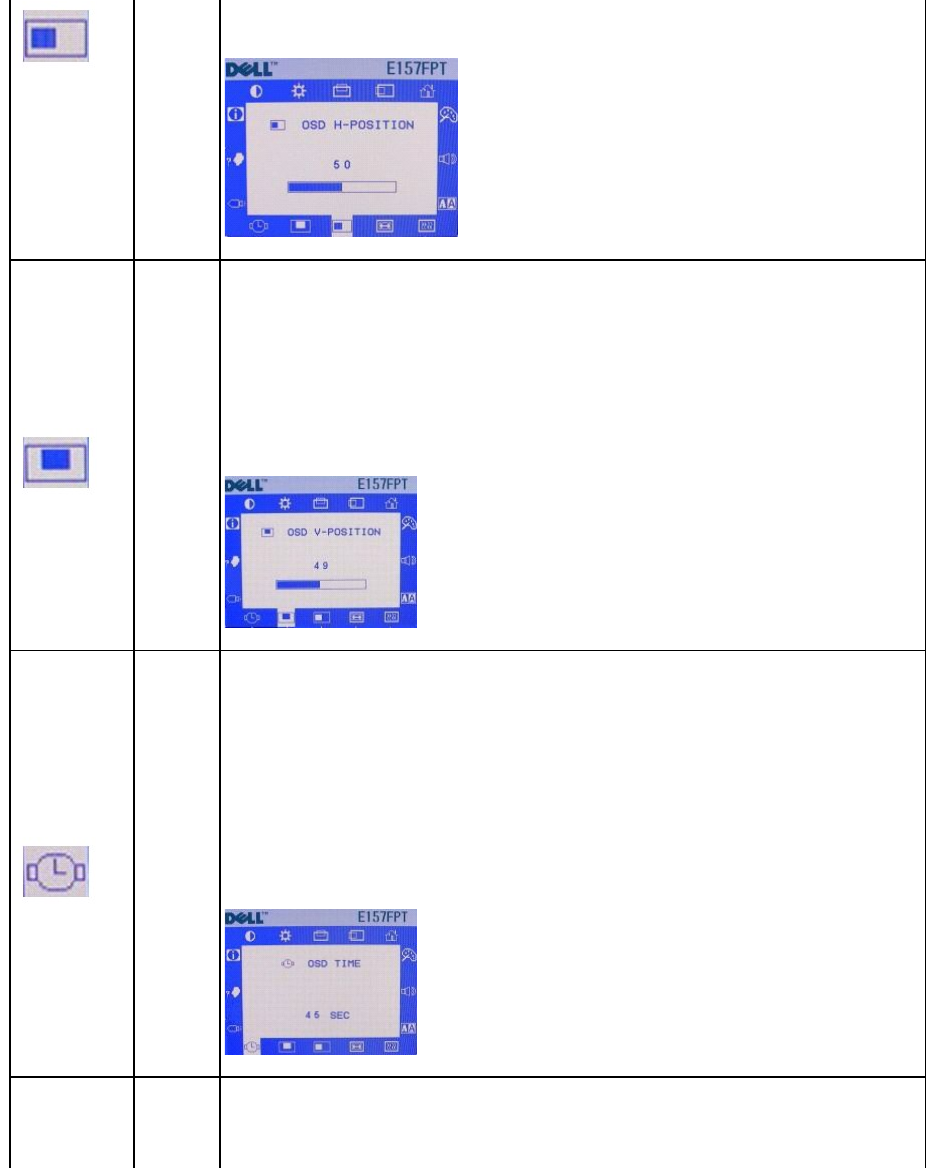
OSD H-
POSITION
OSD V-
POSITION
The OSD V-POSITION function moves the OSD Menu window up or down in relation to the monitor bezel.
Pressing "+" will move the OSD Menu up.
Pressing "-" will move the OSD Menu down.
Minimum is 0. Maximum is 100.
OSD TIME
The OSD TIME function varies the length of time the OSD Menu window remains visible, after the last time a button was
pressed.
Pressing "+" will increase the OSD Menu time.
Pressing "-" will decrease the OSD Menu time.
Minimum is 45 sec. Maximum is 255 sec.
The AUTO ADJUST function allows your monitor to automatically optimize its display settings, for use with your
computer's video output. In most cases, use of the AUTO ADJUST function will result in the best possible image quality
for your configuration.
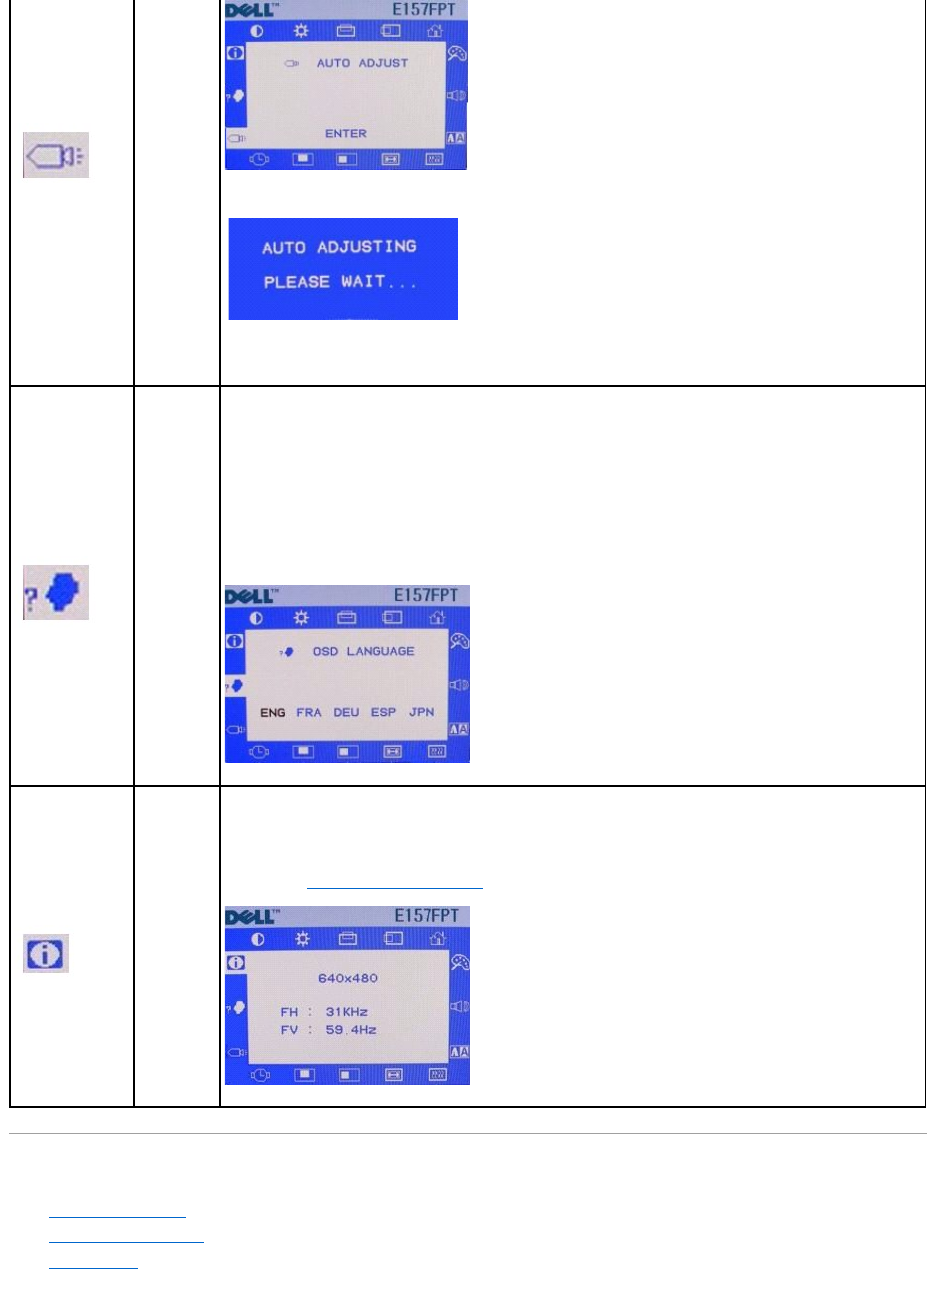
Special OSD Functions
lOSD LOCK and UNLOCK
lPOWER LOCK and UNLOCK
lAutomatic Save
AUTO ADJUST
Pressing "Select" will execute the function.
Auto Adjustment will take only a few seconds. The OSD Menu will automatically disappear after adjustment is complete.
OSD
LANGUAGE
The OSD LANGUAGE function sets the OSD Menu to one of five choices – English, French, German, Spanish, or Japanese.
With the selection cursor highlighting the OSD LANGUAGE icon, press "Select" to enter the function.
Pressing "+" or "-" will now move the selection cursor between the choices. Select the desired choice by pressing
"Select".
TIMING INFO
The TIMING INFO function simply displays information about the video signal which your computer is sending to the
monitor. Screen resolution, horizontal scan rate (FH), and vertical refresh rate (FV) are displayed.
It is recommended that your computer video output be set to a resolution of 1024 x 768, with a vertical refresh rate (FV)
of 60Hz. See "Setting the Optimal Resolution" section below.

OSD LOCK and UNLOCK
Operation of the OSD Menu may be disabled, thereby preventing unauthorized personnel from modifying any OSD adjustments. To "Lock" (disable) the OSD:
1. Press "Menu" and "+" buttons at the same time. A small window will appear, showing the present state of OSD operation.
2. Continue holding "Menu" and "+" buttons until the state of OSD operation changes. Immediately release both buttons.
3. While the OSD operation is in the "Lock" state, all OSD buttons are disabled.
4. To "Unlock" (enable) OSD operation, perform the above steps again, releasing both buttons when the window shows "OSD UNLOCK".
POWER LOCK and UNLOCK
Operation of the Power Button may be disabled, thereby preventing unauthorized personnel from switching the monitor power off. To "Lock" (disable) the
Power Button:
1. Press "Menu" and "-" buttons at the same time. A small window will appear, showing the present state of Power Button operation.
2. Continue holding "Menu" and "-" buttons until the state of the Power Button operation changes. Immediately release both buttons.
3. While the Power Button operation is in the "Lock" state, the Power Button is disabled.
4. To "Unlock" (enable) the Power Button operation, perform the above steps again, releasing both buttons when the window shows "POWER UNLOCK".
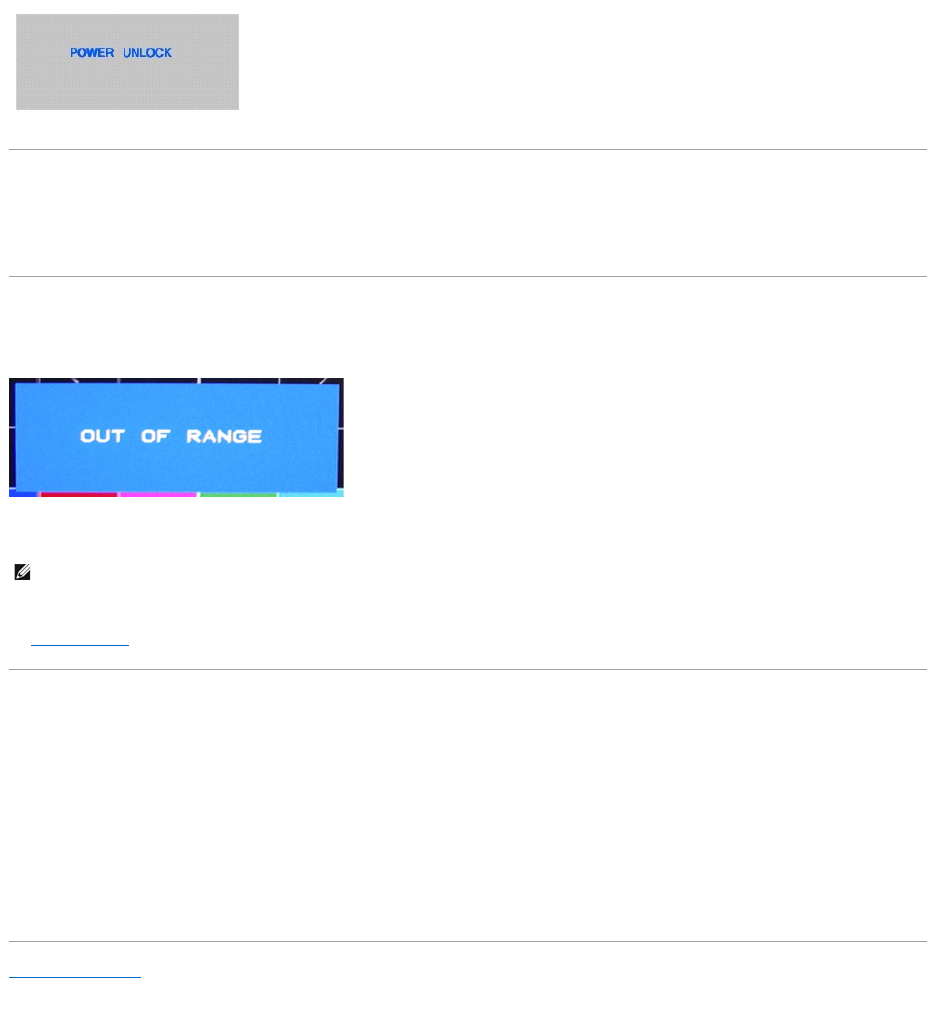
Automatic Save
With the OSD open, if you make an adjustment and then either proceed to another menu or exit the OSD, the monitor automatically saves any adjustments
you have made. If you make an adjustment and then wait for the OSD to disappear the adjustment will also be saved.
OSD Warning Messages
A warning message may appear on the screen indicating that the monitor is out of sync.
This means that the monitor cannot synchronize with the signal that it is receiving from the computer. Either the signal is too high or too low for the monitor to
use. See Specifications for the Horizontal and Vertical frequency ranges addressable by this monitor. Recommended mode is 1024 X 768 @ 60Hz.
Occasionally, no warning message appears, but the screen is blank. This could also indicate that the monitor is not synchronizing with the computer.
SeeSolving Problems for more information.
Setting the Optimal Resolution
For optimal display performance while using the Microsoft®Windows®operating systems, set the display resolution to 1024 x 768 pixels by performing the
following steps:
1. Click Start, point to Settings, and click Control Panel.
2. Double-click the Display icon in the Control Panel window, and then click the Settings tab.
3. In the Desktop area, move the slidebar to 1024 by 768 pixels, then click OK.
Recommended frequency for best performance is 60Hz.
Back to Contents Page
NOTE: A Test-pattern window will appear on-screen if the monitor cannot sense a video signal.
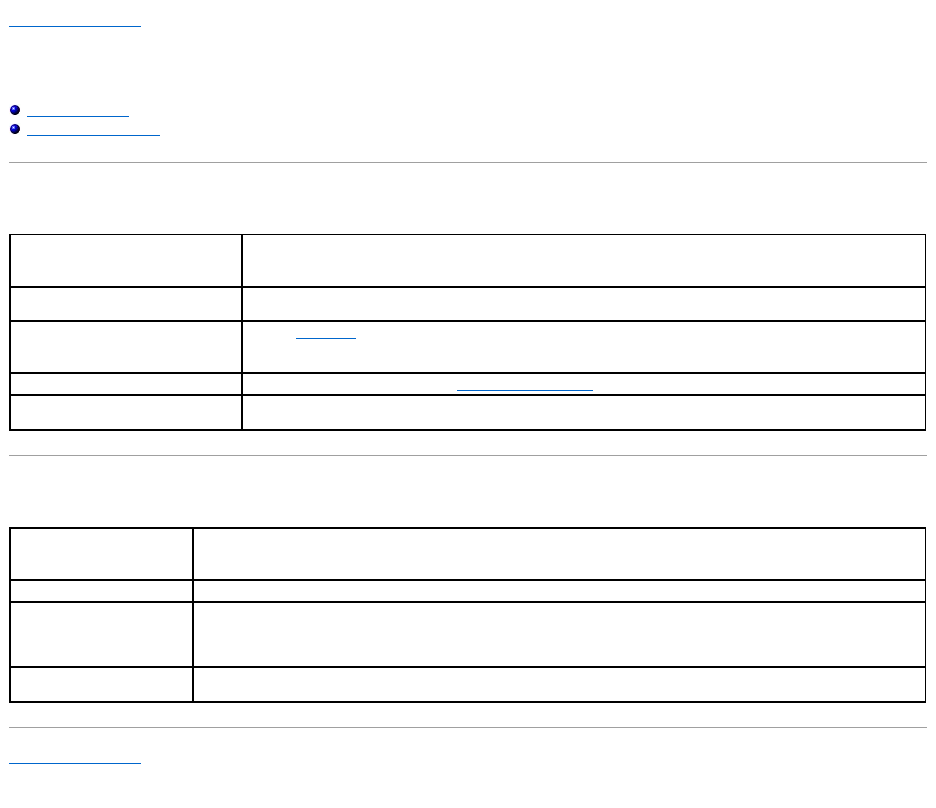
Back to Contents Page
Solving Problems
Dell™E157FPTTouchScreenMonitorContents
General Problems
Touch screen Problems
General Problems
Touch screen Problems
Back to Contents Page
Problem
Suggestion
The monitor does not respond after
you turn on the system.
Check that the monitor's Power Switch is on.
Characters on the screen are dim.
The screen is blank.
Refer to CONTRAST to adjust the brightness. During operation, the monitor screen may automatically turn off as a
result of the Power Saving feature. Press any key to see if the screen reappears.
OSD or power buttons don't work
Check to see if they are locked. See OSD LOCK and UNLOCK.
"Out of Range" display
Check to see if the resolution or vertical frequency of your computer is higher than that of the LCD display.
Resolution should be set to 1024 x 768. Vertical refresh frequency should be set to 60 Hz.
Problem
Suggestion
Touch doesn't work
Make sure cable is securely attached at both ends.
Video alignment doesn't
recognize video resolution.
If you are running an expanded desktop multiple monitor resolution that is not multiples of standard monitor resolutions, you
may experience difficulties in calibrating all of your monitors properly. Contact Dell support for help with modifying this file.
Targets do not appear on
screen during calibration.
You can define the target locations for every monitor in a configuration file called, EloTarget.conf. Contact Dell Application for
help with modifying this file.
Dell™E157FPTTouchScreenMonitorUser'sGuide
Information in this document is subject to change without notice.
©2006DellInc.Allrightsreserved.
Reproduction in any manner whatsoever without the written permission of Dell Inc. is strictly forbidden.
Trademarks used in this text: Dell, the DELL logo, Inspiron, Dell Precision, Dimension, OptiPlex, Latitude, PowerEdge, PowerVault, PowerApp, and Dell OpenManage are trademarks of Dell
Inc.; Intel, Pentium, and Celeron are registered trademarks of Intel Corporation; Microsoft and Windows are registered trademarks of Microsoft Corporation.
Other trademarks and trade names may be used in this document to refer to either the entities claiming the marks and names or their products. Dell Inc. disclaims any
proprietary interest in trademarks and trade names other than its own.
December2006Rev.A01
Model E157FPTe
Power Management Modes
Pin Assignments - 15-pin D-sub connector
Plug and Play Capability
Performing a Silent Install
Disabling Touch Functionality
FCC Notice (U.S. Only)
Performing a Silent Install
Disabling Touch Functionality
Notes, Notices, and Cautions
Information in this document is subject to change without notice.
©2006DellInc.Allrightsreserved.
Reproduction in any manner whatsoever without the written permission of Dell Inc. is strictly forbidden.
Trademarks used in this text: Dell, the DELL logo, Inspiron, Dell Precision, Dimension, OptiPlex, Latitude, PowerEdge, PowerVault, PowerApp, and Dell OpenManage are trademarks of Dell
Inc.; Intel, Pentium, and Celeron are registered trademarks of Intel Corporation; Microsoft and Windows are registered trademarks of Microsoft Corporation.
Other trademarks and trade names may be used in this document to refer to either the entities claiming the marks and names or their products. Dell Inc. disclaims any
proprietary interest in trademarks and trade names other than its own.
December2006Rev.A01
NOTE: A NOTE indicates important information that helps you make better use of your computer.
NOTICE: A NOTICE indicates either potential damage to hardware or loss of data and tells you how to avoid the problem.
CAUTION: A CAUTION indicates a potential for property damage, personal injury, or death.
This display is ENERGY STAR-compliant.
NOTE: A NOTE indicates important information that helps you make better use of your computer.
NOTICE: A NOTICE indicates either potential damage to hardware or loss of data and tells you how to avoid the problem.
CAUTION: A CAUTION indicates a potential for property damage, personal injury, or death.

Back to Contents Page
Using the Touch Screen Software
Dell™E157FPTTouchScreenMonitorContents
About Your Touch Screen Software
Installing Touch Screen Software
Uninstalling Touch Screen Software
Using the Touch Screen Control Panel
Advanced Settings
Dell Right Mouse Button Tool (RMBT)
Tool Tray
Center Desktop Tool
Edge Acceleration Tool (EAT)
About Your Touch Screen Software
Dell provides touch screen software that allows your touchmonitor to work with your computer. Drivers are located on the CD included with your monitor. The
Dell Xpu driver supports the E157FPT Touch screen Monitor. While the touch screen software supports both Windows XP and Windows 2000, this manual uses
the terminology and descriptions for Windows XP in cases where Windows XP and Windows 2000 differ.
The Dell Touch Screen Software package contains:
lNative 32-bit drivers, for both serial and USB touch screen controllers, designed for Microsoft Windows XP and Windows 2000.
lTouch screen software to set your preferences for the touchmonitor. For example, you can define the following preferences:
lWhether the touch action occurs when you touch the screen or when you lift your finger (or pen) off the screen.
lWhether you hear a sound when you touch the screen.
lHow fast you need to touch to produce a double-click.
lA Video Alignment (calibration) utility, that lets you calibrate the touch screen directly without opening the Touch screen software control panel.
lA Touch screen Software Uninstall utility that automatically deletes all Touch screen software components from your computer and removes all Touch
screen software entries from the system files.
Installing Touch Screen Software
You can install the Dell Touch Screen drivers in the following ways based on the number and type of controllers you are installing:
lSingle Monitor with USB or Serial Controller
lMultiple Monitors with Serial Controllers
lMultiple Monitors with USB Controllers
Refer to the appropriate section below.
Single monitor, USB or Serial controller
1. On the Dell CD, browse to the DellTouchDriver directory, then double-click the DellXpu.exe file.
Dell Setup launches.
2. Click Yes.
3. Click Unzip to extract driver files.
4. Specify the language for the Xpu driver package.
5. For USB controllers, select Install USB Touch Screen Drivers, then click Next.
6. For Serial controllers, select Install Serial Touch Screen Drivers, then click Next.
NOTE: The selected language is used for all Dell components in future on the system. To change the user language you must install the package again
on the system. Default selection from the dropdown uses the current users input language from the Windows subsystem.
NOTE: If your serial cable is connected, select Auto-detect Dell devices . If you plan to connect the serial cable later, click Next.
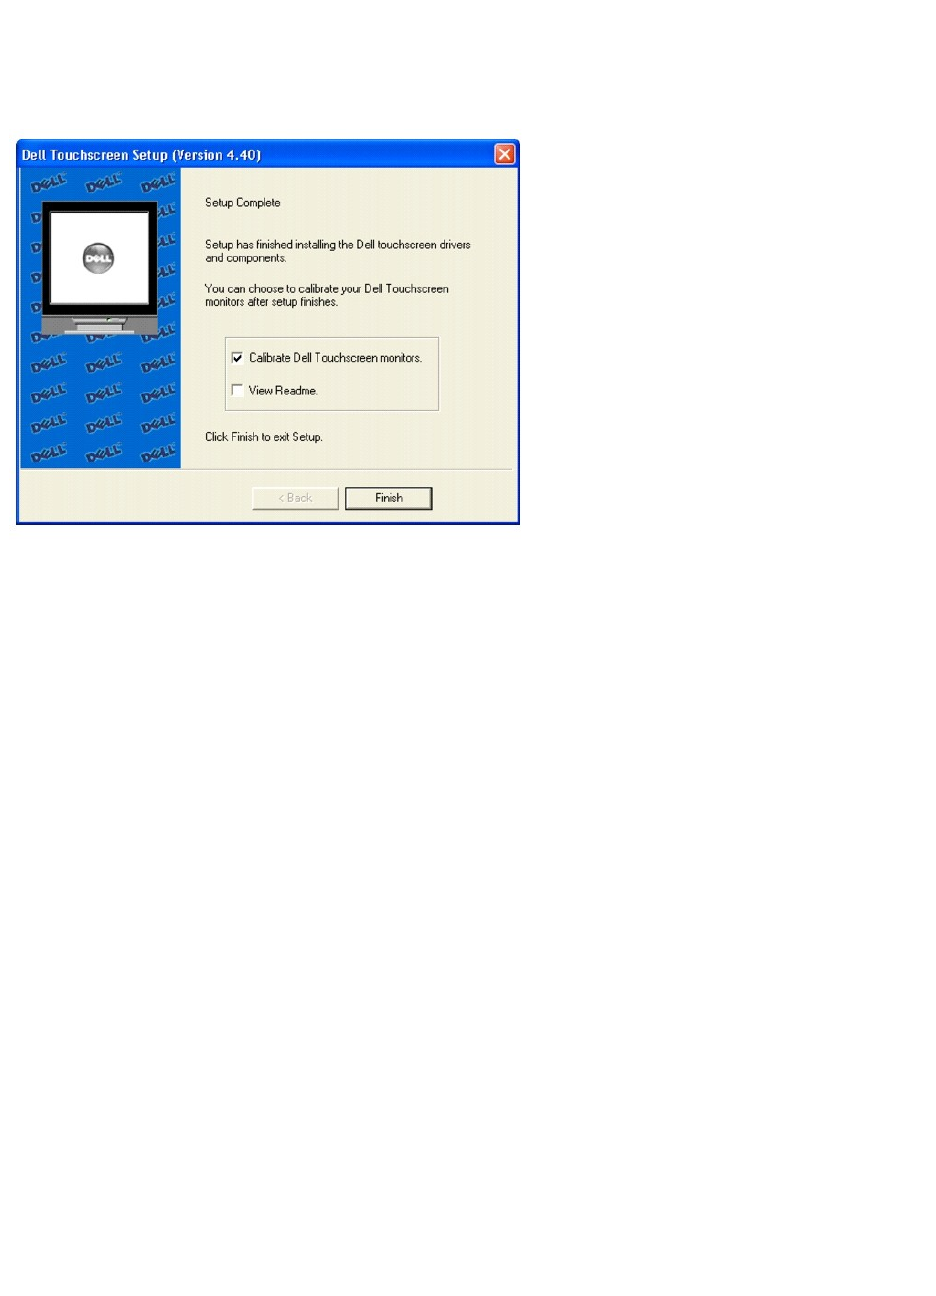
7. Click Next.
8. Review and accept the License Agreement.
The driver files are installed. Following installation, the Setup Complete screen appears.
9. To calibrate the monitor, select Calibrate Dell Touch Screen monitors, click Finish.
You may choose to run the calibrate program at a later time from the Dell Touch Screen Properties.
Multiple Monitors with Serial controllers
Follow the general procedure for Single monitor, serial controller installation above, auto detecting or selecting all the serial ports that you will use. When the
Setup Complete screen appears, you may choose to run calibration (the Dell Video Alignment program, EloVA) immediately or wait until later. If you choose not
to run this program now, you can run it from the Dell Control Panel application. When EloVA runs for the first time, it will attempt to calibrate all controllers
and/or serial ports that were installed. Press the Esc key on the keyboard to terminate or skip calibration for any monitor, or allow the program to time out (as
indicated by the progress bar reaching maximum).
Multiple Monitors with USB controllers
1. Follow the procedure for Single monitor, USB controller installation above.
2. The driver files will install. When the Setup Complete screen appears, you may choose to run calibration (the Video Alignment program, EloVA)
immediately or wait until later. If you choose not to run this program now, you can run it from the Dell Properties Control Panel. When EloVA runs for the
first time, it will attempt to calibrate all controllers and/or serial ports that were installed. Press the Esc key on the keyboard to terminate or skip
calibration for any monitor, or allow the program to time out (as indicated by the progress bar reaching maximum). The program will continue until all
controllers and/or ports have been calibrated.
Multiple Monitors with Serial or USB controllers
1. On the Dell CD, browse to the DellTouchDriver directory, then double-click the DellXpu.exe file.
Dell Setup launches.
2. Click Yes.
Click Unzip to extract driver files.
3. Specify the language for Xpu driver package.
4. Select both the Install Serial Touch Screen Drivers and Install USB Touch Screen Drivers boxes.
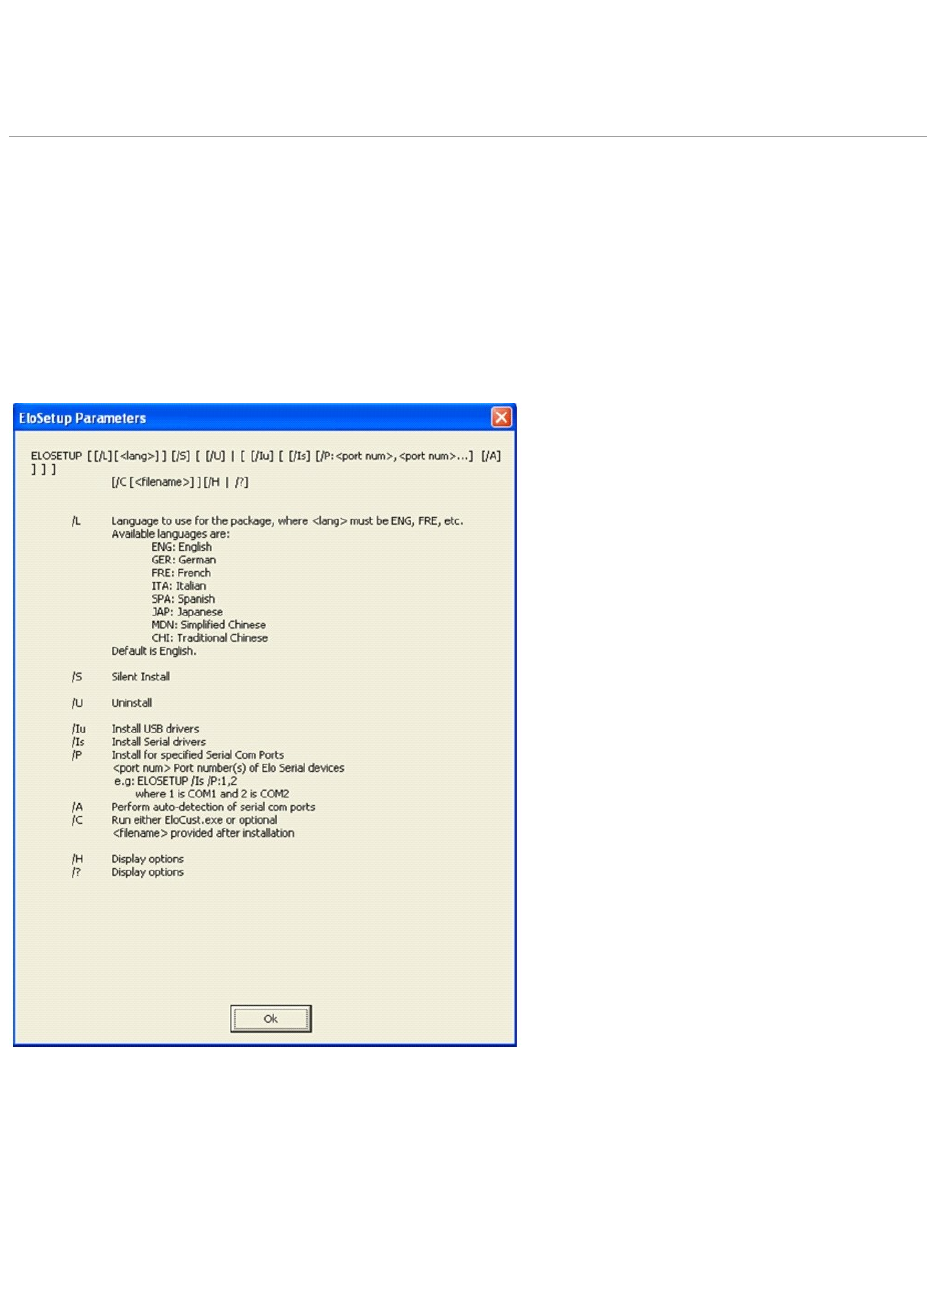
5. Review and accept the License Agreement.
The program will appear to proceed as a single/multiple serial controller installation but USB files will also install. The driver files will install. When the
Setup Complete screen appears, you may choose to run calibration (the Video Alignment program, EloVA) immediately or wait until later. If you choose
not to run this program now, you can run it from the Dell Control Panel application. When EloVA runs for the first time, it will attempt to calibrate all
controllers and/or serial ports that were installed. Press the Esc key on the keyboard to terminate or skip calibration for any monitor, or allow the
program to time out (as indicated by the progress bar reaching maximum). The program will continue until all controllers and/or ports have been
calibrated.
Performing a Silent Install
If you have to perform several installations, you may want to take advantage of the Touch Screen software silent install facility. You can run a silent install
from diskettes, a CD, hard drive, or network drive. To begin, you must create a silent install script that contains the recorded install instructions.
lTo Silent install for USB controllers use:
EloSetup /iu /s
lTo Silent install for a Serial controller on COM1 use
EloSetup /is /P:1 /s
To view all the options available for this installation method, run EloSetup as EloSetup /h.
Adding Controllers
You can add additional controllers after installation from the Windows Add or Remove Programs dialog.
Adding Serial Controllers
1. Click Start" Control Panel "Add or Remove Programs.
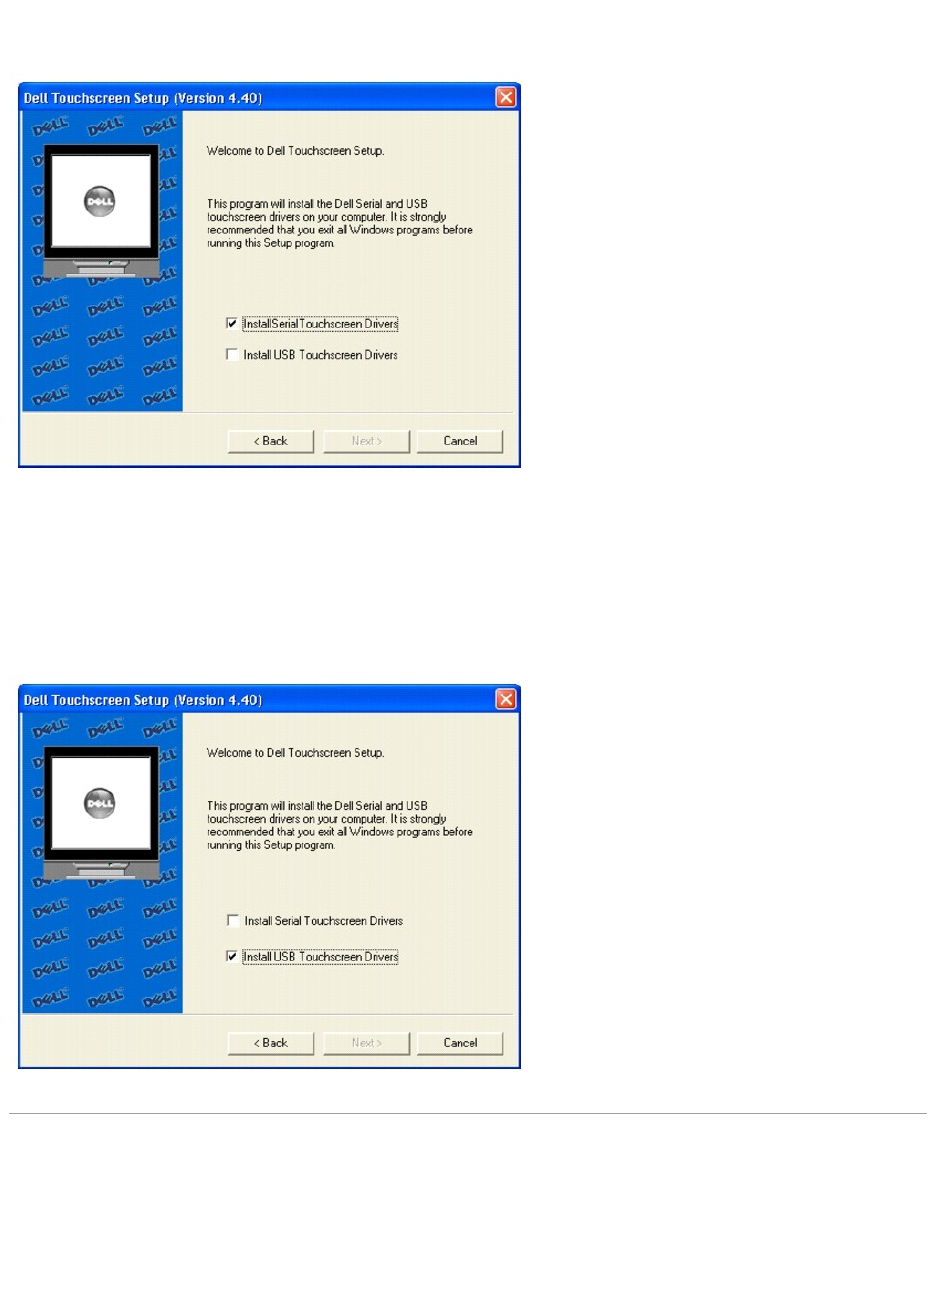
2. Locate the Dell entry, then click Change.
The Dell Touchscreen Setup dialog appears.
3. Select Install Serial Touchscreen Drivers, click Next.
Adding USB Controllers
If there are Dell USB devices already installed, plug the USB cable from the touchmonitor into the computer and run EloVA to calibrate the touchmonitors.
If there are no Dell USB devices attached to the system, click on the Change option from the Add or Remove programs in the Control Panel, Dell entry.
Uninstalling Touch Screen Software
The Uninstall program removes all touch screen software components from your computer. These components include touch screen software files, directories,
program folders, and folder items. The Uninstall program also removes all touch screen software entries from the system registry files.
1. Make sure the touch screen software and Windows control panels are closed.
2. Click Start " Control Panel "Add or Remove Programs.

3. Locate the Dell entry, then click Remove.
4. Click Yes to confirm removal.
You may see the following message when the Uninstall is complete: Some elements could not be removed. You should manually remove items related
to the application. This is normal, as several files remain in use until you restart the computer.
5. Click Details to see the remaining files.
Disabling Touch Functionality
Touch functionality may be quickly and easily disabled using the Tool Tray icon. If the Dell icon is not in the Tool Tray (lower right corner of the display), see the
section on enabling the Tool Tray icon below.
1. Click the Dell icon in the Tool Tray (lower right corner of the display) .
The Dell Touch Screen Properties dialog appears.
2. Click Disable Touch.
3. Touch functionality will be disabled. To re-enable touch functionality, click Enable Touch.
Using the Touch Screen Control Panel
To open the Touch Screen software control panel:
lDouble-click the Touch Screen software icon on the desktop.
lSelect Start "Settings" Control Panel and double-click the Dell Touch Screen icon.
lRight-click the Dell icon in the Windows system tray and choose Dell Touch screen Properties.
General
You can use the General tab on the Dell Touch Screen Properties dialog to align or calibrate your touchmonitor to ensure that the mouse cursor appears at the
position of touch.
Dell uses a three-point calibration sequence that accepts touchscreens with any orientation of the X or Y axis, in landscape or portrait mode.
You should calibrate the touch screen in the following cases:
lWhen you change a particular video resolution (for example 640x480) or video mode of your monitor for the first time.
lWhen you change the size of the video image by adjusting the horizontal and vertical controls on your monitor.
lWhen the cursor does not follow the movement of your finger, or does not reach the edges of the touch screen.
To calibrate the touch screen:
1. Right-click the Dell icon in the Windows system tray and select Align.
The Dell Touch screen Properties dialog appears.
NOTE: If you have a serial controller, you must restart your computer once the Uninstall is complete. The touch screen driver remains in use until you
restart the computer. USB controllers do not require a restart, as the driver is uninstalled when you disconnect the last touch screen.
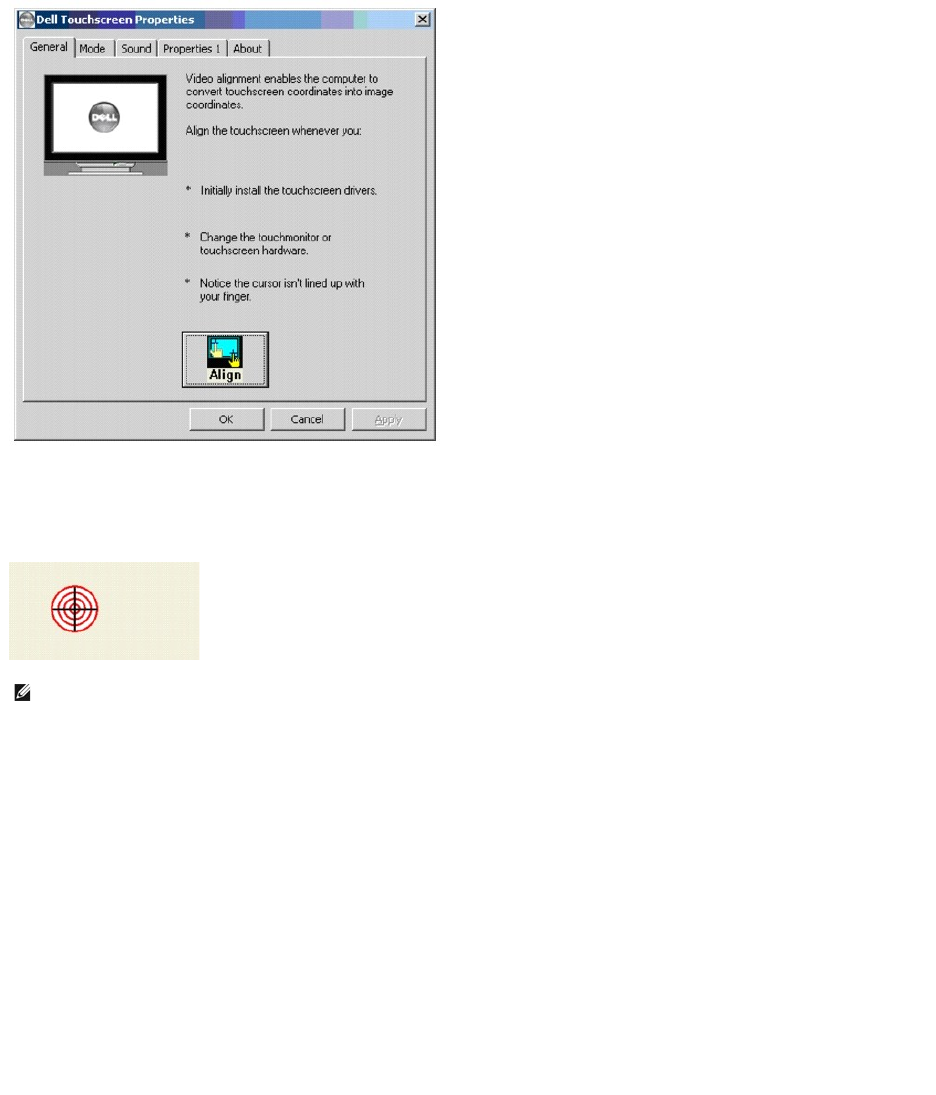
2. Select the General Tab, then click Align.
3. A target appears on the screen. Touch the calibration target firmly and precisely with your fingertip. Be careful to keep your other fingers away from the
touch screen as you touch the target.
4. Repeat these instructions for additional calibration targets.
Recalibrate the touch screen if any of the following tests fail.
lTouch random points on the screen. The cursor should be located underneath your finger or pen when you touch the screen.
lDrag your finger across the screen and check that the cursor follows your movements.
lTouch each corner and along the edges of the screen. Verify that the cursor reaches the full image area of the screen. Ensure that you can touch and
activate all icons and menus across the entire screen.
lIf you need to recalibrate the screen, make sure to touch the targets carefully. It is possible that one of your touches did not register properly or you
accidentally touched the screen in the wrong place during calibration. For example, if you touch beyond the targets or into the non-image area, you will
distort the touch screen calibration.
Mode
You can use the Mode tab to customize the response of your touch screen by defining the touch actions that equate to a mouse click, double-click, and drag.
You must click Apply to activate changes made on the Mode tab.
.
NOTE: If you press Escape or do not touch the touch screen within 20 seconds, the system automatically cancels the calibration process with no change
to the current settings.
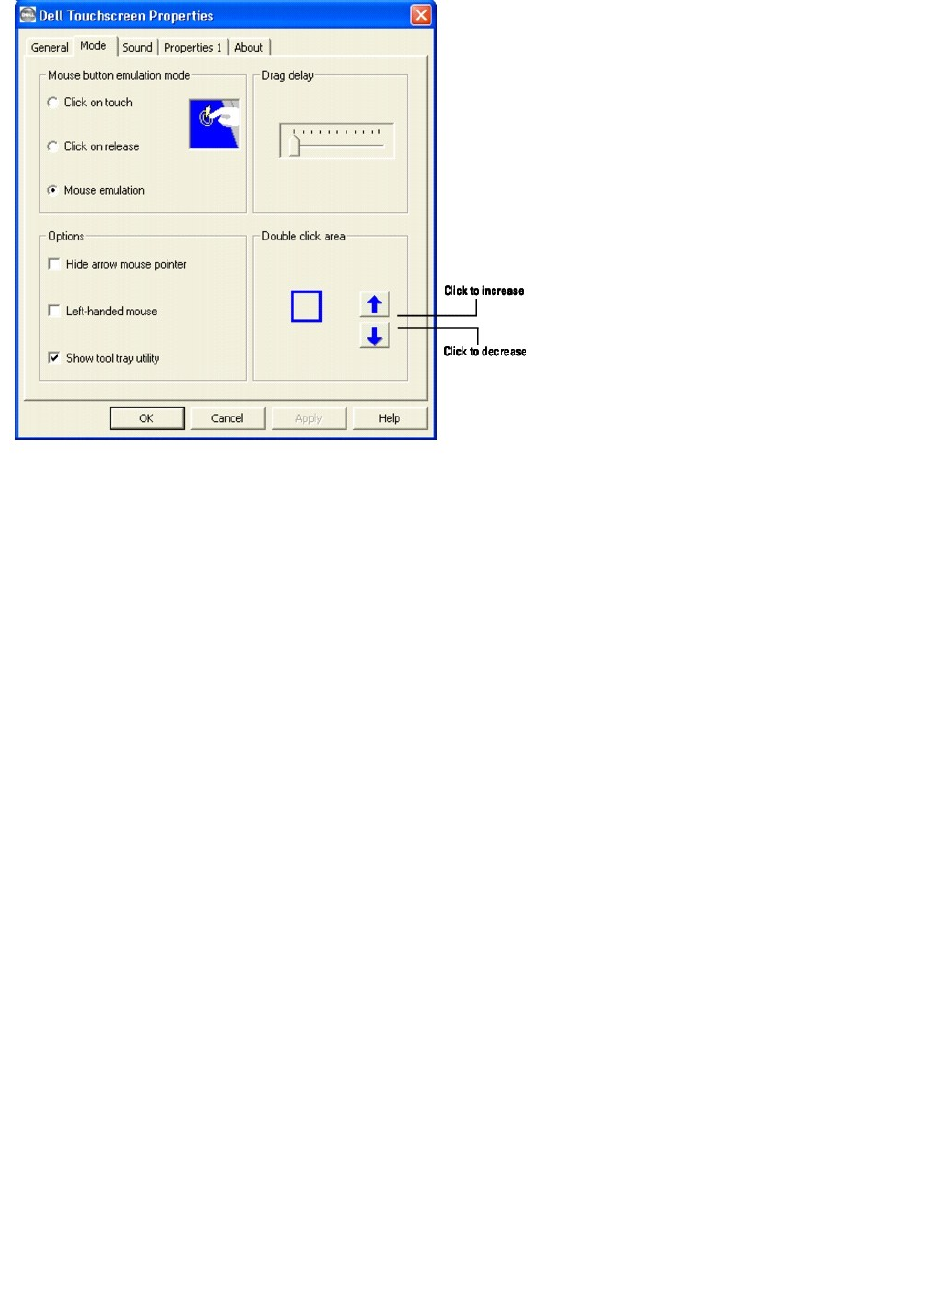
Mouse button emulation mode
Place the right-click tool on your desktop enabling you to utilize right-click functionality using the touch screen.
Click on Touch
Click on Touch sends a mouse down/up message at the point of touch on the touch screen. You must remove your finger from the touch screen for a new
touch at any location to be recognized. The cursor or selected objects cannot be dragged on the screen in this mode.
Click on Release
Click on Release sends at the time of release (untouch) a mouse down/up message at the point that the screen was last touched. Dragging across objects on
the screen will not highlight or select them unless untouch occurs when the touch is over the object.
Mouse Emulation (Drag and Double-Click)
lSends a mouse down message at the point of contact.
lSelects an object if it was at the initial point of contact.
lDrags a selected object on the screen.
lResponse to dragging is set by the Drag delay slider bar.
lSends a mouse up message at the point of untouch.
lDouble-clicks on an object when the screen is touched twice in rapid succession at the same location.
lThe speed to achieve double-click is identical to the speed of a successful double-click with the mouse.
lDouble-click speed is set from the Mouse Properties control panel (Mouse Properties"Buttons"Double-click speed).
lDouble-click area graphically sets the dimensions of the location around each clickable icon or object on the screen which will be recognized by Windows
as a double-click. The size of the wire-frame square displayed in the Double-click area tab is the actual size of double-click area accepted by Windows.
The square is increased or decreased in size by touching the appropriate arrows adjacent to the square. Note that the double-click box size is
independent of screen resolution and must be defined for each user.
Options
Options allow various features of the desktop related to the touch screen to be configured. You must click Apply to activate these features.
lHide arrow mouse pointer turns off the standard mouse cursor.
lLeft-handed mouse interchanges the standard two-button mouse button assignments.
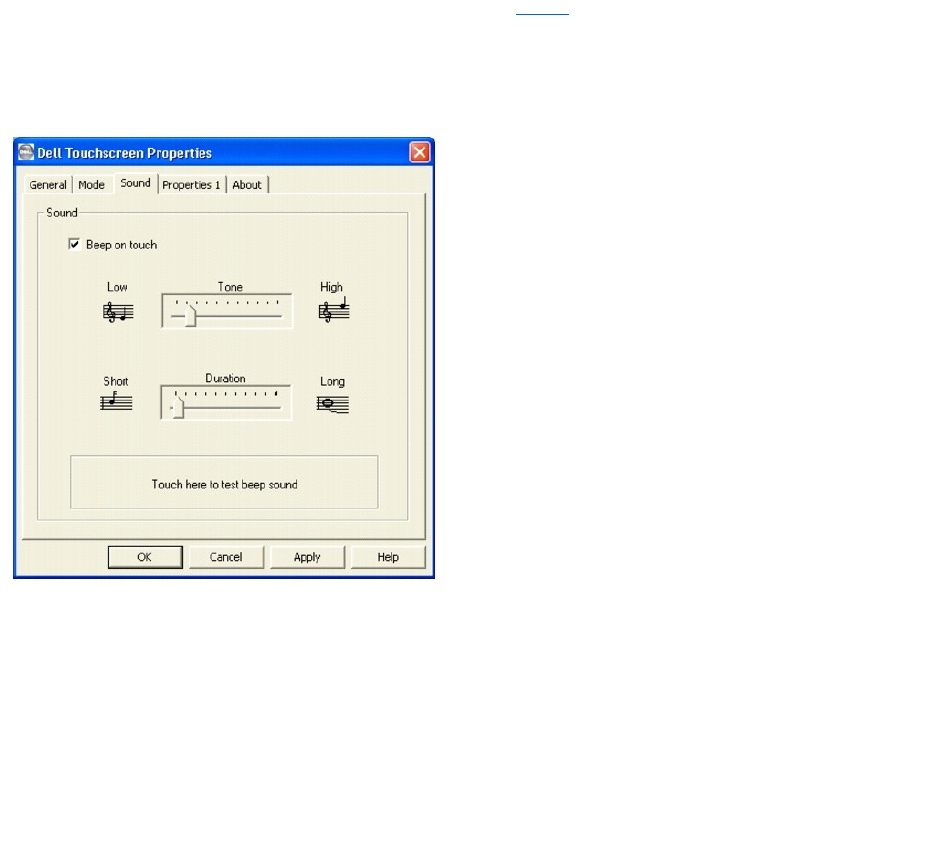
lShow tool tray utility activates the Tool Tray utility in the Windows Task Bar. See Tool Tray for a complete description of this feature
Sound
The Sound tab sends a single-frequency tone or "Beep" to the system speaker each time a valid touch occurs.
The beep is enabled by default when the driver is installed. It may be turned off by unchecking the Beep on touch box in this tab.
The frequency (Tone) and the Duration of the beep can be adjusted by moving the appropriate slider in this tab with the touch screen or mouse, or by using
the keyboard arrow keys.
You must click Apply to activate the changes made on the Sound tab.
Properties
A Properties page is created for each touch screen controller installed by EloSetup and for each serial port reserved for a controller, even if that controller is
not present. A number is assigned to each Properties page that is related to the order in which controllers or ports were detected or enumerated. Each
Properties page contains information extracted from the touch screen controller and the system about the monitor, touch screen, controller, and internal
driver.
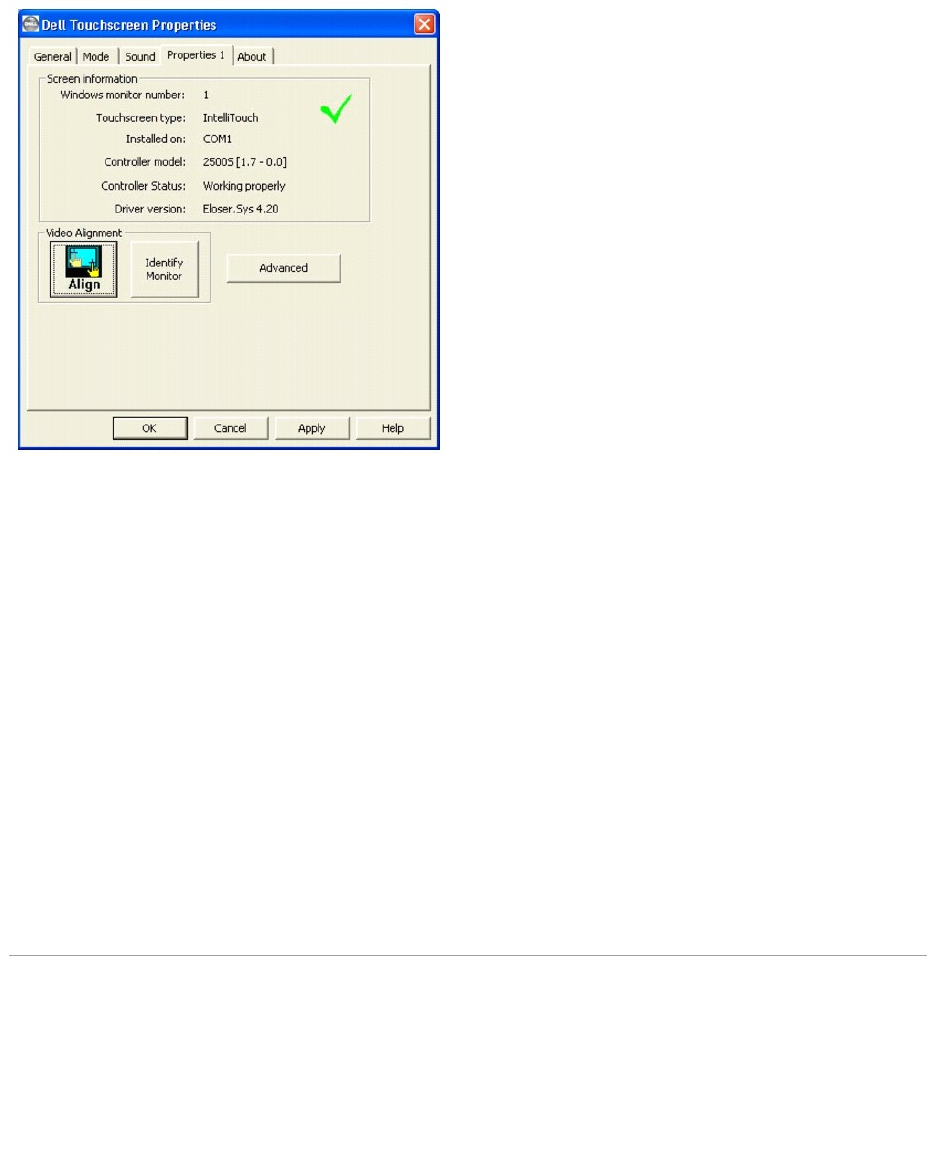
Screen Information
lWindows Monitor Number lists the monitor that corresponds to the "Windows Monitor" from the Windows Display Properties control panel.
lTouch screen Type: IntelliTouch.
lInstalled On indicates USB or lists the Windows COM port that a serial touch screen is installed on.
lController Model lists the marketing model number of the controller attached. It also lists the revision of the firmware loaded in the controller.
lController Status indicates either "Working properly" or reflects any errors reported from the controller.
lDriver Version lists the version number of the internal driver being used for serial and USB devices as appropriate.
lThe Video Alignment and Advanced buttons appears for touchscreens that have been calibrated.
lThe Identify Monitor button displays the Dell logo on the monitor associated with this Properties page for about one second each time this button is
touched.
lThe EloVA icon will launch the video alignment program only for the monitor associated with the current Properties page. Running EloVA from the
Properties page avoids the need to align all monitors in a multiple monitor application when only a single monitor alignment is desired.
lIf a serial port is reserved for a touch screen controller that is not actually installed, the only information contained in the Screen information section of
the associated Properties page is the number of the Windows COM port. No Screen configuration icons are displayed.
About
The About tab provides the version of the Control Panel (which is linked to the driver version) and also provides links to the Dell website, the readme included
with the driver, and the user manual.
Advanced Settings
The Advanced dialog contains additional Touch settings. The Touch tab includes the following options:
lA toggle for Disabling/Enabling touch.
lAn option to display the Right Mouse button tool.
lSettings for defining the behavior of right-click functionality.
lA button for activating the Edge Acceleration Tool.
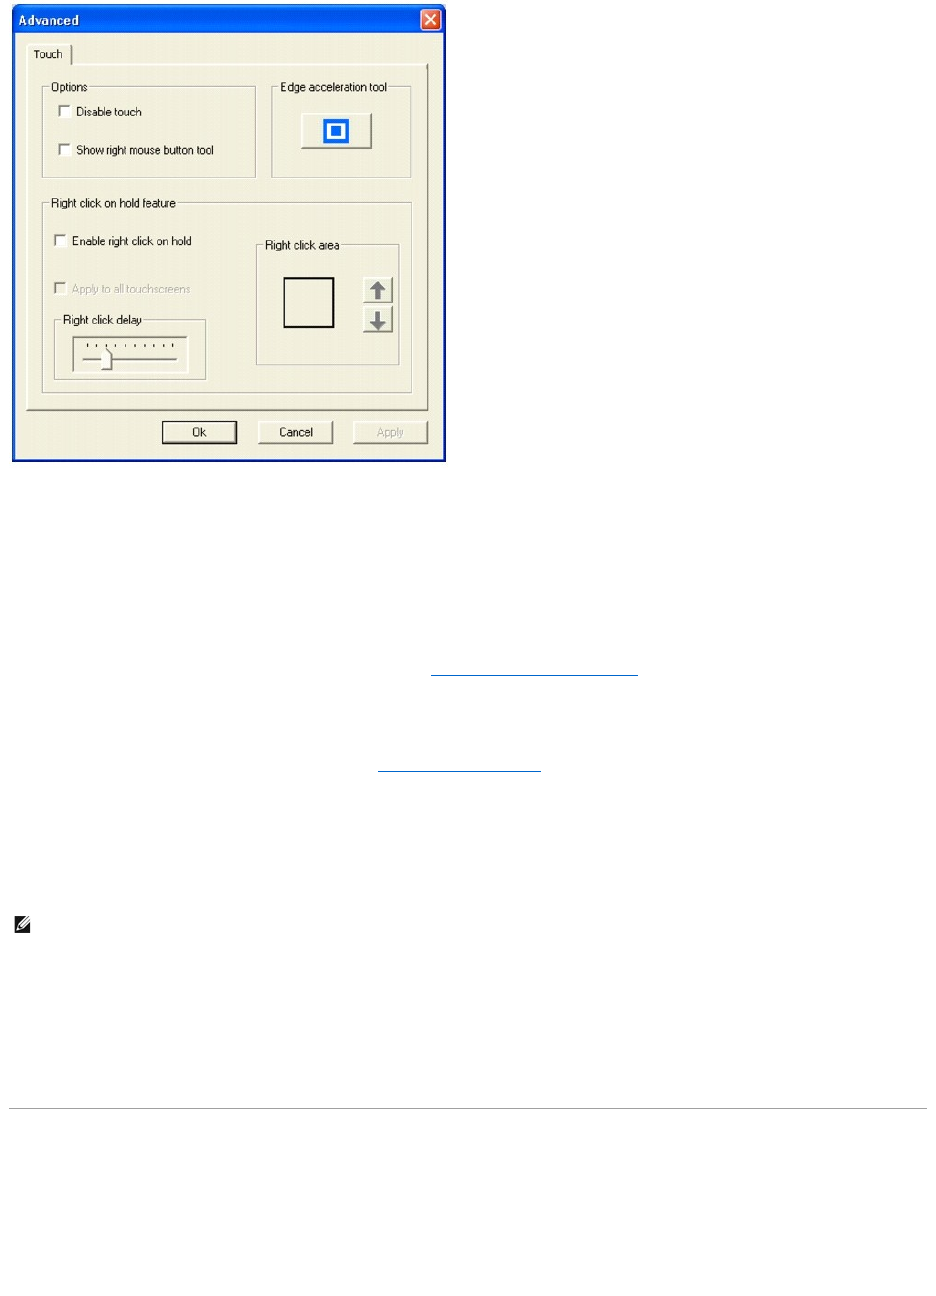
Disable/Enable touch
Disable Touch stops touch information from reaching Windows for this touch screen. This feature may also be activated from the Tool Tray utility. Disabling
touch has no effect on the operation of the standard mouse.
Show right mouse button tool
Show right mouse button tool launches this feature for this monitor. See Dell Right Mouse Button Tool (RMBT) for a complete description of this feature.
Edge acceleration tool
Edge Acceleration Tool launches this utility for this monitor. See Edge Acceleration Tool (EAT) for a complete description of this feature.
Right-click on Hold Feature
Right click on hold feature enables you to create right-clicks on the touch screen without running the Right Mouse Button Tool. If you touch the screen and
hold, a right-click is generated on the screen, if you remain within the right-click area and after the right-click delay time-out has occured. The right-click delay
allows you to perform other touch screen operations normally.
When the Right click on hold feature is turned on, the delay value is set to a minimum of 25 milliseconds.
lTo enable this feature, select Enable right click on hold.
lTo enable this feature for all touchscreens, select the Apply to all touchscreens check box.
Right click delay defines the right click delay value in milliseconds. The right click delay allows the users to perform other touch screen operations normally.
Right click Area defines the area size that generates a right click. This feature allows you to touch within a larger area.
Dell Right Mouse Button Tool (RMBT)
Right Mouse Button tool allows a Windows right mouse button simulation on the touch screen.
A representation of a typical two-button mouse is displayed in a small window on the desktop, when this application is run. The initial presentation of the
RMBT shows the left button shaded, indicating that the left button is active. Any touch on the desktop or an application will produce a left button click
consistent with the Button settings in the Control Panel.
A touch in the RMBT will change the shading to show the right mouse button active. Now any touch on this monitor on which RMBT is running will produce a
right button click.
NOTE: Right click on hold is enabled only in "Mouse emulation" touch mode.
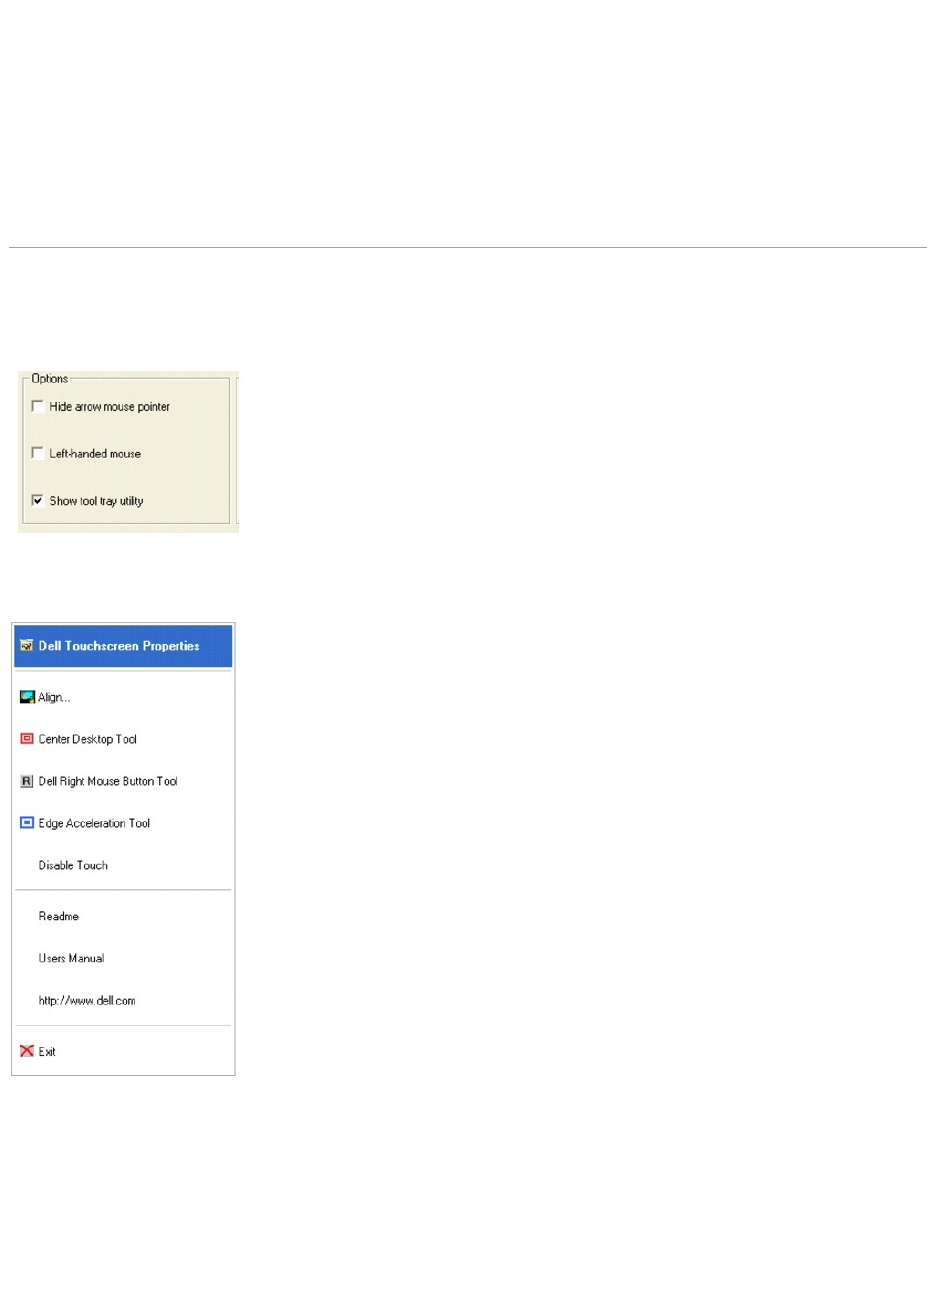
Typically, a right button action will activate a new dialog box for some function similar to mouse right button click. When that dialog box is touched, or any
other touch on the touch monitor is made, this touch will be a left button event. Simultaneously, the mouse button shading in the RMBT will toggle back to the
left button.
After activating the right-button state, touch the RMBT again to display the menu that allows you to:
Launch the Dell Touch screen Properties dialog, close the right button utility.
You can drag the RMBT to any location on the desktop by touching it and holding the touch until the crossed arrows appear.
lThe RMBT may also be dragged with the standard mouse.
lThe RMBT cannot be resized.
lThe RMBT can be run for every touchmonitor from the Dell Control Panel " Properties tab.
Tool Tray
The Tool Tray application offers a convenient way to access commonly used functions of the driver from the operating system desktop. For the Tool Tray icon to
appear in the Windows system tray, you enabled it from the Mode tab in the Control Panel.
.
You can launch the Tool Tray application with a single left or righ- click.
The Tool Tray application provides the following features:
lAccess to Dell Touch screen Properties.
lAlign - Launches EloVA, the Dell Video Alignment program.
lCenter Desktop Tool - Launches Center Desktop Tool.
lDell Right Mouse Button Tool (RMBT) - Launches Right Mouse Button Tool for all touch monitors that have been calibrated.
lEdge Acceleration Tool - Launches Edge Acceleration tool.
lDisable/Enable Touch - When the driver is loaded and running, clicking this segment of the Tool Tray menu will disable the driver, stopping all touch
reports from being sent from the driver to the mouse handler (MouClass)

When disabled through the Tool Tray, touches made on the touch screen are not buffered by the driver, and will not be sent from the driver to MouClass after
the touch screen is re-enabled.
After the touch screen has been disabled, the state of this segment of the Tool Tray menu changes from "Disable" to "Enable." Since the touch screen is now
disabled, it can only be enabled by using the mouse or keyboard. Clicking "Enable" in the Tool Tray will restore touch screen operation.
lReadme - Launches Readme instructions.
lUser Manual - Quick link to this User Manual.
lhttp://www.dell.com - A quick link to Dell's website
lExit - Clicking this button exits the Tool Tray application and also removes it from the Windows Taskbar. The Tool Tray application may also be removed
by clearing the Show tool tray utility check box, then clicking Apply.
Center Desktop Tool
Presents a full screen image for the selected monitor to allow proper adjustment of the video prior to running the EloVA video alignment program
l Configurable parameters are
¡ Border width, in pixels
¡ Which monitor to adjust in a multiple monitor configuration
l Can be launched from the Tool Tray (for single monitor) or command line (for multiple monitors)
l Configuration syntax menu is available by running eloalmon /h. Only one monitor may be adjusted for each execution of the program.
l Program terminates when green "check" mark is touched or clicked with the mouse, or from the keyboard by pressing Esc, Enter or Space. See graphic
below.
The center desktop tool solves the common problem of adjusting the size of the video image in video alignment programs.
Edge Acceleration Tool (EAT)
Edge Acceleration tool can be used to configure cursor acceleration towards the edge of the touch screen. Edge Acceleration is a special feature provided to
allow touches towards the edges.
EAT (i.e. EAT.exe) can be launched from Program Files" Dell Xpu folder.
Presents a full screen image with the edge acceleration rectangle bounds and a Cursor Acceleration Configuration dialog, displaying the configuration
parameters for Edge Acceleration.
NOTE: It is also possible to re-enable the touch screen from the Control Panel after touch has been disabled from the Tool Tray. Open the Control Panel
with mouse or keyboard, uncheck the "Disable Touch" box in the Mode"Options tab, click "Apply" and touch is restored.
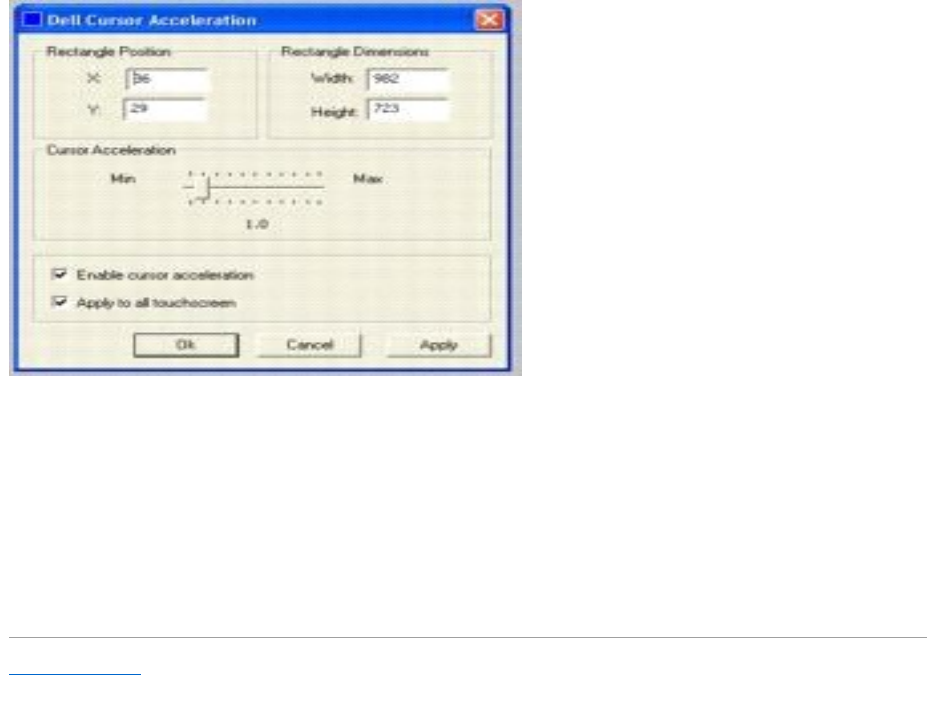
Configurable parameters are:
lCursor Acceleration scale. This scale can be set from a value of 0-10 where, 1 corresponds to no acceleration.
lEdge acceleration rectangle bounds dimensions.
lEdge acceleration rectangle bounds position.
lEnable cursor acceleration.
lApply to all touchscreens.
These parameters can be configured using the mouse to resize or move the bounds rectangle, or by entering the values directly in the dialog box. You must
click Apply to activate the changes made in this dialog.
This applies to all touchmonitors unless run with appropriate command line options. To view the options available, run EloAccel using EloAccel /h.
Back to Contents Page
