Dell Wyse 3040 Thin Client User Guide Manual Users En Us
User Manual: Dell wyse-3040-thin-client Dell Wyse 3040 Thin Client User Guide
Open the PDF directly: View PDF ![]() .
.
Page Count: 45
- Welcome to Dell Wyse 3040 thin client
- Wyse 3040 thin client hardware installation
- Wyse 3040 thin client on ThinOS
- Logging on to the Wyse 3040 thin client running Wyse ThinOS
- Configuring the dual head display settings in Dell Wyse ThinOS
- Configuring the network settings on Dell Wyse ThinOS
- Configuring peripherals settings on Wyse ThinOS
- Power state
- Configuring the broker setup on Dell Wyse ThinOS
- Configuring the WDA settings on Dell Wyse ThinOS
- Wyse 3040 thin client on ThinLinux
- Accessing thin client BIOS settings on Wyse ThinLinux
- Logging on to the Wyse 3040 thin client running ThinLinux
- Configuring your display on Dell Wyse ThinLinux
- Configuring the network settings on Dell WyseThinLinux
- Configuring peripherals settings on Wyse ThinLinux
- Power state
- Configuring connections locally on Dell Wyse ThinLinux
- Configuring the WDA settings on Dell Wyse ThinLinux
- System specifications
- Troubleshooting your system

Dell Wyse 3040 Thin Client
User Guide
Regulatory Model: N10D
Regulatory Type: N10D001

Notes, cautions, and warnings
NOTE: A NOTE indicates important information that helps you make better use of your product.
CAUTION: A CAUTION indicates either potential damage to hardware or loss of data and tells you how to avoid the problem.
WARNING: A WARNING indicates a potential for property damage, personal injury, or death.
© 2017 - 2018 Dell Inc. or its subsidiaries. All rights reserved. Dell, EMC, and other trademarks are trademarks of Dell Inc. or its subsidiaries. Other
trademarks may be trademarks of their respective owners.
2017 - 03
Rev. A00

Welcome to Dell Wyse 3040 thin client
Dell Wyse 3040 thin client is a low-cost entry level thin client platform. These thin clients have a x86 processor, which allows you to run
Wyse ThinOS, PCoIP enabled Wyse ThinOS, and Wyse ThinLinux. The platform is used as a thin client by connecting to any monitor and
allows you to use a remote access client for VDI or cloud-based computing.
Topics:
• About this guide
• Dell Wyse external references
About this guide
This guide is intended for Wyse 3040 thin clients which run Wyse ThinOS, PCoIP enabled Wyse ThinOS, and Wyse ThinLinux. It provides
hardware specications and OS-specic congurations to help you work with Wyse 3040 thin clients.
Dell Wyse external references
This section provides links to Dell support sites for Dell Wyse thin clients.
•Dell reference guides
•Dell Service and Support — Latest software images
•Dell Wyse Device Manager — Information about Dell remote management software
•Dell and the Environment — Information about Dell compliance with RoHS and with the Waste Electrical and Electronic Equipment
(WEEE)
•Dell and e-Recycling — Information about recycling and reuse of Dell products
•Dell Warranty Registration* — Register your product
1
Welcome to Dell Wyse 3040 thin client 3

Wyse 3040 thin client hardware installation
For more information on the hardware installation, see
Dell Wyse 3040 thin client Quick Start Guide
.
2
4 Wyse 3040 thin client hardware installation

Wyse 3040 thin client on ThinOS
This section provides the instructions on how to easily congure and eciently manage Wyse 3040 thin client that runs on ThinOS.
Topics:
• Logging on to the Wyse 3040 thin client running Wyse ThinOS
•Conguring the dual head display settings in Dell Wyse ThinOS
•Conguring the network settings on Dell Wyse ThinOS
•Conguring peripherals settings on Wyse ThinOS
• Power state
•Conguring the broker setup on Dell Wyse ThinOS
•Conguring the WDA settings on Dell Wyse ThinOS
Logging on to the Wyse 3040 thin client running Wyse
ThinOS
What you see after logging on to the server depends on the administrator congurations.
•Users with a Classic Desktop - will see the classic ThinOS desktop with full taskbar, desktop, and Connect Manager familiar to ThinOS
users. This option is the default out-of-the-box experience and is recommended for terminal server environments with published
applications and for backward compatibility with ThinOS 6.x versions.
•Users with a Zero Desktop - will see the Zero Desktop with the Zero Toolbar showing the assigned list of connections from which to
select. This option is recommended for VDI and any full-screen only connections.
In any desktop case, you can select the desktop option you want (Classic Desktop or Zero Desktop) and create the connections you need
using the Visual Experience tab on the Remote Connections dialog box.
To open the Remote Connections dialog box, perform one of the following tasks:
•Classic Desktop — Click User Name , and then select System Setup > Remote Connections.
NOTE: User Name is the user who is logged-on and is located at the lower-left pane of the taskbar
•Zero Desktop — Click the System Settings icon on the Zero Toolbar, and then select Remote Connections.
Conguring the dual head display settings in Dell
Wyse ThinOS
To congure the dual head display settings in Wyse ThinOS:
1 From the desktop menu, click System Setup, and then click Display.
The Display dialog box is displayed.
2 Click the Dual Head tab, and use the following guidelines:
3
Wyse 3040 thin client on ThinOS 5
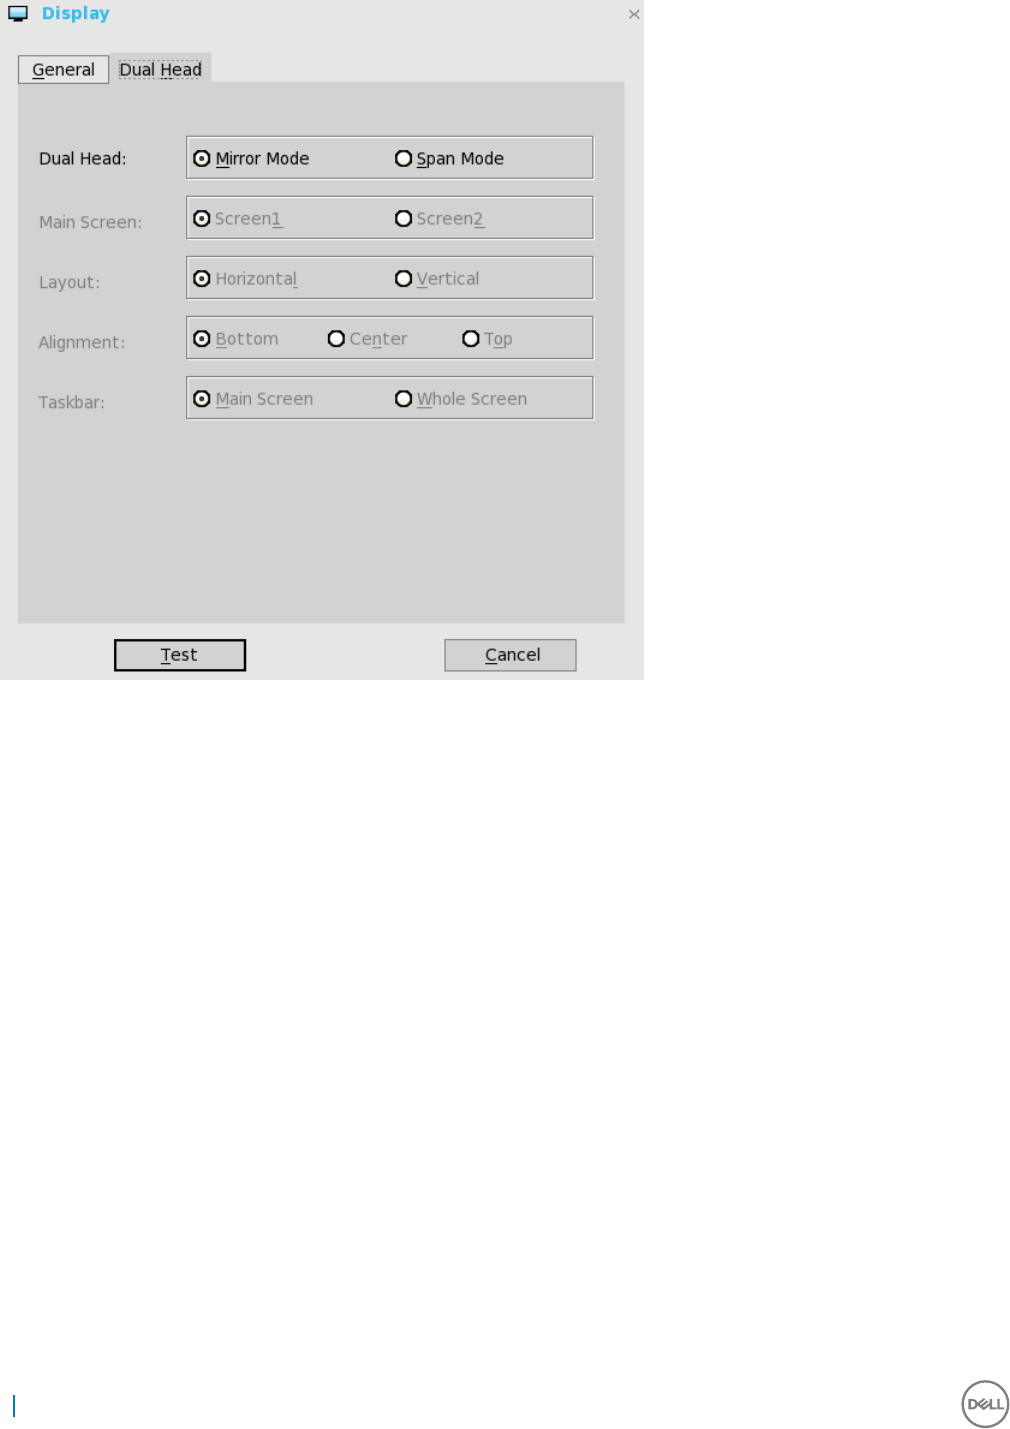
This feature is applicable for supported dual-monitor-capable thin clients only.
aDual Head—Select Mirror Mode to have the two monitors work in a matching state, or Span Mode to have the two monitors
work individually.
bMain Screen—Select which of the two monitors you want to be the main screen (Screen1 or Screen2). The other screen is
extended from the main screen.
cLayout—Select how you want the two monitors to be oriented to each other.
Horizontal — where you move between the monitors from the left and right of the screens.
Vertical— where you move between the monitors from the top and bottom of the screens.
dAlignment— Select how you want the monitors to be aligned Bottom, Center, or Top.
Bottom means screens are bottom-aligned in a horizontal orientation; Center means screens are center-aligned; Top means
screens are top-aligned in a horizontal orientation.
eTaskbar (Classic Desktop Only)—Select under which screen you want the taskbar to appear Whole Screen or Main Screen
Gamma Supported Monitors Only— Use the Gamma Setup tab to adjust the saturation values for Red, Green and Blue on
VGA connected monitors supporting gamma settings, if you feel the default settings are too light. Be aware that the Gamma
Setup tab will be disabled once you click Save+Exit. You can enable it again by setting rgamma={1-100} ggamma={1-100}
bgamma={1-100} in the Resolution INI parameter. For more information, see Dell Wyse ThinOS INI Guide.
6Wyse 3040 thin client on ThinOS
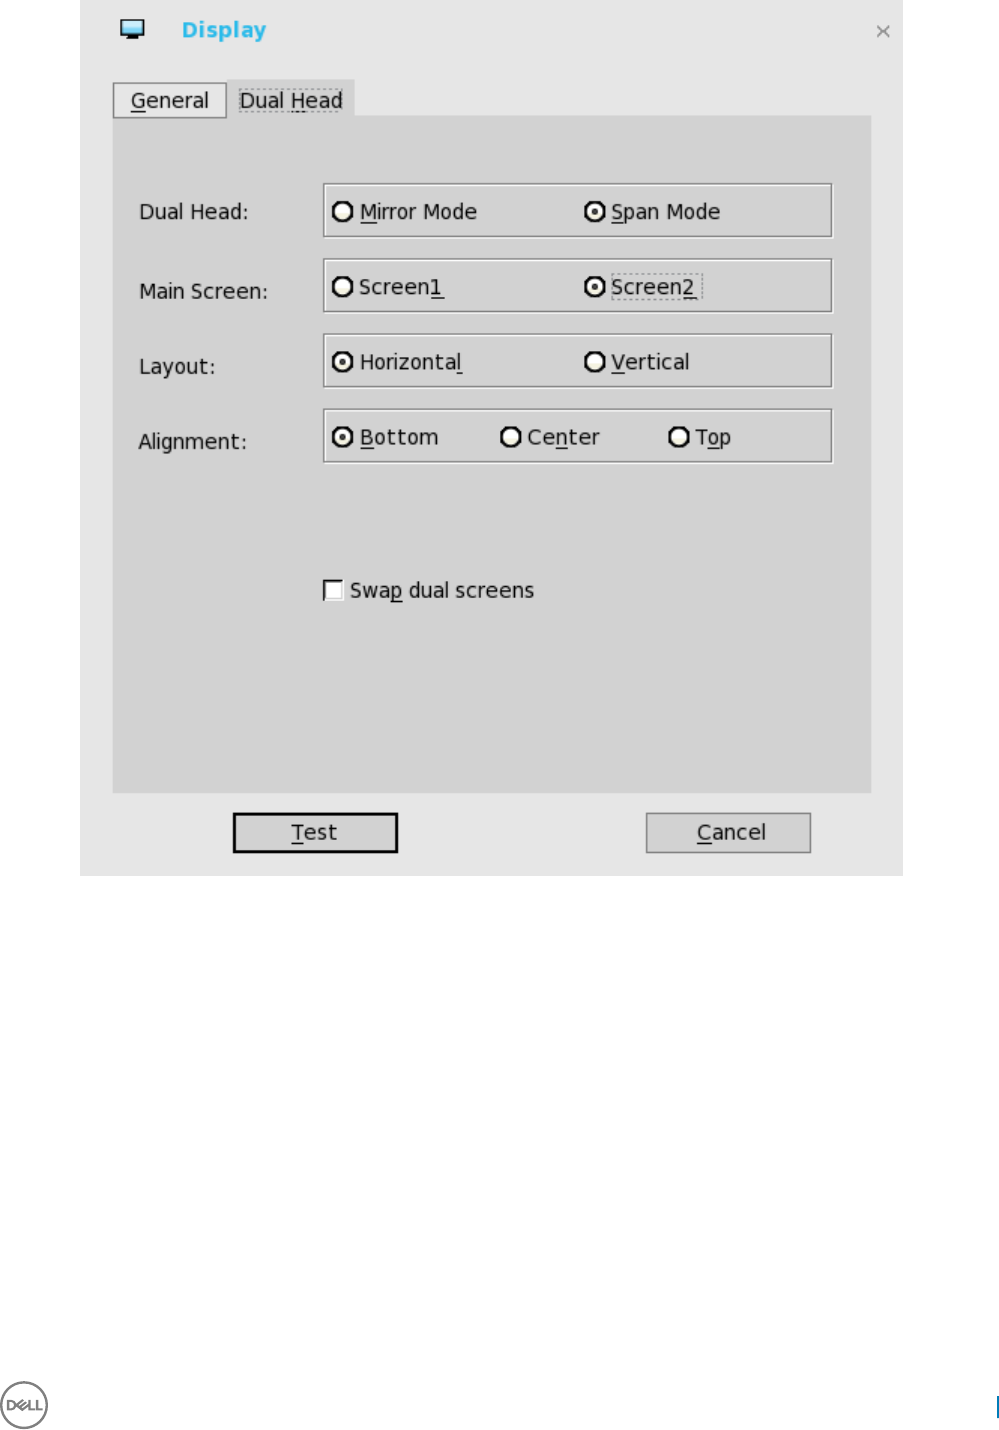
For Swap dual screens, when you set Main Screen to Screen2, an additional check box is displayed at the bottom of the tab that
allows you to swap dual screens. If you clear the check box, the Screen1 is usually the left one or the top one in dual display.
When you set Main Screen to Screen2, the main screen is changed to the right screen or bottom screen. If you select the Swap
dual screens check box, you are able to set Main Screen to Screen2, but still have it at the left side or the top side, which is
considered more user friendly.
Conguring the network settings on Dell Wyse
ThinOS
To congure the network settings use the following options:
•Conguring the general settings.
•Conguring the DHCP options settings.
•Conguring the ENET settings.
•Conguring the WLAN settings.
Wyse 3040 thin client on ThinOS 7
Conguring the General settings
To congure the general network settings:
1 From the desktop menu, click System Setup, and then click Network Setup.
The Network Setup dialog box is displayed.
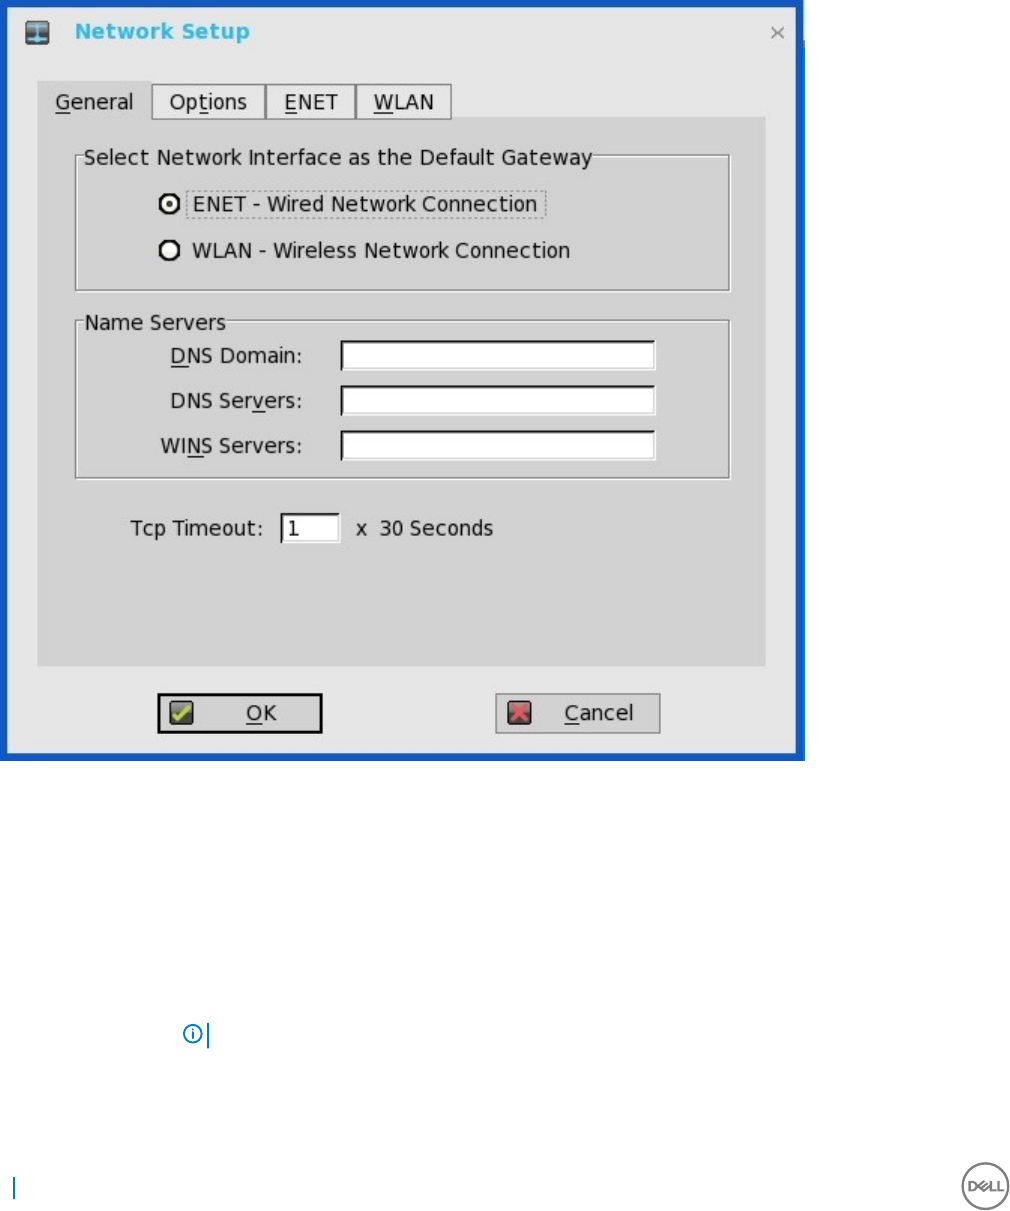
2 Click the General tab, and use the following guidelines:
a To set the default gateway, select the type of network interface from the available options.
1Single Network support — Either wireless or wired network is connected.
•ENET — Click this option, if you want set up the Ethernet Wired Network Connection.
•WLAN — Click this option, if you want to set up the Wireless Network Connection.
• If you use wireless network after selecting ENET connection or wired network after selecting WLAN connection, then
the system log "WLAN: set default gate way xxx.xxx.xxx.xxx" for rst case and "ENET: set default gate way
xxx.xxx.xxx.xxx" for second case are printed to ensure that the UI setting reects the actual usage.
NOTE: The User Interface (UI) will not be changed automatically.
2Dual Network support — Both wireless and wired networks are connected. The default gateway is determined by the UI
settings.
b Enter the URL address of the DNS domain in the DNS Domain box.
8Wyse 3040 thin client on ThinOS

c Enter the IP address of the DNS server in the DNS Server box.
Use of DNS is optional. DNS allows you to specify remote systems by their host names rather than IP addresses. If a specic IP
address (instead of a name) is entered for a connection, it is used to make the connection. Enter the DNS domain and the
network address of an available DNS server. The function of the DNS domain entry is to provide a default sux to be used in
name resolution. The values for these two boxes may be supplied by a DHCP server. If the DHCP server supplies these values,
they replace any locally congured values. If the DHCP server does not supply these values, the locally congured values will be
used.
NOTE: You can enter up to 16 DNS server addresses, separated by a semicolon, comma, or space. The rst address is
for the primary DNS server and the rest are secondary DNS servers or backup DNS servers .
d Enter the IP address of the WINS server in the WINS Server box.
Use of WINS is optional. Enter the network address of an available WINS name server. WINS allows you to specify remote
systems by their host names rather than IP addresses. If a specic IP address (instead of a name) is entered for a connection, it
is used to make the connection. These entries can be supplied through DHCP, if DHCP is used. DNS and WINS provide
essentially the same function, name resolution. If both DNS and WINS are available, the thin client attempts to resolve the name
using DNS rst and then WINS.
You can enter two WINS server addresses (primary and secondary), separated by a semicolon, comma, or space.
e Enter the digit multiplier of 30 seconds in the TCP Timeout box to set the time-out value of a TCP connection. The value must
be 1 or 2 which means the connection time-out value is from 1x30= 30 seconds to 2x30= 60 seconds. If the data for connecting
to the server is not acknowledged and the connection is timed out, setting the time-out period retransmits the sent data and
again tries to connect to the server till the connection is established.
3 Click OK to save the settings.
Conguring the DHCP options settings
To congure the options settings:
1 From the desktop menu, click System Setup, and then click Network Setup.
The Network Setup dialog box is displayed.
2 Click the Options tab, and use the following guidelines:
Wyse 3040 thin client on ThinOS 9

aDHCP Option IDs — Enter the supported DHCP options. Each value can only be used once and must be between 128 and 254.
bInterpret DHCP Vendor-Specic Info — Select this check box for automatic interpretation of the vendor information.
cDHCP Vendor ID — Shows the DHCP Vendor ID when the dynamically allocated over DHCP/BOOTP option is selected.
dDHCP UserClass ID — Shows the DHCP UserClass ID when the dynamically allocated over DHCP/BOOTP option is selected.
3 Click OK to save the settings.
Conguring the ENET settings
To congure the ENET settings:
1 From the desktop menu, click System Setup, and then click Network Setup.
The Network Setup dialog box is displayed.
2 Click the ENET tab, and use the following guidelines:
10 Wyse 3040 thin client on ThinOS
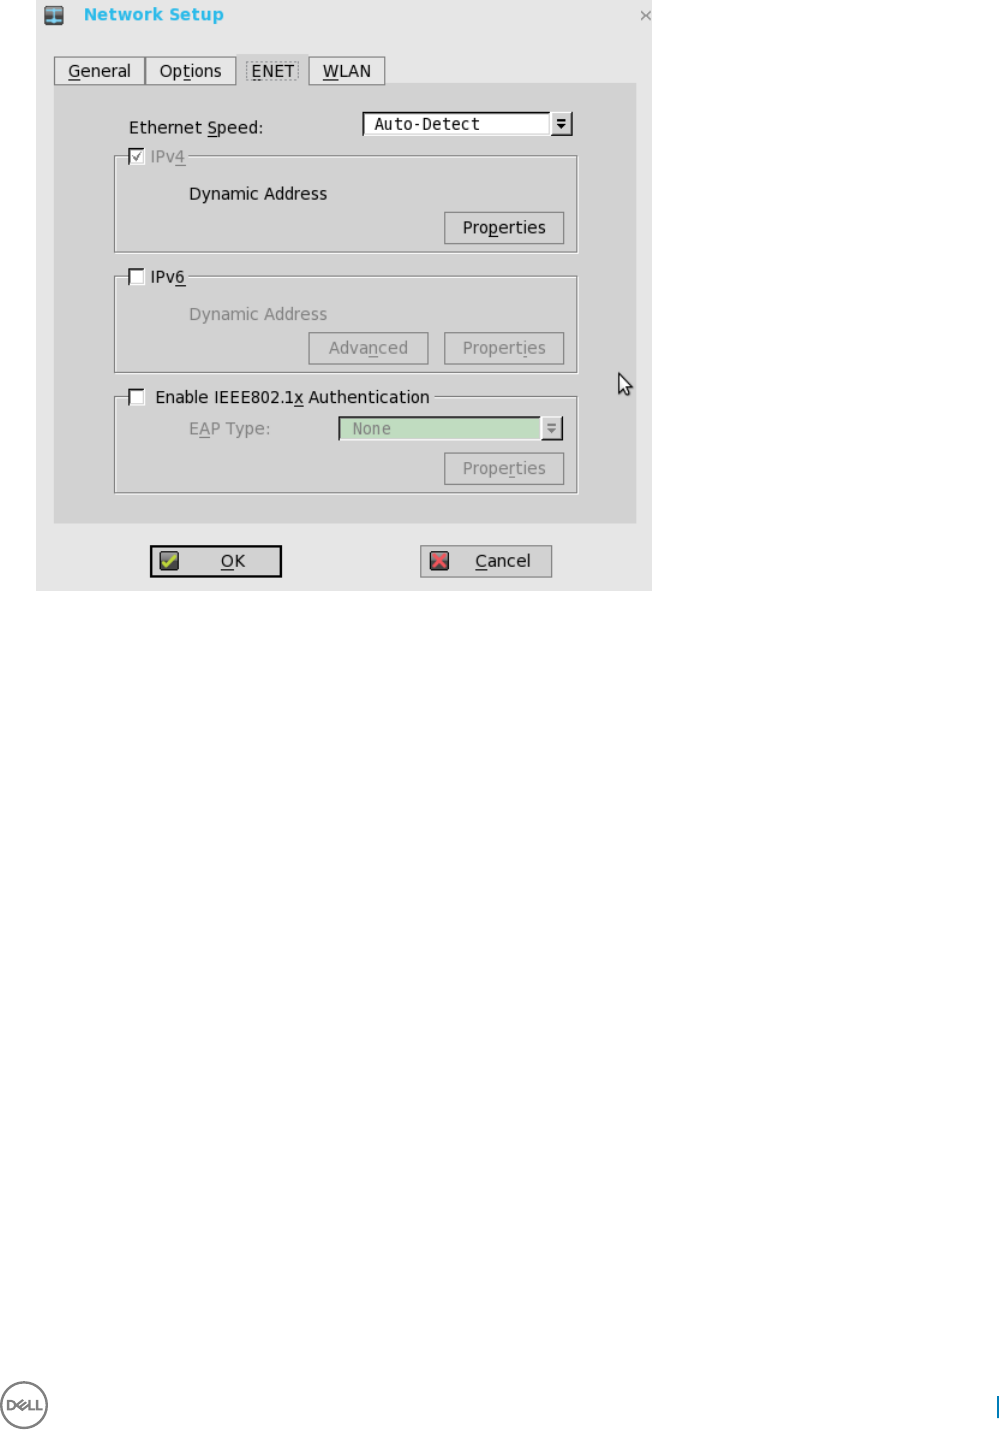
aEthernet Speed — Normally the default (Auto-Detect) should be selected, but another selection can be made if automatic
negotiation is not supported by your network equipment. Selections include Auto-Detect, 10 MB Half-Duplex, 10 MB Full-
Duplex, 100 MB Half-Duplex, 100 MB Full-Duplex, and 1 GB Full-Duplex.
The 10 MB Full-Duplex option can be selected locally at the device, however, this mode may need to be negotiated through
AutoDetect.
b The IPV4 check box is selected by default. Click Properties to set various options supported by IPV4.
•Dynamically allocated over DHCP/BOOTP — Selecting this option enables your thin client to automatically receive
information from the DHCP server. The network administrator must congure the DHCP server using DHCP options to
provide information. Any value provided by the DHCP server replaces any value entered locally on the Options tab, however,
locally entered values are used if the DHCP server fails to provide replacement values.
•Statically specied IP Address — Select this option to manual enter the IP Address, Subnet Mask and Default Gateway:
•IP Address — Must be a valid network address in the server environment. The network administrator must provide this
information.
•Subnet Mask — Enter the value of the subnet mask. A subnet mask is used to gain access to machines on other
subnets. The subnet mask is used to dierentiate the location of other IP addresses with two choices: same subnet or
other subnet. If the location is other subnet, messages sent to that address must be sent through the Default Gateway,
whether specied through local conguration or through DHCP. The network administrator must provide this value.
•Default Gateway — Use of gateways is optional. Gateways are used to interconnect multiple networks (routing or
delivering IP packets between them). The default gateway is used for accessing the internet or an intranet with multiple
subnets. If no gateway is specied, the thin client can only address other systems on the same subnet. Enter the address
of the router that connects the thin client to the internet. The address must exist on the same subnet as the thin client
as dened by the IP address and the subnet mask. If DHCP is used, the address can be supplied through DHCP.
c Select the IPV6 check box, and then click Advanced to select various IPV6 supported setting options from the available check
boxes.
d Click properties and use the following guidelines:
•Wait DHCP — Selecting this option enables your thin client to wait for IPV6 DHCP before the sign-in, if not selected the
system will only wait for IPV4 DHCP if enabled.
•Dynamically allocated over DHCP/BOOTP — Selecting this option enables your thin client to automatically receive
information from the DHCP server. The network administrator must congure the DHCP server (using DHCP options) to
Wyse 3040 thin client on ThinOS 11

provide information. Any value provided by the DHCP server replaces any value entered locally on the Optionstab, however,
locally entered values are used if the DHCP server fails to provide replacement values.
•Statically specied IP Address — Select this option to manually enter the IP Address, Subnet Mask and Default Gateway.
•IP Address — Must be a valid network address in the server environment. The network administrator must provide this
information.
•Subnet Mask — Enter the value of the subnet mask. For more information, see various options supported by IPV4 in
this section.
•Default Gateway — Use of gateways is optional. For more information, see various options supported by IPV4 in this
section.
•DNS Servers — Use of DNS is optional. DNS allows you to specify remote systems by their host names rather than IP
addresses. If a specic IP address (instead of a name) is entered for a connection, it is rather than DNS is used to make the
connection. Enter the network address of an available DNS server. The value for this box may be supplied by a DHCP server.
If the DHCP server supplies this value, it replaces any locally congured value. If the DHCP server does not supply this value,
the locally congured value is used.
e Select the check box to enable IEEE802.1x Authentication.
•EAP Type — If you have enabled the Enable IEEEE 802.1x authentication check box, select the EAP Type option you want
(TLS, LEAP or PEAP).
•TLS — If you select the TLS option, click Properties to open and congure the Authentication Properties dialog box.
• Select the Validate Server Certicate check box because it is mandatory to validate your server certicate.
NOTE: The CA certicate must be installed on the thin client. Also note that the server certicate text
eld supports a maximum of approximately 127 characters, and supports multiple server names.
• If you select the Connect to these servers check box, the box is enabled where you can enter the IP address of server.
• Click Browse to nd and select the Client Certicate le and Private Key le you want.
The following kinds of server names are supported — all examples are based on Cert common name company.dell.com
NOTE: Using only the FQDN, that is company.wyse.com does not work. You must use one of the options (note that
*.dell.com is the most common option as multiple authentication servers may exist): servername.dell.com
*.dell.com
*dell.com
*.com
fLEAP — If you select the LEAP option, click Properties to open and congure the Authentication Properties dialog box. Be
sure to use the correct username and password for authentication. The maximum length for the username or the password is 64
characters.
gPEAP — If you select the PEAP option, click Properties to open and congure the Authentication Properties dialog box. Be
sure to select either EAP_GTC or EAP_MSCHAPv2, and then use the correct username, password and domain. Validate Server
Certicate is optional.
NOTE: The server certicate text box for LEAP and PEAP supports a maximum of approximately 127 characters, and
supports multiple server names.
h To congure EAP-GTC, enter the username only. The password or PIN is required when authenticating.
To congure EAP-MSCHAPv2, enter the username, password and domain.
IMPORTANT: The domain/username in the username box is supported, but you must leave the domain box blank.
The CA certicate must be installed on the thin client and the server certicate is forced to be validated. When EAP-
MSCCHAPV2 is selected in EAP type in the Authentication Properties dialog box (for PEEP IEEE802.1x authentication), an
option to hide the domain is available for selection. Username and Password boxes are available for use, but the Domain text box
is disabled.
3 Click OK to save the settings.
12 Wyse 3040 thin client on ThinOS
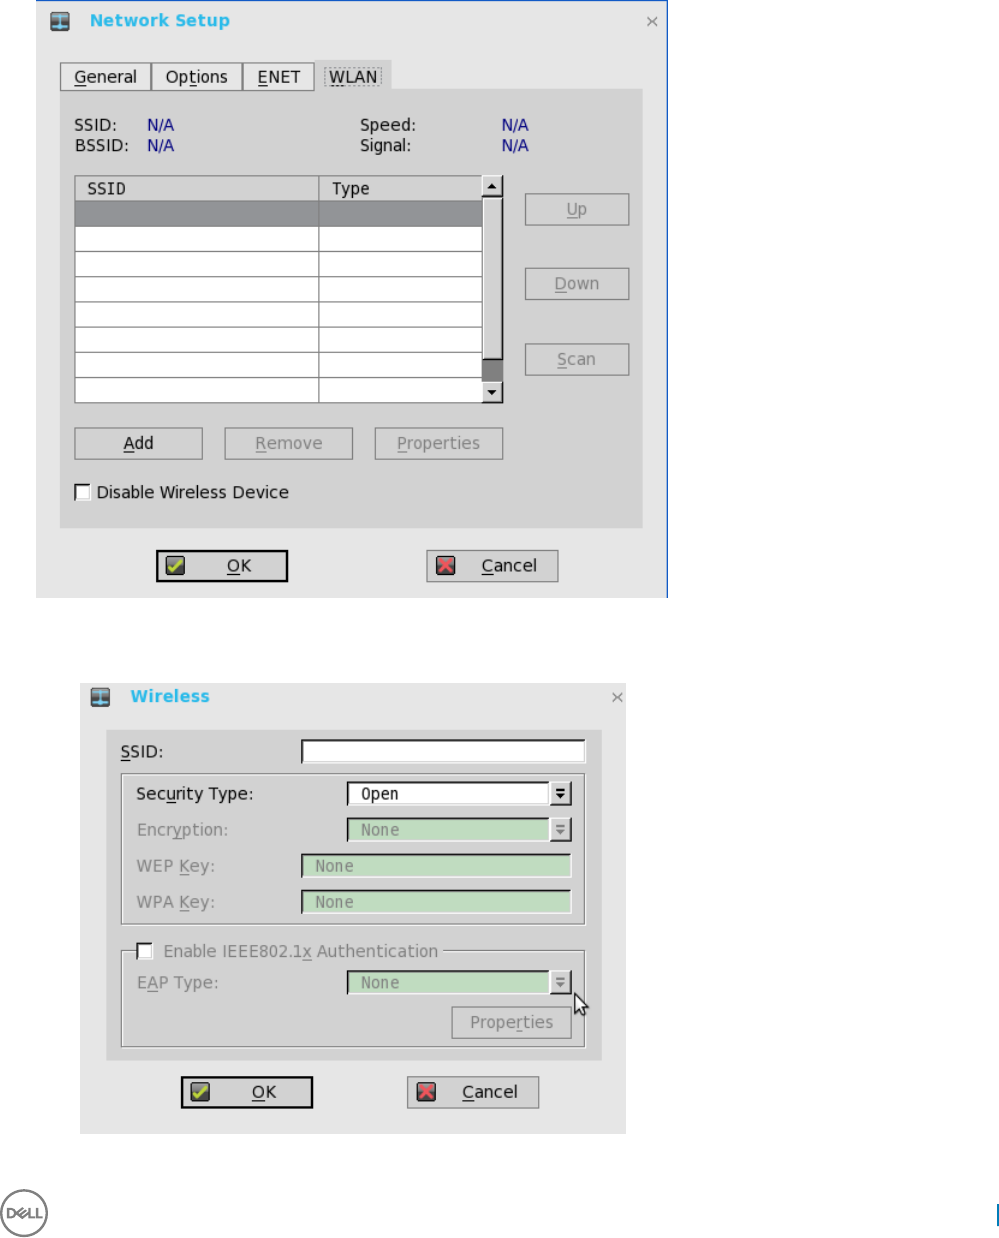
Conguring the WLAN settings
1 From the desktop menu, click System Setup, and then click Network Setup.
The Network Setup dialog box is displayed.
2 Click the WLAN tab, and use the following guidelines:
aAdd— Use this option to add and congure a new SSID connection.
You can congure the SSID connection from the available security type options.
b After you congure the SSID connection, the added SSID connection is listed on the page of the WLAN tab.
Wyse 3040 thin client on ThinOS 13
cRemove — Use this option, if you want to remove a SSID connection by selecting the SSID connection from the list.
dProperties — Use this option to view and congure the authentication properties of a SSID connection that is displayed in the
list.
e Select the Disable Wireless Device check box, if you want to disable a wireless device.
3 Click OK to save the settings.
Conguring peripherals settings on Wyse ThinOS
The Peripherals dialog box enables you to congure the settings for the keyboard, mouse, camera, and printer.
•Conguring keyboard settings
•Conguring mouse settings
•Conguring camera settings
•Conguring printer setup
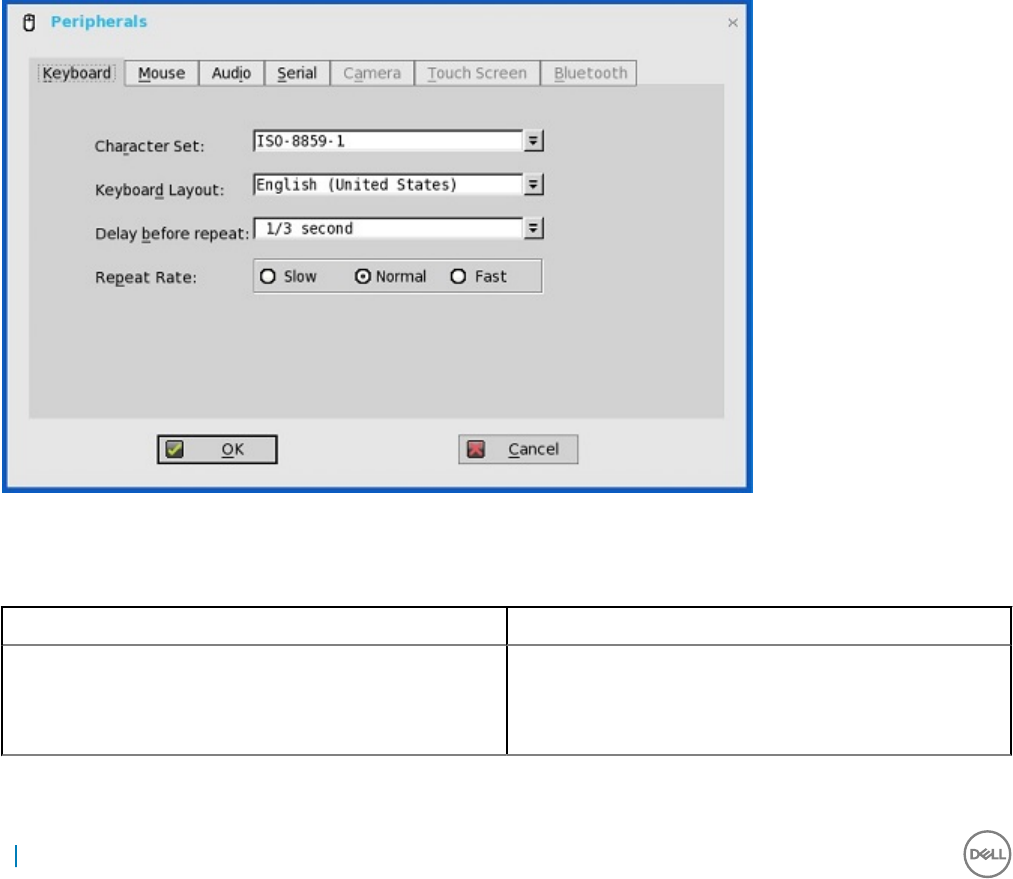
Conguring keyboard settings
To congure the Keyboard settings:
1 From the desktop menu, click System Setup, and then click Peripherals.
The Peripherals dialog box is displayed.
2 Click the Keyboard tab and set the Character Set, Keyboard Layout, Delay Before Repeat and Repeat Rate parameters. The following
table explains the parameters present on the Peripherals dialog box.
Table 1. Keyboard parameters
Parameter Description
Character Set Species the character set. Each character is represented by a
number. The ASCII character set, for example, uses the numbers
0 through 127 to represent all English characters and special
control characters. European ISO character sets are similar to
14 Wyse 3040 thin client on ThinOS
ASCII, but they contain additional characters for European
languages.
Keyboard Layout Presently the keyboard languages listed in the Keyboard layout
drop-down list are supported. The default value is English
(United States).
Delay Before Repeat Species the repeat parameters for held-down key. Select the
Delay before repeat value as either 1/5 second, 1/4 second, 1/3
second, 1/2 second, 3/4 second, 1 second, 2 seconds, or No
Repeat. The default is 1/3 second.
Repeat Rate Select Slow, Medium, or Fast. The default value is Medium.
3 Click OK to save the settings.
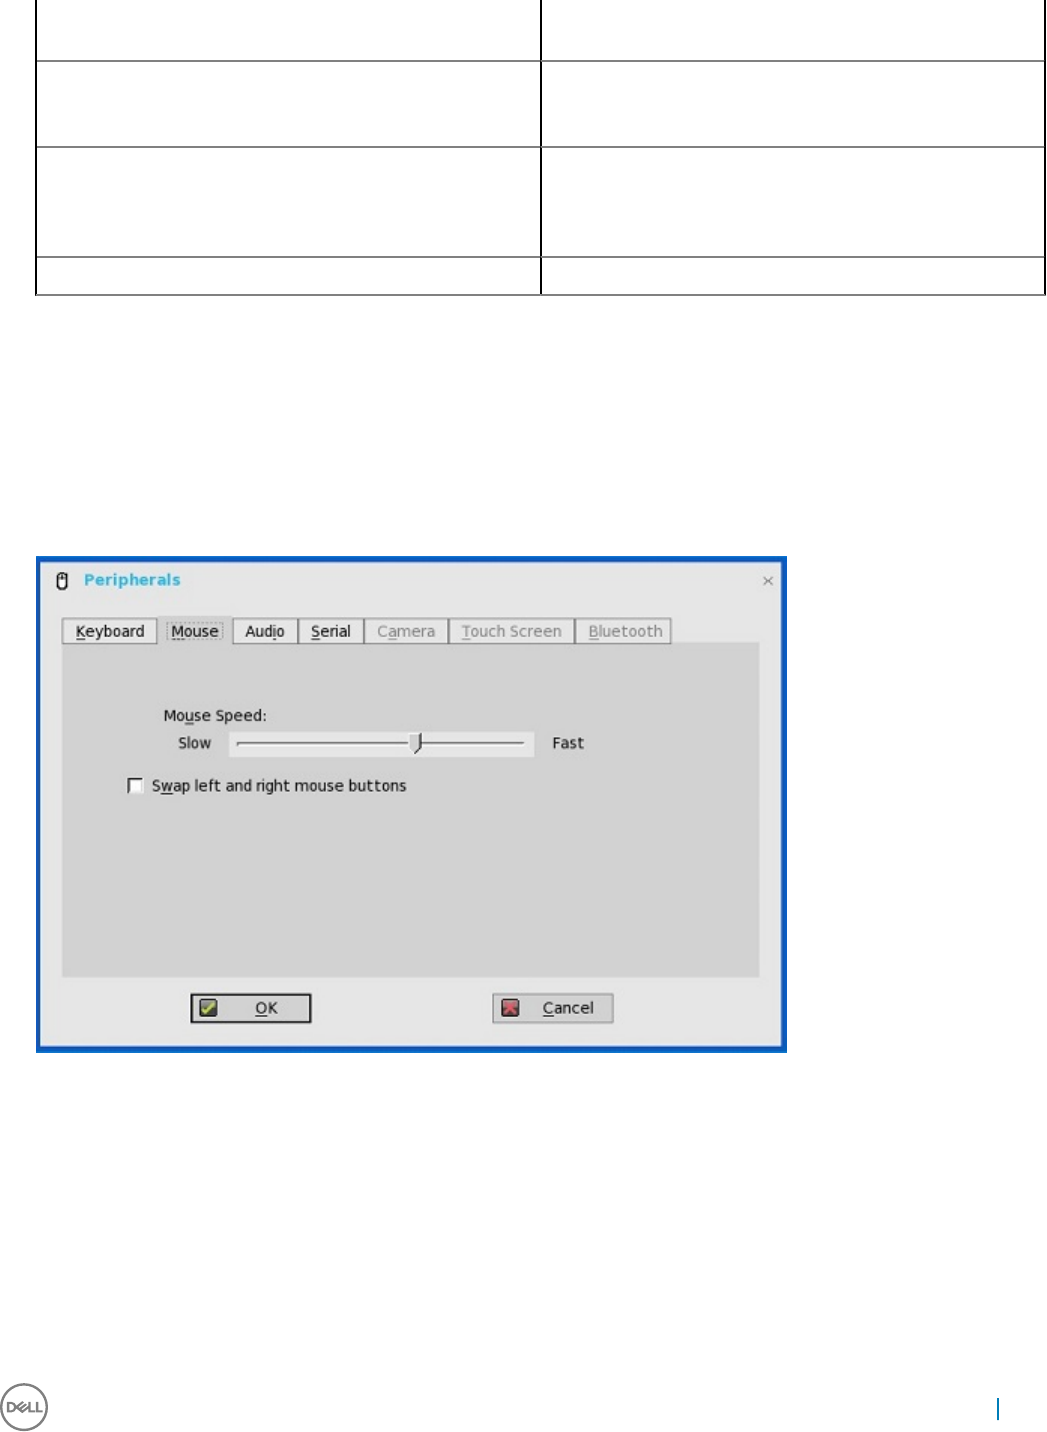
Conguring mouse settings
To congure the mouse settings:
1 From the desktop menu, click System Setup, and then click Peripherals.
The Peripherals dialog box is displayed.
2 Click the Mouse tab to select the mouse speed and mouse orientation.
3 Select the Swap left and right mouse buttons check box to swap mouse buttons for left-handed operations.
4 Click OK to save the settings.
Conguring camera settings
Use the Camera tab to interface with cameras that are locally connected to the thin client (USB) and supported by a UVC driver. When
using the HDX RealTime webcam feature of XenDesktop 5 or XenApp 6, you can control options such as maximum resolution and frames
per second (10 FPS is recommended).
By default, the format of USB camera is set to RAW.
Wyse 3040 thin client on ThinOS 15
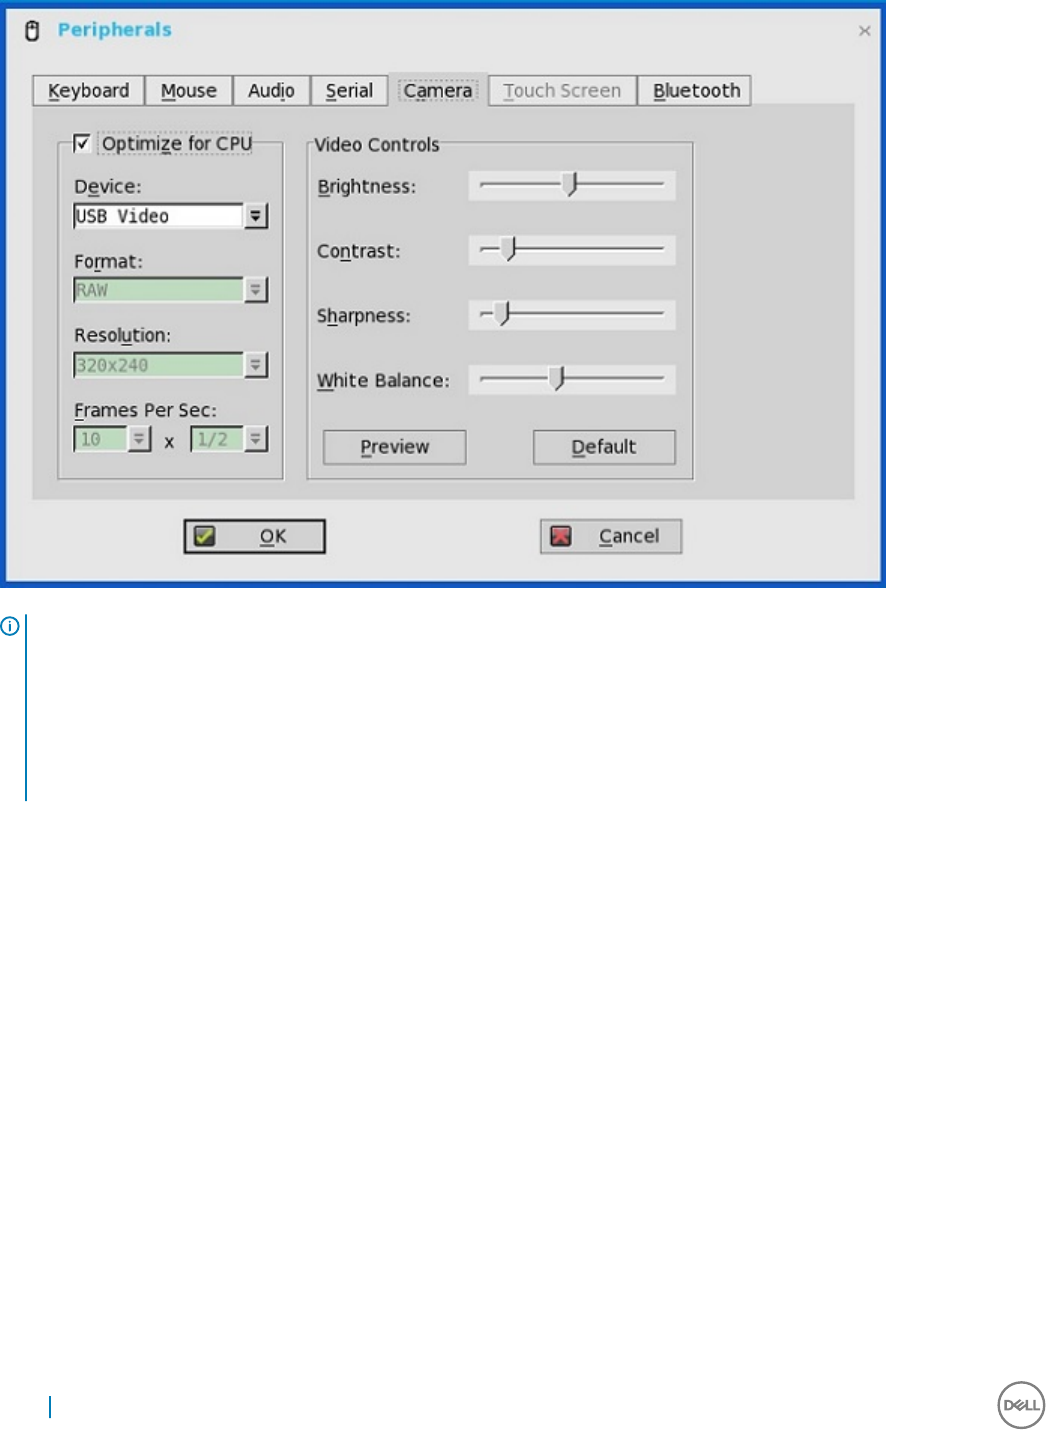
NOTE:
You can optimize performance and modify the frame rate per second, if the Optimize for CPU check box is selected—supported
values include 1/1, 1/2, 1/3, 1/4, 1/5, and 1/6– directly from the thin client (if the webcam supports Universal Video Driver).
This feature is experimental and does not currently support central conguration (INI parameters). Also, this feature is CPU intensive
and is recommended for high performance products such as the Wyse 5010 thin client with ThinOS (D10D), Wyse 3030 LT thin client
with ThinOS and Wyse 3030 LT thin client with PCoIP.
Conguring printer settings
Use the Printer Setup dialog box to congure network printers and local printers that are connected to the thin client. Through its USB
ports, a thin client can support multiple printers. If more than one printer is to be used and another port is not available on your thin client
and the port that is to be used must be shared with a USB modem converter, connect a USB hub to the port.
Power state
Wyse 3040 thin client running Wyse ThinOS.
Use the Shutdown dialog box to select the available option you want:
• Classic Desktop — Click Shutdown in the Connect Manager or Desktop Menu.
• Zero Desktop — Click the Shutdown icon on the Zero Toolbar.
Conguring the broker setup on Dell Wyse ThinOS
To congure the Broker setup:
1 From the desktop menu, click System Setup, and then click Remote Connections.
16 Wyse 3040 thin client on ThinOS
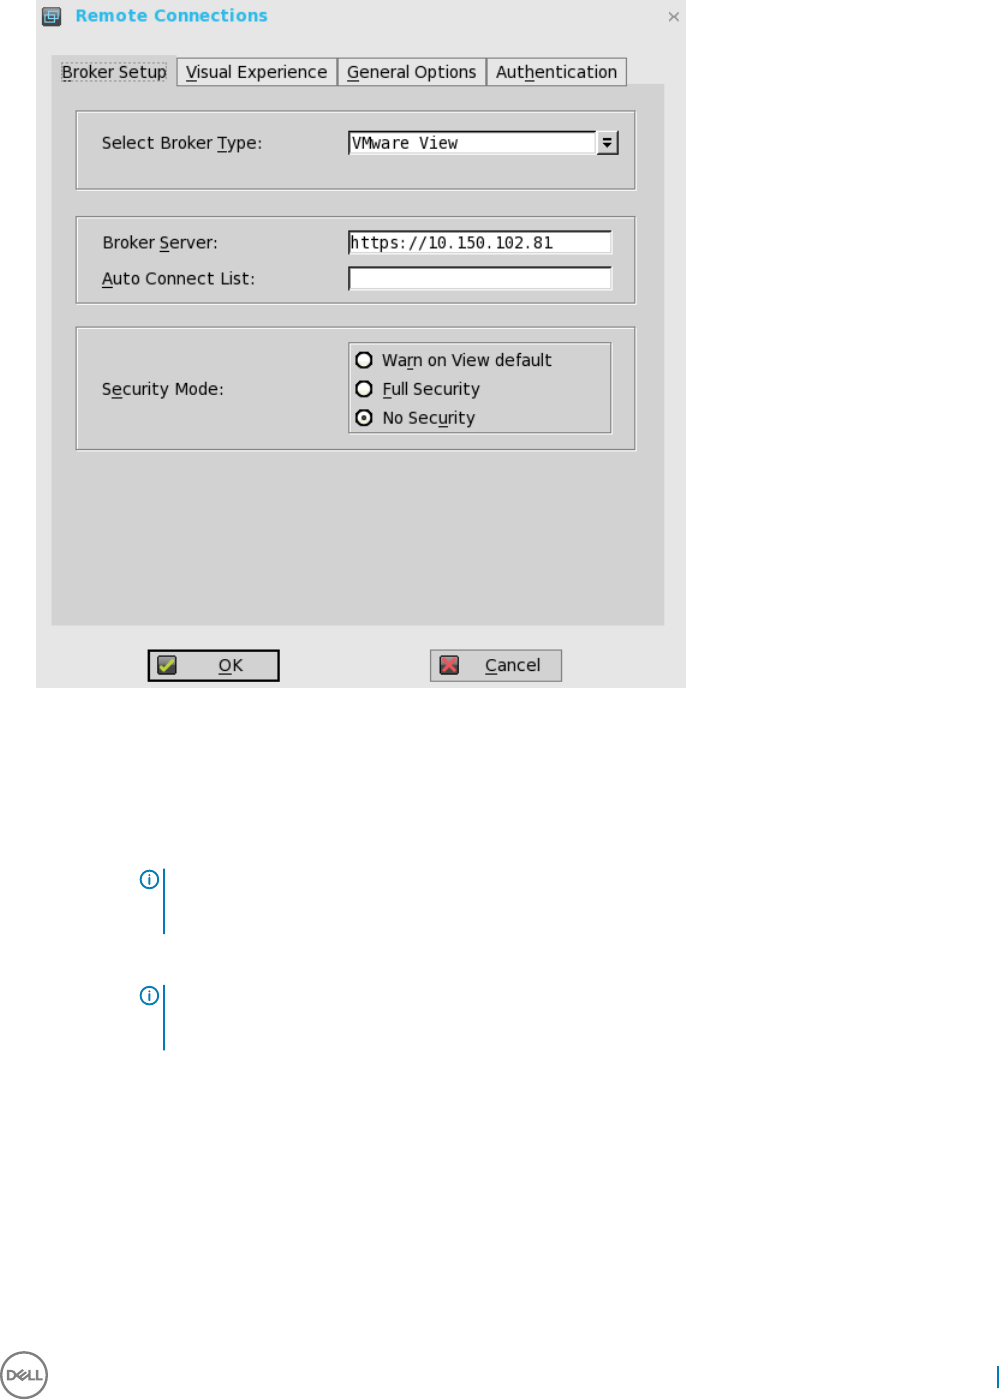
The Remote Connections dialog box is displayed.
2 Select Broker type from the drop-down list.
a If you select None from the list, click either of the following connection protocols:
b If you select the Citrix Xen, use the following guidelines:
• Select the check box to enable the StoreFront style.
•Broker Server— Enter the IP address of the Broker Server.
• Select the check box to enable automatic reconnection at logon.
NOTE: If you enable the automatic reconnection, you are able to select from the reconnection options. Click
either of the options where you can connect to the disconnected sessions only or connect to both active and
disconnected sessions.
• Select the check box to enable automatic reconnection from the button menu.
NOTE: If you enable the automatic reconnection, you are able to select from the reconnection options. Click
either of the options where you can connect to the disconnected sessions only or connect to both active and
disconnected sessions.
•Account Self-service Server— Enter the IP address of the account self-service server.
•XenApp — Use this option, if you want to set default settings to XenApp.
•XenDesktop— Use this option, if you want to set default settings to XenDesktop.
c If you select the VMware View, use the following guidelines:
•Broker Server— Enter the IP address of the Broker server.
•Security Mode
— Use this option to select the Security Mode. The available options are Warn on View default, Full security, and No
security.
d If you select the Microsoft, enter the IP address of the broker server in the Broker Server box, and then click OK to save the
settings.
Wyse 3040 thin client on ThinOS 17
e If you select Dell vWorkspace, use the following guidelines:
•Broker Server— Enter the IP address of the Broker Server.
• Select the check box to enable vWorkspace Gateway.
•vWorkspace Gateway— Enter the IP address of the vWorkspace gateway.
f If you select Other, you must enter the IP address of the broker server in the Broker Server box.
3 Click OK to save the settings.
Conguring the WDA settings on Dell Wyse ThinOS
Use this tab to congure the WDM and CCM settings.
To congure the WDA settings, do the following:
1 From the desktop menu, click System Setup, and then click Central Conguration.
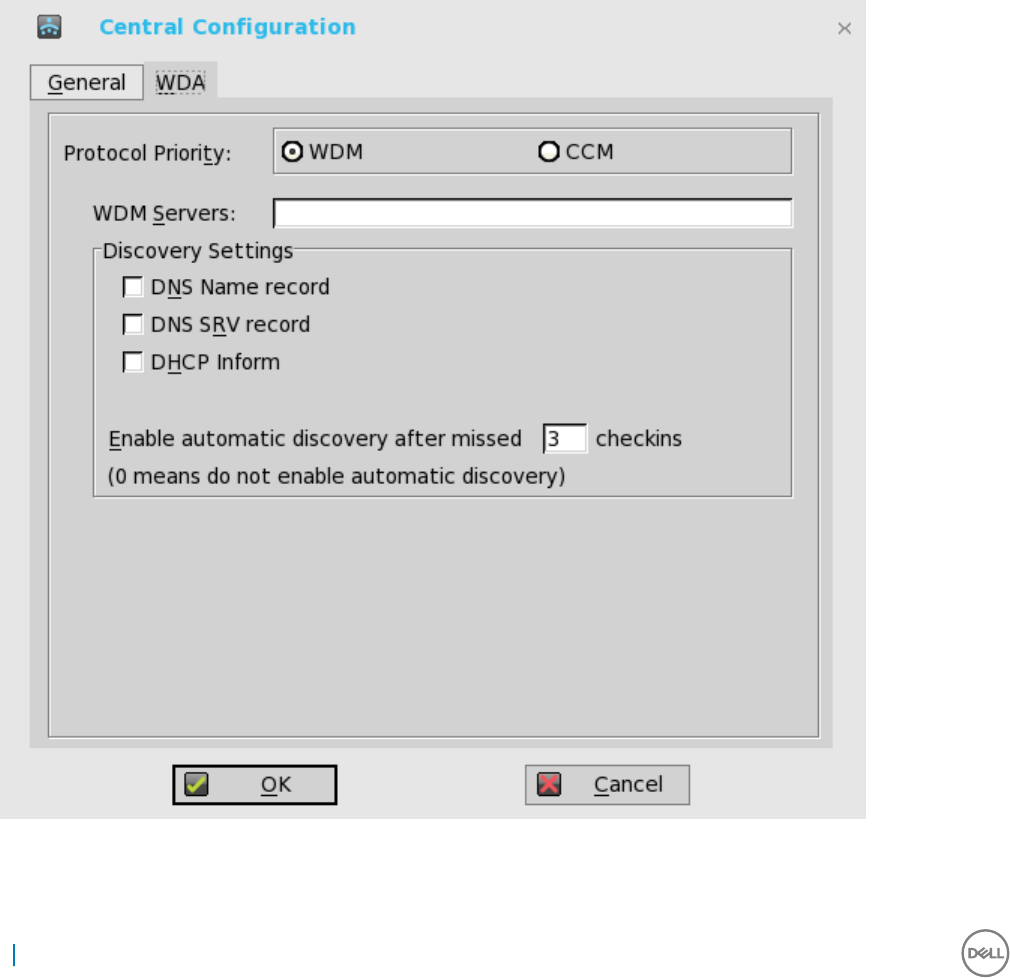
The Central Conguration dialog box is displayed.
2 Click WDA, and use the following guidelines.
WDM is selected by default. WDA service automatically runs after the client starts up.
If the rst discovery, for example, the WDM service is not successful, then it seeks for the next priority, for example, CCM service.
This continues till a discovery is successful. If all discoveries fail, then it is started again automatically after a xed time (24 hours).
18 Wyse 3040 thin client on ThinOS
aWDM Servers — Enter the IP addresses or host names, if WDM is used. Locations can also be supplied through user proles, if
user INI proles are used.
bDNS Name Record — (Dynamic Discovery) Allows devices to use the DNS host name lookup method to discover a WDM
server.
cDHCP Inform — (Dynamic Discovery) Allows devices to use DHCP inform to discover a WDM Server.
dEnable Automatic Discovery After Missed Check-ins — Select the number of missed check-ins after which you want the auto
discovery options enabled.
3 Click OK to save the settings.
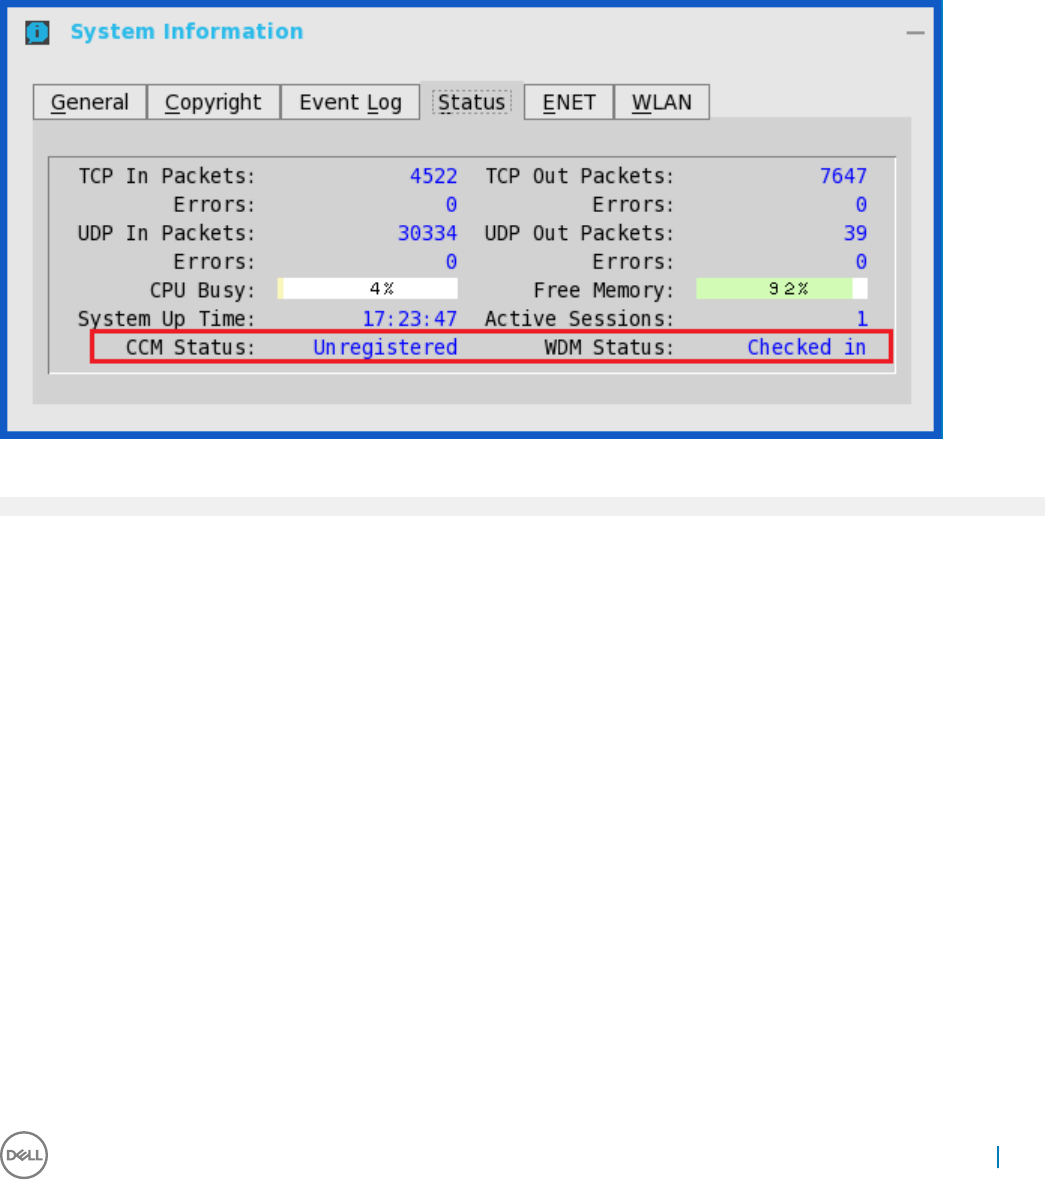
Service checked in status is displayed in System Information.
The following is the INI parameter for this feature:
WDAService={yes(default),no}Priority ={WDM(default),CCM,“WDM;CCM”,“CCM;WDM”}
To congure the CCM settings, do the following:
1 Click CCM, and use the following guidelines.
aEnable Cloud Client Manager (CCM) — Select the check box to enable the Cloud Client Manager(CCM).
Wyse 3040 thin client on ThinOS 19
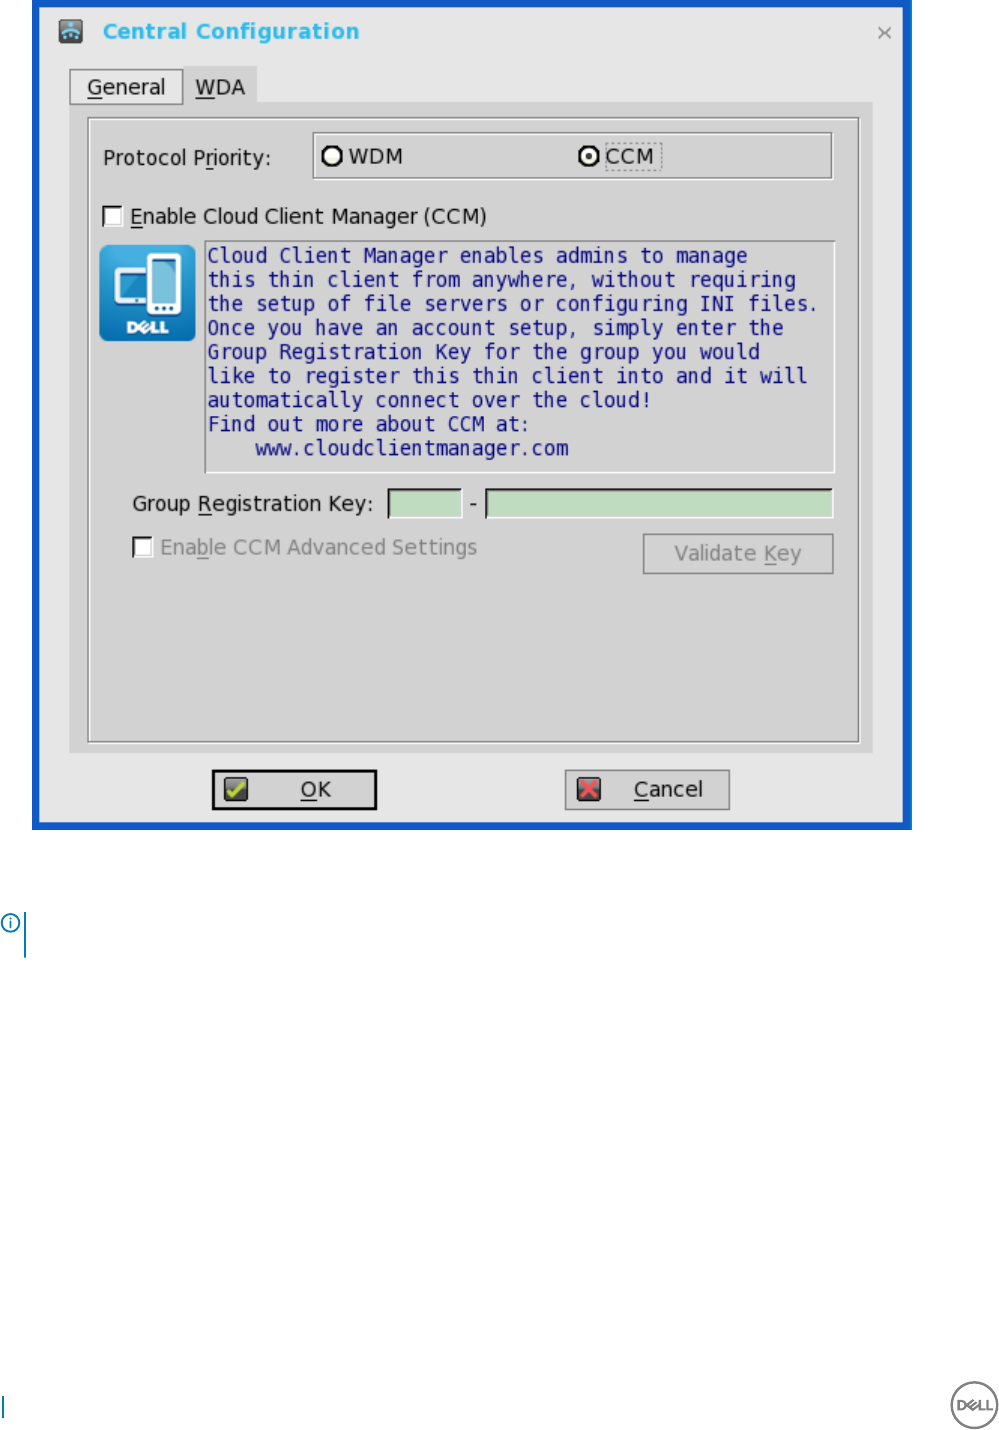
bGroup Registration Key — Enter the Group Registration Key as congured by your cloud Client Manager administrator for the
desired group.
NOTE: If you enable the Cloud Client Manager (CCM ), make sure that you have entered the Group Registration Key and
enabled the CCM Advanced Settings.
2 Click OK to save the settings.
20 Wyse 3040 thin client on ThinOS

Wyse 3040 thin client on ThinLinux
This section provides the instructions on how to easily congure and eciently manage Wyse 3040 thin client that runs on ThinLinux.
Topics:
• Accessing thin client BIOS settings on Wyse ThinLinux
• Logging on to the Wyse 3040 thin client running ThinLinux
•Conguring your display on Dell Wyse ThinLinux
•Conguring the network settings on Dell WyseThinLinux
•Conguring peripherals settings on Wyse ThinLinux
• Power state
•Conguring connections locally on Dell Wyse ThinLinux
•Conguring the WDA settings on Dell Wyse ThinLinux
Accessing thin client BIOS settings on Wyse ThinLinux
This section describes about the Wyse 3040 thin client UEFI BIOS settings.
While starting the thin client, a Dell logo is displayed for a short period.
1 During the start-up, press the F2 key. and the default password is Fireport
2 The BIOS setting is protected by a password. When promoted, enter the password Fireport.
The BIOS settings dialog box is displayed.
3 Use the System Setup settings to change the BIOS settings.
NOTE: There is an option to restore BIOS defaults, Factory Defaults, and Custom user settings for users in BIOS menu.
BIOS default setting restores the values that was part of BIOS le and, Restoring Custom User setting restores to the
default settings. Restoring Factory default restores the BIOS setting to the values that was congured in factory before
shipping the client.
To access the boot menu, during the start-up, press the F12 key. Use the boot selection menu to select or view the boot sequence order as
follows:
• Boot from UEFI: Hard Drive, Partition 2—Boots from the internal eMMC storage.
• Boot from IP4 Realtek PCIe GBE Family Controller—Boots from the network through PXE.
• Boot from IP6 Realtek PCIe GBE Family Controller—Boots from the network through PXE
• Boot from USB—Boots the USB storage from any of the USB ports. This option is displayed if bootable USB devices are plugged in.
Logging on to the Wyse 3040 thin client running
ThinLinux
On your initial conguration, Dell recommends that you connect by using a wired connection by plugging in the network connected
ethernet cable to your thin client.
4
Wyse 3040 thin client on ThinLinux 21

After you turn on your thin client, you are automatically logged in to the local thinuser account. By default, the password of the thinuser
account is set to thinuser.
NOTE: In cases where a GDM login is needed (for example, AD/Domain login, PNAgent login and so on), the auto-login option
can be turned o through the GUI or by using the INI.
Admin mode enables you to perform system administration tasks such as adding or removing connections and setting up specic device
settings. To enter into the Admin mode, click the Switch to Admin button from Setting application screen to admin mode and then enter
the default root password in the Password Needed window. The default root password is admin.
Conguring your display on Dell Wyse ThinLinux
By default, the Customize your display screen is available in both User mode and Admin mode. Any changes to display preferences made
through this screen is saved and available for the built-in thinuser. In a Dual-monitor conguration, if both monitors are connected, then by
default, the monitors are in extended mode. The primary monitor is on the left (monitor 1) and the secondary monitor is on the right
(monitor 2). The resolutions of the monitors are auto detected by the system by analyzing the monitor’s capabilities.
1 Click the Display tab.
The Customize Your Display page is displayed.
Figure 1. Display Settings
2 Select the preferred Resolution from the drop-down list.
3 Select the Rotation type from the drop-down list.
• Normal
• Right
• Left
• Upside-down
4 Click the ON/OFF button to switch between dual display and mirror mode in a dual monitor conguration.
5 Click the ON/OFF button to enable the Set as primary option. This option allows you to set the selected monitor as primary.
6 Click the ON/OFF button to enable the Monitor On/O option. This option allows you to switch o and switch on the preferred
monitor in a dual monitor conguration.
22 Wyse 3040 thin client on ThinLinux
Conguring the network settings on Dell
WyseThinLinux
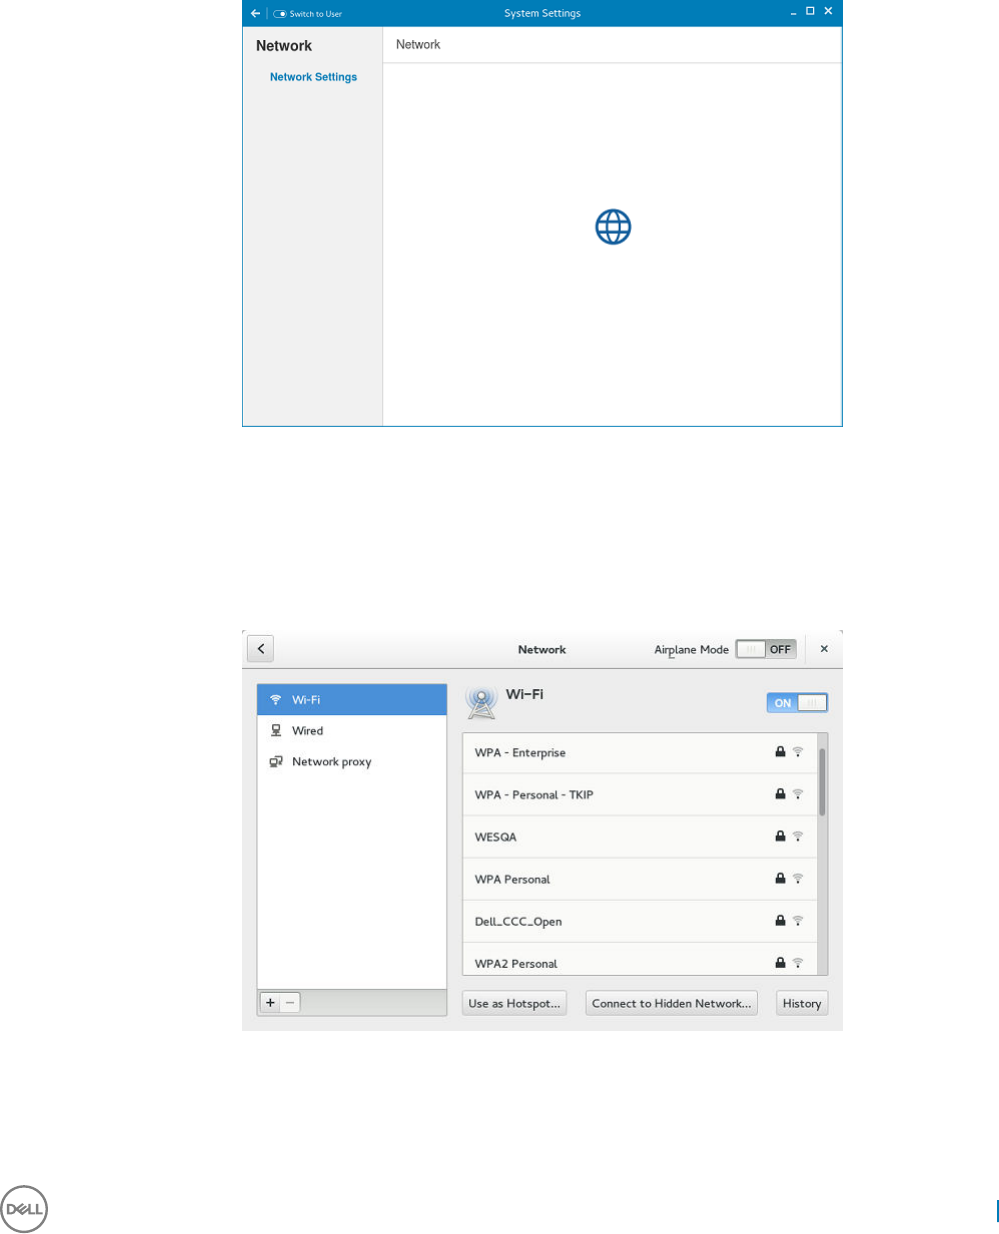
On the System Settings page, click the Network tab to view the Network Settings page.
1 Click the Network icon.
Figure 2. Network Settings
2 The Network settings page is displayed. In the left-pane, the following tabs are available for you to congure.
• Wi-Fi
• Wired
• Network proxy
Figure 3. Network Settings page
Wyse 3040 thin client on ThinLinux 23
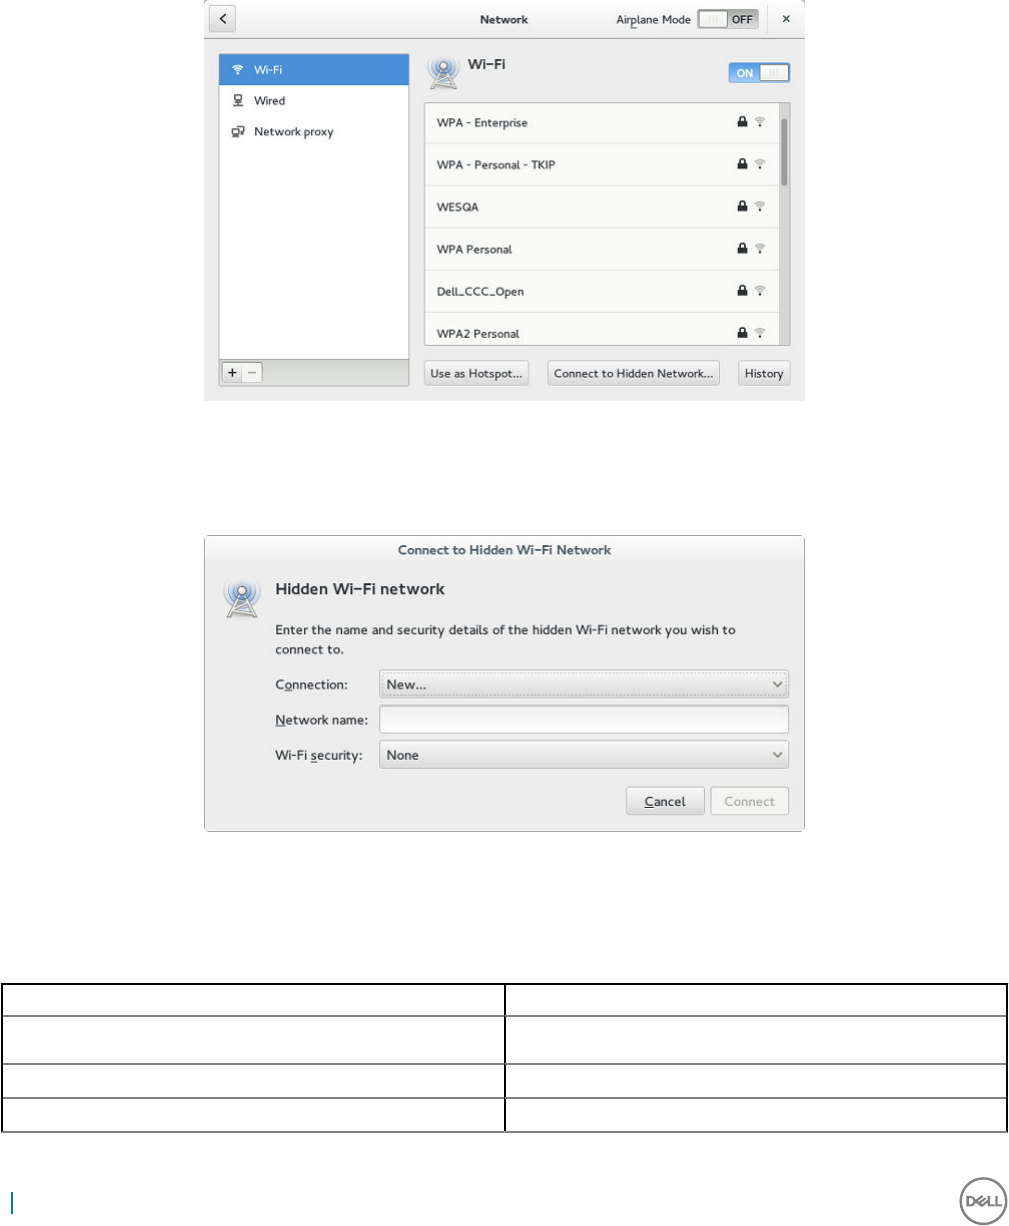
Conguring the wi- settings
To congure the Wi-Fi settings, perform the following steps:
1 In the left-pane, click Wi-Fi tab.
2 Click the ON/OFF button to enable or disable the Wi-Fi option. The list of wireless SSID is displayed if broadcast is enabled.
Figure 4. Wi-Fi Settings
3 To connect to Wi-Fi connection, select the preferred wireless SSID from the list displayed.
4 Click the Connect to Hidden Wi-Fi Network button. The Connect to Hidden Wi-Fi Network window is displayed.
Figure 5. Hidden Wi-Fi Network
5 Enter the name and security details of the hidden network that you want to connect to.
Table 2. Hidden network
Parameter Description
Connection From the drop-down list, select the type of connection.
Network name Enter the preferred network name.
Wi-Fi security From the drop-down list, select the security type.
24 Wyse 3040 thin client on ThinLinux

6 On the Network page, click the History button to view the previous Wi-Fi connections and details.
Conguring wired network connection settings
To congure the wired connection settings, perform the following steps:
1 Click the Wired tab. The following attributes are displayed if the network cable is connected to your thin client and wired connection is
established.
• IP Address
• Hardware Address
• Default Route
• DNS
NOTE: After the network is disconnected, only hardware address and last used information are displayed.
2 On the lower-right corner of the page, click the Settings icon to congure the Wired Network connections.
a In the Details tab, the following attributes are displayed.
• IP Address
• Link Speed
• Hardware Address
• Default Route
• DNS
3 Click the Security tab to congure the 802.1x security settings.
a Click the ON button to enable the 802.1x Security for your network connection.
b From the Authentication drop-down list, select the type of authentication you want to set for your network connection. The
available options are:
• TLS
• Protected EAP (PEAP)
You must congure TLS and PEAP using the INI parameters only. Options that you congure using the INI parameters are
populated on the UI screen. For more information about the usage of INI parameters, see Dell Wyse ThinLinux INI Reference
Guide.
NOTE: You cannot congure the 802.1x authentication settings using the GUI
options.
4 Click the Identity tab and congure the following settings:
NOTE: Only Administrators are allowed to authenticate these settings by entering the admin password in the root privilege
authentication dialog box after a particular setting is changed or congured.
aName—Species the default name of the wired connection. If you want to set your preferred name for the connection, enter
the name and then click Apply.
bMAC Address—Species the MAC address of the network connection.
cCloned Address—Species the IP address that is cloned by the router.
dMaximum transmission unit (MTU)—Species the size (in bytes) of the largest protocol data unit that the protocol layer can
pass onwards.
eFirewall Zone—Species the security level of the connection.
fConnect automatically— Select this check box to automatically connect to the network after you plug-in the network wire.
gMake available to other users— Select this check box if you want to allow other users to congure these settings.
5 Click the IPv4 tab and do the following:
a Enable the IPv4 button to congure the IPv4 settings.
b From the Addresses drop-down menu, select the type of IPv4 conguration. The available options are:
• Automatic (DHCP)
• Manual
Wyse 3040 thin client on ThinLinux 25

• Link-Local Only
c If Automatic (DHCP) option is selected, you must congure the following options.
Table 3. Automatic (DHCP)
Parameter Description
DNS Enable the Automatic button, if you want the thin client to
automatically fetch the DNS Server.
Server Species the IP address of the DNS Server.
Click the + icon to add a new DNS server to the list.
Routes Enable the Automatic button to turn on the automatic IPv4
routing.
Address Species the Router IP address.
Netmask Species the Netmask. Netmask is used to divide an IP
address into subnets and specify the network's available
hosts.
Gateway Species the IP address of the default Gateway.
Metric Species the Metric value for the network connection.
Use this connection only for resources on its network Select this check box, if you want to allow the wired
connection only for resources on its network.
d If Manual option is selected, you must specify the IP address, Netmask IP and Gateway IP along with the parameters mentioned
in the Automatic (DHCP) table.
e If Link-Local Only option is selected, the DNS and Routes options are disabled. This is applicable only for communications within
the host link or the host domain.
6 Click the IPv6 tab and do the following:
a Enable the IPv6 button to congure the IPv6 settings.
b From the Addresses drop-down menu, select the type of IPv6 conguration. The available options are:
• Automatic
• Automatic, DHCP only
• Manual
• Link-Local Only
The IPv6 conguration is similar to conguring the IPv4 Settings. For IPv4 conguration, see the IPv4 settings in this section.
7 Click the Reset tab and do the following:
a Click Reset to reset the settings for your network connection, including passwords. However, the previous network is displayed
as a preferred network.
b Click Forget to remove all details relating to this network that you do not want to automatically connect to.
8 Click Apply to save your congured settings.
NOTE: Click the Add Prole tab to add a new network prole. On the right pane, you must congure the following options:
• Security
• Identity
• IPv4
• IPv6
The conguration of all these tabs are similar to Wired Network connections congurations described in this section.
26 Wyse 3040 thin client on ThinLinux

Conguring the network proxy settings
To congure the Network proxy settings, complete the following task:
1 Click the Network proxy tab.
2 From the Proxy drop-down menu, select the type of Proxy method you want to deploy. The available Proxy methods are:
• None
• Manual
• Automatic
3 If Manual proxy method is selected, you must congure the following options:
a Enter the HTTP Proxy port details for your network connection.
b Enter the HTTPS Proxy port details for your network connection.
c Enter the FTP Proxy port details for your network connection.
d Enter the SOCKS host port details for your network connection.
e Use the Ignore Hosts option to set up proxy to ignore all local addresses.
4 If Automatic proxy method is selected, you must type the conguration URL address in the eld.
NOTE: Web Proxy Autodiscovery is used when a Conguration URL is not provided. Dell does not recommend this option
for untrusted public networks.
Adding a network connection
NOTE: Adding additional wired Ethernet connections is allowed but the added interface is not used in any of the ThinLinux
features.
To add a new network connection, complete the following tasks:
1 On the lower-left corner of the page, click the + icon.
The Add Network Connection dialog box is displayed. The following options are listed for you to congure.
• VPN
• Bond
• Team
• Bridge
• VLAN
2 Click VPN to add a VPN network connection. You must import a le from the stored location to congure the VPN settings.
3 Click Bond to add and congure the Bond network connection for your thin client.
a Click the General tab, and congure the following options:
• Select any of the following check boxes based on your requirement:
• Automatically connect to this network when it is available.
• All users may connect to this network.
• Automatically connect to VPN when using this connection.
• From the drop-down menu, select the rewall zone.
b Click the Bond tab, and congure the following options:
1 Type a name for your network interface.
2 The number of bonded connections that are set up are listed here. To add a new bond connection, click the Add button
and select the type of connection you want to create. The available options are Ethernet, InniBand, Bond, Bridge, Team,
and VLAN.
3 Select the type of Network Mode from the drop-down list. The available options are:
Wyse 3040 thin client on ThinLinux 27

• Round-robin
• Active Backup
• XOR
• Broadcast
• 802.3ad
• Adaptive transmit load balancing
• Adaptive load balancing
4Link Monitoring — Select the type of link monitoring from the drop-down list. The available options are:
• MII (recommended)
• ARP
5 Enter the time in ms for the link up delay duration.
6 Enter the time in ms for the link down delay duration.
c Click the IPv4 Settings tab, and do the following:
1 From the drop-down list select the following method for IPv4 authentication.
• If Automatic (DHCP) method is selected, you must congure the following options:
1 Additional DNS Servers — Type the IP addresses of domain name users that are used to resolve host names. Use
commas to separate multiple domain name server addresses.
2 Additional Search Domains — Type the IP addresses of domains used when resolving host names. Use commas to
separate multiple domains.
3 DHCP client ID — Enter the ID for the DHCP client. This client identier allows the network administrator to
customize your computer’s conguration.
4 Require IPv4 addressing for this connection to complete — The IPv4 address is required to complete the
connection. If the IPv4 address is not available, then the connection is not congured.
5 Click the Routes button to edit IPv4 routes for Bond connection.
a Click Add to add an IP address. After an IP is added, Netmask, Gateway and Metric specic to that IP are
displayed.
b Select the check box if you want to ignore the automatically obtained routes.
c Select this check box if you want to use your connection only for resources on that particular network.
• If Automatic (DHCP) addresses only method is selected, you must congure the following options:
1 DNS Servers — Type the IP addresses of domain name users that are used to resolve host names. Use commas
to separate multiple domain name server addresses.
2 Search domains — Type the IP addresses of domains that are used when resolving host names. Use commas to
separate multiple domains.
3 DHCP client ID — Enter the ID for the DHCP client. This client identier allows you to customize your computer’s
conguration.
NOTE: The other settings remain same as described in automatic (DHCP) method for IPv4
authentication.
• If Manual method is selected, you must congure the following options:
1 Click Add to add an IP address. After an IP is added, Netmask, Gateway specic to that IP are displayed.
2 DNS Servers — Type the IP addresses of domain name users that are used to resolve host names. Use commas
to separate multiple domain name server addresses.
3 Search domains — Type the IP addresses of domains used when resolving host names. Use commas to separate
multiple domains.
NOTE: The DHCP client ID option and Ignore automatically obtained routes check boxes are disabled.
The other settings remains the same as described in automatic (DHCP) method for IPv4 authentication.
28 Wyse 3040 thin client on ThinLinux

• If Link-Local Only method is selected, the DNS Servers, Search domains, DHCP client ID, and Routes options are
disabled. You can select the Require IPv4 addressing for this connection to complete check box to allow the
connection to complete. The IPv4 address is required to complete the connection. If the IPv4 address is not available,
then the connection is not congured.
• If Shared to other computers method is selected, the DNS Servers, Search domains, DHCP client ID, and Routes
options are disabled. You can select the Require IPv4 addressing for this connection to complete check box to allow
the connection to complete. The IPv4 address is required to complete the connection. If the IPv4 address is not
available, then the connection is not congured.
• If Disabled option is selected, IPv4 is not available for this connection.
d Click the IPv6 Settings tab. From the drop-down list, select the following method type for IPv4 authentication. The available
options are:
• Ignore
• Automatic
• Automatic, addresses only
• Manual
• Link-Local Only
NOTE: The settings are same as conguring the IPv4 settings tab described in this section.
4 Click Team to add and congure the team network connection for your thin client.
a Click the Team tab, and congure the following options:
1 Interface name—Type the name of your network interface.
2MTU—Species the size (in bytes) of the largest protocol data unit that the protocol layer can pass onwards.
3 Teamed connections—Lists the number of team connections that are congured. To add a new team connection, click Add
and select the type of connection you want to create. The available options are Ethernet, Bond, Bridge, Team, and VLAN.
4 JSON cong— If you have already added a new team connection, you can enter a custom JSON conguration string in the
text box or import a conguration le.
b To congure the General tab, IPv4 Settings tab, and IPv6 Settings tab for team connection, see the conguration details for
Bond connection in this section.
5 Click Bridge to add and congure the bridge network connection for your thin client.
a Click the Bridge tab, and congure the following options:
1 Interface name — Type the name for your network interface.
2 Bridged connections — The number of bonded connections that are set up are listed here. To add a new bond connection,
click the Add button and select the type of connection you want to create. The available options are Ethernet, Wi-Fi, and
VLAN.
3 Aging time — Enter the Aging time duration in seconds.
4 Enable IGMP snooping—Select this check box to monitor Internet Group Management Protocol (IGMP) communications
among devices.
5 Enable STP — Select this check box to enable the Spanning Tree Protocol (STP) for your connection.
6 Priority — Enter the priority value.
7 Forward delay — Enter the forward delay duration in seconds.
8 Hello time — Enter the hello time duration in seconds.
9 Max age — Enter the value for the maximum age.
b To congure the General tab, IPv4 Settings tab, and IPv6 Settings tab for Bridge connection, see the conguration details for
Bond connection in this section.
6 Click VLAN to add and congure the VLAN network connection for your thin client.
a Click the VLAN tab, and congure the following options:
1 Parent interface — Type the name for your parent interface.
2 VLAN ID — Enter the value for the VLAN id.
3 VLAN interface name — Type the name for your VLAN interface.
Wyse 3040 thin client on ThinLinux 29
4 Cloned MAC address — Type the cloned MAC address.
5 MTU —Species the size (in bytes) of the largest protocol data unit that the protocol layer can pass onwards.
6 Flags—Select the Reorder headers, Generic VLAN Registration Protocol (GVRP), Loose binding, and Multiple VLAN
Registration Protocol (MVRP) check boxes to enable the respective functions for your VLAN connection.
b To congure the General tab, IPv4 Settings tab, and IPv6 Settings tab for VLAN connection, see the conguration details for
Bond connection in this section.
7 Click Save to save your settings.
Conguring peripherals settings on Wyse ThinLinux
On the System Settings page, click the Peripherals icon. The following tabs are displayed on the left pane of the System Settings page.
• Keyboard
• Mouse
• Printers
• Sound
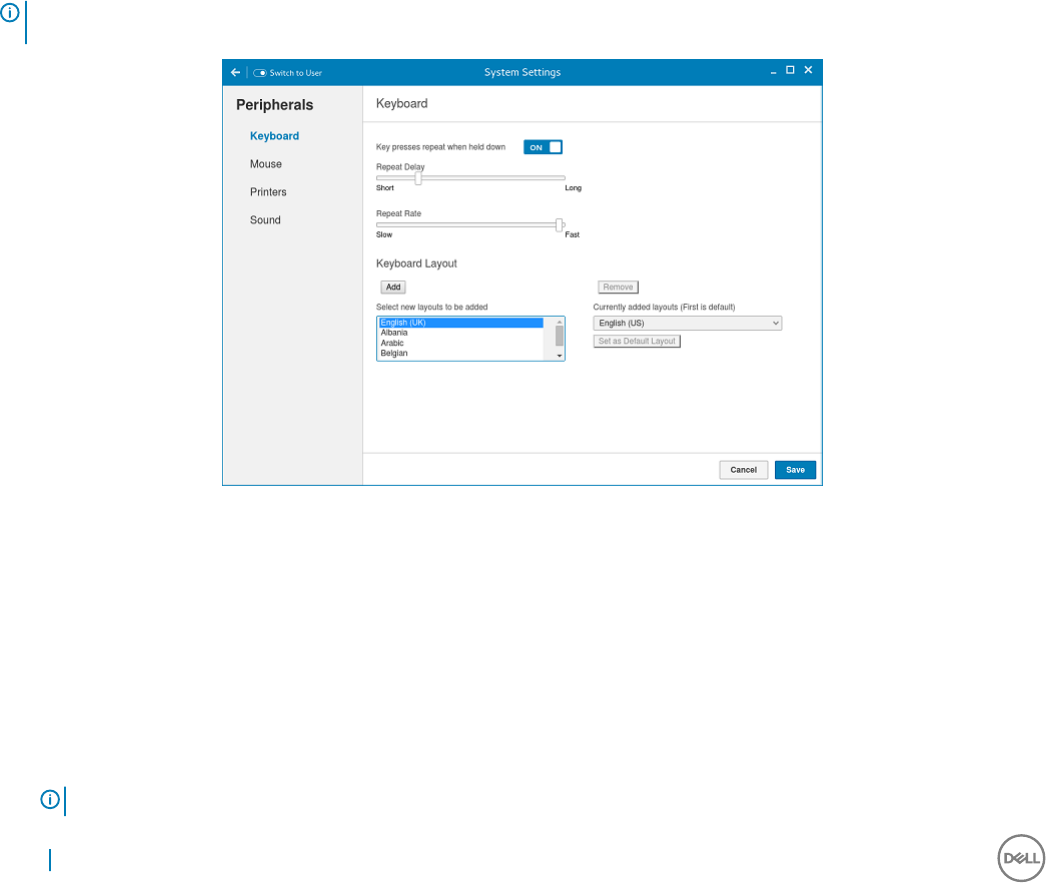
Setting the keyboard preferences
The Keyboard setting page enables you to set the Keyboard preferences and make the Keyboard layout.
NOTE: By default, the Keyboard screen is available in both User mode and Admin mode. Any changes made through Keyboard
preferences screen is saved and continued for the built-in thinuser
Figure 6. Keyboard Preferences
1 Click the ON/OFF button to disable or enable the Key presses repeat when held down option after you log in to the session.
2 Move the slider to the left to decrease the repeated delay time of the pointer or move the slider to the right to increase the repeated
delay time of the pointer.
3 Move the slider to the left to decrease the repeat rate of the pointer or move the slider to the right to increase the repeat rate of the
pointer.
4 In the keyboard layout box, select the layout you want to use and click Add to include the preferred layout in the currently added
layouts list.
5 Select the preferred keyboard layout from the currently added layouts list, and click Set as Default Layout button to set the default
layout.
NOTE: The default keyboard layout is listed on the top of the currently added layout list.
30 Wyse 3040 thin client on ThinLinux
6 Click Save to save your changes.
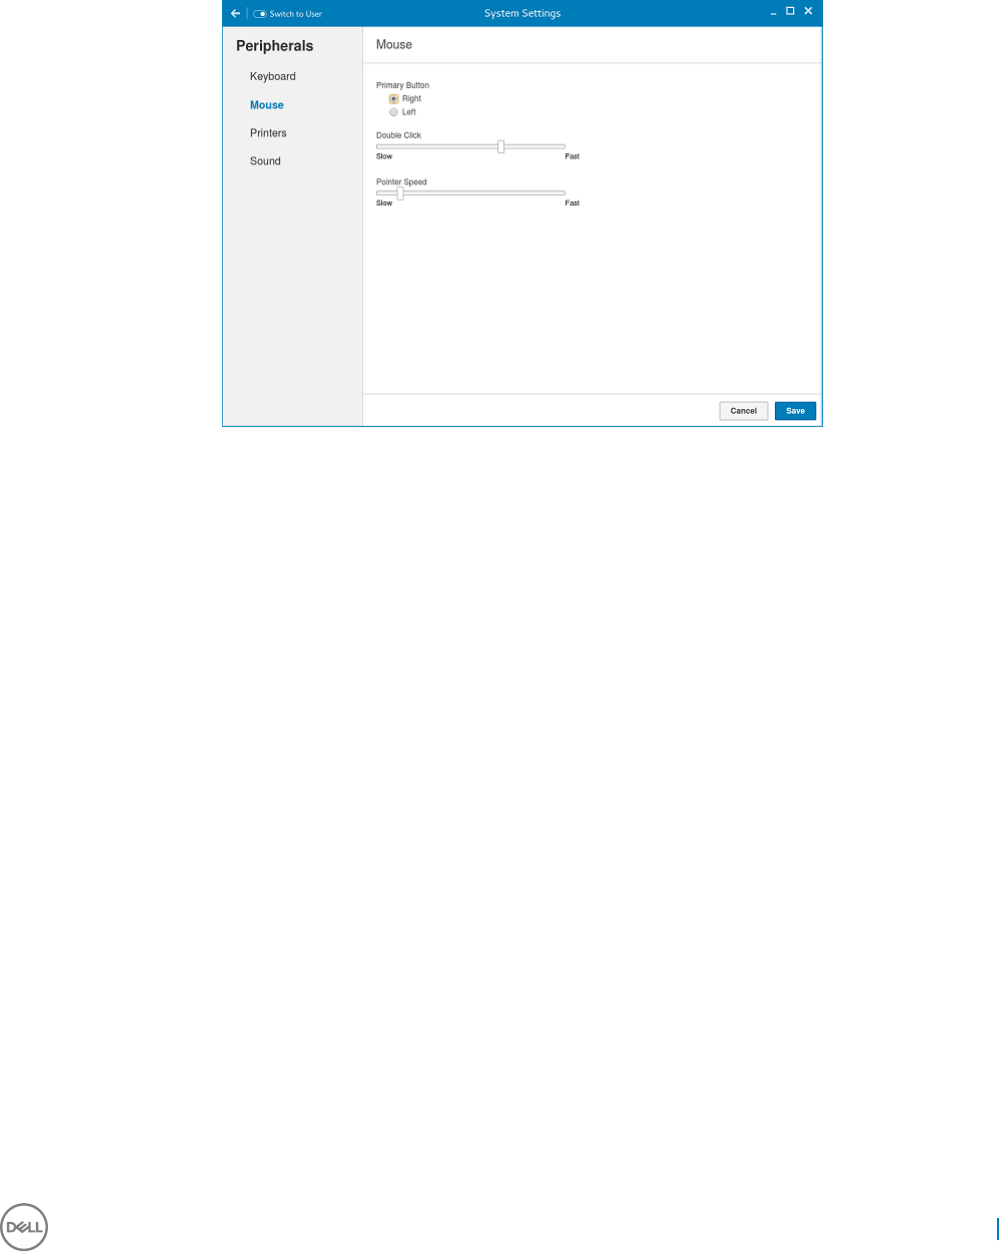
Setting the mouse preferences
By default, the Mouse screen is available in both User mode and Admin mode. Any changes made through the Mouse preferences screen is
saved and continued for the built-in thinuser.
Figure 7. Mouse Preferences
The Mouse setting page enables you to set the Mouse preferences.
1 Click Right or Left to set the primary button of the mouse.
2 Move the slider to the left to increase the speed of the pointer when double-clicked or move the slider to the right to decrease the
length of double-clicked.
3 Move the slider to the left to increase the speed of the mouse pointer or move the slider to the right to decrease the speed of the
mouse pointer.
4 Click Save to save your changes.
Conguring the printer settings
By default, the Printers screen is available only in Admin mode. On the Printer setting page, click the printer icon to start the gnome-
control-center printer.
Wyse 3040 thin client on ThinLinux 31
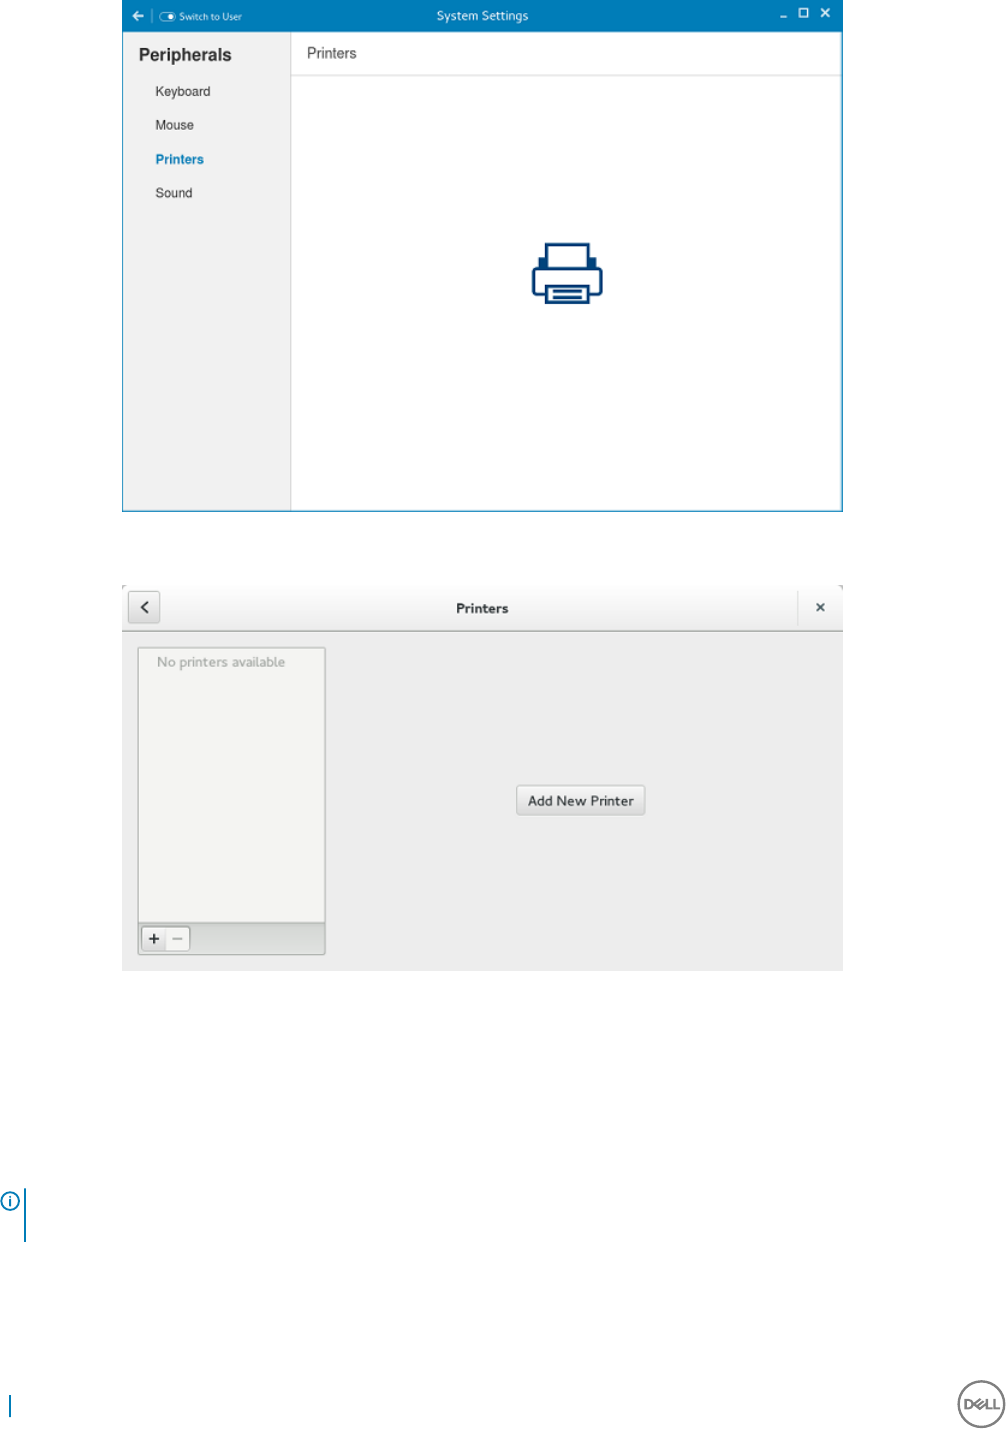
Figure 8. Printer Settings
Figure 9. Add New Printer
1 Click the printer icon.
The gnome-control-center printer dialog box is displayed.
2 Click Add New Printer button to include the new printer in the printers list available on the left pane.
The Add a new printer window is displayed.
3 Enter the address of the printer or the text to lter results.
NOTE: If a USB printer is connected, then it is displayed by default. The printer is not found if wrong address is provided or
the USB is not attached.
4 Click the Add option. Click Print Test Page to test the printer and click (- )icon to remove the printer.
32 Wyse 3040 thin client on ThinLinux
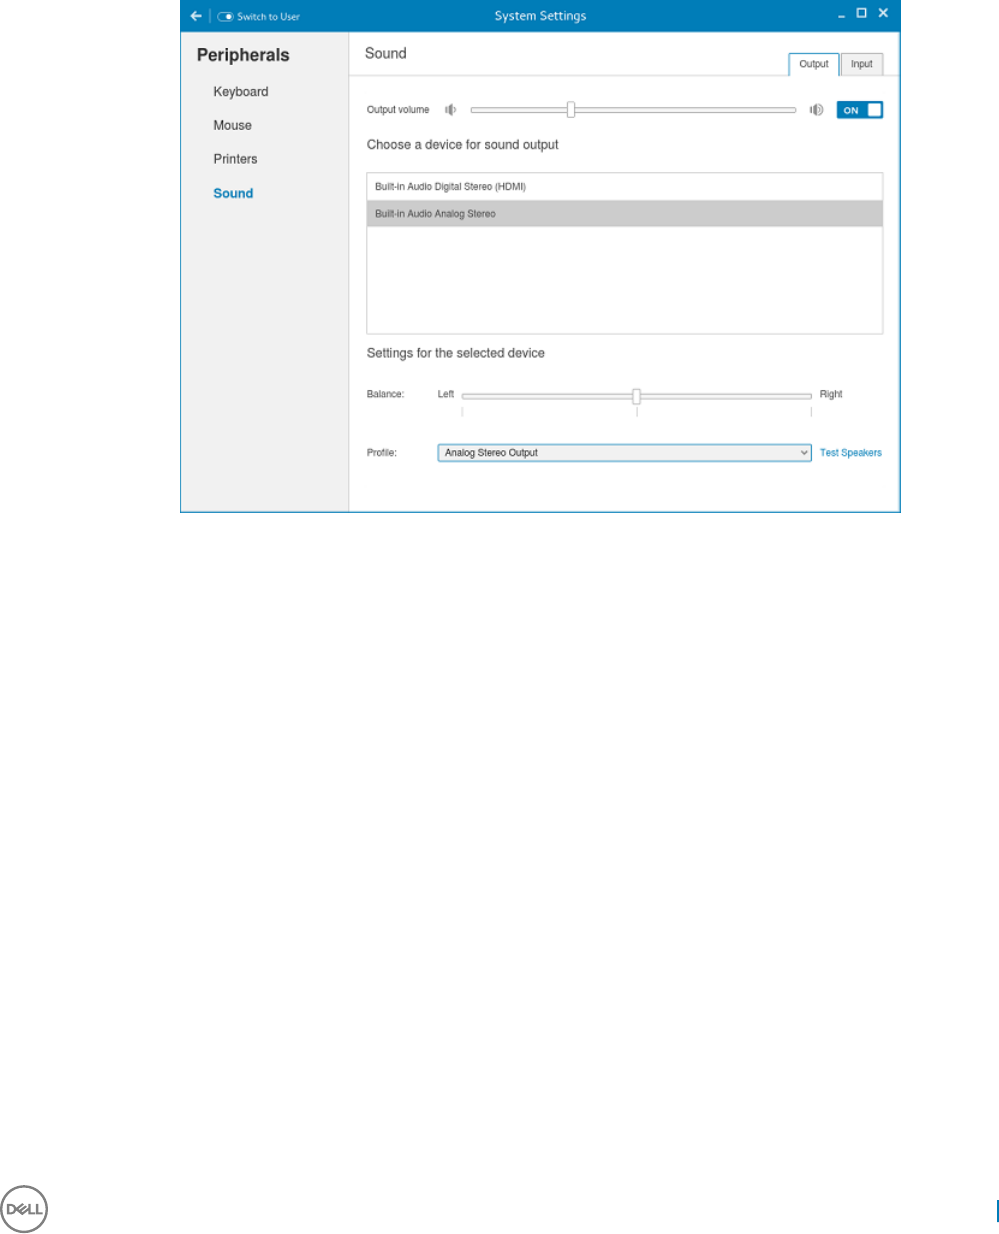
Conguring the sound settings
By default, the Sound screen is available in both User mode and Admin mode. Any changes made through Sound screen is saved and
retained for the built-in thinuser.
1 Click the Output tab to congure the audio output settings.
Figure 10. Sound Settings
a Move the Output volume slider to adjust the output or speaker volume. Click the Output volume button to enable or disable the
output volume.
b Select the device for sound output from the listed output devices. The default audio output is the Analog Output.
c Based on the channels available for the selected output device and prole, you can adjust the Balance and Fade values by
moving Balance and Fade sliders respectively.
d Select the audio prole from the drop-down list.
e Click the Test Speakers option. A dialog box is displayed. You can perform the speaker testing by playing sample wave les.
2 Click the Input tab to congure the audio input settings.
Wyse 3040 thin client on ThinLinux 33
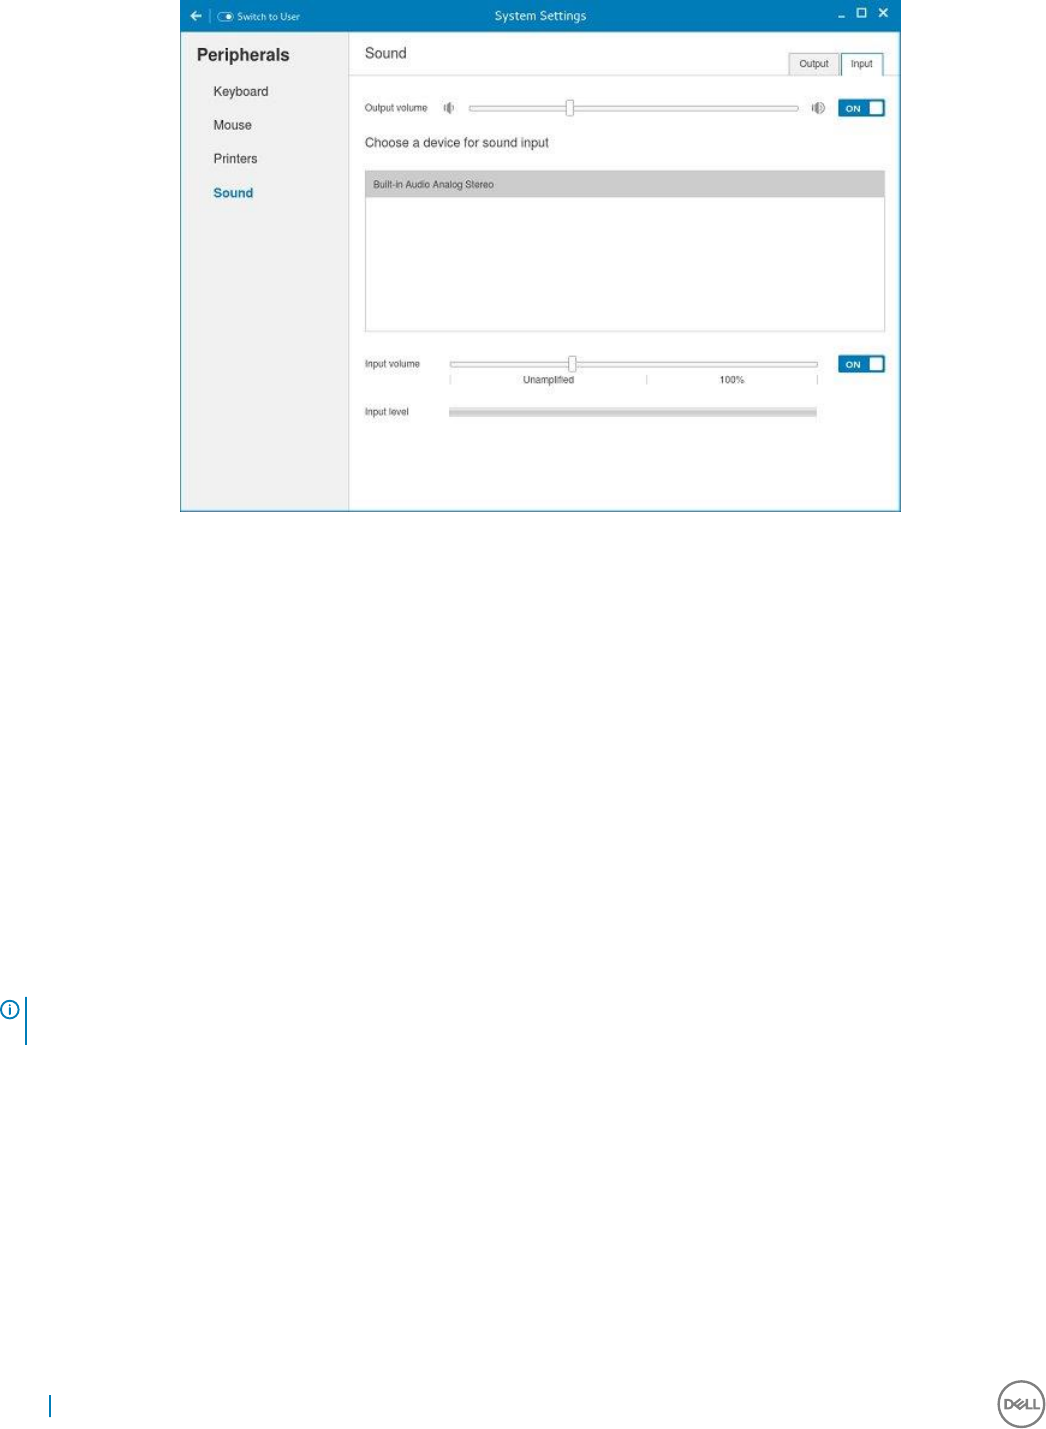
Figure 11. Sound Settings
a Move the Output volume slider to adjust the output or speaker volume. Click the Output volume option to enable or disable the
output volume.
b Select the device for sound input from the listed input devices. The default audio input is the Analog input.
c Move the Input Volume slider to adjust the input or Mic volume. Click the Input volume option to enable or disable the input
volume.
d The Input level meter bar shows the input volume peak level.
Power state
Wyse 3040 thin client running Wyse ThinLinux
On your initial conguration, Dell recommends that you connect by using a wired connection by plugging in the network connected
Ethernet cable to your thin client.
After you turn on your thin client, you are automatically logged in to the thinuser account. By default, the password of the thinuser account
is set to thinuser.
NOTE: In cases where a GDM login is needed (for example, AD/Domain login, the PNAgent login, and so on), the autologin
option can be turned o through the GUI or by using the INI.
Admin mode enables you to perform system administration tasks such as adding or removing connections and setting up specic device
settings. To enter into the Admin mode, click the Switch to Admin button from Setting application screen to admin mode and then enter
the default root password in the Password Needed window. The default root password is admin.
Conguring connections locally on Dell Wyse
ThinLinux
On the System Settings page, click the Connections icon. The Connections page contains the following tabs:
• Citrix
• VMware
34 Wyse 3040 thin client on ThinLinux
NOTE: The description names for all the connections can not be edited once you create the connection.
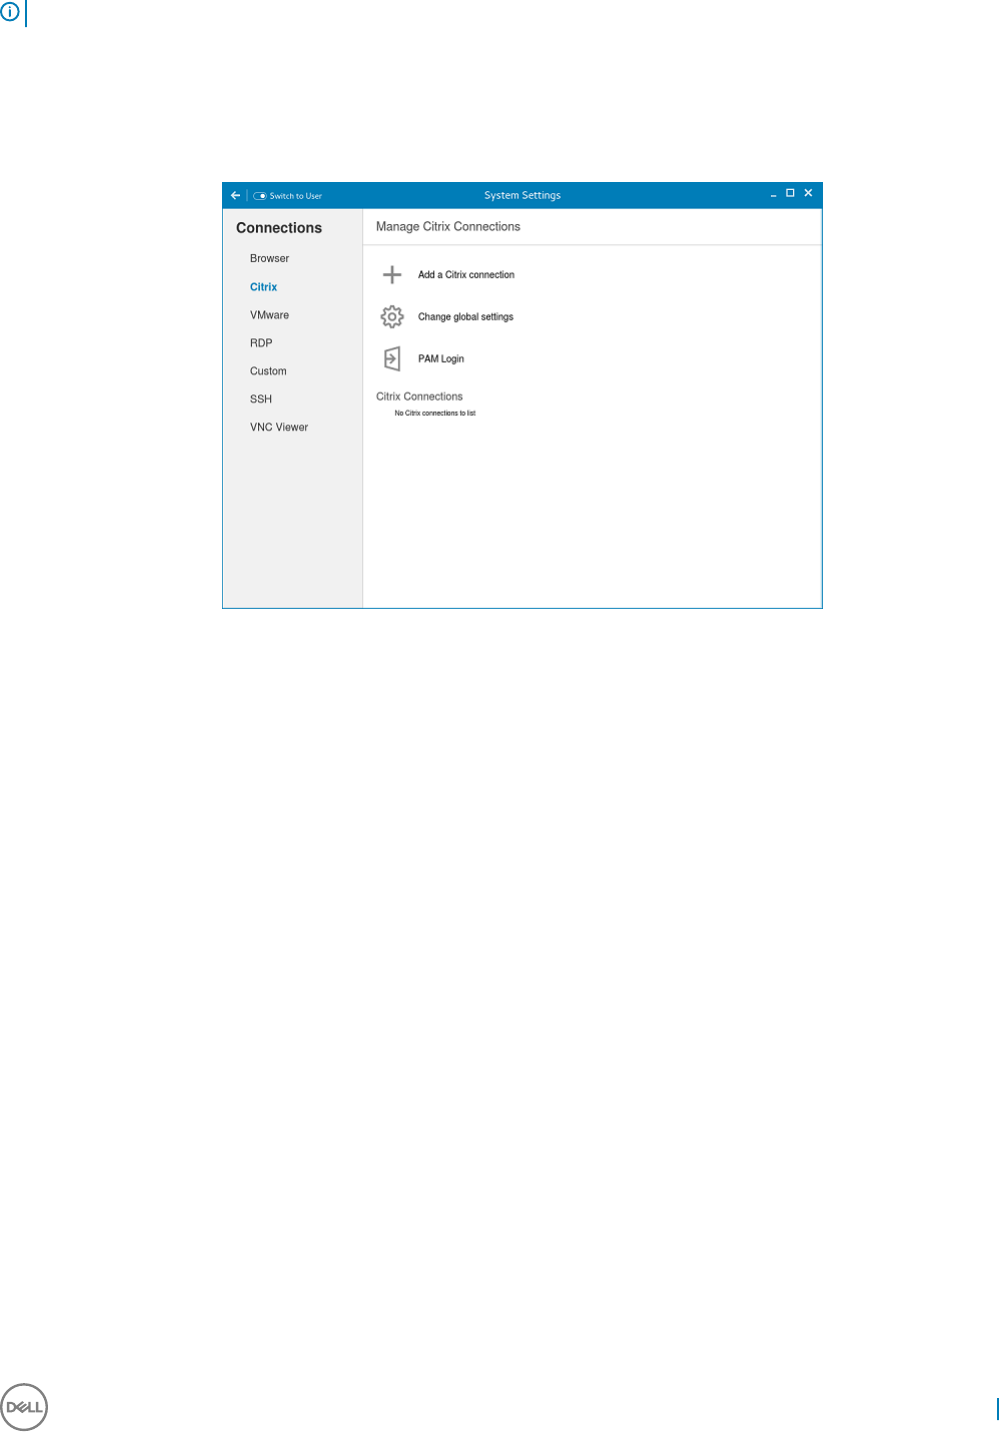
Conguring and managing Citrix connections
The Citrix Connections page enables you to create and manage the Citrix connections both locally and globally.
Figure 12. Citrix connection settings
To congure the local Citrix settings:
1 Click the + icon to add a new Citrix Connection.
The Citrix Connections page is displayed.
2 Enter the name of the Citrix connection for which you specify the Server URL address.
3 From the Connection Type drop-down list, select any of the following connection types:
• Server
• Published Application
• Storefront
4 Click Save to save the changes.
Conguring and managing VMware connections
The VMware connections page enables you to create and manage the View client 3.5 connections.
To congure the VMware Settings, complete the following task:
1 Click the + icon to add a new VMware Connection.
The VMware Connections page is displayed.
Wyse 3040 thin client on ThinLinux 35
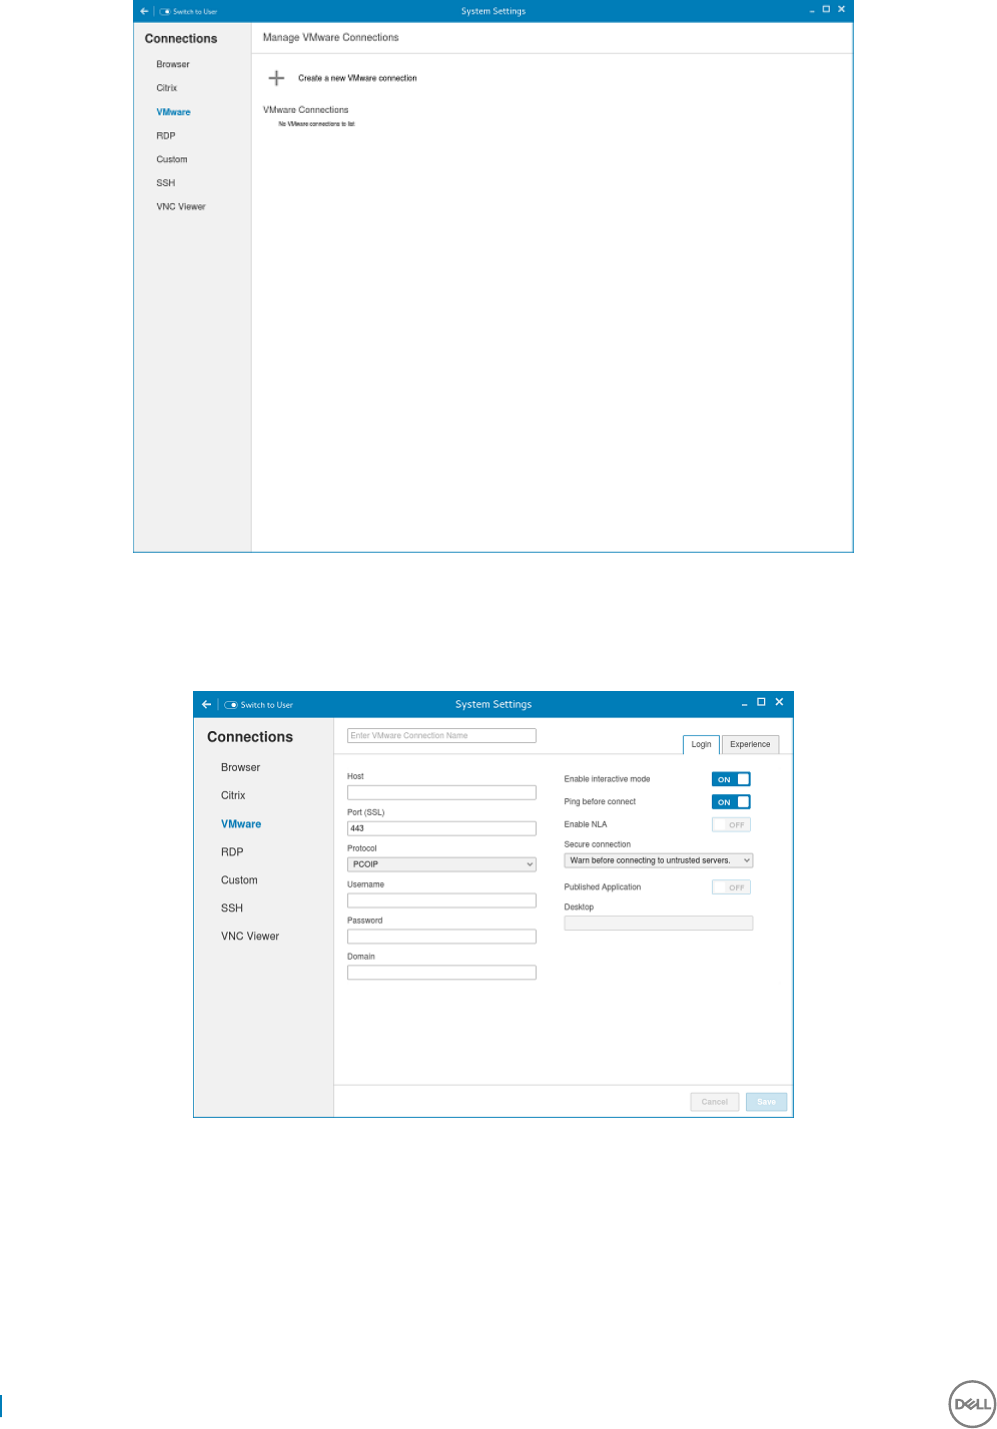
Figure 13. VMware connections settings
2 Enter the name of the VMware connection.
3Congure the following options in the Login tab:
Figure 14. VMware login settings
36 Wyse 3040 thin client on ThinLinux

Table 4. Login parameters
Parameter Description
Host Enter the host name or IP address or FQDN of the Horizon of
the VMware View Server.
Port Enter the port number of the host.
Protocol From the drop-down list, select the specic protocol.
Username Enter the User ID that is used to log in to the remote Horizon
server.
Password Enter the password that is used to log in to the remote Horizon
server.
Published Application Click the ON/OFF button to enable or disable this option.
If enabled, specify the Published Application name.
If disabled, specify the Published desktop name.
Enable interactive mode Click the ON/OFF button to enable or disable this option.
If enabled, then after a successful connection to the server, it
displays all the published application and desktop icons. You can
start the applications or desktop sessions based on your choice.
If disabled, then the Published Applications option is enabled in
the Login tab.
Selecting that option enables you to directly start the application
or desktop that you specify.
Ping before connect Click the ON/OFF button to enable or disable this option. If
enabled, it pings the connection is checked in server IP/FQDN
before connecting to a session.
Enable NLA Click the ON/OFF button to enable or disable this option. Enable
the Network Level Authentication (NLA), if NLA is enabled on
your remote computer. Your remote computer requires NLA user
authentication before you establish a full Remote Desktop
connection and the login screen is displayed.
Secure connection Click the Secure Preferences tab and select any of the options
that determine how the client should proceed when it cannot
verify that your connection to the server is secure.
Domain Enter the Domain name. It is used to log in the remote Horizon
server.
Desktop If interactive mode is disabled, you can specify Published desktop
name.
Application If interactive mode is disabled, you can specify the Published
application name.
4 The following options must be congured in the Experience tab:
Wyse 3040 thin client on ThinLinux 37
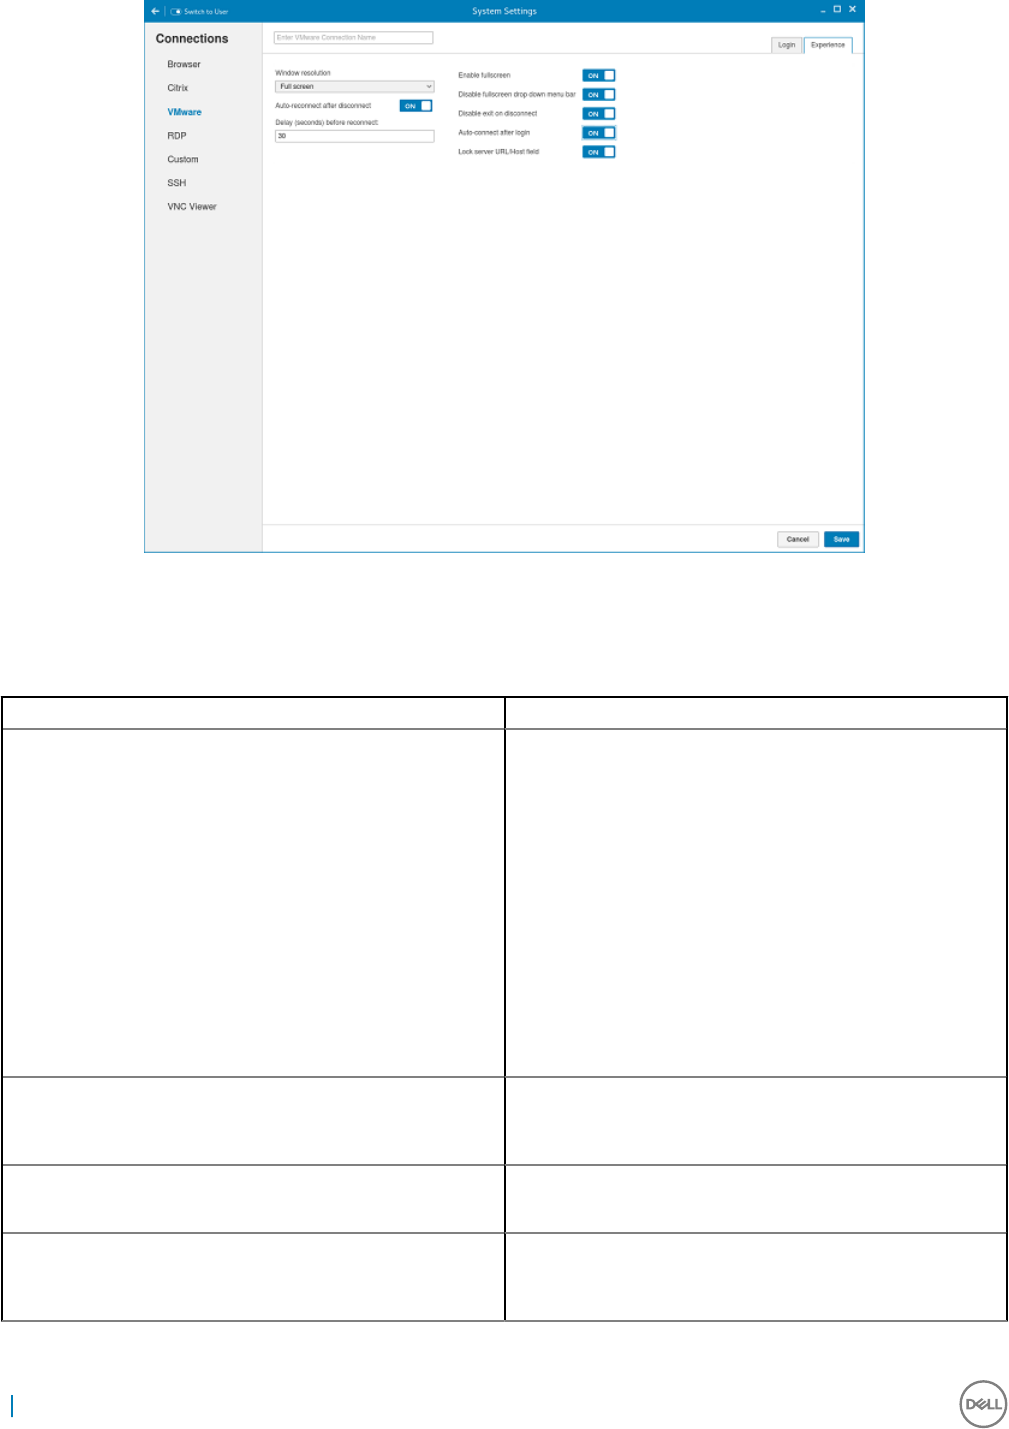
Figure 15. VMware experience settings
Table 5. Experience setting parameters
Parameter Description
Windows resolution Select the Windows resolution that you want to get the best
display on your monitor. The available resolutions are:
Use All Monitors
Full Screen
Large Screen
Small Screen
1024X768
800X600
640X480
Auto-Reconnect after disconnect. Click the ON/OFF button to enable or disable this option. If
enabled, the connection is automatically re-established after you
disconnect from the session.
Delay (seconds) before reconnect. Select the amount of time in seconds to delay the reconnection
attempt after a disconnection occurs.
Enable fullscreen Click the ON/OFF button to enable or disable this option. Select
this option to view the remote session in full screen mode in all
the monitors.
38 Wyse 3040 thin client on ThinLinux
Parameter Description
Disable fullscreen drop-down menu bar Click the ON/OFF button to enable or disable this option.
Select this option to disable the drop-down menu bar in the full
screen mode.
Disable exit on the disconnect Click the ON/OFF button to enable or disable this option.
Select this option if you do not want the Horizon server to retry
connecting if there is a connection error. You can typically select
this option if you use kiosk mode.
Auto-connect after login. Click the ON/OFF button to enable or disable this option.
Select this option to reconnect automatically after a
disconnection occurs.
Lock server URL/Host eld Click the ON/OFF button to enable or disable this option.
5 Click Save to save the settings.
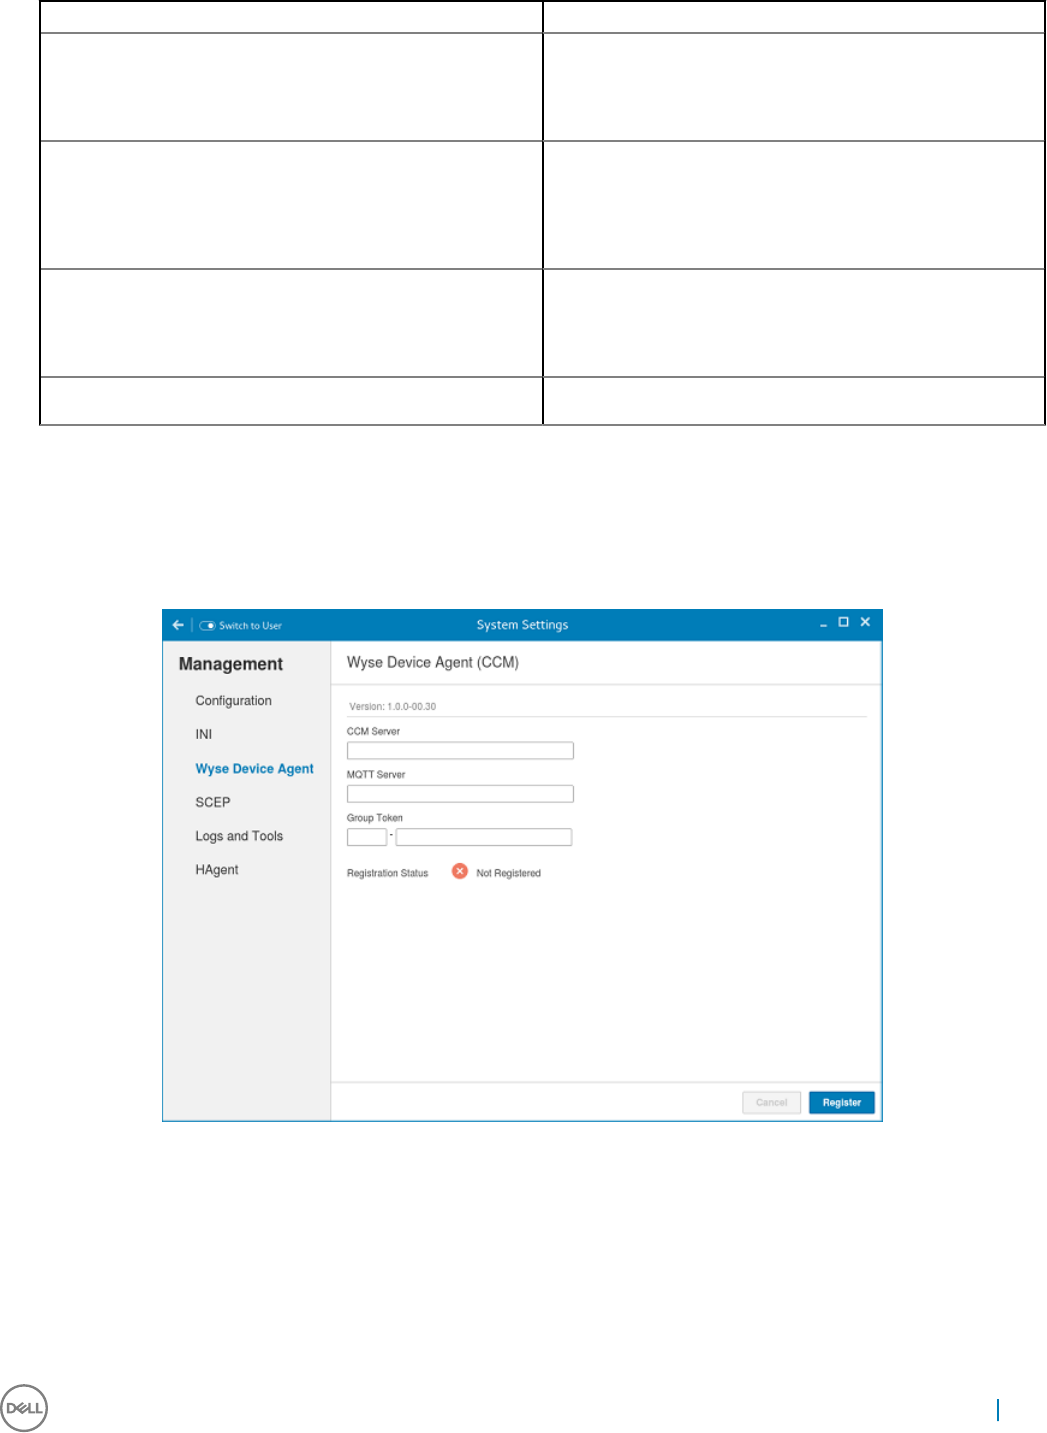
Conguring the WDA settings on Dell Wyse ThinLinux
The Wyse Device Agent (WDA) on the ThinLinux device supports only the features of Cloud Client Manager (CCM) device management
solution. Wyse Device Agent is for conguring the CCM (Cloud Client Manager) client settings and registering a ThinLinux device into CCM
and it is available only for admin user.
Figure 16. Wyse Device Agent (CCM)
If the device is not registered to a CCM server, the Wyse Device Agent screen shows the registration status as Not Registered.
1 In the CCM Server input box, enter the URL of CCM server you want to connect to.
2 In the MQTT Server input box, enter the IP address or hostname of Message Queue Telemetry Transport (MQTT) server.
3 In the Group Token input boxes, enter your group registration key to manage your ThinLinux device. This is a unique key for registering
your thin client device. Thin clients can be directly registered to Groups directly and must have a Group Registration Key enabled to
perform this action.
Wyse 3040 thin client on ThinLinux 39

4 Do one of the following options:
• Click Register to register your thin client on CCM server. When your thin client is successfully registered, the status is shown as
Registered with green color icon next to the Registration Status label, and caption of Register button changes to Unregister.
• Click Unregister, if you want to remove your thin client from the CCM management system. If Unregister fails, a dialog box for
Force Unregister conrmation is displayed. Click Yes to forcefully unregister your device which is managed by CCM. When you
perform Register or Unregister or Force Unregister from Agent screen, the applet should not be closed until Registration Status.
After successful registration, you can access the CCM management server screen where you can view and manage Device Asset
Details, Real-Time commands, and Troubleshooting information of your registered thin client.
Directing the Thin Client to CCM Server:
• To direct your thin client to CCM server, you must provide CCM/MQTT server details and Group registration Key. These details is
discovered by Wyse Device Agent using any of the following ways:
• DHCP Scope options
• Using INI parameter
• Using the Wyse Device Agent screen
• Directing the thin client to CCM Server using DHCP Scope options. The CCM/MQTT server details and Group Registration Key
that are required for CCM registration can be obtained by querying the DHCP server with following option tags:
• 199 – Scope option for Group Token (type = String, value = CCM-group-key).
• 165 – Scope option for CCM server.
• 166 – Scope option for MQTT server.
• Directing the thin client to CCM Server using INI parameters, INI syntax for CCM conguration:
• CCMEnable={yes,no} CCMServer=<CCM Server URL> GroupRegistrationKey=<tenant code-group code>
MQTTServer=<MQTT server>[:<MQTT port>]
NOTE:
When INI discovery method is used for registering the device, if you want to unregister the device, you must delete the INI
parameters and restart the device rst and then unregister the device. Else you have to perform the unregister process twice. For
more information, see ThinLinux INI Guide .
40 Wyse 3040 thin client on ThinLinux

System specications
Table 6. Brand / Sub-brand / Model number / Chassis description / Series level / Category type
Features Specication
Ambient operation 0 to 40 degree Celsius (32 to 104 degree F)
Non-operation temperature -40 to 65 degree Celsius (-40 to 149 degree Fahrenheit)
Humidity 20% to 80% (non condensing)
Max Altitude -15.2 to 3048 m (-50 to 10,000 ft)
OEM Ready
Table 7. Processor / chipset
Features Specication
SOC - Intel Cherry Trail
CPU core Intel Cherry Trail x5 Z-8350 (1.44 GHz Quad Core)
Graphics Built-in Graphics controller supporting dual display up to 2560 x
1600 x 30 resolution at 60Hz
Table 8. Memory
Features Description
System memory 2GB DDR3L 1600MHz, solder down
storage 8GB eMMC ash chip, solder down
Network LAN, 10/100/1000 Base-T Ethernet WLAN+BT Combo Module:
Azurewave AW-CM389MA w/Marvell 8897chip, M.2 2230
(SDIOinterface) (Optional)
Table 9. I/O (front)
Features Specication
LEDs • 1 (White / Amber on Power Button)
USB 2.0 1 * USB 2.0
USB 3.0 1 * USB 3.0
Audio universal jack 1 * Audio universal jack
5
System specications 41

Table 10. I/O (rear)
Features Specication
USB 2.0 2 * USB 2.0 (stacked)
Display Port 2 * DP
Physical security (Right side) 1 * Kensington Lock Slot
Network 1 * UTP, RJ-45
Table 11. Form factor
Features Specication
New Chassis NewDell Wyse ID
Chassis access Sealed chassis, accessible with tools
Optional mounting Wall mount / vesa mount
Height (Z) mm 27.94
Width (x) mm 101.6
Depth (Y) mm 101.6
Weight (pounds / kilograms) 0.24 kg (0.53 lb)
Total no of HDDs/SDDs supported 0
Table 12. Power requirement
Features Specication
Power Input voltage range 3A, 5Vdc. Comply with L.P.S.
Table 13. BIOS
Features Specication
Standard BIOS, UEFI as implemented using AMI Dell BIOS Y
Support Wake-On-LAN Y
Table 14. Operating system
Features Specication
OS and system software Launch at RTS
• ThinLinux 1.0.4 (post RTS)
• ThinOS 8.3.2
• PCoIP enabled Wyse ThinOS
42 System specications

Troubleshooting your system
You can troubleshoot your system using indicators like diagnostic lights, and error messages during the operation of the device.
Topics:
• Power states and LED behavior
• Diagnostic power LED codes
• Power LED error code behavior
Power states and LED behavior
Table 15. Power states and LED behavior
States Behavior
Indicators • Power LED: Bicolor, White / Amber
• Power state:
• S0–On: Power LED solid white
• S5 – O: Power LED o
• Operation State:
• BIOS Post: Power LED solid white
• In OS: Power LED solid white
Power button control • Force O-state: Push and hold power button is >= 4 seconds
Diagnostic power LED codes
Table 16. Diagnostic power LED codes
Power LED light status Possible cause Troubleshooting steps
At rst power apply: No LED light up briey Both power LED and activity LED come up
briey and then turn o. • Check AC power, call your utility
company.
• Check that AC power cord is plugged-in.
• Check that DC plug is plugged into the
unit.
At rst power apply: Both LEDs stay ON Both power LED and activity LED come up
briey and then turn o. • Logic board defect
• BIOS malfunctioning
• Abnormal power source
Push power button the LED does not turn • Power LED should come up in steady
Blue.
• Logic board defect
• Power button defect
6
Troubleshooting your system 43

Power LED light status Possible cause Troubleshooting steps
• Activity LED should turn on in steady
Amber.
• Mechanical assembly misaligned; causes
miss actuation.
LED comes up normally but no display BIOS screen is displayed after few seconds. • Incompatible monitor
• Defect logic board
• Malfunction dongle (if used)
• Defect cable or connector
Distorted display Should have normal viewable display. • Incompatible monitor
• Incompatible dongle (if used)
• Not supported display mode
• Bad connection on display output
• Logic board defect
Power LED error code behavior
Table 17. Power LED error code behavior
LED# of ashes Fault description Fault Action Comment
2,1 CPU CPU Failure Type A
2,2 Motherboard: BIOS
ROM failure
Motherboard, covers BIOS
corruption or ROM error
NA Not applicable to X7 BIOS.
No Test Case support.
2,3 Memory No Memory/RAM
detected
NA Not supported. Memory is
solder down on
Motherboard. It is dicult
to validate this function.
2,4 Memory Memory/RAM failure Type A Supported. Memory is
solder down on
Motherboard, the Service
team could replace the
motherboard/memory to
repurpose the board for
repair.
2,5 Memory Invalid memory is installed NA Memory is solder down on
motherboard.
2,6 Motherboard:
Chipset
Motherboard / Chipset
error
NA This code is not supported.
HW dependent.
2,7 LCD LCD failure NA This code is not supported.
There is no LCD.
3,1 RTC Power failure CMOS battery failure Type B
3,2 PCI / Video PCI or Video card/ Chip
failure
NA Not applicable to X7 BIOS.
No test case support.
3,3 BIOS Recovery 1 Recovery Image not found Type A
3,4 BIOS Recovery 2 Recovery Image found but
invalid
Type A
4,1 CPU Cong or CPU
Failure
NA This code is not supported.
44 Troubleshooting your system

LED# of ashes Fault description Fault Action Comment
4,2 Generic POST Video
Error—Old LED
pattern 1110
NA Not applicable to X7 BIOS.
No test case support.
Example: LED# of ashes: 2,1 indicates that LED blinks two times, pauses, and then blinks once.
Troubleshooting action
• Type A
• Log the fault event.
• Emit the LED error code pattern.
• Repeat the LED error code pattern in a dead-loop.
• Type B
• Log the fault event, if possible.
• Emit the LED error code pattern.
• Repeat the LED error code 3 more times.
• Leave the LED light up in amber color.
• Continue with POST.
Troubleshooting your system 45
