Dell XPS 10 User's Manual (LTE) LTE User Guide Here Tablet Guide2 En Us
Manual xps-10-tablet_User%27s%20Guide2_en-us Dell XPS 10 Tablet User Manual | Manual Device
User Manual: Dell Dell XPS 10 LTE user guide manual here Dell XPS 10 tablet user guide manual - -
Open the PDF directly: View PDF ![]() .
.
Page Count: 56
- Notes, Cautions, and Warnings
- Safety and Regulatory Information
- Contents
- XPS 10 Tablet Features
- XPS 10 Tablet Accessories
- Setting Up Your XPS 10 Tablet
- Using Your XPS 10 Tablet
- Synchronizing Your Tablet
- Using XPS 10 Mobile Keyboard Dock
- Cleaning Your Tablet
- Troubleshooting
- Contacting Dell
- Locating Your Service Tag and Express Service Code
- Specifications
- Glossary
- Index

XPS 10 Tablet
User’s Manual

Notes, Cautions, and Warnings
NOTE: A NOTE indicates important information that helps you make
better use of your tablet PC.
CAUTION: A CAUTION indicates potential damage to hardware or loss
of data if instructions are not followed.
WARNING: A WARNING indicates a potential for property damage,
personal injury, or death.
____________________
© 2013 Dell Inc.
Trademarks used in this text: Dell™ and the DELL logo are trademarks of Dell Inc.; Adobe
Acrobat® is a trademark of Adobe Systems Incorporated which may be registered in
certain jurisdictions; Microsoft®, Windows® and Internet Explorer® are either trademarks
or registered trademarks of Microsoft Corporation in the United States and/or other
countries; Bluetooth® is a registered trademark owned by Bluetooth SIG, Inc. and is
used by Dell under license.
April 2013 Rev. A00
Federal Communications Commission (FCC) Statement
This tablet PC complies with Part 15 of the FCC Rules. Operation is subject to the
following two conditions:
this tablet PC may not cause harmful interference and1)
this tablet PC must accept any interference received, including interference that may 2)
cause undesired operation of the tablet PC.
Regulatory model: J42A
Safety and Regulatory Information
You can find additional Safety Best Practices and information on REACH, Electromagnetic Compatibility (EMC),
Ergonomics, Transportation, and Tuners on the Regulatory Compliance page, www.dell.com/regulatory_compliance.
WARNING: Use of controls, adjustments, procedures, connections, or signal types other than those specified
in your documentation may result in exposure to shock, electrical hazards, and/or mechanical hazards.
CAUTION: Dell products are not certified as medical electrical equipment, and are not intended for use in
close proximity to patients or in oxygen rich environments.
Dell products are not designed for use in hazardous environments.•
Dell products are not designed or intended for use in operating or calibrating medical devices.•
When setting up the equipment for use:
Place the equipment on a hard, level surface.•
Do not stack the equipment, place it in an enclosed space, or otherwise install it where it is subject to heated •
air. The equipment should have least 10.2 cm (4 inches) of clearance on all vented sides to permit the airflow
required for proper ventilation. Restricting airflow can damage the equipment or cause overheating.
If your product contains a tuner, see • www.dell.com/regulatory_compliance for safety instructions for tuners.
If your device includes a modem, the cable used with the modem should be manufactured with a minimum •
wire size of 26 American Wire Gauge (AWG) and an FCC compliant RJ11 modular plug.
WARNING: Do not operate your equipment with any cover(s) (including tablet covers, bezels, filler
brackets, front-panel inserts, and so on) removed.
Do not use your equipment in a wet environment. Protect equipment from liquid intrusion.•
Do not use damaged equipment, including exposed, frayed, or damaged power cords.•
Do not push any objects into the air vents or openings of your equipment. Doing so can cause fire or electric •
shock by shorting out interior components.
Do not allow your tablet or adapter to operate with the base resting directly on exposed skin for extended •
periods of time. The surface temperature of the base will rise during normal operation, particularly when AC
power is present. Allowing sustained contact with exposed skin can cause discomfort or burn.
To remove a tablet from all power sources, turn the tablet off, and disconnect the AC adapter from the •
electrical outlet.
When Working Inside Your Device
WARNING: Hazardous moving parts. Keep away
from the moving fan blades.
Do not attempt to service the equipment yourself, •
except as explained in your Dell documentation or in
instructions otherwise provided to you by Dell. Always
follow installation and service instructions closely.
Internal components may become very warm •
during normal operation. Before touching any
internal components, allow time for them to cool.
Disconnect all cables from the tablet including the •
headphone cable before docking to the mobile
keyboard dock.
Check the voltage rating before you connect the equipment to an electrical outlet to ensure that the required •
voltage and frequency match the available power source.
If your device has a manual voltage-selection switch, your voltage-selection switch on the back panel –
must be manually set to operate at the correct operating voltage used in your location.
To prevent electric shock, plug the equipment power cables into properly grounded electrical outlets. If the •
equipment is provided with a 3-prong power cable, do not use adapter plugs that bypass the grounding
feature and do not remove the grounding feature from the plug or adapter.

Adapter Safety
Use only the Dell-provided AC adapter approved for use with this device. Use of another AC adapter may •
cause a fire or explosion.
The AC adapter may become hot during normal operation of your computer. Ensure adequate ventilation and •
use care when handling the adapter during or immediately after operation. Do not use an auto adapter DC
power cable connected via either an automobile cigarette lighter adapter or an empower-type connector in
vehicles with high voltage (24 VDC), such as commercial transport vehicles.
ENERGY STAR Compliance
The Environmental Protection Agency’s (EPA) ENERGY STAR program is a joint effort between the EPA and
manufacturers to reduce air pollution by promoting energy-efficient products. You can help reduce electricity usage
and its side effects by leaving the power-management features enabled and by turning off your product when it is
not in use for extended periods of time.
ENERGY STAR Label
Any Dell product bearing the ENERGY STAR emblem electronically or physically on the product is
certified to comply with the EPA ENERGY STAR requirements as configured when shipped by Dell.
ENERGY STAR power-management features save energy by allowing computers to enter a very
low power (sleep) mode when not in use for a specified period of time. These power-management
features are activated on all ENERGY STAR qualified computers.
The power-management features are preset to allow the tablet and screen to power down (sleep) after the following
periods of inactivity:
The tablet and screen can be woken from the sleep state through user interaction with the power button or finger gesture.
For additional power-management specific information, see www.energystar.gov/powermanagement.
For additional information on the ENERGY STAR program, see www.energystar.gov.
Recycling Information
Dell recommends that customers dispose of their used tablet hardware, and other peripherals in an environmentally-
sound manner. Potential methods include reuse of parts or whole products and recycling of products, components,
and/or materials.
For specific information on Dell’s worldwide recycling programs, see www.dell.com/recyclingworldwide.
Display Lamp Disposal
Hg
LAMPS INSIDE THIS PRODUCT CONTAIN MERCURY (Hg) AND MUST BE RECYLCED OR DISPOSED
OF ACCORDING TO LOCAL, STATE, OR FEDERAL LAWS. FOR MORE INFORMATION, CONTACT THE
ELECTRONIC INDUSTRIES ALLIANCE AT WWW.EIAE.ORG. FOR LAMP SPECIFIC DISPOSAL INFORMATION
CHECK WWW.LAMPRECYCLE.ORG.
Contents | 5
Contents
XPS 10 Tablet Features1 ..........................................7
XPS 10 Tablet Accessories2 ..................................12
Setting Up Your XPS 10 Tablet3 ...........................13
Getting Your Tablet Ready for Use ..................................... 13
Charging the tablet ............................................................... 14
Turning On Your Tablet ......................................................... 16
Turning Off Your Tablet ........................................................ 17
Turning Off the Screen .......................................................... 17
Inserting a Micro-SD card ....................................................18
Inserting a Micro-SIM card ................................................... 19
Using Your XPS 10 Tablet4 ...................................20
Screen Orientation ................................................................20
Gestures ...................................................................................20
The Windows RT Start Screen .............................................23
Using Headphones ................................................................25
Managing Your Tablet Settings ...........................................26
6 | Contents
Synchronizing Your Tablet5 ................................ 33
Using XPS 10 Mobile Keyboard Dock6 ............. 34
Mobile Keyboard Dock Features .........................................34
Docking Your Tablet to the Keyboard Dock .....................36
Undocking Your Tablet from the Keyboard Dock............38
Charging the tablet and dock ..............................................39
Cleaning Your Tablet7 .......................................... 42
Troubleshooting8 .................................................. 43
Contacting Dell9 ................................................... 47
Locating Your Service Tag and 10
Express Service Code .........................................48
Specifications11 .......................................................49
Glossary12 ..................................................................51
Index13 ...................................................................... 55
XPS 10 Tablet Features | 7
XPS 10 Tablet Features
This section provides information about the features available on
your tablet.
10
1234
6
5
9
8
7
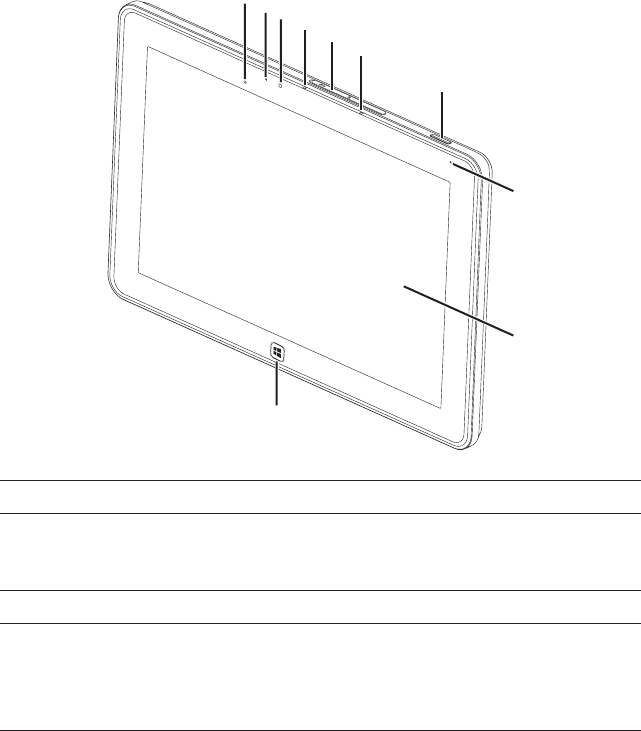
Feature Functionality
Ambient-light sensor1 Automatically adjusts the brightness of the
display's backlight based on surrounding
light levels.
Camera-status light2 Indicates the camera activity.
Front-facing camera3 Capture a front view picture or •
record videos.
Make video calls with web applications, •
such as Skype.

8 | XPS 10 Tablet Features
Feature Functionality
Front microphone 14 Captures sounds.•
Records voice for calls made from web •
applications, such as Skype.
Slot cover5 Provides access to Micro-SD card and
Micro-SIM card slots.
Front microphone 26 Captures sounds.•
Records voice for calls made from web •
applications, such as Skype.
7 Power and Sleep/Wake button Press and hold to turn the tablet on or off.•
Press to turn the touchscreen display •
on or off.
Battery-status light8 Indicates the battery charge status.
Touchscreen display9 Touch the display to use on-screen
controls including buttons, menu items,
and the on-screen keyboard.
10 Windows button Press to open the Windows Start screen.•
Press for quick access to the most •
recently used application or most
recently viewed screen.
NOTE: The default resolution of the front camera is approximately
0.9 MP (16:9). If you change the camera resolution, the setting will be
remembered by Windows.
NOTE: The front camera does not support zoom, face tracking or
touch to focus.
XPS 10 Tablet Features | 9
123
45
6789
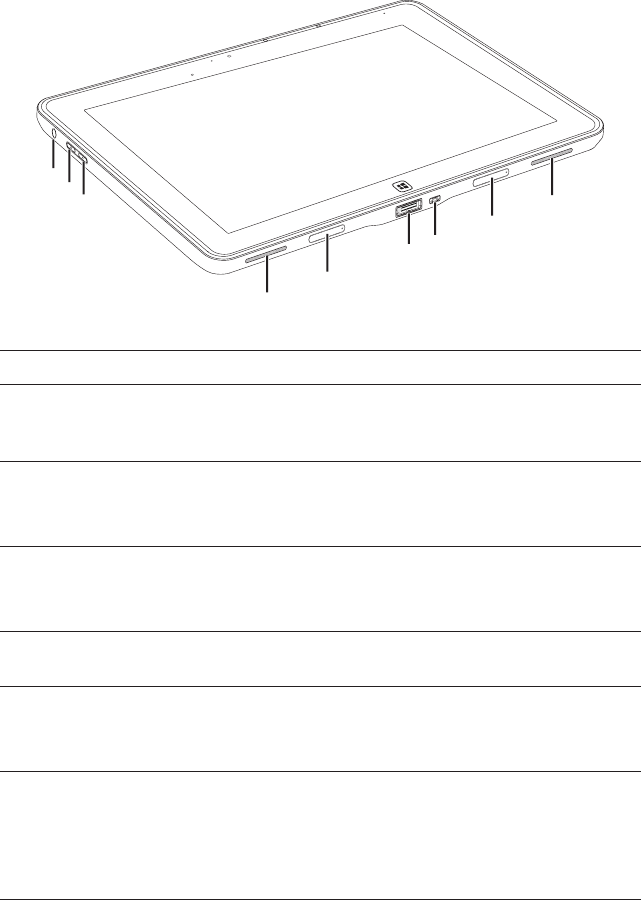
Feature Functionality
Audio port (3.5 mm)1 Connect headphones, microphones, and
other audio equipment to listen to stereo
sound, record audio or make calls.
2 Volume-up button Press to increase volume by one level.•
Press and hold to continuously increase •
the volume.
Volume-down button3 Press to decrease volume by one level.•
Press and hold to continuously •
decrease the volume.
Speaker4 Provides audio output for video and
music playback.
Removable docking-port cover5 Protects the docking port. •
Remove the cover to connect a Dell •
mobile keyboard dock (sold separately).
Power-adapter/docking port6 Connect the supplied power adapter to •
provide power to the tablet and charge
the battery.
Connect a Dell mobile keyboard dock •
(sold separately).

10 | XPS 10 Tablet Features
Feature Functionality
Micro-USB port7 Connect USB devices or connect to •
your computer for transferring or
synchronizing data, music, photos,
videos, contacts, and so on.
Connect USB cable to trickle charge •
the battery.
Capable of providing up to 1 amp power.•
Removable docking-port cover8 Protects the docking port. •
Remove the cover to connect a Dell •
mobile keyboard dock (sold separately).
Speaker9 Provides audio output for video and
music playback.
XPS 10 Tablet Features | 11
1
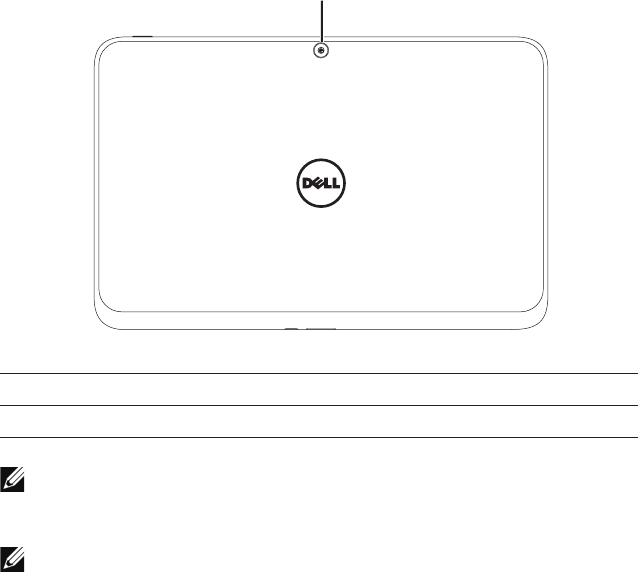
Feature Functionality
Rear camera1 Capture pictures or videos.
NOTE: The default resolution of the rear camera is approximately
0.9 MP (16:9). If you change the camera resolution, the setting will be
remembered by Windows.
NOTE: The rear camera supports continuous auto-focus, but does
not support zoom, face tracking or touch to focus. Auto-focus may be
disabled by default but can be enabled in camera settings.
12 | XPS 10 Tablet Accessories
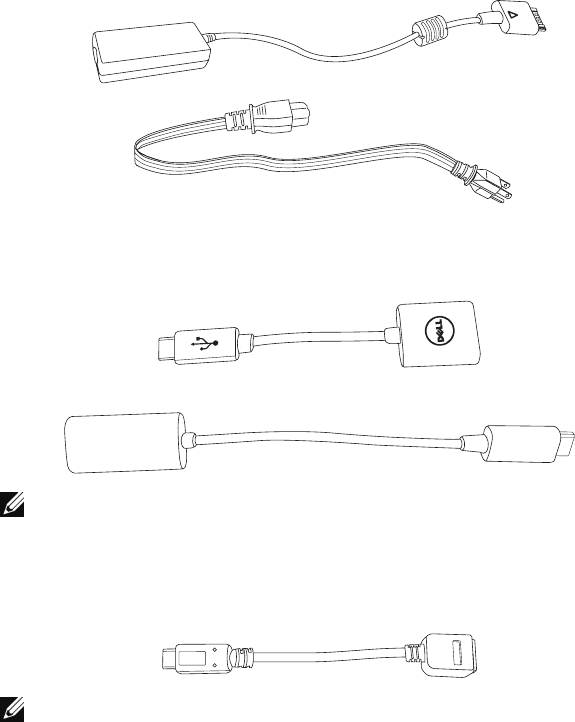
XPS 10 Tablet Accessories
Your XPS 10 Tablet Package includes the following accessories:
30 W AC power adapter and power cable: Provides power to your
tablet and charges the battery.
Micro-USB to standard USB conversion cable: Provides connection
between your tablet and USB devices.
NOTE: This conversion cable is not compatible with high power USB
devices like hard drives or CD-ROMs.
Mini-HDMI to HDMI cable: Provides connection between your tablet
and devices supporting audio/video signals in HDMI format.
NOTE: The Mini-HDMI to HDMI cable is shipped with XPS 10 mobile
keyboard dock (sold separately).
Setting Up Your XPS 10 Tablet | 13
Setting Up Your XPS 10 Tablet
This section provides information about how to set up the XPS 10
Tablet for first time use.
WARNING: Before you begin any of the procedures in
this section, read the safety information that shipped with
your tablet. For additional best practices information, see
www.dell.com/regulatory_compliance.
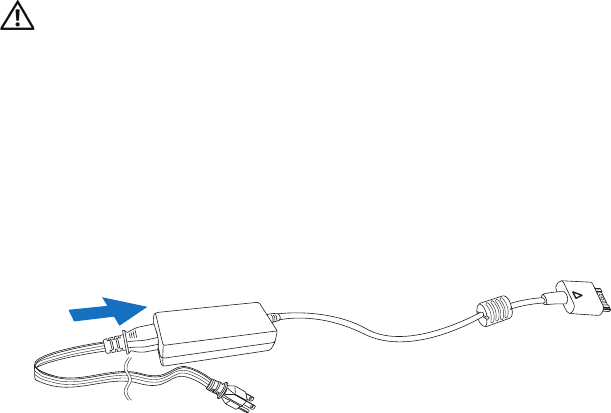
Getting Your Tablet Ready for Use
Connect the AC power adapter and power cable
Connect the supplied power cable into the supplied power 1
adapter.
14 | Setting Up Your XPS 10 Tablet
Charging the tablet
CAUTION: Charge the battery in an ambient temperature of 0 °C to 35 °C.
CAUTION: Use only the supplied power adapter and power cable to
charge your tablet. Using unauthorized power adapters or power cables
may cause severe damage to your tablet.
NOTE: The battery is not fully charged when you unpack your tablet.
Connect the power adapter to the 40-pin power-adapter port on 1
the tablet.
Connect the power adapter to an electrical outlet and charge the 2
tablet until the battery is fully charged.
NOTE: The tablet battery requires about 4 hours to fully charge.
NOTE: You can also trickle charge the tablet via USB connection. The
battery requires up to 24 hours to fully charge depending on the power
output of the USB port.
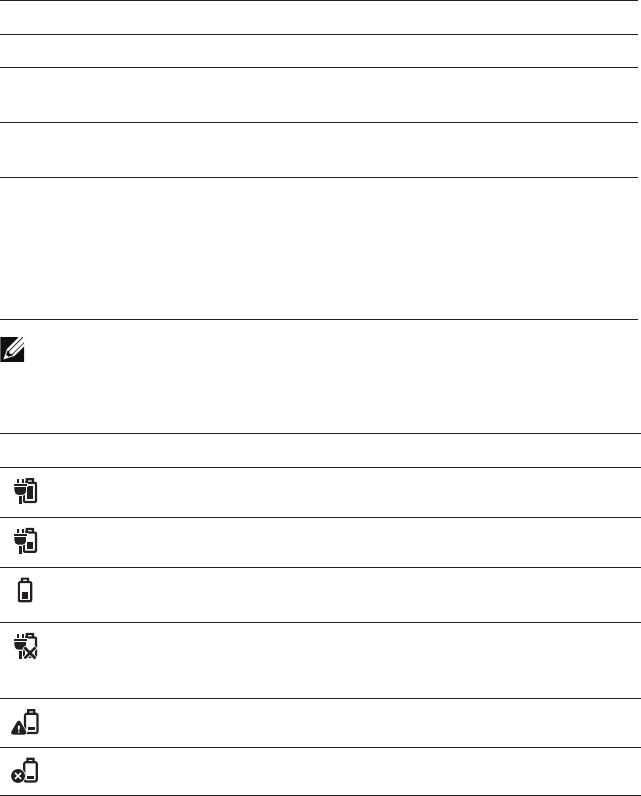
Setting Up Your XPS 10 Tablet | 15
You can check the tablet battery charge status from:
Battery-charge light located on the front of the tablet:•
LED behavior Description
Solid white color on Battery is charging.
Fast Blinking (4 times per second) System is shutting down by pressing and
holding the power button.
Off Battery is not charging, either no AC is
connected or battery is fully charged.
Momentary off Battery is trickle charging but does not yet
have enough charge to power up. If the
power button is pressed during this state,
the LED will be momentarily off. Continue
to trickle charge or attach the AC adapter
to power up immediately.
NOTE: You can check exact battery charge level by booting to the
operating system.
Battery icon displayed on the screen:•
Battery icon Description
Battery is fully charged.
Battery is charging with AC.
Your tablet is running on battery power
and the battery is discharging.
Your tablet is plugged in, and either no
battery is detected, or the battery isn't
working correctly.
Battery is at low level.
Battery is at critical level.
16 | Setting Up Your XPS 10 Tablet
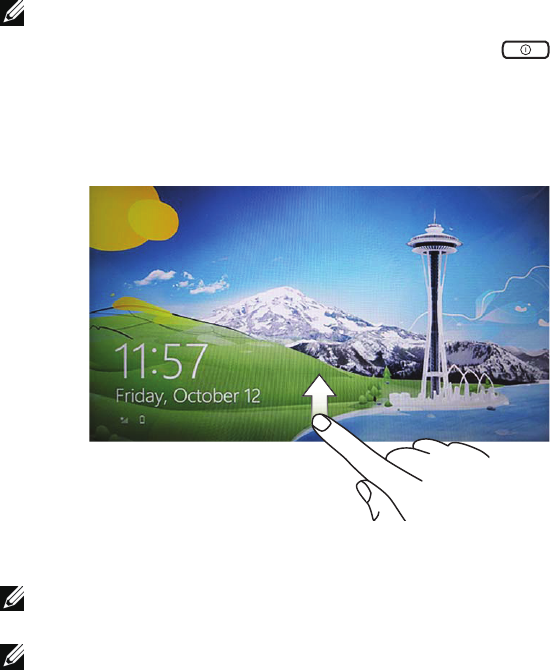
Turning On Your Tablet
NOTE: Use this tablet in an ambient temperature between 0 °C and 35 °C.
Press and hold the 1 Power and Sleep/Wake button for
2 seconds to turn on your tablet.
If the 2 lock screen image is displayed, swipe your finger from the
bottom of the display to switch to the login screen, and then
enter password to log in to Windows.
The tablet is ready for use when the Windows Start screen is displayed.
NOTE: If the login screen is not enabled in Windows RT, you will be
taken directly from the lock screen to the Start screen.
NOTE: The lock screen is only displayed when returning from a sleep state.
Setting Up Your XPS 10 Tablet | 17
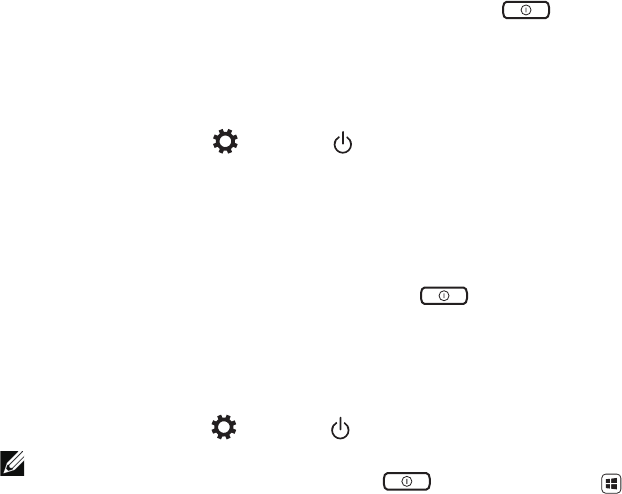
Turning O Your Tablet
Using power button:•
Press and hold the Power and Sleep/Wake button for at
least 4 seconds to turn off the tablet.
Using Charms:•
Swipe from the right edge of the display to access Charms. 1
Touch 2 Settings → Power → Shut down to turn off
the tablet.
Turning O the Screen
Using power button:•
Press the Power and Sleep/Wake button to turn off
the screen.
Using Charms:•
Swipe from the right edge of the display to access Charms.1
Touch 2 Settings → Power → Sleep to turn off the screen.
NOTE: If your tablet is in a sleep state (tablet is on, but screen is off),
press the Power and Sleep/Wake button or Windows button
once to turn on the screen.
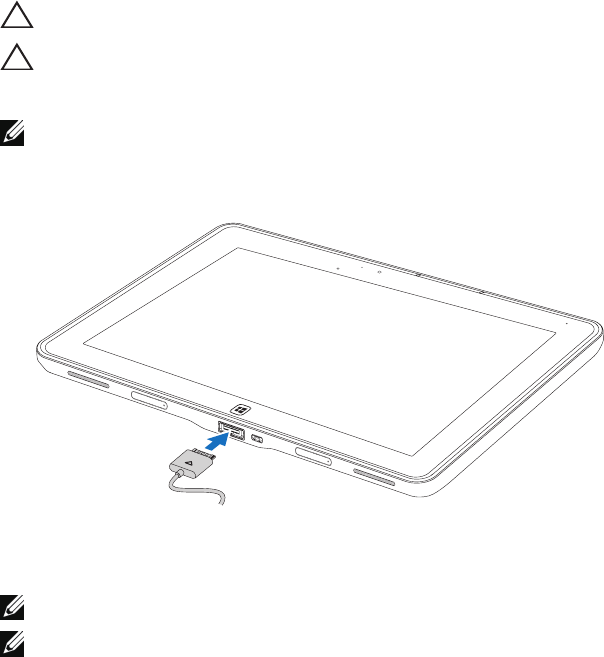
Setting Up Your XPS 10 Tablet | 19
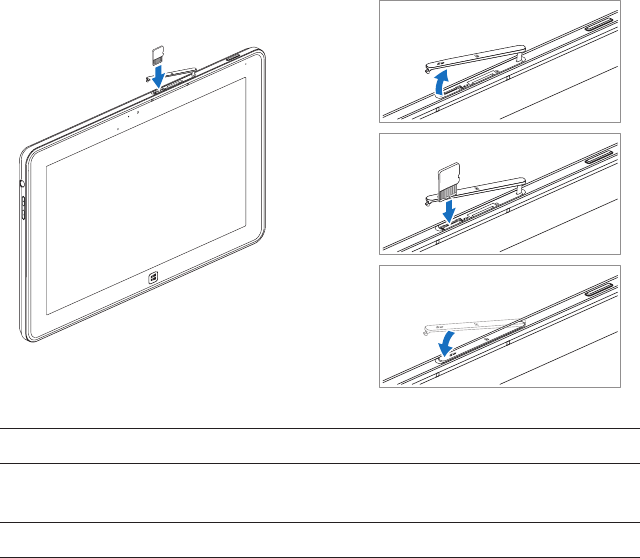
Inserting a Micro-SIM card
1
2
3
Open the slot cover.1
Follow the illustration to insert the Micro-SIM card into the 2
Micro-SIM card slot.
Close the slot cover.3
CAUTION: Inserting an incompatible SIM card, such as a Nano-SIM
card, into the Micro-SIM card slot may damage the card or the tablet,
and may corrupt data stored on the card.
For more information on removing the Micro-SIM card, see Remove
the Micro-SIM card.
20 | Using Your XPS 10 Tablet
Using Your XPS 10 Tablet
Screen Orientation
For optimal viewing experience, the screen orientation changes
automatically to portrait or landscape format depending on how you
hold the tablet.
NOTE: Some applications may not support automatic screen rotation to
portrait or landscape format.
How to lock the screen orientation
Swipe from the right edge of the display to access Charms.1
Touch 2 Settings → Screen .
Touch 3 toggle to lock the screen orientation, or touch
toggle to unlock the screen orientation.
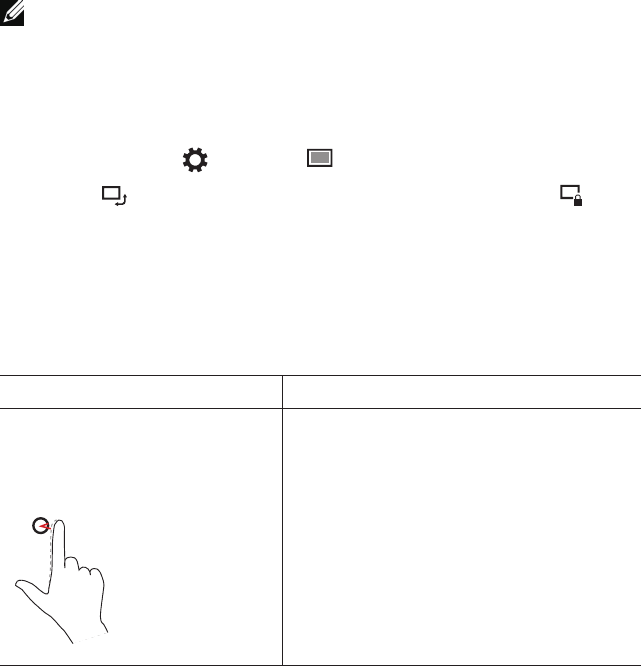
Gestures
Your tablet has a multi-touch display. You can touch the screen to
operate the tablet.
Finger gestures Allows you to:
Touch
Tap gently on the display with
your fingertip.
Select items on the screen, including •
options, entries, images, and icons.
Start applications.•
Touch buttons on the screen.•
Input text using the on-screen •
keyboard.
Using Your XPS 10 Tablet | 21
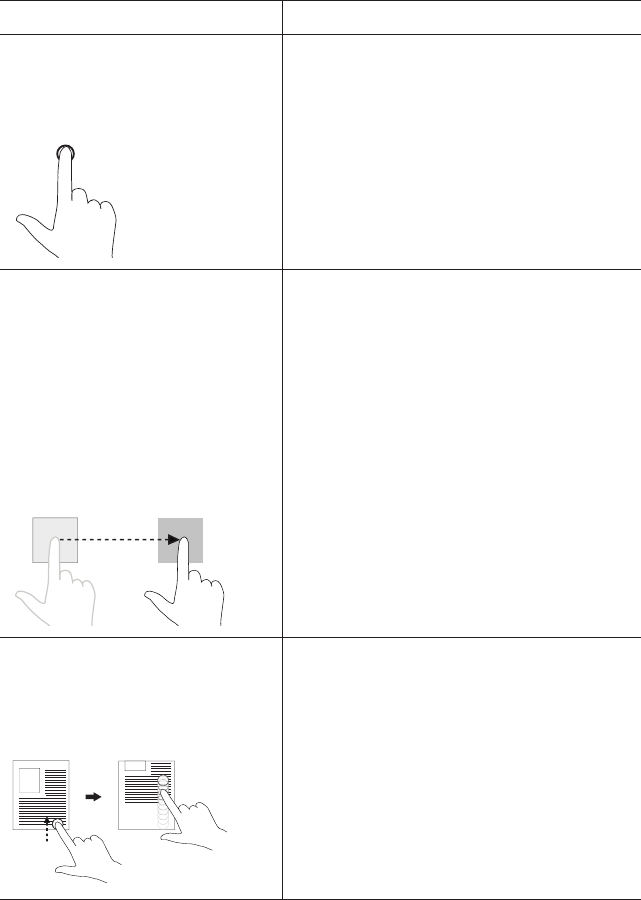
Finger gestures Allows you to:
Touch and Hold
Touch and hold your finger on
the display.
Display detailed information about an •
item.
Open the context menu of an item to •
perform further actions.
Drag
Touch and hold your finger on 1
an item on the screen.
Keeping your finger in contact 2
with the display, move your
fingertip to the desired location.
Take your finger off the 3
display to drop the item in the
desired location.
Move items such as images and icons •
on the screen.
Swipe or Slide
Move your finger in a vertical
or horizontal direction on the
display.
Scroll through the Start screen, web •
pages, lists, entries, photos, contacts,
and so on.
Close an app. (Swipe the app to the •
bottom of the display.)
22 | Using Your XPS 10 Tablet
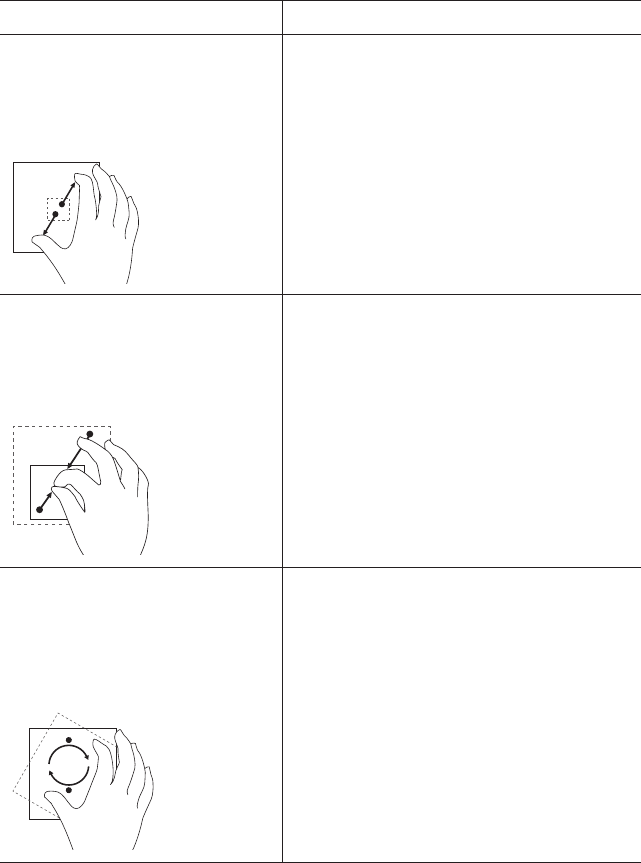
Finger gestures Allows you to:
Zoom in
Touch the display with two
fingers and then move the
fingers apart.
Enlarge the view of an image or web page.•
Zoom out
Touch the display with two
fingers and then move the
fingers closer.
Reduce the view of an image or web page.•
Rotate
Touch the display with two or
more fingers and then move
the fingers in a clockwise or
counter-clockwise arc.
Rotate an object by 90 degrees.•
Using Your XPS 10 Tablet | 23
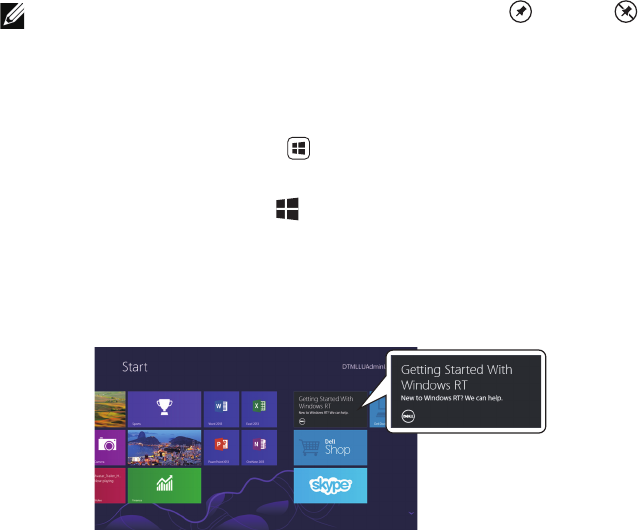
The Windows RT Start Screen
The Windows RT Start screen displays a list of default and custom Live
Tiles, which act as a shortcut to Control Panel, Windows Explorer,
Weather app, RSS, Windows Store, Internet Explorer, and other
installed applications.
Live Tiles on your Start screen change and update in real time so you
can get real-time updates about news or sports, check what your
friends are up to, and get the latest weather forecast.
The tile-based user interface gives you direct access to your most
recently used applications, Emails, photos, music, videos, contacts,
Facebook & Twitter updates, and frequently viewed websites. You can
pin desired or favorite apps as Live Tiles to customize the Start screen.
You also can personalize the Start screen by setting your favorite
picture as the wallpaper.
NOTE: Live Tiles can be added or removed by using Pin or Unpin
options.
How to access the Start screen
Follow either method to access the Start screen:
Press the • Windows button .
Swipe from the right edge of the display to access Charms, and •
then touch the Start icon .
Get to know Windows RT
You can touch the Dell getting started tile on the Start screen to
explore Windows RT.
24 | Using Your XPS 10 Tablet
Swipe left
Swiping-in from the right edge of the display reveals Charms. Charms
provide access to the system commands, such as Start, Search, Share,
Devices, and Settings options.
If your tablet is running on an application or performing actions,
pressing the Start icon takes you back to the Start screen. If you
are at the Start screen, pressing the Start icon takes you to the
most recently used application or most recently viewed screen.
NOTE: The functionality of the Start icon is same as
Windows button .
Swipe right
Swiping-in quickly from the left edge of the display switches the •
currently running apps.
Swiping slowly from the left edge to the right edge of the display •
reveals thumbnails of the open apps.
Swiping-in and out on the left edge of the display brings up a list •
of the most recently used applications.
Swipe up/down
Swiping-in from the bottom or top edge of the display reveals the •
All apps icon . Touch All apps to show an alphabetical list of all
applications installed on your tablet.
Swiping-in from the top to the bottom of an app docks or closes •
the application.
For more information on using Windows RT Start screen, see
http://windows.microsoft.com/en-us/windows/rt-welcome.
Using Your XPS 10 Tablet | 25
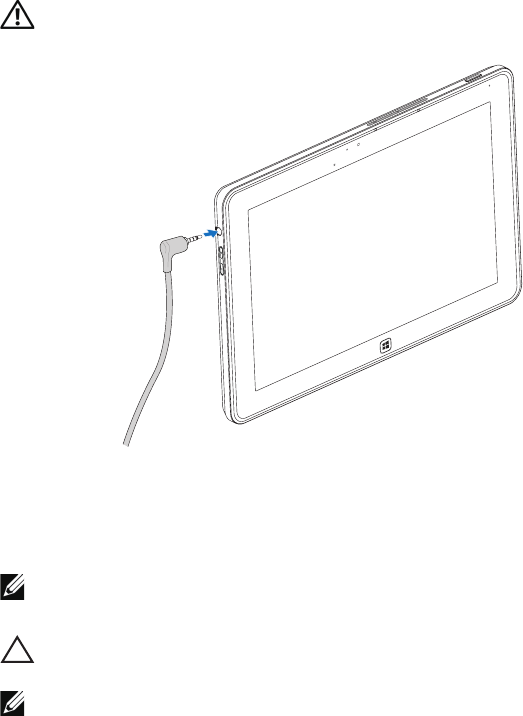
Using Headphones
You can use 3.5 mm headphones to listen to music and sounds,
record audio, or make calls.
WARNING: Listening with the loud music for extended period of time
can lead to hearing loss.
Connect headphones to the audio port (3.5 mm) on the tablet. 1
Insert the earphones in your ears and adjust the volume level to a 2
comfortable level.
NOTE: When you connect an audio device to the 3.5 mm audio jack,
the integrated speakers on your tablet are muted automatically.
CAUTION: To prevent damage to the headphones when disconnecting
it from the tablet, pull the connector and not the cable.
NOTE: It is recommended that turn down the volume level before
plugging the headphone, and then adjust to a comfortable level. Sudden
exposure to loud sounds can cause hearing damage.
26 | Using Your XPS 10 Tablet
Managing Your Tablet Settings
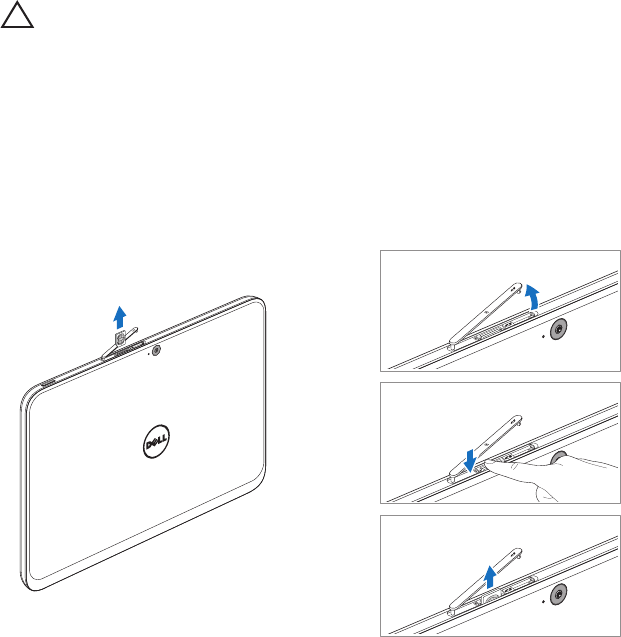
Remove the Micro-SD card
CAUTION: Removing the Micro-SD card when transferring data may
cause data loss or result in application errors. Make sure your tablet has
finished all save operations to the Micro-SD card.
Enter the Desktop mode. Touch 1 Safely Remove Hardware in
the notification area at the bottom-right corner of the screen.
NOTE: If you don’t see Safely Remove Hardware , touch
Show Hidden Icons to display all icons in the notification area.
Touch 2 Eject SD Memory Card. A message appears confirming that
the Micro-SD card can be safely removed. If a warning message
appears stating the Micro-SD card cannot be removed, ensure all
data transfers involving the Micro-SD card are complete.
Open the slot cover.3
Press on the inserted Micro-SD card to release the card.4
Slide the card out after it pops out from the Micro-SD card slot.5
2
3
4
Using Your XPS 10 Tablet | 27
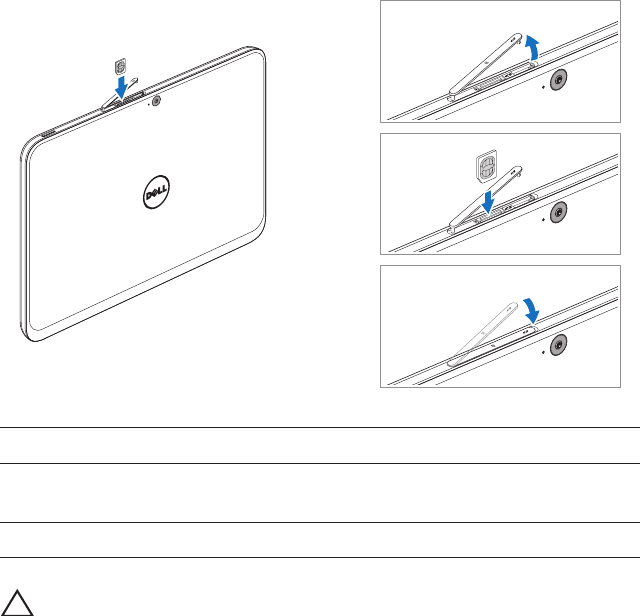
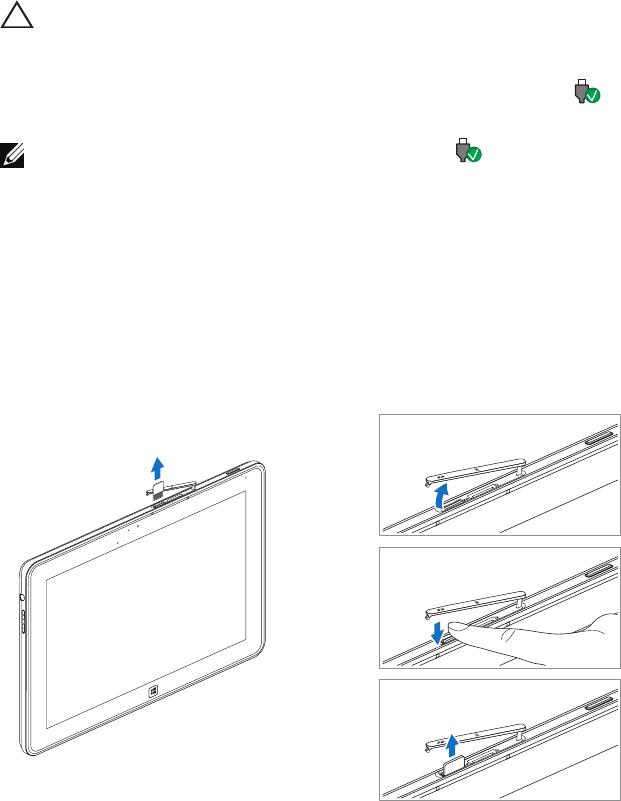
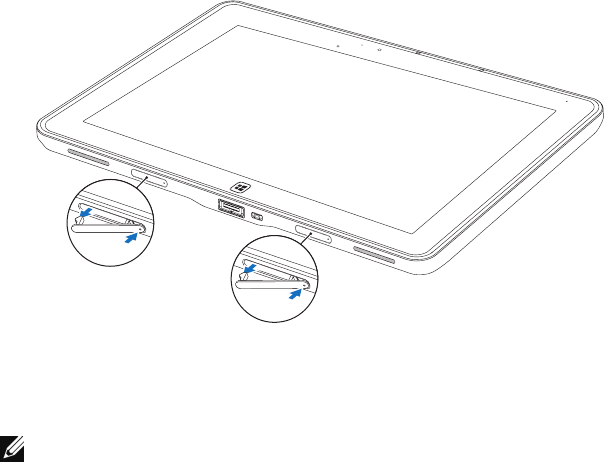
Remove the Micro-SIM card
CAUTION: Removing the Micro-SIM card when the tablet is on may
cause data loss or damage the card. Make sure your tablet is turned off
or the network connections are disabled.
Turn off your tablet. For more information on turning off your 1
tablet, see Turning Off Your Tablet.
Open the slot cover.2
Press on the inserted Micro-SIM card to release the card.3
Slide the card out after it pops out from the Micro-SIM card slot.4
2
3
4

28 | Using Your XPS 10 Tablet
Wi-Fi setting
Turning On/Off Wi-Fi:•
Swipe from the right edge of the display to access Charms. 1
Touch 2 Settings → Change PC settings → Wireless.
Swipe 3 Wi-Fi icon left or right to turn Wi-Fi on or off.
Connecting to a network:•
Swipe from the right edge of the display to access Charms. 1
Touch 2 Settings → Available → Select an available
network → Connect.
Mobile broadband setting
• Turning On/Off mobile broadband:
Swipe from the right edge of the display to access Charms. 1
Touch 2 Settings → Change PC settings → Wireless.
Swipe 3 Mobile broadband icon left or right to turn mobile
broadband on or off.
Using Your XPS 10 Tablet | 29
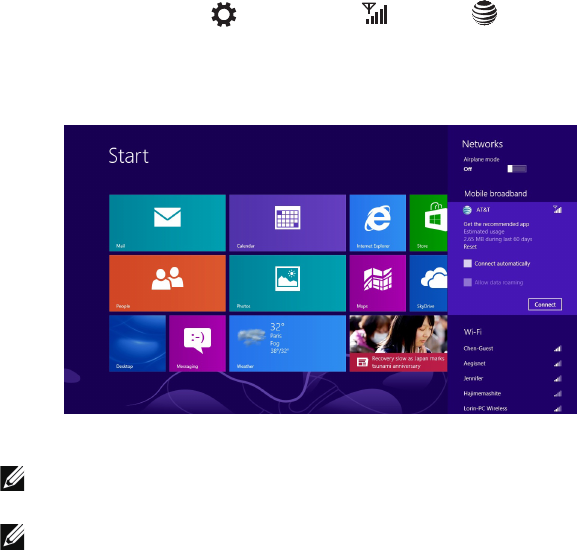
• Connecting to a mobile broadband network:
Ensure an active SIM card is inserted into the tablet. For more 1
information on inserting a Micro-SIM card, see Inserting a
Micro-SIM card.
Swipe from the right edge of the display to access Charms. 2
Touch 3 Settings → Networks → AT&T → Connect.
The estimated data usage will be shown once the mobile 4
broadband network is enabled.
NOTE: You can choose the option Connect automatically to connect
the mobile broadband automatically.
NOTE: Your tablet will automatically prioritize Wi-Fi networks over
mobile broadband networks, when both are available. If your tablet
is connected to the mobile broadband and one of saved Wi-Fi
connections comes within range, it will disconnect from the mobile
network and connect to the Wi-Fi automatically. For more information
on turning on Wi-Fi network, see Wi-Fi setting.

30 | Using Your XPS 10 Tablet
Disconnecting from a mobile broadband network:•
Swipe from the right edge of the display to access Charms. 1
Touch 2 Settings → Networks → AT&T → Disconnect.
NOTE: Once your tablet has disconnected from mobile broadband, the
option Connect automatically will be disabled as well.
• Mobile broadband options:
Swipe from the right edge of the display to access Charms. 1
Touch 2 Settings → Networks .
Touch and hold 3 AT&T or right click if docked.
Touch o Show estimated data usage/Hide estimated data
usage to show or hide your data usage.
Touch o Set as metered connection/Non metered
connection to set a particular connection as a metered/
non-metered connection.
Touch o View connection properties to view your connected
mobile broadband properties.
NOTE: If the option Set as metered connection is enabled, Windows
Update will not download updates automatically unless it is a high
priority critical security update.
• AT&T hardware information:
Swipe from the right edge of the display to access Charms. 1
Touch 2 Settings → Change PC settings → Wireless.
Touch 3 AT&T to view the AT&T hardware information including
the subscriber information and International Mobile Equipment
Identity (IMEI) number.

Using Your XPS 10 Tablet | 31
• Enabling PIN lock:
Swipe from the right edge of the display to access Charms. 1
Touch 2 Settings → Networks .
Touch and hold 3 AT&T or right click if docked.
Touch 4 View connection properties → Security → Enable PIN.
Enter your SIM PIN code.5
CAUTION: If you enter the incorrect PIN code, your mobile
broadband connection will be blocked. If you unsuccessfully enter the
code three times, your SIM card will be locked. To unlock the SIM card,
contact your carrier to get a Personal Unblocking Key (PUK) to unlock
the SIM card.
NOTE: Before you contact your carrier, have your IMEI number ready.
For more information on checking your IMEI number of the SIM card,
see AT&T hardware information.
Refresh your tablet
Refreshing your tablet will restore the system to original factory
settings without deleting any of your personal files, installed apps
from Windows Store or personalization settings.
Swipe from the right edge of the display to access Charms. 1
Touch 2 Settings → Change PC settings → General → Refresh
your PC without affecting your files.
Touch 3 Get started.
Touch 4 Next after you read the warning.
NOTE: Third-party apps will be removed.
32 | Using Your XPS 10 Tablet
Reset your tablet
Resetting your tablet will return the system to original factory settings.
Swipe from the right edge of the display to access Charms. 1
Touch 2 Settings → Change PC settings → General → Reset
your PC and start over.
Touch 3 Get started.
Touch 4 Next after you read the warning.
CAUTION: Resetting your tablet erases all data from your tablet,
including your account configuration, music, pictures, files, and so on.
Ensure that you back up all the required data before you proceed.
Recover your tablet
If your tablet will not boot into Windows RT, you may need to perform
recovery procedures.
Turn off your tablet. For more information on turning off your 1
tablet, see Turning Off Your Tablet.
Press and hold the 2 Volume-up button and then press the
Power and Sleep/Wake button to turn on the tablet.
Release the 3 Volume-up button when “Attempting to boot from
Windows Recovery...” is displayed on the upper left corner of
the display.
Follow the on-screen instructions to refresh or reset your tablet.4

Synchronizing Your Tablet | 33
Synchronizing Your Tablet
Use Microsoft account
If your computer has Microsoft Windows 8 installed, you can
synchronize user settings of your tablet with your computer using
a Microsoft account. When you sign in with your Microsoft account
on your tablet, you can automatically synchronize your settings,
including internet browser history, application settings, and personal
files etc., with other Windows 8 PCs and Windows RT tablets.
NOTE: You need a wireless connection for both your computer and tablet.
Go to Charms, then click 1 Settings → PC Settings → Users →
Switch to a Microsoft account to switch your computer local
account to your Microsoft account.
A new option will be added to 2 PC Settings called Sync your settings.
Click 3 Settings → PC Settings → More PC Settings → Sync
your settings to show all kind of toggles for synchronizing your
data and settings.
Copy music, photos, and videos
Connect your tablet to a computer using the supplied Micro-USB 1
to standard USB conversion cable.
After the copy is complete, use the 2 Safely Remove Hardware
wizard to remove your tablet from the computer.
34 | Using XPS 10 Mobile Keyboard Dock
Using XPS 10 Mobile Keyboard Dock
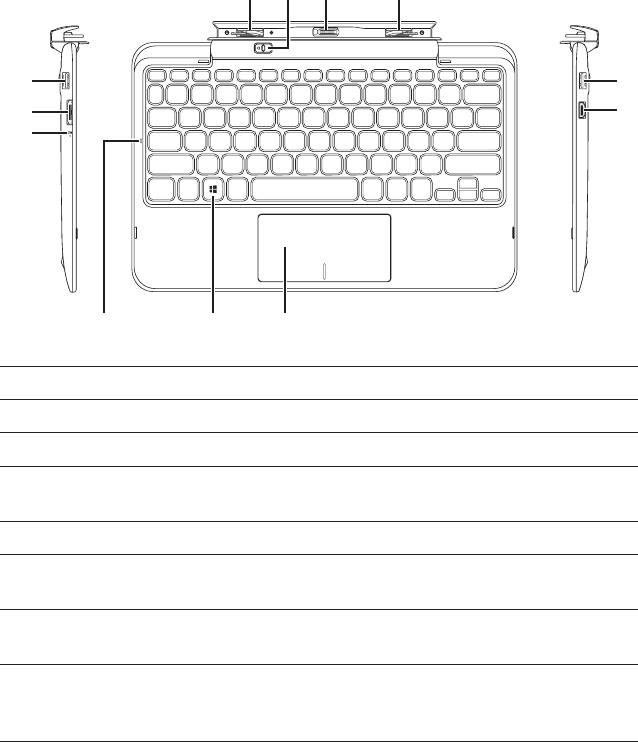
Mobile Keyboard Dock Features
This section provides information about the features available on the
keyboard dock.
1324
5
6
789
10
11
12
Feature Functionality
Docking latch1 Connect a Dell tablet.
Tablet release latch2 Release the tablet from the keyboard dock.
Docking connector3 Connect the power-adapter/docking port
on the tablet.
Docking latch4 Connect a Dell tablet.
USB 2.0 port5 Connect USB devices, such as
flash memory.
Mini-HDMI port6 Connect devices supporting audio/video
signals in HDMI format.
Touchpad and 7
touchpad buttons
Allows you to move the mouse pointer
on the screen and provides the function
of a mouse.

Using XPS 10 Mobile Keyboard Dock | 35
Feature Functionality
Windows key8 Press to open the Windows Start screen.•
Press for quick access to the most •
recently used application or most
recently viewed screen.
Caps-lock light9 Indicates that caps lock is active.
Battery-charge light 10 Indicates the battery charge status.
Power-adapter port11 Connect the supplied power adapter to
provide power to the tablet and dock, and
charge the battery.
USB 2.0 port12 Connect USB devices, such as flash memory.
NOTE: The keyboard dock is sold separately and is not shipped with
the tablet.
Regulatory model: K05M
36 | Using XPS 10 Mobile Keyboard Dock
Docking Your Tablet to the Keyboard Dock
Remove the two docking-port covers from the tablet.1
Align the power-adapter/docking port on the tablet with the 40-pin 2
docking connector on the keyboard dock. Or, center the Windows
button to the painted line on the front of the hinge holder.
NOTE: The hinge holder can be rotated manually to a better position
for easy docking.
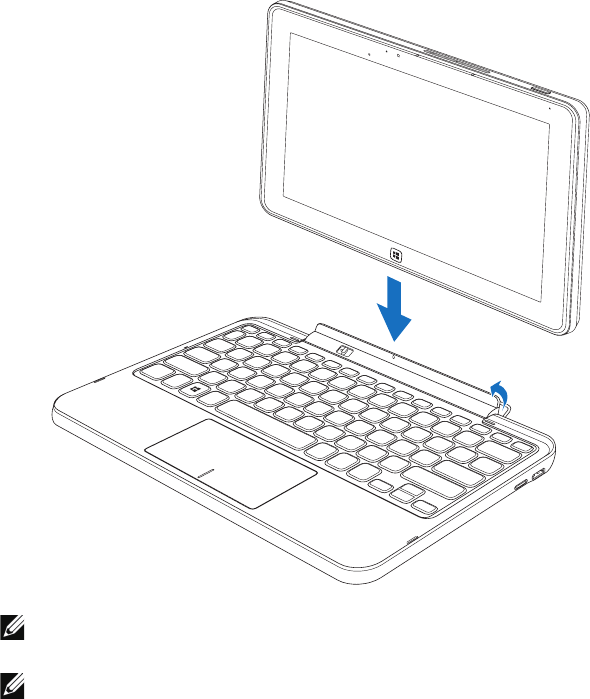
Using XPS 10 Mobile Keyboard Dock | 37
Slide the tablet downward until the tablet clicks into place. When 3
the tablet is correctly connected, the tablet-release latch on the
dock will move to the Locked position.
NOTE: When the connection is made, you need to manually turn the
on-screen keyboard off if it is displayed on the screen.
NOTE: You can reinstall the docking-port covers when the tablet is
not docked.
38 | Using XPS 10 Mobile Keyboard Dock
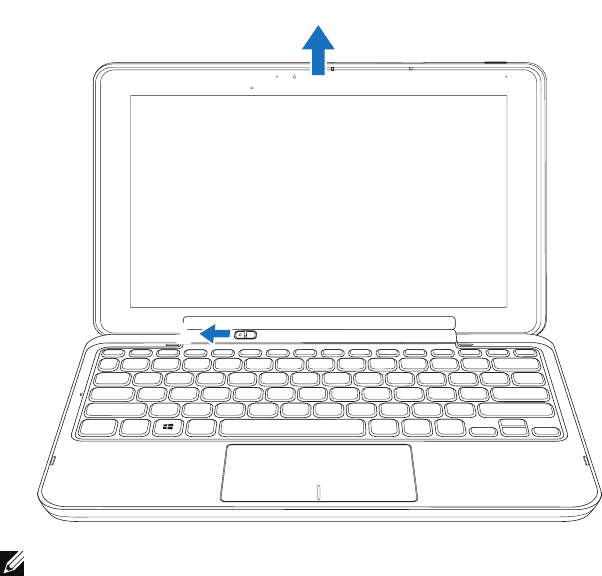
Undocking Your Tablet from the
Keyboard Dock
Slide and hold the tablet-release latch to the 1 Unlock position.
Lift the tablet from the keyboard dock.2
2
11
2
NOTE: The release latch will automatically move to the Locked position
once the tablet is removed from the keyboard dock.
Using XPS 10 Mobile Keyboard Dock | 39
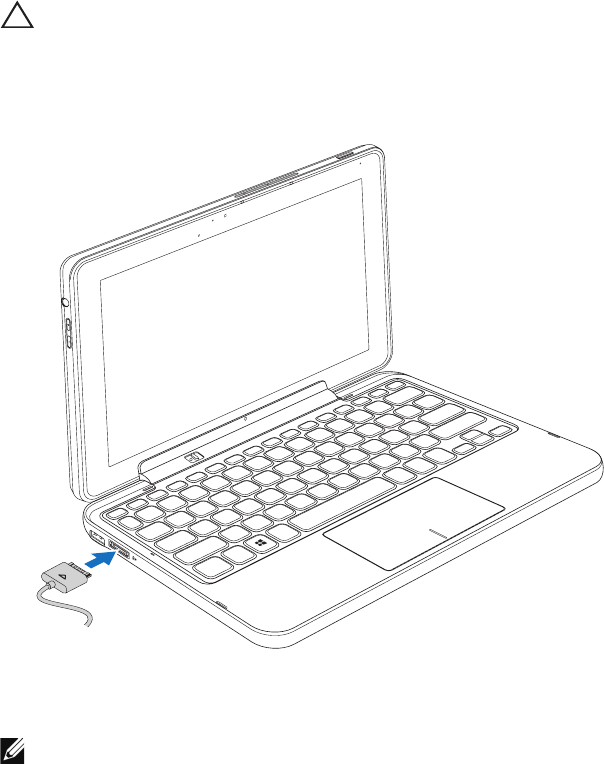
Charging the tablet and dock
CAUTION: Use only the supplied power adapter and power cable to
charge your tablet and dock. Using unauthorized power adapters or
power cables may cause severe damage to your tablet and dock.
Connect the power adapter to the 40-pin power-adapter port on 1
your keyboard dock.
Connect the power adapter to an electrical outlet and charge the 2
tablet and dock until the battery is fully charged.
NOTE: The dock battery requires about 4 hours to fully charge.
For more information on the tablet battery charging time, see
Charging the tablet.

40 | Using XPS 10 Mobile Keyboard Dock
You can check the keyboard dock battery status from:
Battery-charge light located on the left side of the keyboard dock:•
LED behavior Description
Solid white color on Battery is charging with AC.
Off Battery is not charging, either no AC is
connected or battery is fully charged.
For more information on checking the tablet battery status, see tablet
battery charge status.

Using XPS 10 Mobile Keyboard Dock | 41
Battery behavior
When using your tablet, you may encounter the following 4 scenarios
concerning the battery behavior.
Conditions Tablet battery behavior Dock battery behavior
Power adapter is 1
connected to the dock.
Charges both the tablet
and dock battery.
Charges both the tablet
and dock battery.
Power adapter is not 2
connected. Both the
tablet and dock have
battery capacity.
Tablet uses its own
battery to support the
tablet functions.
Dock uses its own
battery to support the
dock functions (e.g.
speakers, USB, and
HDMI...etc).
Power adapter is 3
not connected. The
tablet has LESS than
5% battery capacity
but the dock has
battery capacity.
Tablet functions are
supported by the dock
battery. Tablet will use
the last 5% of its own
battery after the dock
battery runs out.
Dock uses its own
battery to support the
dock functions (e.g.
speakers, USB, and
HDMI...etc).
Power adapter is not 4
connected. The tablet
has battery capacity
but the dock has NO
battery capacity.
Tablet uses its own
battery to support the
tablet functions, but
does not support any
dock functions.
Dock functions are
disabled (e.g. keypad,
touchpad, speakers, USB,
and HDMI...etc). User does
not receive indication of
the dock status.
NOTE: When the tablet has battery capacity and the dock has no
battery capacity, the tablet functions normally, but the dock cannot
perform any functions. You can undock the tablet from the keyboard
dock and continue to use the tablet until the battery is depleted.

42 | Cleaning Your Tablet
Cleaning Your Tablet
CAUTION: Before you clean your tablet, disconnect all the cables.
Clean your tablet with a soft cloth dampened with water. Do not use
liquid or aerosol cleaners, which may contain flammable substances.
Turn off your tablet. For more information on turning off your 1
tablet, see Turning Off Your Tablet.
Disconnect any attached devices, headphones, speakers and 2
keyboard dock from the tablet and from their electrical outlets.
Remove any installed Micro-SD and Micro-SIM card. For more 3
information on removing the Micro-SD card and Micro-SIM card,
see Remove the Micro-SD card and Remove the Micro-SIM card.
Moisten a soft, lint-free cloth with either water or a display 4
cleaner, and wipe the surface of the tablet until it is clean. Do not
allow water from the cloth to seep down to the tablet ports and
the surrounding Windows button.
NOTE: To avoid damaging the tablet or display, do not spray cleaning
solution directly onto the display. Only use products specifically
designed for cleaning displays, and follow the instructions that are
included with the product.
NOTE: Do not clean the keyboard with a moist cloth.

Troubleshooting | 43
Troubleshooting
Battery problem
Problems Possible causes Possible solutions
Battery does not charge Unplug the supplied 1
Dell AC power
adapter from the wall
and verify that the
outlet is functioning.
Check all cable 2
connections and plug
back into the wall, then
back into the tablet.
Check all connectors 3
to ensure proper
connectivity.
The tablet's temperature
is below 0 °C or higher
than 35 °C.
Charge the battery in an
ambient temperature
between 0 °C to 35 °C.
The battery or power
adapter is damaged.
Contact a Dell authorized
reseller to replace the
battery or power adapter.
Battery drains quickly
even when the tablet is
in Standby mode
If the tablet is not in
the range of a network
it can connect to, the
tablet continues to send
out signals to locate a
base station and drains
the battery.
Temporarily turn off •
the tablet.
Move the tablet in •
range of a network
it can connect to, or
temporarily turn off the
wireless connection on
your tablet.

44 | Troubleshooting
System problem
Problems Possible causes Possible solutions
Tablet does not turn on The battery is
completely discharged.
Charge the tablet for 1
at least 4 hours.
Press and hold the 2
Power and
Sleep/Wake button for
4 seconds.
Tablet does not turn off Press and hold the Power
and Sleep/Wake button
for 11 seconds to perform
a hard shut down.
Tablet locks up Press and hold the Power
and Sleep/Wake button
for 11 seconds to perform
a hard shut down.
Tablet is not responding
or behaving unexpectedly
Reboot the tablet. 1
See Turning Off Your
Tablet and Turning On
Your Tablet.
Refresh the tablet. See 2
Reset your tablet.
Contact Dell’s 3
support service. Go to
support.dell.com or
dell.com/ContactDell.
Tablet cannot boot
into Windows
Boot from Windows
recovery. See Recover
your tablet.
Software or feature is not
working as expected
Restart your tablet.
Software updates may
have been downloaded
in the background. Swipe
from the right edge of the
display to access Charms
and touch Settings →
Power → Restart to
restart the tablet.

Troubleshooting | 45
Touchscreen problem
Problems Possible causes Possible solutions
Touchscreen responds
slowly or improperly
Protective cover
prevents the tablet from
recognizing your inputs.
Gently wipe the •
display with a clean
dry cloth.
Remove any •
protective covers
from the touchscreen.
Network Problem
Problems Possible causes Possible solutions
No wireless connection Check if the wireless 1
radio is on. See
Wi-Fi setting.
Try to get closer to the 2
wireless access point.
Reset the wireless 3
router if using a private
network; open the
browser to view the
landing page if using a
public network.
No mobile broadband
connection
Check if the mobile 1
broadband is on.
See Turning On/Off
mobile broadband.
Move your tablet to 2
a different location
for better signal
reception.
The mobile broadband
has been capped.
Stop using mobile
broadband until the next
billing cycle or contact
AT&T to change your
broadband plan.

46 | Troubleshooting
Limited mobile
broadband connection
AT&T network is
temporarily unavailable.
Move your tablet to a •
different location.
Reboot the tablet. •
See Turning Off Your
Tablet and Turning On
Your Tablet.
Excessive amount of
downloaded/uploaded
data.
Check if the mobile 1
data usage has
exceeded the limits.
See Mobile broadband
options.
Switch to Wi-Fi.2
Slow Internet
connections
The signal strength is
not strong enough.
Move your tablet to a
different location for
better signal reception.
Slow mobile broadband
connections
The tablet may not
connect to LTE or
HSPA+ (4G) but
connects to HSDPA (3G).
Move your tablet back
to a location where you
previously connected to a
4G network.
Mobile broadband does
not auto-connect
Mobile broadband option
Connect automatically
is not activated.
Check if the mobile
broadband is on and the
Connect automatically
option is ticked. See
Connecting to a mobile
broadband network.

Contacting Dell | 47
Contacting Dell
For customers in the United States, call 800-WWW-DELL (800-999-3355).
NOTE: If you do not have an active Internet connection, you can find
contact information on your purchase invoice, packing slip, bill, or Dell
product catalog.
Dell provides several online and telephone-based support and service
options. Availability varies by country and product, and some services
may not be available in your area.
To contact Dell for sales, technical support, or customer service issues:
Go to 1 dell.com/ContactDell.
Select your country or region.2
Select the appropriate service or support link based on your 3
requirement.
Choose the method of contacting Dell that is convenient for you.4
48 | Locating Your Service Tag and Express Service Code
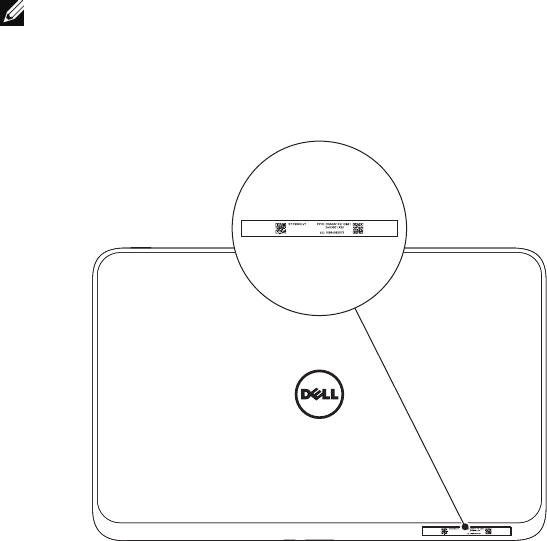
Locating Your Service Tag and
Express Service Code
If you are still unable to resolve the problems or require any additional
help on your tablet, you may contact DELL for additional technical
assistance.
NOTE: Before you call, have your Express Service Code ready. The code
helps Dell’s automated-support telephone system direct your call more
efficiently. You may also be asked for your Service Tag.
The Service Tag and Express Service Code for your tablet can be
found on a label at the bottom right of the tablet back cover.

Specifications | 49
Specifications
Physical dimensions
Height 9.2 mm (0.36 inches)
Width 274.7 mm (10.81 inches)
Depth 177.3 mm (6.98 inches)
Weight 623~633g (1.37~1.39 lb)
Environmental requirements
Temperature range:
Operating 0° to 35 °C (32° to 95 °F)
Non-operating -40° to 65 °C (-40° to 149 °F)
Relative humidity (maximum):
Operating 10% to 90% (noncondensing)
Non-operating 5% to 95% (noncondensing)
Maximum vibration (using a random vibration spectrum that simulates user
environment):
Operating 20 GRMS
0.66 GRMS (tablet + dock)
Non-operating 1.30 GRMS
Maximum shock
Operating 60 G
140 G (tablet + dock)
Non-operating 120 G
163 G (tablet + dock)
Altitude (maximum, unpressurized):
Operating -15.2 to 3048 m (-50 to 10,000 ft)
Storage -15.2 to 10,668 m (-50 to 35,000 ft)
Airborne containment level G2 or lower as defined by ISA-S7 1.04-1985

50 | Specifications
Touchscreen display
Type 10.1” WXGA with multi-point capacitive touch
Maximum resolution 1366 x 768 HD
Aspect ratio 16:9
Brightness 360 nits
Viewing angle Symmetrical 85 degrees
Contrast ratio 800:1
Color depth 24 bit/pixel
Ports and Connectors
Audio One microphone/stereo headphone/
speakers port
Micro-SD card One micro-SD card slot
Micro-SIM card One micro-SIM card slot
Dock One 40-pin power-adapter/docking port
USB One micro-USB port
AC Adapter
Input voltage 100-240 VAC
Input current (maximum) 1.0 A
Input frequency 50-60 Hz
Output power 30 W
Output current 1.54A / 1.58A
Rated output voltage +19.5 VDC / 19 VDC
Temperature range:
Operating 0° to 40 °C (32° to 104 °F)
Storage -40° to 70 °C (-40° to 158 °F)
Glossary | 51
Glossary
This section provides information about the terms used in this
document that is for informational purposes only and may or may not
describe features included with your tablet.
A
A - ampere - A measure of the amount of electric charge passing a
point in an electric circuit.
AC - alternating current - The form of electricity that powers your
tablet when you plug the AC adapter power cable in to an electrical
outlet.
Ambient light sensor - A feature that helps to control the display
brightness.
C
Charms - a Microsoft Windows 8/Windows RT term for the icons that
appear when you swipe from the right edge of the display. It provides
quick access to the commonly system commands, including search,
share, Start, devices and settings options.
D
Device - Hardware such as a disk drive, printer, or keyboard that is
installed in or connected to your tablet.
E
Email - Electronic mail - a method of exchanging digital messages
from an author to one or more recipients via the Internet. Email
servers accept, forward, deliver and store messages, and neither the
users nor their computers are required to be online simultaneously.
52 | Glossary
G
GRMS - A unit of acceleration caused by the force of gravity. The
grms value is typically used to express the overall energy of a
particular random vibration event and is a statistical value used in
mechanical engineering for structural design and analysis purposes.
H
HDMI - High-Definition Multimedia Interface - A compact audio/
video interface for transferring uncompressed digital audio/video data
from an HDMI-compliant device. Mini-HDMI is smaller than standard
HDMI plug connector. The Mini-HDMI port can be connected to a
standard HDMI port using Mini-HDMI to HDMI cable.
Hz - Hertz - A unit of frequency measurement that equals 1 cycle
per second. Computers and electronic devices are often measured in
kilohertz (KHz), megahertz (MHz), gigahertz (GHz), or terahertz (THz).
K
Keyboard dock - provides the docking feature to adapt your tablet to
a laptop workspace.
M
Micro-SD - micro-Secure Digital - a smaller size of SD which is
a removable flash memory card used for storing information in
portable devices, such as mobile phones, digital cameras, and tablet
computers. The standard size of SD is 32 x 24 x 2.1 mm and Micro-SD
is 15 x 11 x 1 mm.
Micro-SIM - micro-Subscriber Identity Module - a micro sized SIM
card used for identifying and authenticating subscribers on mobile
devices such as mobile phones and tablet computers. The standard
size of SIM is 25 x 15 x 0.76 mm and Micro-SIM is 15 x 12 x 0.76 mm.
Micro-USB - universal serial bus - A hardware interface for a low-speed
device such as a USB-compatible scanner, set of speakers, printer,
broadband devices, imaging devices, or storage devices. Devices are
plugged directly in to a 5-pin socket on your tablet, both to communicate
and to supply electric power. The Micro-USB port can be connected to a
standard USB port using Micro-USB to USB cable.
Glossary | 53
R
Resolution - The sharpness and clarity of an image produced by
a printer or displayed on a monitor. The higher the resolution, the
sharper the image.
S
Service Tag - A bar code label on your tablet that identifies your tablet
when you call Dell for customer service or technical support.
Skype - A proprietary voice-over-Internet Protocol (VoIP) service and
software application allows user to communicate with peers by voice,
voice, and instant messaging over the Internet. Calls to other users
within the Skype service are free of charge, while calls to landline
telephones and mobile phones are charged via a debit-based user
account system.
Shortcut - An icon that provides quick access to frequently used
programs, files, folders, and drives. When you place a shortcut on your
Windows Start screen, the home screen of Windows RT is made up of
‘Live Tiles’, and touch the tile, you can open its corresponding folder
or file without having to find it first. Shortcut tiles do not change the
location of files.
Sleep mode - A power management mode that shuts down all
unnecessary computer operations to save energy.
V
V - volt - The measurement of electric potential or electromotive
force. One V appears across a resistance of one ohm when a current
of one ampere flows through that resistance.
VAC - voltage in alternating current - A mathematics of AC voltages,
as alternating currents are caused by alternating voltages.
VDC - voltage in direct current - A measurement in a DC system. The
current flows directly, in one direction in the circuit, and flows at a
specific, constant voltage.
54 | Glossary
W
W - watt - The measurement of electrical power. One W is 1 ampere
of current flowing at 1 volt.
Wallpaper - The background pattern or picture on the Windows
desktop.
Wi-Fi - A technology as a synonym for WLAN (wireless local area
network) connects to the Internet when within range of a wireless
network.
WXGA - wide-aspect extended graphics array - A video standard for
video cards and controllers that supports resolutions up to 1280 x 800.
Index | 55
Index
A
Accessory
Micro-USB to USB cable, 12
Mini-HDMI to HDMI cable, 12
Power adapter, 12
Power cable, 12
B
Battery
Keyboard dock charge, 39
Tablet battery status, 15
Tablet charge, 14
Button
Power and Sleep/Wake, 8
Volume up/down, 9
Windows, 8
C
Charging
Keyboard dock, 39
Tablet, 14
Charms, 24
Connection
Mobile broadband, 29
Wi-Fi, 28
G
Gestures
Drag, 21
Rotate, 22
Swipe or Slide, 21
Touch, 20
Touch and Hold, 21
Zoom in, 22
Zoom out, 22
K
Keyboard Dock
Charge, 39
Docking tablet, 36
Overview, 34
Undocking tablet, 38
L
Lock screen, 16
Login screen, 16
M
Micro-SD card
Insert, 18
Remove, 26
Micro-SIM card
Insert, 19
Remove, 27
Mobile broadband
Options, 30
Setting, 28
56 | Index
P
PIN
Enable pin lock, 31
S
Screen
Lock screen, 16
Login screen, 16
Swipe left, 24
Swipe right, 24
Swipe up/down, 24
Turn off/on, 17
Service tag
Locating, 48
Start icon
Function, 24
Synchronize with computer, 33
T
Tablet
Charge, 14
Overview, 7
Refresh, 31
Reset, 32
Setting, 13
Turn off, 17
Turn on, 16
Touchscreen Display
Orientation, 20
Turn off/on, 17
Troubleshooting
Battery, 43
Network, 45
System, 44
Touchscreen, 45
W
Wi-Fi setting, 28
Windows button
Function, 8
Location, 7
Windows Start screen, 23
