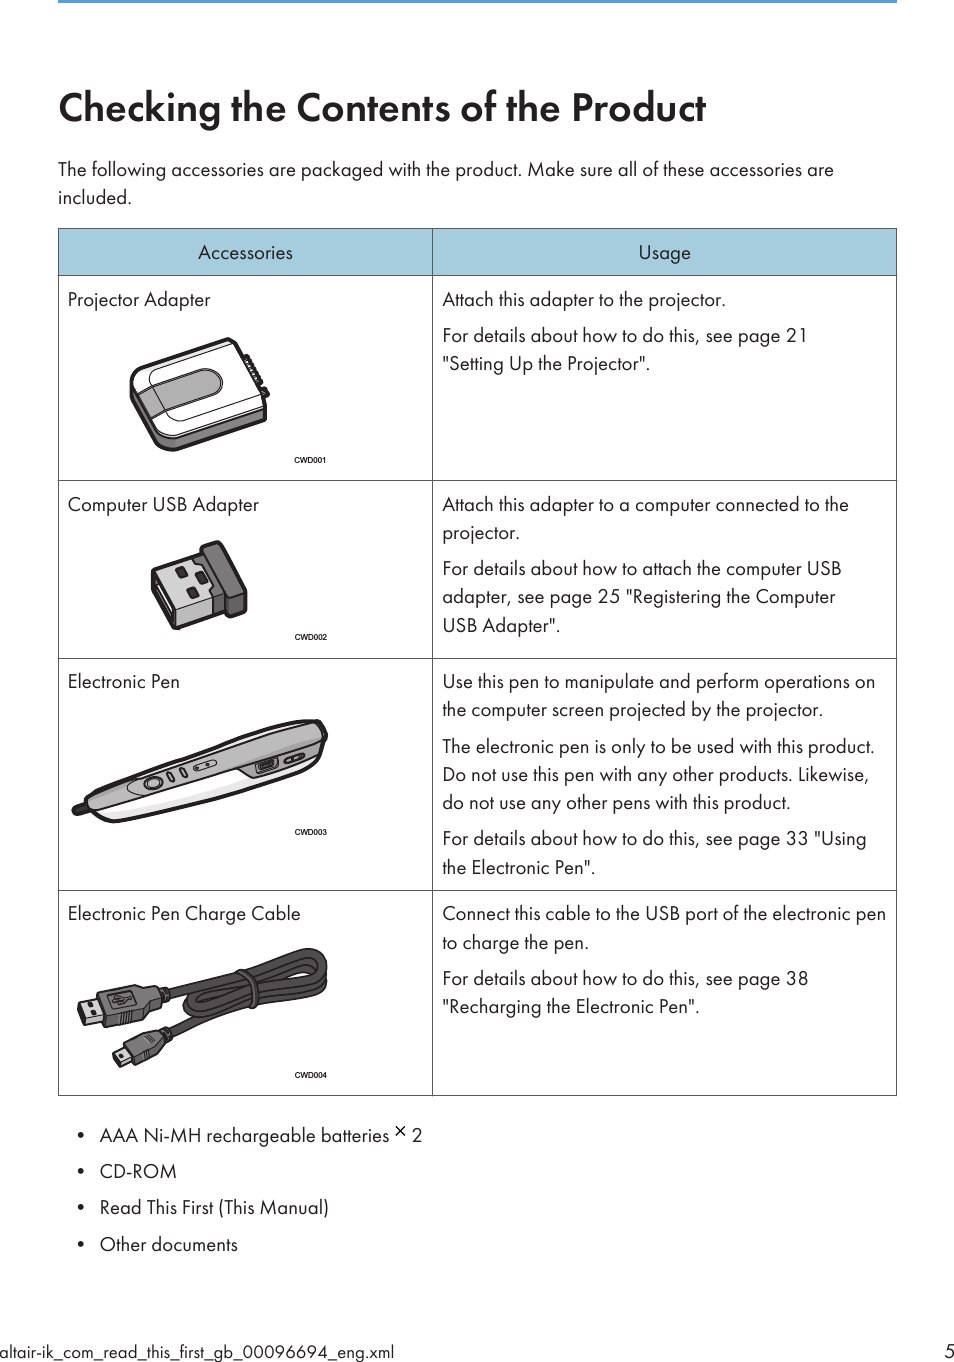
Delta Electronics orporated RBP001 Interactive Pen User Manual
Delta Electronics Incorporated Interactive Pen
UserManual.wiki
>
Delta Electronics orporated
>
RBP001 User Manual
user manual
Navigation menu
Upload a User Manual
Namespaces
Wiki Guide
HTML
PDF
Info
Views
User Manual
Discussion / Help
Navigation

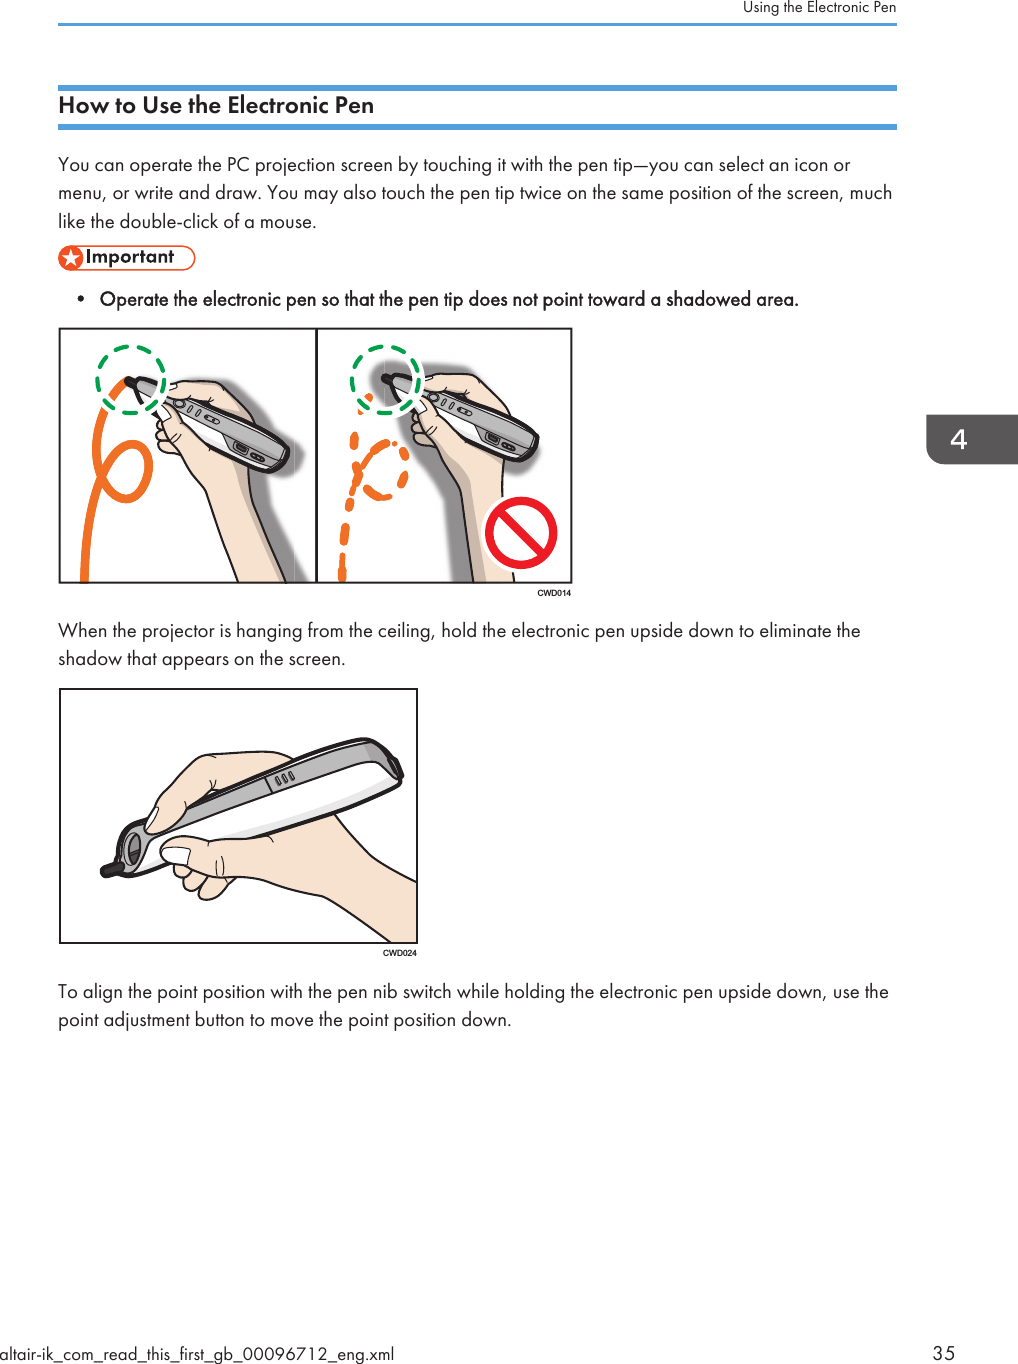
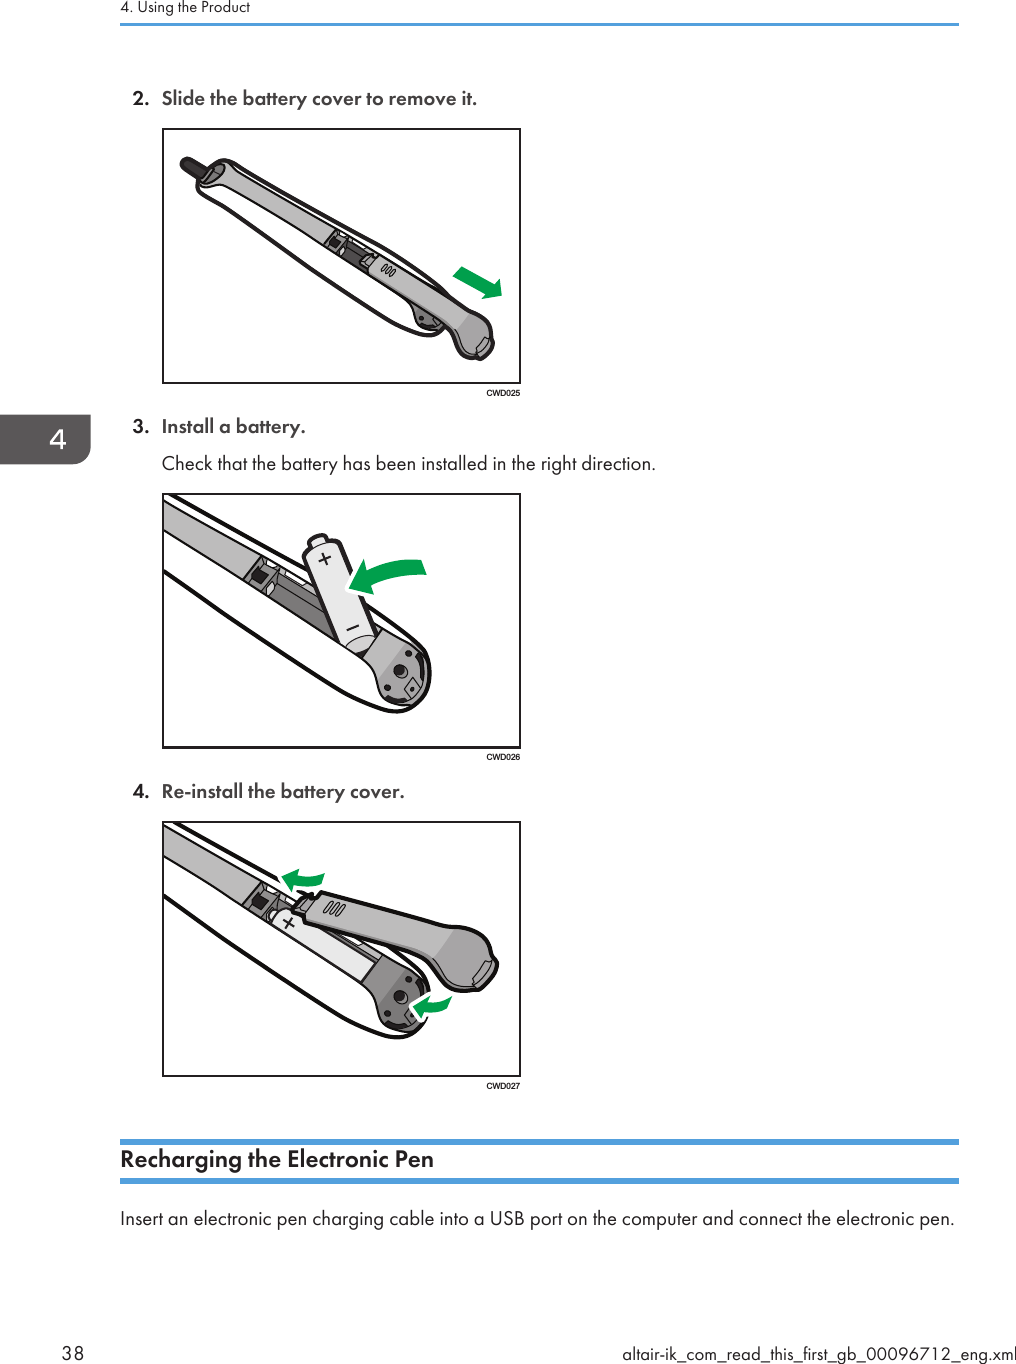
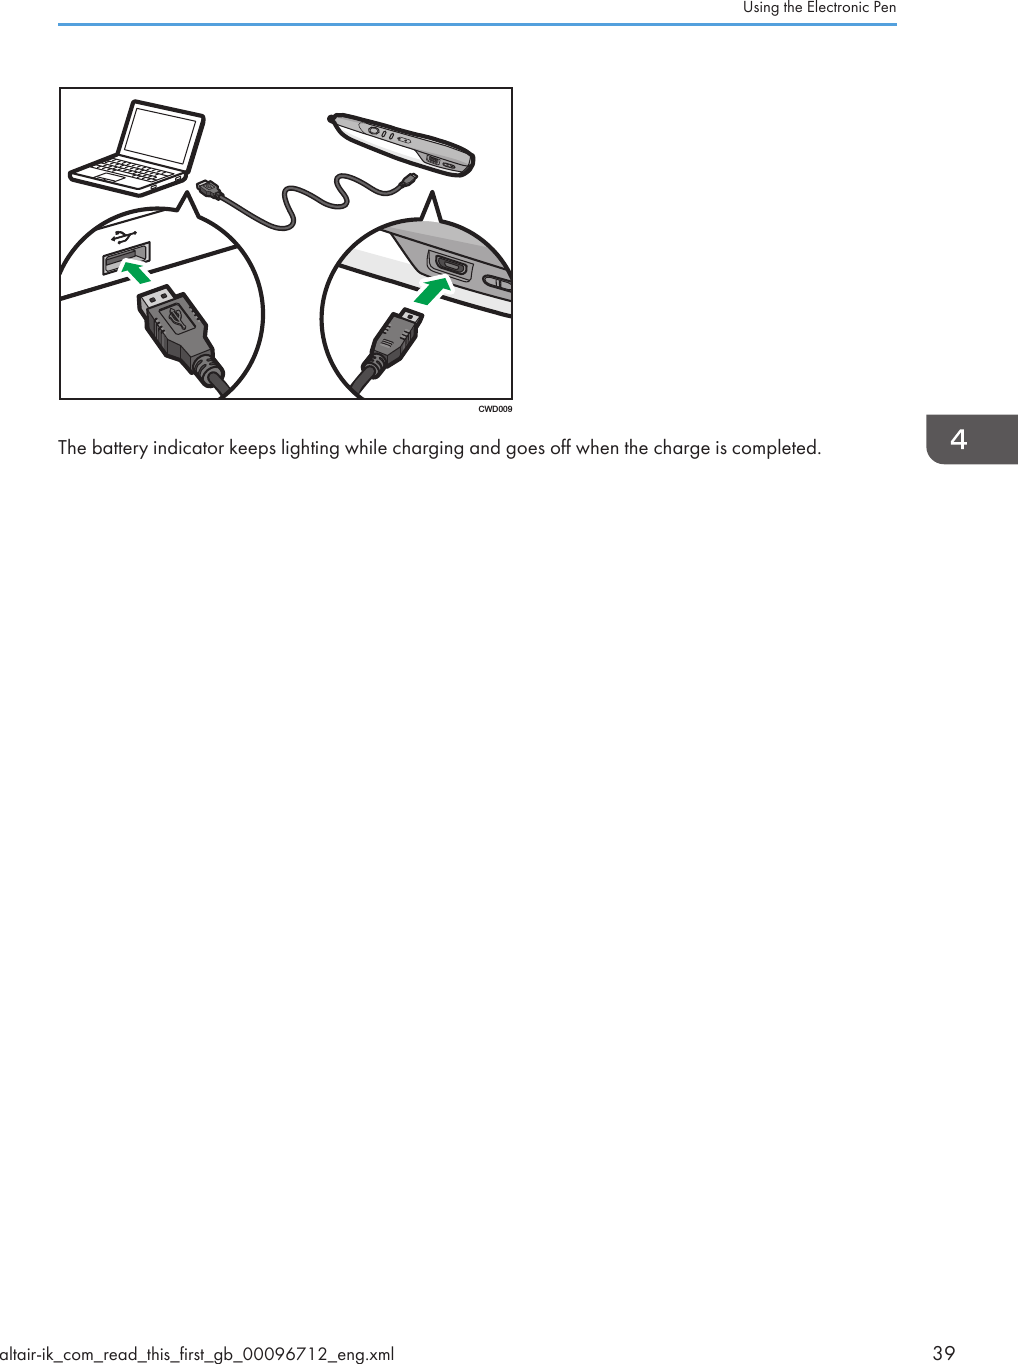
![How to Read This ManualSymbolsThis manual uses the following symbols:Indicates points to pay attention to when using the machine.Indicates supplementary explanations of the machine’s functions, and instructions on resolving usererrors.[ ]Indicates the names of keys on the machine's display or control panels.Indicates instructions stored in a file on a provided CD-ROM.DisclaimerTo the maximum extent permitted by applicable laws, in no event will the manufacturer be liable for anydamages whatsoever arising out of failures of this machine, losses of the registered data, or the use ofthis product and operation manuals provided with it.Make sure that you always copy or have backups of the data registered in this machine. Documents ordata might be erased due to your operational errors or malfunctions of the machine.In no event will the manufacturer be responsible for any documents created by you using this machine orany results from the data executed by you.NotesContents of this manual are subject to change without prior notice.Some illustrations in this manual might be slightly different from the machine.The manufacturer shall not be responsible for any damage or expense that might result from the use ofparts other than genuine parts from the manufacturer with your office products.4altair-ik_com_read_this_first_gb_00096693_eng.xml](https://usermanual.wiki/Delta-Electronics-orporated/RBP001/User-Guide-1845156-Page-4.png)
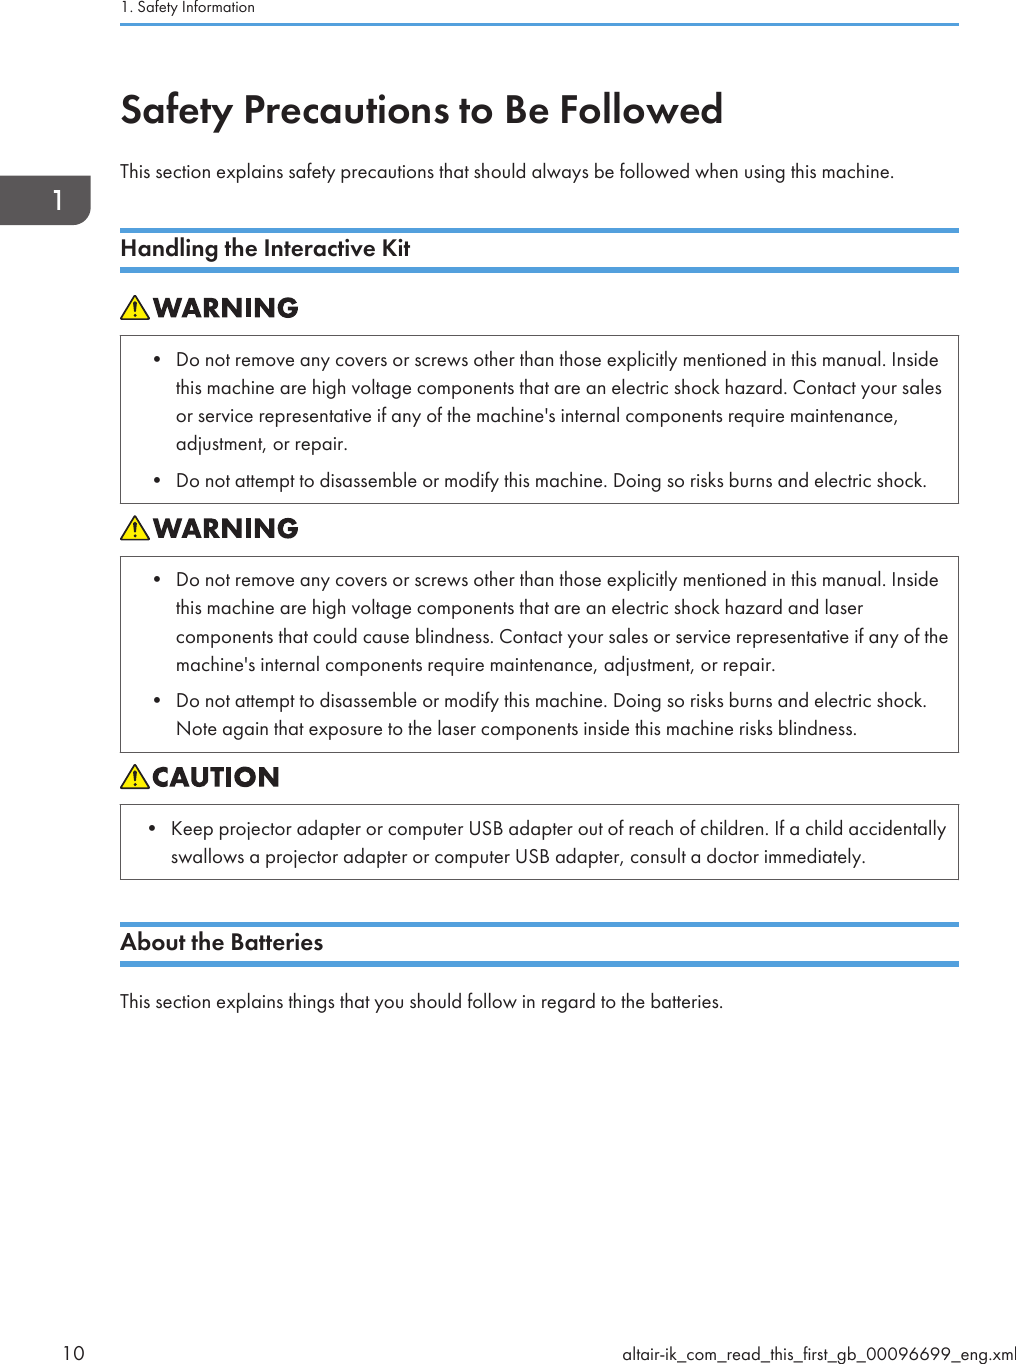
![On-screen Operating InstructionsThis chapter describes the on-screen operating instructions of this machine. The on-screen operatinginstructions are included in the supplied CD-ROM.The operating instructions of this machine are provided in the following formats:• Printed manual• HTML manualReading the HTML Manual on the CD-ROMThis section describes how to read the HTML manual on the supplied CD-ROM.1. Insert the CD-ROM in the CD-ROM drive of your computer.2. Select a language, and then click [OK].3. Click [Read HTML manual].The browser opens.4. Click the title of manual you want to read.• Recommended browsers:• Internet Explorer 6 or later• Firefox 3.5 or later• Safari 4.0 or later• If JavaScript is disabled or unavailable in your browser, you will not be able to search or usecertain buttons in the HTML documentation.Installing and Opening the HTML ManualThis section describes how to install and open the HTML manual on your computer.For your convenience, we recommend you install this manual on your computer.1. Insert the CD-ROM in the CD-ROM drive of your computer.2. Select a language, and then click [OK].3. Click [Install manual].4. Install the HTML manuals by following the on-screen instructions.5. When the installation is complete, click [Finish].6. Click [Exit].6altair-ik_com_read_this_first_gb_00096695_eng.xml](https://usermanual.wiki/Delta-Electronics-orporated/RBP001/User-Guide-1845156-Page-6.png)
![7. Open the HTML manual that you installed.To open the manual from an icon, double-click the icon on the desktop. To open the manuals fromthe [Start] menu, point to [All Programs], and then click [Product Name].8. Click the title of the manual you want to read.• You need administrator permissions to install the manuals. Log in as an Administrators groupmember.• The system requirements for installing the manuals are as follows:• Operating system: Windows XP / Windows Vista / Windows 7, Windows Server 2003 /2003 R2 / 2008 / 2008 R2• Minimum display resolution: 800 600 pixels• If you cannot install a manual, copy the "MANUAL_HTML" folder to your computer's hard drive,and then run "setup.exe".• To delete an installed manual, on the [Start] menu, point to [All Programs], click [Product Name],and then uninstall the data.• Depending on the settings made during installation, menu folder names may differ.altair-ik_com_read_this_first_gb_00096695_eng.xml 7](https://usermanual.wiki/Delta-Electronics-orporated/RBP001/User-Guide-1845156-Page-7.png)


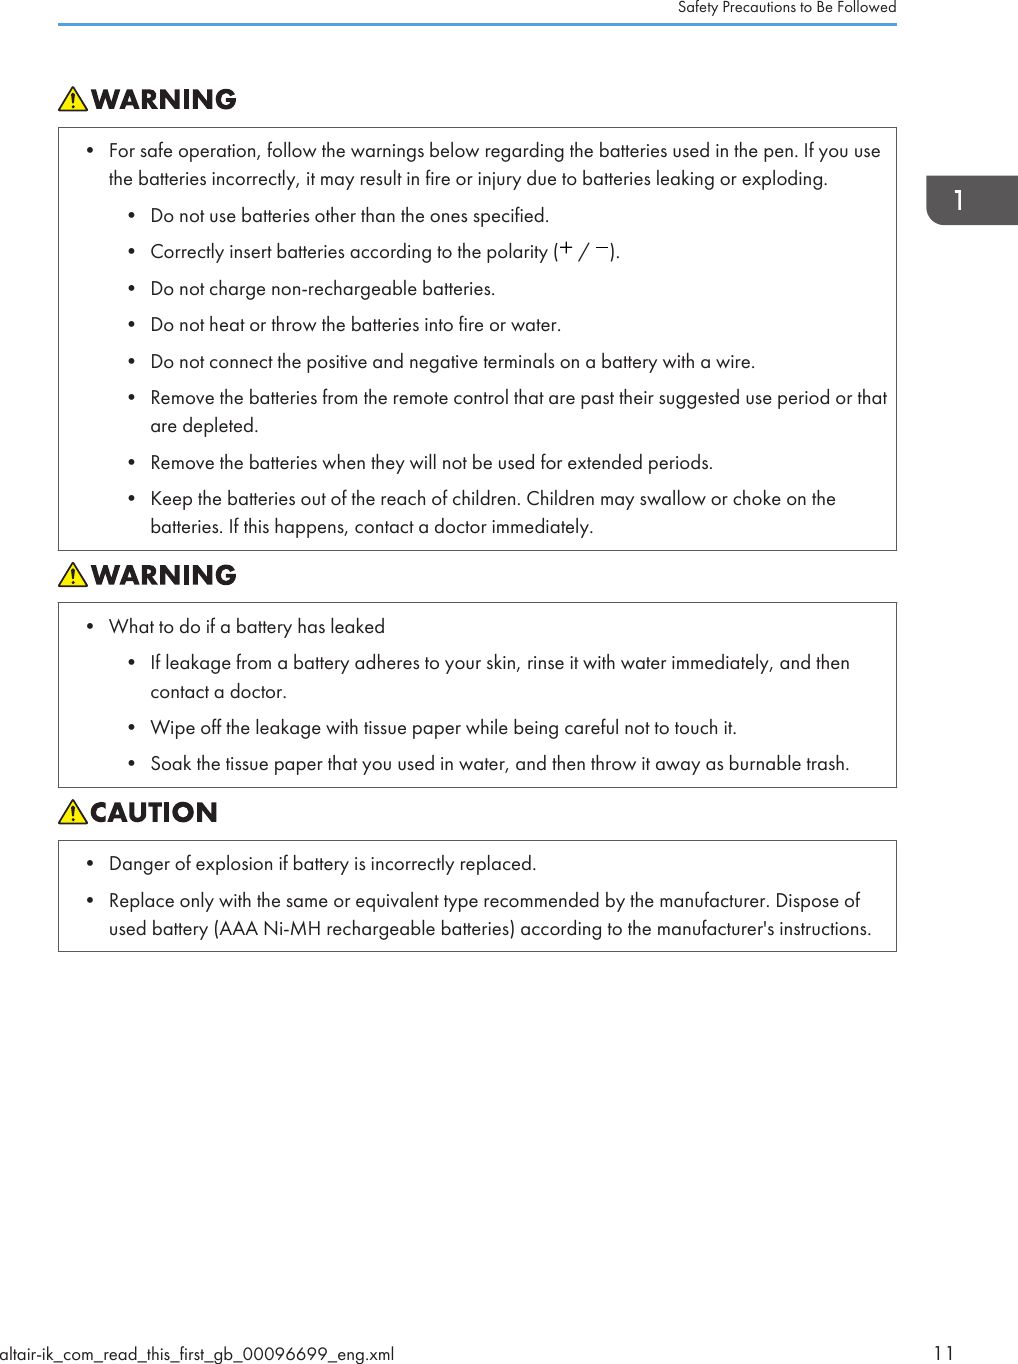


![3. Setting Up the ProductThis chapter explains how to set up the product for use in Interactive Mode.Preparing to Use This ProductThe product consists of an electronic pen, projector adapter, and PC USB adapter. The product allowsyou to operate a PC connected to the projector directly on the projection screen.To operate the computer display on the screen, you need to connect devices using a wirelessconnection. Make the settings by following the steps below.CWD031Step Setting Contents Reference1 Install the projector adapter into the projector. page 21 "Setting Up theProjector"2 Set Interactive Mode to [On]. page 23 "Enabling InteractiveMode"3 Register the projector USB adapter to theprojector.page 25 "Registering theComputer USB Adapter"altair-ik_com_read_this_first_gb_00096705_eng.xml 19](https://usermanual.wiki/Delta-Electronics-orporated/RBP001/User-Guide-1845156-Page-19.png)


![Enabling Interactive ModeThis section explains how to set the projector in Interactive Mode.In Interactive Mode, the projector can recognize the electronic pen and the computer USB adapter.1. Turn on the projector to project the screen.To turn on the projector or project the screen, see the operating instructions provided with theprojector.2. On the projector remote control, press the [Menu] button.3. Using the [ ] and [ ] buttons, select [Default Settings 1] on the menu, and then press the[ ] button.CWE0014. Using the [ ] and [ ] buttons, select [Interactive], and then press the [Enter] button.You cannot select [Interactive] if the projector adapter is not installed into the projector. To installthe projector adapter, see page 21 "Setting Up the Projector".5. Check that [Interactive Mode] has been selected and press the [Enter] button.Enabling Interactive Modealtair-ik_com_read_this_first_gb_00096707_eng.xml 23](https://usermanual.wiki/Delta-Electronics-orporated/RBP001/User-Guide-1845156-Page-23.png)
![6. Using the [ ] button, select [On], and then press the [Enter] button.CWE002To go on to register a computer USB adapter, see page 25 "Registering the Computer USBAdapter".7. Press the [Menu] button twice to close the menu screen.• You can also operate the menu screen of the projector from the projector's control panel.• Some icons may not appear on the menu screen of the projector, depending on the projectormodel used.3. Setting Up the Product24 altair-ik_com_read_this_first_gb_00096707_eng.xml](https://usermanual.wiki/Delta-Electronics-orporated/RBP001/User-Guide-1845156-Page-24.png)
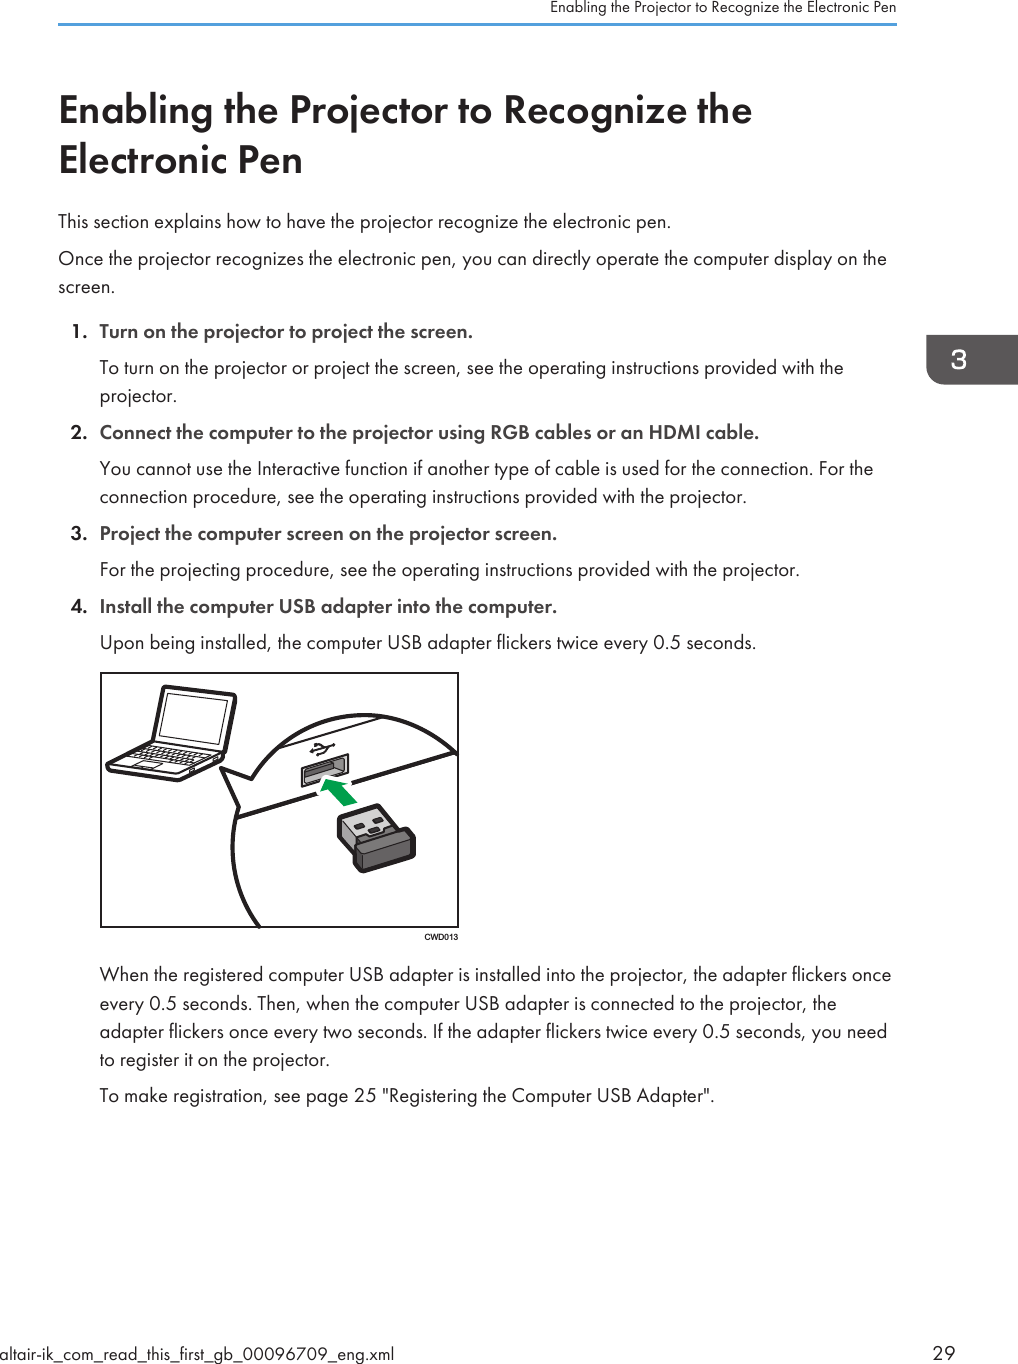
![Registering the Computer USB AdapterThis section explains how to register a computer USB adapter into the projector.To use the computer USB adapter in Interactive Mode, the adapter must be registered to the projector.Once the computer USB adapter is registered to the projector, there is no need to register it again. Youcan use the computer USB adapter with any computer that is connected to the projector.The procedure for registering the computer USB adapter to the projector is described below.Operating Environment of the Computer Using the Computer USB adapterThe following operating environment is required to use the product.Item SpecificationOperating System • Windows XP• Windows 7USB port • USB Type ADo not use a USB hub.Registering the Computer USB Adapter into the ProjectorTo register a computer USB adapter, connect the projector to the computer, and then insert the adapterinto the computer. Have a computer USB adapter at hand, ready for installation.• Keep computer USB adapter out of reach of children. If a child accidentally swallows acomputer USB adapter, consult a doctor immediately.1. Turn on the projector to project the screen.To turn on the projector or project the screen, see the operating instructions provided with theprojector.2. Connect the computer to the projector using RGB cables or an HDMI cable.You cannot use the Interactive function if another type of cable is used for the connection. For theconnection procedure, see the operating instructions provided with the projector.3. Project the computer screen on the projector screen.For the projecting procedure, see the operating instructions provided with the projector.4. On the projector remote control, press the [Menu] button.Registering the Computer USB Adapteraltair-ik_com_read_this_first_gb_00096708_eng.xml 25](https://usermanual.wiki/Delta-Electronics-orporated/RBP001/User-Guide-1845156-Page-25.png)
![5. Using the [ ] and [ ] buttons, select [Default Settings 1] on the menu, and then press the[ ] button.CWE0016. Using the [ ] and [ ] buttons, select [Interactive], and then press the [Enter] button.You cannot select [Interactive] if the projector adapter is not installed into the projector. To installthe projector adapter, see page 21 "Setting Up the Projector".7. Check that [Interactive Mode] is set to [On].For the setting procedure, see page 23 "Enabling Interactive Mode".8. Have a computer USB adapter at hand.CWD002The projector takes about 15 seconds to find the computer USB adapter. Have a computer USBadapter at hand, ready for installation.3. Setting Up the Product26 altair-ik_com_read_this_first_gb_00096708_eng.xml](https://usermanual.wiki/Delta-Electronics-orporated/RBP001/User-Guide-1845156-Page-26.png)
![9. Using the [ ] and [ ] buttons, select [PC Adapter Registration] and press the[Enter ]button.CWE00310. Check the message and press the [Enter] button.CWE00411. Install the computer USB adapter into the computer.Upon being installed, the computer USB adapter flickers twice every 0.5 seconds.CWD013Registering the Computer USB Adapteraltair-ik_com_read_this_first_gb_00096708_eng.xml 27](https://usermanual.wiki/Delta-Electronics-orporated/RBP001/User-Guide-1845156-Page-27.png)
![If registration succeedsThe following message appears.• "Registration has completed."On being registered, the computer USB adapter flickers every two seconds.Press the [Enter] button to close the message.If registration failsThe following message appears.• "Failed to register. Do you want to retry?"Registration fails unless the computer USB adapter is installed into the computer while theprojector is searching for the computer USB adapter.If there are any obstacles between the projector and computer, the attempt to performregistration will fail.To retry registration, select [OK] and press the [Enter] button. Then, take out the computerUSB adapter from the computer and restart the procedure from Step 10.12. Press the [Menu] button twice to close the menu screen.• You can also operate the menu screen of the projector from the projector's control panel.• Some icons may not appear on the menu screen of the projector, depending on the projectormodel used.3. Setting Up the Product28 altair-ik_com_read_this_first_gb_00096708_eng.xml](https://usermanual.wiki/Delta-Electronics-orporated/RBP001/User-Guide-1845156-Page-28.png)


![• If you are a standard user, enter the administrator account password and click [Yes].2. Click the application you want to install.3. Specify the language you want to use during the installation process, and then click [OK].4. If .NET Framework 4 is not installed on your computer, click [Install].If .NET Framework 4 has already been installed, the message [Install] does not appear. Proceed tothe next step.5. Click [Next.]6. Select "I accept the terms of the Software License Agreement.", and then click [Next].If you do not agree, you will be unable to continue the installation process.7. Specify the installation folder, and then click [Next].8. Click [Install].9. Click [Close].Uninstalling the Software from the ComputerThis section explains how to uninstall the Software, using Windows 7 as an example.The procedure may differ slightly depending on the OS you are using, but the basic steps are the same.1. Click [Start], and then select [Uninstall a program] in [Control Panel].2. Select the application, and then click [Uninstall / Change].3. Select [Uninstall], and then click [Next].4. Click [Close].Using the Softwarealtair-ik_com_read_this_first_gb_00096718_eng.xml 41](https://usermanual.wiki/Delta-Electronics-orporated/RBP001/User-Guide-1845156-Page-41.png)

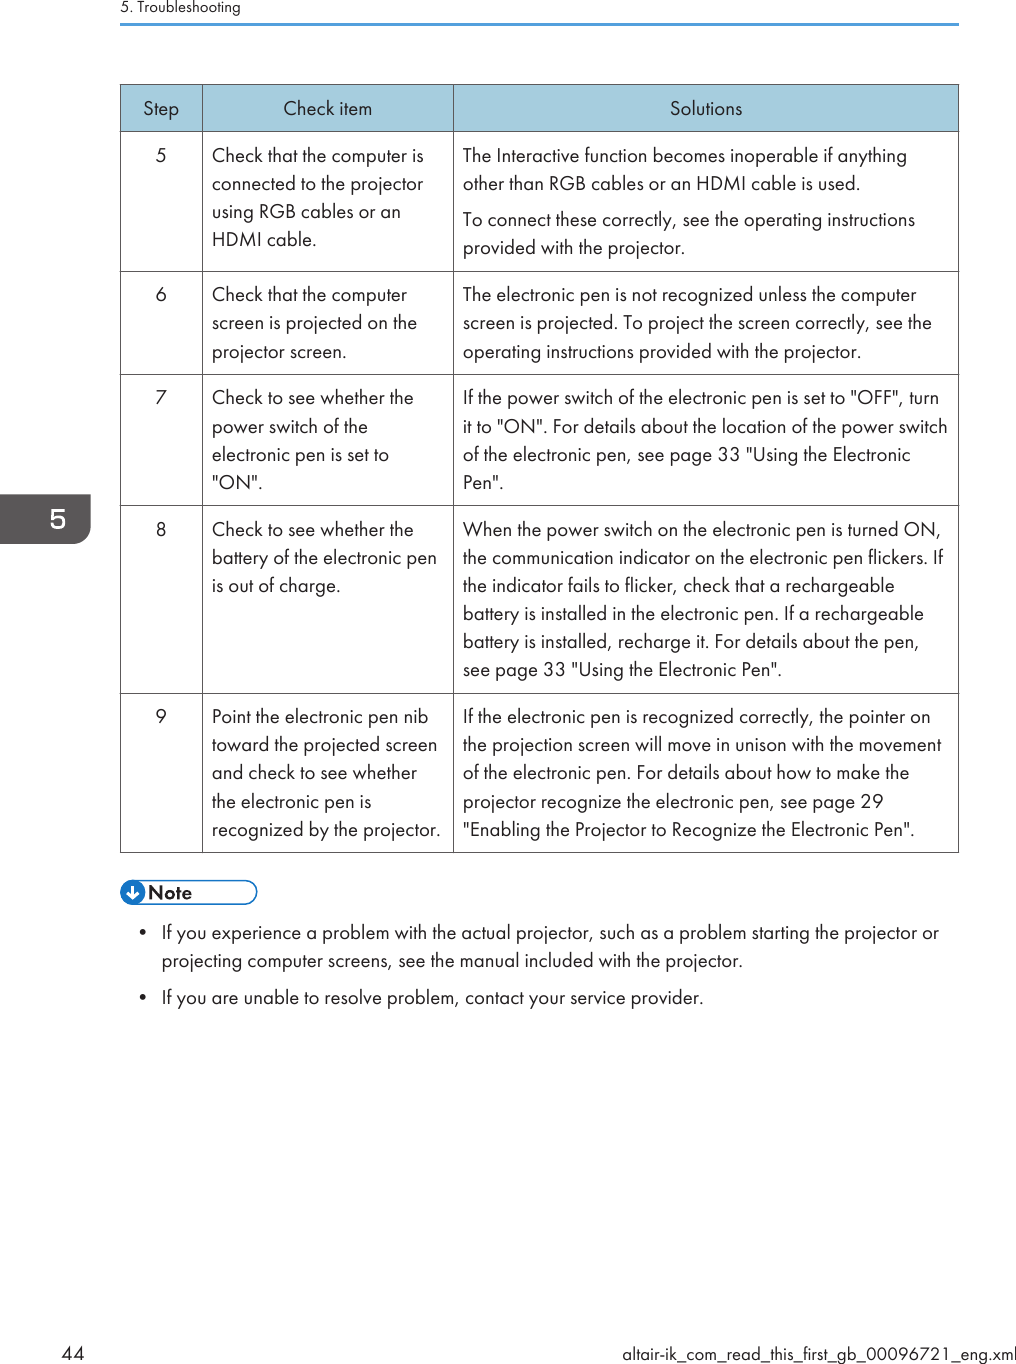
![5. TroubleshootingThis chapter explains what action to do when the projected screen cannot be operated.When the Projected Screen Cannot BeOperatedIf the projected screen cannot be operated after the projector is started, follow the steps below in thespecified order to troubleshoot the problem.Step Check item Solutions1 Check the projector to makesure that power is suppliedto it.If the projector is not supplied with power, check the powercord for connection and turn on the power. To connect thecord and turn on the power correctly, see the operatinginstructions provided with the projector.2 Check to see whether theprojector is in InteractiveMode.If Interactive Mode is set to [Off], switch it to "On". Fordetails about how to check whether the projector is inInteractive Mode, as well as how to specify the mode, seepage 23 "Enabling Interactive Mode".If the projector adapter is not installed into the projector, theInteractive Mode settings are inoperable. Install theprojector adapter. To install it correctly, see page 21"Setting Up the Projector".3 Check to see whether thecomputer USB adapter isconnected to in thecomputer.If the computer USB connector is not connected, connect itto one of the USB ports on the computer.4 Check to see whether thecomputer USB adapterinserted in the computer isregistered to the projector.When registered, the computer USB adapter flickers onceevery 0.5 seconds. Then, when the projector and thecomputer USB adapter are recognized, the adapter flickersonce every two seconds.If the adapter flickers twice every 0.5 seconds, the projectorneeds registering. To register it correctly, see page 25"Registering the Computer USB Adapter".altair-ik_com_read_this_first_gb_00096721_eng.xml 43](https://usermanual.wiki/Delta-Electronics-orporated/RBP001/User-Guide-1845156-Page-43.png)