Denso Wave orporated BHT710BWB Bar Code Handy Terminal User Manual
Denso Wave Incorporated Bar Code Handy Terminal
User Manual
BHT-700BB-CE
BHT-700BWB-CE
BHT-700BWBG-CE
Introduction
Preparation
Using the BHT
Charging
Troubleshooting
■ Usage Precautions ..................................1
■ Wireless Equipment.................................3
■ Product Contents Check..........................4
■ Proper Care of the BHT...........................6
■ Components and Functions.....................7
■ Input Method..........................................15
■ Preparation ............................................16
■ Step 1 Charging.....................................16
■ Step 2 Attaching the Stylus ....................21
■ Step 3 Turning ON the Power................22
■ Scanning Barcodes ...............................25
■ Turning ON/OFF the Backlight ..............27
■ Changing the Default Settings ...............29
■ Transmitting Data ..................................35
■ Battery Power Level Indicator................41
■ Replacing the Battery Cartridge.............42
■ Using the BHT after Long Periods .........45
■ Resetting and Full Resetting..................46
■ Troubleshooting Guide...........................48
Operator’s Guide

Thank you for using the BHT-700BB-CE/BHT-700BWB-CE/BHT-700BWBG-CE
DENSO WAVE Barcode Handy Terminal. (BHT-700BB-CE and BHT700BWBG-CE
can't be used in North America)
Please read this manual thoroughly prior to operation to ensure full use of the
product’s functionality, and store safely in a convenient location for quick reference
even after reading.
This manual contains only the basic details required for operation.
Please refer to the User’s Manual for further details on general operation.
The User’s Manual can be downloaded free of charge from the DENSO WAVE Web
site (QBnet).
Microsoft, ActiveSync, Windows and the Windows logo are trademarks or registered
trademarks of Microsoft Corporation of the US or other countries.
Bluetooth® is a trademark owned by its proprietor. DENSO WAVE uses Bluetooth®
wireless technology under license.
Other company names or product names contained in this manual are trademarks or
registered trademarks of their respective holders.
The latest precision manufacturing technology yields LCD panels with an effective
resolution of 99.99% or higher. The downside, however, is that up to 0.01% of the
pixels can remain permanently dark or lit on today's state-of-the-art panels.
A thin Newton's ring (rainbow-like patterns) may appear on the touch panel.
This does not necessarily indicate a problem with the touch panel.
About this Manual
● Due to improvements and so on, the content of this manual may be subject to
change without prior notice.
● The reproduction or duplication of the whole or part of this manual is strictly
prohibited without prior consent.
● Please contact DENSO WAVE if this manual is lost.
● Every attempt has been made to ensure that the content of this manual is
thorough and up to date, however, we kindly ask that any questionable content,
mistakes, or omissions be reported to DENSO WAVE.
Related Manuals
The following manuals can all be downloaded free of charge from the DENSO WAVE
Web site (QBnet).
• BHT-710BB-CE/710BWB-CE/BHT-710BWB-CE User’s Manual
This manual contains detailed instructions for use of the
BHT-710BB-CE/710BWB-CE handy terminals and communication unit (CU-700).
• BHT-710-CE API Reference Manual
This manual contains instructions for developing application programs for the
handy terminal in Microsoft eMbedded Visual C++ 4.0.
• BHT-710-CE Class Library Reference Manual
This manual contains instructions for developing application programs for the
handy terminal in Microsoft Visual BASIC and Microsoft Visual C#.

Liability Limitations
• DENSO WAVE INCORPORATED does not assume any product liability (including
damages for lost profits, interruption of operations, or the loss of business-related
information) arising out of, or in connection with, the use of, or inability to use the
BHT system software or related manuals.
• DENSO WAVE INCORPORATED ("DENSO WAVE") takes reasonable precautions
to ensure its products do not infringe upon any patents or other intellectual property
rights of other(s), however, DENSO WAVE cannot be responsible for any patent or
other intellectual property right infringement(s) or violation(s) arising from any of
the following.
(1) The use of DENSO WAVE's products in connection or in combination with
other components, products, devices, data processing systems or software
not supplied by DENSO WAVE.
(2) The use of DENSO WAVE's products in a manner for which they were not
intended nor designed.
(3) The modification of DENSO WAVE's products by parties other than DENSO
WAVE.
• If it is judged by DENSO WAVE INCORPORATED that malfunction of the product
is due to the product having been dropped or subjected to impact, repairs will be
made at a reasonable charge even within the warranty period.
Customer Registration
To allow us to provide our customers with comprehensive service and support, we
request that all customers complete a Member Registration Form. Registered
members will be offered the following privileges.
• The latest upgrade information
• Free exhibition and event information for new products
• Free Web-information service "QBnet."
QBnet Service Contents
Information searching
service (FAQ) Offers detailed information on each product.
Download service Offers downloads of repair modules for the latest BHT
Series systems or software, and sample programs.
E-mail inquiries Product related queries can be sent in by e-mail.
* Please note that these privileges may be subject to change without prior notice.
How to Register
Access the URL below and follow the instructions provided.
http://www.denso-wave.com/en/adcd/support/
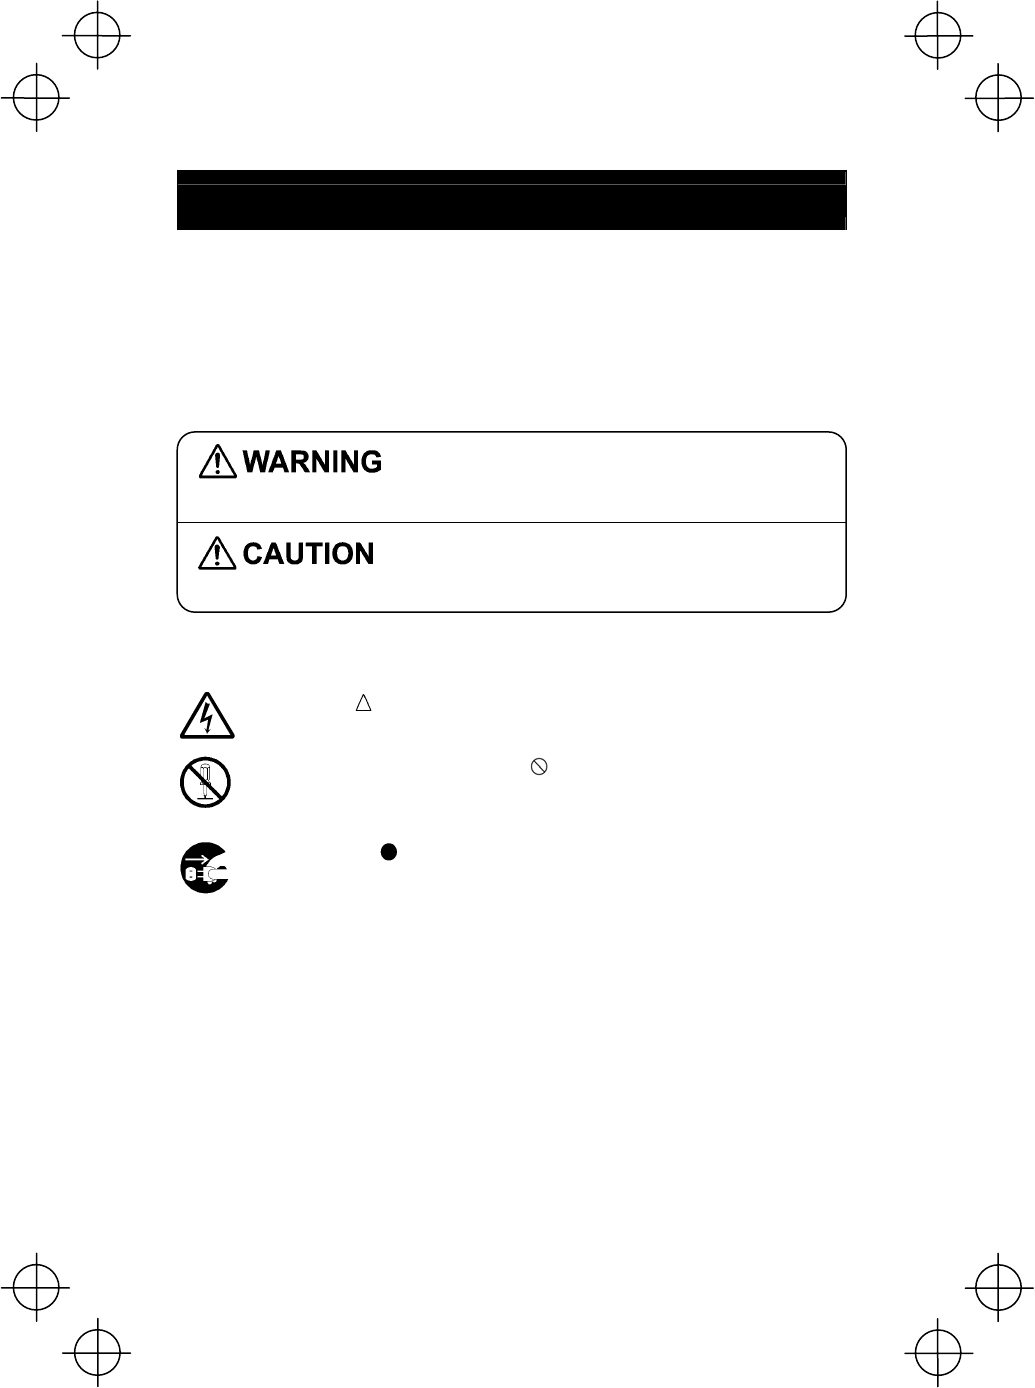
SAFETY PRECAUTIONS
Be sure to observe all these safety precautions.
Strict observance of these warning and caution indications are a MUST for preventing
accidents which could result in bodily injury and substantial property damage. Make
sure you fully understand all definitions of these terms and related symbols given
below, before you proceed on to the text itself.
Alerts you to those conditions which could cause
serious bodily injury or death if the instructions are not
followed correctly.
Alerts you to those conditions which could cause
minor bodily injury or substantial property damage if
the instructions are not followed correctly.
Meaning of Symbols
A triangle ( ) with a picture inside alerts you to a warning of danger.
Here you see the warning for electrical shock.
A diagonal line through a circle ( ) alerts you to something you should
not do; it may or may not have a picture inside. Here you see a
screwdriver inside the circle, meaning that you should not disassemble.
A black circle ( ) with a picture inside alerts you to something you MUST
do. This example shows that you MUST unplug the power cord.
Handling the battery cartridge
• Never disassemble or heat the rechargeable battery cartridge, nor
put it into fire or water; doing so could cause battery-rupture or
leakage of battery fluid, resulting in a fire or bodily injury.
• Do not carry or store the battery cartridge together with metallic
ballpoint pens, necklaces, coins, hairpins, etc.
Doing so could short-circuit the terminal pins, causing the batteries to
rupture or the battery fluid to leak, resulting in a fire or bodily injury.
• Avoid dropping the battery cartridge or letting it undergo any shock or
impact.
Doing so could cause the batteries to break, generate heat, rupture
or burn.
• Never charge the rechargeable battery cartridge where any
inflammable gases may be emitted; doing so could cause fire.
• Only use the dedicated charger for charging the rechargeable battery
cartridge.
Using a different type of charger could cause battery-rupture or
leakage of battery fluid and result in a fire, bodily injury, or serious
damage to property.
Handling the BHT
• Do not poke at the eyes with the stylus that comes with the BHT.
Handling the rechargeable cartridge
• Never charge a wet or damp rechargeable battery cartridge.
Doing so could cause the batteries to break, generate heat, rupture
or burn.
Handling the BHT
• If smoke, abnormal odors or noises come from the BHT, immediately
turn off the power, pull out the battery cartridge, and contact your
nearest dealer.
Failure to do so could cause smoke or fire.
• If foreign material or water gets into the BHT, immediately turn off the
power, pull out the battery cartridge, and contact your nearest dealer.
Failure to do so could cause smoke or fire.
• If you drop the BHT so as to damage its housing, immediately turn off
the power, pull out the battery cartridge, and contact your nearest
dealer.
Failure to do so could cause smoke or fire.
• Do not use batteries or power sources other than the specified ones;
doing so could generate heat or cause malfunction.
Never
disas-
sembly
• Never disassemble or modify the BHT; doing so could result in an
accident such as break or fire.
• Never put the BHT in places where there are excessively high
temperatures, such as inside closed-up automobiles, or in places
exposed to direct sunlight.
Doing so could affect the housing or parts, resulting in a fire.
• Avoid using the BHT in extremely humid or dusty areas, or where
there are drastic temperature changes.
Moisture or dust will get into the BHT, resulting in malfunction, fire or
electrical shock.
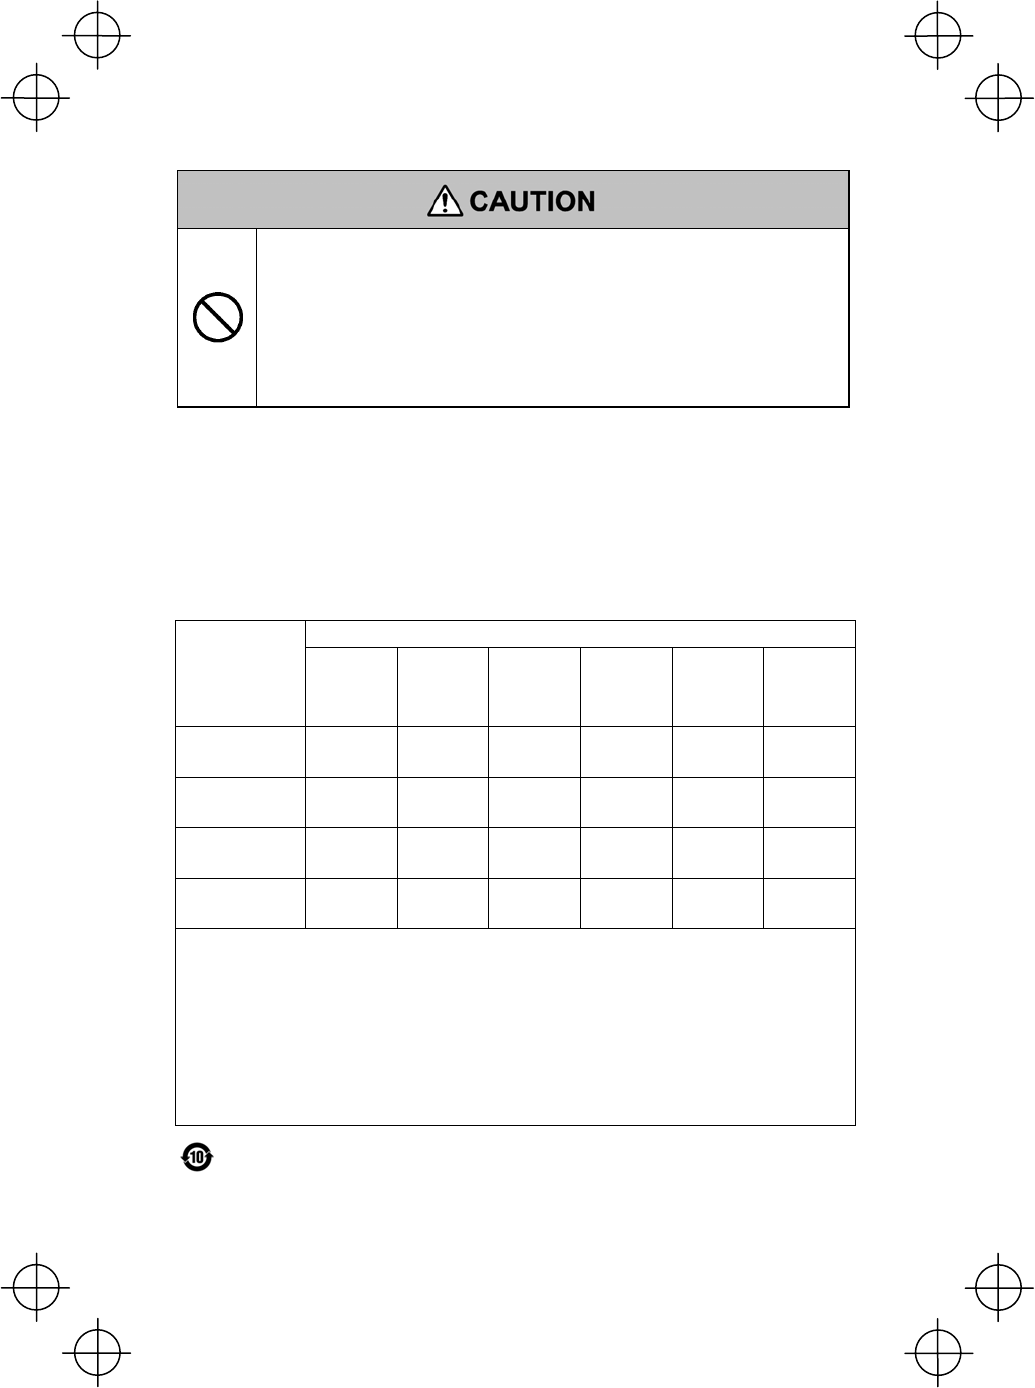
• In environments where static electricity can build into significant
charges (e.g., if you wipe off the plastic plate with a dry cloth), do not
operate the BHT. Doing so will result in malfunction or machine
failure.
• Touch (tap) the LCD only with the stylus that comes with the BHT.
Using the tip of a pen or any pointed object will result in a damaged
or broken LCD.
电子信息产品中有毒有害物质或元素的名称及含量
有毒有害物质或元素
部件名称 铅
(Pb)
汞
(Hg)
镉
(Cd)
六价铬
(Cr(VI))
多溴
联苯
(PBB)
多溴二
苯醚
(PBDE)
实装电路板 × ○ ○ ○ ○ ○
镜头 × ○ ○ ○ ○ ○
LCD面板 × ○ ○ ○ ○ ○
内部线路 × ○ ○ ○ ○ ○
○:表示该有毒有害物质在该部件所有均质材料中的含量均在SJ/T 11363-2006 标准
规定的限量要求以下。
×:表示该有毒有害物质至少在该部件的某一均质材料中的含量超出SJ/T 11363-2006
标准规定的限量要求。
使用欧盟RoHS指令的免除条款中指定的有毒有害物质。
该标志适用于在中华人民共和国境内销售的电子信息产品,标志中央的数字表示
环保使用期限的年数。
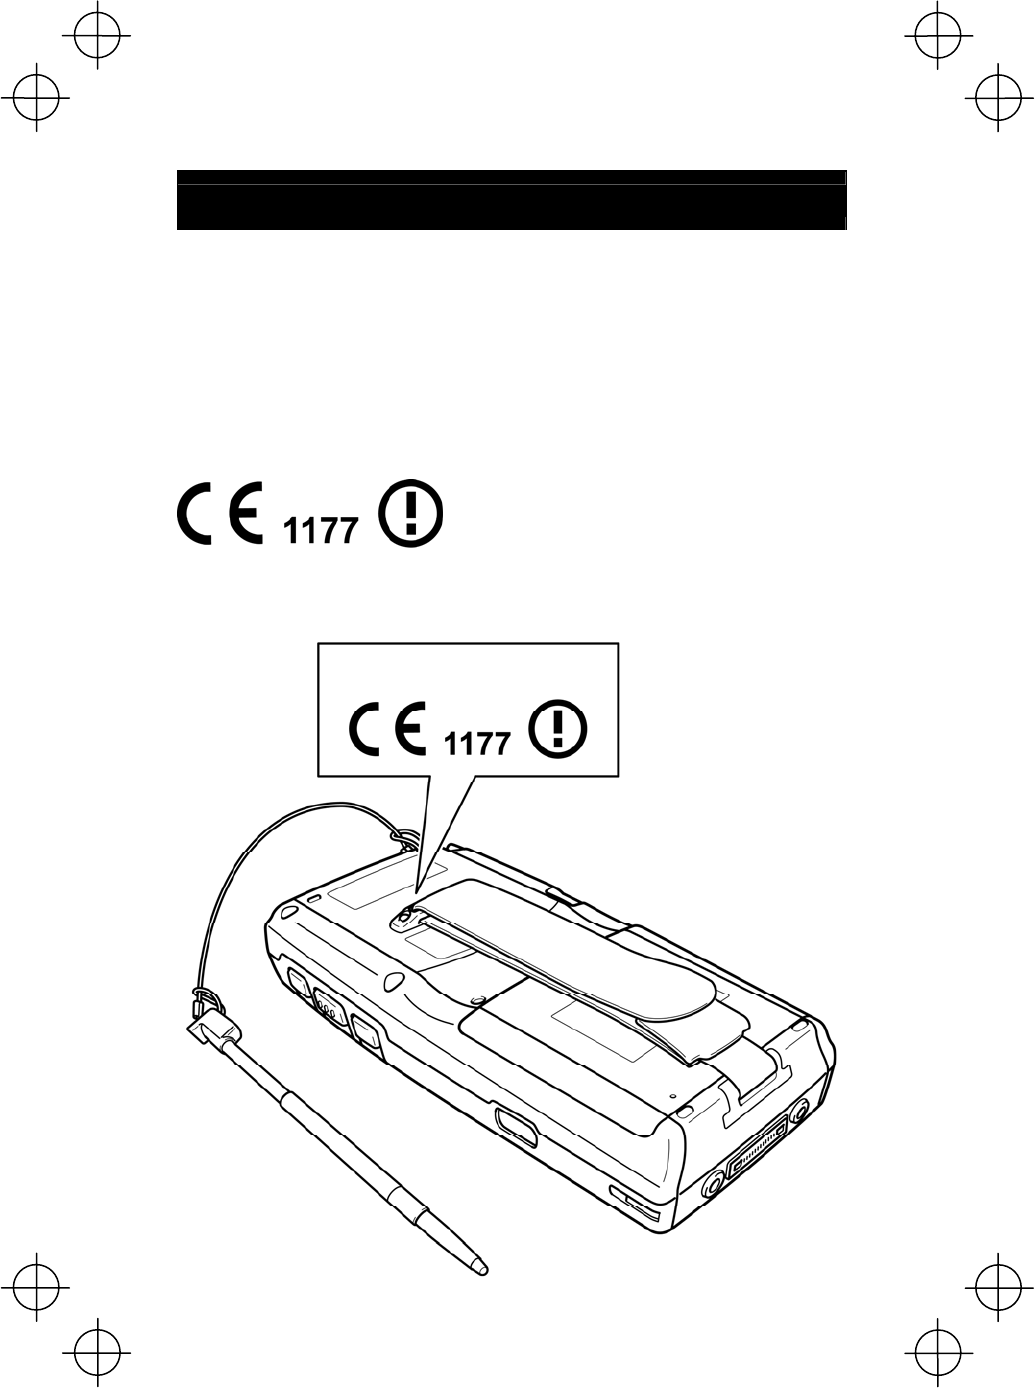
Declaration of Conformity (For European Union)
Hereby, DENSO WAVE INCORPORATED, declares that this BHT-700BB-CE ,
BHT-700BWB-CE ,BHT-700BWBG-CE is in compliance with the essential
requirements and other relevant provisions of Directive 1999/5/EC. (BHT700BB-CE
and BHT700BWBG-CE can't be used in North America)
CE marking:
LABELING:
For European Union

This equipment has been tested and found to comply with the limits for a
Class B digital device, pursuant to Part 15 of the FCC Rules. These limits are
designed to provide reasonable protection against harmful interference in a
residential installation. This equipment generates, uses and can radiate radio
frequency energy and, if not installed and used in accordance with the instructions,
may cause harmful interference to radio communications. However, there is no
guarantee that interference will not occur in a particular installation. If this equipment
does cause harmful interference to radio or television reception, which can be
determined by turning the equipment off and on, the user is encouraged to try to
correct the interference by one of the following measures:
* Reorient or relocate the receiving antenna.
* Increase the separation between the equipment and receiver.
* Connect the equipment into an outlet on a circuit different from that to which the
receiver is connected.
* Consult the dealer or an experienced radio/TV technician for help.
FCC Caution:
Any changes or modifications not expressly approved by the party responsible
for compliance could void the user's authority to operate this equipment.
This device complies with Part 15 of the FCC Rules. Operation is subject to
the following two conditions: (1) This device may not cause harmful interference, and
(2) this device must accept any interference received, including interference that may
cause undesired operation.
This device and its antenna(s) must not be co-located or operating in
conjunction with any other antenna or transmitter.
This device is going to be operated in 5.15 ~ 5.25GHz frequency range and it
is restricted in indoor environment only.
RF Exposure Information (SAR)
This model device meets the government’s requirements for exposure to radio
Federal Communication Commission Interference

waves.
This device is designed and manufactured not to exceed the emission limits for
exposure to radio frequency (RF) energy set by the Federal Communications
Commission of the U.S. Government.
The exposure standard for wireless mobile devices employs a unit of
measurement known as the Specific Absorption Rate, or SAR. The SAR limit set by
the FCC is 1.6W/kg. *Tests for SAR are conducted using standard operating
positions accepted by the FCC with the device transmitting at its highest certified
power level in all tested frequency bands. Although the SAR is determined at the
highest certified power level, the actual SAR level of the device while operating can
be well below the maximum value. This is because the device is designed to
operate at multiple power levels so as to use only the poser required to reach the
network. In general, the closer you are to a wireless base station antenna, the lower
the power output.
The highest SAR value for the model device as reported to the FCC when
tested for use when worn on the body, as described in this user guide, is 0.232 W/kg
(Body-worn measurements differ among device models, depending upon available
enhancements and FCC requirements.)
While there may be differences between the SAR levels of various devices
and at various positions, they all meet the government requirement.
The FCC has granted an Equipment Authorization for this model device with
all reported SAR levels evaluated as in compliance with the FCC RF exposure
guidelines. SAR information on this model device is on file with the FCC and can be
found under the Display Grant section of http://www.fcc.gov/oet/fccid after searching
on FCC ID: PZWBHT710BWB.
For body worn operation, this device has been tested and meets the FCC RF
exposure guidelines for use with an accessory that contains no metal and the
positions the handset a minimum of 1.5 cm from the body. Use of other

enhancements may not ensure compliance with FCC RF exposure guidelines. If
you do no t use a body-worn accessory and are not holding the device at the ear,
position the handset a minimum of 1.5 cm from your body when the device is
switched on.
This Class B digital apparatus complies with Canadian ICES-003.
Cet appareil numérique de la classe B conforme á la norme NMB-003 du Canada.
Operation is subject to the following two conditions: (1) this device may not cause
interference, and (2)this device must accept any interference, including interference
that may cause undesired operation of the device.
For WLAN 2.4G device available in the USA/Canada market, only channel 1~11 can
be operated. Selection of other channels is not possible.
This device and its antenna(s) must not be co-located or operation in conjunction
with any other antenna or transmitter which is not certified together with this device.
To reduce potential radio interference to other users, the antenna type and its gain
should be so chosen that the equivalent isotropic radiated power (e.i.r.p) is not more
than that permitted for successful communication.
The device for the band 5150-5250 MHz is only for indoor usage to reduce potential
for harmful interference to co-channel mobile satellite systems.
IMPORTANT NOTE:
IC Radiation Exposure Statement
This EUT is compliance with SAR for general population/uncontrolled exposure limits
Industry Canada Interference Stent

in IC RSS-102 and had been tested in accordance with the measurement methods
and procedures specified in IEEE 1528. This equipment should be installed and
operated with minimum distance 1.5cm between the radiator and your body.
MEMO
1
Introduction
Usage Precautions
If the BHT is left with the battery cartridge discharged or with no battery cartridge
loaded, or if the battery cartridge is replaced incorrectly, data stored in the BHT may
be lost.
By performing a full reset (refer to “Resetting and Full Resetting”), all data stored in
the RAM will be lost. It is therefore recommended that important data be either saved
to the “FLASH” folder or backed up at the computer.

2
Introduction
Usage environment restrictions
● Do not use the BHT where it may be exposed to fire, high temperatures, or
direct sunlight.
(Failure to observe this may result in damage, overheating, explosion, or fire.)
* When the BHT is stored in a high-temperature, high-humidity environment of 50 to 60° C,
leave to sit in a location at room temperature and normal humidity for at least 1 day prior to
use. Failure to observe this may cause a scanning failure or damage the BHT.
● Do not use the BHT in places with extreme temperature variations.
(Failure to observe this may lead to BHT malfunction due to condensation.)
* Leave the BHT for a short while prior to use when moved from a cold to a warm
environment.
● Do not use the BHT in places where it may be exposed to strong impact or
significant static electricity.
Keep the BHT away from electromagnetic waves and
metallic objects.
Wireless communication may not be possible in the following locations.
● In the vicinity of the following devices operating on a 2.4/5.0GHz waveband
(Communication may not be possible due to electromagnetic interference.)
• Industrial, scientific, or medical equipment such as microwave ovens
• Wireless LAN devices
• Logistics systems in places such as plants or warehouses
• Wireless devices such as personal or amateur radio stations
● In the vicinity of household appliances emitting electromagnetic waves such
as computers or televisions
(Communication may not be possible due to electromagnetic noise.)
● In the vicinity of metallic objects, in places with high levels of metallic dust,
or in places surrounded my metal walls
(Communication may not be possible due to the presence of metallic objects.)
Avoid light interference.
Infra-red communication may not be possible due to light interference.
Ensure to observe the following when performing infra-red communication.
● Do not operate remote control units for televisions and so on nearby.
● The BHT should not be exposed to light interference such as strong
illumination (especially the inverter fluorescent lamp) or sunlight.
Usage Precautions

3
Introduction
Wireless Equipment
● Precautions relating to the frequency used by this device
In addition to industrial, scientific, and medical equipment such as microwave ovens,
static wireless stations (permit required) used for mobile identification in places
such as plant manufacturing lines and specified low-power wireless stations (no
permit required) operate on the same frequency band as this device.
1. Before using this device, ensure that no static wireless stations or specified
low-power wireless stations for mobile identification are being used in the vicinity.
2. In the event of instances of electromagnetic interference from this device to a
static wireless station being used for mobile identification, either promptly alter the
usage frequency, or halt the electromagnetic discharge
3. If other problems arise due to reasons such as electromagnetic interference from
this device to a specified low-power wireless station being used for mobile
identification, please contact DENSO WAVE through QBnet (see page iv).
4. This device is equipped with an international roaming function (IEEE802.11a/b/g)
that allows suitable channels to be selected within specific countries (excludes
the BHT-710BB-CE).
5. Set the country using the access point prior to use. Setting to a country other
than that in which the device is used may be considered a violation of the law
(excludes the BHT-710BB-CE).
● Requests to system designers
• Communication may not be possible depending on the environment in which the
device is being used. Ensure that problem-free communication is possible prior to
use.
• Use a program capable of retransmitting data if communication fails.
• If the BHT is introduced into an environment in which a device using 2.4/5.0GHz
waveband electromagnetic waves is operating, or if a another device using
2.4/5.0GHz waveband electromagnetic waves is introduced following introduction
of the system, run all devices and ensure that communication with the BHT is
possible prior to use.
• Check communication once again prior to use if any changes are made to the
usage environment (addition of household appliances, movement or addition of
shelves, equipment and so on) following introduction of the system.
4
Introduction
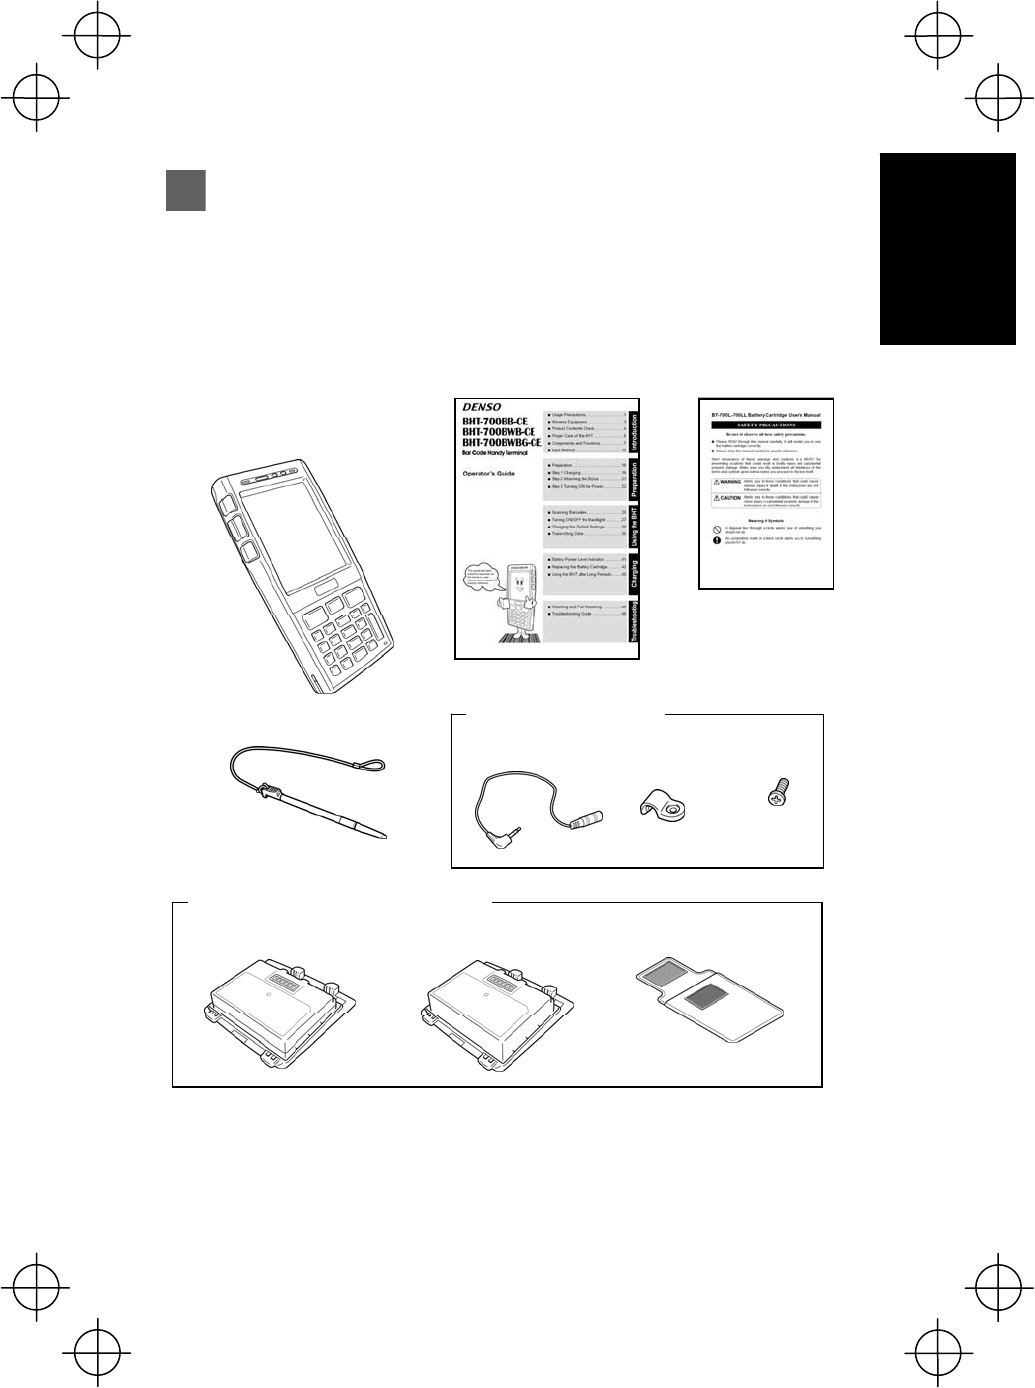
Product Contents Check
Ensure you have all of the following items prior to use. Contact your dealer in the
event that any items are missing or damaged.
(BB and BWBG can’t be used
In North America)
Refer to page ii for details of related manuals such as the User’s Manual.
Operator’s Guide
(this manual)
Handy terminal
(BHT-700BB-CE)
(BHT-700BWB-CE)
(BHT-700BWBG-CE)
User’s Manual
(for BT-700L/700LL)
Soft case for charger
Stylus
Adapter cable Cable holder Screw
For BHT-700BWBG-CE
BT-700LLBT-700L
Charger (lithium-ion battery): Option
or
5
Introduction
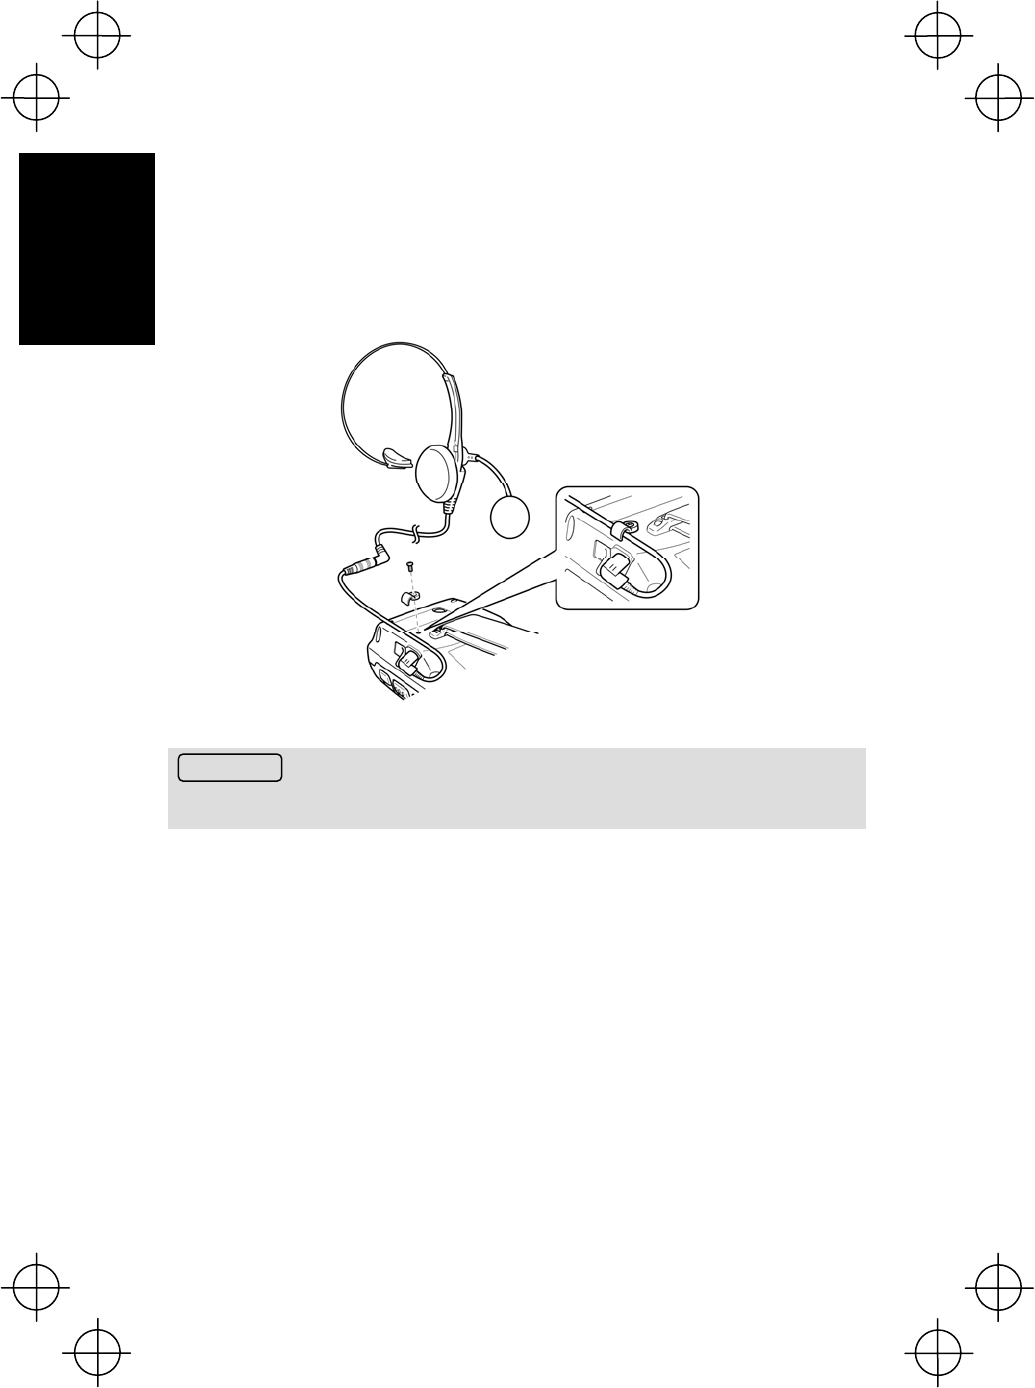
● Handling the headset jack (option) (BHT-700BWBG-CE only)
(BWBG can’t be used In North America)
When using the optional headset jack, connect the adapter cable provided using the
cable holder and screw as shown below.
Request
Avoid inserting the connector at an angle or pulling the adapter cable strongly.
Product Contents Check
6
Introduction
Proper Care of the BHT
Ensure to turn OFF the BHT before cleaning.
● BHT terminal, charger terminal dirt
Periodically wipe any dirt from the BHT or battery terminals with a cotton swab and
so on.
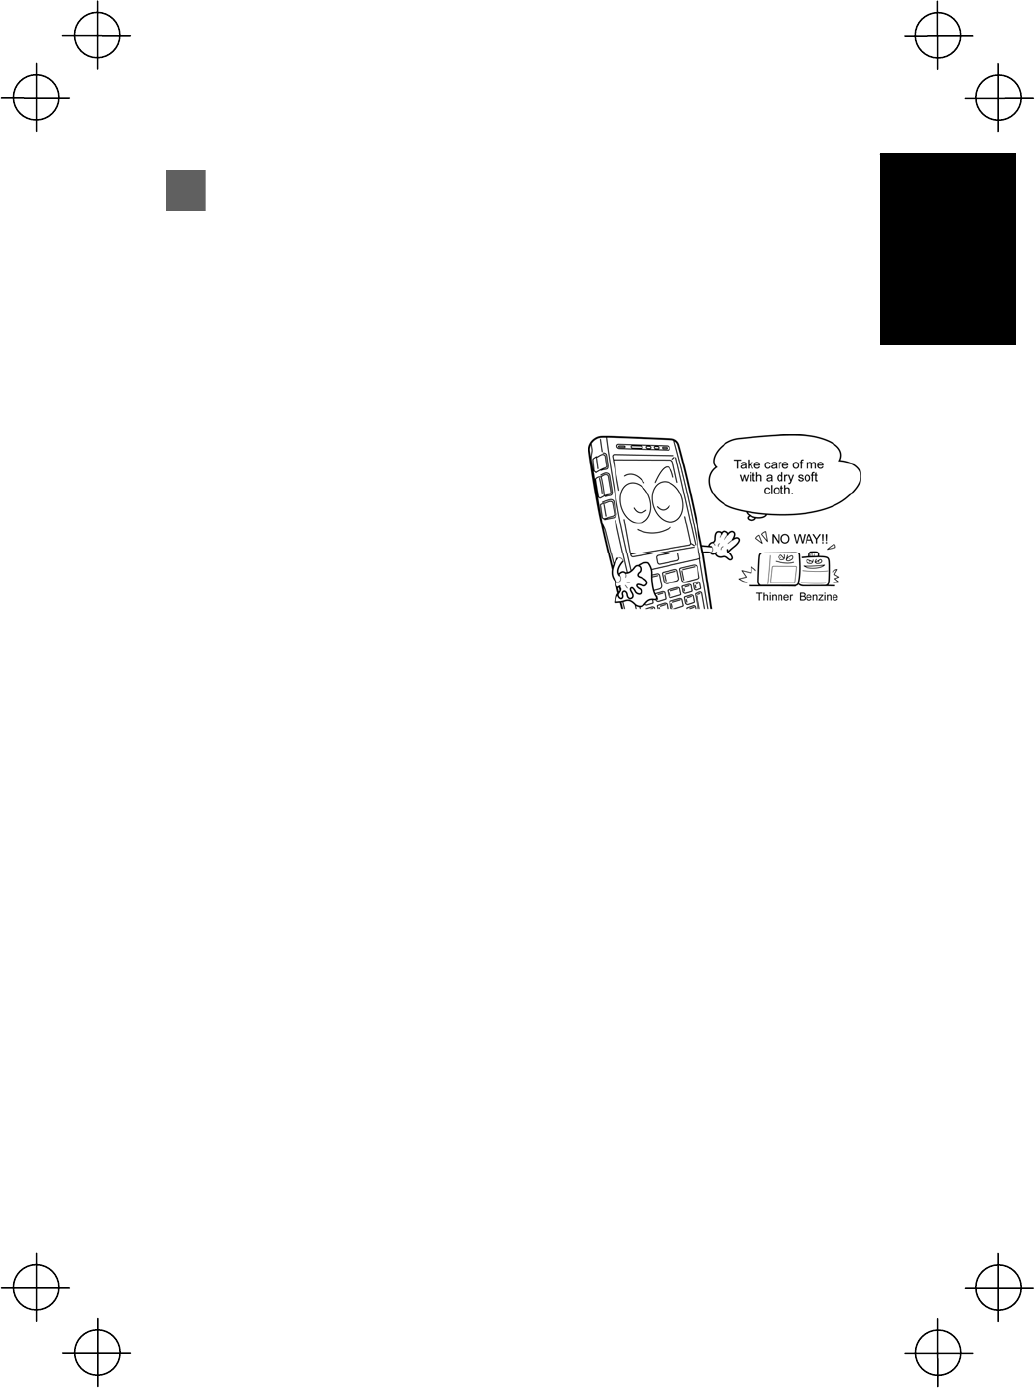
● Housing dirt
Wipe any dirt from the housing with a dry, soft
cloth.
If excessively dirty, wipe with a soft cloth that
has been soaked in soapy water (always use
neutral detergent) and wrung out thoroughly.
Never use substances such as benzene or
alcohol, as this may cause the housing to be
marred or paint to peel off.
● LCD screen dirt
Never rub or strike the LCD screen with anything hard, as this may result in
scratches on the screen or breakage.
● Keypad dirt
When cleaning the keypad, do not scrub the surface too hard or pull on the keys, as
this may break the keys.
● Barcode reading window dirt
Any dirt or dust adhering to the clear plate of the barcode reading window will
adversely affect reading performance.
When using in dusty areas, perform periodic inspections to check whether any dust
has accumulated on the clear plate of the barcode reading window, and if so, first
blow the dust away with an airbrush, and then gently wipe the plate with a cotton
swab or similar soft object.
If sand or hard particles have accumulated, rubbing the plate will result in scratches.
Blow the particles away with an airbrush or wipe with a soft brush.
7
Introduction
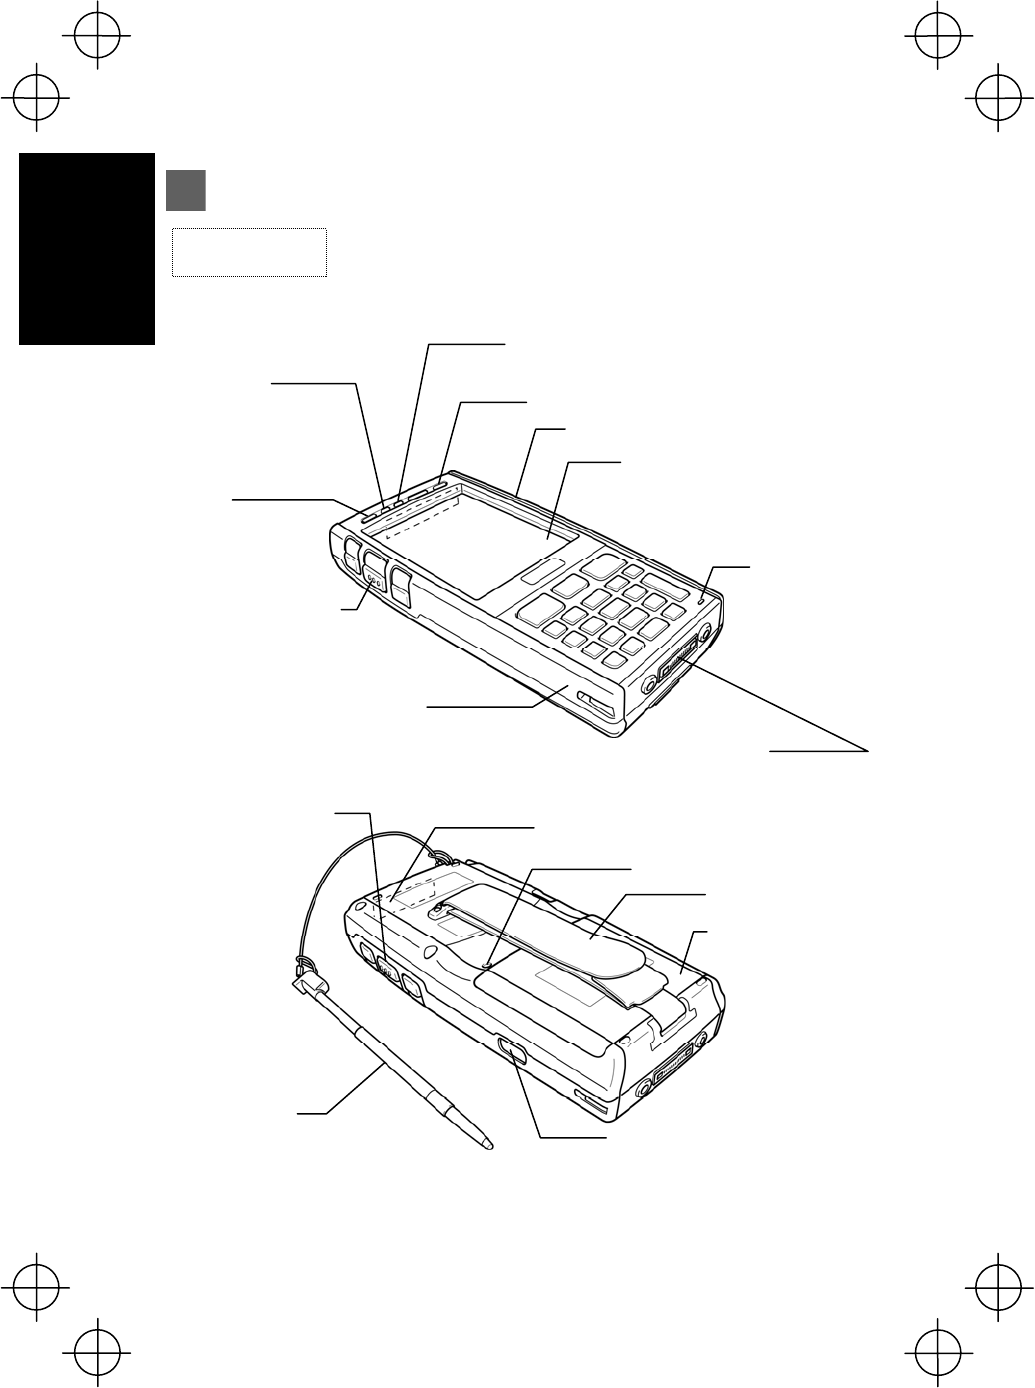
Components and Functions
Bluetooth
®
built-in antenna*
Indicator LED
Illuminates in blue when the BHT has
successfully read a bar code.
Touch screen display (LCD)
Displays the characters and graphic
patterns. Data may be entered by
tapping the screen directly
with the st
y
lus.
Interface port
USB and RS-232C interfaces
Trigger switch
Charge LED
Illuminates in red during
charging and turns green
upon completion of
charging.
** Provided on the BHT-700BWB-CE only.
Rechargeable batter
y
cartridge***
Main BHT power source
Hand belt
Reading window
Stylus
Reset button
Trigger switch
27-Keypad
IEEE802.11a/b/g built-in antenna* **
IrD
A
interface port
Used to exchange data/programs with
the host computer via its integrated IR
port.
Beeper
* Do not cover this antenna section with metal-evaporated
tape or by hand. Doing so may result in communication
failures.
*** The battery cartridge shown in the drawing is the BT-700L.
Receiver
Microphone

8
Introduction
42-Keypad
IrD
A
interface port
Used to exchange data/programs with
the host computer via its integrated IR
port.
Bluetooth
®
built-in antenna*
Indicator LED
Illuminates in blue when the BHT has
successfully read a bar code.
Touch screen display (LCD)
Displays the characters and graphic
patterns. Data may be entered by
tapping the screen directly
with the stylus.
Interface port
USB and RS-232C interfaces
Trigger switch
Rechargeable batter
y
cartridge**
Main BHT power source
Hand belt
Reading window
Stylus
Reset button
Trigger switch
Charge LED
Illuminates in red during
charging and turns green
upon completion of
charging.
GPRS built-in antenna*
IEEE802.11a/b/g built-in antenna*
* Do not cover this antenna section with
metal-evaporated tape or by hand. Doing so may
result in communication failures.
Beeper
Receiver
Microphone
** The battery cartridge shown in the drawing is the B
T
-700LL.
Components and Functions
9
Introduction
Function keys
Used to select functions.
* Function key functions are assigned at user programs. Refer
to the “BHT-700-CE API Reference Manual” or
“BHT-700-CE Class Library Reference Manual” for further
details.
M1, M2, M3
magic keys
• The SF and ENT key functions can be assigned to these
magic keys by making settings at the SYSTEM MENU.
• Character strings can be assigned at user programs.
* Refer to the User’s Manual for details on how to operate the
SYSTEM MENU.
Trigger switch
• Press when scanning a barcode.
• The SF and ENT key functions can be assigned to these
magic keys by making settings at the SYSTEM MENU.
• Character strings can be assigned at user programs.
* Refer to the User’s Manual for details on how to operate the
SYSTEM MENU.
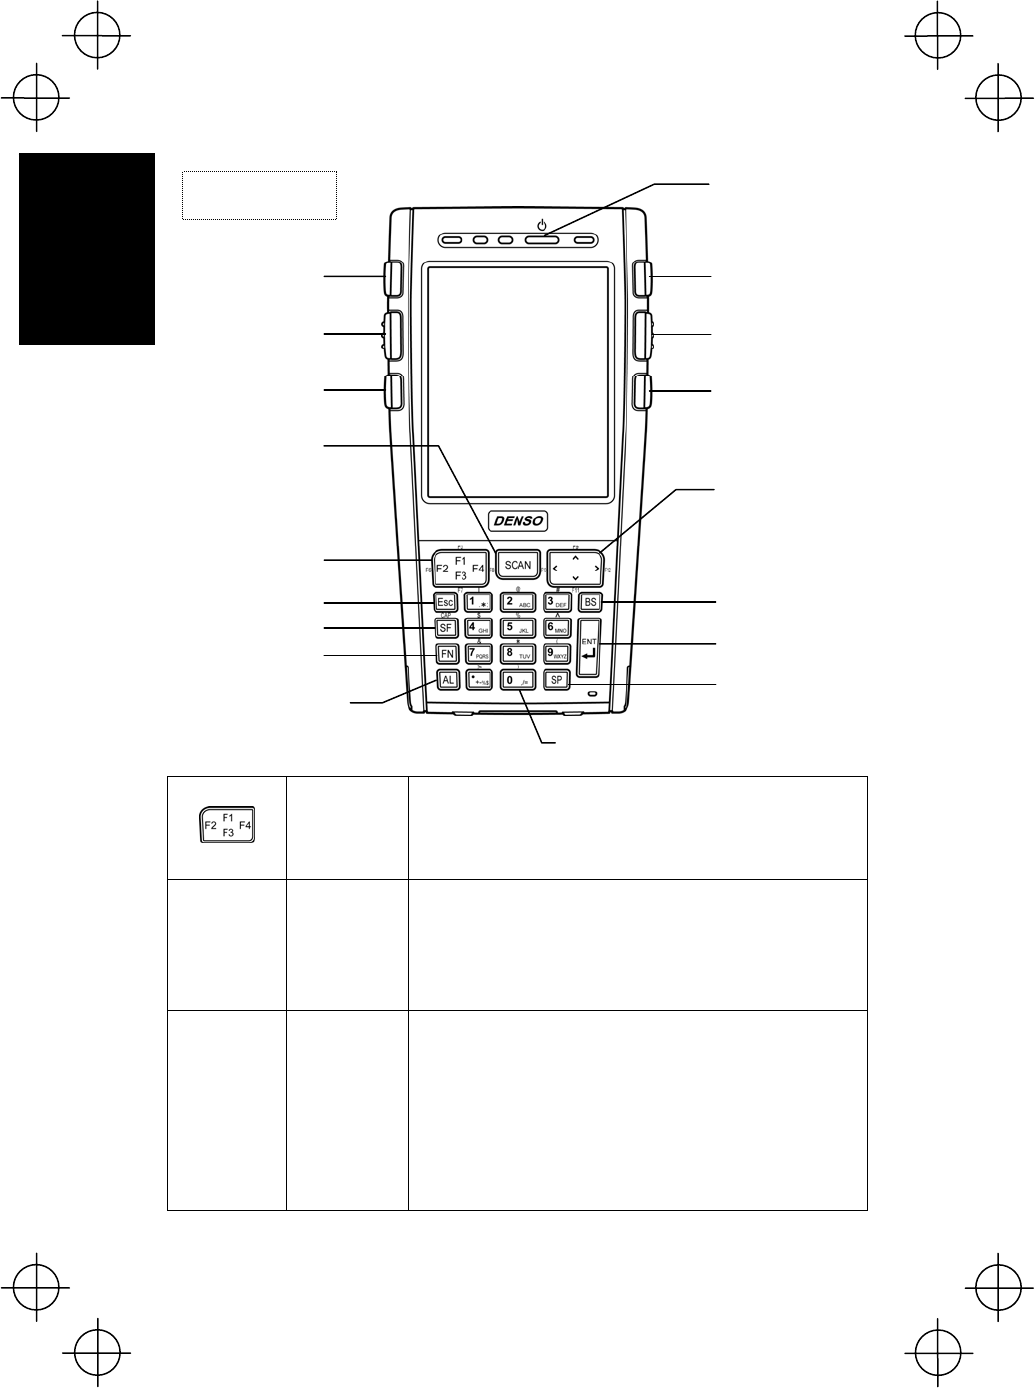
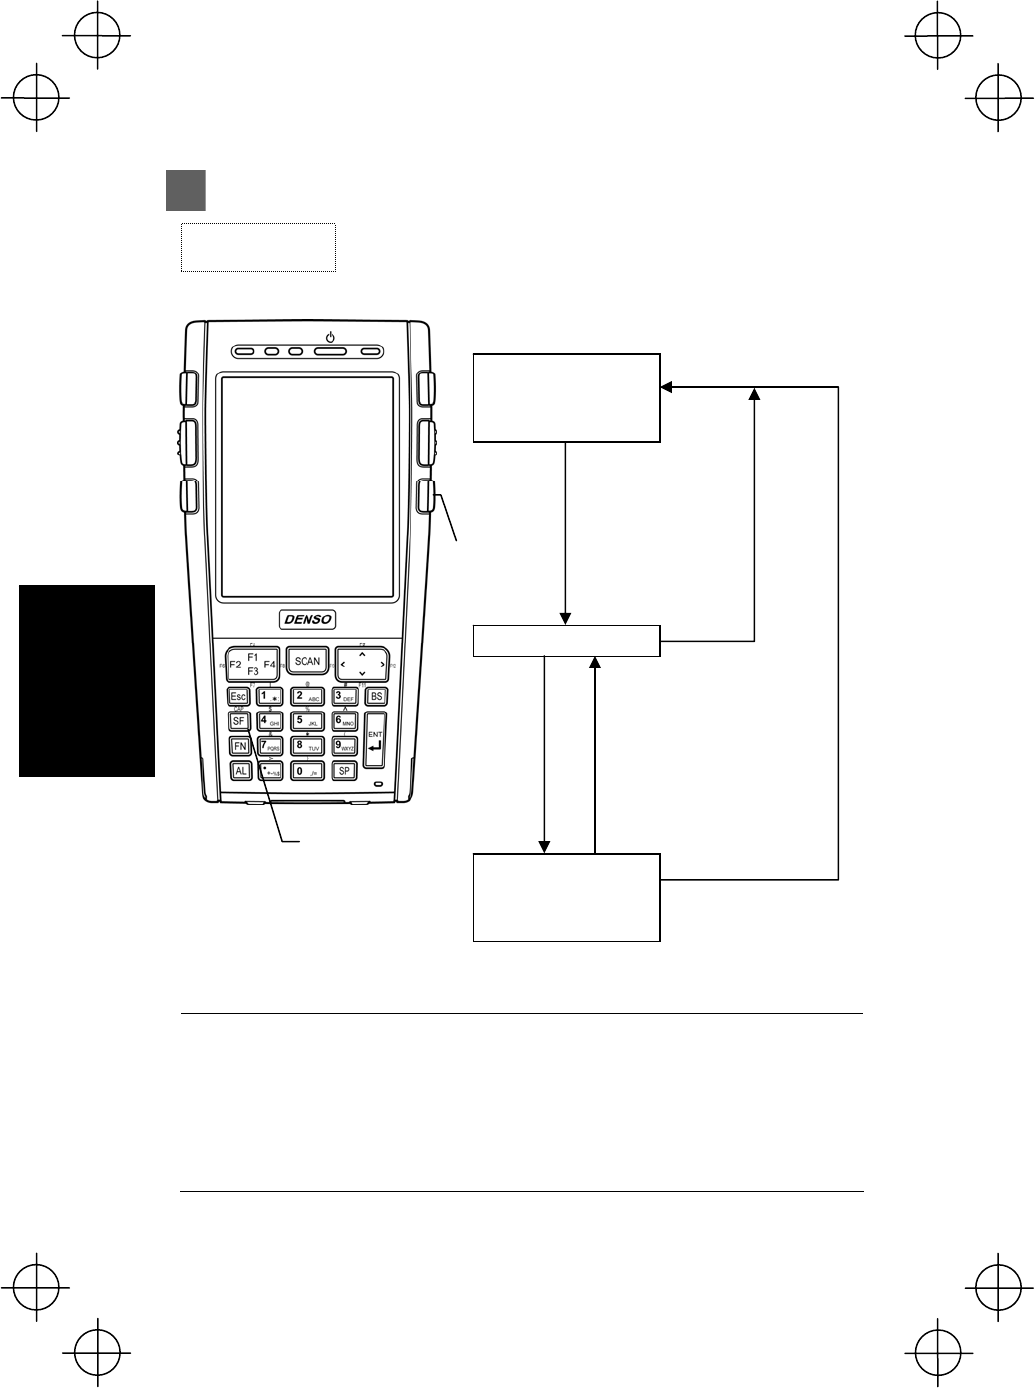
27-Keypad
Components and Functions
ENT (Enter) ke
y
M3 magic ke
y
Cursor keys
AL (Alphabetical mode)
key
SF (Shift) ke
y
SP (Space) ke
y
Trigger switch
Power ke
y
Numerical keys
SCAN ke
y
M1 magic ke
y
FN (Function mode)
key
Function keys
TAB ke
y
BS (Backspace) ke
y
Trigger switch
M2 magic ke
y
ESC(Escape) ke
y

10
Introduction
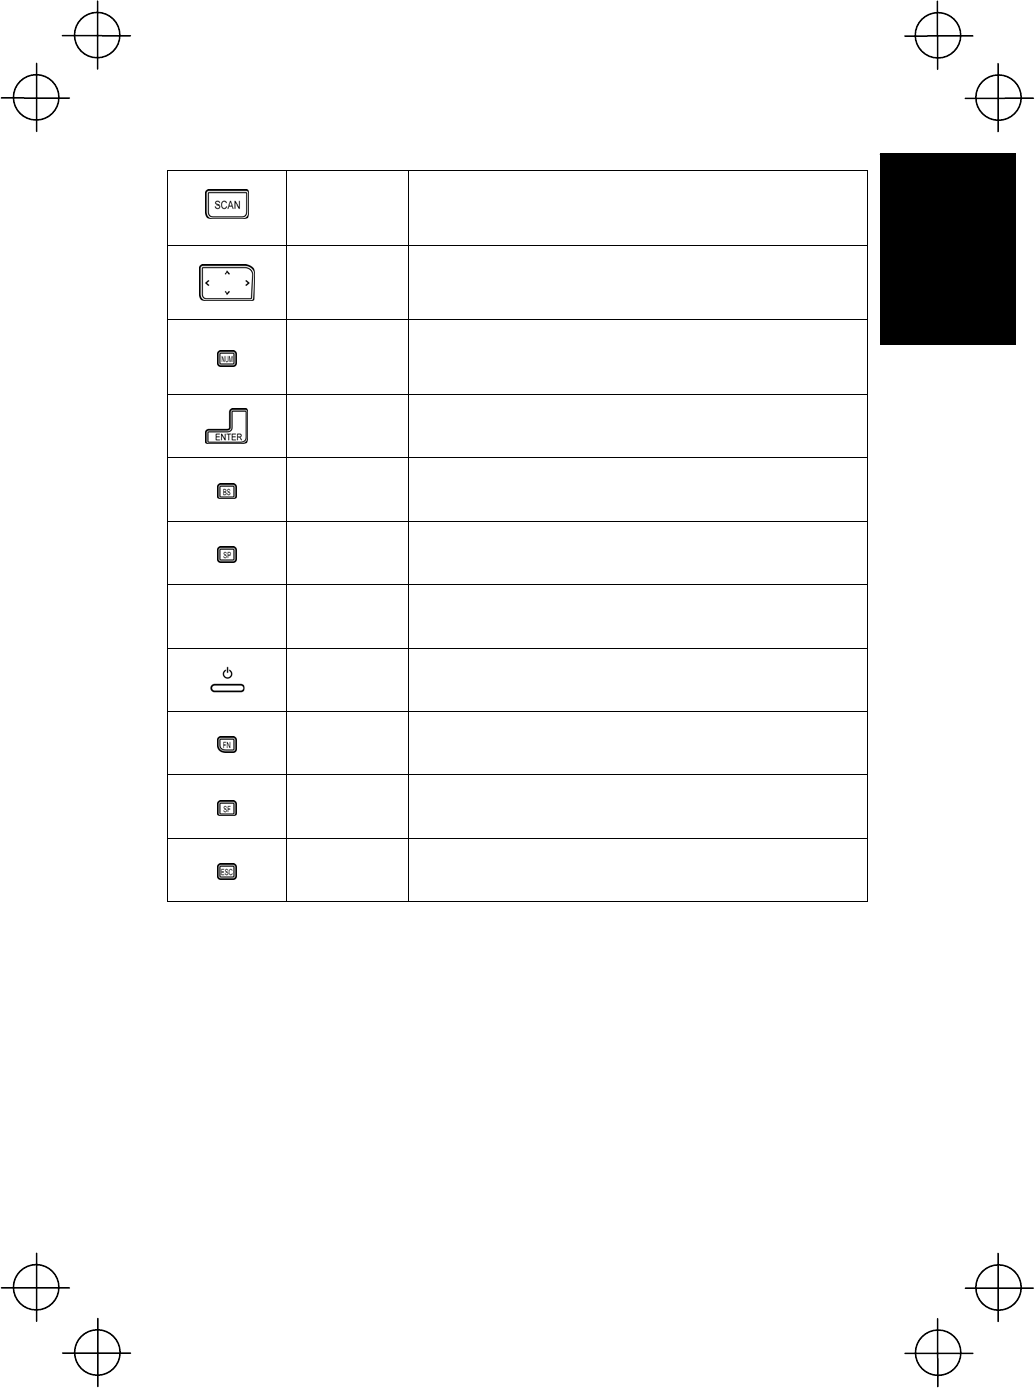
Scan key Press to scan barcodes.
(This key performs the same function as a full-press of the
trigger switch.)
Cursor keys Used to move the cursor and select menus.
Numerical
keys Used to enter data.
Tab key Used to enter a tab character.
Enter key
Press to finalize entered data or execute operations.
Backspace
key Moves back one character.
Space key Enters a space
Alphabetical
mode key Switches to alphabet entry mode.
Power key Turns the BHT power ON and OFF.
Function
mode key Switches to Function mode.
Shift key Used in combination with other keys such as the numerical
keys, BS key, or power key for special input procedures.
Escape key Cancels the operation.
Components and Functions
11
Introduction
Function keys
Used to select functions.
* Function key functions are assigned at user programs. Refer
to the “BHT-700-CE API Reference Manual” or
“BHT-700-CE Class Library Reference Manual” for further
details.
M1, M2, M3
magic keys
• The SF and ENT key functions can be assigned to these
magic keys by making settings at the SYSTEM MENU.
• Character strings can be assigned at user programs.
* Refer to the User’s Manual for details on how to operate the
SYSTEM MENU.
Trigger switch
• Press when scanning a barcode.
• The SF and ENT key functions can be assigned to these
magic keys by making settings at the SYSTEM MENU.
• Character strings can be assigned at user programs.
* Refer to the User’s Manual for details on how to operate the
SYSTEM MENU.
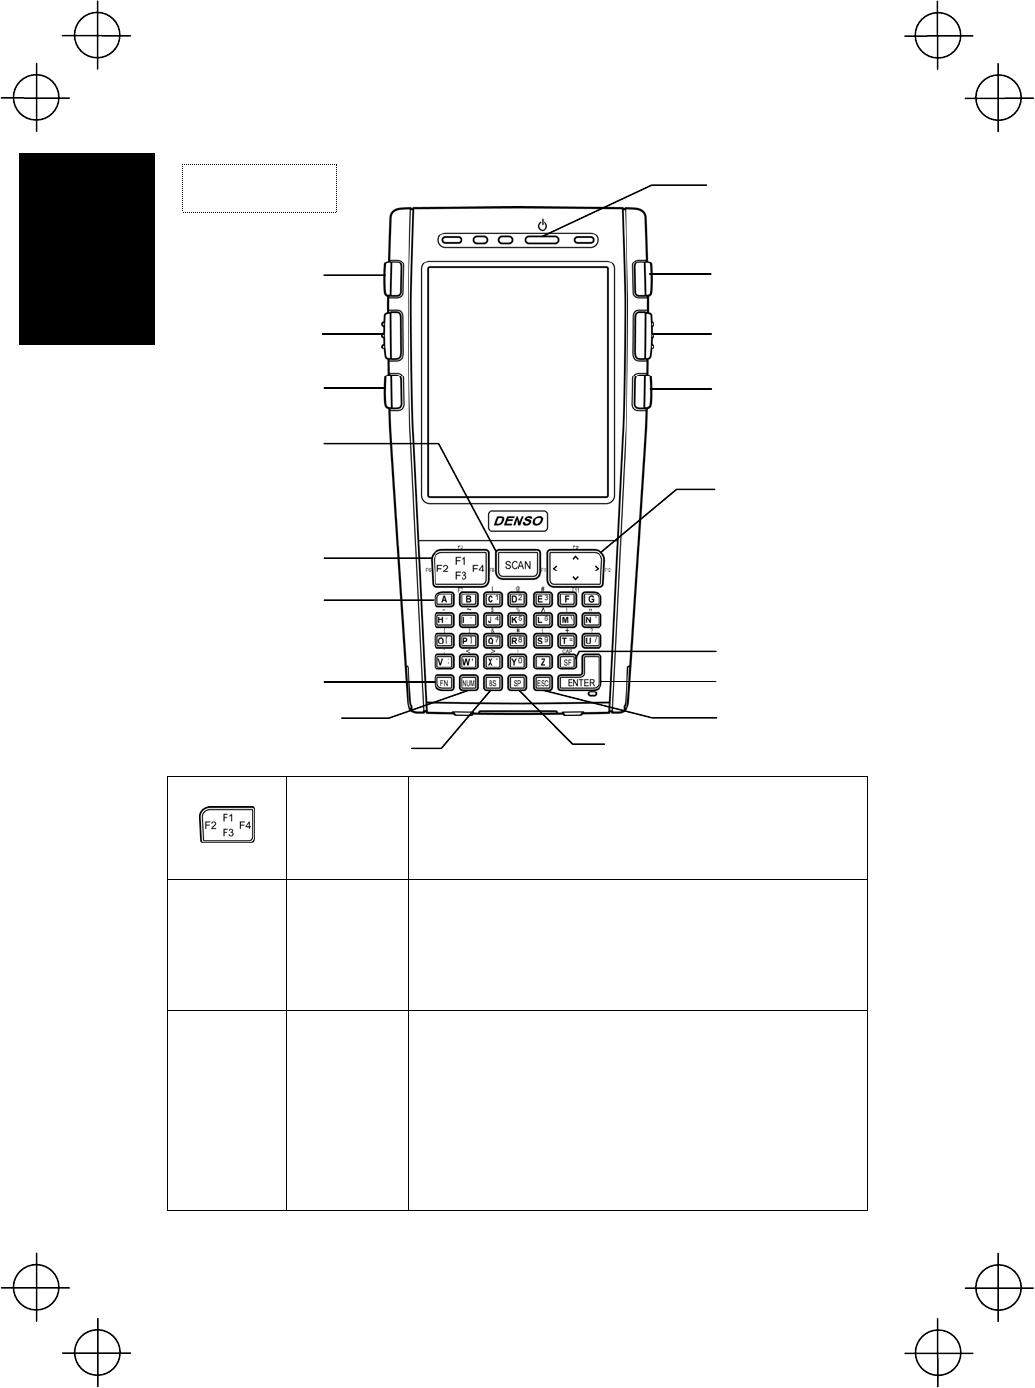
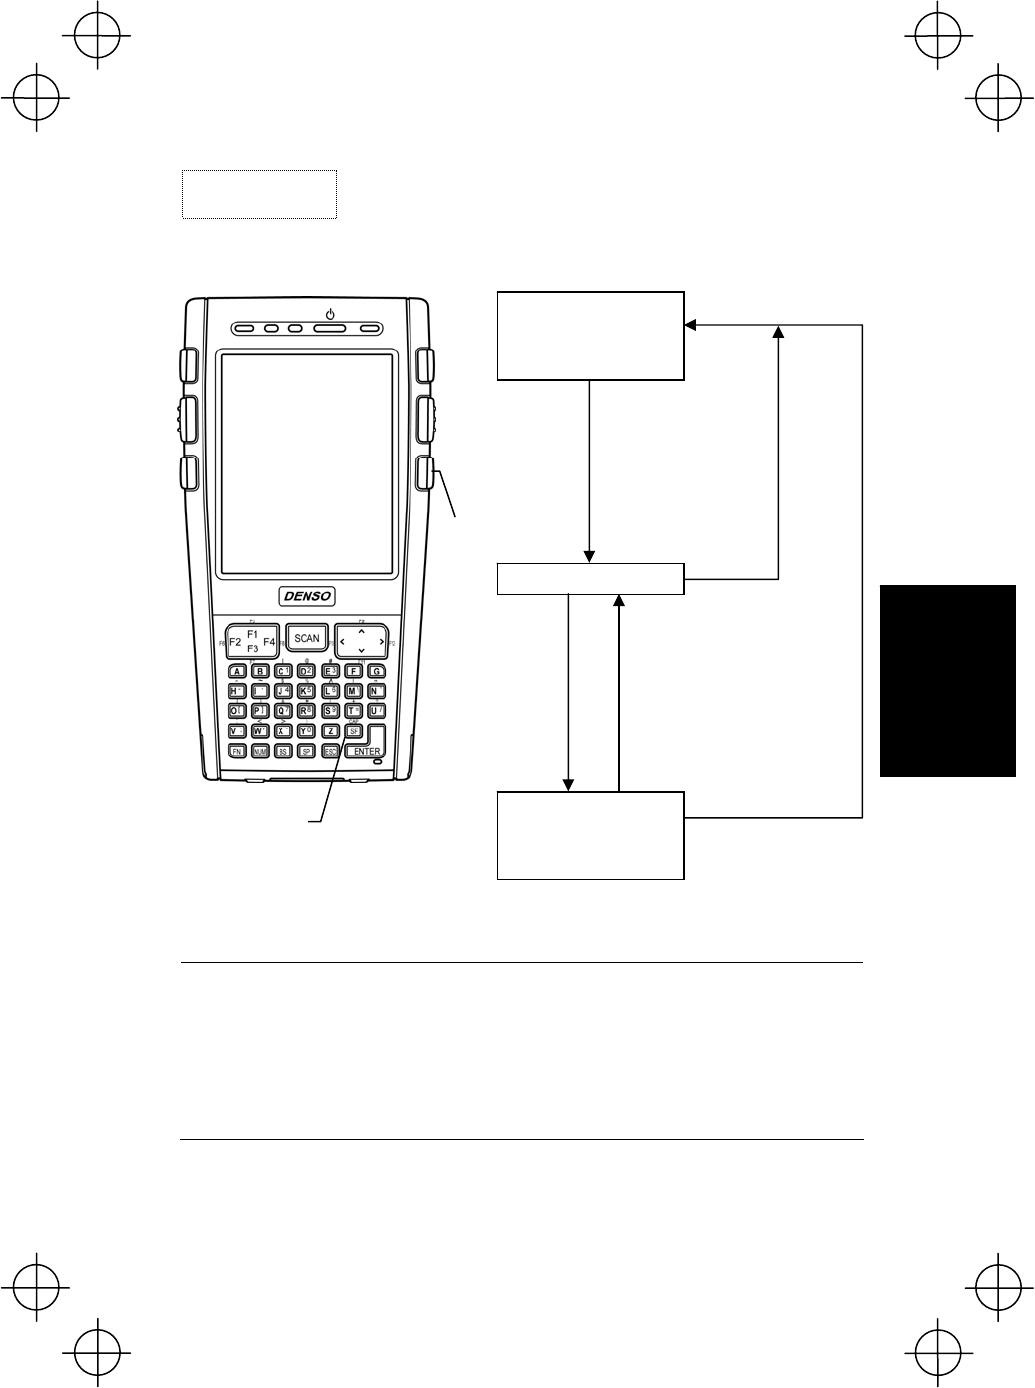
42-Keypad
Components and Functions
ENT (Enter) ke
y
M3 magic ke
y
Cursor keys
SF (Shift) ke
y
SP (Space) ke
y
Trigger switch
Power ke
y
Alphabet keys
SCAN ke
y
M1 magic ke
y
FN (Function mode)
key
Function keys
TAB ke
y
BS (Backspace) ke
y
Trigger switch
M2 magic ke
y
ESC (Escape) ke
y
NUM (Numerical mode)
key
12
Introduction
Scan key Press to scan barcodes.
(This key performs the same function as a full-press of the
trigger switch.)
Cursor keys Used to move the cursor and select menus.
Numerical
mode key Switches to numerical entry mode.
Enter key
Press to finalize entered data or execute operations.
Backspace
key Moves back one character.
Space key Enters a space
Alphabet keys Used to enter data.
Power key Turns the BHT power ON and OFF.
Function
mode key Switches to Function mode.
Shift key Used in combination with other keys such as the numerical
keys, BS key, or power key for special input procedures.
Escape key Cancels the operation.
Components and Functions
13
Introduction
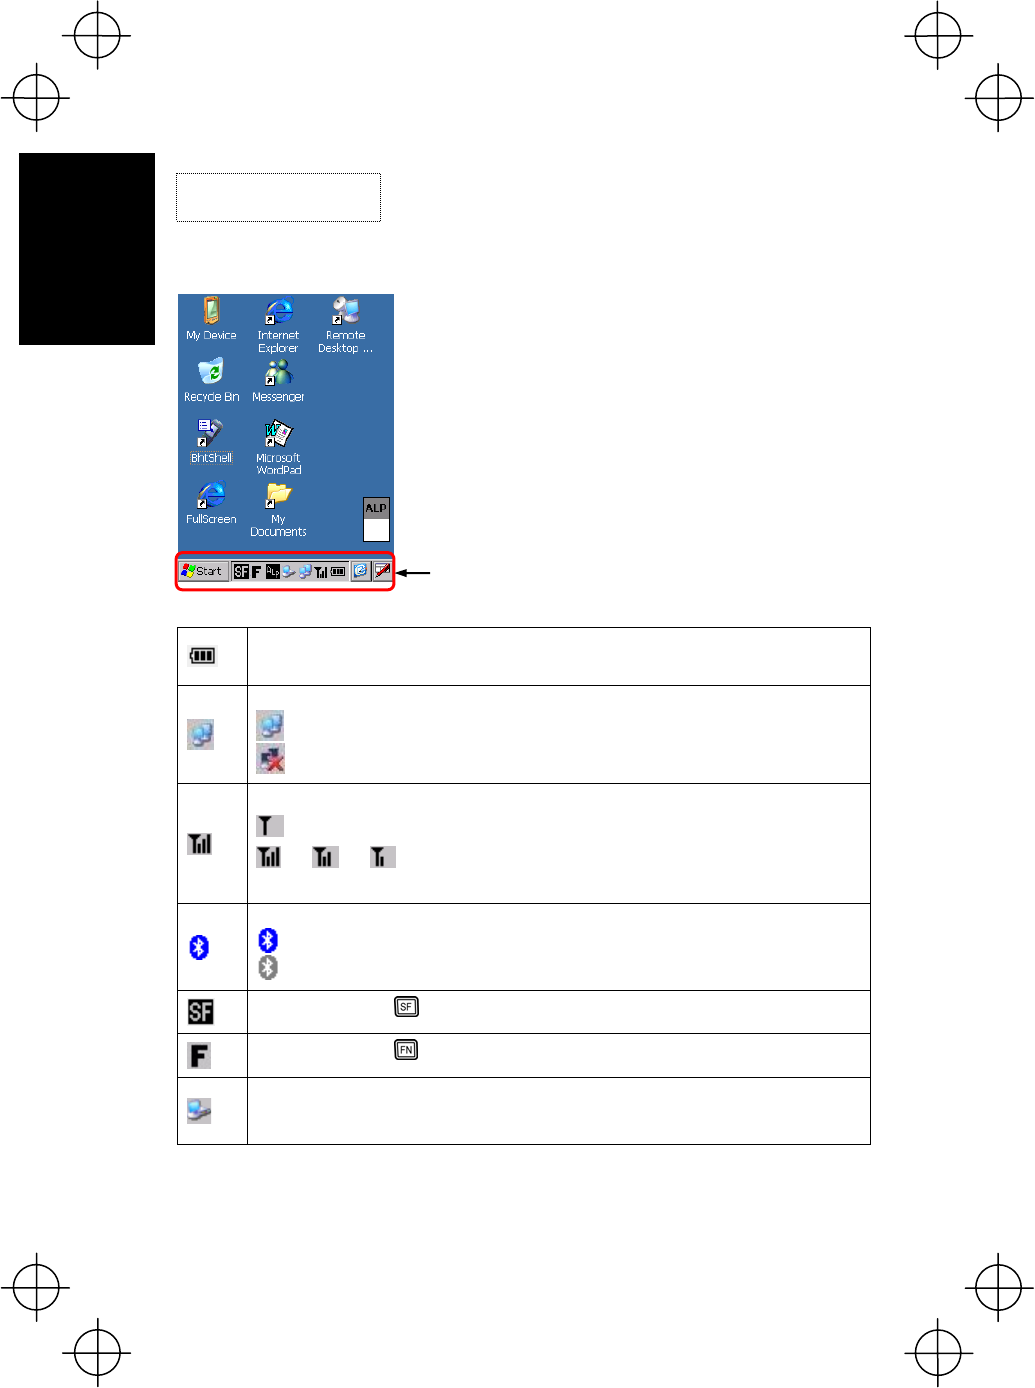
Depending on user settings and so on, the Windows desktop in the screens in this
Operator’s Guide may differ a little from that in the actual BHT screen.
Note: The tasktray may also be a little different from
that in the actual screens.
Indicates the current battery power level. (See page 41.)
Indicates the wireless connection status.
: The BHT is connected to a wireless network.
: The BHT is not connected to a wireless network.
Indicates the wireless device open status and radio field intensity.
: Displays when the wireless device is open.
→ → : Indicates the radio field intensity by the number of bars.
Strong → Weak
Indicates the Bluetooth® power status.
: Appears when the Bluetooth® device is powered on. (Blue.)
: Appears when the Bluetooth® device is powered off. (Grey.)
Displays when the key is pressed and the keys are in the shift status.
Displays when the key is pressed and the keys are in the function status.
Displays when the BHT is communicating with the computer via Microsoft
ActiveSync.
Screen Display
Components and Functions

14
Introduction
Displays when in alphabet entry mode.
(The entry mode can be changed by pressing the ALP key.)
Pressing a numerical key when in alphabet entry mode displays the letter assigned
to that key in this ALP window.
Tap this icon while an application is running to display the desktop. Tap again to
return the original application execution screen.
Used to display/hide the software keyboard.
: Tap this icon to display the software keyboard.
: Tap this icon to hide the software keyboard.
Indicates the software keyboard status.
(Tap this icon to display/hide the software keyboard, or switch the keyboard status
ON/OFF.)
: Displays when ON.
: Displays when OFF.
(This icon does not dislay by default, but can be displayed by changing the setting at
the System Menu or user programs.)
Displays when the CPU switches to standby.
(This icon does not dislay by default, but can be displayed by changing the setting at
the System Menu or user programs.)
Displays when Caps Lock is pressed at the software keyboard.
Components and Functions
15
Introduction
Input Method
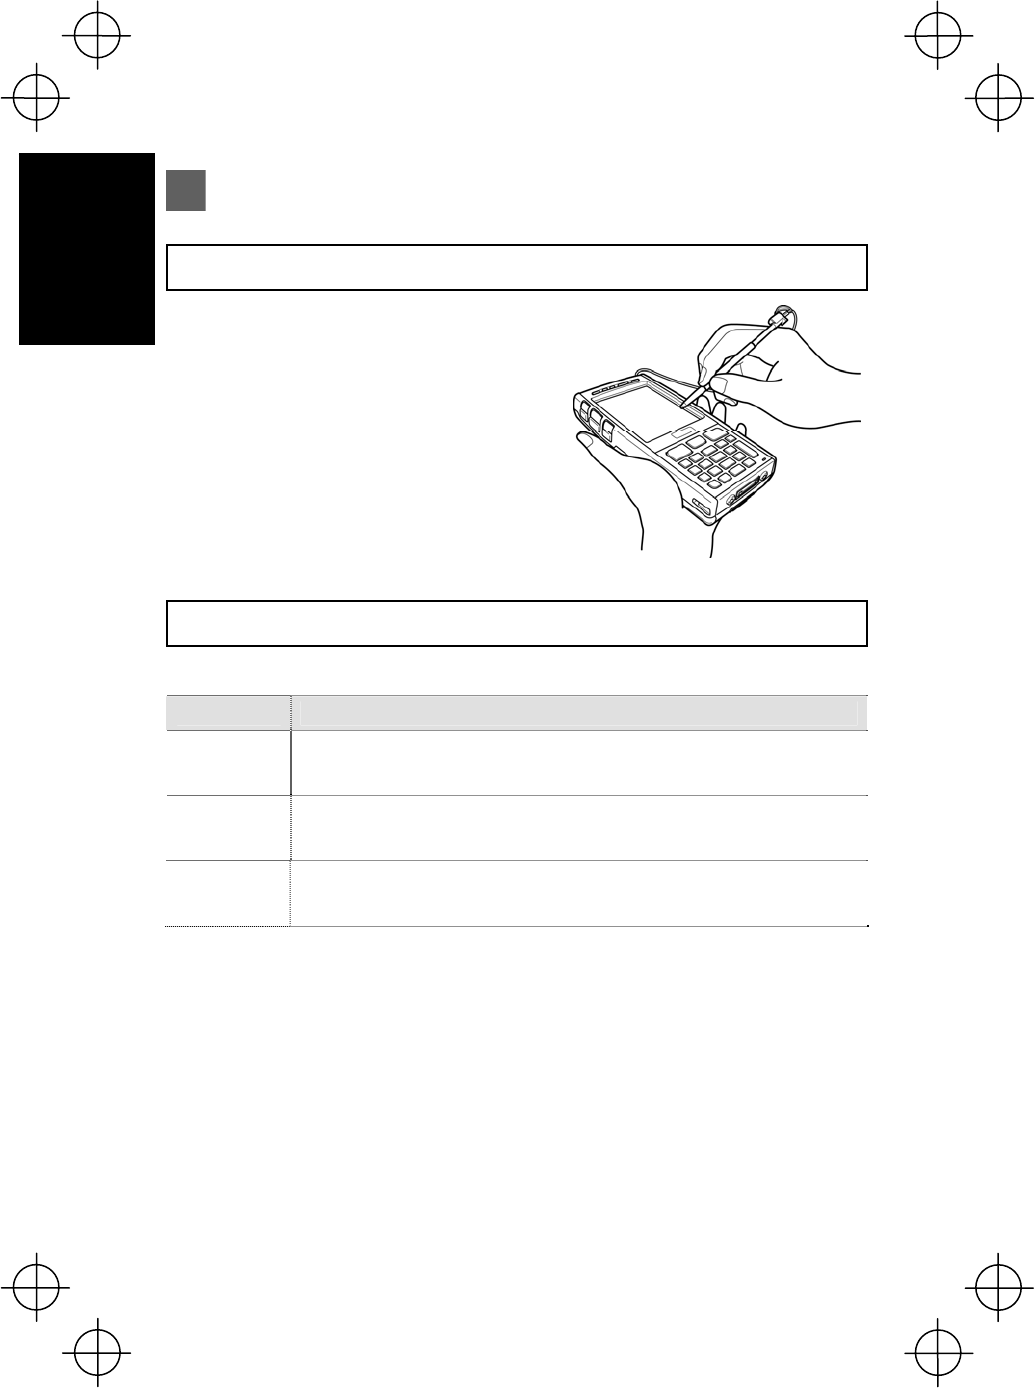
Using the Stylus
The BHT liquid crystal display (LCD) is a
touch screen. Buttons, menus and so
displayed on the screen can be selected
using the stylus provided.
Always perform touch screen adjustments
before operating the touch screen. (See page
23.)
Touch Screen Operation
Select the LCD touch screen buttons and menus and so on using the stylus provided.
Action Description
Tap This involves tapping the touch screen once. This function is the equivalent of
a “click” with a mouse on a computer.
Double-tap This involves tapping the touch screen twice in quick succession. This function
is the equivalent of a “double-click” with a mouse on a computer.
Drag This involves moving the stylus to an object while pressing the touch screen.
This function is the equivalent of “dragging” with the mouse on a computer.
• Always use the stylus provided to operate the touch screen. Never use fingernails
or any pointed or hard objects, or apply strong pressure or impact to the touch
screen. This may result in damage or a malfunction.
• If dirty, clean the touch screen and stylus tip prior to operation. Failure to observe
this may result in scratches to the LCD screen or hinder smooth movement of the
stylus.
16
Preparation
Charging Precautions
● Do not touch the BHT, battery, or charger terminals by hand or stain them. Doing so
could result in a contact failure or prevent charging.
● Never charge the battery near fire or in a high-temperature environment.
High-temperatures may activate the charger’s protective device, preventing charging,
and lead to protective device damage, overheating, blowout or combustion.
● Terminate charging if not completed even after the specified time has elapsed.
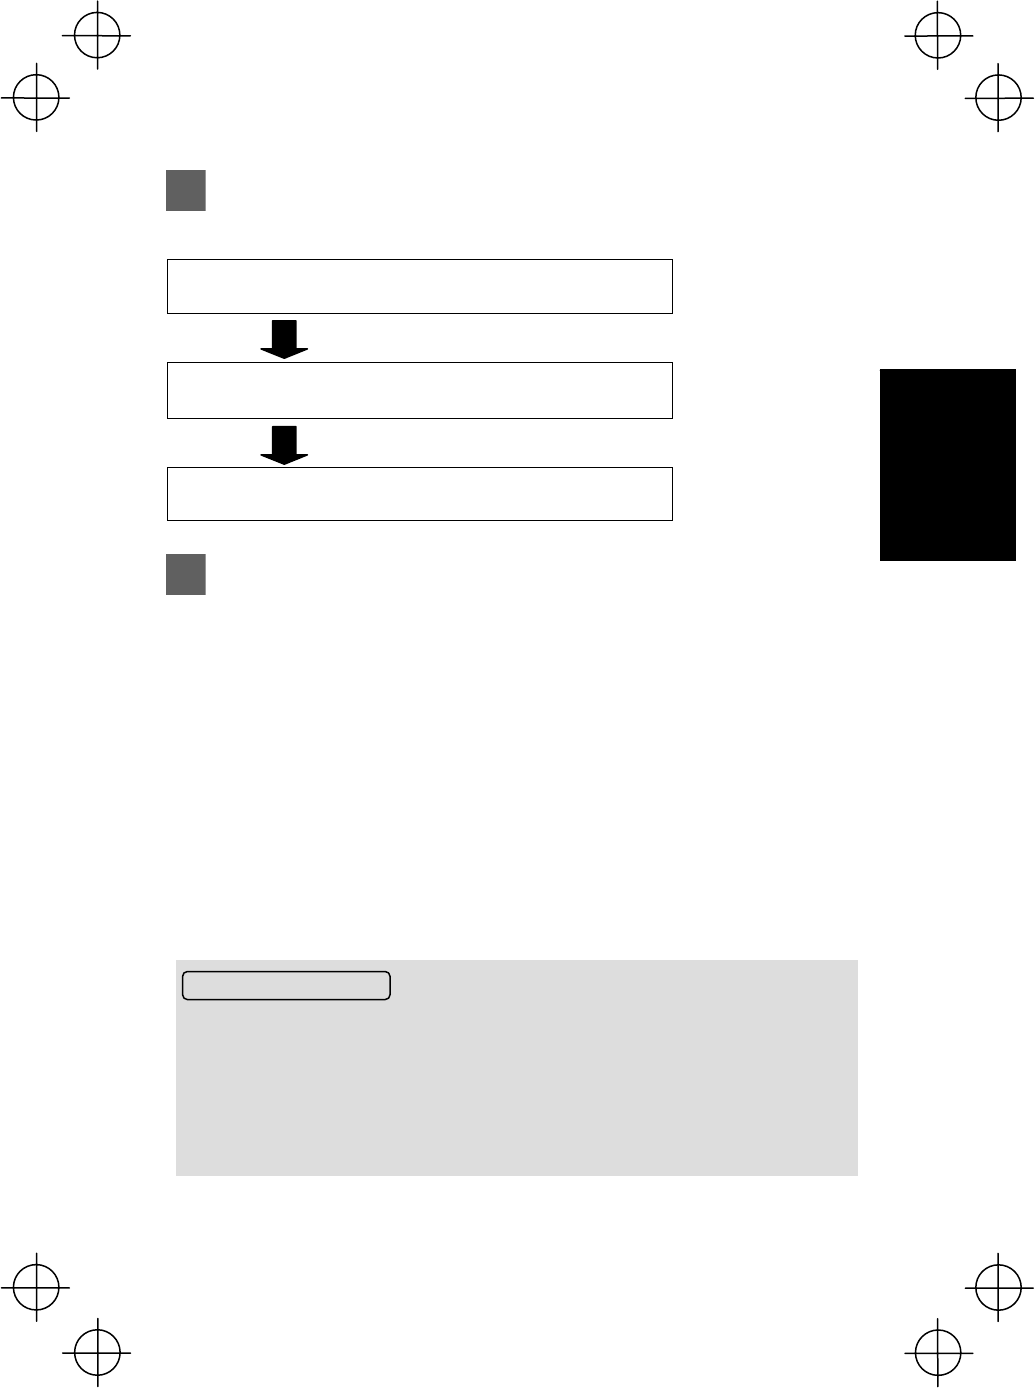
Preparation
Follow the steps below to prepare the BHT for use.
Step 1 Charging (Page 16) First charge the battery.
Step 2 Attaching the Stylus (Page 21) Attach the stylus to
prevent it from being
lost.
Step 3 Turning ON the Power (Page 22) Preparation is now
complete.
Step 1 Charging
The BHT battery is not charged when purchased and must therefore be charged prior
to use.
The following chargers can be used with the BHT.
Communication units: CU-733, CU-714
Battery chargers: CH-751, CH-704
* The CH-704 charger is used for charging individual batteries, and the CH-751 is a
stand-type (same type as CU (communication unit) charger.)
The charge time is approximately 3 hours (standard rechargeable
battery cartridge) or 6 hours (large-capacity rechargeable battery
cartridge).
• An almost completely discharged battery cartridge should take this time to become
fully charged.
17
Preparation
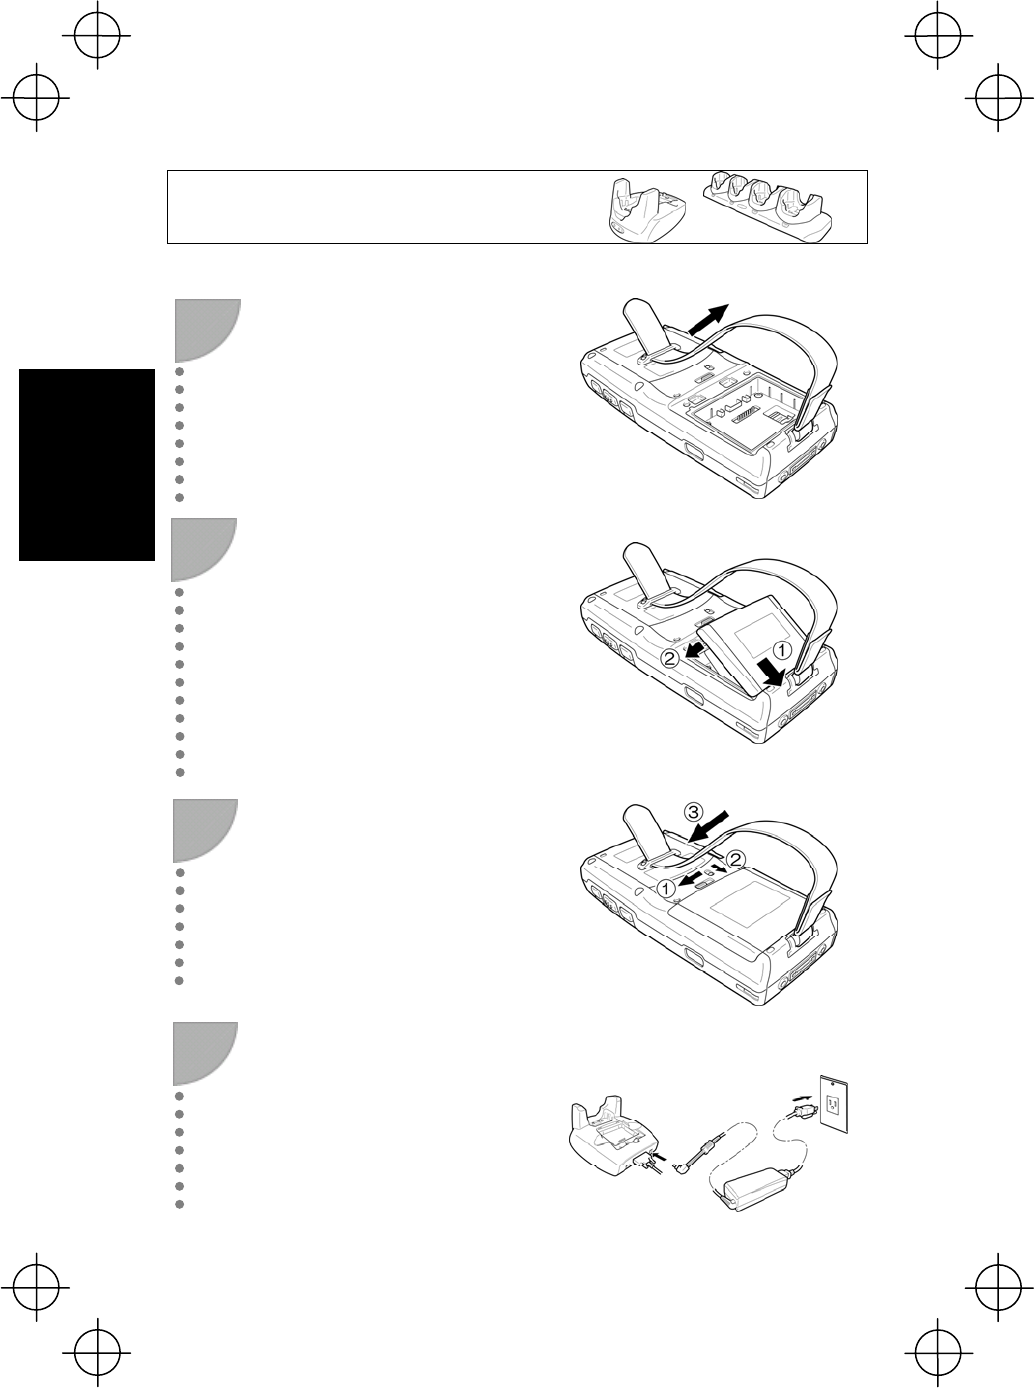
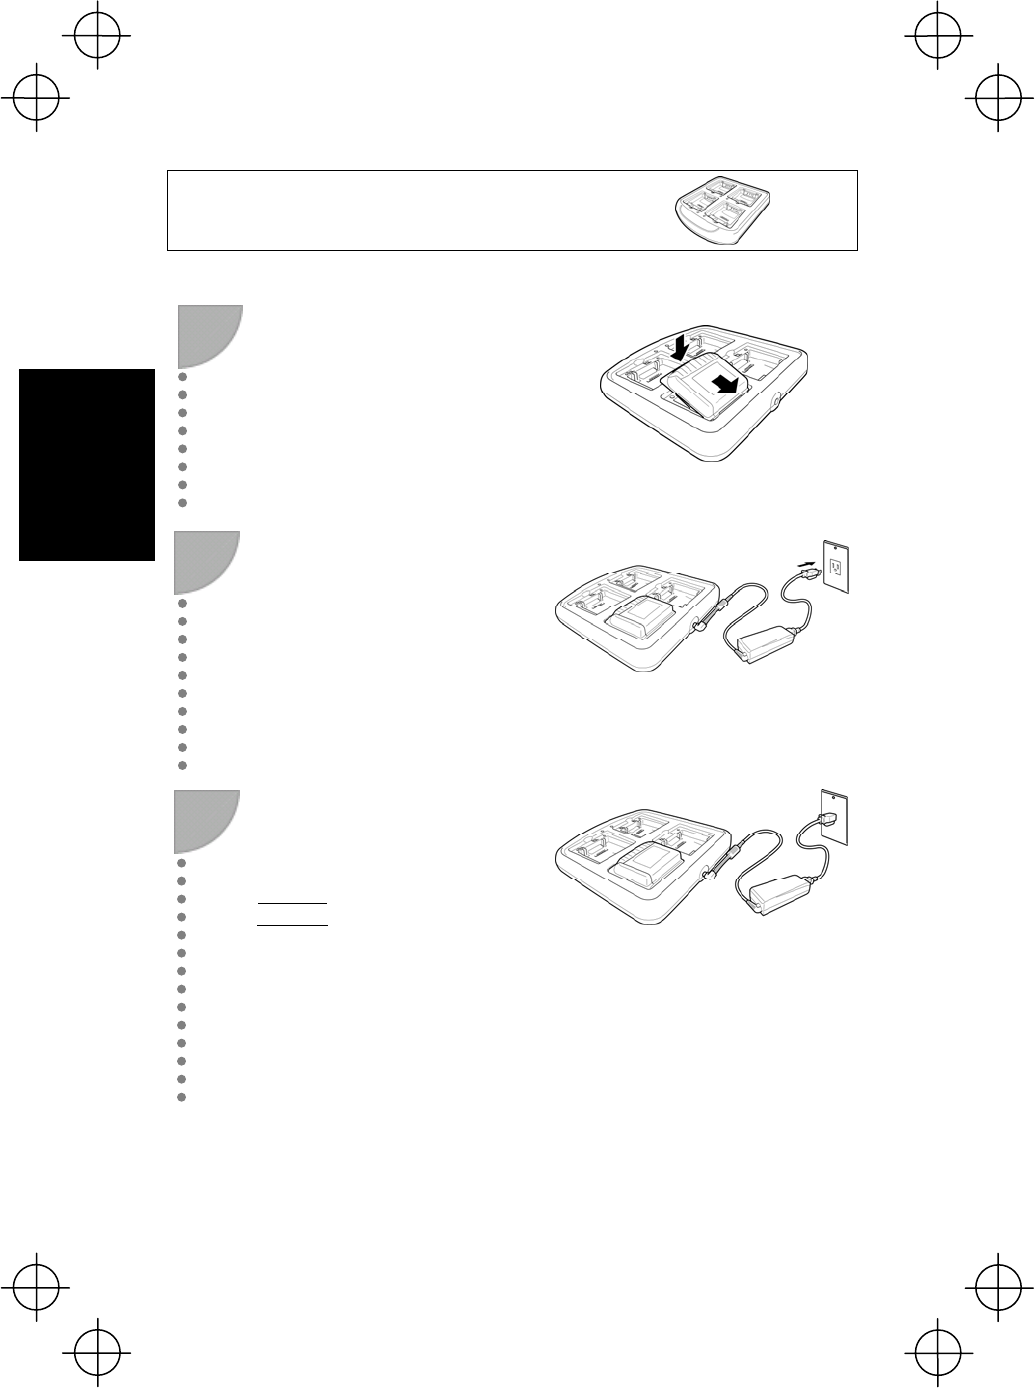
Charging with the communication unit
(CU-733, CU-714) or battery charger (CH-751)
* The battery cartridge shown in the drawing is the BT-700L.
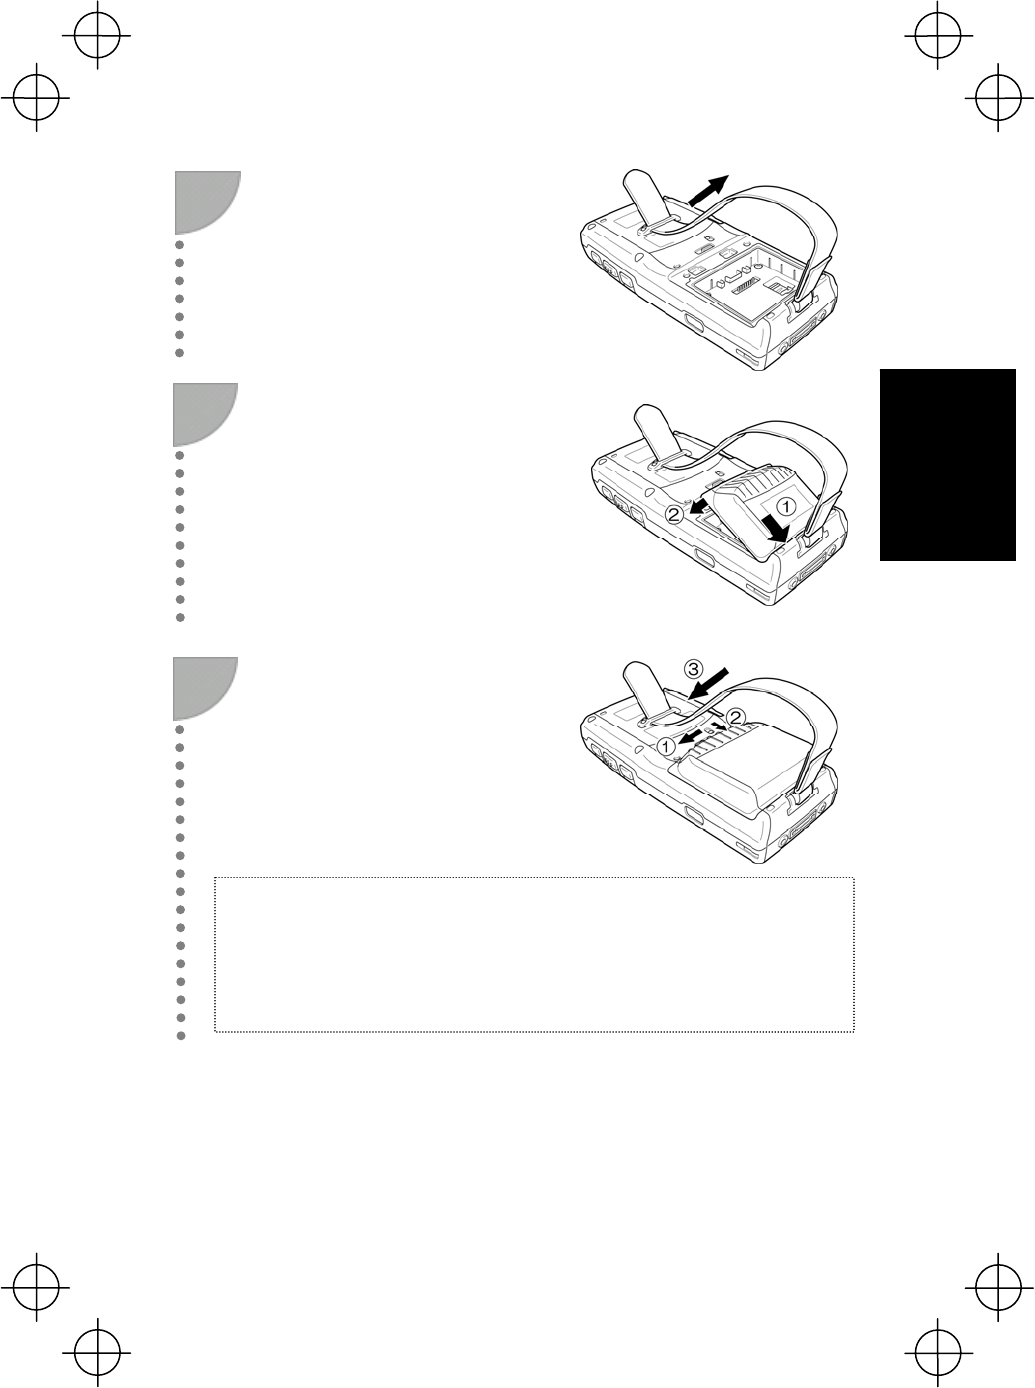
Disconnect the hand belt.
Insert the battery cartridge cover (1)
tabs into the BHT and load the
cartridge in the direction shown by
the arrow (2).
3
Slide the battery cartridge cover
release buttons (1)/(2) in the
direction shown by the arrows and
return the hand belt (3) to its original
position.
4 Connect the dedicated AC adapter
to the DC input connector on the
charger and plug the adapter into
the wall socket.
The charger Power LED (green)
turns ON.
1
2
Step 1 Charging

18
Preparation
5
Place the BHT on the charger.
Point
After placing the BHT on the charger
when using the BHT for the first time or
when left unused for long periods of time,
do not remove from the charger for
approximately 3 hours (standard
rechargeable battery cartridge) or 6
hours (large-capacity rechargeable
battery cartridge).
6 The BHT indicator LED will change
to green when charging is complete.
Point
• Charging takes approximately 3 hours
(standard rechargeable battery
cartridge) or 6 hours (large-capacity
rechargeable battery cartridge).
• An only slightly discharged battery
cartridge should take this time to
become fully charged.
Note:
The BHT is equipped with a back-up battery used to back-up the internal memory and
calender clock. The internal back-up battery is charged first when charging is
commenced.
Do not remove the BHT from the charger for at least 2 days when using the BHT for the
first time or when usin
g
after lon
g
p
eriods of time.
The LED
illuminates in
red and
charging
begins.
Step 1 Charging
Red LED ON
Green LED
19
Preparation
Charging with the battery charger (CH-704)
* The battery cartridge shown in the drawing is the BT-700LL.
1
Check the battery cartridge
terminals and insert the cartridge.
2 Connect the power cable to the
CH-704 and connect the plug to a
commercial AC power source (100
V AC).
The LED will turn red when charging is
commenced.
3 The red LED flashes slowly (1
second ON, 1 second OFF) when
charging is complete.
Point
• Charging takes approximately 3
hours (standard rechargeable
battery cartridge) or 6 hours
(large-capacity rechargeable
battery cartridge).
• An only slightly discharged battery
cartridge should take this time to
become fully charged.
Step 1 Charging
20
Preparation
Disconnect the hand belt.
Insert the battery cartridge cover (1)
tabs into the BHT and load the
cartridge in the direction shown by
the arrow (2).
6
Slide the battery cartridge cover
release buttons (1)/(2) in the
direction shown by the arrows and
return the hand belt (3) to its original
position.
4
5
Step 1 Charging
Note:
The BHT is equipped with a back-up battery used to back-up the internal memory and
calender clock.
The internal back-up battery is charged first a charged battery cartridge is inserted.
Do not remove the BHT from the charger for at least 2 days when using the BHT for the
first time or when using after long periods of time.
21
Preparation
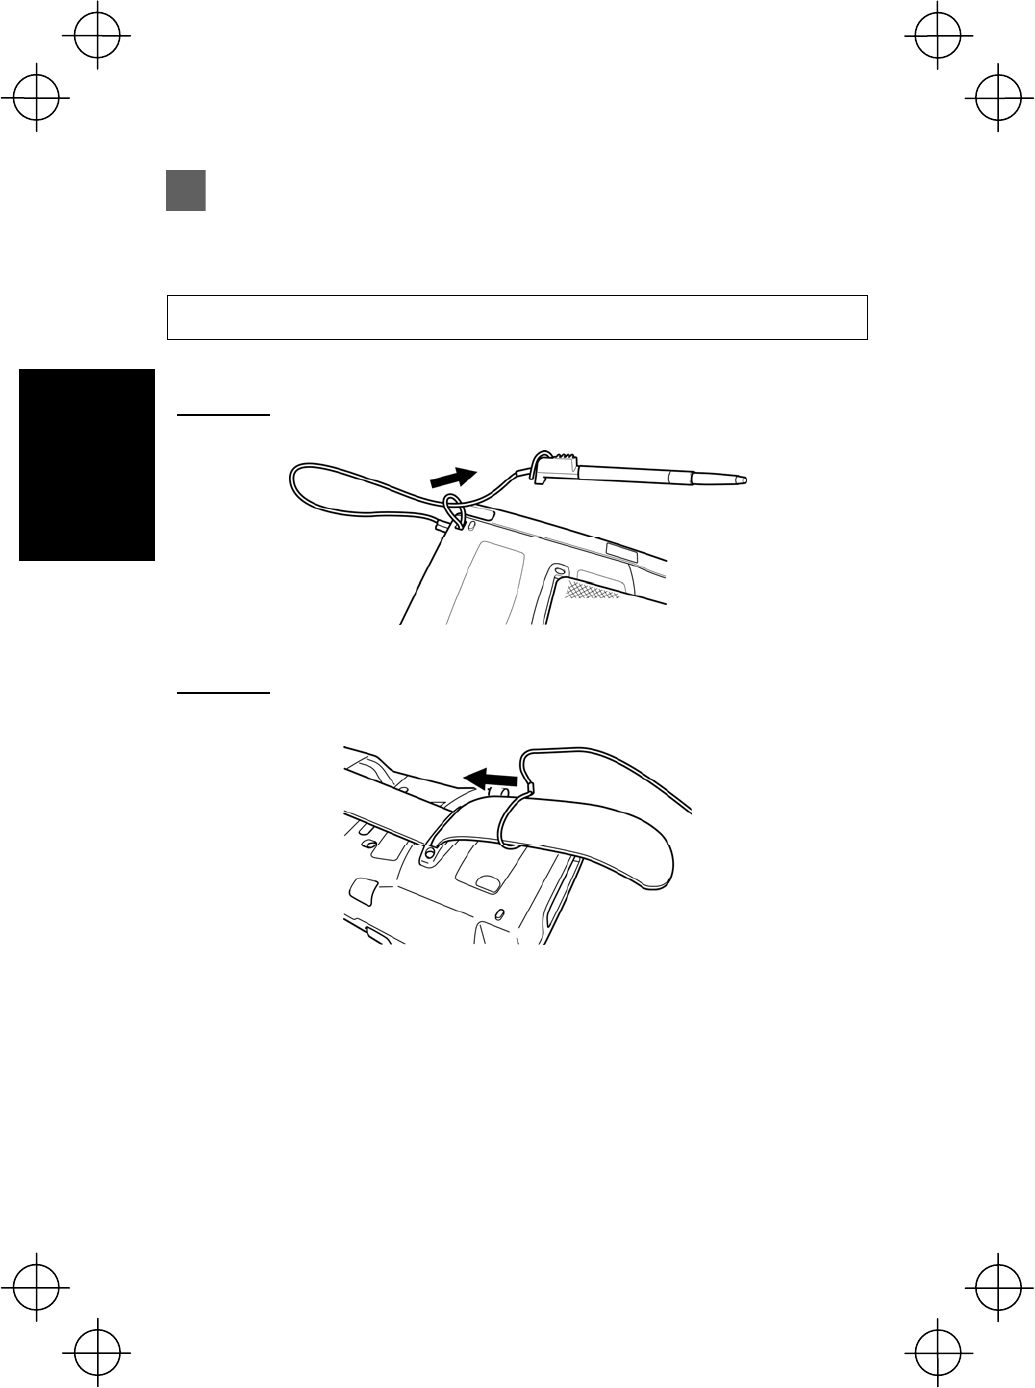
Step 2 Attaching the Stylus
Attach the stylus to prevent it from being lost.
Stylus Attachment
Attach the stylus as shown below.
27-key pad
42-key pad
22
Preparation
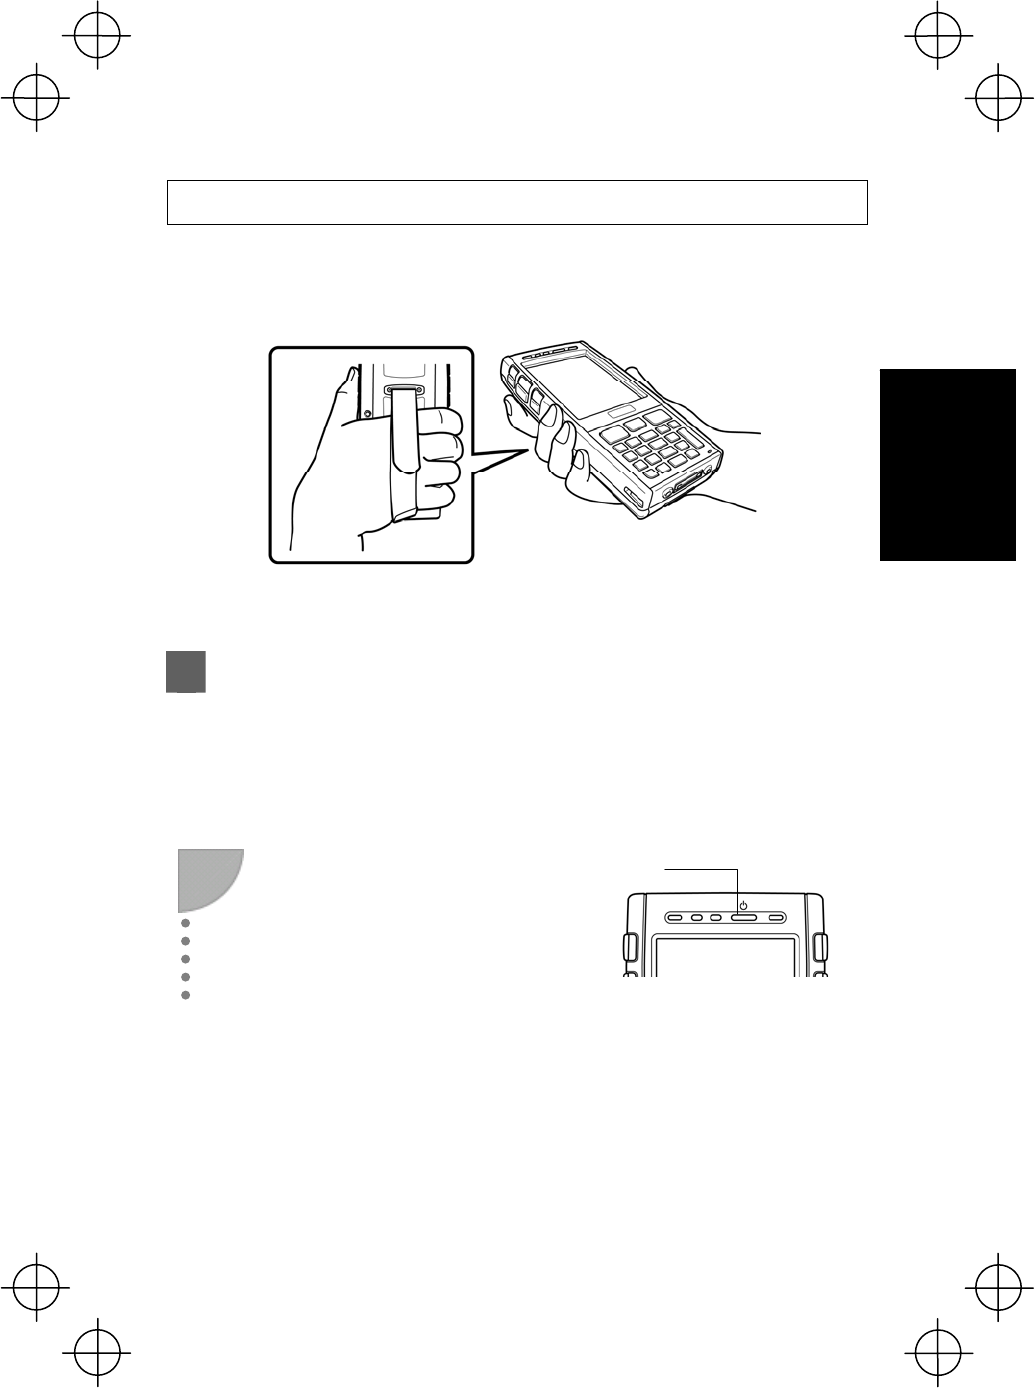
Holding the BHT
Insert your hand into the hand belt and hold the BHT as shown below.
Step 3 Turning ON the Power
It is necessary to perform touch screen calibration and set the date and time when
turning ON the BHT power for the first time. Press the power key to turn ON the BHT
power. The calibration screen should then display.
If the calibration screen does not display, first perform a “full reset”. Refer to
“Resetting and Full Resetting” (page 46) for details of the full reset method.
1
Press the power key to turn ON the
BHT power.
Power key
Step 2 Attaching the Stylus
23
Preparation
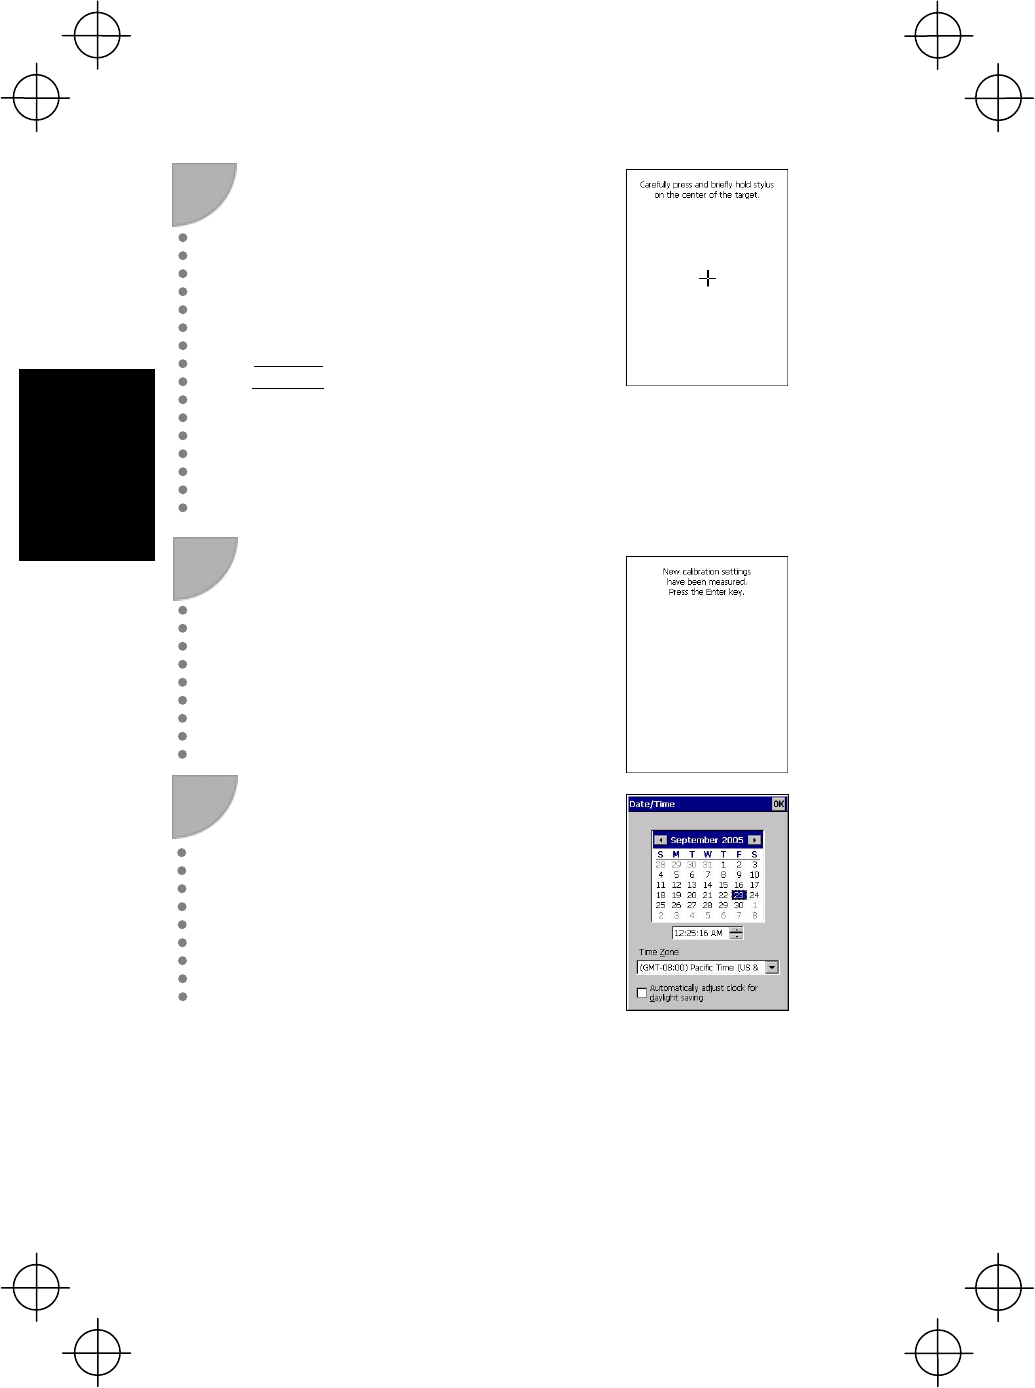
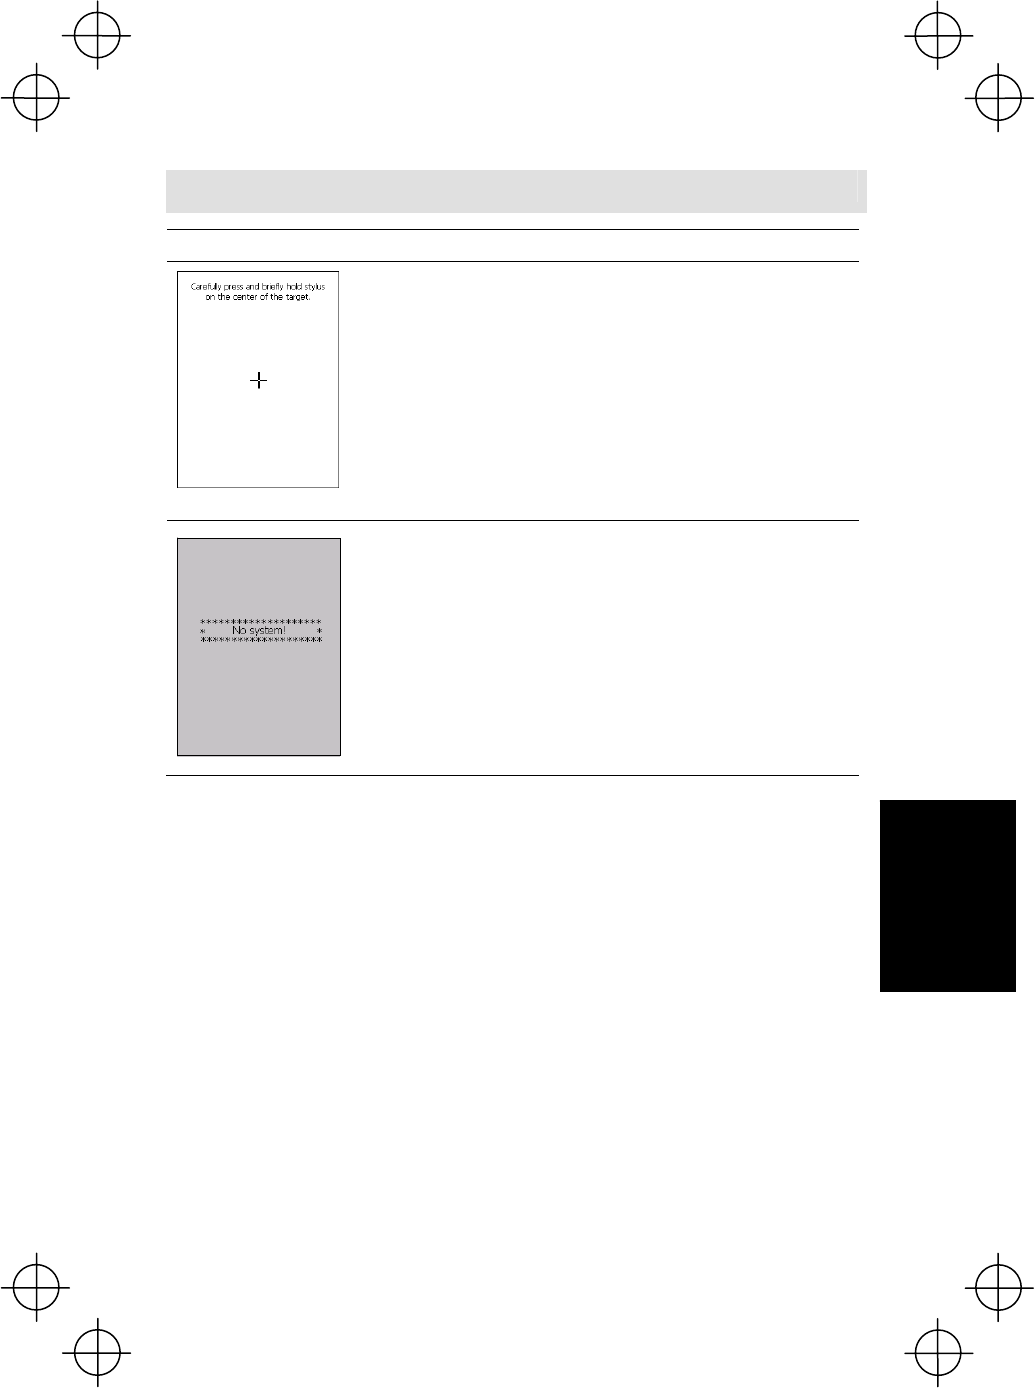
2 Tap the “+” that displays at the calibration
screen in the center with the stylus for
approximately 1 second. Next touch the
center of the “+” each time it moves. (The
“+” mark moves from the center of the
screen to the upper left, lower left, lower
right and upper right, making a total of 5
positions.)
Point
The power cannot be turned OFF by pressing
the power key during touch screen calibration.
Press the power key when calibration is
complete.
3 Press the ENT key or tap the screen to
complete touch screen calibration and
display the data and time setting screen.
4 Set the date, time and time zone and then
tap the OK button.
Step 3 Turning ON the Power
24
Preparation
Turning the Power OFF
Use one of the following three methods to turn OFF the BHT power.
(1) Normal power OFF: Press the power key.
(2) Turning the power OFF after registry back-up: Hold down the SF key and press
the power key.
(3) Auto power OFF: The power turns OFF automatically when the BHT is not used
for a set length of time.
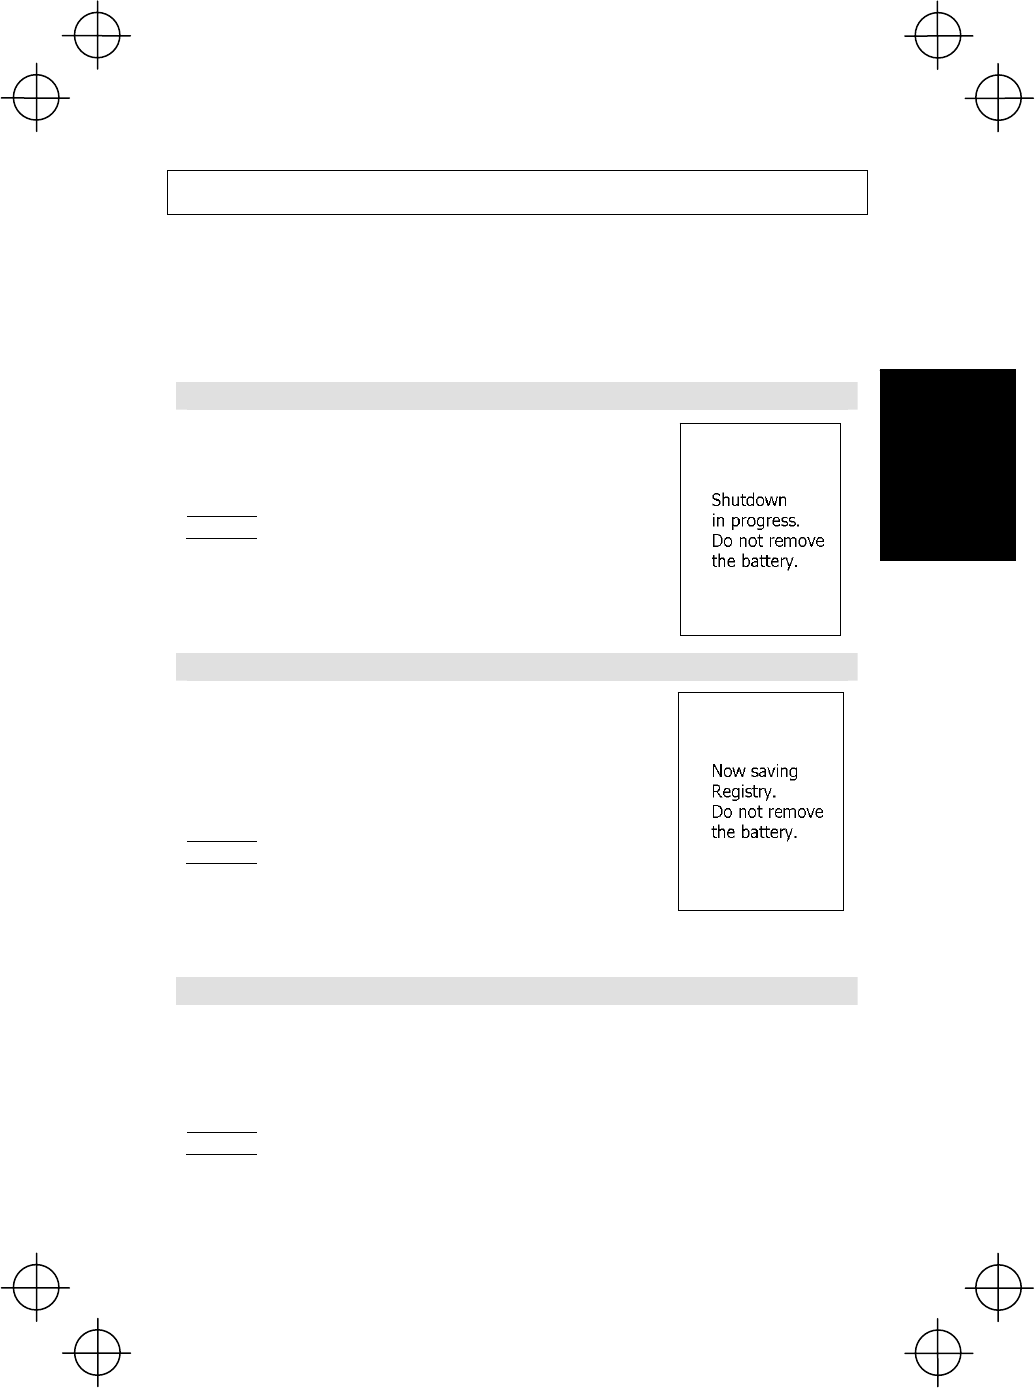
(1) Normal power OFF
Press the power key.
The BHT power turns OFF after the message right
displays.
Point
Do not remove the battery cartridge while the message on the
right is displayed.
Failure to observe this may result in data stored in the BHT
being lost.
(2) Turning the power OFF after registry back-up
Hold down the SF key and press the power key.
The message right displays and registry back-up is
commenced.
The power turns OFF automatically when the back-up is
complete.
Point
Do not remove the battery cartridge while the message on the
right is displayed.
Failure to observe this may result in data stored in the BHT
being lost.
(3) Auto power OFF
The power turns OFF automatically when the BHT is not used for the length of
time set at the user program. The default time is set to 3 minutes when the BHT is
shipped from the factory.
* Refer to the User’s Manual for further details of auto power OFF.
Point
Do not remove the battery cartridge while Auto power OFF is processing.
Failure to observe this may result in data stored in the BHT being lost.
Step 3 Turning ON the Powe
r
25
Using the BHT
Scanning Barcodes
Follow the procedure below to scan barcodes.
Procedure
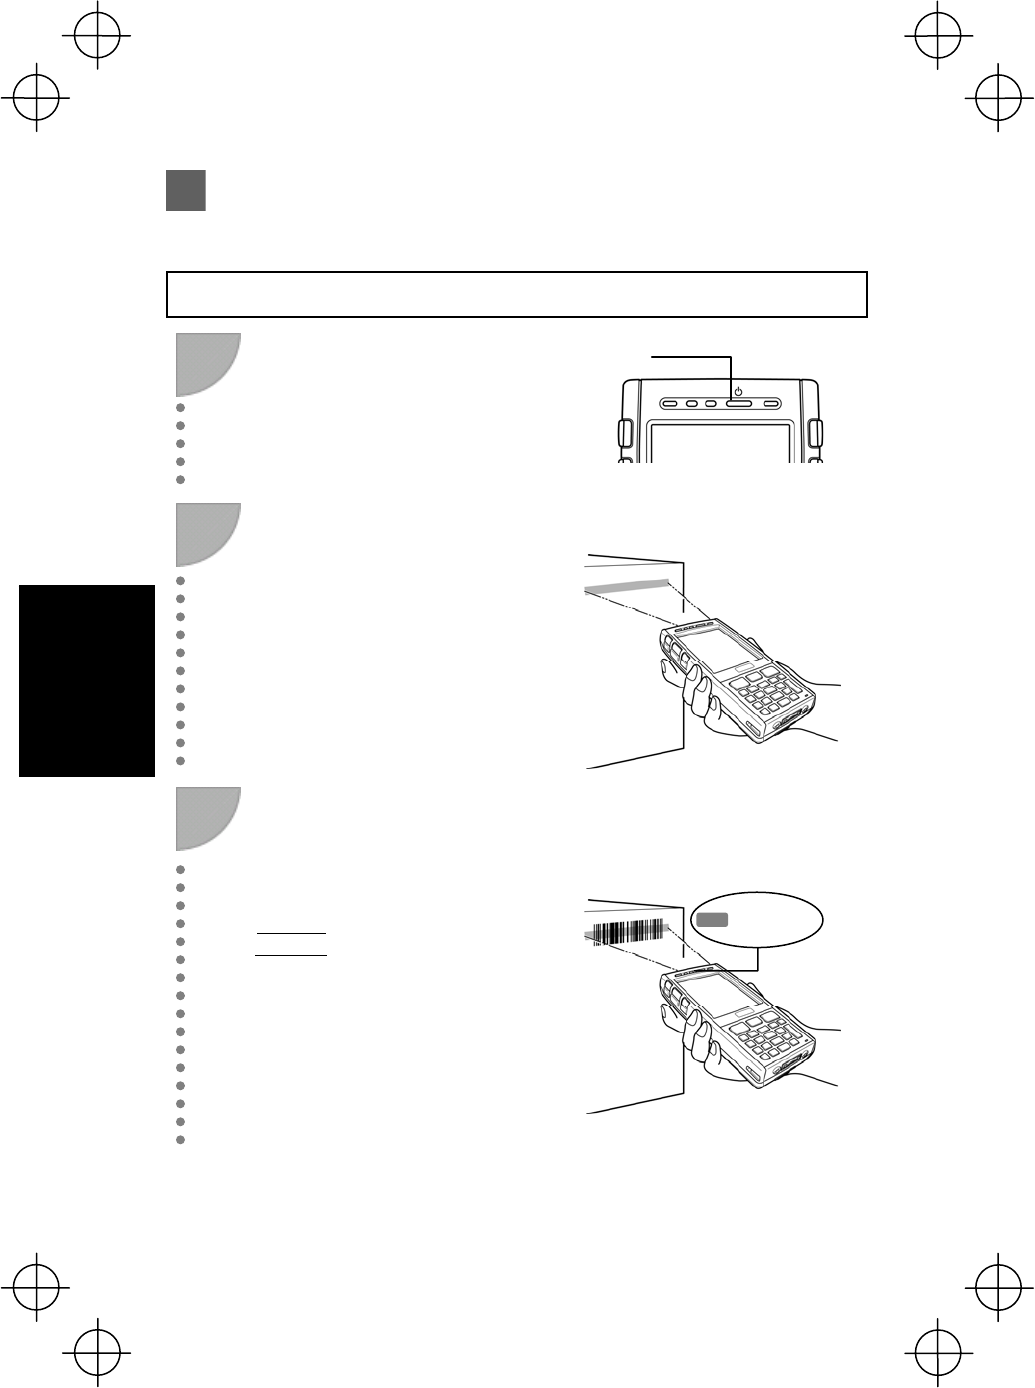
1
Turn the BHT power ON.
2
Bring the barcode reading window
to a barcode to be scanned, and
press the trigger switch.
3
The BHT turns on the illumination
LED to scan the barcode.
Barcodes can be read also by
pressing the Scan key.
Point
The barcode scanning method may
differ depending on the application.
Perform scanning in accordance with
the instructions provided in the
application User’s Manual.
When the BHT has read the barcode
successfully, the indicator LED will
illuminate in blue.
Power key
Blue LED ON
26
Using the BHT
When Unable to Successfully Read Barcodes
Cause Countermeasure
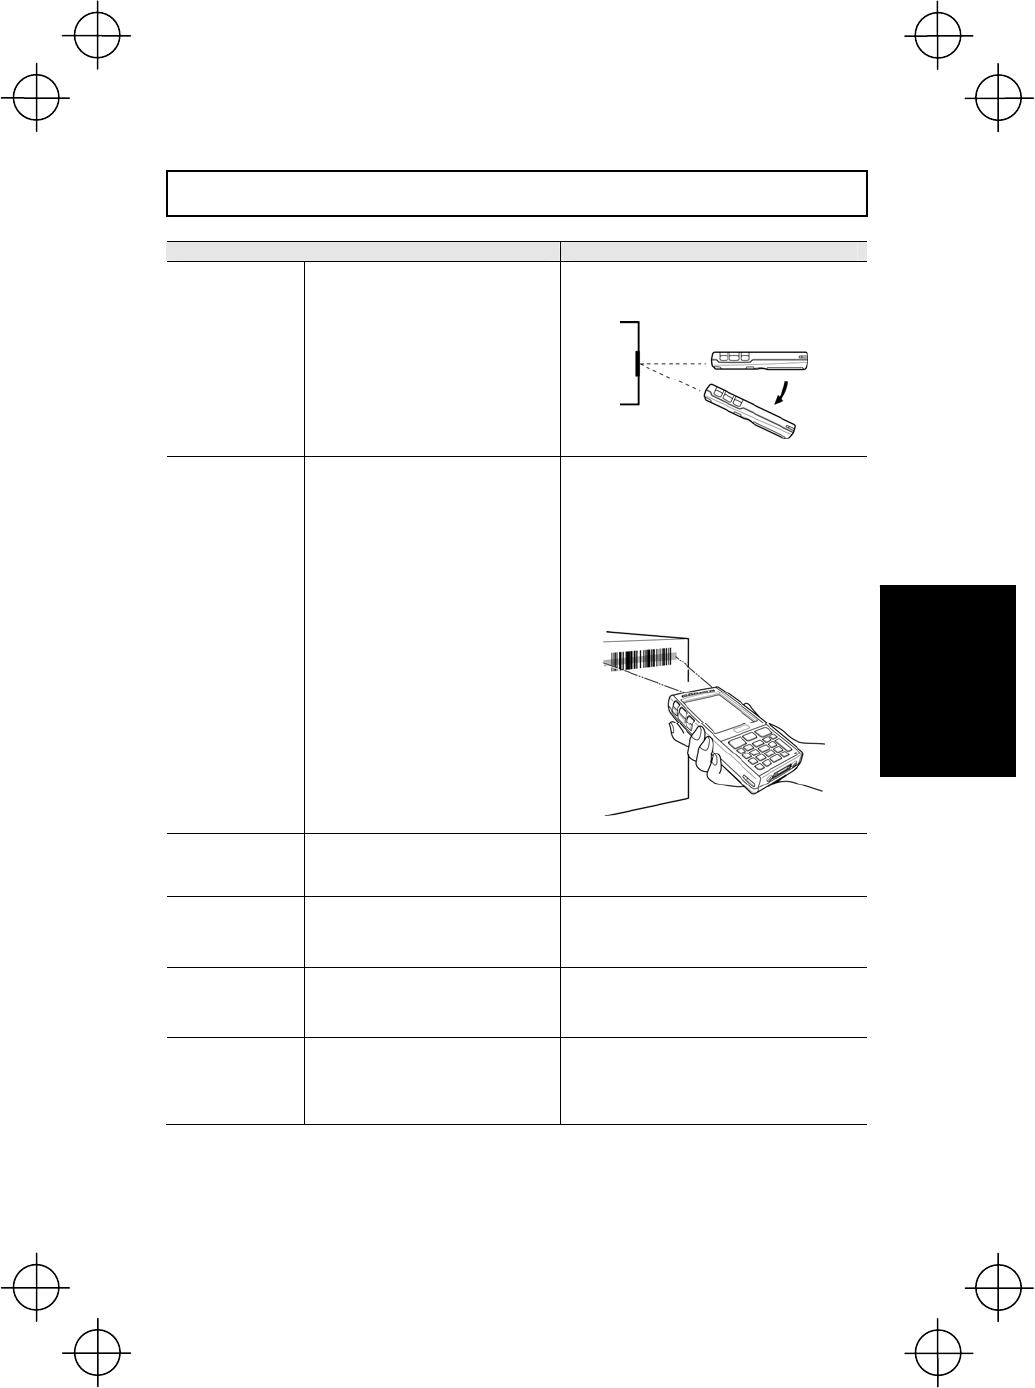
Specular
reflection
When the illumination LED is
focused on the printed surface of
the barcode from directly above,
there are times when scanning is
unsuccessful due to specular
reflection.
Change the BHT scanning angle and try
again.
Distance from
barcode
Scanning may be unsuccessful if
the BHT reading window is too
close to or too far from the
barcode, even when the barcode is
within the illumination LED range.
Move the BHT slowly toward or away from
the barcode and try again.
The illumination LED range is only a
guideline.
Barcodes can be read at a maximum
distance of 62 cm from the BHT reading
window.
Barcode surface
curvature
Scanning may be unsuccessful if
the barcode surface is curved.
Scan the barcode at the center of the
barcode reading window.
Barcode surface
dirt
Scanning may be unsuccessful if
the barcode surface is dirty.
Wipe the dirt from the barcode and try
again.
Barcode reading
window dirt
Scanning may be unsuccessful if
the barcode reading window is
dirty.
Blow any dust away with an airbrush, and
then gently wipe the reading window with a
cotton swab or similar soft object.
Direct sunlight,
ambient light
Barcode scanning may be
adversely affected by direct
sunlight or the brightness of the
surrounding light.
Perform barcode scanning away from
direct sunlight. Try adjusting the brightness
of the surrounding light when scanning
indoors.
Scanning Barcodes
27
Using the BHT
Turning ON/OFF the Backlight
To turn the backlight ON or OFF, hold down the SF key and press the M3 magic key.
− Point − z The backlight function enable/disable key (simultaneous
pressing of SF key and M3 magic key set as default) and time
until auto OFF can be set at user programs.
z As opposed to pressing the backlight function enable/disable
key, the backlight function can be enabled or disabled at the
Backlight settings menu.
Backlight OFF or dim
(backlight function
disabled)
Hold down the SF
key and press the
M3 magic key.
Backlight OFF or dim
(backlight function
enabled)
Backlight ON
Hold down the SF key
and press the M3 magic
key.
Hold down the SF
key and press the
M3 magic key.
* Under 1 minute if the BHT is placed on the CU.
SF ke
y
M3 magic ke
y
If no key is
pressed for 3
seconds.*
Press any key (except fo
r
the
simultaneous depression of
the M3 magic key and SF key)
or tap the touch screen.
27-Keypad
28
Using the BHT
To turn the backlight ON or OFF, hold down the SF key and press the M3 magic key.
− Point − z The backlight function enable/disable key (simultaneous
pressing of SF key and M3 magic key set as default) and time
until auto OFF can be set at user programs.
z As opposed to pressing the backlight function enable/disable
key, the backlight function can be enabled or disabled at the
Backlight settings menu.
Backlight OFF or dim
(backlight function
disabled)
Hold down the SF
key and press the
M3 magic key.
Backlight OFF or dim
(backlight function
enabled)
Backlight ON
Hold down the SF key
and press the M3 magic
key.
Hold down the SF
key and press the
M3 magic key.
* Under 1 minute if the BHT is placed on the CU.
Press any key (except fo
r
the
simultaneous depression of
the M3 magic key and SF key)
or tap the touch screen.
42-Keypad
SF ke
y
M3 magic ke
y
If no key is
pressed for 3
seconds.*
Turning ON/OFF the Backlight
29
Using the BHT
Changing the Default Settings
The beeper volume, switching between the beeper and vibrator, touch-screen
calibration and backlight settings can be changed at the System Menu or Control
Panel.
Item Details
(1)
Beeper volume,
beeper/vibrator
switching
Used to adjust the beeper volume and switch between
beeper/vibrator.
(2) Touch screen Used to calibrate the touch screen.
(3) Backlight
Used to set the LCD screen backlight brightness, keypad backlight
and the length of time these backlight are turned OFF when not in
use for energy saving purposes.
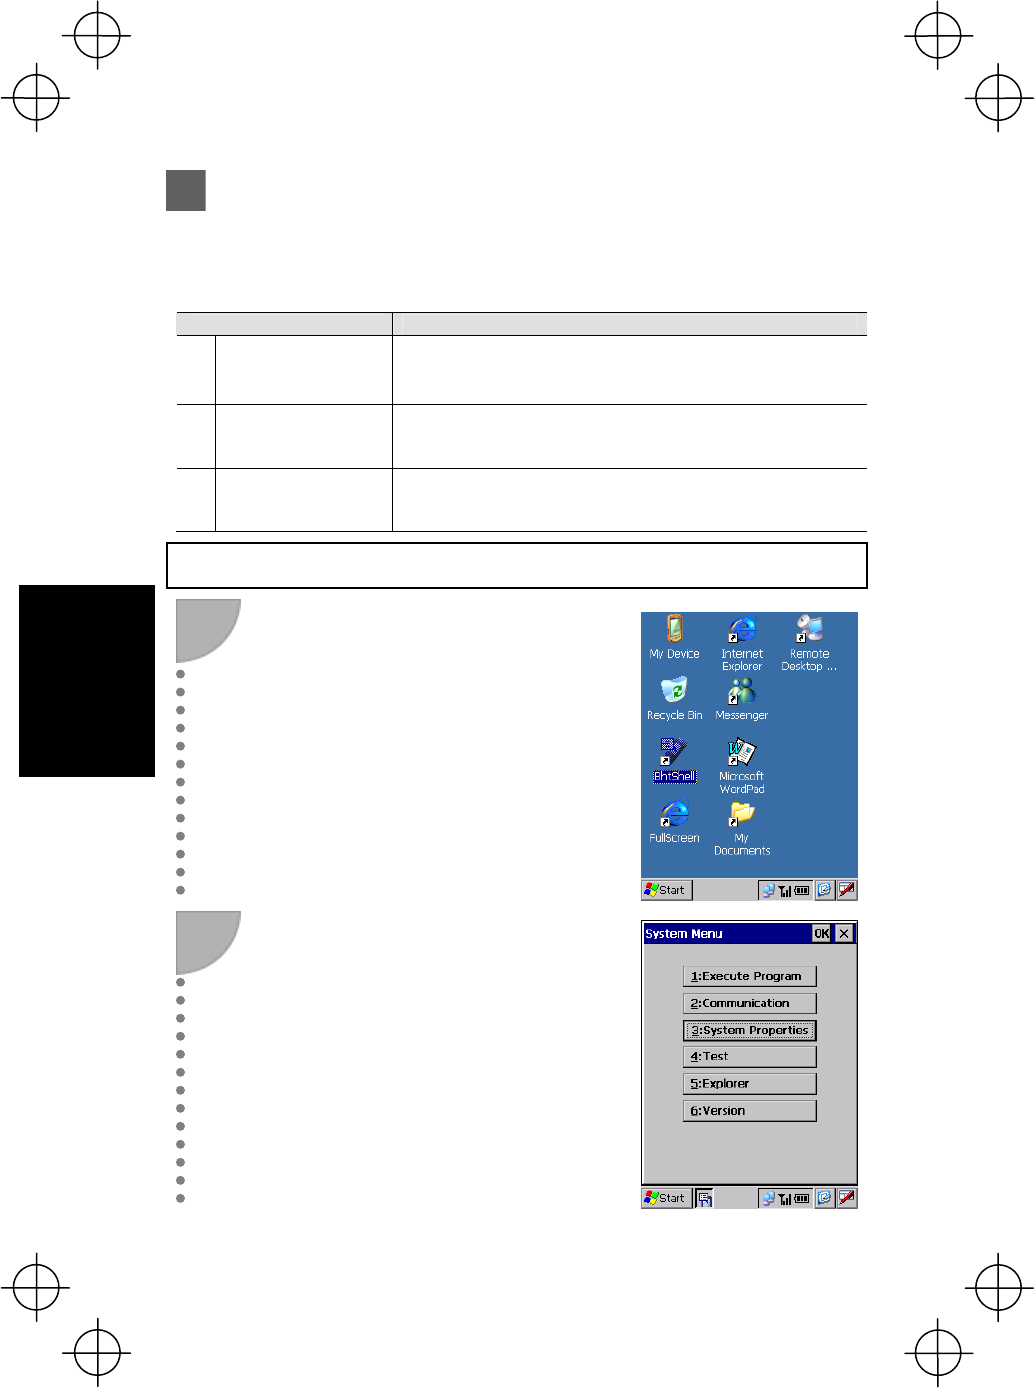
(1) Beeper Volume, Beeper/Vibrator Switching
1
Double-tap the "BhtShell" icon on the
desktop to call up the "System Menu."
2 Tap “3:System Properties”.
30
Using the BHT
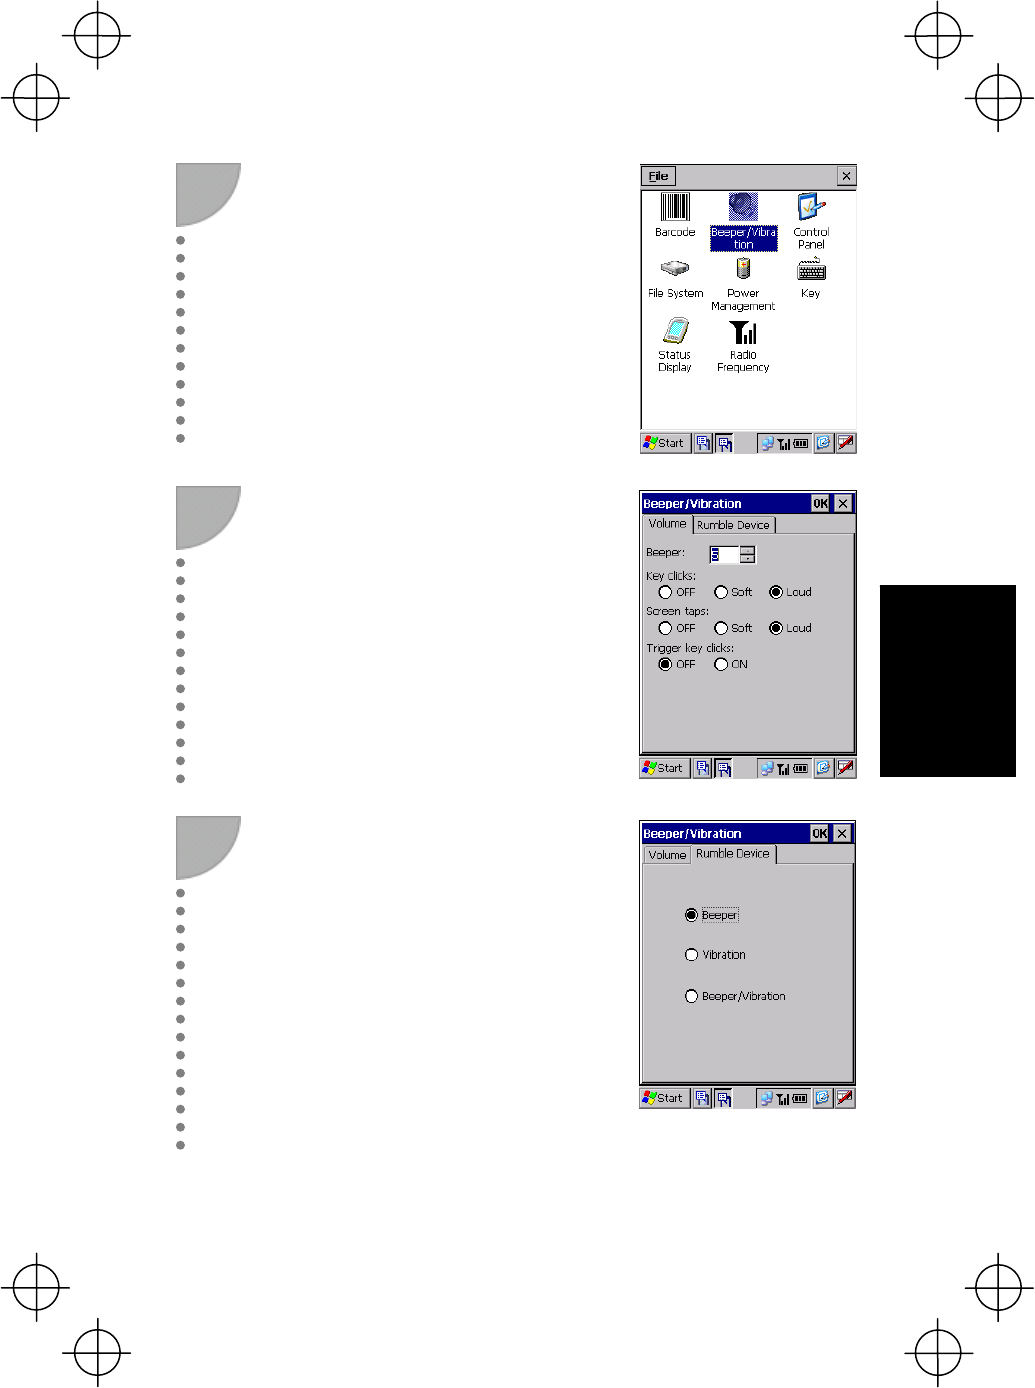
3
Double-tap the “Beeper/Vibration” icon at the
"Device Settings" menu that displays.
4
Tap the “Volume” tabbed page at the
“Beeper/Vibration” menu to display the
screen on the right.
At this screen, use the “Beeper:” spin box to
set the beeper volume. The volume can be
set between 0 and 5. The greater the value,
the higher the volume.
5
Tap the “Rumble Device” tabbed page at the
“Beeper/Vibration” menu to display the
screen on the right.
A selection can be made from beeper,
vibrator, or both beeper and vibrator
notification to inform the operator that
barcodes have been scanned successfully.
Beeper: Beeper notification
Vibration: Vibrator notification
Beeper/Vibration: Simultaneous
beeper/vibrator
notification
Changing the Default Settings
31
Using the BHT
(2) Touch Screen
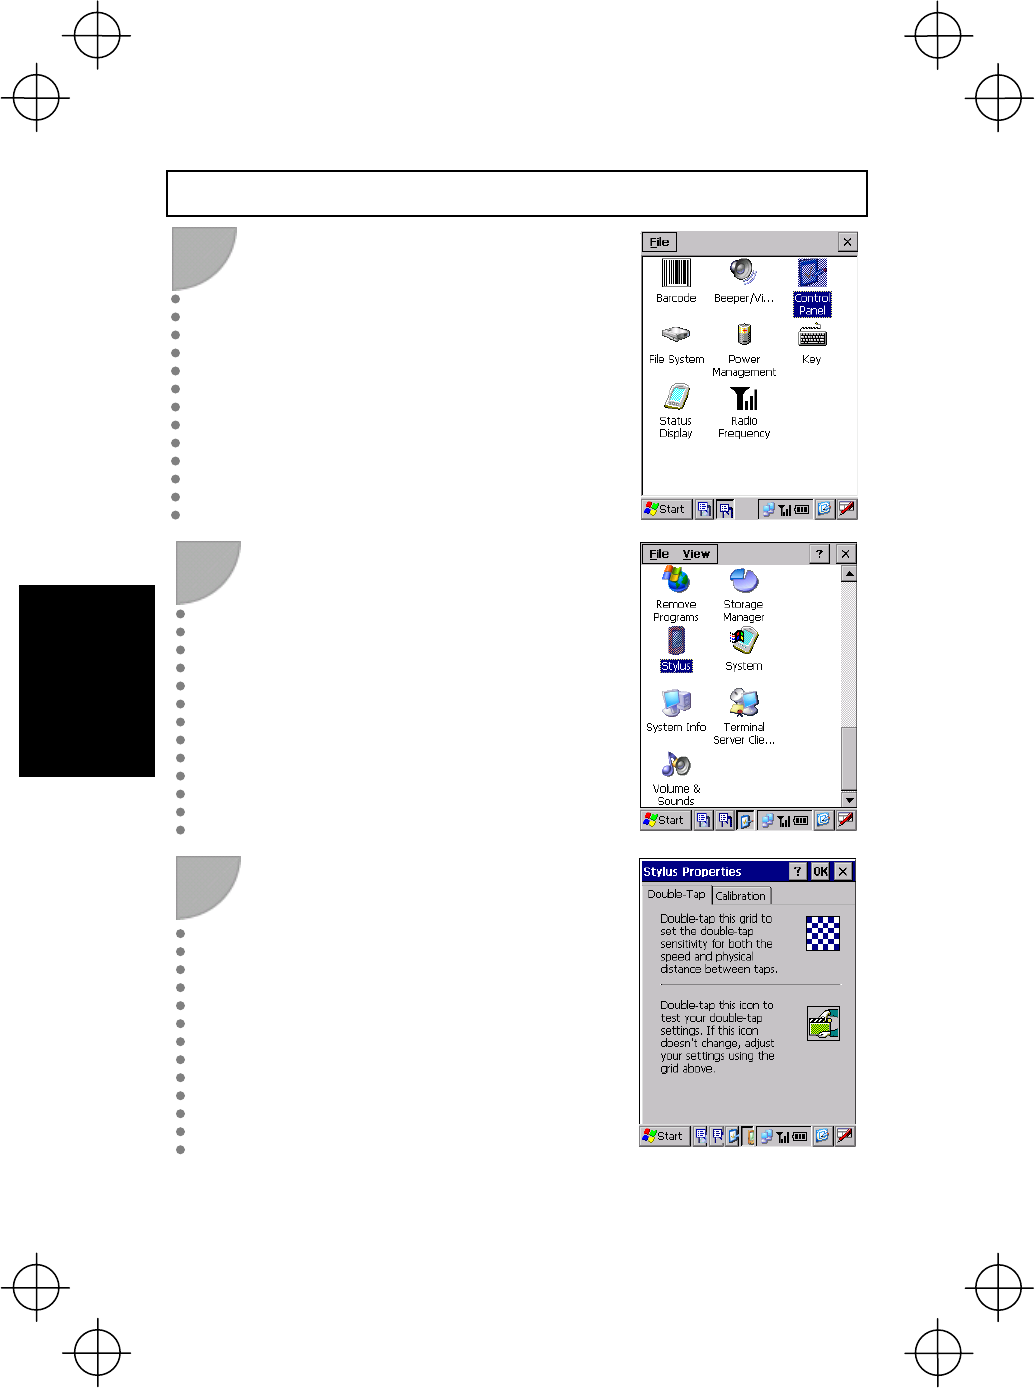
1
Double-tap the “Control Panel” icon at the
"Device Settings" menu.
2
Scroll down and double-tap the “Stylus” icon.
3
The “Stylus Properties” screen displays.
Changing the Default Settings
32
Using the BHT
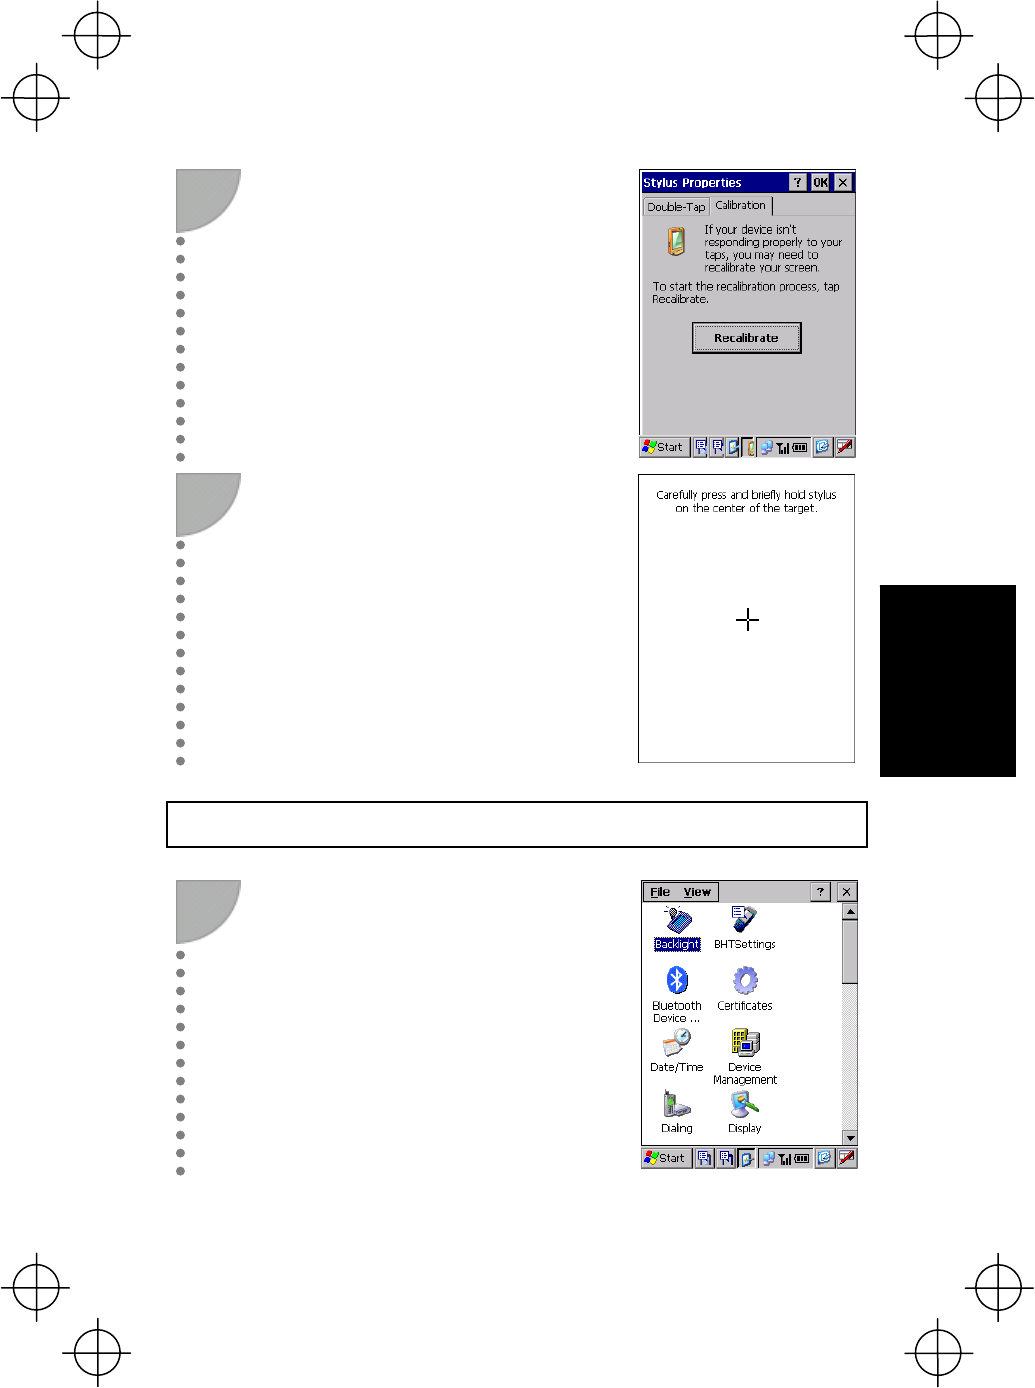
4
Tap the “Calibration” tabbed page.
5
Tab the [Recalibrate] button to display the
screen on the right.
Follow the instructions displayed on the
screen. (See page 23.)
(3) Backlight
1
Double-tap the “Backlight” icon at the
“Control Panel”.
Changing the Default Settings
33
Using the BHT
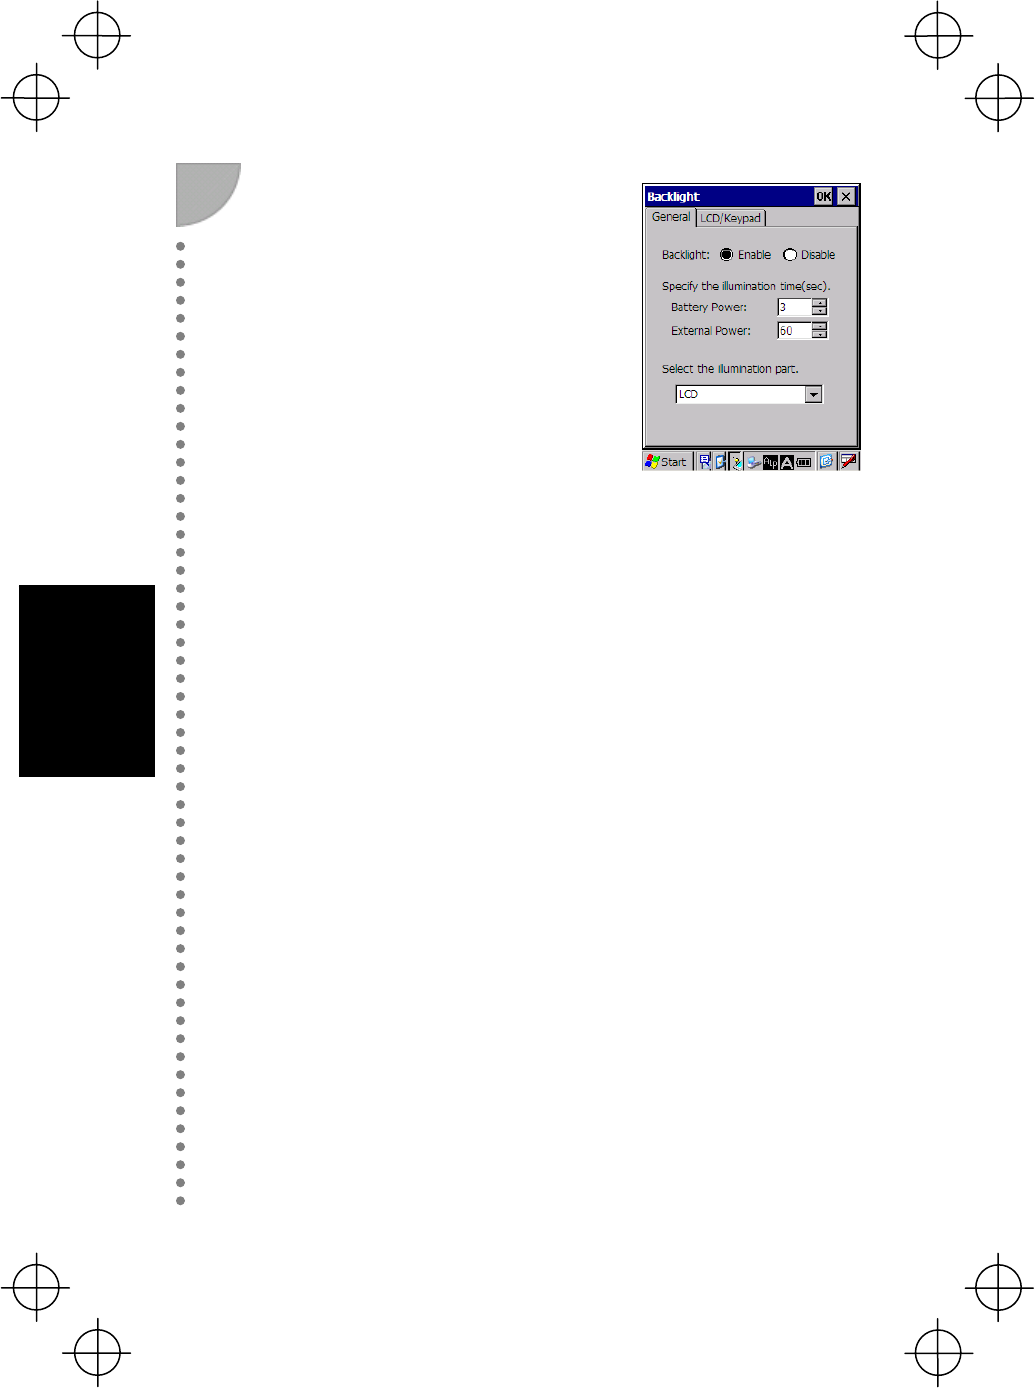
2
The “Backlight” screen displays.
Tap the “General” tabbed page at the
“Backlight” menu to display the screen on the
right.
Backlight (*1)
Set whether to turn ON the backlight when
keys are pressed or the screen tapped.
Enable: Backlight turns ON.
Disable: Backlight does not turn ON.
(*1) Pressing the backlight function ON/OFF
key (Default setting: simultaneous
pressing of SF key and M3 magic key
switches between the enabled and
disabled states, regardless of the
backlight function setting made at this
screen.
Specify the illumination time(sec)
Set the length of time the backlight remains
ON when keys are pressed or the screen
tapped.
Battery Power: ON-duration when the BHT
is not placed on the CU.
External Power: ON-duration when the BHT
is placed on the CU.
Select the illumination part
Select the location for which the backlight is
to be illuminated when keys are pressed or
the screen tapped.
None
LCD
Keypad
LCD and Keypad
Changing the Default Settings
34
Using the BHT
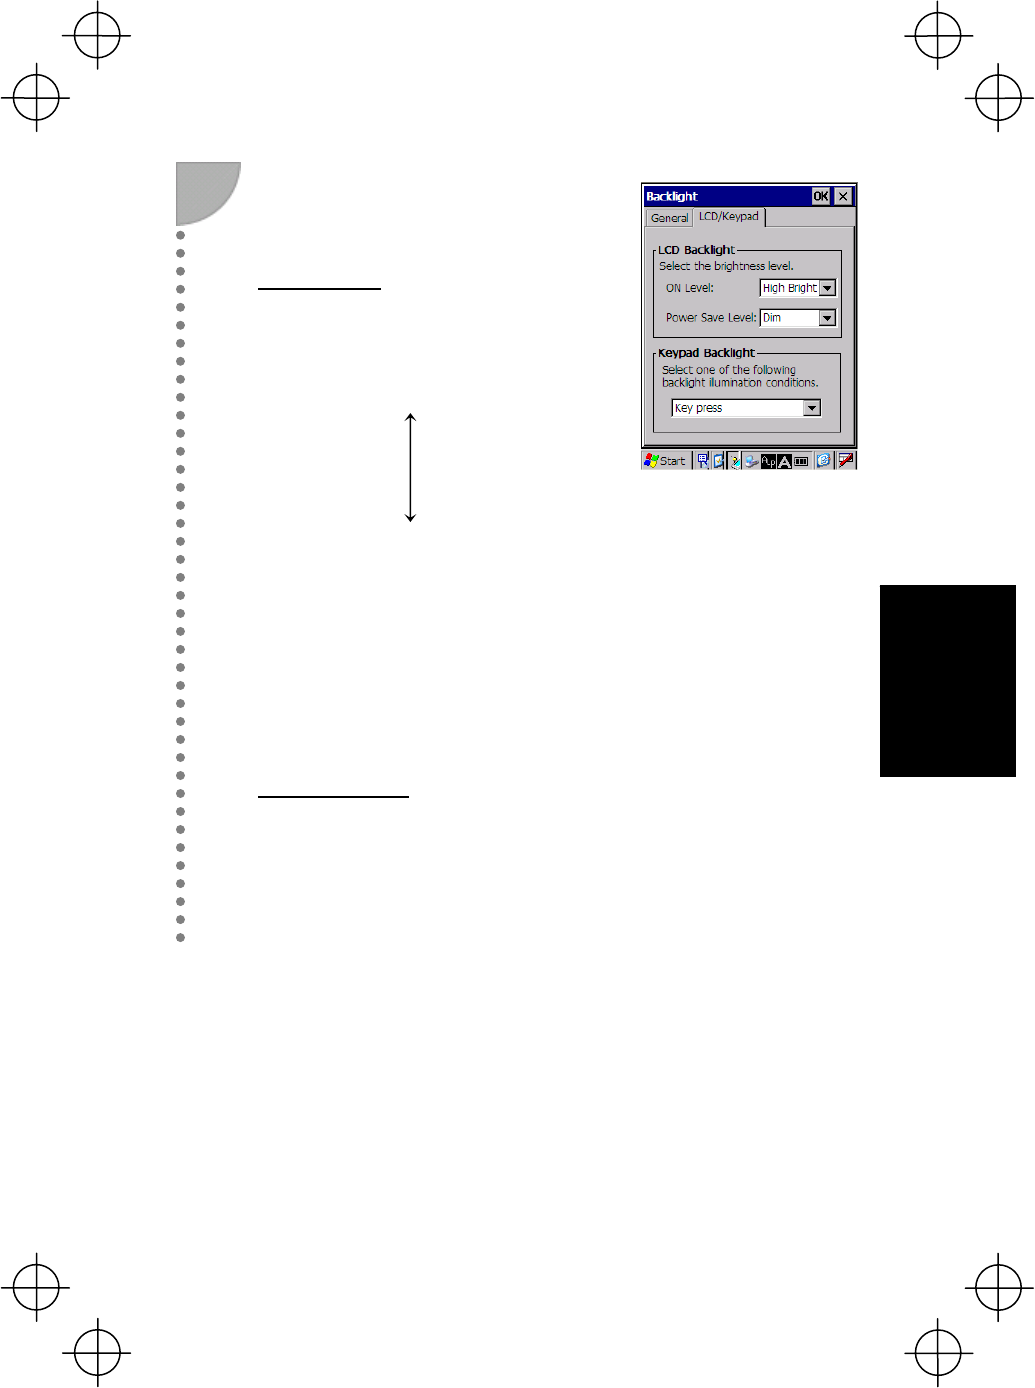
3 Tap the “LCD/Keypad” tabbed page at the
“Backlight” menu to display the screen on the
right.
LCD Backlight
ON Level
Select the brightness from one of the
following four levels.
(Dark)
Off
Low Bright
Mid Bright
High Bright
(Bright)
Power Save Level
Change the settings for turning OFF the
backlight after no keys have been pressed or
the screen tapped for a specified period of
time.
Dim: Dim (Backlight remains ON
faintly.)
OFF: Backlight turns OFF.
Keypad Backlight
Select one of the following keypad backlight
illumination conditions.
Key press or screen tap
Key press
Disable
Changing the Default Settings
35
Using the BHT
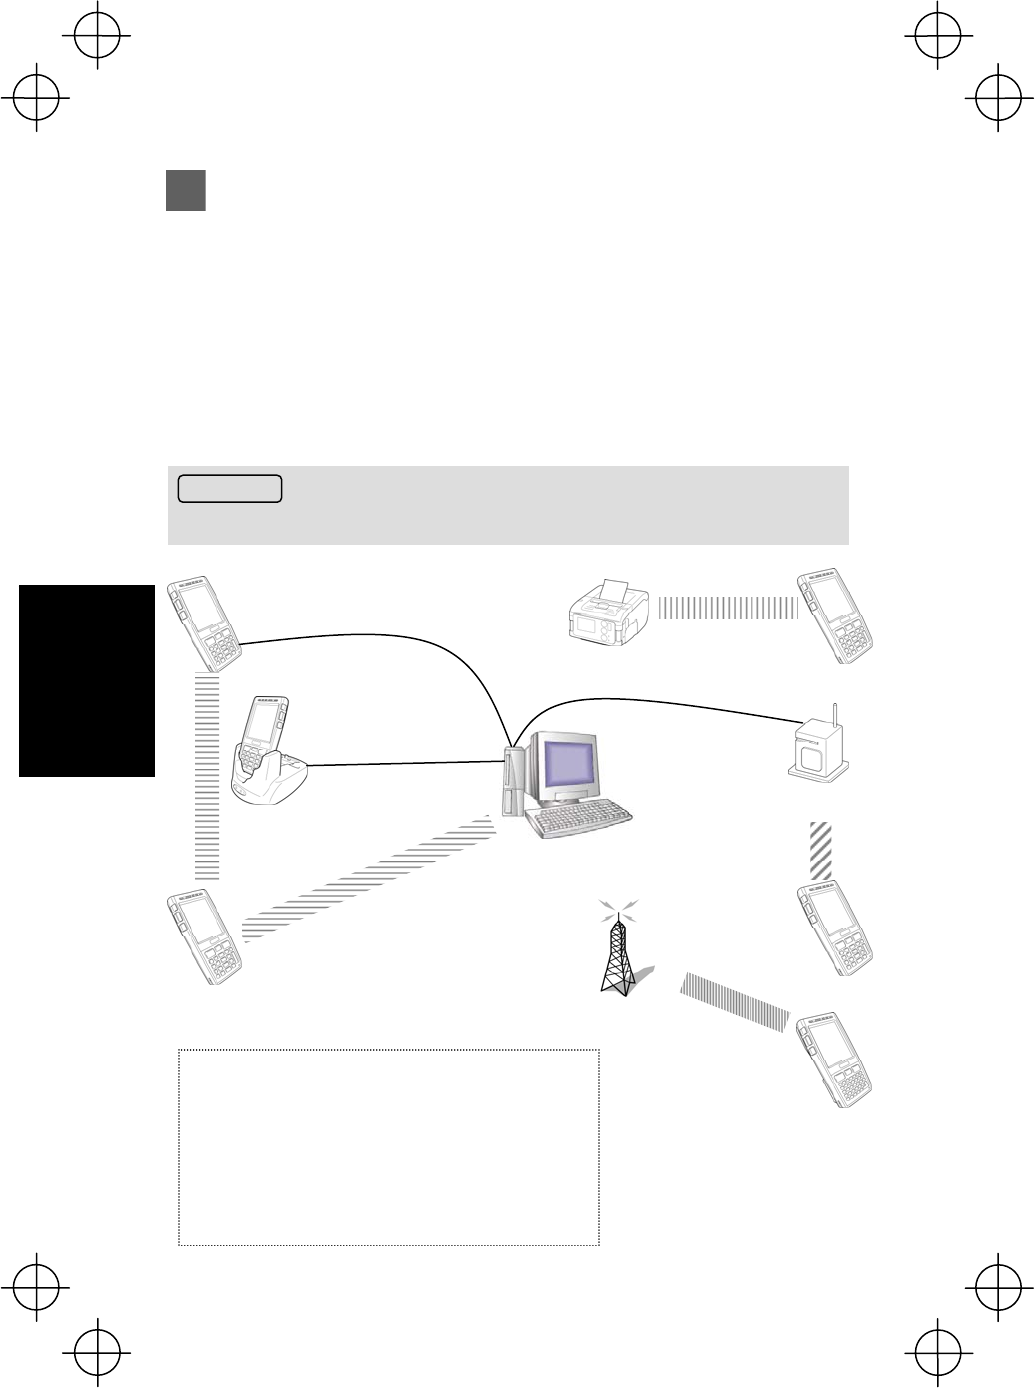
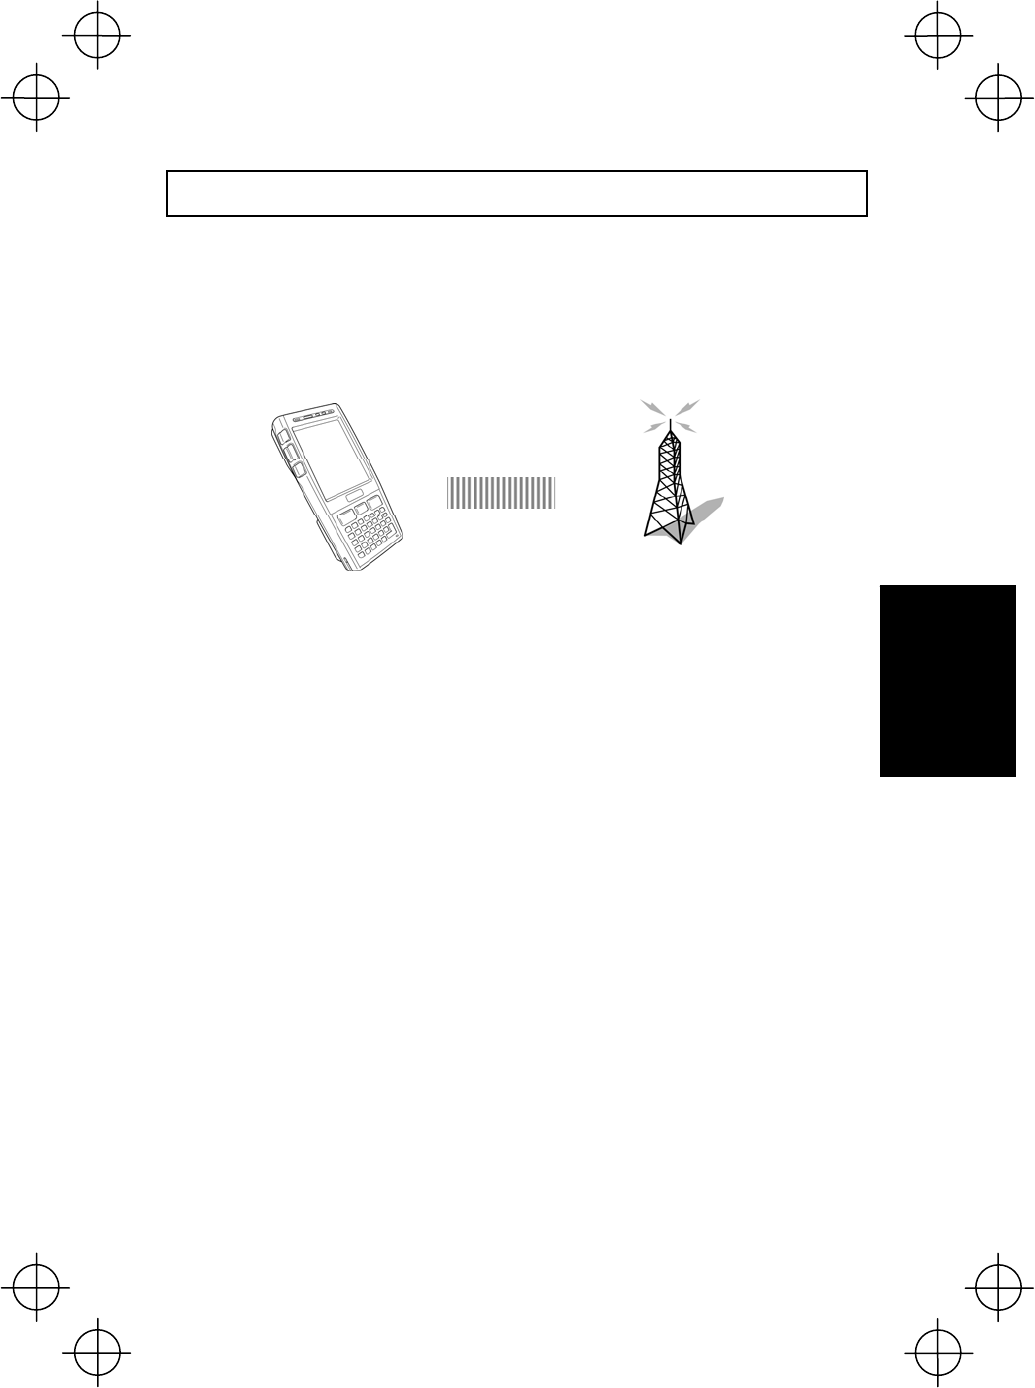
Transmitting Data
Data gathered by the BHT can be transmitted to the host computer by connector
communication, infrared communication, Bluetooth® communication, wireless
communication* or GPRS and EDGE communication**.
Infrared communication is used to transmit data to and from BHT units.
The data transmission method and BHT setting method will differ depending on the
system used, and therefore the system administrator should be contacted for details
of operation.
Refer to the User’s Manual for details of each communication method.
Request
Data gathered by the BHT should be promptly uploaded to the host computer.
Wireless LAN
access point
(2) Infrared
communication
Dedicated interface cable
(RS-232C or USB)
(1) Connector
communication Ethernet
Host computer
* BHT-700BWB-CE/700BWBG-CE only
To perform wireless communication with a wireless LAN
access point, it is necessary to configure the wireless local
area network (wireless LAN) at the BHT and access point.
** BHT-700BWBG-CE only
It is necessary to establish a contract with a service provider
and acquire a SIM card in order to perform packet data
communication.
***BHT-700BWBG-CE can’t be used in North America
Bluetooth
®
-enabled
devices
CU-733 : RS232C or USB
CU-714 : Ethernet
(4) Wireless
communication*
(3) Bluetooth
®
communication
(5) GPRS and EDGE
communication**
Wireless base station
36
Using the BHT
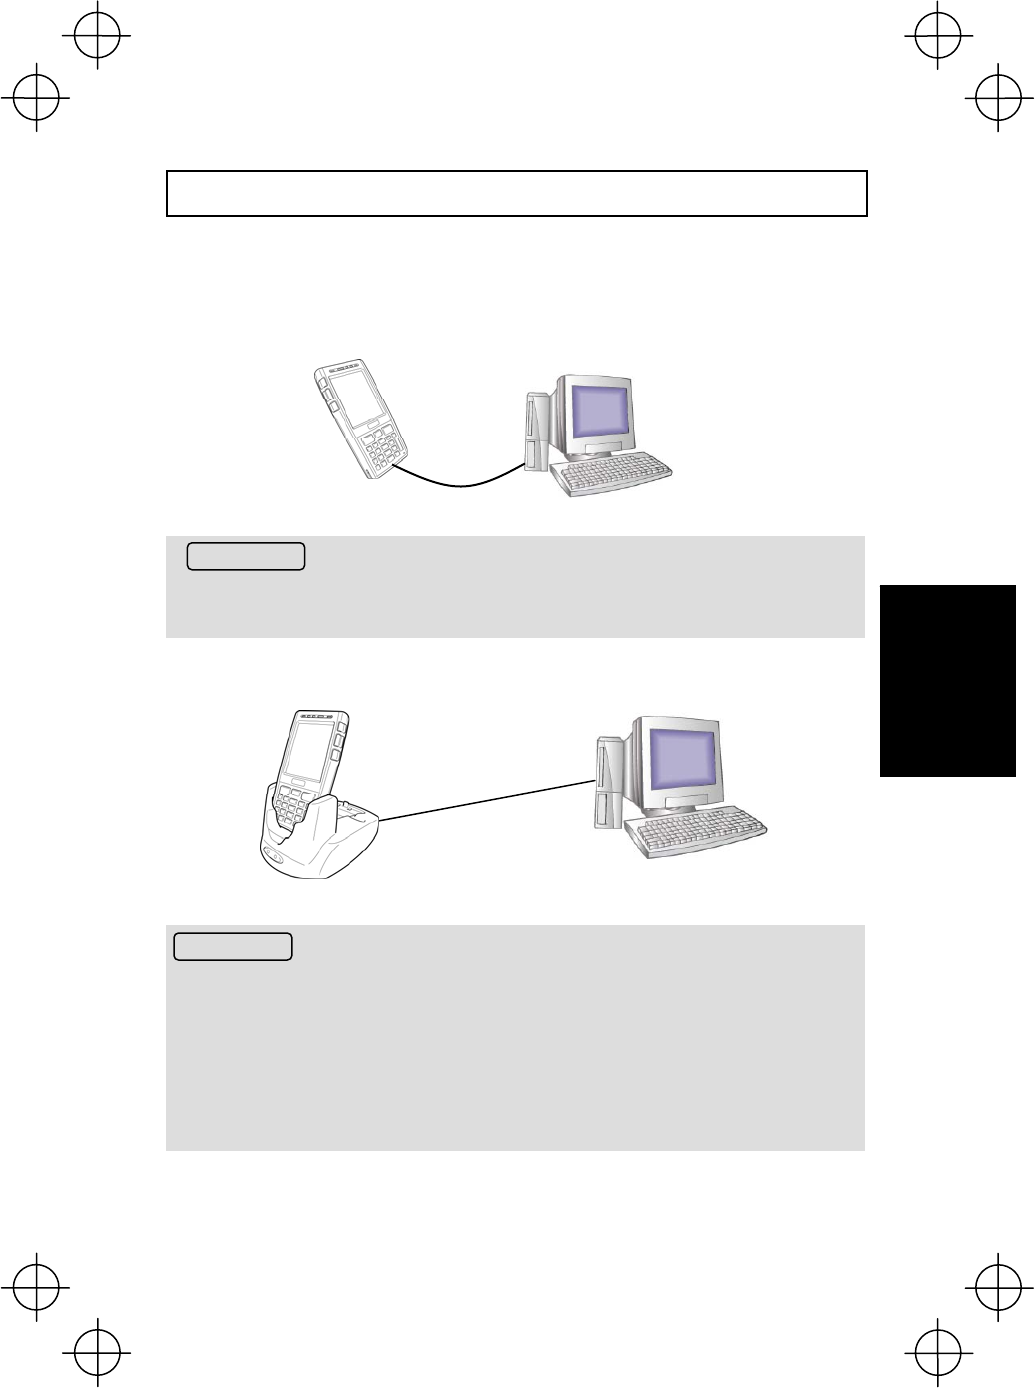
(1) Connector Communication
Connector communication can be performed by selecting either an RS-232C
connection or USB connection depending on the host computer interface.
Connect the host computer and BHT with a dedicated interface cable and perform
data communication.
Requests
z Do not use a cable other than the dedicated interface cable.
z Avoid inserting the connector at an angle or pulling the cable strongly.
Place the BHT on the communication unit (CU-733, CU-714) and transmit data.
Requests
Handling the CU-714
z A Category 5 (Cat 5) LAN cable or higher is required when using the CU-714 in
100BASE-TX networks. Successful communication may not be possible with other
cables.
z Do not forcibly insert the LAN connector or pull the cable strongly. Failure to observe this
may result in damage to the connector or cable.
z The MAC address is written on the nameplate on the rear of the CU-714.
Transmitting Data
Dedicated interface
cable
CU-733: RS232C or USB
CU-714: Ethernet
37
Using the BHT
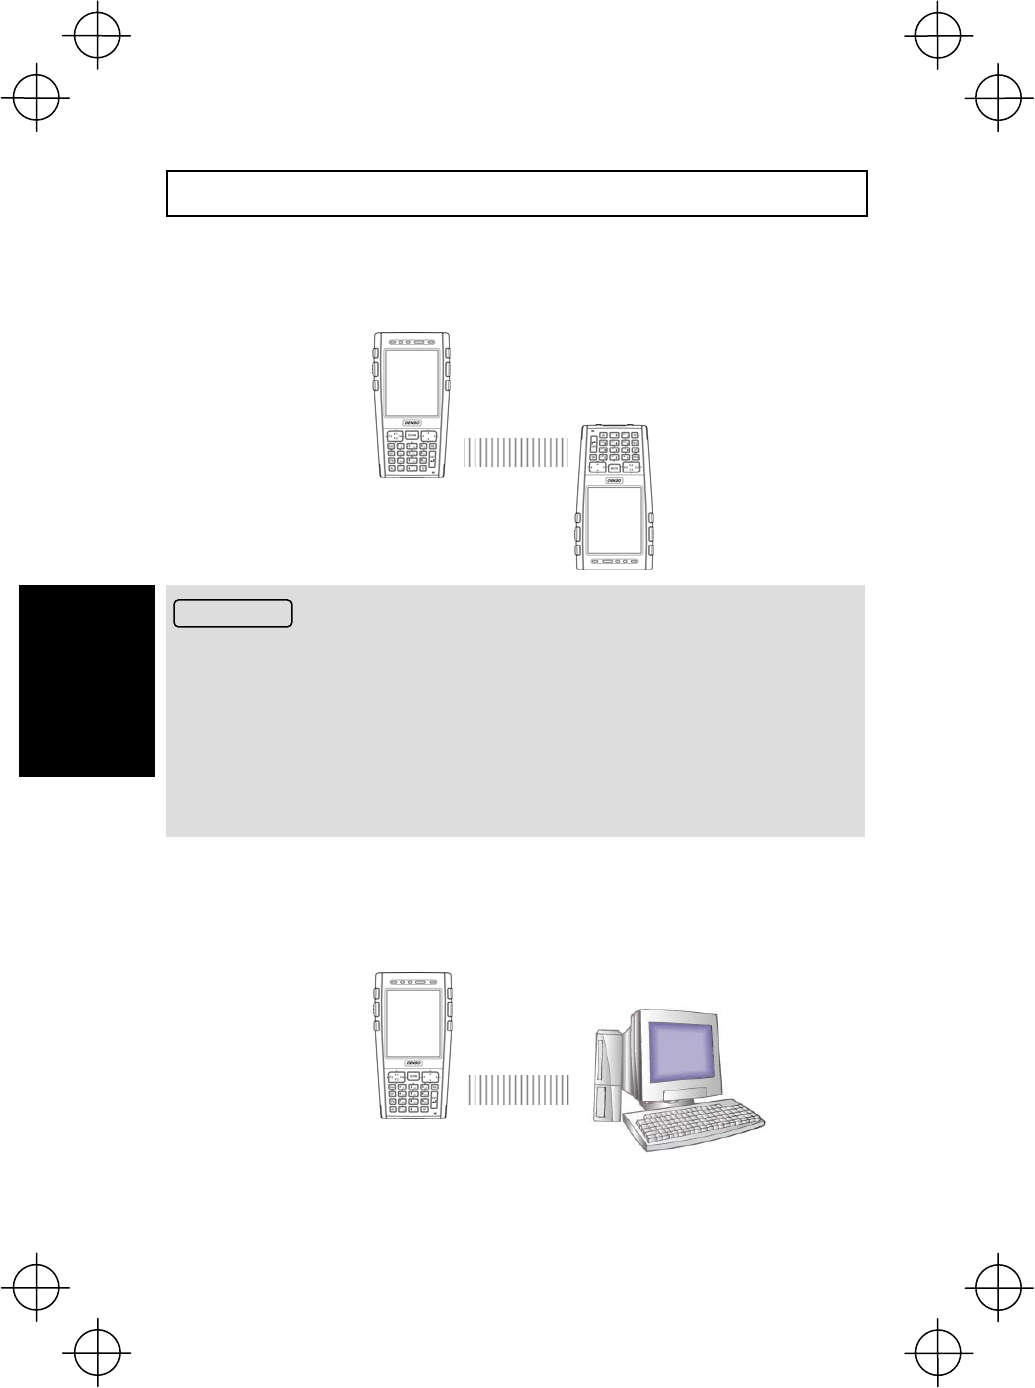
(2) Infrared Communication
■ When performing data communication between BHT units
Point the BHT infrared communication ports toward each other and perform
communication.
Requests
z Ensure that the light path between the BHT and any target stations is not obstructed.
z Perform communication within the effective infrared emission range (15 cm).
z Do not operate remote control units for televisions and so forth in the vicinity of infrared
communication. This may result in comunication failure.
z Perform communication in locations where the BHT units will not be exposed to light
interference from sources such as intence ambient lighting (inverter-driven fluorescent
lighting, in particular) or direct sunlight. This may result in comunication failure.
■ When performing data communication with the host computer
Data can be transmitted directly to the host computer if the computer is equipped with
an infrared communication port.
Transmitting Data

38
Using the BHT
(3) Bluetooth® Communication
This interface permits wireless communications with other Bluetooth®-enabled
devices.
Request
Pointing the BHT in the direction of the other device sometimes improves communications over
the link.
Bluetooth
®
communication
Bluetooth
®
-enabled devices
Transmitting Data
39
Using the BHT
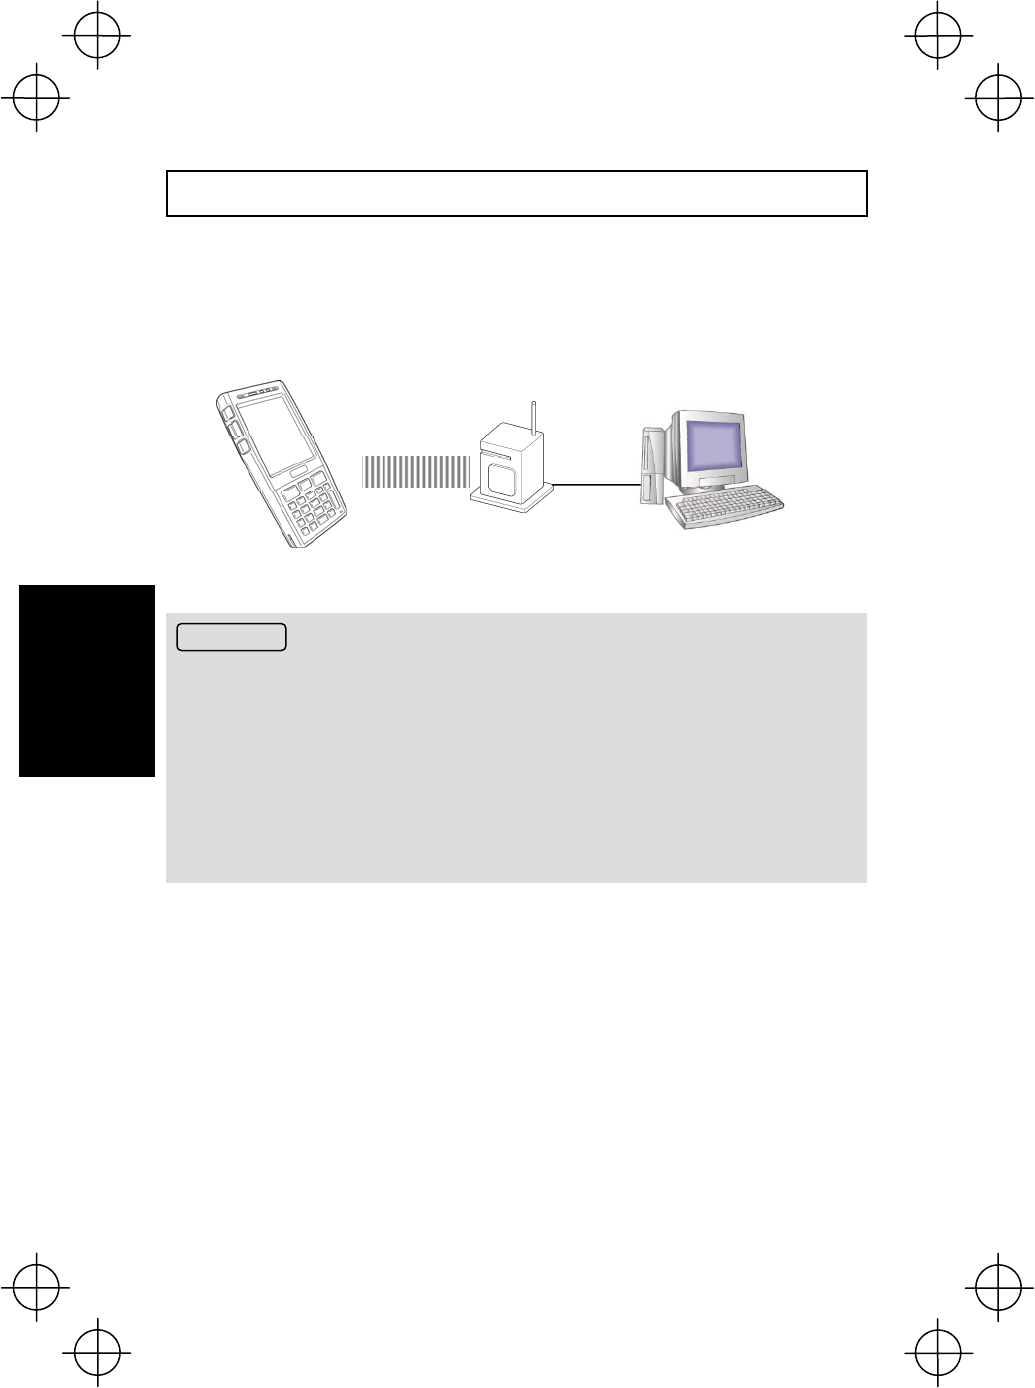
(4) Wireless Communication
* BHT-700BWB-CE/700BWBG-CE only(BWBG can’t be used in North America)
Transmit data to host computer via the wireless LAN access point.
To perform wireless communication, it is necessary to configure the wireless local
area network (wireless LAN) at the BHT and access point.
Requests
z Point the antenna on top of the BHT toward the access point to improve communication
performance.
z Communication may not be possible at the following locations.
1. In the vicinity of devices operating on the same 2.4/5.0GHz waveband as the BHT
such as microwave ovens, industrial heating equipment, or high-frequency medical
equipment.
2. In the vicinity of computers or household appliances such as refridgerators that
emitelectromagnetic noise.
3. In the vicinity of metallic objects, in places with high levels of metallic dust, in rooms
surrounded by metal walls (metallic influence), or places where the BHT may be
subject to strong impact.
Wireless
communication
Wireless LAN access point
Transmitting Data
40
Using the BHT
(5) GPRS and EDGE Communication
* BHT-700BWBG-CE only(BWBG can’t be used in North America)
The BHT can perform packet data communication using GSM system mobile phone
networks via a wireless base station.
It is necessary to establish a contract with a service provider and acquire a SIM card
in order to perform packet data communication.
GPRS and EDGE
communication
Transmitting Data
Wireless base station
41
Charging
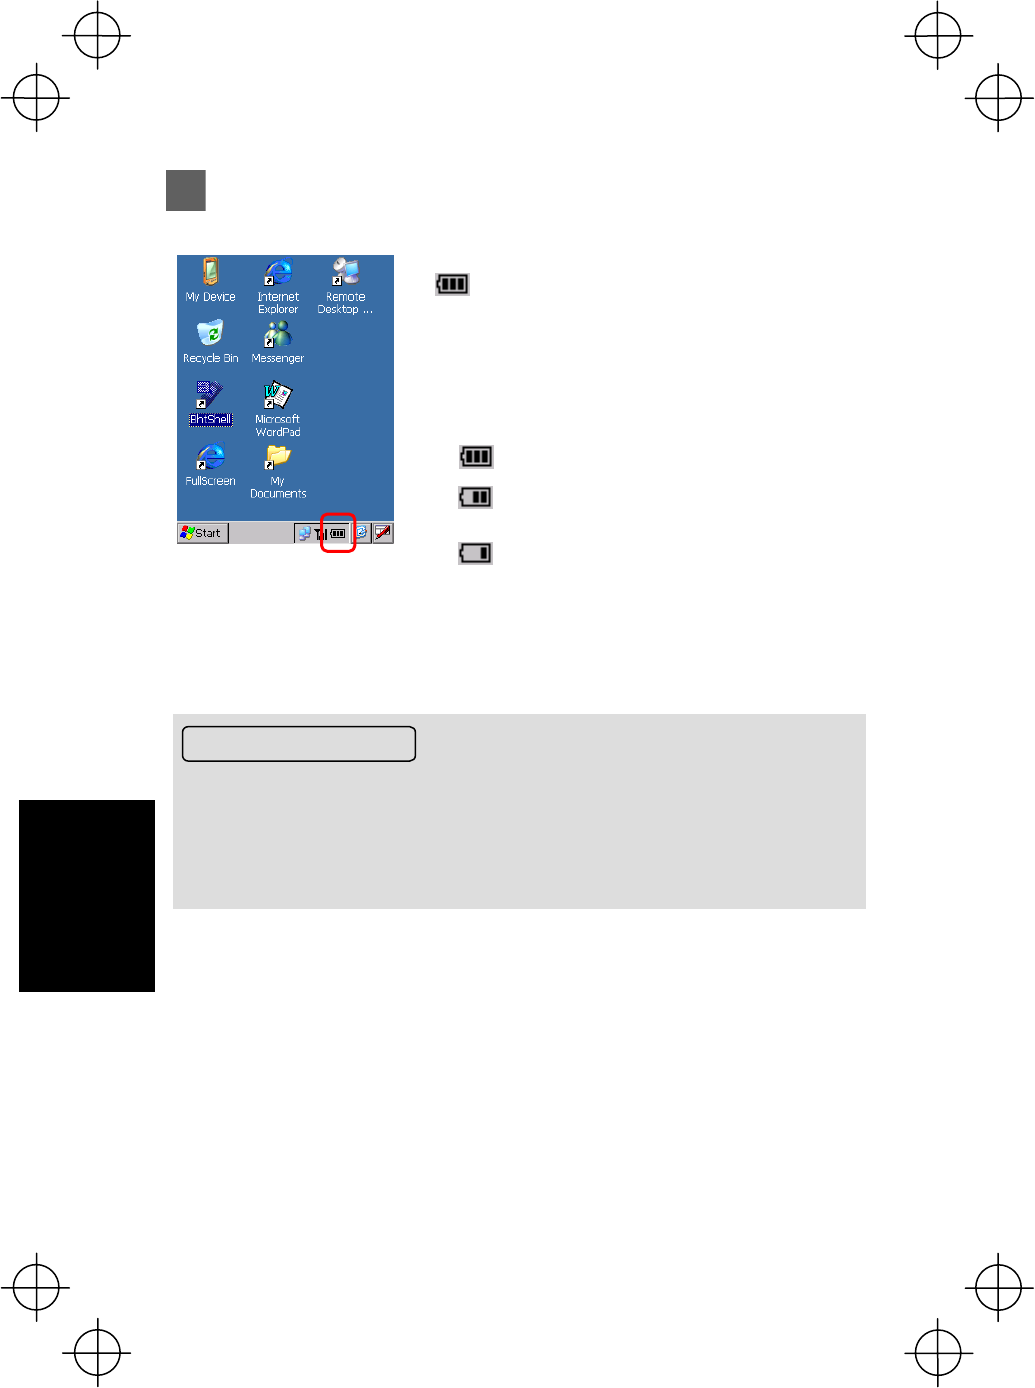
Battery Power Level Indicator
The battery power level can be checked at the
icon that displays in the tasktray. The battery
power displays in three levels.
The battery power level indicator is a guideline to
notify the operator to charge the battery promptly
when discharged.
: Sufficient battery power remains.
: The battery power is partially depleted.
Charge promptly.
: The battery power is almost fully depleted
and should be charged immediately.
Note: There are times when the taskbar displa
y
differs from the display on the BHT LCD
screen.
About the Battery Level
● The battery power level indicator does not accurately reflect the battery residual power
and should only be used as a guideline.
● The battery power level will fluctuate due to BHT operation, and therefore disparities may
occur between the actual battery voltage and the display indicator.
● Ensure to charge the battery as soon as possible before the battery power is depleted.
42
Charging
Replacing the Battery Cartridge
Battery Cartridge Service Life
The battery cartridge is a consumable part and should be replaced after being
charged approximately 300 times.
The performance of the battery cartridge’s lithium-ion battery will deteriorate
gradually with repeated charging, even during normal use. When the battery
operation time becomes shorter even after charging for the specified length of time,
replace the battery with a new one.
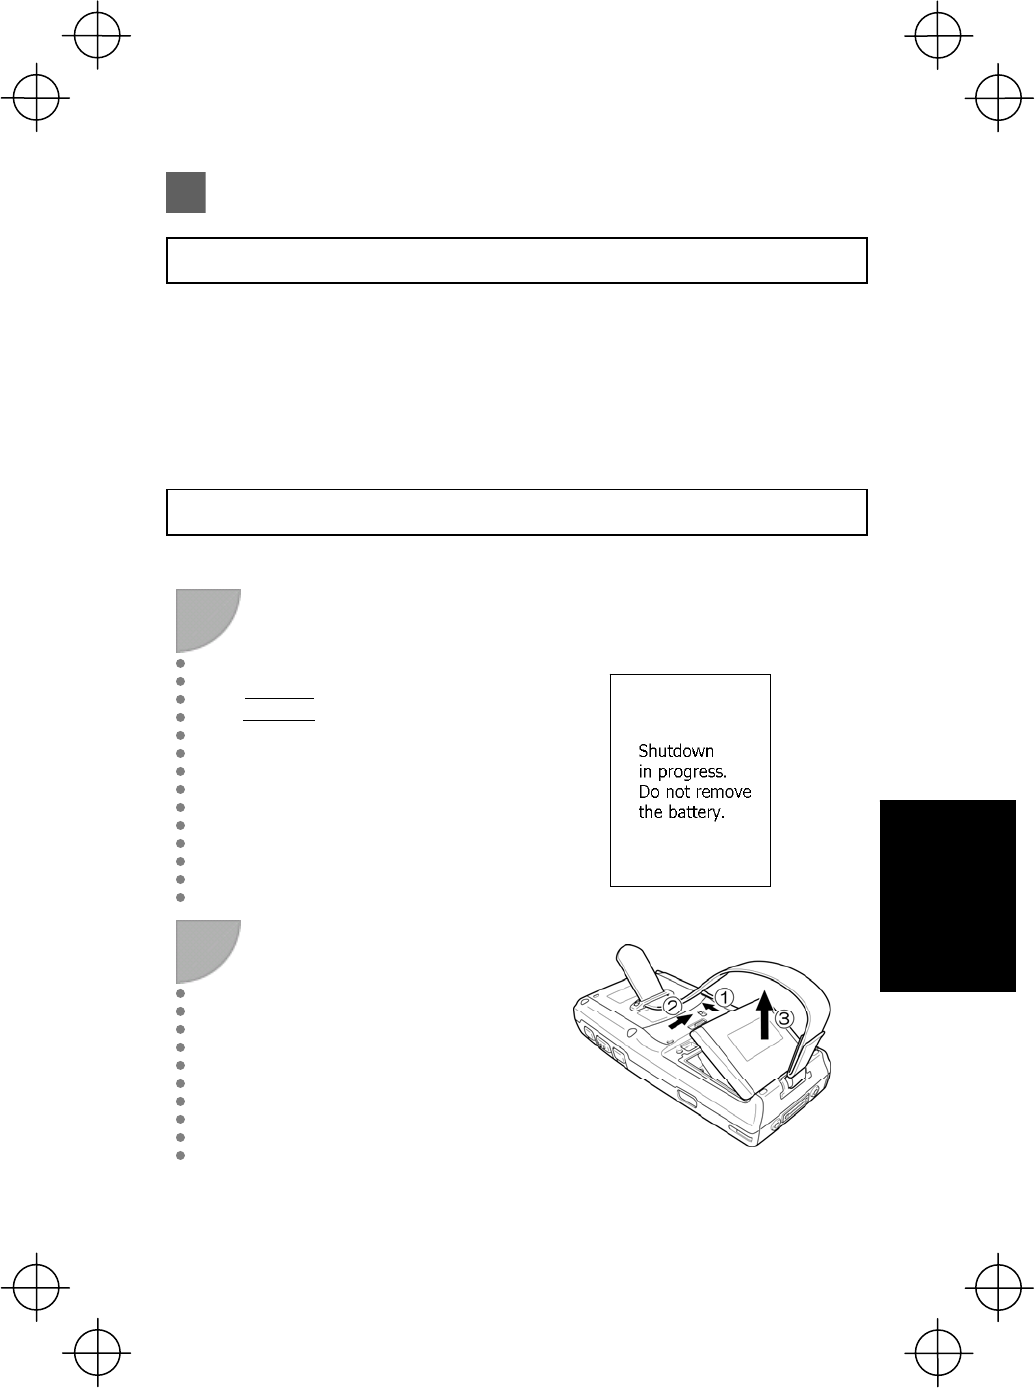
Battery Cartridge Replacement Method
* The battery cartridge shown in the drawing is the BT-700L.
1
Press the power key to turn OFF
the BHT power. The screen on the
right displays.
Point
Do not remove the battery cartridge until
the power turns OFF and the screen
display clears.
Turn OFF the power after the
message below displays.
2
Disconnect the hand belt.
Slide the battery cartridge cover
release buttons (1)/(2) in the
direction shown by the arrows and
remove the battery cartridge (3).
43
Charging
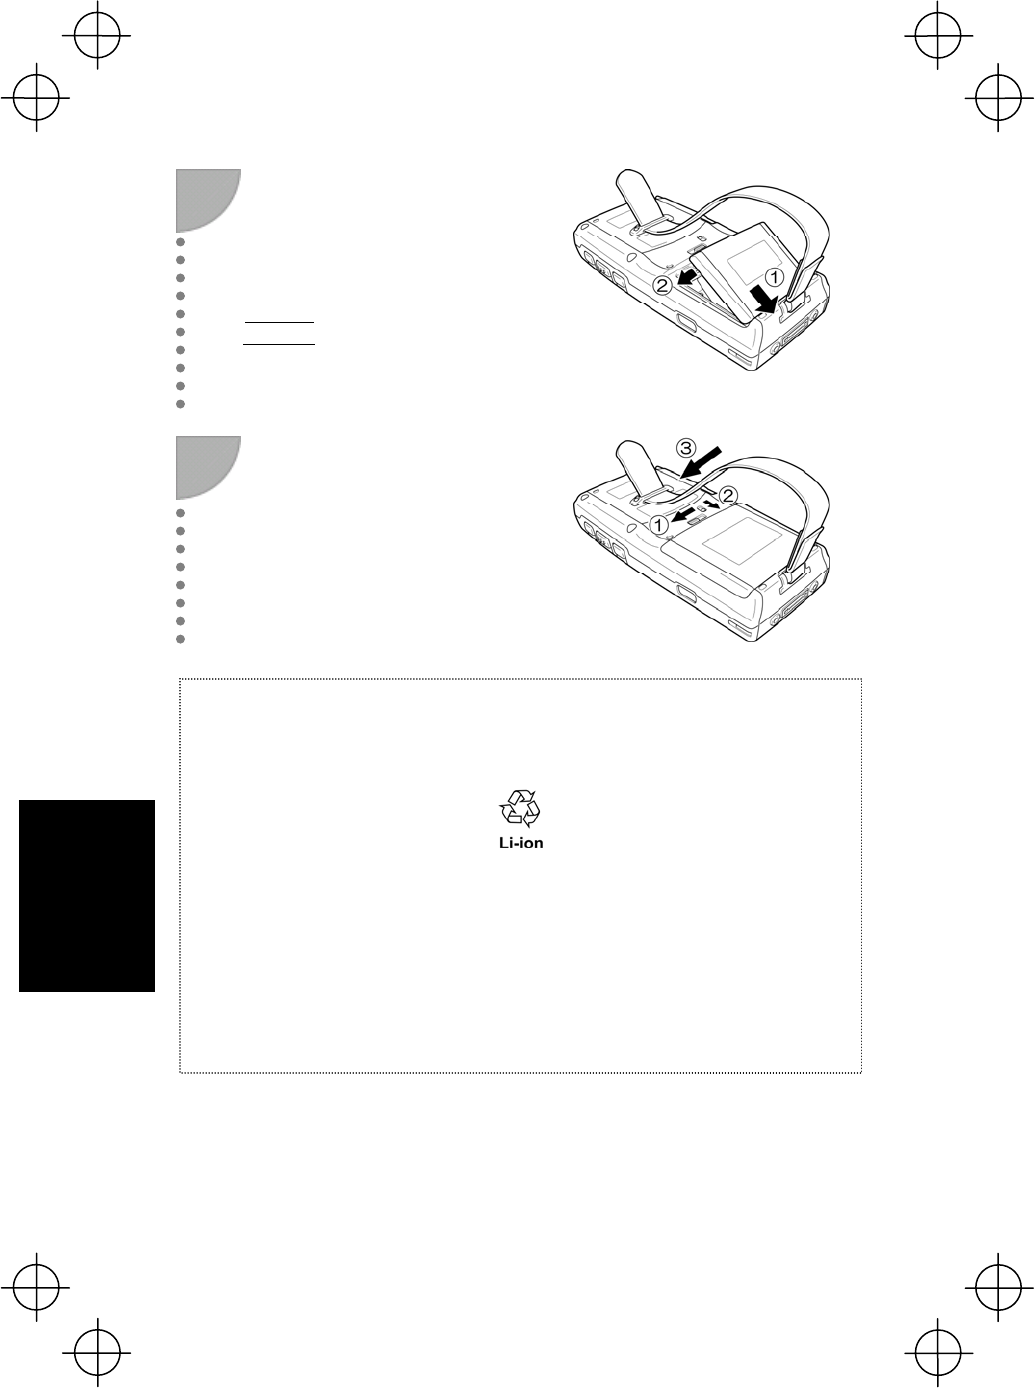
3
Insert the tabs on the cover for the
new battery cartridge (1) into the
BHT and load the cartridge in the
direction shown by the arrow (2).
(See “Step 1 Charging” on page 16.)
Point
Insert the new battery cartridge within 3
minutes of removal to avoid data loss.
4
Slide the battery cartridge cover
release buttons (1)/(2) in the
direction shown by the arrows and
return the hand belt (3) to its original
position.
Battery Cartridge Recycling Request
● This product uses a lithium-ion battery that contains scarce, recyclable resources. We
kindly ask for your cooperation in recycling to ensure reuse of these resources.
● Used battery cartridges must not be disposed of as combustibles.
● Contact your nearest rechargeable battery recycling center or DENSO WAVE sales office
for information on disposal procedures.
● When disposing of used battery cartridges at your nearest recycle center, cover the
terminals with vinyl tape to insulate and protect from overheating or fire due to a
short-circuit.
● Never disassemble battery cartridges.
Replacing the Battery Cartridge
44
Charging
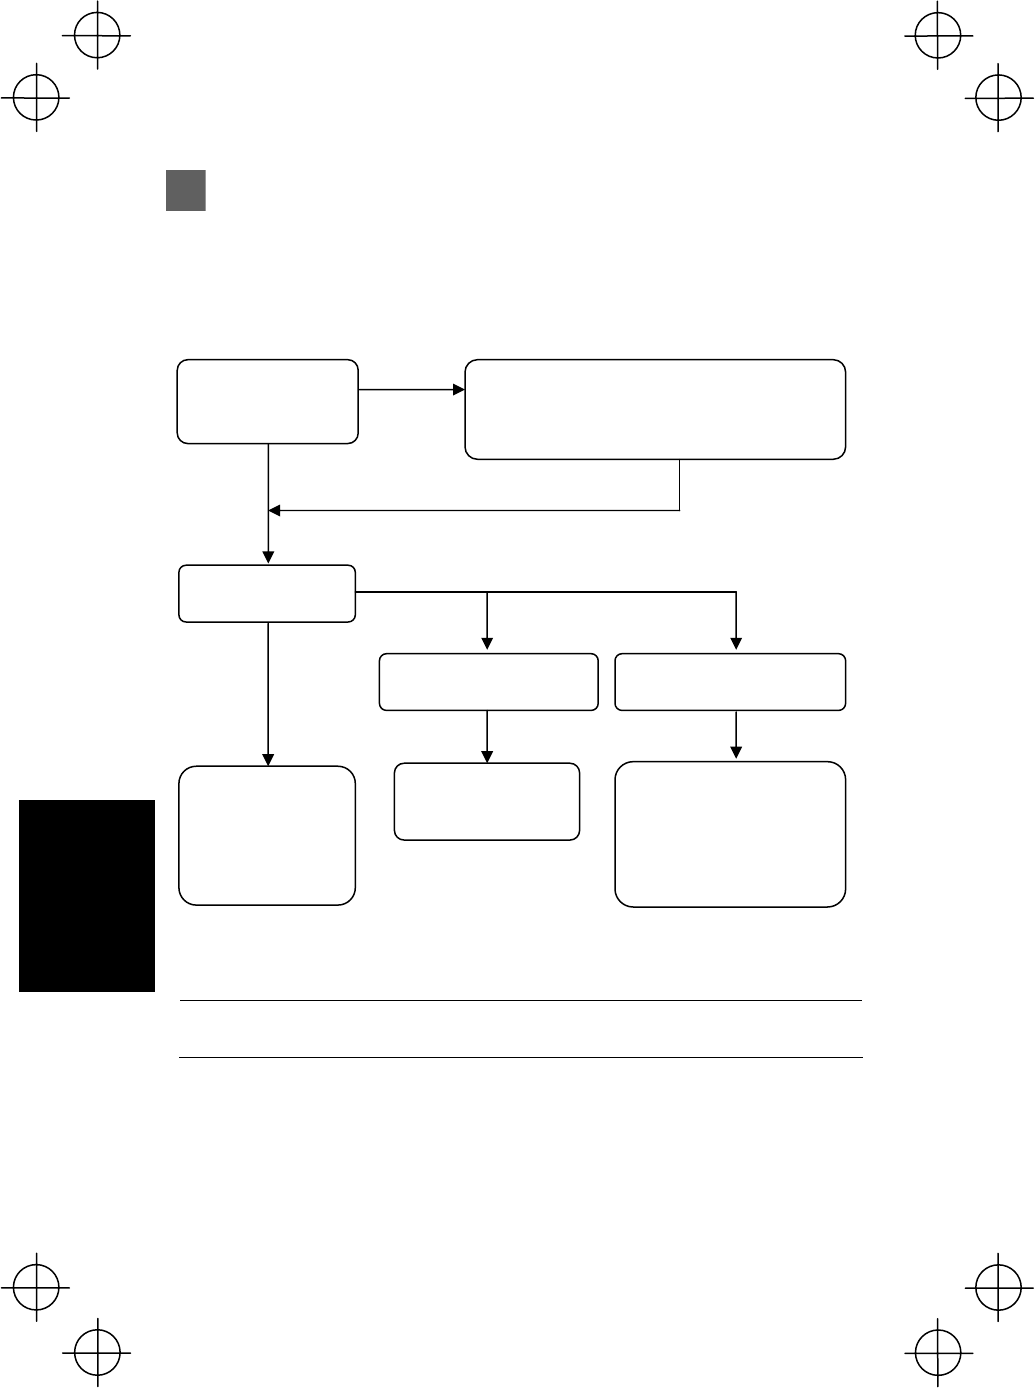
If the Screen Below Displays Following Replacement…
Display Handling
When the BHT power is turned ON after a long period of no
use, it may be necessary to recalibrate the touch screen and
reset the date and time.
If this message displays, calibrate the touch screen and set
the date and time. (See page 23.)
Reboot the BHT if this message displays. Contact the system
administrator if this error persists.
Replacing the Battery Cartridge
45
Charging
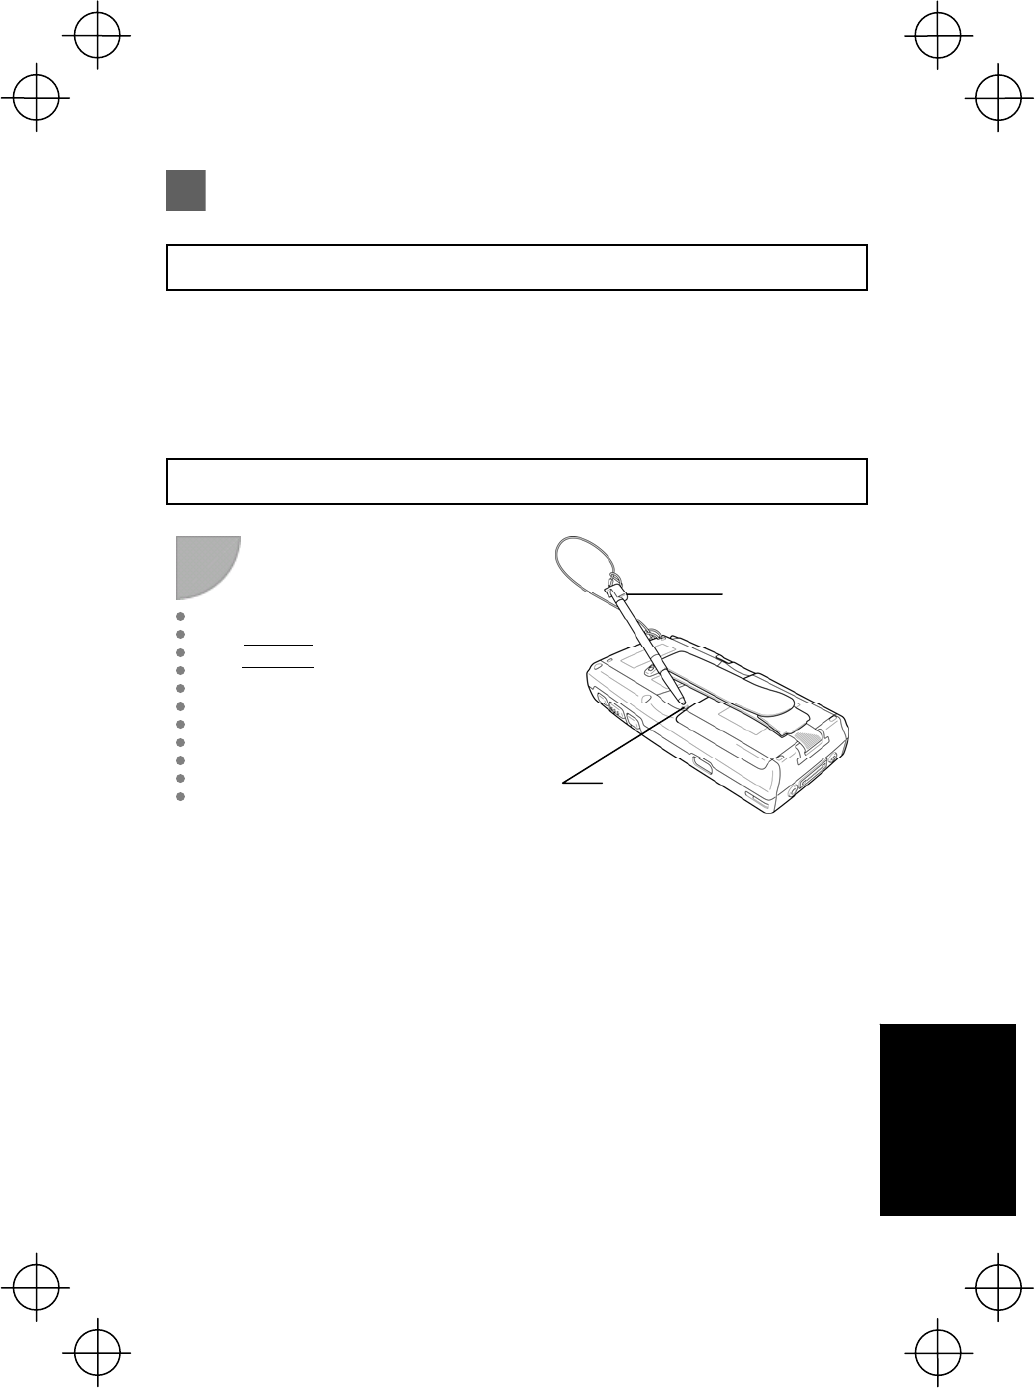
Using the BHT after Long Periods
Data stored in the BHT may be lost and the calendar clock may stop if the BHT is left
unused for long periods of time.
Take appropriate measures in accordance with the procedure below.
− Point − *: Files may become corrupt if left for a long period of time without
replacing the battery cartridge.
Insert a fully charged battery cartridge.
* This is used as a memory back-up power source
and therefore should not be removed from the
BHT for at least 2 days.
Does the normal
screen display?
The BHT can be
used.
Charge promptly
before the battery
becomes fully
depleted. (*)
The touch screen calibration
screen displays.
The “No system!” screen
displays.
Calibrate the touch
panel.
See page 23.
Yes
No
Yes
No
The following reasons may
be considered. Contact the
system administrator.
• Hardware damage
• Application failure
Power ON
Can the power be
turned ON?
46
Troubleshooting
Resetting and Full Resetting
Reset
Reset the BHT in the following cases.
• The BHT makes no response to entry from the touch screen or keys.
• Programs in the BHT malfunction for some unknown reason.
Reset Method
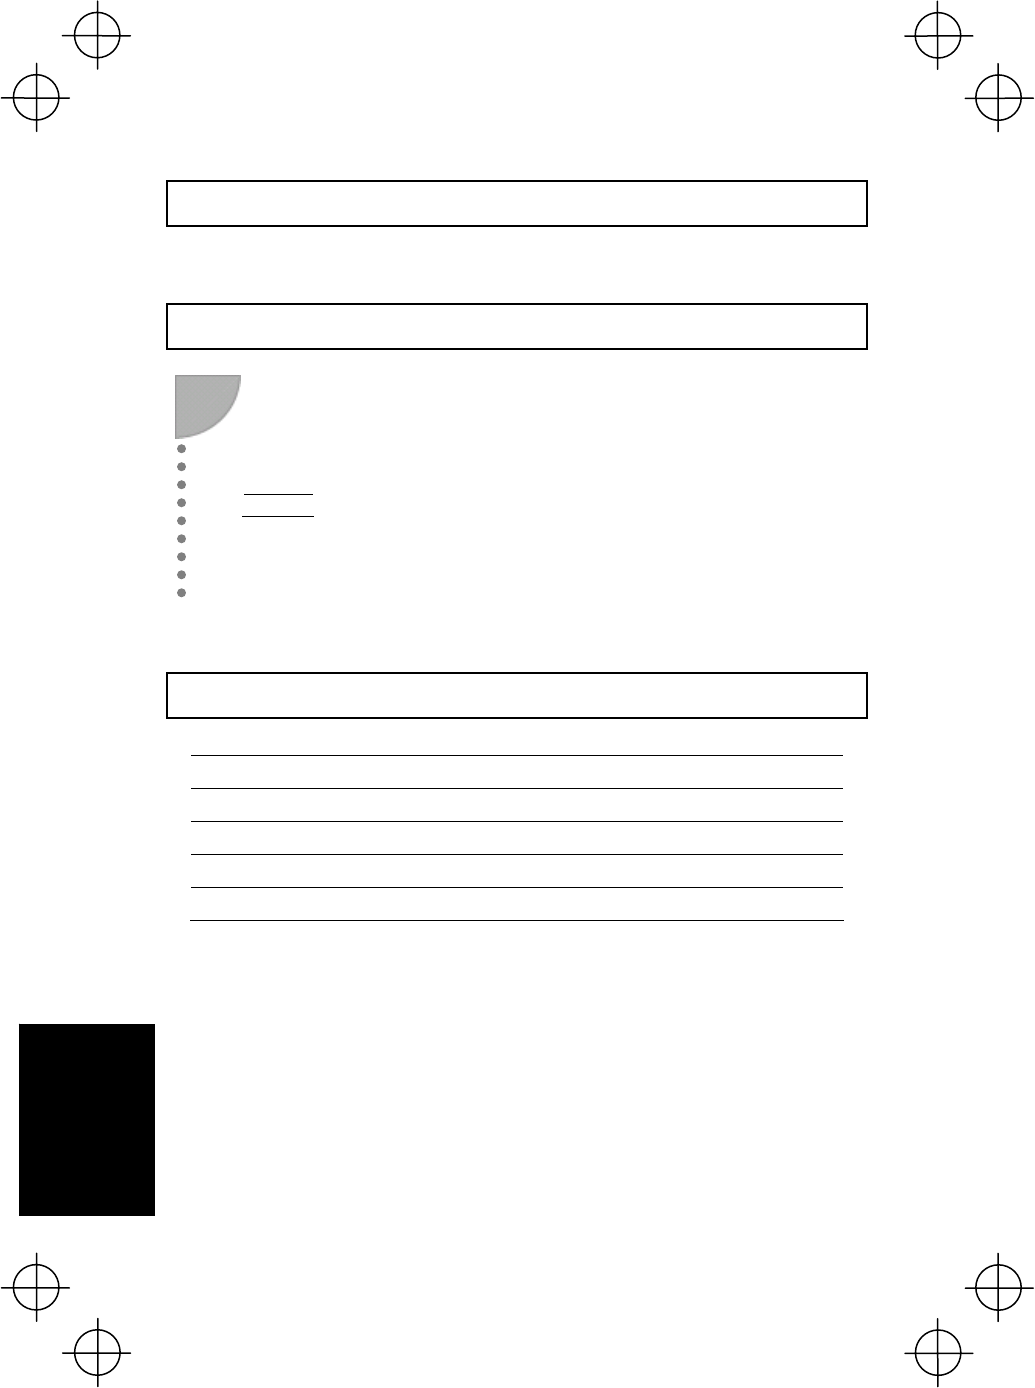
1
With the BHT power ON, press the
reset button at the rear of the BHT
with the stylus provided.
Point
Data stored in the memory will not be
lost even after resetting. However, any
data currently being edited will be lost.
Reset
button
Stylus
47
Troubleshooting
Full Reset
Perform a full reset if the problem persists even after resetting.
Full Reset Method
1
With the BHT power OFF, hold down the reset button at the rear of the BHT
with the stylus and press the power key. Then release the reset button and
power key and press the power key again to fully reset the BHT.
Point
All data stored in the RAM will be lost when performing a full reset. It is
recommended that any important data be backed up to the “FLASH” folder or to the
computer.
Memory Contents after Reset/Full Reset
Reset Full Reset
Data in the "FLASH" folder Data retained Data retained
Data in other folders Data retained Data erased
Contents of the Registry Data retained Data erased (Note)
Data being edited Data erased Data erased
(Note) If the Registry has been backed up (see page 24.), the backed up Registry will be used.
Resetting and Full Resetting
48
Troubleshooting
Troubleshooting Guide
Problem The BHT power does not turn ON.
• Ensure that the battery cartridge has been properly inserted into the BHT. (See page 17.)
• Check the battery power level (see page 41) and charge if necessary.
• Wipe any dirt from the battery cartridge and BHT terminals. (See page 6.)
If the power still does not turn ON after taking the above measures, there is a
possibility that the BHT may be broken. Notify the system administrator.
Problem Unable to charge the BHT.
• Ensure that the dedicated battery charger is being used. (See page 16.)
• Ensure that the battery cartridge has been properly inserted into the BHT. (See page 17.)
• Ensure that the BHT has been properly placed on the charger.
The BHT LED will turn red when properly placed on the charger.
• Wipe any dirt from the battery cartridge and BHT terminals. (See page 6.)
• When using an old battery cartridge that has been repeatedly charged 300 times or more,
replace with a new one. (See page 42.)
If still unable to charge the BHT after taking the above measures, there is a possibility
that the charger may be broken. Notify the system administrator.
Problem The BHT power turns OFF immediately.
• Ensure that the battery cartridge has been charged (see page 41) and charge if necessary.
• If set to auto power OFF, the BHT power will automatically turn OFF if not used for the set
length of time. (See page 24.)
The auto power OFF setting can only be changed at user programs.
49
Troubleshooting
Problem Unable to read barcodes.
It may not be possible to read barcodes at the following times. Refer to page 26 and take
appropriate measures.
• The barcode surface is dirty or curved.
• The barcode reading window is dirty.
• The scanning distance from the barcode is unsuitable.
• The BHT is unable to read barcodes due to specular reflection.
• Scanning is performed in a place where the direct sunlight or ambient lighting is too bright, or
in a place that is too dark.
If still unable to read barcodes after taking measures to tackle the above problems,
notify the system administrator.
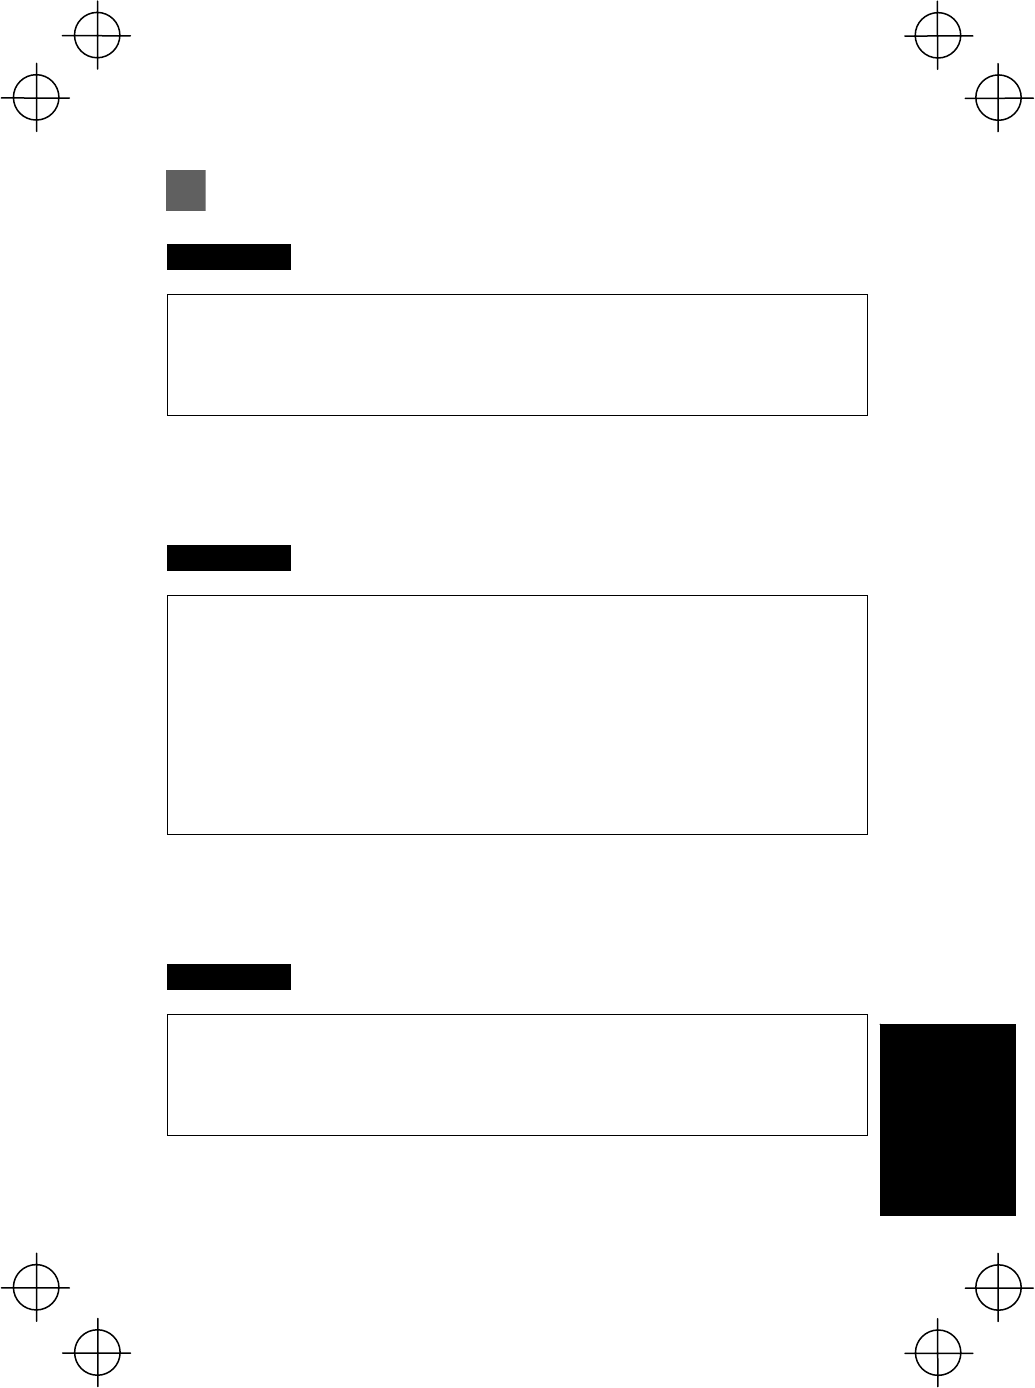
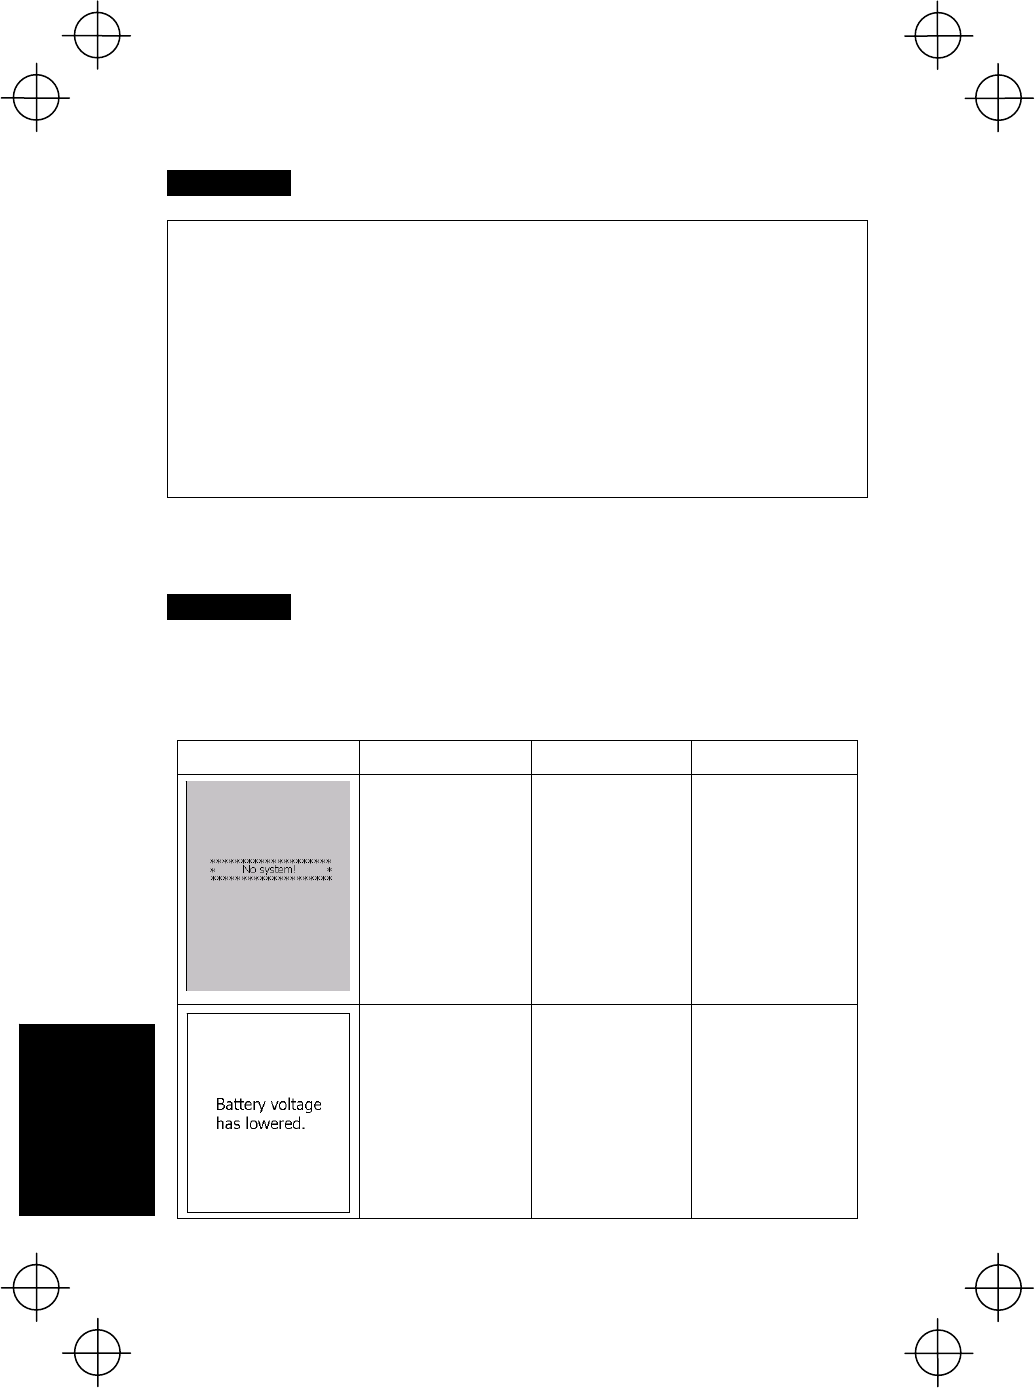
Problem An error message displays.
The error messages that display on the screen and the causes and countermeasures
to be taken if an error occurs when the power is turned ON or while running a
program are shown below.
Message BHT Response Cause Countermeasure
The beeper sounds 5
times (each beep lasts
for 0.1 seconds) and
then the power turns
OFF.
System program
abnormality Notify the system
administrator.
The BHT displays a
warning for
approximately 2
seconds while
sounding the beeper 3
times (each beep lasts
for 0.1 seconds)
before returning to its
normal operational
status.
The battery voltage
has dropped to a
level that requires
charging or battery
cartridge
replacement when
turning the BHT ON,
OFF or while running
a program (System
mode or application).
Replace or charge
the battery cartridge.
Troubleshooting Guide

50
Troubleshooting
Message BHT Response Cause Countermeasure
The beeper sounds 5
times (each beep lasts
for 0.1 seconds) and
then the power turns
OFF. Depending on
the battery
consumption status,
the beeper may not
sound 5 times.
The battery voltage
has dropped to a
level that prevents
BHT operation when
turning the BHT ON,
OFF or while running
a program (System
mode or application).
Replace or charge
the battery cartridge.
The back-up
battery discharge
count has exceeded
the specified number
of times and the
battery power level
has dropped below
the stipulated level.
Replace the back-up
battery.
Refer to the User’s
Manual for details of
the replacement
method.
Troubleshooting Guide

51
Troubleshooting
MEMO

52
Troubleshooting
MEMO

4-2-12, Toranomon, Minato-ku, Tokyo, Japan 105-0001
http://www.denso-wave.com/en/index.html?selectlang=1
496487-5551