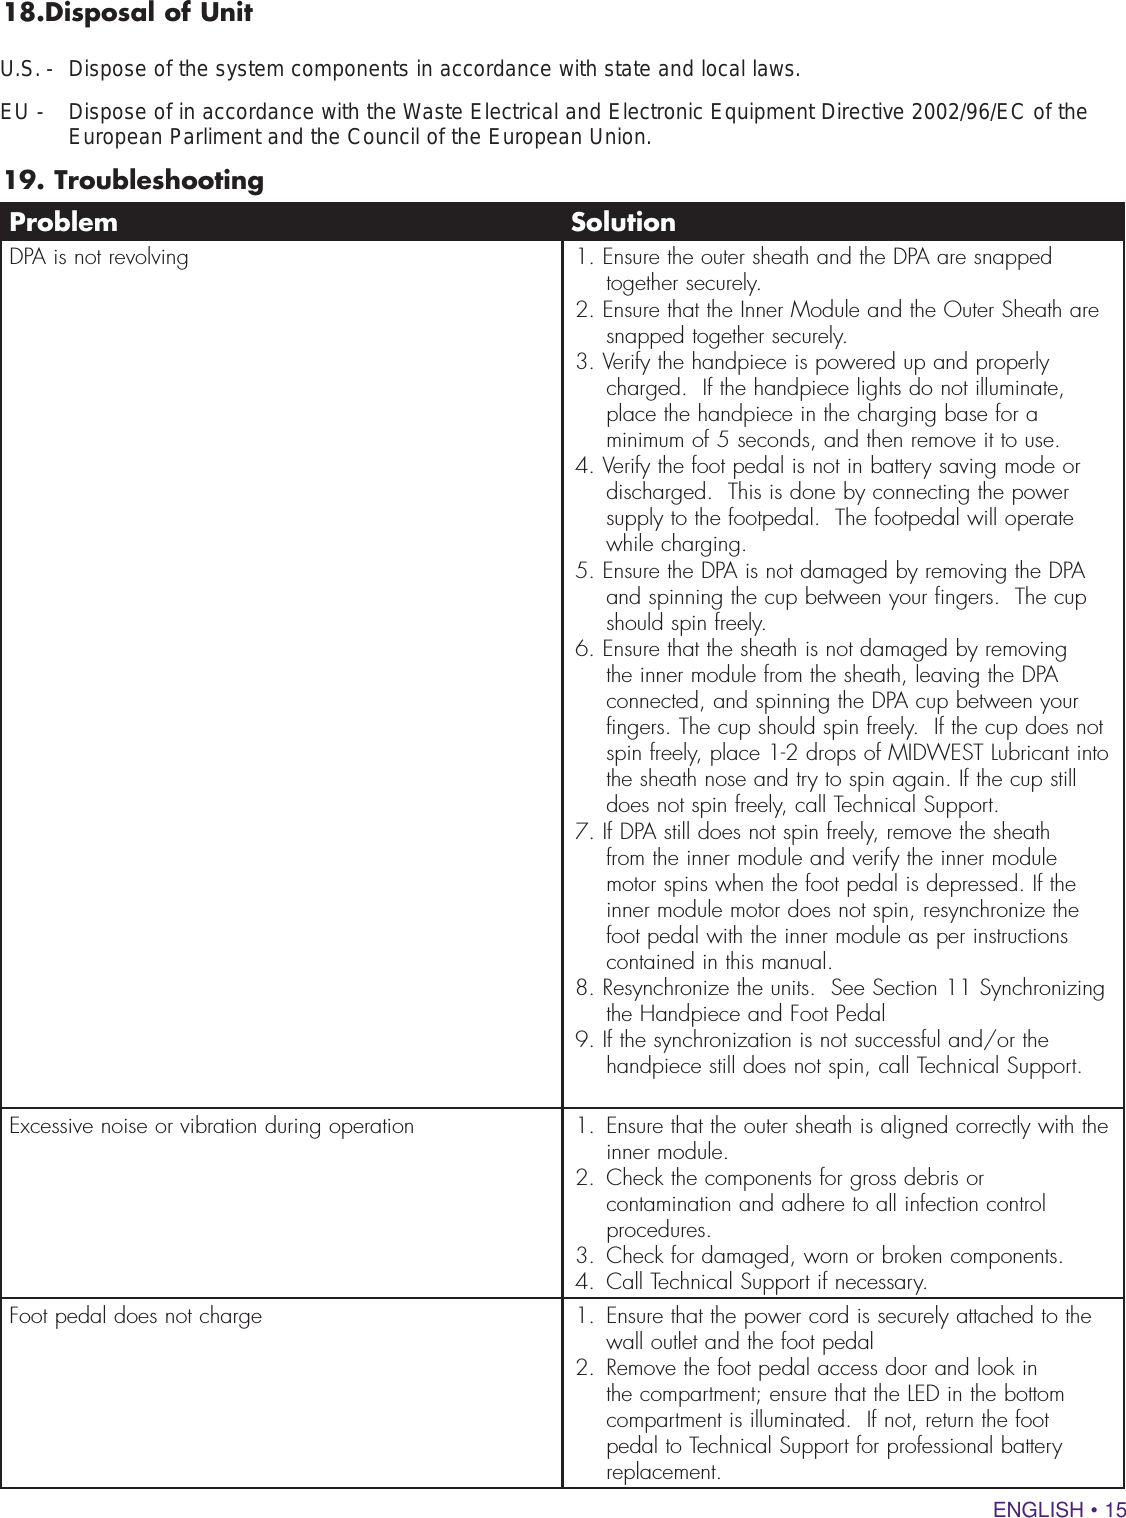
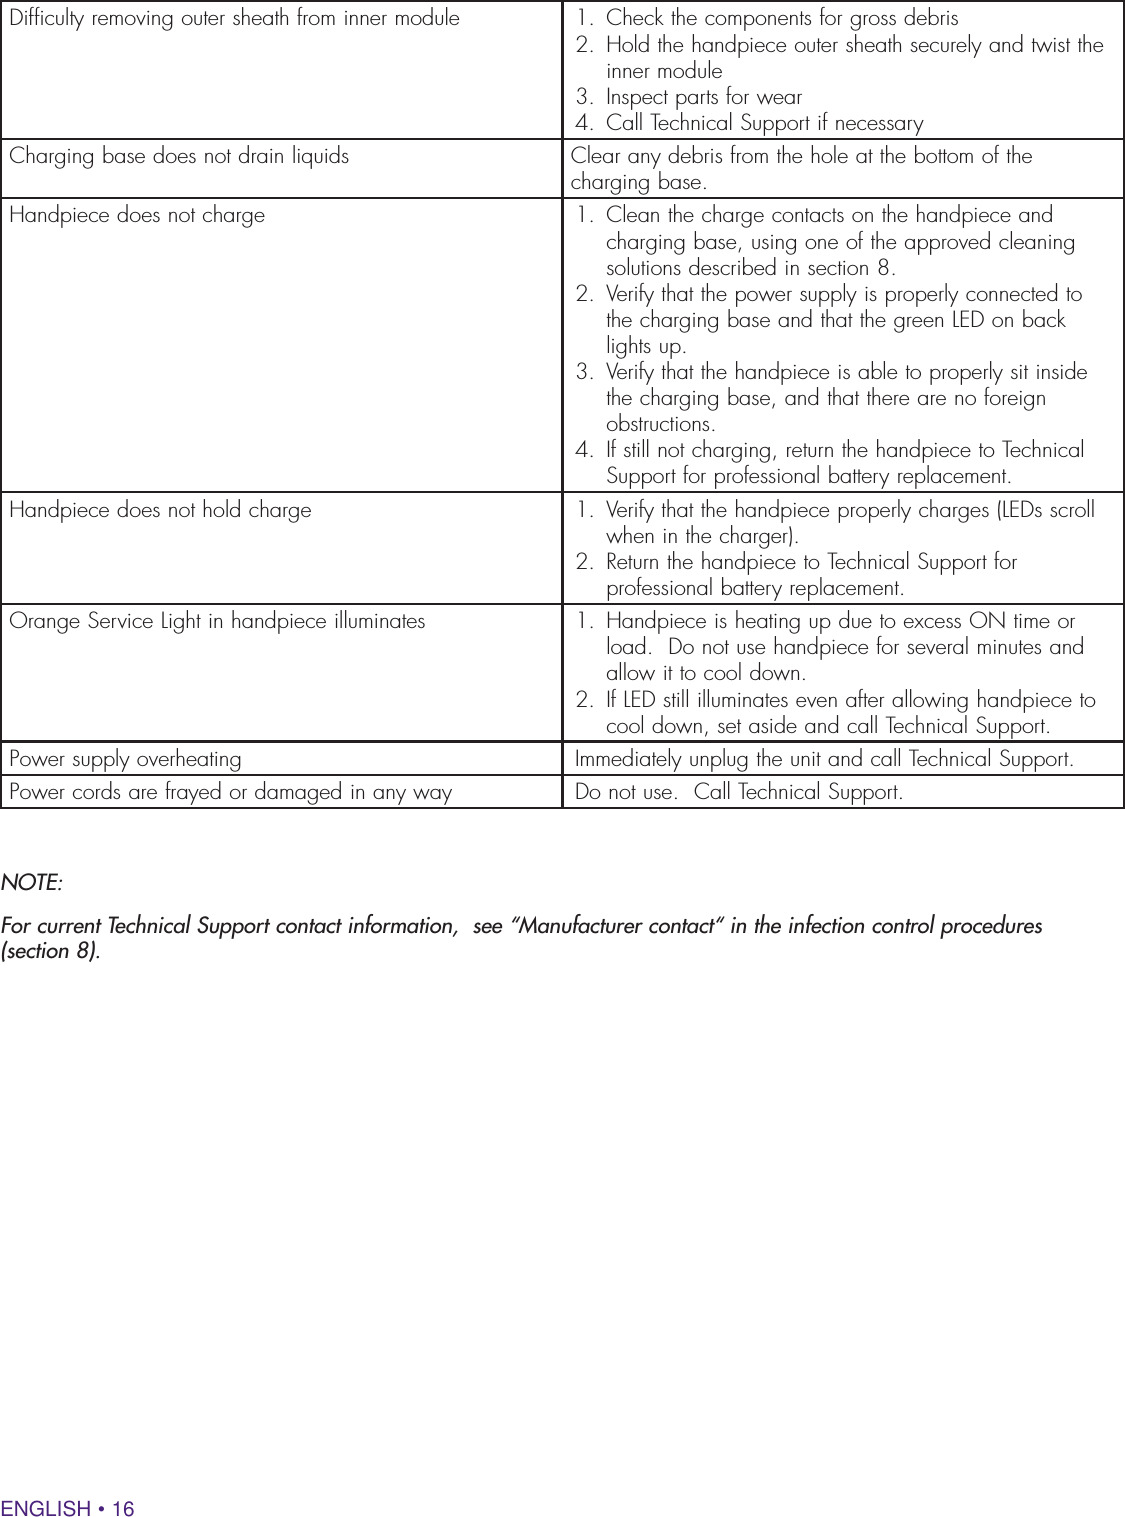
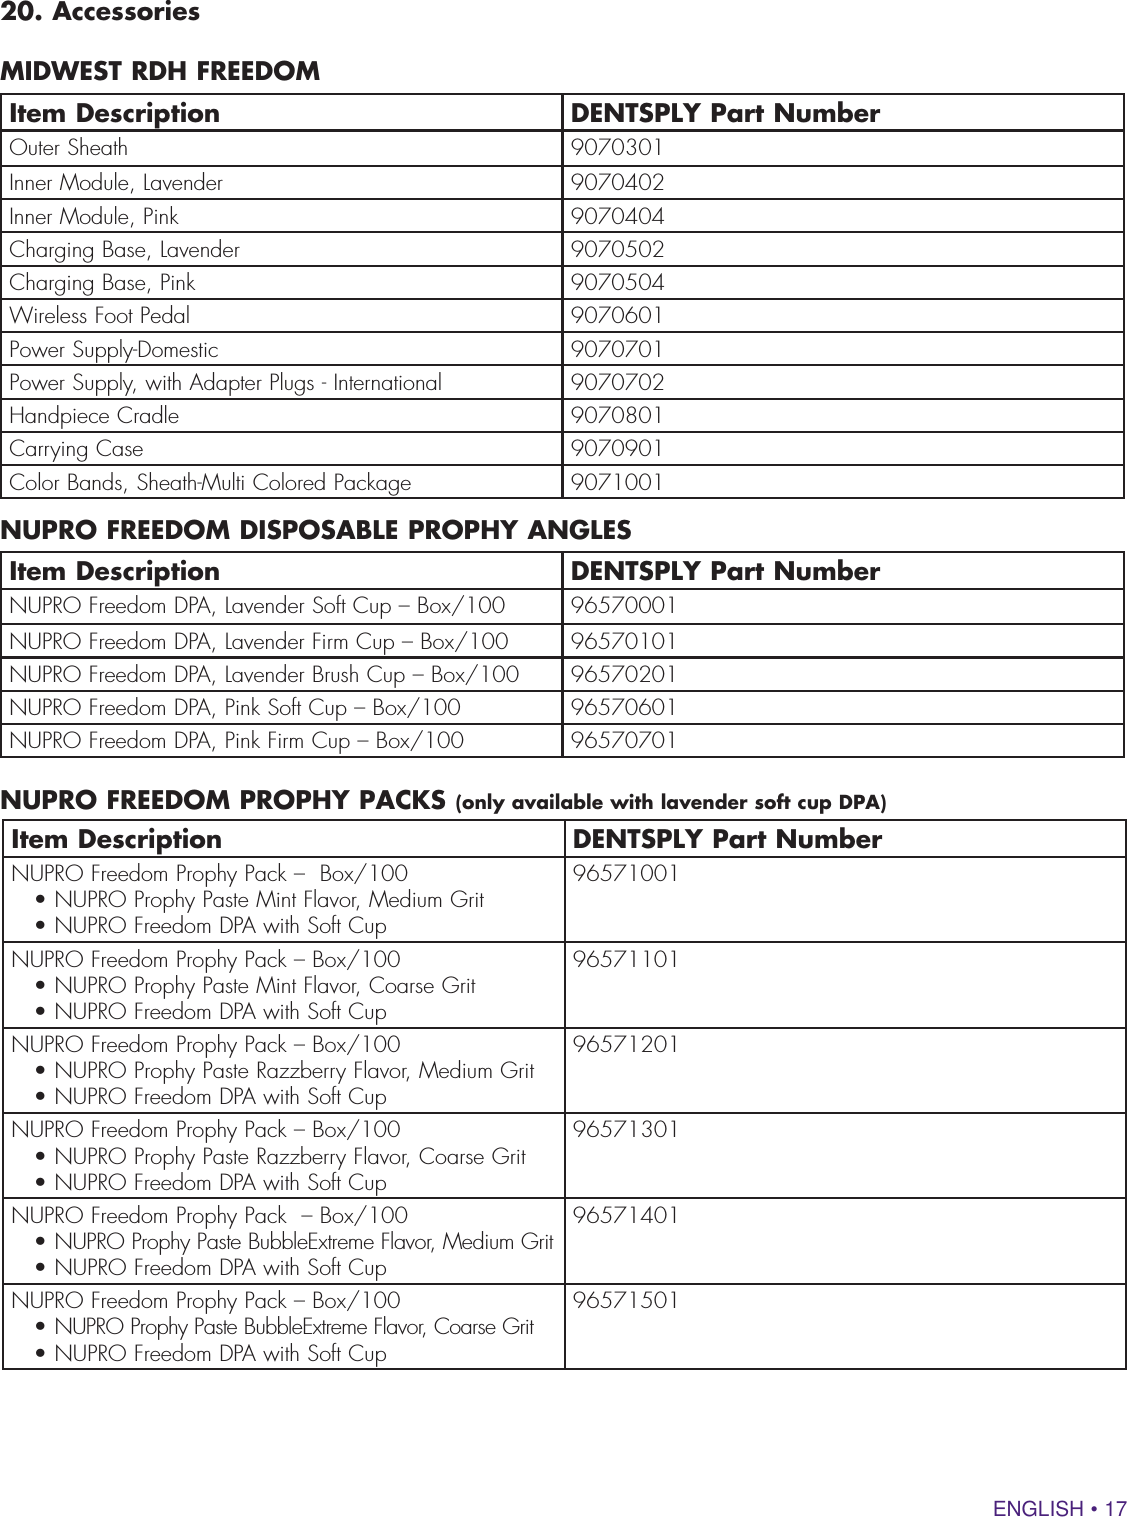
Dentsply Professional Division 73345D4 MIDWEST RDH Freedom Cordless Prophy System Handpiece Inner Module User Manual 90714 Rev 2 07 11 with Translations indd

Dentsply Professional Division MIDWEST RDH Freedom Cordless Prophy System Handpiece Inner Module 90714 Rev 2 07 11 with Translations indd

final manual

ENGLISH • 1ENGLISH • 1DIRECTIONS FOR USEMode d’emploiInstrucciones de usoGebrauchsanweisungIstruzioni per l’usoУказания по применению  Cordless Prophy SystemPlease read carefully and completely before operating unit.Prière de lire attentivement et complètement avant la première utilisation de l’appareil.Por favor lea cuidadosamente y en su totalidad antes de operar la unidad. Bitte vor Inbetriebnahme der Einheit sorgfältig und vollständig durchlesen.Si prega di leggere attentamente e completamente prima di utilizzare l’apparecchio.Пожалуйста, внимательно и полностью прочтите перед использованием устройства.
ENGLISH • 2ENGLISH • 2TABLE OF CONTENTSOVERVIEW .  .  .  .  .  .  .  .  .  .  .  .  .  .  .  .  .  .  .  . 31.   INDICATIONS FOR USE.  .  .  .  .  .  .  . 32.   CONTRAINDICATIONS  .  .  .  .  .  .  .  . 33.   WARNINGS   .  .  .  .  .  .  .  .  .  .  .  .  .  .  .  . 34.   PRECAUTIONS  .  .  .  .  .  .  .  .  .  .  .  .  .  . 45.   ADVERSE REACTIONS  .  .  .  .  .  .  .  . 46.    MIDWEST® RDH FREEDOM™ CORDLESS PROPHY SYSTEM DESCRIPTION  .  .  .  .  .  .  .  .  .  .  .  .  .  . 57.   UNPACKING THE SYSTEM  .  .  .  .  . 68.   INFECTION CONTROL PROCEDURES  .  .  .  .  .  .  .  .  .  .  .  .  . 69.   SYSTEM SETUP  .  .  .  .  .  .  .  .  .  .  .  .  . 910.  CHARGING THE HANDPIECE AND FOOTPEDAL .  .  .  .  .  .  .  .  .  .  .  . 911.  SYNCHRONIZING THE HANDPIECE AND FOOTPEDAL .  .  .  .  .  .  .  .  .  .  .  .  .  .  .  .  .  .  .  1012. PREPARATION FOR USE.  .  .  .  .  .  1113. OPERATION  .  .  .  .  .  .  .  .  .  .  .  .  .  .  .  1214.  HANDPIECE INDICATOR LIGHTS (WHEN IN USE)   .  .  .  .  .  .  1215. SPECIFICATIONS  .  .  .  .  .  .  .  .  .  .  .  1316. CLASSIFICATIONS  .  .  .  .  .  .  .  .  .  .  1317. SYMBOL IDENTIFICATION.  .  .  .  .  1418. DISPOSAL OF UNIT.  .  .  .  .  .  .  .  .  .  1519. TROUBLESHOOTING.  .  .  .  .  .  .  .  .  1520. ACCESSORIES  .  .  .  .  .  .  .  .  .  .  .  .  .  1721. LIMITED WARRANTY  .  .  .  .  .  .  .  .  17
ENGLISH • 31. Indications for UseThe Midwest RDH Freedom is a high-performance cordless prophylaxis handpiece with a wireless foot pedal for use with Freedom disposable prophylaxis angles in a hygiene operatory to perform cleaning and polishing procedures on teeth.  WARNING Use care to prevent personal and / or patient injuryPRECAUTION Use care to prevent product damage and ensure safe and effective product useSafety Conventions in This Document3.  Warnings•  Sterilizing the inner module will cause component damage to the handpiece and the sterilizing equip-ment, and may cause personal bodily injury.•  The outer sheath must be steam sterilized before first use and between patients to prevent cross contamination.  See Section 8 for the Infection Control Procedures.•  The Disposable Prophy Angles are designed for single-patient use only and should never be used more than once. Disposable Prophy Angles are not autoclavable or designed to withstand disinfection solutions. The risk of reuse of a Disposable Prophy Angle are damage to equipment and cross-con-tamination. Install a new Prophy Angle before each use.•  It is the responsibility of the Dental Healthcare Professional to determine the appropriate uses of this product and to understand:• the health of each patient• the dental procedures being undertaken•  applicable industry and governmental agency recommendations for infection control in dental healthcare settings•  requirements and regulations for safe practice of dentistry• these Directions for Use in their entirety•  Per FCC Part 15.21, changes or modifications not expressly approved by the party responsible for compliance could void the user’s authority to oper-ate this equipment.•  Failure to follow recommendations for environ-mental operating conditions (see Section 15 for Specifications) could result in injury to patients or users.  •  Inspect the handpiece system before each use for worn, loose or damaged parts.  Do not attempt to operate unless the Disposable Prophy Angle (DPA) is properly installed.  A loose DPA could eject from the handpiece causing bodily injury.  Reinstall the DPA or replace any damaged parts as necessary.•  Operating the Disposable Prophy Angle at an excessive speed or with excessive force may cause heating of the tooth and temporary discom-fort to the patient.•  To prevent bodily injury and damage to the device, do not sterilize the disposable prophy angle, inner module, charging base, foot pedal or power supply.  Disinfect the inner module, charging base, foot pedal and power supply using only the tested and approved disinfectants listed in Section 8, Infection Control Procedures.  •  The inner module, foot pedal, charging base and power supply are not waterproof.  To prevent dam-age to the equipment, contamination or bodily injury, do not immerse any of these components in water or a chemical solution. •  Use only components and accessories listed in Section 7 of this manual. Failure to do so will void the warranty, may decrease system performance and may lead to unsafe operation.•  Never mount a Disposable Prophy Angle to the handpiece body while it is operating.     OverviewThe MIDWEST® RDH Freedom™ Cordless Prophy System offers a cordless design that eliminates cord drag and allows clinicians easy access and comfort during prophylaxis procedures. Quieter than traditional hygiene and low speed handpieces, the system offers all-day battery life while delivering the same performance you would expect from a corded handpiece. The system includes an autoclavable outer sheath for infection control.2. ContraindicationsNone Known.
ENGLISH • 4•  There are no user-serviceable items in the inner module, power supply, outer sheath, foot pedal or charging base. Opening any of these units may result in unsafe operation and will void the war-ranty.  •  According to IEC 60601-1/UL60601-1, this device must not be used in the presence of a flammable anesthetic gas mixed with air, oxygen, or nitrous oxide. (Note: nitrous oxide by itself is not a flam-mable anesthetic gas.).4.  Precautions•  Before using this product, carefully read and follow all instructions and save them for future reference.  Observe all precautions and warnings.•  The handpiece system can only be used with NUPRO® Freedom™ Disposable Prophy Angles.•  Do not place the system on or next to a radiator or other heat source. Excessive heat may damage the system’s electronics. •  As with all dental procedures, use universal pre-cautions (i.e., wear face mask, eyewear, or face shield, gloves and protective gown).•  The inner module motor is designed to be lube-free.  Lubrication may cause damage to the inner module.•  Oil and/or dirt may damage the motor, electron-ics and battery located inside the handpiece inner module.•  To prevent damage, charge the handpiece using only the charging base provided.•  The batteries are not user replaceable.  When needed, the units should be returned to the listed repair center for replacement. •  Inadvertent system shutdown may occur in the presence of strong non-compliant radio frequency-generating components.  •  This device complies with part 15 of the FCC Rules and with Industry Canada license-exempt RSS standard(s).  Operation is subject to the fol-lowing two conditions:  (1) This device may not cause harmful interference, and (2) This device must accept any interference received, including interference that may cause undesired operation.  Changes or modifications not expressly approved by the party responsible for compliance (i.e. the manufacturer) could void the user’s authority to operate the equipment.  This Class B digital apparatus complies with Canadian ICES-003.”•  Under Industry Canada regulations, this radio transmitter may only operate using an antenna of a type and maximum (or lesser) gain approved for the transmitter by Industry Canada. To reduce potential radio interference to other users, the antenna type and its gain should be so chosen that the equivalent isotropically radiated power (e.i.r.p.) is not more than that necessary for successful communication.•  This equipment has been tested and found to comply with the limits for a Class B digital device, pursuant to Part 15 of the FCC Rules. These lim-its are designed to provide reasonable protection against harmful interference in a residential instal-lation. This equipment generates, uses and can radiate radio frequency energy and, if not installed and used in accordance with the instructions, may cause harmful interference to radio communica-tions. However, there is no guarantee that interfer-ence will not occur in a particular installation. If this equipment does cause harmful interference to radio or television reception, which can be deter-mined by turning the equipment off and on, the user is encouraged to try to correct the interfer-ence by one or more of the following measures:• Reorient or relocate the receiving antenna.•  Increase the separation between the equip-ment and receiver.•  Connect the equipment into an outlet on a circuit different from that to which the receiver is connected.5.  Adverse ReactionsThere are no known adverse reactions.
ENGLISH • 56.  MIDWEST® RDH Freedom™ Cordless Prophy System Description NUPRO® Freedom™ Disposable Prophy Angle Removable, Autoclavable      Outer Sheath Charging Base (See Section 10)   Removable, Replaceable Color Ring  Inner Module  LED Indicator Lights  (Charging - See Section 10) (Operation - See Section 14)  Wireless Rechargable Foot Pedal(Charging - See Section 10) (Syncronization - See Section 10)  Handpiece Tray Cradle - Autoclavable  Handpiece Tray Cradle - AutoclavableModule  LED Indicator Lights  (Charging - See Section 10)
ENGLISH • 67.  Unpacking the SystemAs you unpack your MIDWEST® RDH Freedom™ Cordless Prophy System, verify that the following compo-nents and accessories are included: 8.  Infection Control ProceduresThe objective of the information provided in this section is to reduce the potential for cross contamination when using a MIDWEST® RDH Freedom™ Cordless Prophy System during routine dental care.  In the event any regulatory agency disagrees with this information, the agency requirements take precedence.NOTE:  Outer sheaths and handpiece cradle must be steam-autoclave sterilized prior to each use.  Additional outer sheaths and handpiece cradles are available for purchase.Basic System:1- Handpiece Inner Module 1- Handpiece Outer Sheath 1- Charging Base 1- WIreless Foot Pedal 1- Power Supply1- Double-ended extension cable (not shown)20-  NUPRO Freedom Disposable Prophy Angles (DPAs) 1- Disposa-Shield Trial Pack (25) 1- Handpiece Cradle1-  Handpiece Outer Sheath Color Bands Package (3pk)Premium System:1- Handpiece Inner Module 3- Handpiece Outer Sheaths 1- Charging Base 1- WIreless Foot Pedal 1- Power Supply         1- Double-ended extension cable (not shown) 20-  NUPRO Freedom Disposable Prophy Angles (DPAs) 1- Disposa-Shield Trial Pack (25) 1- Handpiece Cradle 1-  Handpiece Outer Sheath Color Bands Package (3pk)1- Carrying case
ENGLISH • 7WARNINGS These instructions are for use ONLY on the outer sheath and handpiece cradle.  All other parts of the system should be disinfected according to the procedures in the “Disinfection” section.The outer sheath and handpiece cradle for the MIDWEST® RDH Freedom™ Cordless Prophy System are not sterile upon receipt and must be sterilized prior to use in accordance with the following instructions.LIMITATIONS ON REPROCESSING Repeated cleaning and sterilization cycles have minimum effect on these instruments. End of life is normally determined by wear and damage due to use.Do not use chemical disinfectants prior to sterilization or rapid deterioration of the material may occur.Cold liquid disinfection/sterilization, chemical vapor sterilization, and dry heat sterilization methods have not been tested or validated for efficacy and are not recommended for use.Do not immerse the outer sheath or handpiece cradle in an ultrasonic bath.POINT OF USE Remove excess soil with disposable cloth or paper wipe.It is recommended that instruments are reprocessed as soon as is reasonably practical following use.CONTAINMENT AND TRANSPORTATION Protect the outer sheath and handpiece cradle from contact with other dental instruments that may cause damage.PREPARATION FOR DECONTAMINATION Remove the outer sheath from the inner module of the handpiece. Only the outer sheath, color ring of the handpiece, and handpiece cradle may be steam-autoclave sterilized.CLEANING: MANUAL Rinse the instruments with running water to remove any gross debris.DISINFECTION Disinfection of the instruments is not necessary prior to steam - autoclave sterilization.PACKAGING Place each instrument in a separate paper or paper/plastic steam-sterilization pouch. If using a sterilizing cassette, ensure that the sterilizer’s maximum load is not exceeded.STERILIZATION Use a steam autoclave. Place bagged instruments into the steam autoclave, paper side up when using a paper/plastic pouch. Gravity Steam SterilizationFull Cycle:135°C (275°F) for 3.5 minutesPre-vacuum Steam SterilizationFull Cycle:132°C (270°F) for 3 minutes Alternate Method: Place non-bagged instruments into the steam autoclave and run at the listed cycles.NOTE: Instruments sterilized unbagged should be used immediately.DRYING To dry, use the drying cycle of the autoclave.  Set cycle for 20 to 30 minutes.  Do not exceed 137°C.Instructions for Sterilizing The Outer Sheath And Handpiece Cradle
ENGLISH • 8WARNINGS The charging base, inner module, foot pedal, power supply and extension cable (not shown) are not sterilizable by autoclave, but can be disinfected following the procedures listed below.Only use water based non-immersion type disinfectant solutions. Per the Centers for Disease Control and Prevention (CDC), chemical germicide registered with the EPA as a “hospital disinfectant” and labeled for “tuberculocidal” (i.e., mycobactericidal) activity is recommended for disinfecting surfaces that have been soiled with patient material. These intermediate-level disinfectants include phenolics, and chlorine-containing compounds. The following tuberculocidal disinfectants are safe for use on the components listed above: • Phenolics (Dual Water-Based) such as Birex SE Concentrate or Disinfectant Wipes (Manufactured by Biotrol)• Phenolics (Dual Alcohol-Based) such as Cavicide Spray or Wipes (Manufactured by TotalCare)• Quarternaries (Dual or Synergized Plus Alcohol) such as Lysol IC Disinfectant Spray (Manufactured by Sultan Heathcare)• Sodium Hypochlorite such as Clorox Germicidal Spray or Wipes (Manufactured by Harry J. Bosworth Company)• Sodium Bromide & Chlorine (Microstat Tablets) 2 tablets/quart of waterLIMITATIONS ON REPROCESSING Repeated cleaning has minimum effect on these instruments. End of life is normally determined by wear and damage due to use.Do not use disinfectant solution on sterilizable outer sheaths. Refer to sterilization procedures for sterilizable outer sheaths.POINT OF USE Remove excess soil with disposable cloth or paper wipe. Discard wipe after use.CONTAINMENT AND TRANSPORTATION Handle with care.CLEANING Generously spray disinfectant solution on a clean cloth. Wipe the outer surfaces of the charging base, inner module, foot pedal, power supply and cords.  Discard used cloth. Wipe dry with a clean cloth.DISINFECTION Generously spray disinfectant solution on a clean cloth. Wipe the outer surfaces of the charging base, inner module, foot pedal, and the power supply and its cord.  Discard used cloth. Allow disinfectant to air dry.Instructions For Disinfecting All Other Parts (Charging Base, Inner Module, Foot Pedal and Power Supply)MAINTENANCE Visually inspect to ensure that all contamination has been removed.Check for distortion, damage or wear.  Discard damaged, worn or corroded instruments.STORAGE To maintain sterility, instruments should remain bagged until ready for use.MANUFACTURER CONTACT In the United States, contact DENTSPLY Professional Customer Service Technical Support at 800-989-8826. For areas outside the United States, contact your local DENTSPLY Division.Instructions For Sterilizing The Outer Sheath And Tray Cradle, Cont.Only use water based non-immersion type disinfectant solutions. Per the Centers for Disease Control and Prevention (CDC), chemical germicide registered with the EPA as a “hospital disinfectant” and labeled for “tuberculocidal”
ENGLISH • 9DRYING When cleaning, wipe surfaces dry with a clean cloth. To achieve disinfection, allow surfaces to air dry.MAINTENANCE Visually inspect to ensure that all contamination has been removed.Visually inspect power supply and cords for damage.STORAGE Ambient temperature range: -20˚C to 50˚CRelative humidity range: 45 - 95% (non-condensing)MANUFACTURER CONTACT In the United States, contact DENTSPLY Professional Customer Service Technical Support at 800-989-8826. For areas outside the United States, contact your local DENTSPLY Division.Instructions For Disinfecting All Other Parts (Charging Base, Inner Module, Foot Pedal and Power Supply), Cont.The instructions provided above have been validated by DENTSPLY as being capable of preparing a medical device for re-use.  It remains the responsibility of the processor to ensure that the processing is actually performed using equipment, materials and personnel in the processing facility to achieve the desired result.  This requires validation and routine monitoring of the process.  Likewise, any deviation by the processor from the instructions provided should be properly evaluated for effectiveness and potential adverse consequences. 9.  System Setup   Both the handpiece and footpedal must be charged prior to first use.  Charge the handpiece and foot pedal for at least 90 minutes.  (See Section 10, Charging the Handpiece and Foot Pedal).  10. Charging the Handpiece and Foot     Pedal    When the corresponding indicator light is orange, the handpiece and/or foot pedal must be charged.10.1 An extension cable has been supplied that allows  you to charge both the inner module and the foot pedal at the same time. Plug the female onto the Power Supply Cable plug and plug the male ends into the charging base and foot pedal.   You can also charge the inner module and the foot pedal individually using the power supply cable alone.Handpiece charge indicatorPower IndicatorFoot-pedal charge indicatorPower supply connector10.2 Plug the power supply into a wall outlet.NOTE: The green power-on indicator on the back of the charging base illuminates when the charging base is successfully connected.PRECAUTION: Connect to single phase AC power 100-240V power only.  Otherwise, malfunction will occur.  Do not unplug the power supply by pulling on the cord.Power supply connectorconnectorPower Indicator
ENGLISH • 1010.3 Place the inner module or handpiece on the  charging base, aligning the charging contacts on each. 10.4 Refer to the figure and table below to determine the charging progress for the inner module.NOTE:• The handpiece should be recharged after each full day’s use.• If necessary, the handpiece may be “quick charged” for a single use in 15 minutes.10.5 The foot pedal should be recharged monthly. A fully discharged foot pedal will need approximately 90 minutes to fully recharge. The foot pedal may be operated while charging.  NOTE:• The middle LED light on the inner module denotes the degree of the charge in the foot pedal battery. A solid green light means greater than 30%. A solid orange light means less than 30%.Indicator Lights Degree of ChargeScrolling orange Less than 50%Scrolling green 50-90%Solid green Greater than 95%NOTE:• After one week of non-use, both the handpiece and the foot pedal enter an enhanced battery-saving mode.      •  Place the handpiece inner module into an energized charging base for 5 seconds to restore normal functions.    •  Connect the footpedal to the power supply for 5 seconds to restore normal functions.11. Synchronizing the Handpiece and Foot PedalNOTE:Follow this procedure when:• the foot pedal or handpiece inner module is replaced for any reason• the handpiece and foot pedal do not seem to be communicating properly 11.1 Place the foot pedal within 10 feet of the charging base. 11.2 Invert the foot pedal and remove the screw and the access door.11.3 Remove the inner module from the outer sheath of the handpiece.11.4 Place the inner module on the charging base, ensuring that the three indicator lights are scrolling or all are solid green.  Charging ContactsIndicator lightsScrewAccess Door
ENGLISH • 1112. Preparation for Use12.1 Position the foot pedal for use, ensuring that the floor is level.  12.2 Ensure that the outer sheath has been sterilized according to the Infection Control Procedures (sec-tion 8). 12.3 When it is sufficiently charged, insert the inner module into a Disposa-Shield®, piercing the shield just enough to expose the tip.PRECAUTION:  The Disposa-Shield protects the inner module from debris and splatter.  Do NOT apply the Disposa-Shield to the outer sheath, which must be sterilized before each use.  12.4 Install the inner module into the outer sheath by aligning the swoops on each and snapping in place.12.5 Attach a NUPRO Freedom Disposable Prophy Angle to the handpiece by aligning the swoops on each and snapping in place.  12.6 Verify that all parts of the handpiece are securely attached before use.Aligned correctlyFully-Assembled Handpiece11.5 Invert the inner module and place it on the charg-ing base as shown.  The LED shown below will blink green if the position is correct for synchroni-zation.11.6 When the indicator lights display a scrolling green and orange pattern, press the red button in the bottom compartment of the foot pedal within 15 seconds.NOTE:  • The LED beside the synchronization switch of the foot pedal flashes orange to indicate that the foot pedal is in synchronization mode.  11.7 If the synchronization was successful, the three indicator lights on the handpiece and the LED in the foot pedal will flash green several times.  11.8 If all three handpiece indicator lights, and the foot-pedal LED flash orange, the syncing was unsuc-cessful.  Return the inner module to an upright position in the charging base and repeat the proce-dure.  LEDtion 8). 12.3 When it is sufficiently charged, insert the inner module into a Disposa-Shieldjust enough to expose the tip.PRECAUTION:  The Disposa-Shield protects the inner module from debris and splatter.  Do NOT apply the Disposa-Shield to the outer sheath, which must be place.Aligned correctly
ENGLISH • 1213. Operation13.1   The handpiece powers up when it detects motion, i.e. when the user picks it up.  If not in use, it will shut down again after a minute.13.2    Load the DPA with prophy paste and depress the foot pedal slowly to avoid splatter. The DPA (motor) will only rotate in one direction.13.3    Adjust pressure on the foot pedal to control the rotation speed of the DPA throughout the procedure.13.4    Follow standard prophylaxis procedures as you would with any corded prophy device.  13.5    Applying excessive force to the polishing surface may slow or stop the rotation of the DPA and result in ineffective polishing.13.6    The Handpiece Cradle should be placed on the instrument tray so that the Handpiece may be placed in it to avoid the handpiece possibly rolling and falling off the tray during a prophylaxis procedure.NOTES: • If the handpiece seems to be losing power, recharge as soon as possible. • If the handpiece battery is completely discharged, the three LEDs will blink and the unit will shut down.  The handpiece must be put in the charging base before it’s able to operate again.14. Handpiece Indicator Lights (when in use)The MIDWEST® RDH Freedom™ Cordless Prophy System handpiece has three LEDs. Whenever the handpiece is in normal operational mode (i.e., not being charged or synchronized) the handpiece indicator lights display information about the system according to the table below:  Handpiece charge indicatorTemperature indicator lightFoot-pedal charge indicatorDegree of Charge Color Light Functional DescriptionHandpiece charge indicator  Orange Handpiece charge less than 50%Green Handpiece charge greater than 50%Foot-pedal charge indicator Orange Foot pedal charge less than 30%Green Foot pedal charge greater than 30%Temperature indicator light Orange Illuminates when the internal temperature of the handpiece is higher than normal.  The light will turn off when the temperature returns to normal. Operator should refrain from using the handpiece for several minutes until the indicator light goes out. If the temperature indicator light persists, call tecnical support.
ENGLISH • 1315. Specifications16. ClassificationsPower Supply manufacturer:Power Supply model number:AC InputAult (SL Power)MW170KB0502B3Continuous (100-240 VAC)AC Input Current Less than 0.7AAC Input Phases SingleAC Input Frequency 50-60 HzDC Output Power 8WDC Output Voltage and Current +5VDC at 0-1.6AOutput Regulation +/- 10%Weight Handpiece with metal sheath = 120 g Foot pedal = 200 g  Dimensions Handpiece with sheath & disposable angle    L = 190 mm, W = 30 mmFoot pedal       W = 118 mm      H = 40 mmFoot Pedal Protection Class IPX1.  Not for operating theatres.Remote Communication Frequency:  Power:  Channels:2405-2480 MHz1mW16Operating Environment Ambient temperature:Relative Humidity: 10°C-40°C   45-95% (non-condensing)Transport and Storage Conditions Ambient temperature:Relative Humidity: Atmospheric Pressure:-20°C to 50°C 45-95% (non-condensing)500-1060 hPaHandpiece Performance Protection Class IPX3.Max Cup Speed Max Torque 3000 rpm 10 mNmType of protection against electric shock: Class IIDegree of protection against electric shock: Type B Applied PartMode of operation for handpiece:Mode of operation for foot pedal:Intermittent:  5 minutes ON, 25 minutes OFFContinuousDegree of safety of application in the presence of a flammable anesthetic mixture with air or with oxygen or nitrous oxide:Equipment not suitable for use in the presence of flammable mixturesAccording to medical device directive: IIA (Rule 9) (ISO/IEC 60601)
ENGLISH • 1417. Symbol IdentificationThe following standard symbols appear on the device label.Class IIEquipmentClass II EquipmentType B applied part   MEDICAL EQUIPMENT WITH RESPECT TO ELECTRIC SHOCK, FIRE AND MECHANICAL HAZARDS ONLY IN ACCORDANCE WITH UL-2601-1/60601-1, CAN/CSA C22.2 NO.601.1Consult instructions for use135 Sterilizable up to the temperature specifiedDo not re-useDo not re-use (For DPAs)Dispose of in accordance with the Waste Electrical and Electronic Equipment Directive 2002/96/EC of the European Parliament and the Council of the European UnionIPX0 Protection Class IPX0 IPX0 Classification of ingress of water for Charger – not protected IPX1 Footswitch not for operating theatresProtection Class IPX1                                                     IPX1 Classification of ingress of waterIPX3 Protection Class IPX3IPX3 Classification of ingress of water for Inner Module - Protected against falling spray. 5 min25 minDuty Cycle for handpiece:5 minutes ON25 minutes OFFSerial NumberLOT Batch Code/Lot NumberManufactured byThis symbol is a mandatory marking for devices entering the European market to indicate conformity with the essential health and safety requirements set out in European Directives. The symbol may be accompanied by a four-digit identification number of the notified body. The vertical dimensions may not be less than 5 mm high.
ENGLISH • 1518.Disposal of UnitU.S. -  Dispose of the system components in accordance with state and local laws.EU -  Dispose of in accordance with the Waste Electrical and Electronic Equipment Directive 2002/96/EC of the European Parliment and the Council of the European Union.19. TroubleshootingProblem SolutionDPA is not revolving 1. Ensure the outer sheath and the DPA are snapped together securely.2. Ensure that the Inner Module and the Outer Sheath are snapped together securely.3. Verify the handpiece is powered up and properly charged.  If the handpiece lights do not illuminate, place the handpiece in the charging base for a minimum of 5 seconds, and then remove it to use.  4. Verify the foot pedal is not in battery saving mode or discharged.  This is done by connecting the power supply to the footpedal.  The footpedal will operate while charging.  5. Ensure the DPA is not damaged by removing the DPA and spinning the cup between your fingers.  The cup should spin freely.6. Ensure that the sheath is not damaged by removing the inner module from the sheath, leaving the DPA connected, and spinning the DPA cup between your fingers. The cup should spin freely.  If the cup does not spin freely, place 1-2 drops of MIDWEST Lubricant into the sheath nose and try to spin again. If the cup still does not spin freely, call Technical Support.7. If DPA still does not spin freely, remove the sheath from the inner module and verify the inner module motor spins when the foot pedal is depressed. If the inner module motor does not spin, resynchronize the foot pedal with the inner module as per instructions contained in this manual.  8. Resynchronize the units.  See Section 11 Synchronizing the Handpiece and Foot Pedal9. If the synchronization is not successful and/or the handpiece still does not spin, call Technical Support.Excessive noise or vibration during operation 1.  Ensure that the outer sheath is aligned correctly with the inner module.2.  Check the components for gross debris or contamination and adhere to all infection control procedures.3.  Check for damaged, worn or broken components.4.  Call Technical Support if necessary. Foot pedal does not charge 1.  Ensure that the power cord is securely attached to the wall outlet and the foot pedal 2.  Remove the foot pedal access door and look in the compartment; ensure that the LED in the bottom compartment is illuminated.  If not, return the foot pedal to Technical Support for professional battery replacement.
ENGLISH • 16Difficulty removing outer sheath from inner module 1.  Check the components for gross debris2.  Hold the handpiece outer sheath securely and twist the inner module3.  Inspect parts for wear 4.  Call Technical Support if necessaryCharging base does not drain liquids Clear any debris from the hole at the bottom of the charging base.Handpiece does not charge 1.  Clean the charge contacts on the handpiece and charging base, using one of the approved cleaning solutions described in section 8.2.  Verify that the power supply is properly connected to the charging base and that the green LED on back lights up.3.  Verify that the handpiece is able to properly sit inside the charging base, and that there are no foreign obstructions.4.  If still not charging, return the handpiece to Technical Support for professional battery replacement.Handpiece does not hold charge 1.  Verify that the handpiece properly charges (LEDs scroll when in the charger).2.  Return the handpiece to Technical Support for professional battery replacement.Orange Service Light in handpiece illuminates 1.  Handpiece is heating up due to excess ON time or load.  Do not use handpiece for several minutes and allow it to cool down.2.  If LED still illuminates even after allowing handpiece to cool down, set aside and call Technical Support. Power supply overheating Immediately unplug the unit and call Technical Support.Power cords are frayed or damaged in any way Do not use.  Call Technical Support. NOTE:For current Technical Support contact information,  see “Manufacturer contact“ in the infection control procedures (section 8).
ENGLISH • 1720. AccessoriesMIDWEST RDH FREEDOMNUPRO FREEDOM DISPOSABLE PROPHY ANGLESNUPRO FREEDOM PROPHY PACKS (only available with lavender soft cup DPA)Item Description DENTSPLY Part NumberOuter Sheath 9070301Inner Module, Lavender  9070402Inner Module, Pink 9070404Charging Base, Lavender 9070502Charging Base, Pink 9070504Wireless Foot Pedal 9070601Power Supply-Domestic 9070701Power Supply, with Adapter Plugs - International 9070702 Handpiece Cradle 9070801Carrying Case 9070901Color Bands, Sheath-Multi Colored Package 9071001Item Description DENTSPLY Part NumberNUPRO Freedom DPA, Lavender Soft Cup – Box/100 96570001NUPRO Freedom DPA, Lavender Firm Cup – Box/100 96570101NUPRO Freedom DPA, Lavender Brush Cup – Box/100 96570201NUPRO Freedom DPA, Pink Soft Cup – Box/100 96570601NUPRO Freedom DPA, Pink Firm Cup – Box/100 96570701Item Description DENTSPLY Part NumberNUPRO Freedom Prophy Pack –  Box/100   • NUPRO Prophy Paste Mint Flavor, Medium Grit   • NUPRO Freedom DPA with Soft Cup96571001NUPRO Freedom Prophy Pack – Box/100   • NUPRO Prophy Paste Mint Flavor, Coarse Grit   • NUPRO Freedom DPA with Soft Cup96571101NUPRO Freedom Prophy Pack – Box/100   • NUPRO Prophy Paste Razzberry Flavor, Medium Grit   • NUPRO Freedom DPA with Soft Cup96571201NUPRO Freedom Prophy Pack – Box/100   • NUPRO Prophy Paste Razzberry Flavor, Coarse Grit   • NUPRO Freedom DPA with Soft Cup96571301NUPRO Freedom Prophy Pack  – Box/100   • NUPRO Prophy Paste BubbleExtreme Flavor, Medium Grit                 • NUPRO Freedom DPA with Soft Cup96571401NUPRO Freedom Prophy Pack – Box/100   • NUPRO Prophy Paste BubbleExtreme Flavor, Coarse Grit   • NUPRO Freedom DPA with Soft Cup96571501
ENGLISH • 1821. Limited WarrantyThe DENTSPLY Professional MIDWEST® RDH Freedom™ Cordless Prophy System is designed exclusively for dental use and this warranty is not applicable to other uses.  This warranty extends to Midwest RDH Freedom system purchased from an authorized DENTSPLY distributor, and only to the original purchaser. The system is made up of four significant assemblies, the Inner Module, Metal Outer Sheath, Charging Base and Wireless Foot Pedal.  All are warranted against defects arising from faulty materials and workmanship.  All components of the Midwest RDH Freedom Cordless Prophy System, except the Disposable Prophy Angle, which is a single use only item, are warranted for (1) year from the date of purchase with (1) free battery replacement for the inner module within the first three years. Parts will be repaired or replaced at the discretion of DENTSPLY Professional provided that the system has been operated and maintained as prescribed in these instructions and has not been subjected to apparent misuse, abuse or accident.  Claims covered by this warranty will be honored when presented through your DENTSPLY Professional distributor within thirty (30) days from discovery of defect within the applicable warranty period.  THERE ARE NO WARRANTIES, EXPRESS OR IMPLIED, WHICH EXTEND BEYOND THE DESCRIPTION ON THE FACE HEREOF. DENTSPLY neither assumes, nor authorizes any person to assume for it, any other liability in connection with the sale or use of its products. DAMAGES ARE LIMITED STRICTLY TO REPAIR OR REPLACEMENT OF PARTS. DENTSPLY EXPRESSLY DISCLAIMS LIABILITY FOR INCIDENTAL AND CONSEQUENTIAL DAMAGES RESULTING FROM THE USE OF THE PRODUCTS.
ENGLISH • 104ENGLISH • 104Manufactured by:DENTSPLY ProfessionalDENTSPLY International1301 Smile WayYork, PA 17404-1785 USAImported and Distributed by:DENTSPLY CanadaWoodbridge, OntarioL4L 4A3DENTSPLY DeTrey GmbHDe-Trey-Str. 178467 KonstanzGermanyPN: 90714 Rev.2 (07/11)

Navigation menu