Depuy Mitek 225024 VAPR VUE Generator User Manual
Depuy Mitek VAPR VUE Generator
User Manual

User Manual
GYRUS P/N:
192058-BG
P/N: 110009-EN
Rev: J Revised 08/2017
© DePuy Synthes 2010-2017. All rights reserved.

User Manual
This user’s guide will familiarize you with the controls and output functions available from your DePuy Mitek
VAPR VUE® RADIOFREQUENCY (RF) System and instruct you on the proper use of the equipment. Review
this manual thoroughly before installation and use of the VAPR VUE RF System. Please also read, understand
and follow all cautions and warnings in this manual and those included in the Instructions for Use included with the
VAPR System accessories. Additional information, training and product servicing are available from DePuy Mitek.
The information contained in this manual is based upon the most current information available at the time of print-
ing. DePuy Mitek reserves the right to update the equipment and its operation without notice.
The entire content of this manual is the property of DePuy Mitek and is protected by all relevant copyright laws.
Do not reproduce any portion of this manual, in any form, without express written approval of DePuy Mitek.
Worldwide Patents pending.
This manual covers the VAPR VUE System only.
Part Number: 225024
GYRUS P/N:
192058-BG
P/N: 110009-EN
Rev: J Revised 08/2017
© DePuy Synthes 2010-2017. All rights reserved.

TABLE OF CONTENTS
Section 1: INtRodUctIoN
Background . . . . . . . . . . . . . . . . . . . . . . . . . . . . . . . . . . . . . . . . . . . . . . . . . 1-1
Comparison to Conventional Electrosurgery ........................ 1-1
System Description ........................................... 1-2
Principles of Operation ........................................ 1-3
Section 2: INdIcatIoNS foR USe, coNtRaINdIcatIoNS
Indications for Use............................................ 2-1
Contraindications............................................. 2-1
Section 3: SafetY
Operating Personnel .......................................... 3-1
Fire/Explosion Warnings ....................................... 3-1
Electrical Safety Considerations ................................. 3-1
EMC (Electromagnetic Compatibility) Precautions ................... 3-2
Electrosurgical Smoke Caution . . . . . . . . . . . . . . . . . . . . . . . . . . . . . . . . . . 3-2
Prior to Surgery .............................................. 3-2
During Surgery............................................... 3-3
After Surgery ................................................ 3-5
Section 4: SYStem deScRIPtIoN
VAPR VUE Radiofrequency Generator ............................ 4-1
Output Modes ............................................... 4-1
Generator Controls and Displays................................. 4-3
Front Panel Display Symbols . . . . . . . . . . . . . . . . . . . . . . . . . . . . . . . . . . . 4-4
Footswitches ................................................ 4-7
Wireless Footswitch........................................... 4-8
VAPR Electrodes ............................................. 4-9
VAPR Handpiece ............................................ 4-12
Section 5: INStRUctIoNS foR USe
System Installation . . . . . . . . . . . . . . . . . . . . . . . . . . . . . . . . . . . . . . . . . . . 5-1
System Setup and Use During Surgery............................ 5-2
Using VAPR Thermal Control (TC) Electrodes ...................... 5-4
Adjusting the Tone Volume ..................................... 5-4
Adjusting the Generator for Footswitch, Hand Control or
Wireless Foot Switch Operation ................................. 5-5
Changing Electrodes During Surgery ............................. 5-5
Use of Suction Electrodes ...................................... 5-6
After Surgery ................................................ 5-6
Section 6: cleaNING aNd SteRIlIzatIoN PRocedUReS
Cleaning the Generator ........................................ 6-1
Cleaning the Footswitch ....................................... 6-1
Cleaning and Sterilizing the VAPR Handpiece and Cable.............. 6-1
Section 7: PeRIodIc maINteNaNce INSPectIoN ............................. 7-1
Section 8: eRRoR aNd faUlt SYmBolS, tRoUBleShootING GUIde
Error & Fault Symbol Interpretation and Recovery ................... 8-1
Error Symbols ............................................... 8-1
Fault Symbols ............................................... 8-1
Recover - Resetting Generator Faults and Errors .................... 8-2
Alarms ..................................................... 8-2
Troubleshooting Guide ........................................ 8-7

aPPeNdIx a: techNIcal SPecIfIcatIoNS .................................... A-1
VAPR VUE Generator Specifications ............................. A-1
VAPR 3 Wired Footswitch Specifications .......................... A-2
VAPR VUE Wireless Footswitch Specifications...................... A-2
Output Waveform and Characteristics............................. A-2
aPPeNdIx B: emc taBleS ............................................... B-1
aPPeNdIx c: WaRRaNtY aNd SeRvIce ...................................... C-1
aPPeNdIx d: acceSSoRIeS ............................................... D-1

INtRodUctIoN
1-1
Section 1
IntroDuCtIon
Caution: Federal law restricts this device to sale by or on the order of a physician.
BACKGROUND
Arthroscopy relates to the use of an arthroscope to visualize the joint space. A variety of
instruments specifically designed for arthroscopic use may be introduced through separate
puncture sites, employing the technique of triangulation, in order to perform various surgical
procedures within the joint space.
The DePuy Mitek VAPR VUE RF System represents a versatile approach to arthroscopy.
Based on an innovative form of bipolar electrosurgery, the VAPR® Radiofrequency System
has been specifically designed to provide a range of arthroscopic surgical modalities including
soft tissue ablation (electro-vaporization), contouring, cutting, coagulation, and temperature
indication. Arthroscopic surgery could include subacromial decompression, acromioplasty,
bursectomy, synovectomy, labral tear resection, excision of scar tissue, chondroplasty,
meniscectomy, lateral release, tendon debridement, ligament debridement, plica removal and/
or fracture debridement. Complementing the VAPR technology, the VAPR VUE system offers
a new approach to tissue management with a COOLPULSE® (CP) RF mode that achieves
enhanced ablation.
COMPARISON TO CONVENTIONAL ELECTROSURGERY
Conventional electrosurgical systems deliver high frequency electrical current through tissue
for the purposes of tissue cutting or hemostasis of blood vessels. Monopolar electrosurgery
utilizes an “active” electrode located on the surgical instrument and a separate “return”
electrode applied to the patient. Current flows from the active electrode through the patient to
the return electrode. Bipolar electrosurgery differs in that both the active and return electrodes
are located on the surgical instrument, thus minimizing the amount of tissue involved in the
electrical circuit.
Problems potentially encountered when using conventional bipolar electrosurgery include
limited power delivery and visualization of the working tip, tissue sticking, and dependence
upon proper electrode-to-tissue orientation. Additionally, conventional bipolar electrodes do not
operate effectively while immersed in conductive irrigating solutions used in arthroscopy, such
as normal saline or Ringer’s lactate.
In contrast, VAPR bipolar electrosurgery electrodes are specifically designed to function in
conductive irrigating solutions. The VAPR “return” electrode is mounted on the shaft of the
instrument and does not have to be oriented to be in contact with tissue during use. This
eliminates the need for a separate patient ground electrode. Additionally, since only the tissue
that is in contact with the active electrode is involved in the electrical circuit, the recognized
safety features of bipolar electrosurgery are preserved.
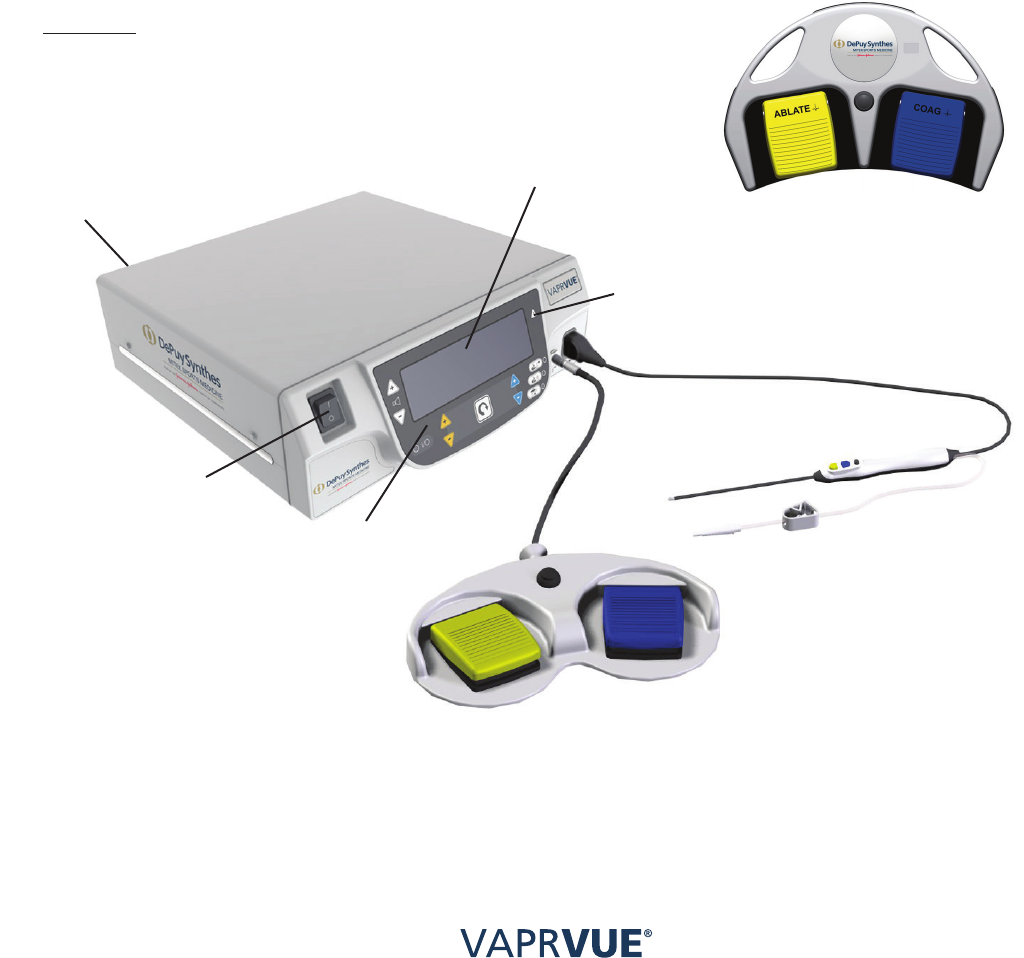
SYSTEM DESCRIPTION
The VAPR VUE System is designed to provide soft tissue ablation (vaporization), contouring,
cutting and hemostasis of blood vessels during arthroscopic surgical procedures.
The components of the DePuy Mitek VAPR VUE System (Figure 1) are individually described
in Section 4 of this manual:
• VAPR VUE Radiofrequency Generator
• VAPR Handpiece
• VAPR Electrodes
• VAPR Electrodes with integrated handpiece
• VAPR Electrodes with integrated handpiece and hand controls
• VAPR 3 Footswitch
• VAPR VUE Wireless Footswitch
• Power Cord (not provided)
Use only the DePuy Mitek Handpiece and Electrodes with this System.
INtRodUctIoN
1-2
AC POWER INPUT
GENERATOR
20x4 CHARACTER
USER DISPLAY
ON/OFF
SWITCH
CONTROL PANEL
RED FAULT INDICATOR
ONE PIECE
ELECTRODE
(WITH HAND
CONTROL OPTION)
TWO PEDAL + ONE
MODE BUTTON
WIRED FOOTSWITCH
TWO PEDAL + ONE MODE
BUTTON WIRELESS
FOOTSWITCH
fIGURe 1
INtRodUctIoN
1-3
PRINCIPLE OF OPERATION
The VAPR VUE System offers five bipolar modes of operation: Ablation (Vaporization),
Coagulation, CP (COOLPULSE) Ablation, Blended Vaporization, and Coagulation with tem-
perature control.
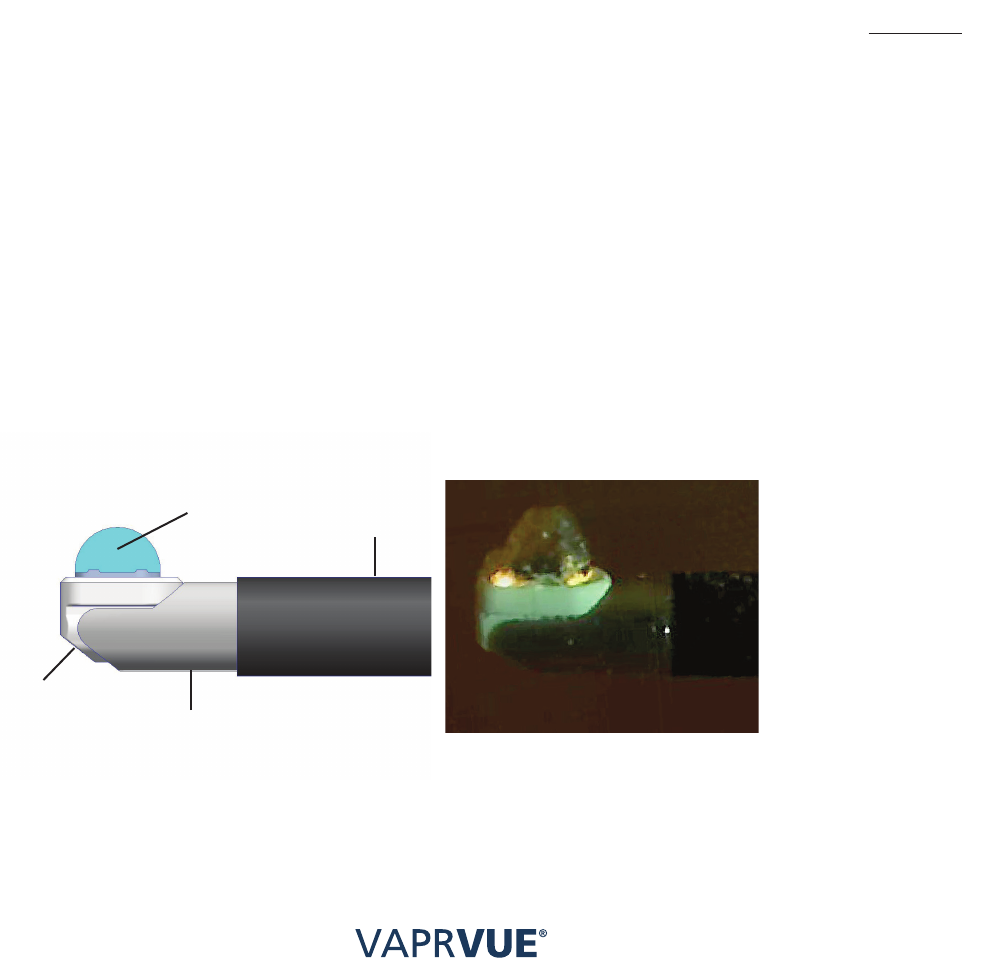
• In the Ablation mode of operation, high frequency power is delivered from the VAPR
VUE Generator to the Electrode tip. At specific threshold power levels, a vapor pocket,
characterized by an orange glow, is created around the active electrode. Arcs within the
vapor pocket lead to vaporization of tissue entering the vapor pocket.
• The Ablation power threshold for a particular VAPR Electrode is automatically set as
a default by connecting the Electrode to the Generator. The default setting for each
Electrode type is the optimal power required to produce the desired tissue effect. As an
inherent safety feature, the VAPR System is designed to minimize the power required to
sustain the vapor pocket around the active electrode.
• In the Coagulation mode of operation, the VAPR Generator delivers high frequency
power to the active electrode to cause tissue coagulation without sparking or cutting.
The Coagulation power level is also automatically set as a default for each style
of Electrode.
• In the CP (COOLPULSE) Ablation mode of operation, the mode of RF delivery reaches
vaporization mode quicker with short-duration high power pulses. Once the vapor
pocket is formed around the tip, the RF mode reverts to continuous operation (similar to
standard Ablation mode). The COOLPULSE mode is able to sustain the vapor pocket
better than the standard vaporization mode in difficult conditions such as cold or high-
flow saline conditions. The pulses of the CP Ablation mode cause more rapid saline
heating at the active electrode with shorter time for heat dissipation.
• The Blended Ablation mode of operation provides tissue vaporization combined
with hemostasis. Certain Electrode styles will automatically default to Blended
Ablation mode.
• In the Coagulation Mode with temperature control (only available with the VAPR
Temperature Control (TC) electrodes), the tip temperature is set as a default, along with
a power level. The VAPR System will monitor the actual tip temperature while activated,
automatically adjusting the power to maintain the tip temperature at the set temperature.
NOTE
The Temperature Control system will only automatically adjust the power up to the limit of the
coagulate power level as displayed at time of use.
VAPOR
POCKET ELECTRODE
SHAFT
RETURN
ELECTRODE
INSULATOR
fIGURe 2

INdIcatIoNS
foR USe,
coNtRaINdIcatIoNS
2-1
Section 2
InDICAtIons
For use,
ContrAInDICAtIons
INDICATIONS FOR USE
The VAPR VUE Radiofrequency System is intended for resection, ablation, and excision of
soft tissue, hemostasis of blood vessels and coagulation of soft tissue in patients requiring
arthroscopic surgery.
NOTE
Refer to VAPR electrode Instructions for Use for specific indication statement.
CONTRAINDICATIONS
The DePuy Mitek VAPR System is contraindicated in any non-arthroscopic surgical procedure
and in procedures where saline or Ringer’s lactate is not used as an irrigant. The System is
also not appropriate for patients for whom an arthroscopic procedure is contraindicated for any
reason. Use of the System is also contraindicated in patients with heart pacemakers or other
electronic device implants.

SafetY
3-1
SafetY
3-1
Section 3
sAFety
OPERATING PERSONNEL
The surgeon using this device should:
• be trained in arthroscopic surgical procedures
• be aware of the risks associated with those procedures
• have current knowledge of technological advances in surgical products and techniques.
WARNING
Hazardous Electrical Output: This equipment is capable of producing a physiological effect and
is for use only by licensed physicians, trained in the use of this device.
WARNING
Read the instructions, cautions, and warnings provided with all VAPR VUE System accessories
before use. This device is an integral system; only use approved accessories with the VAPR VUE
Generator. Your sales representative can advise which accessories are available and approved
for use with the VAPR VUE System.
FIRE/EXPLOSION WARNINGS
• As with all electrosurgical devices, do not use in the presence of flammable anesthetics
or oxidizing gases, such as nitrous oxide, oxygen or endogenous gases which have
accumulated in body cavities. An electrosurgical device has the potential for providing a
source for ignition.
• Nonflammable substances should be used for cleaning and disinfecting. Use of
flammable substances, such as alcohol-based skin prepping agents and tinctures
should also be avoided.
• All oxygen connections must be leak free for the duration of the surgical procedure.
Pathways, such as endotracheal tubes, must be leak free and properly sealed to
prevent oxygen leaks.
• Electrosurgical accessories which are activated or hot from use can be a potential fire
hazard if placed near or in contact with flammable materials. Some materials, such as
gauze, cotton or wool, when saturated with flammable liquids, can be ignited by sparks
produced during the normal use of electrosurgical devices.
ELECTRICAL SAFETY CONSIDERATIONS
• Examine all accessories and connections to the VAPR VUE Generator before use.
Ensure that the accessories function as intended. Improper connection may result in
arcing, sparking, or malfunction of the Electrode or Handpiece, any of which can result
in an unintended surgical effect, injury, or product damage.
• Unless specified in the instructions for use accompanying an approved VAPR
accessory, the VAPR VUE System should only be activated with the working tip of the
electrode accessory completely immersed in 0.9% w/v; 150 mmol/l sodium chloride
or Ringer’s lactate solutions. For convenience, these will be referred to within the
remainder of this manual as normal saline or Ringer’s, respectively. Performance will
be suppressed by use of other irrigating solutions such as Glycine, Sorbitol, Dextrose,
Mannitol or other solutions containing a non-physiological concentration of electrolytes.

SafetY
3-2
SafetY
3-2
• No modification to the equipment is allowed.
• To avoid the risk of electric shock this equipment must only be connected to a SUPPLY
MAINS with protective earth.
• Ensure that the generator is positioned so that the ability to disconnect or isolate from
the mains supply is not restricted.
EMC (ELECTROMAGNETIC COMPATIBILITY) PRECAUTIONS
Medical electrical equipment requires special precautions regarding EMC and needs to be
installed and put into service according to the EMC information in Appendix B.
WARNING
Portable and mobile RF communications equipment can affect medical electrical equipment.
WARNING
The use of accessories and cables other than those for which the system was designed can
significantly degrade emissions and immunity performance.
WARNING
Keep the accessory cables away from cables from other electrical equipment. Electrical currents
may be induced in the other equipment causing unintended effects.
WARNING
Do not use a monopolar generator or accessories simultaneously with the VAPR VUE generator.
Activation of a monopolar generator or accessories may cause interference with the VAPR VUE
generator resulting in user message changes on the display. Before proceeding with surgery,
confirm proper power settings are displayed on the generator. Ensure the appropriate output
setting is enabled for the desired surgical outcome.
WARNING
Provide as much distance as possible between the electrosurgical generator and other electronic
equipment (such as monitors) because an activated electrosurgical generator may cause
interference.
ELECTROSURGICAL SMOKE CAUTION
Studies have shown that smoke generated during electrosurgical procedures can be potentially
harmful to surgical personnel. Use appropriate surgical masks or other means of protection.
PRIOR TO SURGERY
CAUTION
Non-function of the generator may cause interruption of surgery. Ensure that all installation
procedures are followed and that all connectors are correctly inserted before use. A backup
generator should be available for use.
Operator Safety Warnings
• Electric Shock Hazard: Do not connect wet accessories to the handpiece or generator.
Ensure that all accessories are securely and properly connected.
• Electric Shock Hazard: Do not remove or tamper with the Generator housing. Contact
DePuy Mitek technical service for assistance.
• The power cord must meet all requirements for safe grounding. Do not use extension
cords, multiple point plugs or 2 to 3 pronged plug adapters.
• Do not reuse or resterilize accessories labeled “SINGLE USE,” as malfunction, injury or
cross-infection may result. These products are for single-use only and have not been
designed to be re-used/re-sterilized.

SafetY
3-3
SafetY
3-3
• Reprocessing may lead to changes in material characteristics such as metallic corrosion
and dulled edges, ceramic and plastic deformation or splitting which may impact the
strength of the device and compromise device performance. Reprocessing of single use
devices can also cause cross-contamination leading to patient infection. These risks
may potentially affect patient safety.
• When bending the FLEX Electrode, do not exceed a 45° angle relative to the plane of
the shaft. Do not change the FLEX Electrode shape more than three times at the same
point on the shaft. More than three angle modifications can result in electrode fracture.
• Use of instruments to bend the electrodes can cause damage to the FLEX Electrode.
Electrodes should only be bent using fingers.
Operator Safety Cautions
• Inspect the insulation of all cords for cracks, nicks and breaks. Inspect all connectors for
damaged or missing parts.
• Use default power levels to test Electrode performance. Confirm proper default power
settings with package insert information before proceeding with surgery.
• Using arthroscopic guidance, ensure that the Electrode tip is completely surrounded by
conductive irrigant solution during use.
• Accessories labeled “REUSABLE” must only be processed according to the recom-
mended procedures provided in this manual.
• Avoid touching the ceramic and active tip of the electrode with your fingers or instruments.
DURING SURGERY
NOTE
For the purposes of safety procedures, and despite the absence of a conventional return pad, the
VAPR System should still be treated as a high power electrosurgical device.
WARNING
Failure of the RF SURGICAL EQUIPMENT could result in an unintended increase of output
power.
Operator Safety Warnings
•
Observe extreme caution when using electrosurgery in close proximity to, or in
direct contact with, any metal objects. The majority of arthroscopes and arthroscopic
instruments are metal. Do not activate the electrode while any portion of the electrode
tip is in contact with metal objects or instruments; avoid ablating tissue that is trapped
between the arthroscope and the electrode. Doing so may result in unintended injury to
the patient or surgical personnel and/or damage to the electrode and/or other equipment.
• Do not wrap Handpiece, Footswitch or Generator power cables around metal objects.
Wrapping cables around metal objects may induce currents that could lead to electric
shock, fire and/or injury to patient or surgical personnel.
• During an electrosurgical procedure, the patient should not be allowed to come into
direct contact with grounded metal objects such as surgical table frame, instrument
table, etc.
• Confirm proper default generator power settings before proceeding with surgery. Always
check that the automatic default settings shown on the display match those indicated on
the package insert of the Electrode being used.
• Caution should be used when overriding the default power settings. Use the lowest
power setting and the minimum tissue contact time necessary to achieve the
appropriate surgical effect.

SafetY
3-4
• Visually inspect the Handpiece and Electrode to ensure that they are clean, dry, and
free of damage prior to inserting the Electrode. Damage to the connectors or the
presence of fluid may cause a hazardous electrical short.
• Ensure that the Electrode is fully seated in the Handpiece prior to use. Improper
connection could result in non-activation of the Electrode and fluid leakage which may
produce an electrical short.
• Ensure that Electrodes with handpiece are properly connected to the generator, and
that the correct default settings are displayed.
• Introducing the Electrode without an instrument cannula may result in tissue injury and/
or product damage.
•
Do not insert, withdraw or touch the active tip of the Electrode when power is being applied.
• All high frequency electrosurgical devices can potentially cause muscle stimulation
during use. The VAPR VUE system has been designed such that this undesirable effect
is minimised, however, muscle stimulation may cause unexpected movement of the
patient within the surgical field.
• When not in use, place the active Electrode in a clean, dry, nonconductive, and highly
visible area not in contact with the patient. Inadvertent activation while in contact with
the patient may result in burns.
• Skin to skin contact (for example between the arms and body of the patient) should be
avoided, for example by insertion of dry gauze.
• Fluids pooled in the body depressions and cavities should be removed before the use of
HF surgical equipment.
• Failure of the HF SURGICAL EQUIPMENT could result in an unintended increase or
decrease in output power, change in output waveform characteristics or absence of
electrosurgical output.
Operator Safety Cautions
• The VAPR VUE system contains an over-current alarm. If this is heard during activation,
the Electrode and Handpiece must be withdrawn and inspected for damage. An
accessory that causes repeated overcurrent alarms (when not in contact with a metal
surface/object) should be discarded.
• Maintain the Generator volume control to a level that will be audible in a normal
operating room environment. The activation tone is heard while the foot pedal or hand
control button is depressed, indicating the Electrode is activated.
• If possible, avoid the use of needle style electrodes for any physiological monitoring
equipment that may be connected to the patient during electrosurgery.
• Where practical, only use monitoring equipment that incorporates high frequency
current limiting devices during electrosurgical procedures.
• The Handpiece or Electrode cable should be positioned so that it avoids contact with
the patient and any other leads.
• Should a power supply interruption occur, the Generator power settings will revert to the
minimum values when power is re-established should the accessory combination still be
connected.
• A backup means should be available for all RF activation modes (i.e., backup Wireless
Footswitch, backup Wired Footswitch, or backup Electrode with hand controls).

SafetY
3-5
• Attempts to bend electrodes can result in electrode fracture or degradation of electrode
performance.
Potential Hazards for Arthroscopic Procedures
As visualization may be impaired during arthroscopy, be particularly alert to these poten-
tial hazards:
• An activated Electrode tip may remain hot enough to cause burns after the electrosurgi-
cal current is deactivated.
• Maintain the active Electrode in the field of view at all times. Injuries to the patient may
result from inadvertent activation or movement of an activated Electrode outside the
field of view.
• Use care when inserting and withdrawing the Electrode from a cannula to avoid the
possibility of damage to the devices and/or injury to the patient.
• Continuous flow of irrigant is strongly recommended. Fluid flow assists in removing
vaporization by-products as well as reducing the temperature of the electrode tip
between activations.
• Ensure that the Electrode tip is completely surrounded by irrigant solution during use.
• Outflow is important, especially in small joint spaces.
• Prolonged or unnecessary activation when not in contact with tissue may result in
unintentional damage to surrounding tissue.
AFTER SURGERY
WARNING
Electric shock hazard: Turn off the Generator and unplug the power cord from the AC source
prior to cleaning Generator.
Equipment Disposal
• The VAPR System Generator contains electronic printed circuit assemblies. At the end
of the useful life of the equipment it should be disposed of in accordance with any appli-
cable national or institutional related policy relating to obsolete electronic equipment.
• Dispose of any system accessories according to normal institution practice relating to
potentially contaminated items.
• Do not reuse or resterilize accessories labeled “SINGLE USE.” These products are for
single-use only and have not been designed to be re-used/re-sterilized. Reprocessing
may lead to changes in material characteristics such as metallic corrosion and dulled
edges, ceramic and plastic deformation or splitting which may impact the strength of the
device and compromise device performance. Reprocessing of single use devices can
also cause cross-contamination leading to patient infection. These risks may potentially
affect patient safety.

SYStem
deScRIPtIoN
4-1
Section 4
system
DesCrIptIon
VAPR VUE RADIOFREQUENCY GENERATOR
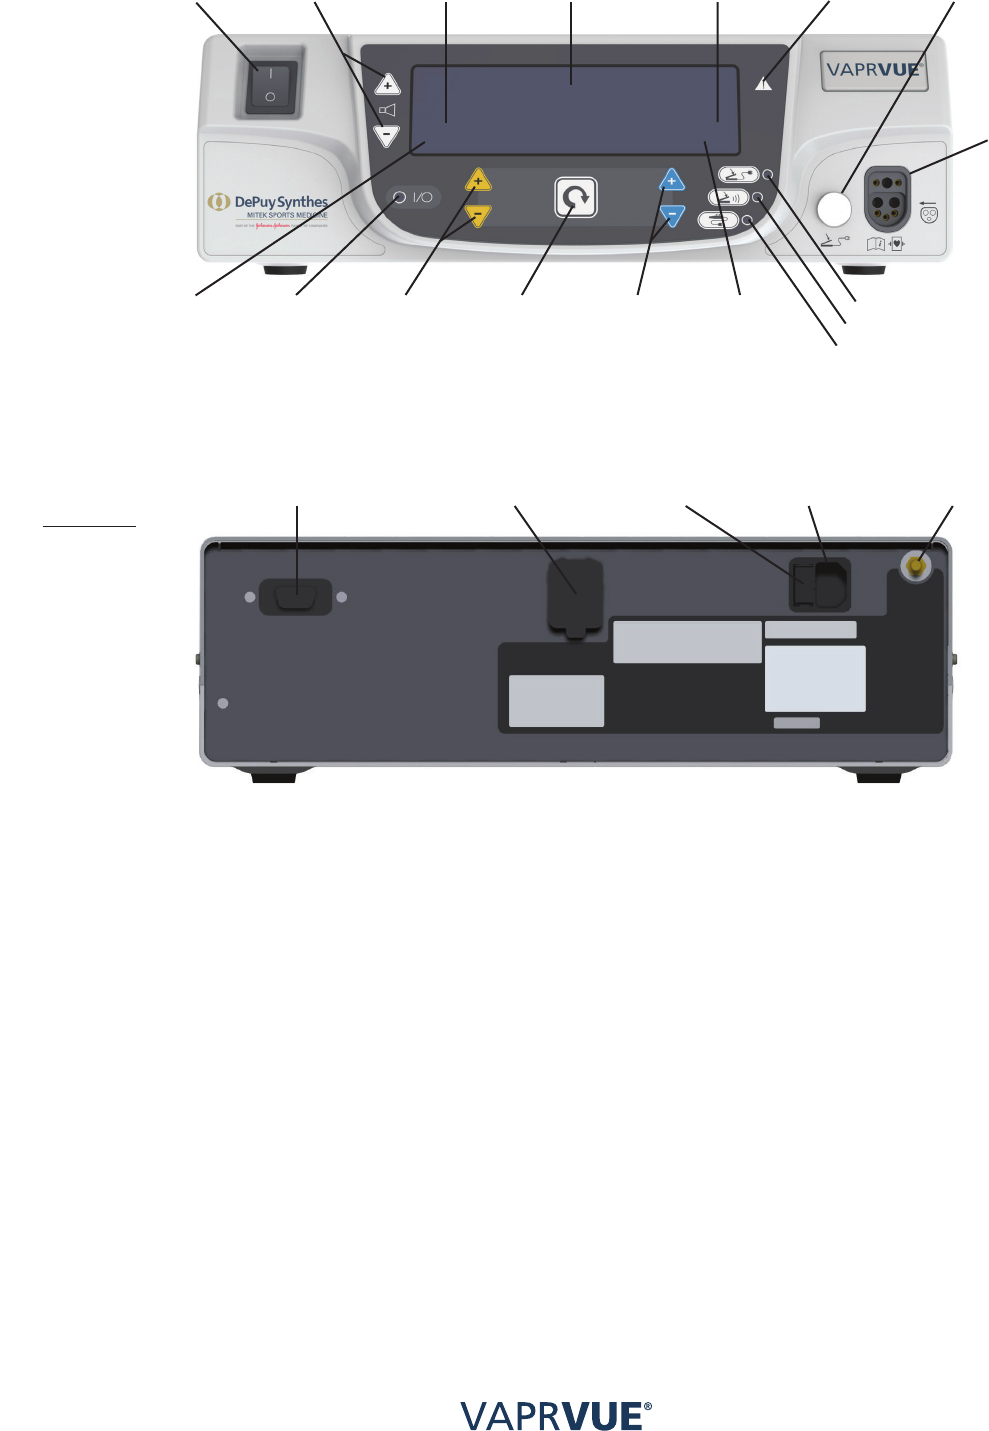
The VAPR VUE Generator (FIGURE 3) is an isolated output radiofrequency generator
that provides power for soft tissue vaporization (ablation), cutting and coagulation during
arthroscopic surgical procedures. Technical specifications are detailed in Appendix A.
OUTPUT MODES
The VAPR VUE Generator allows the user to select one of the following functional modes
using generator front panel set-up options: tissue Ablation mode, Coagulation (hemostasis)
mode, CP (COOLPULSE) Ablation mode, Coagulation mode with temperature control, and
Blended Ablation mode that combines Ablation and Coagulation. A brief description of each
mode is provided below:
ABLATE Modes
There are three standard V mode ablation levels V1, V2 and V3. The least aggressive tis-
sue vaporization is created in the V1 mode while the most aggressive tissue vaporization
is created in the V3 mode. Activate using YELLOW foot pedal or hand control button.
Coagulation (COAG) Mode
The Coagulation mode provides hemostasis of blood vessels without tissue vaporization.
Available with all Electrode configurations, the hemostatic effect will be dependent on the
active electrode contact area and power setting. The depth of effect for a given Electrode
configuration and power setting is dependent upon the application time. Activate using
BLUE foot pedal or hand control button.
COOLPULSE (CP) ABLATE Mode
The COOLPULSE Ablation mode provides tissue vaporization with a ‘pulse effect’.
Available with specific Electrode configurations only, the vaporization effect is dependent
upon the application but will typically be more aggressive than the standard V3 mode.
Activate using YELLOW foot pedal or hand control button.
COAG with Temperature Control
When in coagulation mode, this allows the display of electrode tip temperature, and control
against a set temperature. Activate using BLUE foot pedal or hand control button.
Blended ABLATION (BV) Modes
There are two Blended Ablation modes: BV1 and BV2. The Blended Vaporization output
modes combine tissue ablation with hemostasis and are useful when cutting or de-bulking
more vascular tissue structures.
• BV1 mode automatically switches between the V2 ablation mode and coagulation
(hemostasis) mode.
• BV2 mode switches between the V3 ablation mode and coagulation (hemostasis) mode.
Activate using YELLOW foot pedal or hand control button.
SYStem
deScRIPtIoN
4-2
AC ON/OFF
Switch
Volume
Adjustment
Ablate Output
Display
Coagulate
Power
Setting
Coagulate
Power
Adjustment
Ablate Power
Adjustment &
Output Mode
Select
AC ON/OFF
Indication
Ablate
Power
Setting
Mode Function/
Wireless
Footswitch
Pairing
Fault
Indicator
Instrument
Type
Footswitch
Connection
Equipotential
Terminal
Usb Interface
(Service Use Only)
Serial Interface
(Service Use Only)
AC Power
Input
Fuse Holder
Wired Footswitch Enable
Wireless Footswitch Enable
Handswitching Enable
Instrument
Connection
Coagulate
Output Display
fIGURe 3
SYStem
deScRIPtIoN
4-3
GENERATOR CONTROLS AND DISPLAYS
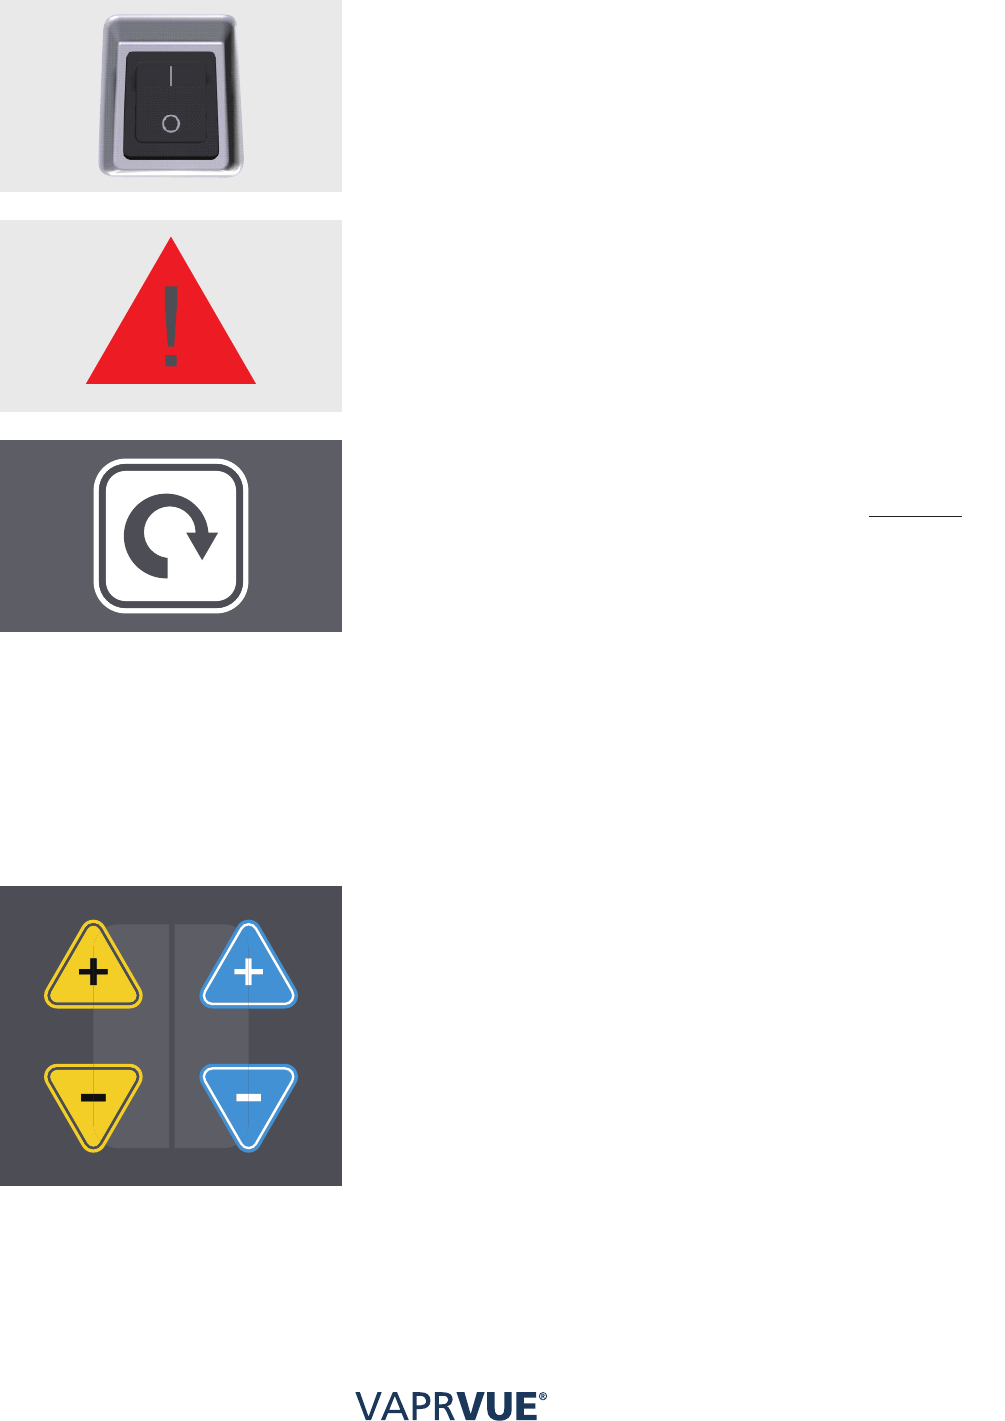
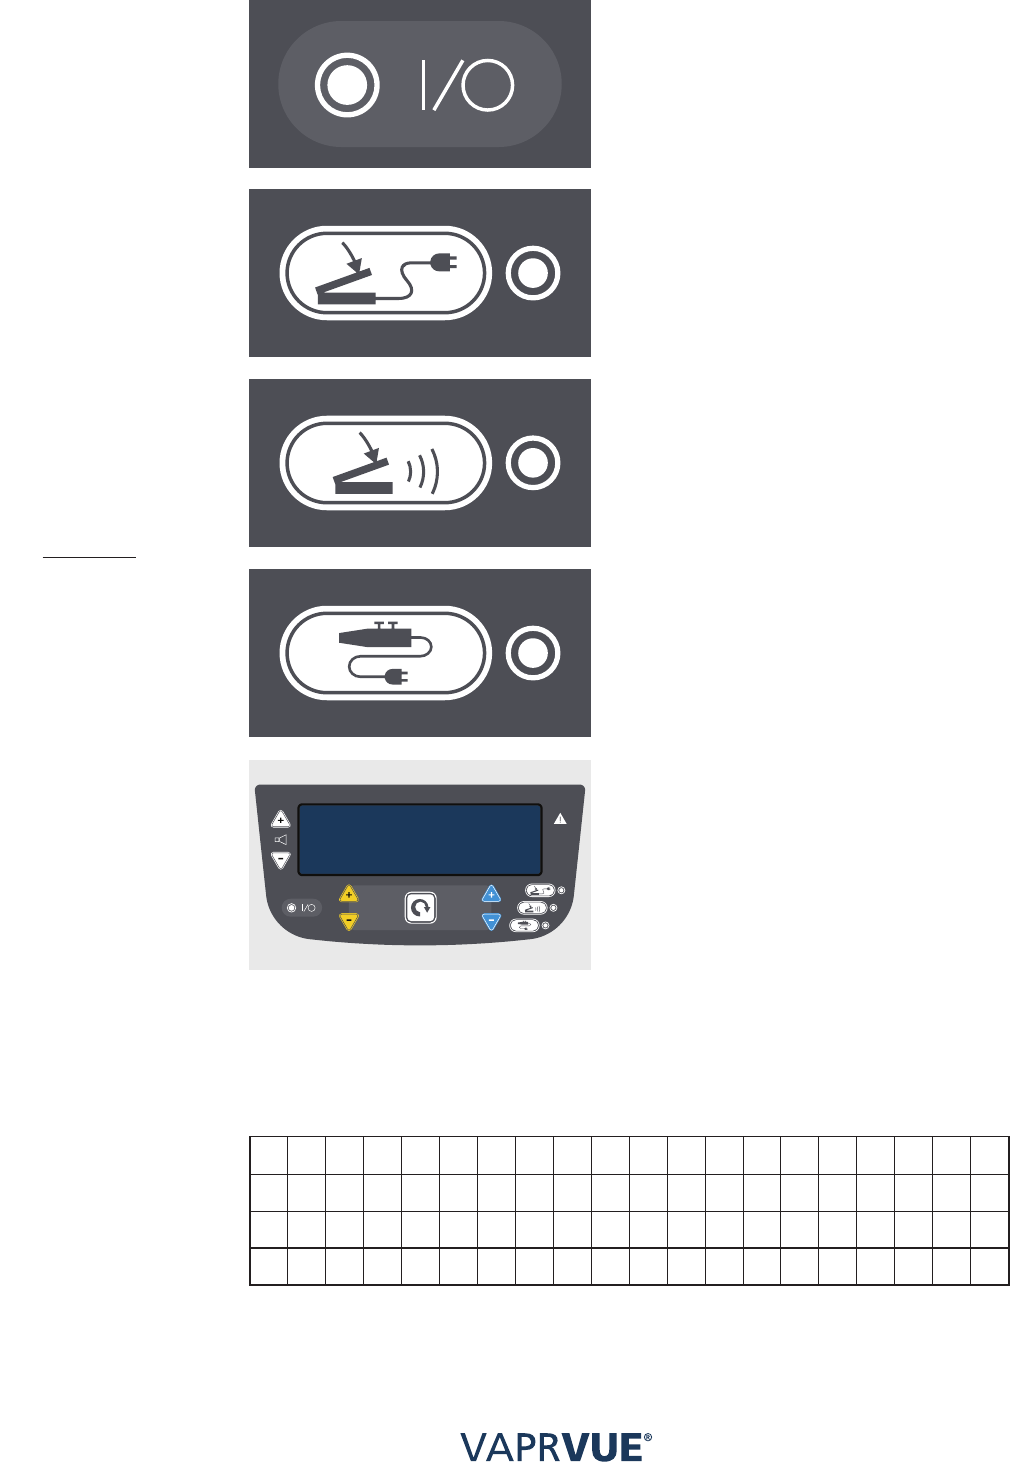
Power Switch
The power switch turns AC power on and off. It is
advisable to switch off the Generator whenever
it is not in use to avoid any possibility of inadver-
tent activation.
Fault Indication Light
This light will illuminate to indicate a Generator
critical failure or a VAPR accessory malfunction.
NOTE
The light will illuminate briefly during the self-test
routine. This is normal and does not indicate a failure.
Mode Button
Depressing the mode button once will enable
selection of the Output Mode using the BLUE
Power Up and Down buttons. Once the display
shows the desired V, CP or BV output mode,
holding the Mode Button down will return the
Generator to a Ready condition.
Depressing the mode button twice will enable
selection of User Mode, ADVANCED (output power displayed in Watts) or BASIC (output
displayed as relative number from 1 to 10). The equivalent values for ADVANCED and BASIC
mode vary by Electrode type. Refer to the Electrode Instructions for Use to confirm the BASIC-
ADVANCED Equivalency Table for the specific Electrode type.
NOTE
When an instrument is attached, switching between ADVANCED and BASIC User Mode after
adjusting the power output settings will reset the power output values to the default settings for
the specific electrode type. The Mode button must be pressed to confirm use.
Power Up/Down
The Power Up and Down buttons are used
to override the default power settings. The
Yellow Arrow buttons control the Ablation (V),
COOLPULSE (CP) Ablation and Blended
Ablation (BV) outputs in standard electrodes and
set tip temperature with TC electrodes. The Blue
Arrow buttons control the Coagulate (COAG)
output. Press the appropriate button once for a
power increment or decrement. Holding down
the button accelerates the incrementing or
decrementing.
NOTE
Power can only be adjusted after an Electrode is properly connected to the Generator. Each
VAPR Electrode type will determine its own default output power and set temperature.
SYStem
deScRIPtIoN
4-4
Power Indicator
Illuminates when the unit is switched on.
Wired Footswitch Select
Press to select. Illuminates when the unit is in
wired footswitch mode.
Wireless Footswitch Select/Pair
Press to select. Illuminates when the unit is in
wireless footswitch mode.
Pressing and holding for 2 seconds will initiate
wireless footswitch pairing procedure.
Hand Control Select
(inactive for unsupported instruments)
Press to select. Illuminates when the unit is in
hand control mode.
Power/Temperature Setting Display
The left side displays the nominal output power
(in Watts or as relative number) for the select-
ed Ablation, COOLPULSE Ablation or Blended
Ablation modes or set temperature for TC elec-
trodes. The right side displays the nominal output
power (in Watts or as relative number) for the
Coagulate output. When an output is activated,
the power display for the selected output flashes
and an audible tone sounds. For a VAPR TC elec-
trode the actual measured ‘TIP’ temperature is
displayed.
FRONT PANEL DISPLAY SYMBOLS
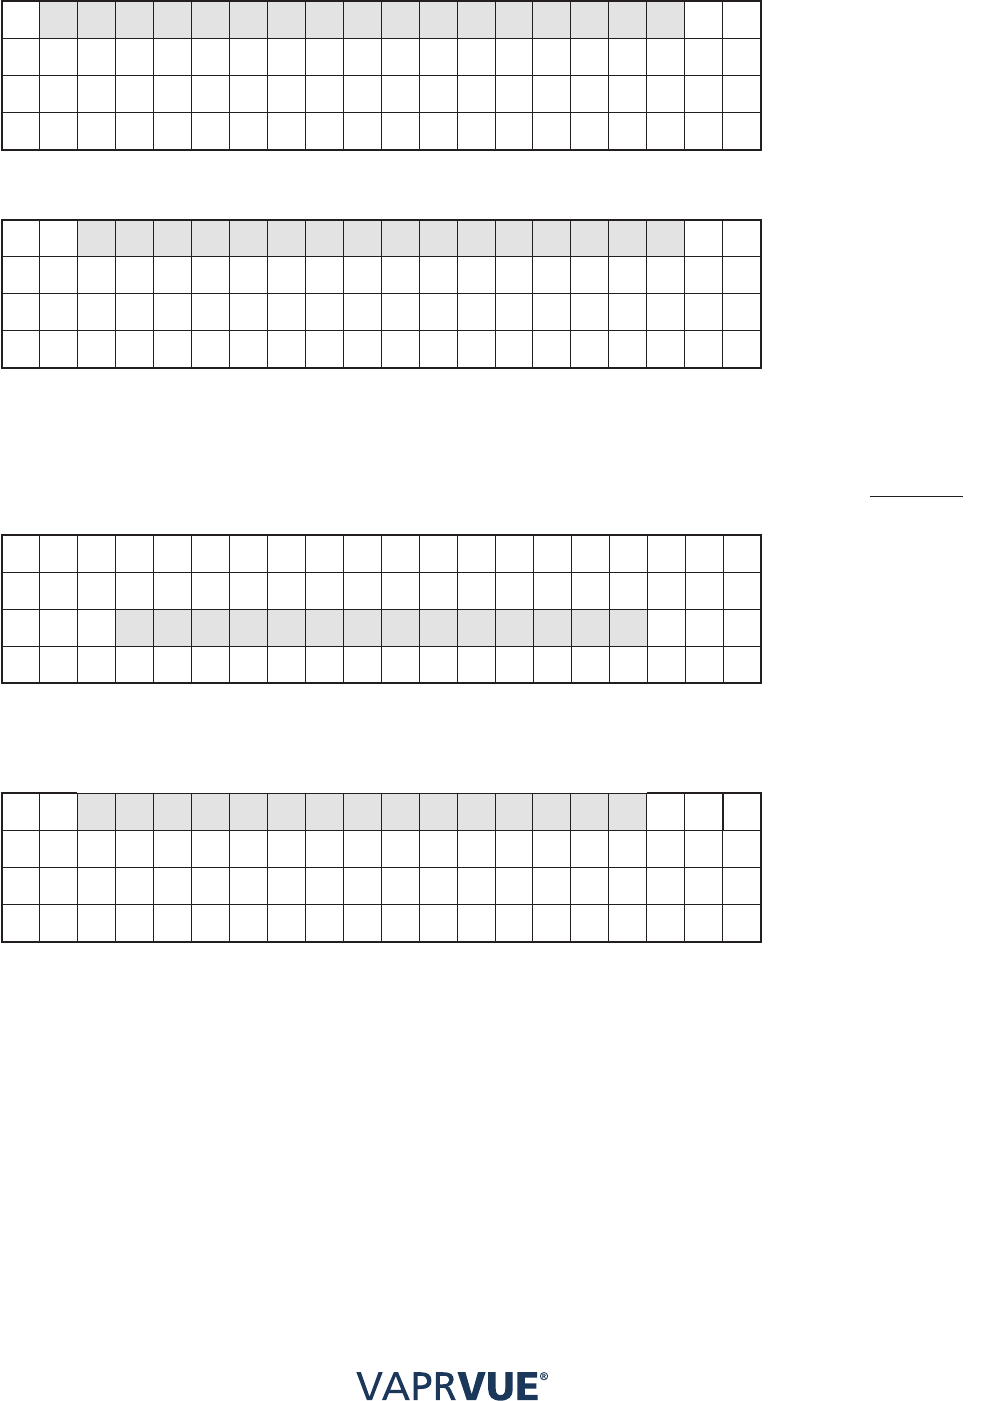
P a i r i n g i n P r o g r e s s
F a i l - R e f e r t o
U s e r M a n u a l
P r e s s M O D E t o U s e
When the generator is powered on, the wireless footswitch module may enter a pairing process which
may result in mispairing with other foot pedals and generators within close proximity. If this occurs,
repairing will be necessary.
SYStem
deScRIPtIoN
4-5
NOTE
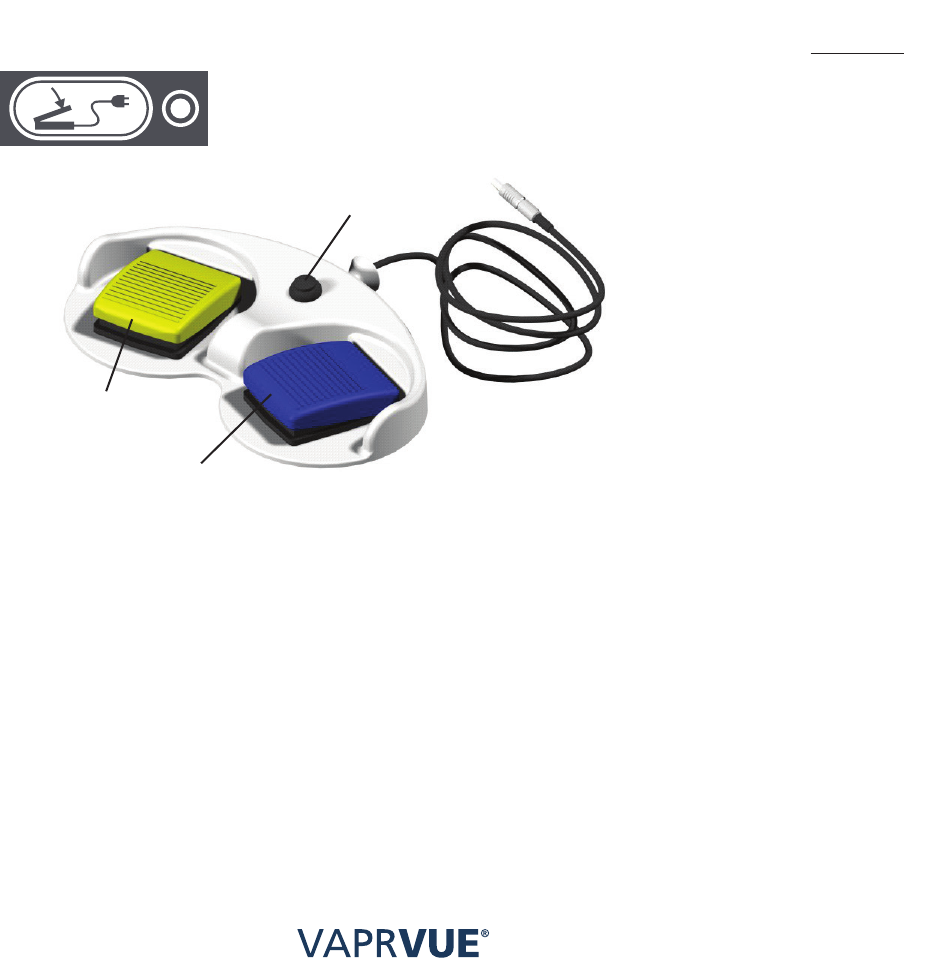
Letters in grey are flashing.
A t t a c h I n s t r u m e n t
Indicates that the Generator is waiting for either the Handpiece or Electrode with integrated handpiece to
be attached to the front panel receptacle.
A t t a c h E l e c t r o d e
Indicates that the Generator is waiting for an Electrode to be inserted into the Handpiece. Not displayed
when using Electrodes with integrated Handpiece.
NOTE
Mode selection can only be performed after an Electrode and Handpiece or a One-piece Electrode is
connected to the Generator. If the Mode button is quickly pressed and released the next user set-up option
appears.
O U T P U T S H O R T E D
R E - A P P L Y P E D A L
May appear if the active tip shorts against nearby metal objects. A warning tone will also be issued.
Operation will resume automatically when the short is removed (provided foot-pedal or hand control
button remains depressed). For TC electrodes only, press the mode button on the front panel or footswitch
to resume operation.
S e l e c t L a n g u a g e
⇑
F r a n c a i s
⇓
Indicates the current language and enables (via the blue UP and DOWN buttons on generator) the
selection of alternate languages.
The following languages are supported:
a. English
b. French
c. German
d. Italian
e. Spanish
f. Finnish
g. Dutch
h. Swedish
i. Danish
j. Norwegian
k. Portuguese

SYStem
deScRIPtIoN
4-6
S e l e c t M o d e
⇑
V 1
⇓
Indicates the current output mode and enables (via the blue UP and DOWN buttons on generator) the
selection of alternative output modes, where available. Accessible only when an instrument is connected
to the generator.
NOTE
Above display is an example only. The “V 1” is one of the output modes.
S e l e c t U s e r M o d e
⇑
A d v a n c e d
⇓
Indicates the current user mode and enables (via the blue UP and DOWN buttons on generator) the
selection of user mode, BASIC or ADVANCED. If the user mode is changed (either from BASIC to
ADVANCED or from ADVANCED to BASIC), then the following will be displayed:
E l e c t r o d e R E S E T
t o D E F A U L T v a l u e s
P r e s s M O D E t o u s e
SYStem
deScRIPtIoN
4-7
FOOTSWITCHES
Wired Footswitch
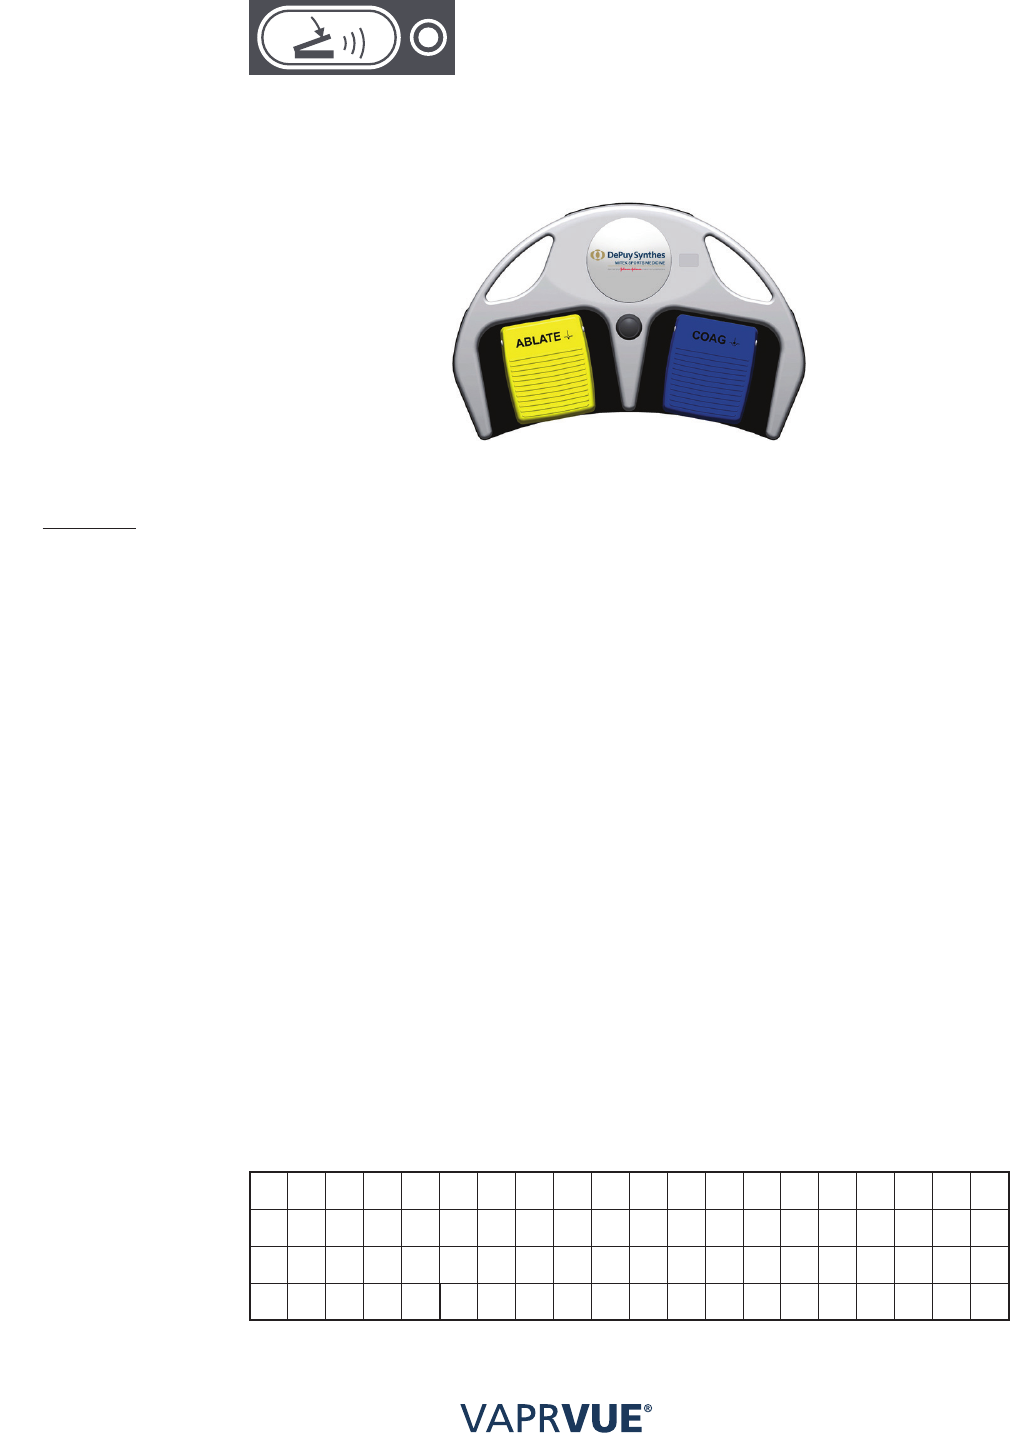
The VAPR 3 Footswitch (FIGURE 4) connects to the VAPR VUE Generator. The yellow and
blue pedals are used for output activation. The black mode pedal is used for fault clearance or
remote adjustment of the ABLATE output setting.
The adjacent light will illuminate on selection.
• Depressing the yellow pedal activates the selected Ablation (V), COOLPULSE Ablation
(CP) or Blended Ablation (BV) outputs.
• Depressing the blue pedal activates the Coagulate (DES) output to produce hemostasis
or thermal modification of tissue.
• Depressing the black mode pedal can reset the Generator from a fault condition.
• Depressing the black mode pedal for 2 seconds under normal conditions allows the
generator ABLATE power to be adjusted from the VAPR3 footswitch. Each press of the
yellow pedal will increment the power level up one level (to the maximum power level
for the particular electrode in use). Each press of the blue pedal will decrement the
power level down one level.
NOTE
The mode control pedal on the Footswitch can only change ablation power. Coagulation power
can be adjusted only using the buttons on the Generator.
Mode Button
Ablate/power
up adjust
Coagulate/power
down adjust
fIGURe 4
SYStem
deScRIPtIoN
4-8
WIRELESS FOOTSWITCH
The VAPR VUE Wireless Footswitch (FIGURE 5) interfaces wirelessly to the VAPR VUE
Generator. The yellow and blue pedals are used for output activation. The black mode pedal
is used for fault clearance or remote adjustment of the ABLATE power settings (if enabled as
shown below).
fIGURe 5
Wireless footswitch pairing process.
To establish a wireless link between the generator and wireless footswitch:
• Prior to the attachment of an Electrode, press and hold the Wireless Footswitch
Select/Pair button for 2 seconds. Follow the on screen instructions:
• The display will show “Hold Footswitch Face Up”. Hold the Footswitch in a horizontal
position with the pedals facing upward in close proximity (2 feet or less) in front of the
generator for several seconds. Observe the progress bar on the bottom of the display.
• As the progress bar gets close to filling the bottom line of the display, prepare to turn the
footswitch upside down.
• The display will change to show “Hold Footswitch Face Down”. Promptly turn and then
hold the Footswitch in a horizontal position with the pedals facing downward in close
proximity (2 feet or less) in front of the generator for several seconds. Observe the
progress bar on the bottom of the display.
• Successful pairing is confirmed via audible beep and a displayed message.
• Repeat the pairing process if unsuccessful pairing at the first time.
NOTE
Once a Footswitch is paired to a Generator it will remain so, even after the main power to the
Generator is cycled or the wireless Footswitch batteries are changed. If the main power to the
generator is cycled, wireless footswitch use must be confirmed by pressing the black mode pedal
on the footswitch (re-pairing is not necessary).
Front panel display during footswitch pairing process.
H o l d F o o t s w i t c h
F a c e U p
❚❚❚❚❚❚❚❚❚❚❚❚❚❚❚❚

SYStem
deScRIPtIoN
4-9
H o l d F o o t s w i t c h
F a c e D o w n
❚❚❚❚❚❚❚❚❚❚❚❚
P a s s - F o o t s w i t c h i s
n o w r e a d y t o u s e
If the pairing process is unsuccessful, the following will appear:
P a i r i n g i n P r o g r e s s
F a i l - R e f e r t o
U s e r M a n u a l
Repeat the pairing process if unsuccessful pairing at the first time.
Once successful pairing has occurred, the following will be displayed upon powering on
the Generator:
P r e s s M O D E p e d a l
t o C o n f i r m S e t t i n g
VAPR ELECTRODES
The family of VAPR Electrodes has been designed to facilitate access and control the
delivery of energy to the joint space. The Electrodes interface to the Generator via a discrete
Handpiece, or they may be equipped as a one-piece Electrode (an integrated handpiece,
cable and plug assembly) allowing their direct connection to the Generator. Each Electrode
contains an internal classification code which automatically adjusts the VAPR Generator to the
optimal output power setting for the specific Electrode. The VAPR Electrode has an integrated
“return” electrode on its shaft, eliminating the need for a conventional patient ground pad.
Angled Electrode styles are also available to facilitate tissue access and positioning during use.
Flexible (FLEX) electrodes are also available. These electrodes can be bent, as specified in
product-specific Instructions for Use.
Articulating suction electrodes are also available to facilitate access to constrained anatomy.
These electrodes include a mechanical actuator on the handle assembly which can be used to
achieve angular displacement of the distal portion of the electrode from 0 to approximately 110
degrees.
SYStem
deScRIPtIoN
4-10
The current product group consists of the following types of electrodes:
Type Functions
Ablation Tissue ablation / vaporization and coagulation
Thermal Tissue coagulation only for collagen shrinkage
Suction Tissue ablation/ vaporization and coagulation with ability to apply
suction to remove bubbles and debris.
Articulating Suction
Electrodes
Tissue ablation/coagulation to allow for ablation/coagulation for
constrained anatomy with ability to apply suction to remove bubbles
and debris.
The working tips of the Electrodes can be divided into the following main functional types
according to the geometry of the active electrode and insulation support.
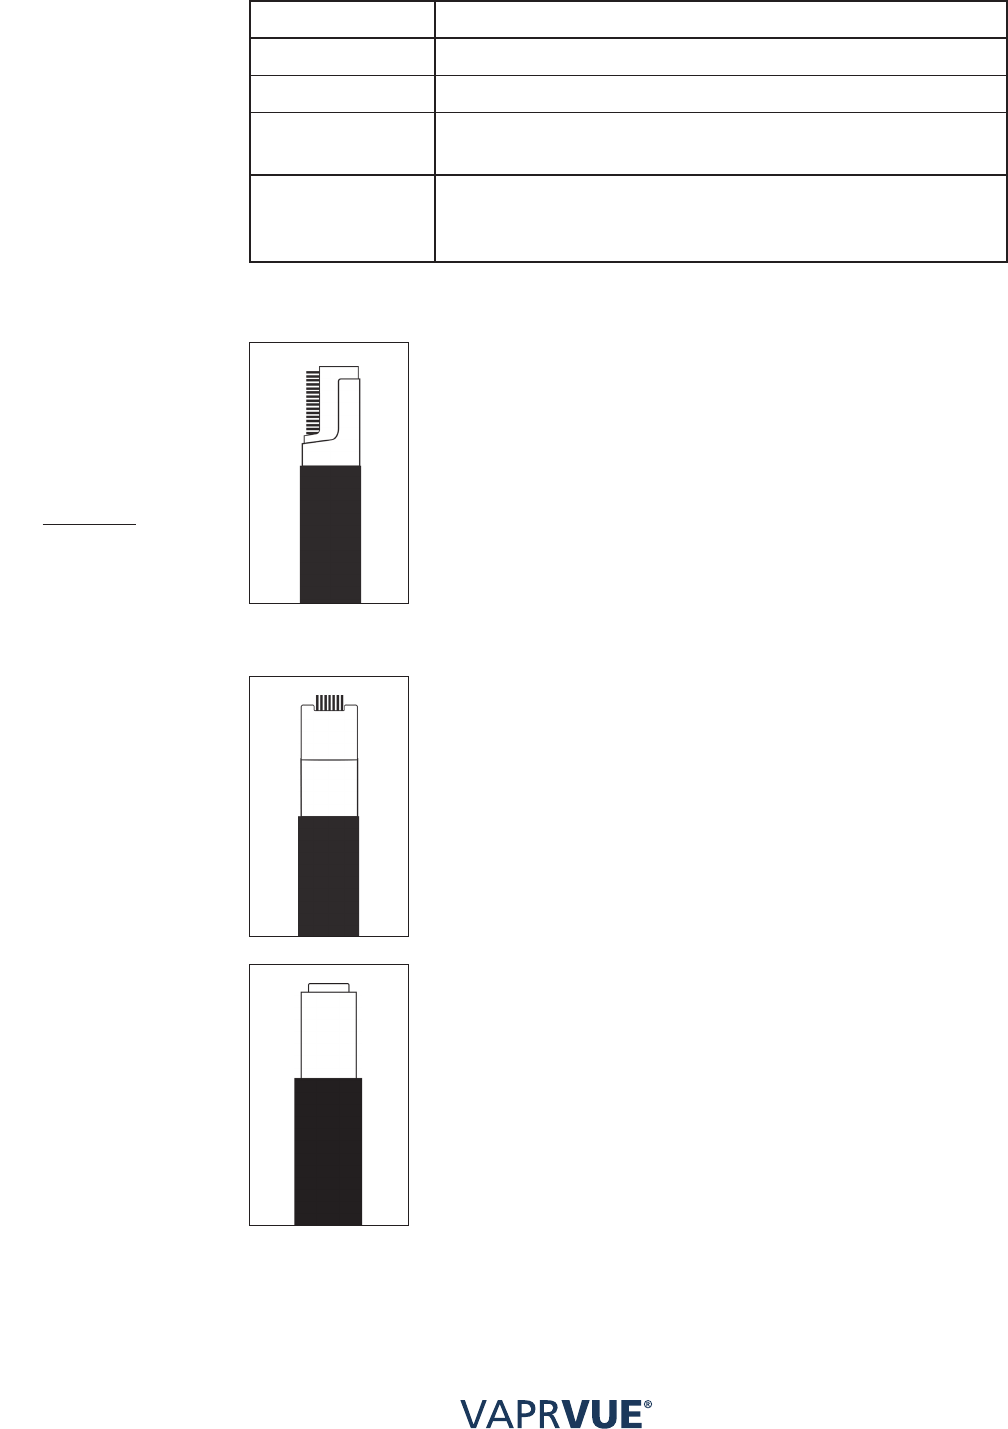
Side-facing Electrode
The side-facing electrode is designed to maximize tissue contact area
and produce rapid tissue debulking. The active, tissue contact electrode
is mounted on the side of the working tip with the return electrode
extending over the insulator on the opposite side of the active electrode.
This configuration is particularly useful in engaging tissue which is
approached at an acute angle. Additionally, the insulator and return
electrode assist in protecting adjacent structures from inadvertent injury
during activation. The larger contact area of the electrode means that
these electrodes also produce effective hemostasis of blood vessels.
The 2.3 mm configuration is particularly useful in engaging tissue that
cannot be approached using the 3.5 mm electrode.
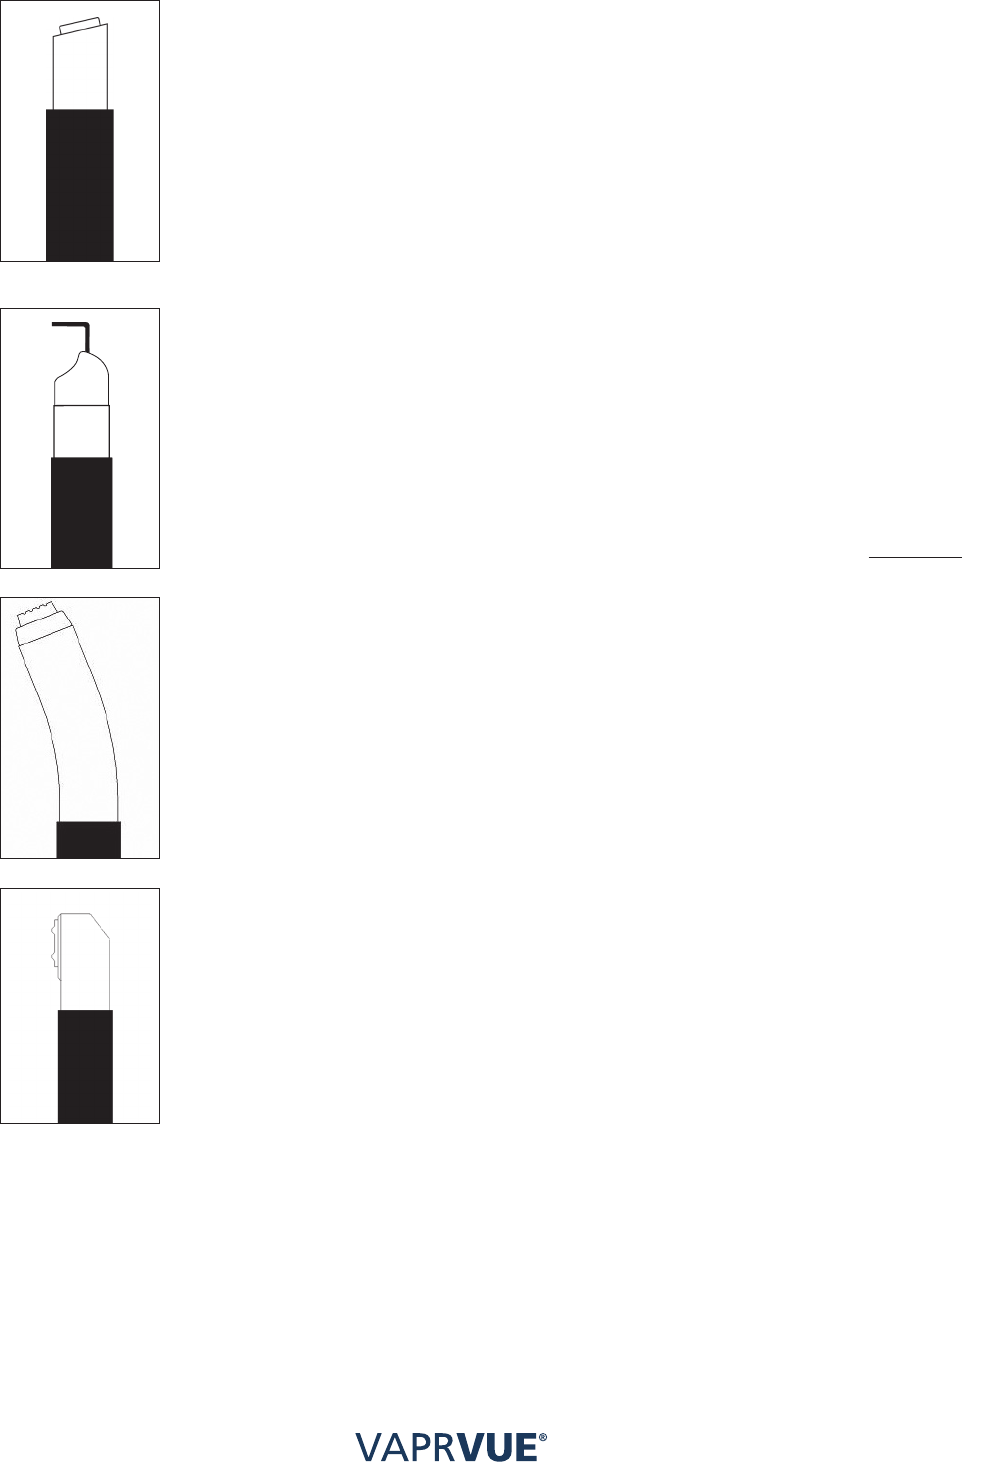
End-facing Electrode
The forward-facing electrode is designed to facilitate controlled, precise
tissue effects. Additionally, side extensions of the insulator minimize
undesired collateral tissue contact.
The 2.3 mm configuration is particularly useful in engaging tissue that
cannot be approached using the 3.5 mm electrode.
Temperature Control End Effect Electrode
This electrode is a soft tissue coagulation device. Utilization with a
VAPR system allows tip temperature of the electrode to be controlled
and indicated on the generator display.
SYStem
deScRIPtIoN
4-11
Wedge Electrode
The 45° angled active tip is designed to facilitate controlled, precise
tissue effects. Additionally the side extension of the insulator will
minimize undesired collateral tissue contact.
Hook Electrode
The hook electrode is designed to provide tissue cutting. Use of the
hook as a probe should be avoided.
Angled Suction Electrode
The forward facing active tip is designed to facilitate controlled, precise
tissue effects. The RF probe, with angled shaft is intended to be used
for removal of soft tissue during arthroscopic procedures in smaller,
more difficult to access areas of the anatomy such as the knee (e.g.,
posterior horn of meniscus). The integral Suction Port allows bubbles
and vaporization products to be removed. The design provides a large
area suction path which attracts difficult to access frond tissue to the tip
and helps minimize clogging.
90 Degree Suction Electrode
The side facing electrode is designed to maximize the tip tissue contact
area and provide rapid tissue debulking. The electrode has a large tip-
to-shaft offset which maximizes tactile feedback and facilitates removal
of difficult to reach tissue. The integral Suction Port allows bubbles
and vaporization products to be removed. The design provides a large
area suction path which attracts difficult to access frond tissue to the
tip and helps minimize clogging. Additionally, the forward facing end
of the manifold may be useful in protecting adjacent structures from
inadvertent injury during activation.
SYStem
deScRIPtIoN
4-12
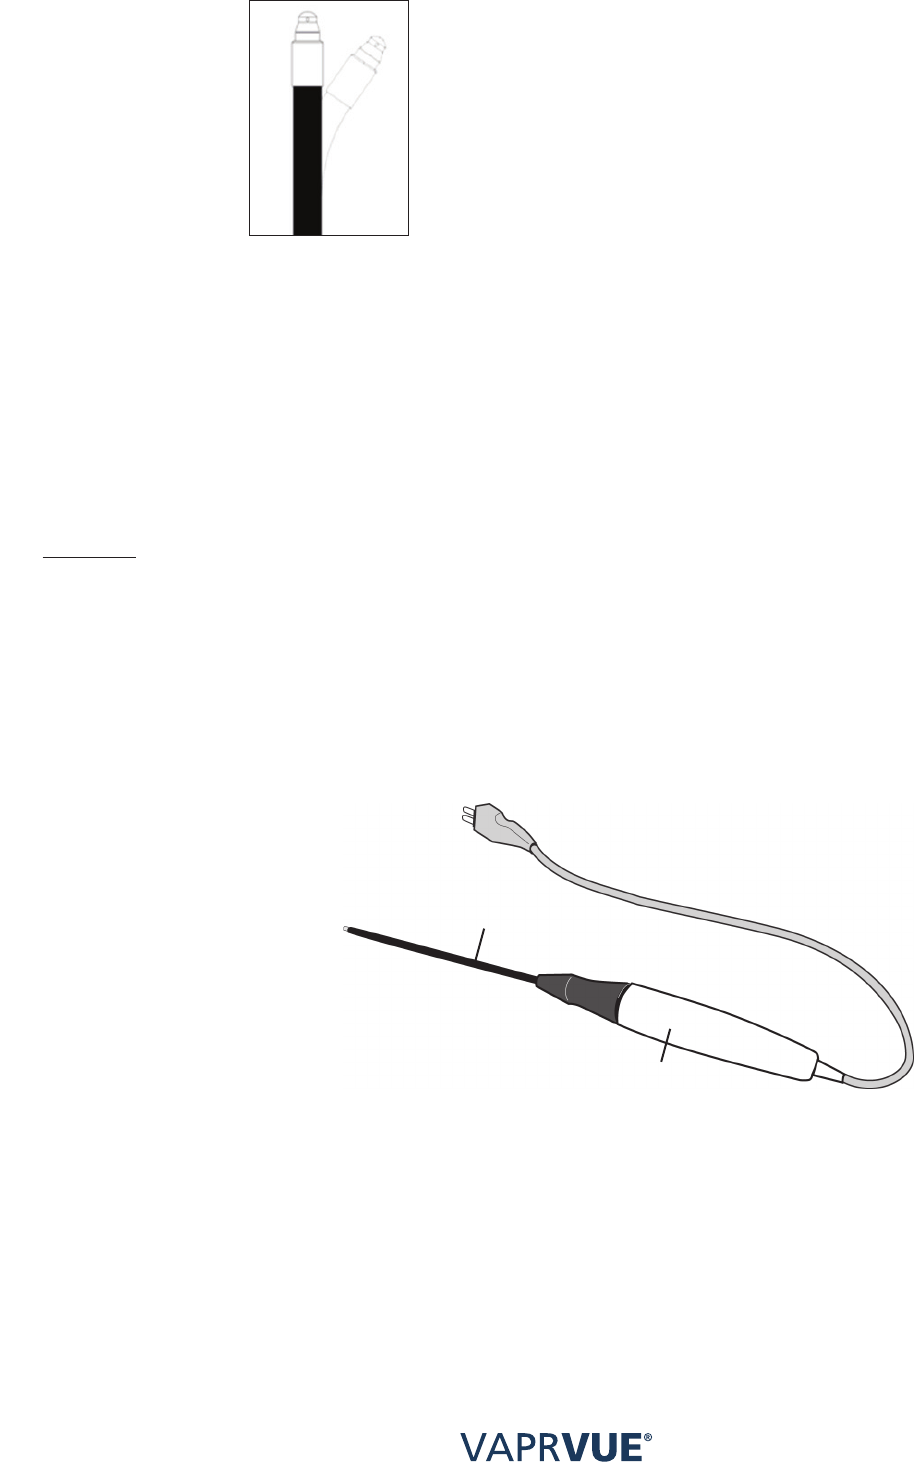
Articulating Suction Electrodes
Articulating suction electrodes are designed to provide access to
constrained anatomy and allow bubbles and vaporization products to be
removed.
These electrodes include a mechanical actuator on the handle
assembly which can be used to achieve angular displacement of the
distal portion of the electrode from 0 to approximately 110 degrees.
WARNING
The VAPR Electrodes are single use, sterile, disposable soft tissue ablation and coagulation
devices intended for use with the VAPR System. These products are for single-use only and have
not been designed to be re-used/re-sterilized. Reprocessing may lead to changes in material
characteristics such as metallic corrosion and dulled edges, ceramic and plastic deformation
or splitting which may impact the strength of the device and compromise device performance.
Reprocessing of single use devices can also cause cross-contamination leading to patient
infection. These risks may potentially affect patient safety.
WARNING
Read the instructions, cautions, and warnings provided with all VAPR VUE System accessories
before use. This device is an integral system; only use approved accessories with the VAPR VUE
Generator. Your sales representative can advise which accessories are available and approved
for use with the VAPR VUE System.
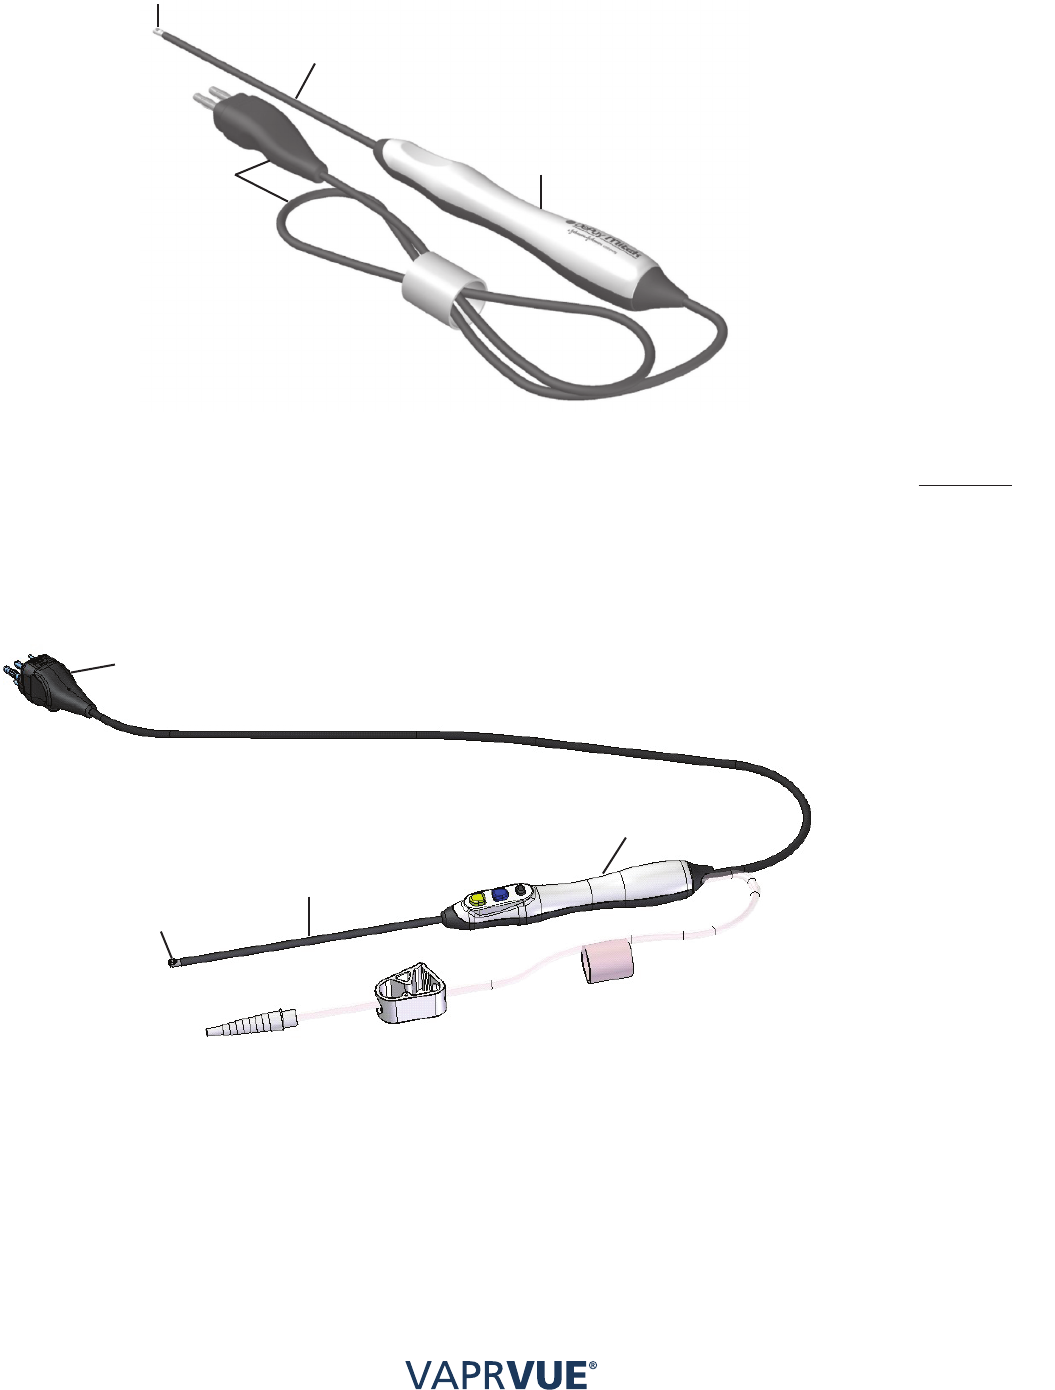
VAPR HANDPIECE
The VAPR Handpiece with Electrode (FIGURE 6) is ergonomically designed to facilitate
user comfort and control during use. The Handpiece connects the disposable Electrode with
the VAPR VUE Generator. The Handpiece and Cable are supplied non-sterile and must be
sterilized prior to each use. Refer to Handpiece Instructions for Use for specific sterilization
instruction. It is intended to be re-used up to twenty times.
Electrode
Handpiece
fIGURe 6
VAPR Handpiece with 2-piece Electrode.
SYStem
deScRIPtIoN
4-13
One-piece Electrodes (FIGURE 7) are equipped with an integrated cable and plug, eliminating
the need for the Handpiece. These Electrodes are single-use only.
Working Tip
Electode Shaft
Cables and Plug Handle
fIGURe 7
VAPR One-piece Electrode.
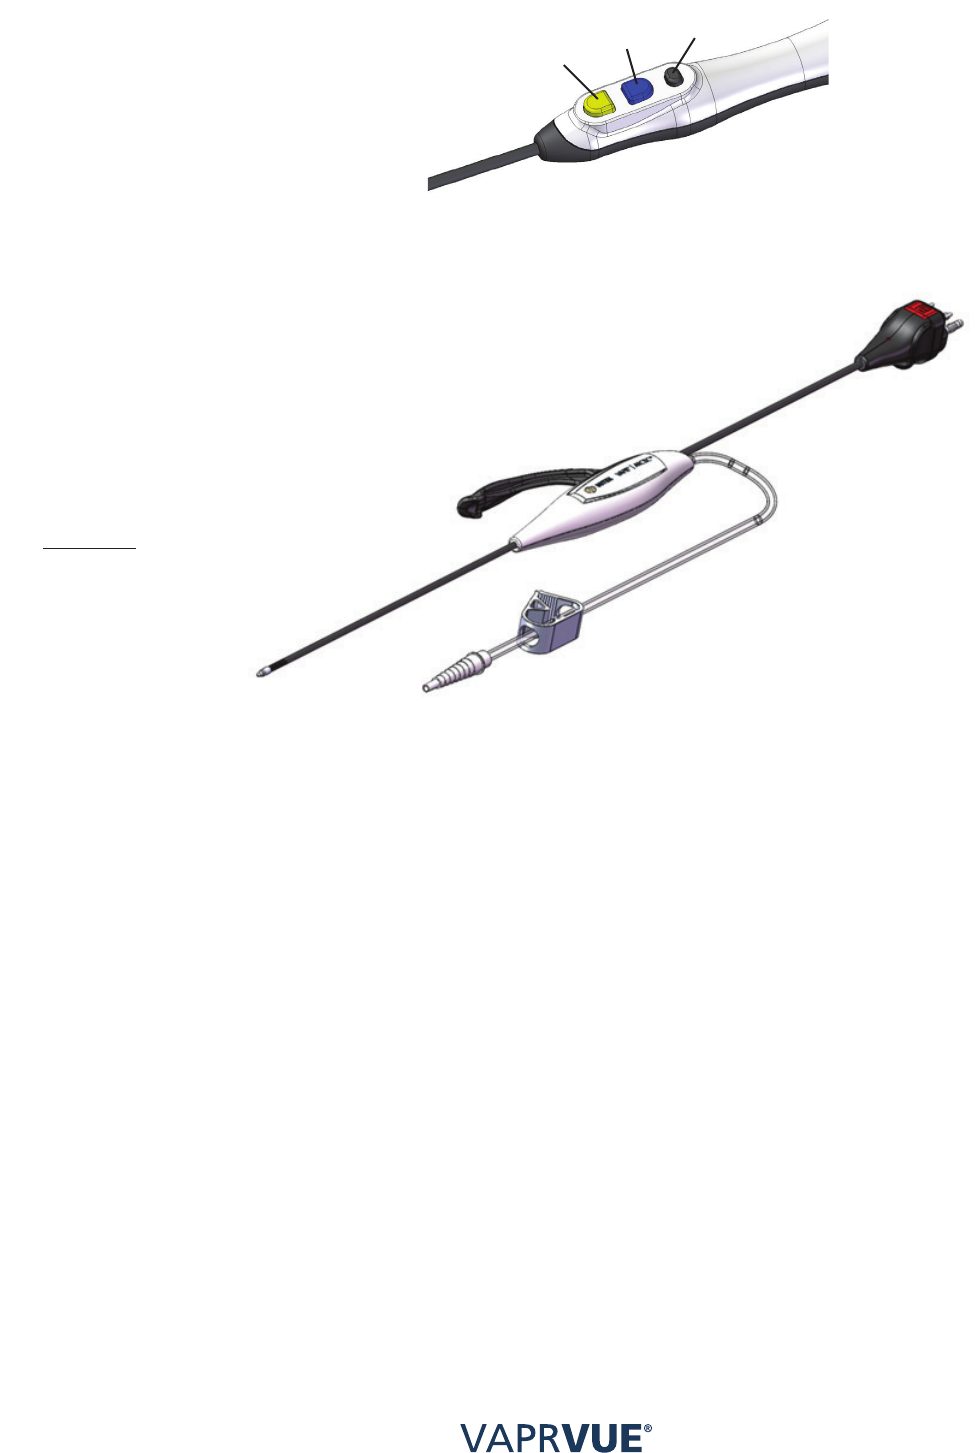
VAPR Hand Control Electrodes (FIGURE 8) have three integral buttons: ablation (yellow
button), coagulation (blue button), and mode (black button) buttons. These Electrodes are
single-use only.
Connector Plug
Working
Tip
Electrode Shaft
Buttons for
Hand Operated
Activation
Handle
Electrode
and Cables
fIGURe 8
VAPR Electrode with integrated handpiece and hand controls
SYStem
deScRIPtIoN
4-14
Cut
Coag Mode
fIGURe 8a.
Details of hand controls
fIGURe 9
VAPR Articulating Suction Electrode

INStRUctIoNS
foR USe
5-1
Section 5
InstruCtIons
For use
NOTE
The Manufacturer is responsible for safety, reliability, and performance of equipment only if:
• Installation procedures in this manual are followed.
• Assembly operations, extensions, readjustments, modifications or repairs are carried out by
persons authorized by the manufacturer and the electrical installation of the relevant operating
room complies with the local codes and regulatory requirements governing such facilities.
• The equipment is used in accordance with these instructions.
WARNING
The DePuy Mitek VAPR VUE System and accessories have been designed specifically as a
system to maximize safety and effectiveness. To avoid incompatibility and unsafe operation, only
DePuy Mitek cables and accessories should be used. DePuy Mitek accessories are rated for at
least the maximum peak output voltage of the system.
CAUTION
EMC CONSIDERATIONS
• Provide as much separation as possible between the Generator and other electronic equipment
(such as monitors). When activating the Generator, unintended electromagnetic coupling may
cause interference with the other equipment.
• Should any unintentional effects appear upon other equipment when using the Generator,
repositioning the Generator, the connecting leads or other equipment may alleviate the
problem. It may also help to use different mains supply sockets for any affected equipment.
• The generator should not be used adjacent to or stacked with other electrical equipment.
If adjacent or stacked use is necessary both the Generator and other equipment should be
observed to verify normal operation in the configuration in which it will be used.
• The EMC classification of the VAPR VUE system (class A) is suitable for use on dedicated
supply systems not connected to the public mains network, such as hospitals.
NOTE
Although class A limits have been derived for industrial and commercial establishments,
administrations may allow, with whatever additional measures necessary, the installation and
use of class A ISM equipment in a domestic establishment or establishment connected directly to
domestic electricity power supplies.
Refer to VAPR VUE Wireless Footswitch User Manual for EMC consideration for the Wireless
Footswitch.
SYSTEM INSTALLATION
1. Place the Generator on a table, cart racking system or other stable platform that can be
positioned as close as possible to the operative site during use.
2. Provide at least four inches (10 centimeters) of space from the rear of the Generator.
Never cover the Generator or stack other equipment on top of it other than in a standard
cart system. Ensure adequate ventilation, as it is normal for the Generator to become
warm during use.

INStRUctIoNS
foR USe
5-2
3. Insert the power cord into the Power Cord Receptacle on the back of the Generator. A
standard hospital grade power cord is necessary for proper connection of the Generator
to the power source. To ensure user safety, the Generator must be properly grounded
through the power cord and power outlet.
4. Connect the power cord from the Generator directly to an AC source. The Generator is
designed to operate as shipped with full regulation between 90-132 VAC or 207-253
VAC at 50-60 Hz. This allows the Generator output to remain constant in case of brown-
outs or power surges.
WARNING
The power cord must meet all requirements for safe grounding. Its purpose should not be
defeated by using extension cords, multiple plug points or three pronged to two pronged
adapters. Power cords should always be grasped by the plug. Do not pull the cord itself.
5. Connect the Wired Footswitch (if required) to the receptacle on the front of the Generator.
6. Press the Generator power switch to the ON position. When the Generator is first
switched on prior to Electrode connection a system self-check sequence will be initiated.
Verify that all indicator lights are on and off at least once during this sequence. During
the self check sequence the alarm system is verified by checking for three alarm tones
of increasing pitch. The first tone is minimum volume, the second maximum volume,
the third being the user preset volume. A fourth higher pitch tone may be emitted if an
Electrode is connected to the Generator.
7. Verify that “ATTACH INSTRUMENT” is flashing on the display prompt on the front of
the Generator. This completes the Generator installation procedure. Turn the generator
power switch OFF when not in use.
SYSTEM SETUP AND USE DURING SURGERY
Minimum System Component Requirements:
• A properly installed VAPR VUE Generator
• VAPR 3 Footswitch or VAPR VUE Wireless Footswitch (if VAPR Electrode does not
incorporate hand controls).
• A Sterile VAPR Handpiece and Electrode, or a VAPR Electrode with integrated hand-
piece, or a VAPR Electrode with hand controls appropriate to the procedure being
undertaken.
NOTE
The VAPR Handpieces are supplied NON-STERILE. Refer to Section 6 of this manual for
sterilization instructions prior to use.
1. Press the Generator power switch to the ON position. Verify that the system self-check
sequence is initiated.
2. Verify that “ATTACH INSTRUMENT” is flashing on the Generator display, indicating that
the Generator is in idle mode.
3. Set up for the desired activation method:
a. Wired Footswitch: Attach the wired footswitch connector to the front panel foot switch
socket and press the WIRED FOOTSWITCH SELECT button on the front panel.
b. Wireless Footswitch: Press the WIRELESS FOOTSWITCH SELECT/PAIR button on
the front panel. See “Wireless footswitch pairing process” if pairing is required.
INStRUctIoNS
foR USe
5-3
c. Hand Control: Only available on certain electrodes, if one of these is connected to
the generator it will default to this activation method. Alternatively, press the HAND
CONTROL SELECT button on the front panel if switching from wired or wireless
footswitch back to hand control activation method.
4. The ABLATE and COAG output displays can be shown as maximum power in Watts
(ADVANCED) or a relative number from 1 to 10 (BASIC). Refer to Appendix A for
equivalencies between ADVANCED and BASIC output displays. Set up for the desired
output display style:
a. Press MODE button twice. The first press will allow the required Output Mode (CP, V3,
V2, V1, BV1, BV2 and COAG as indicated by instrument allowed operating modes)
to be selected. The second press of the mode button will allow the ADVANCED or
BASIC User Mode to be selected by pressing the BLUE up-down arrows.
b. Press MODE button to confirm the selection.
5. Inside the sterile field, pass the plug end of the sterile Handpiece or One-piece electrode
out of the sterile field, and connect it to the front of the Generator.
6. (Only when using VAPR Handpiece) Verify that “ATTACH ELECTRODE” is flashing on
the Generator display, indicating the Handpiece is properly connected to the Generator.
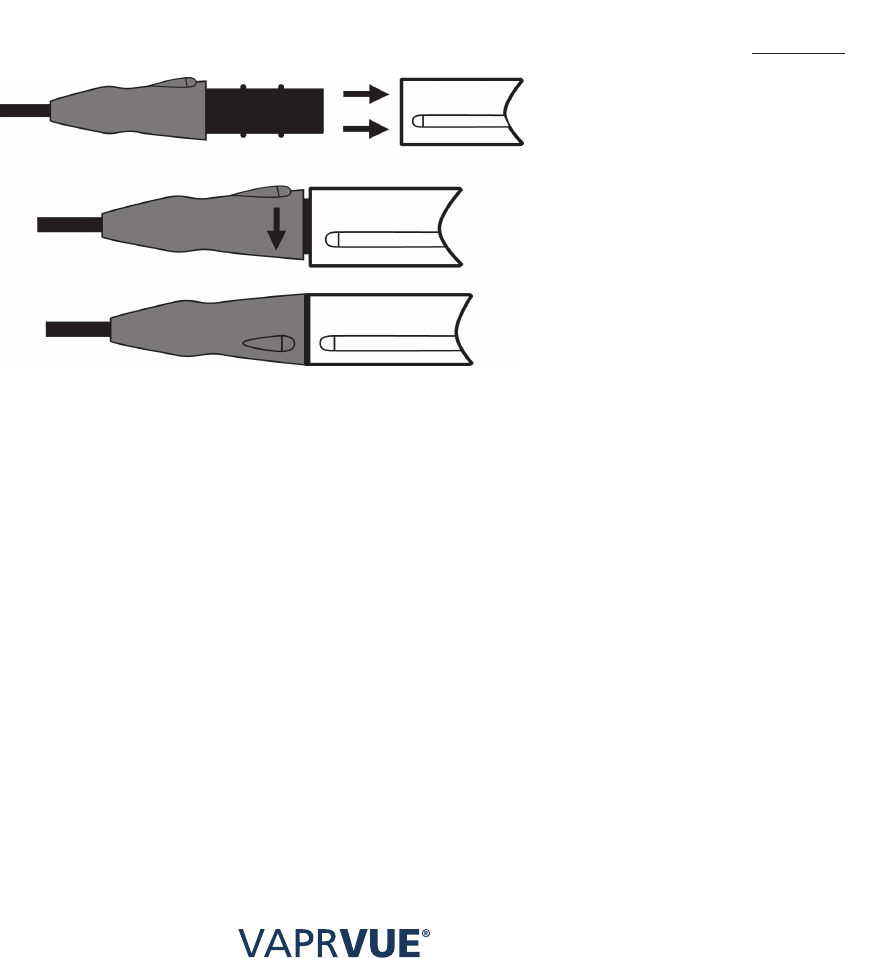
7. (Only when using VAPR Handpiece) Connect the VAPR Electrode to the Handpiece as
shown in FIGURE 10. Once connected, the “ATTACH ELECTRODE” symbol flashing on
the Generator display will change to the default settings for that Electrode style.
fIGURe 10
Handpiece connection
NOTE
The Default Power settings used for the intended arthroscopic procedures vary with the size and/
or configuration of the active electrode. Increasing or decreasing the Default Power settings
will determine the level of performance. If the power to the generator is switched ON with an
electrode plugged in, the MODE button on the front panel must be pressed to accept the default
settings.
If power settings have been overridden to non-default values, the adjusted values will be
retained when unplugging and replugging the same electrode, when connecting a new electrode
of the same type, or when connecting a different electrode model with the same default values.
If the generator is switched off and then on, a newly attached electrode will always revert to its
default values. Always confirm proper, desired power settings before proceeding with surgery.
8. With the arthroscope inserted into the joint cavity, carefully insert the Electrode through
the instrument portal under direct vision. Avoid the use of excessive force. Wherever
possible, use an instrument cannula for the access portal. Maintain the active Electrode
in the field of view at all times.

INStRUctIoNS
foR USe
5-4
9. Press either the yellow or blue pedal of the Footswitch or yellow or blue button of the
hand control, as appropriate, to activate the Electrode:
YELLOW Pedal or Button: Activates the Ablation, COOLPULSE Ablation and the
Blended Ablation (BV) modes depending on output mode selection. Activation is accom-
panied by flashing of the Ablation or Blended Ablation power display and a high pitched
audible tone.
BLUE Pedal or Button: Activates the Coagulate (COAG) mode only. Activation is
accompanied by flashing of the Coagulate power display and an audible tone.
10. Power and mode adjustment can only be made when the Generator is not activated.
The permissible range of power adjustment is determined by the Electrode style. All
settings may be altered from the front panel buttons. The mode control button on the
Footswitch or Hand Control can only change ablation power, as described in section 4.
The coagulation power can be adjusted on the Generator, as described in section 4.
USING VAPR THERMAL CONTROL (TC) ELECTRODES
• When attaching the VAPR TC electrode the Generator will automatically configure itself
in temperature control mode. The display will indicate the default SET temperature and
coagulation power. The ablation output is inhibited; pressing the yellow pedal will have
no effect.
• The SET temperature may be adjusted from its default using the yellow Up/Down
buttons. Similarly the Coagulation power may be adjusted using the blue Up/Down
buttons on the generator.
• Power, SET and mode adjustment can only be made when the generator is not
activated.
• During activation, the display will change from the SET temperature to the actual
measured TIP temperature.
• The system will only deliver power up to the limit indicated on the display. The desired
SET temperature may not be reached such as during high flow conditions in the joint. If
this occurs, increase the power from its default setting in small increments until correct
temperature control is possible.
• For user convenience an over-temperature indicator is operational in temperature
control mode. An audible tone will sound if the measured TIP temperature reaches more
than 8ºC over the SET temperature.
NOTE
Certain conditions may momentarily cause temperature overshoot and trigger the over-
temperature indicator. Once triggered the tone will sound for a minimum of one second. Possible
causes are:
1. Excessive power used with low/no flow environment.
2. Insufficient saline around tip.
3. Unstable surgical environment, excessive changes in saline flow rate and/or volume.
4.
Incorrect irrigation solution used.
ADJUSTING THE TONE VOLUME
The activation tone volume can be adjusted by using the dedicated volume UP/DOWN controls
on the front panel of the generator (refer to section 4).
NOTE
Familiarize yourself with the two audible output tones to verify output selection as it is often
difficult to visualize the activation pedals (footswitch) or buttons (hand controls) during
arthroscopic surgery.

INStRUctIoNS
foR USe
5-5
ADJUSTING THE GENERATOR FOR FOOTSWITCH,
HAND CONTROL OR WIRELESS FOOTSWITCH OPERATION
To configure the generator for use with Wired Footswitch, Hand Controls or Wireless
Footswitch, select the preferred control method by pressing the associated button on the front
panel (refer to section 4).
NOTE
•On selection of the desired control method, other means of control will become inactive.
•If a wireless footswitch was the last operational mode selected, turning the AC power to the
generator off and then on will revert back to wireless footswitch mode. The mode button on the
wireless footswitch must be pressed to acknowledge wireless footswitch operation.
•If a wired footswitch was the last operational mode selected, turning the AC power to the
generator off and then on will revert back to wired footswitch mode.
•If an electrode with hand controls is connected, the generator will default to hand control
operation. Wired or wireless footswitch operation, if available, may be selected.
CHANGING ELECTRODES DURING SURGERY
When using the VAPR Handpiece, an Electrode can be removed from the Handpiece by
unlocking the connector assembly and then pulling the Electrode and Handpiece apart.
Once the Electrode is disconnected, the Generator will automatically enter idle mode with the
display showing the “ATTACH ELECTRODE” symbol.
Fit a new sterile Electrode as previously described. If the new Electrode has different default
settings than the previous Electrode, check that the Generator display matches the Electrode
default settings specified on the package insert.
When Using VAPR Electrodes with integrated handpiece, insert the plug at the end of the
electrode into the connector on the front panel of the generator. Ensure correct orientation of
the plug to the connector. At the end of surgery, disconnect the Electrode by pulling on the plug.
NOTE
When switching to or from a VAPR Electrode with integrated handpiece, the generator will
display “ATTACH INSTRUMENT”.
If the new Electrode has identical default settings to the previous Electrode, the Generator will
retain the settings displayed prior to changing the Electrode, even if power settings have been
overridden to non-default values.
Switching the Generator power off will clear all output adjustments.
WARNING
Do not insert or withdraw Electrodes while activated. Injury and/or product damage may result.
NOTE
In the event of a power failure, or if the Generator is turned off while an Electrode is connected
to the Generator, the Generator will revert to the default settings for the attached Electrode
when the mains power is reestablished. The user will be prompted to accept these settings before
proceeding. (The display reads “PRESS MODE TO USE”).
Recommendations
• Unless circumstances dictate otherwise, use the Electrode default power and mode
settings to enhance patient and user safety.
• Remove any tissue buildup from Electrodes to maximize surgical effect.

INStRUctIoNS
foR USe
5-6
• Avoid any unnecessary and prolonged Electrode activation to prevent overheating.
• When de-bulking or vaporizing tissue, apply firm pressure using a progressive surface
brushing technique. Avoid burying the electrode in the tissue as this could increase
debris formation.
• The speed of tissue de-bulking will be determined by the output mode selection, size
and style of the Electrode, and application technique.
• When rapidly de-bulking or vaporizing tissue some browning of the tissue can be
anticipated. This can either be brushed away with a non-activated electrode or ablated
using gentle application pressure during activation.
• If more than one style of Electrode is used during a procedure, the Generator will revert
to the default settings defined by each Electrode style.
• Bubbles are produced during tissue vaporization which may interrupt surgery by
temporarily interfering with vision. A fluid management system is recommended to
prevent accumulation and to remove bubbles, as well as any particulate products
of vaporization, from the operative field. Use of Electrodes with built-in suction will
minimize these effects.
WARNING
Avoid bubble accumulation in the joint space during use. The accumulation of bubbles around
the working tip of the Electrode will diminish performance and may produce overheating
sufficient to damage adjacent structures.
USE OF SUCTION ELECTRODES
Suction electrodes are designed to provide improved visibility at the operative site whilst
facilitating removal of degradation products. To avoid premature clogging of the suction
pathways in these devices:
• Close the pinch/roller clamp before insertion of the device into patient.
• Open the pinch/roller clamp immediately prior to activation (ablation).
• Close the pinch/roller clamp immediately after device activation (ablation).
• The pinch/roller clamp should not be opened for tissue modification or the sealing of
blood vessels (blue pedal use) as the suction flow may suck unintended tissue into the
device and cause clogging.
AFTER SURGERY
After surgery, you need to perform the following:
• Withdraw the Electrode.
• Disassemble the Electrode and Handpiece.
• Dispose of the SINGLE-USE VAPR Electrodes.
• Prepare the Handpiece and Cable for steam autoclave processing.
IMPORTANT
Disconnecting the Electrode/Handpiece will automatically result in the “ATTACH
INSTRUMENT” idle mode. The Generator can be left in this mode between cases but at the end
of the operating session must be switched off from the power supply.

cleaNING aNd
SteRIlIzatIoN
PRocedUReS
6-1
Section 6
CleAnIng AnD
sterIlIzAtIon
proCeDures
CLEANING THE GENERATOR
The VAPR VUE Generator cannot be sterilized. The Generator surfaces can be cleaned with a
non-abrasive cleaning agent. Do not allow fluids to enter the Generator connectors.
CLEANING THE FOOTSWITCH
The VAPR 3 footswitch and VAPR VUE Wireless Footswitches cannot be sterilized. Refer to
the Instructions for Use for the particular footswitch you are using.
NOTE
The use of strong alkali detergents or cleaners must be avoided as these may damage the device.
CLEANING AND STERILIZING THE VAPR HANDPIECE AND CABLE
Refer to the Instructions for Use for the VAPR Handpiece for cleaning and sterilization.

PeRIodIc
maINteNaNce
INSPectIoN
7-1
Section 7
perIoDIC mAIntenAnCe
InspeCtIon
The manufacturer recommends that the VAPR VUE Generator be regularly inspected to ensure
continued safety of operation throughout its service life. The following safety checks should
be performed at least every 12 months by a qualified person who has adequate training,
knowledge and practical experience to perform such tests.
• Inspect the Generator and the Footswitch for obvious signs of mechanical damage
or wear. Ensure that the Generator case shows no sign of tampering. There are no
user serviceable items within the Generator or Wired Footswitch. There are no user
serviceable items within the Wireless Footswitch except the batteries and battery cover
gasket.
• Check that the Generator back panel label is present and decipherable and that the
front panel markings and symbols are still legible.
• Retract the fuse drawer of the main inlet connector and verify that both fuses are intact
and match the rated current and breaking characteristics as per the back panel label.
• Verify that the resistance between the earth terminal of the mains inlet connector and
the Generator enclosure is within the limits defined in IEC 60601-1 or the corresponding
national standard as applicable.
• Switch on the Generator ensuring that the initial internal self-test completes normally
as reported on the front panel display. Check that the audio alarm, front panel
warning indicator and vacuum fluorescent display are functioning normally via the user
verification sequence which follows initialization.
• Check that the enclosure earth leakage current is within the limits for Class I equipment
as prescribed with IEC 60601-1 or the corresponding national standard as appropriate.
• Measure the patient earth leakage currents and ensure it is within the limits of CF type
equipment as defined within IEC 60601-1 or a corresponding national standard.
• Details of these tests should be recorded in an equipment log with the date of test
for future reference. Contact DePuy Mitek customer service should a unit fault be
suspected.
• Inspect the front keypad membrane for any damage.
eRRoR aNd
faUlt SYmBolS,
tRoUBleShootING
GUIde
8-1
Section 8
error AnD
FAult symBols,
trouBleshootIng guIDe
ERROR & FAULT SYMBOL INTERPRETATION AND RECOVERY
Most technical problems are indicated by either an Error or a Fault symbol that appears in the
Generator display window. The VAPR VUE system constantly performs self-checking to ensure
its correct operation. Fault codes are reported to the user based on time and weighting of those
self checks.
• An Error symbol indicates an accessory malfunction or a Generator component failure
that requires servicing of the equipment. These symbols include a code number to be
used by DePuy Mitek technical service to diagnose why the system failed.
• A Fault symbol indicates a transient non-hazardous event and can be corrected by
resetting the system.
ERROR SYMBOLS
An Error symbol is displayed as follows:
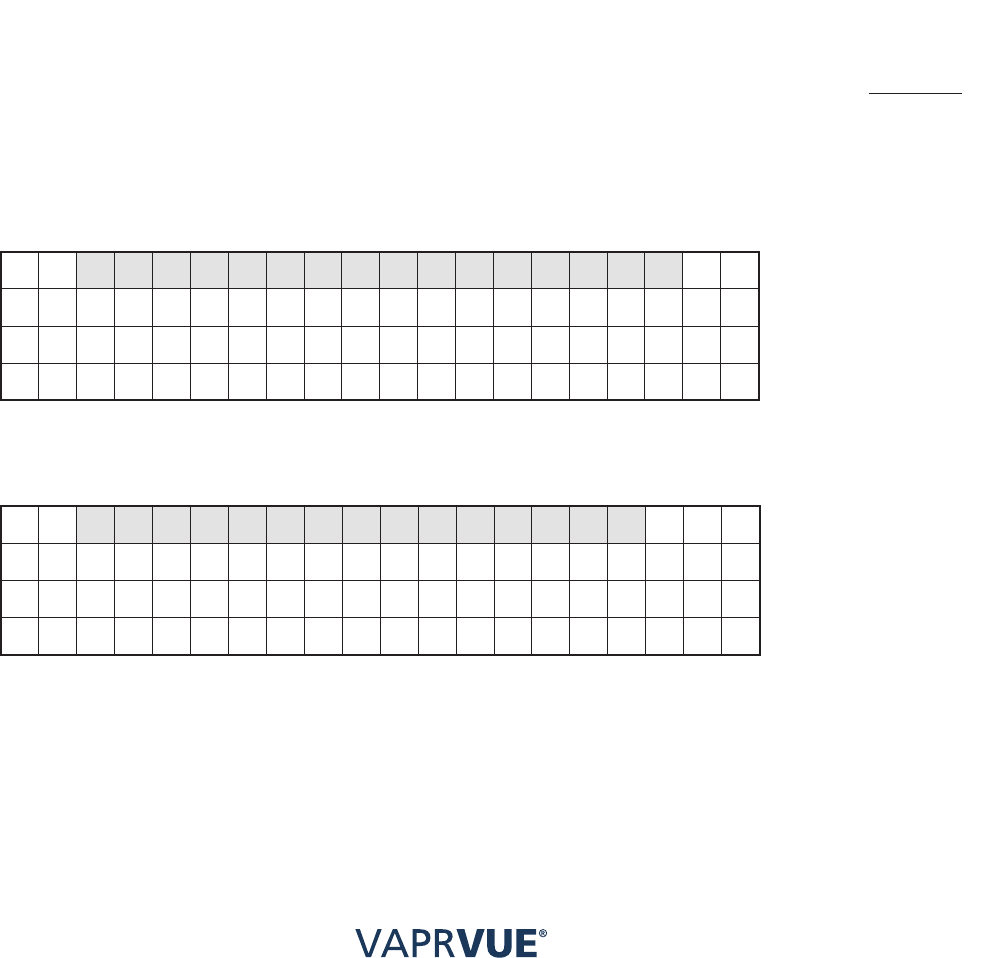
I N T E R N A L F A I L U R E
E r r o r c o d e
x x x R e f x x
FAULT SYMBOLS
A Fault symbol is displayed as follows:
T E X T U A L M E S S A G E
F a u l t c o d e
x x x R e f x x
where TEXTUAL MESSAGE relates to the type of fault.

eRRoR aNd
faUlt SYmBolS,
tRoUBleShootING
GUIde
8-2
WARNING
An Error symbol indicates an equipment malfunction which may be hazardous. Disconnect all
accessories and switch the Generator off. Switch the Generator back on and if the self-test is
completed satisfactorily as evidenced by the “ATTACH INSTRUMENT” message on the display,
the failure occurred in the accessories which should be discarded and replaced. If the self-test
fails, then all functions will be inhibited and no attempt should be made to use the Generator.
Contact DePuy Mitek customer service for assistance.
RECOVERY – RESETTING GENERATOR FAULTS AND ERRORS
NOTE
Remember to take note of the fault/error code for reporting to customer service before
completing the reset.
Reset the generator by either:
PRESSING MODE BUTTON
Depress and release the MODE button once,
OR
DISCONNECTING THE INSTRUMENT AND CYCLING THE POWER
Press the mains on/off switch twice to cycle the power.
If this does not resolve the problem, contact DePuy Mitek customer service.
ALARMS
Alarms are prioritized in the order listed below.
Fault Type Description Alarm Type
[F] Fatal error. User can reset the generator Latching
[AF] Automatic Fatal error. The generator will automatically reset
when the condition causing the error is cleared.
Non - Latching
[R] Recoverable error. User can reset the generator and enter a
Ready mode if permitted.
Latching
[SOFT] Soft error. The unit will automatically recover and continue
to operate as normal when the condition causing the error is
cleared. For certain faults, the user may be required to confirm
the fault before proceeding.
Non - Latching
NOTE
•A LATCHING alarm signal continues to be generated until stopped by a deliberate operator
action.
•A NON-LATCHING alarm signal automatically stops when the event causing the alarm no
longer exists.
Error codes are grouped as shown below:
Error code Description
100-199 Program crash, memory fault
200-299 Hardware failure (internal)
300-399 Dosage error, over-temperature
400-499 User error or equipment failure
500-599 Reserved for manufacture/engineer diagnostic
• All visual alarm conditions produced by the VAPR VUE system are LOW Priority
technical alarms as per IEC60601-1-8 table 1.

eRRoR aNd
faUlt SYmBolS,
tRoUBleShootING
GUIde
8-3
• There are no user defined alarms used in the VAPR VUE system.
• There are no distributed alarms used in the VAPR VUE system.
• There is no facility for disabling or silencing alarms used in the VAPR VUE system.
• Audio alarms comply with the requirements of IEC 60601-2-2:2009.
Alarm tones for the 4 types of faults are as follows:
Fault Type Alarm Description
[F] 2kHz tone for 200ms repeated every 500ms indefinitely.
[AF] 2kHz tone for 200ms repeated every 500ms four times.
[R] 2kHz tone for 200ms repeated every 500ms indefinitely.
[SOFT] 2kHz tone for 200ms repeated every 500ms three times.
The list of error codes is presented in the following table:
Error
Code Ref Vfd Text String Type Description
100 10 SYSTEM RESET [R] Software execution failure (watchdog reset)
100 11 INTERNAL FAILURE [F] ROM checksum failure
100 12 SETTINGS CORRUPT [R] Non volatile memory corrupt or not
initialised
100 13-16 Reserved — —
100 17 SYSTEM RESET R] Software execution failure
100 18 INTERNAL FAILURE [F] Continuous test timing
100 19 INTERNAL FAILURE [F] Background loop timing
100 20 INTERNAL FAILURE [F] Status_event_q overrun
100 21 INTERNAL FAILURE [F] User_event_q overrun
100 22 INTERNAL FAILURE [F] Vfd_event_q overrun
100 23 INTERNAL FAILURE [F] Waveform_generator_event_q overrun
100 24 Reserved — —
100 25 INTERNAL FAILURE [F] RS232 monitor Rx Queue overflow
100 26 INTERNAL FAILURE [F] RS232 monitor Tx Queue overflow
100 27 INTERNAL FAILURE [F] ID board communications fault
100 28 INTERNAL FAILURE [F] CPU Core failure – indicates a failure
with the CPU core or one of its on-chip
peripherals.
200 10 INTERNAL FAILURE [F] PWM signal : shorted high
200 11 INTERNAL FAILURE [F] PWM signal : shorted low
200 12-13 Not used — —
200 14 INTERNAL FAILURE [F] Energy stuck high
200 15-19 Reserved — —
200 20 INTERNAL FAILURE [F] CLAMP signal error (DAC output)
200 21 INTERNAL FAILURE [F] BOOST signal error (DAC output)
200 22-24 Reserved — —
200 25 INTERNAL FAILURE [F] OVERDOSE signal error : permanently ON
200 26 INTERNAL FAILURE [F] ENERGY signal error : stuck low

eRRoR aNd
faUlt SYmBolS,
tRoUBleShootING
GUIde
8-4
Error
Code Ref Vfd Text String Type Description
200 27 Reserved — Reserved for audio fault detection
200 28 Warming up [SOFT] Generator too cold
200 29 reserved — Reserved for audio fault detection
200 30 Reserved — —
200 31-32 Reserved — —
200 33 INTERNAL FAILURE [F] BUSVOLTS signal error (analogue input )
200 34 INTERNAL FAILURE [F] Incorrect PK RF board installed
200 35-36 Reserved — —
200 37 INTERNAL FAILURE [F] SPRF active stuck on
200 38 Reserved — —
200 39 CHECK MAINS SUPPLY [R] Mains input supply out of limits
200 40 — — —
200 41 Not used — —
200 42 INTERNAL FAILURE [F] CPU POST Thermistor failure
200 43 INTERNAL FAILURE [F] CPU POST failure
200 44 RAM [R] RAM test failure [POST check]
200 45 INTERNAL FAILURE [F] Crystal failure [POST check]
200 46 Reserved — —
200 47 INTERNAL FAILURE [F] Analogue reference failure [POST check]
200 48 INTERNAL FAILURE [F] CLAMP_SET failure [POST check]
200 49 INTERNAL FAILURE [F] BOOST_SET failure [POST check]
200 50 INTERNAL FAILURE [F] CURRLIM_SET failure [POST check]
200 51 Reserved — —
200 52 INTERNAL FAILURE [F] COAG_CUT failure [POST check]
200 53-55 Reserved — —
200 56 INTERNAL FAILURE [F] NO_RF failure [POST check]
200 57-64 Reserved — —
200 65 INTERNAL FAILURE [R] RFBUS_VOLTS failure [POST check]
200 66 Reserved — —
200 67 INTERNAL FAILURE [F] PSU_STATUS failure [POST check]
200 68 INTERNAL FAILURE [R] Mains input failure [POST check]
200 69 INTERNAL FAILURE [F] OVERDOSE failure [POST check]
200 70 INTERNAL FAILURE [F] PWM low failure [POST check]
200 71 INTERNAL FAILURE [F] ID CAL circuit failure [POST check]
200 72 Reserved — Reserved
200 73 INTERNAL FAILURE [F] CURRLIM failure [POST check]
200 74 INTERNAL FAILURE [F] VOLTLIM failure [POST check]
200 75 INTERNAL FAILURE [F] SPRF_ACTIVE failure [POST check]
200 76 INTERNAL FAILURE [F] VCC_ANA_DIV_2 failure [POST check]
200 77 INTERNAL FAILURE [F] 12V failure [POST check]

eRRoR aNd
faUlt SYmBolS,
tRoUBleShootING
GUIde
8-5
Error
Code Ref Vfd Text String Type Description
200 78 Reserved — n/a
200 79 INTERNAL FAILURE [F] PK-RF Thermistor failure [POST check
200 80-81 Reserved — n/a
200 82 INTERNAL FAILURE [F] ANALOGUE_REF failure
200 83 INTERNAL FAILURE [F] VCC_ANA_DIV_2 failure
200 84 INTERNAL FAILURE [F] 12V failure
200 85-86 Reserved — Reserved
200 87 INTERNAL FAILURE [F] PSU_STATUS failure
200 88-89 Reserved — Reserved
200 90 INTERNAL FAILURE [F] CURRLIM_SET failure
200 91-92 Reserved — N/a
200 93 INTERNAL FAILURE [F] External Watchdog unable to reset CPU
200 94 INTERNAL FAILURE [F] Internal Watchdog unable to reset CPU
300 10 THERMAL SHUTDOWN [R] Internal overheating
300 11 Reserved — Reserved
300 12 INTERNAL FAILURE [F] PK-RF board overheating
300 13 EXCESSIVE TIP TEMP [SOFT] Tip temperature exceeding 8°C above
set temperature during thermal control
algorithm.
300 14 <Instrument
dependent – see
shorted errors in table
R10.1.X.20>
[SOFT] Accessory error : excessive RF
output current
Output shorted – the error text and user
interaction are dependent on the instrument.
300 15-20 Reserved — N/a
300 21 <Instrument
dependent – see
shorted errors in table
R10.1.X.20>
[SOFT] SP Accessory error : excessive RF
output current
Output shorted – the error text and user
interaction are dependent on the instrument.
300 23 INSTRUMENT ERROR [R] Instrument thermistor is open circuit
300 24 INSTRUMENT ERROR [R] Instrument thermistor is short circuit
400 10 INTERNAL FAILURE [F] Coag activation signal stuck
400 11 INTERNAL FAILURE [F] Cut activation signal stuck
400 12 INTERNAL FAILURE [F] Mode activation signal stuck
400 14 INTERNAL FAILURE [F] Electrode identification circuit fault
400 15 BUTTON STUCK [R] Front panel : CUT (left) UP button stuck
400 16 BUTTON STUCK [R] Front panel : CUT (left) DOWN button stuck
400 17 BUTTON STUCK [R] Front panel : blue (Right) UP button stuck
400 18 BUTTON STUCK [R] Front panel :
blue (Right) DOWN button stuck
400 19 BUTTON STUCK [R] Front panel : MODE button stuck
400 20 Reserved — —
400 21-24 Reserved — —

eRRoR aNd
faUlt SYmBolS,
tRoUBleShootING
GUIde
8-6
Error
Code Ref Vfd Text String Type Description
400 25 Test Time Expired
Remove Power Lead
[SOFT] BioMed Time Credit expired. Notifies the
user that the allocated time credit has
expired. No RF can be generated until the
generator is power-cycled by mains power.
400 26 BUTTON STUCK [R] Front panel : Volume UP stuck
400 27 BUTTON STUCK [R] Front panel : Volume DOWN stuck
400 28 BUTTON STUCK [R] Front panel :
Wireless Footswitch activation button stuck
400 29 BUTTON STUCK [R] Front panel :
Footswitch activation button stuck
400 30 BUTTON STUCK [R] Front panel :
Handswitch activation button stuck
500 10 Reserved — N/a
600 20 FOOTPEDAL STUCK [AF] Footswitch cut stuck
600 21 FOOTPEDAL STUCK [AF] Footswitch coag stuck
600 22 FOOTPEDAL STUCK [AF] Footswitch mode stuck
600 23 HANDSWITCH STUCK [AF] Handswitch cut stuck
600 24 HANDSWITCH STUCK [AF] Handswitch coag stuck
600 25 HANDSWITCH STUCK [AF] Handswitch mode stuck
600 26 FOOTPEDAL STUCK [AF] Wireless footpedal cut stuck
600 27 FOOTPEDAL STUCK [AF] Wireless footpedal coag stuck
600 28 FOOTPEDAL STUCK [AF] Wireless footpedal mode stuck
600 29 “Wireless Footswitch
Attention Low Battery”,
with “Press Mode to
use” / “Refer to User
Manual” alternating
every 1s
[SOFT] Wireless footswitch is indicating low
battery. This fault is only to be reported
if not already acknowledged by the user
(since 1st power-up).
600 30 “Wireless Footswitch
Attention Low
Reception”, with
“Press Mode to use” /
“Refer to User Manual”
alternating every 1s
[SOFT] Wireless footswitch is indicating low signal
reception. This fault is only to be reported
if not already acknowledged by the user
(since 1st power-up).
600 31 “CUT/COAG STUCK” [SOFT] Activation input signal stuck.
Handswitch or footswitch/wireless
footswitch cut or coag button/pedal stuck.
Refer to table 9.1 for list of scenarios that
will cause this fault.
The above faults will be detected and reported within 1 second of occurring with the exception
of the 400-14 alarm which takes up to 1 minute. This fault code reports a fault in the electrode
identification circuit. This is also checked on power-up, at which time a fault would be detected
and reported immediately (200-71).

eRRoR aNd
faUlt SYmBolS,
tRoUBleShootING
GUIde
8-7
TROUBLESHOOTING GUIDE
The following troubleshooting guide describes potential problem causes and suggested
operator solutions. If the suggested actions do not resolve the problem, please contact
technical service.
Problem Suggestions/Solutions
No output power Check Handpiece Cable connections.
Check Electrode connection.
Contact technical service.
Generator resets during
activation (Fault Symbol 100.10)
Ensure no contact was made with other equipment
during activation.
Check grounding of Generator.
Check integrity of Electrode.
Fault indicator illuminates Check error code list for associated fault.
Unable to activate the Generator Check footswitch for damage.
Ensure correct footswitch is connected.
Ensure correctly paired wireless footswitch is being used.
Check connection of hand control probe.
Ensure correct activation device is selected.
Alarm tone too loud or too quiet Readjust volume.
Generator will remember the last volume setting used.
No display on the Generator Request assistance from qualified service engineer if
fault persists.
Check inlet fuses, replace with correct type.
See Appendix A for fuse specifications.
Contact customer service if problem persists.
Generator displays “ATTACH
INSTRUMENT” symbol when
Handpiece Cable is inserted
Remove connector and inspect pins for damage.
Check that connector is fully inserted.
Check for damage to Cable.
Generator displays “ATTACH
ELECTRODE” symbol after
Electrode is inserted
Ensure the connector contacts are clean and dry and have
not been damaged. Check Electrode integrity. Ensure that
only DePuy Mitek approved Electrodes are being used.
Generator overheats (Fault
Symbol 300.10)
Ensure ambient temperature is within operating limits. Allow
Generator to cool down before re-use. Check sufficient
ventilation provided around Generator.
Accessory Fault
(Fault Symbol 300.14 or 300. 21)
Contact may have been made with other equipment during
activation such as the scope or other instrumentation. Note,
this may also occur when activation occurs in close proxim-
ity to such instruments. Remove the electrode from the joint
and inspect the accessories for damage. Check the acces-
sories by activating the electrode immersed in sterile irrigat-
ing fluid contained in a bowl, or similar, remote from patient
contact before proceeding with surgery. If the fault recurs,
first replace the electrode and check as above. If the fault
remains, replace the handpiece and check as above. If the
fault continues, contact DePuy Mitek Customer Service.

eRRoR aNd
faUlt SYmBolS,
tRoUBleShootING
GUIde
8-8
Problem Suggestions/Solutions
Output Shorted When working in a joint cavity the electrode tip may make
contact with metallic instrumentation close to the operative
site. As a safety measure, the generator will immediately
terminate activation and show a warning message with a
short alarm tone.
In the case of any short, remove the electrode from the joint
and inspect the accessories for damage. If the foot pedal
remains depressed activation will automatically restart
following a short period.
For TC electrodes, the ‘Output Shorted’ fault may be
cleared by releasing the BLUE pedal, in this instance acti-
vation will not automatically restart if the foot pedal remains
depressed. Check the accessories by activating the elec-
trode immersed in sterile irrigating fluid contained in a bowl,
or similar, remote from patient contact before proceeding
with surgery. If the fault recurs, first replace the electrode
and check as above. If the fault remains, replace the hand
piece and check as above. Do not use any accessory that
persistently faults. If the fault continues, contact DePuy
Mitek Customer Service, and discontinue use of accessory.
Unable to access temperature The Temperature Control mode is only enabled when an
appropriate TC electrode is connected.
Wired Footswitch inoperative Check the activation source has not been set to HAND
CONTROL or WIRELESS FOOTSWITCH.
Hand Control inoperative Check the activation source has not been set to WIRED or
WIRELESS FOOTSWITCH.
Wireless Footswitch inoperative Check the activation source has not been set to HAND
CONTROL or WIRED FOOTSWITCH.
Verify that the wireless footswitch has been correctly paired
with the generator.

techNIcal
SPecIfIcatIoNS
A-1
Appendix A
teChnICAl
speCIFICAtIons
In this section, “typical” refers to a specification that is within ± 20% of a stated value at room
temperature (25°C/ 77°F).
VAPR VUE GENERATOR SPECIFICATIONS
Dimensions (H x W x D): 5 in x 16 in x 16 in (13.5 cm x 41 cm x 41 cm)
Weight: 18 lb. (8kg) approximately
Transport and Storage Conditions
Ambient Temperature Range: 32 to 104°F (0 to 40°C)
Relative Humidity: 10% to 90%, non-condensing
Atmospheric Pressure: 500 to 1060 millibars
Operating Conditions
Ambient Temperature Range: 50 to 104°F (10 to 40°C)
Relative Humidity: 30% to 75%, non-condensing
Atmospheric Pressure: 700 to 1060 millibars
Power Supply
Regulation Voltage: 90 -132 Volts RMS, 207- 253 Volts RMS
Operating Range: nominal 100-120/230 V RMS 50/60Hz
Input Rating 1000 VA
Inlet Fuses: Time lag 10.0A (T10AH 250V)
Leakage Currents: Within limits of Class CF equipment as per IEC
Power Cord Applicable to the USA and Canada markets:
UL listed type SJT, SJE, SJO, SJTO minimum 18AWG
3 conductor rated minimum 60DEGC terminating in
molded-on or Hospital Grade attachment plug having 125V
minimum 15A configuration.
Alarm Volume: Adjustable between 40dBA (at minimum volume)
and greater than 65dBA (at maximum volume) at 1m.
NOTE
The audible signals present during RF activation follow the
specific requirements of IEC60601-2-2 and do not represent
alarm conditions. All other audible signals are not technical
alarm tones and do not follow IEC60601-1-8. The fault indicator
on the front panel indicates a Low Priority alarm condition.
Classification: Class 1 ordinary equipment as per IEC 60601-1.
Electrical: EMC: Group 1 Class A as per IEC 60601-1-2.
Defibrillator Proof, Type CF equipment with isolated
(CF) applied part. Each of the electrode terminals of
the Generator can withstand the effects of defibrillator
discharge.

techNIcal
SPecIfIcatIoNS
A-2
Liquid Spillage: Liquid Spillage as per IEC 60601-2-2. The Generator
enclosure will prevent reasonable amounts of liquid from
inter fering with the Generator’s safe and satisfactory
operation.
Intermittent Operation
The Generator is cooled by natural convection. Under maximum power setting and rated load
conditions the Generator is suitable for a 10 seconds on, 30 seconds off duty cycle for 1 hour.
Temperature Control Mode
Control range 45 - 95ºC
Display range 10 - 99ºC
Over temp indicator >8ºC above SET temperature
VAPR 3 WIRED FOOTSWITCH SPECIFICATIONS
CAT. NO. 225023
Rating IPX8
VAPR VUE WIRELESS FOOTSWITCH SPECIFICATIONS
CAT. NO. 227214
Rating IP68
OUTPUT WAVEFORM AND CHARACTERISTICS
Waveform
The RF output in V1/V2/V3 and COAG modes is a variable amplitude sinusoid
waveform varying between approximately 300kHz and 450kHz, corresponding
to minimum and maximum load impedance respectively. The RF output in CP
mode is a fixed amplitude sinusoidal waveform of approximately 360kHz.
Crest Factor V1, V2, V3, CP, BV1, BV2 and COAG
A nominal crest factor of 1.4 for all outputs. (NOTE: Crest factor for CP is for
pulse envelope during ON time).
Power V output (V1, V2, V3, BV1, BV2) maximum power 260W into 330 Ohms.
V output (COAG) maximum power 200W into 28 Ohms.
CP output for 228146, 228147 and 225028, maximum power 400W into 68 Ohms.
CP output for 225029, maximum power 260W into 68 Ohms.
CP output for 225030, maximum power 200W into 68 Ohms.
Maximum Voltages:
Mode
Maximum
(typical into 1K + 20%)
Maximum
(typical into open circuit + 20%)
V1 305V RMS 431V PK 340V RMS 480V PK
V2 368V RMS 520V PK 410V RMS 580V PK
V3 408V RMS 577V PK 453V RMS 640V PK
CP (part numbers 228146,
228147 and 225028)
408V RMS 577V PK 423V RMS 598V PK
CP (part numbers 225029
and 225030)
367V RMS 564V PK 372V RMS 570V PK
BV1 As V2 As V2
BV2 As V3 As V3
Coagulate 144V RMS 204V PK 159V RMS 225V PK
VAPR TC Coagulate 124V RMS 175V PK 131V RMS 184V PK
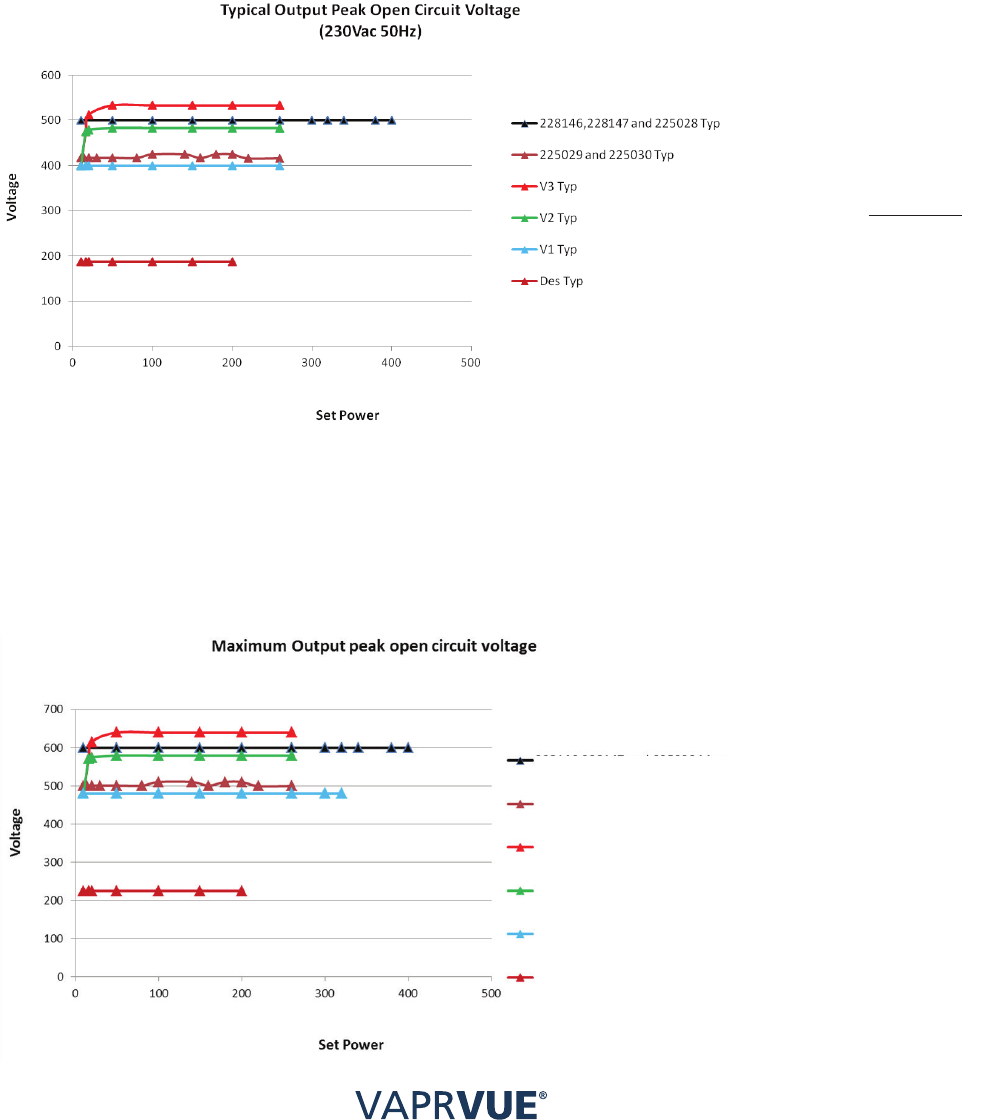
techNIcal
SPecIfIcatIoNS
A-3
NOTE
The following load curves apply to the fundamental power delivery capability of the generator alone.
They do not imply a given power output for any given electrode and cable configuration when used
with the generator. Each accessory will self-impose an upper set power limit for the generator, the
value of which will be equal to or below the maximum power delivery capability of the generator.
NOTE
In the following curves, “DES” refers to COAG mode. BV1 power output (a composite
waveform of V2 and COAG) will be equal or less than V2 output depending on load. BV2 power
output (a composite waveform of V3 and COAG) will be equal or less than V3 output depending
on load. BV1 and BV2 are blended outputs which are a composite waveform based upon 50%
duty cycle for ABLATE and 50% duty cycle for COAG, alternating at 30 Hz.
Figure A-1. Typical Output Peak Open Circuit Voltage (230VAC 50Hz)
CAUTION
The measurements indicated above are the averaged measurements from a number of generators
and are subject to +/- 20% tolerance. Please refer to the graph below and the table on Page A -2
for the maximum voltage values.
Figure A-2. Maximum Output Peak Open Circuit Voltage (230VAC 50Hz)
228146, 228147 and 225028 Max
225029 and 225030 Max
V3 Max
V2 Max
V1 Max
Des Max
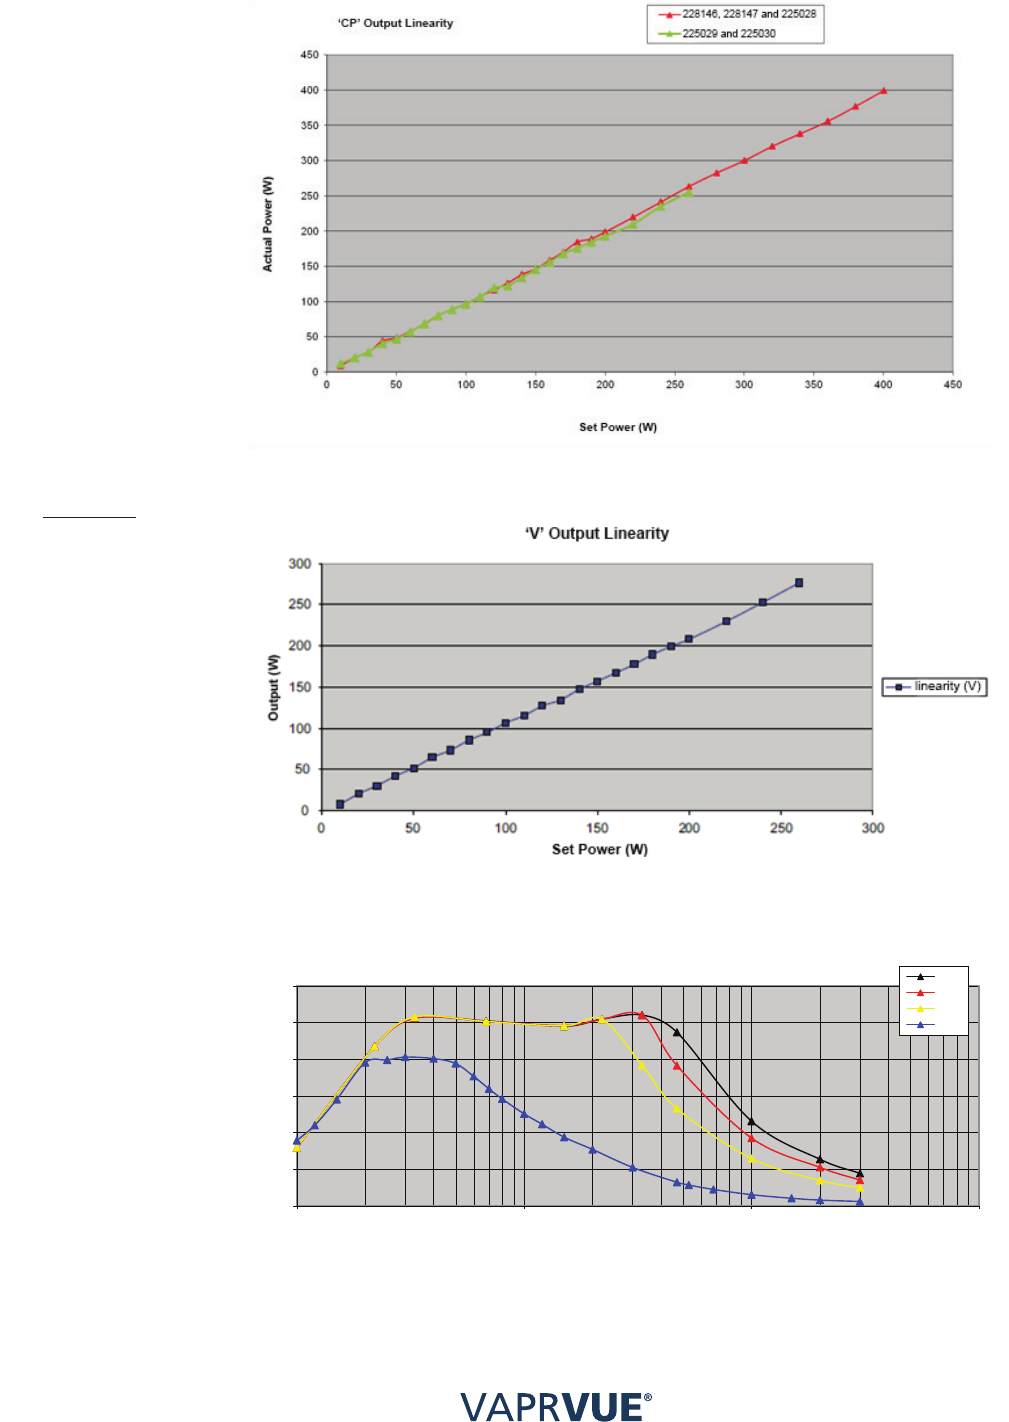
techNIcal
SPecIfIcatIoNS
A-4
Figure A-3. Output Linearity in to rated load 68R
Figure A-4. Typical Output Peak Open Circuit Voltage
Figure A-5. Full Power V3, V2 and V1@ 260W; DES@ 200W 240V
0
50
100
150
200
250
300
10 100 1000 10000
Full Power V3, V2 & V1 @ 260W; DES @ 200W
240V
Resistance (R)
Full Power V3, V2 & V1 @ 260W; DES @ 200W
240V V3
V2
V1
DES
Resistance (R)
Power (W)
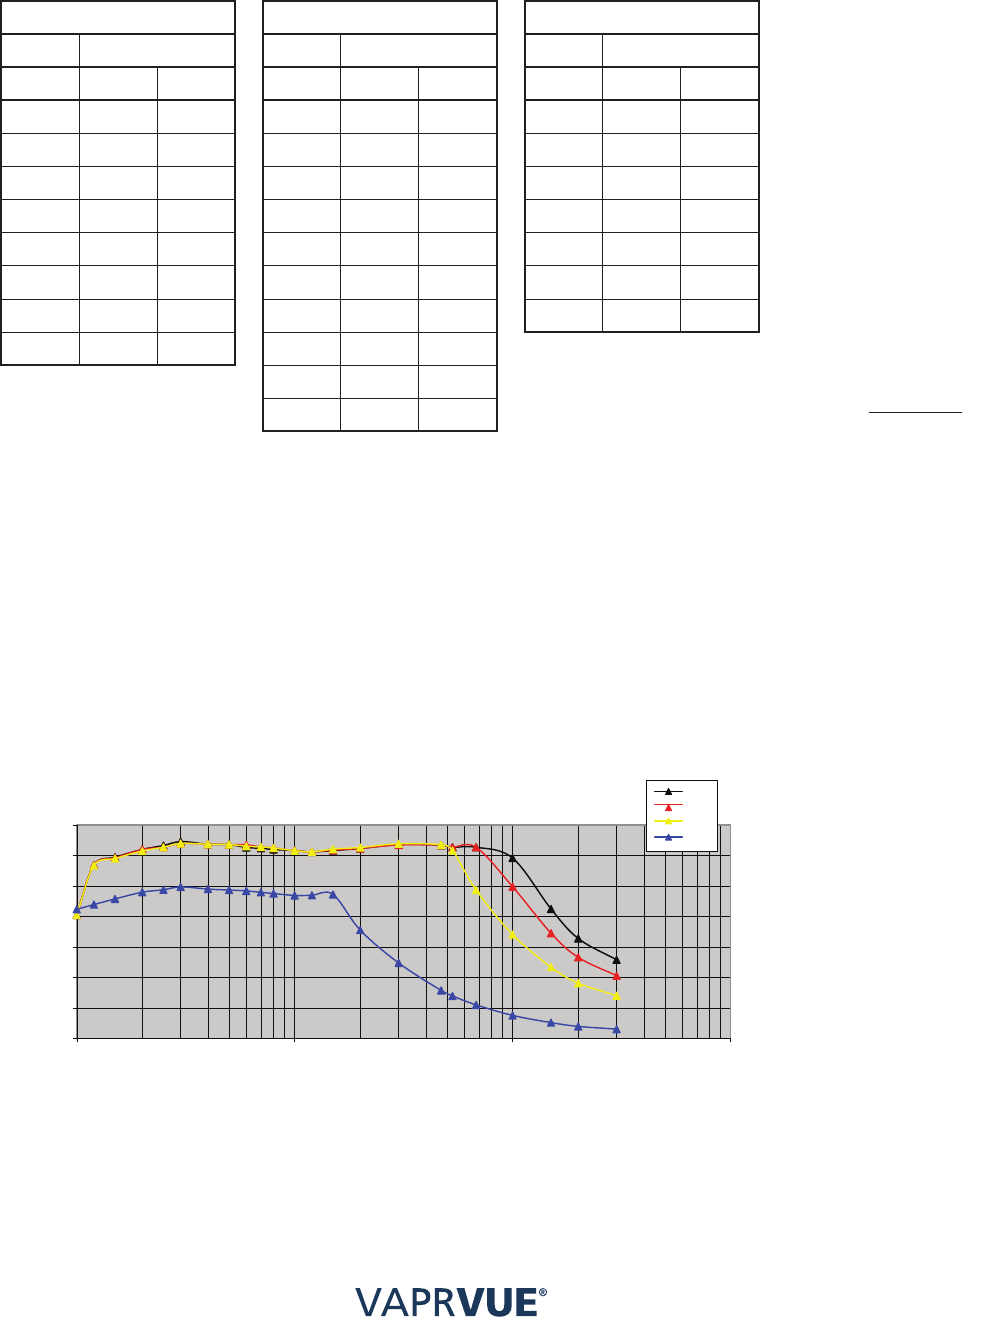
techNIcal
SPecIfIcatIoNS
A-5
BASIC-ADVANCED Equivalency Tables
NOTE
The equivalent values for ADVANCED and BASIC mode vary by Electrode type. Refer to the
Electrode Instructions for Use to confirm the BASIC-ADVANCED Equivalency Table for the
specific Electrode type.
Ablation CP Ablation Coagulation
BASIC ADVANCED BASIC ADVANCED BASIC ADVANCED
Value Lower Upper Value Lower Upper Value Lower Upper
1 10 10 1 10 10 1 10 10
2 20 45 2 100 140 2 20 45
3 50 60 3 150 190 3 50 80
4 80 110 4 200 220 4 90 110
5 120 140 5 240 260 5 120 150
6 160 180 6 280 280 6 160 180
7 200 240 7 300 300 7 190 200
8 260 260 8 320 320
9 340 340
10 360 400
NOTE
In ADVANCED mode, output power can be adjusted in finer increments than in BASIC mode.
NOTE
When an instrument is attached, switching between ADVANCED and BASIC User Mode after
adjusting the power output settings will reset the power output values to the default settings for
the specific electrode type. The Mode button must be pressed to confirm use.
The power values for load resistances below 20 Ohms are shown for the Biomed test instru-
ment (Biomedical Engineering and Service use only). For all other instruments the generator
will display “OUTPUT SHORTED.”
Figure A-6. Half Power V3, V2, V1 @ 130W; DES @ 100W 240V
0.00
20.00
40.00
60.00
80.00
100.00
120.00
140.00
10 100 1000 10000
Half Power V3, V2 & V1 @ 260W; DES @ 200W
240V
Resistance (R)
Half Power V3, V2 & V1 @ 130W; DES @ 100W
240V
V3
V2
V1
DES
Resistance (R)
Power (W)
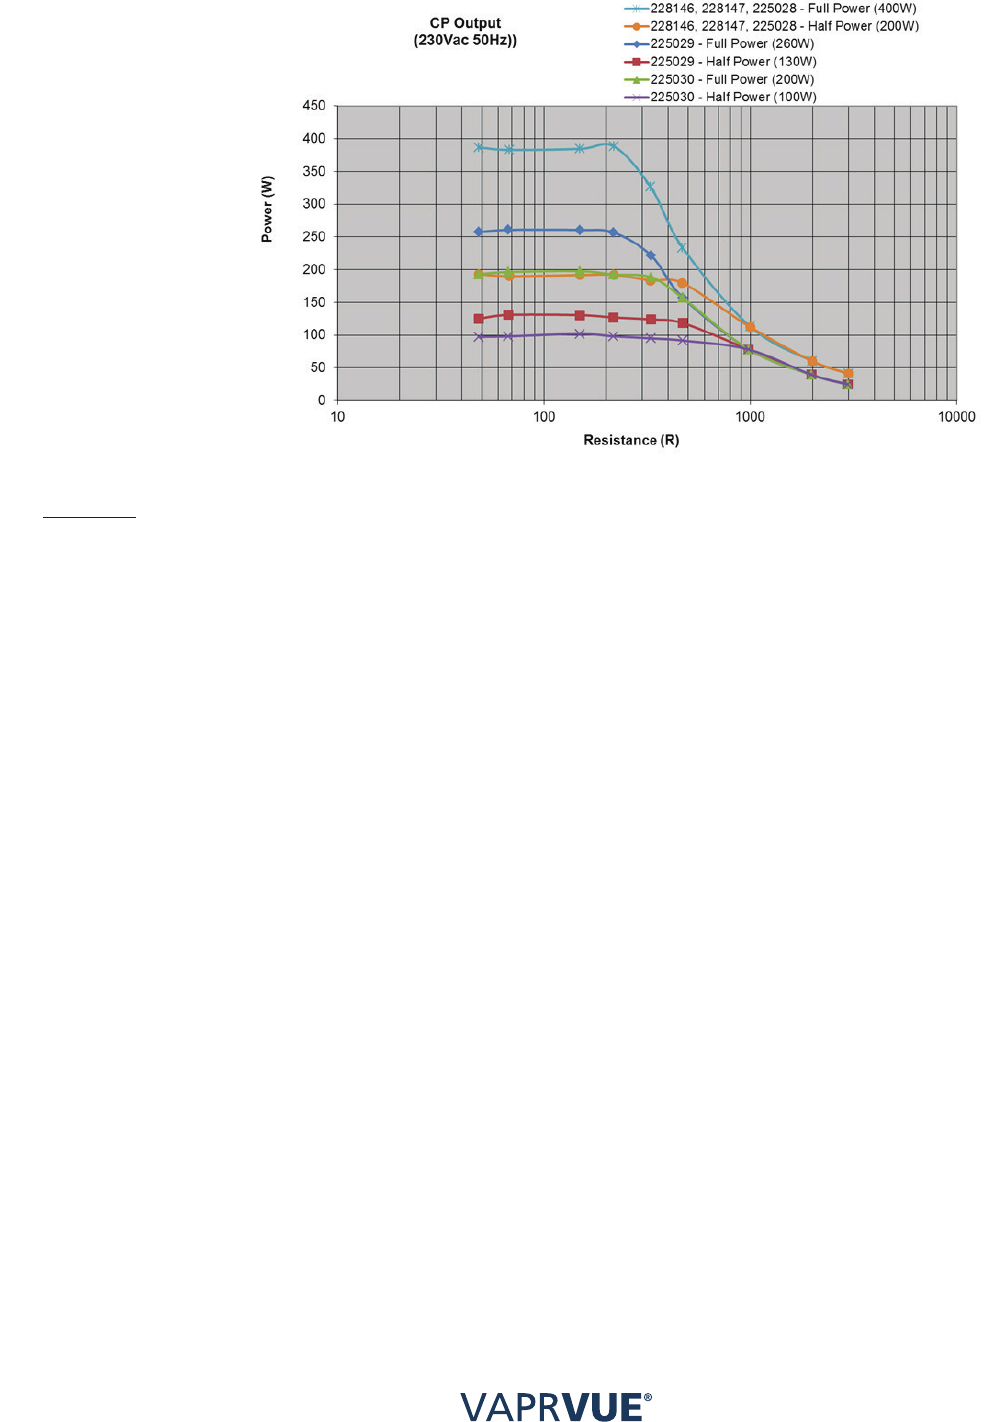
techNIcal
SPecIfIcatIoNS
A-6
Figure A-7. CP Output (230VAC 50Hz)

techNIcal
SPecIfIcatIoNS
A-7
Equipment fault
Refer to instruction manual/booklet
Refer to instruction manual/booklet
Non-ionizing radiation. This equipment intentionally emits RF
energy during activation.
Defibrillator-proof type CF equipment.
This equipment provides a degree of protection against electric
shock to TYPE CF as defined in IEC 60601-1. This equipment has
an F type applied part capable of withstanding the effects of defi-
brillator discharge.

techNIcal
SPecIfIcatIoNS
A-8
This symbol indicates the conductor that may be used to provide
potential equalization between the equipment and the installations
bus bar.
This symbol indicates that the product contains less than the
maximum concentration value of all six hazardous substances.
This symbol identifies that products contain certain toxic or
hazard ous substances or elements, and can be used safely during
its environmental protection use period. The number in the middle
of the logo indicates the environmental protection use period (# of
years) for the electronic information product. The logo also
signifies that the product should be recycled immediately after its
environ mental protection use period has expired.
MEDICAL - APPLIED CURRENT/ENERGY
EQUIPMENT AS TO ELECTRICAL SHOCK,
FIRE AND MECHANICAL HAZARDS ONLY
ES60601-1 (2005) + AMD 1 (2012),
CAN/CSA-C22.2 No. 60601-1 (2014),
IEC 60601-2-2 (2009),
IEC 60601-1-8 (2006, A1: 2012),
IEC 60601-1-6 (2010, A1: 2013)
21FA

emc taBle
B-1
Appendix B
emC tABles
Guidance and Manufacturer’s Declaration –
Electromagnetic Emissions
The VAPR VUE GENERATOR is intended for use in the electromagnetic environment specified
below. The customer or the user of the VAPR VUE GENERATOR should assure that it is used
in such an environment.
Emissions Test Compliance Electromagnetic Environment – Guidance
RF Emissions CISPR 11 Group 1 The VAPR VUE GENERATOR uses RF energy
only for its internal function. Therefore, its RF
emissions are very low and are not likely to cause
any interference in nearby electronic equipment.
RF Emissions CISPR 11 Class A The VAPR VUE GENERATOR is suitable for use
in all establishments other than domestic and
those directly connected to the public low voltage
power supply network that supplies buildings
used for domestic purposes.
Harmonic Emissions
IEC 61000-3-2
Class A
Voltage Fluctuations /
Flicker Emissions
IEC 61000-3-3
Complies

emc taBle
B-2
Guidance and Manufacturer’s Declaration –
Electromagnetic Immunity
The VAPR VUE GENERATOR is intended for use in the electromagnetic environment specified
below. The customer or the user of the VAPR VUE GENERATOR should assure that it is used
in such an environment.
Immunity Test
IEC 60601
Test Level
Compliance
Level
Electromagnetic
Environment – Guidance
Electrostatic
Discharge (ESD)
IEC 61000-4-2
±6 kV Contact
±8 kV Air
±6 kV Contact
±8 kV Air
Floors should be wood,
concrete or ceramic tile.
If floors are covered with
synthetic material, the
relative humidity should be
at least 30%.
Electrical Fast
Transient / Burst
IEC 61000-4-4
±2 kV for Power
Supply Lines
±1 kV for Input /
Output Lines
±2 kV for Power
Supply Lines
±1 kV for Input /
Output Lines
Mains power quality
should be that of a typical
commercial or hospital
environment.
Surge
IEC 61000-4-5
±1 kV Differential
Mode
±2 kV Common
Mode
±1 kV Differential
Mode
±2 kV Common
Mode
Mains power quality
should be that of a typical
commercial or hospital
environment.
Voltage Dips,
short interrup-
tions and Voltage
Variations on
Power Supply
Input Lines
IEC 61000-4-11
<5 % UT (>95% Dip
in UT) for 0.5 Cycle
40% UT
(60% Dip in UT)
for 5 Cycle
70% UT
(30% Dip in UT)
for 25 Cycle
<5% UT
(>95% Dip in UT)
for 5 sec
<5 % UT (>95%
Dip in UT) for
0.5 Cycle
40% UT
(60% Dip in UT)
for 5 Cycle
70% UT
(30% Dip in UT)
for 25 Cycle
<5% UT
(>95% Dip in UT)
for 5 sec
Mains power quality
should be that of a typical
commercial or hospital
environment.
If the user of the VAPR VUE
GENERATOR requires
continued operation during
power mains interruptions,
it is recommended that the
VAPR VUE GENERATOR
be powered from an unin-
terruptible power supply or
a battery.
NOTE
UT is the AC mains voltage prior to application of the test level.
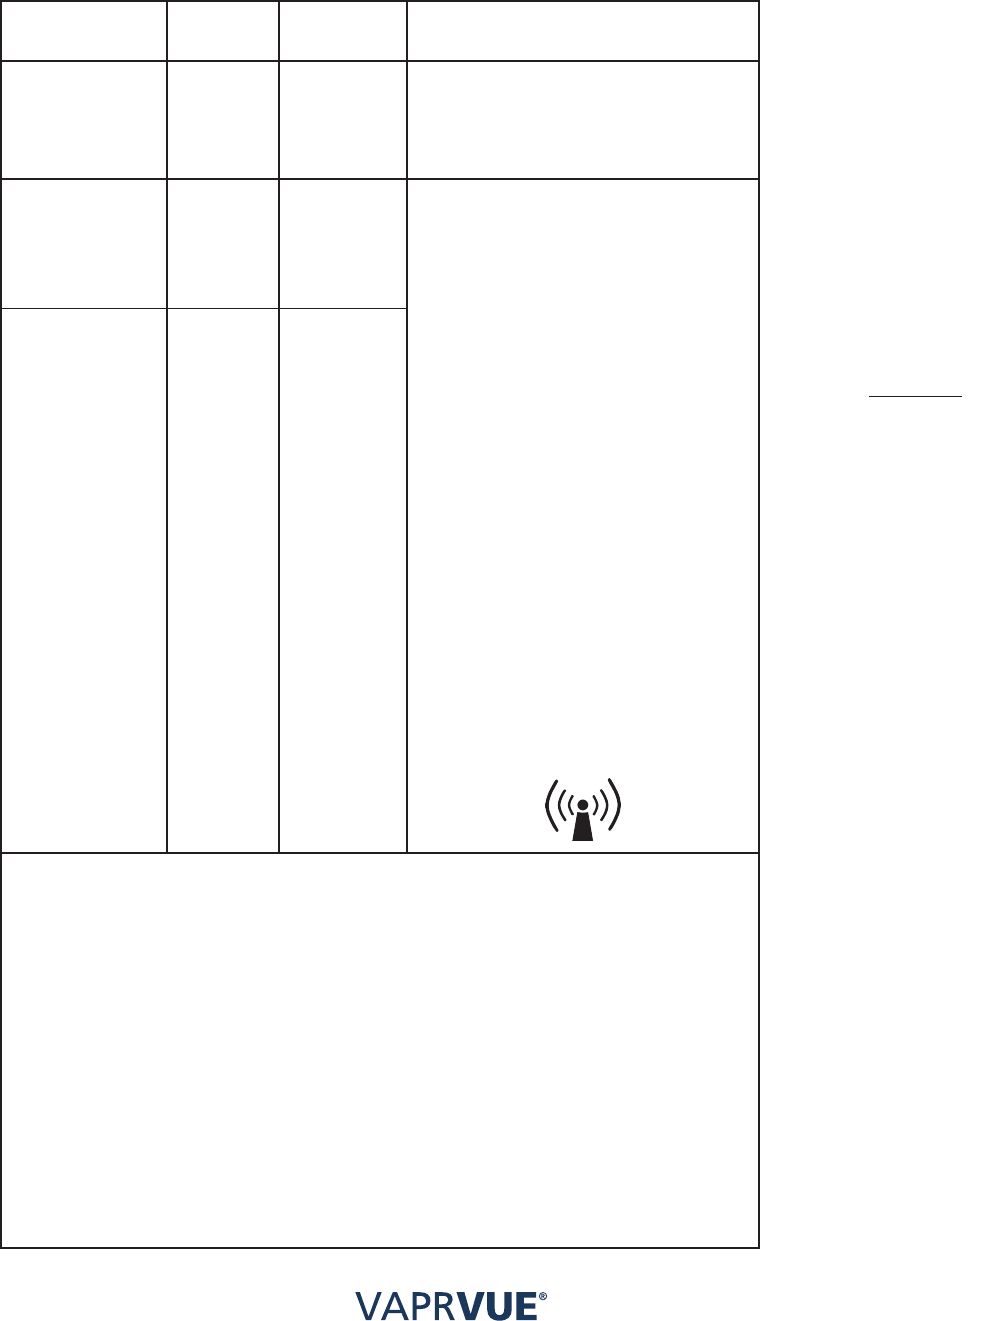
emc taBle
B-3
Guidance and Manufacturer’s Declaration –
Electromagnetic Immunity
The VAPR VUE GENERATOR is intended for use in the electromagnetic environment specified
below. The customer or the user of the VAPR VUE GENERATOR should assure that it is used
in such an environment.
Immunity Test
IEC 60601
Test Level
Compliance
Level
Electromagnetic Environment –
Guidance
Power Frequency
(50/60 Hz)
Magnetic Field
IEC 61000-4-8
3 A/m 3 A/m Power frequency magnetic fields should
be at levels characteristic of a typical
location in a typical commercial or
hospital environment.
Conducted RF
IEC 61000-4-6
3 Vrms
150 kHz to
80 MHz
3 V Portable and mobile RF communications
equipment should be used no closer to
any part of the VAPR GENERATOR,
including cables, than the recommended
separation distance calculated from the
equation applicable to the frequency
of the transmitter. Recommended
Separation Distance.
d = [1.17]√P
d = [1.17]√P 80 MHz to 800 MHz
d = [2.33]√P 800 MHz to 2.5 GHz
Where P is the maximum output
power rating of the transmitter in
watts (W) according to the transmitter
manufacturer and d is the recommended
separation distance in meters (m).
Field strengths from fixed RF transmitters,
as determined by an electromagnetic site
survey (a) should be less than the com-
pliance level in each frequency range (b).
Interference may occur in the vicinity
of equipment marked with the
following symbol:
Radiated RF
IEC 61000-4-3
3 Vrms
80 MHz to
2.5 GHz
3 V/m
NOTE 1
At 80 MHz and 800 MHz, the higher frequency range applies.
NOTE 2
These guidelines may not apply in all situations. Electromagnetic propagation is affected by
absorption and reflection from structures, objects and people.
a)
Field strengths from fixed transmitters, such as base stations for radio (cellular/cordless)
telephones and land mobile radios, amateur radio, AM and FM radio broadcast and TV
broadcast cannot be predicted theoretically with accuracy. To assess the electromagnetic
environment due to fixed RF transmitters, an electromagnetic site survey should be considered.
If the measured field strength in the location in which the VAPR VUE GENERATOR is used
exceeds the applicable RF compliance level above, the VAPR VUE GENERATOR should be
observed to verify normal operation. If abnormal performance is observed, additional measures
may be necessary, such as reorienting or relocating the VAPR VUE GENERATOR.
b) Over the frequency range 150 kHz to 80 MHz, field strengths should be less than 3 V/m.

emc taBle
B-4
Recommended Separation Distances between Portable
and Mobile RF Communications Equipment and the
VAPR VUE GENERATOR
The VAPR VUE GENERATOR is intended for use in an electromagnetic environment in
which radiated RF disturbances are controlled. The customer or the user of the VAPR VUE
GENERATOR can help prevent electromagnetic interference by maintaining a minimum
distance between portable and mobile RF communications equipment (transmitters) and the
VAPR VUE GENERATOR as recommended below, according to the maximum output power of
the communications equipment.
Rated Maximum
Output Power of
Transmitter (W)
Separation Distance According to Frequency of Transmitter (m)
150 kHz to 80 MHz
d = [3.5/V1]√P
80 MHz to 800 MHz
d = [3.5/E1]√P
800 MHz to 2.5 GHz
d = [7/E1]√P
0.01 0.12 0.12 0.23
0.1 0.37 0.37 0.74
1 1.17 1.17 2.33
10 3.69 3.69 7.38
100 11.67 11.67 23.33
For transmitters rated at a maximum output power not listed above, the recommended
separation distance d in meters (m) can be estimated using the equation applicable to the
frequency of the transmitter, where P is the maximum output power rating of the transmitter
in watts (W) according to the transmitter manufacturer.
NOTE 1
At 80 MHz and 800 MHz, the separation distance for the higher frequency range applies.
NOTE 2
These guidelines may not apply in all situations. Electromagnetic propagation is affected by
absorption and reflection from structures, objects and people.
FCC warning statement:
• This device complies with Part 15 of the FCC Rules.
Operation is subject to the following two conditions:
(1) This device may not cause harmful interference, and
(2) This device must accept any interference received, including interference that may
cause undesired operation.
• This equipment complies with FCC radiation exposure limits set forth for an uncontrolled
environment. End users must follow the specific operating instructions for satisfying
RF exposure compliance. This transmitter must not be co-located or operating in
conjunction with any other antenna or transmitter.
• Changes or modifications not expressly approved by the party responsible for
compliance could void the user’s authority to operate the equipment.

WaRRaNtY aNd
SeRvIce
C-1
Appendix C
WArrAnty AnD servICe
DePuy Mitek products are guaranteed to be free from defects in material and workmanship
for the warranty period of a particular product, beginning from date of invoice.
Contact your DePuy Mitek representative for specific product warranty information.
DePuy Mitek offers an expedited service replacement program for its products to
minimize downtime in your operating room. For a return authorization number or for
additional information on this program, call DePuy Mitek Customer Service at +1 (800)
382-4682 and choose Option 5 in the United States or contact your DePuy Mitek
representative.

acceSSoRIeS
D-1
Appendix D
ACCessorIes
NOTE
Not all electrodes are available in all countries. Consult your local sales representative for availability.
The following Electrodes and accessories are compatible with the VAPR VUE system:
Part Number Product Description
225002 VAPR® Handpiece
REUSABLE
225023 VAPR® 3 Footswitch
REUSABLE
227214 VAPR® VUE™ Wireless Footswitch
REUSABLE
225303 VAPR® End Effect Electrode
3.5 mm x 160 mm
225301 VAPR® Side Effect Electrode
3.5 mm x 160 mm
225305 VAPR® 90 Degree Hook Electrode
3.5 mm x 160 mm
225304 VAPR® Angled End Effect Electrode
3.5 mm x 160 mm
225302 VAPR® Angled Side Effect Electrode
3.5mm x 160 mm
225201 VAPR® 2.3 Side Effect Electrode
140 mm
225202 VAPR® 2.3 End Effect Electrode
140 mm
225211 VAPR® 2.3 Side Effect Electrode (Short)
85 mm
225213 VAPR® 2.3 Wedge Electrode (Short)
85 mm
225203 VAPR® 2.3 Wedge Electrode
140 mm
225312 VAPR® Flexible Side Effect Electrode
3.5 mm x 160 mm
225314 VAPR® Flexible End Effect Electrode
3.5 mm x 160 mm
227301 VAPR® Side Effect Electrode
3.5 mm Side Effect with Integrated Handpiece
227305 VAPR® Hook Electrode
3.5 mm Hook with Integrated Handpiece
227302 VAPR® Angled Side Effect Electrode
with Integrated Handpiece, 3.5 mm x 160 mm
227312 VAPR® Flexible Side Effect Electrode
with Integrated Handpiece, 3.5 mm x 160 mm
227203 VAPR® 2.3 Wedge Electrode
with Integrated Handpiece, 140 mm
227213 VAPR® 2.3 Wedge Electrode (Short)
with Integrated Handpiece, 85 mm
227211 VAPR® 2.3 Side Effect Electrode (Short)
with Integrated Handpiece, 85 mm

acceSSoRIeS
D-2
227202 VAPR® 2.3 End Effect Electrode (Short)
with Integrated Handpiece, 140 mm
225360 VAPR® LD Suction Electrode
4.0 mm x 160 mm
225361 VAPR® LP Suction Electrode
4.0 mm x 160 mm
225370 VAPR® S90 Electrode
4.0 mm, 90° Suction with Integrated Handpiece
227355 VAPR® S50 Electrode
50° Suction with Integrated Handpiece
227504 VAPR® Premiere50 Electrode
50° Suction with Integrated Handpiece
227204 VAPR® Premiere90 Electrode
90° Suction with Integrated Handpiece
227252 VAPR® Temperature Control End Effect Electrode
with Integrated Handpiece, 2.3 mm x 140 mm
225252 VAPR® Temperature Control End Effect Electrode
2.3 mm x 140 mm
228147 VAPR® COOLPULSE® 90 Electrode with Hand Controls
90° Suction with Integrated Handpiece
228146 VAPR® COOLPULSE® 90 Electrode
90° Suction with Integrated Handpiece
228203 VAPR® 2.3 Wedge Electrode with Hand Controls
2.3mm with Integrated Handpiece
228300 VAPR® Side Effect Electrode with Hand Controls
3.5mm Side Effect with Integrated Handpiece
228305 VAPR® Hook Electrode with Hand Controls
3.5mm Hook Electrode with Integrated Handpiece
228370 VAPR® S90 Electrode with Hand Controls
4.0mm, 90° Suction with Integrated Handpiece
228504 VAPR® Premiere50 Electrode with hand Controls
3.0mm, 50° Suction with Integrated Handpiece
225028 VAPR® TRIPOLAR 90° Suction Electrode with Integrated Handpiece
225029 VAPR® ARCTIC™ Suction Electrode with Dome Tip
225030 VAPR® ARCTIC™ Suction Electrode with Chisel Tip

*
*
DePuy Mitek, Inc. Medos International SARL
325 Paramount Drive Chemin-Blanc 38
Raynham, MA 02767, USA 2400 Le Locle, Switzerland
1-800-356-4835
* For recognized manufacturer, refer to product label.
US Representative DePuy International Ltd.
DePuy Mitek, Inc. St Anthony’s Road
325 Paramount Drive Leeds LS11 8DT England
Raynham, MA 02767, USA Tel: +44 113 270 0461
1-800-356-4835 Fax: +44 113 272 4101
Manufactured for DePuy Mitek by:
Gyrus Medical Ltd,
Fortran Road, St Mellons,
Cardiff, CF30LT, UK
P/N: 110009-EN Rev: J