Dericam Technology S1 IP Camera User Manual
Shenzhen Dericam Technology Co., Ltd. IP Camera Users Manual
Users Manual

www.dericam.com-Shenzhen Dericam Technology Co.,Ltd
User Manual
Dericam HD IP Camera-Sx Series
V1.0.1

www.dericam.com-Shenzhen Dericam Technology Co.,Ltd
Contents
Welcome .................................................................................................................................. 5
1 Features and Specifications .............................................................................................. 7
1.1 Overview ........................................................................................................................ 7
1.2 Features......................................................................................................................... 7
1.3 Specifications ................................................................................................................ 8
2 Camera Connection and Installation ................................................................................ 9
2.1 Connection Guide ........................................................................................................ 9
2.2 Installation Guide ......................................................................................................... 9
2.3 Default Username and Password .............................................................................. 9
3 Access the camera ............................................................................................................ 10
3.1 Mobile device access ................................................................................................ 10
3.2 Web browser access ................................................................................................. 10
3.2.1 SearchTool for Windows OS ................................................................... 10
3.2.2 SearchTool for Mac OS ........................................................................... 11
3.2.3 Access by IP address and http port ......................................................... 13
3.2.4 Remote access........................................................................................ 16
3.3 NVR access ................................................................................................................ 16
3.4 RTSP access .............................................................................................................. 16
4 App for Mobile Device ....................................................................................................... 19
4.1 Add Camera ................................................................................................................ 19
4.1.1 Set up a new camera............................................................................... 19
4.1.2 Set up an existing camera. ...................................................................... 23
4.2 Camera list page ........................................................................................................ 24
4.3 Live view page ............................................................................................................ 25
4.4 Settings pages ............................................................................................................ 27
4.4.1 Edit Password ......................................................................................... 27
4.4.2 Alarm Settings ......................................................................................... 27
4.4.3 Alarm link settings ................................................................................... 27
4.4.4 Timed recording settings ......................................................................... 28

www.dericam.com-Shenzhen Dericam Technology Co.,Ltd
4.4.5 Audio settings .......................................................................................... 28
4.4.6 Video settings .......................................................................................... 28
4.4.7 Wifi settings ............................................................................................. 29
4.4.8 SD Card settings ..................................................................................... 29
4.4.9 Device time settings ................................................................................ 29
4.4.10 Email settings ........................................................................................ 30
4.4.11 FTP settings .......................................................................................... 30
4.4.12 System settings ..................................................................................... 30
4.4.13 Device information ................................................................................. 31
4.5 Local files page ........................................................................................................... 31
4.6 Playback page ............................................................................................................ 32
5 Web User Interface for operation .................................................................................... 33
5.1 Login page................................................................................................................... 33
5.2 Live page ..................................................................................................................... 33
5.2.1 OSD ........................................................................................................ 33
5.2.2 Pan/Tilt control ........................................................................................ 34
5.2.3 View ........................................................................................................ 34
5.2.4 Preset ...................................................................................................... 34
5.2.5 ImageSettings ......................................................................................... 35
5.2.6 Tool bar ................................................................................................... 35
5.3 Playback page(Only for IE/Firefox browser in windows) ..................................... 37
5.3.1 Search and playback videos .................................................................... 37
5.3.2 Tool bar ................................................................................................... 38
5.4 Configuration page ..................................................................................................... 38
5.4.1 Media settings ......................................................................................... 38
5.4.2 Network ................................................................................................... 40
5.4.3 Alarm ....................................................................................................... 42
5.4.4 Advance .................................................................................................. 44
5.4.5 System .................................................................................................... 48
6. Frequently Asked Questions .......................................................................................... 51

www.dericam.com-Shenzhen Dericam Technology Co.,Ltd

www.dericam.com-Shenzhen Dericam Technology Co.,Ltd
Welcome
Thank you for purchasing a Dericam HD IP camera! This user manual will help you
become familiar with our camera in a very short time. Before installation and operation,
please read the below safeguards and warnings carefully.
Important Safeguards and Warnings
In order to keep your camera secure and prevent unauthorized access, please make sure
to follow the steps below:
-Always make sure your camera has the latest firmware as listed on www.dericam.com.
-Never use the default password for your camera. Always ensure your password is at
least 8-10 characters long and contains a combination of lowercase characters,
uppercase characters as well as numbers.
Electrical Safety
All installations and operations here should conform to your local electrical safety
codes.
We assume no liability or responsibility for any of the fires or electrical shocks caused
by improper handling or installation.
We are not liable for any problems caused by unauthorized modifications or
attempted repair.
Improper battery use may result in fire, explosion, or personal injury.
When replacing the battery, please make sure you are using the same model.
This product must be grounded to reduce the risk of electric shock.
Transportation Security
Heavy stress, violent vibrations, and excess moisture should not occur during transportation,
storage, and installation of the device.
Installation
Handle the device with care. Keep the device right side up.
Do not apply power to the camera before completing installation.
Do not place objects on top of the camera.
Repair Professionals
All the examination and repair work should be done by qualified service engineers.
We are not liable for any problems caused by unauthorized modifications or user-attempted
repair.
Environment

www.dericam.com-Shenzhen Dericam Technology Co.,Ltd
The camera should be kept in a cool, dry place away from direct sunlight, flammable materials,
explosive substances, etc.
This product should be transported, stored, and used only in the specified environments as
stated above.
Do not aim the camera at a strong light source, as it may cause overexposure of the picture,
and may affect the longevity of the camera’s sensors.
Ensure that the camera is in a well ventilated area to prevent overheating.
Operation and Maintenance
Do not touch the camera sensor or lens directly.
To clean dust or dirt off of the lens, use an air blower or a microfiber cloth.
Accessories
Be sure to use only the accessories recommended by manufacturer.
Before installation, please open the package and check to ensure that all of the components
are present.
Contact the retailer that you purchased from, or Dericam directly if anything is broken or
missing in the package.
Check Hardware
When you receive the product in the packaging, unpack it, and check all sides of the
product for any physical damage. The protective materials used in the packaging of the
product can protect most accidental damage during transportation, but to ensure that your
equipment is operating as expected, it is recommended to inspect the product before
proceeding further.
On the product, check specifically that the label on the bottom of the product is not
damaged. The serial number of the unit is often needed to provide support.
Please check that all required items for your camera are present and accounted for. If any
item is missing, please contact us as soon as possible so we can send you the missing
component.
Note: Hardware does not look exactly as pictured in this section, but the steps to
assemble the hardware are the same.

www.dericam.com-Shenzhen Dericam Technology Co.,Ltd
1 Features and Specifications
1.1 Overview
The Dericam IP Camera is an excellent digital surveillance product that can be useful to a
wide variety of users. The camera connects to any router, and uses an internet connection
to allow the user to access all of its functionality from many internet connected devices.
It’s easy to use and can be set up in a relatively small amount of time. It has various
functions such as recording, playback, and monitoring functionality and it synchronizes
audio and video by default.
The Dericam IP camera connects to a wide variety of routers in order to connect to the
internet, both through a wired connection and wirelessly. Once setup, the camera can be
accessed remotely from a wide variety of internet connected devices, including PC,
iPhone, iPad, Android tablet, and Android phone.
This Dericam IP Camera adopts a high-quality design in order to achieve high levels of
reliability and security. It can be configured to work locally, as well as on a network. It also
has a built-in WiFi adapter that allows for the camera to be used on a wireless network,
without needing a physical connection to a router or PC.
1.2 Features
The Dericam IP Camera has the following main features:
HD Resolution
It is an integrated wireless IP Camera with a color CMOS sensor which enable to view in
High Definition resolution. It combines a high quality digital video camera, with a powerful
web server, to bring clear video to your desktop and mobile devices no matter where by
your local network or over the Internet.
P2P function
It supports P2P connection. You don’t need to make complicated Port Forwarding and
DDNS settings, you just need to add it into Dericam App, then you can access it over the
Internet.
H.264 Encoding
It provides users with more comprehensive controls over a monitored site. It supports
H.264 video compression technology, dramatically reduces file size and saves network
bandwidth.
Web access
It is designed for surveillance with wide applications such as at home, in retail store and in
office. Controlling the camera and managing images are simplified by using the provided
web interface across the network in either wired or wireless way.
Mobile device access
It provides “Dericam” App for mobile device, please search and install App named

www.dericam.com-Shenzhen Dericam Technology Co.,Ltd
“Dericam” in App Store or Google Play, then you can view your camera anywhere,
anytime as you wish.
Advanced Playback Function
It supports real-time recording and can support search, fast forwarded playback, recorded
searches, and downloading of videos and screenshots. When recording, the Camera
shows a date/time overlay to ensure accurate viewing of events when they occurred.
1.3 Specifications
Camera
Image Sensor
1/3" 960P CMOS
Effective Pixels
1280 (H)x960(V)
Day/Night control
Auto(ICR) / Color / Black&White
Pan & Tilt
Horizon-355°, Vertical-90°
Memory slot
Miscro SD Card, up to 128GB
IR distance
20m
Smart Alerts
Motion Detection
Lens
Focal Length
2.8-12mm, 4x optical zoom
Max Aperture
F1.2
Angle of View
30-90°
Video
Resolution
Main Stream:720P (1280x720)+ VGA (640x480)
Sub Stream: VGA (640x480) + QVGA (320x240)
Video Bitrates
32Kbps ~ 6144Kbps
Video Frame Rate
25fps@720P
Image snapshot
Supported
Dual video stream
Supported
Network
Ethernet
RJ-45 (10/100Base-T)
Network Protocol
HTTP, FTP, TCP/IP, UDP, SMTP, DHCP, NTP, UPNP,
RTSP, Onvif, DDNS
Web browser
Windows: IE/Firefox/Chrome, Mac: Safari/Chrome
Smart Phone
Dericam App, IOS: iPhone+iPad, Android:
Smartphone+Tablet
Wifi
WiFi (802.11b/g), 2.4G only, supports
WEP/WPA-PSK/WPA2-PSK encryption
P2P
Supported
Max. User Access
3 users (Main stream) + 3 users (Sub stream)
General
Power Supply
DC 12V/1A
Power
Consumption
<8W
Working
Environment
-10℃~+60℃,10%~90% RH
Dimensions
250x225x145mm
Weight
1.5kg
www.dericam.com-Shenzhen Dericam Technology Co.,Ltd
2 Camera Connection and Installation
To make your experience with the Dericam camera easy and simple, we've provided
multiple ways to set up, view, and operate your camera as on your needs. Please set up
your camera in the way that works best for you.
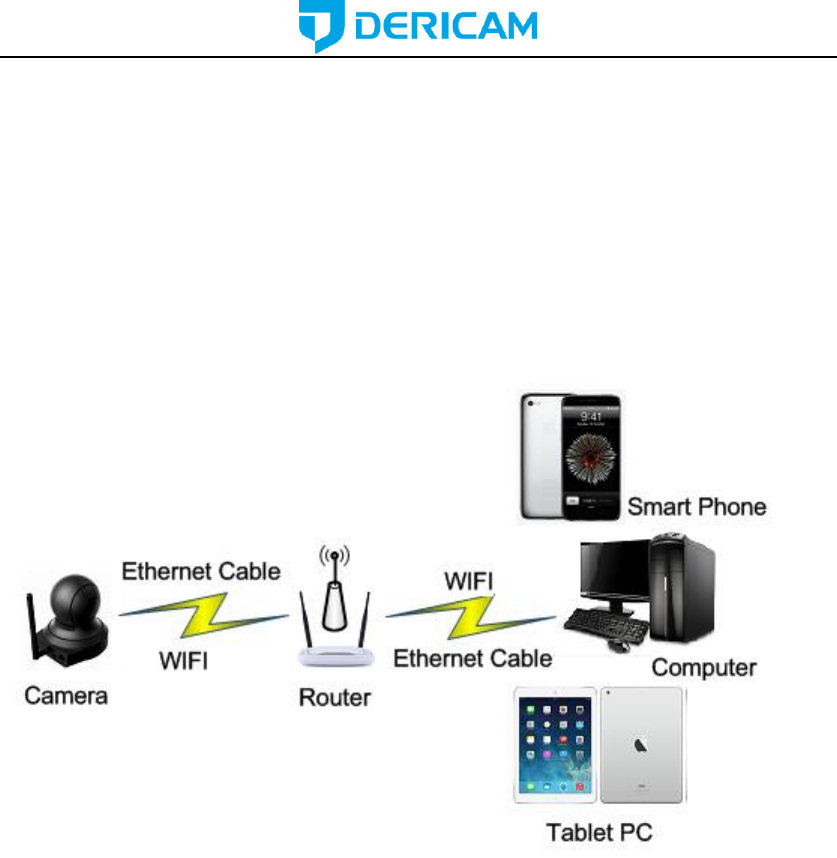
2.1 Connection Guide
The Dericam camera can be accessed through the web browser in computer or “Dericam”
App in smart phone or tablet PC. Before accessing, you should connect the camera to
your router by Ethernet cable or WIFI after it is powered on.
2.2 Installation Guide
The camera has a standard camera tripod screw hole (1/4-20 UNC thread) for use in
mounting the camera onto a stable surface.
Note: Prior to installation ensure that the installation environment can support at least 3
times the weight of the camera.
2.3 Default Username and Password
To login to the system for the first time, use one of the following default
username/password combinations. Once you’ve successfully logged in, it is highly
recommended to change the password for security reasons.
Username: admin
Password: admin
Note: Logging in for the first time will prompt the user to change the password to the
admin account.
www.dericam.com-Shenzhen Dericam Technology Co.,Ltd
3 Access the camera
3.1 Mobile device access
The Dericam camera can be accessed through the “Dericam” app on either iOS or
Android mobile devices. To access Dericam camera from a mobile device, please search
and install the “Dericam” App first from the Google Play or App Store.
3.2 Web browser access
The Dericam can be accessed through the web browser for both windows and Mac OS. It
supports the IE/Chrome/ Mozilla Firefox in windows and Safari/Chrome in Mas OS. The
web browser accessing can supports all advance features of Dericam camera.
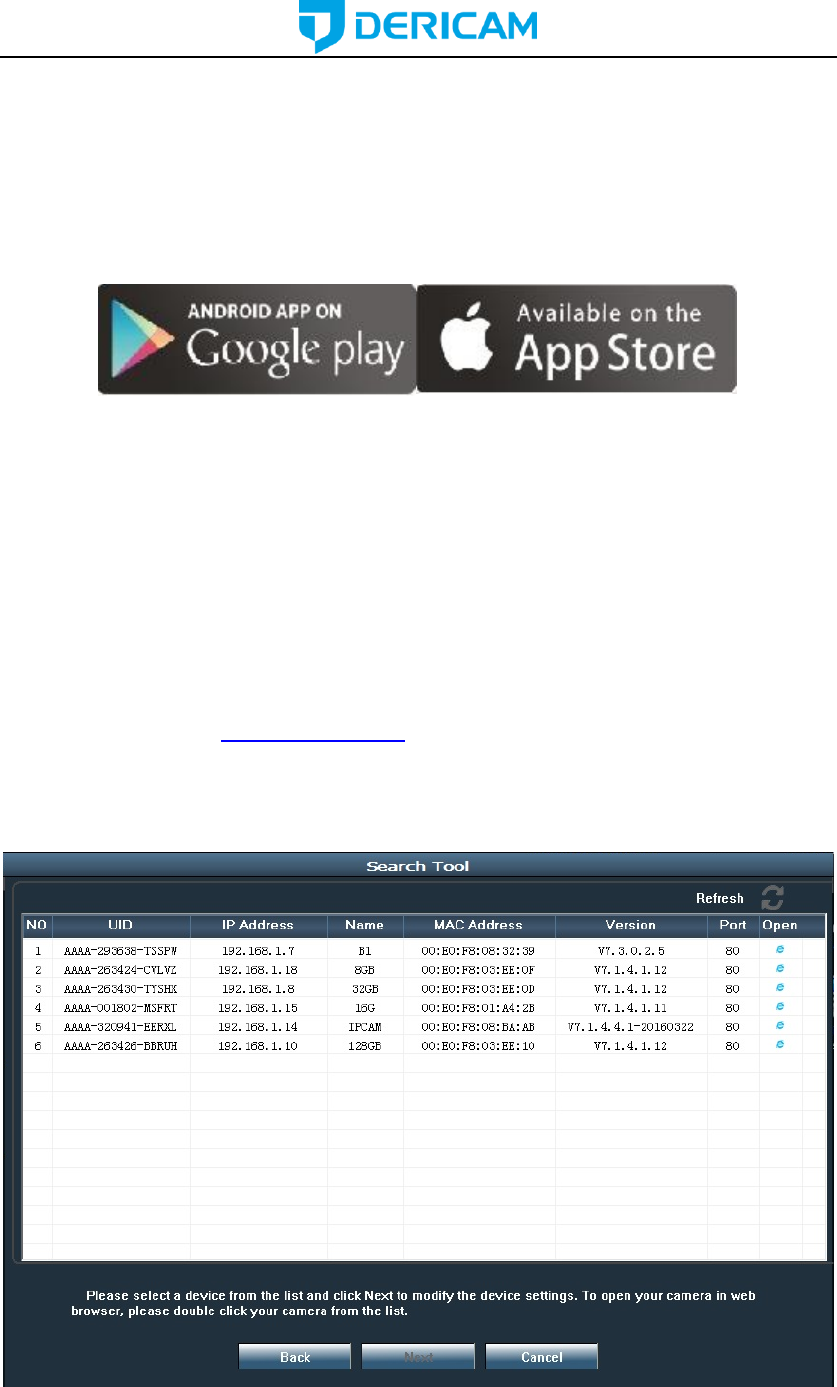
3.2.1 SearchTool for Windows OS
To easily search and access the Dericam camera in web browser of Windows OS, please
use the included CD to install and run the “SearchTool” for windows. Alternatively, you can
find the latest tool from www.dericam.com. Before running this tool, please ensure:
-The camera is connected to the router via an Ethernet cable or wifi.
-The camera and the PC are on the same local network.
-Using the IE/Chrome/Mozilla Firefox in Windows OS, the Safari/Chrome in Mac OS.
www.dericam.com-Shenzhen Dericam Technology Co.,Ltd
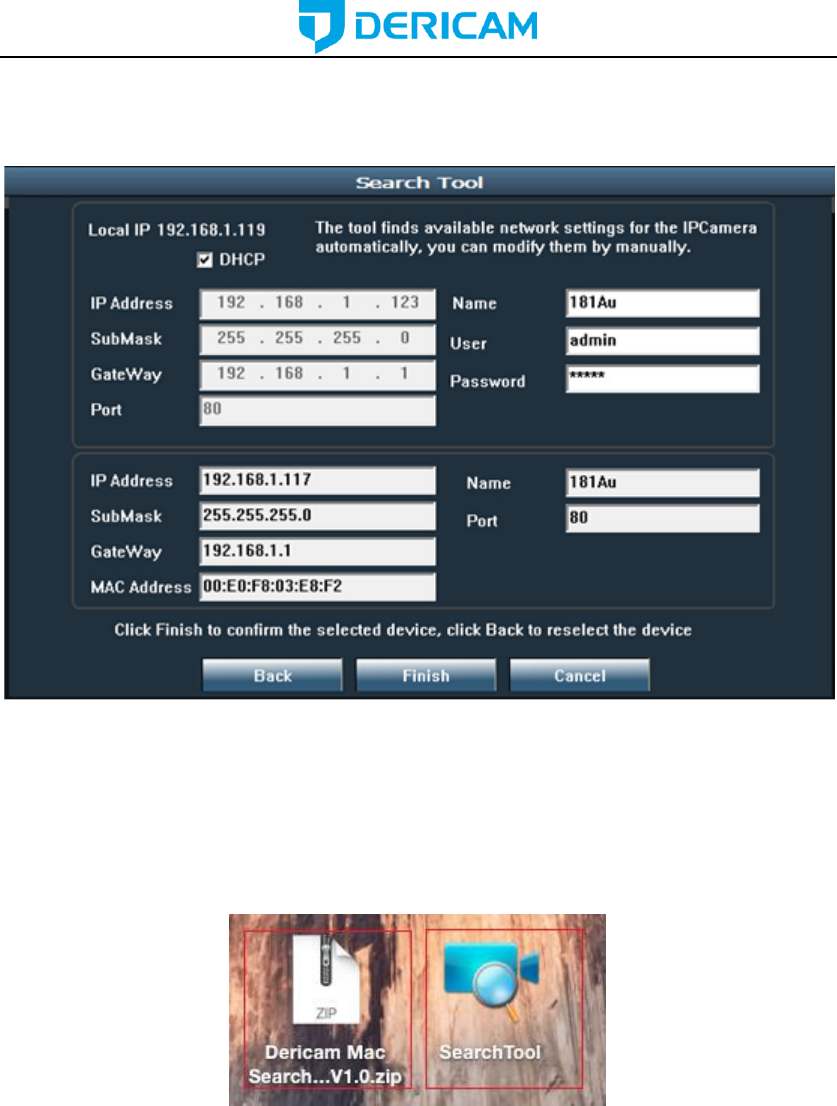
You can also modify some camera’s network configurations and camera name through
the SearchTool. Please ensure you have input the right username and password of the
camera to make your modifications valid.
3.2.2 SearchTool for Mac OS
You can find the “Dericam Mac SearchTool.zip” for Mac OS in the included mini CD.
Please copy and install it on your Mac computer. Then run the tool named “SearchTool” to
search the camera in your LAN. From the tool, you can get the name, UID, IP address,
Mac address, Http port and firmware version of the camera.
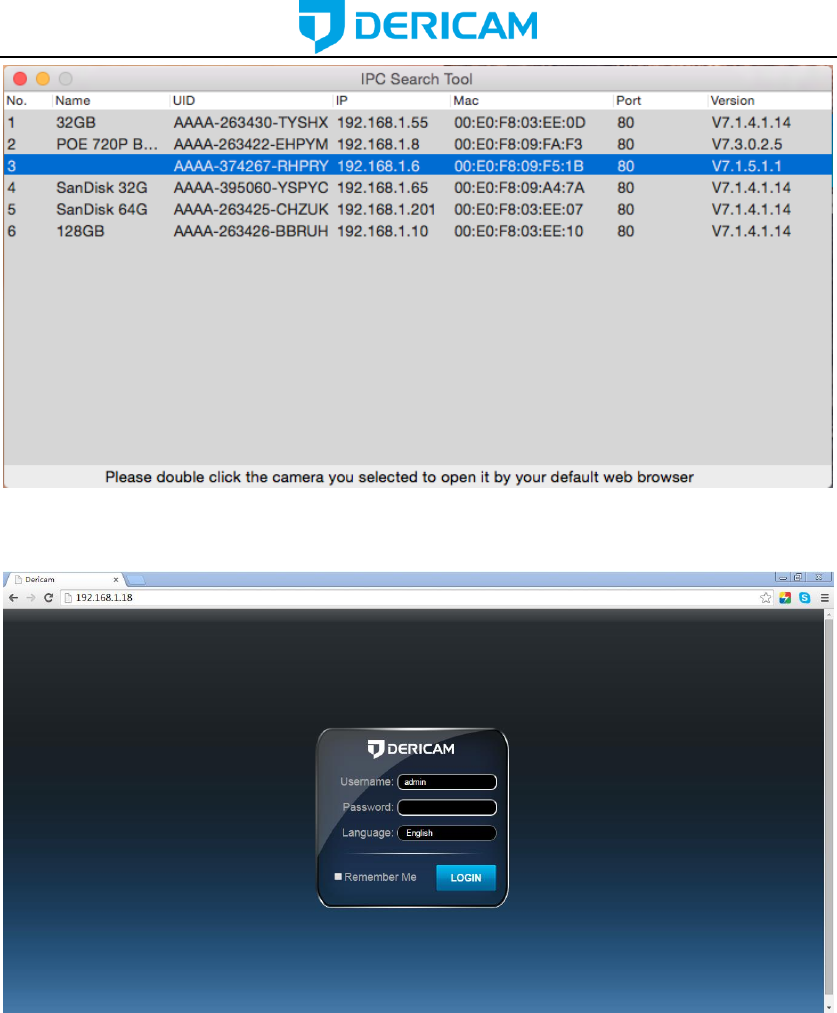
www.dericam.com-Shenzhen Dericam Technology Co.,Ltd
By double left clicking the camera in the searching list, you can open the camera by your
default web browser, such as Safari.
You can find the button “Refresh Camera List” and “Flush Arp Buffer” by right click the
search tool or the camera in the searching list, then you can refresh the searching list by
these 2 buttons.
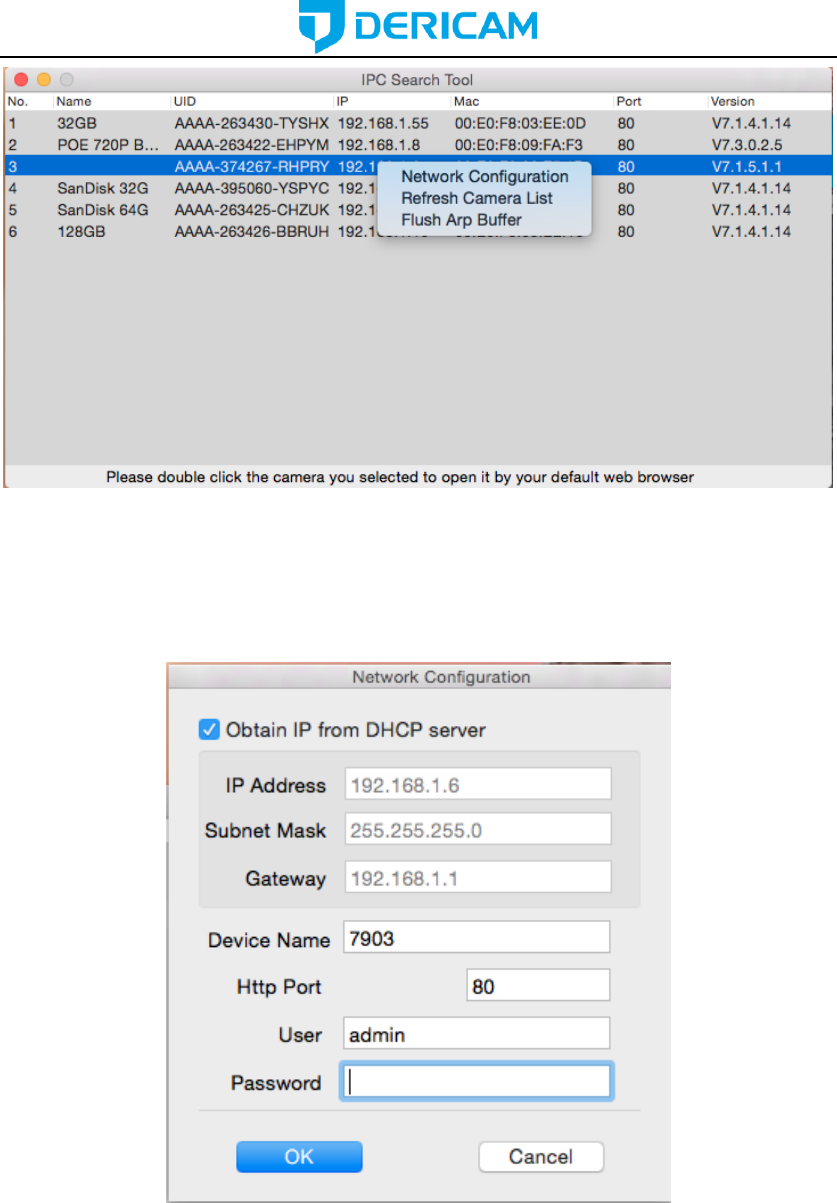
www.dericam.com-Shenzhen Dericam Technology Co.,Ltd
Here is a “Network Configuration” button in the right-clicking button list. From this button,
you can modify the IP, Device display name and http port of the camera. Please note:
1. The camera will reboot automatically if you modify its http port.
2. Please enter the right username and password of your camera before you modify any
network configuration of the camera.
3.2.3 Access by IP address and http port
After launching the SearchTool, click the next to skip the welcome page and refresh the
searching page to bring up the cameras on your LAN. Then you can double click the
camera you selected to login the camera by your default web browser, or you can open
the web browser you want first and input the IP address of the camera in the URL address
bar of the browser by manually to login your camera. You can access the Dericam camera
www.dericam.com-Shenzhen Dericam Technology Co.,Ltd
by HTTP protocols as below:
http://LAN IP Address + HTTP Port No. For example: http://192.168.1.108:80.
You can find the LAN IP Address and HTTP port of your camera through the SearchTool.
The default HTTP port No. is 80.
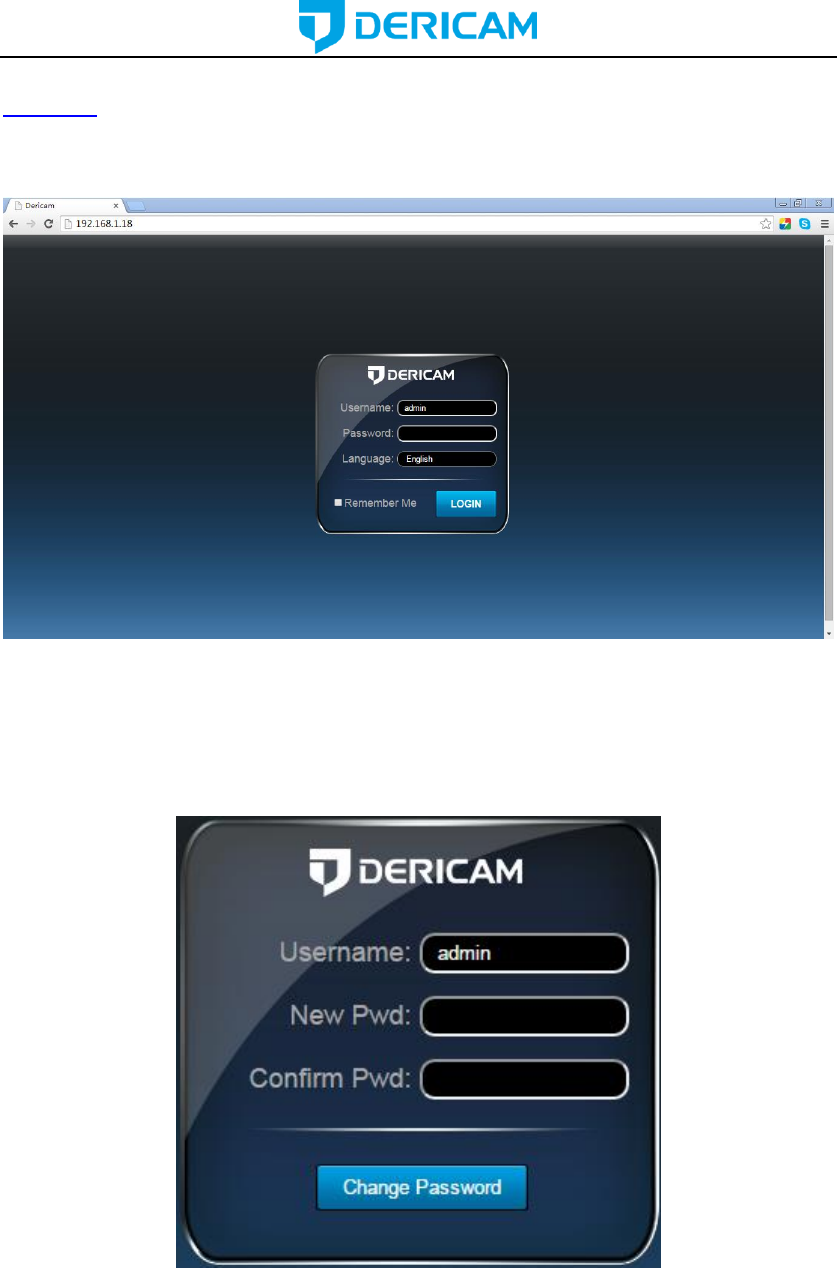
Login to the camera by your login credentials (default username/password are both
“admin”). If this is your first time logging into the camera by default account after it is reset,
you will be prompted to change the default password. Please select a password that is at
least 8 characters long, and include a combination of uppercase letters, lowercase letters,
and numbers.
For the IE/ Mozilla Firefox web browser in Windows OS, when opening the camera’s
interface, the browser will prompt you to install a plugin. The plugins are necessary to get
video from camera. Click install to download the plugin, and install it. If the browser
prompts you to allow the plugin to work on the computer, hit Allow to ensure the plugin can
run successfully. Then the camera is now successfully set up for live viewing, playback
www.dericam.com-Shenzhen Dericam Technology Co.,Ltd
and configuration!
www.dericam.com-Shenzhen Dericam Technology Co.,Ltd
Note: Due to the limitations of NPAPI plugins, the web browser of Chrome/Safari does not
support the settings for features of playback, talk, motion-detection and privacy mask.
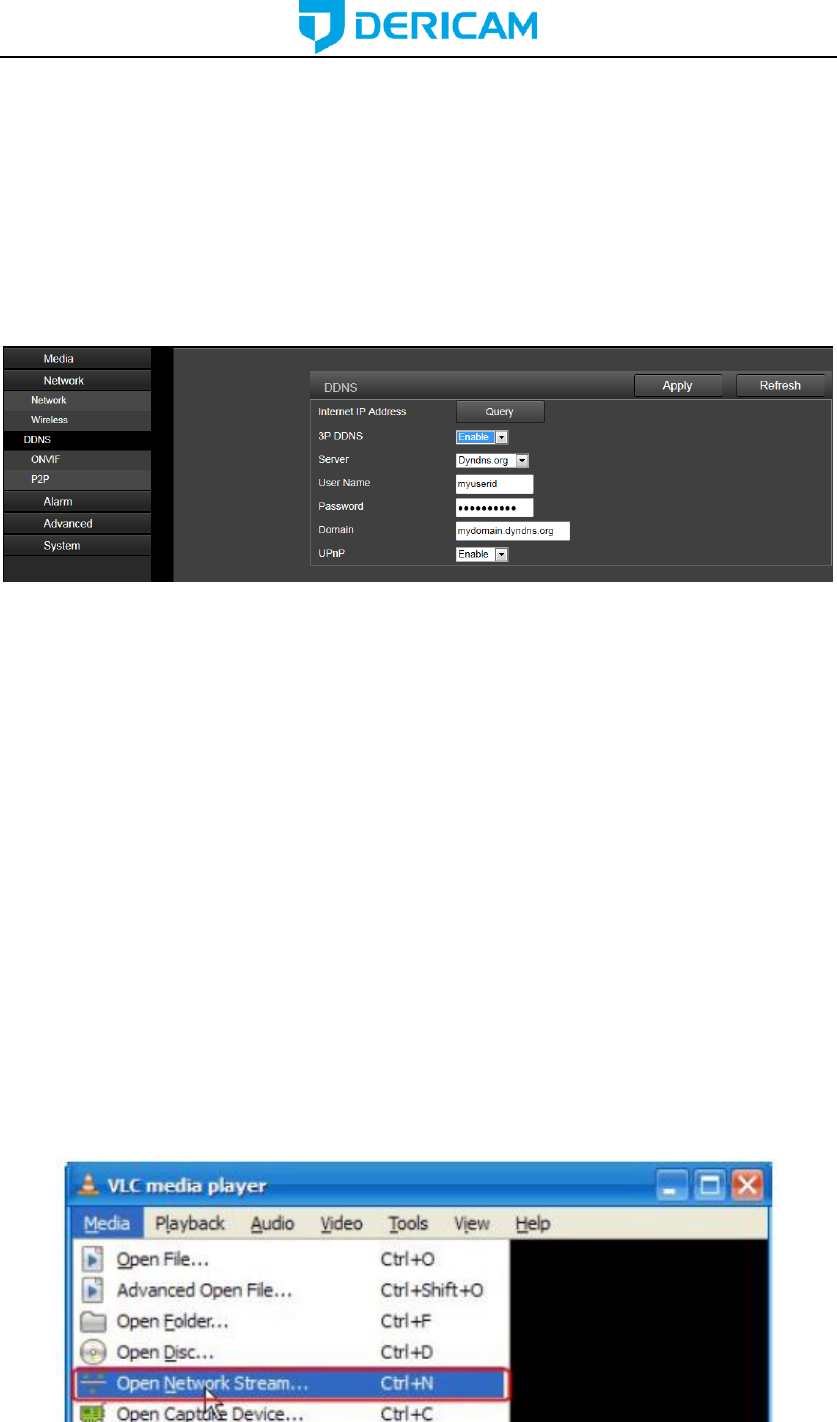
3.2.4 Remote access
You can access Dericam camera remotely through web browsers by UPnP/DDNS
features or Port forwarding.
Go to the CONFIG/DDNS page to enable the UPnP and input the information for
third-party DDNS, such as Dyndns.org/3322.org/dynddns.us/No-ip.com. Then you can
access the camera by DDNS remotely.
Go to your router settings page to make the appreciate port forwarding, then you can
access your camera remotely through the public IP address and its corresponding port.
3.3 NVR access
The Dericam camera supports connecting to any NVR that ONVIF-enabled. This allows
the camera to view live, playback and record to a network storage device.
3.4 RTSP access
The Dericam camera supports standard RTSP, you can access its video and audio
directly by RTSP player such as VLC. Please make sure you enabled the RTSP feature of
your camera, you can set this feature through web browsers.
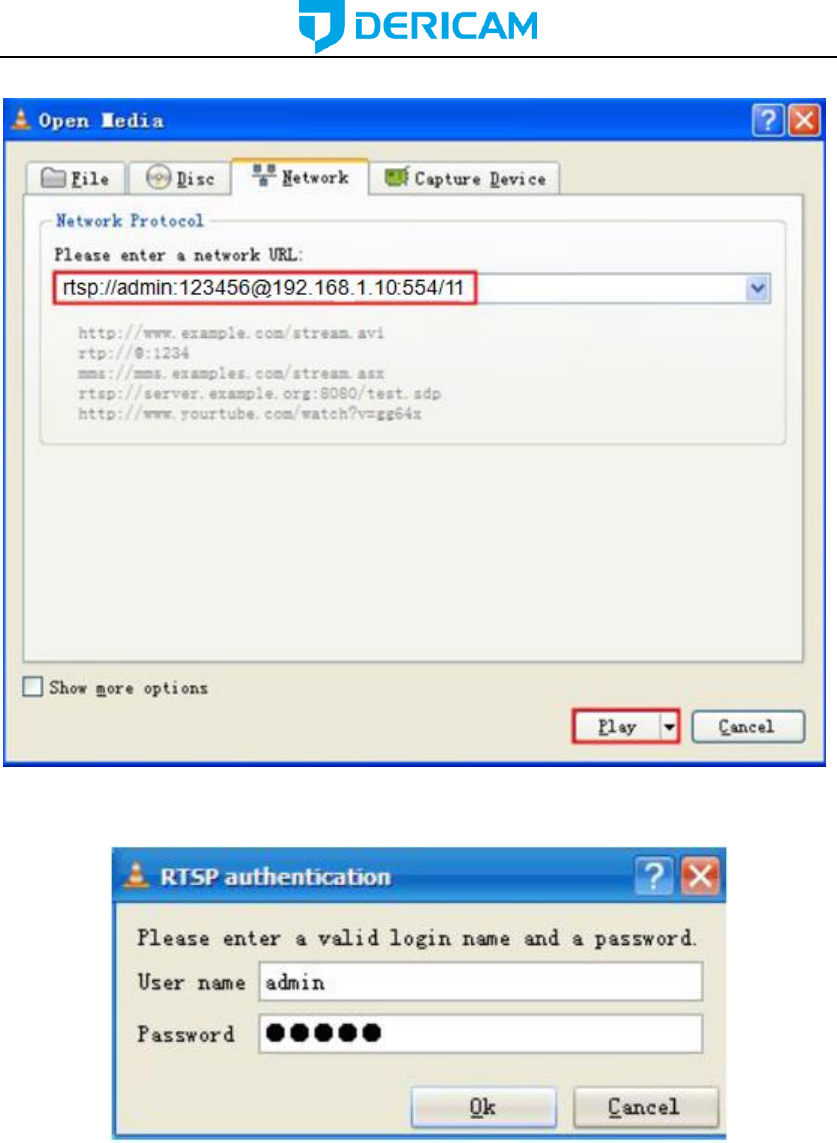
RTSP URL
First stream: rtsp://username:password@IP:port/11
For example: rtsp://admin:123456@192.168.1.10:554/11
Second stream: rtsp://username:password@IP:port/12
For example: rtsp://admin:123456@192.168.1.10:554/12
Follow these steps to access the camera’s RTSP stream by VLC player:
1) Open the VLC player and go to “Media”/”Open Network Stream”;
www.dericam.com-Shenzhen Dericam Technology Co.,Ltd
2) Enter the URL in VLC and click the play button.
3) You may need to enter the RTSP authentication if you did not input the
username/password in your RTSP RUL.
4) Then you can view the video from the VLC player by now.
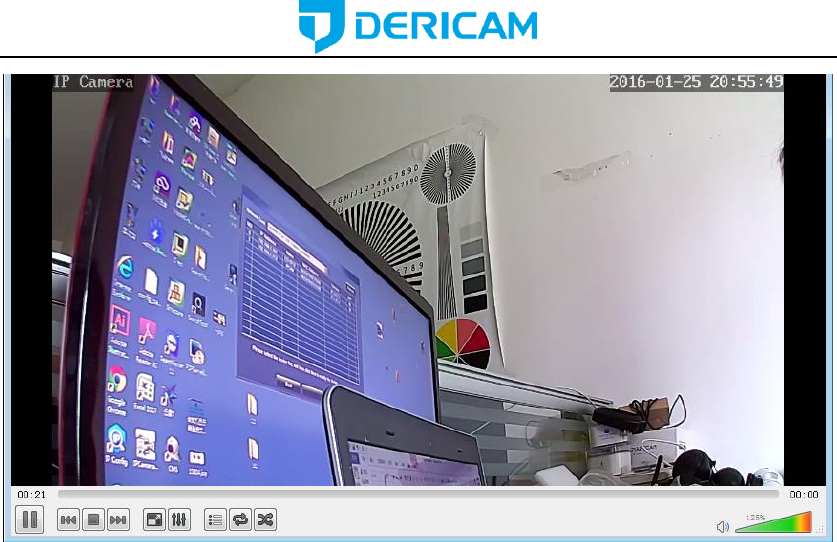
www.dericam.com-Shenzhen Dericam Technology Co.,Ltd
Note: you can also view the video remotely by the RTSP stream if you have the right
DDNS or port mapping and forwarding.
www.dericam.com-Shenzhen Dericam Technology Co.,Ltd
4 App for Mobile Device
To access your camera from a mobile device, please search and install “Dericam” App in
App Store or Google Play. For Android device, you can also download this “Dericam” App
from www.dericam.com.
Note: In this guide, we take iOS device as example for interface reference. The App
Interface may differ slightly from the screenshots below as updates are released.
Note: If you have a dual band router, and your camera is not connecting to your WiFi
network, please make sure you did not set 5G wifi to your camera. It supports 2.4G only.
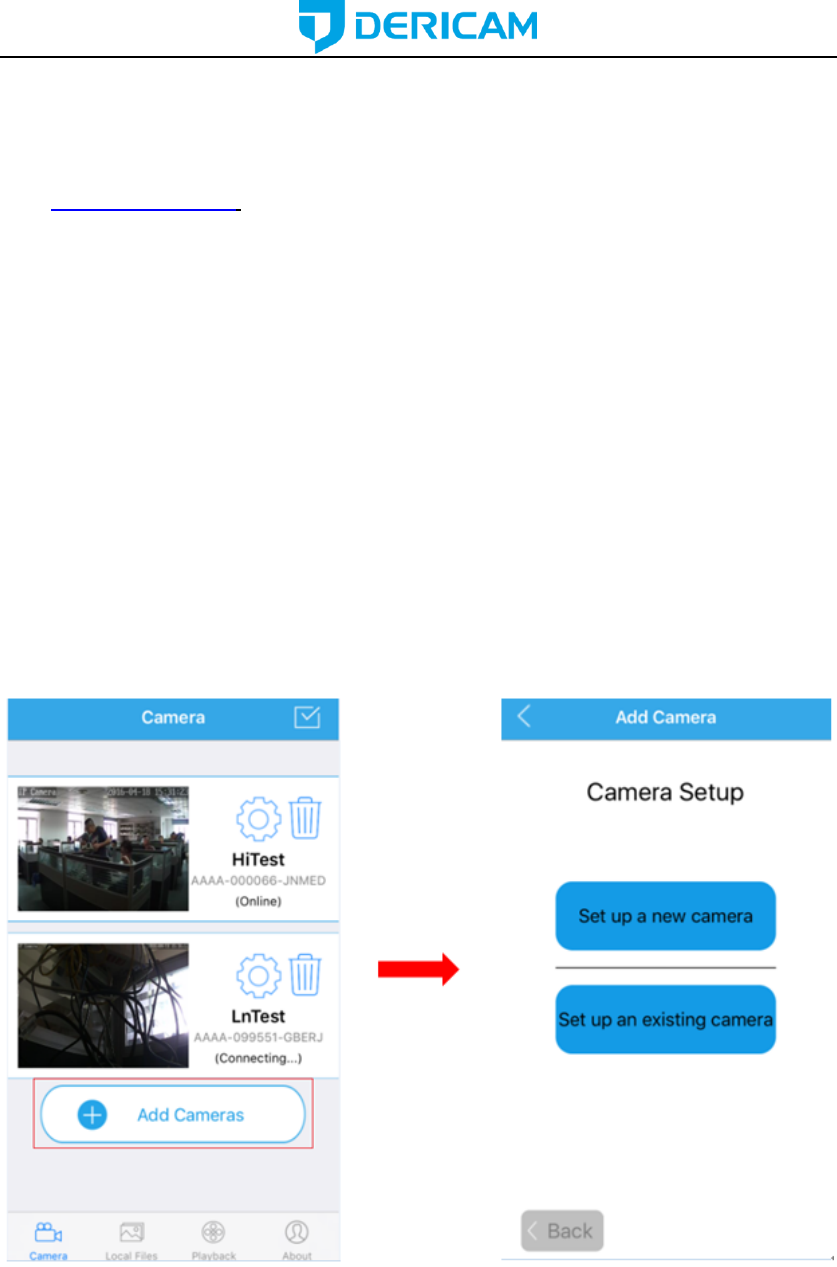
4.1 Add Camera
You can go to the camera list page to find a “+ Add Camera” to add cameras into your App.
There are 2 methods to add camera. The first one is “Set up a new camera”, it is used to
add camera which is just reset to factory setting or you just get the camera from the
package. You can change the initial password of the camera and set wifi settings to your
camera through this method. It is usually used for the first time you want to setup this
camera. The second one is “Set up an existing camera”, it means to add the camera you
set up before, for example you have already set up your camera in another smartphone or
web. For the second method, you can search and add the camera directly, no need to
change the password or set the wifi configuration.
4.1.1 Set up a new camera.
If you are the first time to set up the Dericam camera, or you just reset your camera.
Please click the button “Set up a new camera” to add it into your mobile device.
Please power up your camera first, and connect your camera to your router with an
Ethernet cable. After you connect your mobile device to the same local network, then you
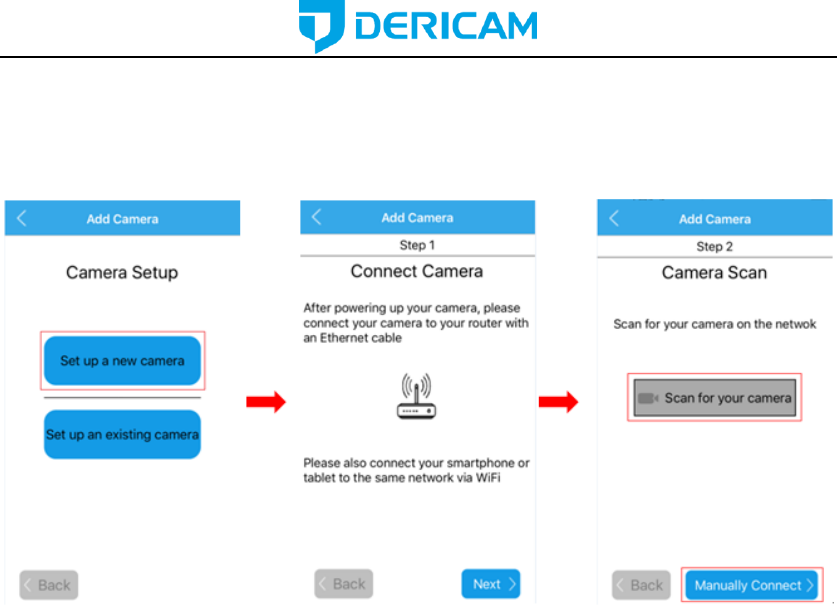
www.dericam.com-Shenzhen Dericam Technology Co.,Ltd
can go to add your camera into the App by scanning the camera in the LAN or by entering
its UID by manual. We do recommend you to scan and add the camera in your local
network, so you do not need to input the UID which is a long identifie and hard to
remember.
1. Scan for your camera
Once you chosen to add the camera by scanning, you can follow the NEXT or text
instructions to complete the process of adding camera. Here are the screenshots to show
how to add the camera by scanning.
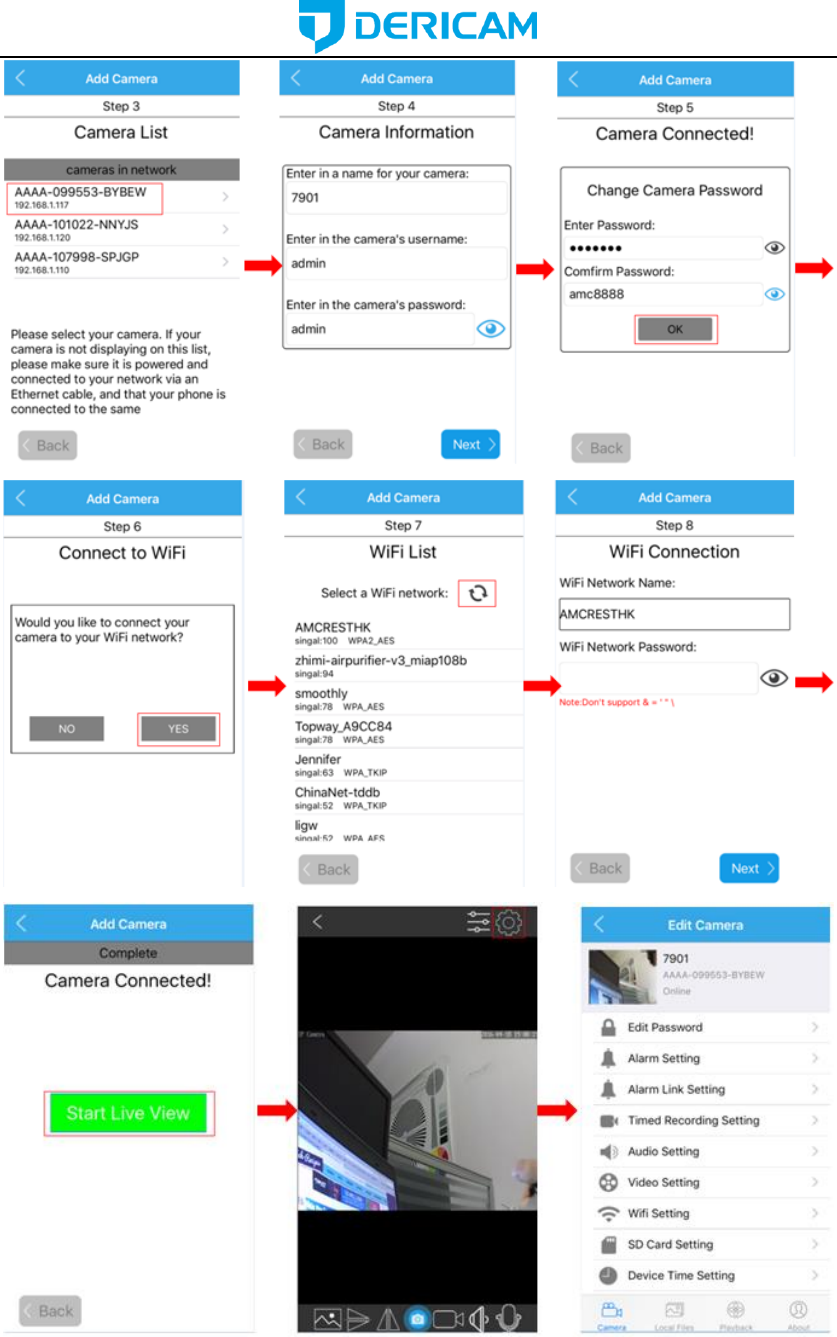
-Select the camera you want to set up from the camera list you get by scanning.
-Give your camera a name, and enter right username and password to access it. The
default username/password is admin/admin.
-Change the initial admin/admin username/password for the consideration of account
security. Give your camera a private username and password that known only by you, and
keep it secret.
-If you want to configure the wifi in this set up process, you can choose YES to connect it
to your wifi, or you can choose NO to start the live view directly. You can also configure
your wifi in the wifi setting page after you added the camera into your App if you do not
want to configure it in this step.
-Please click the refresh icon to search the wifi AP list again if you did not find the wifi
SSID you want.
-Please input the right password of your wifi, and click next to set it into your camera.
-Then you can start live view of your camera and complete this set up process, and you
can access and control your camera now.
www.dericam.com-Shenzhen Dericam Technology Co.,Ltd
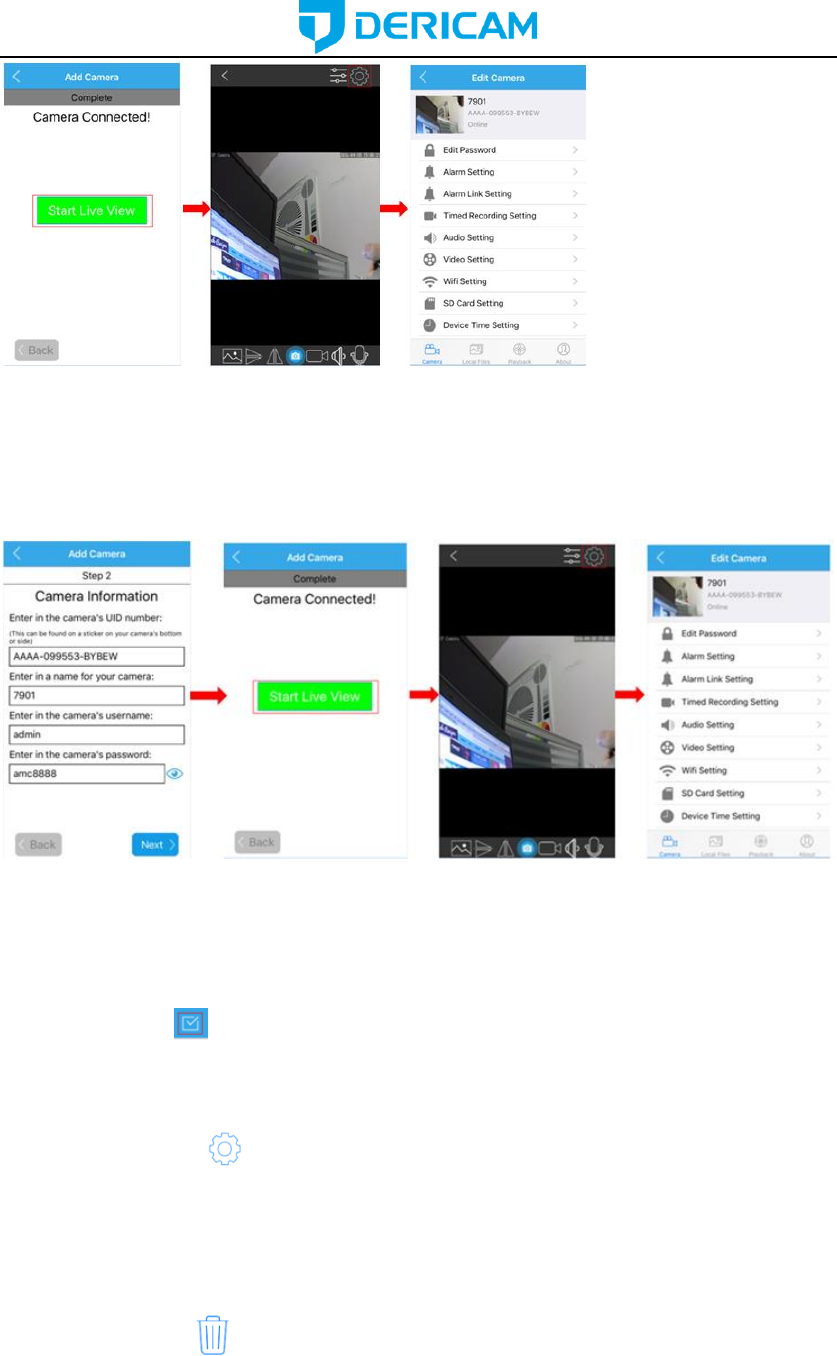
2. Manually connect
Once you chosen to add the camera by manual, you can follow the NEXT or text
instructions to complete the adding process. Here are the screenshots to show you this
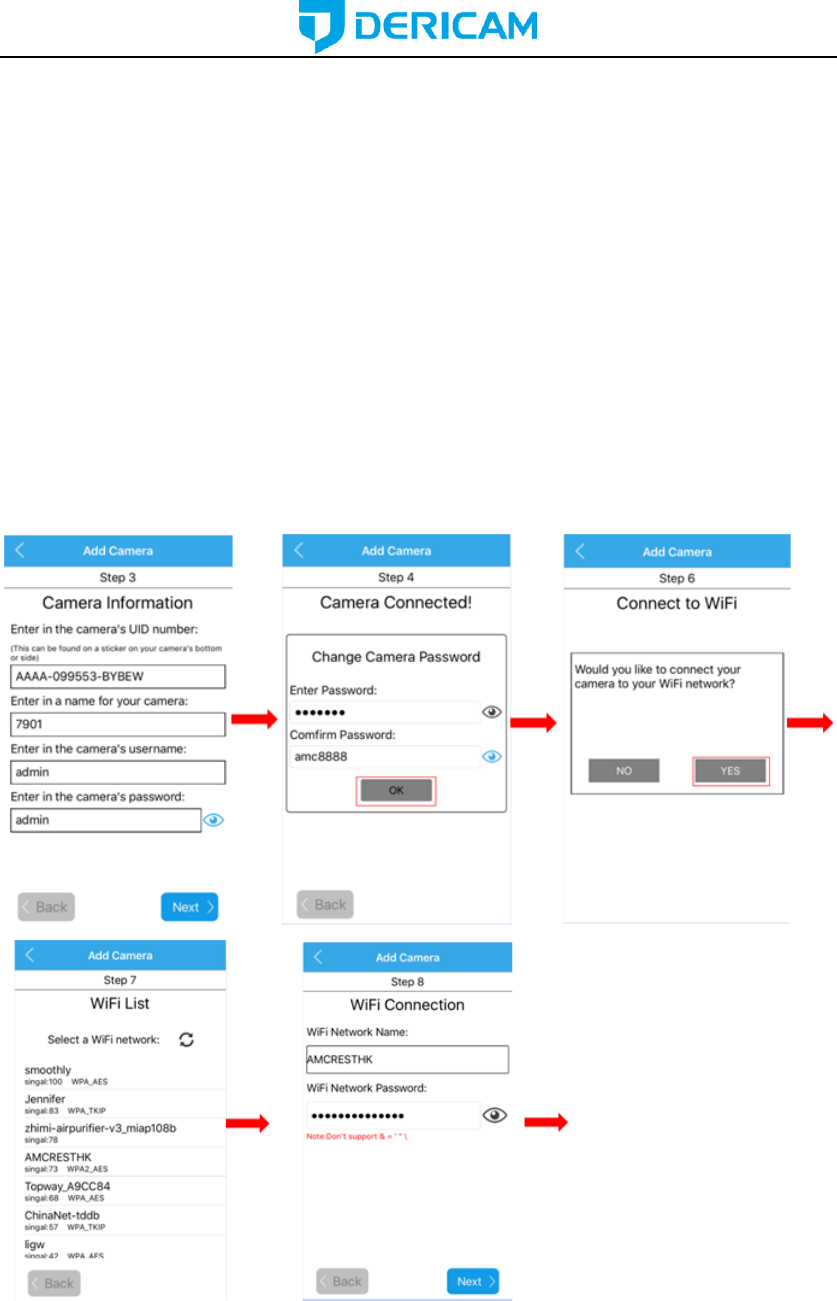
www.dericam.com-Shenzhen Dericam Technology Co.,Ltd
process.
-Enter in your camera’s UID first, you can find it on the sticker of your camera’s bottom or
side. Give your camera a name, and input right username and password to access it. The
default username/password is admin/admin.
-Change the initial admin/admin username/password for the consideration of account
security. Give your camera a private username and password that known only by you, and
keep it secret.
-If you want to configure the wifi in this set up process, you can choose YES to connect it
to your wifi, or you can choose NO to start the live view directly. You can also configure
your wifi in the wifi setting page after you added the camera into your App if you do not
want to configure it in this step.
-Please click the refresh icon to search the wifi AP list again if you did not find the wifi
SSID you want.
-Please input the right password of your wifi, and click next to set it into your camera.
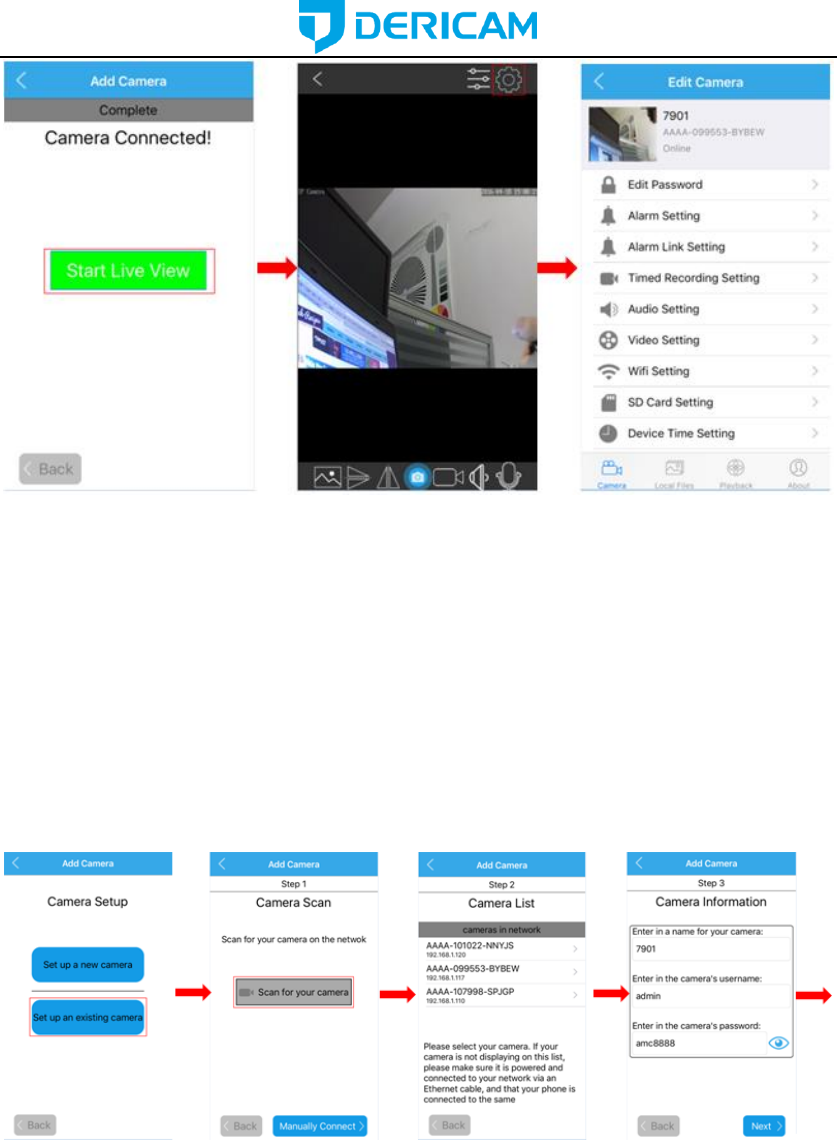
-Then you can start live view of your camera and complete this set up process.
www.dericam.com-Shenzhen Dericam Technology Co.,Ltd
4.1.2 Set up an existing camera.
For the Dericam camera you have added or accessed before, you can click the button
“Set up an existing camera” to add it into your mobile device. There are also 2 ways to
add it, by scanning or by manual. We do recommend you to scan and add the camera in
your local network area, so you do not need to enter the UID which is a long identifie and
hard to remember.
1. Scan for your camera
-After click the scanning button to search the Dericam camera in your local network area,
you can get a camera list. Please select the camera you want to set up.
-Give you camera a name, and enter in its right username and password.
-Then you can start the live view and go to the setting page to access or control it.
www.dericam.com-Shenzhen Dericam Technology Co.,Ltd
2. Manually connect
If you want to add this existing camera to your mobile device by manual, please click the
button “Manually Connect”. Enter in your camera’s UID, username and password, you can
also give it a new name you like. Then you can start the live view and go to the setting
page to access and control your camera.
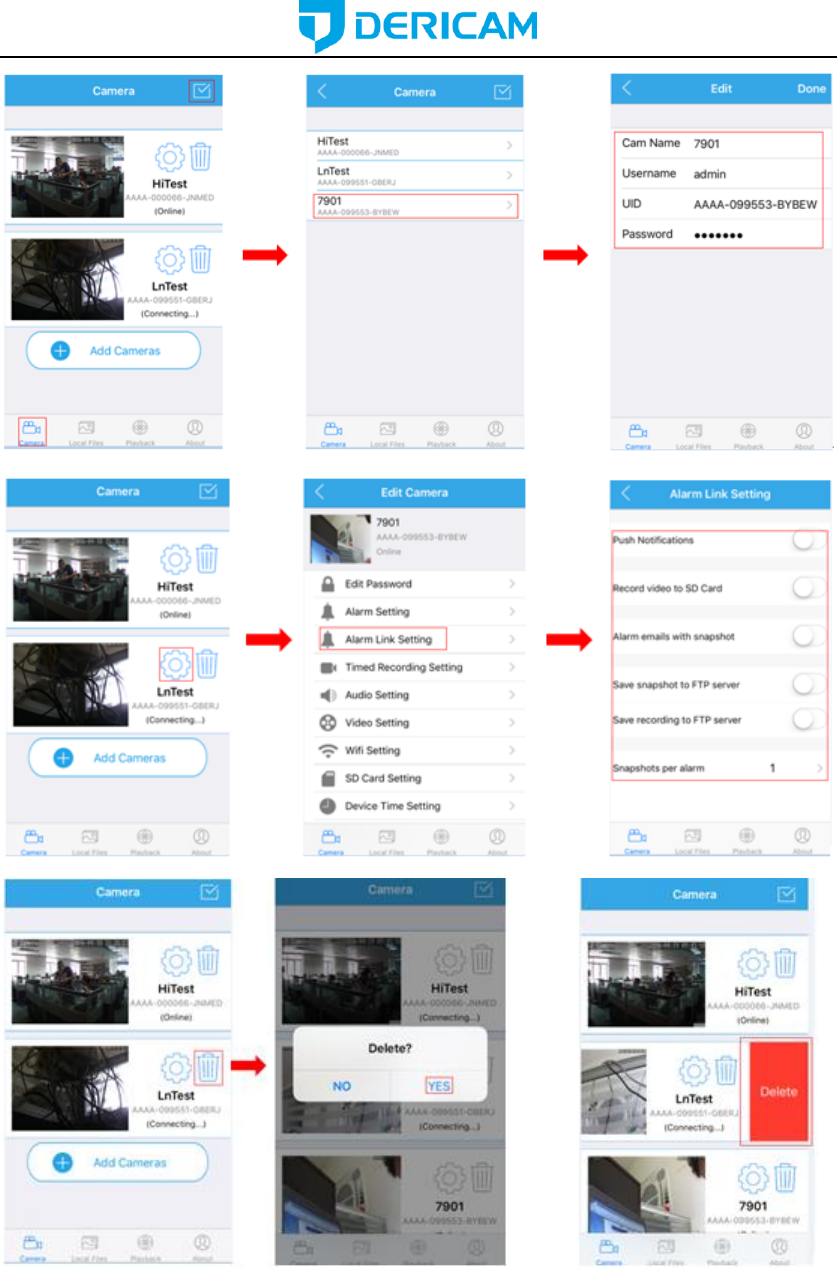
4.2 Camera list page
You can go to the camera page to check the cameras you have added. You can also
delete or edit the login information for the cameras in the list.
-Click the edit icon to edit the camera login information. For example, you can change
the camera’s name in App or modify the camera’s username or password if you could not
login your camera, even the UID.
-Click the tooling icon to enter the setting page, then you can edit all your camera’s
settings, include Edit Password, Alarm Setting, Alarm Link Setting, Timed Recording
Setting, Audio Setting, Video Setting, Wifi Setting, SD Card Setting, Device Time Setting,
Email Setting, FTP Setting, System Setting and Device Information. All of these settings
will be explained in detail in next chapter.
-Click the trash icon to delete the camera you want. For iOS device, you can also
delete the camera you want by sliding the camera from right to left, then you can find a
Delete button to delete it.
www.dericam.com-Shenzhen Dericam Technology Co.,Ltd
4.3 Live view page
After add the camera successfully, you can preview the video of your camera and set the
configurations you want. This section will show you what the icons can do in the live view
page.
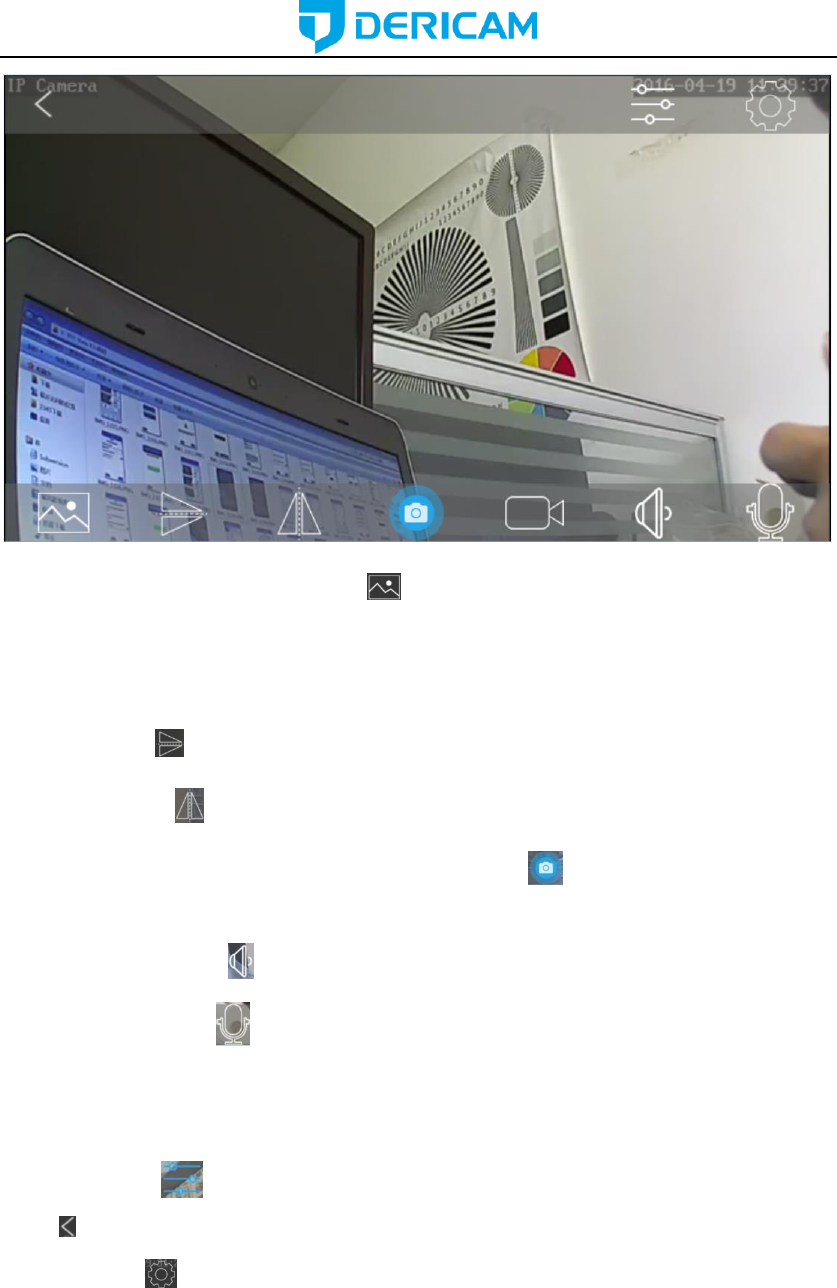
www.dericam.com-Shenzhen Dericam Technology Co.,Ltd
-The resolution (HD/SD or High/Low)
The HD standards for the first/main stream of the camera, it is 720P as default. The SD
means second/sub stream of the camera, it is VGA as default. You can also change the
default settings as you want in the setting pages.
-Flip the Viewo ;
-Mirror the Video ;
-Snap picture from the video and save it to your phone ;
-Record video by manual from the video and save it to your phone;
-Audio from the camera ;
-Talking to the camera ; By press and holding this icon, you can hear the voice from
the camera or the audio out port by connecting an earphone.
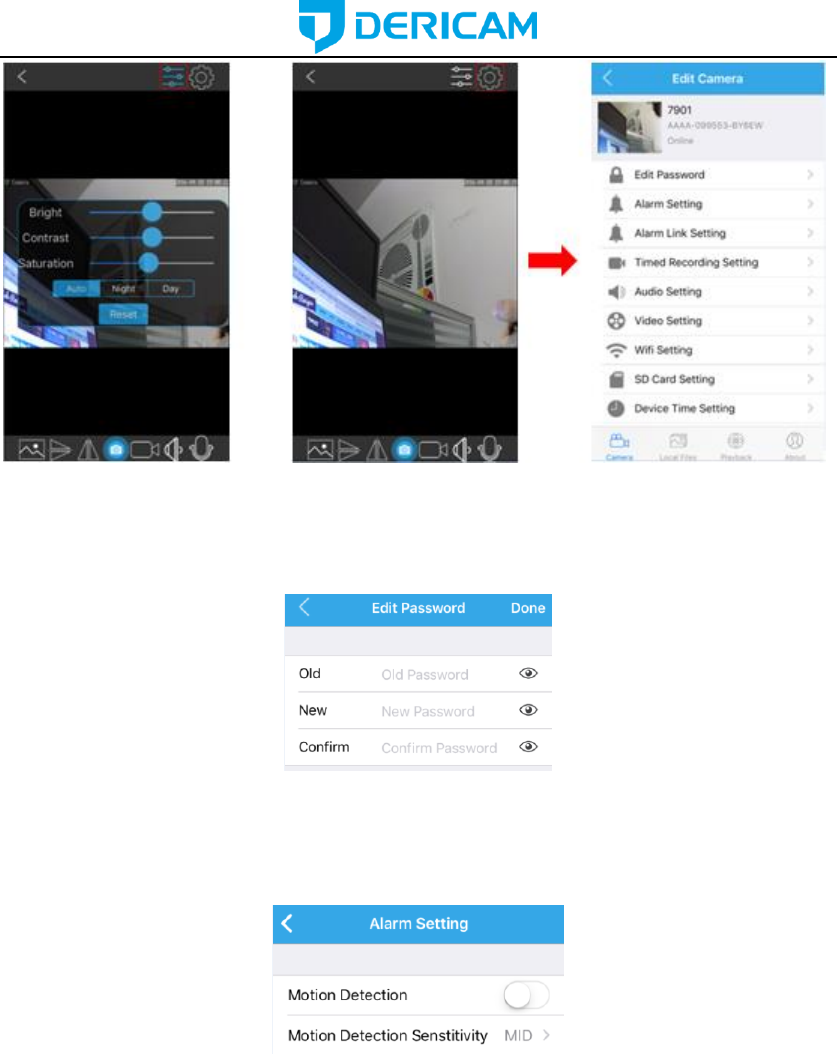
-Set the video parameters of your camera, such as bright/contrast/saturation. And
control the LED status of your camera by the icons of the model, such as auto/night
vision/day vision.
-Exit , you can go back to the device list page by click the back icon .
-Settings page , you can go to the settings page by click the icon of settings.
www.dericam.com-Shenzhen Dericam Technology Co.,Ltd
4.4 Settings pages
4.4.1 Edit Password
You can change the password of Dericam camera in this page.
4.4.2 Alarm Settings
You can set the configuration about motion-detection alarm of the camera in this page,
such as enable or disable the alarm, set the sensitivity of the motion-detection like
low/medium/high.
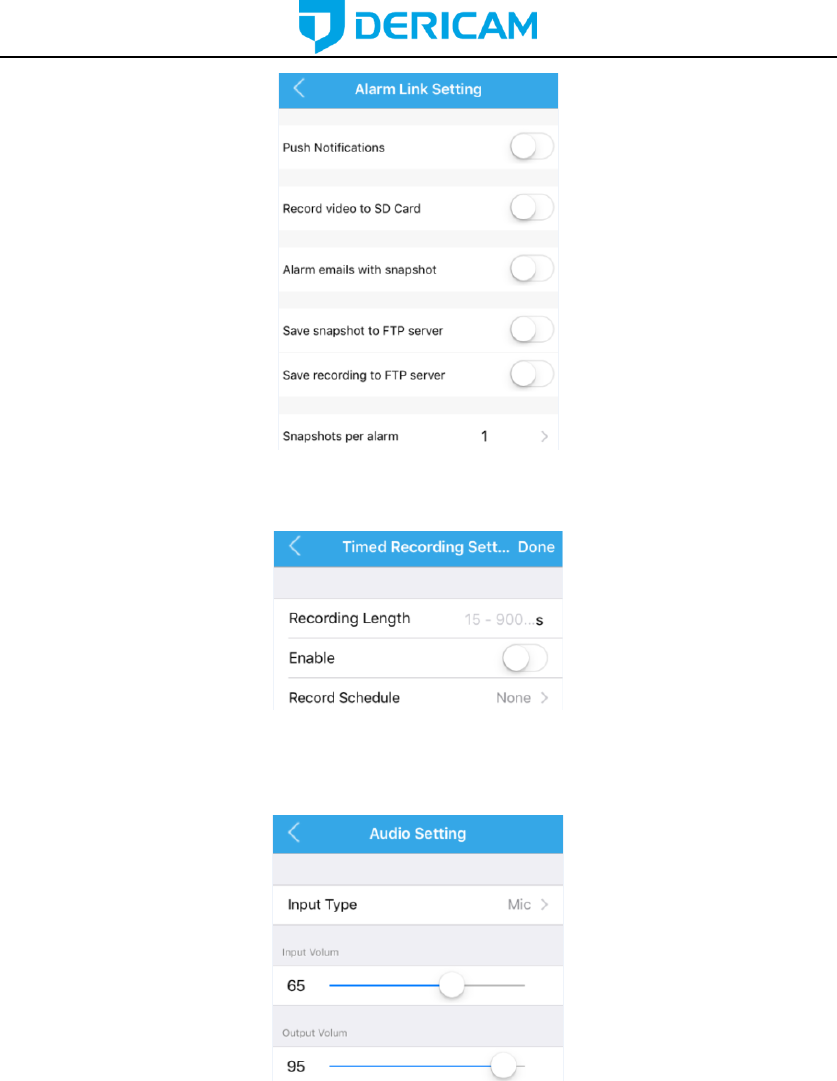
4.4.3 Alarm link settings
You can enable the linked actions once the alarm is triggered in this page, include the
Push Notifications to your smartphone, record video to the SD Card, alarm emails with
snapshot, save snapshot or recording to FTP server, and the count for the snapshot.
www.dericam.com-Shenzhen Dericam Technology Co.,Ltd
4.4.4 Timed recording settings
You can set the scheduled recording settings in this page, include the recording length.
4.4.5 Audio settings
You can set the configurations for audio in this page.
4.4.6 Video settings
You can set the configuration about video encoding for the first/second stream in this page,
like bitrate/frame rate and video quality. The top one is for first stream, the second one is
for second stream.

www.dericam.com-Shenzhen Dericam Technology Co.,Ltd
4.4.7 Wifi settings
You can search the wifi in the LAN and set it to your camera in this page.
4.4.8 SD Card settings
You can get the space information about the SD Card in your camera and format it in this
page.
4.4.9 Device time settings
You can set the time of your camera to sync it with your smartphone in this page.
www.dericam.com-Shenzhen Dericam Technology Co.,Ltd
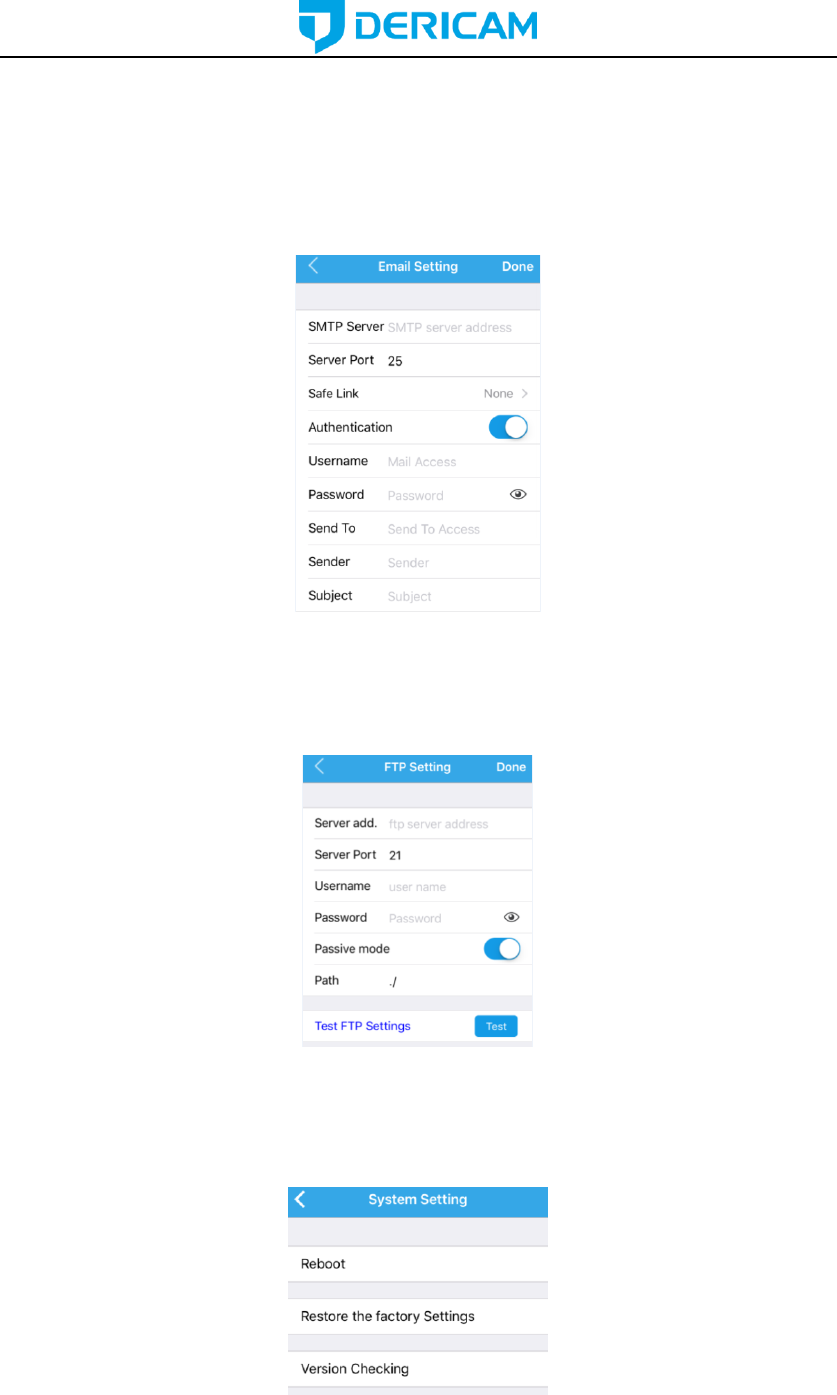
4.4.10 Email settings
You can set the email information in this page to enable the email alarm actions. Here is a
test button for you to check the connection of the email settings, please save your settings
and test it before you complete the email settings to make sure your email setting will work
successfully.
4.4.11 FTP settings
You can set the FTP account information for the video recording or alarm linked actions in
this page.
4.4.12 System settings
You can reboot, restore the camera in this page. And there is an icon “Version checking”
for you to check the latest firmware for the camera and upgrade it online.
www.dericam.com-Shenzhen Dericam Technology Co.,Ltd
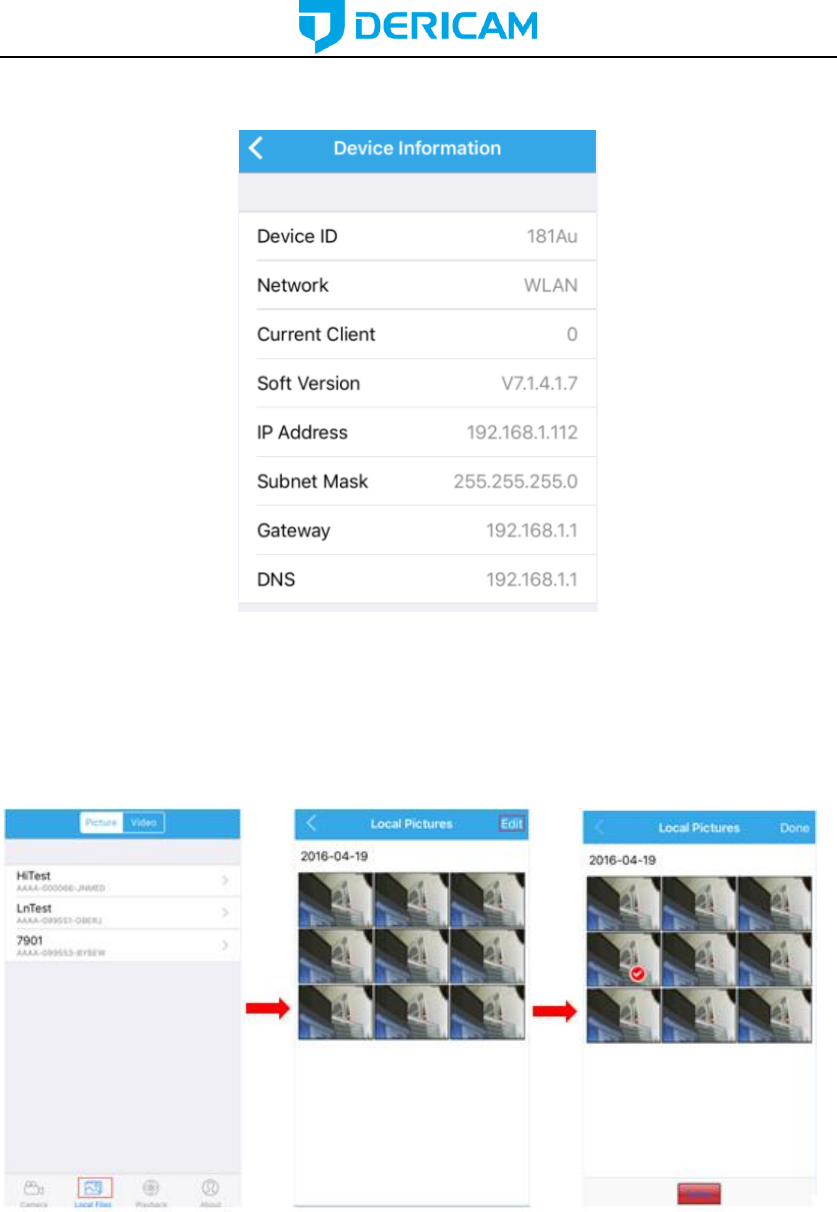
4.4.13 Device information
You can obtain the information about the camera in this page.
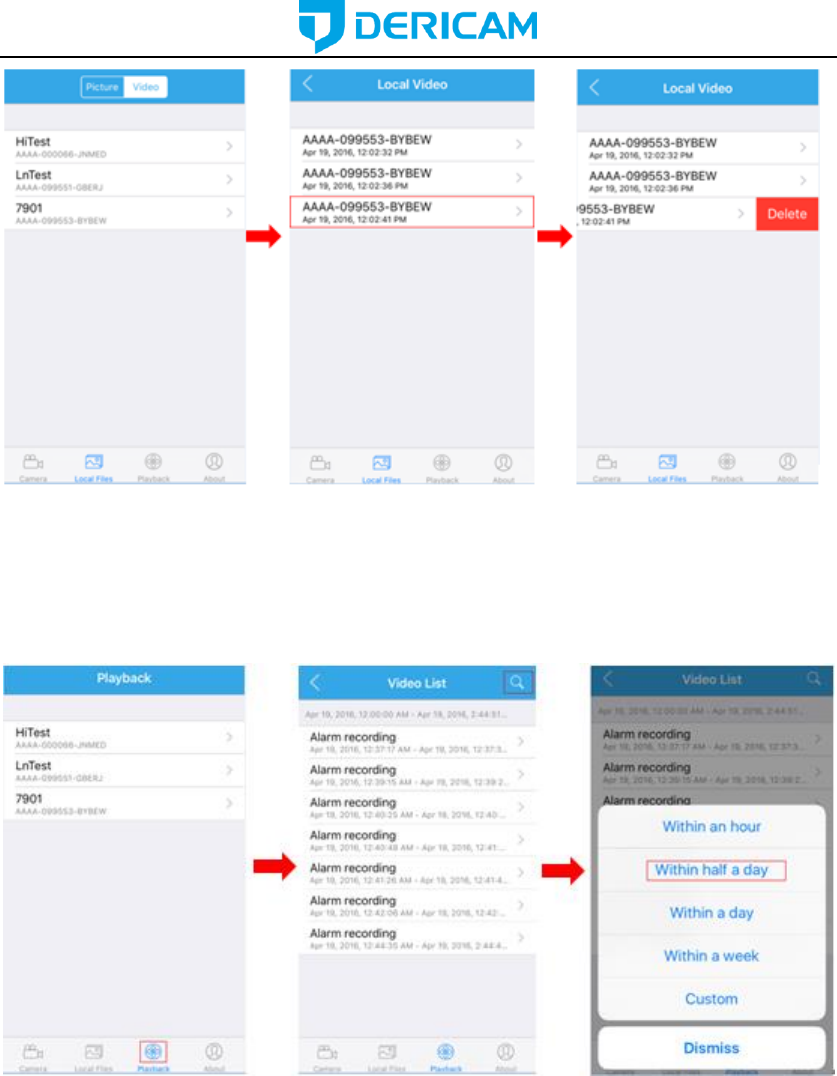
4.5 Local files page
You can browse the pictures and videos saved in your smart phone in this page by clicking
the chosen file. And you can delete these files if you want. For the video file you can
delete by sliding the file you choosing from right to left.
www.dericam.com-Shenzhen Dericam Technology Co.,Ltd
4.6 Playback page
You can browse the recording stored in the SD Card of the camera in the playback page
and playback it remotely by click the video file from the list. And you can also filter the files
by assigning an exact recording time.
www.dericam.com-Shenzhen Dericam Technology Co.,Ltd
5 Web User Interface for operation
Here details the Dericam camera’s user interface for web browser, as well as all of the
operations the camera can perform, including the Login, LIVE, PLAYBACK and CONFIG
pages.
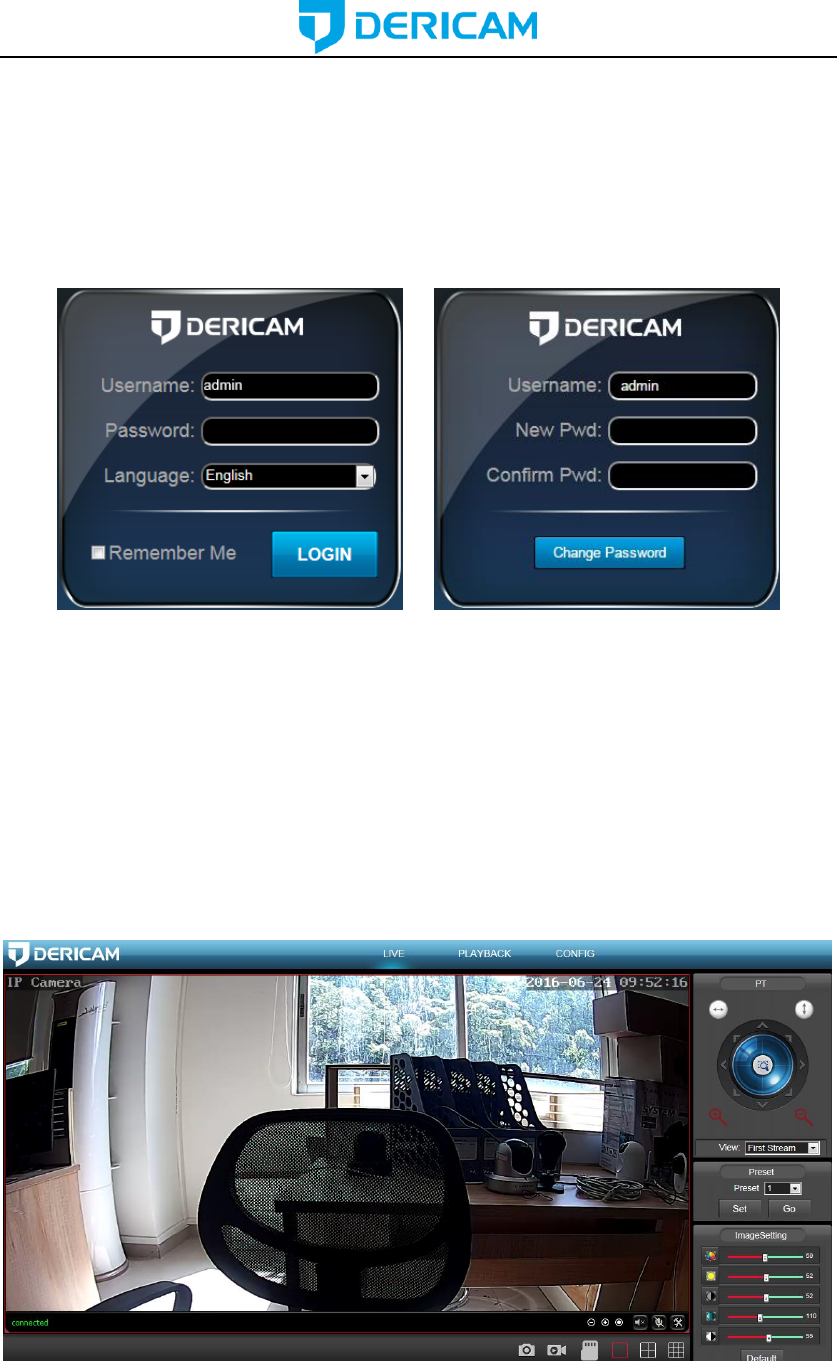
5.1 Login page
Username and Password: It is the account of your camera, the default
username/password is admin/admin.
Language: You can click on the language dropdown list to select the language for the web
UI.
Note: When setting up your camera for the first time, it will force you to modify the default
password to enhance the security of the camera, please enter the new password and
confirm it. Then you can access your camera by the new password in the future once you
saved your settings.
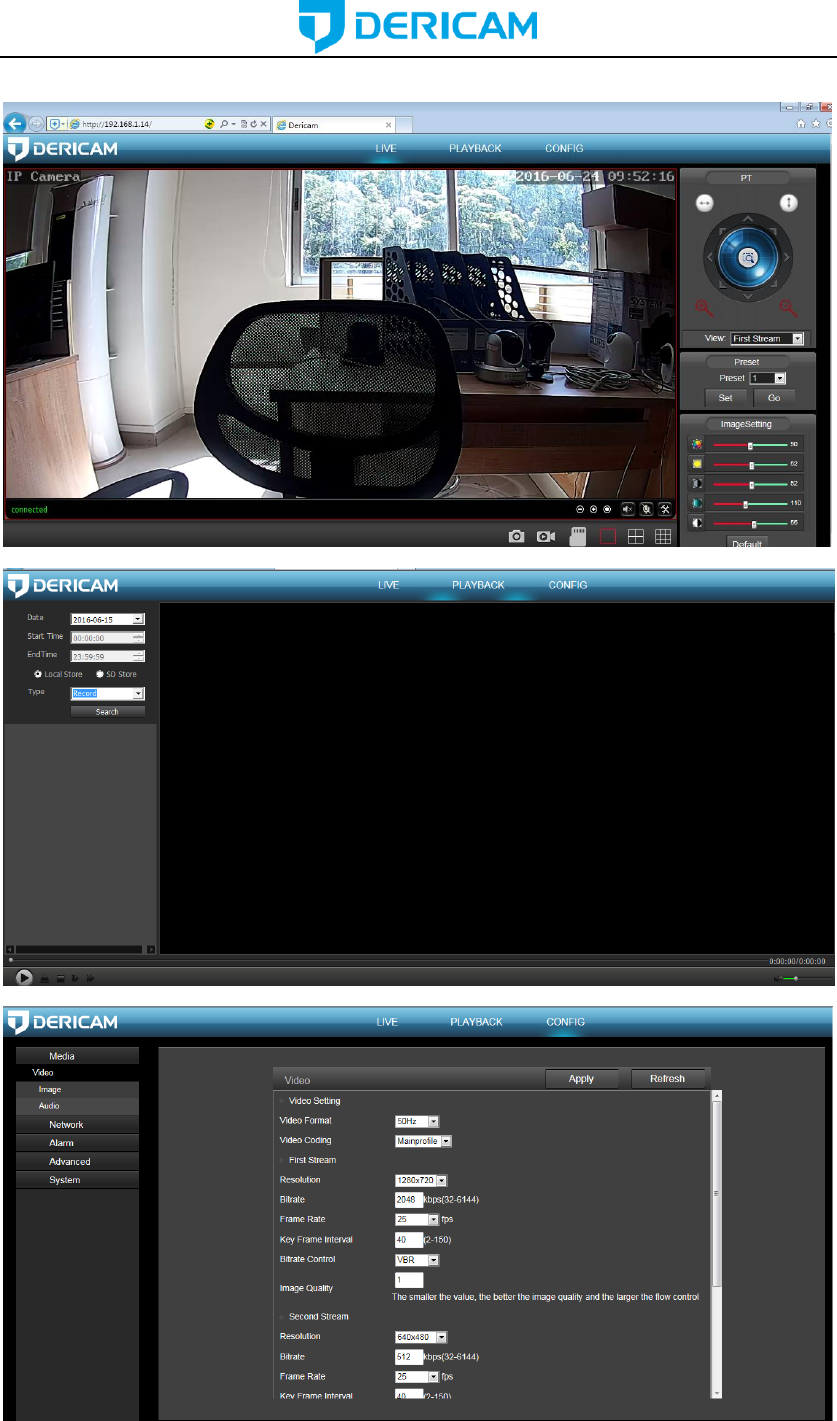
5.2 Live page
5.2.1 OSD

www.dericam.com-Shenzhen Dericam Technology Co.,Ltd
-Camera Name:
-Camera Date & Time:
5.2.2 Pan/Tilt control
No.
Remark
No.
Remark
No.
Remark
1
Go to up
2
Go to right-up
3
Go to right
4
Go to right-down
5
Go to down
6
Go to left-down
7
Go to left
8
Go to left-up
9
Back to center
: Cruise for horizontal, from up to down.
: Cruise for vertical, from left to right.
: Zoom in.
: Zoom out.
5.2.3 View
First Stream: the main stream, default is 720P-1280x720.
Second Stream: the sub stream, default is VGA-640x480.
5.2.4 Preset
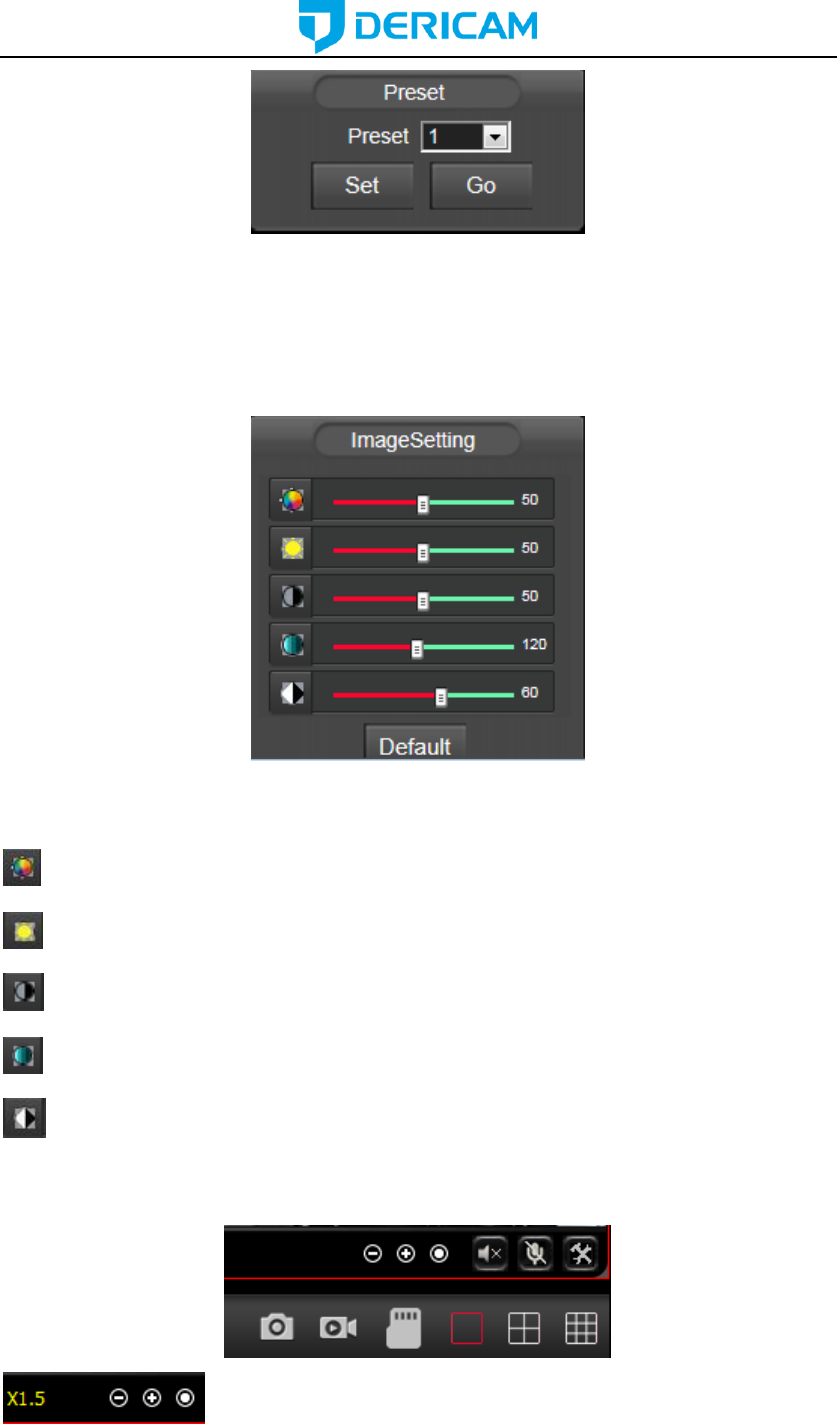
www.dericam.com-Shenzhen Dericam Technology Co.,Ltd
The Dericam camera can support max 8 preset positions, from 1 to 8. You can click the
“Set” button to save one preset point named by number 1-8, and click the “Go” button to
let the Pan/Tilt go to the preset you saved before.
5.2.5 ImageSettings
You can set the color parameters for the video image in this “ImageSet”, such as Hue,
Brightness, Contrast, Saturation, Sharpness.
: Hue.
: Brightness.
: Contrast.
: Saturation.
: Sharpness.
5.2.6 Tool bar
: Zoom in/Zoom out/Back to original size, 1x/1.5x/2x/3x.
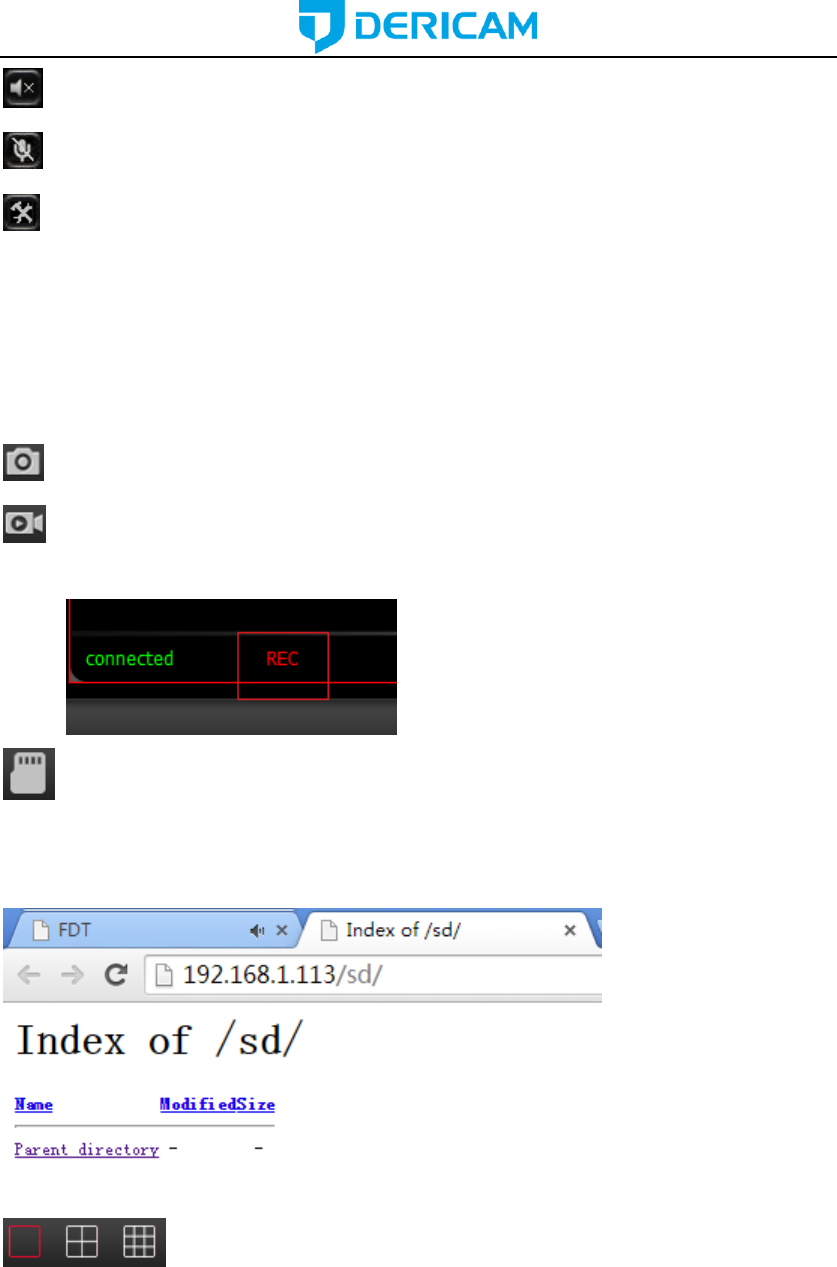
www.dericam.com-Shenzhen Dericam Technology Co.,Ltd
: Open/Close the audio.
(Only for IE/Firefox browser in windows): Enable/Disable the talking.
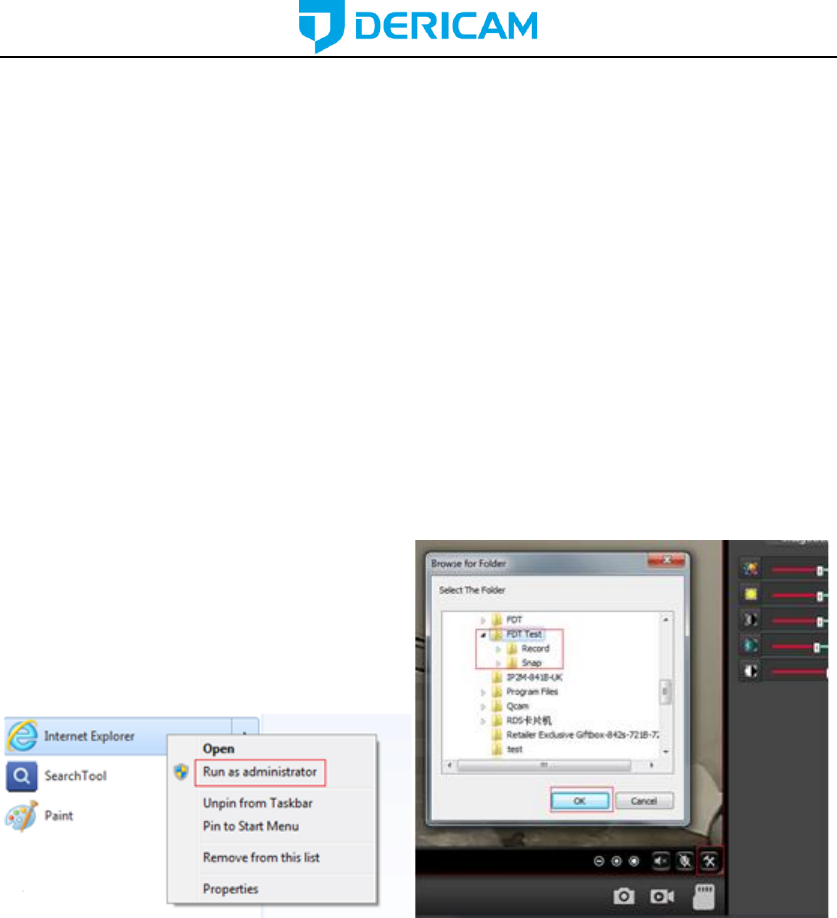
(Only for IE/Firefox browser in windows): Set the storage path to save the picture
captured by manual through the web browser, or save the video recorded by manual
through the web browser. It will pop up a folder browser windows for you to select the
folder path in your computer.
Note: If your windows OS is windows 10, please run the web browser as administrator, or
it will forbit you to generate the folder in your computer, then you will be failed to snap
pictures or record video through the web browser.
(Only for IE/Firefox browser in windows): Capture pictures by manual.
(Only for IE/Firefox browser in windows): Record video by manual. There will
show you a red “REC” icon if you enable the manual recording.
: This icon is for you to browser the content of the SD card in your camera, such as
pictures or video recordings. You need to go through the authentication of the
username/password of your camera to browser your SD card in the camera. You can also
edit the contents in your SD card like delete files or download files through this icon.
(Only for IE browser in windows): These icons are used to show you
multiple-devices in your local network at the same time. If you have multi Dericam
cameras, you add them to the multiple-device page, then you can view them all at the
same time.
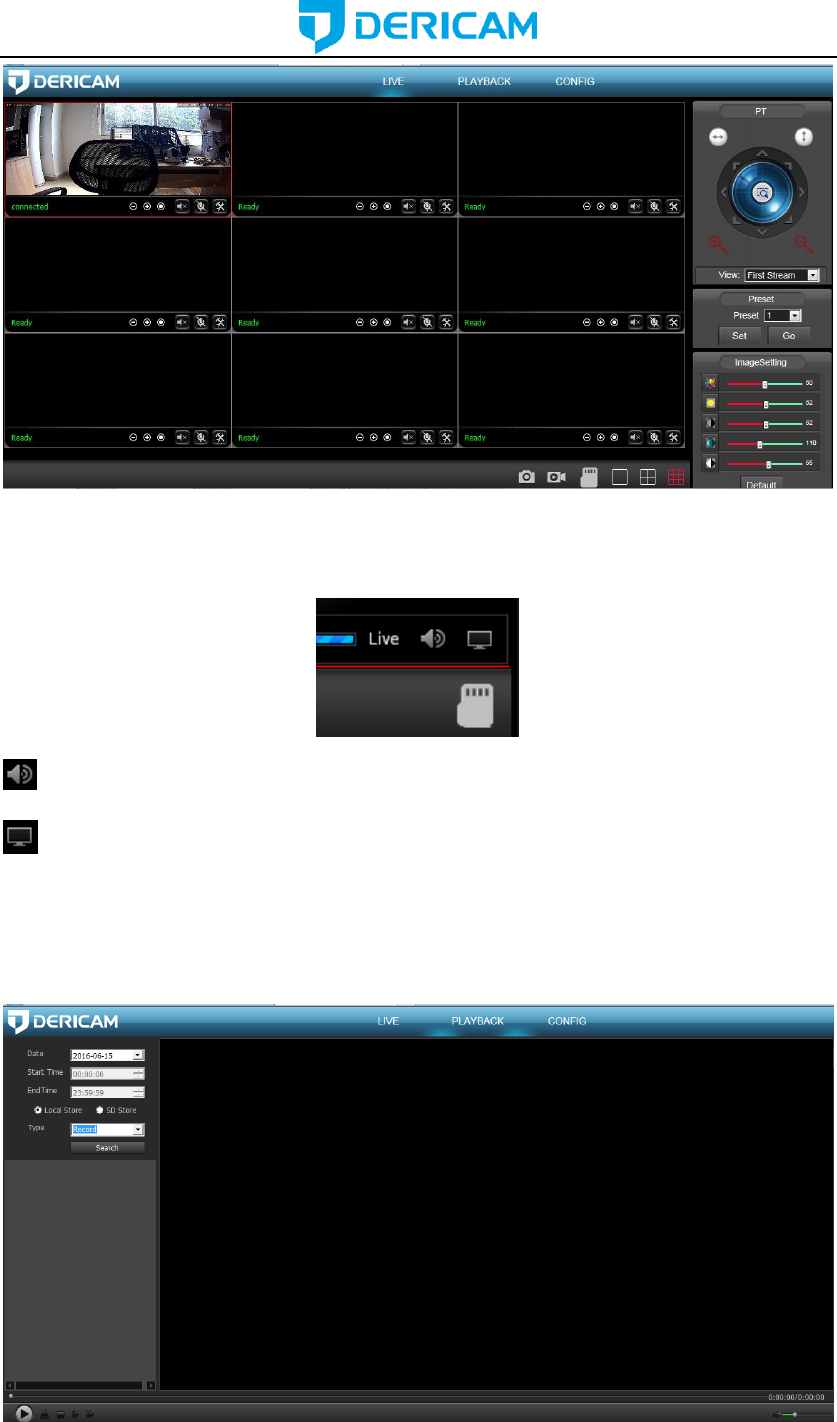
www.dericam.com-Shenzhen Dericam Technology Co.,Ltd
Note: For the Chrome in windows and Chrome/Safari in Mas, there are something
limitations for the plugins. They have different tool bar show as below and some features
are forbited.
: Open/Close the audio.
: Enable the full screen for the live view video.
5.3 Playback page(Only for IE/Firefox browser in windows)
5.3.1 Search and playback videos
www.dericam.com-Shenzhen Dericam Technology Co.,Ltd
In the playback page, you can browser the videos/snapshots in your SD card or local
computer hard disk recorded by the motion alarm or schedule or the videos stored in your
computer recorded by manual. You can search these videos by date and time, then
playback them online.
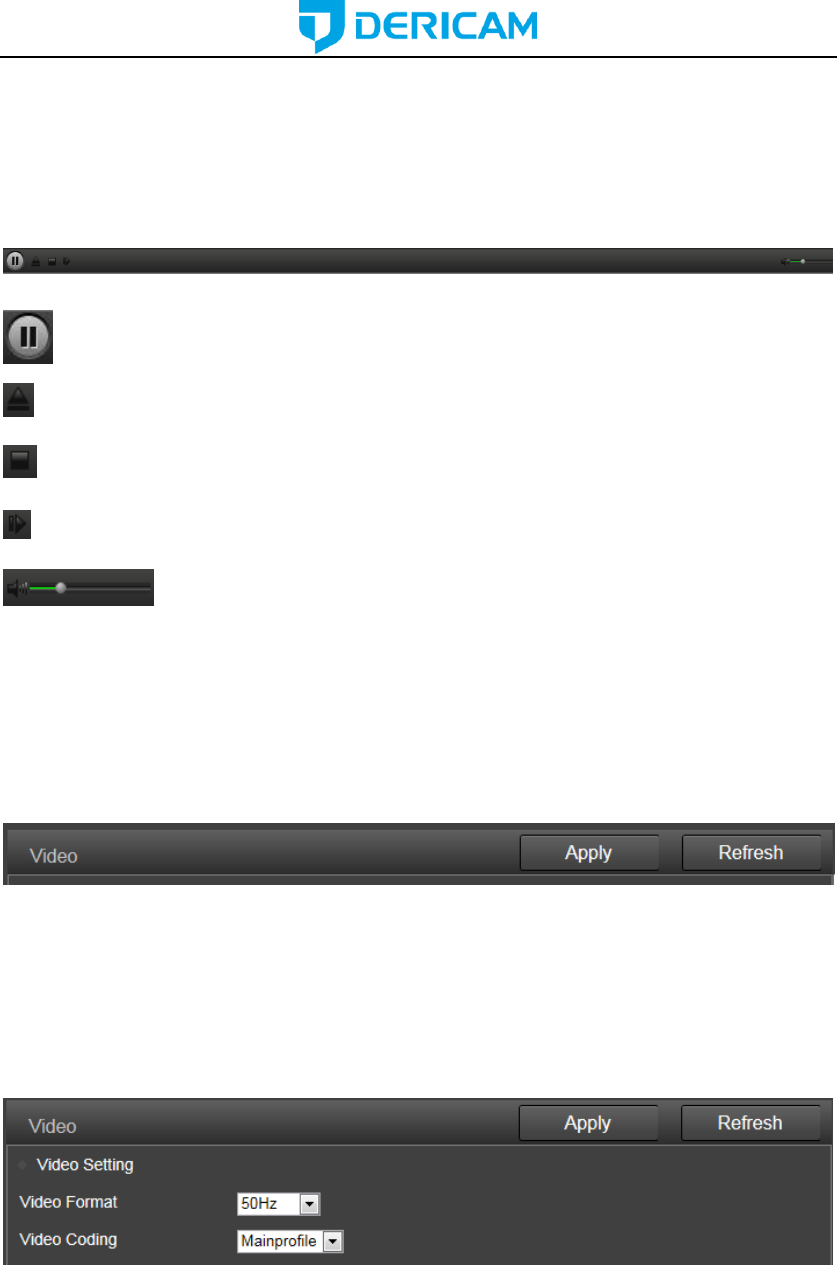
5.3.2 Tool bar
There is a tool bar in the playback page for you to control your playback as your wish.
: Play or Pause the playback process.
: Open the local file in your computer to playback.
: Stop or close the playback process.
: Playback next frame in the video.
: Adjust the audio volume when you playback the recordings.
5.4 Configuration page
Here you can set configurations for all features of the Dericam camera, please click the
“Apply” button to save your settings, click the “Refresh” to query or refresh the current
configuration in your camera.
5.4.1 Media settings
1) Video
Here you can set the configurations for power frequency and the encoding profile for
H.264. For the power frequency, 50Hz used for the region Europe and China, 60HZ used
for the region USA and Cananda.
Here you can set the configurations about the stream for both first and second stream in
your camera, such as the resolution, bitrate, frame rate, key frame interval, bitrate control
and the image quality level.
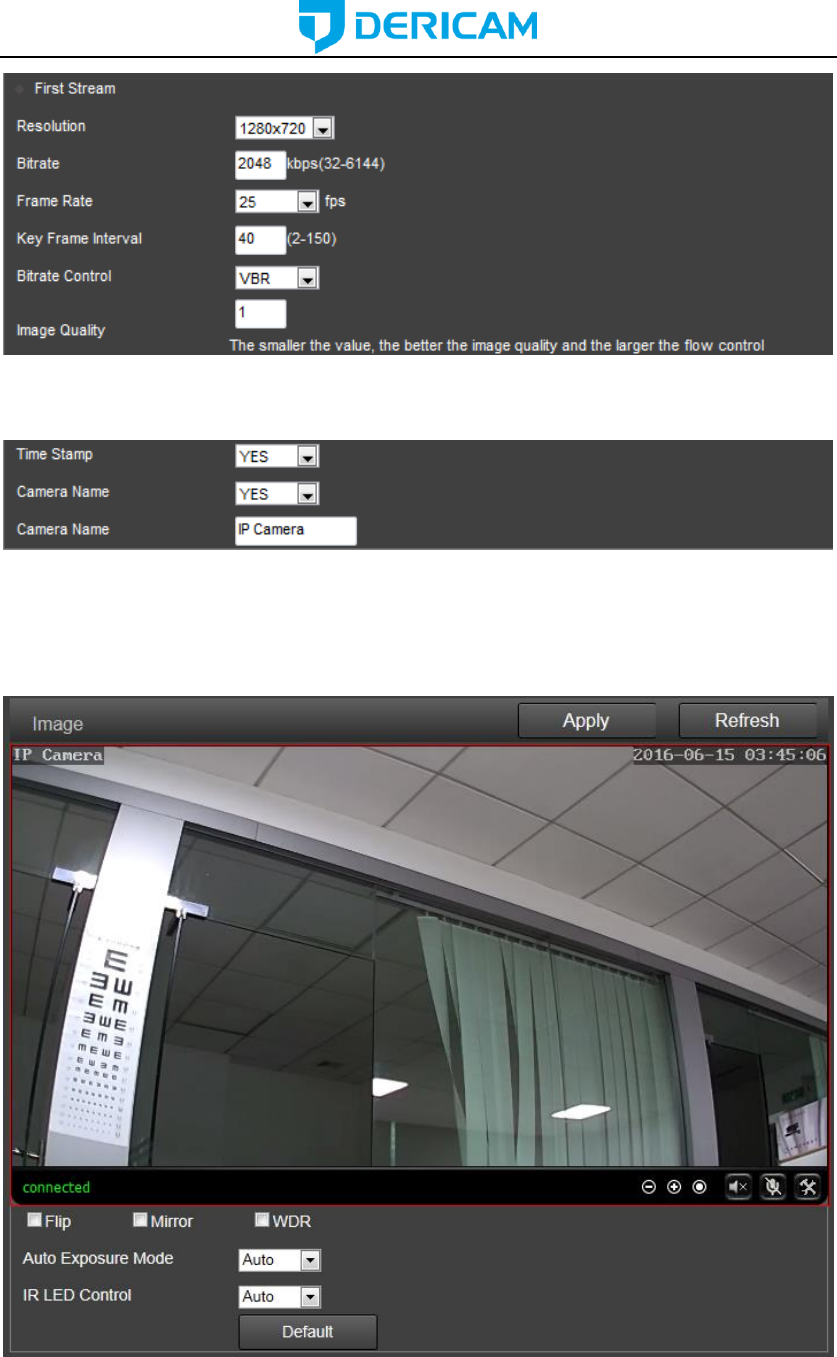
www.dericam.com-Shenzhen Dericam Technology Co.,Ltd
Here you can enable/diable the OSD for camera time or name, and modify the camera
name to what you like.
2) Image
Here you can control the camera video status, such as mirror the video, flip the video,
enable/disable the WDR.
Here you can set an appropriate exposure mode for your camera, such as indoor, outdoor
or let it change automatically as the change of the working environment.

www.dericam.com-Shenzhen Dericam Technology Co.,Ltd
Here you can control the LED light status:
Enable-Camera works at the night vision status always.
Disable-Camera works at the day vision status always.
Auto-Camera will change between the day and night vision status automatically according
the change of the outside light.
Note: To reset the default settings, please click the “Default” button.
3) Audio
You can set the configurations about audio in this section, including the encoding format
for audio, enable or disable the audio for first stream or second stream, the input type, the
volume for input and output.
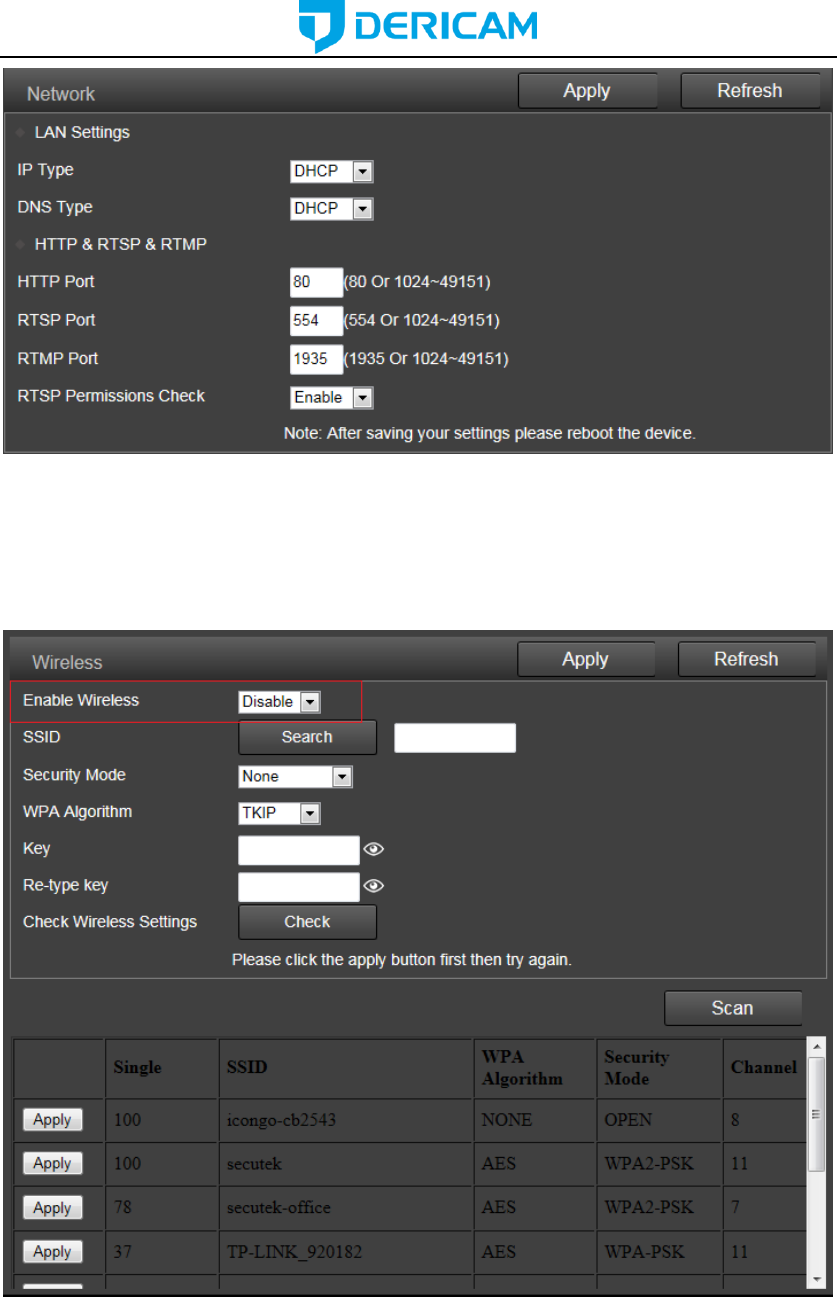
5.4.2 Network
1) Network
Here you can set the IP address information like DHCP or Static and the port for
HTTP/RTSP/RTMP.
Note: Please keep the type for IP and DNS are the same, both are the DHCP or Static
www.dericam.com-Shenzhen Dericam Technology Co.,Ltd
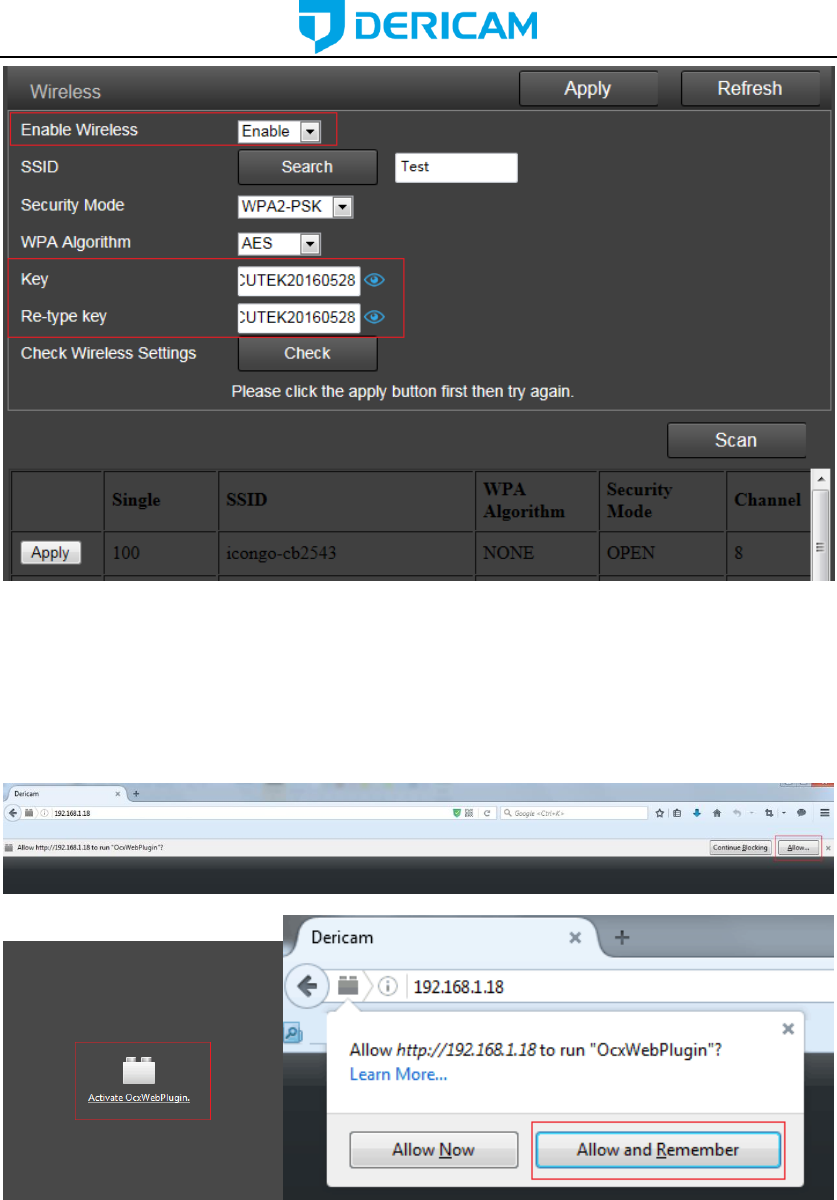
2) Wireless
Here you can search the WIFI AP around your camera, then select and apply one of them
to your camera. Please make sure you enable the wifi before you start to use it.
You can also check your settings by click the “Check” button after you save your settings.
Note: The Dericam camera use the wired Ethernet cable by default, it will work on the
wireless status automatically if you disconnect the Ethernet cable. But the wireless will not
work if you still connect the Ethernet cable in your camera.
www.dericam.com-Shenzhen Dericam Technology Co.,Ltd
Please make sure you enabled the wireless, or the camera will not work on the wifi
mode.
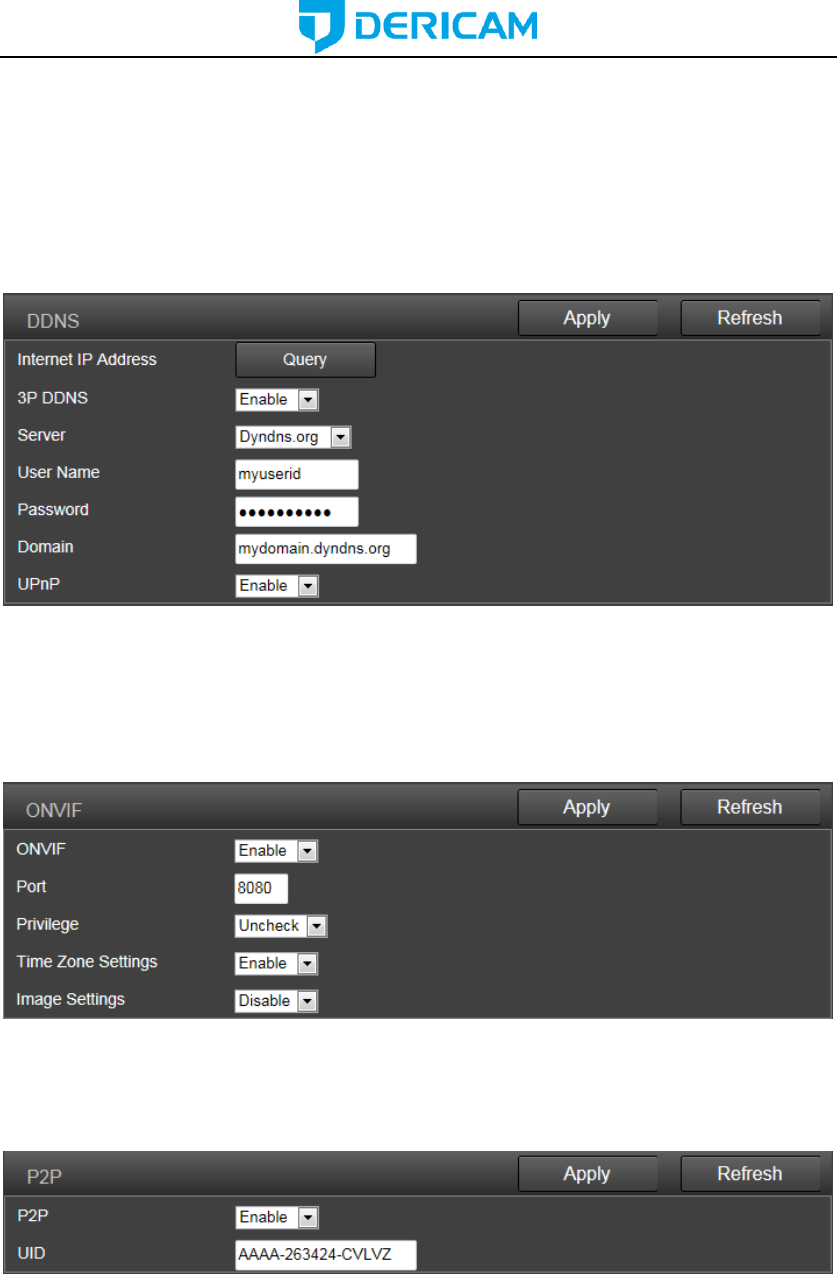
3) DDNS
Here you can set the third-party DDNS like Dyndns.org/3322.org/dynddns.us/No-ip.com
and the status of the UPnP for your camera. You can get the public IP address of the LAN
your camera works by click the “Query” button.
4) ONVIF
Here you can set the control configurations about ONVIF, such as enable status, port and
privilege. You can configure these information as the needs of your NVR, so the Dericam
camera can match your NVR best.
5) P2P
Here you can query the UID of your camera for P2P, and you can enable or disable the
P2P feature of your camera as you need.
5.4.3 Alarm
1) Audio Alarm
Here you can enable/disable the audio alarm of your camera. You can set the sensitivity of
the audio alarm for the responding of your camera.
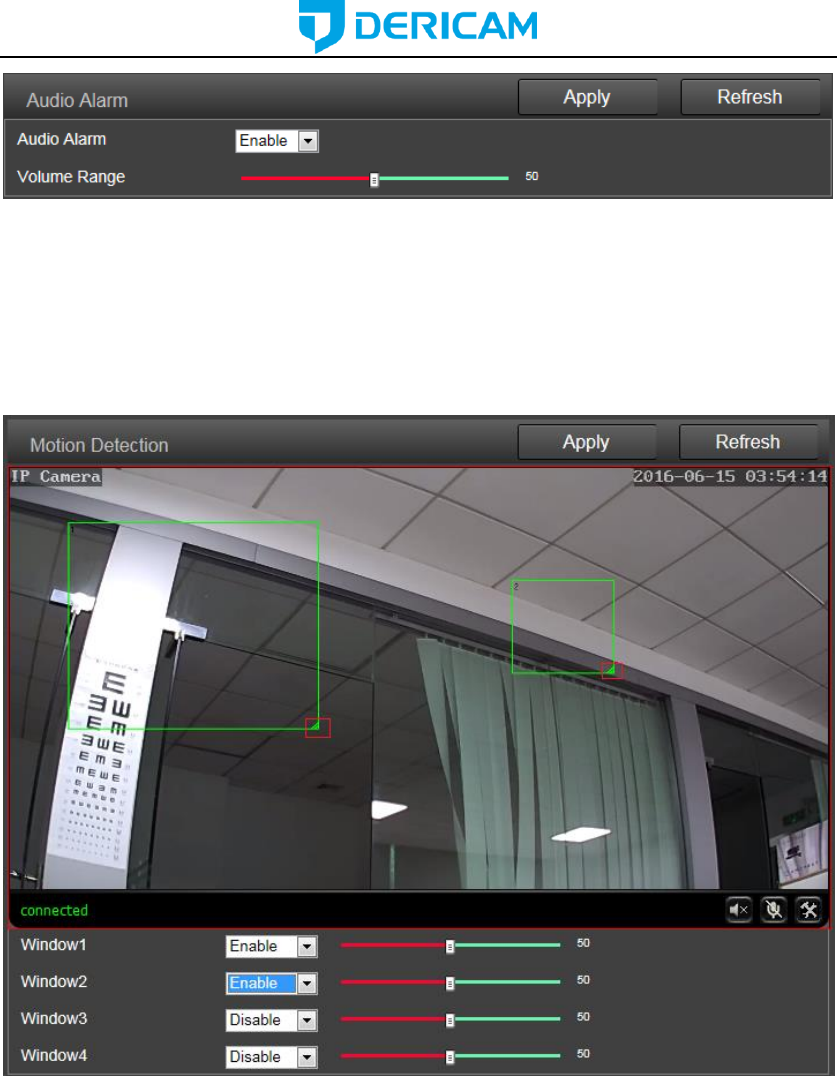
www.dericam.com-Shenzhen Dericam Technology Co.,Ltd
2) Motion Detection(Only for IE/Firefox in windows)
Here you can set the areas for the motion detection and the sensitivity of each area. You
can enable or disable each of the area, or change the size of each area by dragging the
bottom right corner of the setting window of square, or change the position by dragging
the setting window through your mouse.
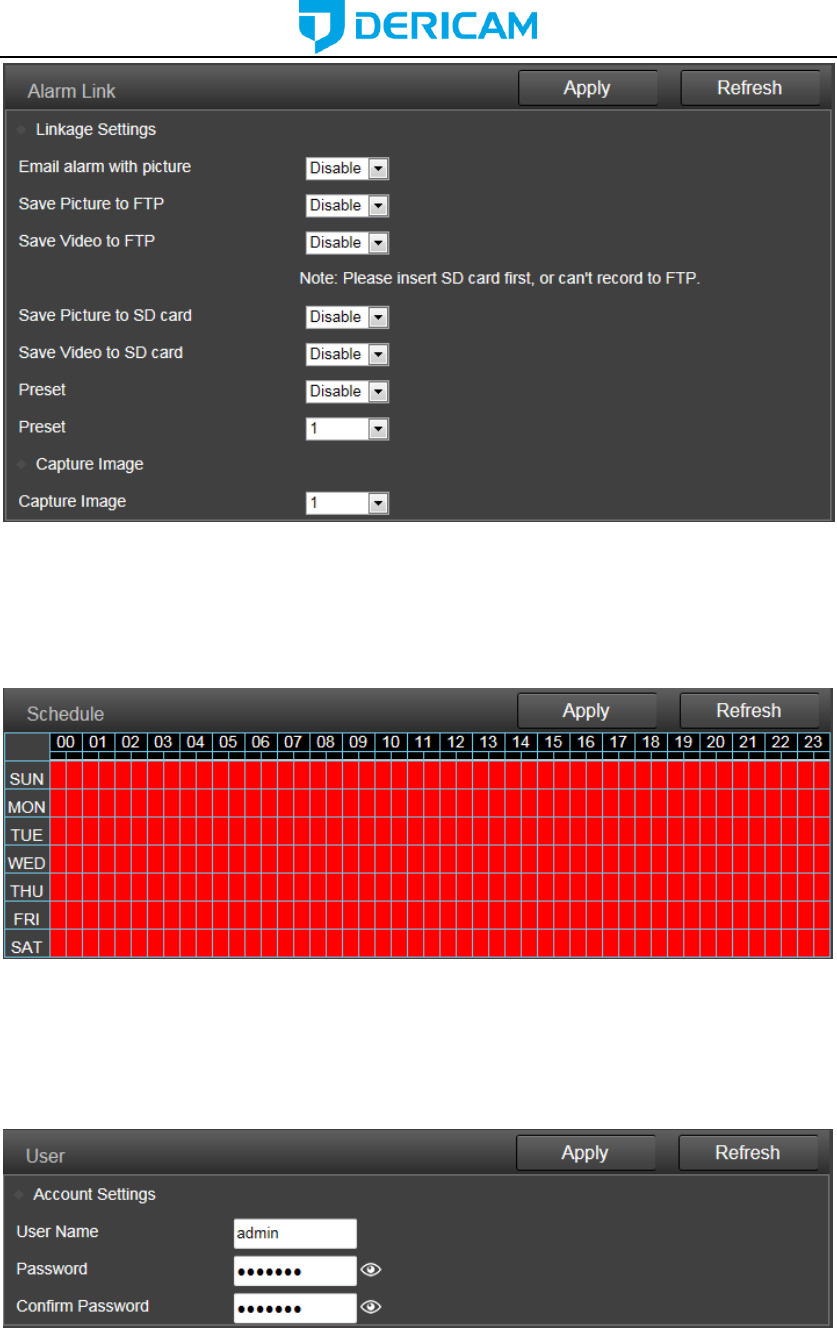
3) Alarm link
Here you can enable or disable the alarm actions once the alarm triggered, including send
email with picture, save alarm picture or video to SD card or FTP server, go to one certain
preset point and also the picture numbers for capturing.
www.dericam.com-Shenzhen Dericam Technology Co.,Ltd
4) Schedule
Here you can set the schedule for the motion detection alarm, red means enable and
white means disable. You can select certain one or several days or hours you like to
enable or disable the motion detection features.
5.4.4 Advance
1) User
Here you can edit the account information of the Dericam camera, such as change the
username or password, the default account is admin/admin.
2) Auto Snap
Here you can set the save path and time interval for the feature of capture pictures

www.dericam.com-Shenzhen Dericam Technology Co.,Ltd
automatically. You can select to save the picture to SD card, FTP server or both of them.
3) Timed Recording
Here you can set the configurations for timed recording, you can enable or disable it, set
the file size for each of the video, select the stream you want to record(first or second
stream) and the time schedule.
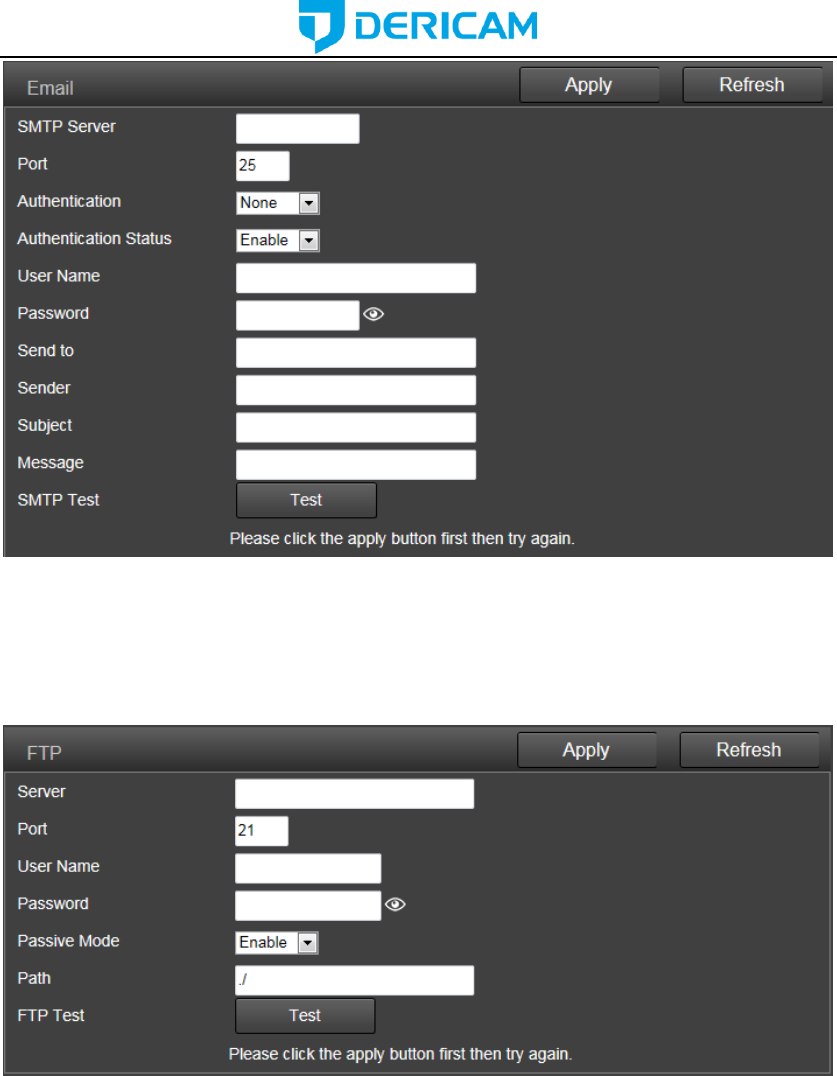
4) Email
Here you can set the sending or receiving email for your email alarm.
Note:
SMTP port is usually set as 25. Some SMTP servers have special port, such as 587 or
465.
Authentication is used for transport layer security, it is usually none. If you use gmail and
enable the authentication with TLS or STARTTLS, the SMTP port must be set to 465 or
587, it depends the authentication type you selected.
You can click the “Test” button to check whether your email settings is valid or not.
www.dericam.com-Shenzhen Dericam Technology Co.,Ltd
5) FTP
Here you can set the FTP server configurations for your FTP storage for picture or video.
You can click the “Test” button to check whether your settings is ok or not. Please make
sure you have input the right folder path in your FTP server.
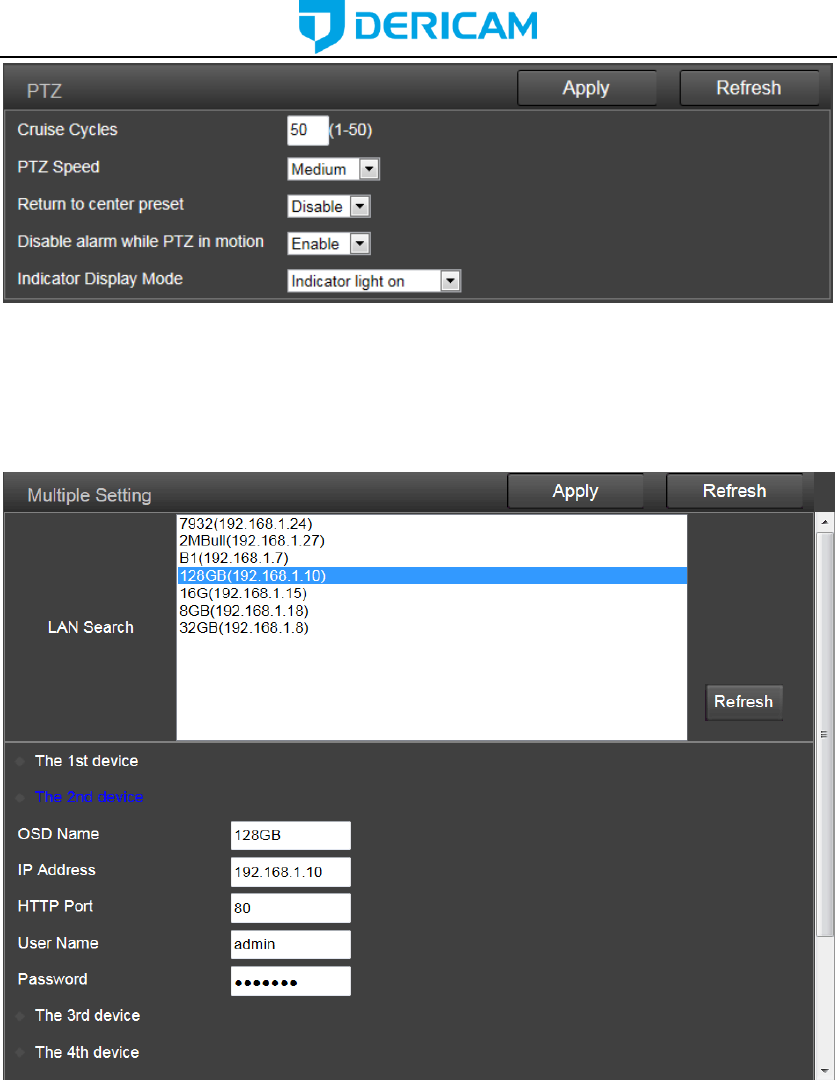
6) PTZ
Here you can set the configurations about Pan/Tilt motion for your camera.
Cruise cycles decide the time for your vertical and horizontal cruise.
If you enable the “Return to center preset”, it will go to the center preset when the cruise is
complete.
The “Indicator Display Mode” decides the status for the system LED status in the
front-head of the Pan/Tilt.
www.dericam.com-Shenzhen Dericam Technology Co.,Ltd
7) Multiple Setting(Only for IE in windows)
Here you can search the Dericam cameras in your LAN and add them into your multiple
device group. Then you can view them at the live page together.
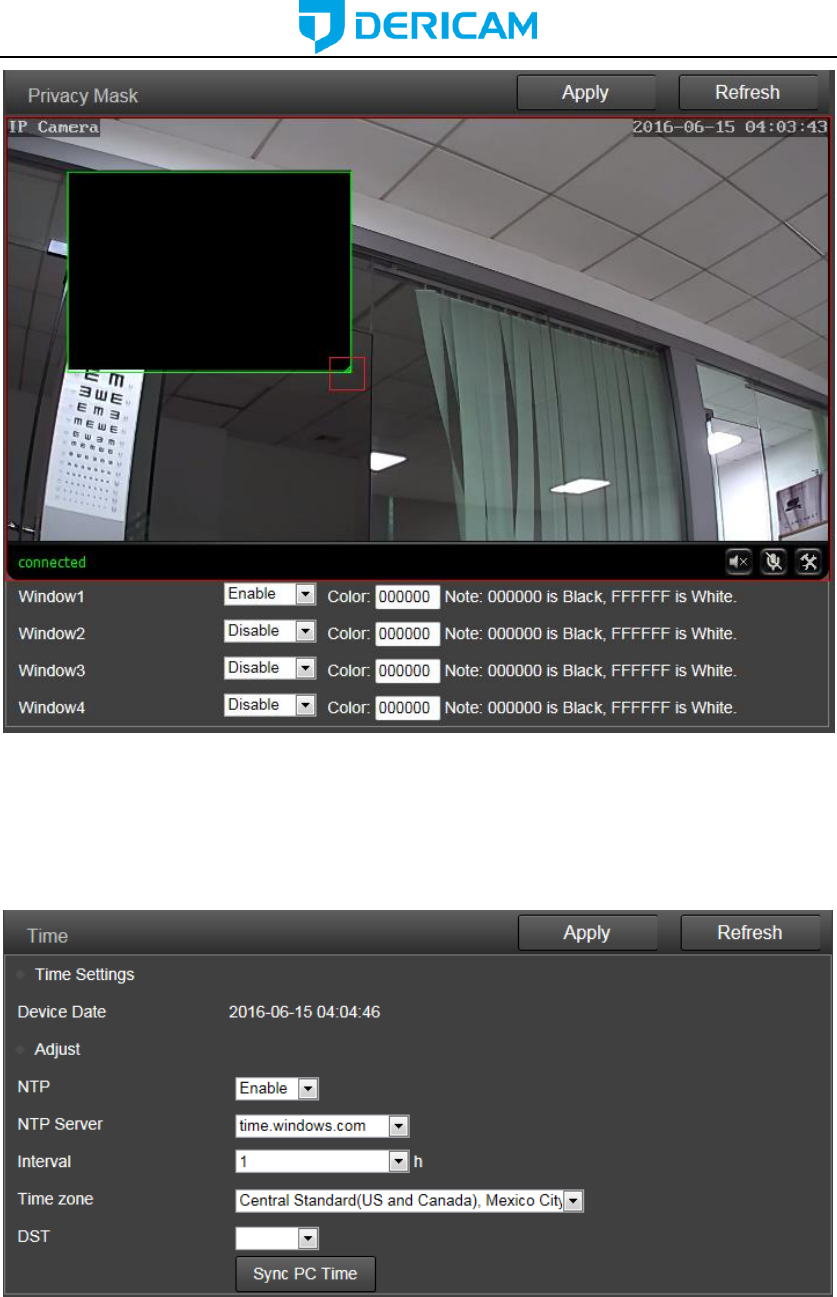
8) Privacy Mask(Only for IE/Firefox in windows)
Here you can set the area and color for the privacy mask of your camera, it up to 4 areas.
You can set the color of the mask, change the size of the area by dragging the
right-bottom corner, change the position of the area by dragging the area.
www.dericam.com-Shenzhen Dericam Technology Co.,Ltd
5.4.5 System
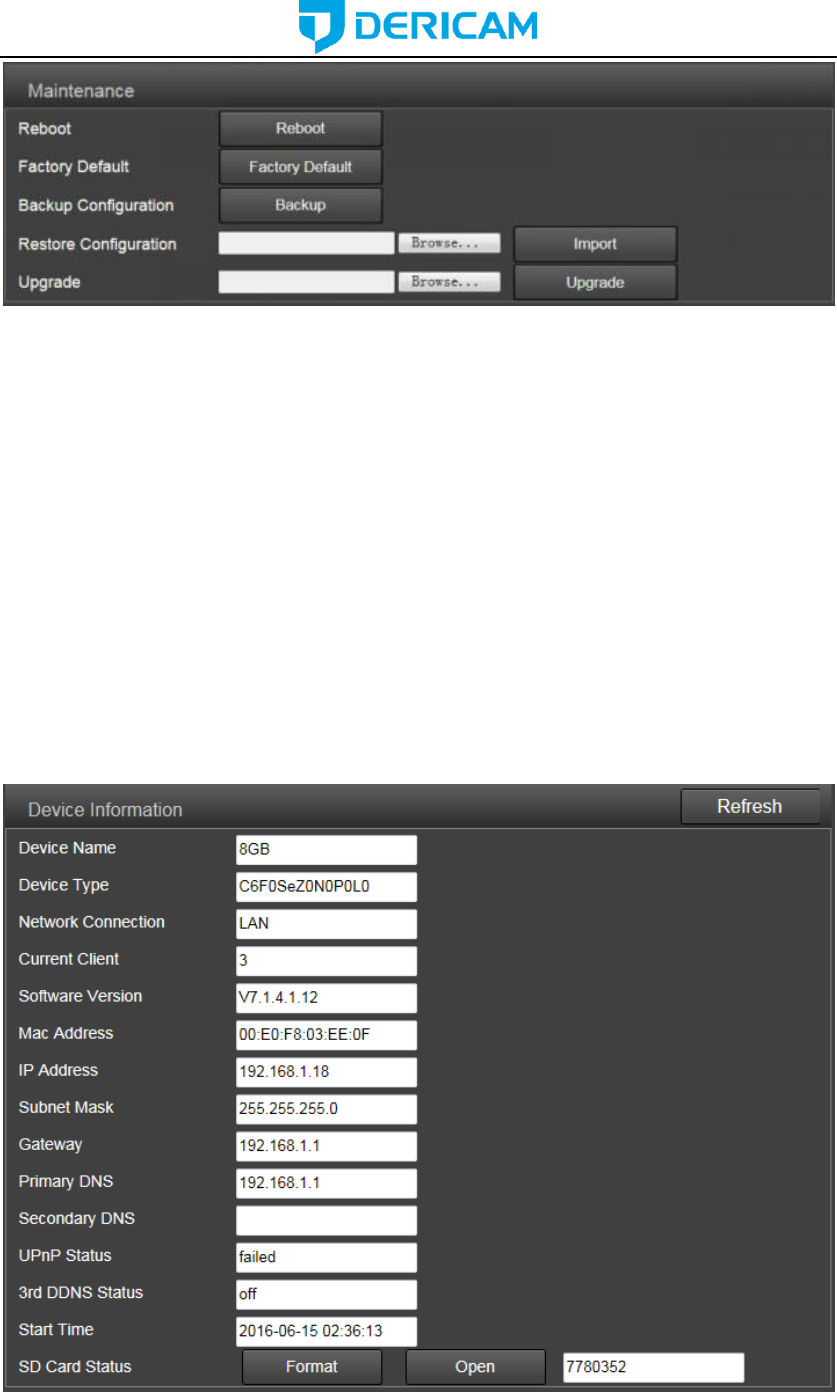
1) Time
Here you can set the time and date, the status for NTP and DST, the time zone for your
camera.
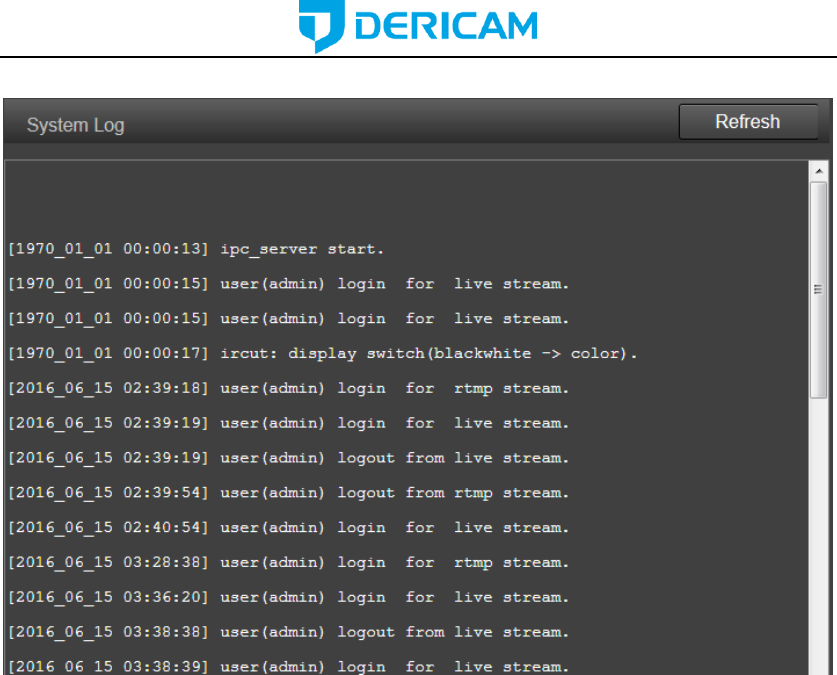
2) Maintenance
www.dericam.com-Shenzhen Dericam Technology Co.,Ltd
Reboot: reboot the camera.
Factory Default: restore the camera settings to the factory default settings.
Backup Configuration: backup the current settings of the camera, it will generate a file
name “config_backup.bin” for you to save.
Restore Configuration: Import and restore the configuration file you backup before.
Please browse and select the file you want to import, then click the “Import” button.
Upgrade: Upgrade the firmware. Please browse and select the file you want to upgrade,
then click the “Upgrade” button.
3) Device Information
Here you can query and check the main information and status of the Dericam camera,
including the name, time, IP, firmware version, DDNS and UPnP status, and the SD card
left space.
By clicking the “Format” button, you can format the SD card in your camera. By clicking
the “Open” button you can open and browser the contents in your SD card.
4) System Log
www.dericam.com-Shenzhen Dericam Technology Co.,Ltd
Here you can query the history operation or running log for your camera.
www.dericam.com-Shenzhen Dericam Technology Co.,Ltd
6. Frequently Asked Questions
6.1 How to start the live view in computer by web browser?
Before you start the live view in windows OS by IE browser or Mozilla Firefox. Please
install the plugin first. But for the Google Chrome in Windows/Mac OS and Safari in Mac,
you can start the live view directly by accessing the IP address of your camera, no need to
install the plugin.
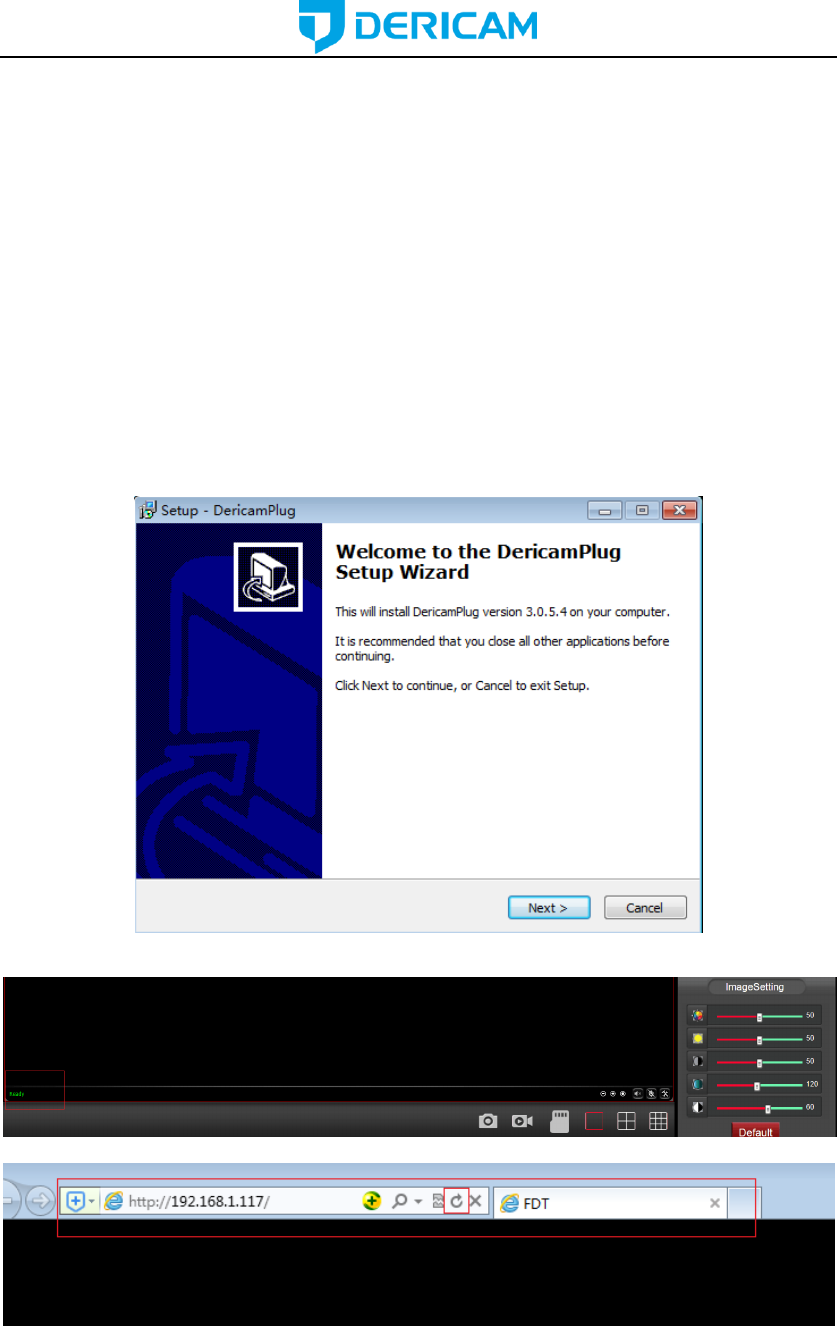
6.1.1 How to install the plugin for IE browser in Windows OS?
When you login the camera in your computer at the first time by IE browser, the IE
browser will prompt automatically to show you to allow the installing of the Dericam
camera plugin named DericamPlug.
1. Allow to install this plugin after you login the camera.
2. Install the plugin after you login the camera.
3. Refresh the IP address when it is ready to login and access your camera.
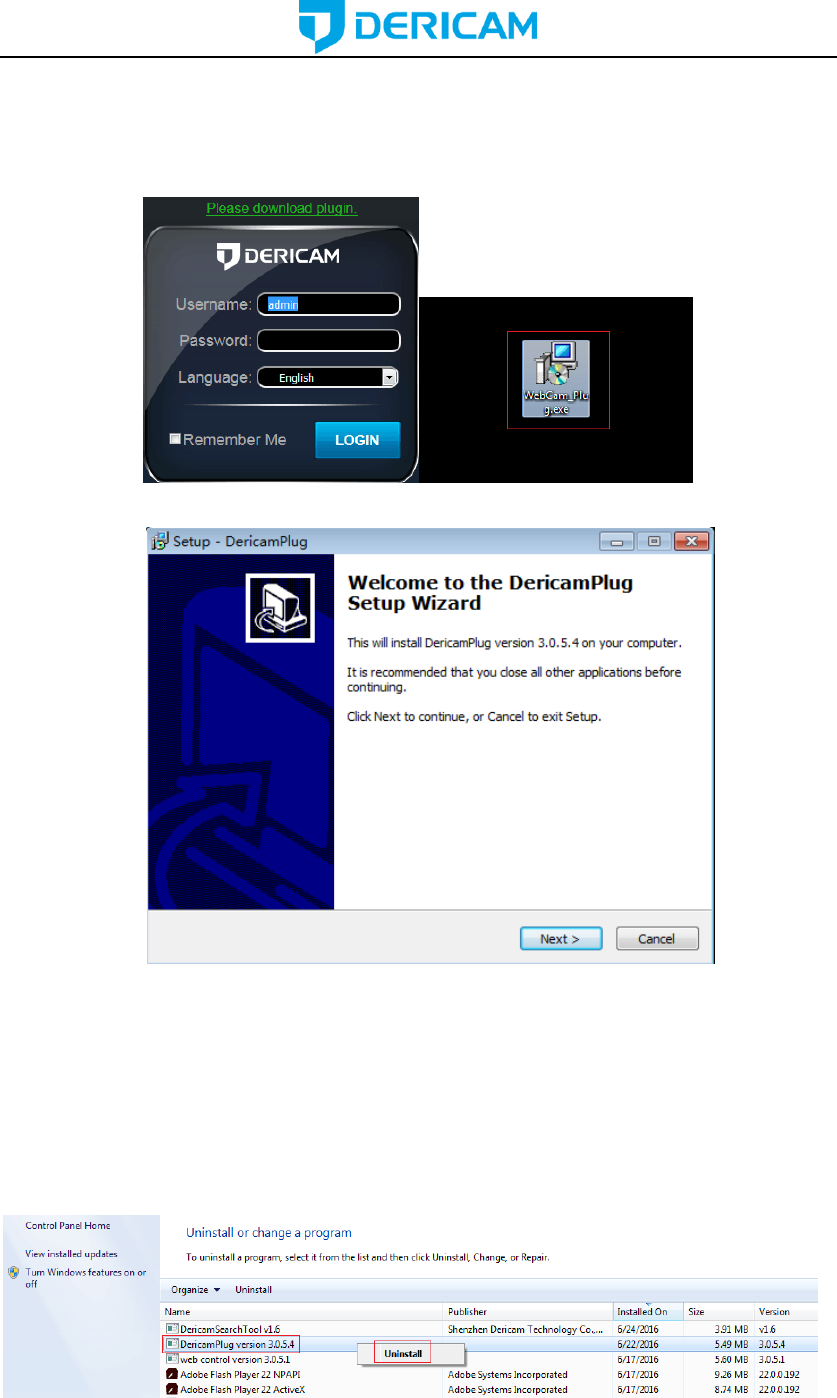
6.1.2 How to install the plugin for Mozilla Firefox browser in Windows
OS?
www.dericam.com-Shenzhen Dericam Technology Co.,Ltd
When you login the camera in your computer at the first time by Firefox browser, it will
show you to download the plugin. Please click the text link to download and save this
plugin in you computer, and install it by manually.
1. Click and download the plugin from the login page, save it to your computer
2. Double click the DericamPlug.exe file to install it in your computer.
3. Refresh the IP address in your web browser to access your camera after you install
the plugin successfully in your computer.
6.2 How to uninstall the plugin in your computer?
Please go to Control Panel->Uninstall a program to find the program named
DericamPlug, then uninstall it directly.
Note: Please make sure you closed the web browser who is using this plugin, or it may
could not be uninstalled completely.
www.dericam.com-Shenzhen Dericam Technology Co.,Ltd
6.3 Forgotten the username or password of the camera.
Here have a hard reset button in the camera. Please press and hold the reset button for
5-10 seconds. Upon releasing the reset button, the camera will reboot automatically and
the username and password will be restored to the factory default settings.
Default username: admin
Default password: admin
6.4 Could not record videos or snap pictures in IE 11 or Firefox
of Windows 10 OS.
Because the security limitation of IE 11 and windows, you could not enable the
recording/snap path to store. Please run your web browser as administrator authority, and
set an available file path to save your recordings and pictures. Then they will work in your
computer.
6.5 Camera could not connect the wireless network by wifi.
1. Please go to the CONFIG->Network->Wireless page through web browser, here is a
check button, you can check whether your wifi settings are right or not by this button. If
your settings are correct, it will show you success.
2. Please make sure these special characters did not be included in your wifi password,
such as & = ’ ’’ \ % +.
3. The camera only support 2.4G wifi, did not support 5G. Please make sure you did not
set the 5G wifi configuration to the camera.
4. Please make sure you have enabled the wireless.
5. Please make sure your wifi password is correct, you can display the password by
click the eye-icon beside the input box.
www.dericam.com-Shenzhen Dericam Technology Co.,Ltd
6.6 The plugin is blocked by Firefox.
Firefox will block the NPAPI plugin by default, it will prompt you to allow this plugin when
you access the camera or you can active the plugin after you login the camera.
Please refresh the IP address of your camera to access your camera again once you
allow or active the plugin in your Firefox browser.