DewertOkin CU155PAPL CU155+ User Manual 1
DewertOkin GmbH CU155+ 1
User Manual
Kurzanleitung CU155+
22.08.2018 90532 1.0 1 / 3
Quittierung: Ein erfolgreicher Abschluss des jeweiligen Vorgangs wird durch 2x blinken der UBB und ein „Piep“ Signal signalisiert.
Handsender/App anlernen: Zur Inbetriebnahme des RF-Handsenders und eines Bluetooth® Gerät muss die Funkkommunikation mit der CU155+ aufgebaut werden. Für das Verfahren Ihres Systems mit einem
Bluetooth® Gerät (z.B: Smartphone / Tablet), laden Sie die „OKIN“ App von der entsprechenden Plattform herunter und installieren diese auf Ihrem Gerät.
Automatisch anlernen
Verbinden Sie die CU155+ mit dem Antriebssystem und stecken Sie
anschließend den Netzstecker in die Steckdose.
Die CU155+ befindet sich für 120sec im Pairing Modus, dieser teilt
sich wie folgt auf: In den ersten 60sec kann ein RF-Handsender
angelernt werden, in den zweiten 60sec ein Bluetooth® Gerät.
Während der Anlernphase für RF-Handsender leuchten die UBB und
die blaue LED.
RF-TOPLINE / RF-LITELINE: Betätigen Sie gleichzeitig die Tasten
1 + 2. Ein erfolgreicher Abschluss wird quittiert.
Nach Beendigung des Anlernvorgangs für RF-Handsender erlischt
die UBB. Die blaue LED zum Anlernen eines Bluetooth® Gerätes
beginnt zu blinken.
Ist das Anlernen für Bluetooth® Geräte abgelaufen oder ein Gerät
verbunden, erlischt die blaue LED. Ein erfolgreicher Abschluss wird
quittiert.
Drücken Sie während der Anlernphase für RF-Handsender an einem
bereits angemeldeten Handsender eine beliebige Taste, wird auf
den Bluetooth® Anlernmodus gewechselt.
Sind der RF-Handsender bzw. ein Bluetooth® Gerät innerhalb der
Pairing Phase angelernt, wird der Pairing Modus automatisch
beendet. Die UBB und die blaue LED werden ausgeschaltet.
Wiederholung vom automatischen Anlernen: Zuerst ziehen Sie den
Stecker von der Spannungsversorgung, warten Sie 60sec, und
stecken Sie anschließend den Stecker wieder in die Spannungsver-
sorgung. Sie können jetzt mit dem neuen Anlernvorgang beginnen.
Parallelbetrieb: Mit den Tasten (3) und (4) können Sie nach der
gleichen Methode ein zweites Antriebssystem zur Parallelfahrt von
zwei Applikationen pairen. Nehmen Sie immer nur ein System, nie
mehrere Systeme gleichzeitig in Betrieb.
Manuell einlernen
Das System muss an die Spannungsversorgung angeschlossen sein.
Verbinden Sie die CU155+ mit dem Antriebssystem.
Betätigen Sie 2x kurz hintereinander die Pairing-Taste (a) an de
r
CU155+, die UBB und die Pairing LED (blau) leuchten. Die
CU155+ befindet sich für 120sec im Pairing Modus, der teilt sich
wie folgt auf: In den ersten 60sec kann ein RF-Handsender
angelernt werden, in den zweiten 60sec ein Bluetooth® Gerät.
Während des Anlernen vom RF-Handsender leuchten die UBB
und die blaue LED.
RF-TOPLINE / RF-LITELINE: Betätigen Sie gleichzeitig die
Tasten 1 + 2. Ein erfolgreicher Abschluss wird quittiert.
Nach Beendigung des Anlernvorgangs für RF-Handsender
erlischt die UBB. Die blaue LED zum Anlernen eines Bluetooth®
Gerätes beginnt zu blinken.
Ist das Anlernen für Bluetooth® Geräte abgelaufen oder ein Gerät
verbunden, erlischt die blaue LED. Ein erfolgreicher Abschluss
wird quittiert.
Drücken Sie während der Anlernphase für RF-Handsender an
einem bereits angemeldeten Handsender eine beliebige Taste,
wird auf den Bluetooth® Anlernmodus gewechselt.
Sind der RF-Handsender bzw. ein Bluetooth® Gerät innerhalb der
Pairing Phase angelernt, wird der Pairing Modus automatisch
beendet. Die UBB und die blaue LED werden ausgeschaltet.
Parallelbetrieb: Mit den Tasten (3) und (4) können Sie nach der
gleichen Methode ein zweites Antriebssystem zur Parallelfahrt
von zwei Applikationen pairen. Nehmen Sie immer nur ein
System, nie mehrere Systeme gleichzeitig in Betrieb.
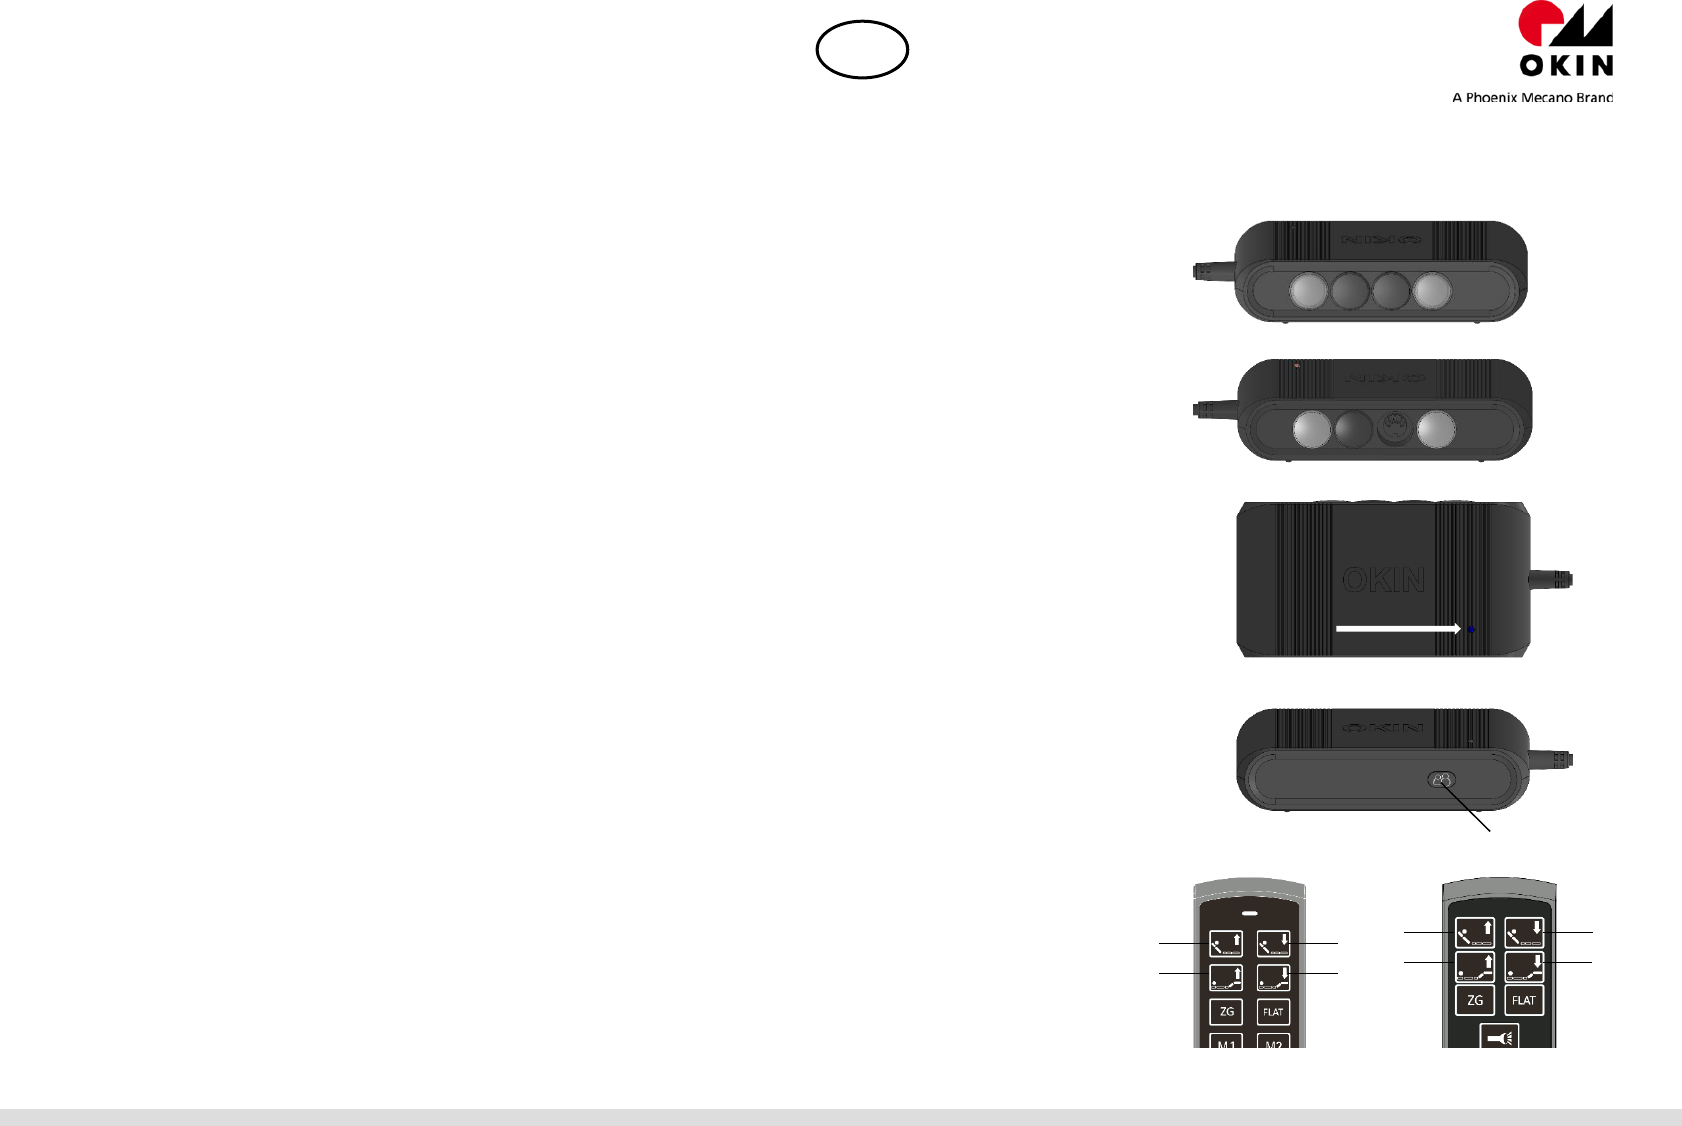
CU155+
Achtung! Nehmen Sie immer nur ein System, nie mehrere Systeme gleichzeitig in Betrieb.
Zum Einstellen auf Werkseinstellung führen Sie folgende Schritte durch.
Betätigen Sie 4x kurz hintereinander die Pairing-Taste (a). Die Pairing-LED schaltet sich ein.
Betätigen Sie jetzt 1x die Pairing-Taste (a). Die Pairing-LED erlischt.
Der RF-TOPLINE / RF-LITELINE ist deaktiviert.
RF-TOPLINE
RF-LITELINE
D
a
1 2 1 2
3 4 3 4
Quick Guide CU155+
22.08.2018 90532 2.0 2 / 3
Acknowledgement: The floor lighting will blink twice and a peep sound to signal the successful completion of the step.
Teach-in for the RF remote or app: To start using the RF remote with a Bluetooth® device, the wireless link with the CU155+ must first be established. In order to use a Bluetooth® device
(a smart phone or tablet) with your system, you will first need to download and install the "OKIN" app for your device.
Automatic teach-in
Connect the CU155+ to the drive system and put the power plug into
the socket.
The CU155+ will be in pairing mode for 120sec which is divided as
follows: During the first 60sec, an RF remote can be discovered (the
teach-in). During the next 60sec, a Bluetooth® device can be
discovered.
The floor lighting and the blue LED are illuminated during this teach-
in phase for the RF remote.
RF-TOPLINE / RF-LITELINE: Simultaneously press buttons 1 and 2
.
A successful pairing will be acknowledged.
The floor lighting will switch off after the teach-in process for the RF
remote is finished. The blue LED for pairing with a Bluetooth®
device starts flashing.
The blue LED switches off when the Bluetooth® pairing process has
timed out or when the device has connected successfully. A
successful pairing will be acknowledged.
If, during the RF remote's teach-in process, you press any button on
an already paired RF remote, then it switches to the Bluetooth®
teach-in mode.
If the RF remote or a Bluetooth® device is discovered during the
pairing phase, then this pairing mode is automatically ended. The
floor lighting and the blue LED switch off.
Repeat the automatic teach-in process. First, remove the plug from
the power supply. Then wait 60sec and insert the plug back into the
power supply. You can now start the new teach-in process.
Parallel operation: According to this method you can pair either a 2nd
drive system for parallel operation of two application or an external
Power Socket by using button (3) and (4). Only commission one
system at a time. Never configure multiple systems simultaneously.
For reset to factory default, perform the following steps.
Manuel teach-in
The system must be connected to the power supply.
Connect the CU155+ to the drive system.
Quickly press the Pairing button (a) twice on the CU155+. The
floor lighting and the blue pairing LED will illuminate. The
CU155+ is now in pairing mode for 120 seconds, which is divided
as follows: During the first 60 seconds, an RF remote can be
discovered (the teach-in). During the next 60 seconds, a
Bluetooth® device can be discovered.
The floor lighting and the blue LED are illuminated during this
teach-in phase for the RF remote.
RF-TOPLINE / RF-LITELINE: Simultaneously press buttons 1
and 2. A successful pairing will be acknowledged.
The floor lighting will switch off after the teach-in process for the
RF remote is finished. The blue LED for pairing with a Bluetooth®
device starts flashing.
The blue LED switches off when the Bluetooth® pairing process
has timed out or when the device has connected successfully.
A successful pairing will be acknowledged.
If, during the RF remote's teach-in process, you press any button
on an already paired RF remote, then it switches to the
Bluetooth® teach-in mode.
If the RF remote or a Bluetooth® device is discovered during the
pairing phase, then this pairing mode is automatically ended. The
floor lighting and the blue LED switch off.
Parallel operation: According to this method you can pair either
a 2nd drive system for parallel operation of two application or an
external Power Socket by using button (3) and (4). Only
commission one system at a time. Never configure multiple
systems simultaneously. For reset to factory default, perform the
following steps.
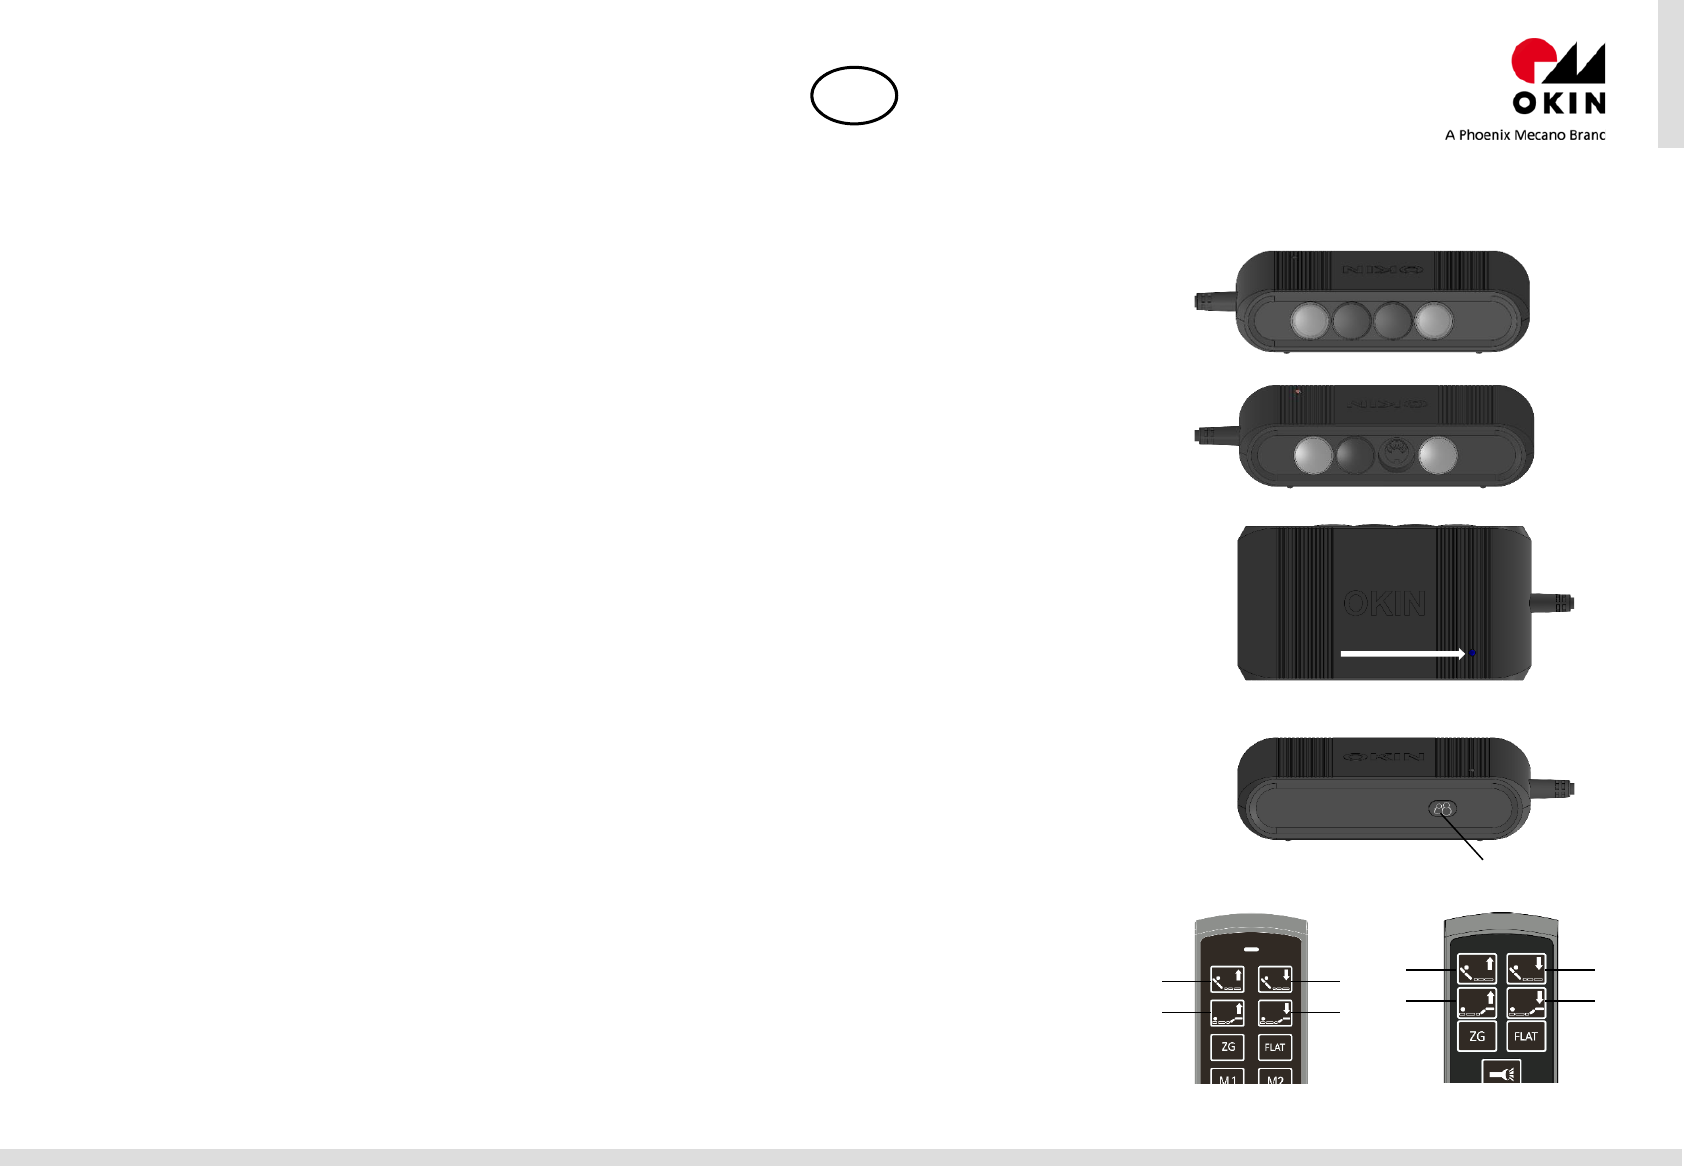
CU155+
Note! Only commission one system at a time. Never configure multiple systems simultaneously.
For reset to factory default, perform the following steps.
Give the Pairing button (a) 4x short press in succession. The Pairing LED1 lights on.
Now actuate the Pairing button (a) one times. The Pairing LED lighting extinguishes.
The RF-TOPLINE / RF-LITELINE is deactivated.
RF-TOPLINE
RF-LITELINE
GB
a
1 2 1 2
3 4 3 4
Quick Guide CU155+
22.08.2018 90532 2.0 3 / 3
GB
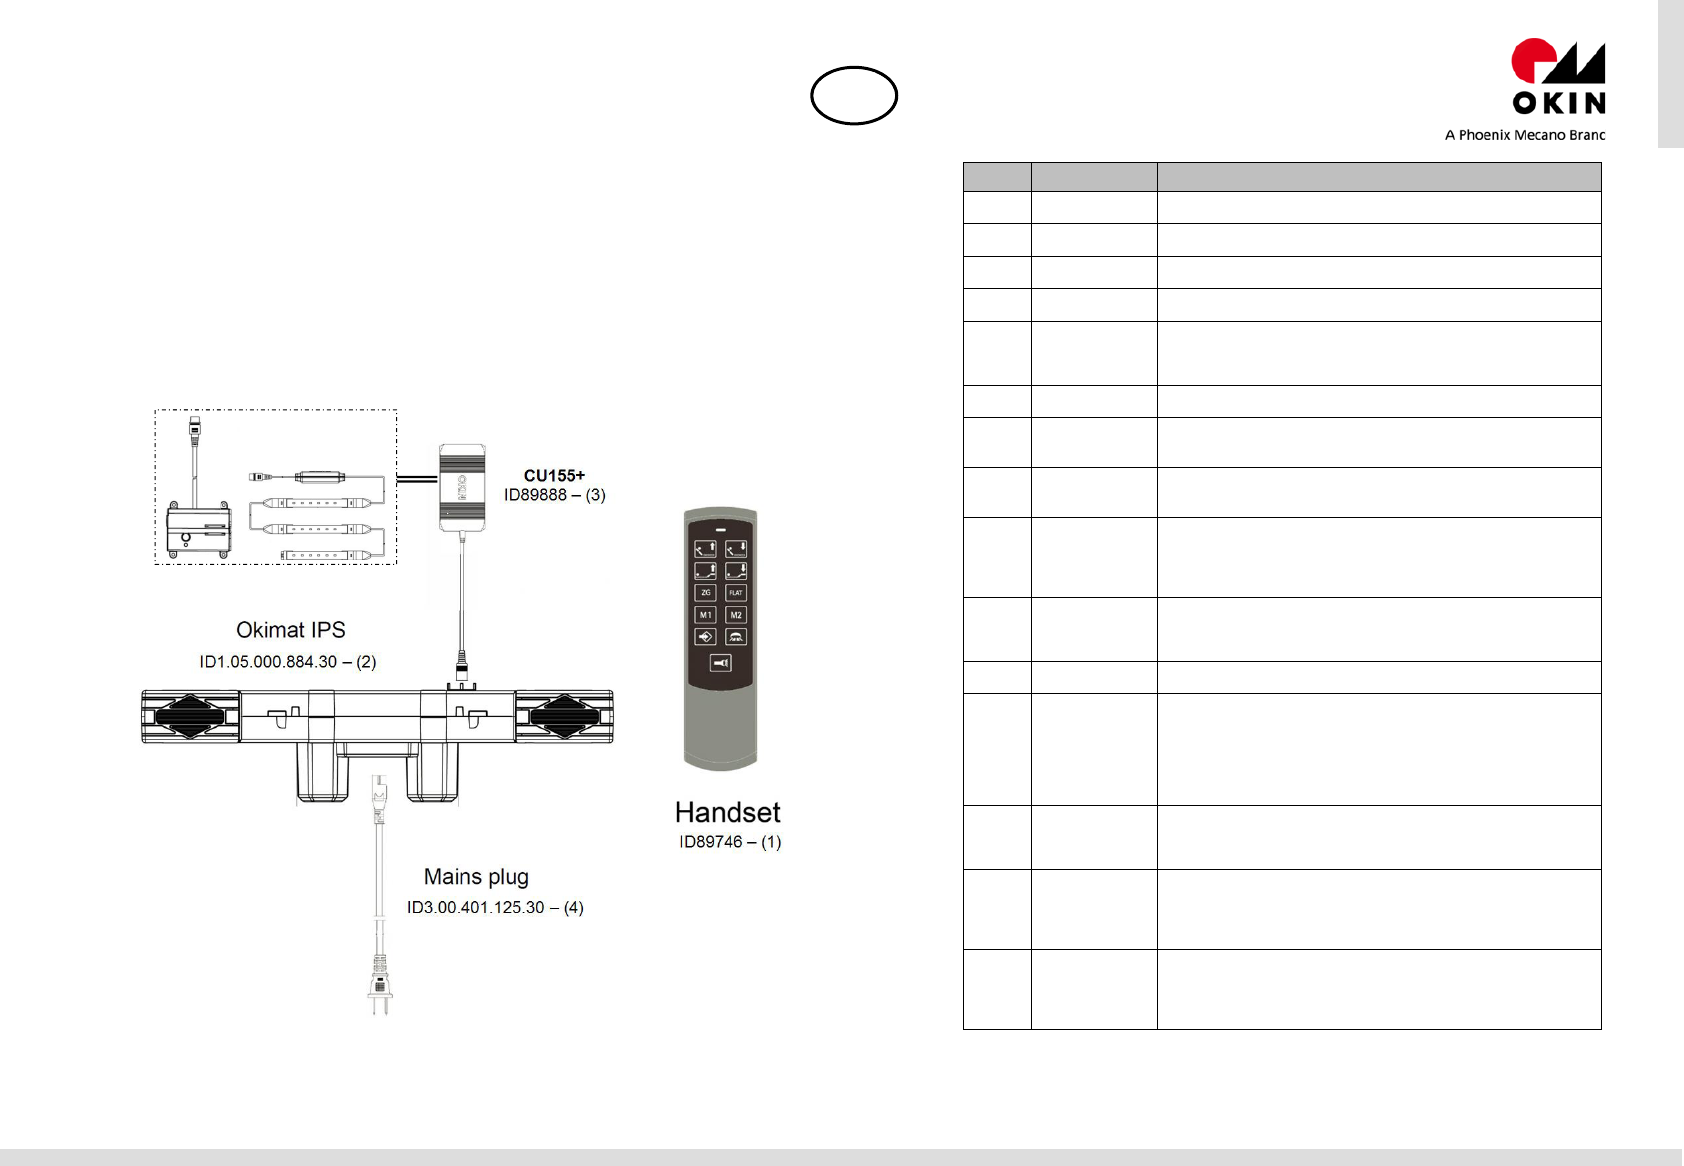
1. Required testing equipment
Handset RF-Topline ID89746 – (1)
Okimat IPS ID1.05.000.884.30 – (2)
DUT (e.g. CU155+ ID89888) – (3)
Mains plug (EUR) ID3.00.401.125.30 – (4)
Power down box (e.g. ID74389) (option) – (5)
LED-set (option) – (6)
2. Preparation / Connecting
All pictures shown are for illustration purpose only
Actual product may vary
optional (MFP)
Power down
box (5)
LED-set (6)
End of testing
Button Function Direction
1 M1 out Moves M1 out. The motor will run as long the button is pressed. And
the backlight turns on.
2 M1 in Moves M1 in. The motor will run as long the button is pressed. And
the backlight turns on.
3 M2 out Moves M2 out. The motor will run as long the button is pressed. And
the backlight turns on.
4 M2 in Moves M2 in. The motor will run as long the button is pressed. And
the backlight turns on.
5 ZG / REJUVEN8
Fixed memory position ZG or REJUVEN8. Briefly press and than
release the button (press and release) drive M1 back to 20mm stroke
and M2 foot to 44mm stroke.
To stop the automatic drive any key can be pressed to stop.
6 Flat Briefly press and then release the button (press and release), the M1
and M2 completely move in.
7
Memory-Position
1
By briefly pressing and immediately releasing the Memo 1 button
(Press and Release), the system moves to the stored position and the
backlight turns on.
8
Memory-Position
2
By briefly pressing and immediately releasing the Memo 2 button
(Press and Release), the system moves to the stored position and the
backlight turns on.
9 Memory-save
Press the button "Memory save button" once. Then within 3 seconds
desired memory button to be switched.The desired traversing position
is stored if the signal confirmations beep twice and the integrated UBB
on the controller flashes twice to confirm the completion of the storage
process.
10 UBB on / off
Switches external under bed ilumination at MFP-Port on /off.
UBB off - press button then UBB switch on.
UBB on - press button then UBB switch off.
The UBB automatically turns off after about 30min.
11 Flashlight on / off Turn on the flashlight. As long as the button is pressed, the flashlight
is switched on. And the backlight turns on.
1 & 2 Paring
=> System 1
Press the function key on the control unit, 2x briefly.
The function / pairing LED lights up and the system is now in teach-in
mode for approx. 60 seconds. Then simultaneously press button 1
and button 2 on the RF transmitter. The LED starts flashing and
confirms the successful pairing process by a permanent LED light.
A beep on the control unit will signal the completion of the pairing
process.
1 & 2 UBB on / off
Switches external under bed ilumination at MFP-Port on /off.
UBB off - press button then UBB switch on.
UBB on - press button then UBB switch off.
The UBB automatically turns off after about 30min.
3 & 4
Paring
=> System 2
Option
Then simultaneously press the button 3 and button 4 on the RF
transmitter. The LED starts flashing and confirms the successful
pairing process by a permanent LED light.
A beep on the control unit will signal the completion of the pairing
process.
3 & 4
Wireless socket
on / off
Option
external wireless socket on / off.
Status of wireless socket switched off -> Simultaneously pressing
button 3 and button 4 switches on the socket.
Status of wireless socket switched on -> Simultaneously pressing the
button 3 and button 4 switches off the socket
brouillage est susceptible d'en compromettre le fonctionnement.

FCC Warning
This device complies with part 15 of the FCC Rules. Operation is subject to the following two conditions:
(1) This device may not cause harmful interference, and (2) this device must accept any interference
received, including interference that may cause undesired operation.
Any Changes or modifications not expressly approved by the party responsible for compliance could
void the user's authority to operate the equipment.
Note: This equipment has been tested and found to comply with the limits for a Class B digital device,
pursuant to part 15 of the FCC Rules. These limits are designed to provide reasonable protection
against harmful interference in a residential installation. This equipment generates uses and can radiate
radio frequency energy and, if not installed and used in accordance with the instructions, may cause
harmful interference to radio communications. However, there is no guarantee that interference will not
occur in a particular installation. If this equipment does cause harmful interference to radio or television
reception, which can be determined by turning the equipment off and on, the user is encouraged to try to
correct the interference by one or more of the following measures:
-Reorient or relocate the receiving antenna.
-Increase the separation between the equipment and receiver.
-Connect the equipment into an outlet on a circuit different from that to which the receiver is
connected.
-Consult the dealer or an experienced radio/TV technician for help.
IC Warning
This device complies with Industry Canada’s licence-exempt RSSs. Operation is subject to the following
two conditions:
(1) This device may not cause interference; and
(2) This device must accept any interference, including interference that may cause undesired operation
of the device.
The device has been evaluated to meet general RF exposure requirement. The device can be used in
portable exposure condition without restriction.
The device has been evaluated to meet general RF exposure requirement. The device can be used in
portable exposure condition without restriction.
The device has been
evaluated to meet general RF exposure requirement. The device can be used in
portable exposure condition without restriction.
Cet appareil est conforme aux CNR exemptes de licence d'Industrie Canada . Son fonctionnement est
soumis aux deux conditions suivantes :
( 1 ) Ce dispositif ne peut causer d'interférences ; et
( 2 ) Ce dispositif doit accepter toute interférence , y compris les interférences qui peuvent causer un
mauvais fonctionnement de l'appareil.
Le dispositif a été concu pour rencontrer le général RF
Le dispositif peut être utilisé dans les conditions de détention.