DewertOkin RFTOUCH1089 Remote Control User Manual
DewertOkin GmbH Remote Control
user manual
Kurzanleitung RF-TOUCH (4 motorig) / Quick guide RF-TOUCH (4 motors)
27.02.2017 Id-Nr. 85742(a) 1 / 6
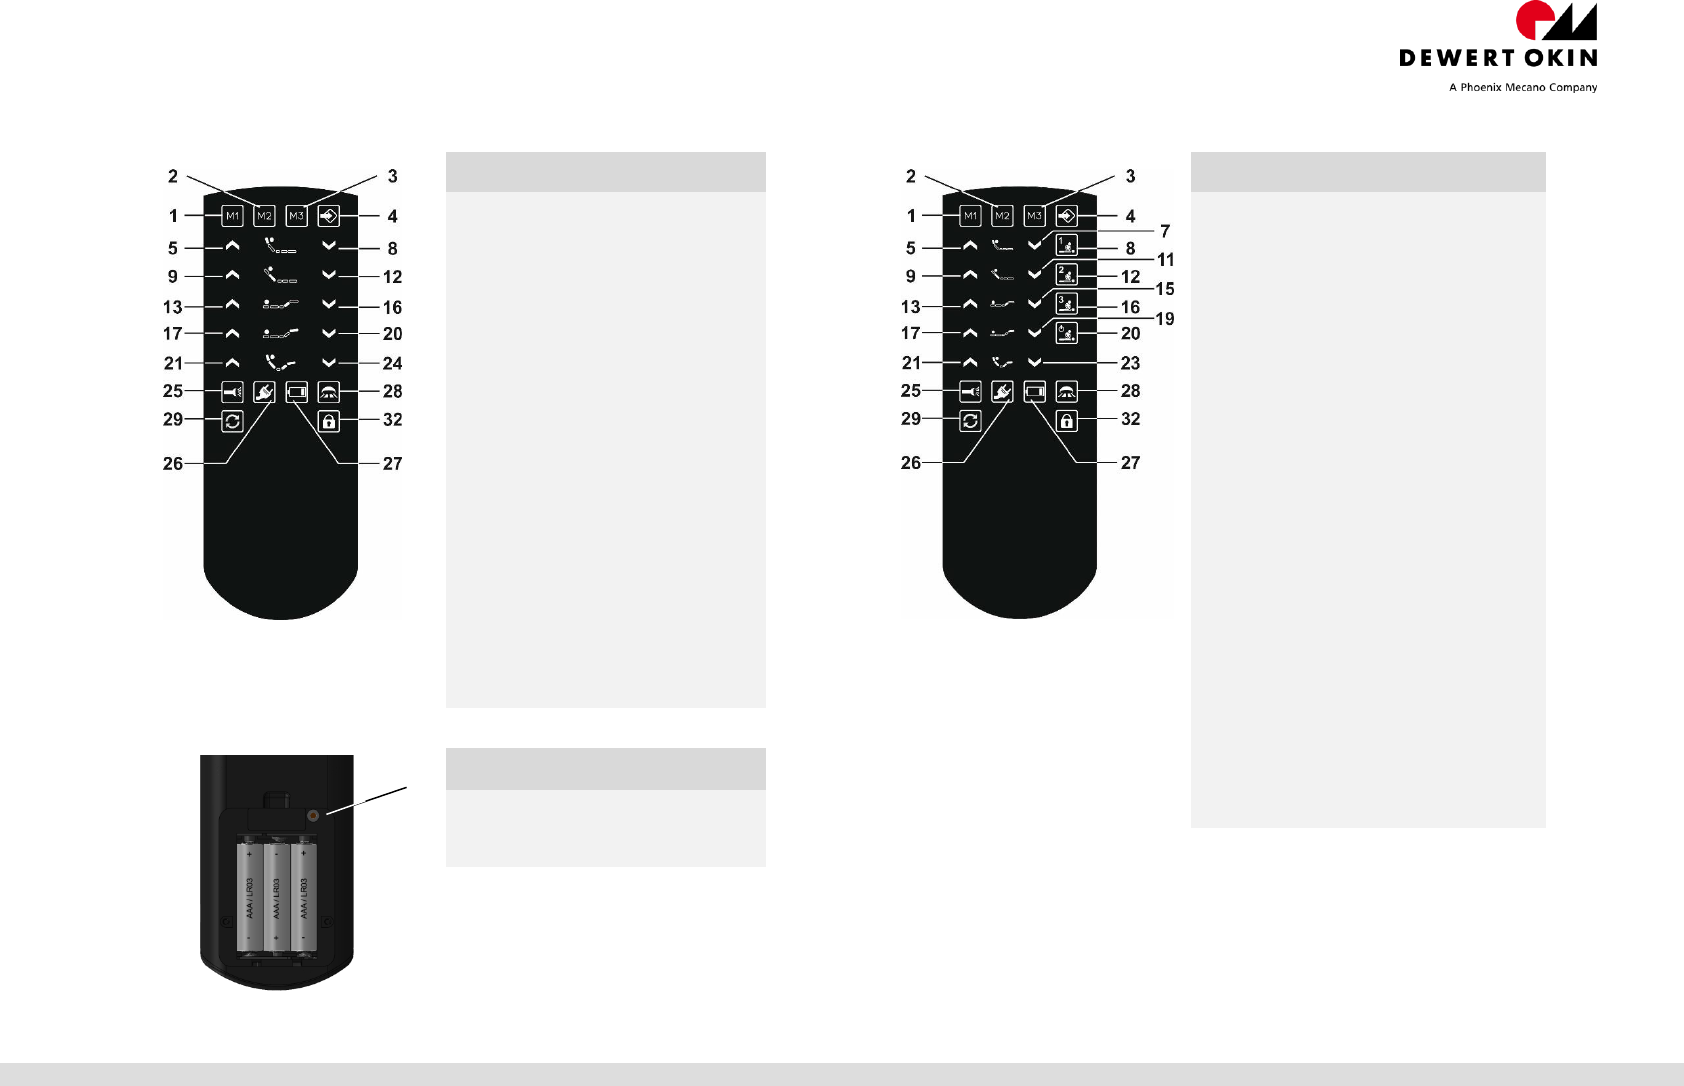
RF TOUCH (ohne Massage) RF TOUCH (mit Massage)
Taste Funktion
Taste Funktion
1 Memoryposition 1
2 Memoryposition 2
3 Memoryposition 3
4 Memoryspeichertaste
5 Antrieb M1 auf
8 Antrieb M1 ab
9 Antrieb M2 auf
12 Antrieb M2 ab
13 Antrieb M3 auf
16 Antrieb M3 ab
17 Antrieb M4 auf
20 Antrieb M4 ab
21 Reset M1 – M4 auf
24 Reset M1 – M4 ab
25 Taschenlampe ein/aus
26 Schaltbare Steckdose
ein/aus
27 Batterieanzeige
28 UBB ein/aus
29 Synchronbetrieb ein/aus
32 Kindersicherung ein/aus
1 Memoryposition 1
2 Memoryposition 2
3 Memoryposition 3
4 Memoryspeichertaste
5 Antrieb M1 auf
7 Antrieb M1 ab
8 Massageprogramm 1
9 Antrieb M2 auf
11 Antrieb M2 ab
12 Massageprogramm 2
13 Antrieb M3 auf
15 Antrieb M3 ab
16 Massageprogramm 3
17 Antrieb M4 auf
19 Antrieb M4 ab
20 Massageprogramm aus
21 Reset M1 – M4 auf
23 Reset M1 – M4 ab
25 Taschenlampe ein/aus
26 Schaltbare Steckdose ein/aus
27 Batterieanzeige
28 UBB ein/aus
29 Synchronbetrieb ein/aus
32 Kindersicherung ein/aus
Taste Funktion
P Pairing-Taste
Pairing-LED
P
Kurzanleitung RF-TOUCH (4 motorig) / Quick guide RF-TOUCH (4 motors)
27.02.2017 Id-Nr. 85742(a) 2 / 6
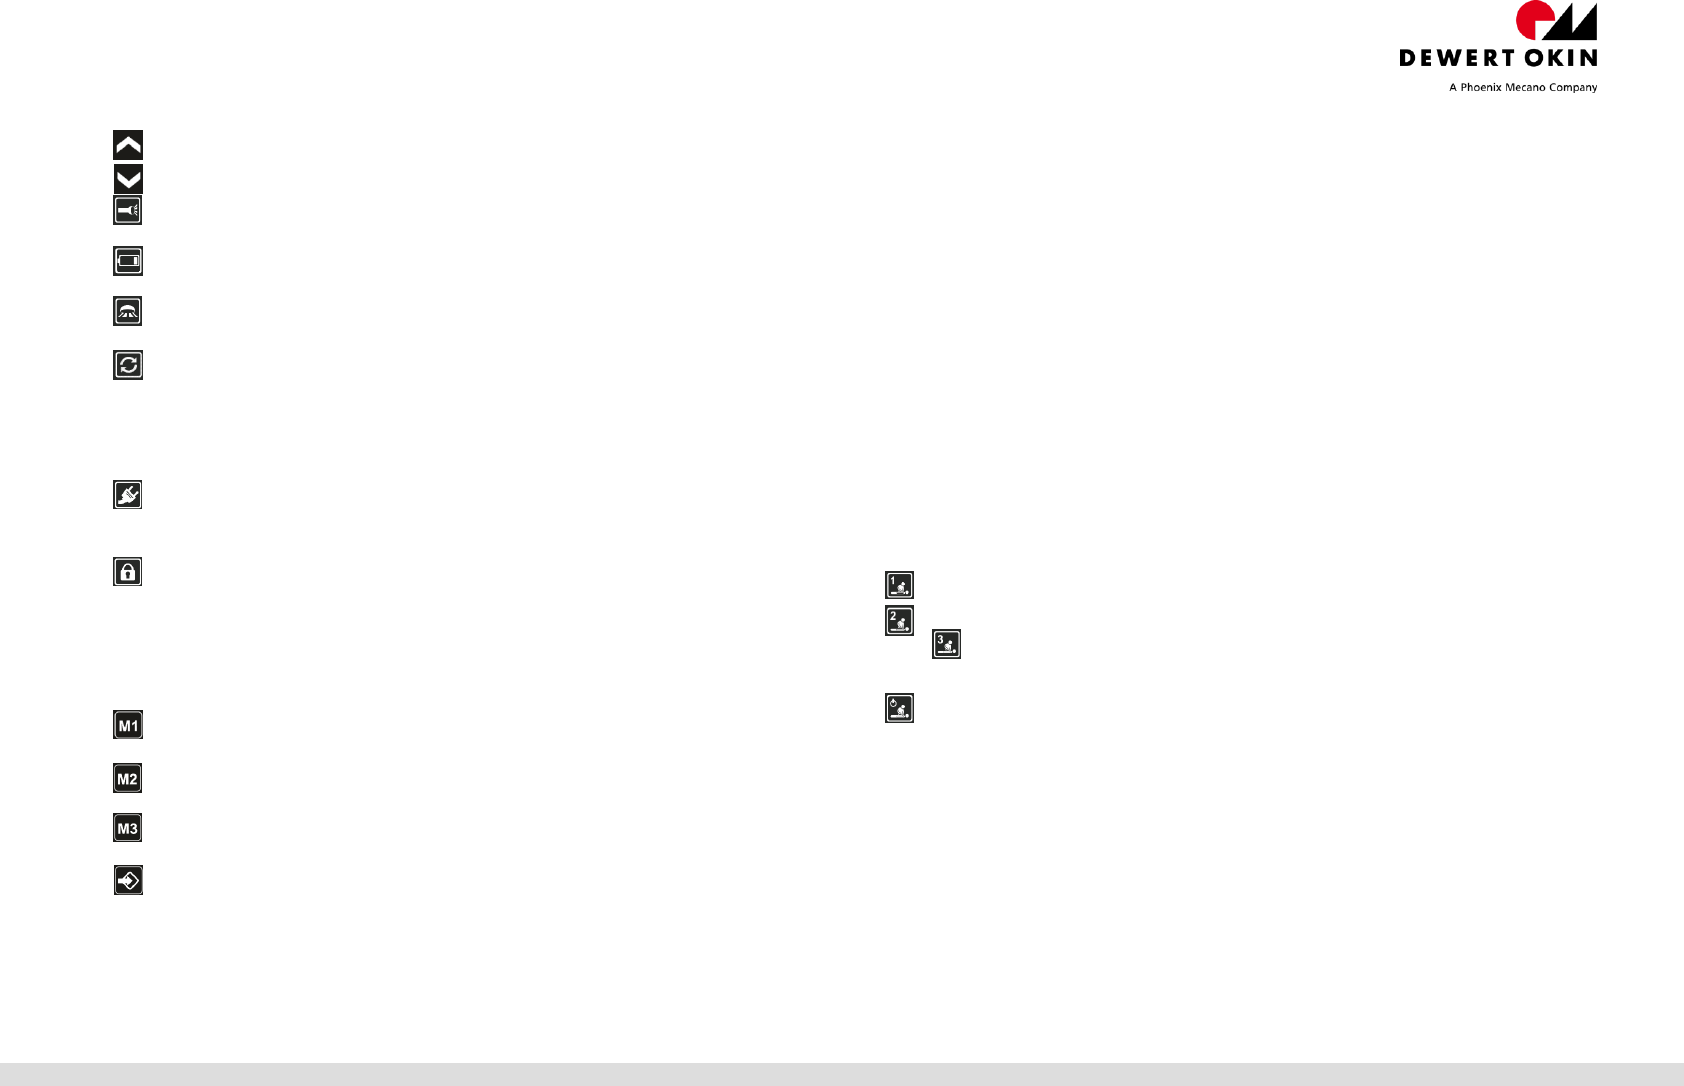
Tastenbeschreibung
Antrieb(e) auf: Solange die Taste betätigt wird, verfährt der Antrieb(e) und die Taste leuchtet blau.
Antrieb(e) ab: Solange die Taste betätigt wird, verfährt der Antrieb(e) und die Taste leuchtet blau.
Taschenlampe ein/aus: Solange die Taste betätigt wird, ist die Taschenlampe eingeschaltet und die
Taste leuchtet blau.
Batterieanzeige: Der RF-TOUCH ist aktiviert und die Batteriespannung sinkt unter 3,5V, leuchtet die
Taste rot, die Batterien müssen ersetzt werden.
UBB ein/aus: Schaltet die UBB ein/aus. Bei eingeschalteter UBB, leuchtet die Taste blau. Die UBB
erlischt automatisch nach ca. 30min.
Synchronbetrieb ein/aus: Dafür müssen Sie zwei OKIMAT 8 über ein Synchronkabel miteinander
verbinden.
Synchronbetrieb ein: Betätigen Sie für ca. 3 sec die Taste bis die Hintergrundbeleuchtung 2x blinkt. Die
Taste leuchtet blau.
Synchronbetrieb aus: Betätigen Sie für ca. 3 sec die Taste bis die Hintergrundbeleuchtung 2x blinkt. Die
Tastenbeleuchtung erlischt.
Schaltbare Steckdose ein/aus: Durch Betätigen der Taste, wird die Steckdose ein- bzw. ausgeschaltet.
Taste leuchtet blau, die Steckdose ist eingeschaltet.
Tastenbeleuchtung ist aus, die Steckdose ist ausgeschaltet.
Kindersicherung ein/aus:
Kindersicherung ein: Betätigen Sie für ca. 5 sec die Taste. bis die Hintergrundbeleuchtung 2x blinkt. Taste
leuchtet blau, die Kindersicherung ist eingeschaltet.
Kindersicherung aus: Betätigen Sie ca. 5 sec die Taste bis die Hintergrundbeleuchtung 2x blinkt. Die
Tastenbeleuchtung aus, die Kindersicherung ist ausgeschaltet.
Die Stellung „Kindersicherung aus“ hat keine Beeinträchtigung auf die Funktionen: Taschenlampe,
schaltbare Steckdose, UBB, Massageprogramm 1-2-(3), Massage aus.
Memoryposition 1: Antriebe fahren zur abgespeicherten Position. Solange die Taste betätigt wird,
verfahren die Antriebe und die Taste leuchtet blau.
Memoryposition 2: Antriebe fahren zur abgespeicherten Position. Solange die Taste betätigt wird,
verfahren die Antriebe und die Taste leuchtet blau.
Memoryposition 3: Antriebe fahren zur abgespeicherten Position. Solange die Taste betätigt wird,
verfahren die Antriebe und die Taste leuchtet blau.
Memoryspeichertaste: Antriebe zur gewünschten Position verfahren. Die Memoryspeicher-taste 1x
drücken, es leuchten die Tasten "Memoryposition 1-2-3" blau, dann innerhalb von 2 sec. die
gewünschte Taste drücken. Die Position ist gespeichert.
Massageprogramme
Die Massageprogramme starten immer in der Stufe 1.
Die Stufe 1 entspricht der niedrigsten Stufe.
Die Stufe 4 entspricht der höchsten Stufe.
Die Stufe 0 entspricht Massage aus, die Taste leuchtet nicht
Die Tastenbeleuchtung der aktivierten Taste leuchtet blau. Die Taste leuchtet blau bei den Stufen 1-2-3-4-
3-2-1.
Jedes Betätigen der Taste „Massageprogramm“ erhöht/verringert die Intensität um eine Stufe.
Wird die Stufe 4 erreicht, blinkt beim Betätigen der Taste, die Hintergrundbeleuchtung 1x mal „weiß“.
Es ergibt sich daraus folgende Reihenfolge:0-1-2-3-4-3-2-1-0
Nach der Stufe 0 wiederholt sich die Folge
Beim Wechsel in ein anderes Massageprogramm oder beim Betätigen der Taste „Massage-programm
aus“, wird das aktivierte Massageprogramm beendet und die blaue Beleuchtung deaktiviert.
Das Massageprogramm endet nach ca. 15 min, die blaue Tastenbeleuchtung erlischt, wenn Sie eine
beliebige Taste betätigen.
o Wechseln Sie in dieser Zeit die Intensität bleibt die Massagedauer (ca. 15min) bestehen.
o Wechseln Sie in dieser Zeit das Massageprogramm, startet die Massagedauer (ca. 15min) von vorne.
Beim Verfahren der Antriebe und gleichzeitig aktivierten Massageprogramm wird das gewählte
Massageprogramm nicht unterbrochen.
Das „Massageprogramm“ funktioniert auch bei eingeschalteter Kindersicherung.
Massageprogramm 1: Stationäre Intensität, die Massagemotore laufen mit gleicher Drehzahl.
Massageprogramm 2: Pulsierende Massage, die Massagemotore ändern gleichmäßig ihre
Drehzahl.
Massageprogramm 3: Wellenförmige Massage, die Massagemotore ändern zeitversetzt ihre
Drehzahl.
Massageprogramm aus: Solange die Taste gedrückt wird leuchtet diese Taste blau. „Massageprogramm
aus“ funktioniert auch bei eingeschalteter Kindersicherung.
Pairing RF-TOUCH
Verbinden Sie alle Komponenten mit dem Antriebssystem.
Stecken Sie den Stecker in die Steckdose.
Drücken Sie 2x die Pairing-Taste (a) bis die LED leuchtet. Der Pairing-Prozess ist für die nächsten 10sec
aktiv.
Drücken Sie die Paring-Taste (P) im Batteriefach des RF-TOUCH, Halten sie die Pairing-Taste gedrückt, die
Pairing LED blinkt. Sobald die Pairing-LED erlischt, ist das Pairing beendet.
Nehmen Sie immer nur ein System, nie mehrere Systeme gleichzeitig in Betrieb.
Initialisierung RF-Touch
Bei der Inbetriebnahme, sowie bei jedem Batteriewechsel sollte die Touchfläche (Fläche mit der Symbolik) des
RF-TOUCH nicht berührt werden.
Kurzanleitung RF-TOUCH (4 motorig) / Quick guide RF-TOUCH (4 motors)
27.02.2017 Id-Nr. 85742(a) 3 / 6
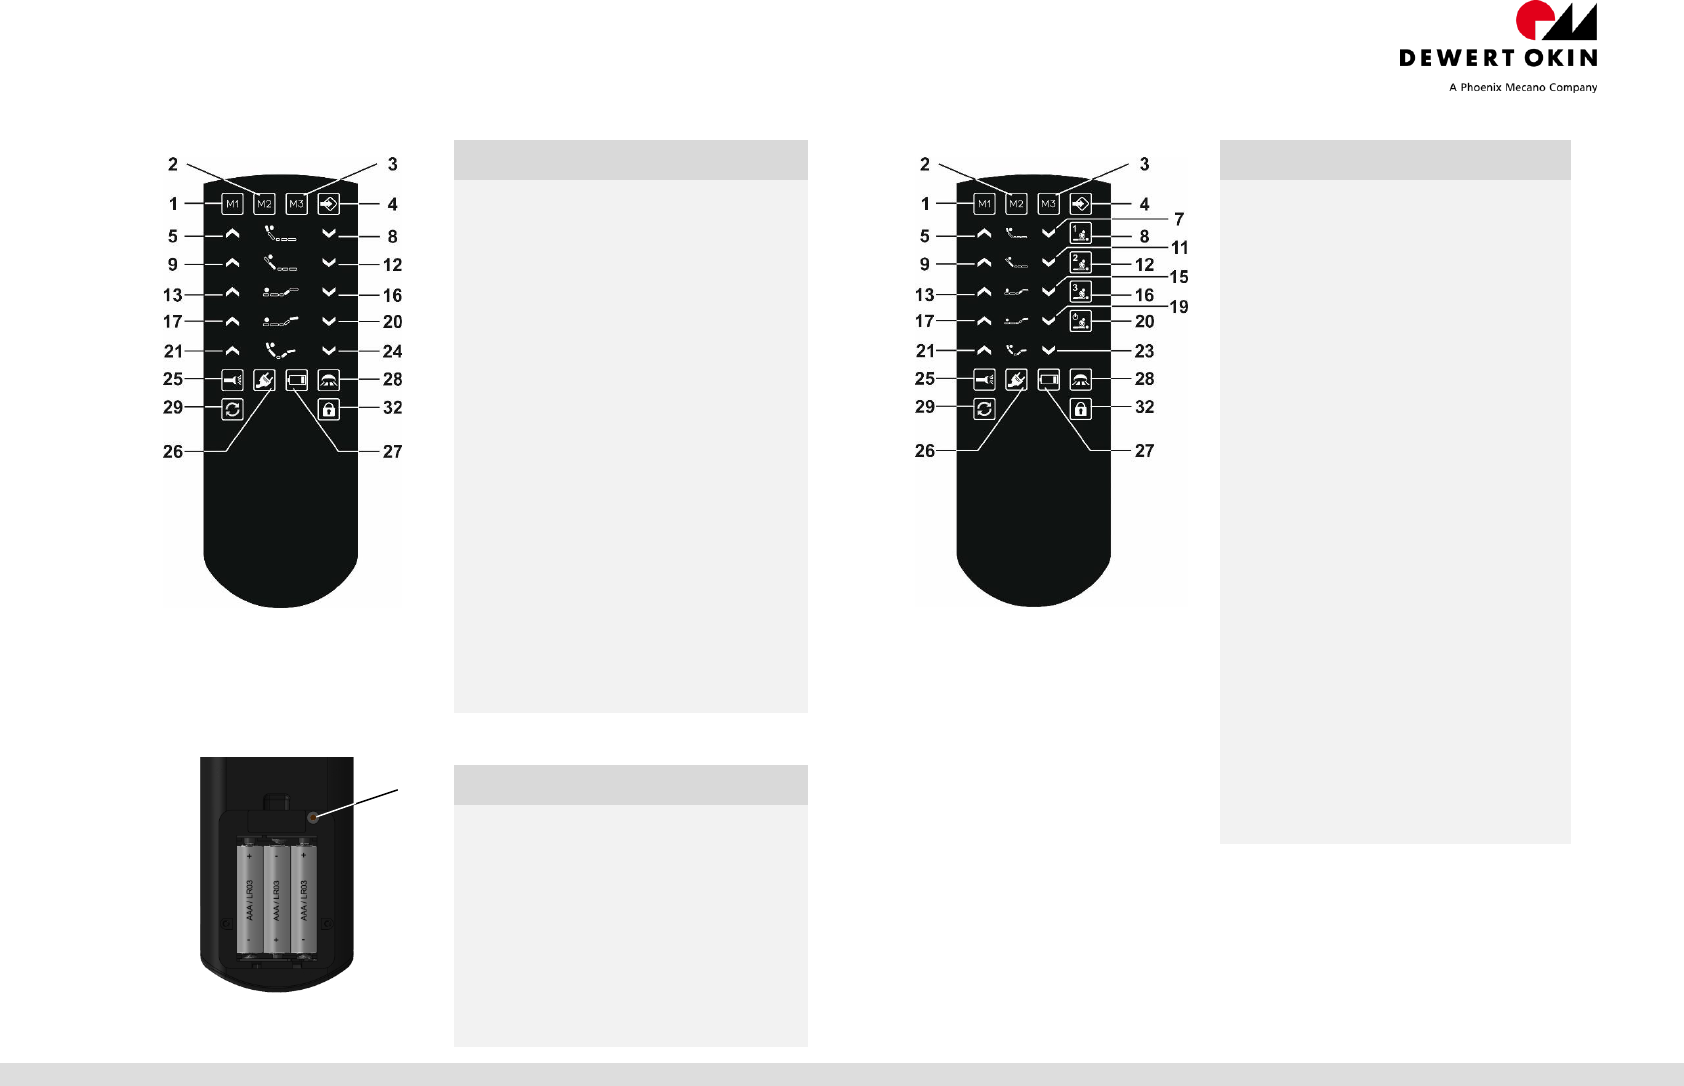
RF-TOUCH (without massage) RF-TOUCH (with massage)
Button Function
Button Function
1 Memory position 1
2 Memory position 2
3 Memory position 3
4 Memory save button
5 Drive M1 up
8 Drive M1 down
9 Drive M2 up
12 Drive M2 down
13 Drive M3 up
16 Drive M3 down
17 Drive M4 up
20 Drive M4 down
21 Reset M1 - M4 up
24 Reset M1 - M4 down
25 Flashlight on/off
26 Switchable socket on/off
27 Battery indicator
28 Floor lighting on/off
29 Synchronous mode on/off
32 Child lock mechanism on/off
1 Memory position 1
2 Memory position 2
3 Memory position 3
4 Memory save button
5 Drive M1 up
7 Drive M1 down
8 Massage mode 1
9 Drive M2 up
11 Drive M2 down
12 Massage mode 2
13 Drive M3 up
15 Drive M3 down
16 Massage mode 3
17 Drive M4 up
19 Drive M4 down
20 Massage mode off
21 Reset M1 - M4 up
23 Reset M1 - M4 down
25 Flashlight on/off
26 Switchable socket on/off
27 Battery indicator
28 Floor lighting on/off
29 Synchronous mode on/off
32 Child lock mechanism on/off
Button Function
P Pairing key
Pairing LED
P
Kurzanleitung RF-TOUCH (4 motorig) / Quick guide RF-TOUCH (4 motors)
27.02.2017 Id-Nr. 85742(a) 4 / 6
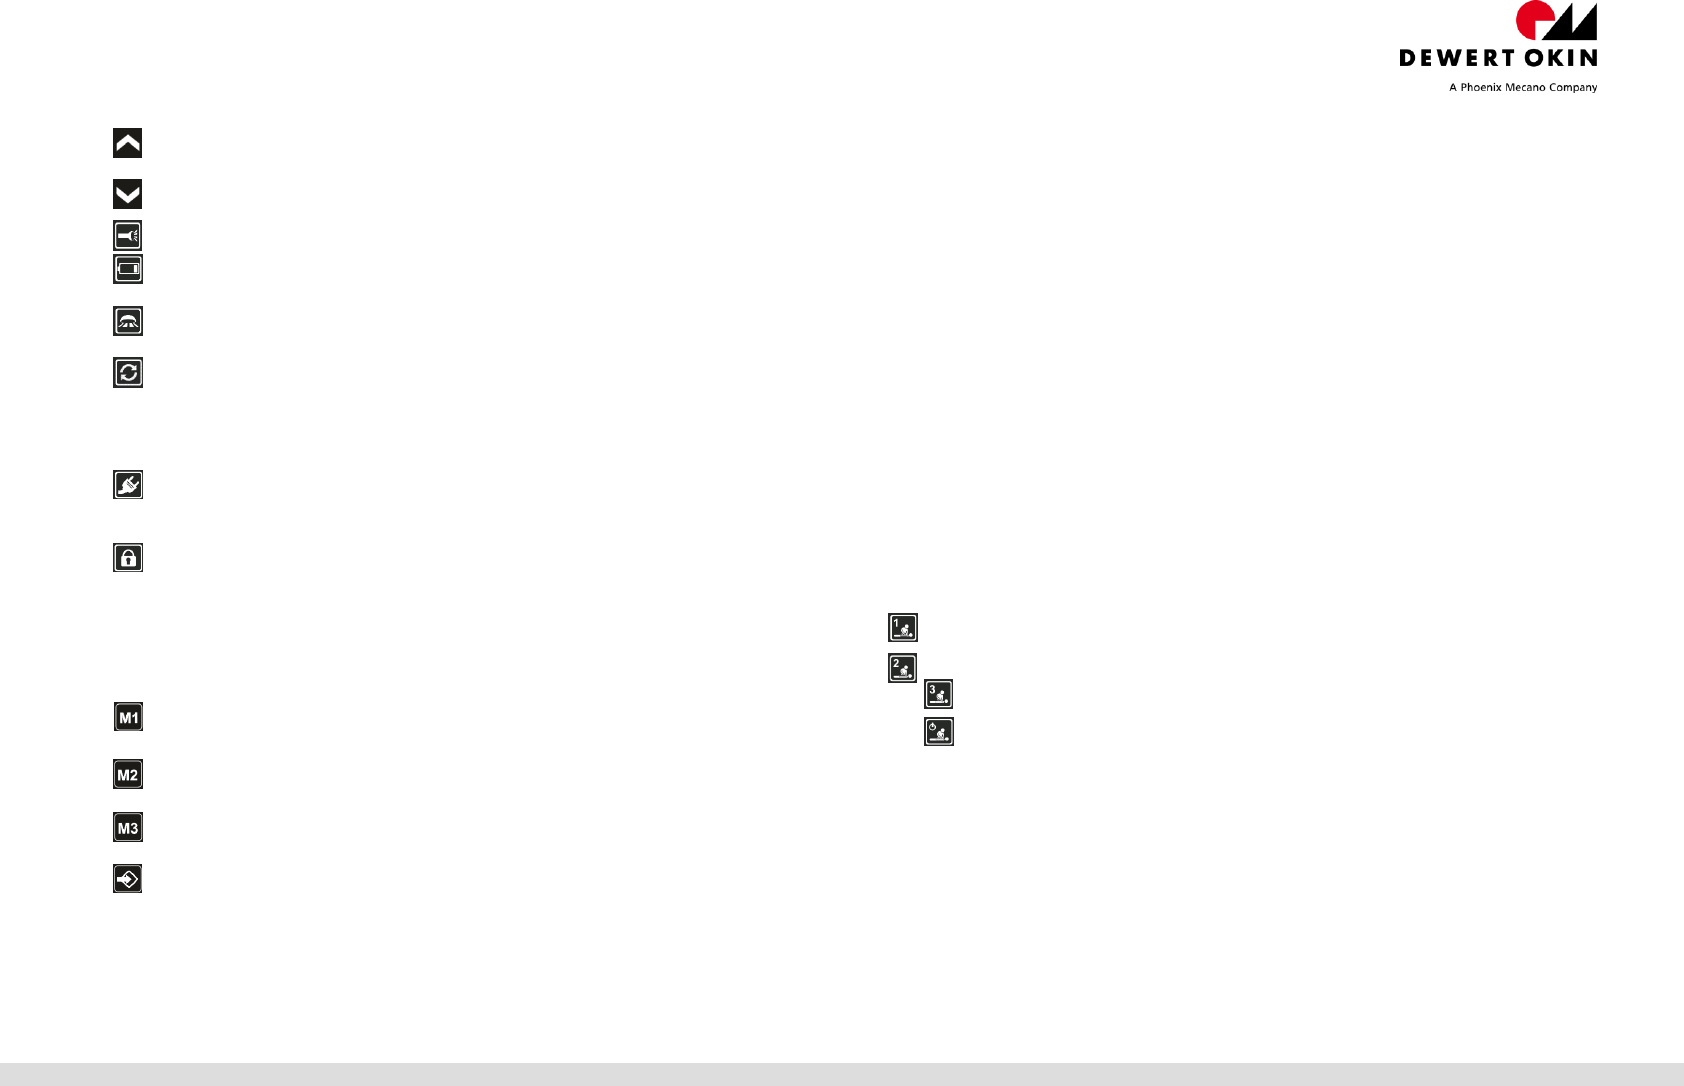
Description of button
Drive(s) up: The drive(s) move and the button is lit blue as long as this button is pressed.
Drive(s) down: The drive(s) move and the button is lit blue as long as this button is pressed.
Turn the flashlight on/off: The flashlight is on and the button is lit blue as long as this button is pressed.
Battery indicator: This button will light red whenever the RF-TOUCH is enabled and the battery voltage
drops below 3.5 V. The batteries must then be replaced.
Floor lighting on/off: Switch the floor lighting on/off. The button is lit blue when the floor lighting is on.
The floor lighting turns off automatically after 30 minutes.
Synchronous mode on/off: Two OKIMAT 8 units must be connected to each other using a sync. cable.
Synchronous mode on: Press this button for about 3 seconds until the backlit illumination blinks twice.
The button is then lit blue.
Synchronous mode off: Press this button for about 3 seconds until the backlit illumination blinks twice.
The button illumination switches off.
Switchable socket on/off: Press this button to switch the socket on or off.
The socket is activated when the button is lit blue.
The socket is deactivated when the button is not illuminated.
Child lock mechanism on/off:
Activating the child lock: Press this button for about 5 seconds until the backlit illumination blinks twice.
The child lock is activated when the button is lit blue.
Deactivating the child lock: Press this button for about 5 seconds until the backlit illumination blinks
twice. The child lock is deactivated when the button is not illuminated.
The “deactivated child lock” feature does not influence the functionality of the flashlight, switchable
socket, floor lighting, massage modes 1-2-(3) or deactivated massage mode.
Memory position 1: The drives move to the saved position. The drives move and the button is lit blue as
long as this button is pressed.
Memory position 2: The drives move to the saved position. The drives move and the button is lit blue as
long as this button is pressed.
Memory position 3: The drives move to the saved position. The drives move and the button is lit blue as
long as this button is pressed.
Memory save key: The drives move to their desired positions. Press the memory save button once: the
“Memory position 1-2-3” button light up. Then press the desired position button within two seconds. The
position is saved in memory.
Massage modes
The massage modes always start at level 1.
Level 1 is the lowest level.
Level 4 is the highest level.
Level 0 means the massage is deactivated. The button is not illuminated.
The activated button will be lit blue. The button lights up blue for the levels 1-2-3-4-3-2-1.
Each time the “Massage mode” button is pressed, the intensity increases or decreases according to
the next level.
When level 4 has been reached, a press of the button will cause the backlit illumination to blink
“white” once.
The levels are in the following sequence: 0-1-2-3-4-3-2-1-0
The sequence repeats after level 0.
When switching massage modes or after the “Massage mode off” button has been pressed, the
activated massage mode ends and the corresponding blue illumination switches off.
The massage mode will end after about 15 minutes. The blue button illumination goes out when you
press any button.
o If the intensity is changed in this time, the massage duration (about 15 minutes) does not
change.
o If the massage mode is changed in this time, the massage duration (about 15 minutes) starts
over.
An activated massage mode is not interrupted when the drives are moved.
The massage mode can also function while the child lock is enabled.
Massage mode 1: Stationary intensity: the massage motors run at continual speed.
Massage mode 2: Pulsing massage: the massage motors change their speed at the same time.
Massage mode 3: Wave massage: the massage motors change their speed at offset times.
Massage mode off: This button is lit blue as long as the button is pressed. The “Massage mode
off” button also functions while the child lock is enabled.
Pairing RF-TOUCH
Connect all components to the drive system
Insert the plug into the socket.
Press the pairing button (a) 2x until the LED turns on. You now have 10s for the pairing process.
Press and hold the Paring button (P) (located in the battery compartment of the RF-TOUCH). The
pairing LED blinks. This LED stops blinking as soon as the pairing is finished.
Only commission one system at a time. Never configure multiple systems simultaneously.
Initialization of the RF-Touch
Do not touch the touch surface (surface with the icons) of the RF-TOUCH while the unit is being
commissioned or while the batteries are being changed.

Kurzanleitung RF-TOUCH (4 motorig) / Quick guide RF-TOUCH (4 motors)
27.02.2017 Id-Nr. 85742(a) 5 / 6
FCC WARNING
This device complies with Part 15 of the FCC Rules. Operation is subject to the following two conditions:
(1) This device may not cause harmful interference, and
(2) this device must accept any interference received, including interference that may cause undesired operation.
Section 15.21 Information to user
Changes or modifications not expressly approved by the party responsible for compliance could void the user's authority to operate the equipment.
NOTE: This equipment has been tested and found to comply with the limits for a Class B digital device, pursuant to part 15 of the FCC Rules. These limits are designed to provide reasonable protection against harmful
interference in a residential installation. This equipment generates, uses and can radiate radio frequency energy and, if not installed and used in accordance with the instructions, may cause harmful interference to radio
communications. However, there is no guarantee that interference will not occur in a particular installation. If this equipment does cause harmful interference to radio or television reception, which can be determined by
turning the equipment off and on, the user is encouraged to try to correct the interference by one or more of the following measures:
Reorient or relocate the receiving antenna.
Increase the separation between the equipment and receiver.
Connect the equipment into an outlet on a circuit different from that to which the receiver is connected.
Consult the dealer or an experienced radio/ TV technician for help.
IC WARNING
This device complies with Industry Canada’s licence-exempt RSSs. Operation is subject to the following two conditions:
(1) This device may not cause interference; and
(2) This device must accept any interference, including interference that my cause undesired operation of the device.
Le présent appareil est conforme aux CNR d’Industrie Canada applicables aux appareils radio exempts de licence. L’exploitation est autorisée aux deux conditions suivantes :
1) l’appareil ne doit pas produire de brouillage;
2) l’utilisateur de l’appareil doit accepter tout brouillage radioélectrique subi, même si le brouillage est susceptible d’en compromettre le fonctionnement.
RF EXPOSURE STATEMENT
This device complies with the RF exposure SAR test exclusion requirements for portable devices. However, the device shall be used in such a manner that the potential for human contact during normal operation is
minimized.
Kurzanleitung RF-TOUCH (4 motorig) / Quick guide RF-TOUCH (4 motors)
27.02.2017 Id-Nr. 85742(a) 6 / 6
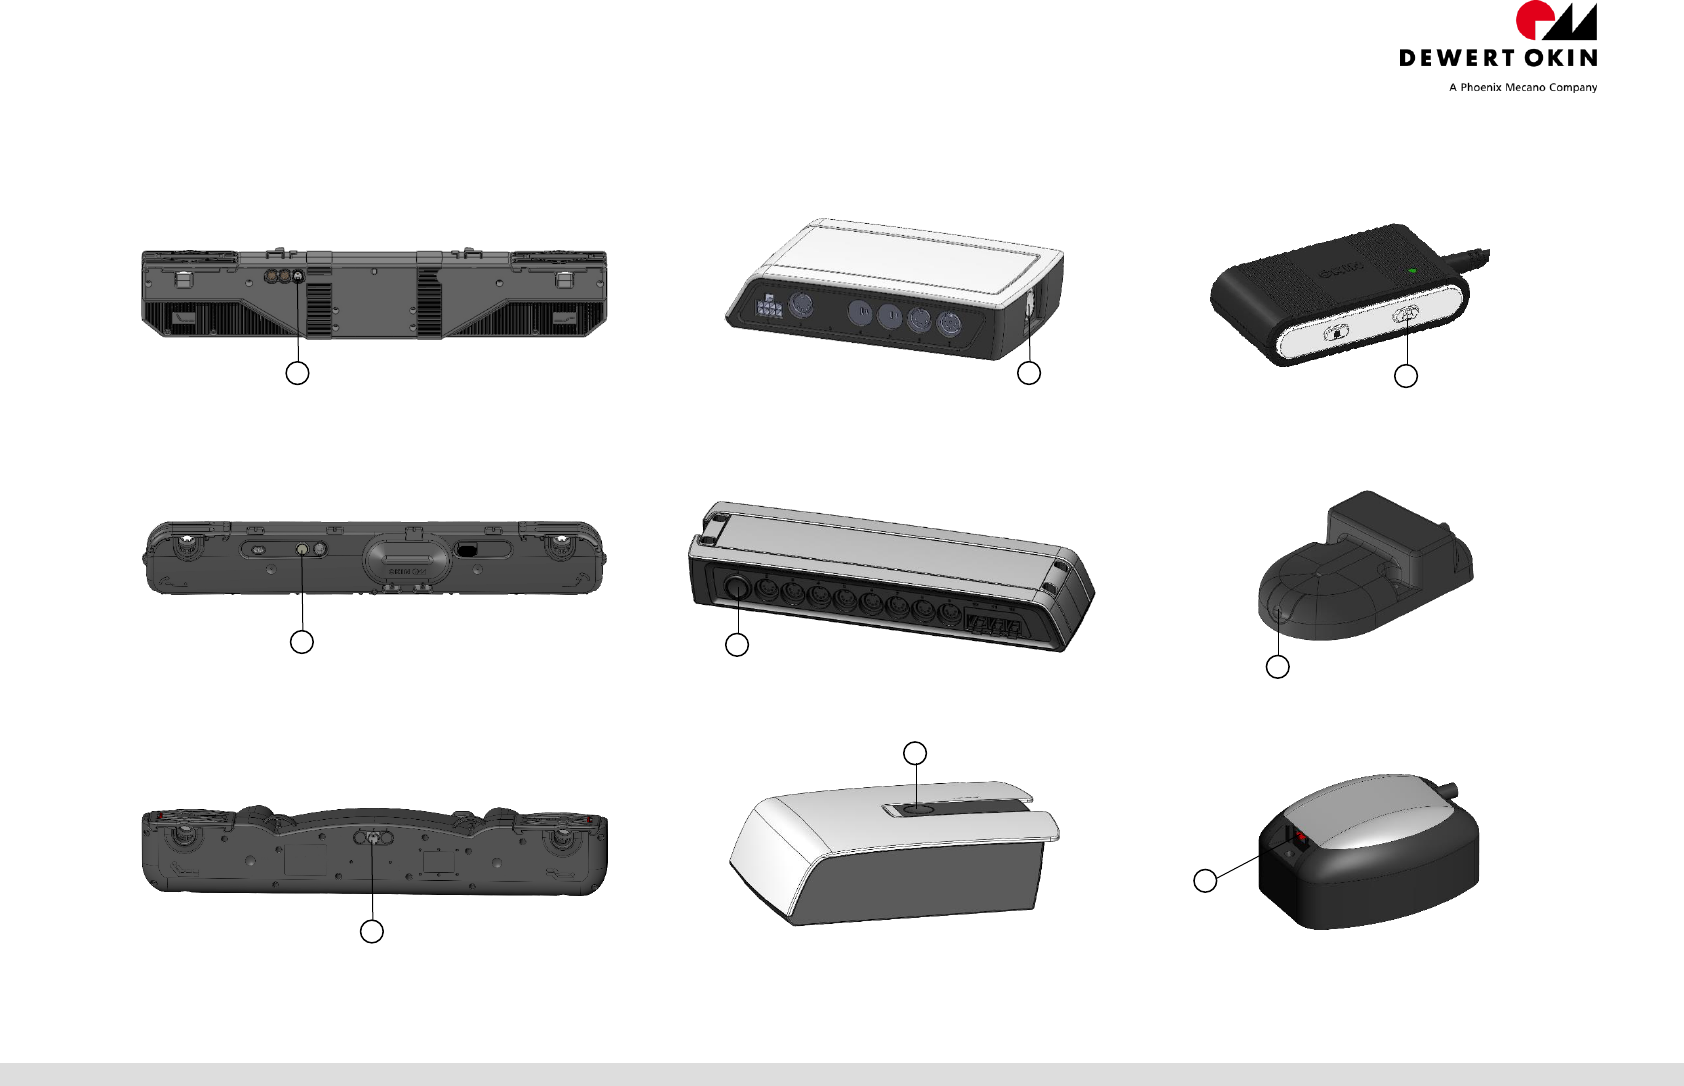
Position der Pairing Taste / Position of the Pairing button
OKIMAT 2
HE150
Remote Control ECO / RF ECO BT
OKIMAT 4
HE-300
RF FLASH
OKIMAT 8
HE-300 SMPS
RF-EMPFÄNGER
a
a
a
a
a
a
a
a
a