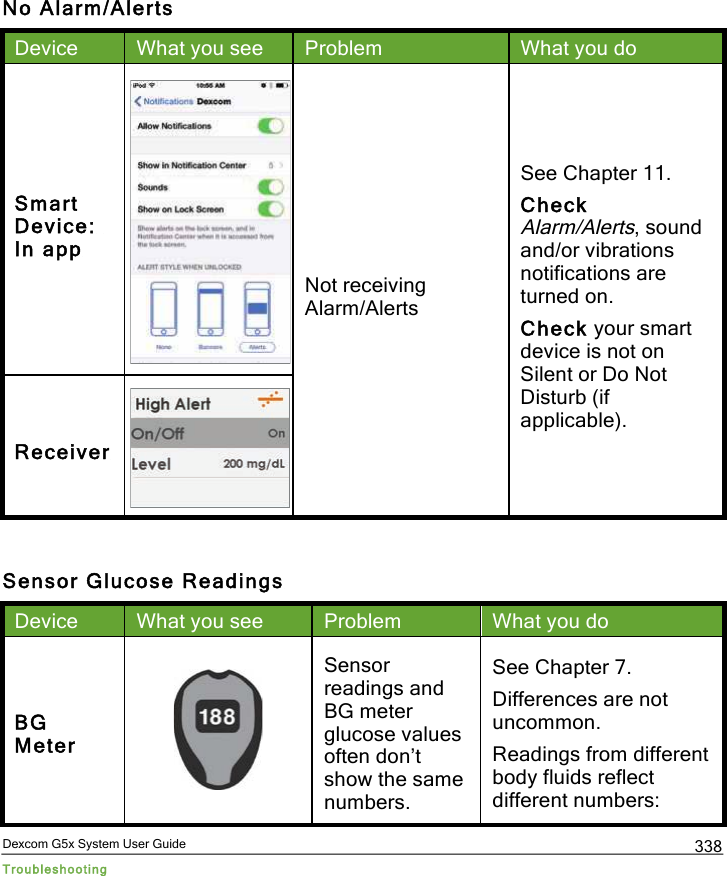
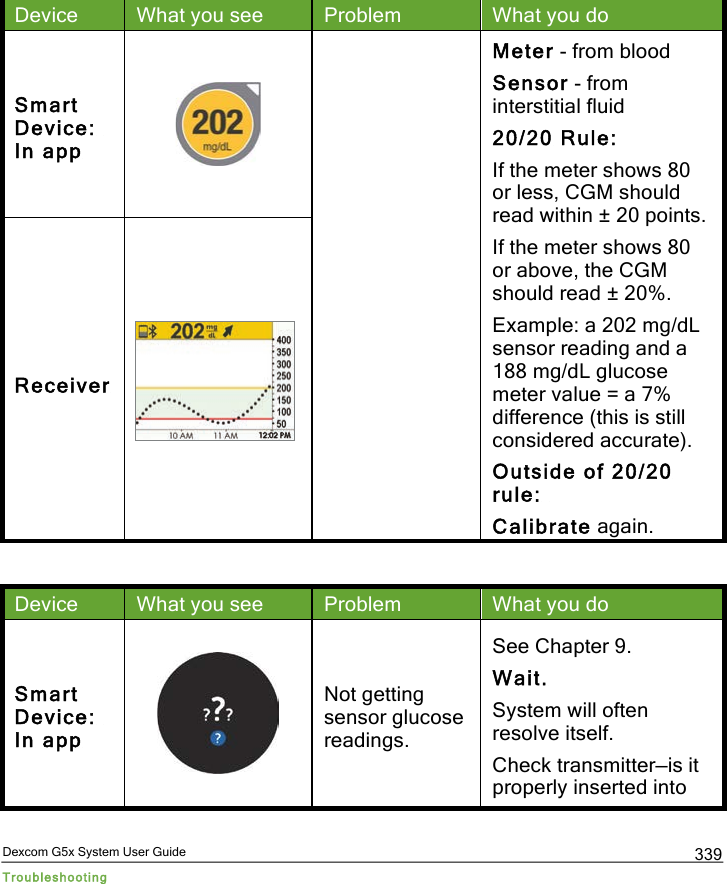
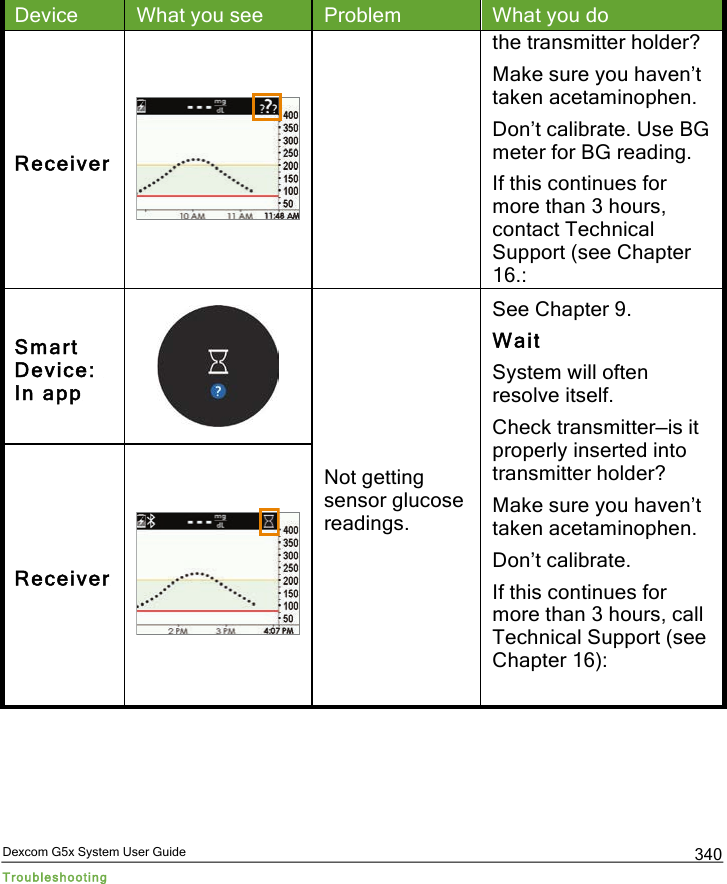
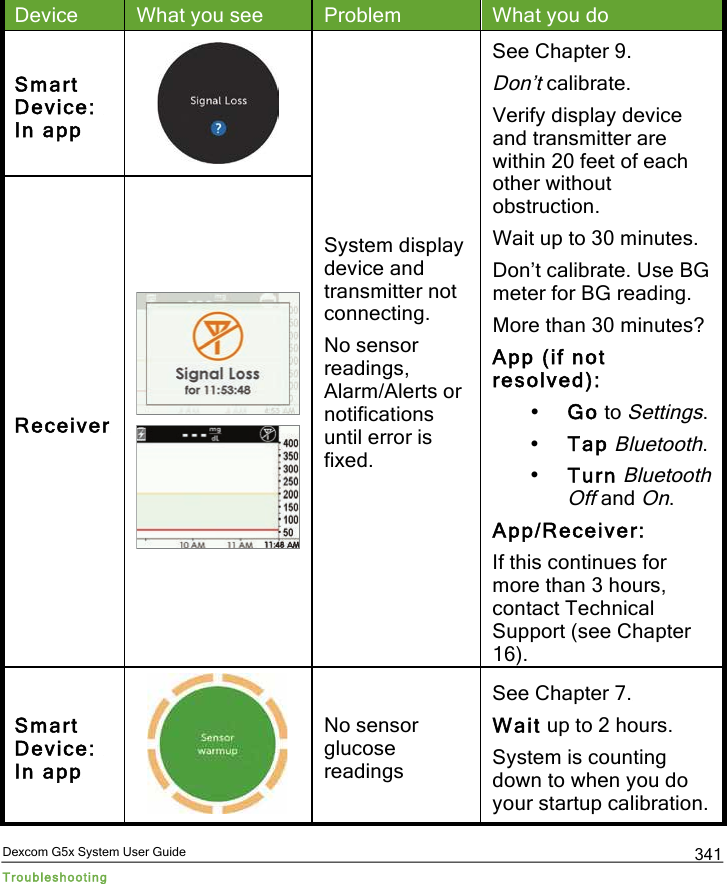
Dexcom 9588 G5x Transmitter User Manual
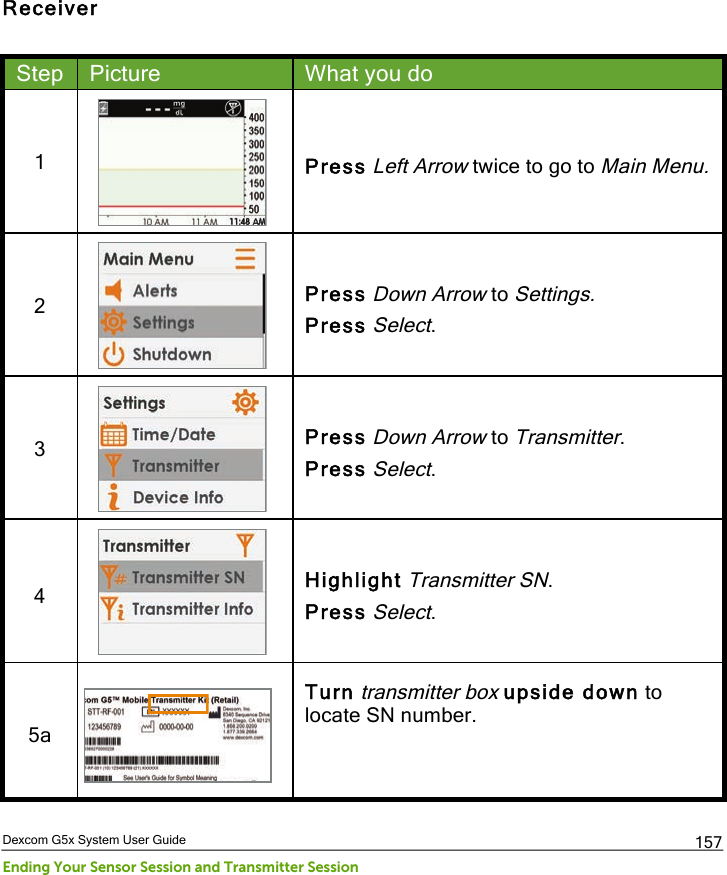
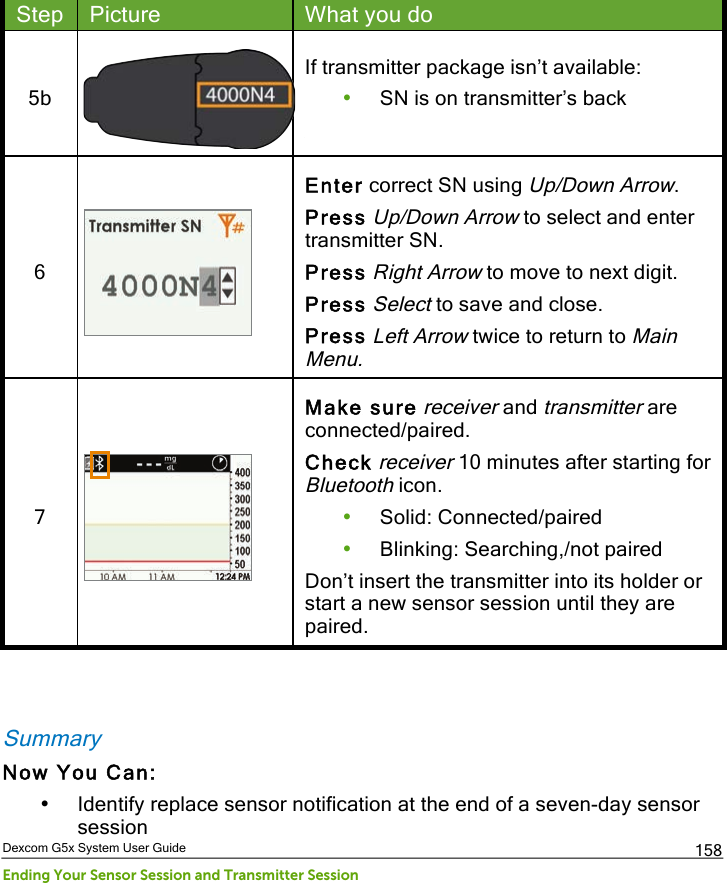
Dexcom, Inc. G5x Transmitter
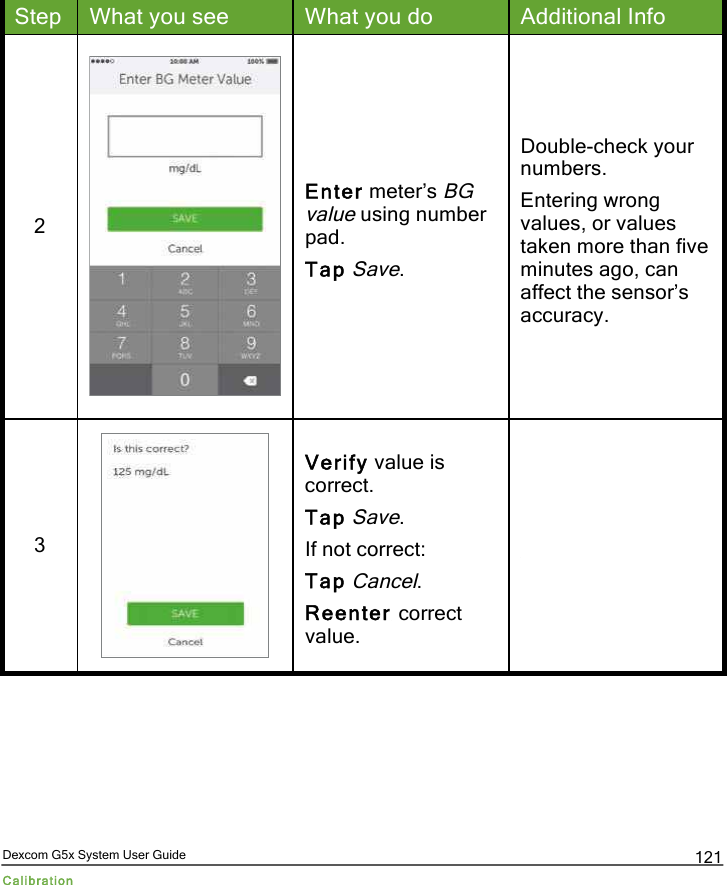
UserManual.wiki
>
Dexcom
>
9588 User Manual
User Manual
Navigation menu
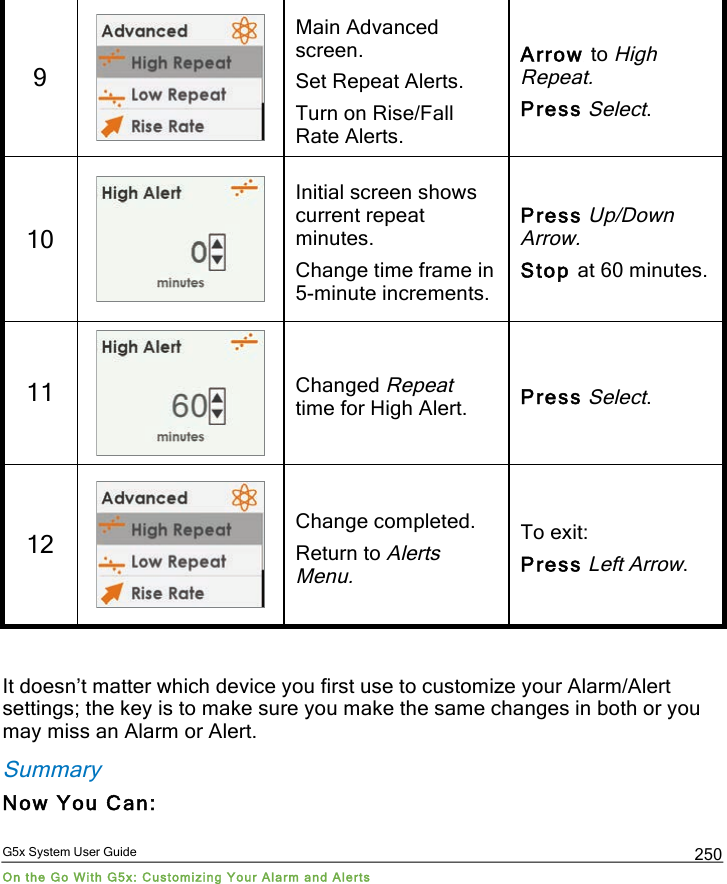
Upload a User Manual
Namespaces
Wiki Guide
HTML
PDF
Info
Views
User Manual
Discussion / Help
Navigation
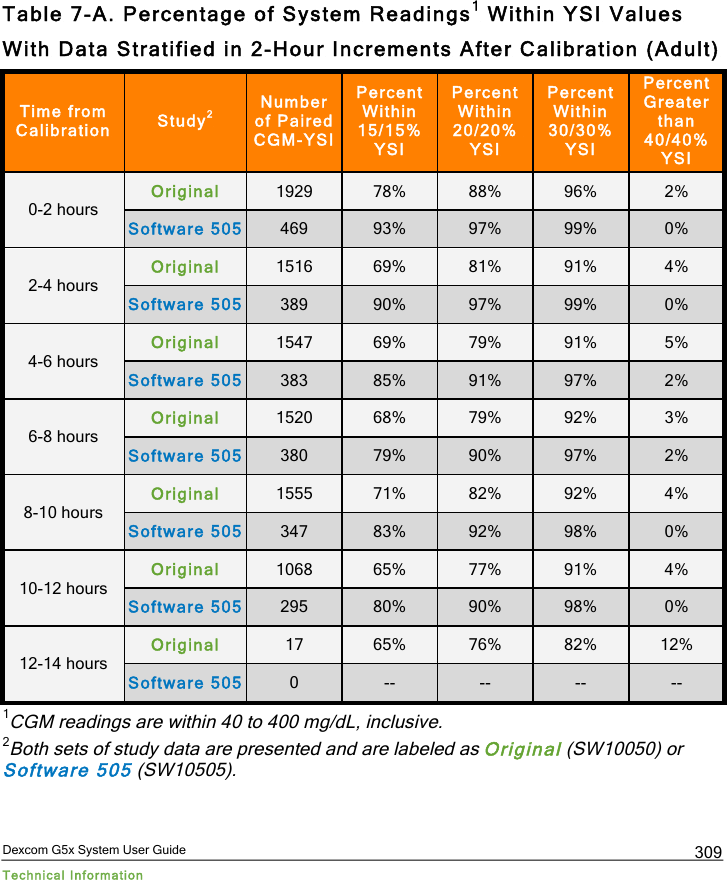
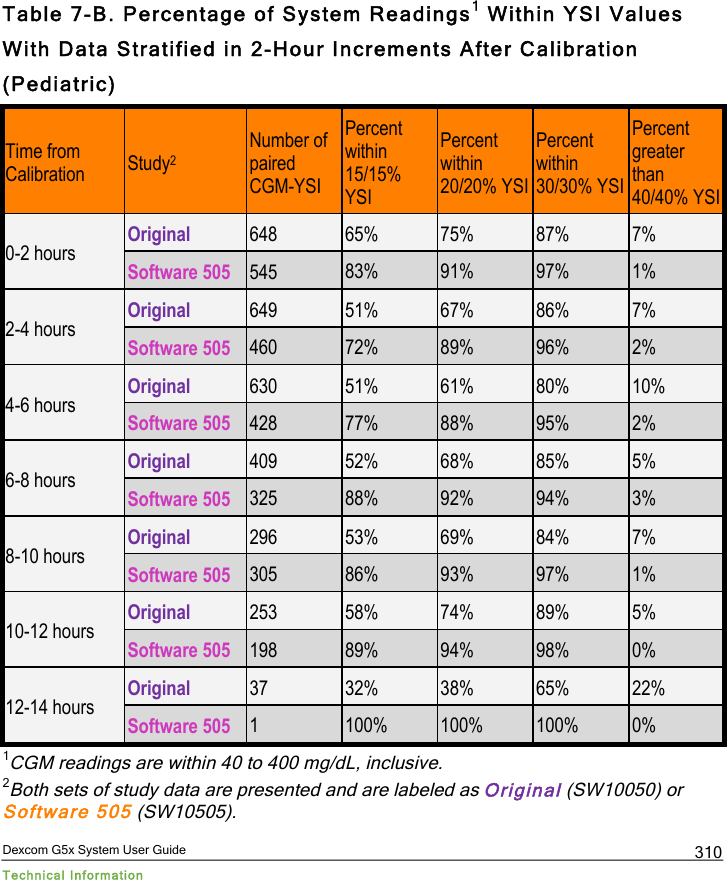
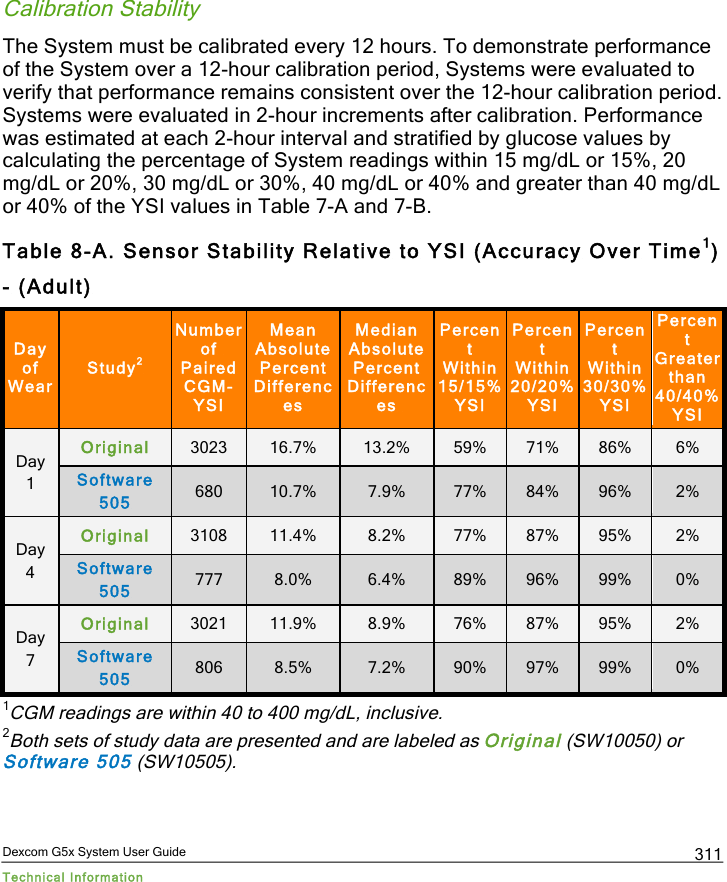
![Dexcom G5x System User Guide Glossary 4 Apple"Today"View"Widget"..................................................................."171"9.4"Rate"of"Change"Arrows"................................................................."181"9.5"Error"Messages".............................................................................."182"+,%-./&(0C())))))))))))))))))))))))))))))))))))))))))))))))))))))))))))))))))))))))))))))))))))))))))(0*N"8%4"'(VO/5.$(SFF/:.(6#7&(!"7:#$/(T&/5E$(%5E(Y%../&5$())))))))))))))))))))))))(0*N"10.1"Introduction"................................................................................"189"10.2"What"Is"an"Event?"......................................................................."189"10.3"Entering"Events"..........................................................................."198"10.4"Viewing"Events"............................................................................"207"+,%-./&(00())))))))))))))))))))))))))))))))))))))))))))))))))))))))))))))))))))))))))))))))))))))))))(BCN"=/5$#&(!"7:#$/(S"%&;(%5E(S"/&.$())))))))))))))))))))))))))))))))))))))))))))))))))))))))(BCN"11.1"Introduction"................................................................................"209"11.2"Safety"Statements"......................................................................."210"11.3"Alarm"and"Alerts"........................................................................."213"11.4"Alarm"and"Alerts"Screens"............................................................"215"11.5"App:"Alarm/Alert"Recommended"Settings".................................."221"11.6"Receiver:"Default"Beeps"and"Vibrations"......................................"222"11.7"Clearing"Alarm/Alerts".................................................................."226"+,%-./&(0B())))))))))))))))))))))))))))))))))))))))))))))))))))))))))))))))))))))))))))))))))))))))))(BBN"Next%StepsQ()))))))))))))))))))))))))))))))))))))))))))))))))))))))))))))))))))))))))))))))))))))))))(BBN"Z5(.,/(!#(L4.,(!?9Q(+7$.#;4[453(6#7&(S"%&;(%5E(S"/&.$())))))))))))))))))))(BBN"12.1"Introduction"................................................................................"229"12.2"Safety"Statement"........................................................................."229"12.3"Changing"app"Alarm"and"Alerts"..................................................."230"12.4"Changing"Receiver"Alarm"and"Alerts"..........................................."243"V\VJ6TWD]!(V^=V(!?9()))))))))))))))))))))))))))))))))))))))))))))))))))))))))))))))))))(B?B"+,%-./&(0H())))))))))))))))))))))))))))))))))))))))))))))))))))))))))))))))))))))))))))))))))))))))))(B?H"L%&&%5.'Q(T,/(_45/(Y&45.()))))))))))))))))))))))))))))))))))))))))))))))))))))))))))))))))))))(B?H"13.1"Introduction"................................................................................"253"13.2"Receiver"Warranty"Information".................................................."253"13.3"Transmitter"Warranty"Information"............................................."256"13.4"Dexcom’s"Obligations"Under"the"Limited"Warranty"..................."257"+,%-./&(01())))))))))))))))))))))))))))))))))))))))))))))))))))))))))))))))))))))))))))))))))))))))))(BPC"W#X(.#(T%K/(+%&/(#F(6#7&(!?9())))))))))))))))))))))))))))))))))))))))))))))))))))))))))))(BPC"14.1"Introduction"................................................................................"260"14.2"Basic"Maintenance"......................................................................"260"PDF compression, OCR, web optimization using a watermarked evaluation copy of CVISION PDFCompressor](https://usermanual.wiki/Dexcom/9588/User-Guide-2994928-Page-4.png)
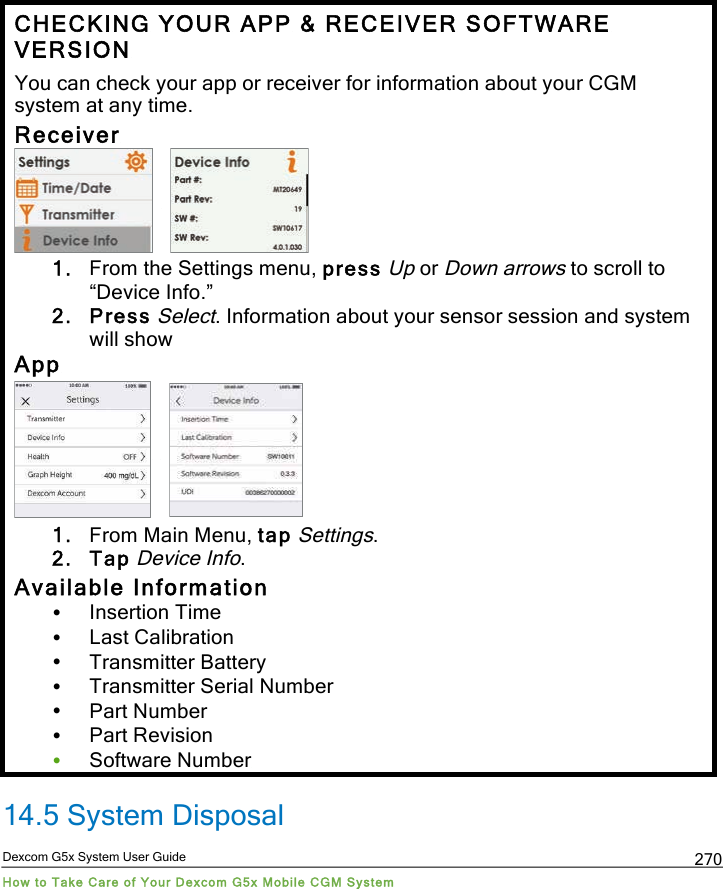
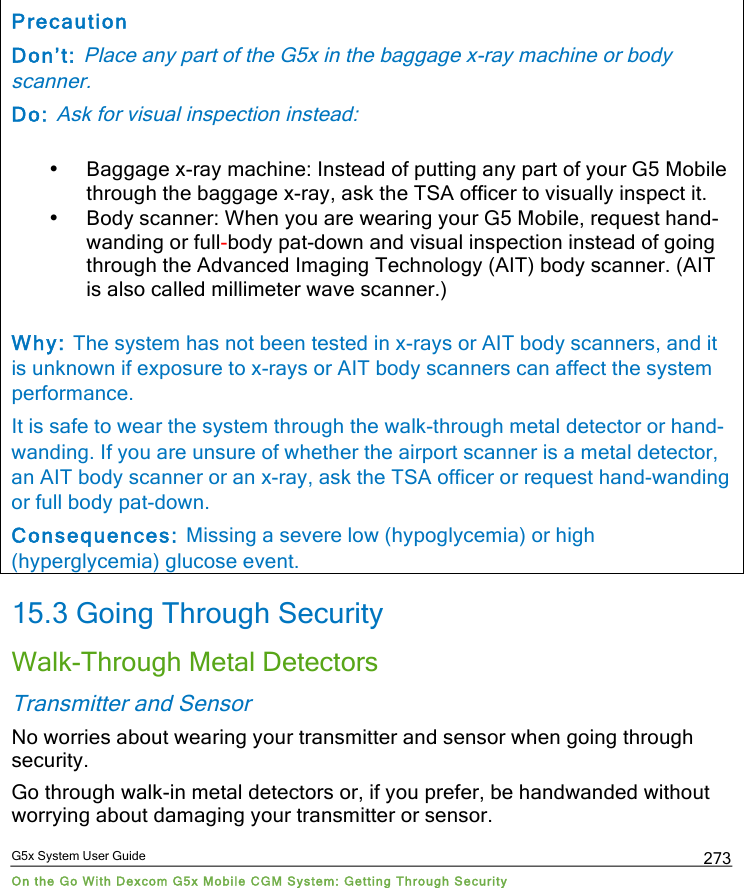
![Dexcom G5x System User Guide Glossary 5 14.3"Storage"........................................................................................"268"14.4"Checking"app"and"Receiver"Information"....................................."269"14.5"System"Disposal".........................................................................."270"+,%-./&(0?())))))))))))))))))))))))))))))))))))))))))))))))))))))))))))))))))))))))))))))))))))))))))(BIB"Z5(.,/(!#(L4.,(!?9Q(!/..453(T,&#73,(=/:7&4.'()))))))))))))))))))))))))))))))))))(BIB"15.1"Introduction"................................................................................"272"15.2"Safety"Statement"........................................................................."272"15.3"Going"Through"Security"..............................................................."273"+,%-./&(0P())))))))))))))))))))))))))))))))))))))))))))))))))))))))))))))))))))))))))))))))))))))))))(BIP"]//E(W/"-M(6#7`&/(]#.(S"#5/a())))))))))))))))))))))))))))))))))))))))))))))))))))))))))))(BIP"16.1"Dexcom"Technical"Support"Team"................................................"276"16.2"Dexcom"Patient"Care"Team"........................................................."277"16.3"Dexcom"Sales"Support"Team"......................................................."278"16.4"Corporate"...................................................................................."279"+,%-./&(0I())))))))))))))))))))))))))))))))))))))))))))))))))))))))))))))))))))))))))))))))))))))))))(B*C"T/:,54:%"(D5F#&;%.4#5()))))))))))))))))))))))))))))))))))))))))))))))))))))))))))))))))))))))))(B*C"17.1"Device"Performance"Characteristics"..........................................."280"17.2"Product"Specifications"................................................................."325"17.3"FCC"Requirements"......................................................................."334"+,%-./&(0*())))))))))))))))))))))))))))))))))))))))))))))))))))))))))))))))))))))))))))))))))))))))))(HHP"T&#7U"/$,##.453()))))))))))))))))))))))))))))))))))))))))))))))))))))))))))))))))))))))))))))))))(HHP"18.1"Introduction"................................................................................"336"18.2"Safety"Statements"......................................................................."336"18.3"Troubleshooting".........................................................................."337"+,%-./&(0N())))))))))))))))))))))))))))))))))))))))))))))))))))))))))))))))))))))))))))))))))))))))))(H?H"=';U#"$(#5(Y%:K%3/(^%U/"$()))))))))))))))))))))))))))))))))))))))))))))))))))))))))))))))))(H?H"=WSJD]!(D=(+SJD]!())))))))))))))))))))))))))))))))))))))))))))))))))))))))))))))))))))))(H?P"+,%-./&(BC())))))))))))))))))))))))))))))))))))))))))))))))))))))))))))))))))))))))))))))))))))))))))(H?I"8/9:#;(Shareb()))))))))))))))))))))))))))))))))))))))))))))))))))))))))))))))))))))))))))))))))))(H?I"20.1"Learning"About"Dexcom"Share"...................................................."357"20.2"Dexcom"Share"Overview"............................................................."363"20.3"Risks"and"Benefits"......................................................................."366"20.4"Safety"Statement"........................................................................."367"20.5"Setting"Up"Dexcom"Share"............................................................"371"20.6"Using"Dexcom"Share"..................................................................."380"20.7"Dexcom"Follow"App"...................................................................."386"PDF compression, OCR, web optimization using a watermarked evaluation copy of CVISION PDFCompressor](https://usermanual.wiki/Dexcom/9588/User-Guide-2994928-Page-5.png)


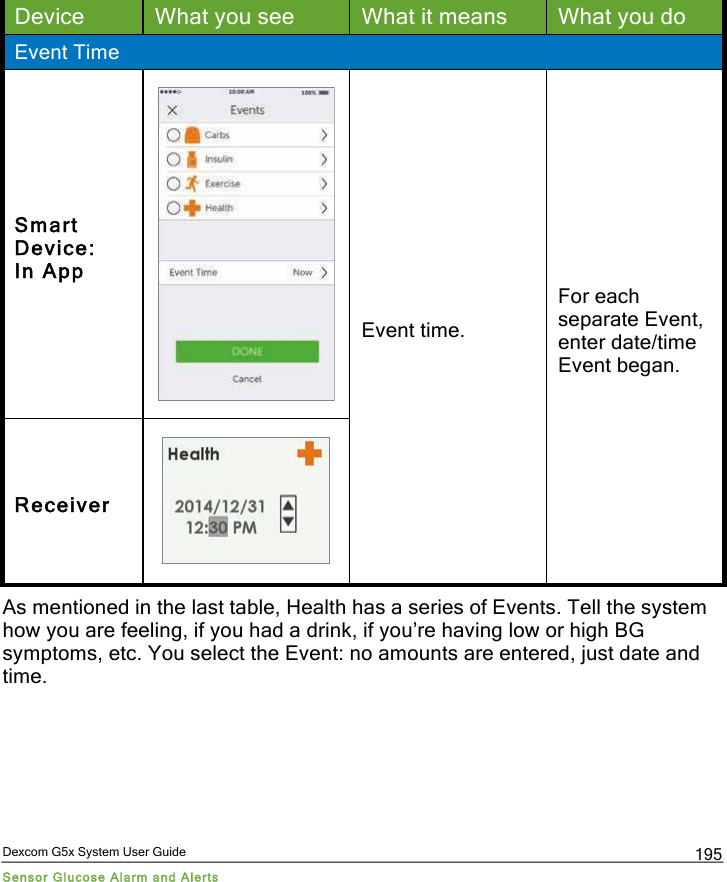


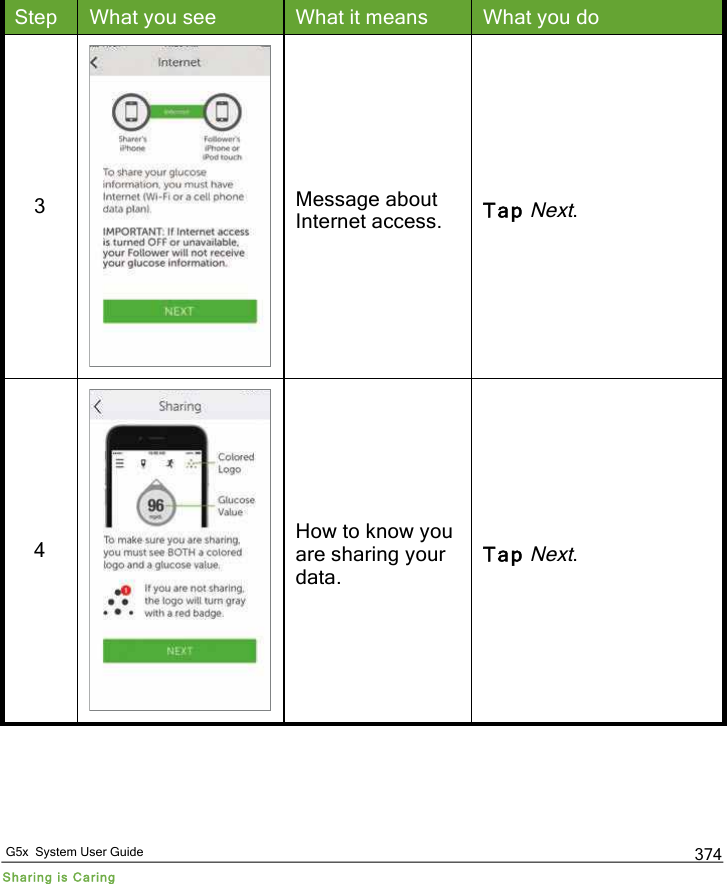


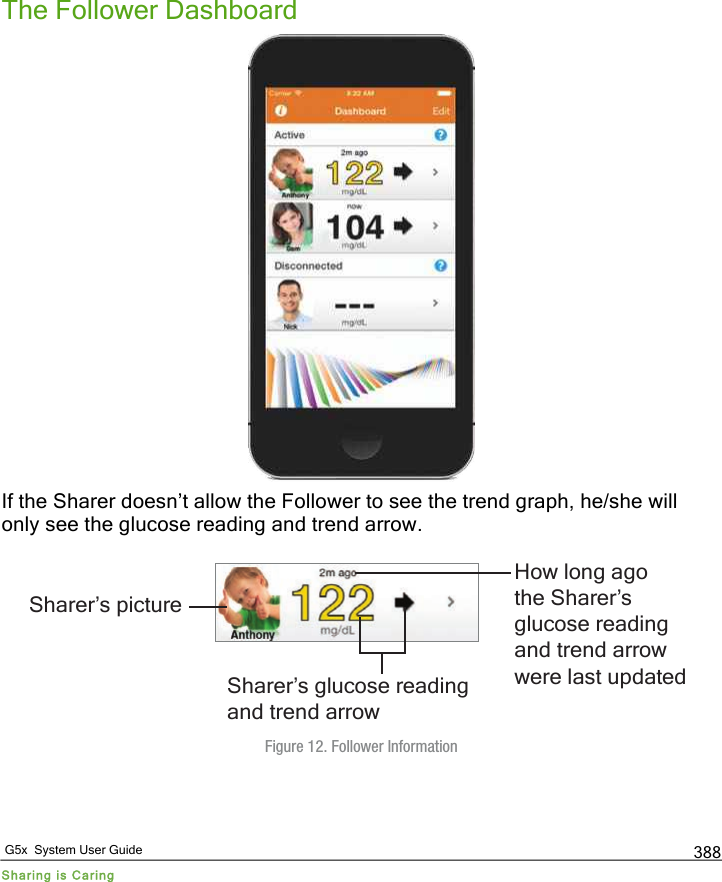
![G5x System User Guide Sharing is Caring 386 Stop Sharing The Sharer can swipe the On/Off switch to temporarily stop glucose information and Alarm/Alerts from being sent to Followers. Sharing stops until the Sharer turns the On/Off Switch back on. For reasons of safety and intended use, the Follower will get a message telling them the Sharer’s data was set to Not Sharing. The Follower’s dashboard will show the Sharer has stopped sharing glucose information. 20.7 Dexcom Follow App Dexcom Follow App Description The Dexcom Follow app is a separate app from the G5 Mobile app. Your Followers only need to download and install the Dexcom Follow app. What the Dexcom Follow App does: • Allows Follower to view Sharer’s glucose information • Allows Follower to get Alarm and Alerts • Allows Follower to view Sharer’s trend graph What the Follower app does not do: • Provide treatment advice • Interact with the G5 Mobile app Receiving Dexcom Follow Invitation Email After getting the Sharer’s Follow invitation by email, the Follower sets up his/her smart device. Glucose Alarm and Alerts A glucose notification is a visual message saying “Glucose notification from [Sharer’s name]” that appears on the screen of the Follower’s smart device. The notification may include sounds, depending on the smart device’s settings. Types of notifications the Follower gets: PDF compression, OCR, web optimization using a watermarked evaluation copy of CVISION PDFCompressor](https://usermanual.wiki/Dexcom/9588/User-Guide-2994928-Page-386.png)