Diasonic Technology Co DDR4200 DAB RECEIVER & VOICE RECORDER User Manual DDR 4200 Manual English
Diasonic Technology Co Ltd DAB RECEIVER & VOICE RECORDER DDR 4200 Manual English
USERS MANUAL
1
User’s Guide manual
DAB & FM Receiver & Digital Voice Recorder &
Audio Player
Product name: DAB Receiver & Voice Recorder
Model name: DDR-4200
Thank you for purchasing PORTABLE DIGITAL AUDIO PLAYER from DIASONIC.
Please carefully Read the Instruction manual for safe use of the product. We
recommend you to keep this instruction manual for future reference.
2
Information to User
This equipment has been tested and found to comply with the limits for a Class B
digital device, Pursuant to part 15 of the FCC Rules. These limits are designed to
provide reasonable protection against harmful interference in a residential
installation.
This equipment generates, uses and can radiate radio Frequency energy and, if not
installed and used in accordance with the instructions, may cause harmful
interference to radio communications.
However, there is no guarantee that interference will not occur in a particular
installation. If this equipment does cause harmful interference to radio or television
reception, which can be determined by turning the equipment off and on, the user is
encouraged to try to correct the interference by one or more of the following
measures:
▪ Reorient or relocate the receiving antenna.
▪ Increase the separation between the equipment and receiver
▪ Connect the equipment into an outlet on a circuit different from that to which the
receiver is connected.
Consult the dealer or an experienced radio/TV technician for help.
INFORMATION TO THE USER
※ WARNING
Changes or modifications not expressly approved by the manufacturer could void the
user’s authority operate the equipment.
This device com
p
lies with Part 15 of the FCC Results. O
p
eration is sub
j
ect to the
following two conditions:
(1) This Device may not cause harmful interface, and
(2) This device must accept any interference received, including interference that
may cause undesired operation.
3
● Do not drop DAB Receiver, it may cause a malfunction.
● Do not leave DAB Receiver in the following areas:
- Place of high temperature (above 60℃)
- Exposed to direct sunlight or near heating appliances.
- Inside a car; especially in the summer
- High humidity area like a bathroom
● Avoid any impact to the LCD Display
● Do not place credit cards, phone cards, bank books or subway tickets near
DAB Receiver. The magnetism of the player may damage the data stored in
the magnetic strip.
● We are not responsible for any damage or claims from a third party resulting
from the use of DAB Receiver.
● We are not responsible for any loss of files caused by any reason.
● Do not repair, disassemble or make modifications to DAB Receiver.
● Do not use DAB Receiver in any area designated No Electronic Devices like
airports or medical facilities.
● Do not operate while driving.
● If DAB Receiver is misused by the user, subjected to static electricity or
electrical shock even if just changing the battery, the files stored in the
memory may be lost or corrupted.
Backup all important data!
● Only insert a memory card when the unit is off or a malfunction may occur
DAB Receiver is manufactured under strict quality control procedures to ensure the
best performance and customer experience.
● Elegant Design and Exterior Finishing
DAB Receiver is designed with the customer in mind. Using a wide LCD Screen and half
miller window to eliminate the closeness of a small display and show off a high class
image to enhance the user’s experience.
● DAB/FM/Voice Recording and MP3 PLAYER
DAB Receiver can record DAB/FM/Voice and play MP3 files.
● External memory
DAB Receiver has the ability to expand the memory capacity using SD or MMC memory
Safety Precautions
Functions and Features
4
cards.
● Record DAB/FM RECEIVER
With DAB Receiver you can record live or future DAB/FM broadcasts.
● RYW-EXPLORER
With DAB Receiver you can transmit data between the device and your PC and even send
those files to a friend using E-mail.
● Recording Timer
DAB Receiver can be programmed to record voice or Receiver at a later time with its built in
timer.
● USB Interface
● Displays file/frequency/current time on the wide LCD Screen
● Built-in calendar up to the year 2099
● Elegant Design and Exterior Finishing
● Built-in microphone
● Separate and record files up to a high tone quality of 99
● Lock (HOLD) function to prevent unnecessary battery consumption caused by an
accidental key press.
● TIMER recording function to allow voice or Receiver recording at a later time/date.
● REPEAT PLAY allows a message to be played repeatedly
● Resume Playback Function
● Section Repeat Play (A↔B REPEAT PLAY)
● Automatic power OFF after manual setting of no use.(SLEEP MODE)
● MONITOR Function allows the user to listen to what is being recorded using an earphone
(MONITOR)
● Volume adjustable 30 levels
● EQ equalizer modes (NORMAL,ROCK,JAZZ,CLASSIC,POP)
● Repeat (NORMAL/SECTION REPEAT/1 TRACK/ALL TRACK)
● Download and playback of MP3 Files
● Real time or reserved FM RECEIVER RECORDING function
● Real time or reserved DAB RECEIVER RECORDING function
● DAB/FM PRESET CH function
● DAB Region setting EUROPE (9) or USA (10)
● Setting up to 10 reserved recordings is possible
● S-FORWARD and S-REWIND Searching function (10 times/100 times searching)
● External memory slot (SD-CARD/MMC)
● Built-in high-power speaker
● Easy recording from external audio devices
● Recover time and settings after replacing the battery (BACK-UP Function)
5
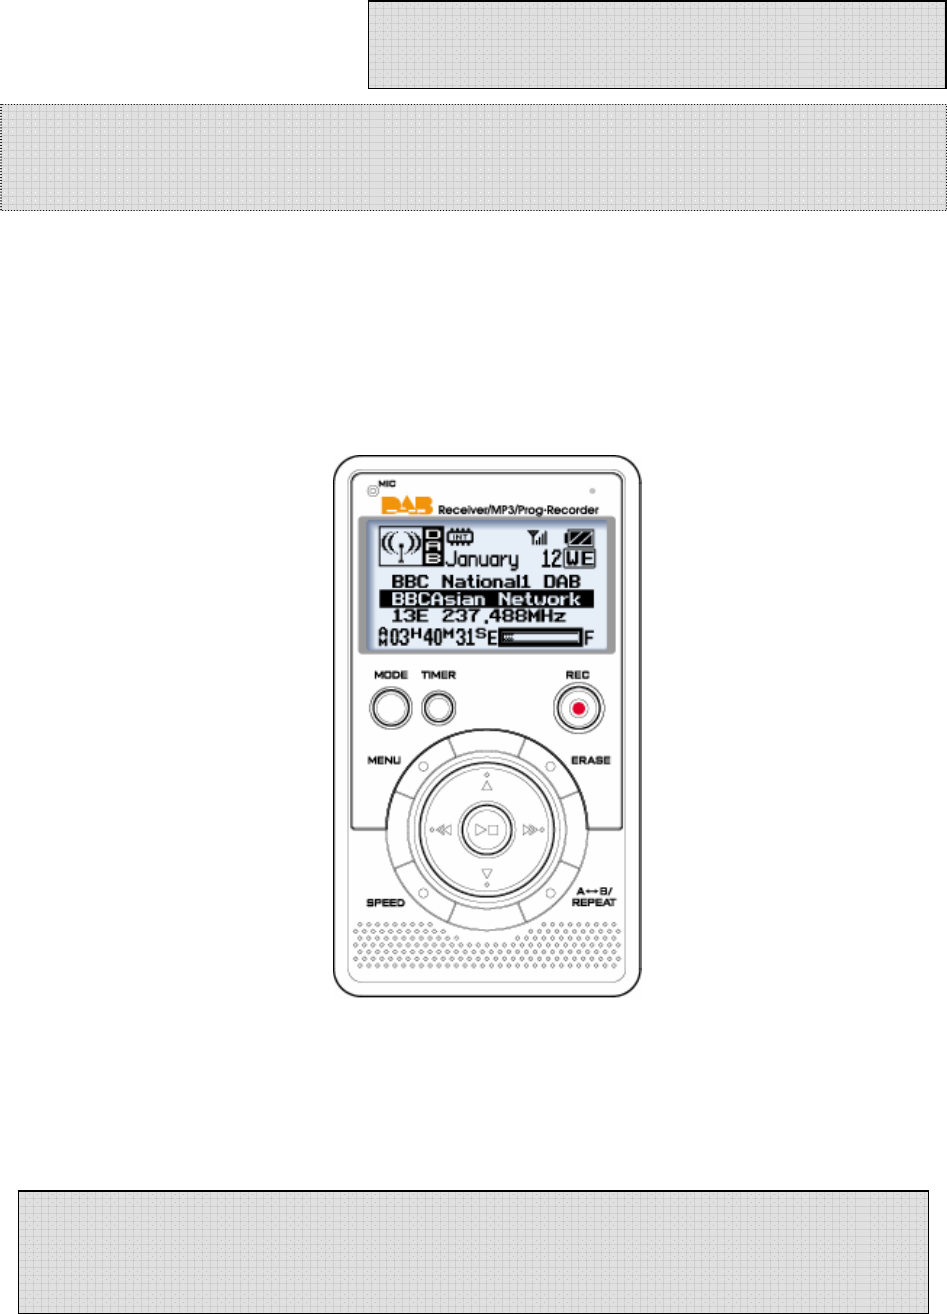
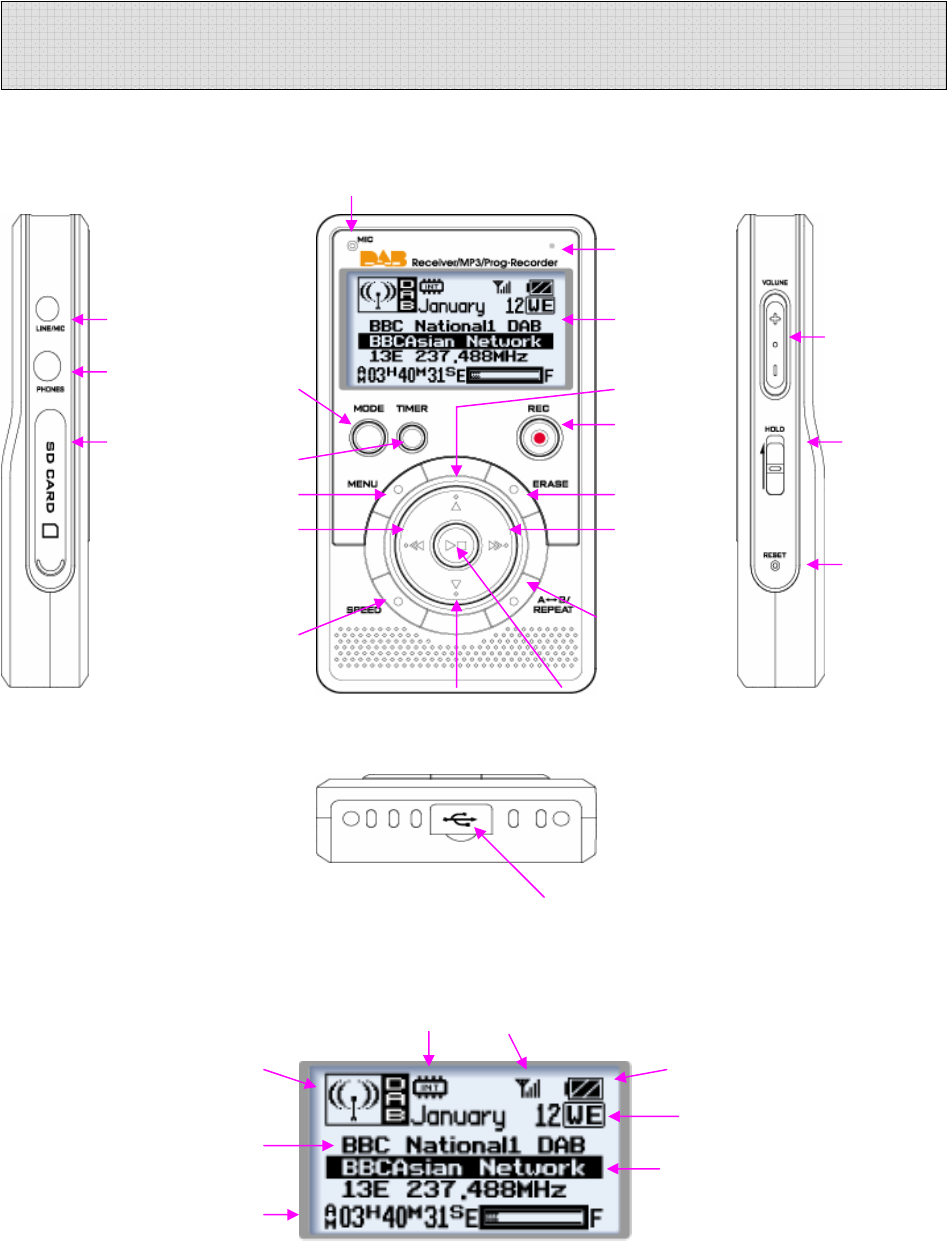
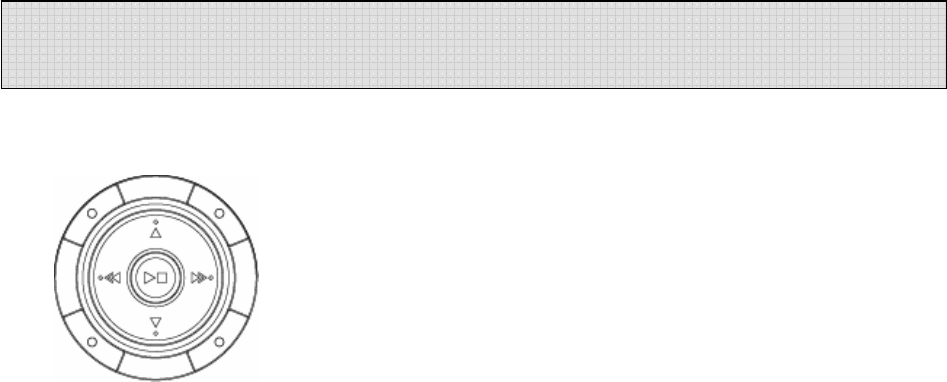
1) MAIN SET
Internal Microphone
LED Lamp
External Display
Microphone Jack Vol +/-
Ear phone Mode File Up
REC Hold On/Off
External Timer
Memory Slot Menu Erase
Rewind Forward
Reset
Speed A↔B/Repeat
File Down Play/Stop
USB Jack
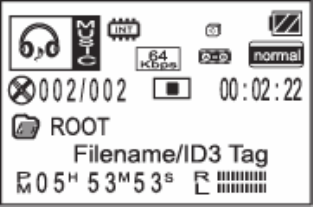
2) LCD
Memory Type DAB Received Indicator
Mode Selection Battery Strength
Date & Weekdays
Ensemble
File Info/Frequency
Parts and Components
6
/Station Name
Current Time
Memory Space
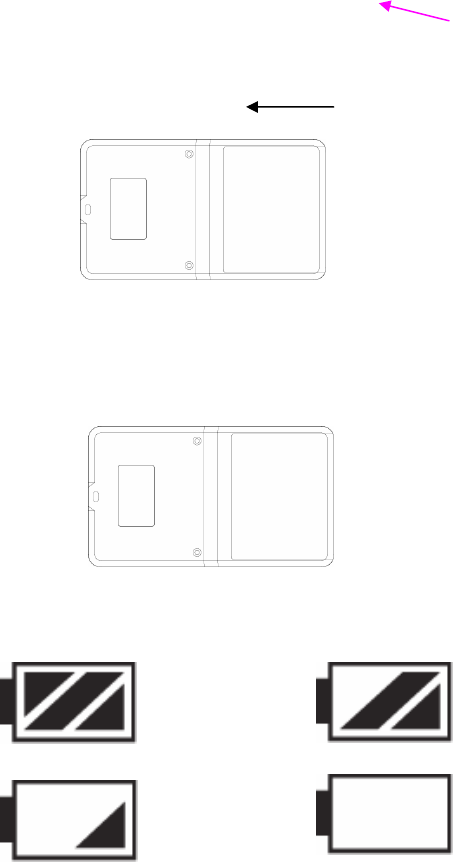
3) Battery Use and Description of Components
① Open the Battery Cover.
Open
② Close the cover after inserting Rechargeable Li-Polymer Battery(3.7V/1500mAH)to the
correct (+) (-) polarities.
Battery : Rechargeable Li-Polymer Battery(3.7V/1500mAH)
③ Check the battery strength by pressing the PLAY/STOP or record mode button.
Battery strength is strong. Battery is partially run down.
Battery is almost run down. Replace the battery.
※ Caution
Check the polarities of the batteries if the LCD Display doesn’t turn ON after inserting new
batteries.
※ Note
If you do not use DAB Receiver for a long time, the batteries may be run down naturally.
Take out the batteries if you do not plan on using DAB Receiver for a long time.
④ Battery Life
7
Battery Type Recording Playback via Speaker
(Volume: Middle) Playback via Ear phone
Li-Polymer Approx 12hr Approx 12hr Approx 18hr
⑤ Caution when Using the Battery
● Do not use other battery.
● If you do not use this recorder & player for a long time, take the batteries out of the
body.
● When using rechargeable batteries, carefully read the manual of the battery and
charger before using them.
⑥ Components
Stereo Earphone, Line-in Cable, USB Cable, Adaptor, External ANT, Cradle.
5) Basic Functions
● Turning the Power ON/OFF
To turn the player on, hold the PLAY button for 1-3 seconds.
If no key is pressed for more than 3 minutes, the power is automatically shut OFF.
To turn the player off, hold the STOP button for 1-3 seconds.
If you put in the provided batteries after purchasing DAB Receiver, the Power should turn
ON and the initial display screen appears. When the power is OFF, you may turn the power
ON by pressing the PLAY Button.
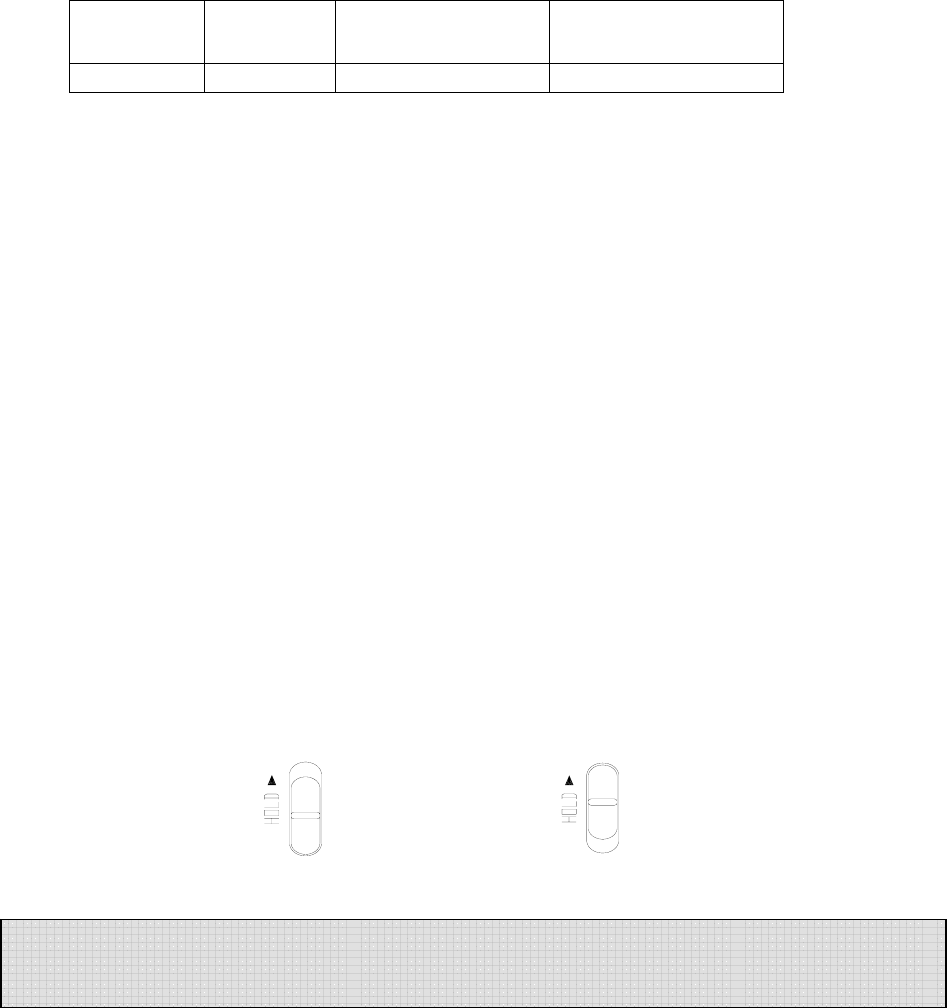
● How to Use the HOLD function
When the lock button is in the upper position, the player is in HOLD and will not
operate. Use this recorder & player only after checking the lock switch is released from
the HOLD position.
HOLD OFF HOLD ON
Released Player not operable
● VOICE MODE (VOICE)
VOICE/DAB/FM/MP3 Buttons

8
Upon operating the keys, ㅡ means a short press and ㅡㅡ means pressing and
holding (longer than 1 sec).
● DAB/FM Receiver Domain (RECEIVER/KEY Operation)
Buttons Key
Operations Stopped Upon Recording Playing
ㅡ
ㅡㅡ
Plays the beginning of file
/Stop status
Power off
X
X
/Stops recording
Power off
ㅡ Moves to the next file X Beings to play the next file
ㅡ
ㅡㅡ Moves to the previous file X Plays the previous file
If key held down more than 5 second
ㅡ S-Forward current file very fast X S-Forward current file
ㅡ S-Forward current file very fast X S-Forward current file
MODE ㅡ VOICE/DAB/FM/MP3 X VOICE/DAB/FM/MP3
TIMER
ㅡ
ㅡㅡ
Checks the time and sets the
timer for a future recording
Modifies the time setting
X X
A↔B ㅡ Selects from the external/
internal memories X Repeats the playing section between
A↔B
REPEAT ㅡ Change the repeat setting X Change the repeat setting
ERASE
ㅡ
ㅡㅡ
Deletes the current file
(push erase to confirm when
blinking)
Deletes all files
(push erase to confirm when
blinking)
X X
REMAIN ㅡ Showa remaining record time in
voice mode
Showa remaining
record time in
voice mode
X
VOL+ Volume+ Volume+ Volume+
VOL- Volume- Volume- Volume-
HOLD ON/OFF ON/OFF ON/OFF

9
Buttons Key
Operations Receiving Upon Recording
ㅡ
ㅡㅡ
PRESET the station /Stop
Power off
X/ Stops recording
Power OFF
ㅡ Changes to the next preset X
ㅡ Changes to the previous preset X
ㅡ,
ㅡㅡ
SEEK TUNNING
AUTO TUNNING X
ㅡ
ㅡㅡ SEEK TUNNING/AUTO TUNNING X
MODE ㅡ VOICE/DAB/FM/MP3 X
TIMER ㅡ
ㅡㅡ
Checks TIME and reserved settings
Sets and modifies TIME X
VOL+ VOLUME+ VOLUME+
VOL- VOLUME- VOLUME-
HOLD ON/OFF ON/OFF
Note) The earphone plays the role of the antenna in the FM Receiver.
If the earphone wire is longer, receiving sensitivity is improved.
● MP3 FILE Domain (MP3)
Buttons Key
Operations Upon Stopping Upon Playing
ㅡ
ㅡㅡ
Play the current file/Stop
Power OFF
Pauses the file/ Stops playing file
Power OFF
ㅡ Move to the next file Begins to play the next file
ㅡ
ㅡㅡ
Moves to the previous file
Plays the previous file
If key held down more than 5 seconds, goes
to the beginning of the file
ㅡ S-FORWARD current file
very fast S-FORWARD current file
ㅡ S-REWIND current file very
fast S-REWIND current file
MODE ㅡ VOICE/DAB/FM/MP3 VOICE/DAB/FM/MP3
TIMER ㅡ
ㅡㅡ
Checks TIME
Modifies TIME Setting X

10
A-B ㅡ Selects from the
external/internal memory Repeats playing section between A-B
REPEAT ㅡ Changes repeat setting Changes repeat setting
ERASE ㅡ
ㅡㅡ
Deletes the current file
Deletes all files X
EQ ㅡ ROCK/CLASSIC/NORMAL
/POP/LIVE ROCK/CLASSIC/NORMAL/POP/LIVE
VOL+ VOLUME+ VOLUME+
VOL- VOLUME- VOLUME-
HOLD ON/OFF ON/OFF
11
You need to set the current date and time prior to initiating a recording.
① Press and hold the TIMER Button while the player is stopped.
② When you hold the TIMER Button, the day will be flickering and then if you press or
you can change the day. Push the PLAY Button to set and now the window displaying
the time will also be flickering. If you press or you can change the hour, press PLAY
again to set and do the same thing to change the minute and press PLAY again to set.
③ When the time setting is completed, you may return to the initial screen by pressing
the STOP button.
④ To check the time, press the TIMER button, the current time (hour/minute/second) will
display, and if you want to change the time, you may change the day/hour/minute by
pressing and holding the TIMER Button.
● How to Record
When you are in VOICE/DAB/FM/MUSIC Mode, you may record using the RECORD
Button.
① Select the mode by pressing the MODE Button.
(When you are in the DAB/FM Mode, the frequency currently received is recorded).
② Press and hold the RECORD (REC/STOP) Button for about 1 second with the
internal microphone toward the sound source.
The recording is initiated and a red light indicating recording turns ON.
③ To stop recording, press the STOP button.
※ Once recording is initiated, you may not stop recording for the first Five (5) seconds.
※ The recording is automatically recorded in the next available slot.
※ When recording for a long time, replace the battery with a new one.
※ Check the capacity of the battery prior to recording.
※ Note
Perform a test recording to avoid any errors while recording.
If the battery is completely run down during a recording, the message “low battery (BAT)”
will display on the screen and the power will be automatically shut OFF.
Replace the battery with new one.
● Monitoring a Recording
You may listen to what is being recorded by connecting an earphone.
※ Note
- Do not take the battery out during a recording because it may cause the recording to be
Timer Recording
12
lost or a malfunction
Take out the battery only when the player is stopped.
- If the corresponding file exceeds the recording capacity or there is not enough room for a
recording, the recording will not be available.
When the memory is FULL, a message "FULL" will display.
- Recording to MP3 or H/D domains is not available (Only playback is available in MP3).
● Bit rate Setting
To change the recording bit rate from 16kbps to 32kbps, switch the unit to voice mode (using
the mode button) and hold down the REMAIN/EQ button until you see the desired bit rate on
the LCD screen.
*When you see the desired bit rate, let go of the REMAIN/EQ button.
13
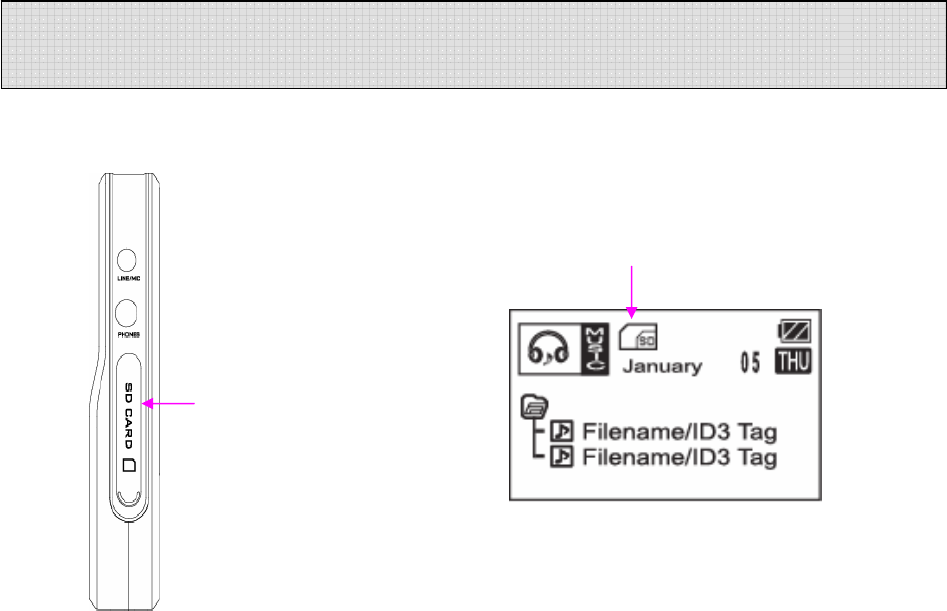
SD Memory
External Memory Slot
① If you press the A-B Button in the stop status after inserting an external memory card,
the display screen of INT/CARD will be converted and the internal and external memory
domains will be separated.
② You may record, play, save from the PC and transfer files with the external memory.
③ Inserting and taking out an external memory card must be performed only when the
player is stopped.
- Note
Only insert a memory card when the unit is off or a malfunction may occur.
The external memory is compatible with an SD/MMC-CARD only.
- If you take out the battery or external memory during a recording or playback, it may
cause a lost file or malfunction.
Take out the battery only when the player is stopped and take out or insert the external
memory only after turning-off the power.
- If the corresponding file exceeds the recording capacity or there is not enough room
for the recording, the recording will not be available.
When the memory is FULL, a message "FULL" will display.
- Recording to MP3 or H/D domains is not available (Only playback is available in MP3).
External Memory

14
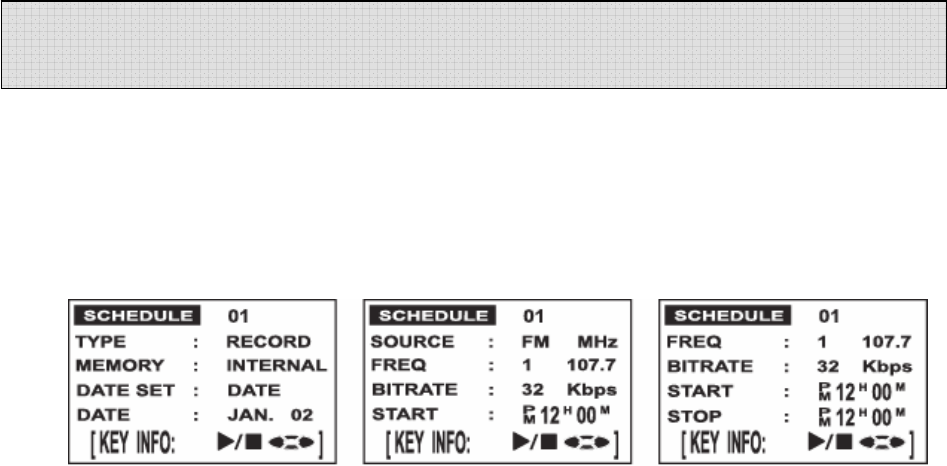
1. Push the A-B button on DAB Receiver to switch to the SD/MMC card and next press the
TIMER Button twice and the reserved recording screen appears. The minute needle clock
indicator and setting channel should be flickering. Press FW or RW to select the file number
and then push PLAY. Now the days of the week will flicker. Use FW or RW to select the
desired day and press PLAY.
2. After selecting the day, set the hour by using FW or RW and pushing PLAY (same as
before) to select the desired hour (do the same for minutes). After the minutes are set, the
start time will flicker but you will be setting the ending time now. Set the hour by using FW
or RW and pushing PLAY (same as before) to select the desired hour (do the same for
minutes). When you finish, you will see the main screen and your unit is ready to record on
the selected day(s) & time(s). You may set up to 10 reserved recordings for all the sections
in DAB/FM/VOICE.
SD/MMC Card Recording
15
● Playing a VOICE file
① Select the message you want to listen to.
(Select the file you want 01-99 using Button.)
② You may play by pressing the PLAY () Button.
③ Adjust the volume with the DIGITAL VOLUME button.
Listen to music in quiet areas using the micro speaker.
Use the earphones to avoid interference or in noisy areas.
④ To stop, press the STOP () Button.
⑤ For the S-FORWARD and S-REWIND function,
press the button.
You may stop this function by pressing the PLAY()/STOP()
Button.
⑥ You may select and play the next or previous file during playback using the Button.
※ If the battery is completely run down while playing, a message “BAT” will flicker and
automatically disappear after the warning. Replace the battery with a new one.
● Playing MP3 files
① Using the MODE Button, select the MP3 Domain.
② If there is no music downloaded, the message “NO.IF” displays on the LCD.
③ If you download a music file (MP3) via the USB, the file will be saved in the MP3 Domain
and you may play it using the PLAY Button.
● S-FORWARD and S-REWIND
Selectively play the next file or previous file during playback using Button.
If you press the Button during the playback of a file, S-REWIND/S-FORWARD is
initiated at a speed of about 10 seconds per second.
※ Used to fast-forward or rewind a specific section.
If you press the Button when the player is stopped, (showing the file number) S-
REWIND/S-FORWARD is initiated at a faster speed of about 1 minute per second.
Pressing will S-REWIND from the end of the file (Exp a 1 hour file will rewind from
1:00:00 - 59:00:00 etc). Pressing will S-FORWARD from the beginning of the file.
(Exp a 1 hour file will fast-forward from 0:00:00 0:01:00 etc)
※ Press PLAY to STOP and play the desired section.
● Resume Function
While listening to a file, press and hold the STOP () Button (this will turn the unit off)
when you power on the unit again (pressing PLAY), the file will continue (resume) to play
from the section you left off.
● Repeat playing in the VOICE Domain
Playback Mode
16
● Repeat playing in the MP3 Domain
You may set the repeat functions by pressing the
REPEAT Button during playback.
NOR: Plays and stops all music
NOR (1): Plays and stops only one music file
(1) ALL: Repeats playing music
ALL: Keeps playing all music in order
● Repeat a Section A↔B
If you want to repeat playing a specific section, press the A-B button to select the
beginning of that section and then press A-B again to select the end of that section. The
selected section will continue repeating until you push A-B or PLAY.
※ This only works with one file at a time.
※ Section repeat is done the same way for ALL files
● Equalizer Functions
When playing MP3 files, you may play according to genre using the equalizer functions
NORMAL, ROCK, LIVE, CLASSIC and POP.
You may set the equalizer functions when the player is stopped using the EQ Button.
At this time, the message “NOR, JAZZ, CLASSIC, POP, ROCK, LIVE” displays on the LCD.

17
※ Deleting is only available when the player is stopped.
● Deleting a Message One by One
① Select the file to delete using the Button.
② If you press ERASE, “ERASE” will be flickering on the LCD and the message to be
deleted is displayed for confirmation. While the message “ERASE” is flickering, press
the ERASE Button again to delete the message. If the message is deleted, the number
displayed on the LCD will be forwarded to the next file.
※ While the message “ERASE” is flickering, if you press any button, the erase function is
cancelled.
※ Note: Once a message is deleted, it is not recoverable.
● Deleting all Files
① Select the files to delete using the MODE Button.
② If you press and hold the ERASE Button for longer than 5 seconds, the “AL.ERASE” will
be flickering. If you press the ERASE Button again at this time, all files will be deleted.
③ You may delete the information in the MP3 Domain the same way.
Deleting HD files is only available using the PC-APPLICATION after connecting your PC
with the USB connection.
※ Note : If you use up (full) the memory by using the hard disk function, No recording
capabilities will be available. Do not turn off the power or take out an external
memory card while deleting files. It may cause a malfunction.
● Deleting a Reserved Recording
1. Press the TIMER Button once, the time displays and if you press the TIMER Button twice,
the reserved recording screen appears. (DAB/FM/VOICE mode only)
2. Select the file to delete using the Button and press erase two times
※ To set a reserved (future) recording, the TIME Setting must be set.
If you press the TIMER Button, the time (Hour/Minute/Day) displays.
If the time setting is done, the correct Day/Hour/Minute/Second will appear on the display
screen. To change it:
① Press and hold the TIMER Button while the player is stopped.
② When you hold the TIMER Button, the day will be flickering and If you press or you
can change it. Push the PLAY Button to set and the window displaying the time will also
be flickering. If you press or you can change the hour, press PLAY to set and do
the same to change the minute and press PLAY to set.
※ Make sure you are in the desired mode to set a reserved (future) recording and/or tuned
to the desired DAB/FM station prior to setting a reserved (future) recording.
③ After the time setting is done, if you press the TIMER Button once, the time displays and
if you press the TIMER Button twice, the reserved recording screen appears.
Files Erase
18
(DAB/FM/VOICE mode only)
The minute needle clock indicator and setting channel should be flickering.
Press to select the file number and then push PLAY.
Now the days of the week will flicker. Use to select the desired day and press PLAY.
④ After selecting the day set the hour by using and pushing PLAY (same as before) to
select the desired hour (do the same for minutes). After the minutes are set, the start
time will flicker but you will be setting the ending time now. Set the hour by using
and pushing PLAY (same as before) to select the desired hour (do the same for minutes).
When you finish, you will see the main screen and your unit is ready to record on the
selected day(s) & time(s). (It will seem like you are changing the start time when setting
the ending time but trust us you are setting the ending time)
A start and ending time setting requires 4 PLAY presses.
(Exp- 1 start hour + 1 start minute + 1 ending hour + 1 ending minute = 4 )
⑤ 1) The reserved recording is initiated at every Nth time of every day
2) The reserved recording is initiated at every Nth time on Monday - Saturday
3) The reserved recording is initiated on a certain day of every week
You select using and confirming is done using.
⑥ After setting the day, set the hour and minute.
⑦ And then, set the hour and minute ending time.
Once END Setting is done, the TIMER icon displays and the recording is automatically
initiated at the designated time.
* You may set up to 10 reserved recordings for all the sections in DAB/FM/VOICE. It is set
the same way described on the last page. A reserved recording is automatically initiated
even when the power is OFF. (Timer function)
● Deleting a Reserved Recording
1. Press the TIMER Button once, the time displays and if you press the TIMER Button twice,
the reserved recording screen appears. (DAB/FM/VOICE mode only)
2. Select the file to delete using the Button and press erase two times
● Modifying a Reserved Recording
To modify a reserved recording,
1. Follow the procedure to set a new reserved recording
2. When the file number blinks, use the REWIND key to select the number of the reserved
recording you wish to modify.
3. Go through the normal process of setting up the reserved recording.
Note: You can only edit day and time settings. If you made a mistake setting the correct
recording station, you must erase the reserved recording.
19
● Connecting an External Microphone
- Plug a pre-amplified microphone in the line in terminal of the body.
※ When an external microphone is connected to the line in, the built-in microphone is not
operational.
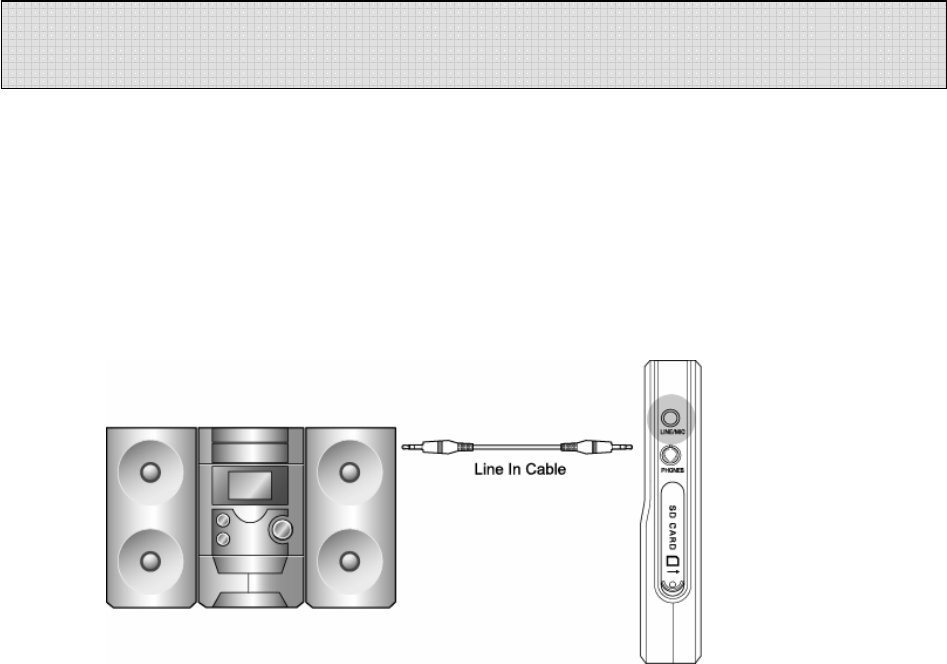
● Connecting to External Devices
You may record from almost any device using the line in and audio cable.
● Connecting to a stereo
When recording from the line in of the voice recorder, connect the audio cable to the line in
of the recorder and to the headphone jack of the output device.
How to Connect to a stereo
※ Note
★ When connecting to an external device, make the connections with the power OFF.
★ Before connecting to any external device, carefully read the manual of the external device
●When recording from an external device, record after connecting the audio cable to this
device and decreasing the volume of the external device.
●To record in the external device, play this device and initiate the recording in the external
device at the same time. (Refer to your devices user manual) (This timing may be different
depending on each device, so make a test recording prior to performing an actual
recording).
Connecting External Device
20
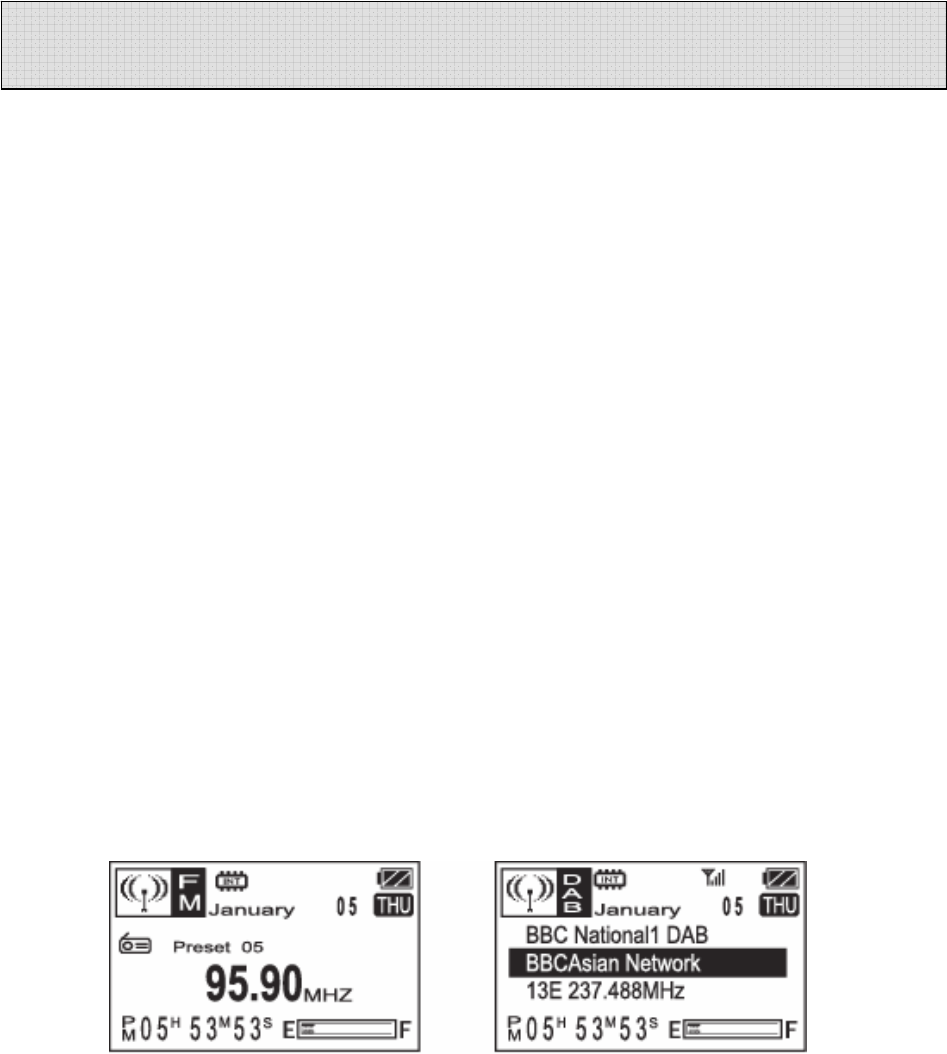
When listening to the FM Receiver, use earphones. They act as the antenna. You can also
plug an antenna in the headphone jack of the player and use the speaker.
* It is very convenient for you to listen to a broadcast using the AUTO SEEK Function.
After selecting the Receiver mode, if you press and hold for about 1 second, it will
stop at an audible broadcast channel. This saves time in unfamiliar areas.
After finding a station, AUTO SEEK will stop.
When using AUTO SEEK to find a station, a precise TUNNING may not be available, please
perform a fine adjustment using the REW or FF KEY.
● How to Save a Channel
① Convert to DAB/FM mode by pressing the MODE Button.
② The frequency will display on the LCD. Select the frequency using .
③ Press the PLAY Button, a file number (01-10) will be flickering on the display screen.
Select a channel (01-10) using the Button and PRESS PLAY to select that channel.
The selected channel will be saved. (01-10)
④ You may save up to ten channels the same way.
* Confirming the saved channel
If you press the Button, the saved channel and frequency is displayed. You may select
a channel using the Key. In this mode, if you press the Button, you will go back
to the frequency (FR) selection mode.
● How to Record a Receiver Broadcast
① Select the broadcast channel you want to record (same as Receiver Channel Setting)
② Record by pressing the RECORD Button. The recording will be saved in the voice folder
and in the empty portion just after the last recorded message.
You may check the file in the voice folder after you have finished the recording.
DAB/FM Receiver
21
● DAB/FM Reserved Recording
* Make sure you are in tuned to the desired DAB/FM station prior to setting a reserved
(future) recording.
1. Press the TIMER Button twice and the reserved recording screen appears.
The minute needle clock indicator and setting channel should be flickering.
Press to select the file number and then push PLAY.
Now the days of the week will flicker. Use to select the desired day and press PLAY.
2. After selecting the day set the hour by using and pushing PLAY (same as before) to
select the desired hour (do the same for minutes). After the minutes are set, the start time
will flicker but you will be setting the ending time now. Set the hour by using and
pushing PLAY (same as before) to select the desired hour (do the same for minutes). When
you finish, you will see the main screen and your unit is ready to record on the selected
day(s) & time(s).
(It will seem like you are changing the start time when setting the ending time but trust us
you are setting the ending time)
A start and ending time setting requires 4 PLAY presses.
(Exp- 1 start hour + 1 start minute + 1 ending hour + 1 ending minute = 4 )
You may set up to 10 reserved recordings for all the sections in DAB/FM/VOICE.
DAB/FM SD card Reserved Recording
1. Make sure you are in tuned to the desired DAB/FM station prior to setting a reserved
(future) recording. Push the A-B button on DAB Receiver to switch to the SD/MMC card
and next press the TIMER Button twice and the reserved recording screen appears. The
minute needle clock indicator and setting channel should be flickering. Press FW or RW
to select the file number and then push PLAY. Now the days of the week will flicker. Use
FW or RW to select the desired day and press PLAY.
2. After selecting the day, set the hour by using FW or RW and pushing PLAY (same as
before) to select the desired hour (do the same for minutes). After the minutes are set,
the start time will flicker but you will be setting the ending time now. Set the hour by
using FW or RW and pushing PLAY (same as before) to select the desired hour (do the
same for minutes). When you finish, you will see the main screen and your unit is ready
to record on the selected day(s) & time(s). You may set up to 20 reserved recordings for
all the sections in DAB/FM/VOICE/Line-in/Alarm.
22
MODEL DAB Receiver & Voice Recorder
RECORD TIME 256M byte : 1086Min / 2173Min
Bit rate 32Kbps / 64Kbps/96Kbps/128Kbps/192Kbps/256Kbps
FILE VOICE : 999個 / MP3
FM Record Stereo (87.5MHz~108MHz)
DAB Record 174 ~ 245MHz
Timer Record Date / Daily/ Weekly
Mic Built-in Mic / Line (external Mic)
Record Device Built-in Flash Memory / EXT (MMC/ SD CARD 2GB)
S/N 45dB (62dB input 1KHz, speaker output 200mW)
Distortion 3%±0.2 (62dB input 1KHz , speaker output 200mW)
Freq, Response 400Hz~3.2KHz (-6dB)
Output Power Max 9mW (stereo earphone 16ohm)
VOICE
RECORD/
PLAY
Repeat play NOR/ NOR1/ 1ALL/ ALL/RANDOM
S/N Min 50dB at 98.3MHz
Distortion 1%(max) at 98.3MHz ∆f=22.5KHz
Freq, Response 60dBu at 98.3MHz
Sensitivity 15dBu(Max) at S/N=30db
Frequency
Cover range 87.5 ~ 108MHz
FM
RECEIVER
(stereo)
Preset Mode 10 Receiver station
DAB Standard EUREKA - 147
DAB Mode Mode Ⅰ, Ⅱ, Ⅲ, Ⅳ
IF Frequency 850KHz
IF Bandwidth 1.5MHz
Frequency
Cover range Band 3: 174MHz ~ 245MHz
DAB
RECEIVER
Scan Auto Scan, Manual Scan
Bit/rate 32Kbps~320Kbps (MPEG 1/2 LAYER 3)
S/N 85dB up (1KHz input 0db)
Distortion 0.3%±0.05 (1KHz input 0db)
Freq, Response 20Hz~20KHz
Earphone Max 9mW (16ohm)
MP3
EQ EQ : NOR, JAZZ, CLASSIC, POP, ROCK, LIVE
General Specification
23
Repeat play NOR/ NOR1/ 1ALL/ ALL/RANDOM
communication USB 2.0
System CPU200MHz more than , RAM 64MB more than, 20MB of free space
OS windows98SE , windows2000 , windows ME , windows XP
Sound card Sound blaster 16 compatible
PC
interface
Display 640X480 more than
Ext mic/Line in ∮3.5 plug-in power microphone(mini plug / stereo) IMP less than 3KΩ
Earphone ∮3.5 earphone(mini plug / stereo) IMP less than 16Ω
IN/OUT
JACK
USB Mini jack (PC : B TYPE)
SPEAKER Diameter ∮16
VOLUME Digital volume (30 step)
MEMORY Nand flesh Memory (32MB/ 64MB/ 128MB/ 256MB/ 512MB/ 1GB/ 2GB)
LED Recording display LED (RED)
MODE VOICE/DAB/FM/MP3
Messages 01~999(INDEX)
EQ NOR, JAZ, CLA, POP, ROC, LIV
Repeat NOR/ NOR1/ 1ALL/ ALL/RANDOM
LCD
(FSTN)
CLOCK CLOCK, SUN, MON, TUE, WED, THU, FRI, SAT
ADAPTOR DC5V /1200mAh(CE, FCC)
KEY FUNCTION MODE/ TIMER/ REC/ MENU/ ERASE/ VOL+, -/ HOLD/ REW/
PLAY, STOP/ FF/ FILE UP/ FILE DOWN
POWER requirement 5V, Rechargeable Li-Polymer cell(3.7V/1500mAh)
MP3 PLAY Approx. 15hour during the mp3 play
(ear phone output: volume middle position)
VOICE PLAY Approx. 15hour during the voice play
(ear phone output: volume middle position)
Approx. 11hour during the FM Receiver play
(ear phone output: volume middle position)
RECEIVER
RECIVE Approx. 7hour during the DAB Receiver play
(ear phone output: volume middle position)
Battery
life
RECEIVER/VOICE
REC
Approx. 9hour during the Receiver play expect from DAB Receive
(ear phone output: volume middle position)
Accessory
Connecting cable for external equipment (1)/ install CD (1)/
stereo ear phone (angle type)(1)/ EXT ANT (1)/ USB cable (1)/ manual
(1)
SIZE