Diebold Nixdorf Singapore WN-RFIDNFC-01 NFC/RFID Reader User Manual TempConfidential BA9x RFID NFC Installation Manual

Wincor Nixdorf Pte Ltd NFC/RFID Reader TempConfidential BA9x RFID NFC Installation Manual

TempConfidential_BA9x-RFID_NFC_Installation_Manual
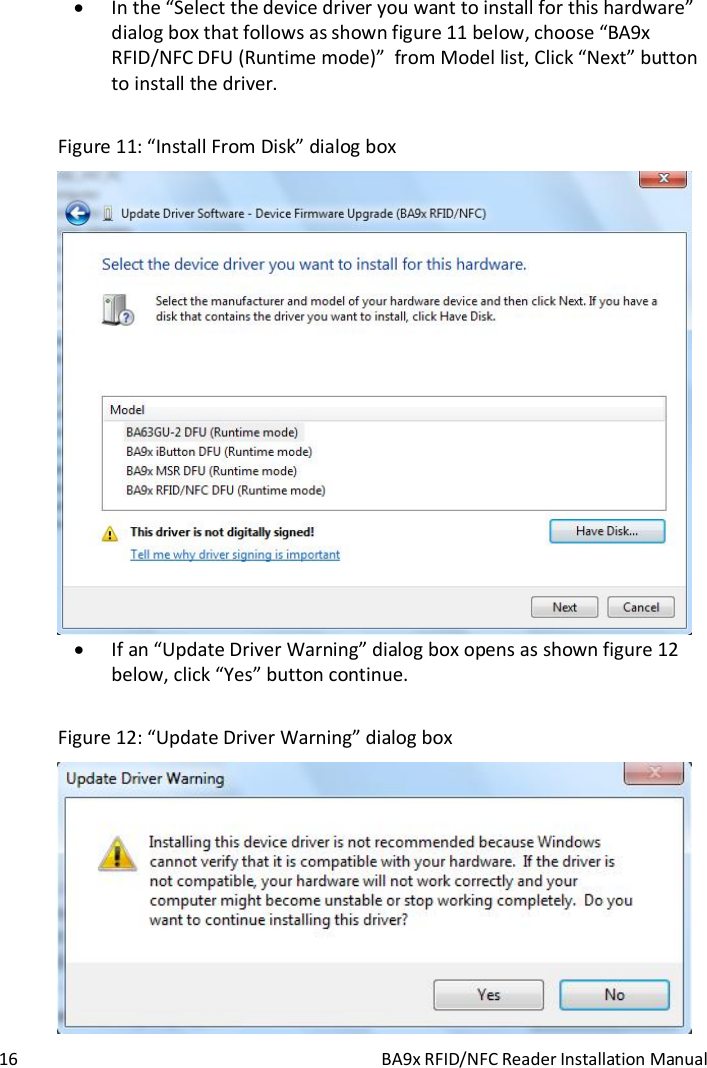
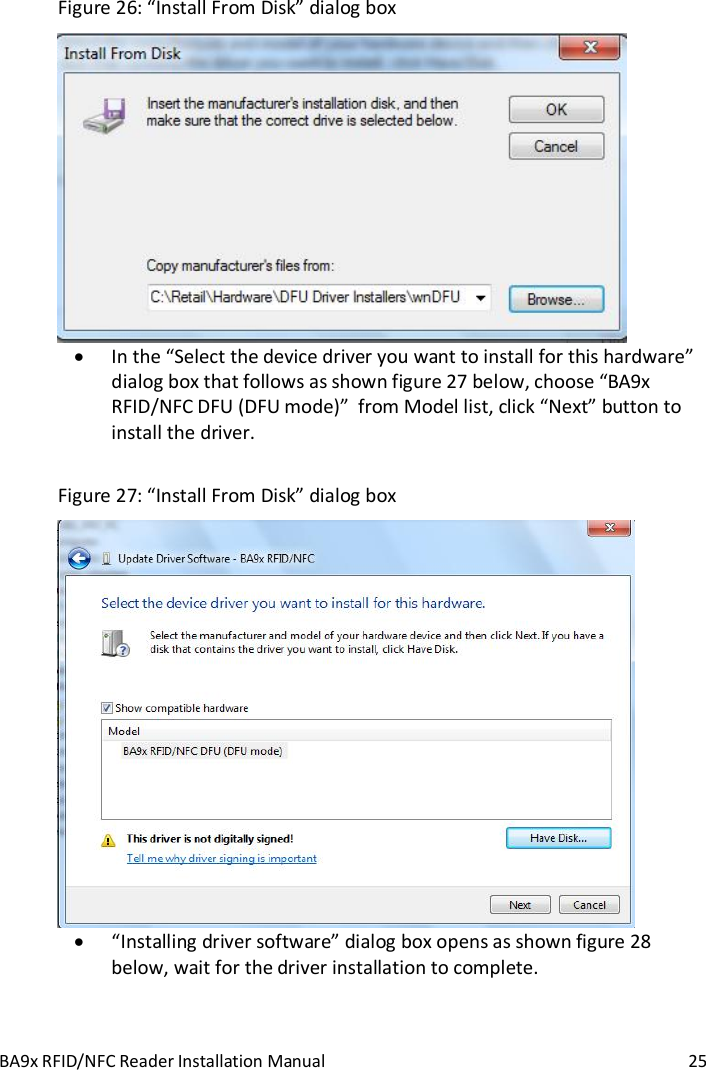
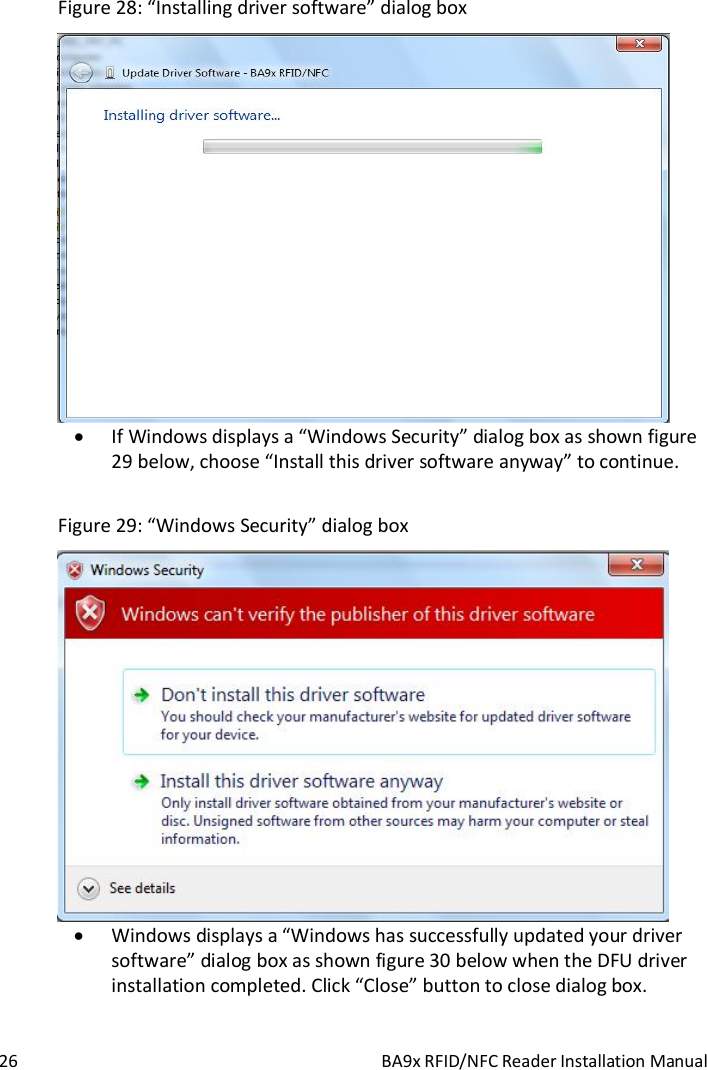
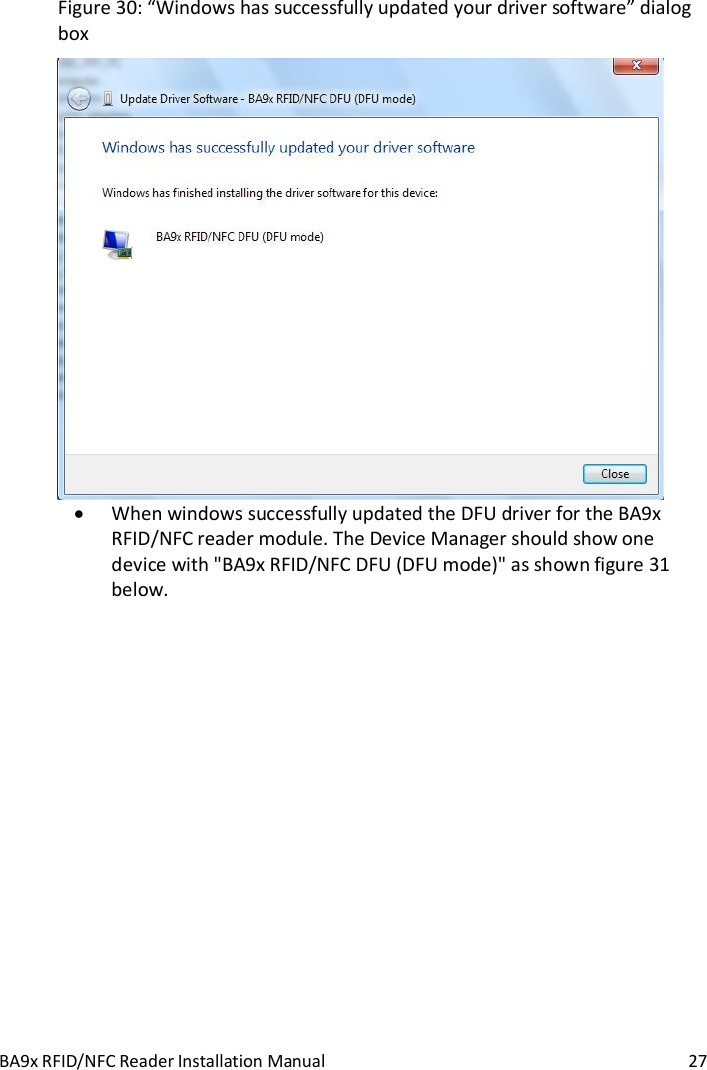
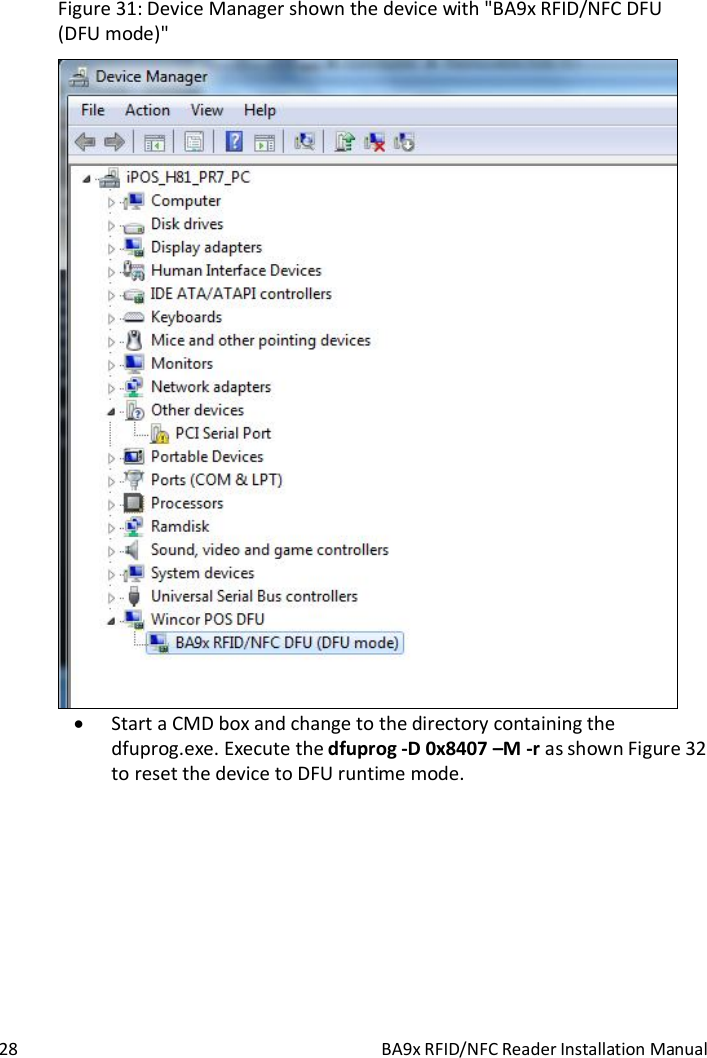
                    BA9x RFID/NFC Reader         Firmware version 1.00       Installation Manual
We would like to know your opinion on this publication.  Please send us a copy of this page if you have any constructive criticism. We would like to thank you in advance for your comments.  With kind regards.                          Wincor Nixdorf Pte Ltd Research and Development 151 Lorong Chuan New Tech Park #05-01A/B Singapore 556741  E-Mail: retail.documentation@wincor-nixdorf.com  Order-No.:  01750265251B Your Opinion:
        BA9x RFID/NFC Reader     Installation Manual                        Edition September 2014
  Contents Manufacturer´s  Certification .......................................................... 1 Europe-EU Declaration of Conformity ............................................. 1 FCC Radiation Exposure Statement ................................................. 3 FCC-Class A Declaration .................................................................. 3 About This Manual ......................................................................... 4 The parts in a kit ............................................................................ 5 Hardware installation .................................................................... 6 DFU Driver  installation ................................................................... 9 System requirement ....................................................................... 9 DFU Driver Installers folder contents............................................. 10 DFU drivers installation ................................................................. 10 DFU driver installation for DFU runtime mode ...................... 11 DFU driver installation for DFU mode ................................... 19 Operating the device .................................................................... 30 Supported TAGs ............................................................................ 30 Technical Data.............................................................................. 33 Abbreviations............................................................................... 34
  BA9x RFID/NFC Reader Installation Manual 1 Manufacturer´s Certification The device complies with the requirements of the EEC directive 2004/108/EC with regard to ‘Electro-magnetic compatibility" and 2006/95/EC “Low Voltage Directive” and RoHS directive 2011/65/EU. Europe-EU Declaration of Conformity Hereby, Wincor Nixdorf declares that this device is in compliance with the essential requirements and other relevant provisions of Directive 1999/5/EC.   Csky [Czech]: Wincor Nixdorf tímto prohlašuje, že tento zaízení je ve shod se základními požadavky a dalšími píslušnými ustanoveními smrnice 1999/5/ES. Dansk [Danish]: Undertegnede Wincor Nixdorf erklærer herved, at følgende udstyr Enhed overholder de væsentlige krav og øvrige relevante krav i direktiv 1999/5/EF. Deutsch [German]: Hiermit erklärt Wincor Nixdorf, dass sich das Gerät in Übereinstimmung mit den grundlegenden Anforderungen und den übrigen einschlägigen Bestimmungen der Richt-linie 1999/5/EG befindet. Eesti [Estonian]: Käesolevaga kinnitab Wincor Nixdorf seadme vastavust direktiivi 1999/5/EÜ põhinõuetele ja nimetatud dire ktiivist tulenevatele teistele asjakohastele sätetele. English: Hereby, Wincor Nixdorf declares that this device is in compliance with the essential requirements and other relevant provisions of Directive 1999/5/EC. Español [Spanish]: Por medio de la presente declara que el dispositivo cumple con los requisitos esenciales y cualesquiera otras disposi-ciones aplicables o exigibles de la Directiva 1999/5/CE.  [Greek]:  Wincor Nixdorf    1999/5/. Français [French]: Par la présente Wincor Nixdorf déclare que l'appareil est conforme aux exigences essentielles et aux autres disposi-tions pertinentes de la directive 1999/5/CE.
 2  BA9x RFID/NFC Reader Installation Manual Italiano [Italian]: Con la presente Wincor Nixdorf dichiara che questo dispos-itivo è conforme ai requisiti essenziali ed alle altre dis-posizioni pertinenti stabilite dalla direttiva 1999/5/CE. Latviski [Latvian]: Ar šo Wioncor Nixdorf deklar, ka ierce atbilst Direktvas 1999/5/EK btiskajm prasm un citiem ar to saisttajiem noteikumiem. Lietuvi [Lithuanian]: Šiuo Wincor Nixdorf deklaruoja, kad šis prietaisas atitinka esminius reikalavimus ir kitas 1999/5/EB Direktyvos nu-ostatas. Nederlands [Dutch]: Hierbij verklaart Wincor Nixdorf dat het toestel apparaat in overeenstemming is met de essentiële eisen en de andere relevante bepalingen van richtlijn 1999/5/EG. Malti [Maltese]: Hawnhekk, Wincor Nixdorf jiddikjara li dan apparat jikkon-forma mal-tiijiet essenzjali u ma provvedimenti orajn relevanti li hemm fid-Dirrettiva 1999/5/EC.  Magyar [Hungarian]: Alulírott, Wincor Nixdorf nyilatkozom, hogy a eszköz megfelel a vonatkozó alapvetõ követelményeknek és az 1999/5/EC irányelv egyéb elõírásainak. Polski [Polish]: Niniejszym Wincor Nioxdorf owiadcza, e urzdzenie jest zgodny z zasadniczymi wymogami oraz pozostaymi sto-sownymi postanowieniami Dyrektywy 1999/5/EC. Português [Portu-guese]: Wincor Nixdorf declara que este dispositivo está conforme com os requisitos essenciais e outras disposições da Direc-tiva 1999/5/CE. Slovensko [Slovenian]: Wincor Nixdorf izjavlja, da je ta Naprava v skladu z bistven-imi zahtevami in ostalimi relevantnimi doloili direktive 1999/5/ES. Slovensky [Slovak]: Wincor Nixdorf týmto vyhlasuje, že zariadenie spa zá-kladné požiadavky a všetky príslušné ustanovenia Smernice 1999/5/ES. Suomi [Finnish]: Wincor Nixdorf vakuuttaa täten että laite on direktiivin 1999/5/EY oleellisten vaatimusten ja sitä koskevien direk-tiivin muiden eh tojen mukainen. Svenska [Swedish]: Härmed intygar Wincor Nixdorf att denna enhet står I överensstämmelse med de väsentliga egenskapskrav och övriga relevanta bestämmelser som framgår av direktiv 1999/5/EG. Íslenska [Icelandic]: Hér með lýsir Wincor Nixdorf yfir því að tæki er í samræmi við grunnkröfur og aðrar kröfur, sem gerðar eru í tilskipun 1999/5/EC. Norsk [Norwegian]: Wincor Nixdorf erklærer herved at utstyret enhet er i samsvar med de grunnleggende krav og øvrige relevante krav i direktiv 1999/5/EF.
BA9x RFID/NFC Reader Installation Manual  3 The declaration of conformity may be consulted at http://www.wincor-nixdorf.com. FCC Radiation Exposure Statement This equipment complies with FCC radiation exposure limits set forth for an uncontrolled environment. This equipment should be installed and operated with  minimum distance 20 cm between the radiator and your body. This transmitter must not be co-located or operating in conjunction with any other antenna or trasmitter.  This device complies  with Part 15 of the FCC Rules. Operation is subject to the following two conditions: 1. This device may not cause harmful interference, and  2. This device must accept any interference received, including interference that may cause undesired operation. FCC-Class A Declaration This equipment has been tested and found to comply with the limits for a Class A digital device, pursuant to part 15 of the FCC Rules. These limits are designed to provide reasonable protection against harmful interference when the equipment is operated in a commercial environment. This equipment generates, uses, and can radiate radio frequency energy and, if not installed and used in accordance with the instruction manual, may cause harmful interference to radio communications. Operation of this equipment in a residential area is likely to cause harmful interference in which case the user will be required to correct the interference at his own expense. Modifications not authorized by the manufacturer may void users authority to operate this device. This class A digital apparatus complies with Canadian ICES-003. Cet appareil numerique de la classe A est conforme à la norme NMB-003 du Canada.
 4  BA9x RFID/NFC Reader Installation Manual About This Manual This manual informs you about everything you might need to know for the installation of your BA9x RFID/NFC Reader for the BA9x displays family and iPOS plus Advanced.   Notes in the manual are marked by this symbol.  This symbol is used for warnings.
BA9x RFID/NFC Reader Installation Manual  5 The parts in a kit The kit contains the BA9x RFID/NFC Reader with holder and two screws.
 6  BA9x RFID/NFC Reader Installation Manual About the Device The BA9x RFID/NFC is a short-range two-way communication contactless card reader. Operating in the unlicensed radio frequency ISM band of 13.560MHz, the reader generates a near-field that can power passive tags/cards that are within the operating range and perform read/write op-eration. The maximum reading range is 10 cm but typically it is shorter de-pends on the types and the number of tags/cards within the reading range. The BA9x RFID/NFC can be attached on either side of the BA9x series of touch monitors and also the BEETLE/ iPOS plus Advanced. It supports read/write of tags that are fully compliant to ISO/IEC14443A & B and ISO/IEC15693. For cards that are not fully compliant support is limited to only reading of UID. In any case, user should pick from the list of validated tags/cards shown in Table 1. On a request basis, user may submit preferred tags/cards to Wincor for validation. The physical interface is USB, and as it belongs to the HID device class there is no need to install device driver for normal cards operation. How-ever, for firmware update, it is necessary to install both the DFU-mode as well as the Runtime-mode device drivers. For ease of developing software application Wincor provides JavaPOS 1.13 middleware, alternatively, customer can also develop application that di-rectly calls the API at the HID interface.
BA9x RFID/NFC Reader Installation Manual  7 Hardware installation Unpack the parts and check whether the delivery matches the details of the delivery note. The BA9x RFID/NFC Reader can be installed on either the right or the left side of the screen. You will find a flap at the rear side of the display at the position for the peripherals.  Follow the steps below to install the reader to the display.       1. Remove the flap using a screw driver, exposing one end of a connecting cable (1).      2. Release the catch on one side of the holder.
 8  BA9x RFID/NFC Reader Installation Manual   3. Remove the back cover of  the holder.           4.  Locate the holder (1) to the side of the display uncov-ered in step 1. Route the connecting cable (2) mentioned in step 1, into the holder and connect to the connector (3).        5. Use the two screws supplied to secure the holder to the display, in locations (1) and (2).         6. Place in the back cover of the holder.  The installation is complete.
BA9x RFID/NFC Reader Installation Manual  9 DFU Driver installation System requirement In order to use “dfuprog” DFU tools with the Window operating system, The Microsoft Visual C++ 2010 Redistributable Package must be installed on the PC.  To verify if the package is installed on the PC, follow below steps: 1. Open Programs and Features by clicking the Start button   –> Control Panel–>Programs and Features. 2. To check if the Microsoft Visual C++ 2010 Redistributable Package is listed from Programs and Features as shown in the example in Figure 1 below. 3. If the package was not installed, go to the Microsoft Visual C++ 2010 Redistributable Package download site for the correspond-ing system type (x86 or x64). 4. Download the package to your local folder. 5. Double-click the package and follow the package installation in-structions. 6. Once the package is installed successfully on the PC, it should be listed.
 10  BA9x RFID/NFC Reader Installation Manual Figure 1: the Microsoft Visual C++ 2010 Redistributable Package is installed  DFU Driver Installers folder contents The following folders are included in DFU Driver Installers folder:  dfuprog folder : this folder consists of the following files  BA9xRFID.bin: the latest application firmware binary file.  dfuprog.exe: DFU firmware upgrading executable file.  wndfu.dll, wndfu.lib, wndfu_rt.dll, wndfu_rt.lib, wnusbdll.dll, wnusbdll.lib: library files for dfuprog.exe.  wnDFU folder : this folder consists of the driver files for DFU mode.  wnDFU_RT folder: this folder consists of the driver files for DFU runtime mode. DFU drivers installation In order to use DFU tools for upgrading application firmware for the BA9x RFID/NFC reader module, you need to install Wincor DFU drivers when the module is in DFU runtime mode and DFU mode.
BA9x RFID/NFC Reader Installation Manual  11 DFU driver installation for DFU runtime mode  Connect the BA9x RFID/NFC reader module to a spare USB port on the PC.  If this is the first time you connect the module to the PC, it will appears “Device driver software was not successfully installed” in the notification area on the PC as shown in figure 2 below.  Figure 2: Device drive software was not successfully installed   Then you will need to update driver manually. To do this, open the Device Manager. Select “System and Security” –> “System” – >“Device Manager” locate in “Control Panel”. The Device Manager should show one device with "Device Firmware Upgrade (BA9x RFID/NFC)" as shown figure 3 below.  Figure 3: Device Manager shows one device with “Device Firmware Upgrade (BA9x RFID/NFC)”
 12  BA9x RFID/NFC Reader Installation Manual   Right-click on the device, and choose “Update Driver Software” from the context menu. This will open the “Update Driver Software -> Device Firmware Upgrade (BA9x RFID/NFC)” dialog box shown as figure 4 below. In the dialog box, choose “Browse my computer for driver software”.  Figure 4: “Update Driver Software - Device Firmware Upgrade (BA9x RFID/NFC)” dialog box   In the dialog box that follows as shown figure 5 below, choose “Let me pick from a list of device drivers on my computer”, Click “Next” to proceed to next step.
BA9x RFID/NFC Reader Installation Manual  13 Figure 5: “Browse for driver software on your computer” dialog box   In the dialog box that follows as shown figure 6 below, to select “Show All Devices” and click the “Next” to next step.  Figure 6: “Select your device’s type from the list below” dialog box
 14  BA9x RFID/NFC Reader Installation Manual  In the dialog box that follows as shown figure 7 below, choose the “Have Disk” and click “Next” to next step.  Figure 7: “Select the device driver you want to install for this hardware” dialog box   In the dialog box that follows as shown figure 8 below, Click “Browse” button to locate the driver.   Figure 8: “Install From Disk” dialog box
BA9x RFID/NFC Reader Installation Manual  15  In the “Locate File” dialog box that follows as shown figure 9 below, locate the “wnDFU_RT.inf” setup information file and click “Open” button. This is usually located in “C:\Retail\Hardware\DFU Driver Installers\wnDFU_RT”.   Figure 9: “Locate File” dialog box   In the “Install From Disk” dialog box that follows as shown figure 10 below, Click “OK” button to back to the “Select the device driver you want to install for this hardware” dialog box .  Figure 10: “Install From Disk” dialog box
 16  BA9x RFID/NFC Reader Installation Manual  In the “Select the device driver you want to install for this hardware” dialog box that follows as shown figure 11 below, choose “BA9x RFID/NFC DFU (Runtime mode)”  from Model list, Click “Next” button to install the driver.  Figure 11: “Install From Disk” dialog box   If an “Update Driver Warning” dialog box opens as shown figure 12 below, click “Yes” button continue.  Figure 12: “Update Driver Warning” dialog box
BA9x RFID/NFC Reader Installation Manual  17  “Installing driver software” dialog box opens as shown figure 13 below, wait for the driver installation to complete.  Figure 13: “Installing driver software” dialog box   If Windows displays a “Windows Security” dialog box as shown figure 14 below, choose “Install this driver software anyway” to continue.  Figure 14: “Windows Security” dialog box
 18  BA9x RFID/NFC Reader Installation Manual  Windows displays a “Windows has successfully updated your driver software” dialog box as shown figure 15 below when the DFU driver installation completed. Click “Close” button to close dialog box.  Figure 15: “Windows has successfully updated your driver software” dialog box   When windows successfully updated the DFU driver for the BA9x RFID/NFC reader module. The Device Manager should show one device with "BA9x RFID/NFC DFU (Runtime mode)" as shown figure 16 below.
BA9x RFID/NFC Reader Installation Manual  19 Figure 16: Device Manager shown the device with " BA9x RFID/NFC DFU (Runtime mode)"  DFU driver installation for DFU mode After DFU driver for DFU runtime mode installation completed, you need to install DFU drivers for DFU mode by following below steps.   To open Command Prompt, Click the Start button . In the Search box, type Command Prompt, and then, in the list of results, double-click Command Prompt.  Change the path to the location where the dfuprog.exe is. This is usually located in “C:\Retail\Hardware\DFU Driver Installers\dfuprog”.  Execute the dfuprog -D 0x0407 –m as shown Figure 17 below to switch the device to DFU mode.  Figure 17: switch the device to DFU mode
 20  BA9x RFID/NFC Reader Installation Manual   If this is the first time you switch the BA9x RFID/NFC reader module to DFU mode, it will appears “Device driver software was not successfully installed” in the notification area on the PC as shown figure 18 below.  Figure 18: Device drive software was not successfully installed   Then you will need to update driver manually. To do this, to open the Device Manager, Select “System and Security” – “System” – “Device Manager” locate in “Control Panel”. The Device Manager should show one device with "BA9x RFID/NFC" as shown figure 19 below.
BA9x RFID/NFC Reader Installation Manual  21 Figure 19: Device Manager shows one device with “BA9x RFID/NFC”   Right-click on the device, and choose “Update Driver Software” from the context menu. This will open the “Update Driver Software - BA9x RFID/NFC” dialog box shown as figure 20 below. In the dialog box, choose “Browse my computer for driver software”.
 22  BA9x RFID/NFC Reader Installation Manual Figure 20: “Update Driver Software - BA9x RFID/NFC” dialog box   In the dialog box that follows as shown figure 21 below, choose “Let me pick from a list of device drivers on my computer”, Click “Next” to proceed to next step.  Figure 21: “Browse for driver software on your computer” dialog box   In the dialog box that follows as shown figure 22 below, to select “Show All Devices” and click the “Next” to next step.
BA9x RFID/NFC Reader Installation Manual  23 Figure 22: “Select your device’s type from the list below” dialog box   In the dialog box that follows as shown figure 23 below, choose the “Have Disk” and click “Next” to next step.  Figure 23: “Select the device driver you want to install for this hardware” dialog box   In the dialog box that follows as shown figure 24 below, Click “Browse” button to locate the driver.
 24  BA9x RFID/NFC Reader Installation Manual Figure 24: “Install From Disk” dialog box   In the “Locate File” dialog box that follows as shown figure 25 below, locate the “wnDFU.inf” setup information file and click “Open” button. This is usually located in “C:\Retail\Hardware\DFU Driver Installers\wnDFU”.  Figure 25: “Locate File” dialog box   In the “Install From Disk” dialog box that follows as shown figure 26 below, Click “OK” button to back to the “Select the device driver you want to install for this hardware” dialog box .
BA9x RFID/NFC Reader Installation Manual  25 Figure 26: “Install From Disk” dialog box   In the “Select the device driver you want to install for this hardware” dialog box that follows as shown figure 27 below, choose “BA9x RFID/NFC DFU (DFU mode)”  from Model list, click “Next” button to install the driver.  Figure 27: “Install From Disk” dialog box   “Installing driver software” dialog box opens as shown figure 28 below, wait for the driver installation to complete.
 26  BA9x RFID/NFC Reader Installation Manual Figure 28: “Installing driver software” dialog box   If Windows displays a “Windows Security” dialog box as shown figure 29 below, choose “Install this driver software anyway” to continue.  Figure 29: “Windows Security” dialog box   Windows displays a “Windows has successfully updated your driver software” dialog box as shown figure 30 below when the DFU driver installation completed. Click “Close” button to close dialog box.
BA9x RFID/NFC Reader Installation Manual  27 Figure 30: “Windows has successfully updated your driver software” dialog box   When windows successfully updated the DFU driver for the BA9x RFID/NFC reader module. The Device Manager should show one device with "BA9x RFID/NFC DFU (DFU mode)" as shown figure 31 below.
 28  BA9x RFID/NFC Reader Installation Manual Figure 31: Device Manager shown the device with "BA9x RFID/NFC DFU (DFU mode)"   Start a CMD box and change to the directory containing the dfuprog.exe. Execute the dfuprog -D 0x8407 –M -r as shown Figure 32 to reset the device to DFU runtime mode.
BA9x RFID/NFC Reader Installation Manual  29 Figure 32: reset the BA9x RFID/NFC reader module to DFU runtime mode   When windows successfully updated the DFU driver for the BA9x RFID/NFC reader module and reset to DFU runtime mode. The Device Manager should show one device with "BA9x RFID/NFC DFU (Runtime mode)" as shown figure 33 below.  Figure 33: Device Manager shown the device with "BA9x RFID/NFC DFU (Runtime mode)"
 30  BA9x RFID/NFC Reader Installation Manual Operating the BA9x RFID/NFC Reader A set of application software running on a PC will control this device through USB connectivity.  This connectivity also supplies operating power to the device.  For effective detection, place the card (tag) over the sensor of the reader and approximately 10 mm away.   1. RFID/NFC reader 2. Sensor 3. Card (Tag)  Supported TAGs The BA9x RFID/NFC Reader supports a broad range of tags compliant with ISO/IEC 14443 type A and B standards, including SR series tags from STMicroelectronics, tags which belong to the Philips MIFARE® family, ISO/IEC 15693 tags.  Table 1 below is a list of identified cards that are or will be validated. The list will expand when other card types are acquired. The user should be advised to select from this list when deciding the card to use.
BA9x RFID/NFC Reader Installation Manual  31  Table 1: BA9x RFID/NFC reader module capability  Cards/Tags  Manufac-turer  Protocol Supported function UID Read Block Write Block ISO/IEC 15693 LRI1K  STM  ISO 15693 part 3     LRI2K  STM  ISO 15693 part 3     LRIS2K  STM  ISO 15693 part 3     LRIS64K  STM  ISO 15693 part 3     M24LR-04  STM  ISO 15693 part 3     Tag-it HF-I Standard Chip/Inlays TI  ISO 15693 part 3     Tag-it HF-I Pro Chip/Inlays  TI  ISO 15693 part 3     Tag-it HF-I Plus Chip/Inlays  TI  ISO 15693 part 3     ICODE SLIX SL2S20/21  NXP  ISO 15693 part 3     ICODE SLI  SL2 S20/21  NXP  ISO 15693 part 3     ICODE SLI SL2 S50/51  NXP  ISO 15693 part 3     ISO/IEC 14443 type A  compliant Mifare Classic 1K  NXP  ISO 14443-A part 3   ×  × Mifare  Ultralight  NXP  ISO 14443-A part 3   ×  × Mifare  Ultralight C  NXP  ISO 14443-A part 3   ×  × Desfire 4K  NXP  ISO 14443-A part 3   ×  × Mifare Classic 1K  INFINEON  ISO 14443-A part 3   ×  × QR2213  Fudan  ISO 14443-A   ×  × FM11RF08  Fudan  ISO 14443-A part 3   ×  ×
 32  BA9x RFID/NFC Reader Installation Manual Cards/Tags  Manufac-turer  Protocol Supported function UID Read Block Write Block ISO/IEC 14443 type A  NFC forum type2 tags NTag 203  NXP  ISO 14443-A Part 3   ×  × ISO 14443 type B SRI2K  STM  ISO 14443-B part 2,3     SRI4K  STM  ISO 14443-B part 2,3     SRIX4K  STM  ISO 14443-B part 2,3     SRI512  STM  ISO 14443-B part 2,3     SRT512  STM  ISO 14443-B part 2,3     Max66040E-000AA+  MAXIM  ISO 14443-B part 3   ×  ×  Note:    : Supported   ×:  Not supported  :  Supported but not validated
BA9x RFID/NFC Reader Installation Manual  33 Technical Data Supported Standards  ISO/IEC 15693 ISO/IEC 14443 Type A ISO/IEC 14443 Type B RF Operating Frequency  13.56 MHz Host Interface  USB 2.0 Full speed  HID 1.11 Usage Page: 0xFF45, Usage: 0x2200 Rated Voltage  5.0 V Rated Current  250 mA Operating Temperature  0 º C to 40 º  C Device Firmware Upgrade  Firmware upgradable via DFU interface Middleware support  JavaPOS 1.13 Operating Systems  Windows 7, Linux Certification  CE & FCC Height x Width x Depth  125 mm x 72.8 mm x 34.2 mm Weight   Approx. 102 g
 34  BA9x RFID/NFC Reader Installation Manual Abbreviations CE  European symbol of Comformity DFU  Device Firmware Upgrade EC  European Community EEC  European Economic Community FCC  Federal Communications Commission ICES  Inteference-Causing Equipment Standard IEC  International Electrotechnical Commission ISO  International Organization for Standardization NFC  Near Field Communication PC  Personal Computer POS  Point-Of-Sales RF  Radio Frequency RFID  Radio-frequency Identification UID  Unique Identifier USB  Universal Serial Bus
                                        Wincor Nixdorf Pte Ltd 151 Lorong Chuan New Tech Park #05-01A/B Singapore 556741  Order No. / Bestell-Nr.: 01750265251A

Navigation menu