Digi International Network Hardware Ts 2 4 Users Manual Dg1 Psts2
TS 4 to the manual 0861405e-e5a5-4ce1-b66d-78f2fc4542f3
2015-02-04
: Digi Digi-Digi-International-Network-Hardware-Ts-2-4-Users-Manual-513522 digi-digi-international-network-hardware-ts-2-4-users-manual-513522 digi pdf
Open the PDF directly: View PDF ![]() .
.
Page Count: 104 [warning: Documents this large are best viewed by clicking the View PDF Link!]

92000307_B
Digi One/PortServer TS 2/4
Configuration and Administration
Guide
The Digi logo is a trademark of Digi International.
All other brand and product names are trademarks of their respective holders.
© Digi International Inc., 1998, 2000, 2001, 2002. All Rights Reserved
http://www.digi.com
Information in this document is subject to change without notice and does not represent a
commitment on the part of Digi International.
Digi provides this document “as is”, without warranty of any kind, either expressed or implied,
including, but not limited to, the implied warranties of fitness or merchantability for a particular
purpose. Digi may make improvements and/or changes in this manual or in the product(s) and/or the
program(s) described in this manual at any time.
This product could include technical inaccuracies or typographical errors. Changes are periodically
made to the information herein; these changes may be incorporated in new editions of the
publication.
i
Contents
Chapter 1 Introduction
Setup Overview....................................................................................................1-2
About This Guide.................................................................................................1-3
About Entering Commands on the Command Line.............................................1-3
Supported Devices ...............................................................................................1-3
Other Documents in the Library ..........................................................................1-4
About Configuration Methods .............................................................................1-5
Configuration Prerequisites.................................................................................. 1-6
Chapter 2 Configuring the IP Address
Options for Configuring the IP Address and Mask.............................................. 2-2
Configuring the Ethernet Interface with DPA-Remote........................................ 2-3
Configuring the IP Address Using Ping-ARP...................................................... 2-4
Configuring the Ethernet Interface from the Command Line..............................2-5
Configuring an IP Address using DHCP and RARP........................................... 2-5
Chapter 3 Configuring Ports for RealPort
About RealPort..................................................................................................... 3-2
Configuring Ports: Web Interface........................................................................3-3
Configuring Ports for RealPort: Command Line................................................. 3-4
Chapter 4 Configuring Ports for Printers
Configuration Considerations ..............................................................................4-2
Configuring Ports for Printers: Web Interface..................................................... 4-3
Configuring Printer Connections: Command Line ..............................................4-3
Configuring a Port for Direct-Access Printing .................................................... 4-5
Chapter 5 Configuring Ports for Modems
Tips on Configuring A Modem............................................................................ 5-2
Configuring Ports for Modems: Web Interface ................................................... 5-3
Configuring Ports for Incoming Modem Connections: Command Line .............5-3
Configuring Ports for Outgoing/Bi-Directional Connections: Command Line... 5-4
Chapter 6 Configuring Ports for Terminals and Computers
Configuring Ports for Terminals: Web Interface .................................................6-2
Configuring Ports for Terminals: Command Line...............................................6-2
About Computer Connections.............................................................................. 6-3
Chapter 7 Configuring Autoconnection
About Autoconnection ......................................................................................... 7-2
Configuring a Port for Autoconnection: Web Interface....................................... 7-2
Configuring Autoconnection By Port: Command Line....................................... 7-2
Configuring a User for Autoconnection: Web Interface...................................... 7-3
Configuring a User for Autoconnection: Command Line ...................................7-3
ii
Chapter 8 Configuring PPP
Configuring PPP Connections: Web Interface..................................................... 8-2
Configuring Inbound PPP Connections: Command Line.................................... 8-3
Configuring Outbound PPP Connections: Command Line .................................8-5
Chapter 9 Configuring IP Routing
Introduction to Routing........................................................................................9-2
About RIP Routing Updates ................................................................................9-3
Configuring Static Routes.................................................................................... 9-5
Configuring Dynamic Routes Using RIP.............................................................9-6
Configuring Proxy ARP.......................................................................................9-7
Chapter 10 Configuring Console Management
About Console Management.............................................................................. 10-2
Configuring Console Management: Web Interface ...........................................10-2
Configuring Console Management: Command Line......................................... 10-2
Chapter 11 Configuring Modbus
About Modbus.................................................................................................... 11-2
Configuring Modbus Using the Web Interface.................................................. 11-3
Configuring Modbus from the Command Line .................................................11-4
Examples............................................................................................................ 11-6
Chapter 12 Configuring Security Features
Controlling Access to the Digi One/PortServer TS 2/4 Configuration.............. 12-2
Controlling Access to Inbound Ports ................................................................. 12-2
Controlling Access to Outbound Ports...............................................................12-3
Controlling Access to the Digi One/PortServer TS 2/4 Command Line ........... 12-3
Issuing User Passwords......................................................................................12-4
Configuring SSH Version 2 for Secure Communication...................................12-5
Chapter 13 Configuring DNS
About the Domain Name System....................................................................... 13-2
Configuration Procedures ..................................................................................13-3
Chapter 14 Configuring SNMP
About SNMP and the Digi One/PortServer TS 2/4 Agent.................................14-2
Configuration Procedure: Web Interface ........................................................... 14-3
Configuration Procedure: Command Line......................................................... 14-3
Chapter 15 Configuring Users
About Configuring Users................................................................................... 15-2
Common User Features...................................................................................... 15-2
Configuring a User: Web Interface....................................................................15-3
Configuring a User: Command Line Examples................................................. 15-4
Chapter 16 Managing the OS and Configuration
Upgrading the OS (Firmware): Web Interface .................................................. 16-2
Upgrading the OS (Firmware): Command Line ................................................ 16-3
Configuring Digi One/PortServer TS 2/4 from a Remote Host.........................16-4
Resetting the Configuration to Defaults............................................................. 16-6
iii
Chapter 17 Configuration Examples
Terminal Server Configuration Without RealPort............................................. 17-2
Terminal Server Configuration Using Autoconnection..................................... 17-3
Terminal Server Configuration Using RealPort ................................................. 17-4
Chapter 18 Digi One/PortServer TS 2/4 Troubleshooting
Symptom: Digi One/PortServer TS 2/4 Does Not Boot ....................................18-2
Symptom: Cannot Telnet to the Digi One/PortServer TS 2/4 ........................... 18-3
Symptom: Trouble Accessing a Port ................................................................. 18-4
Running Digi One/PortServer TS 2/4 Customer Diagnostics............................ 18-4
Key to Interpreting Digi One/PortServer TS 2/4 LEDs.....................................18-5
Verifying TFTP on a UNIX System .................................................................. 18-5
Troubleshooting TFTP Problems.......................................................................18-5
Resetting Digi One/PortServer TS 2/4 Configuration to Defaults.....................18-6
Verifying the Digi One/PortServer TS 2/4 IP Address...................................... 18-7
Checking for Duplicate IP Addresses ................................................................18-7
Pinging an IP Address........................................................................................18-7
Verifying the Network Cabling..........................................................................18-8
Verifying the RealPort Process..........................................................................18-9
Digi Contact Information ................................................................................. 18-11
iv
Introduction 1-1
Chapter 1 Introduction
In This Chapter
This chapter provides a brief introduction on setting up your Digi device. It discusses the following
topics:
• Setup Overview . . . . . . . . . . . . . . . . . . . . . . . . . . . . . . . . . . . . . . . . . . . . . . . . . 1-2
• About This Guide. . . . . . . . . . . . . . . . . . . . . . . . . . . . . . . . . . . . . . . . . . . . . . . . 1-3
• About Entering Commands on the Command Line. . . . . . . . . . . . . . . . . . . . . . 1-3
• Supported Devices . . . . . . . . . . . . . . . . . . . . . . . . . . . . . . . . . . . . . . . . . . . . . . . 1-3
• Other Documents in the Library . . . . . . . . . . . . . . . . . . . . . . . . . . . . . . . . . . . . 1-4
• About Configuration Methods . . . . . . . . . . . . . . . . . . . . . . . . . . . . . . . . . . . . . . 1-5
• Configuration Prerequisites . . . . . . . . . . . . . . . . . . . . . . . . . . . . . . . . . . . . . . . . 1-6
1-2 Setup Overview
Setup Overview
This section provides an overview of the setup process.
Step A: Plan
Before beginning setup, consider the following:
• How to assign an IP address to the Digi device’s Ethernet interface, which can be accomplished
in a number of ways. See "Configuring the IP Address" on page 2-1.
• How to configure serial ports. A key consideration is whether to use RealPort. Other consider-
ations include the type of peripheral that will connect to the port and the peripheral’s cabling
requirements. See "Configuring Ports for RealPort" on page 3-1 and the online RealPort driver
documentation and Cable Guide, both of which are on the Access Resource CD.
• The various ways that your Digi device can be configured. See "About Configuration Methods"
on page 1-5 and "Configuration Prerequisites" on page 1-6 for more information.
Step B: Set Up the Hardware
1. If the Digi device, supports multiple serial port interfaces (EIA-232, EIA-422/485), set the inter-
face with the dip switches on the device.
2. Connect the device to power and to the network.
3. Connect peripherals to serial ports. See the Cable Guide on the Access Resource CD.
Step C: Install and Setup DPA-Remote
DPA-Remote is a utility that provides one of the ways to configure an IP address and also provides
port monitoring. See the Digi Port Authority Remote Device Monitor Setup Guide, which is on the
Access Resource CD.
Step D: Configure an IP Address
There are a number of ways to configure an IP address. See "Configuring the IP Address" on page 2-
1 for more information.
Step E: Configure Ports
See the following for more information:
• "Configuring Ports for RealPort" on page 3-1
• "Configuring Ports for Printers" on page 4-1
• "Configuring Ports for Terminals and Computers" on page 6-1
• "Configuring Ports for Modems" on page 5-1
Step F: Configure Other Features as Required
See the following for information on setting up other features:
• "Configuring PPP" on page 8-1
• "Configuring IP Routing" on page 9-1
• "Configuring Autoconnection" on page 7-1
• "Configuring Console Management" on page 10-1
• "Configuring Security Features" on page 12-1
• "Configuring DNS" on page 13-1
Step G: Troubleshoot Setup Problems
Troubleshoot problems as required. . See "Digi One/PortServer TS 2/4 Troubleshooting" on page
18-1.
Introduction 1-3
About This Guide
Purpose
This guide provides the following:
• Configuration and administration procedures
• Configuration examples
Audience
This manual is intended for the person responsible for configuring and administering Digi
One/PortServer TS 2/4. It assumes that this person has experience configuring network devices and
is familiar with networking concepts.
Scope
This manual provides step-by-step instructions for configuring and administering Digi
One/PortServer TS 2/4’s main features. It does not address how to configure every option, provide
complete information on commands, or discuss hardware installation. These topics are covered in
other documents in the Digi One/PortServer TS 2/4 library.
About Command Line Examples
In this manual, many command examples are broken up and placed on two lines of the manual. This
is done to control where the line breaks, making it as easy to read as possible. When this is done, the
second line of the command will be indented slightly, as shown below.
set menu range=6 t1="Console Management Menu" name="Console Management
Menu" m3="Connect to System 1" c3="connect 1" m4="Connect to System 2"
c4="connect 2"
About Entering Commands on the Command Line
On the Digi One/PortServer TS 2/4 command line, do not force a line break (by pressing Enter or
Return). This will commit the command before you finish adding all command fields. If your
terminal does not support wrapping to the next line and long commands scroll out of sight, the
easiest way to enter long commands is by breaking the command into multiple commands as shown
below. If you use this method, however, you must let the Digi One/PortServer TS 2/4 know that you
are configuring the same entity, such as the same port, menu, or line. This is done by repeating the
range or name field in each command.
set menu t1="Console Management Menu" range=6
set menu range=6 name="Console Management Menu" m3="Connect to System 1"
set menu range=6 c3="connect 1" m4="Connect to System 2"
set menu range=6 c4="connect 2"
Supported Devices
This manual provides information on the following Digi devices:
• Digi One RealPort
• Digi One IA RealPort
•PortServer TS 2
•PortServer TS 4
1-4 Other Documents in the Library
Other Documents in the Library
Here is a list of the other documents in the library:
Access Resource CD Card
This card provides information on the contents of the Access Resource CD. It includes the CD
mounting instructions required to access the CD on many Unix systems.
Digi One/PortServer TS 2/4 Setup Card
This card, which comes in the Digi One/PortServer TS 2/4 package, provides a brief overview on
the setup process.
Digi One/PortServer TS Command Reference
This online manual, available on the Access Resource CD, provides complete information on
commands.
RealPort Setup Guides
These online manuals provide information on setting up servers for RealPort software.
Digi Port Authority - Remote Device Monitor Setup Guide
This online manual provides information on installing and using Digi Port Authority - Remote
software.
Introduction 1-5
About Configuration Methods
Use this section to learn about configuration methods.
Configuring the Digi One/PortServer TS 2/4 from an Attached Terminal
With this method, you cable a terminal or PC running terminal emulation software to a Digi
One/PortServer TS 2/4 port and then use the command line to enter commands. This method allows
you to configure all features. It requires, however, that you and the Digi One/PortServer TS 2/4 be in
the same location. Some users find it advantageous to configure the Digi One/PortServer TS 2/4 IP
address this way and then use one of the other methods for the rest of the configuration.
Configuring the Digi One/PortServer TS 2/4 from a Telnet Session
With this method, you Telnet to the Digi One/PortServer TS 2/4 and use the command line to com-
plete configuration tasks. The only disadvantage to this method is that you have to configure the
Digi One/PortServer TS 2/4 with an IP address before you can Telnet to it.
Configuring the Digi One/PortServer TS 2/4 from the Web Interface
The great advantage to this method is ease of use. This method does, however, require that you
configure the IP address before you can access the configuration from the web interface, and some
features cannot be configured this way.
Downloading a Configuration File
With this method, you configure a Digi device and then do the following:
1. Download an existing configuration file to a host system.
2. Edit the file with specific configuration using a text editor.
3. Upload the file to the the Digi Digi One/PortServer TS 2/4.
This an excellent method for maintaining highly similar configuration files for multiple Digi
devices. The disadvantage is that the Digi One/PortServer TS 2/4 requires some configuration steps,
such as the IP address, to be completed before it can be used.
1-6 Configuration Prerequisites
Configuration Prerequisites
Accessing the Command Line from a Locally-Connected Terminal
Use this procedure to access the command line and the configuration from a terminal connected to
one of the Digi One/PortServer TS 2/4’s serial ports.
1. Connect a terminal or PC to a serial port on the Digi One/PortServer TS 2/4.
• For a terminal, use the cable that came with your package.
• For a Windows Hyperterminal connection, use the cable that came in the package, a straight-
through DB25-to-DB9 modem cable, and gender changers as required.
2. Configure the parameters of the terminal or terminal emulation software to work with the Digi
serial port. The default port settings are:
• VT 100 emulation
• 9600 baud
• 8-bit character
• 1 stop bit
• No parity
3. Log in as the root user. The default password is dbps.
Logging On As Root from the Command Line
1. At the login prompt, enter the following: root
2. At the password prompt, supply the root password. The default is dbps.
Accessing the Command Line from a Telnet Session
Use this procedure to access the command line and the configuration from a Telnet session. This
procedure assumes that you have configure the Digi device with an IP address already. See
"Configuring the IP Address" on page 2-1.
1. To Telnet to the Digi One/PortServer TS 2/4, enter the following command from a command
prompt on another networked device, such as a server:
telnet ip-address
where ip-address is the Digi One/PortServer TS 2/4’s IP address
Example: telnet 192.3.23.5
2. Log in as the root user. The default password is dbps.
Accessing the Configuration from the Web Interface
Use this procedure to access the configuration from the web interface. This procedure assumes that
you have configured the Digi device with an IP address already. See "Configuring the IP Address"
on page 2-1.
1. Access the Digi One/PortServer TS 2/4 from a web browser by specifying the Digi One/PortS-
erver TS 2/4’s IP address in the URL window.
2. Log on as root. The default password is dbps.
Configuring the IP Address 2-1
Chapter 2 Configuring the IP Address
In This Chapter
This chapter discusses how to configure Digi One/PortServer TS 2/4’s IP address and other features
associated with its Ethernet interface. It discusses the following topics:
• Options for Configuring the IP Address and Mask . . . . . . . . . . . . . . . . . . . . . . 2-2
• Configuring the Ethernet Interface with DPA-Remote . . . . . . . . . . . . . . . . . . . 2-3
• Configuring the IP Address Using Ping-ARP . . . . . . . . . . . . . . . . . . . . . . . . . . 2-4
• Configuring the Ethernet Interface from the Command Line . . . . . . . . . . . . . . 2-5
• Configuring an IP Address using DHCP and RARP . . . . . . . . . . . . . . . . . . . . . 2-5

2-2 Options for Configuring the IP Address and Mask
Options for Configuring the IP Address and Mask
Options
The Digi One/PortServer TS 2/4 IP address can be configured using the following methods:
• With Digi Port Authority-Remote, a Digi utility
• By updating the ARP table on a server and then pinging the Digi device (called Ping-ARP)
• From the command line using the set config command
• Using a RARP server
• Using a DHCP server
The IP address and mask can also be changed using the web interface. This method, however, does
not work for the initial IP address configuration.
Devices That Support DPA-Remote and Ping-ARP for IP Address Configuration
Not all Digi devices can use DPA-Remote and Ping-ARP for IP address configuration. To determine
if you can use these features, find the hardware label on your Digi device and then use the table
below to determine whether this feature is available:
Device Part Number Revision Required
Digi One IA RealPort 50000764-01 F or higher
Digi One RealPort 50000723-01 J or higher
PortServer TS 2 50000723-02 J or higher
PortServer TS 4 50000723-03 G or higher
Configuring the IP Address 2-3
Configuring the Ethernet Interface with DPA-Remote
Use this section to configure an initial IP address, subnet mask, and default gateway using DPA-
Remote. This procedure cannot be used to change the IP address, but only to assign the initial IP
address. It also cannot be used if a DHCP server is active.
Starting Point
This procedure assumes the following:
• That your Digi device supports this feature. See "Devices That Support DPA-Remote and Ping-
ARP for IP Address Configuration" on page 2-2.
• That your Digi device is connected to the Ethernet network
• That the Digi device has DHCP client turned on. This is the default setting, so it will be on
unless it was turned off.
• That you do not have a DHCP server to serve IP address. If you do, use the DHCP procedure.
See "Configuring an IP Address using DHCP and RARP" on page 2-5.
• That you have installed DPA-Remote version 2.01.11or later. For information on installing DPA-
Remote, see the Digi Port Authority Remote Device Monitor Setup Guide, which is on the
Access Resource CD.
Procedure
1. Run DPA-Remote.
2. If DPA-Remote is not set for ADDP, choose ADDP as the Discovery Protocol.
3. Choose Discover.
A list of Digi devices appears. Systems with IP addresses of 0.0.0.0 need IP addresses.
4. Select a device from the list and then choose Configure.
5. Supply an IP address, subnet mask and default gateway and then choose OK.
DPA-Remote configures the IP address, subnet mask and default gateway.
2-4 Configuring the IP Address Using Ping-ARP
Configuring the IP Address Using Ping-ARP
Use this section to configure an IP address by manually updating a server’s ARP table and then
pinging the Digi device.
Starting Point
This procedure assumes the following:
• That your Digi device supports this feature. See "Devices That Support DPA-Remote and Ping-
ARP for IP Address Configuration" on page 2-2.
• That your Digi device is connected to the Ethernet network
Procedure
1. Record the MAC address of the Digi device. It’s on the back of the unit.
2. Access a server on the same subnet as the Digi device.
3. Manually update the server’s ARP table using the Digi device’s MAC address and the IP address
you want assigned to the Digi device. The following is an example of how this is done on a Win-
dows NT 4.0 system:
arp -s 143.191.2.1 00-40-9d-22-23-60
4. Ping the Digi device using the IP address just assigned. The following is an example:
ping 143.191.2.1
The ping will probably time out before there is a response from the Digi device.
5. Wait a few seconds and then ping the Digi device again.
The Digi device replies to the ping, indicating that the IP address has been configured.
Configuring the IP Address 2-5
Configuring the Ethernet Interface from the Command Line
This section discusses how use the command line to configure an IP address, mask, and default
gateway for Digi One/PortServer TS 2/4’s Ethernet interface.
Manual Configuration Procedure
1. To configure an IP address for the Ethernet interface, enter the following command:
set config ip=ip-address
where ip-address is the IP address for the Ethernet interface
Example: set config ip=191.143.2.154
2. To configure a subnetmask, enter the following command:
set config submask=mask
where mask is the subnet mask for this subnetwork
Example: set config submask=255.255.255.0
3. To ensure that this address is permanent, turn DHCP off by entering the following command:
set config dhcp=off
4. To configure a default gateway, enter the following command:
set config gateway=ip-address
where ip-address is the IP address of the default gateway
Example set config gateway=191.143.2.46
5. Reboot the Digi device at the prompt using the following command:
boot action=reset
Manual Configuration Example
In this example set config commands configure the Ethernet interface and the boot command reboot
the Digi device, which is required for the address change to take affect.
set config ip=192.150.150.10 submask=255.255.255.0 dhcp=off
set config gateway=192.150.150.11
boot action=reset
Configuring an IP Address using DHCP and RARP
About DHCP and RARP
When the Digi One/PortServer TS 2/4 boots, it transmits a DHCP request and a RARP request. This
continues until an address is assigned.
Procedure
To use RARP or DHCP follow these steps:
1. Set up an entry for an address on a DHCP or RARP server. If you intend to use RealPort, do the
following:
• Reserve a permanent IP address.
• Record the IP address. You will need it when you configure the RealPort driver.
2. Power on the Digi One/PortServer TS 2/4.
The DHCP or RARP server assigns the Digi One/PortServer TS 2/4 an IP address.
2-6 Configuring an IP Address using DHCP and RARP
Configuring Ports for RealPort 3-1
Chapter 3 Configuring Ports for RealPort
In This Chapter
This chapter describes how to configure Dig One/PortServer TS 2/4 for RealPort connections. It
discusses the following topics:
• About RealPort. . . . . . . . . . . . . . . . . . . . . . . . . . . . . . . . . . . . . . . . . . . . . . . . . . 3-2
• Configuring Ports: Web Interface . . . . . . . . . . . . . . . . . . . . . . . . . . . . . . . . . . . 3-3
• Configuring Ports for RealPort: Command Line . . . . . . . . . . . . . . . . . . . . . . . . 3-4
• Example . . . . . . . . . . . . . . . . . . . . . . . . . . . . . . . . . . . . . . . . . . . . . . . . . . . . . . . 3-4
3-2 About RealPort
About RealPort
This section provides a brief introduction to RealPort.
What is RealPort?
RealPort is a feature that allows network-based host systems to use the ports of the Dig
One/PortServer TS 2/4 as though they were the host system’s own ports, appearing and behaving as
local ports to the network-based host.
RealPort Advantages
RealPort provides the following advantages:
• It expands the number of ports available to the host system.
• It enables Dig One/PortServer TS 2/4 ports to be treated as if they were directly connected to the
host, which means they use all standard operating system interfaces that control baud rate, parity,
stop bits, and flow control.
• It enables host administrators to do most of the required configuration on the host, the system
with which the administrator is most familiar.
• It dramatically reduces host CPU overhead because multiple terminal or printer sessions are
multiplexed over the same TCP/IP connection.
Configuring the RealPort Software
You must install and configure RealPort software on each host that will use RealPort ports. See the
RealPort documentation for more information.
Configuration Options
You can configure Dig One/PortServer TS 2/4 for RealPort from the command line or using the web
interface. For information on using the web interface, see "Configuring Ports: Web Interface" on
page 3-3.

Configuring Ports for RealPort 3-3
Configuring Ports: Web Interface
Use this procedure to configure a port from the web interface.
1. Access the web interface by entering the Dig One/PortServer TS 2/4 IP address in a browser’s
URL window.
2. Log in to the Dig One/PortServer TS 2/4 as root.
The default password is dbps.
3. From the main menu, select Configure > RealPort.
A screen similar to the following appears.
4. To complete configuration, choose Next and then follow the prompts.
5. To return to the main Ports menu, choose Ports from the Menu again.
6. To complete RealPort setup, install and configure the RealPort driver. See the appropriate
RealPort setup guide on the Access Resource CD.
3-4 Configuring Ports for RealPort: Command Line
Configuring Ports for RealPort: Command Line
This section describes how to configure RealPort ports from the command line.
Procedure
Use this procedure to use the command line to configure Dig One/PortServer TS 2/4 for RealPort.
This procedure assumes that you have signed on as root and have or will
• Install RealPort software on each RealPort host. See the appropriate RealPort documentation for
more information.
• Properly cabled Dig One/PortServer TS 2/4 ports and devices.
• Set up the devices connected to Dig One/PortServer TS 2/4 ports
1. Configure the RealPort TCP port by entering the following command:
set tcp realport=771
2. Configure Dig One/PortServer TS 2/4 ports by entering the following command:
set ports range=range dev=rp
where range is the range of ports to which this command applies
Example: set ports range=2 dev=rp
Example
In this example, all ports are configured for RealPort.
set tcp realport=771
set ports range=* dev=rp
Configuring Ports for Printers 4-1
Chapter 4 Configuring Ports for Printers
In This Chapter
This chapter describes how to configure Dig One/PortServer TS 2/4 ports for printer connections. It
discusses the following topics:
• Configuration Considerations . . . . . . . . . . . . . . . . . . . . . . . . . . . . . . . . . . . . . . 4-2
• Configuring Ports for Printers: Web Interface . . . . . . . . . . . . . . . . . . . . . . . . . . 4-3
• Configuring Printer Connections: Command Line . . . . . . . . . . . . . . . . . . . . . . 4-3
• Configuring a Port for Direct-Access Printing. . . . . . . . . . . . . . . . . . . . . . . . . . 4-5

4-2 Configuration Considerations
Configuration Considerations
You should be aware of the following considerations if you intend to configure Dig One/PortServer
TS 2/4 to handle printers.
Using RealPort
RealPort, a feature that allows network-based host systems to use the ports of the Dig
One/PortServer TS 2/4 as though they were the host system’s own ports, is an easy and efficient way
for printers to use Dig One/PortServer TS 2/4 ports. For information on this option, see
"Configuring Ports for RealPort" on page 3-1.
Determining Your Printer’s Flow Control Requirements
If you set the Dig One/PortServer TS 2/4 flow control parameters incorrectly, the printer may not
print all data sent to it. Consequently, before you configure a Dig One/PortServer TS 2/4 port for a
printer, check the printer’s documentation to determine if it uses hardware flow control, software
flow control, or no flow control at all.
Flow Control Tips
Here are some tips to ensure that your printer performs as expected:
• If flow control is necessary, ensure that the printer and Dig One/PortServer TS 2/4 use the same
flow control scheme.
• Most printers that use hardware flow control issue the DTR (data terminal ready) signal when
they are ready for data. If so, the DTR pin on the cable from the printer must be wired to an input
on the Dig One/PortServer TS 2/4 port (usually CTS or DCD) that can be used for flow control.
Printing with AIX Systems
Digi does not recommend using lpd to print multiple jobs to a Dig One/PortServer TS 2/4-attached
printer from an AIX print spooler because this may cause the print job to time out.
Using the lpd Protocol
Here are some tips for configuring the print spooler on your UNIX system when you intend to print
using the lpd protocol to a printer attached to Dig One/PortServer TS 2/4:
1. The number of copies option with lpr is not supported.
2. Banner pages are not supported.
3. Give the Dig One/PortServer TS 2/4’s DNS name or IP address as the remote system’s name.
4. Specify a queue name that conforms to the following conventions:
• Begin the queue name with one of the following character strings: (a) Use ascii if you want
Dig One/PortServer TS 2/4 to substitute carriage return and line feed characters for each line
feed the system sends. (b) Use raw if no substitution should be performed.
• After the queue name, insert an underscore character and the number of the Dig One/PortS-
erver TS 2/4 port to which the printer is attached.
• If you want to use either of the following options, specify an additional underscore and then
the letter that identifies the option: (a) Use f to append a form feed character to the end of
each file in a print job (b) Use d to add a Ctrl-d to the end of each file in a print job. (This is
often required by PostScript printers.)
Examples
String Result
ascii_1 Prints to port 1 and translates CR to CR/LF.
ascii_8_f Prints to port 8, translates CR to CR/LF and prints a form feed at the end
of the job.
raw_1_d Prints to port 1 with no translation and appends a Ctrl-d to the end of the
print job.
Configuring Ports for Printers 4-3
Tips for telnet and rsh Printing
Here are some tips for handling telnet and rsh printing:
• If line feed and carriage return problems occur, try supplying a set line command that specifies
onlcr=on. This converts carriage returns to carriage return/line feeds.
• If you want tab characters (ASCII character 9) converted to 8 spaces, use a set line command
that specifies otab=on.
Configuring Ports for Printers: Web Interface
Use this procedure to configure a port from the web interface.
1. Access the web interface by entering the Dig One/PortServer TS 2/4 IP address in a browser’s
URL window.
2. Log in to the Dig One/PortServer TS 2/4 as root.
The default password is dbps.
3. From the main menu, choose Configure > Ports.
4. To configure a port, do the following:
a. Choose the port from the port column.
b. Ensure that the Device Type is Printer.
c. Make other changes to the configuration as required. Use the online help for information.
d. If you want to apply this configuration to multiple ports, choose Clone, select the ports for
this configuration, and then choose Continue.
e. Choose Submit.
5. To return to the main Ports menu, choose Ports from the menu again.
Configuring Printer Connections: Command Line
This section describes how to configure Dig One/PortServer TS 2/4 for printer connections.
Related Information
See the set ports, set line, and set flow commands in the Digi One/PortServer TS Command
Reference.
Procedure
This procedure assumes the following:
• That you are logged in as root
• That you know printer attributes, such as baud rate and parity
1. Configure the port for a printer by supplying the following command:
set ports dev=prn range=range
where range is a range of ports
Example: set ports dev=prn range=1-2
2. Configure line attributes with a set line command. The attributes you configure depend on
printer requirements. See the set line command in the Digi One/PortServer TS Command Refer-
ence to determine which set line command fields you require.
3. Configure flow control attributes with the set flow command. The attributes you configure
depend on printer requirements. See the set flow command in the Digi One/PortServer TS Com-
mand Reference for more information.
Example
In this example, port 2 is configured for a printer that uses hardware flow control.
set ports range=2 dev=prn
4-4 Configuring Printer Connections: Command Line
set line range=2 baud=9600 csize=8 stopb=1 parity=n
set flow range=2 cts=on ixon=off ixoff=off

Configuring Ports for Printers 4-5
Configuring a Port for Direct-Access Printing
Direct access printing allows Telnet users on the LAN to access a port and to issue print commands
directly to the printer. This section describes the two ways users can access a printer directly and
explains how to configure the port to support each method.
Method 1: Specifying Port Numbers in the Telnet Command
This method allows users to issue telnet commands that identify the correct port by using TCP port
numbers. Users identify the type of connection and port number by specifying one of the following:
User Command Example 1
In this example, a user specifies a standard telnet connection on port 2 of a Dig One/PortServer TS
2/4 using IP address 199.250.38.15.
cat myfile | telnet 199.250.38.15 2002
User Command Example 2
In this example, a user specifies a raw telnet connection on port 2 of a Dig One/PortServer TS 2/4
using IP address 199.250.38.15.
cat myfile | telnet 199.250.38.15 2102
Method 1 Configuration
There is no special configuration required to set up a port for this type of direct access. Simply
configure the port for a printer. See "Configuring Printer Connections: Command Line" on page 4-3
for more information.
Method 2: Using Alternate IP Addresses
This method provides similar functions to method 1, except alternate IP addresses allow users to
identify a specific port by simply specifying an IP address.
Method 2 Configuration
To configure an alternate IP address, do the following:
• Configure the port for a printer. See Configuring Printer Connections: Command Line on page
4-3 for more information.
• Supply a set altip command that specifies the following:
set altip group=port-number ip=ip-address
where
—port-number is the number of a Dig One/PortServer TS 2/4 port
—ip-address is the IP address of the Dig One/PortServer TS 2/4
Command Line Example
set ports range=2 dev=prn
set line range=2 baud=9600 csize=8 stopb=1 parity=n
set flow range=2 cts=on rts=on ixon=off ixoff=off
set altip group=2 ip=199.250.38.17
For this connection type... Identify the port by specifying...
Telnet 2000 plus the number of the port.
Example: 2002 for port 2.
Raw 2100 plus the number of the port.
Example: 2102 for port 2.
4-6 Configuring a Port for Direct-Access Printing
Configuring Ports for Modems 5-1
Chapter 5 Configuring Ports for Modems
In This Chapter
This chapter describes how to configure Digi One/PortServer TS 2/4 ports for modem connections.
It discusses the following topics:
• Tips on Configuring A Modem . . . . . . . . . . . . . . . . . . . . . . . . . . . . . . . . . . . . . 5-2
• Configuring Ports for Modems: Web Interface . . . . . . . . . . . . . . . . . . . . . . . . . 5-3
• Configuring Ports for Incoming Modem Connections: Command Line . . . . . . 5-3
• Configuring Ports for Outgoing/Bi-Directional Connections: Command Line 5-4
5-2 Tips on Configuring A Modem
Tips on Configuring A Modem
Here are some tips on configuring modems to work with Digi One/PortServer TS 2/4:
• Configure the modem so that DCD goes high when it receives an incoming connection request.
• Configure the modem to answer an incoming call only when DTR is high, and to drop the line
when DTR goes low.
• For bidirectional connections, it is advisable to configure the non-volatile parameters in the
modem for incoming calls. Also configure the modem to reset to these parameters when DTR is
dropped.
• Configure the modem to lock the serial line speed at the highest baud rate the modem will accept
for reliable data transfer because Digi One/PortServer TS 2/4 cannot switch the baud rate of the
serial line on a per call basis without reconfiguration.
Note: You may want to consider connecting modems using RealPort, a feature that allows
network-based host systems to use the ports of the Digi One/PortServer TS 2/4 as
though they were the host system’s own ports. It is an easy and efficient way for
modems to use Digi One/PortServer TS 2/4 ports. For information on this option, see
"Configuring Ports for RealPort" on page 3-1.
Configuring Ports for Modems 5-3
Configuring Ports for Modems: Web Interface
Use this procedure to configure a port for a modem from the web interface.
1. Access the web interface by entering the Digi One/PortServer TS 2/4 IP address in a browser’s
URL window.
2. Log in to the Digi One/PortServer TS 2/4 as root.
The default password is dbps.
3. From the main menu, choose Configure > Ports.
4. To configure a port, do the following:
a. Choose the port from the port column.
b. Configure the correct device type. Choose Modem in for inbound modem connections,
Modem out for outbound connections, and Modem for bidirectional connections.
c. Make other changes to the configuration as required. Use the online help for information.
d. If you want to apply this configuration to multiple ports, choose Clone, select the ports for
this configuration, and then choose Continue.
e. Choose Submit.
5. To return to the main Ports menu, choose Ports from the menu again.
Configuring Ports for Incoming Modem Connections: Command Line
This section describes how to configure incoming-only modem connections, that is, connections that
are initiated by a device across the telephone network.
Related Information
• If you intend to run PPP traffic over this modem connection, see "Configuring PPP" on page 8-
1.
• For more information on setting the port’s flow control attributes see the set flow command in
the Digi One/PortServer TS Command Reference.
• For information on setting up the port for autoconnection, see "Configuring Autoconnection" on
page 7-1 of this manual and the set ports command in the Digi One/PortServer TS Command
Reference.
• For information on setting serial line operating parameters such as character size, the number of
stop bits, and parity, see the set line command in the Digi One/PortServer TS Command Refer-
ence.
Procedure
This procedure assumes that you
• Know the operating parameters required by the modem. If you do not, see the modem documen-
tation.
• Have or will correctly cable the connection between the Digi One/PortServer TS 2/4 serial ports
and modems. See the Digi One/PortServer Cable Guide for more information.
• Have logged in as root
1. Supply a set ports command that specifies the following:
set ports range=range dev=min
where range is a Digi One/PortServer TS 2/4 port or range of ports.
Example: set ports range=2 dev=min
2. Supply a set line command that specifies the following:
set line range=range baud=bps
where range is a port or range of ports and bps is the line speed for this port.
Example: set line range=2 baud=115200
3. Supply a set flow command that defines the flow control scheme required by the modem.
5-4 Configuring Ports for Outgoing/Bi-Directional Connec-
Example
In this example, ports 1 and 2 are set up for incoming modem connections using RTS/CTS flow
control.
set ports range=1-2 dev=min
set line range=1-2 baud=115200
set flow range=1-2 ixon=off ixoff=off cts=on rts=on
Configuring Ports for Outgoing/Bi-Directional Connections: Command Line
This section describes how to configure outgoing and bidirectional modem connections from the
command line.
Related Information
• For more information on setting the port’s flow control attributes see the set flow command in
the Digi One/PortServer TS Command Reference.
• For information on setting serial line operating parameters such as character size, the number of
stop bits, and parity, see the set line command in the Digi One/PortServer TS Command Refer-
ence.
• For more information on configuring dialer and login scripts, see the set script command in the
Digi One/PortServer TS Command Reference.
Before You Begin
This procedure assumes that you
• Know the operating parameters required by the modem. If you do not, see the modem documen-
tation.
• Have or will correctly cable the connection between the Digi One/PortServer TS 2/4 serial ports
and modems. See the Digi One/PortServer Cable Guide for more information.
• Logged in as root
Procedure
1. Supply a set ports command that specifies the following:
set ports range=range dev=dev
where range is a serial port or range of serial ports and dev is one of the following:
• dev=mout for outgoing-only connections
• dev=mio for bidirectional connections
Note: Use a group number (on the group field), if you intend to create a hunt group of ports
that can access a pool of modems. Make sure this group number is greater than 65.
Example: set ports range=2 dev=mio
2. Supply a set line command that specifies the following:
set line range=range baud=bps
where range is a serial port or range of ports and bps is the line speed of the connection
Example: set line range=2 baud=115200
3. Supply a set flow command that defines the flow control scheme required by the modem.
Example
In this example, ports 1 and 2 are configured for bidirectional modems.
set ports range=1-2 dev=mio
set line range=1-2 baud=115200
set flow range=1-2 ixon=off ixoff=off rts=on cts=on
Configuring Ports for Terminals and Computers 6-1
Chapter 6 Configuring Ports for Terminals
and Computers
In This Chapter
This chapter describes how to configure Digi One/PortServer TS 2/4 ports for terminal and
computer connections. It discusses the following topics:
• Configuring Ports for Terminals: Web Interface . . . . . . . . . . . . . . . . . . . . . . . . 6-2
• Configuring Ports for Terminals: Command Line . . . . . . . . . . . . . . . . . . . . . . . 6-2
• About Computer Connections . . . . . . . . . . . . . . . . . . . . . . . . . . . . . . . . . . . . . . 6-3
6-2 Configuring Ports for Terminals: Web Interface
Configuring Ports for Terminals: Web Interface
Use this procedure to configure a port from the web interface.
1. Access the web interface by entering the Digi One/PortServer TS 2/4 IP address in a browser’s
URL window.
2. Log in to the Digi One/PortServer TS 2/4 as root.
The default password is dbps.
3. From the main menu, choose Configure > Ports.
4. To configure a port, do the following:
a. Choose the port from the port column.
b. Ensure that the Device type is set to Terminal.
c. Make changes to the configuration as required. Use the online help for information.
d. If you want to apply this configuration to multiple ports, choose Clone, select the ports for
this configuration, and then choose Continue.
e. Choose Submit.
5. To return to the main Ports menu, choose Ports from the Menu again.
Configuring Ports for Terminals: Command Line
This section describes how to configure Digi One/PortServer TS 2/4 ports for terminal connections.
Port Defaults
Here is the default configuration for Digi One/PortServer TS 2/4 ports:
• VT-100 emulation
• 9600 baud
• 8-bit characters
• 1 stop bit
• No parity
• Software flow control
Related Information
• For information on the set line, set ports, and set flow commands, see the Digi One/PortServer
TS Command Reference.
• For information on configuring terminal ports for autoconnections, see, "Configuring Autocon-
nection" on page 7-1.
Procedure
This procedure assumes the following:
• That you are logged in as root
• That you know the attributes, such as baud rate and parity, of the terminal that will be connected
to this port
1. Supply a set ports command that specifies the following:
set ports range=range dev=term sess=num-of-sess
where range is a port or range of ports and num-of-sess is the number of simultaneous sessions
the port user can maintain
2. Supply a set line command that specifies the following:
set line range=range baud=bps csize=characters parity=parity
stopb=num-bits
where
•range is a port or range of ports
Configuring Ports for Terminals and Computers 6-3
•bps is the line speed
•characters is the character size
•parity is the parity scheme to use on this line
•num-bits is the number of stop bits to use
3. If your terminal uses hardware flow control, supply a set flow command that specifies the fol-
lowing (software flow control is the default, so a set flow command is not required in that case):
set flow range=range ixoff=off ixon=off cts=on rts=on
where range is a port or range of ports
Note: You may need to use additional set flow command fields, depending on the flow con-
trol scheme required by your terminal. See the set flow command in the Digi
One/PortServer TS Command Reference for more information.
Example
In this example, port 1 and 2 are configured for connection to terminals using hardware flow control.
The connection uses default for character size (8 bits), parity (no parity), and stop bits (1).
set ports range=1-2 sess=3 dev=term termtype=wy60
set line range=1-2 baud=19200
set flow range=1-2 ixon=off ixoff=off rts=on cts=on
About Computer Connections
Configuring computer connections is very similar to configuring terminal connections, which is
discussed on page 6-2. Consequently, this section simply discusses the differences between these
connection types.
Starting Point
This section assumes that
• You are logged in as root
• You know the attributes, such as baud rate and parity, of the PC that will be connected to this
port
Configuring Typical PC Connections
To configure a port for a directly-connected PC, where the PC always initiates the connection,
configure the connection as you would a terminal connection, except on the set ports command do
the following:
• Specify dev=min if you have a 10-pin null modem cable to support this type of connection.
• Specify dev=term if you do not have a 10-pin null modem cable
Consider defining the serial connection as a PPP link. See "Configuring PPP" on page 8-1 for more
information.
Command Line Example
In this example, ports 1-2 are set up for a BBS host.
set ports range=1-2 dev=prn group=70
set line range=1-2 baud=19200
set flow range=1-2 ixon=off ixoff=off rts=on cts=on
set altip group=70 ip=199.179.23.10
6-4 About Computer Connections
Configuring Autoconnection 7-1
Chapter 7 Configuring Autoconnection
In This Chapter
This Chapter discusses how to configure the autoconnection feature. It covers the following topics:
• About Autoconnection . . . . . . . . . . . . . . . . . . . . . . . . . . . . . . . . . . . . . . . . . . . . 7-2
• Configuring a Port for Autoconnection: Web Interface. . . . . . . . . . . . . . . . . . . 7-2
• Configuring Autoconnection By Port: Command Line . . . . . . . . . . . . . . . . . . . 7-2
• Configuring a User for Autoconnection: Web Interface . . . . . . . . . . . . . . . . . . 7-3
• Configuring a User for Autoconnection: Command Line . . . . . . . . . . . . . . . . . 7-3
7-2 About Autoconnection
About Autoconnection
The autoconnection feature allows you to configure a user to access the Digi One/PortServer TS 2/4
and then be automatically connected to a host on the LAN. You can implement autoconnection in
the following ways:
• By port. In this case, all port users are automatically connected to the same host. The Digi
One/PortServer TS 2/4 is completely transparent to them.
• By user. In this case, a user is required to login and may be required to supply a password, but
once the user is authenticated, an automatic connection to a host is made.
Configuring a Port for Autoconnection: Web Interface
This section describes how to configure a port for autoconnection from the web interface.
1. Access the web interface by entering the Digi One/PortServer TS 2/4 IP address in a browser’s
URL window.
2. Log in to the Digi One/PortServer TS 2/4 as root.
The default password is dbps.
3. Select Configure and then Autoconnect from the menu.
4. Configure the port as required. Use the online help for more information.
5. To return to the main Ports menu, choose Ports from the Menu again.
Configuring Autoconnection By Port: Command Line
This section describes how to configure a port for autoconnection from the command line.
Procedure
This procedure describes how to set up a port for autoconnection only. It assumes that you have or
will configure the port appropriately for a modem connection (see Chapter 5) or terminal connection
(see Chapter 6).
To configure a port to provide automatic connections for all port users, supply a set ports command
that specifies the following:
set ports range=range auto=on dest=ip-address dport=tcp=port
where
•range is a port or range of ports
•ip-address is the IP address of the host to which the autoconnection should be made
•tcp-port is a TCP port to use for this connection
Example
In this example, port 2 is configured for automatic Telnet connections to a host.
set ports range=2 auto=on dest=199.125.123.10 dev=min dport=23
Configuring Autoconnection 7-3
Configuring a User for Autoconnection: Web Interface
1. Access the web interface by entering the Digi One/PortServer TS 2/4 IP address in a browser’s
URL window.
2. Log in to the Digi One/PortServer TS 2/4 as root.
The default password is dbps.
3. Select Configure and then Users from the menu.
4. To add an autoconnect user, do the following:
a. Choose Add User.
b. Enter a name and then choose Submit
c. Choose the new user from the Name column.
d. Configure the user. Be sure to specify the following: (1) Default Access: Autoconnect (2)
Enable Autoconnect (3) The IP address that will be the destination for the autoconnect user
(4) A Destination TCP port number, which determines the type of connection for this user
(such as 23 for Telnet).
e. Choose Submit.
5. To return to the main User menu, choose User from the Menu again.
Configuring a User for Autoconnection: Command Line
This section describes how to configure a user for autoconnection.
Procedure
This procedure deals with autoconnection features only. It assumes that you have or will configure
• The port for modem connections (see Chapter 5) or terminal connections (see Chapter 6)
• Other user attributes (see the set user command in the Digi One/PortServer TS Command Refer-
ence)
To configure a user to automatically connect to a host, supply a set user command that specifies the
following:
set user name=user-name ports=ports autoconnect=on autohost=ip-address
autoport=tcp-port defaultaccess=autoconnect
where
•user-name is the name of the user
•ports is the ports this user can use
•ip-address is the IP address of the host to which the user will be connected
•tcp-port is the TCP port to use for connections
Example
In this example, a user is configured for autoconnection using telnet to the host specified. Because
the password field is not specified, the default (password=on) requires that the user supply a
password before the connection is made.
set user name=user4 autoconnect=on autohost=199.193.150.10 autoport=23
defaultaccess=autoconnect
7-4 Configuring a User for Autoconnection: Command Line
Configuring PPP 8-1
Chapter 8 Configuring PPP
In This Chapter
This chapter discusses how to configure PPP connections. It covers the following topics:
• Configuring PPP Connections: Web Interface. . . . . . . . . . . . . . . . . . . . . . . . . . 8-2
• Configuring Inbound PPP Connections: Command Line . . . . . . . . . . . . . . . . . 8-3
• Configuring Outbound PPP Connections: Command Line . . . . . . . . . . . . . . . . 8-5
8-2 Configuring PPP Connections: Web Interface
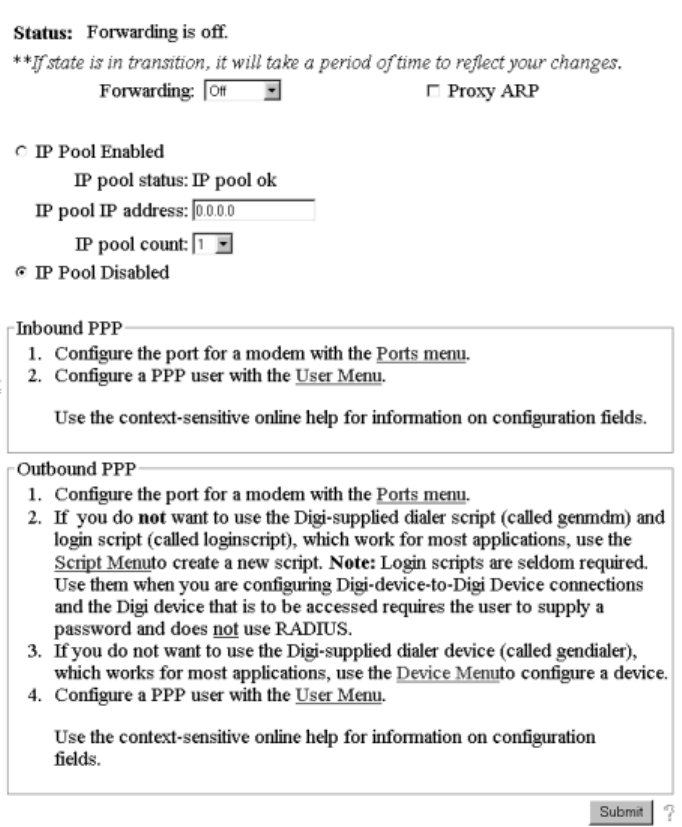
Configuring PPP Connections: Web Interface
Use this procedure to configure PPP connections from the web interface.
1. Access the web interface by placing the IP address of the Digi device in the URL window of a
browser.
2. Log in as the root user. The default password is dbps.
3. Navigate to the PPP configuration screen, by choosing PPP from the Configure menu.
A screen similar to the following appears.
4. Use the web interface and the online help to complete configuration tasks.
Configuring PPP 8-3
Configuring Inbound PPP Connections: Command Line
Use this section to configure simple inbound PPP connections from the command line. For
information on fine-tuning PPP connections, see the set user command in the Digi One/PortServer
TS Command Reference.
Note: CHAP authentication works between two Digi devices. CHAP will be negotiated to
PAP for all other connections
Procedure
1. To configure the port for a modem, enter the following command:
set ports range=range dev=device
where range is the port or ports and device is one of the following:
• min for inbound only modem connections
• mio for bidirectional modem connections.
See the set ports command in the Digi One/PortServer TS Command Reference for more infor-
mation.
Example: set ports range=3 device=min
2. To configure flow control for the ports, enter the following command:
set flow range=range flow-control=scheme
where range is the port or ports and flow-control=scheme is the flow control required for this
connection. Typically, for modem connections RTS and CTS are on.
Example: set flow range=3 ixon=off ixoff=off rts=on cts=on
See the set flow command in the Digi One/PortServer TS Command Reference for more infor-
mation.
3. To configure the baud rate for this connection, enter the following command:
set line range=range baud=bps
where range is the port or ports to configure and bps is the line speed in bits-per-second. Typi-
cally, you can set this to 115000 bps for modem connections.
Example: set line range=3 baud=115000
4. To create an inbound PPP user, enter the following command:
set user name=name protocol=ppp netservice=on
defaultaccess=netservice
where name is a name to assign the PPP user
Example:
set user name=pppin protocol=ppp netservice=on defaultaccess=netservice
5. To configure an IP address for the remote PPP user, enter the following command:
set user name=name ipaddr=ip-address
where
•name is the user’s name
•ip-address is one of the following: (a) A standard IP address in dotted decimal format. (b)
0.0.0.0, which means the remote user will supply the IP address (c) ippool, which means that
the user will be assigned an IP address from an IP address pool. See the set ippool command
in the Digi One/PortServer TS Command Reference.
Example:
set user name=pppin ipaddr=ippool
6. If you used the IP address pool option in the previous step, specify the following subnetwork
mask using the following command: (a mask of 255.255.255.255 is required)
set user ipmask=255.255.255.255
8-4 Configuring Inbound PPP Connections: Command Line
7. To configure an IP address for the local end of the PPP connection, enter the following com-
mand:
set user name=name localipaddr=ip-address
where name is the user’s name and ip-address is the IP address to assign to the local end of the
PPP connection. This address must be unique. That is, no other user can be assigned this address
and it cannot be the IP address for the Ethernet interface.
Example: set user name=pppin localipadr=199.1.1.2
Configuring Inbound PPP Connections: Example
This example shows a very simple PPP inbound configuration. Here are some points on this
configuration:
• The port is set up for inbound connections (dev=min).
• RTS and CTS are used for flow control.
• The baud rate has been set to 115000 bps.
• The user has been configured to use an IP address pool
set ports range=3 device=min
set flow range=3 ixon=off ixoff=off rts=on cts=on
set line range=3 baud=115000
set user name=pppin protocol=ppp netservice=on defaultaccess=netservice
set user name=pppin ipaddr=ippool
set user name=pppin localipadr=199.1.1.2
Configuring PPP 8-5
Configuring Outbound PPP Connections: Command Line
This section describes how to configure outbound PPP connections. Use it to configure outbound
only connections or to configure the outbound portion of bidirectional connections.
Note: CHAP authentication works between two Digi devices. CHAP will be negotiated to
PAP for all other connections
Procedure
1. To configure the port for a modem, enter the following command:
set ports range=range dev=device
where range is the port or ports and device is one of the following:
• mout for outbound only modem connections
• mio for bidirectional modem connections.
See the set ports command in the Digi One/PortServer TS Command Reference for more infor-
mation.
Example: set ports range=3 device=mout
2. To configure flow control for the ports, enter the following command:
set flow range=range flow-control=scheme
where range is the port or ports and flow-control=scheme is the flow control required for this
connection. Typically, for modem connections RTS and CTS are on.
Example: set flow range=3 ixon=off ixoff=off rts=on cts=on
See the set flow command in the Digi One/PortServer TS Command Reference for more infor-
mation.
3. To configure baud rate for this connection to the modem, enter the following command:
set line range=range baud=bps
where range is the port or ports to configure and bps is the line speed in bits-per-second. Typi-
cally, you can set this to 115000 bps for modem connections.
Example: set line range=3 baud=115000
4. If you do not want to use the Digi-supplied dialer script (genmdm) and login script (loginscript),
which work for most applications, use the set script command to create your own scripts.
See the set script command in the Digi One/PortServer TS Command Reference for more infor-
mation.
5. If you do not want to use the Digi-supplied outbound device (gendialer), which works for most
applications, enter the following command:
set device name=name ports=ports dialer=name
where
• name=name is the name for this device
•ports are the ports to associate with this device
•dialer=name is the name of a dialer script, either the Digi-supplied script or a user-created
one
6. To create a PPP user, enter the following command:
set user name=name protocol=ppp
where name is the name of the PPP user
Example
set user name=pppout protocol=ppp
7. To configure this user for outbound connections, enter the following command:
8-6 Configuring Outbound PPP Connections: Command Line
set user name=name outgoing=on device=device
where device is either the Digi-supplied device or the outbound device created earlier in this pro-
cedure
Example:
set user name=pppout outgoing=on device=gendialer
8. To configure an IP address for the local end of the PPP connection, enter the following com-
mand:
set user name=name localipaddr=ip-address
where name is the user’s name and ip-address is one of the following:
• 0.0.0.0. , which means that the user will request an IP address from the remote server.
• A specific IP address, which means that the Digi device will attempt to use this IP address.
The remote server must agree to this request.
Example: set user name=pppout localipadr=0.0.0.0
9. To configure a telephone number to dial to reach the outbound user, enter the following com-
mand:
set user name=name n1=telephone-number
where name is the user’s name and telephone-number is the number to dial to reach the user.
You can enter this number as digits only, with dashes (-) separating digits, or with commas.
Example: set user name=pppout n1=4452624
Example
This example shows a very simple outbound PPP configuration. Here are some points on this
configuration:
• The port is set up for outbound connections (dev=mout).
• Hardware flow control is used.
• Default device and scripts are used
set ports range=3 device=mout
set flow range=3 ixon=off ixoff=off rts=on cts=on
set line range=3 baud=115000
set user name=pppout protocol=ppp
set user name=pppout dialout=on outgoing=on device=gendialer
set user name=pppout localipadr=0.0.0.0
set user name=pppout n1=4452624
Configuring IP Routing 9-1
Chapter 9 Configuring IP Routing
In This Chapter
This chapter describes how to configure IP routing. It discusses the following topics:
• Introduction to Routing . . . . . . . . . . . . . . . . . . . . . . . . . . . . . . . . . . . . . . . . . . . 9-2
• About RIP Routing Updates. . . . . . . . . . . . . . . . . . . . . . . . . . . . . . . . . . . . . . . . 9-3
• Configuring Static Routes . . . . . . . . . . . . . . . . . . . . . . . . . . . . . . . . . . . . . . . . . 9-5
• Configuring Dynamic Routes Using RIP. . . . . . . . . . . . . . . . . . . . . . . . . . . . . . 9-6
• Configuring Proxy ARP. . . . . . . . . . . . . . . . . . . . . . . . . . . . . . . . . . . . . . . . . . . 9-7
9-2 Introduction to Routing
Introduction to Routing
This section provides some introductory information on routing.
What is Routing
Routing is the method, employed by IP software, of choosing a path over which to send packets
between systems on different physical networks. When Digi One/PortServer TS 2/4 is configured as
a router, it performs this service.
Types of Routing
Digi One/PortServer TS 2/4 can be configured to perform the following types of routing:
• Static routing. When you use static routing, you manually configure routes to other networks for
Digi One/PortServer TS 2/4. Static routing works fine for small, stable networks. Maintaining
static routes is difficult on larger networks and on networks that experience a lot of changes.
• Dynamic routing. When you use dynamic routing, routes are not manually configured but are
automatically established and maintained using information provided by routing information
protocol (RIP). Route maintenance is obviously easier using RIP, but RIP has some shortcom-
ings that are discussed later in this chapter. Digi One/PortServer TS 2/4 supports the RIP 1 stan-
dard.
• Proxy ARP, which is a technique in which a router answers ARP requests intended for another
system. Typically, you use proxy ARP to move packets between physical networks that use the
same IP network address. By pretending to be the other system, the Digi One/PortServer TS 2/4
accepts responsibility for forwarding packets to that system. Proxy ARP makes routing decisions
based on either static routes or on routing information provided by RIP.
Configuring IP Routing 9-3
About RIP Routing Updates
Introduction
RIP defines a method for propagating routing information among routers. It provides IP software
with the information needed to make intelligent routing decisions.
The information, passed in RIP updates packets from router-to-router, consists of two items, a
network ID and a hop count. A hop count is the number of routers through which a packet must pass
on its way from a source to a destination network.
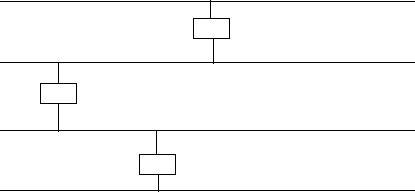
RIP Example
In the example that follows, Router R1 “advertises” (using RIP) that it can reach Net 1 in one hop.
When Router R2 receives this advertisement, it then knows that since it is on a common network
with R1 that it can reach Net 1 in two hops. It advertises this fact to other routers in the network,
who use this information to calculate their own routes to Net 1.
Problem with RIP: Sending Updates Across a WAN
RIP can be an expensive way to handle routing if RIP updates are regularly sent across lines that
charge by traffic volume or usage time. Neither of these, of course, applies to LANs or leased lines.
Because of these cost considerations, Digi One/PortServer TS 2/4 lets you turn RIP off on some or
all serial links.
Problem with RIP: Slow Convergence
Slow convergence is a problem that can arise from the method RIP uses to disseminate routing
information. In the preceding figure,
1. R1 advertises that it can reach Net 1 in one hop.
2. R2 then advertises that it can reach Net 1 in two hops
3. R3 then advertises that it can reach Net 1 in three hops.
What happens if R1’s link to Net 1 goes down? First it realizes that its one-hop route to Net 1 is no
longer available. But it hears that R2 can reach Net 1 in two hops, so it updates its routing table to
say it can reach Net 1 in three hops, the one hop to R2 and the two hops R2 says it needs to reach Net
1.
R1 then advertises that it can reach Net 1 in three hops. R2 hears the advertisement and realizes that
if R1 needs three hops to get to Net 1 then it needs to update its own routing tables to reflect that
fact, because it knows that its route to Net 1 is always one more hop than R1 requires. Consequently,
it updates its routing tables to say that it can reach Net 1 in four hops. This can go on until the hop
count to Net 1 reaches 16, which RIP defines as an unreachable destination.
Combatting RIP’s Slow Convergence Problem
There are two methods to combat RIP’s slow convergence problem, both of which Digi
One/PortServer TS 2/4 implements.
The first is called “split horizon,” which stipulates that learned routes are not propagated from the
interface on which they are learned. Had split horizon been used in the preceding example, R2
would not have advertised to R1 that it could reach Net 1. Consequently, R1 would never have
Net 1
R1
R2
Net 2
Net 3
R3
Net 4
9-4 About RIP Routing Updates
regarded R2 as an alternate path to Net 1.
The second is called “poison reverse,” which stipulates that routes are advertised as unreachable on
the interface on which the route is learned. Had poison reverse been used in the preceding example,
R2 would have advertised Net 1 as unreachable in its RIP updates to R1. Again R1 would never
have regarded R2 as an alternate path to Net 1.
Digi One/PortServer TS 2/4 Participation in RIP Updates
Digi One/PortServer TS 2/4’ s participation in the exchange of RIP updates can be configured on the
set forwarding command. This command allows you to configure Digi One/PortServer TS 2/4
• To neither receive nor propagate RIP updates (state=off), which means it must be configured for
static routes (set route command) if it is to do any routing at all.
• To receive RIP updates but not advertise its own routes using RIP (state=passive)
• To both receive and pass RIP updates (state=active)
Configuring IP Routing 9-5
Configuring Static Routes
This section describes how to configure Digi One/PortServer TS 2/4 for static routes.
Related Information
See the set route command in the Digi One/PortServer TS Command Reference.
Procedure
To configure a static route over a PPP link, enter the following command:
set route net=addr mask=mask metric=hops wanname=interface gateway=gateway
where
•addr is either the IP address of a system to be reached over this route or the network address of
the subnet that is to be reached on this route
•mask is the mask to use for interpreting the IP address.
•metric is the number of hop to the destination
•interface is either ether if this route is over the Ethernet interface or the name of a user if the
route is over a PPP link
•gateway is the IP address of the device that is the next hop to the destination
Example: Route Using the Ethernet Interface
In this example, a route to a subnet is created over the Ethernet interface. Key features include the
following:
• The address on the net field is a subnetwork address, not the IP address of a specific device
• The wannane=ether, indicating that this route is over the Ethernet interface
• The metric field indicates that packets to this subnet will pass through two routers
• The gateway field indicates that all packets using this route are to be forwarded to the device at
IP address 191.21.21.2.
set route net=199.21.33.0 mask=255.255.255.0 metric=2 wannname=ether gateway=199.21.21.2
Example: Route Using a PPP Link
In this example, a route to a subnet is created over the Ethernet interface. Key features include the
following:
• The address on the net field is IP address of a specific device, not a subnetwork address
• The wannane is the name of a PPP user.
• The metric field indicates that packets to this subnet will pass through two routers
• The gateway field indicates that all packets using this route are to be forwarded to the device at
IP address 191.21.21.2.
set route net=199.21.33.44 mask=255.255.255.255 metric=2 wannname=ppp1 gateway=199.21.21.2
9-6 Configuring Dynamic Routes Using RIP
Configuring Dynamic Routes Using RIP
This section describes how to configure Digi One/PortServer TS 2/4 for dynamic routing.
Related Information
See the set forwarding command in the Digi One/PortServer TS Command Reference.
Starting Point
This procedure assumes that you have sign on as root and have or will configure modems, modem
scripts, devices, and filters for routes that use serial lines.
Procedure
1. Configure the links over which routed packets and RIP updates will be sent.
• To enable routing over the LAN to which Digi One/PortServer TS 2/4 is attached, no rout-
ing-specific configuration is required.
• To enable routing over PPP, links be sure to use the netrouting field on the set user command
to configure how Digi One/PortServer TS 2/4 handles RIP updates. You can configure the
link so that Digi One/PortServer TS 2/4 does any of the following with RIP updates:
— Both sends and receives them (netrouting=both)
— Sends them only (netrouting=send)
— Receives them only (netrouting=receive)
— Neither sends nor receives them (netrouting=off)
2. Configure the Digi One/PortServer TS 2/4 for dynamic routing with a set forwarding command
that specifies state=active.
You may also want to turn on the poisonreverse and splithorizon fields to prevent the RIP slow
convergence problem discussed on page 9-3. See the discussion on the set forwarding command
provided in the Digi One/PortServer TS Command Reference for more information.
Example: Dynamic Routes
In this example, which shows only those commands and command fields pertinent to routing, Digi
One/PortServer TS 2/4 is configured for dynamic routing using RIP. But to prevent RIP updates
from being sent across the PPP link, the set user command that defines the link specifies
netrouting=off.
set forwarding state=active poisonreverse=on splithorizon=on
set user name=link1...netrouting=off
Digi Device
Router
192.150.75.0
187.100.46.9
PPP

Configuring IP Routing 9-7
Configuring Proxy ARP
This section describes how to configure Digi One/PortServer TS 2/4 for Proxy ARP.
Related Information
See the set forwarding command in the Digi One/PortServer TS Command Reference.
Starting Point
This procedure assumes that you have signed on as root and have or will configure modems, modem
scripts, devices, and filters for routes that use serial lines.
Procedure
1. Configure the links over which packets will be routed using a set user command. This command
must specify (on the ipaddr field) a specific IP address for the remote system using the Proxy
ARP service.
2. Configure Digi One/PortServer TS 2/4 for Proxy ARP by supplying a set forwarding command
that specifies the following:
• state=passive
• proxyarp=on
Example
In this example, Digi One/PortServer TS 2/4 provides Proxy ARP services to a remote host.
set user name=link1...ipaddr=187.155.24.11
set forwarding state=passive proxyarp=on
Digi Device
187.155.24.0
PPP
187.155.24.11
9-8 Configuring Proxy ARP
Configuring Console Management 10-1
Chapter 10 Configuring Console Management
In This Chapter
• About Console Management . . . . . . . . . . . . . . . . . . . . . . . . . . . . . . . . . . . . . . 10-2
• Configuring Console Management: Web Interface . . . . . . . . . . . . . . . . . . . . . 10-2
• Configuring Console Management: Command Line. . . . . . . . . . . . . . . . . . . . 10-2

10-2 About Console Management
About Console Management
Digi One/PortServer TS 2/4 can be configured to remotely manage network devices, such as routers,
switches, and servers, which usually provide EIA-232 serial ports for management. Using the Digi
One/PortServer TS 2/4 and TCP/IP utilities like reverse Telnet and SSH2, network administrators
can access consoled serial ports from a single station over the LAN.
Configuring Console Management: Web Interface
1. Access the web interface by entering the Digi One/PortServer TS 2/4 IP address in a browser’s
URL window.
2. Log in to the Digi One/PortServer TS 2/4 as root.
The default password is dbps.
3. Select Configure and then Console Management from the menu.
4. Follow the prompts to complete configuration.
Configuring Console Management: Command Line
This procedure describes how to configure Digi One/PortServer TS 2/4 to handle console
management.
Procedure
1. For each port connected to a device that will be managed, specify the following:
set ports dev=prn range=range
where range is the port or range of ports to be set up for console management
2. Ensure that the port and the device to be managed are using the same flow control scheme.
• See the device's documentation for information on flow control requirements.
• To check the Digi One/PortServer TS 2/4 current settings and to change them, see descrip-
tion of the set flow command in the Digi One/PortServer TS Command Reference.
3. Ensure that the port and the device are using the same baud rate.
• See the device's documentation for information on baud rate requirements.
• To check the Digi One/PortServer TS 2/4 current settings and to change them, see set line
description in the Digi One/PortServer TS Command Reference.
4. If you want to simplify access to the ports, do one of the following:
• If the administrator will access the port from a station on the LAN, you can assign IP
addresses to each port that will be connected to a managed device, which will allow the
administrator to Telnet directly to the port without specifying a port number. See set altip
command in the Digi One/PortServer TS Command Reference for more information.
• If you want to use a menu to simplify access, see the examples that follow and the set menu
command in the Digi One/PortServer TS Command Reference for more information.
5. If you want to use SSH2 connections and use a public key for authentication, do the following:
• Ensure that you have supported hardware and firmware. This feature works on the devices
specified in the following table. To determine the hardware level of your device, see the label
on the bottom of the unit. To determine the firmware level, use the set config command.
• If you have a supported device, enter the following command
set user name=name loadkey=host:key
Device Required Hardware Required Firmware
Digi One TS 50000771-01A or higher 82000747a or higher
PortServer TS 2 50000771-02A or higher
PortServer TS 4 50000771-03A or higher
Configuring Console Management 10-3
where
•name is the name of a user
•host is either an IP address or DNS name of a host running TFTP
•key is the name of a file that contains the DSA public key. If your host’s implementation
requires a complete path to the file, specify the path here as well.
Example: set user name=secure loadkey=143.191.2.34:ssh-file
Example: SSH2 and Menu Access
In this example, a Digi device is configured to use an SSH2 public key, and it presents a menu to the
administrator, from which he or she will select a device to manage.
Key aspects of this configuration include the following:
• Two ports to which the managed devices are connected specify dev=prn, a device type that does
not spawn a login from the Digi device.
• A menu specifies connect commands, which when selected provide connections to ports 1 and 2
and the managed systems. The menu also specifies a menu table index number of 6 (on the range
parameter), which is then linked to a user with the set user command
set ports dev=prn range=1-2
set line baud=19200 range=1-2
set menu name=menu1 t1="Console Management Menu" range=6
set menu name=menu1 range=6 name="Console Management Menu" m1="Connect to
System 1"
set menu name=menu1 range=6 c1="connect 1" m2="Connect to System 2"
set menu name=menu1 range=6 c2="connect 2"
set user name=admin1 defaultaccess=menu menu=6 password=on outgoing=on
set user name=admin1 loadkey=142.191.2.34:ssh-file1
Example: Alternate IP Addresses
Configuration
In this example, the Digi One/PortServer TS 2/4 is configured with
• Alternate IP addresses using set altip commands, which assign IP addresses to ports 1 and 2.
This enables direct access to one of these ports with a Telnet command that specifies one of the
IP addresses.
• Password protection on ports 1 and 2. This is done with the set auth command.
set ports dev=prn range=1-2
set line baud=19200 range=1-2
set auth login=1-2 range=2
set altip group=1 ip=119.180.33.50
set altip group=2 ip=119.180.33.51
User Command
In this example, a user Telnets to port 1 using an IP address. He/she will be required to log in before
access to the port is granted.
telnet 119.180.33.50
10-4 Configuring Console Management: Command Line
Configuring Modbus 11-1
Chapter 11 Configuring
Modbus
In This Chapter
• About Modbus . . . . . . . . . . . . . . . . . . . . . . . . . . . . . . . . . . . . . . . . . . . . . . . . . .11-2
• Configuring Modbus Using the Web Interface . . . . . . . . . . . . . . . . . . . . . . . . .11-3
• Configuring Modbus from the Command Line . . . . . . . . . . . . . . . . . . . . . . . . .11-4
• Examples . . . . . . . . . . . . . . . . . . . . . . . . . . . . . . . . . . . . . . . . . . . . . . . . . . . . . .11-6
11-2 About Modbus
About Modbus
What Is Modbus
Modbus is a protocol that defines a method for devices in an industrial automation environment to
communicate. It allows a single controlling unit, called a protocol master, to manage one or more
units, called protocol slaves. The protocol specifies that only the master may initiate
communication. Slaves may only respond.
The protocol defines the structure of Modbus messages, determines how the master requests
information from the slave or specifies an action for the slave to take, defines how the slave is to
respond, specifies addressing conventions, and deals with many of the other details required for
communication to occur.
Modbus and Modbus TCP
There are two forms of the protocol. Modbus, the older of the two, was designed to run over serial
connections, such as RS-232 links, and designed to use one of two encoding schemes, ASCII or
RTU.
Modbus TCP is simply an adaptation of Modbus that provides for Modbus message encapsulation
within IP datagrams, enabling Modbus messages to run over TCP/IP networks.
Digi’s Support for Modbus and Modbus TCP
Digi provides an extremely flexible implementation, offering support for Modbus TCP, Modbus
with RTU encoding, and Modbus with ACSII encoding. The implementation allows any
combination of these transport mechanisms.
Here are some examples of the configurations supported:
• A master (or multiple masters) using Modbus TCP communicates through the Digi device with a
port-attached slave or group of slaves using Modbus RTU. A similar configuration allows the
master to use Modbus TCP to communicate with a port-attached slave using Modbus ASCII.
• A port-connected master using Modbus RTU communicates with multiple network-connected
slaves, each using Modbus TCP.
Configuration Methods
Modbus can be configured using the web interface or the command line. The web interface is
extremely easy to use and works for many configurations. More complex configurations may
require the flexibility provided by the command line interface.
Key Modbus Configuration Considerations
A key to ensuring that your Modbus configuration works as intended is matching masters with the
slaves they control. So, here are some things to keep in mind:
• The default configuration allows any Modbus TCP master to communicate with any port-
attached slave using RTU encoding. Consequently, if there are no security considerations, that is,
if you are not concerned about restricting access to slaves to particular masters, and the slaves
use RTU encoding, no Modbus configuration is required. (There are still, however, some non-
Modbus configuration tasks that must be completed, such as assigning the Digi device an IP
address and configuring ports.)
• If you use the command line, you must match masters to slaves in the following way:
— The set modbus slave command has a range field that requires you to assign an index number
to identify the slave.
— The set modbus master command has a slave field that requires you to list the index numbers
of slaves that are to be controlled by that master. The examples that follow will clarify this
relationship.
Configuring Modbus 11-3
Configuring Modbus Using the Web Interface
1. Access the Digi One/PortServer TS 2/4 from a web browser by entering the Digi One/PortServer
TS 2/4 IP address in the URL window.
2. Sign on to the Digi One/PortServer TS 2/4.
3. Choose Modbus from the menu.
4. Fill in fields as required. Use the context-sensitive help for guidance.
5. Configure ports for modbus, by doing the following:
a. Select Ports.
b. Specify Modbus as the device type.
c. Configure other port attributes as required by the attached device.
6. Exit to the main menu when you finish.
11-4 Configuring Modbus from the Command Line
Configuring Modbus from the Command Line
Use this procedure to configure a Digi device for Modbus.
Starting Point
This procedure assumes that you have logged on to the Digi device as root.
Procedure
1. To ensure that the line speed for the port is configured to match the speed required by the
attached device, issue the following command:
set line range=range baud=bps csize={5|6|7|8} parity={o|e|n}
stopb={1|2}
where
•range is a port or ports
•bps is the line speed required
• csize is the character size, 5, 6, 7, or 8 bits
• parity is odd (o), even (e), or none (n)
2. Configure the port for Modbus by specify issuing the following command:
set ports range=range dev=modbus
where range is a port or ports
3. Configure a Modbus master by issuing a set modbus master command that specifies the follow-
ing:
• An index number on the range field to identify this master or set of masters. Use an integer
between 1 and 16. Example: range=3
• If the master or masters are located on the network, an IP address or range of IP addresses
Example of single IP address: ip=143.191.3.117
Example of a range of addresses: ip=143.191.3.117-143.191.3.122
• If the master or masters are connected to a port or range of ports, a port number or numbers
on the port field:
Example of a single port: port=1
Example of range of ports: ports=1-2
• The index number of the slave or slaves that this master will control on the slaves field.
Example of a single slave: slave=17
Example of a range of slaves: slave=17-22
• If this this master is connected to a serial port, an encoding scheme (ASCII or RTU) on the
format field. Specify the encoding scheme required by the master.
Example: format=ascii
• Timers as required. Typically the defaults work. If you require additional information, see the
set modbus command in the Digi One/PortServer TS 2/4 Command Reference.
4. Configure the Modbus slave by issuing a set modbus slave command that specifies the follow-
ing:
• An index number on the range field to identify this slave. Use a integer between 1 and 32.
This number must be included in the range of slave index numbers specified on the slave
field of the set modbus master command.
Example: range=15
• If this slave is located on the network, an IP address
Example: ip=143.191.3.117
• If this slave is connected to a port, a port number on the port field:
Example: port=1
• If this this slave is connected to a serial port, an encoding scheme (ASCII or RTU) on the for-
mat field. Specify the encoding scheme required by the slave.
Example: format=ascii
Configuring Modbus 11-5
• A Modbus protocol unit number for each slave. This can be specifies in any of the following
ways: (a) An individual unit number. (b) A range of unit numbers. (c) All, which means
accept messages carrying any Modbus protocol unit number.
• Timers as required. Typically the defaults work. If you require additional information, see the
set modbus command in the Digi One/PortServer TS 2/4 Command Reference.
11-6 Examples
Examples
Configuring Network-Connected Masters
Introduction
Here are a few points regarding this configuration:
• All timers for both masters and slaves are using defaults.
• The range field on the set modbus master command is an index number that Digi One IA identi-
fies these masters. The range fields on each of the set modbus slave commands identify the indi-
vidual slaves.
• The slaves field on the set modbus master command then identifies the slaves that belong to this
master.
• The value on the unit fields of the set modbus slave commands are hardware addresses for the
slaves.
• The format=rtu option on the set modbus slave command is optional, since rtu is the default for
Modbus communication over the serial port.
Configuration
set line range=1 baud=14400
set ports range=1 dev=modbus
set modbus master range=1 ip=143.191.2.100-143.191.2.102 slaves=2-3
set modbus slave range=2 port=1 format=rtu unit=100
set modbus slave range=3 port=1 format=rtu unit=101
Configuring a Port-Connected Master
Introduction
Take special note of the following attributes of this configuration:
• All timers for both masters and slaves are using defaults.
• The range field on the set modbus master command is an index number that Digi One IA uses to
identify this master. The range fields on each of the set modbus slave commands identify the
individual slaves.
• The slaves field on the set modbus master command then identifies the slaves that belong to this
master.
• The value on the unit fields of the set modbus slave commands are hardware addresses for the
slaves.
• The format=rtu option on the set modbus master command is optional, since rtu is the default for
Modbus communication over the serial port.
Configuration
set line range=1 baud=14400
set ports range=1 dev=modbus
set modbus master port=1 slaves=2,5 ra=4 format=rtu
set modbus slave ip=143.191.2.100 range=2 unit=200
set modbus slave ip=143.191.2.155 range=5 unit=100
Configuring Security Features 12-1
Chapter 12 Configuring Security Features
In This Chapter
This chapter describes Digi One/PortServer TS 2/4 security features and discusses how to configure
them. It presents the following topics:
• Controlling Access to the Digi One/PortServer TS 2/4 Configuration . . . . . . 12-2
• Controlling Access to Inbound Ports . . . . . . . . . . . . . . . . . . . . . . . . . . . . . . . . 12-2
• Controlling Access to Outbound Ports. . . . . . . . . . . . . . . . . . . . . . . . . . . . . . . 12-3
• Controlling Access to the Digi One/PortServer TS 2/4 Command Line . . . . . 12-3
• Issuing User Passwords . . . . . . . . . . . . . . . . . . . . . . . . . . . . . . . . . . . . . . . . . . 12-4
• Configuring SSH Version 2 for Secure Communication . . . . . . . . . . . . . . . . . 12-5
12-2 Controlling Access to the Digi One/PortServer TS 2/4 Con-
Controlling Access to the Digi One/PortServer TS 2/4 Configuration
Digi One/PortServer TS 2/4 restricts access to the configuration by defining the following types of
users:
• The root user, who has unlimited access to Digi One/PortServer TS 2/4 commands. He or she
can view any configuration table and change any configuration parameter. The root is identified
by the user name root and must supply a password to be authenticated. The default root pass-
word is dbps. You should change this password immediately.
• Regular users, who have much more restricted access to Digi One/PortServer TS 2/4 commands.
Regular users can view some configuration tables and can change some configuration parame-
ters related to their own sessions and passwords. See the Digi One/PortServer TS Command Ref-
erence for information on the limitations placed on regular users for each command.
Controlling Access to Inbound Ports
This section describes methods of controlling access to inbound serial ports. An inbound port is one
defined on the dev field of the set ports command for one of the following device types:
• term (used to define terminal connections)
• min (used to define incoming modem connections)
• mio (used to define bi-directional modem connections)
• hdial, hio (used to define computer connections)
Default Access Restrictions
The default configuration for inbound ports is that a login and password are required to access them.
Options for Removing Access Restriction
The login and password requirement for inbound ports can be changed by configuring
• The port so that it does not require a login and password. In this case, no one is required to sup-
ply a login or password.
• Specific users so that they do not require a password. In this case, some users do not supply pass-
words, and others are required to.
Procedure for Changing a Port’s Access Requirements
To configure a port so that no one has to login or specify a password, supply a set logins command
that specifies the following:
set logins range=range login=off passwd=off
Example: set logins range=1-2 login=off passwd=off
Procedure for Changing a User’s Access Requirements
To configure a user so that he or she does not have to specify a password when accessing an inbound
port, supply a set user command that specifies the following:
set user name=name password=off
where name is a name to identify the user
Example: set user name=user1 password=off
Configuring Security Features 12-3
Controlling Access to Outbound Ports
This section describes methods for controlling access to outbound serial ports. An outbound port is
one defined on the dev field of the set ports command for one of the following device types:
• prn (used to define printer connections)
• mout (used to define outbound modem connections
• mio (used to define bi-directional modem connections)
• host (used to define host connections)
• modbus
Default Access
The default for outbound ports is unlimited access.
Restricting Access to Outbound Ports
Use the set auth command to restrict access to outbound ports. See the description of the set auth
command in the Digi One/PortServer TS Command Reference for more information.
Controlling Access to the Digi One/PortServer TS 2/4 Command Line
This section describes how to restrict access to the Digi One/PortServer TS 2/4 command line.
Method 1 Autoconnection
The autoconnection feature allows you to configure a user to access the Digi One/PortServer TS 2/4
but then be automatically connected to a host on the LAN.
You can implement autoconnection in the following ways:
• By port. In this case, all port users are automatically connected to the same host. The Digi
One/PortServer TS 2/4 is completely transparent to them.
• By user. In this case, a user is required to login and may be required to supply a password, but
once the user is authenticated, an automatic connection to a hosts made.
For information on configuring autoconnection, see "Configuring Autoconnection" on page 7-1.
Method 2: Menus
Menus select destination systems without having to access the Digi One/PortServer TS 2/4
command line. For information on configuring menus, see the description of the set menu command
in the Digi One/PortServer TS Command Reference.
12-4 Issuing User Passwords
Issuing User Passwords
This section discusses how to issue user passwords.
Related Information
See the newpass and set user commands in the Digi One/PortServer TS Command Reference.
Starting Point
This procedure assumes that you have signed on as root and already configured the user to whom
you will be issuing a password.
Procedure
1. Issue a newpass command that identifies the user (on the name field) to whom this password will
be issued.
2. When the system prompts you for a new password, type in the password and then press Enter.
3. When the system prompts you to enter the new password again, type it in and then press Enter.
Example
In this example, the newpass command initiates a dialog with Digi One/PortServer TS 2/4 that
results in the user being assigned a password.
newpass name=edm1001

Configuring Security Features 12-5
Configuring SSH Version 2 for Secure Communication
This section discusses how to configure a user to use SSH version 2 encryption.
This feature is only available for the following devices.
Password Protection
To configure simple password authentication for an SSH user, no SSH-specific configuration is
required. Simply configure a user by entering the following commands:
set user name=name password=on
newpass name=name
where name is a user name
Example
set user name=ssh-user1
newpass name=ssh-user1
Using a Public Key
To enable public key authentication and to associate a public key with a user, enter the following
command:
set user name=name loadkey=host:key
where
•name is the name of a user
•host is either an IP address or DNS name of a host running TFTP that holds
•key is the name of a file that contains the DSA public key. If your host’s implementation requires
a complete path to the file, specify the path here as well.
Example: set user name=secure loadkey=143.191.2.34:ssh-file
Device Required Hardware Required Firmware
Digi One TS 50000771-01A or higher 82000747a or higher
PortServer TS 2 50000771-02A or higher
PortServer TS 4 50000771-03A or higher
12-6 Configuring SSH Version 2 for Secure Communication
Configuring DNS 13-1
Chapter 13 Configuring DNS
In This Chapter
This chapter discusses how to configure Digi One/PortServer TS 2/4 to use DNS. Topics discussed
include the following:
• About the Domain Name System. . . . . . . . . . . . . . . . . . . . . . . . . . . . . . . . . . . 13-2
• Configuration Procedures. . . . . . . . . . . . . . . . . . . . . . . . . . . . . . . . . . . . . . . . . 13-3
13-2 About the Domain Name System
About the Domain Name System
This section discusses key concepts of the domain name system.
Purpose of DNS
The domain name system maps domain names to information associated with these names, such as
IP addresses.
DNS Components
DNS components include:
• A distributed database consisting of domain names and associated information
• A hierarchical system of domain name servers that maintain the database and use it to respond to
requests for information about a particular domain name, such as its IP address
• Domain name resolvers that
— Accept requests from users
— Satisfy information requests by building and submitting properly formulated queries to one
or more name servers or by retrieving information from a local host file
— Return information to users
— Cache information for future use
Types of Name Servers
There are two types of name servers in the domain name system:
• Local servers maintain information for resources within a local zone. It is up to individual net-
work administrators to determine the scope of a local zone.
• Root servers maintain information in higher-level domains than do local servers.
Typically, when a user requires information about a domain name, the resolver queries a local server.
If local servers cannot provide the information, root servers are queried next.
Naming Conventions
Each node in the domain name system has a globally unique domain name that consists of its own
name, which is called a label, and the labels of all superior nodes.
DNS Name Example
Here is an example of a domain name. Note that labels are separated by periods:
mn07.amalgamated.com
In this example, mn07 is part of the higher-level domain called amalgamated.com.
Configuring DNS 13-3
Configuration Procedures
Procedure for Using a Name Server
To configure a DNS server, enter the following command:
set config domain=domain myname=name dns=ip-address
where
•domain is the domain in which the Digi One/PortServer TS 2/4 will reside
•name is a DNS name for Digi One/PortServer TS 2/4
•ip-address is the IP address of a name server
Example: set config domain=digi.com myname=poe dns=204.221.1.4
Procedure for Using a Host File
Use this section to configure the host table, which maps IP addresses to host names.
Enter the following command
set host name=name ip=ip-address
where
•name is the name the host
•ip-address is the IP address of the host
Example
In this example, three IP address-to-name mappings are configured
set host name=poe ip=204.221.110.200
set host name=gary ip=204.221.110.202
set host name=toni ip=204.221.110.203
13-4 Configuration Procedures
Configuring SNMP 14-1
Chapter 14 Configuring SNMP
In This Chapter
This chapter describes how to configure the Digi One/PortServer TS 2/4 SNMP agent. It discusses
the following topics:
• About SNMP and the Digi One/PortServer TS 2/4 Agent. . . . . . . . . . . . . . . . 14-2
• Configuration Procedure: Web Interface . . . . . . . . . . . . . . . . . . . . . . . . . . . . . 14-3
• Configuration Procedure: Command Line. . . . . . . . . . . . . . . . . . . . . . . . . . . . 14-3
14-2 About SNMP and the Digi One/PortServer TS 2/4 Agent
About SNMP and the Digi One/PortServer TS 2/4 Agent
This section introduces SNMP and network management in TCP/IP networks, and it describes the
Digi One/PortServer TS 2/4 agent. It discusses the following:
• Network management components
• The SNMP agent
•SNMP traps
• The Digi One/PortServer TS 2/4 agent’s MIB support
• The Digi One/PortServer TS 2/4 agent’s supported traps
Network Management Components
The TCP/IP network management architecture contains the following components:
• Managed nodes such as host systems, routers, terminal and communications servers (such as
Digi One/PortServer TS 2/4) and other network devices
• One or more network managers (also called network management stations), which are the points
from which the network is managed
• Agents that reside on managed nodes and retrieve management information and communicate
this information to network managers
• The network management protocol, SNMP, which governs the exchange of information between
the nodes and stations
• Management information, which is the database of information about managed objects. This
database is called the management information base (MIB).
SNMP Management Agent
Each managed node contains at least one agent—a component that responds to requests from the
network manager—that retrieves network management information from its node and notifies the
manager when significant events occur.
SNMP Traps
A mechanism defined by SNMP is called a trap, which is a report or “alarm” from a managed node
to an SNMP manager that a significant event has occurred.
MIB Support
The agent supports the following MIBs:
• Read-write for MIB II (RFC 1213), which is an Internet-standard MIB, consisting of managed
objects from the systems, interfaces, IP, ICMP, TCP, UDP, transmission, and SNMP group
• Read-write for the character-stream devices using SMIv2 MIB (RFC 1658)
• Read-write for the RS-232-like hardware devices MIB (RFC 1659)
• Read-write for the Digi One/PortServer TS 2/4 IP Network Control Protocol of the Point-to-
Point Protocol MIB (RFC 1473)
Message Support
The SNMP agent supports the Set, Get, GetNext, and Trap messages as defined in RFC 1157. These
messages are used as follows:
• Set, which means set the value of a specific object from one of the supported MIBs
• Get, which means retrieve the value of a specific object form one of the supported MIBs
• GetNext, which means retrieve the value of the next object in the MIB
• Trap, which means send traps to the manager when a particular type of significant event occurs
Supported Traps
The agent can send traps when any of the following occur:
• Cold starts (Digi One/PortServer TS 2/4 initializes)
• Authentication failures
Configuring SNMP 14-3
Configuration Procedure: Web Interface
1. Access the web interface by entering the Digi One/PortServer TS 2/4 IP address in a browser’s
URL window.
2. Log in to the Digi One/PortServer TS 2/4 as root.
The default password is dbps, which should be changed. See the newpass command in the Digi
One/PortServer TS Command Reference for information on changing passwords.
3. Select Configure and then SNMP from the menu.
4. Fill in the configuration fields and then press Submit.
Configuration Procedure: Command Line
This section describes how to configure PortServer’s SNMP agent.
Related Information
See the set snmp command in the Digi One/PortServer TS Command Reference.
Starting Point
This procedure assumes that you have gathered the following information:
• The IP address of the manager to which traps are sent
• The name and location of the SNMP contact person
• The SNMP name of the PortServer you are configuring
Procedure
Issue a set snmp command to configure Digi One/PortServer TS 2/4’s SNMP agent. Specify the
following:
• The ip address of an SNMP management station to which traps are to be sent on the trap_dest
field
• A name for this Digi One/PortServer TS 2/4 on the name field
• A description of where Digi One/PortServer TS 2/4 is located on the location field. If there are
spaces in this entry, enclose it in quotation marks.
• The name of an SNMP contact person on the contact field. If there are spaces in this entry,
enclose it in quotation marks.
• Whether authentication traps are generated when an authentication error occurs on the auth_trap
field
• Whether the SNMP agent should run immediately on the run field
Configuration Example
set snmp auth_trap=on trap_dest=190.174.150.10 location=”Digi Minnesota”
name=blaze contact=”bill jones” run=on
14-4 Configuration Procedure: Command Line
Configuring Users 15-1
Chapter 15 Configuring Users
In This Chapter
This chapter discusses how to configure users. It covers the following topics:
• About Configuring Users. . . . . . . . . . . . . . . . . . . . . . . . . . . . . . . . . . . . . . . . . 15-2
• Common User Features . . . . . . . . . . . . . . . . . . . . . . . . . . . . . . . . . . . . . . . . . . 15-2
• Configuring a User: Web Interface . . . . . . . . . . . . . . . . . . . . . . . . . . . . . . . . . 15-3
• Configuring a User: Command Line Examples. . . . . . . . . . . . . . . . . . . . . . . . 15-4

15-2 About Configuring Users
About Configuring Users
Although it is not required, the Digi One/PortServer TS 2/4 is often configured to accommodate the
requirements of particular users. Typical configurable user attributes include the following:
• Whether the user is required to supply a password
• Autoconnection attributes, such as the system to which the user should be automatically con-
nected at login
• The interface the device presents the user, such as a menu or command line
• Whether the user has access to outbound ports
Note: For information on configuring PPP users, see "Configuring PPP" on page 8-1.
Configuration Methods
You can configure users in the following ways:
• With the set user command. See the set user command in the Digi One/PortServer TS Command
Reference.
• With the web interface.
Common User Features
This section discusses common user-related features. For a complete list, see the set user command
in the Digi One/PortServer TS Command Reference.
Feature Description set user Field
autoconnect
Automatically connects the user to the host specified on the auto-
host field using the service (TCP port) defined on the autoport or
autoservice fields.
Autoconnection can also be implemented by port instead of by
user.
This feature is configurable from the web interface.
autoconnect
autohost
autoport
autoservice
Default access
type
Defines the type of access the user is restricted to. Menu, command
line, autoconnect, and outgoing and netserviceare the types.
This feature is configurable from the web interface.
defaultaccess
Menu access Defines the menu that is to be presented to a user with menu access.
This feature is configurable from the web interface. menu
Port access
Defines the number of outbound ports a user connected over the
LAN can access at one time.
This feature is not configurable from the web interface.
maxsessions
PPP Defines PPP-related parameters for the user.
There are too
many fields to
list here. See the
set user com-
mand for more
information.
Routing updates Defines whether RIP routing updates are forwarded over the link to
this user. netrouting
Configuring Users 15-3
Configuring a User: Web Interface
Use this section to configure users with from the web interface.
1. Access the web interface by entering the Digi One/PortServer TS 2/4 IP address in a browser’s
URL window.
2. Log in to the Digi One/PortServer TS 2/4 as root.
The default password is dbps.
3. Select Configure and then Users from the menu.
4. To add a user, do the following:
a. Choose Add User.
b. Enter a name and then choose Submit
c. Choose the new user from the Name column.
d. Configure the user as required.
e. Choose Submit.
5. To return to the main User menu, choose User from the Menu again.
15-4 Configuring a User: Command Line Examples
Configuring a User: Command Line Examples
This section consists of a set of examples that tell you how to use the set user command to configure
various user attributes.
Configuring a User for a Password
In this example, the set user command configures a new user. The newpass command then initiates a
dialog with the Digi One/PortServer TS 2/4 to assign a password to the new user.
set user name=jsmith
newpass name=jsmith
Configuring a User for a Menu
In this example, the user is configured to use a menu, which is identified by a menu-table index
number. If the menu has not been configured, the Digi One/PortServer TS 2/4 will generate a
warning message, but the user will be configured to use the menu, which can then be created later.
set user name=jsmith defaultaccess=menu menu=4
Configuring a User for Autoconnect
In this example, the user is configured to do the following
• Automatically connect to the host identified on the autohost field
• Connect using Telnet
set user name=jsmith autoconnect=on defaultaccess=autoconnect
autohost=191.143.2.17 autoservice=telnet
Displaying an Entry in the User Table
This example assumes that the user named jsmith has already been created, in which case attributes
for jsmith are displayed. If the user did not already exist, this command would create a new user
named jsmith that uses all default attributes.
set user name=jsmith
Removing a User from the User Table
In this example, a user is removed from the user table.
remove user name=martymertz
Managing the OS and Configuration 16-1
Chapter 16 Managing the OS and Configuration
In This Chapter
This chapter provides information on updating the operating system (OS) and managing the
configuration. Topics include the following:
• Upgrading the OS (Firmware): Web Interface. . . . . . . . . . . . . . . . . . . . . . . . . 16-2
• Upgrading the OS (Firmware): Command Line . . . . . . . . . . . . . . . . . . . . . . . 16-3
• Configuring Digi One/PortServer TS 2/4 from a Remote Host. . . . . . . . . . . . 16-4
• Resetting the Configuration to Defaults. . . . . . . . . . . . . . . . . . . . . . . . . . . . . . 16-6
16-2 Upgrading the OS (Firmware): Web Interface
Upgrading the OS (Firmware): Web Interface
Use this section to upgrade the firmware using the web interface.
1. Access the web interface by entering the Digi One/PortServer TS 2/4 IP address in a browser’s
URL window.
2. Log in to the Digi One/PortServer TS 2/4 as root.
The default password is dbps.
3. From the main menu, choose Admin and then either HTTP upgrade or TFTP upgrade.
4. Follow the prompts to complete the upgrade.
Managing the OS and Configuration 16-3
Upgrading the OS (Firmware): Command Line
This section describes how to upgrade the Digi One/PortServer TS 2/4 operating system (OS). The
OS is stored in flash ROM and can be upgraded without changing the ROM or other hardware.
Related Information
See the boot and set config commands in the Digi One/PortServer TS Command Reference.
Prerequisite Task
Note: When upgrading from a firmware release prior to 82000716_B , the POST code must be
upgraded first. To determine your current firmware release, issue the set config command. If you
need to upgrade the POST code first, here is how you do it:
1. Download the POST code from the Digi web site to a server running TFTP.
2. To load the new POST code, issue the following command:
boot load-post=tftp-server-ip:filename
where tftp-server-ip is the IP address of the TFTP server and filename is the POST file.
Example: boot load-post=143.21.10.5:82000679_C1
3. Reboot the Digi device.
When the Digi device reboots, it is ready for new firmware.
Procedure
This procedure assumes that you have logged in as root.
1. Download a copy of the latest Digi One/PortServer TS 2/4 firmware from the Digi International
web site, digi.com, and copy it to a host running TFTP.
2. Load the new OS into flash ROM by entering the following command:
boot load=ip-address:filename
where
•ip-address is the IP address of the TFTP host
•filename is the name of the firmware file.
The following message should appear:
The image in flash now appears valid.
3. If this message does not appear, do not reboot Digi One/PortServer TS 2/4. The unit may
become inoperative if you do; call technical support for instruction on what to do next.
4. If you want to confirm this operation, reboot from the OS in flash ROM by entering the follow-
ing command:
boot action=reset
16-4 Configuring Digi One/PortServer TS 2/4 from a Remote
Configuring Digi One/PortServer TS 2/4 from a Remote Host
This section discusses remote configuration, that is, configuring Digi One/PortServer TS 2/4 from a
remote host and then downloading the configuration file to Digi One/PortServer TS 2/4.
When To Use Remote Configuration
Typically, you use remote configuration when you have several Digi One/PortServer TS 2/4s with
similar configurations and want to keep a master configuration on a remote host, from which you
can easily create variations for downloading to individual Digi One/PortServer TS 2/4s.
Rules for Editing a Configuration file
Here are some rules for editing a configuration file on a remote host:
• Edit the file with any text editor.
• Each line of the file must start with a set command, such as set user or set line. In other words, do
not let commands wrap to the next line if your editor supports this function.
Copying the Configuration File to a Host
This section describes how to copy the Digi One/PortServer TS 2/4 configuration file to a remote
host for editing.
Related Information
See the cpconf command in the Digi One/PortServer TS Command Reference.
Starting Point
This procedure assumes that you
• Have an existing configuration on the Digi One/PortServer TS 2/4 that you want to copy to a
remote host for editing
• Are logged in to Digi One/PortServer TS 2/4 as root, which is a requirement for using the cpconf
command to copy the configuration file to a host
Procedure
1. Create a file with appropriate write permissions on the remote host.
2. Ensure that TFTP is running on the remote host.
3. Supply a cpconf command with a tohost field that specifies the following:
• The IP address of the target host
• The name of the file that will hold the configuration.
Example
cpconf tohost=199.250.121.12:cnfg-fle
Managing the OS and Configuration 16-5
Copying a Configuration File from a Host to Digi One/PortServer TS 2/4
This section describes how to copy the configuration file from a host to Digi One/PortServer TS 2/4
after the file has been edited on the host.
Related Information
See the cpconf command in the Digi One/PortServer TS Command Reference.
Starting Point
This procedure assumes that you
• Have edited a configuration file on a host and now want to copy it to Digi One/PortServer TS 2/4
for use
• Are logged in to Digi One/PortServer TS 2/4 as root, which is a requirement for using the cpconf
command to copy the configuration file to a host
Supply a cpconf command with a fromhost field that specifies the following:
• The IP address of the source host
• The name of the configuration file on the host
Example
cpconf fromhost=199.250.121.12:cnfg-fle

16-6 Resetting the Configuration to Defaults
Resetting the Configuration to Defaults
Use this section to learn how to use the revert command to reset the all or some of the configuration
factory or to the latest configuration stored in NVRAM.
Note: You can also use the range field on this command to define a range of ports with the
serial, port, line, flow, keys and login options.
To Reset the ... To factory defaults specify ... To the latest version in NVRAM
specify...
Entire configuration revert all=factory revert all=nvram
altip configuration revert altip=factory revert altip=nvram
arp configuration revert arp=factory revert arp=nvram
auth configuration revert auth=factory revert auth=nvram
set config configuration revert config=factory revert config=nvram
set flow configuration revert flow=factory revert flow=nvram
set host configuration revert host=factory revert host=nvram
set keysconfiguration revert keys=factory revert keys=nvram
set line configuration revert line=factory revert line=nvram
set logins configuration revert login=factory revert login=nvram
menu configuration revert menu=factory revert menu=nvram
Modbus revert modbus=factory revert modbus=nvram
altip, arp, host, route,
snmp, tcpip, and telnetip revert network=factory revert network=nvram
set ports revert port=factory revert port=nvram
Routing revert routed=factory revert routed=nvram
set auth, set logins, and
set radius revert security=factory revert security=nvram
set flow, set line, set
ports revert serial=factory revert serial=nvram
set service revert service=factory revert service=nvram
SNMP configuration revert snmp=factory revert snmp=nvram
set config, set keys, set
menu, set service, set
terms, set trace, and set
user
revert system=factory revert system=nvram
set tcpip revert tcpip=factory revert tcpip=nvram
set telnetip revert telnetip=factory revert telnetip=nvram
set terms revert terms=factory revert terms=nvram
Trace settings revert trace=factory revert trace=nvram
set user revert users=factory revert users=nvram
Configuration Examples 17-1
Chapter 17 Configuration Examples
This chapter provides several simple, but complete, configuration examples. If you find that the
examples implement exactly the features needed for your network, simply copy them, making
appropriate substitutions for site-specific information such as IP addresses. Quite likely, however,
you will be able to use the examples as a starting point only and will need the information provided
in other chapters in this manual and in the Digi One/PortServer TS Command Reference to complete
your configuration.
In This Chapter
This chapter provides the following discussions:
• Terminal Server Configuration Without RealPort . . . . . . . . . . . . . . . . . . . . . . 17-2
• Terminal Server Configuration Using Autoconnection . . . . . . . . . . . . . . . . . . 17-3
• Terminal Server Configuration Using RealPort. . . . . . . . . . . . . . . . . . . . . . . . 17-4
17-2 Terminal Server Configuration Without RealPort
Terminal Server Configuration Without RealPort
In this configuration, Digi One/PortServer TS 2/4 functions as a terminal server, providing Telnet
and Rlogin access to hosts. This configuration enables the following:
• Telnet or Rlogin access to the LAN-based hosts, both from locally-connected terminals and from
devices accessing the LAN from the telephone network.
• Access for the LAN-based hosts to Digi One/PortServer TS 2/4 ports (sometimes called reverse
Telnet)
Related Information
For more information on configuring
• The Ethernet interface, see "Configuring the IP Address" on page 2-1.
• Terminal connections, see "Configuring Ports for Terminals and Computers" on page 6-1.
• Modem connections, see "Configuring Ports for Modems" on page 5-1.
Illustration
Configuration
set config ip=192.250.150.10 submask=255.255.255.0 (1)
set ports range=1-2 dev=term
set line range=1-2 baud=9600
set flow range=1-2 ixon=on ixoff=on (2)
set ports range=3-4 dev=mio
set line range=3-4 baud=115200
set flow range=3-4 ixon=off ixoff=off rts=on cts=on (3)
set user name=user1 (4)
Configuration Notes
1. The set config command configures the IP address and mask for the Digi One/PortServer TS 2/4
Ethernet interface.
2. The first set ports, set line, and set flow commands configure ports 1 and 2 for terminal connec-
tions.
3. The next set ports, set line and set flow commands configure the ports for bidirectional modems.
Software flow control (the default) is explicitly shut off and hardware flow control turned on
using the set flow command.
4. The set user command defines a user, which assigns a user name for login purposes. All Digi
One/PortServer TS 2/4 users can login with this name.
Host
Terminals
192.250.150.10
192.250.150.9
Modems
Digi Device
Host
192.250.150.17
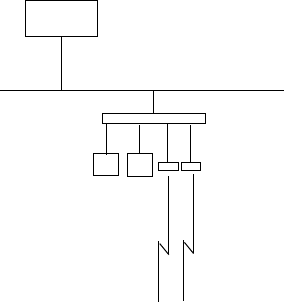
Configuration Examples 17-3
Terminal Server Configuration Using Autoconnection
This example shows a Digi One/PortServer TS 2/4 functioning as a terminal server implementing
autoconnection.
• The terminals are connected to autoconnect ports. Consequently, when a user presses a terminal
key, an automatic connection to a host is made.
• The modem ports are not configured for autoconnection, but a port user is, which means that as
soon as this particular user supplies a login, an automatic connection to a host is made.
Related Information
For more information on configuring
• The Ethernet interface, see "Configuring the IP Address" on page 2-1.
• Terminal connections, see "Configuring Ports for Terminals and Computers" on page 6-1.
• Modem connections, see "Configuring Ports for Modems" on page 5-1.
Illustration
Configuration
set config ip=192.250.150.10 submask=255.255.255.0
set ports range=1-2 dev=term auto=on dest=192.250.150.9 dport=23
set line range=1-2 baud=9600
set flow range=1-2 ixon=on ixoff=on (1)
set ports range=3-4 dev=min
set line range=3-4 baud=115200
set flow range=3-4 ixon=off ixoff=off rts=on cts=on (2)
set user name=user1 autoconnect=on defaultaccess=autoconnect
autohost=192.250.150.9 autoport=23 password=off (3)
Configuration Notes
1. The first set of set ports, set line and set flow commands configure ports 1 and 2 for terminals,
autoconnection, Telnet (dport=23), and software flow control.
2. The second set ports, set line, and set flow commands set up ports 3 and 4 for incoming modem
connections and RTS/CTS flow control.
3. The set user command configures the user for automatic connection to the host specified on the
autohost field using Telnet (autoport=23).
H
ost
Terminals
192.250.150.10
192.250.150.9
Modems
Digi Device
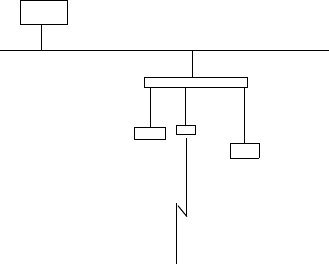
17-4 Terminal Server Configuration Using RealPort
Terminal Server Configuration Using RealPort
In this example, the Digi One/PortServer TS 2/4 is simply providing ports for the LAN-based host
using RealPort. The configuration is exceedingly simple because port attributes are configured on
the host itself.
Related Information
For more information on configuring:
• The Ethernet interface, see "Configuring the IP Address" on page 2-1
• RealPort, see "Configuring Ports for RealPort" on page 3-1
Illustration
Configuration
set config ip=192.250.150.11 submask=255.255.255.0 (1)
set ports range=2-4 dev=rp (2)
Configuration Notes
1. The set config command configures the internet address and mask for Digi One/PortServer TS
2/4 Ethernet interface.
2. The set ports command configures ports 2, 3, and 4 for Realport. This command specifies
dev=rp, which is an appropriate device type for RealPort.
Printer
Terminal
Modem
192.250.150.11
Digi One/PortServer TS 2/4 Troubleshooting 18-1
Chapter 18 Digi One/PortServer TS 2/4 Troubleshooting
In This Chapter
• Symptom: Digi One/PortServer TS 2/4 Does Not Boot . . . . . . . . . . . . . . . . . 18-2
• Symptom: Cannot Telnet to the Digi One/PortServer TS 2/4 . . . . . . . . . . . . . 18-3
• Symptom: Trouble Accessing a Port . . . . . . . . . . . . . . . . . . . . . . . . . . . . . . . . 18-4
• Running Digi One/PortServer TS 2/4 Customer Diagnostics . . . . . . . . . . . . . 18-4
• Key to Interpreting Digi One/PortServer TS 2/4 LEDs . . . . . . . . . . . . . . . . . . 18-5
• Verifying TFTP on a UNIX System. . . . . . . . . . . . . . . . . . . . . . . . . . . . . . . . . 18-5
• Troubleshooting TFTP Problems. . . . . . . . . . . . . . . . . . . . . . . . . . . . . . . . . . . 18-5
• Resetting Digi One/PortServer TS 2/4 Configuration to Defaults. . . . . . . . . . 18-6
• Verifying the Digi One/PortServer TS 2/4 IP Address . . . . . . . . . . . . . . . . . . 18-7
• Checking for Duplicate IP Addresses . . . . . . . . . . . . . . . . . . . . . . . . . . . . . . . 18-7
• Pinging an IP Address . . . . . . . . . . . . . . . . . . . . . . . . . . . . . . . . . . . . . . . . . . . 18-7
• Verifying the Network Cabling . . . . . . . . . . . . . . . . . . . . . . . . . . . . . . . . . . . . 18-8
• Verifying the RealPort Process. . . . . . . . . . . . . . . . . . . . . . . . . . . . . . . . . . . . . 18-9
• Digi Contact Information. . . . . . . . . . . . . . . . . . . . . . . . . . . . . . . . . . . . . . . . .18-11

18-2 Symptom: Digi One/PortServer TS 2/4 Does Not Boot
Symptom: Digi One/PortServer TS 2/4 Does Not Boot
Introduction
Use the information provided in this discussion when Digi One/PortServer TS 2/4 will not complete
the boot cycle.
Procedures
Things to Try See ...
Check for hardware problems.
• "Running Digi One/PortServer TS 2/4
Customer Diagnostics" on page 18-4
• "Key to Interpreting Digi One/PortServer
TS 2/4 LEDs" on page 18-5
Check for TFTP problems if Digi
One/PortServer TS 2/4 is booting
from a TFTP host.
• "Verifying TFTP on a UNIX System" on
page 18-5
• "Troubleshooting TFTP Problems" on
page 18-5
Resetting the device to configura-
tion defaults. "Resetting Digi One/PortServer TS 2/4 Con-
figuration to Defaults" on page 18-6
If you cannot resolve the problem,
contact Digi. "Digi Contact Information" on page 18-11

Digi One/PortServer TS 2/4 Troubleshooting 18-3
Symptom: Cannot Telnet to the Digi One/PortServer TS 2/4
Introduction
Use the information provided in this discussion to troubleshoot network problems.
Assumptions
This discussion assumes that the Digi One/PortServer TS 2/4 itself is working, that is, that it
completes the boot cycle.
Procedures
Things to Try See ...
Verify the IP address.
This procedure ensures that you
are using the right IP address to
Telnet to the Digi One/PortServer
TS 2/4.
"Verifying the Digi One/PortServer TS 2/4 IP
Address" on page 18-7
Check for duplicate IP address.
This procedure ensures that two
devices are not using the same IP
address.
"Checking for Duplicate IP Addresses" on
page 18-7
See if you can ping the IP address.
If you can ping the address, but
cannot Telnet to it, you probably
have a firewall problem. See the
Firewall documentation for more
information.
"Pinging an IP Address" on page 18-7
Verify the network cabling. "Verifying the Network Cabling" on page 18-8
If you cannot resolve the problem,
contact Digi. "Digi Contact Information" on page 18-11

18-4 Symptom: Trouble Accessing a Port
Symptom: Trouble Accessing a Port
Introduction
Use this procedure if you are having trouble accessing a Digi One/PortServer TS 2/4 port. The
specific problem might be that you cannot logon from a terminal or the printer or modem is not
working properly.
Assumptions
This discussion assumes the following:
• That the Digi One/PortServer TS 2/4 itself is working, that is, that it completes the boot cycle. If
it is not, see "Symptom: Digi One/PortServer TS 2/4 Does Not Boot" on page 18-2.
• That the network is working. This is a relevant consideration if the ports you are working with
are RealPort ports and if all RealPort ports are not working. The discussion in "Symptom: Can-
not Telnet to the Digi One/PortServer TS 2/4" on page 18-3 goes through the steps of validating
the network connection.
Procedures
Running Digi One/PortServer TS 2/4 Customer Diagnostics
Use this topic to run hardware diagnostic procedures to validate the Digi One/PortServer TS 2/4.
1. Connect a terminal to a Digi One/PortServer TS 2/4 port.
2. Configure the terminal to use the following settings:
• VT-100 emulation
• 9600 baud
• 8-bit characters
• 1 stop bit
• No parity
3. Reboot the Digi One/PortServer TS 2/4.
4. While the LED is blinking, press the v key.
5. When the Customer Diagnostics Menu appears, select a test to perform.
Things to Try See ...
If this is a RealPort port and all
ports are not working, ensure that
the RealPort process is running. "Verifying the RealPort Process" on page 18-9
Verify Digi One/PortServer TS 2/4
port settings.
Check the port configuration in the Digi
One/PortServer TS 2/4 Command Reference.
Look under the set ports, set line, and set flow
commands for more information.
Verify the cabling to the peripheral See the Cable Guide for information.

Digi One/PortServer TS 2/4 Troubleshooting 18-5
Key to Interpreting Digi One/PortServer TS 2/4 LEDs
Here is a key to interpreting Digi One/PortServer TS 2/4 LEDs
Procedure
.
Verifying TFTP on a UNIX System
Use this procedure to verify that TFTP is working correctly on your UNIX host.
Note: This procedure, which uses a TFTP transfer of the Digi Device's boot image between
two UNIX hosts, enables you to compare the size of the boot image before and after it
is transferred, enabling you to determine if TFTP is working properly.
Procedure
1. Access a root prompt on the UNIX host.
2. Make sure that you are not in the /tftpboot directory.
3. Enter this command:
tftp ipaddress
where ipaddress is the IP address of the UNIX host.
A TFTP prompt appears.
4. At the prompt, enter the following command:
binary
5. Enter this command at the TFTP prompt:
get tftp_file_name
where tftp_file_name is the name of the Digi Device's boot image in the /tftpboot direc-
tory.
6. Enter this command at the TFTP prompt to exit TFTP:
quit
7. Compare the size of the original file against the transferred file using this command:
cmp -l tftp_file_name /tftpboot/tftp_file_name
If the data within the files to see if TFTP is working properly. If they are the same, no message will
be generated.
Troubleshooting TFTP Problems
Here are some things to check if you encounter TFTP problems.
• Verify that the /tftpboot directory exists and has read, write and execute (777) permissions with
this command:
ls -l /tftpboot
If necessary, use this command to create the directory:
LED Activity Indication
1-1-1 pattern Starting the EOS.
1-3-1 pattern TFTP boot process started
1-5-1 pattern Tells you that configuration has been return to the fac-
tory configuration. See "Resetting Digi One/PortServer
TS 2/4 Configuration to Defaults" on page 18-6.
Steady blinking Device seeking an IP address from DHCP server.
Solid On Digi One RealPort and PortServer TS 2/4 devices,
this means the boot completed sucessfully. One Digi
One IA devices, it indicates a problem.
18-6 Resetting Digi One/PortServer TS 2/4 Configuration to
mkdir /tftpboot
• If necessary, use this command to change permissions of the directory to read, write and execute:
chmod 777 /tftpboot
• Verify that the file /tftpboot/tftp_file_name exists and has read and execute permissions with this
command:
ls -l /tftpboot/tftp_file_name
where tftp_file_name is the name of the firmware boot image specified by the Digi
Device.
If necessary, use this command to change permissions of the file to read and execute:
chmod 666 /tftpboot/tftp_file_name
• Verify that the inetd.conf file is properly configured for tftp by displaying the file /etc/inetd.conf.
An entry similar to this should be uncommented:
tftp dgram udp something
where something will vary with each operating system.
For controlled TFTP access, make sure that the file /etc/tftpaccess.ctl exists and verify that it
only allows access to public directories. If this file is not present, tftp will allow full access. A
sample file is located in the directory /usr/lpp/tcpip/samples.
• Restart the inetd process with these two commands:
ps -ef | grep inetd
This will report back the inetd process number.
Kill -1 inetd_PID
Where inetd_PID is the process number for the inetd process reported by the previous command.
Resetting Digi One/PortServer TS 2/4 Configuration to Defaults
Use this topic to reset the Digi One/PortServer TS 2/4 configuration to defaults.
Note: This procedure causes the Digi One/PortServer TS 2/4 to lose all configuration
changes. If you have a complex configuration, contact Digi before performing for
information on saving your configuration. See "Digi Contact Information" on page 18-
11 for information.
Procedure
1. Use a pen, the point of a paper clip, or some other device to press the recessed button on the front
panel.
2. While holding down the button, power on the Digi One/PortServer TS 2/4.
3. When the 1-5-1 LED pattern is displayed, release the button.
The device boots up.
Digi One/PortServer TS 2/4 Troubleshooting 18-7
Verifying the Digi One/PortServer TS 2/4 IP Address
Use this procedure to check the IP address on the Digi One/PortServer TS 2/4.
1. Connect a terminal to a Digi One/PortServer TS 2/4 port.
2. If the port is still using the default configuration, configure the terminal to use the following set-
tings (Otherwise, configure the terminal to match the port configuration):
• VT-100 emulation
• 9600 baud
• 8-bit characters
• 1 stop bit
• No parity
3. Press Enter to get a logon prompt from the Digi One/PortServer TS 2/4.
4. Log on to the Digi One/PortServer TS 2/4.
5. Use the set config command to verify the Digi One/PortServer TS 2/4 IP address.
Checking for Duplicate IP Addresses
Use this procedure to ensure that the Digi One/PortServer TS 2/4 and another device are not using
the same IP address.
Procedure
1. From another system on the network, use the ping command to determine if the IP address is in
use. The following is the command syntax:
ping ip-address
2. Do one of the following:
• If there is no response to the ping, exit this procedure and return to the symptoms section of
this section. Two devices using the same IP address is probably not a problem.
• If there is a response, continue with this procedure.
3. Turn the Digi One/PortServer TS 2/4 off and then ping again.
4. Do one of the following:
• If there is a response to the ping, there is another device using that IP address, so assign one
of the devices a new IP address.
• If there is no response, turn the Digi One/PortServer TS 2/4 back on. Another device is not
using the IP address assigned Digi One/PortServer TS 2/4.
Pinging an IP Address
Use this procedure to deterrmine if a system can be reached from across a network.
Procedure
Attempt to ping the Digi One/PortServer TS 2/4 from another system on the network. Here is the
format of the command:
ping ip-address
18-8 Verifying the Network Cabling
Verifying the Network Cabling
Use this procedure to troubleshoot network cabling problems.
1. Check the Ethernet cable. Verify the following:
• The Ethernet cable is connected securely at both ends.
• The Ethernet cable is pinned correctly.
• The quality of the cable is sufficient for the cable length and the cable environment. Consult
an Ethernet cable manufacturer for a recommended cable for your configuration.
2. Verify your Ethernet hub. See your Ethernet hub manual.
Digi One/PortServer TS 2/4 Troubleshooting 18-9
Verifying the RealPort Process
Use one of these procedures to verify the RealPort process:
AIX: Verifying the RealPort Process
Use this topic to verify that the RealPort daemon (process) is running on the AIX system.
1. Type the following:
lsdev -Cc nts
2. If the sa devices are not in an available state, type the following from the AIX prompt:
mkdev -1 sa#
cfgmgr
where # is the number of the Digi Device.
HP-UX: Verifying the RealPort Process
1. Verify that RealPort is running on the HP-UX operating system by entering:
ps ef| grep drp
If you see an entry for each Digi Device similar to the following, the RealPort process is running.
root 2254 1 0 Dec 13 ? 0:03/sbin/drpd 1 199.86.0.1 root 2049 1 0
Dec 13 ? 0:01/sbin/drpd 1 199.86.5.1
2. If the daemon is not running, enter this command at a root prompt:
/usr/sbin/drpadmin
3. Answer the prompts as appropriate.
Linux: Verifying the RealPort Process
The RealPort daemon (process) controls communication between the RealPort driver module and
your Digi Devices across the network. One daemon must remain in the background for each Digi
Device, maintaining the communication link. You should not need to start the daemon by hand. The
dgrp_cfg_node program does this automatically.
However, to determine whether any RealPort daemons are currently running on your system, as well
as to determine which Digi Device each daemon is communicating with, you can execute the
following command:
ps ax | grep drpd
For more information about the RealPort daemon, see the drpd man page that is installed with the
driver package.
SCO: Verifying the RealPort Daemon
Use this topic to verify that the RealPort daemon is running on a SCO Unix or SCO OpenServer
operating system.
1. At the root prompt, enter the following command:
ps ef| grep ncxd
If the RealPort Daemon is running, you should see an entry for each Digi Device similar to the
following?
root 2254 1 0 Dec 13 ? 0:03/etc/nexd -d /dev/cts0 -n
root 2049 1 0 Dec 13 ? 0:01/etc/nexd -d /dev/cts0 -n
2. If you do not see this information, restart the daemon by doing the following:
a. Modify the /etc/rc2.d/S86ncxa file with the appropriate IP addresses.
b. Reboot the server.
18-10 Verifying the RealPort Process
Solaris: Verifying the RealPort Process
Use this topic for information on verifying that the RealPort process is running on a Solaris system.
1. Type the following command:
ps -ef|grep ncxd
2. If the information that appears is not correct, do the following:
a. Modify the /etc/rc2.d/S26realport file with the appropriate IP addresses.
b. Reboot the UNIX server.
Windows NT: Verifying the RealPort Service
Use this procedure to verify the RealPort service on Microsoft Windows NT.
1. From the Start menu, choose Settings > Control Panel > Devices > Digi RealPort.
2. If the RealPort service has not been started, choose Start.
Windows 2000: Verifying the RealPort Service
Use this procedure to verify the RealPort service (process) on Microsoft Windows 2000.
1. Right-click on My Computer, choose Properties > Hardware tab > Device Manager.
2. Expand the Multi-port Serial Adapters list if necessary and select Digi PortServer.
3. If the RealPort Service (process) is not enabled, right-click and choose Enable.

Digi One/PortServer TS 2/4 Troubleshooting 18-11
Digi Contact Information
Digi International
11001 Bren Road East
Minnetonka, MN 55343
U.S.A
Customer Service and Support
World Wide Web: http://support.digi.com
email support@digi.com
Telephone (U.S.) 1-800-344-4273
Telephone (other locations (+011) 952-912-3444
18-12 Digi Contact Information
