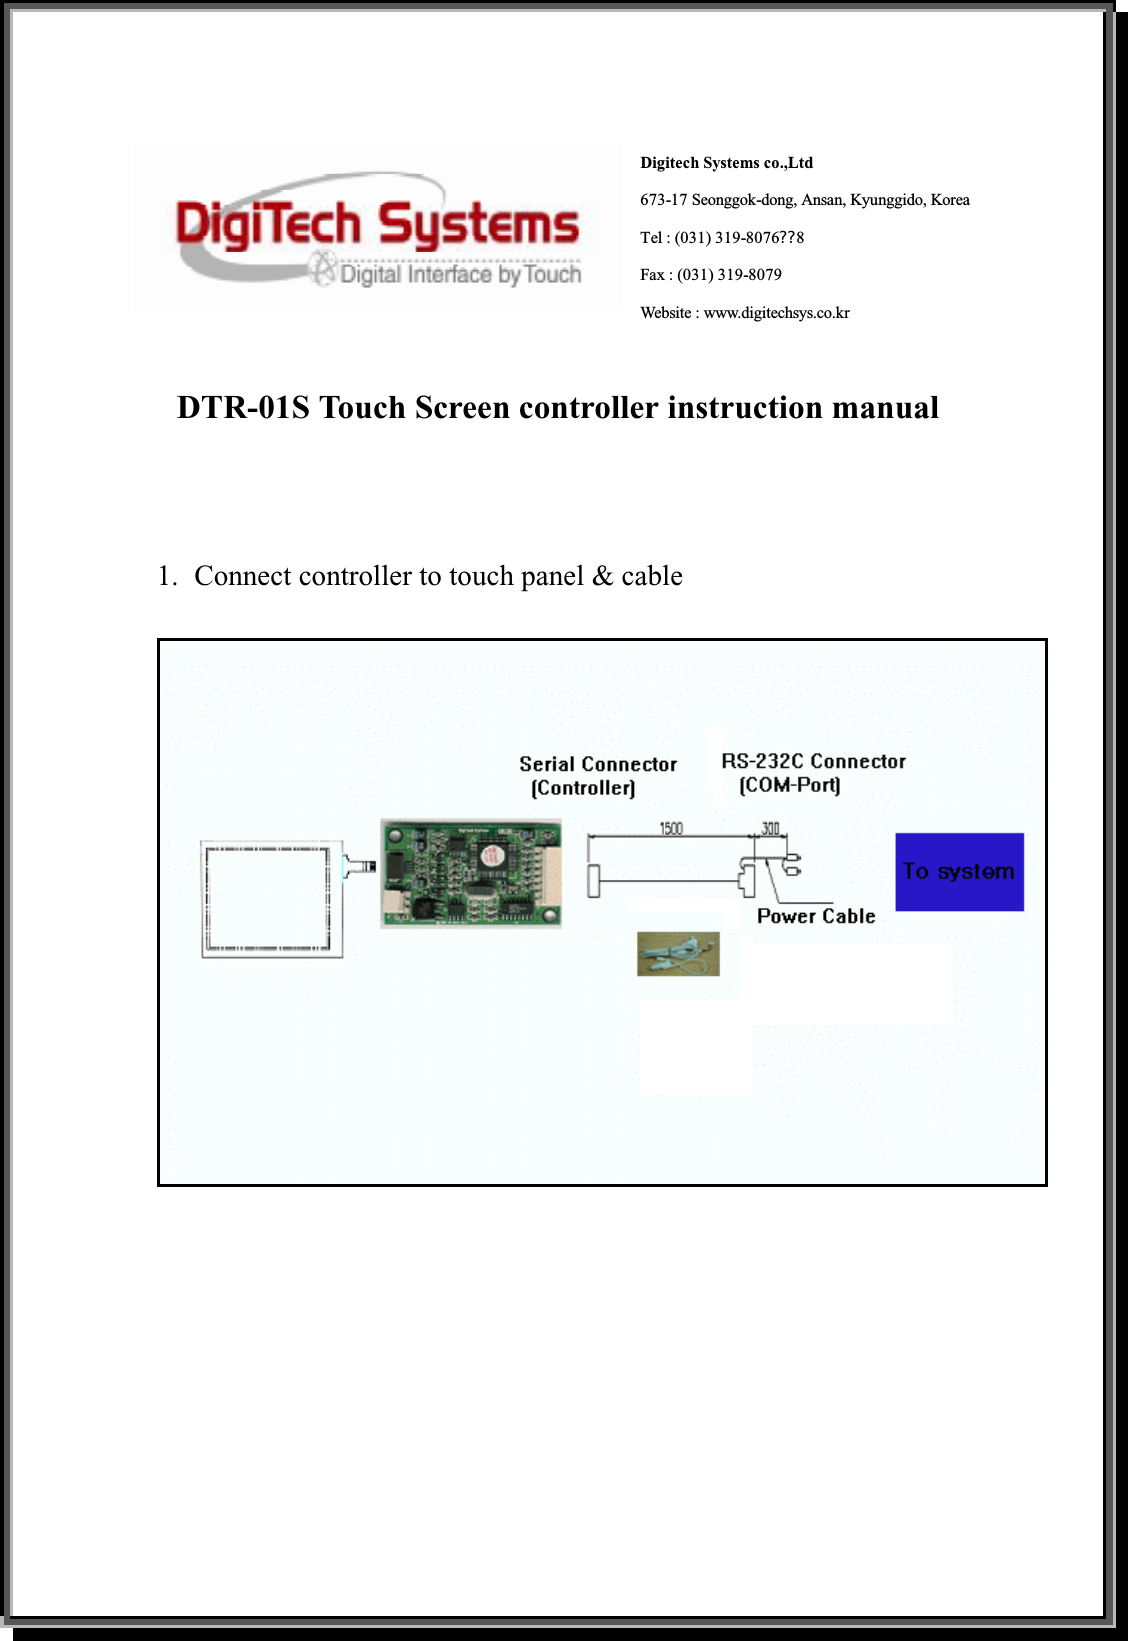
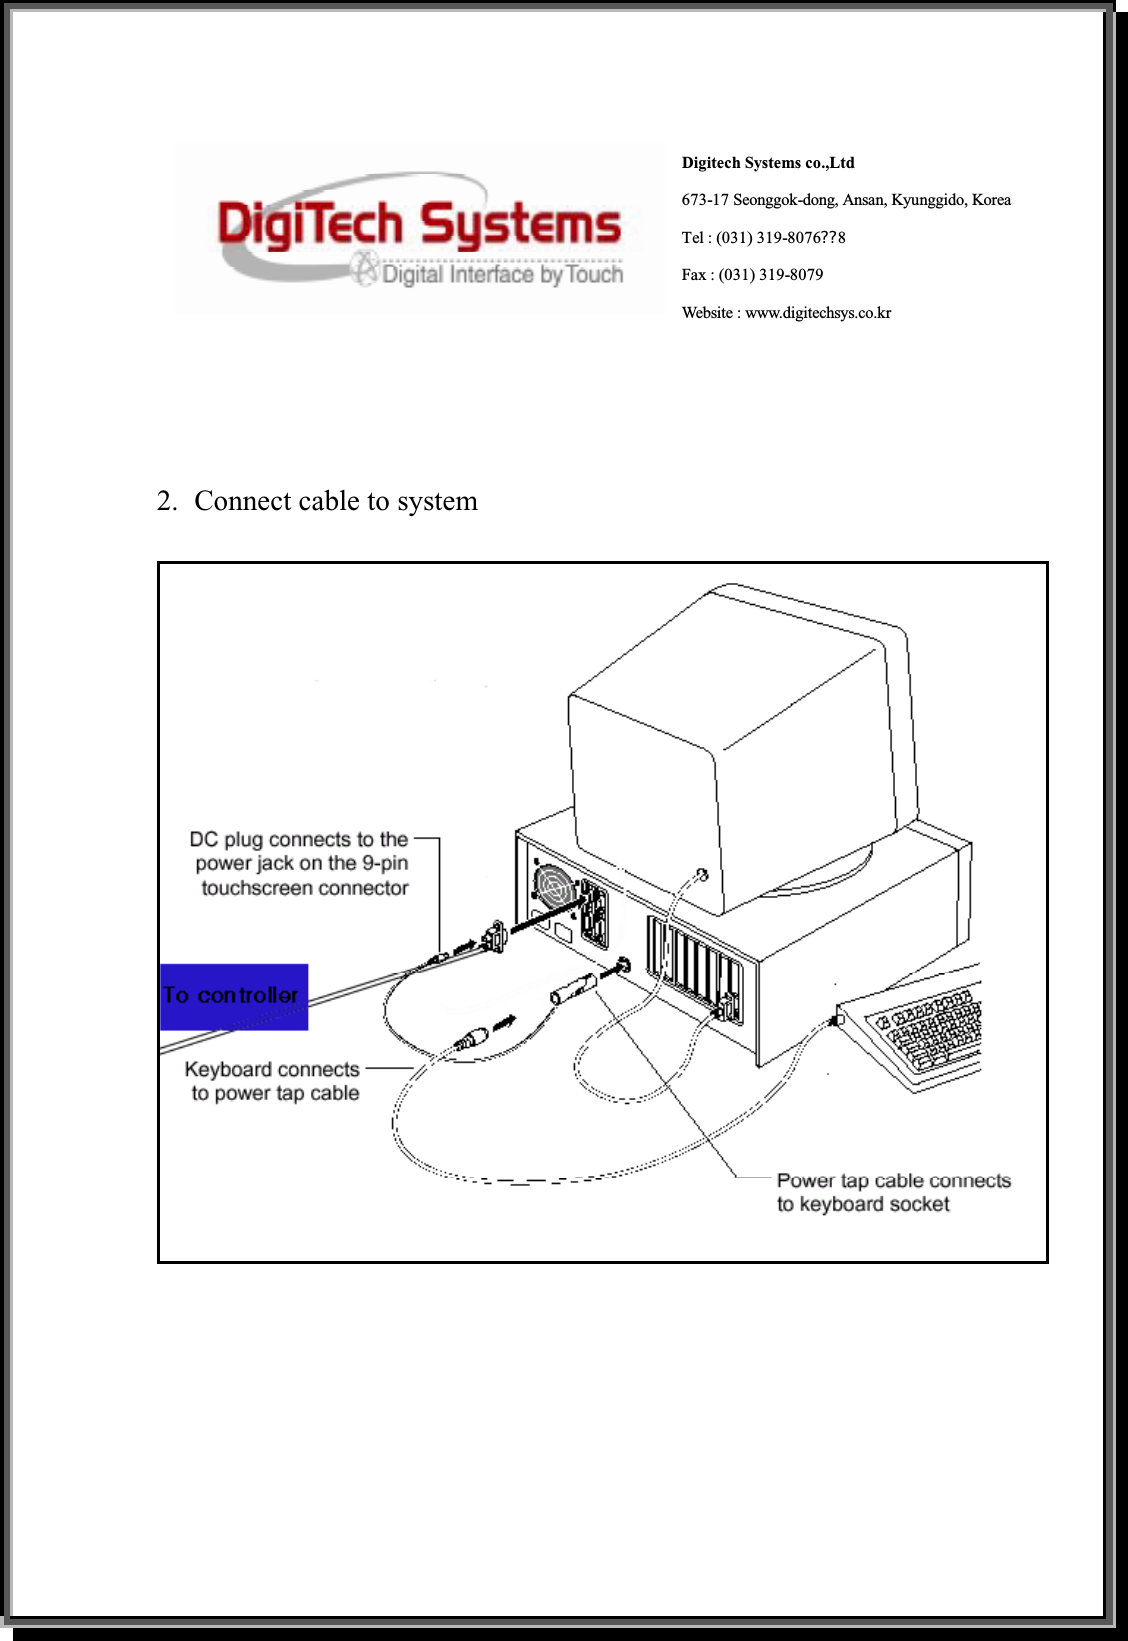
DigiTech Systems DTR-01S 4 Wire Resistive Touch Panel Controller User Manual users manual

DigiTech Systems Co., Ltd. 4 Wire Resistive Touch Panel Controller users manual

users manual

   !"#$%!&'#() *"+##()#")#,*(,-.%(,)./.'&012!) ) #0!'!)"-.3*0*"",!4!)*0,#5!/#&%3"%*()).&*3).-) #%0#" #"#0!'!)"*3#,#"!4(#,).&3.5!,#3#*".(*+0#&3.)#/)!.(*4*!(") *3'-%0!()#3-#3#(/#!(*3#"!,#()!*0!(")*00*)!.( !"#$%!&'#()4#(#3*)#"%"#"*(,/*(3*,!*)#3*,!.-3#$%#(/1#(#341*(,!-(.)!(")*00#,*(,%"#,!(*//.3,*(/#2!) ) #!(")3%/)!.("'*1/*%"# *3'-%0!()#3-#3#(/#).3*,!./.''%(!/*)!.(.2#5#3) #3#!"(.4%*3*()##) *)!()#3-#3#(/#2!00(.).//%3!(*&*3)!/%0*3!(")*00*)!.(-) !"#$%!&'#(),.#"/*%"# *3'-%0!()#3-#3#(/#).3*,!..3)#0#5!"!.(3#/#&)!.(2 !/ /*(+#,#)#3'!(#,+1)%3(!(4) ##$%!&'#().--*(,.() #%"#3!"#(/.%3*4#,).)31)./.33#/)) #!()#3-#3#(/#+1.(#.3'.3#.-) #-.00.2!(4'#*"%3#"6#.3!#().33#0./*)#) #3#/#!5!(4*()#((*6(/3#*"#) #"#&*3*)!.(+#)2##() ##$%!&'#()*(,3#/#!5#36.((#/)) ##$%!&'#()!().*(.%)0#).(*.!3/%!),!--#3#(/#-3.'   ) *)).2 !/ ) #3#/#!5#3!"/.((#/)#,6.("%0)) #,#*0#3.-*(#7&#3!#(/#,3*,!.8)#/ (!/!*(-.3 #0& #'*(%-*/)%3#3!"(.)3#"&.("!+0#-.3*(13*,!..3!()#3-#3#(/#/*%"#,+1%(*%) .3!9#,'.,!-!/*)!.(").) !"#$%!&'#()%/ '.,!-!/*)!.("/.%0,5.!,) #%"#3:"*%) .3!)1)..&#3*)#) ##$%!&'#()
 !"#$%"&%'( !"#$%"$)* +++ !"#$%&'()&* (%'+,'+'+, '+-. //( 0 1+'%'+2 '22'+   3/- (   (%'+,'+'+, '+-....4-%5/2/"# !##-%4./46*-& // 7.../2#".6*."899  !" 129    /(   //  7    . . ./-*%2(- 0     *:2;.*;<-=*>
Digitech Systems co.,Ltd673-17 Seonggok-dong, Ansan, Kyunggido, Korea Tel : (031) 319-8076଩8Fax : (031) 319-8079 Website : www.digitechsys.co.krDTR-01S Touch Screen controller instruction manual 1.  Connect controller to touch panel & cable
Digitech Systems co.,Ltd673-17 Seonggok-dong, Ansan, Kyunggido, Korea Tel : (031) 319-8076଩8Fax : (031) 319-8079 Website : www.digitechsys.co.kr2.  Connect cable to system
TOUCH DRIVERUSER'S MANUALDigiTech Systems co.,Ltdwww.digitechsys.co.krCopyright ⓒ2001JUNE. 2002
Information in this document is subjects to change without notice and Doesnot represent a commitment on the part of Digitech Systems co.,Ltd. Noreproduction or translation of any part of this guide by any means may beobtained, without prior written permission from Digitech Systems co., LtdRequest for permission and inquiries for further information should be e-mailTo mail@digitechsys.co.kr .You are welcome to visit us at the addresshttp://www.digitechsys.co.krCopyright© 2001 By Digitech Systems co., Ltd.All Rights ReservedINTRODUCTIONChapter 1: Installing DigiTouchChapter 2: How to use DigiTouchContents
■IntroductionTouch screen can be the simplest way to apply in entertainment, amusement andgaming and POS, PDA. The interface should be durable, reliable, precise and stable.The users don't have to know a lot about technical knowledge, but know how to pointwhat they want directly.Digitech Systems Co.,Ltd has been operating as a professional support solutionsprovider with experienced manpower in fast growing Touch Screen market sinceestablishment in September 6.2000. Digitech Systems is the major touch screenmanufacturer in Korea as well as in the world who provides the best input devicesolutiontotheendusers.We are young but more than 10 years of experience for developing and manufacturingTouch Screen.Digitech Systems started the mass production for resistive Touch Screen for variousbusiness application market as well as consumer device market such as PDA, HPC, andmobile communicator.To be the reading supplier of touch screen in Korea as well as world class touchscreen in terms of Quality and Quantity.Digitech Systems Touch Screen Kits Include three items■PanelPanel is consisted of Glass and Film that transparent conducting Film is evaporated .Film and Glass is contacted at position that user selects and position signal get throughcontroller.■ControllerController is device that make analog signal from panel change to digital signal.■DriverDriver is optimized software to embody for any operating system.( DOS, Windows 9X/Me/NT/2000/XP and Windows CE )
Chapter 1. Installing DigitouchDigitouch drivers support DOS, Windows 9X/Me/NT/2000/XP and Windows CEoperating systems under PC environment. The update drivers are available in ourwebsite, address is http://www.digitechsys.co.kr and users could download the newdriver from our homepage.[ To install Digitouch ]1. Make sure you have completed the appropriate connections2. Power on your systems Make sure no other applications are open3. Insert the Digitouch CD4. Browse to folder and double click the setup.exe file5. Follow the onscreen instructions to begin the installation6. Once installation is complete, restart the system and Windows loads driver[ To uninstall Digitouch ]1. Make sure the Digitouch are closed2. Click on start →Programs →Digitech →Uninstall3. Follow the onscreen instructions to remove Digitouch
Chapter 2. How to use Digitouch1. Hardware TabController type It shows the digitech systems controller type.DTR-01S is serial controller.Firmware version This digits represents the version number and the revisionlevel of the firmware.Driver Version This digits represents the version number and The revisionlevel of the driver.COM Port Display the Com Port used the controller connectionBaud Rate The standard baudrate is 9600 Which is generallyacceptable for most applications.Auto When you select auto OK Touchscreen found and operationalNot found The system could not detect the touchscreen.
2. Setting TabRight ButtonRight button function has two option.1. iconwhen select this option, there is a mouse icon shown in theright-lower place of screen. it showns 'left button' being asdefault for normal use, touch this mouse icon to change thenext touch to be 'Right Button' function2. timewhen select this option, long touch (about two second) will bethe right function.Cursor Offset When select this function, mouse cursor will be offset as persetting.Beep on click When select this function, On or Off beep sound attouchdownDouble clickThis area is for double click adjustment and test area. Movethe button of "slow", "fast" and "small", "large" to have goodperformance of double click.
3. Calibrate TabCalibrationCalibration aligns the touchscreenwith the underlying video. Oncecalibrated, the touchscreen is savedby the touchscreen for each videoresolution. Therefore , you need torecalibrate the touchscreen the firsttimeyouchangetoaparticularvideo resolution(Example: 800×600, 1024×768)1. Select 2-point or 5-point2. Click the Calibration3. Calibration targets appear the screen4. Touch the targets within 3 seconds.5. success message appear the screen.6. Touch the next targets and successmessage appear the screen.7. Repeat these instruction the additionalcalibration targets
4. Draw TabDrawThe Draw program lets you test the operation Touchscreen and pen by checkingthe accuracy and speed with which the system responds to your touch. thisprogram includes the option (Use double click to exit)
5. Option TabDual screenThis option confines touch to a single screen in two Monitor configuration.This enables you to use a single touchscreenWith an image split horizontally across two screens you need onlySelect which side is the touch screen (Primary or Secondary).

Navigation menu