USERS MANUAL
User’s Manual
TS-500
This device complies with part 15 of the FCC Rules. Operation is subject to the following two
conditions: (1)This device may not cause harmful interference, and (2) this device must accept any
interference received, including interference that may cause undesired operation.
NOTE: THE MANUFACTURER IS NOT RESPONSIBLE FOR ANY RADIO OR TV
INTERFERENCE CAUSED BY UNAUTHORIZED MODIFICATIONS TO THIS EQUIPMENT
SUCH MODIFICATIONS COULD VOID THE USER'S AUTHORITY TO OPERATE THE
EQUIPMENT.
NOTE: This equipment has been tested and found to comply with the limits for a Class B digital
device, pursuant to part 15 of the FCC Rules. These limits are designed to provide reasonable
protection against harmful interference in a residential installation. This equipment generates, uses
and can radiate radio frequency energy and, if not installed and used in accordance with the
instructions, may cause harmful interference to radio communications. However, there is no
guarantee that interference will not occur in a particular installation. If this equipment does cause
harmful interference to radio or television reception, which can be determined by turning the
equipment off and on, the user is encouraged to try to correct the interference by one or more of
the following measures:
- Reorient or relocate the receiving antenna.
- Increase the separation between the equipment and receiver.
- Connect the equipment into an outlet on a circuit different from that to which the receiver is
connected.
- Consult the dealer or an experienced radio/TV technician for help.
1
Product Features
- Unique Design
Using creative and beautiful design using the medium of nature, the design comes to users with
more friendly for longer time.
- Digital Audio Format
Not only MP3 files but also WMA, OGG, ASF files are supported.
-Large Color Graphic LCD
By adopting graphic color LCD, the player provides visual along with fabulous sound. In addition,
40 languages are supported.
- Direct Encoding
Using the PC, MP3 files can be downloaded. Even in the absence of the PC, the player supports
recording Cassette tape, CD player and various audio devices through the external input
connector. A user can make MP3 file from any audio device.
- Firmware upgrade
Since the player supports firmware upgrade, constant performance improvement and
addition/change of functions are provided.
- Real powerful Rechargeable Battery Life Time
Through the USB connection, quick and easy recharge of the embedded battery is available, and
up to 12 hours of continuous playing is possible. (When the battery is completely flat, 90%
recharge takes approximately 1.5 hours and 100% recharge takes 2 hours.)
- FM Tuner Listening/Recording
Using automatic frequency detection function and frequency memory function, listening to FM
broadcasting is never been so easier. Also, the FM broadcasting can be recorded.
- Custom Equalizer
Depending on the type of music and user, one of diverse equalizations (normal, classic, rock,
pop, and customized) can be selected.
- Voice MP3 Recording Function
With the embedded microphone, important lectures or meetings can be recorded.
-The player became even smaller and is easy to wear it around the neck.
2
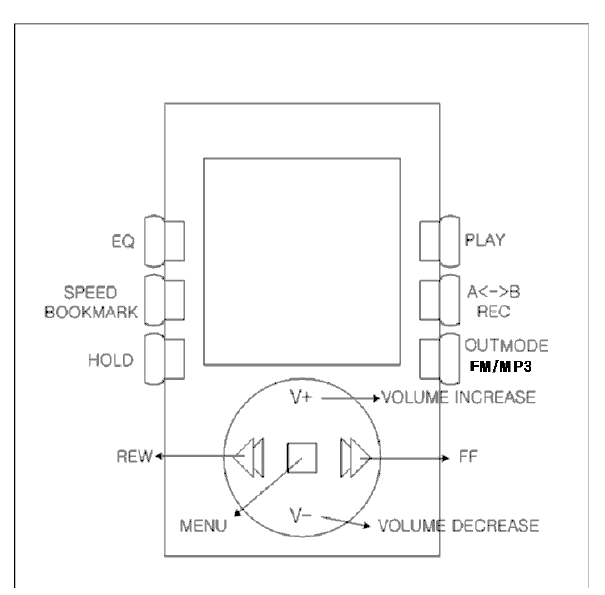
1. Name of Parts
• Player
2. Components
1.Player
2.User’s Manual
3.Earphone
4.USB Cable
5.Install CD(USB 2.0 driver and user’s manual for WINDOW 98)
6.Product Case
7.LINE IN Cable
8.Charger Adapter (Optional)
3
3. Basic Operation
Power ON/OFF/Pause Function
• Power On/Off: Hold down the play ( /▶װ) button located on the side of the player for 2-3
seconds to turn on the power and play songs. Hold down the play ( /■)▶ button for 2-3 seconds
to turn off the power. (Hold down the play button turn off in any mode.)
• Pause Function: Short-press the play ( /■)▶ button once while a song is in play to pause and
short-press again to resume.
Song Selection Function (◀◀/)▶▶
• Song Selection: Short-press the SELECT button to left/right to select previous/next song.
Song Search Function (Forward/Rewind)
• Fast Forward: Hold down the SELECT button to the right while in play ( )▶▶ .
• Fast Rewind: Hold down the SELECT button to the left while in play.
• When searching through songs, the search is performed in 2x speed during the first three
seconds, and x3 speed during the rest of the song.
Volume Adjustment Function (VOL -/+)
• Short-press the SELECT button in the front of the product. When the SELCT button is moved in
larger scale, the volume is moved up/down faster.
• The volume can be adjusted from 0-30.
Voice Recording and LINE IN Recording Start/Recording Stop Function
• Start Recording: Hold down the REC button for 1-2 seconds to start the recording in the
selected MDOE.
• Pause Recording: Hold down the REC button to stop the recording.
☞ Note:
1) Voice recording is available only when there is additional space in the memory.
2) Voice recording can be executed in MP3 or Voice mode, and when LINE-IN is connected,
LINE-in gets priority of recording.
3) Select Voice from the NAVIGATION mode to play the recorded file. Select a recorded file and
press play (▶/■) button to play the recorded file.
4
Sectional Repeat Start/Configuration/Release
☞ This is a function that is used when a certain part of a song need to be repeated.
• Sectional Repeat Start: Short-press REC button in the beginning of the repeat section. (A↔ )
• Sectional Repeat Configuration: Short-press REC button where the repeated playing starts.
(A↔B) (Sectional Repeat Release: Short-press REC button during repeated play to release the
sectional repeat.
HOLD Configuration/Release
When activated, a lock icon is displayed on LCD screen, and all operations of KEYS are ※
prohibited.
• Lock Configuration: Move the H button to the arrow direction.
• Lock Release: Move the H button to the opposite direction of the arrow.
4. Menu Configuration Function
4-1 MODE MENU Selection
• NAVIGATION Play
How to use NAVIGATION function
• Navigation function is a convenient function that allows playing of a desired song by performing
song search.
• Short-press SELECT button and selecting NAVIGATION while music is in play to display all songs
in order.
Move the SELECT button up/down to select a song to replay and press SELECT button to play.
1. VOICE: When selected the recorded MP3 file can be played.
-Select and press play button to start playing.
※ Voice Recording
1) Hold down A-B/REC button in MP3,VOICE MODE to start voice recording.
2) Hold down A_B/REC button when recording is over to stop voice recording.
3) However, when the player is in TUNER MODE, FM broadcasting is recorded.
4) Voice record file is stored in the VOICE folder as V000.MP3 file format.
5) When the product microphone of the player is placed to close to the source of sound, the quality
of recording is degraded. Keep appropriate distance when recording.
5
2. LINE ENC: When selected the recorded MP3 can be played through an external device.
-Press play button after selecting to play the recorded file.
※ Recording from LINE IN source
1)Connect the output connector of an external device to the player’s LINE-IN connector and play the
external player. Then, hold down the A-B/REC button to start voice recording.
2) Once the recording is completed, hold down the A-B/REC button once again to stop the recording.
3) The LINE-IN recording is stored in the LINE folder with L000.MP3 file format.
※Caution
- Adjust the volume of the external device when recording. When the volume is too high, the
recorded file may sound noisy. Adjust and test the volume prior to recording, and start recording
from the desired point.
3. RADIO ENC: The MP3 file that recorded the FM radio can be played.
- Press the play button after selecting the file to play.
• Total Play
When selected, the stored MP3 is played.
-Press the play button after selecting TOTAL PLAY to play.
• Book Mark Play
Bookmarked MP3 files are played.
※This is a convenient function that selects and plays only specially assigned songs.
• How to configure BOOKMARK
1) Short-press the SELECT button in MP3 PLAY MODE to display the NAVIGATION screen. When
the stored song list is displayed, move the SELECT button up/down to select and hold down
Sbutton to complete the BOOKMARK configuration.
(Hold down BookMark button once again to cancel the BOOKMARK configuration. The icon
disappears and the BOOKMARK configuration is canceled.
• FM Radio
You can listen to FM radio.
※Listening to FM RADIO
1) Changing the channel: Move the SELECT button left/right to select a desired frequency or store
PRESET frequency.
2) Manual Frequency Store: Move the SELECT button left/right to select a desired frequency and
short-press Mbutton to store.
3) Automatic Frequency Store: Short-press Mbutton that displays PRESET mode on the LCD. Hold
down Mbutton, frequency is automatically stored.
6
FM※ Broadcasting Recording
1) Hold down A-B/REC button while FM broadcasting is on to start recording. Hold down the A-B /
REC button again to stop recording.
2) The recorded FM RADIO is stored in RADIO folder as F000.MP3 file format.
※ When an external device is connected to the external LINE-IN connector, FM broadcasting is not
recorded. Instead the external source is recorded.
☞ Note
- Short-pressing PLAY button while listening to music pauses the player. Short-press the PLAY
button again to resume the play.
- Hold down the O/M button while listening to music to change to TOTAL MUSIC
- Listening to radio in areas with bad reception rate may cause unstable broadcasting reception or
noise.
• Stop Watch
• Exit
4-2 MAIN MENU Selection
• DISPLAY Selection
• Moving between Menus: Short-press SELECT button up/down to move between menus.
• Selecting Menu: Short-press SELECT button after selecting the function. Then, move the SELECT
button left/right to adjust and short-press the SELCT button again.
• Exiting Menu: Move the SELECT button up/down to select EXIT and press SELECT button.
1. SCROLL: The scroll speed of the display screen can be adjusted.
-The speed are in 10 steps from LEVEL01 ~ LEVEL 10.
2. CONTRAST: The brightness of LCD screen can be adjusted by steps.
-The brightness steps are in 10 steps from LEVEL01 ~ LEVEL 10
3. BACKLIGHT: Length of Backlight time can be configured.
(The shorter the backlight time, the battery can run for longer period of time.)
-Steps are 5 seconds, 10 seconds, 15 seconds, 20 seconds, and EVER.
4.EXIT: Exit from the current menu.
7
• DELETE Selection
• Moving between menus: Short-press SELECT button up/down to move between menus.
• Selecting Menu: Short-press SELECT button after selecting a function.
1) NAVIGATION: Select a file to delete from the LIST and press SLECT button again.
A DELETE dialog window pops up asking whether to delete the file or not. Select YES to delete the
MP3 file, otherwise select NO. The selected file is deleted after short-pressing the SELECT button.
2) BOOKMARK: Select a MP3 file from the bookmarked files and press SELECT button. A DELETE
dialog box pops up asking whether to delete the file or not. Select YES to delete, otherwise, select
NO.
3) FORMAT: Press SELECT button after moving to FORMAT menu. A dialog window pops up asking
whether to format or not. Select YES to proceed. Otherwise, select NO and press SELECT button.
※Caution: When FORMAT is processed, all data stored in the player is deleted. Make sure to
backup important data before formatting.
4) EXIT: Exits from the current menu.
• EQUALIZER Selection
1) NORMAL, CLASSIC, POP, ROCK, and JAZZ can be selected.
2) USER: When user configured equalizer is desired.
-A user can configure the frequency in five steps (63HZ, 250HZ, 1KHZ, 4KHZ, and 16KHZ)
USER EQ ※Configuration
1. Select Equalizer from the MAIN MENU screen or hold down Mbutton.
2. Select USER from the displayed EQUALIZER screen.
From each frequency, select the frequency and move each frequency using
UP/DOWN/LEFT/RIGHT and finish the adjustment by pressing SELECT S/W.
3) EXIT: Exit from the current menu.
☞ Note: For quick EQ MODE change, hold down Mbutton while the player is in operation. Select the
EQ mode with SELECT button.
• PLAY BACK Selection
1) NORMAL : Listen to all songs once
2) INTRO: Play only the first 10 seconds of songs listed in order.
3) RPT ONE : Repeat one song only.
4) RPT ALL : Repeat all songs listed.
5) SHUFFLE : Listen to the listed songs in random order.
8
• SETTING Selection
1) POWER OFF TIME: If the player is paused for the configured time, the player is automatically
powered off. The time can be configured to 5 seconds, 10 seconds, 15 seconds, 20 seconds, and OFF.
2) VOICE RECORD
- VOICE BPS: This configures the record quality when using the microphone. It can be configured LP,
SP, AND HQ. The higher the rate, the shorter recording is allowed.
3) ENCODE
- AUTO SYNC: When encoding using the external device, this function automatically configures the
tracks.
- BIT RATE: This decides the recording quality when recording the external LINE-IN. It can be set to
48 KBPS, 96 KBPS, 128 KBPS, and 192 KBPS.
The higher the rate, the shorter recording is allowed.
- EXIT: Exits from the current menu.
4) FM BAND: configures the FM frequency range for each country.
• USA: 87.5~108MHZ
• EUROPE: 87.5~108MHZ
• JAPAN: 76~108MHZ
5) LANGUAGE: configures the language for each country
• KOREA
• ENGLISH
• JAPAN
• USA
• CHINA
• TAIWAN
• EUROPE
6) SETTING DEFAULT: Initializes all configurations to default values.
7) DEFAULT VOLUME: configures the volume when power on
8) EXIT: Exits from the current menu
• Connecting to the PC
1. Recommended PC Specification
Pentium 133MHz or above / Windows 98SE/ME/2000/XP / 20MB Hard Drive Space /
CD-ROM Drive Support / USB Port (1.1/2.0) Support / VGA Graphic / RAM 64MB or above
2. File Download
3. Driver Installation for WIN98
- On Window 98, a driver needs to be installed separately. Otherwise, the mobile disk is not
recognized. If it is your first time using the player, refer to the driver installation guide and complete
the installation before actually using the device.
9
☞Note
-On Windows ME, 2000, and XP, no extra driver installation is needed.
• USB Cable Removal
• Once the file transfer is complete, remove the player only using the following direction to protect the
player from any unexpected damages.
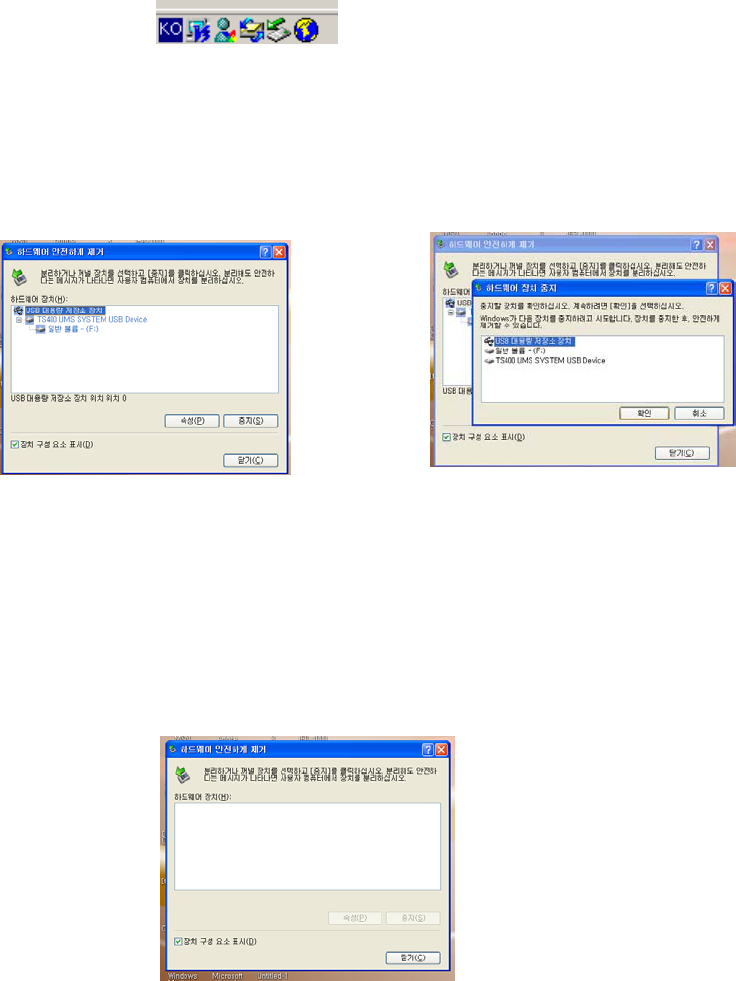
1.Double click the green arrow located in the system tray as shown in Figure 1. A window ‘Safely remove
hardware’ appears.
<Figure 1. System Tray >
2. Select the large capacity USB device from the Figure 2 and press stop button. When the stop
window appears as shown in Figure 3, press OK.
<Figure 2 Hardware Device Removal Screen > <Figure 3 Hardware Device Stop Window >
3. When the hardware device disappears from ”Safely Remove Hardware” window, click CLOSE.
Confirm that the green arrow disappears and the player’s USB connection is disconnected (power is
turned off) and remove the USB cable.
<Figure 4 Hardware device removed >
10
☞Note
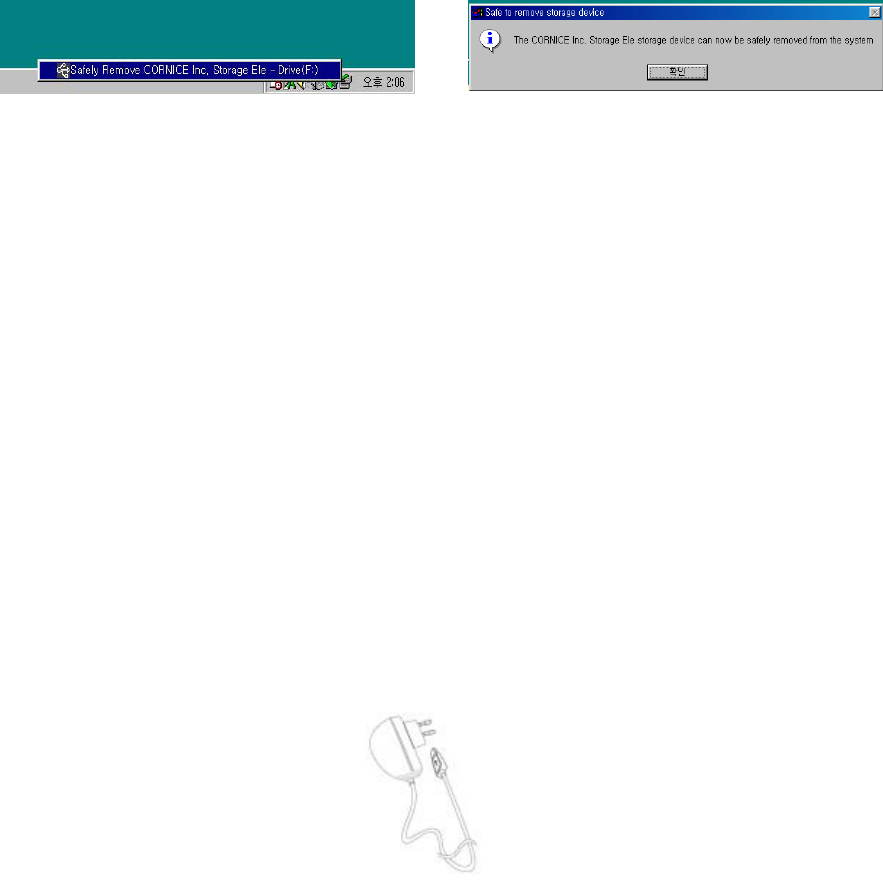
On Windows 98, click the green arrow as shown in Figure 5, and click the message again. In a few
seconds, click OK as shown in Figure 6 and remove the USB cable.
<Figure 5 98 Removal Screen> <Figure 6 98 Removal Screen >
• Recharging
※The player is rechargeable. It is designed to be connected to the PC to recharge. For faster and more
convenient recharge, an extra recharge adaptor can be purchased separately.
(Optional recharge adaptor)
1.Recharging from the PC
- Connect the USB port to the PC USB port using the provided USB cable.
- When the USB connection screen appears, The recharge is in progress and the player’s LED is lit.
- Once recharging is complete, the player’s LED is turned off.
2. Recharging using the optional recharge adaptor
- Connect to the SUB port of the rechargeable adapter of figure 3. If the USB connection screen
appears as shown in Figure 2, the recharging is in progress.
<Figure 3: The device and Rechargeable Adaptor >
☞NOTE
- Fast and simple recharge of the embedded battery though the USB connection is available. Up to
12 hour long continuous play is possible.
- When the battery is completely flat, 90% recharge takes 1.5 hours and 100% recharge takes 2
hours.
- Only use appropriate AC adopter voltage recommended.
11
※ Safety Caution and Precaution in using recharge adaptor
1) Do not pull the recharge adopter cord or touch the power plug with wet hand. It may cause fire or
you may receive an electric shock.
2) Do not apply excessive force when connecting the USB cable. Recharge may not occur or the
player may get damaged.
3) Do not recharge with unauthenticated power source (generator, illegal charger, and etc.) It may
cause fire or damage to the player. The related damage cannot receive our A/S.
• Customer Support
※ Safety Caution and Precautions in Using Product
• Thank you for using our product. Please read the following items to use our product safer and
longer.
1.Do not apply excessive force to the device. It may cause damage to the player. Severe impact
(drop from higher ground or placing heavy weight object on top of the device) can cause severe
damage to the product.
2. Avoid using the product in areas with dust, moisture, and strong magnetic field. (Especially, if
water gets into the product, it may cause severe damage to the player)
3. Avoid usage for a long period of time under direct sunlight or heat source. If the player is located
near by the source of heat for a long period of time, it may explode. Especially, do not leave the
player in a car. It may cause severe damage.
4. Avoid places where severe static might occur.
5. Disassembly, repair, and modification may cause malfunction of the player and the device can no
longer be receive A/S for free of charge.
6. Do not listen to music in high volume for a long period of time. It may cause hearing damage. If
you experience ringing in you ear while listening to music, lower the volume or stop using the
player.
7. Do NOT use the player while driving automobile, motorcycle, and bicycle.
8. Listening to music in high volume while walking can be dangerous.
9. Falling down while keeping the player in a pocket may cause minor injury or fracture.
10. Important data must be backed up at some other safe location.
(External impact or unexpected occurrence may delete or damage the data. We do not take
responsibilities for the load data)
11. Separate the player from the PC or the adopter when recharging is complete.
12. Do not insert sharp metal object, coin, or pin into the player. It may cause severe damage to the
player or the damaged battery might explode. Especially, be careful so that the USB JACK or the
earphone connector is not damaged.
13. Keep away from pets or children for they are exposed to the danger of explosion when the
embedded battery is bitten or played with.
12
• Trouble Shooting
• Make sure the following items before receiving our service.
1) Cannot turn on the power.
- Confirm whether the device’s battery status.
- Make sure the ‘Hold’ switch is in locked position.
2) TS-500’s buttons do not operate
- Confirm that ‘Hold’ switch is in locked position.
3) Sound is not heard or too much noise
- Make sure whether the volume is set to ‘0’.
- Confirm whether the earphone is firmly connected to the connector.
- Check the earphone when sound is played only on one side.
- Check whether the music file is corrupted.
4) Noise is heard while listening to the radio. Broadcasting channel is in bad reception.
- Change the direction of the player and the earphone.
- In bad reception areas, noise may be heard.
- Place the player away from electric appliances.
☞Note: The earphone operates as an antenna. Therefore, when the earphone is not plugged in,
listening to broadcasting may not be available.
5)Connection to the PC cannot be made or files cannot be downloaded.
- Check the USB connection between the PC and TS-500
- Restart the PC and re-connect to the player.
6) Characters on the display screen are weird.
- Check the language setting.
13

14
Product Specification
Model TS-500
Disk Space 128MB / 256MB / 512MB / 1GB embedded memory
Power 3.8V : Li-polymer Battery(550mAh)
Size (WxHxD ) / Weigth 41×74×20 mm / 45 g
LCD 96 dots x 64 dots x RGB CSTN COLOR LCD
Case PC (UV Coating)
Noise Rate 85dB with 20KHz LPF
Earphone Output mW (Maximum 12mW) / 16Ω
Output Frequency Range 20Hz ~ 20KHz
FM Frequency 87.5 ~ 108.0MHz
Noise rate per FM Signal 45dB
FM Rate 1%
FM Actual Sensitivity 10dB
File Support
MPEG1/2/2.5 Layer3(8Kbps ~ 320Kbps, 8KHz ~ 48KHz)
WMA (48Kbps ~192Kbps, 8KHz ~ 48KHz), ASF,
OGG format file
※ The contents of the product are subject to change without notice for quality improvement.