Digital Camp MASTO2200 Portable Storage Controller User Manual users manual
Digital Camp Co., Ltd. Portable Storage Controller users manual
users manual

MASTO User Manual Digital Camp
1/1 Page
MastoTM-2200plus/UUser Manual
Rev. A

MASTO User Manual Digital Camp
2/2 Page
CONTENTS
Introduction
Features
Package Contents
HDD Installation
Driver Installation
Connecting cables
Disconnecting MASTO
Troubleshooting
Warranty and service

MASTO User Manual Digital Camp
3/3 Page
MASTO 2200+/U is a trademark of Digital Camp Co., Ltd. Windows ,MS-DOS and NT are
registered trademarks of Microsoft Corporation. Other product and company name used in
this manual are for identification only may be trademarks of their respective owners.
Specifications are subject to change without notice or obligation
Nov. 2002 Copyright 2002 by Digital Camp Co., Ltd.. All rights reserved.
Introduction
MASTO2200plus/U is ideal for users who need a light, durable and portable storage solution with high
performance. This compact drive is perfect for transporting large files such as multimedia presentations
between computers, archiving files, creating backups of laptop and desktop PC’s, updating or installing
software on multiple computers or simply sharing files between home and office
Features
* denotes USB/IEEE1394 version only.
Features
Aluminum Case
Supports USB 1.1, USB 2.0 and * Firewire(IEEE1394) interface.
True plug & play, hot pluggable and hot swappable.
Fast data transfer rate up to 400~480Mbps.
Supports Ultra DMA-66.
Slim, light and compact design
- Dimension: 128(L)x 79(W)x18(H)mm
- 51.2”(L)X 31.6”(W)X 7.2”(H)inch
USB and *IEEE1394 cables
Powered by USB port and *Firewire port

MASTO User Manual Digital Camp
4/4 Page
Item Checklist
MASTO 2200 drive
USB cable
Additional USB cable
User manual
Installation CD
Hardware installation kit.
*IEEE1394 cable(6p-6p/6p-4p)
Minimum System Requirements
PENTIUM II 233Mhz or higher, AMD K6/Athlon or MAC
64MB of system memory
CD-Rom Drive
USB1.1 or 2.0, * Firewire( IEEE 1394) Port
Please don’t use Firewire and USB port at the same time.
Supported operating systems
•Windows2000
•WindowsMe
•Windows98SE
•WindowsXP
•MacintoshOS 8.6 or higher
MASTO User Manual Digital Camp
5/5 Page
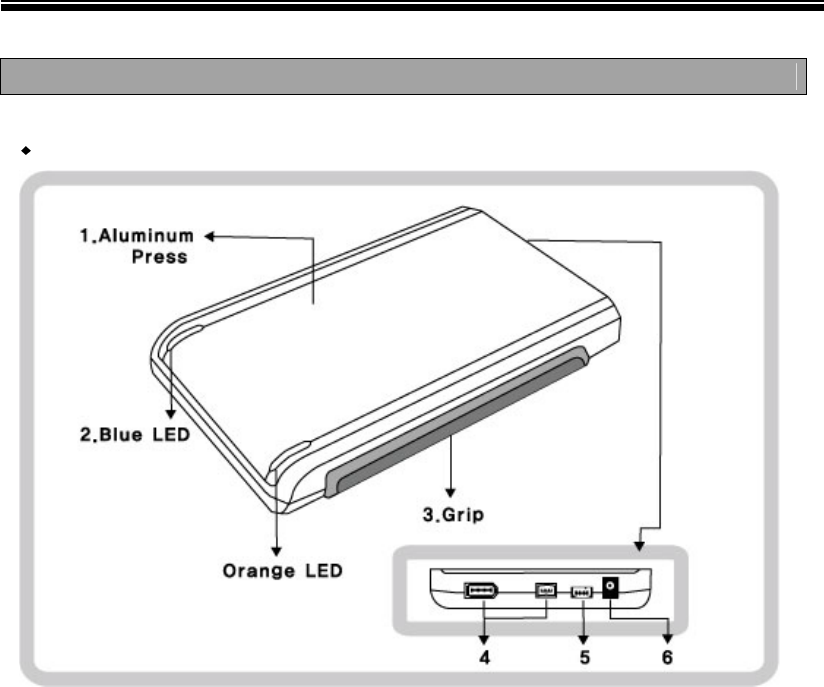
Package Contents
MASTO 2200+/U Drive
1. Aluminum Press
2. LEDs from left to right
Power (Blue) : Power LED
HDD (Orange) : HDD Access LED
3. Grip (Anti shock)
4. * IEEE 1394 Port : Connects to PC using IEEE1394 cable
5. USB Mini Port : Connects to PC using USB cable.
6. DC/IN Port : For extra power sources .
MASTO User Manual Digital Camp
6/6 Page
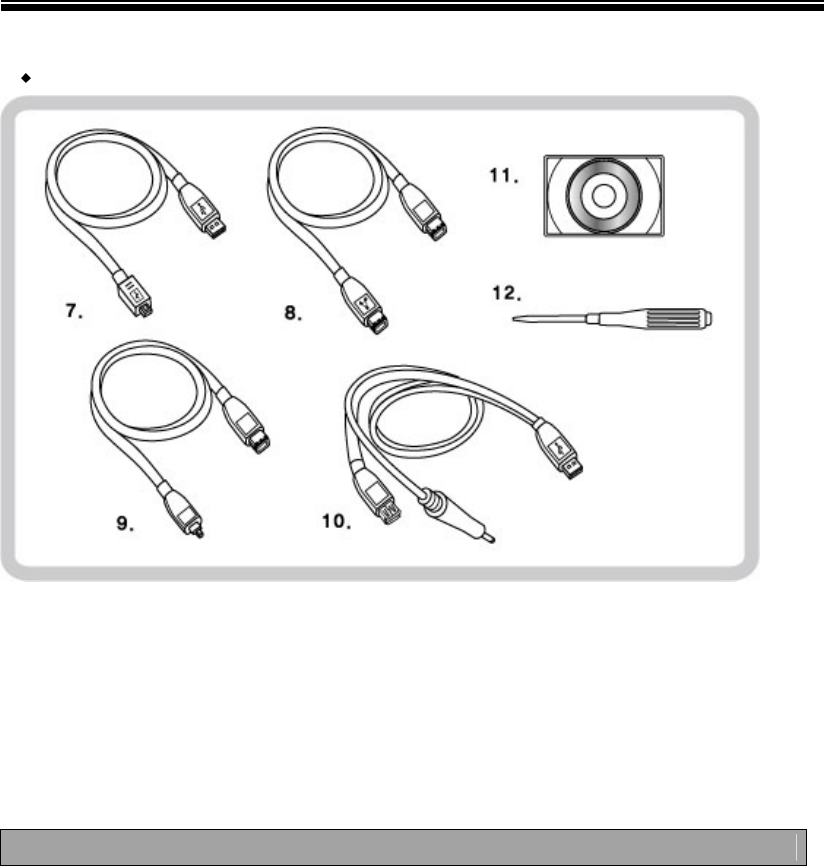
Cables and components
7. Mini USB Cable : For USB interface user.
8. *IEEE 1394 6P : For 6 Pin IEEE1394 interface user.
9. *IEEE 1394 4P : For 4 Pin IEEE1394 interface user. (NO BUS Power)
10. Extra power cable : For the inferior PC in power(most of notebooks & a few laptop PCs) user.
11. CD Driver : Device driver for installation.
12. Screw and driver : for assembling PCB with hard drive
HDD Installation
MASTO is compatible with most of 2.5” notebook hard drives.
** MASTO is compatible with most 2.5” hard drives that require DC 5.0V & 700mA(0.7A) or
500mA(0.5A). However there are few drives that operate at DC 5.0V & 1.0A.These drives are not
compatible with some notebook or laptop PC’s. **
Follow the steps below to install HDD.
MASTO User Manual Digital Camp
7/7 Page
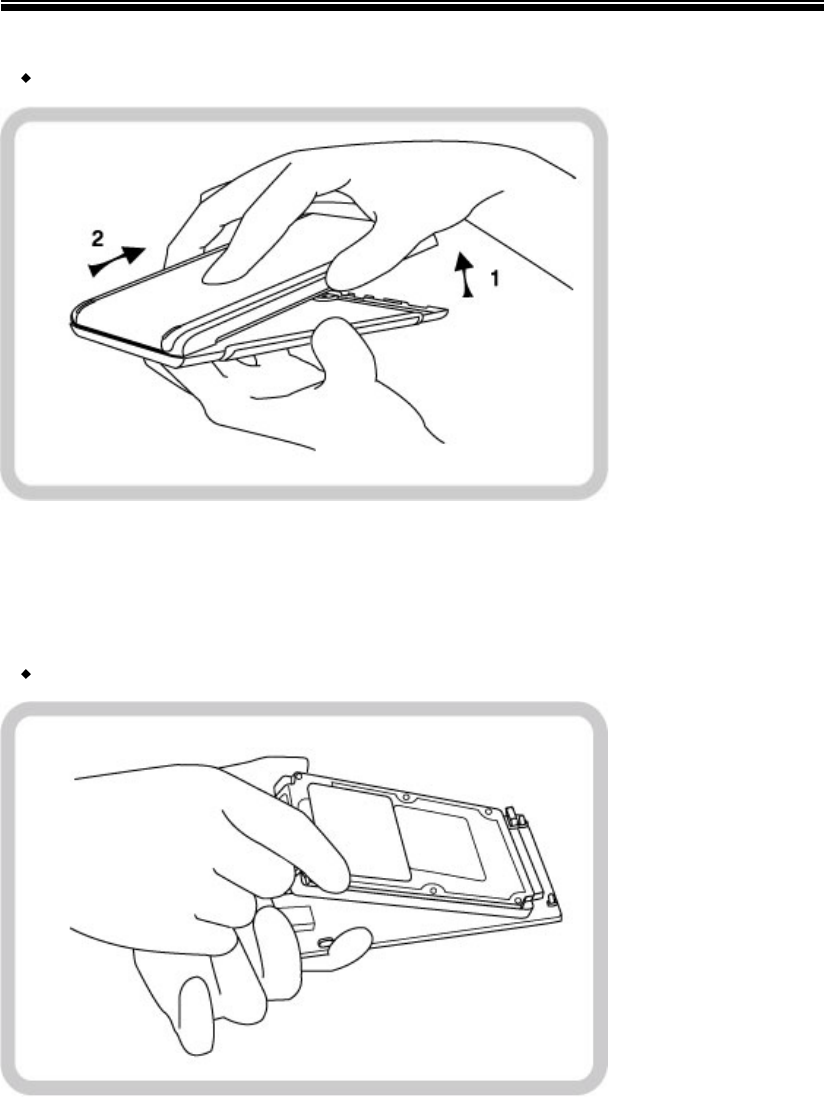
Removing case cover
1. Lift it up and pull it backward like figure 1 and 2 above.
Attention : If you lift it up strongly, fixed pin will be broken
Inserting HDD
2. Take circuit board out and insert HDD into socket.(See figure above)
MASTO User Manual Digital Camp
8/8 Page
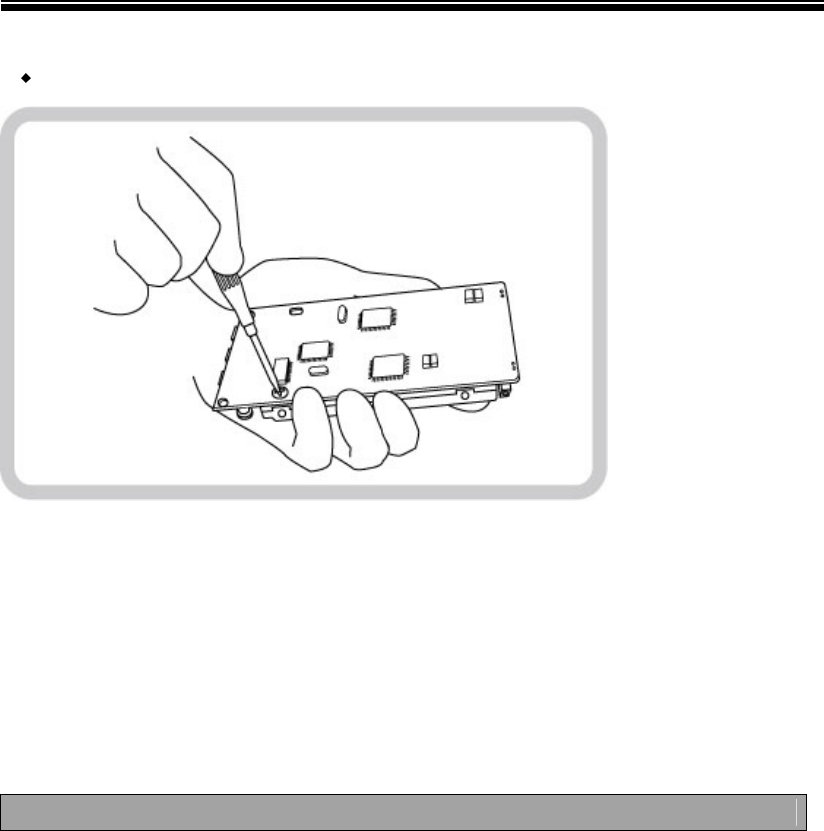
Fixing HDD
3. Screw the HDD to the circuit board. (See figure above)
4. Put it back to the case and assemble.
Driver Installation
* Firewire User
1. Windows98SE and Windows ME
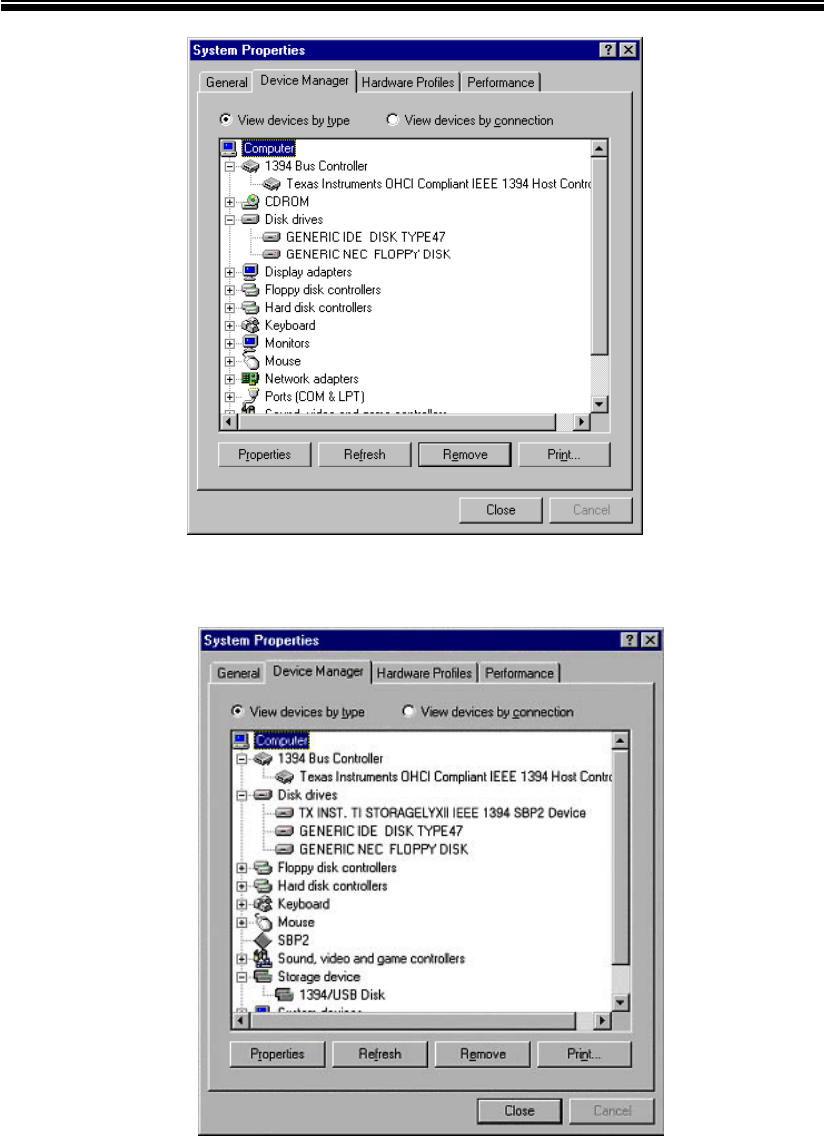
If your PC is equipped with IEEE1394, you will see “IEEE1394 Bus host controllers” icon in device manager.
Start Setting Control Panel System.
Before connecting MATSO to IEEE1394 port (See figure below).
MASTO User Manual Digital Camp
9/9 Page
After connecting MASTO to Firewire port, you will see “1394/USB Disk”icon under Storage Device.
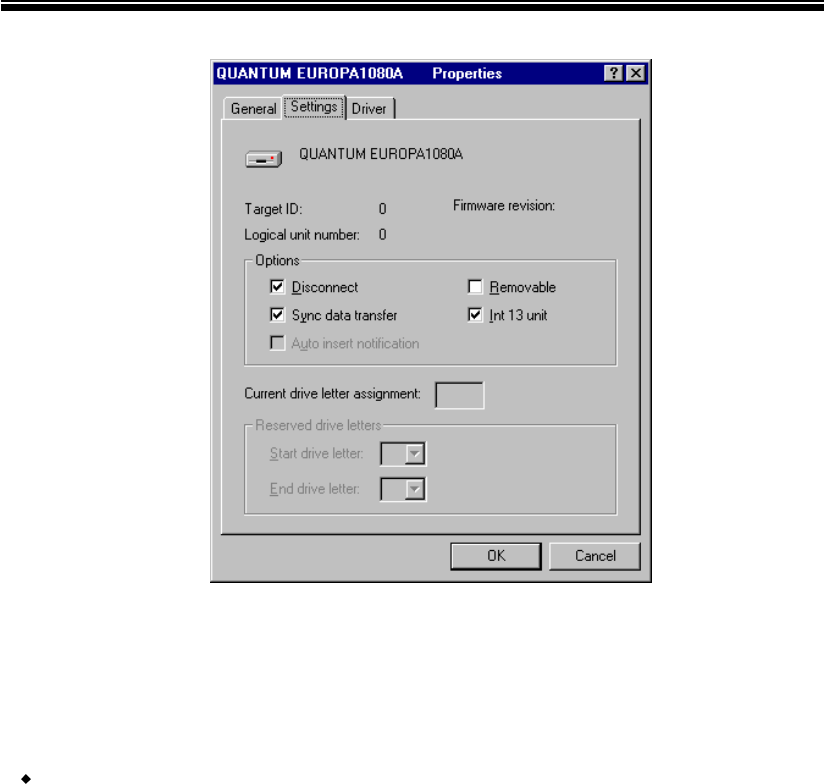
Select “1394/USB Disk” icon under Storage device, and check the property of the drive.
You can verify name and model number of the drive.
(I.e.: TX INST. TI STORAGELYXll IEEE 1394 SBP2 Device)
MASTO User Manual Digital Camp
10/10 Page
When you install a brand new drive, you have to create a partition and format the drive.
Please follow the steps below for partition and format.
How to create partition and format disk under windows 98/ME
1. Start →Program→MS DOS prompt ,Type “fdisk”
2. Enter [Y] on large disk support.
3. Enter [5] to select the drive you installed.
4. Enter the fixed drive number (usually [2])
5. Enter [1] to create DOS partition (Extended partition) and assign logical drive letter.
6. Close MS-DOS prompt program and restart your computer.
7. After rebooting the system. Go to My computer and open.
8. Select the new drive icon (i.e: E:).
9. Highlight the drive icon and format.
MASTO User Manual Digital Camp
11/11 Page
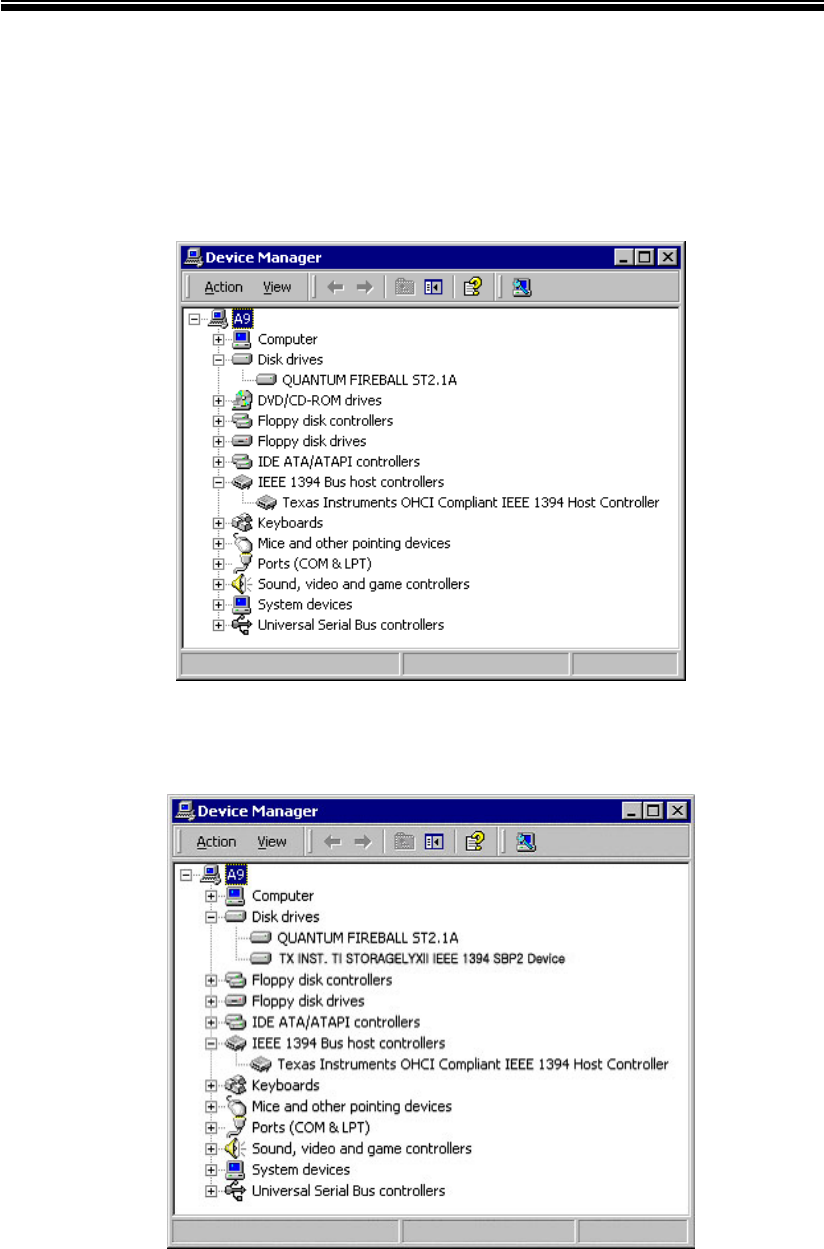
2. Windows 2000 and Windows XP
If your PC is equipped with IEEE1394, you will see “IEEE1394 Bus host controllers” icon in device manager.
Start Setting Control Panel System →Hardware→Device manager.
Before connecting MASTO to IEEE1394 port (See figure below).
After connecting MASTO to IEEE1394 port, you can verify name and model number of the drive.

MASTO User Manual Digital Camp
12/12 Page
When you install a brand new drive, you have to create a partition table and format the drive.
Please follow the steps below for partition and format.
1. Start →Settings→Control panel→Administrative Tools→Computer Management→Storage
→Disk Management (Local)
2. Click “NEXT” on “Welcome to the write signature and upgrade disk wizard”.
3. Select disk1 on “Select disk to write signature” and click “NEXT” and “Finish”
4. Right click on “disk1” and select “create volume” on the menu and “NEXT”
5. Select “simple volume” on “Welcome to the create volume wizard” and “NEXT”
6. Choose disk1 on “Select disks” and “NEXT”
7. Assign a drive letter (i.e.: E:) and “NEXT”
8. Choose the partition type and click “NEXT” and “Finish”
9. The drive will be formatted and ready to be used.
Attention : Not support to format over 32G in size using the FAT32 file system when you install Windows
2000.
MASTO User Manual Digital Camp
13/13 Page
USB 1.1 or 2.0 User
1. Windows98SE and Windows ME
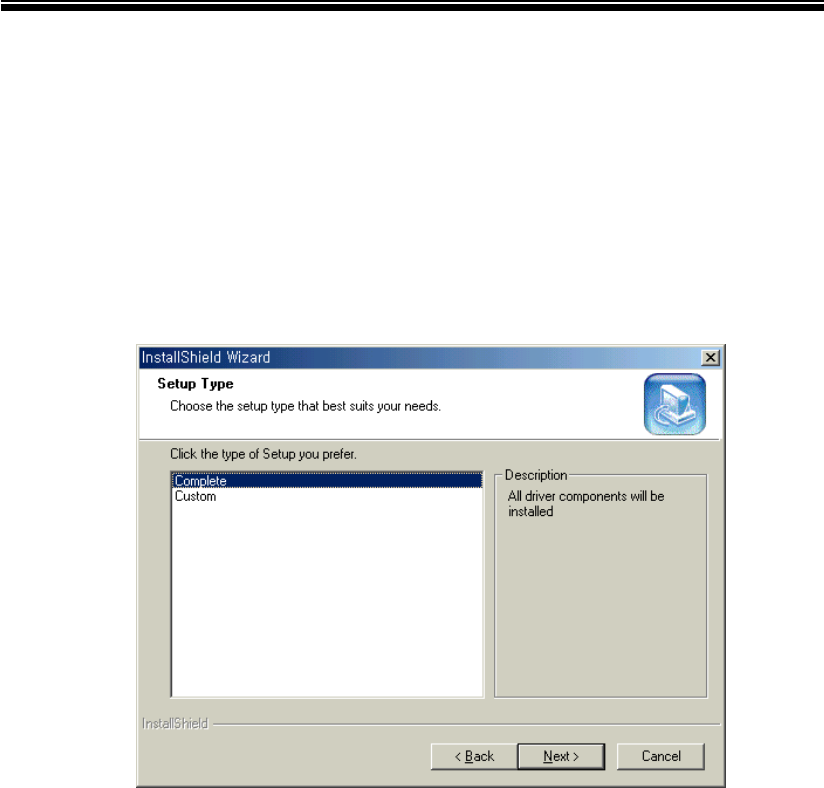
Before you connect MASTO drive, install the device driver first.
Insert mini Installation CD into CD-ROM drive. Run (..\preinstaller\tppinst_5_04.exe) setup program and
you will see display below.
Choose ‘Complete’ and then click ‘Next’. Then it will install the driver.
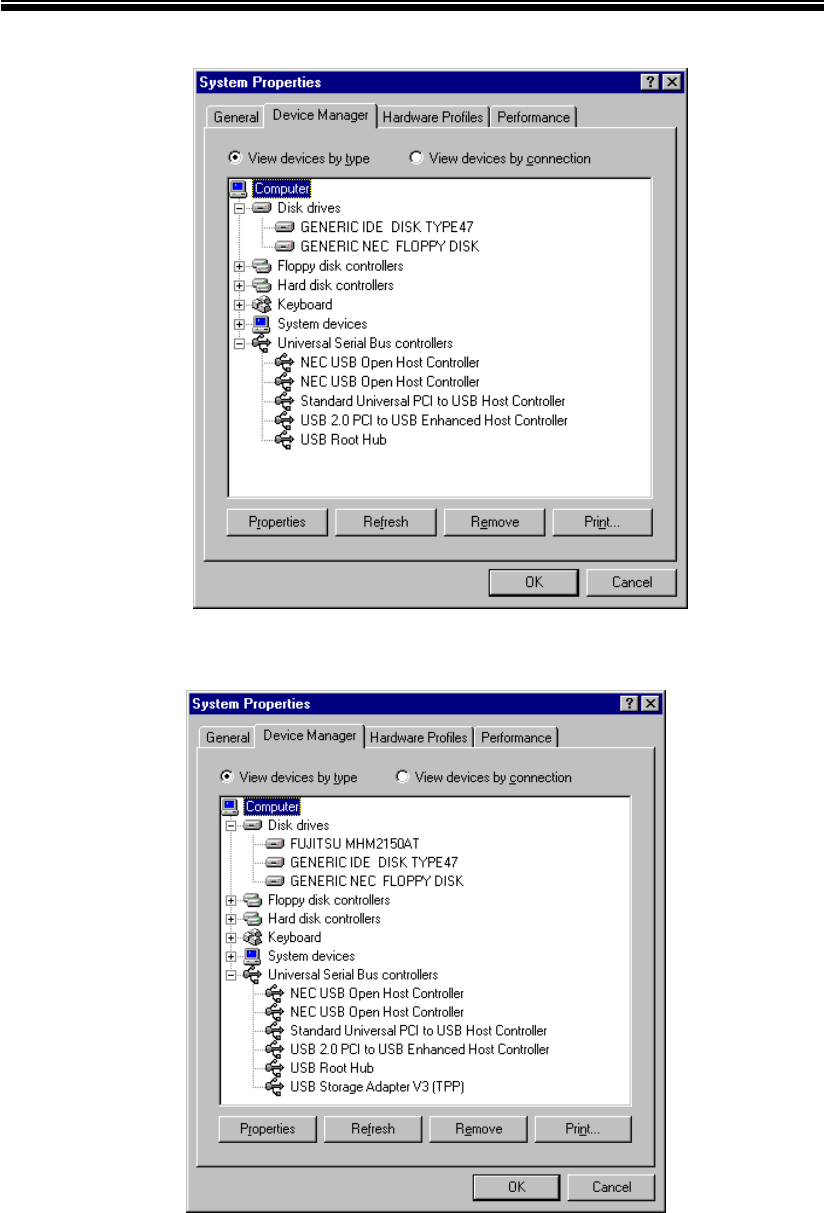
Before connecting MASTO to USB port (Windows 98SE / ME)
MASTO User Manual Digital Camp
14/14 Page
After connecting MASTO to USB port (Windows 98SE/ME)
MASTO User Manual Digital Camp
15/15 Page
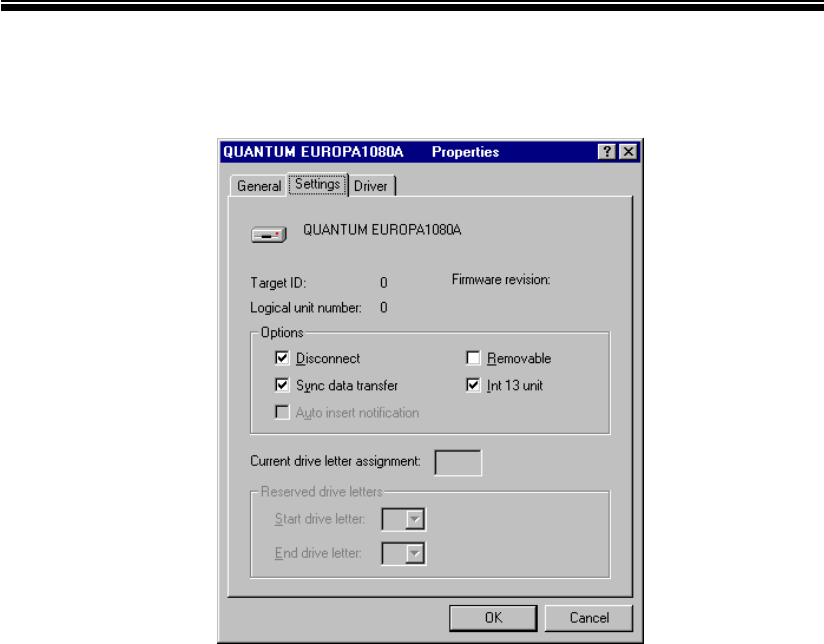
Select the drive icon you installed under “Disk drives” icon, and check the property of the drive.
You can verify name and model number of the drive (i.e.: Fujitsu MHM2150AT)
When you install a brand new drive, you have to create a partition and format the drive.
Please refer following steps create partitions and formats disk.
1. Start →Program→MS DOS prompt ,Type “fdisk”
2. Enter [Y] on large disk support.
3. Enter [5] to select the drive you installed.
4. Enter the fixed drive number (usually [2])
5. Enter [1] to create DOS partition (Extended partition) and assign logical drive letter.
6. Close MS-DOS prompt program and restart your computer.
7. After rebooting the system. Go to My computer and open.
8. Select the new drive icon.
9. Highlight the new drive and format.
MASTO User Manual Digital Camp
16/16 Page
2. Windows 2000 and Windows XP
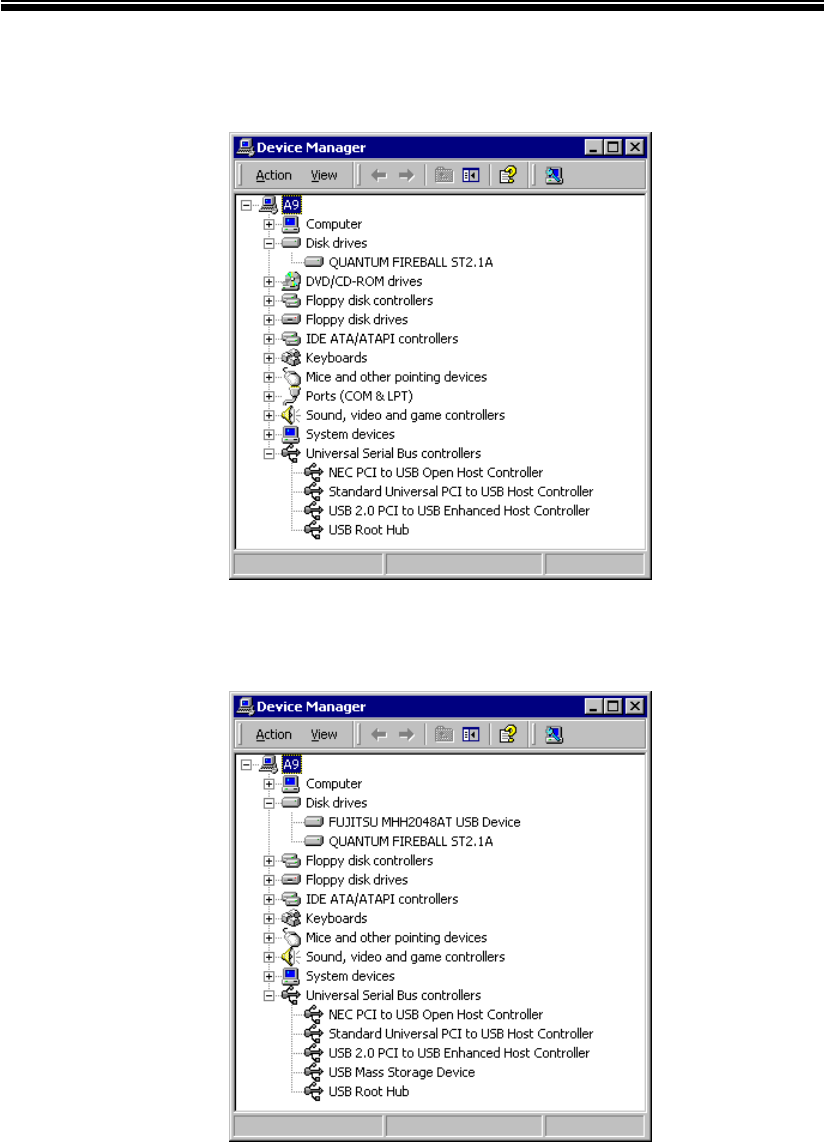
Before connecting MASTO to USB (Windows 2000 and XP)
After connecting MASTO to USB (Windows 2000 and XP)
When you install a brand new drive, you have to create a partition table and format the drive.
Please refer Firewire section to partition and format the drive.

MASTO User Manual Digital Camp
17/17 Page
Mac OS User
Attention 1) MacintoshOS 8.6 or higher
2) Run (FDISK and FORMAT) before you use new HDD.
3) Use MAC and IBM, before you run (FDISK and FORMAT) on IBM.
Installation IEEE1394
MAC OS 8.6/9.X/X.1 : No required installation driver.
Installation USB
- MAC OS 8.6/9.X
1) Before you connect MASTO drive, install the device driver first.
2) Insert mini Installation CD into CD-ROM drive.
Run ( usb\macos\3.1\CYMSC_MACOS9_3_1.hqx) setup program
3) Reboot your system and connect MASTO drive.
- MAC OS X.1
1) Before you connect MASTO drive, install the device driver first.
2) Insert mini Installation CD into CD-ROM drive.
Run ( usb\macosx\1.0.1\WILLPOD_MACOSX_1_01.hqx) setup program
3) Reboot your system and connect MASTO drive.
MASTO User Manual Digital Camp
18/18 Page
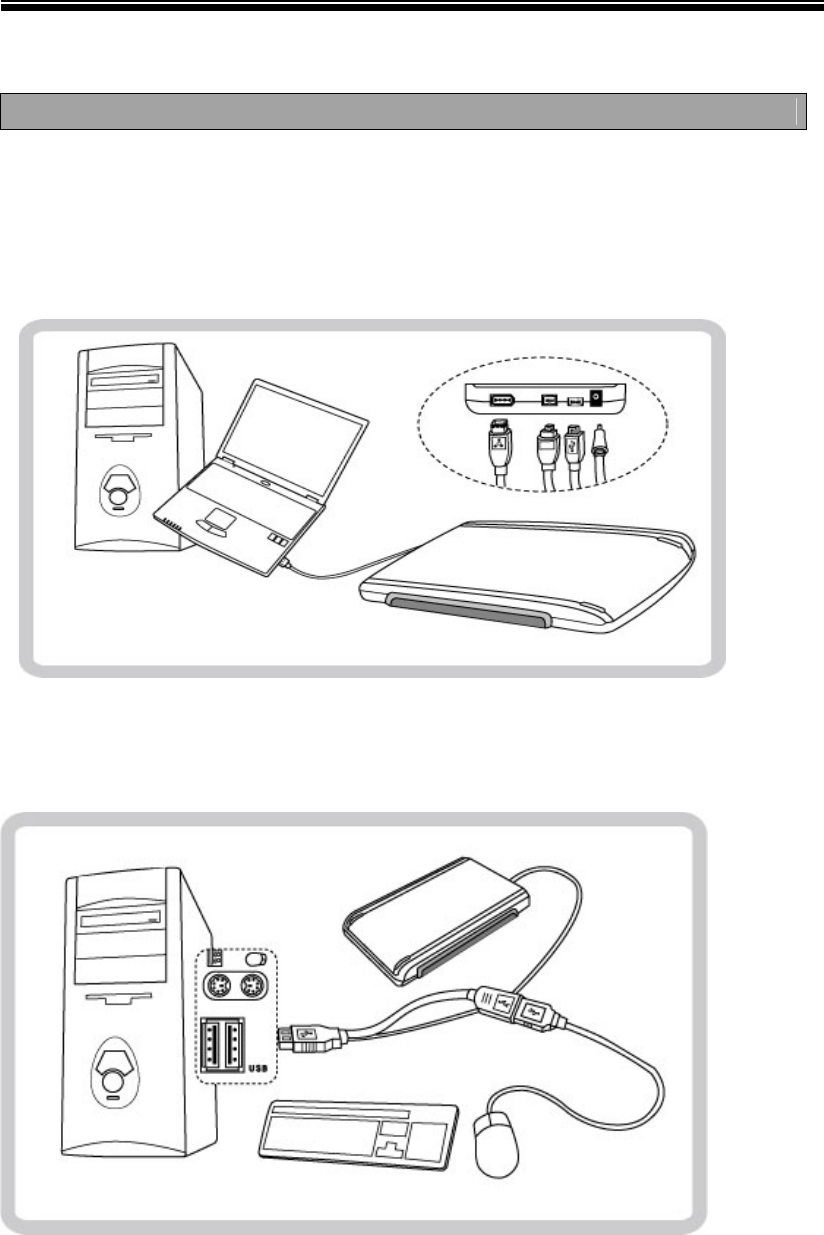
Connecting cables
MASTO comes with one USB and two firewire cables. Select proper cables according to your system need.
Refer to pictures below for connecting cables.
If MASTO drive needs additional power, use extra USB provided power cable shown below
MASTO User Manual Digital Camp
19/19 Page
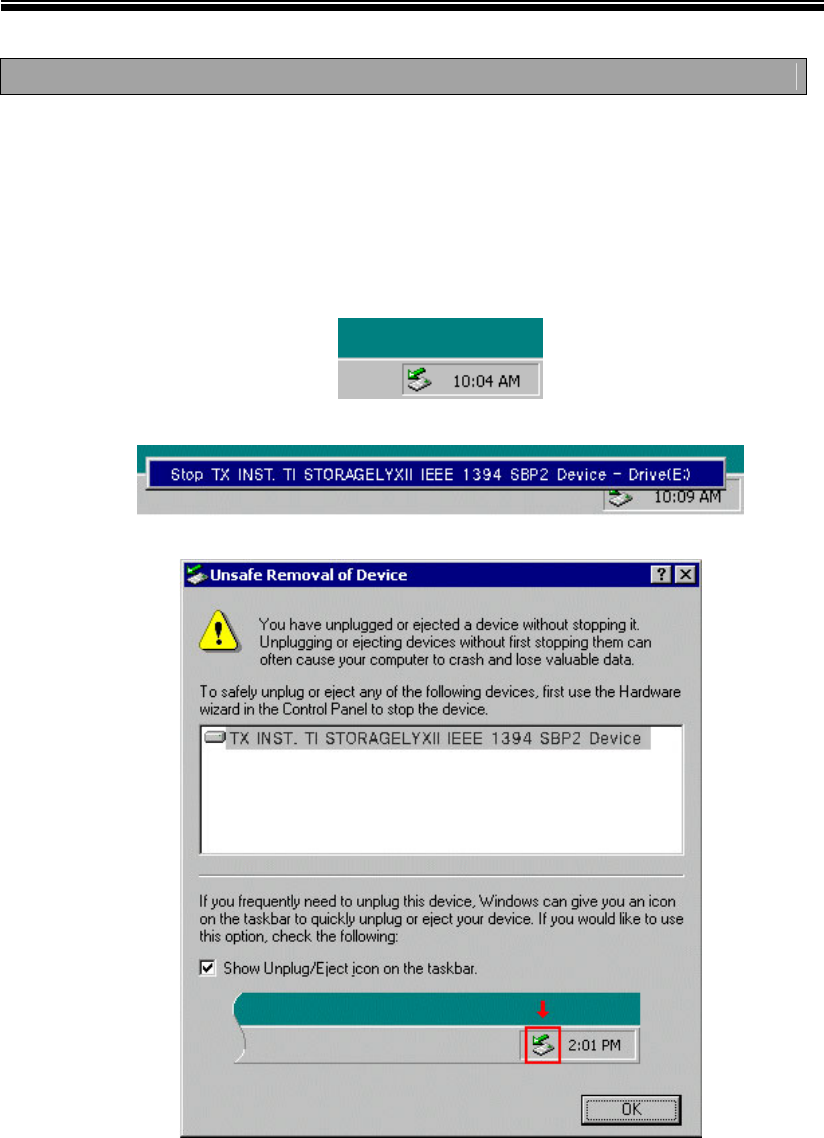
Disconnecting MASTO
The Hard disk device is sensitive against shock. When MASTO drive is running, please do not move unit.
In order to disconnect MASTO from PC safely, click “Unplug or eject hardware” icon in the system tray.
Click “Stop USB or 1394 Mass storage device- Drive (drive letter:)” sign. And click “OK” when you
see ”The USB or 1394 Mass storage device can now be safely removed form the system”. Now it is safe to
remove the MASTO.
This is the warning message, if you disconnect MASTO drive without executing “Unplug or eject
hardware”
MASTO User Manual Digital Camp
20/20 Page
Troubleshooting
1. My computer does not recognize MASTO
•Check connections. Make sure the cable is connected securely to the computer.
•Connect MASTO directly to USB port of the computer, if you use passive USB hub.
•Check power LED on the unit. It should be on. If not try to use additional USB power cable.
•Make sure you install USB driver
2. I’m having a problem using the 4 pins IEEE1394 or PCMCIA IEEE1394 port.
•Those ports do not provide power .Use DC adaptor (5V, 1A Higher) or USB additional cable.
3. MASTO drive is not spinning, and USB LED is blinking.
•Check the hard drive’s voltage and current requirements on the label (less then 700mA)
•Try to install a different hard drive.
Windows NT does not support USB Port.
Warranty and Service
1. Product Warranty
Digital Camp USA will provide 1 year limited warranty to be free from defects in material and workmanship
under the normal operation. Warranty will be Void if product is repaired modified or altered, unless authorized
by Digital Camp USA. In no event shall the manufacturer be liable for direct, indirect, incidental or
consequential damages arising from any defect for error in this product.
2. Return Merchandise Authorization (RMA)
To obtain an RMA number, Digital Camp’s RMA Department can be reached at (714)-537-3399. In order to
issue RMA number, serial number, date of purchase and nature of problems are required.
Fill out the RMA form, and Fax at (714)-537-3399. Then an RMA number will be provided.

MASTO User Manual Digital Camp
21/21 Page
When you ship to service center, proper packing is required. Clearly write your RMA number on the top of
the returned package and copy of RMA form.
SERVICE CENTER (USA & Canada)
If you need technical support, call (Monday to Saturday 10AM-6PM Pacific time) or fax to number below.
Digital Camp USA
13155 Brookhurst St.
Garden Grove, CA 92843
Tel: 714-636-7750 FAX: 714-537-3399 Toll free : 1 (800) 970 5222
MODEL : MASTO 2000 plus /U
FCC Compliance Statement
Caution: Any changes or modifications in construction of this device, which are not expressly
approved by the party responsible for compliance, could void the user’s authority to operate the
equipment.
Note: This equipment has been tested and found to comply with the limits for a Class B digital
device, pursuant to part 15 of the FCC Rules. These limits are designed to provide reasonable
protection against harmful interference in a residential installation This equipment generates, uses
and can radiate radio frequency energy and, if not installed and used in accordance with the
instructions, may cause harmful interference to radio communications, However, there is no
guarantee that interference will not occur in a particular installation. If this equipment does cause
harmful interference to radio or television reception, which can be determined by turning the
equipment off and on, the user is encouraged to try to correct the interference by one or more of
the following measures:
- Reorient or relocate the receiving antenna.
- Increase the separation between the equipment and receiver.
- Connect the equipment into an outlet on a circuit different from that to which the receiver is
connected.
- Consult the dealer or an experienced radio/TV technician for help.