Digital China Networks WL8200-I3 802.11AC Wireless Access Point User Manual

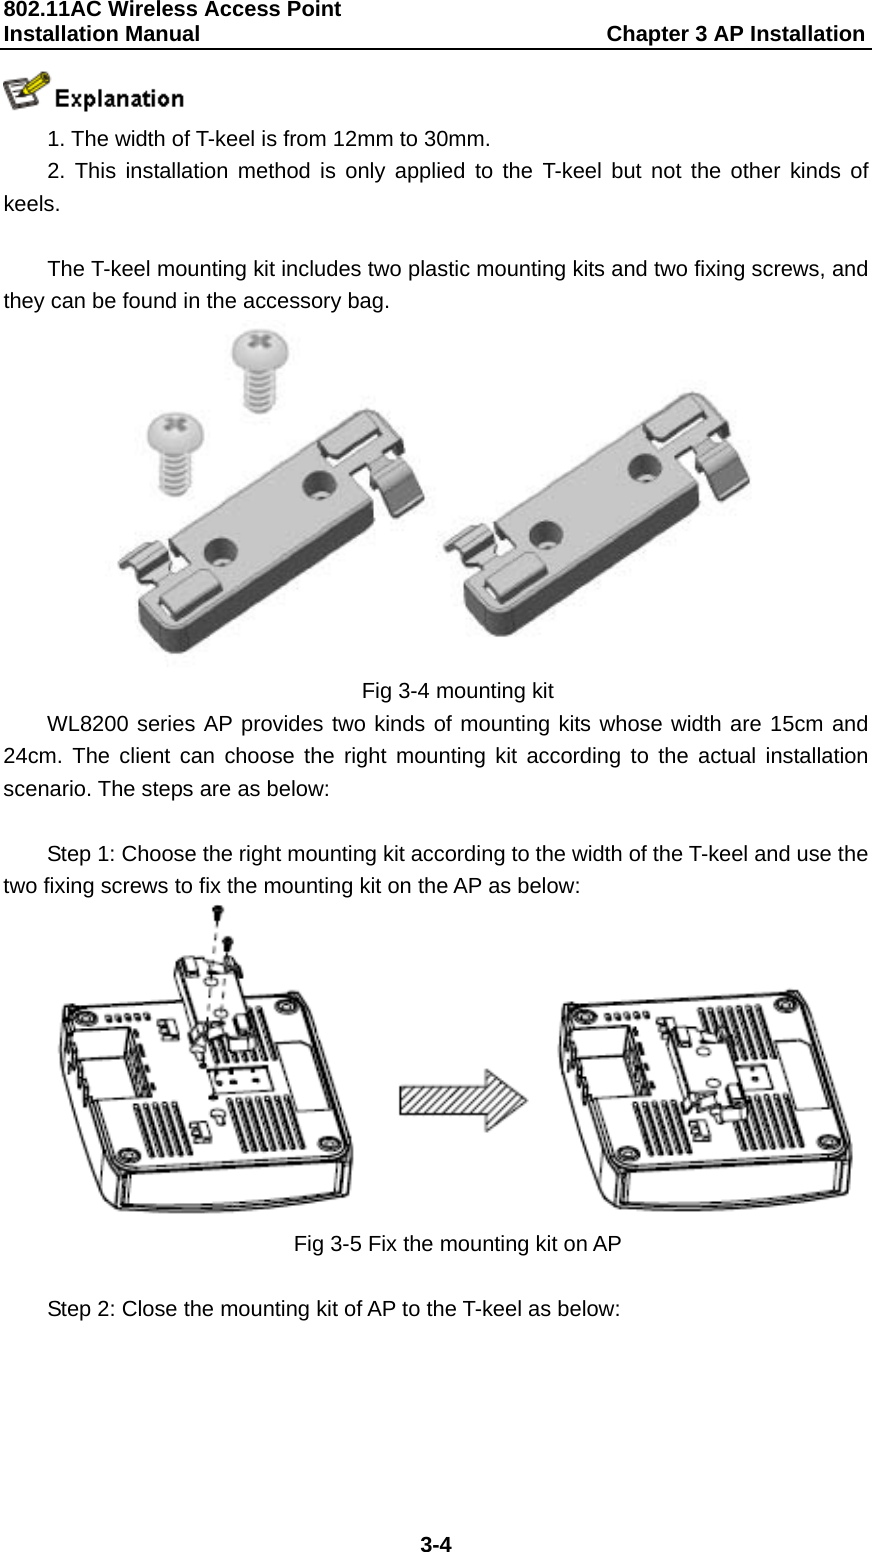
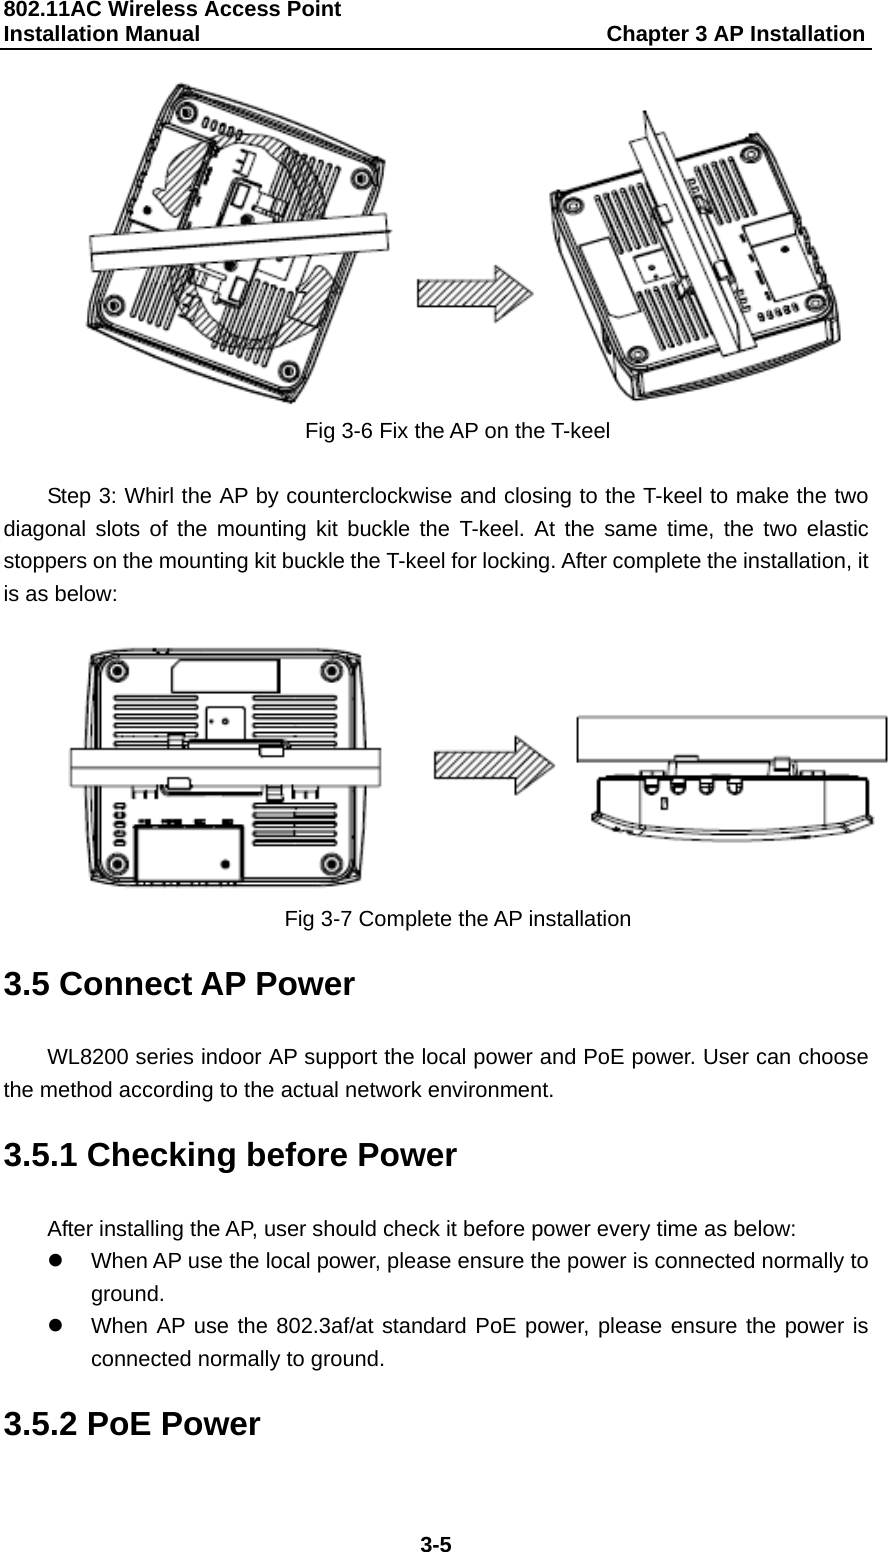
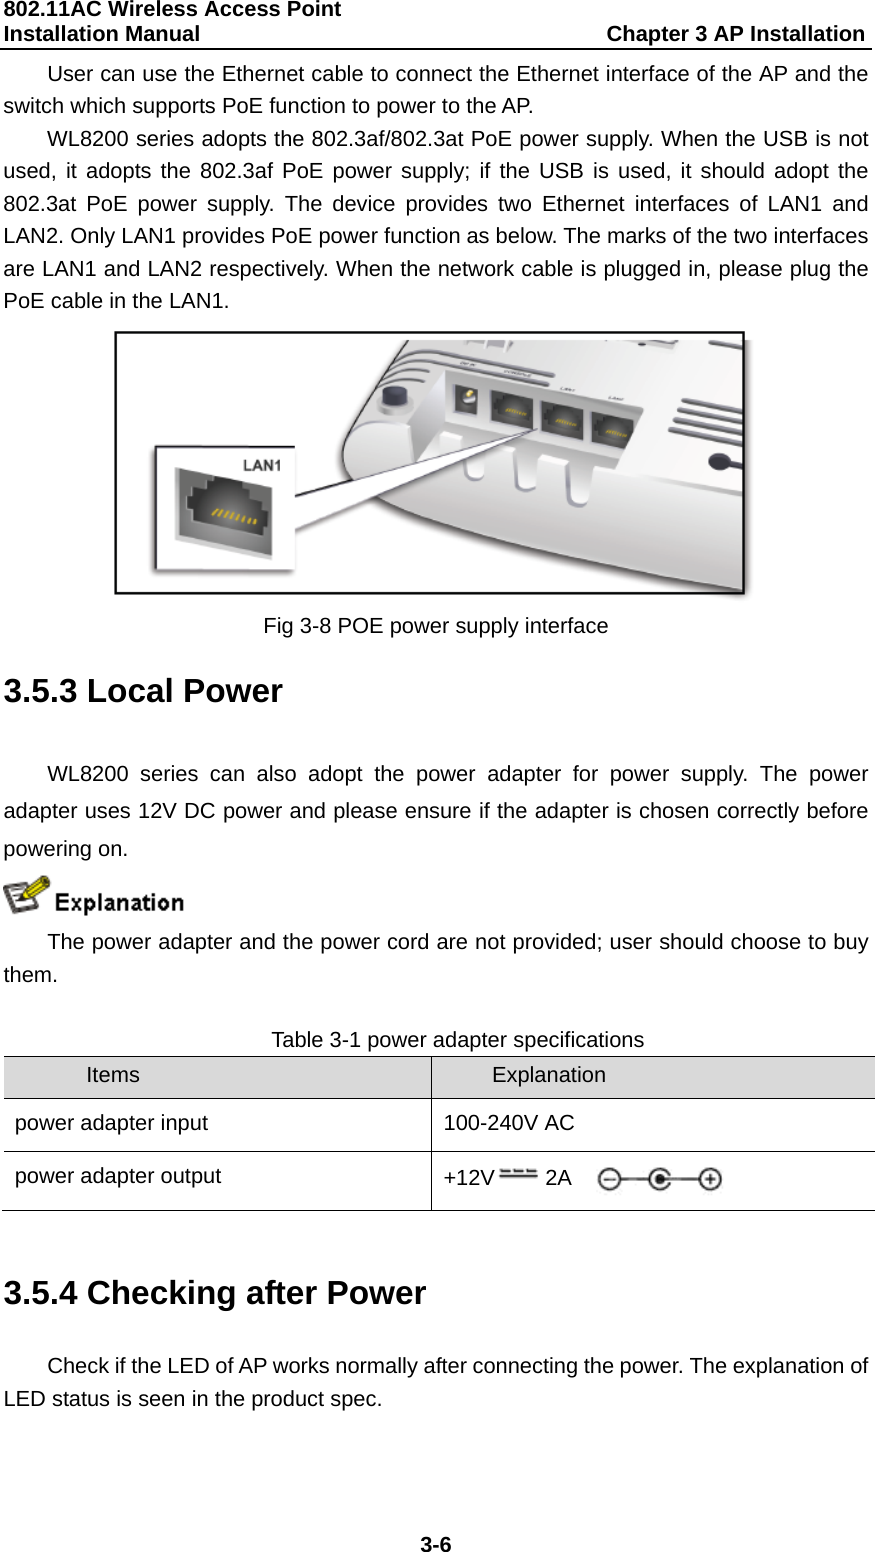
Digital China Networks (Beijing) Limited 802.11AC Wireless Access Point Users Manual

Users Manual

        802.11AC Wireless Access Point Installation Manual   Manual Version: v1.0
802.11AC Wireless Access Point   Installation Manual                                                   Content 1 Content Chapter 1Device Introduction ............................................. 1-1Chapter 2Preparation for Installation ................................. 2-12.1 Installation Precautions ................................................................. 2-12.2 Installation Environment Requirements ....................................... 2-22.3 Equipment Accessories ................................................................. 2-22.4 Installation Tools ............................................................................. 2-2Chapter 3AP Installation ...................................................... 3-13.1 Installation Process ........................................................................ 3-13.2 Checking before Installation .......................................................... 3-23.3 Ensure the Installation Position .................................................... 3-23.4 Install WL8200 Series ..................................................................... 3-23.4.1 Wall Hanging Installation ..................................................................... 3-23.4.2 T-keel Installation .................................................................................. 3-33.5 Connect AP Power .......................................................................... 3-53.5.1 Checking before Power ........................................................................ 3-53.5.2 PoE Power ............................................................................................. 3-53.5.3 Local Power ........................................................................................... 3-63.5.4 Checking after Power ........................................................................... 3-63.6 Connect AP to Internet ................................................................... 3-7
802.11AC Wireless Access Point   Installation Manual                               Chapter 1 Device Introduction  1-1 Chapter 1 Device Introduction WL8200 Series Wireless AP ( Access Point) is the new 1000Mb wireless AP device based on 802.11n and 802.11AC standard with high performance from DigitalChina Networks Limited (DCN). 802.11AC Wireless Access Point can work in the band of 2.4GHz and 5GHz. It can provide higher bandwidth and cover wider range. The uplink of this AP adopts the 1000Mb Ethernet port which supports PoE power. It expands the bandwidth. This series AP includes two products: WL8200-I2 is the 2X2 AP, WL8200-I3 is the 3X3 AP.  Fig 1-1 WL8200 Series  The basic configuration of WL8200 Series indoor AP is as below:  Table 1-1 basic configuration  Product Model Applicable Protocols  and Features Antenna Maximum Power Consumption WL8200-I2 • IEEE802.11a/b/g/n/ac • Double RadiofrequencyBuilt-in antenna:•2.4G gain 4.5dBi•5G gain 5dBi Default:  ≤12.92WUsing USB:  ≤18W
802.11AC Wireless Access Point   Installation Manual                               Chapter 1 Device Introduction  1-2 WL8200-I3 • IEEE802.11a/b/g/n/ac • Double RadiofrequencyBuilt-in antenna: •2.4G gain 4.5dBi•5G gain 4.5dBi Default:  ≤12.92WUsing USB:  ≤20W The shape size and weight of WL8200 series indoor AP is as below:  Table 1-2 the shape size and weight  Product Model Shape Size Weight WL8200 series(W×D×H)  183 x 150 x 42 mm  0.5kg
802.11AC Wireless Access Point Installation Manual                         Chapter 2 Preparation for Installation  2-1 Chapter 2 Preparation for Installation 2.1 Installation Precautions  Only allow the professionals installing and disassembling the device and its annex. Before the installation and configuration, please read the related security introduction carefully. z  Adopt the appropriate security measures to avoid the personal injury and equipment damage. z  Please put the device on the dry and flat place and ensure the anti-skid measures. z  Keep the device clean without dirt. z  Do not put the device on the wet place and avoid the device touching the liquid. z  Do not put the device and the installation tools in the walking area. Any Changes or modifications not expressly approved by the party responsible for compliance could void the user’s authority to operate the equipment. This device complies with part 15 of the FCC Rules. Operation is subject to the following two conditions: (1) This device may not cause harmful interference, and (2) this device must accept any interference received, including interference that may cause undesired operation. FCC Radiation Exposure Statement:    This equipment complies with FCC radiation exposure limits set forth for an uncontrolled environment. This equipment should be installed and operated with minimum distance 20cm between the radiator& your body.    This transmitter must not be co-located or operating in conjunction with any other antenna or transmitter  Note: This equipment has been tested and found to comply with the limites for a Class B digital device, pursuant to part 15 of the FCC Rules. These limits are designed to provide reasonable protection against harmful interference in a residential installation. This equipment generates uses and can radiate radio frequency energy and, if not installed and used in accordance with the instructions, may cause harmful interferenceto radio communications. However, there is no guarantee that interference will not occur in a
802.11AC Wireless Access Point Installation Manual                         Chapter 2 Preparation for Installation  2-2 particular installation. If this equipment does cause harmful interference to radio or television reception, which can be determined by turning the equipment off and on, the user is encouraged to try to correct the interference by one or more of the following measures: ---Reorient or relocate the receiving antenna. ---Increase the separation between the equipment and receiver. ---Connect the equipment into an outlet on a circuit different from that to which the receiver is connected.  ---Consult the dealer or an experienced radio/TV technician for help. 2.2 Installation Environment Requirements Before the installation, please check the installation conditions of the device to make sure that the device is in the good operating environment in a long time. Check this with the following aspects. The temperature and humidity environment requirements of the device are as below: Table 2-1 The temperature and humidity index Items  Range Standard working environment temperature (indoor)  -10℃~55℃ Storage temperature  -40℃~70℃ Working humidity (non-condensing)  5%~95% 2.3 Equipment Accessories Please refer to the packing list. 2.4 Installation Tools When installing WL8200 series indoor AP, the following tools may be used (user-owned).      Horizontal ruler Permanent marker Knife Wire stripper Network pliers
802.11AC Wireless Access Point Installation Manual                         Chapter 2 Preparation for Installation  2-3   Impact drill (1) and some supporting drills Rubber hammer Phillips screwdriver Ladder
802.11AC Wireless Access Point   Installation Manual                                     Chapter 3 AP Installation  3-1 Chapter 3 AP Installation  Because the installation position of WL8200 series indoor AP is high normally, the maintenance personal cannot maintain and debug through the console port to login the device after installation. We suggest user conducting the basic configuration according to need before installing the AP to the appointed position. 3.1 Installation Process  Fig 3-1 AP installation flow diagram
802.11AC Wireless Access Point   Installation Manual                                     Chapter 3 AP Installation  3-2 3.2 Checking before Installation Please check the following items before the AP installation: z  Please power to the AP first and connect the AP to the Ethernet, then check the LED status to make sure the AP can work normally.   z  Please ensure to complete the wiring in the position of AP installation. z  WL8200 series indoor AP supports 802.3af and 802.3at standard PoE (Power over Ethernet) power. If user wants to get the maximum performance, user can use the 1000M connection method. z  Please record AP’s MAC address and serial number (MAC address and serial number are on the back of the AP) first for convenient to find and use.  3.3 Ensure the Installation Position The rules of installation position are as below: z  Cut back the obstacles (such as walls) between AP and the user terminal device as much as possible. z  Make the AP’s position far away from the electrical device that can bring the RF noise (such as the microwave). z  The installation position should be hidden as much as possible to prevent disturbing the inhabitants. z  Strictly forbid to install the AP in the environment with hydrocephalus, seepage, water-clock and condensation. And user should avoid the water flowing into the device along the cable.   If there is outdoor cable, please check if installed the network port SPD beside the AP, the network port SPD should be provided by user. 3.4 Install WL8200 Series WL8200 Series can be installed indoor only and there are two methods supported: z  Wall hanging installation z T-keel installation 3.4.1 Wall Hanging Installation If install the AP on the wall, use the supporting expansion screw tubes and screws of the wall mounting. After received the device, the expansion screw tubes and screws as below in the accessory bag can be found.
802.11AC Wireless Access Point   Installation Manual                                     Chapter 3 AP Installation  3-3  Fig 3-2 wall mounting screws   When installed with wall hanging method, please connect the Ethernet cable to the AP first and then install the AP on the wall mounting bracket.    (1) Connect the AP to the wired LAN by using the cable (2) Mark the positions of two holes on the wall and the distance between them is 65 mm. And then punch two holes with the impact drill; (3) Insert the expansion bolt into the holes and use the rubber hammer beating it until the expansion bolt got into the wall completely; (4) Screw the screws in the two plastic expansion screw tubes. Please do not screw them in the tubes completely, keep 3-5 mm out of them; (5) Make the two holes on the back of the AP hang on the two screws; (6) After hanging the AP, push the AP down and the AP will be locked on the wall. The installation steps are as below:         Punch and nail on the wall              Stuck the AP on the screws      Complete the installation Fig 3-3 steps of wall hanging installation  3.4.2 T-keel Installation
802.11AC Wireless Access Point   Installation Manual                                     Chapter 3 AP Installation  3-4  1. The width of T-keel is from 12mm to 30mm. 2. This installation method is only applied to the T-keel but not the other kinds of keels.  The T-keel mounting kit includes two plastic mounting kits and two fixing screws, and they can be found in the accessory bag.  Fig 3-4 mounting kit WL8200 series AP provides two kinds of mounting kits whose width are 15cm and 24cm. The client can choose the right mounting kit according to the actual installation scenario. The steps are as below:  Step 1: Choose the right mounting kit according to the width of the T-keel and use the two fixing screws to fix the mounting kit on the AP as below:  Fig 3-5 Fix the mounting kit on AP  Step 2: Close the mounting kit of AP to the T-keel as below:
802.11AC Wireless Access Point   Installation Manual                                     Chapter 3 AP Installation  3-5  Fig 3-6 Fix the AP on the T-keel  Step 3: Whirl the AP by counterclockwise and closing to the T-keel to make the two diagonal slots of the mounting kit buckle the T-keel. At the same time, the two elastic stoppers on the mounting kit buckle the T-keel for locking. After complete the installation, it is as below:   Fig 3-7 Complete the AP installation 3.5 Connect AP Power WL8200 series indoor AP support the local power and PoE power. User can choose the method according to the actual network environment. 3.5.1 Checking before Power After installing the AP, user should check it before power every time as below: z  When AP use the local power, please ensure the power is connected normally to ground. z  When AP use the 802.3af/at standard PoE power, please ensure the power is connected normally to ground. 3.5.2 PoE Power
802.11AC Wireless Access Point   Installation Manual                                     Chapter 3 AP Installation  3-6 User can use the Ethernet cable to connect the Ethernet interface of the AP and the switch which supports PoE function to power to the AP. WL8200 series adopts the 802.3af/802.3at PoE power supply. When the USB is not used, it adopts the 802.3af PoE power supply; if the USB is used, it should adopt the 802.3at PoE power supply. The device provides two Ethernet interfaces of LAN1 and LAN2. Only LAN1 provides PoE power function as below. The marks of the two interfaces are LAN1 and LAN2 respectively. When the network cable is plugged in, please plug the PoE cable in the LAN1.  Fig 3-8 POE power supply interface 3.5.3 Local Power WL8200 series can also adopt the power adapter for power supply. The power adapter uses 12V DC power and please ensure if the adapter is chosen correctly before powering on.  The power adapter and the power cord are not provided; user should choose to buy them.  Table 3-1 power adapter specifications Items  Explanation power adapter input  100-240V AC power adapter output  +12V 2A    3.5.4 Checking after Power Check if the LED of AP works normally after connecting the power. The explanation of LED status is seen in the product spec.
802.11AC Wireless Access Point   Installation Manual                                     Chapter 3 AP Installation  3-7 3.6 Connect AP to Internet In the actual use, AP can be uplink connected to the Internet or MAN through the Ethernet port. Connect the Ethernet port of the AP to the switch port to achieve the uplink connection.

Navigation menu