Digital Gallery Global SPC658 Alarm Clock with Bluetooth Speaker User Manual SPC658 Manual
Digital Gallery Global Limited Alarm Clock with Bluetooth Speaker SPC658 Manual
Manual.pdf
SPC658 LED Alarm Clock with Bluetooth
Instruction Manual & Warranty
Thank you for your purchase of this quality clock. The utmost care has gone into the design and manufacture of your
clock. Please read these instructions and store them in a safe place for future reference.
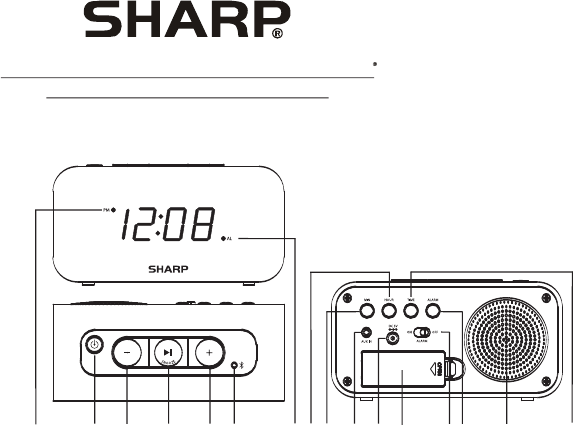
FEATURES
1. PM indicator
2. POWER ON/OFF button
3. VOL - button
4. PLAY/PAUSE/
SNOOZE button
5. VOL + button
6. Bluetooth indicator
7. Alarm indicator
8. HOUR button
9. MIN button
10. AUX IN jack
11. DC 5V jack
12. Battery compartment
13. ALARM ON/OFF switch
14. ALARM button
15. Speaker
16. TIME button
CONNECTING TO THE POWER SUPPLY
Insert the AC adaptor into a 120V AC ~ 60Hz mains outlet and the other end of the cord into the DC 5V jack on the
back of the unit.
INSTALLING THE CLOCK & ALARM BACK UP BATTERIES
The clock time and alarm time (if set) can be maintained during a power failure by 2 x AAA/ LR03 batteries (not
supplied). However, once the power is restarted, check the time to make sure it is accurate and reset if necessary.
INSERTING THE BATTERIES
1. Open the battery compartment at the back of the unit by pressing on the catch and removing the cover.
2. Insert 2 x AAA/ LR03 batteries (preferably alkaline batteries) into the battery compartment, following the polarity
as shown on the diagram inside the compartment.
3. Replace the battery compartment cover.
SETTING THE CLOCK
- Press and hold the TIME button down to activate time setting.
- While holding down the TIME button, press the HOUR button to advance to the correct hour. The PM indicator will
light when the hour is advanced into the PM time.
- While holding down the TIME button, press the MIN button to advance to the correct minute.
- Release the TIME button when the correct time is shown on the display.
SETTING THE ALARM
- Press and hold the ALARM button down to activate alarm setting.
- While holding down the ALARM button, press the HOUR button to advance to the correct hour. The PM indicator
will light when the hour is advanced into the PM time.
- While holding down the ALARM button, press the MIN button to advance to the correct minute.
- Release the ALARM button when the correct alarm time is shown on the display.
USING THE ALARM FUNCTION
- Slide the ALARM ON/OFF button to ON to activate the alarm and the alarm indicator will be lit.
- Slide the ALARM ON/OFF button to OFF to deactivate the alarm and the alarm indicator no longer be visible.
SNOOZE FUNCTION
- Pressing the SNOOZE button after the alarm sounds will cause the alarm to stop and the alarm will sound again in
9 minutes. This will happen each time the SNOOZE button is pressed.
USING BLUETOOTH FUNCTION
- Press the POWER ON button to enter Bluetooth mode. The Pairing Indicator will flash blue quickly.
- Using the native controls on your Bluetooth device, select the “SPC658” in your Bluetooth settings to pair.
When pairing, remain within 3 feet of the unit.
12345678910 11 12 1314 15 16

SPC658
- When successfully paired and connected, the Pairing Indicator will display a solid blue light and a beep will sound
from the unit.
- Use the native controls on the connected Bluetooth device to select a track.
- To play or skip the selected track, use the native controls on the connected Bluetooth device.
- To pause the track, use the PLAY/PAUSE button on the alarm clock.
- Audio played through the connected Bluetooth device will now be heard through the speakers.
- To adjust the volume, press the VOL+/- button on the alarm clock.
After initial pairing, the unit will stay paired unless unpaired manually by the user or erased due to a reset of the device.
FCC WARNINGS
Warning: Changes or modifications to this unit not expressly approved by the party responsible for compliance could
void the user’s authority to operate the equipment.
NOTE: This equipment has been tested and found to comply with the limits for a Class B digital device, pursuant to
Part 15 of the FCC Rules. These limits are designed to provide reasonable protection against harmful interference in
a residential installation. This equipment generates, uses and can radiate radio frequency energy and, if not installed
and used in accordance with the instructions, may cause harmful interference to radio communications.
However, there is no guarantee that interference will not occur in a particular installation. If this equipment does
cause harmful interference to radio or television reception, which can be determined by turning the equipment off and
on, the user is encouraged to try to correct the interference by one or more of the following measures:
- Reorient or relocate the receiving antenna.
- Increase the separation between the equipment and receiver.
- Connect the equipment into an outlet on a circuit different from that to which the receiver is connected.
- Consult the dealer or an experienced radio/TV technician for help.
USING AUX IN FUNCTION
- Connect the 3.5mm audio cable (not included) to the AUX IN jack on the unit and an audio output on an MP3 player
or other audio source.
- Press the POWER ON button to enter AUX IN mode.
- Use the native controls on the connected MP3 player or other audio source to play and control audio played through
the alarm clock.