Digital Gallery Global SXE86002 Bluetooth Clock Radio User Manual SXE86002 Instruction Manual
Digital Gallery Global Limited Bluetooth Clock Radio SXE86002 Instruction Manual
User Manual
Thank you for your purchase of this quality clock. The utmost care has gone into the design and manufacture of your
clock. Please read these instructions and store them in a safe place for future reference.
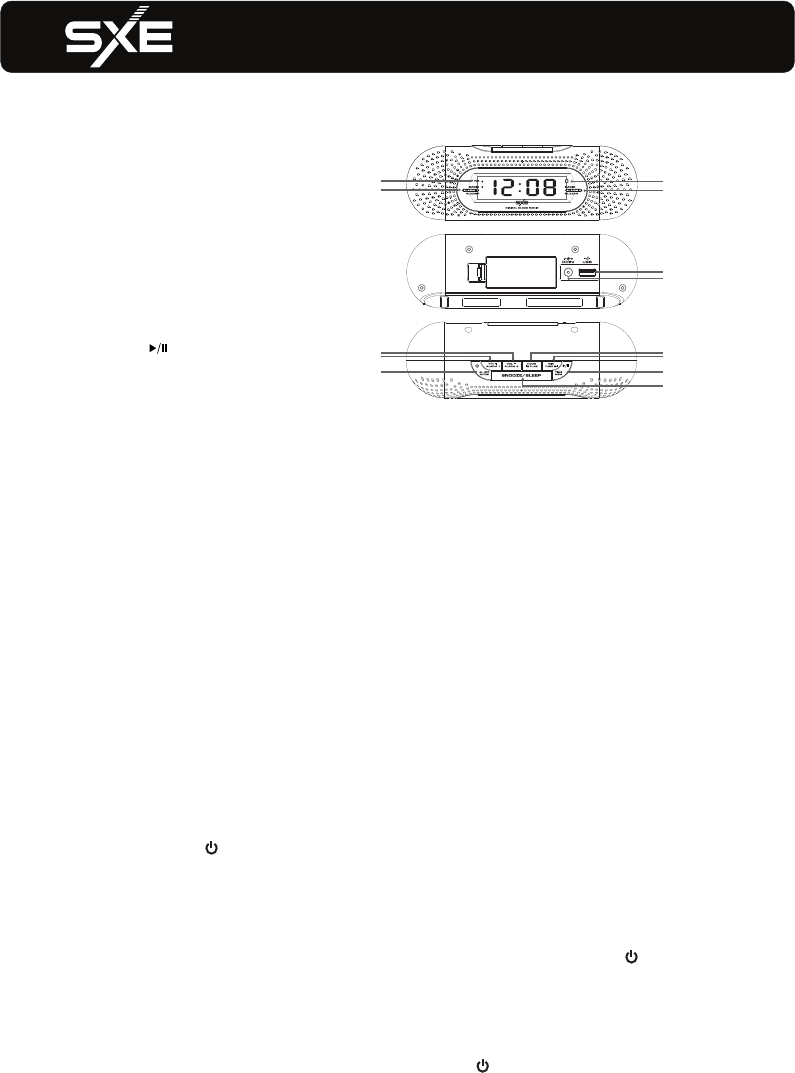
FEATURES
1. PM indicator
2. Alarm 1 indicator
3. Bluetooth indicator
4. Alarm 2 indicator
5. USB charging port
6. DC5V jack
7.VOLUME - / ALARM 2 button
8. VOLUME + / ALARM 1 button
9. POWER ON/OFF / ALARM OFF / MODE button
10. HOUR / TUNING < button
11. MINUTE / TUNING > button
12. TIME / MEMORY / button
13. SNOOZE / SLEEP button
CONNECTING TO THE POWER SUPPLY
Insert the AC adaptor into a 120V AC ~ 60Hz mains outlet and the other end of the cord into the DC 5V jack on the
back of the unit.
INSTALLING THE CLOCK & ALARM BACK UP BATTERIES
The clock time and alarm (if set) can be maintained during a power failure by 2 x AAA/ LR03 batteries (not supplied).
Once the power is restored, check the time to make sure it is accurate and re-set if necessary.
INSERTING THE BATTERIES
1. Open the battery compartment at the bottom of the unit by pressing on the catch and removing the cover.
2. Insert 2 x AAA/ LR03 batteries (preferably alkaline batteries) into the battery compartment, following the polarity
as shown on the diagram inside the compartment.
3. Replace the battery compartment cover.
SETTING THE CLOCK AND ALARM
1. Press and hold the TIME button and the hour/minute digits will flash.
2. Use the HOUR button to set the hours. The PM indicator will light when the hour is advanced into the PM time.
3. Use the MINUTE button to set the minutes.
4. Press the TIME button to confirm.
Setting the alarm
1. To set the alarm time, follow steps (1) to (4) above, using the ALARM 1/2 button, instead of the TIME button.
2. Use the ALARM 1/2 button to select buzzer or radio
USING THE ALARM FUNCTION
1. To enable the alarm function, use the ALARM 1/2 buttons to select buzzer or radio. The selected alarm mode
indicator will light up.
2. The buzzer or radio will come on at the set time.
3. To stop the alarm, press the button. The alarm will sound again the next day.
Note: While the buzzer alarm volume is fixed and cannot be adjusted, the radio alarm volume can be adjusted to your
desired level using the VOLUME buttons. To select a radio station to wake up to, see the section on “USING THE
RADIO”.
SNOOZE FUNCTION
When the alarm sounds, press the SNOOZE button. The alarm mode indicator will flash and the alarm will sound again
after 9 minutes. To cancel the SNOOZE function and repeat the alarm the next day, press the button.
SLEEP FUNCTION
With this function, you can listen to the radio for up to 120 minutes, after which it will turn off automatically.
1. When the unit is switched on, press the SLEEP button repeatedly to select the duration: 120, 90, 60, 45, 30, 15, 05
minutes or OFF.
2. At the end of the set time, the radio turns off automatically.
3. To cancel the sleep function before the end of the set time, press the button to turn off the radio immediately.
INSTRUCTIONS & WARRANTY
Model# SXE86002
1
2
3
4
5
6
7
8
9
10
11
12
13

1. Press the button to turn on the radio and press the MODE button and select FM mode.
2. Press and hold one of the <TUNING> buttons to start automatic tuning up/down. Release the button when the unit is
receiving a station you would like to listen to. For manual fine-tuning, you can press it briefly to adjust the frequency
step by step.
3. Press and hold the button to turn off the radio.
For optimum reception
Extend and position the FM antenna to achieve optimum reception.
Preset radio stations
You can store up to 10 stations.
Use the <TUNING> buttons to search for a station. Press and hold the MEMORY button to store the station and a
number to be assigned for the preset will be displayed.
Listening to a preset station
While listening to the radio, press the MEMORY button to select a preset station. The current time is always displayed.
When you change to Radio mode, the frequency will be displayed for 5 seconds and then the unit will go back to
displaying the time.
1. Press the button to turn on the radio and press the MODE button and select Bluetooth mode. The Bluetooth indicator
will start flashing.
When pairing, remain within 3 feet of the unit.
After initial pairing, the unit will stay paired unless unpaired manually by the user or erased due to a reset of the device.
Use the <TUNING> buttons t
USB CHARGING FUNCTION
To charge, connect your USB device like smartphone to the USB port of this clock. Use only with devices that require
5V USB power. USB port provides 1000mA recharging current. Devices requiring more than 1000mA should not be
used. Charging time may vary for difference devices.
Note: Charging function may not be supported for all phones or electronic devices.
Charging output would be around 80% in radio mode.
FCC Warnings
Warning: Changes or modifications to this unit not expressly approved by the party responsible for compliance could
void the user's authority to operate the equipment.
NOTE: This equipment has been tested and found to comply with the limits for a Class B digital device, pursuant to
Part 15 of the FCC Rules. These limits are designed to provide reasonable protection against harmful interference in
a residential installation. This equipment generates, uses, and can radiate radio frequency energy and, if not installed
and used in accordance with the instructions, may cause harmful interference to radio communications. However,
there is no guarantee that interference will not occur in a particular installation. If this equipment does cause harmful
interference to radio or television reception, which can be determined by turning the equipment off and on, the user is
encouraged to try to correct the interference by one or more of the following measures:
- Reorient or relocate the receiving antenna.
- Increase the separation between the equipment and receiver.
- Connect the equipment into an outlet on a circuit different from that to which the receiver is connected.
- Consult the dealer or an experienced radio/TV technician for help.
Additional Warnings
- The apparatus shall not be exposed to dripping or splashing and that no objects filled with liquids, such as vases,
shall be placed on apparatus.
- Do not place the unit on top of any soft, porous, or sensitive surfaces to avoid damaging the surface. Use a protective
barrier between the unit and surface to protect the surface.
- Do not mix old and new batteries.
- Do not mix alkaline, standard (carbon-zinc), or rechargeable (ni-cad, ni-mh, etc) batteries.
- Batteries should be recycled or disposed of as per state and local guidelines.
USING THE RADIO
USING BLUETOOTH FUNCTION
2. Using the native controls on your Bluetooth device, select the “SXE86002” in your Bluetooth settings to pair.
3. When successfully paired and connected, the Bluetooth indicator will display a solid red light from the unit.
4. Use the native controls on the connected Bluetooth device to select a track.
5. o play or skip the selected track.
6. Use the button to pause the track.
7. Use the VOL+/- buttons to adjust the volume.
This device complies with Industry Canada license-exempt RSS standard(s). Operation is subject to the following
two conditions: (1) this device may not cause interference, and (2) this device must accept any interference, including
interference that may cause undesired operation of the device.
Le présent appareil est conforme aux CNR d'Industrie Canada applicables aux appareils radio exempts de licence.
L'exploitation est autorisée aux deux conditions suivantes : (1) l'appareil ne doit pas produire de brouillage, et
(2) l'utilisateur de l'appareil doit accepter tout brouillage radioélectrique subi, même si le brouillage est susceptible
d'en compromettre le fonctionnement.