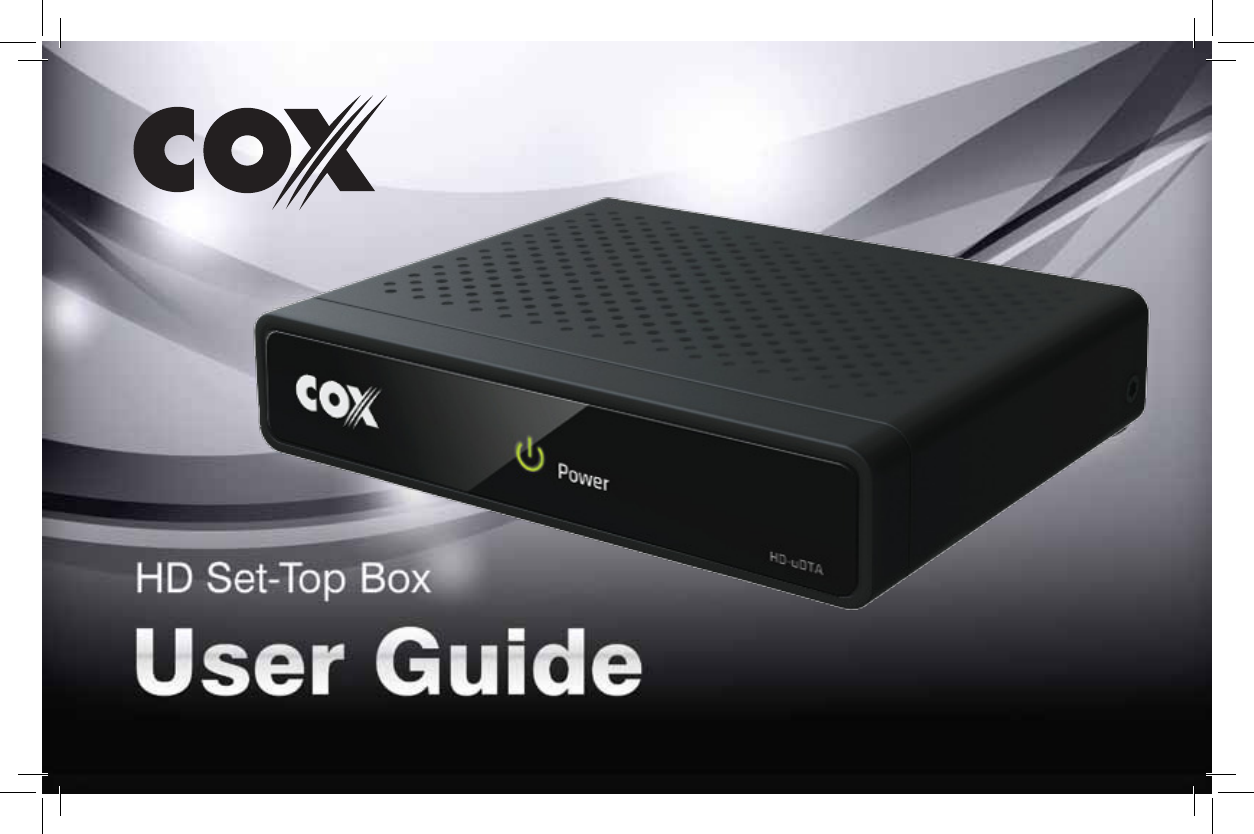
Digital Multimedia Technology DMS-2344UHDS HD Set-Top Box User Manual
Digital Multimedia Technology Co., Ltd HD Set-Top Box
User Manual
WARNING
TO REDUCE THE RISK OF FIRE OR ELECTRIC SHOCK, DO NOT EXPOSE THIS PRODUCT TO RAIN OR MOISTURE. DO
NOT INSERT ANY METALLIC OBJECT THROUGH THE VENTILATION GRILLS OR OTHER OPENINGS ON THE EQUIPMENT.
APPARATUS SHALL NOT BE EXPOSED TO DRIPPING OR SPLASHING AND NO OBJECTS FILLED WITH LIQUIDS, SUCH
AS VASES, SHALL BE PLACED ON THE APPARATUS.
EXPLANATION OF GRAPHICAL SYMBOLS
The lightning flash with arrowhead symbol, within an equilateral
triangle, is intended to alert the user to the presence of “dangerous
voltage” within the product’s enclosure that may be of sufficient
magnitude to constitute a risk of electric shock to persons.
The exclamation point within an equilateral triangle is intended
to alert the user to the presence of important operating and main-
tenance (servicing) instructions in the literature accompanying
the product.
1. Read these instructions.
2. Keep these instructions.
3. Heed all warnings.
4. Follow all instructions.
5. Do not use this apparatus near water.
6. Clean only with a dry cloth.
7. Do not block any of the ventilation openings. Install in
accordance with the manufacturer’s instructions.
8. Do not install near any heat sources such as radiators,
heat registers, stoves, or other apparatus (including
amplifiers) that produce heat.
9. Do not defeat the safety purpose of the polarized or
grounding type plug. A polarized plug has two blades
with one wider than the other. A grounding type plug has
two blades and a third grounding prong. The wide blade
or the third prong is provided for your safety. When the
provided plug does not fit into your outlet, consult an
electrician for replacement of the obsolete outlet.
10. Protect the power cord from being walked on or pinched
particularly at plugs, convenience receptacles, and the
point where they exit from the apparatus. Ensure that the
power cord receptacle is accessible such that power can
be easily disconnected if required.
11. Only use the attachments/accessories specified by
the manufacturer.
12. Use only with a cart, stand, tripod, bracket, or table
specified by the manufacturer, or sold with the apparatus.
When a cart is used, use caution when moving the cart/
apparatus combination to avoid injury from tip-over.
13. Unplug this apparatus during lightning storms or when
unused for long periods of time.
14. Refer all servicing to qualified service personnel. Servicing
is required when the apparatus has been damaged in
any way, such as power supply cord or plug is damaged,
liquid has been spilled or objects have fallen into the
apparatus, the apparatus has been exposed to rain or
moisture, does not operate normally, or has been dropped.
CAUTION: TO REDUCE THE RISK OF ELECTRIC SHOCK.
DO NOT REMOVE COVER (OR BACK).
NO USER-SERVICEABLE PARTS INSIDE.
REFERS SERVICING TO QUALIFIED SERVICE PERSONNEL.
CAUTION
RISK OF ELECTRIC SHOCK
NO NOT OPEN
HD Set-Top Box
Important Safety Instructions
FCC Information
This equipment has been tested and found to comply with the limits for a
Class B digital device, pursuant to Part 15 of the FCC Rules. These limits are
designed to provide reasonable protection against harmful interference in a
residential installation.
This equipment generates, uses and can radiate radio frequency energy
and, if not installed and used in accordance with the instructions, may cause
harmful interference to radio communications. However, there is no guaran-
tee that interference will not occur in a particular installation.
If this equipment does cause harmful interference to radio or television re-
ception which can be determined by turning the equipment off and on, the
user is encouraged to try to correct the interference by one or more of the
following measures:
• Increase the separation between the equipment and receiver.
• Connecttheequipmentintoanoutletonacircuitdifferent
from that to which the receiver is connected.
• Consult the dealer or an experienced radio/TV technician for help.
• Onlyshieldedinterfacecableshouldbeused.
Finally, any changes or modifications to the equipment by the user not
expressly approved by the grantee or manufacturer could void the user’s
authority to operate such equipment.
Disconnection Device
Disconnect the main plug from the apparatus, if it’s defective. And please call a repair man in your location. When used outside of the U.S., it may be used
HAR code with fittings of an approved agency is employed.
CAUTION
These servicing instructions are for use by qualified service personnel only. To reduce the risk of electric shock do not perform any servicing other than that
contained in the operating instructions unless you are qualified to do so.
4 5
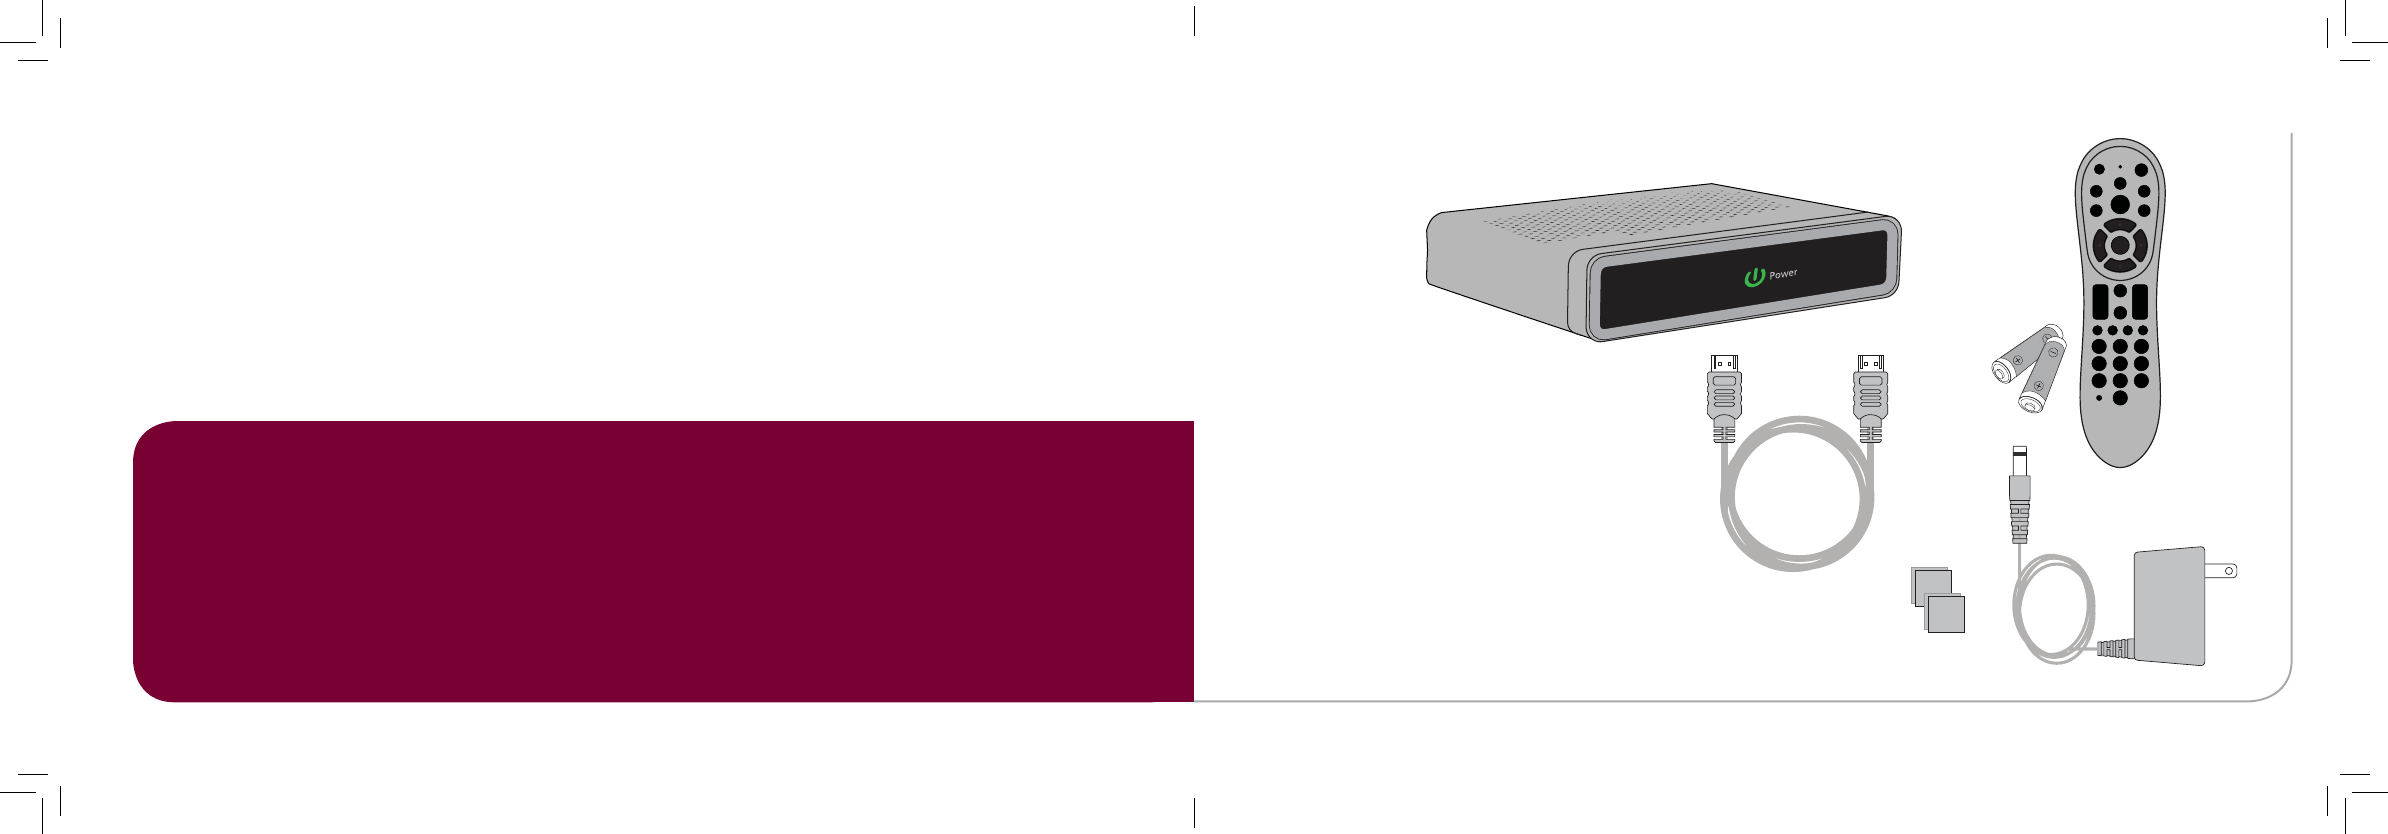
Getting Set Up
HD
Thank You for choosing the High-Definition Set-Top
Box (HD STB). You can now enjoy viewing Standard-
Definition (SD) or High-Definition (HD) programming
on an analog or digital television set. When con -
necting the Set-Top Box with an HDMI cable to your
HDTV, you will be able to view HD programming
with easy-to-use on-screen menus
and navigation. In the user guide ê
Cable Connections 6
HDTV or SD Coaxial A/V
Activation 9
Remote Control 10
Pair your remote control 11
Remove remote control pairing 11
Menu 12
FAQs 14
Specifications 16
In the box ê
HD Set-Top Box
Power Cord
Adhesive
Velcro
Remote with
Batteries
HDMI Cable
Setup your HD STB by
following the connection
diagrams on page 6-8.
Activate your HD STB
by calling your cable
provider or going online
(if available).
Pair your remote with your
HD STB and TV by following
the directions on page 11.
1 setup 2 activate 3 pair remote
Let’s get started! è
TV
M enu
Exit
Last
Pg Pg
Info
VOL CH
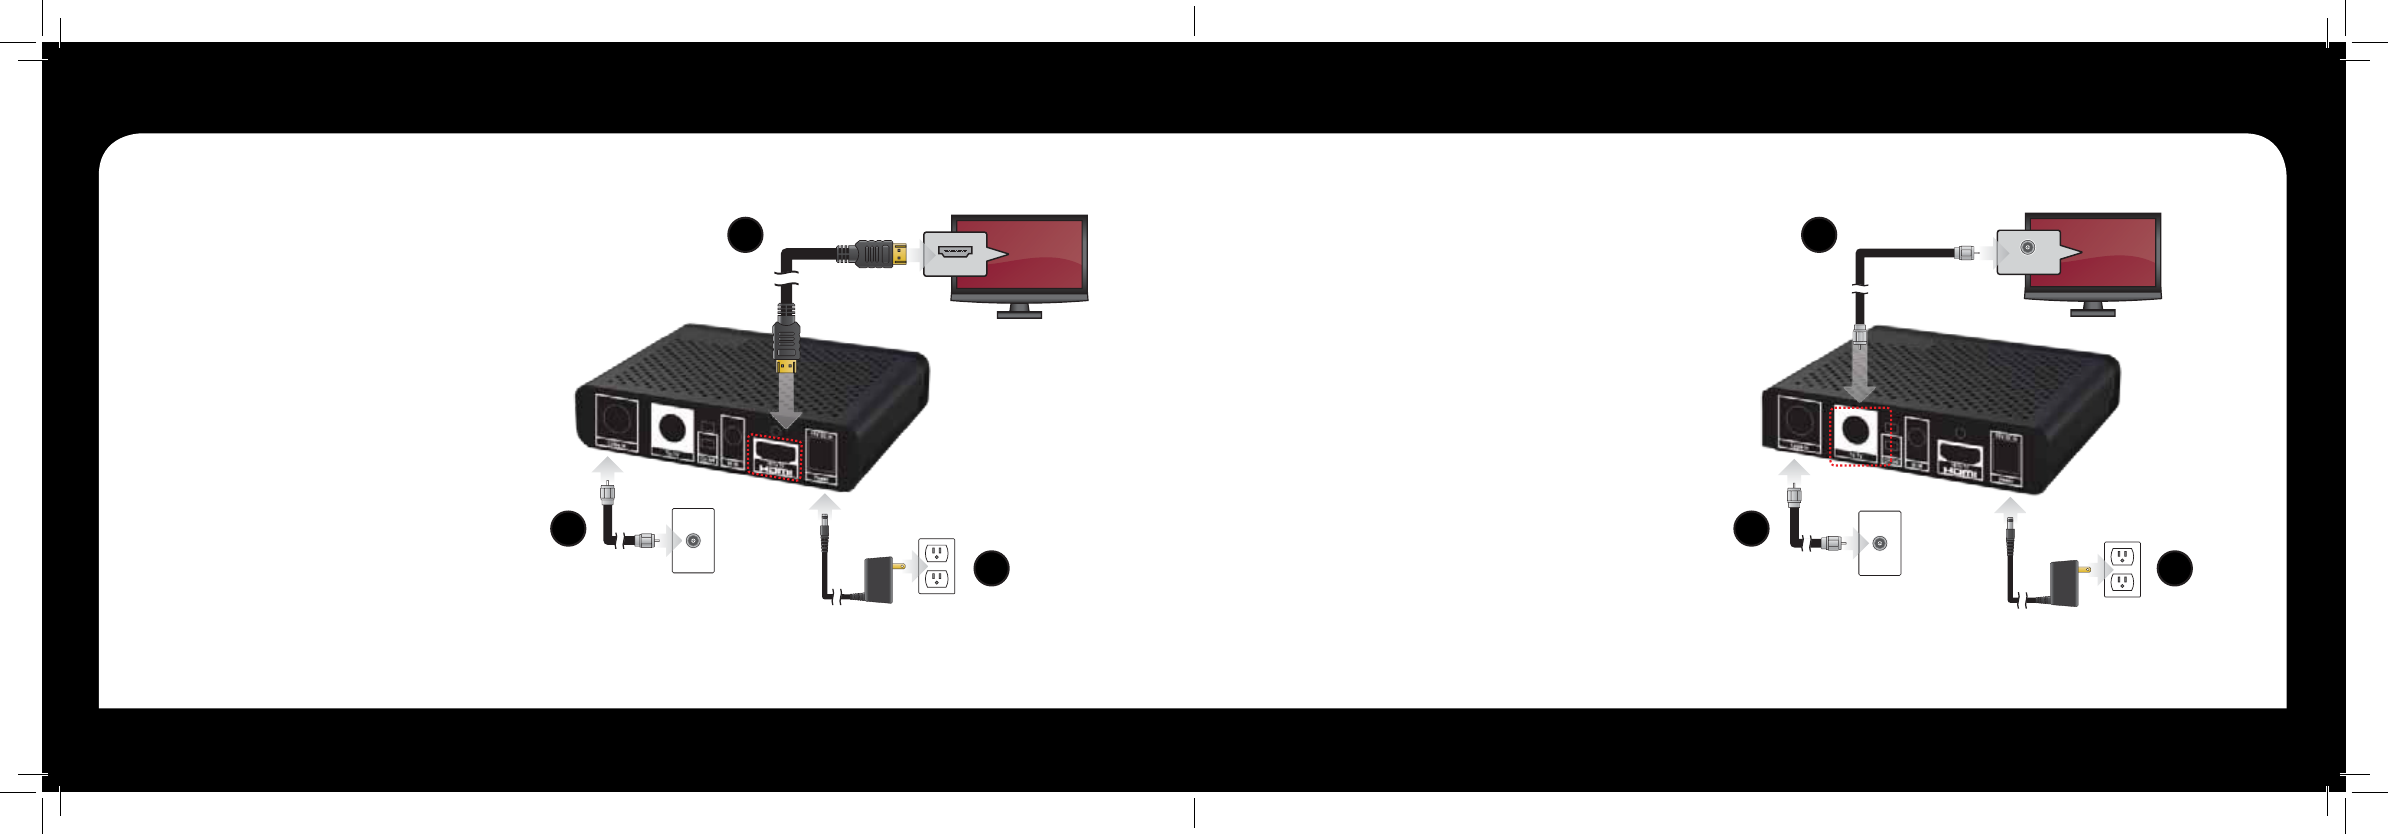
6 7
HDMI (IN)
To TV
To Electrical Outlet
To Coaxial Wall Outlet
1
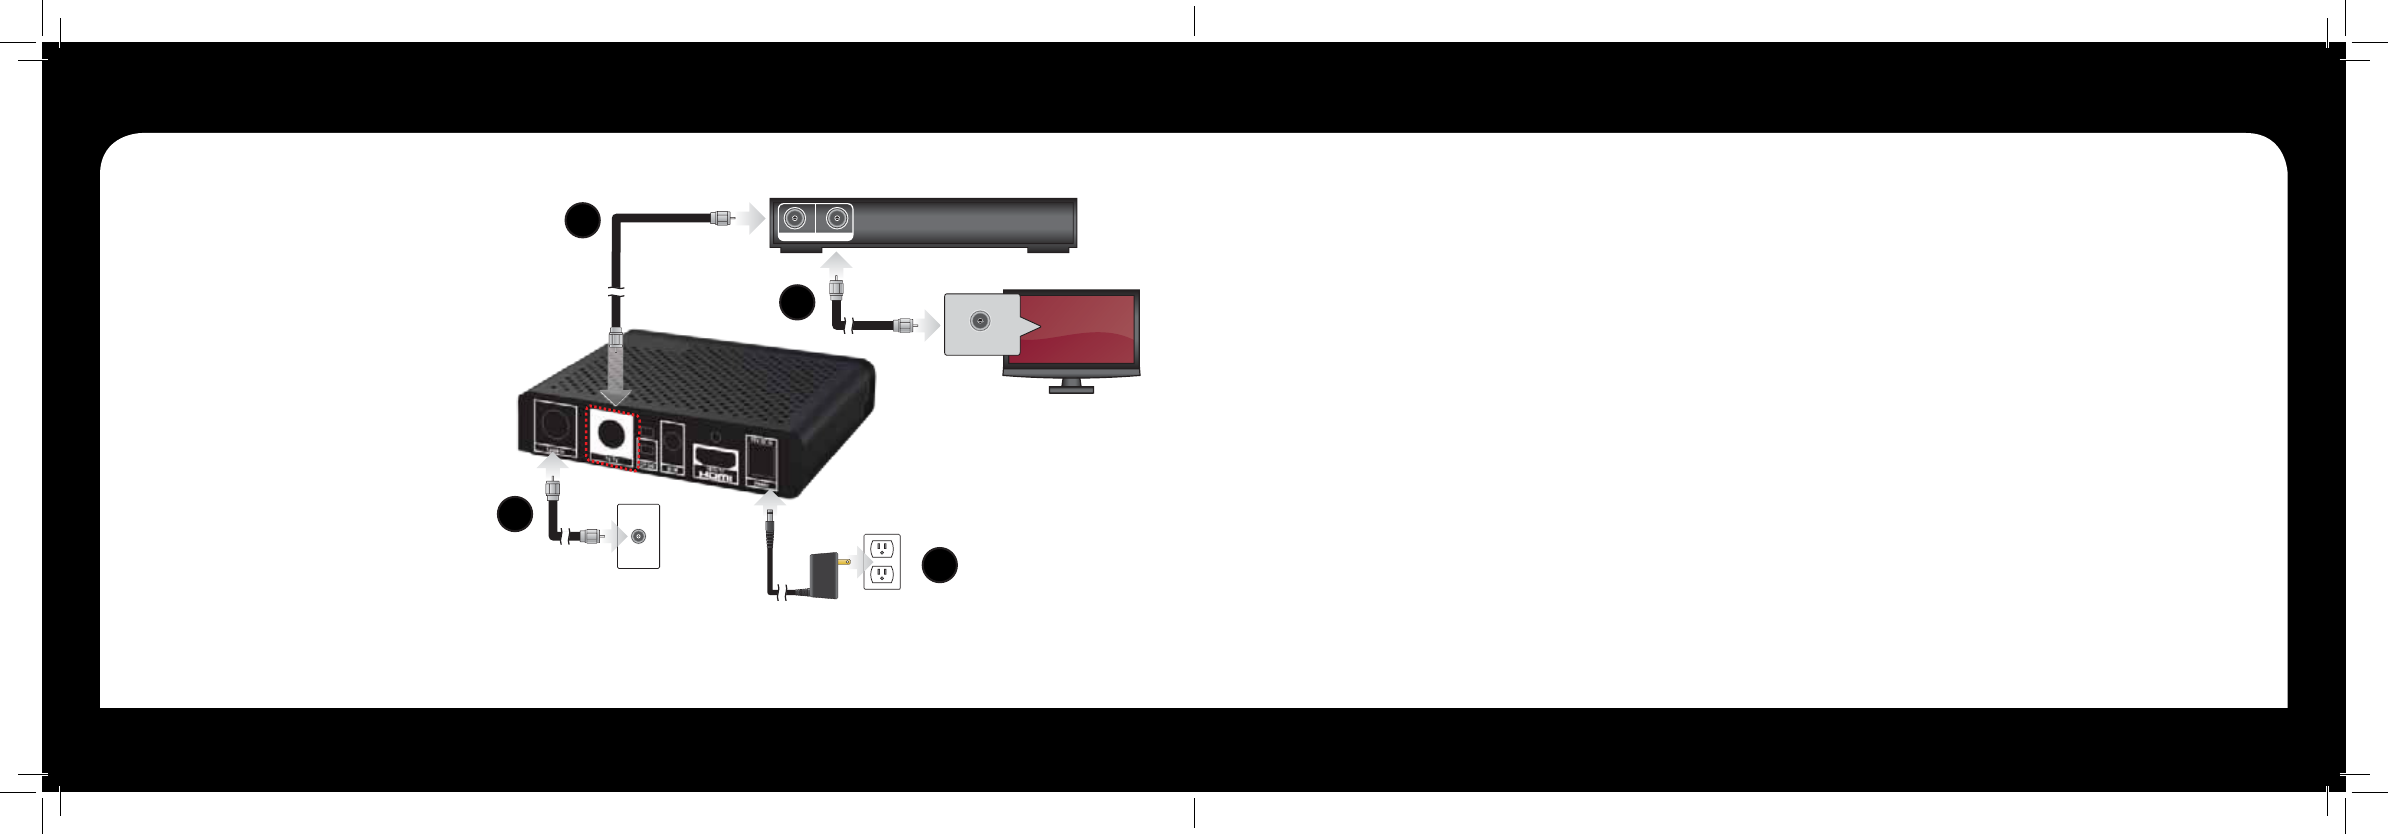
Cable Connections
CABLE IN
To TV
To Electrical Outlet
To Coaxial Wall Outlet
HDMI Connection è
HDMI allows you to take full advantage of the
HD Set-Top B ox hig h-definition digital features.
1. Connect a coaxial cable to the cable
wall outlet and the “CABLE IN” port
on the HD Set-Top Box.
2. Connect the HDMI cable to the
“HDMI” port on HD Set-Top Box and
the “HDMI” port on your HDTV.
3. Connect the power cord to the
electrical wall outlet and the “DC 5V
IN” port on the HD Set-Top Box.
Note: HDMI cables carry audio and video to the TV.
SD Coaxial
Audio/Video Connection è
1. Connect a coaxial cable to the cable
wall outlet and the “CABLE IN” port on
the HD Set-Top Box.
2. Connect another coaxial cable to the
“RF OUT” port on the HD Set-Top
Box. Connect the other end to the
input port on the TV.
3. Connect the power cord to the
electrical wall outlet and the “DC 5V
IN” port on the HD Set-Top Box.
Note: Make sure the channel 3/4 switch matches the channel
on your TV. For example, if your cable box is set to “3”, make
sure your TV is on channel “3”.
Cable Connections
1 1
2 2
3 3
8 9
VCR/DVD Player
Connection è
1. Connect a coaxial cable to the cable
wall outlet and the “CABLE IN” port
on the HD Set-Top Box.
2. Connect another coax cable to the
“To TV” port on your HD Set-Top Box
to the “Cable/RF In” port on your
VCR/DVD Player.
3. Ensure coax cable is still connected
from the output port on your VCR/DVD
Player to the “Cable/RF In” port on
your TV.
4. Connect the power cord to the electrical
wall outlet and the “DC 5V IN” port on the
HD Set-Top Box.
To Electrical Outlet
To Coaxial Wall Outlet
CABLE IN
VCR
To VCR
To TV
Cable/RF In Loop Out 2
1. Complete the Cable Connection
steps prior to activating.
2. Have the HD STB Serial Number
available. This can be found on the
bottom of the HD STB or on the
side panel of the product packaging.
3. Have your cable provider customer
account number accessible. This is
typically found on your cable
provider billing information.
4. Activate your HD STB by calling
your cable provider directly.
Note: Installation and activation will not impact your
current existing cable service.
Activate your HD Set-Top Box
Activation essentially “turns on” your digital box in your home and on your cable provider’s network.
Cable Connections Activation
1
2
3
4
Note: Make sure the channel 3/4 switch matches the channel on your TV and VCR/DVD Player. For
example, if your cable box is set to “3”, make sure your TV and VCR/DVD Player is on channel “3”.
10 11
3
Remote ControlRemote Control
NOTE
Remove remote
control pairing
If you would like to
use your remote
control for a different
set-top box, you
must first un-pair
the remote control
from the current
device. Follow the
steps below to
remove the pairing.
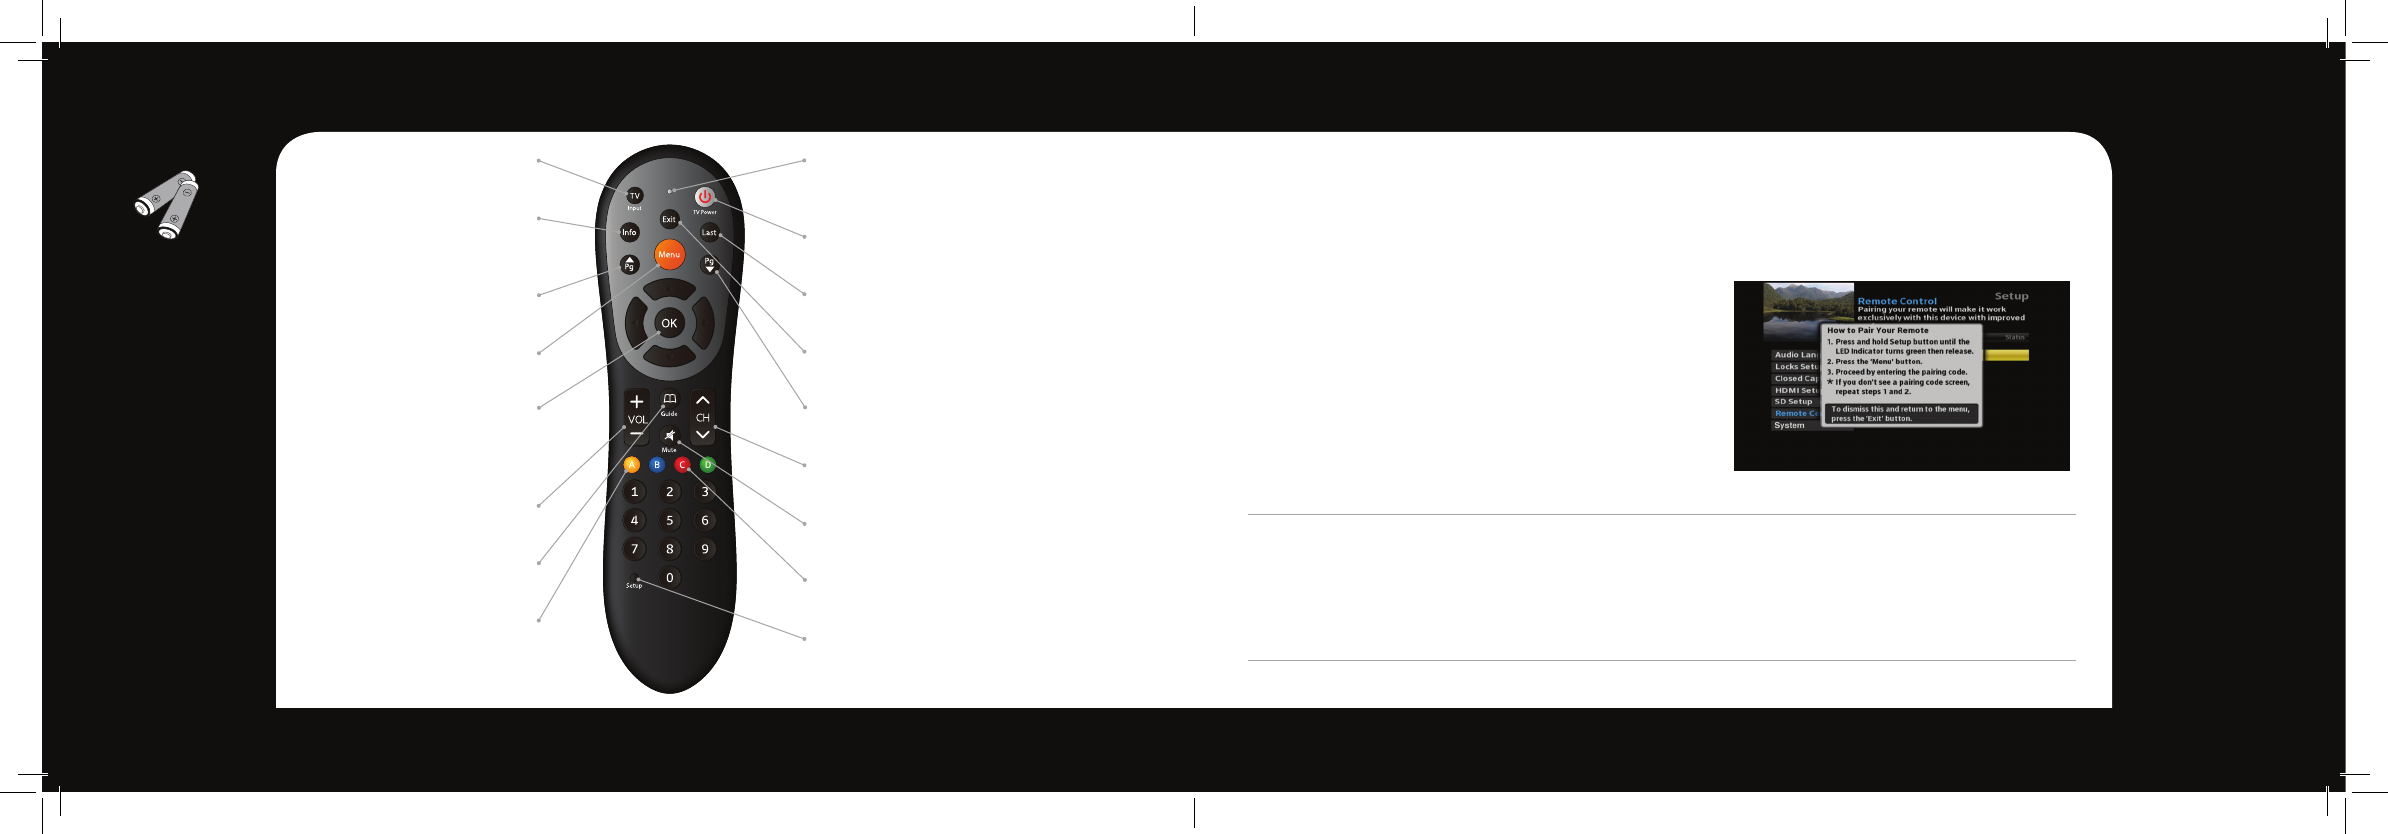
Pair your remote control with your HD STB
1. Press the Menu button.
2. Select Remote Control and then select
Remote Control Pairing.
3. Press and hold Setup button until the
LED Indicator turns green.
4. Press the Menu button.
Please allow a few seconds for the menu to display
5. Proceed by entering the pairing code displayed
in blue on the pairing code pop-up screen. Note: If you don’t see a pairing code screen, repeat steps 1 and 2.
To force remote control to send volume
control commands to the TV
1. Press and hold Setup button until the
LED Indicator turns green.
2. Press the volume up button
To force remote control to send volume
control commands to the HD STB
1. Press and hold Setup button until the
LED Indicator turns green.
2. Press the volume down button
Installing your HD Set-Top Box out of sight (pair remote) ê
Your remote control can be paired directly with your HD STB, allowing you to place the device out
of sight (in an entertainment center or behind your TV, for example). Once your remote is paired to
a specific HD STB, it will not control any other set-top box in your home.
Note: Refer to the Remote Control Programming and Operating instructions, provided with your remote control, to program your remote to
work on your TV and for more detailed information regarding pairing your remote.
TV Input*
Toggle TV Input
Info
View the channel name
and number, date and time
Page Up
Now & Next page up
Menu
Display the Main Menu
OK
Select a highlighted item within
Menus. Display channel name
and number, date and time
Volume
Audio up & down
Guide
View Now & Next
Yellow A
Toggle to secondary language
(if available)
*TV must be programed with the remote
LED Indicator
Button press and special
command indication
TV Power*
Turn your TV on or off
Last
Return to the previous channel or menu
Exit
Return to watching TV
Page Down
Now & Next page down
Channel
Channel up & down
Mute
Sound on & off
Red C
Toggles through available closed captioning
Setup
Program your remote control to your STB
and TV
12 13
Using the
RF output?
SD Setup
Use SD Setup to
scale video to
your TV.
Select SD Setup
and press OK.
The following op-
tions are available;
Aspect Ratio, Just
Scale, Box, and Pan
and Scan.
Menu Menu
Menu
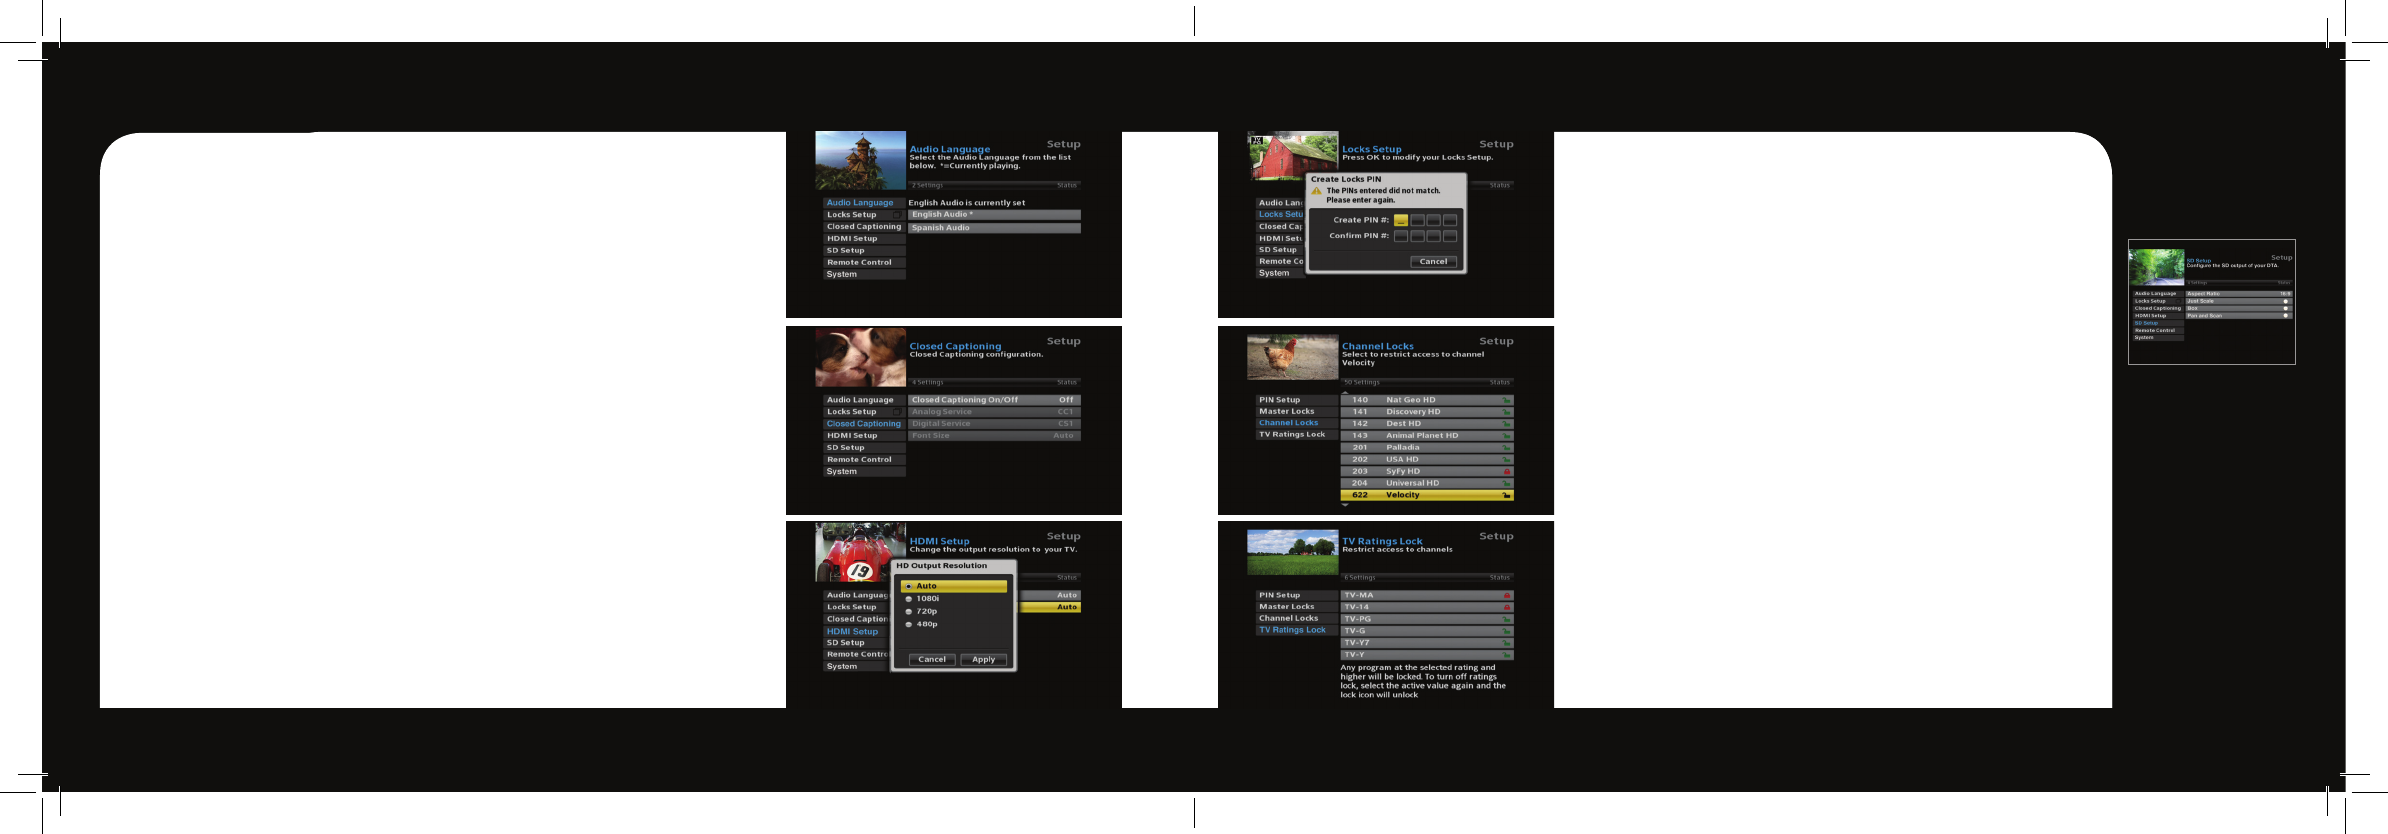
Press the Menu button on your remote control to access the main menu. The menu
will allow you to update your HD set-top box settings. Press the arrow buttons to
navigate through the menu. Press Exit at anytime to return to watching live TV.
Audio Language è
Select Audio Language, press the OK button on your remote.
Scroll to select the desired Audio Language (if available).
Closed Captioning è
Select Closed Captioning, press OK to change status from On/Off.
When Closed Captioning is turned On. The following options are available;
Analog Service, Digital Service, Font Size. Scroll through the available settings
using your arrow buttons. Ensure you select Apply to change the CC setting.
HDMI Setup è
Select TV Aspect Ratio and press the OK button. Select Auto (recommended),
4:3, or 16:9 and press the OK button to select, scroll to Apply and select.
Select TV Output Resolution and press the OK button. Scroll to highlight Auto
(recommended), 1080i, 720p, or 480p and press the OK button to select, scroll
to Apply and select.
Locks Setup ç
The first time you enter Locks Setup, it will prompt you to
Create Locks PIN. Enter your desired PIN and keep that in a safe
place to refer to later. This PIN will be needed to Change PIN,
Clear PIN and set Channel Locks.
Set Channel Locks í
Select Channel Locks, a channel list will appear. Scroll up/
down to highlight the channel you would like to lock. Press the
OK button and you will see the unlock icon change to lock. This
will indicate the channel has been locked and will require a PIN
to be entered to view.
TV Ratings Lock í
Choose TV Ratings Lock to lock programs by their TV Rating.
Use the Arrow (▲/▼) buttons to highlight the TV Ratings you
want locked and select OK to lock/unlock the ratings. When you
select a rating it will lock all programs with that rating and higher.
For example if you lock TV-14 it will lock all programs with TV-14
as well as those with TV-MA.
NOTE: Not all programs will have a TV rating and any unrated programs will
never be locked regardless of the TV Ratings Lock selected.

14 15
FAQsFAQs
powered on and set to the appropriate input source.
Refer to your home theater manual for more
detailed instructions.
Why won’t my HD Set-Top Box respond when I press a
button on the remote control?
• Checkthebatteriesforpossiblereplacement.Refer
to pages 5-6 for more detailed instruction on the
remote control and batteries.
• Refertopage6forinstructionstopairyour
remote control.
What if I forgot my PIN Code?
• Contactyourcableproviderandtheywillbeabletoreset
them back to the default. That will allow you to enter a
new PIN code. Refer to page 8 to learn how to change
your PIN code.
How do I control what my child watches?
• Youcanrestrictviewingofcertainmaterialonyour
TV in the Locks Setup menu. Refer to page 8
for instructions.
Is it necessary to get a new TV to watch HDTV?
• ToviewHDchannelsfromyourcableproviderintheir
native resolution, a high-definition “capable” or “ready”
television is required.
• Youwillalsoneedtouseadigitalcableconnection
such as the HDMI cable to view HD channels. Refer to
the CABLE CONNECTIONS section on page 3 for
more information.
FAQs
Why won’t my HD Set-Top Box turn on?
• Doublecheckthatthepowercordisconnectedtothe
HD Set-Top Box and the AC wall outlet.
• IftheHDSet-TopBoxisconnectedtoanotherunit
(such as a switched outlet or DVD player), verify that
the unit is powered on.
Why do I have no sound when viewing cable channels?
• VerifythattheMUTEbuttononremotecontrolhasnot
been pressed; try pressing the MUTE button to restore
sound for both the HD Set-Top Box and television.
• VerifythatthevolumeontheHDSet-TopBoxisnot
turned down. Press the volume up on the Set-Top Box
remote. Volume level will be displayed on the bottom
of the screen.
• Doublecheckyouraudioconnections.Refertothe
CABLE CONNECTIONS section on page 3 to verify
the correct cables are being used for the audio ports. If
they match the diagrams, make sure they are firmly
connected to the ports on both the TV and HD Set-Top Box.
What should I do if there is no video or picture on the
TV screen?
• TryanotherchannelorenteryourPINcode,thischannel
may be restricted from viewing.
• VerifythatyourTVismatchingthesettingonthe
HD Set-Top Box. For instance, if you’ve connected using
the coaxial jumper cable, make sure you have the same
channel selected on the TV and 3/4 switch on the back of
the HD Set-Top Box. Refer to CABLE CONNECTIONS
section on page 3 for more details.
• Doublecheckallyourcableconnections,including
verifying your coaxial cable is securely tightened onto
both the cable wall outlet and the INPUT port of your
HD Set-Top Box. Verify that all video cables between the
HD Set-Top Box and the TV are firmly connected. Refer
to the CABLE CONNECTION section on page 3 for
more detailed information regarding the correct
connections and alternative video cable options.
• IftheHDSet-TopBoxvideooutputisconnectedtoa
home theater unit, verify that the home theater unit is

16 17
SpecificationsSpecifications
Specifications
GENERAL FEATURES
• MPEG-2 / MPEG-4 Part 10 / H.264
• Video Display format with NTSC/480p/576p/720p/1080i
• Favorite channel, Parental Lock
• Dolby Digital AC3
• HDMI 1.3a with HDCP 1.1
• Automatic search for newly added transponder (Network Auto Search)
• Stores up to 5000 channels
• Plug-and-play data transfer system (DSR to DSR)
• Timer function, automatically turns On/Off by setting function
(daily, weekly, monthly and one time)
• Automatic reserved channel moving system
• Provide Electronic Program Guide (EPG)
• More than 800 pages OSD Teletext (DVB ETS 300 706)
and Subtitle function support
• Support for various video output : HDMI, RF 3/4 Mod.
• 256 colors On-Screen-Display
• PAL/NTSC automatically conversion
• Last channel automatically saving
ENGINEERING SPECIFICATION
1. Front-End
1-1. Tuner Input
Input frequency : 105 to 1002 MHz
Connector : F-Type (1 Input)
1-2. Demodulator
Demodulation type :demodulation and FEC decoding
in accordance with ITU-T J.83 Annex-A/B/C
Demodulation - 64/256-QAM
Symbol rate : 5.5Msps max
IF Bandwidth : 6,7,8 MHz
2. Demultiplexing
In accordance with ISO 13818-1.
- Maximum input band transport stream rate supported is 100 Mbps.
- Maximum combined transport stream burst rate can be greater than
262Mbps based on usage.
- Maximum combined transport stream average rate after PID filtering
is 262Mbps.
- Supports 256 PID filters via 128 PID channels.
3. Video Processing
Decompression
Video buffer
Video output
Video format
4. Audio Processing
Decompression
Outputs
- H.264/AVC main and high profile to level 4.1
- VC-1 advanced profile @ level 3
- VC-1 simple and main profile
- HD MPEG-2 and SD MPEG-2
- AVC/MPEG-2/VC-1 still picture decode
simultaneous with live decode
- 512 Mbits of DDR DRAM is provided
- 480i/480p/576i/576p/720p/1080i/1080p
(24/30 Hz) output formats
- Macrovision 7.1 Support
- 4:3, 16:9
- MPEG I Layer 1, 2 / MPEG I Layer 3 (MP3)
- AAC LC, AAC LC+ SBR Level 2, AAC+
Level 2, AAC+ Level 4
- Dolby Digital, Dolby Digital Plus
- Windows Media Audio (WMA)
- Stereo Channel
- Dual Mono
- Joint Stereo Channel
- Mono
- Spdif with AC-3
5. Baseband Inputs / Outputs
RF Output Signal
Video Carrier Frequency
6. HDMI Outputs
Connector type
7. Microprocessor
Microprocessor
Clock frequency
DDR-RAM Memory
Flash memory
8. Remote Control unit
Transmission Type
Number of keys
Operating distance
Batterys
- NTSC
- 61.25 ± 90 KHz US 3 CH
- 67.25 ± 90 KHz US 4 CH
- IEC169-24, 1 x F-Type
- 1 x HDMI 1.3a
- 19 pin Type-A HDMI connect
- BCM7572QKFEB03G
- 432MHz
- 128Mbyte (DDR2-RAM 1G x 1)
- 16Mbyte(Serial Flash)
Infrared
21 Keys
15 m
AA

18 19
SpecificationsSpecifications
9. Power Supply
Type
Main Output voltage
Nominal power consumption
10. Physical Characteristics
10-1. Front Panel
Display
10-2. Rear Panel
Connectors
- Wallmount Type External Adapter
(100 V ~ 120 V AC @ 50 Hz/60 Hz, 0.18 A)
- 5V DC / 1.5A
- 5Watts
- 2 color LED
- 1 RF Input (F-type)
- 1 x CH 3/4(Slide Switch)
- 1 x RF Modulator (1 F-type)
- 1 x IR Input(3.5mm)
- 1 x HDMI
- 1 x DC Power Jack
MEMO

© 2013 Evolution Digital, LLC. All Rights Reserved.
Manufactured under license from Dolby Laboratories. Dolby and the double-D symbol are trademarks of Dolby Laboratories.
The information should preferable be on the exterior of the apparatus, excluding the bottom. It is, however,
permissible to have it in an area that is easily ACCESSIBLE BY HAND, for example under a lid, or on the exterior
of the bottom of a PORTABLE APPARATUS or an apparatus with a mass not exceeding 7kg, provided that the
location of the marking is given in the instructions for use.