DigitalWay MPIO-FG100 MP3 Player User Manual Contents
DigitalWay Co., Ltd. MP3 Player Contents
users manual

Contents
. Technical Specifications
. Control’s Overview
. Listening to Music
. Listening to FM Radio
. Recording
Technical Specifications
Dimensions 31(W) x 82(H) x 28.5(D)/mm
Weights
Display Device 4-line2 Areas Color OLED (Orange & Blue)
Memory 256MB, 512MB, 1GB
Decoding MP3, WMA
Encoding MP3
Frequency Range 20Hz ~ 20KHz
S/N ratio 90dB
THD 0.1
Audio
Out Power 18mW/Channel (EU: 6mW/Channel)
Frequency Band 76 ~ 108MHz
S/N ratio 50dB
FM
Preset Station 20
Menu English
Languages File Information 55 languages
PC Interface USB 2.0(Compatible with USB 1.1)
File Transfer Speed Approx. 40Mbps
PC Interface
Supported OS Windows: 98/SE/ME/2000/XP
Macintosh: Mac OS Version 9.2 and higher
Type AA × 1
Battery Playing Time Approx. 45 hours
Operating Temperature 0˚C ~ 40˚C
. Actual usable capacity can be changed via the logic file system regardless of the physical
capacity of FG100.
. The warranty does not cover PC connections with the use of extended cords like the USB hub,
etc.
. Data transfer rate may vary depending on the computer systems.
. Playing time may vary depending on the usage, configuration and condition.
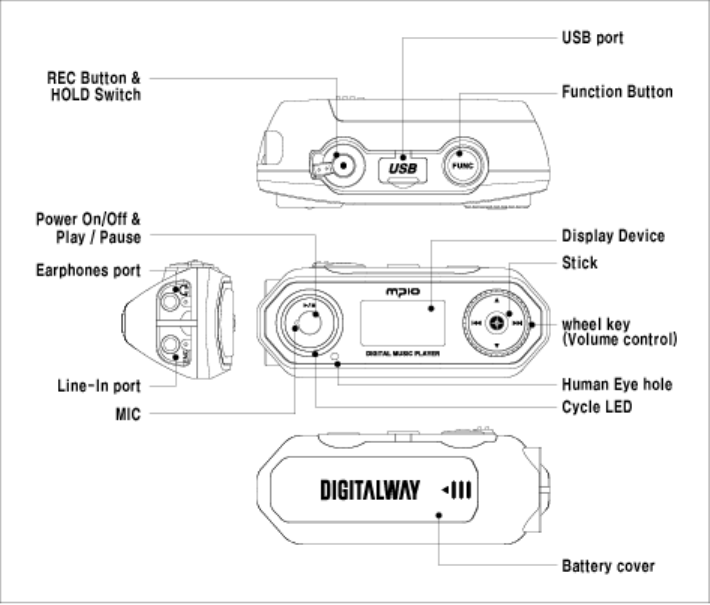
Control’s Overview

Listening to Music
Step 1. Driver Installation
It isn’t needed to install driver with windows me/2000/XP.
The software should be installed before connect player and computer.
1. Insert the Install CD into the CD-ROM driver.
: The Install Menu Screen will display automatically.
2. Click on the Driver in install Menu.
Step 2. Transfer Music
1. Turn the player on by pressing ▶/■ button for long.
2. When you connect your player and PC, the PC recognizes it as a removable disk that
you can use to transport music files. This means you can drag and drop files using
Microsoft Windows Explorer or save a file by selecting the player.
3. Once you're finished transferring files, be sure to Disconnect the USB Cable from the
player as described in the next section.
Step 3. Disconnect the Player and PC
It is important to follow this procedure to disconnect the USB cable from your player and PC.
If you do not, you risk losing files as they are transferring to your player.
1. Click the USB icon on the Windows taskbar usually located at the bottom right of the
Desktop.
2. From the popup menu, select the Stop command.
3. After a notification message displays, you may disconnect the cable from the player.
Step 4. Listening to Music
. Power On/Off: Pressing ▶/■ button for long.
. Playback/Pause: Pressing ▶/■ button.
※ Information for Playback Mode
Selecting the previous/next track & Forward/Rewind function
In case of pause status:
If you push the stick button to right or left, player plays the next track or previous track.
In case of during playback:
If you push the stick button to right or left, player performs the forward or rewind function.
Volume control
Turn the Wheel key to down or up (Volume Level: 0 ~30).
Down: To increase volume
UP: To decrease volume
Navigation
1. Press the stick button during playback.
2. Select the music file by push the stick button.
3. Press the ▶/■ button to play music.
※ Enter the Folder & Escape the Folder
To move to the sub-folder, press the stick button.
To move to the upper folder, press the FUNC button.
Repeat Segmentation
1. Press the REC button at the start point.
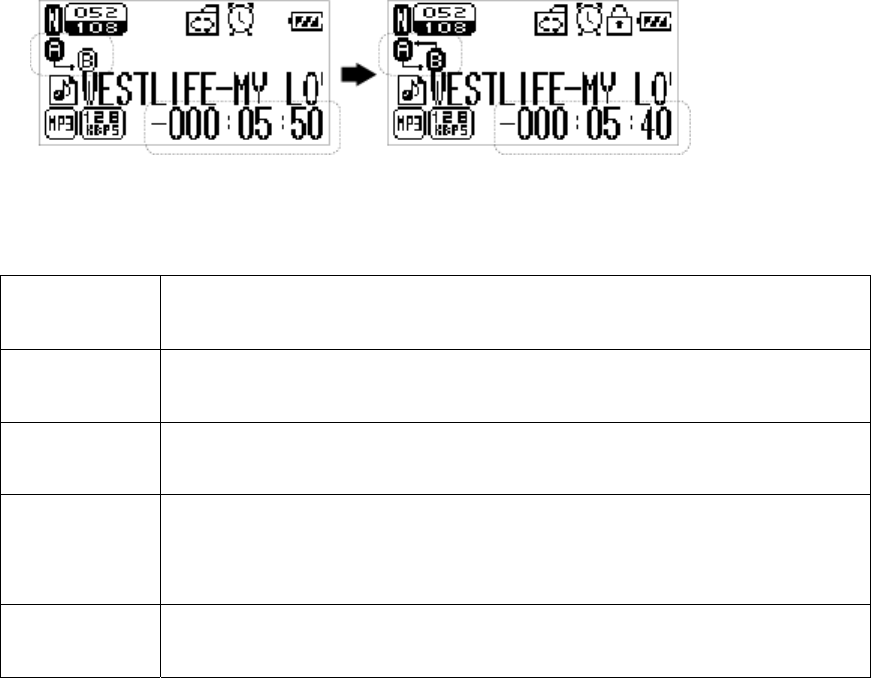
2. Press the REC button again at the end point.
3. If you want to cancel this function, press the REC button again.
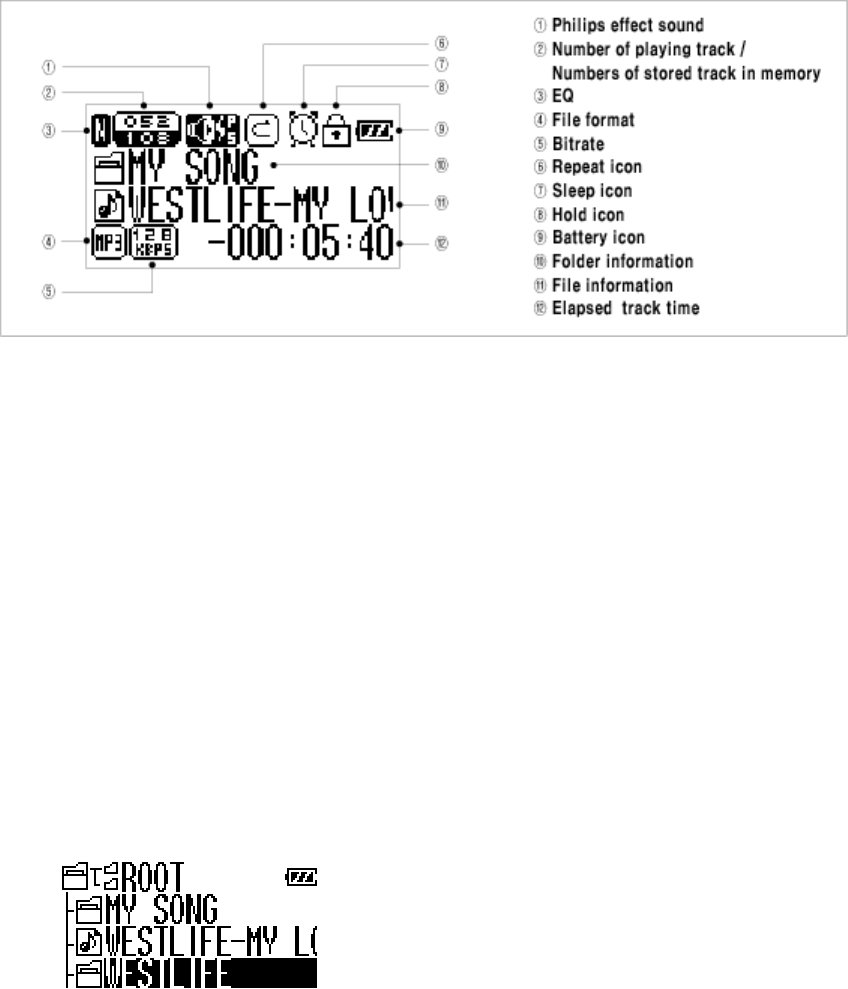
Menu Structure for Playback Mode
Mode
Select the Main Mode.
1. Playback 2. Recording 3. FM Tuner
EQ Select the EQ by music genre
1. Normal 2. Pop 3. Rock 4. Jazz 5. Classic 6. Vocal 7. User 8. Reset
Sound Effect Select the sound effect.
1. Off 2. Pure Studio 3. Concert 4. Groove 5. Dynamic Bass
Repeat Select the repeat order.
1. Normal 2. Repeat One 3. Repeat All 4. Random
5. Directory Normal 6. Directory All 7. Directory Random
Erase Delete the file.
1. Erase File 2. Erase All

Language Select the language to display file Information (or ID3 Tag) on the display
device.
A: Afrikaans, Albania, Arabic, Azeri
B: Basque, Byelorussian, Bulgrian
C: Catalan, Chinese(Simple), Chinese(Trandition), Croatian, Czech
D: Danish, Dutch
E: English, Estonian
F: Faeroese, Farsi, Finnish, French
G: Galician, German, Greek
H: Hebrew, Hungarian
I: Icelandic, Indonesian, Italian
J: Japanese
K: Kazakh, Korean, Kyrgyz
L: Latvian, Lithuanian
M: Macedonian, Malay, Mongolian
N: Norwegian
P: Polish, Portuguese
R: Romanian, Russian
S: Serbian, Slovak, Slovenian, Spanish, Swahili, Swedish
T: Tatar, Thai, Turkish
U: Ukrainian, Urdu, Uzbek
V: Vietnamese
1. Human Eye Control automatically contrast of OLED by outside
brightness.
1. On 2. Off
2. File Info Select the file information to display.
1. Tag Info 2. File Name
3. Scroll Width Control the scroll speed of file information.
2 ~ 16(Default) ~ 128
4. Time Info Select the display for elapsed track time.
1. Discount 2. Count
Display
5. Cycle LED Select the status of LED.
1. On 2. Off
System 1. Auto Play After turning up the power, control the auto play of
music.
1. Off 2. On
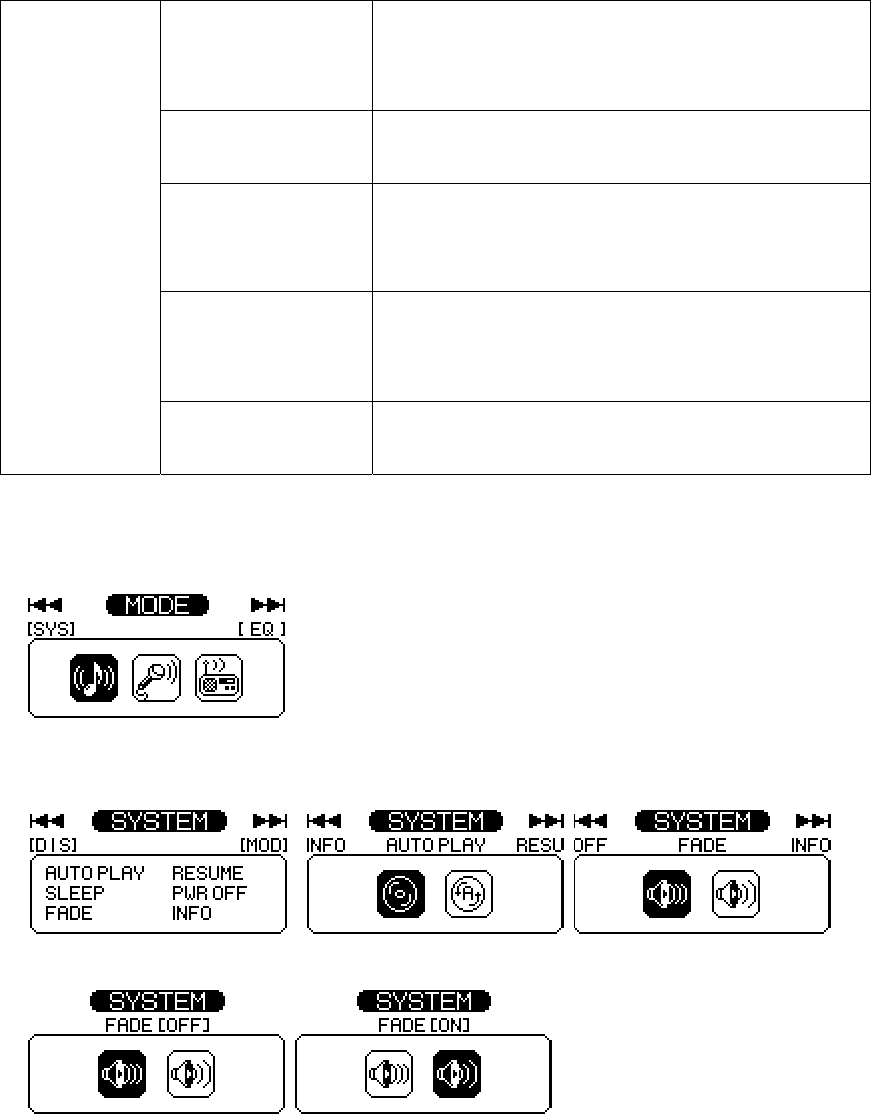
2. Resume Remembers and plays the part played right before the
power was turned off.
1. Initial 2. Stopped
3. Sleep You can power off the device at the reserved time.
0(Default) ~ 60min
4. Auto Power Off Set the function of Auto Power off when no button is
pressed for a certain time in the pause state.
3(Default) ~ 30min
5. Fade When activated, volume increases gradually at
playback to prevent sudden loudness.
1. Off 2. On
6. Information Display the Firmware Version, Internal Total/Free
Memory, External Total/Free Memory information.
Change the Setup Status of the REPEAT Menu
1. Enter the menu by pressing the stick button for long.
2. Select the system menu by pushing the stick button and enter the fade menu by pressing
the stick button.
3. Move to the ON using the stick button. Save the setup status by pressing the stick button.
4. Move to the Playback pressing the FUNC button.
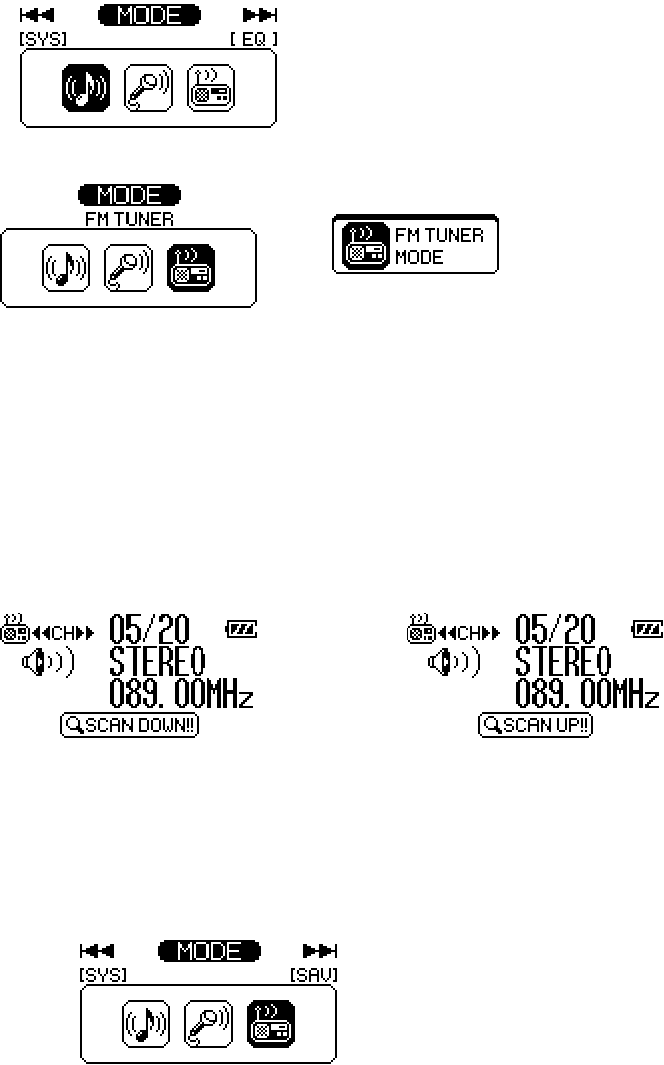
Listening to the FM Radio
Move to FM Radio Mode
1. Move to Menu by pressing the stick button. And press the stick button again.
2. Select the FM Turner Mode, and press the stick button.
Tip
When you press the FUNC button for long in playback mode, move to FM Radio Mode
Channel Control
1. Push the stick button to ◄◄ or ►► direction.
2. If you push and hold the stick button to ◄◄ or ►► direction, player performs the auto
scan function.
Save Channel
1. Select the channel that you want to save it by using the stick button to ◄◄ or ►►
direction.
2. Move to menu by pressing the stick button function button.
3. Select the Save Channel, press the stick button.
3. Select the station number that you want to save it by using the stick button, press the
stick button.
Tip Channel Mode & Station Mode
Channel Mode: Search the Channel by using the stick button.
Station Mode: Move between the Stations saved.
※ Move between channel and station mode by pressing the FUNC button.
FM Recording: Record contents that radio reception.
1. Press the REC button for long.
2. If you want to pause, press the REC button.
3. If you want to keep record, press it again.
4. Press the stick button for long to stop record
Save the FM radio record file in the RECORD folder.
Menu Structure for Playback Mode
Mode Select the main mode.
1. Playback 2. Recording 3. FM Tuner
Save Channel You can save the Channel (Frequency) while receiving it.
STN1 ~ STN20
FM Band Select the FM Frequency range.
1. US/EU/KR/CN (87.5 ~ 108MHz)
2. Japan (76 ~ 92MHz)
3. World Wide (76 ~ 108MHz)

Auto Preset You can save up maximum 20 stations searched from the Frequency Range
in disregard of the existing Station.
1. No 2. Yes
Seek Step Select the unit of frequency switch in the Channel Search Mode using the
stick button.
1. 100kHz 2. 50kHz
1. Quality Sets the quality of FM recording sound.
Sample Rate: 32kHz, 44.1kHz
Bit Rate:
In case of 32kHz: 48Kbps ~ 320Kbps
In case of 44.1kHz: 48Kbps ~ 128Kbps
FM Recording
2. Record Gain Controls the recording level.
1. Low 2. Middle 3. High
1. Human Eye Control automatically contrast of OLED by outside
brightness.
1. On 2. Off
Display
2. Cycle LED Select the status of LED.
1. On 2. Off
1. Sleep You can power off the device at the reserved time.
0(Default) ~ 60min
System
2. Information Display the Firmware Version, Internal Total/Free
Memory, External Total/Free Memory information.
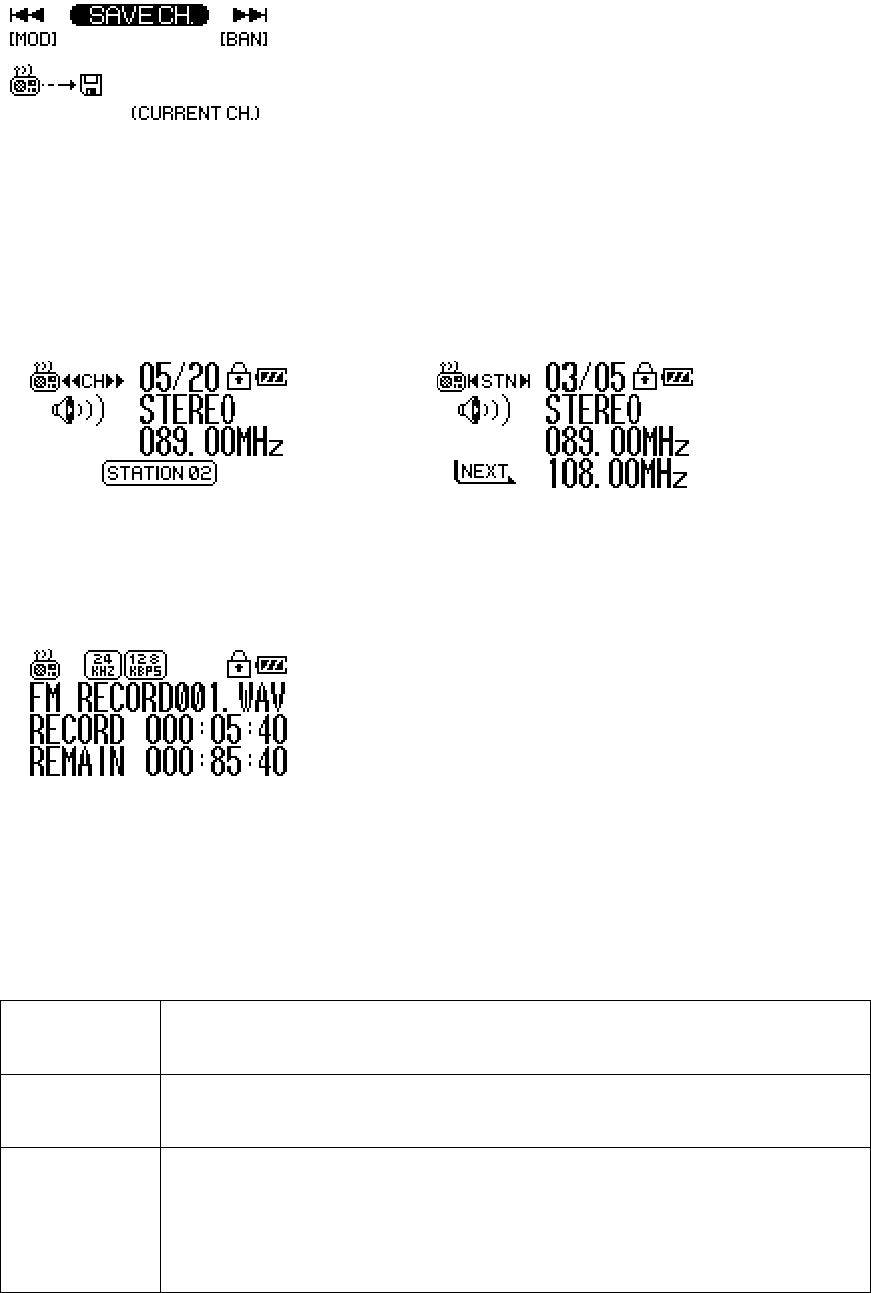
Recording
Voice Recording
1. Move to menu by pressing the stick button. And press the stick button again.
2. Select the recording mode. Press the stick button in recording Mode.
3. Press the REC button for long.
4. If you want to pause, press the REC button.
If you want to keep record, press it again.
5. Press the stick button for long, record stop.
Save the voice record file in the RECORD folder.
Tip Voice Recording in Playback Mode.
If you want to voice recording in playback mode, press the Record button for long in the
pause state of playback mode.
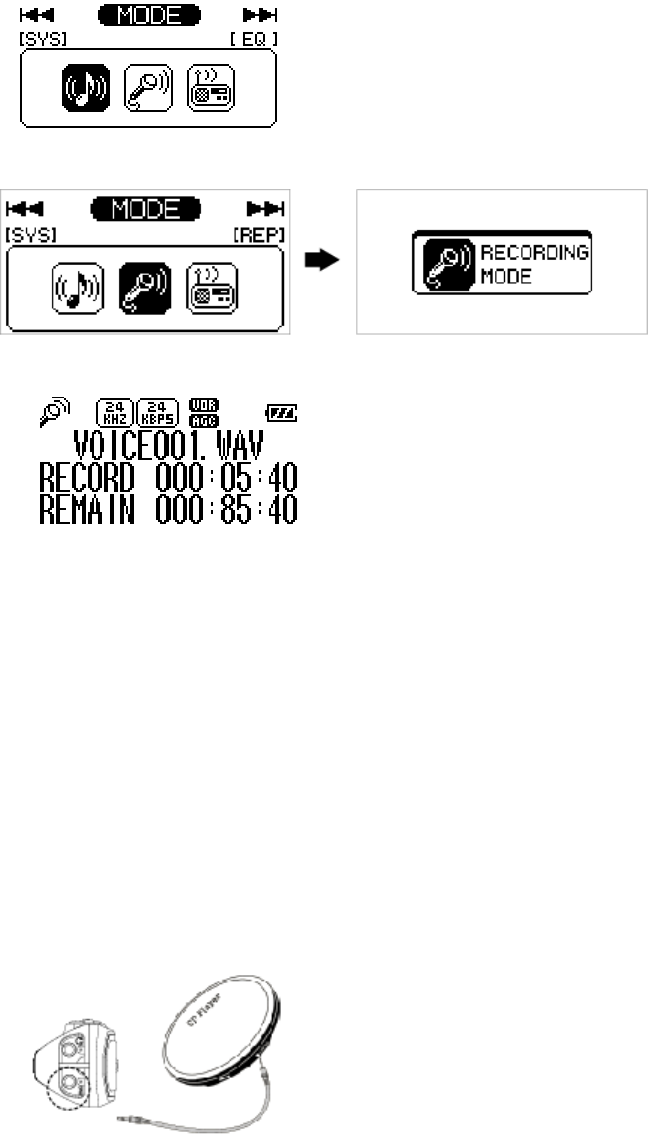
Direct Encoding
1. Connect with stereo cable between line-in jack of player and line-out jack of the
audio source.
2. Keep the pause status of audio source.
3. Move to menu in recording mode by pressing the stick button.
4. Select the direct encoding in REC OPT menu by pressing the stick button.
5. Play the audio source.
Volume of Encoding file is affected the audio source.
6. Press the REC button for long.
If you want to pause, press the function button.
If you want to keep encoding, press it again.
7. Press the stick button for long to stop encoding.
Save the encoding file in the ENCODE folder.
Menu Structure of Recording Mode
Mode Select the main mode.
1. Playback 2. Recording 3. FM Tuner
Repeat Select the repeat order.
1. Normal 2. Repeat One 3. Repeat All 4. Random
REC OPT Select the option of recording mode.
1. Voice Recording 2. Direct Encoding

1. Quality Sets the quality of voice recording.
Sample Rate: 32kHz, 44.1kHz
Bit Rate:
In case of 32kHz: 48Kbps ~ 320Kbps
In case of 44.1kHz: 48Kbps ~ 128Kbps
2. Record Gain Controls the recording level.
1. Low 2. Middle 3. High
3. VOR VOR (Voice Operated Recording) function: Saves
memory size and prevent unnecessary recording
by recording only when the sound is detected.
The VOR function is supported in voice recording
mode only.
The VOR function switches to 'off' whenever the
power is turned off.
1. Off 2. Library 3. Office 4. Park
Voice
Recording
4. AGC AGC(Automatic Gain Control)
: Automatic adjustment of amplification level for
input signal to be target level.
The AGC function switches to 'off' whenever the
power is turned off.
1. Off 2. On
Direct
Encoding
Sets the quality of direct encoding.
Sample Rate: 32kHz, 44.1kHz
Bit Rate:
In case of 32kHz: 48Kbps ~ 320Kbps
In case of 44.1kHz: 48Kbps ~ 128Kbps
1. Human Eye Control automatically contrast of OLED by outside
brightness.
1. On 2. Off
2. Time Info Select the display for elapsed track time.
1. Discount 2. Count
Display
3. Cycle LED Select the status of LED.
1. On 2. Off
System 1. Sleep You can power off the device at the reserved time.
0(Default) ~ 60min

2. Auto Power Off Set the function of Auto Power off when no button is
pressed for a certain time in the pause state.
3(Default) ~ 30min
3. Fade When activated, volume increases gradually at
playback to prevent sudden loudness.
1. Off 2. On
4. Information Display the Firmware Version, Internal Total/Free
Memory, External Total/Free Memory information.

Note:
This equipment has been tested and found to comply with the limits for a class B digital device,
pursuant to Part 15 of the FCC Rules.
These limits are designed to provide reasonable protection against harmful interference in a
residential installation. This equipment generates, uses and can radiate radio frequency energy
and if not installed and used in accordance with the instructions, may cause harmful
interference to radio communications. However, there is no guarantee that interference will
not occur in a particular installation. If this equipment does cause harmful interference to radio
or television reception, which can be determined by turning the equipment off and on, the user
is encouraged to try to correct the interference by one or more of the following measures:
-Reorient or relocate the receiving antenna
-Increase the separation between the equipment and receiver
-Connect the equipment into an outlet on a circuit different from that to which the receiver is
connected
-Consult the dealer or an experienced radio/TV technician for help.
This device complies with Part 15 of the FCC Rules. Operation is
subject to the following two conditions: (1) this device may not cause
harmful interference, and (2) this device must accept any interference
received, including interference that may cause undesired operation.
**CAUTION: Changes or modifications not expressly approved by the
party responsible for compliance could void the user's authority to
operate the equipment.